If you’ve ever created a web form, you know that there’s an army of spammers out there just looking to fill it with junk.
Thankfully, you have options to fight back against form spam with Gravity Forms – and that’s what this post is all about.
Below, we’re going to dig into the Gravity Forms anti-spam features in detail, giving you a look at all the different ways in which Gravity Forms can help you set up anti-spam WordPress protection.
We’ll start with some of the strongest tools that you can use to protect Gravity Forms (and WordPress in general):
- reCAPTCHA v2
- reCAPTCHA v3
- Akismet
- Cloudflare Turnstile
- Moderation
- Gravity Forms anti-spam honeypot and submission speed checks
Then, we’ll dig into some other tips and tricks that you can use to stop spam, such as using conditional logic, multi-page forms, validation rules, and more.
Top options for Gravity Forms anti-spam protection
To help you combat WordPress form spam, Gravity Forms has several built-in features and add-ons to stop spam in its tracks.
Depending on the level of spam that you’re dealing with, you might need to implement just one of these Gravity Forms anti-spam tactics.
Or, you can consider stacking multiple tactics as needed.
Let’s go through some of the main anti-spam tools and then we’ll cover some other anti-spam WordPress tips.
Here’s a summary of the different options that we’ll cover in this section:
- Google reCAPTCHA v3 (classic or Enterprise) – An invisible method that assigns a score to each submission. You can adjust the score threshold to choose how aggressive you want to be in flagging submissions as spam. Human visitors will never need to interact with anything.
- Google reCAPTCHA v2 – Most commonly, all visitors must check the “I’m not a robot” checkbox to submit the form. If Google detects potential spam, visitors also might need to solve an image challenge – e.g. “Select all of the images that contain a bicycle”. You can also make this invisible and only display the checkbox to suspected spammers.
- Cloudflare Turnstile – Invisible to most human visitors. In borderline situations where Cloudflare detects the possibility of spam, visitors might need to click a checkbox. However, they never need to solve a CAPTCHA, which makes this method pretty unobtrusive.
- Akismet – While Akismet is best known for protecting WordPress comments from spam, you can also use it to protect the forms that you create with Gravity Forms. Akismet is free for non-commercial use, but you need to purchase a paid plan for commercial sites.
- Moderation – This helps you specifically protect your forms from toxic comments, rather than vanilla spam. It can be a good option to use in conjunction with more purely spam-focused methods.
- Honeypot – A core feature that adds a hidden honeypot field to detect spam bots without affecting the form experience for human visitors.
- Submission speed check – Another core feature that lets you flag entries that fill out the form faster than a normal human could.
Google reCAPTCHA v3
Google reCAPTCHA v3 is an invisible anti-spam service from Google.
It works behind the scenes to determine whether or not a visitor is legitimate. Based on the visitor’s behavior, it assigns a risk score between 0.0 (almost certainly a bot) and 1.0 (almost certainly a human).
You can then choose which score threshold to use for spam protection on your site, which gives you some flexibility in how aggressive you want to be in your anti-spam efforts.
Unlike reCAPTCHA v2 (which we’ll cover next), reCAPTCHA v3 does not require any human interaction, so it can be an option to consider if you don’t want there to be any chance of inconveniencing legitimate visitors.
Gravity Forms supports two options for using reCAPTCHA v3:
- reCAPTCHA v3 Classic – Free for up to 10,000 assessments per month (e.g. 10,000 form submissions).
- reCAPTCHA v3 Enterprise – Despite the “Enterprise” tag, this is also free for up to 10,000 assessments per month.
Because reCAPTCHA v3 Enterprise has an identical free allowance while giving you access to some additional functionality, we recommend using this option going forward. This page details the differences between the different tiers.
Here’s how to set it up…
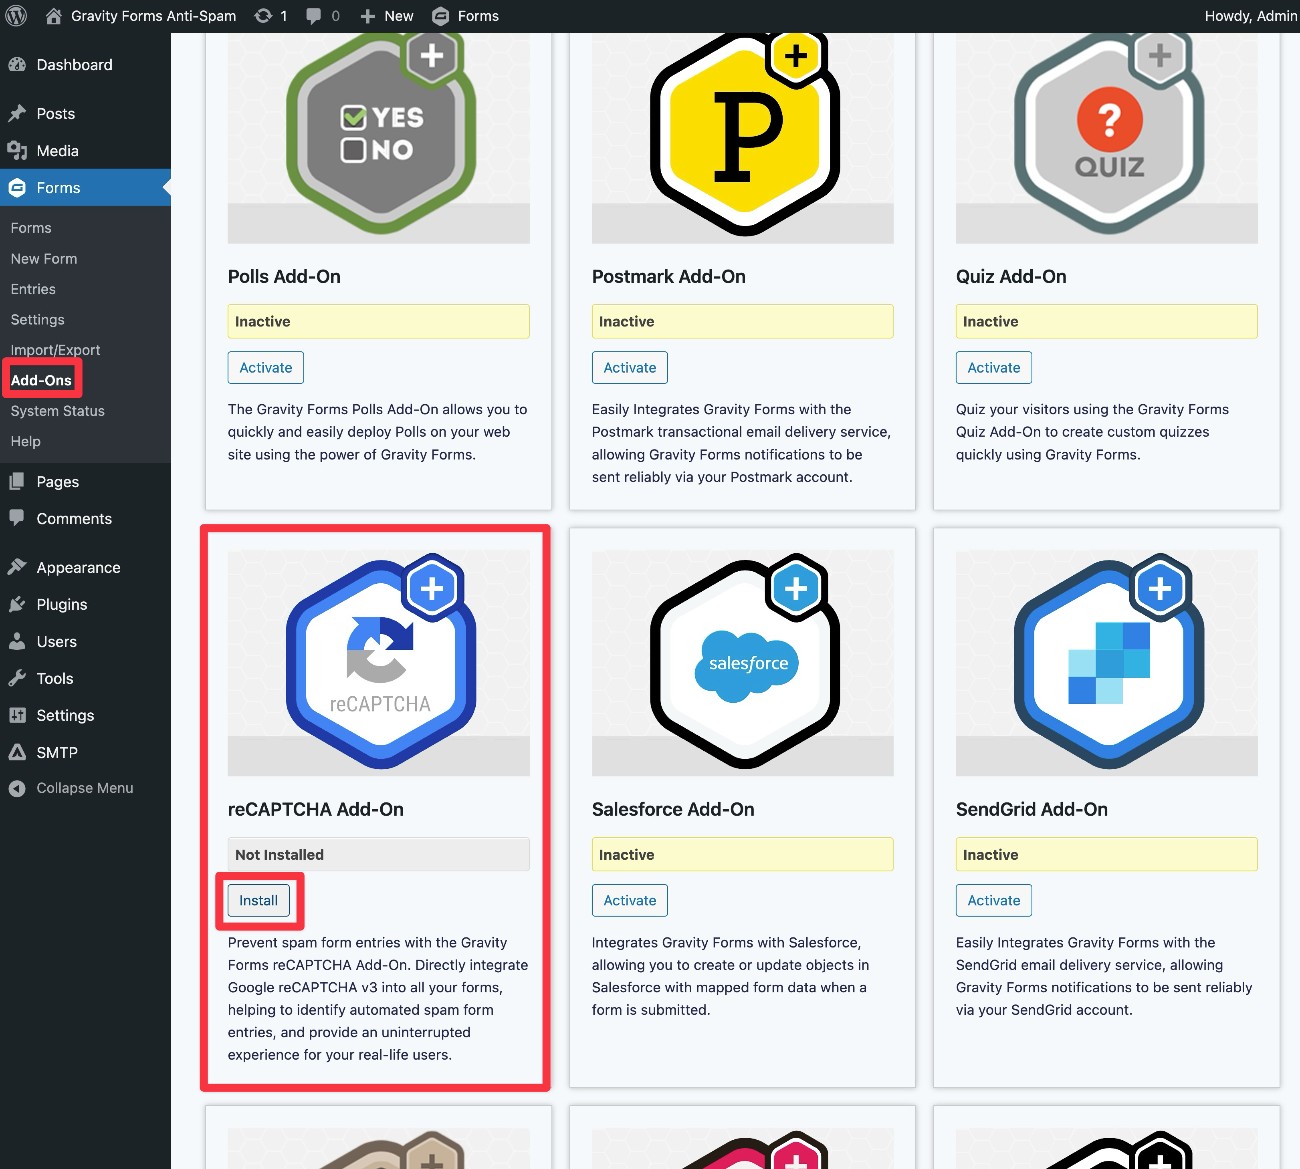
1. Install the Google reCAPTCHA Add-On
To start, you need to install the Gravity Forms reCAPTCHA Add-On on your site:
- Go to Forms → Add-Ons.
- Find reCAPTCHA Add-On in the list of available add-ons and click the Install button.
- Once the installation finishes, make sure to activate the add-on.
2. Create an Enterprise reCAPTCHA key
Recently, Google has made the decision to migrate reCAPTCHA key management from its own dedicated website to Google Cloud Console.
While existing keys will continue to function, this means that you will need to manage some aspects through Google Cloud Console now.
However, Google still provides a dedicated interface that offers a simpler way of creating reCAPTCHA keys, so the actual setup process is still quite fast.
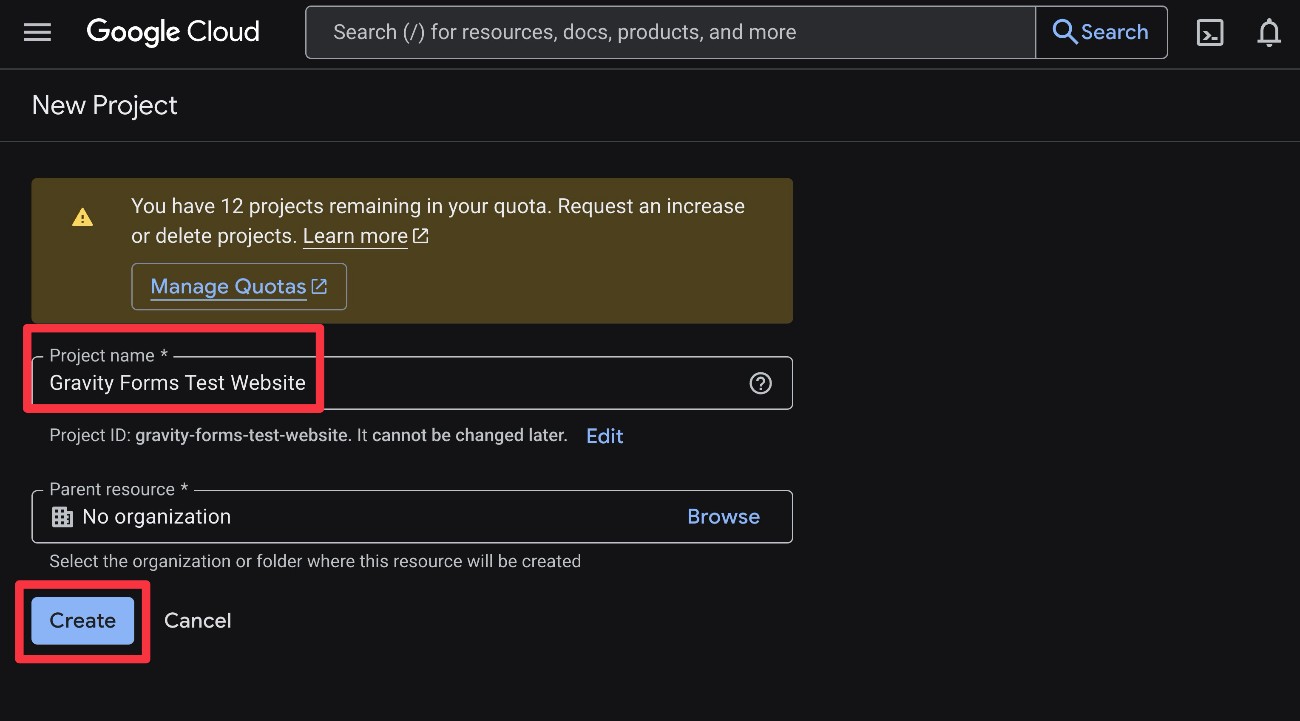
Before using that interface, we recommend creating a Google Cloud Console project for your WordPress website. While you can skip this and go straight to the reCAPTCHA interface, setting up a project first will give you more control over the naming and where you manage your keys, which could be helpful if you plan to set up reCAPTCHA on multiple sites.
You can use your existing Google account for everything – there’s no need to create a separate account for Cloud Console. You can create a new project by clicking this link. Alternatively, you can open the Select a project interface and then click New project.
Give your project a name and then click Create.
Now, you need to create an API key for your WordPress website:
- Click this link to open the reCAPTCHA admin interface to register a new site.
- Add a Label to help you remember it.
- Choose Score based (v3) for the reCAPTCHA type.
- Add your WordPress site’s domain name in the Domains box.
- Select your Google Cloud Platform project from the drop-down.
- Click the Submit button.
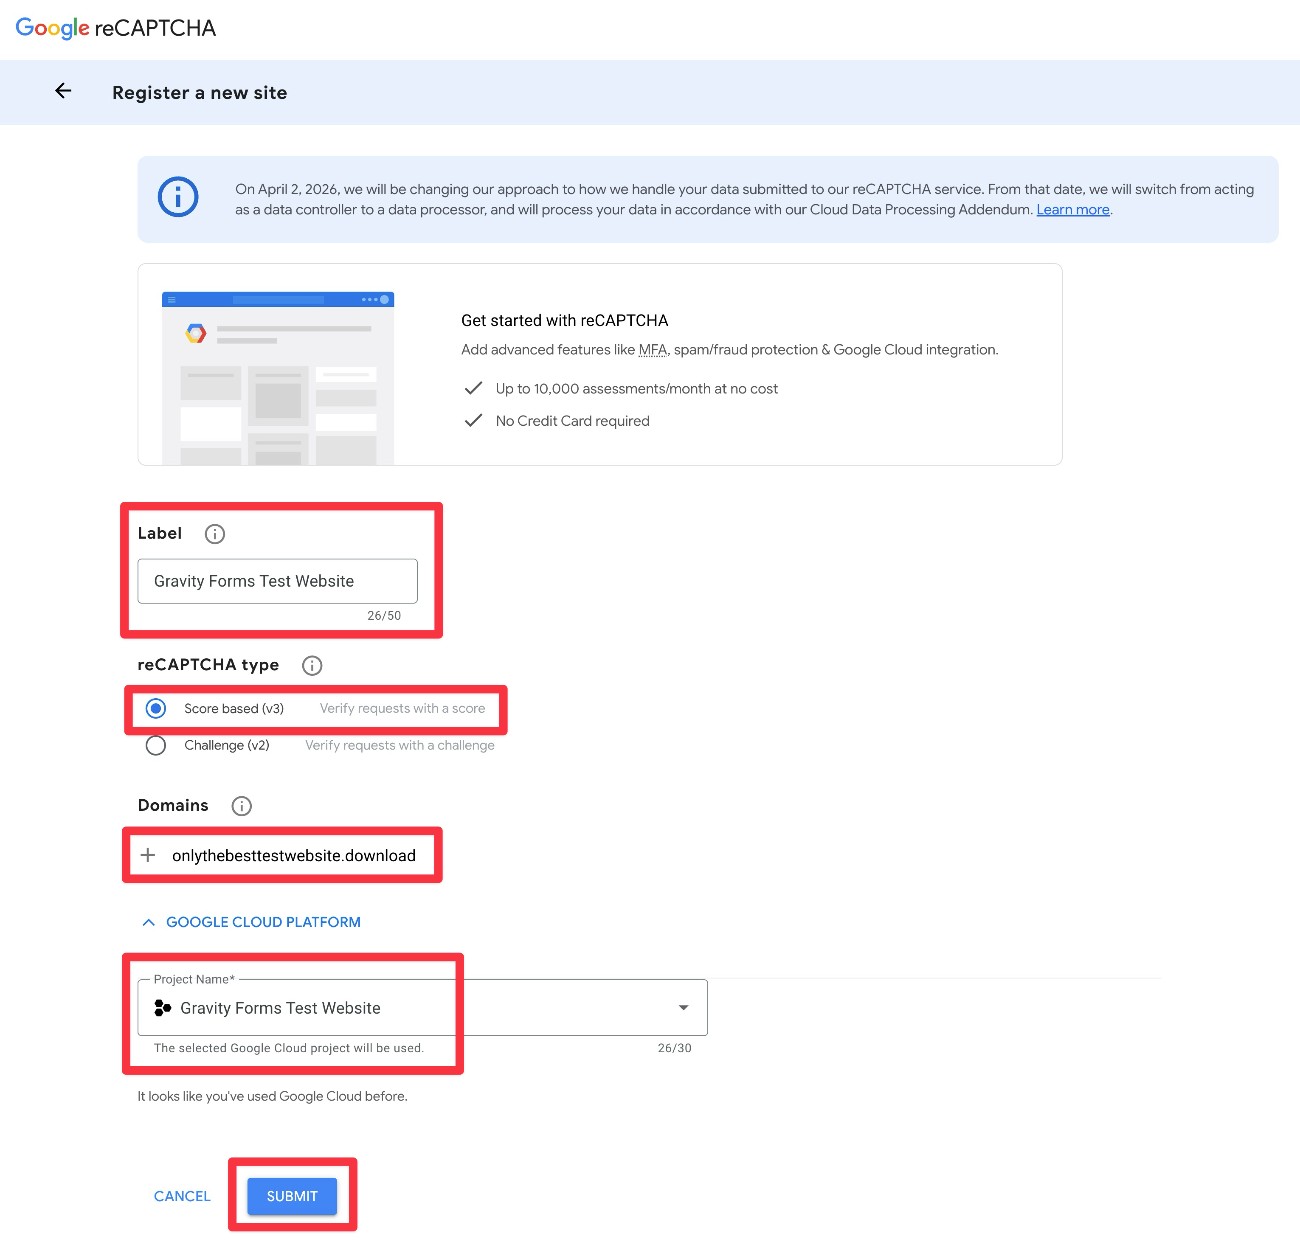
Google will now display the Site Key and Secret Key for your site. However, you will not need these details to set up Gravity Forms reCAPTCHA v3 Enterprise, as Gravity Forms lets you work via the Google OAuth instead.

3. Connect Gravity Forms to reCAPTCHA
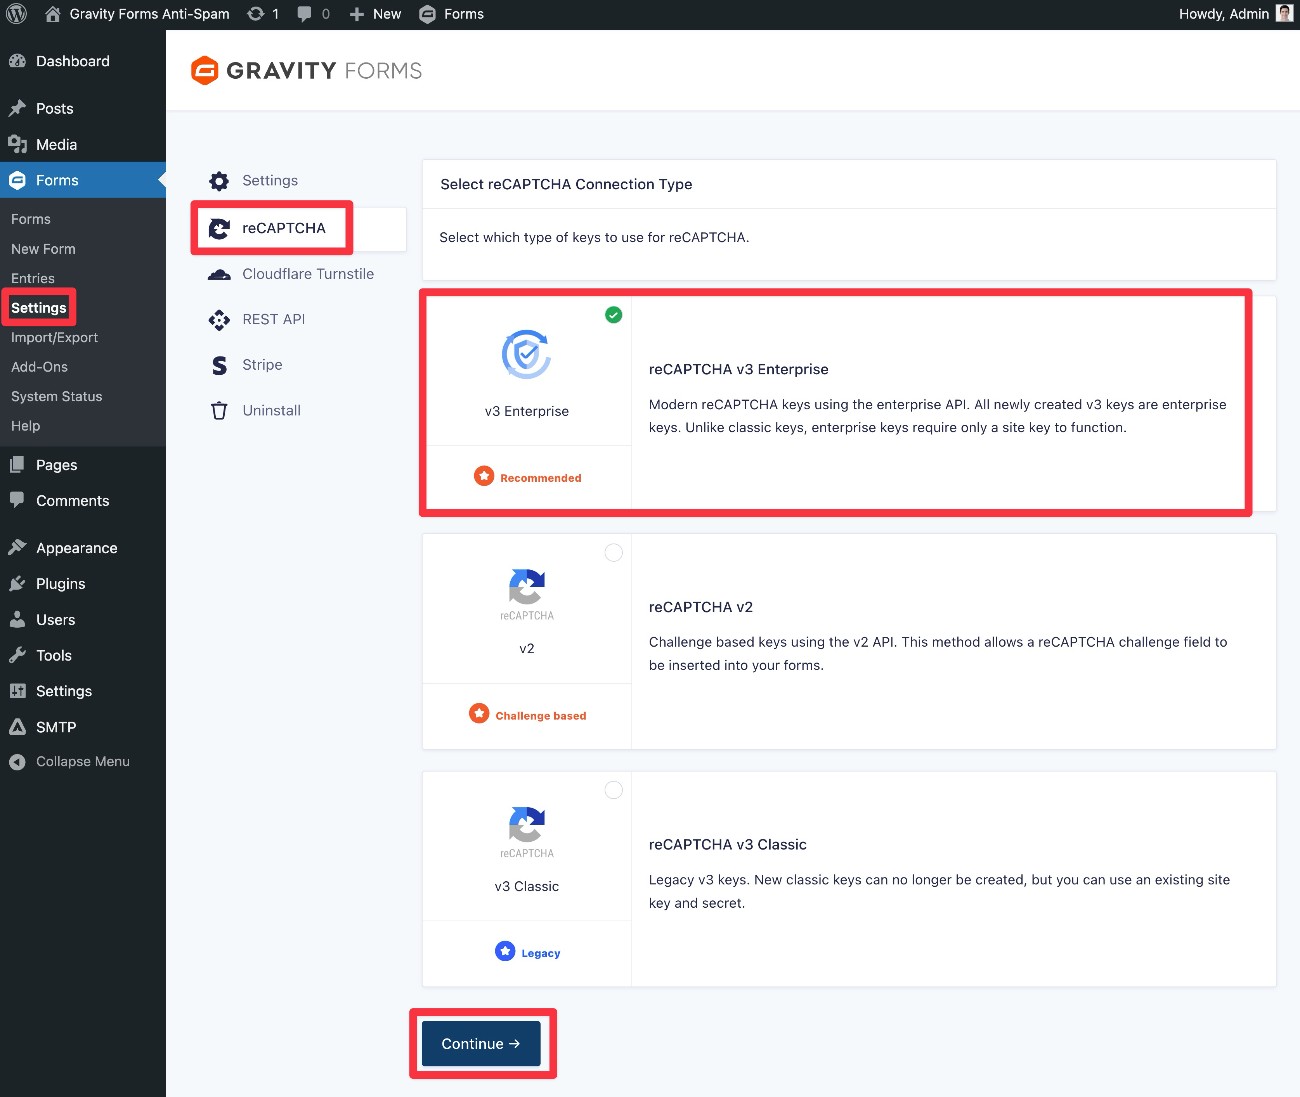
Now, you need to go back to your WordPress dashboard to connect Gravity Forms to reCAPTCHA v3:
- Go to Forms → Settings.
- Select the reCAPTCHA tab in the settings area.
- Choose reCAPTCHA v3 Enterprise.
- Click the Continue button.
On the next screen, you’ll see the OAuth interface. If you have multiple Google accounts, make sure to choose the account that you use for Cloud Console.
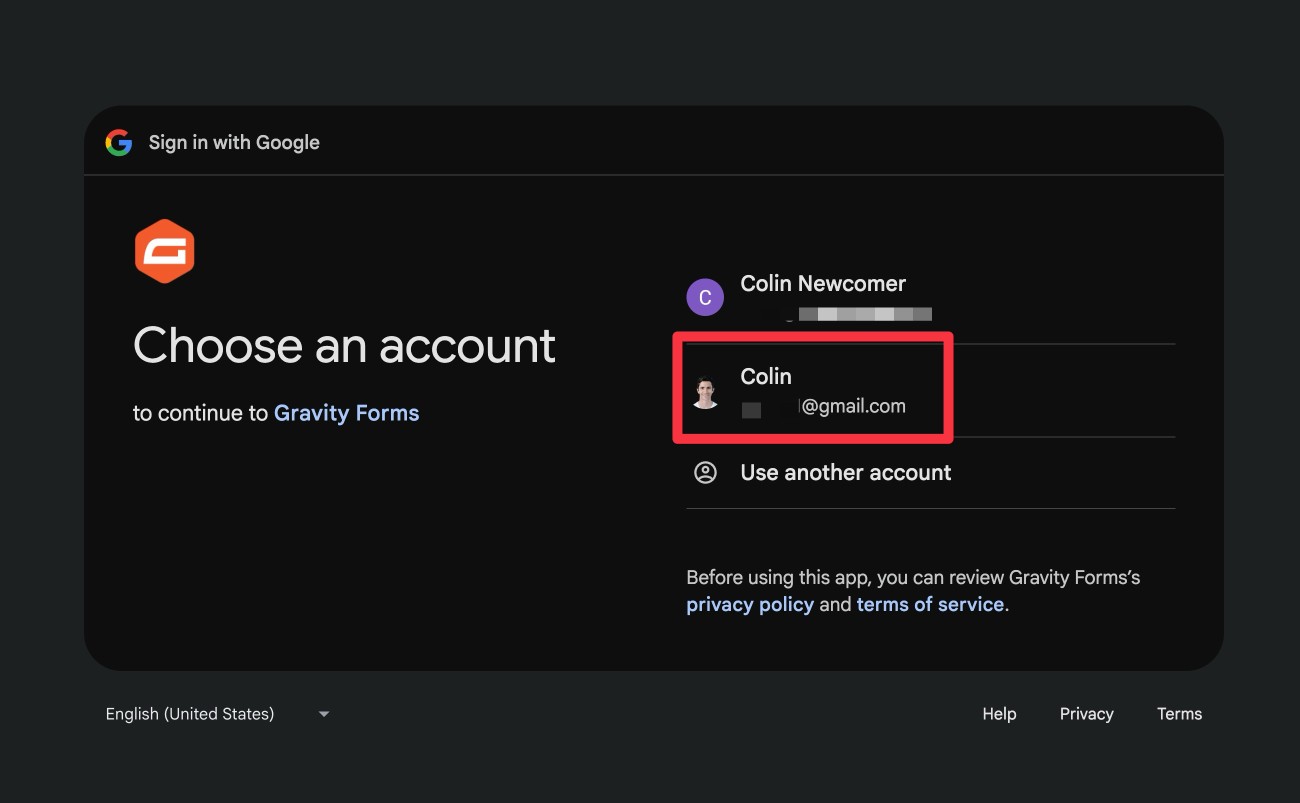
Click Continue again to give Gravity Forms access to the needed permissions.
Then, you’ll be taken back to your WordPress dashboard.
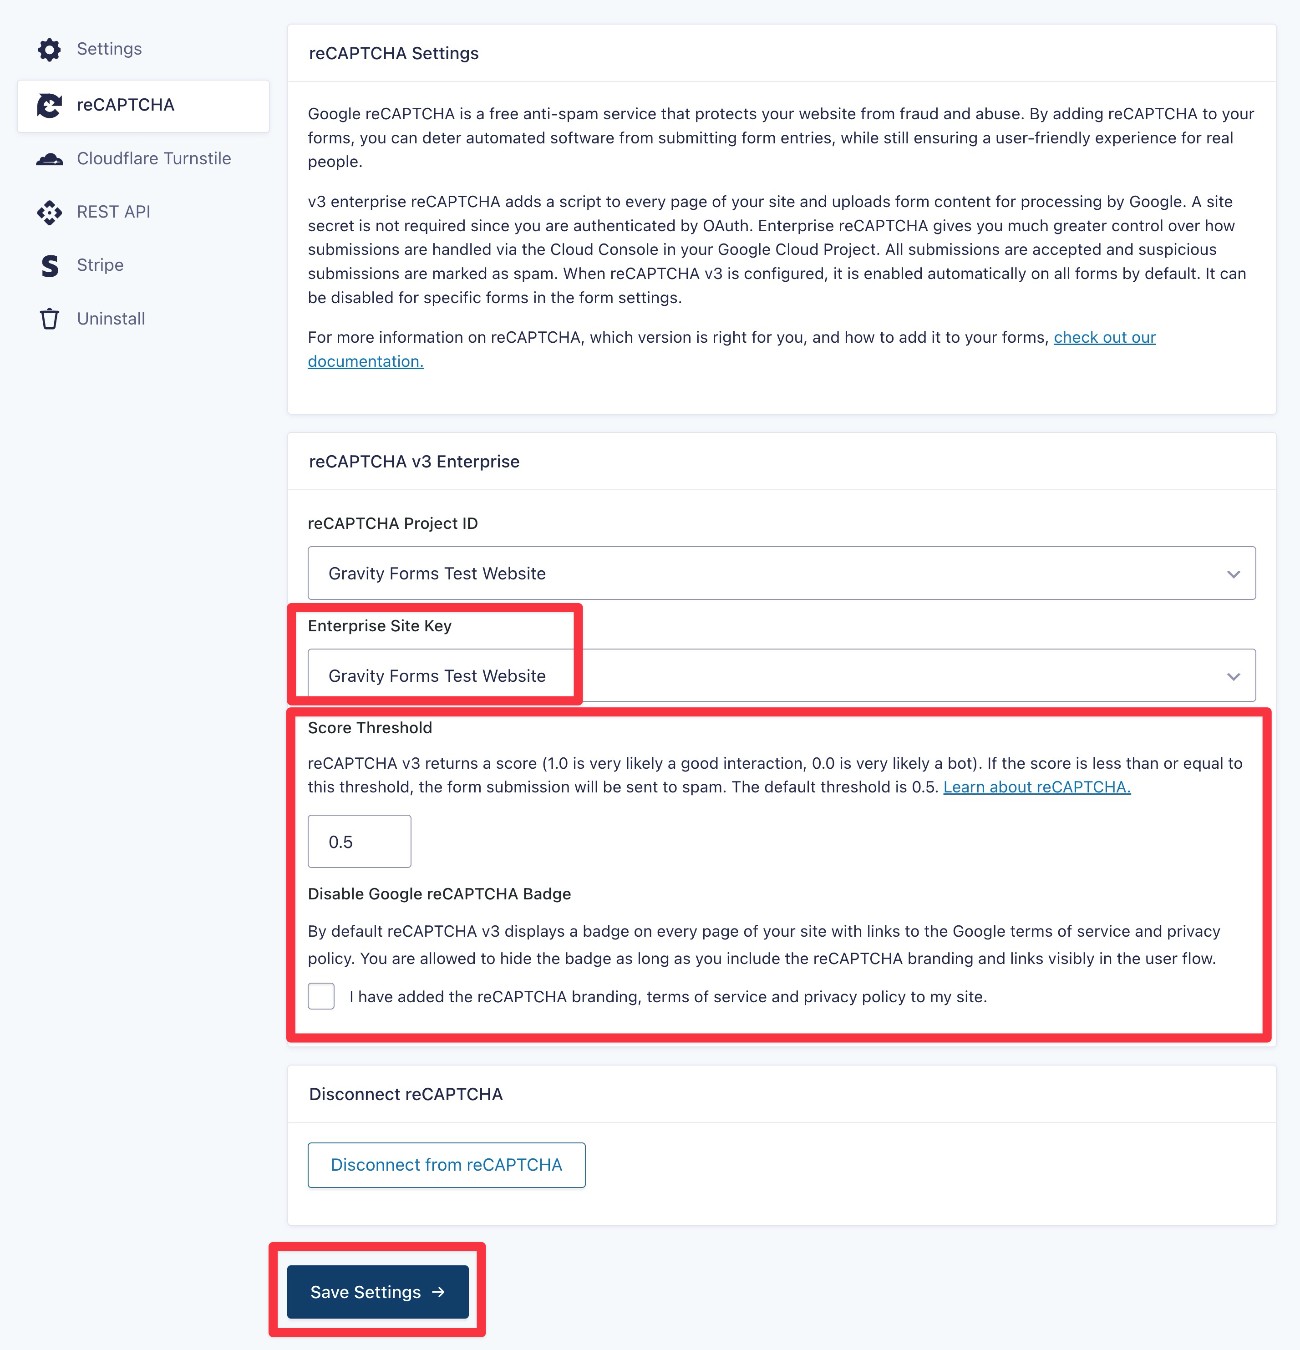
You need to use the drop-downs to connect Gravity Forms to your reCAPTCHA v3 key.
First, use the reCAPTCHA Project ID drop-down to select the name of the project that you created in Google Cloud Platform.
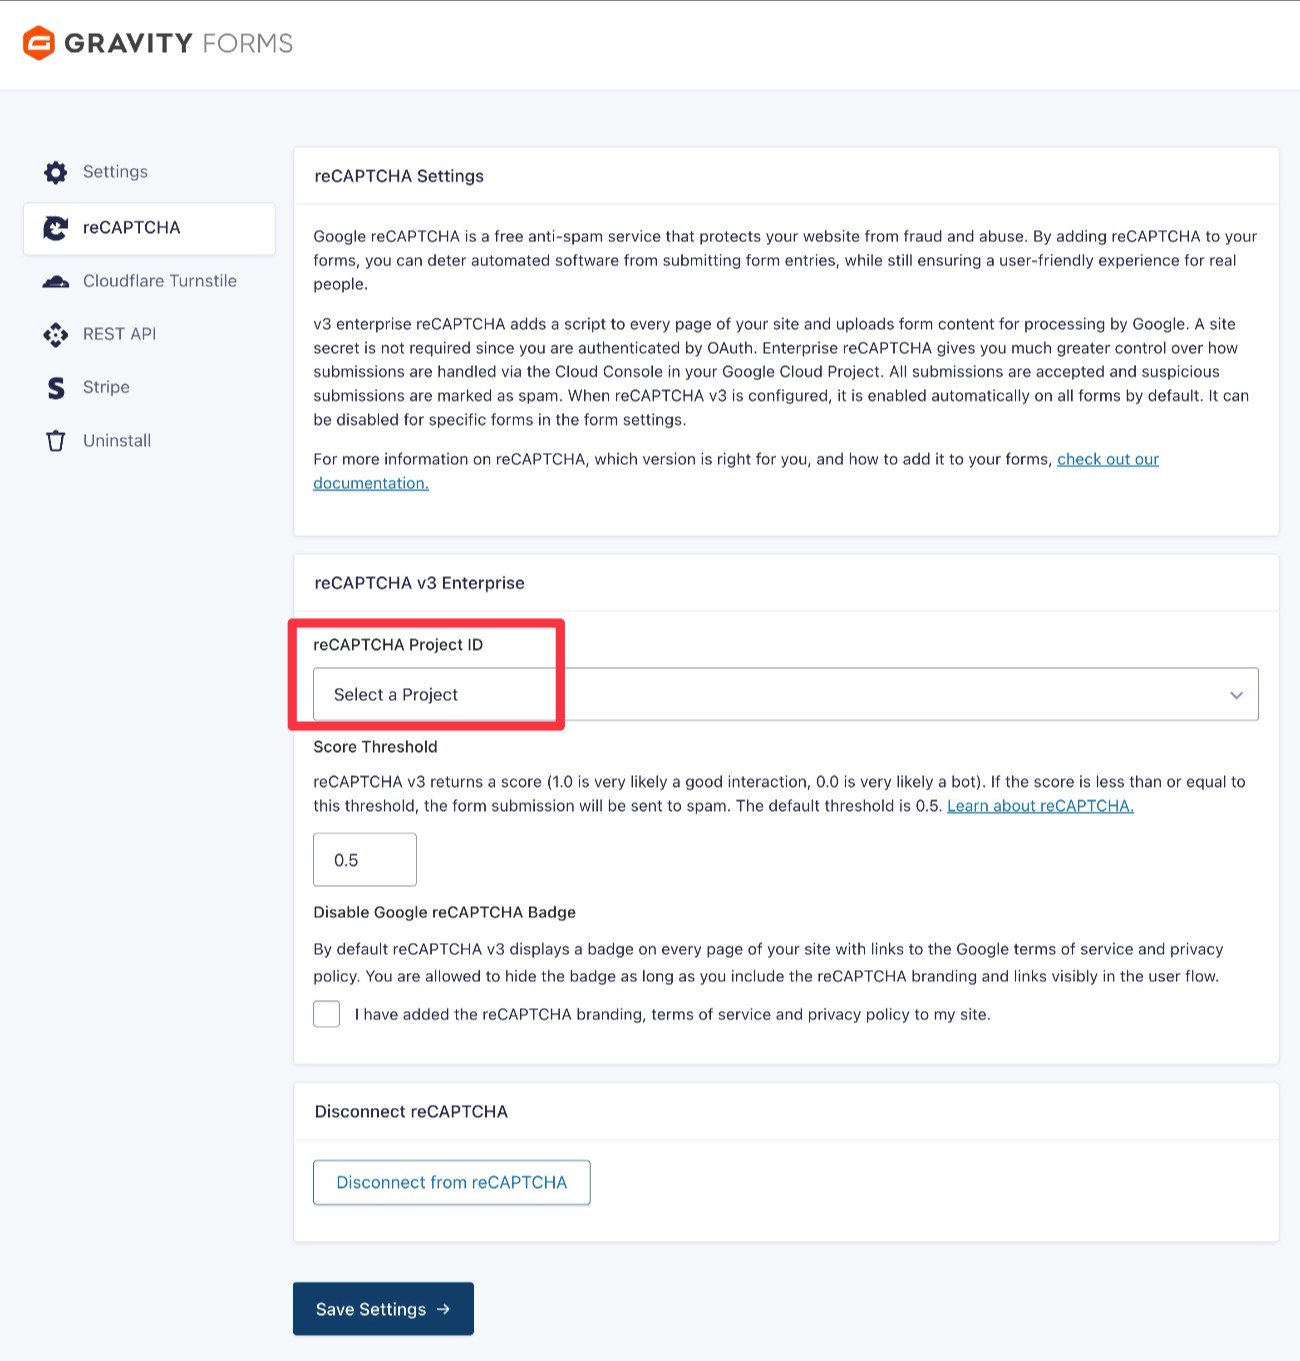
Once you select your project, Gravity Forms will automatically pull in all of the Site Keys associated with that project.
If you’re following this guide, there will only be one Site Key. Select that in the drop-down again.
Finally, you can make two additional choices about spam protection:
- Score Threshold – You can choose how aggressive you want reCAPTCHA to be about flagging entries as spam from 0.0 to 1.0. If the score is lower than the threshold, it will be flagged as spam. Making the threshold higher will make it more likely to flag entries as spam (with potentially more false positives). Making it lower will make it less likely to flag entries as spam. We recommend starting with the default 0.5 and adjusting higher or lower based on your experience.
- Disable Google reCAPTCHA Badge – You must display the badge to comply with Google’s policies unless you include the reCAPTCHA branding and links visibly in the user flow.
When you’re finished, click Save Settings.
4. How to manage reCAPTCHA v3 on forms
By default, Gravity Forms will add reCAPTCHA v3 protection to all of your site’s forms. There is no need to manually enable it on forms.
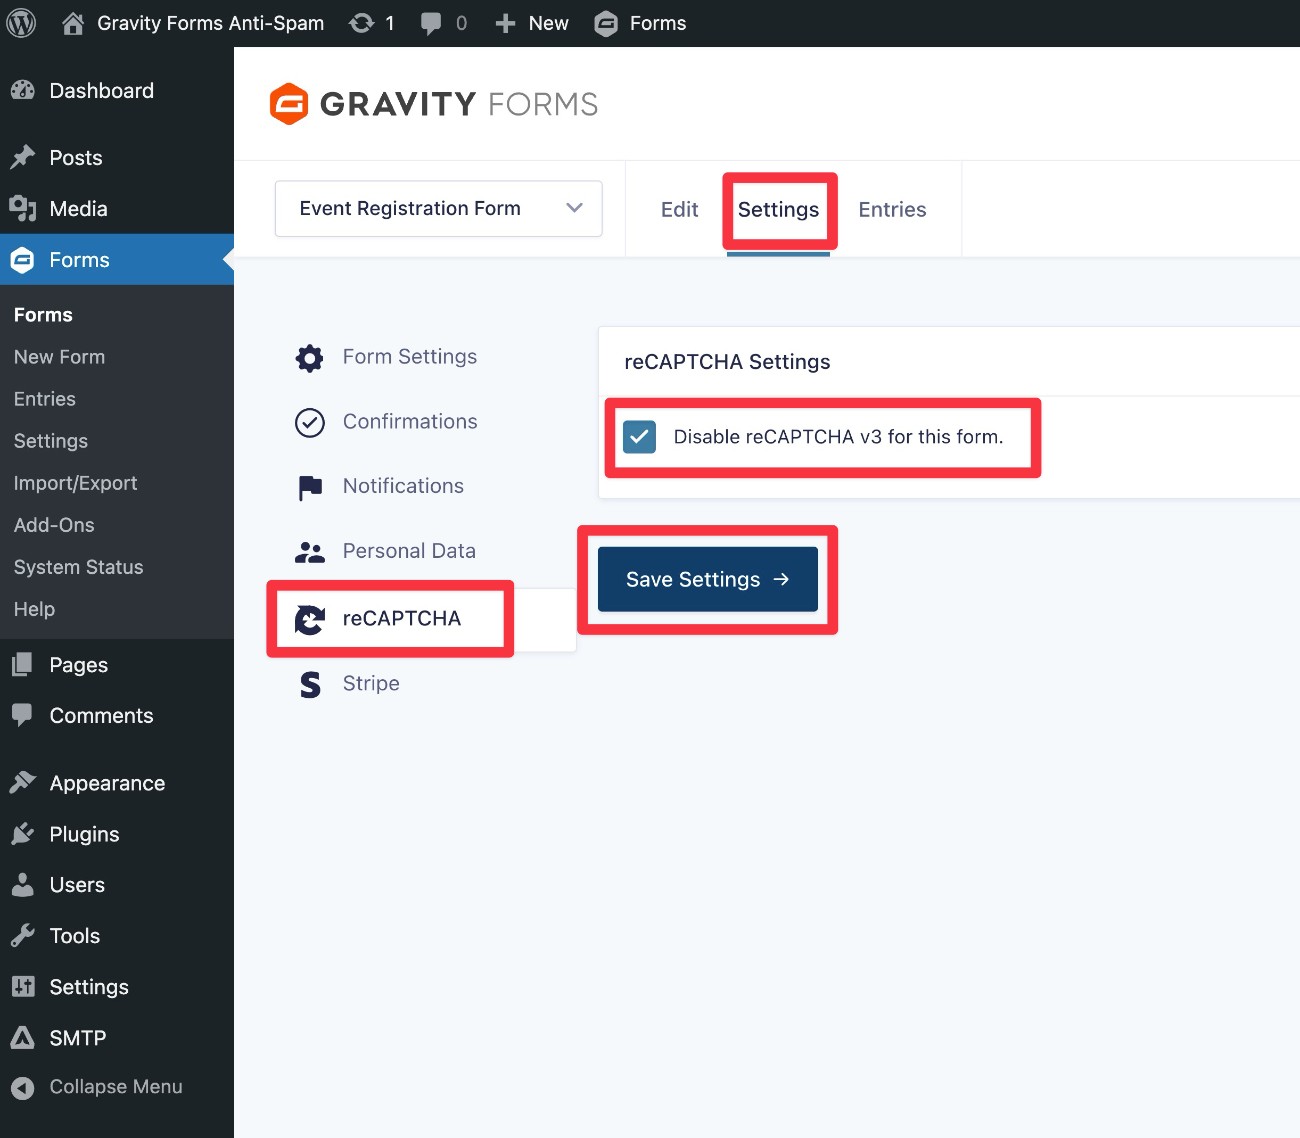
However, you do have the option to manually disable it on certain forms if needed. Here’s how:
- Open the form for which you want to disable reCAPTCHA.
- Go to Settings → reCAPTCHA in the form editor.
- Check the Disable reCAPTCHA v3 box.
- Click Save Settings.
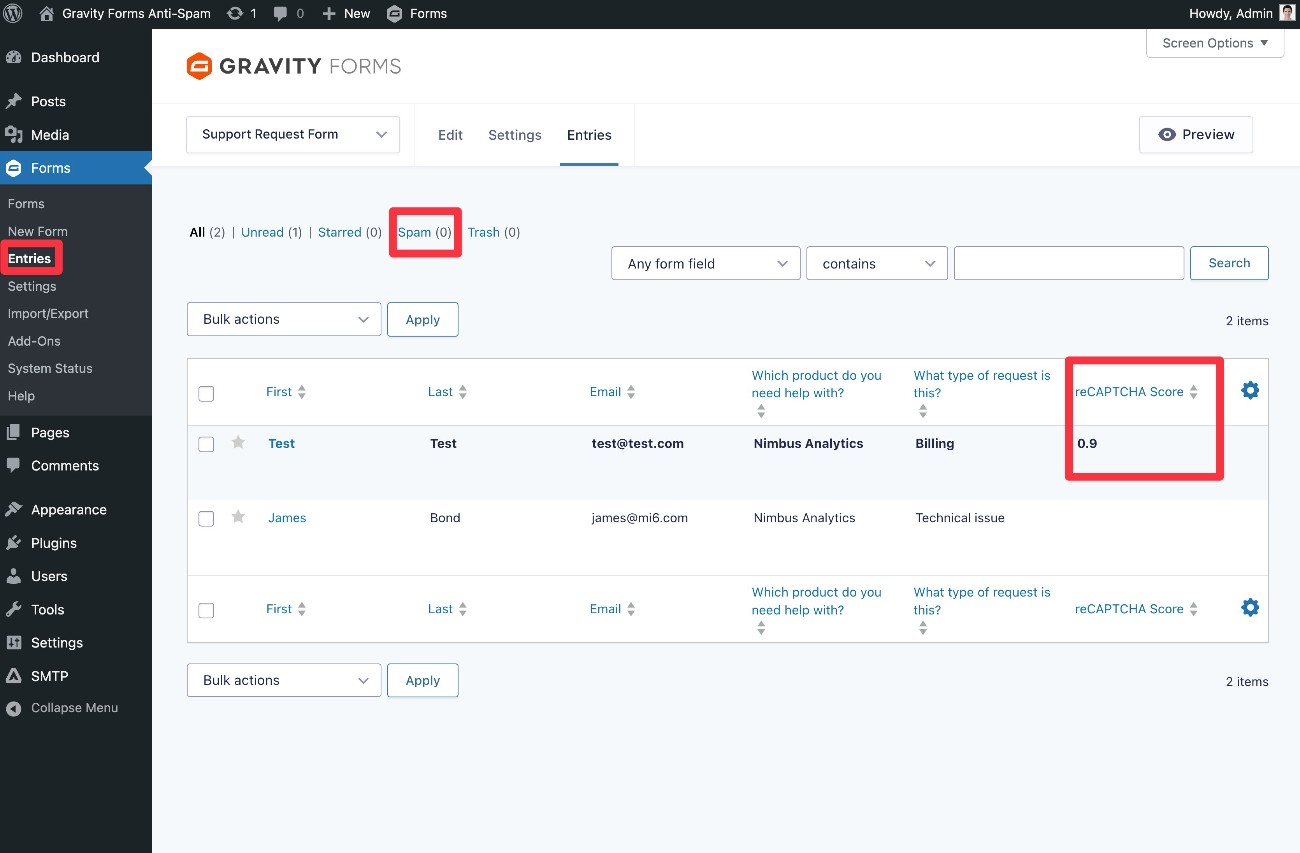
5. How to manage form entries with reCAPTCHA v3
When you use reCAPTCHA v3, Gravity Forms will still save entries that have been flagged as spam. However, it diverts them to a separate Spam tab.
If you go to the Entries dashboard for your form, you can see the reCAPTCHA Score for all of your form submissions.
Entries with a score below your Score Threshold will be automatically filtered to the Spam tab.
Google reCAPTCHA v2
While Google reCAPTCHA v3 is invisible for most people submitting your forms, Google reCAPTCHA v2 uses a more interactive approach as its primary anti-spam method.
In order to submit a form, visitors must check the well-known “I’m not a robot” checkbox, which you’ve probably encountered at some point when browsing the web.
For most visitors, this will be the only action that’s required. However, if Google detects potential spam, a visitor might need to solve an additional image challenge – e.g. “select all of the images that contain bicycles.” Again, you’ve probably had to solve one of these image challenges yourself at some point.
In addition to the checkbox, Google reCAPTCHA v2 also offers an invisible mode, which just displays a badge for most visitors instead of requiring them to check a box.
However, if the invisible version detects potential spam, those visitors might still need to solve an image challenge. This is one of the key differences between Google reCAPTCHA v2 invisible mode and reCAPTCHA v3.
Setting up reCAPTCHA v2 works a lot like reCAPTCHA v3, so we won’t go quite as in-depth with the tutorial here.
1. Install the reCAPTCHA Add-On
To start, make sure that you’ve installed the Gravity Forms reCAPTCHA Add-On, if you haven’t done so already.
2. Generate your reCAPTCHA v2 keys
Next, you can either create a Google Cloud Platform project as we showed you above or just jump straight into the reCAPTCHA interface (if you’re ok with choosing an existing project or letting Google create one for you).
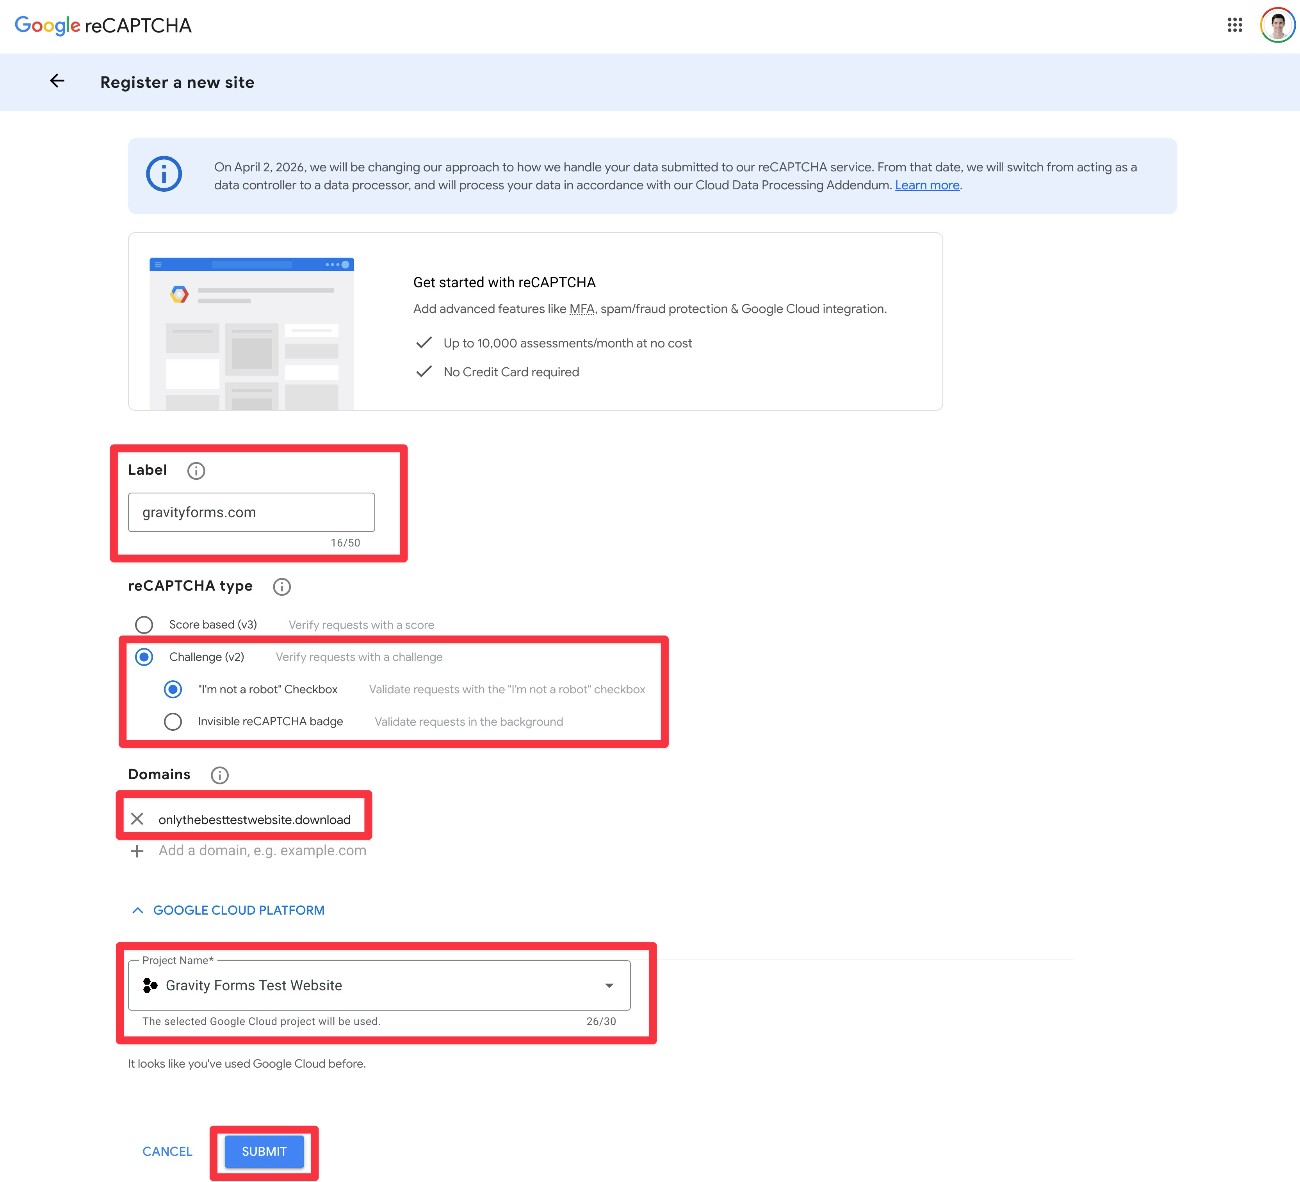
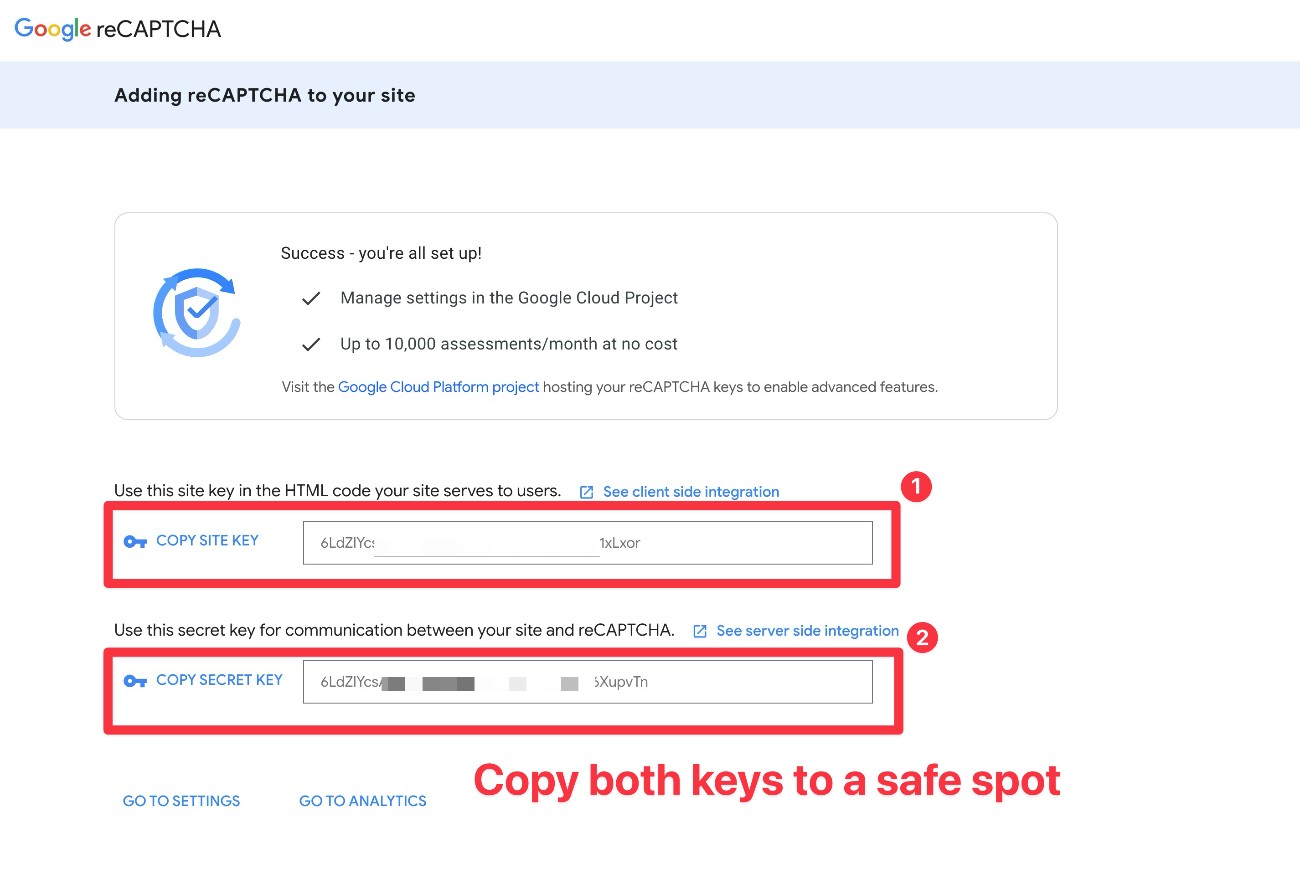
Then, click this link to go to the “Register a new site” interface in Google reCAPTCHA:
- Add a Label to help you remember it.
- Choose Challenge (v2) for the reCAPTCHA type.
- In the sub-options that appear, choose between the “I’m not a robot” Checkbox and Invisible reCAPTCHA badge. We’ll use the checkbox for this example.
- Add your WordPress site’s domain name in the Domains box.
- Select your Google Cloud Platform project from the drop-down.
- Click the Submit button.
Google will now display your site keys. Unlike the v3 tutorial above, you must copy both of these keys to a safe spot because you’ll need them in the next step.
If you accidentally misplace them, you’ll need to go through the Google Cloud Platform console to find them again, so we recommend making sure you have both of them copied before advancing.
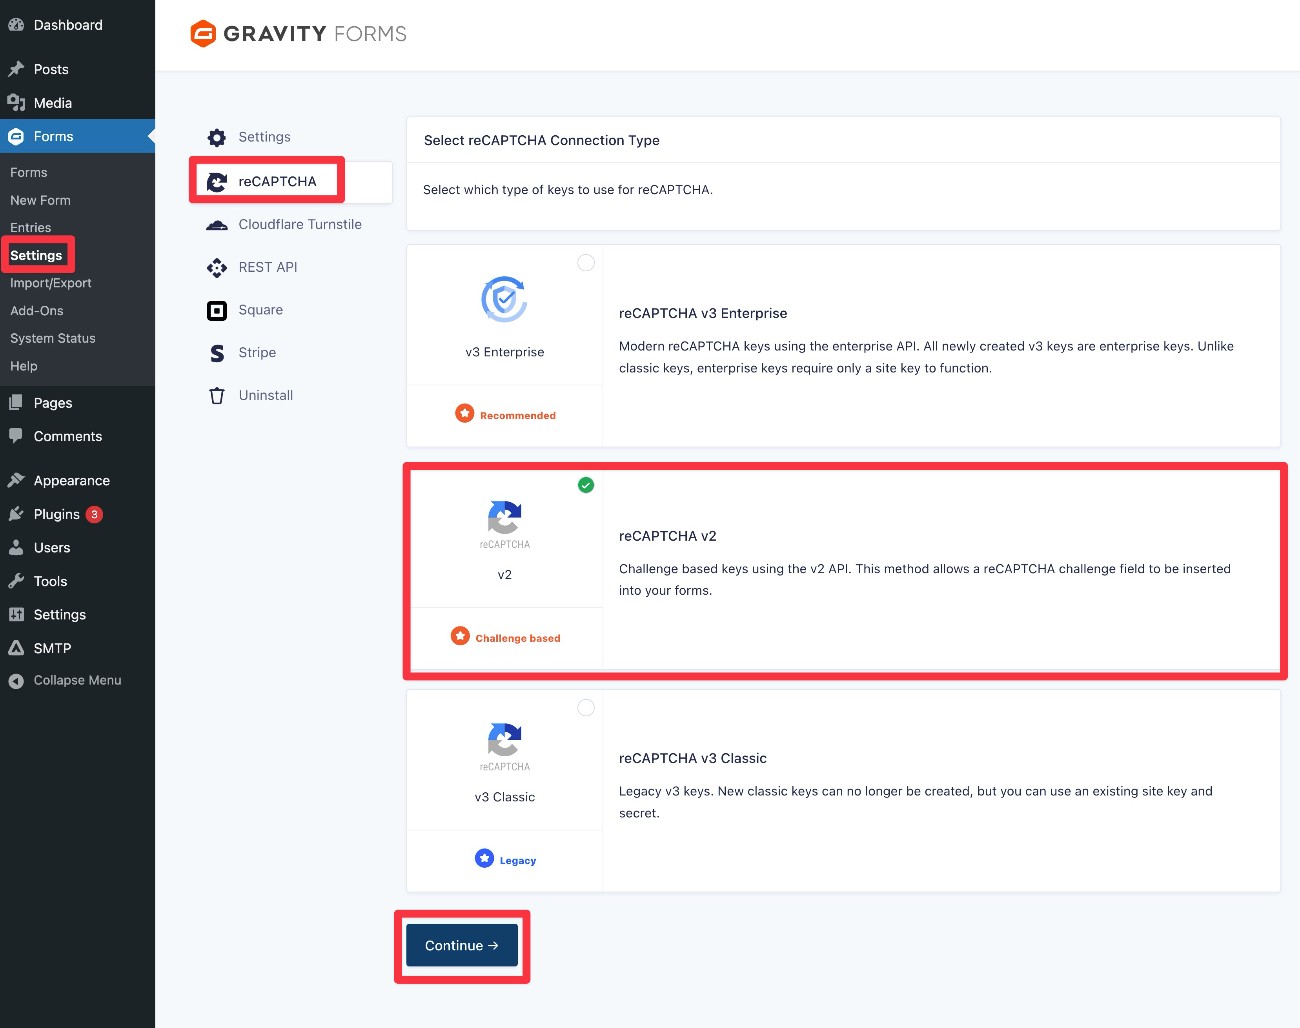
3. Connect Gravity Forms to reCAPTCHA v2
Now, you need to connect Gravity Forms to reCAPTCHA v2:
- Go to Forms → Settings in your WordPress dashboard.
- Select the reCAPTCHA tab in the settings area.
- Choose reCAPTCHA v2 in the list of options.
- Click the Continue button at the bottom.
In the settings interface, you need to add the two keys that you got from Google.
Under Type, make sure to choose the same type that you selected in Google’s interface:
- Checkbox – Choose this if you selected the “I’m not a robot” Checkbox option.
- Invisible – Choose this if you selected the Invisible reCAPTCHA badge option.
If you choose the Checkbox option, you’ll then need to actually click the real checkbox widget to validate your keys.
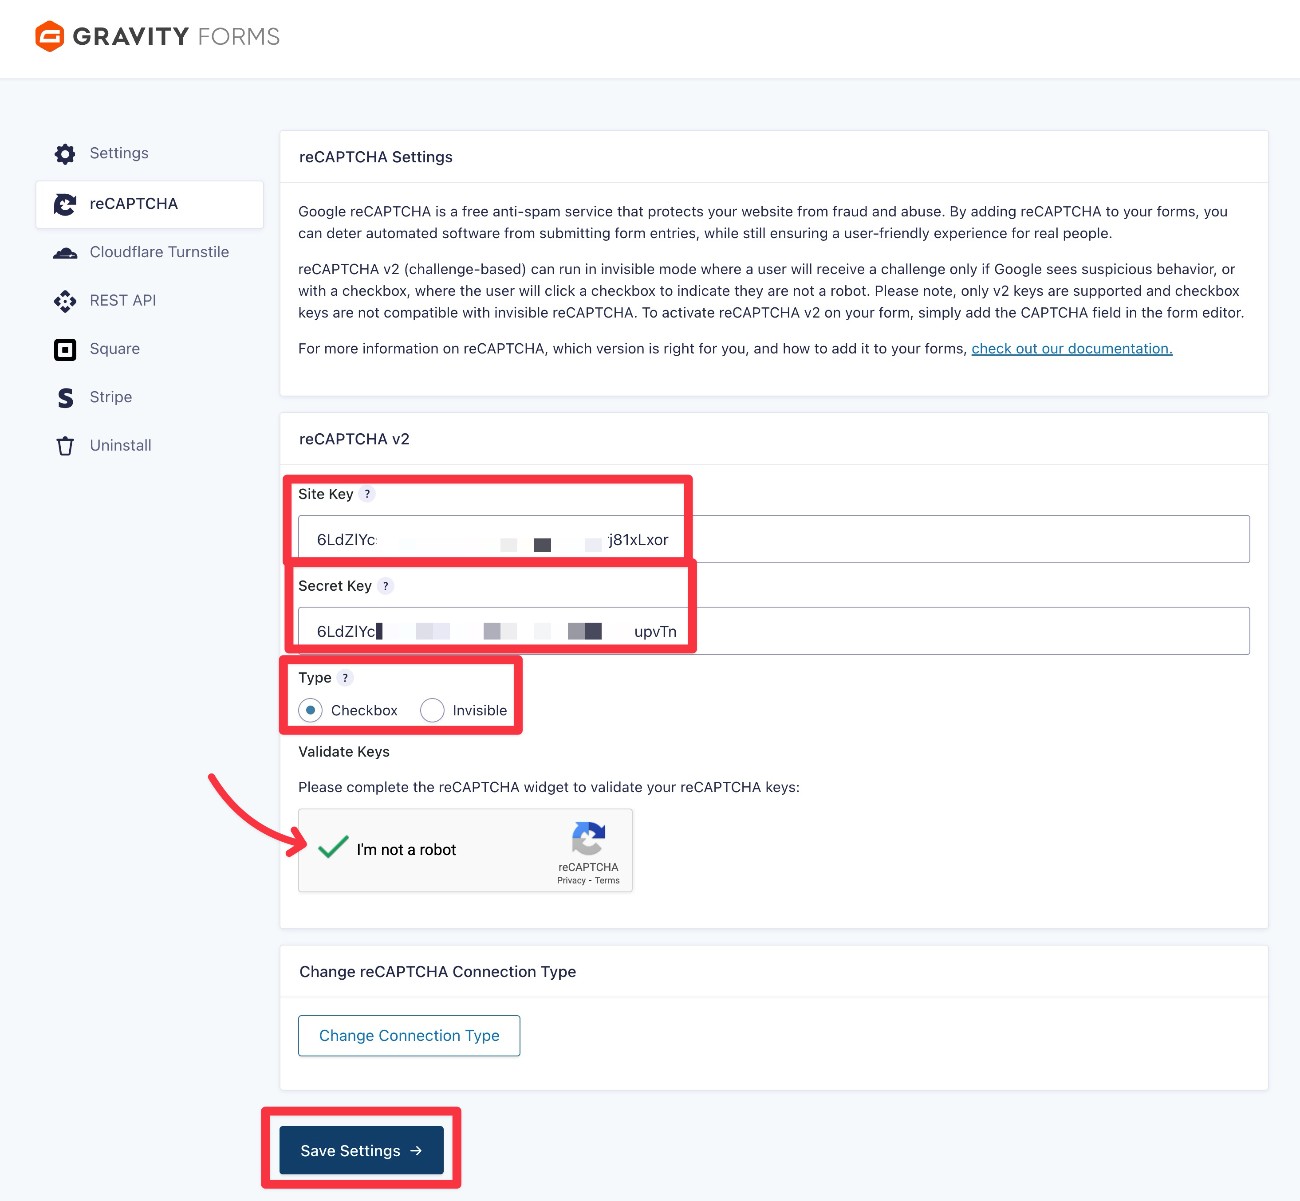
Click Save Settings when you’re finished.
4. Add the CAPTCHA field to forms that you want to protect
Whereas reCAPTCHA v3 works automatically on all of your forms (unless you manually disable it), reCAPTCHA v2 will not be active by default.
To add reCAPTCHA v2 spam protection to a form, you need to edit the form and add the CAPTCHA field, which is located in the Advanced Fields section. Generally, you should add the field immediately above the Submit button.
Within the CAPTCHA field’s settings, you can choose between a light and dark style, along with adjusting the language of the CAPTCHA if needed.
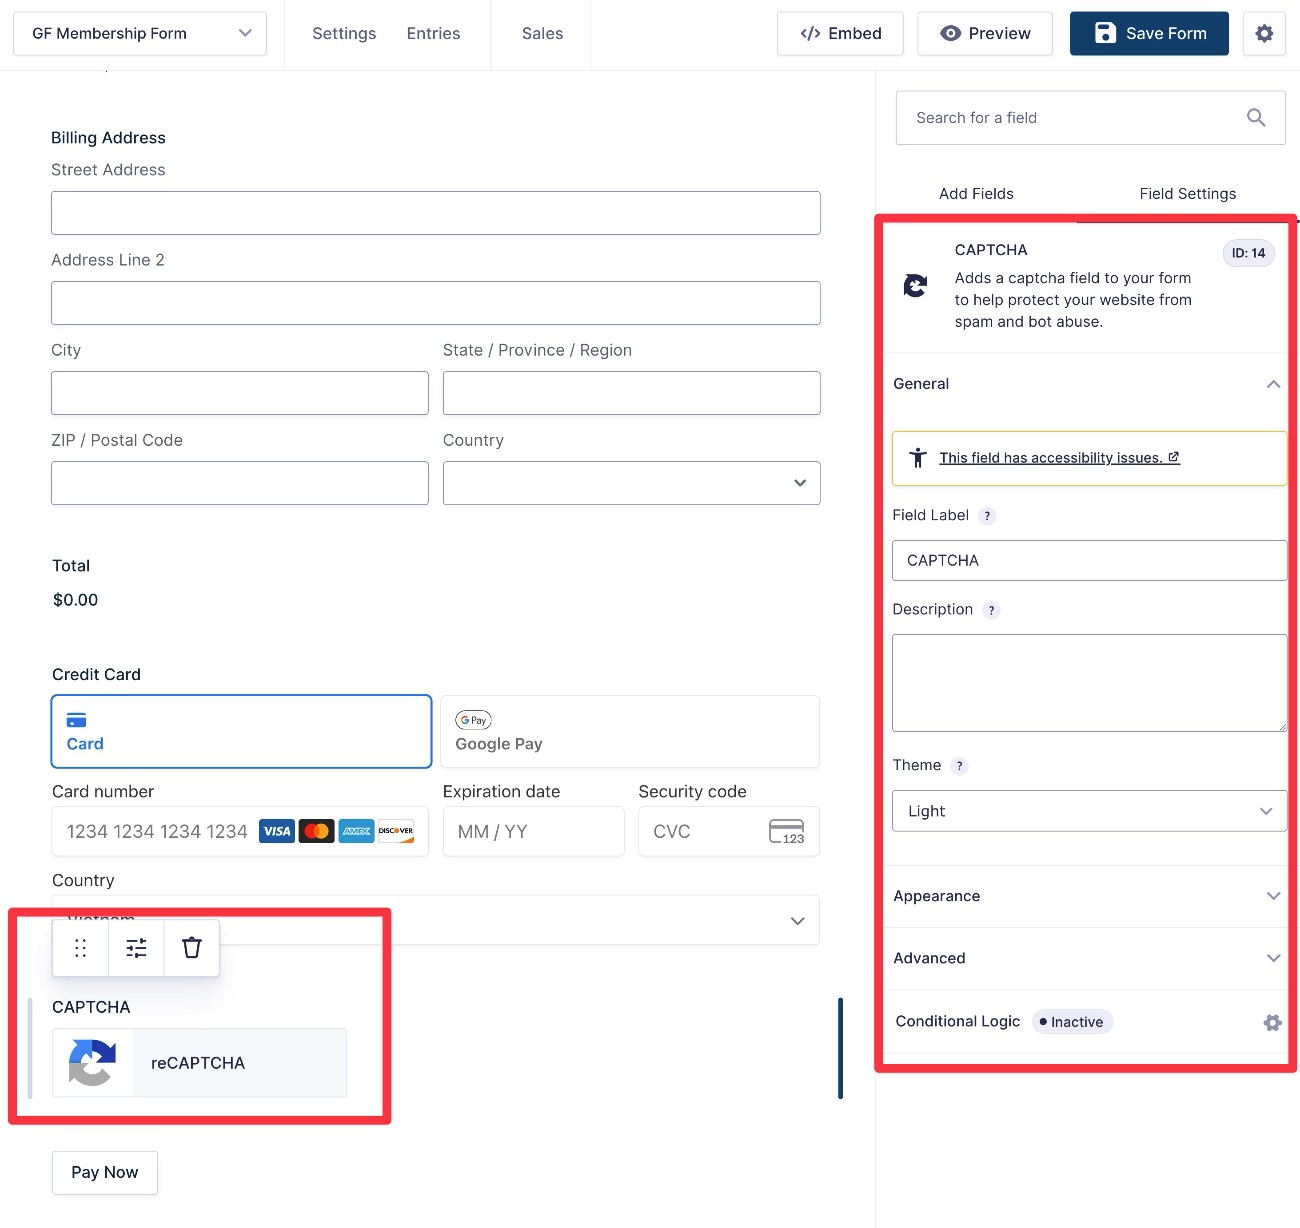
Repeat the same process to add CAPTCHA to other forms.
Cloudflare Turnstile
Cloudflare Turnstile is another excellent third-party service that you can use to protect your forms from spam.
While it does come from Cloudflare, you do not need to be using Cloudflare’s nameservers/reverse proxy service to use Cloudflare Turnstile. It’s compatible with all WordPress websites and does not require any changes to your DNS records.
Cloudflare Turnstile is also free for up to one million requests per month (i.e. one million form submissions), which makes it a completely free anti-spam solution for the vast majority of WordPress websites.
For the vast majority of legitimate human visitors, Cloudflare Turnstile works entirely in the background and does not require any interaction.
For a very small percentage of legitimate visitors who are deemed suspicious, the most interaction that will be required of them is to check a box like in the image below. Cloudflare Turnstile never requires visitors to solve image puzzles as is the case with something like reCAPTCHA v2.
While the exact ratio will depend on your specific visitors, Cloudflare Turnstile is generally able to avoid requiring any extra interaction for 90% of the human visitors to your site.
In addition to just generally being user friendly and unobtrusive to legitimate human visitors, Cloudflare Turnstile can also have benefits for webmasters who value privacy.
Some have criticized Google reCAPTCHA for tracking visitors across the web. Cloudflare Turnstile does not have these types of tracking issues hanging over it, which might make it a better option than Google reCAPTCHA for webmasters who want to go the extra mile to protect website visitors’ privacy.
Here’s how to use Cloudflare Turnstile for WordPress forms that you create with Gravity Forms…
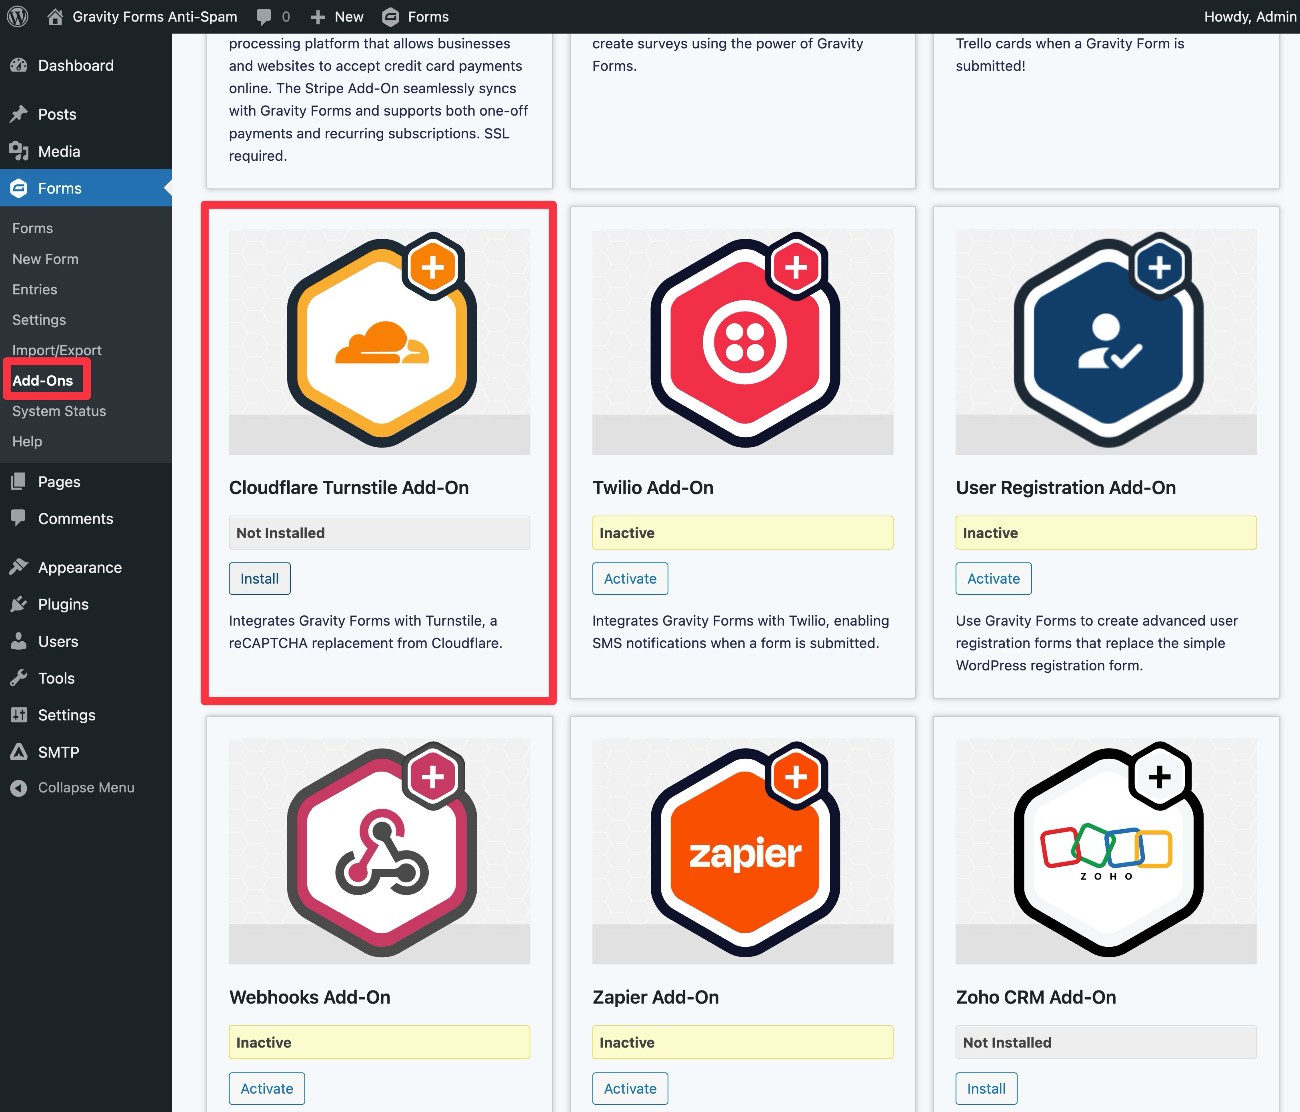
1. Install the Gravity Forms Cloudflare Turnstile Add-on
Gravity Forms offers its own dedicated Cloudflare Turnstile Add-On, which is available on all Gravity Forms licenses.
To get started, you’ll need to install the add-on on your site:
- Go to Forms → Add-Ons.
- Find Cloudflare Turnstile in the list of available add-ons and click the Install button.
- Once the installation finishes, make sure to activate the add-on.
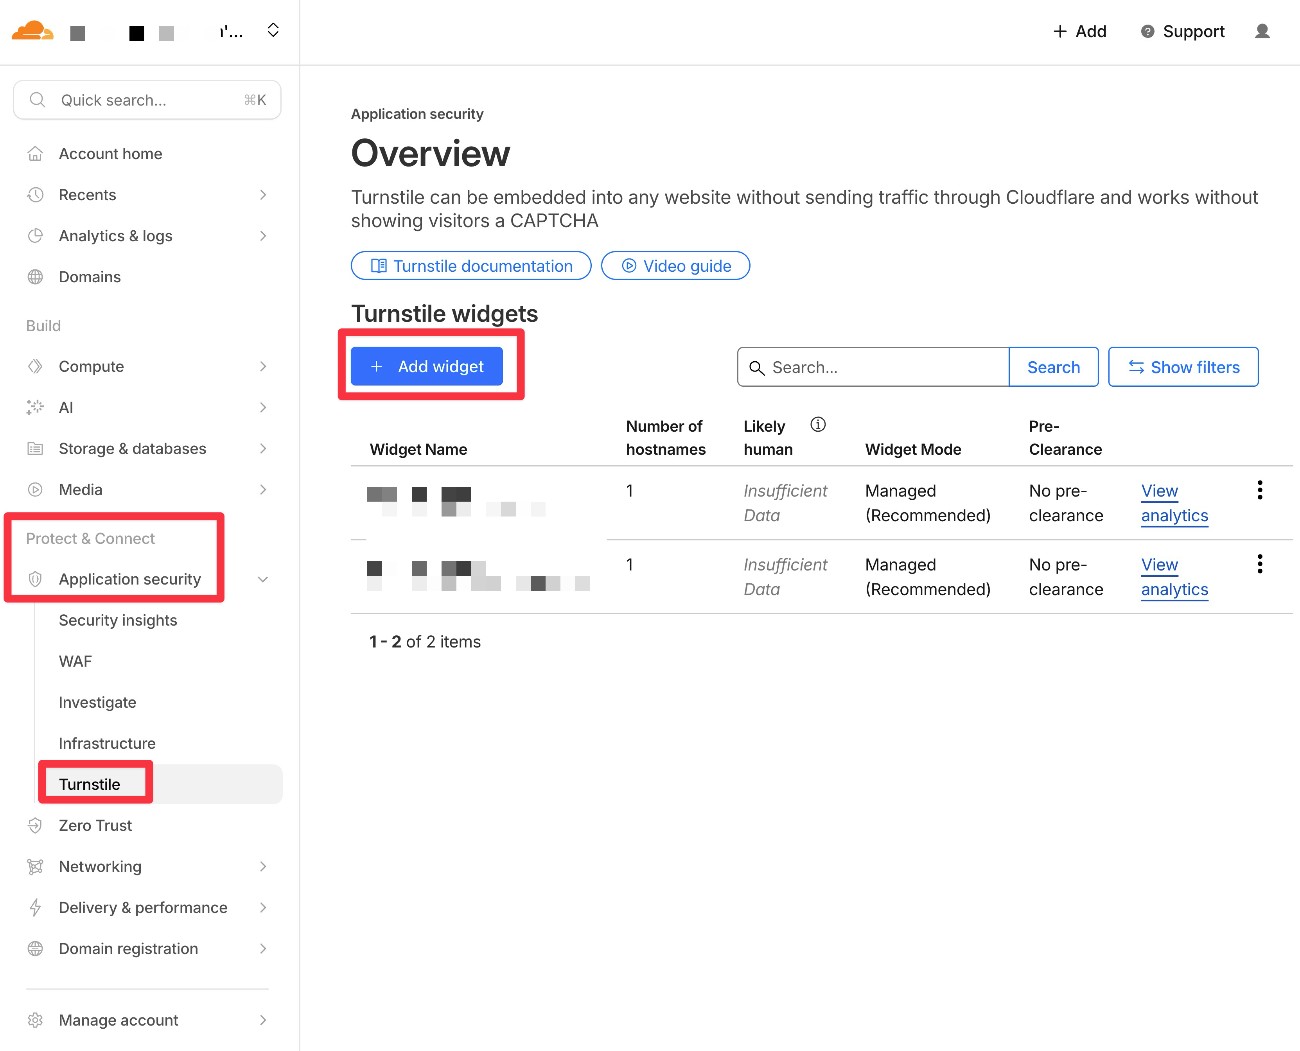
2. Set up Cloudflare Turnstile widget and locate API keys
Next, you need to shift to the Cloudflare interface. If you don’t already have a Cloudflare account, you can create a free account here.
In the Cloudflare dashboard side, expand Application security under Protect & Connect. Then, choose Turnstile.
In this interface, click the + Add widget button.
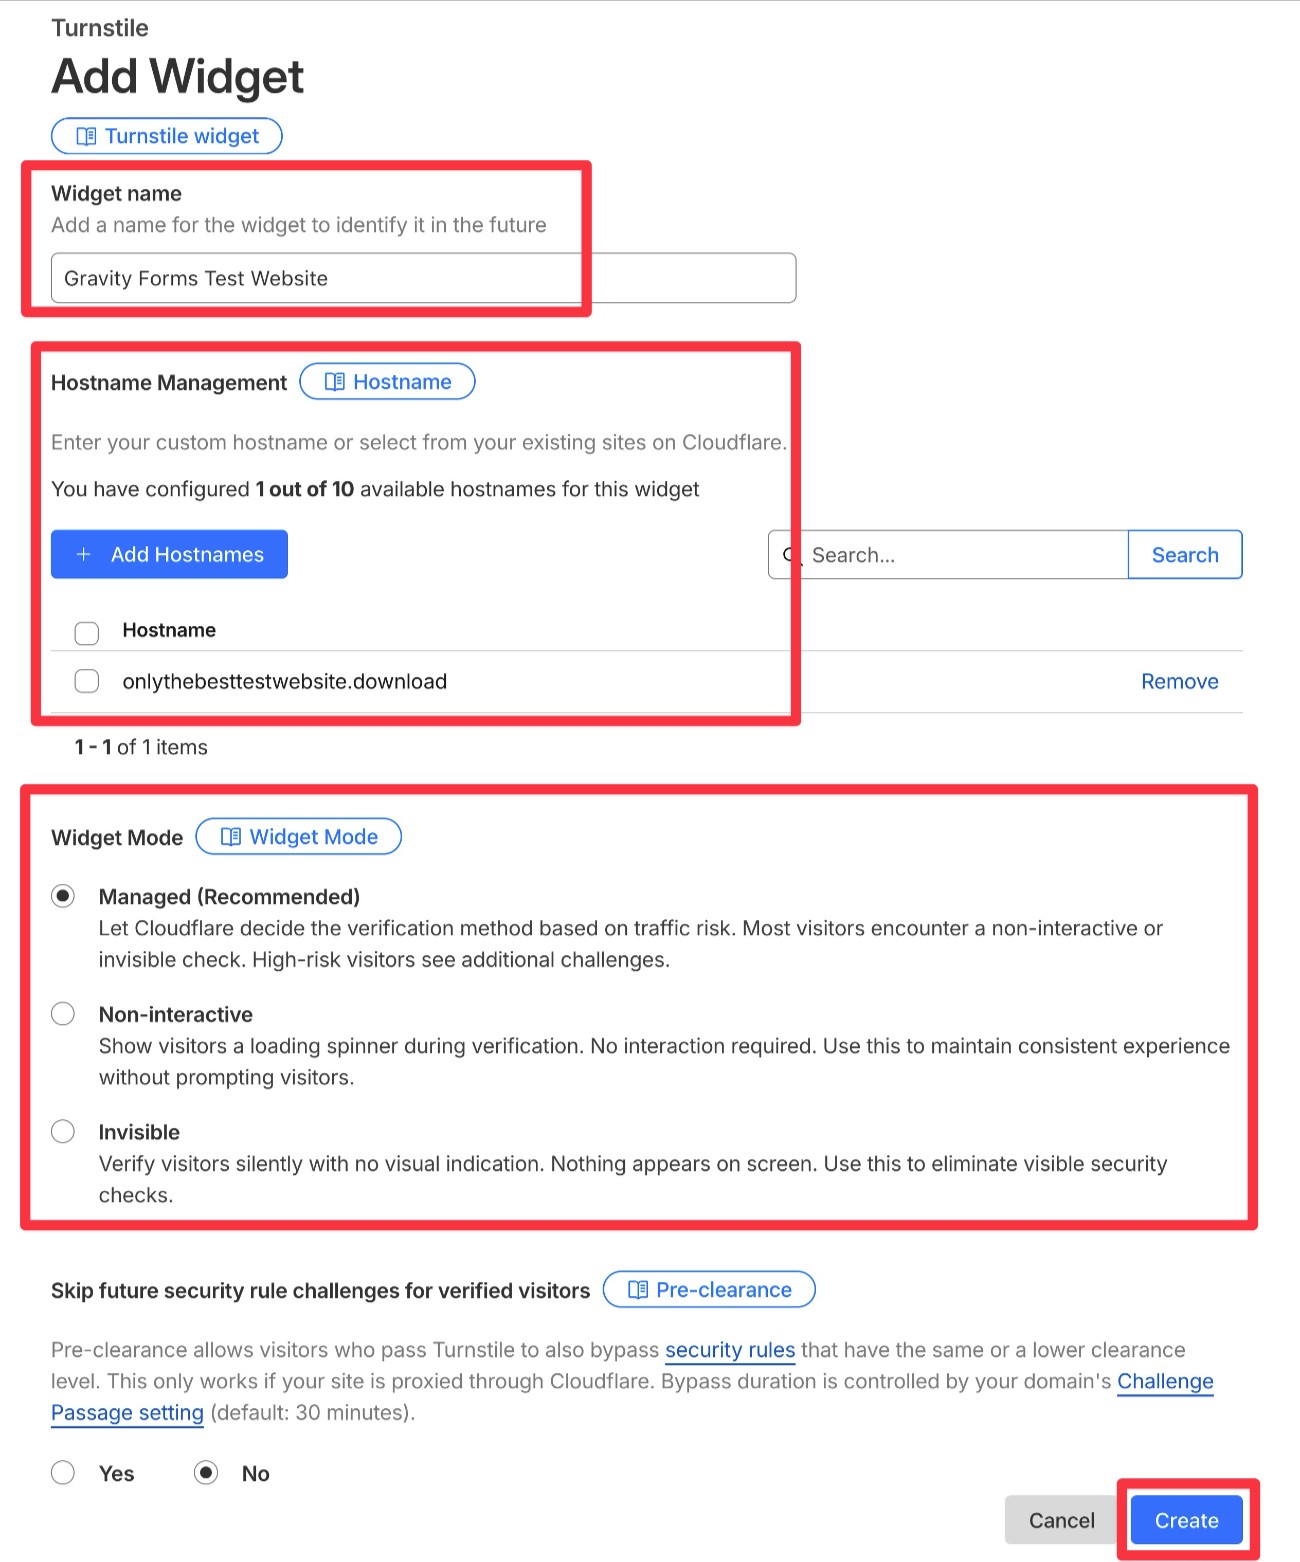
To configure your widget, you’ll need to do a few things:
- Widget name – This is an internal name to help you remember what this widget does.
- Hostname Management – Add your WordPress site’s domain name by clicking the + Add Hostnames button. You can then manually add the domain name. Or, if you’re using Cloudflare’s DNS, you can select your domain name from the list of your added sites.
- Widget Mode – Choose Managed for the best anti-spam protection. However, you could choose something like Invisible if you want to completely avoid any visible checks.
- Pre-clearance – If you’re using Cloudflare’s reverse proxy, you can enable this. Choose No if you’re not using Cloudflare.
Once you’ve configured everything, click the Create button in the bottom-right corner.
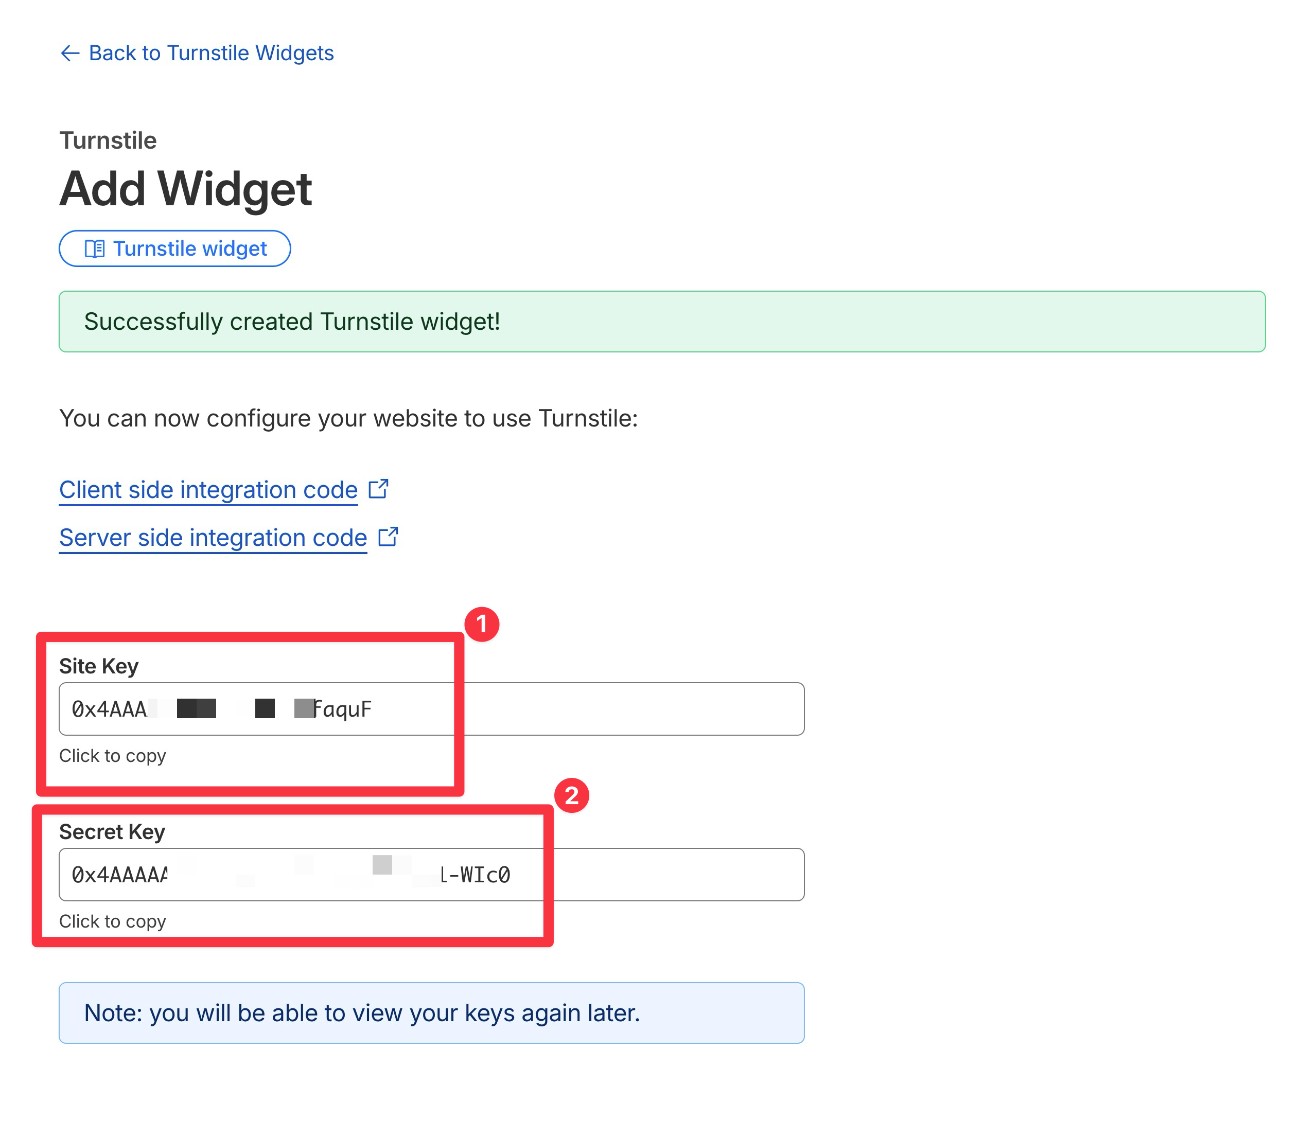
After clicking Create, Cloudflare will show you two keys:
- Site Key
- Secret Key
Copy both of these keys to a safe spot because you’ll need them to configure the Gravity Forms Cloudflare Turnstile Add-On in the next step.
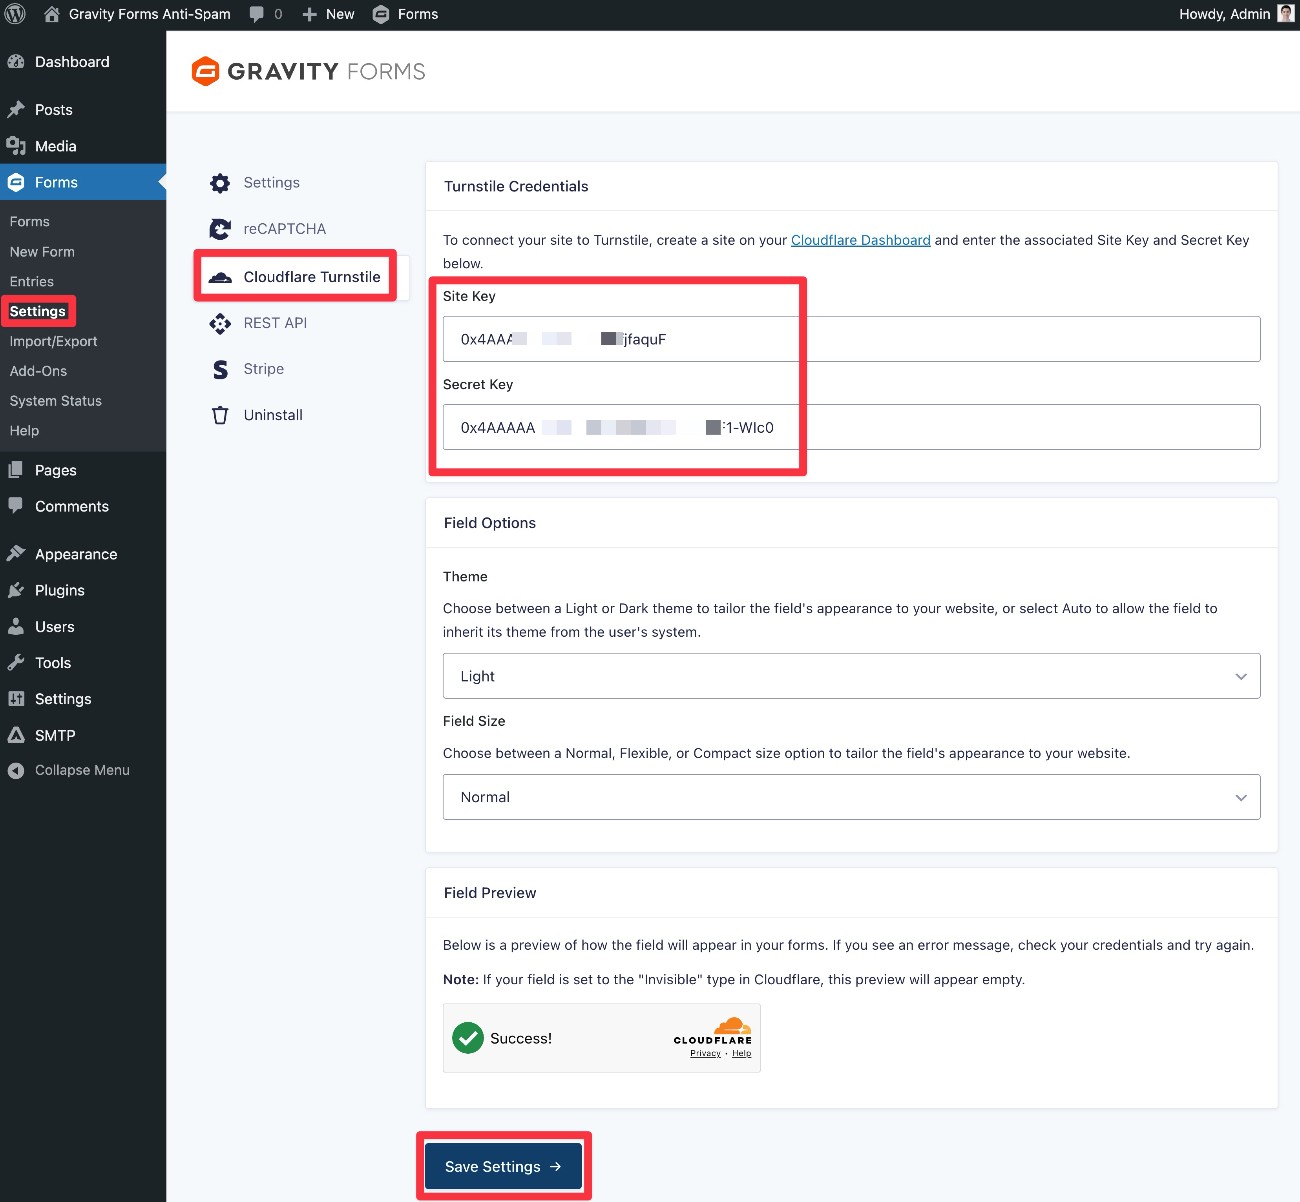
3. Connect Gravity Forms to Cloudflare Turnstile
Next, you need to connect Gravity Forms to Cloudflare Turnstile:
- Go to Forms → Settings in your WordPress dashboard.
- Select Cloudflare Turnstile in the settings area.
- Paste in the Site Key and Secret Key that you just obtained from Cloudflare.
- Use the Field Options to choose the color and size of the Cloudflare Turnstile box (if you’re using Invisible, this won’t apply because there will be no visible box).
- Click Save Settings.
4. Add Cloudflare Turnstile field to form(s)
To finish things out, you need to add the Turnstile field to the form(s) that you want to protect.
You’ll find this field in the Advanced Fields section and we typically recommend adding it right above the Submit button.
In the Turnstile field’s settings, you can manually override the color and size of the box for just this form if needed.
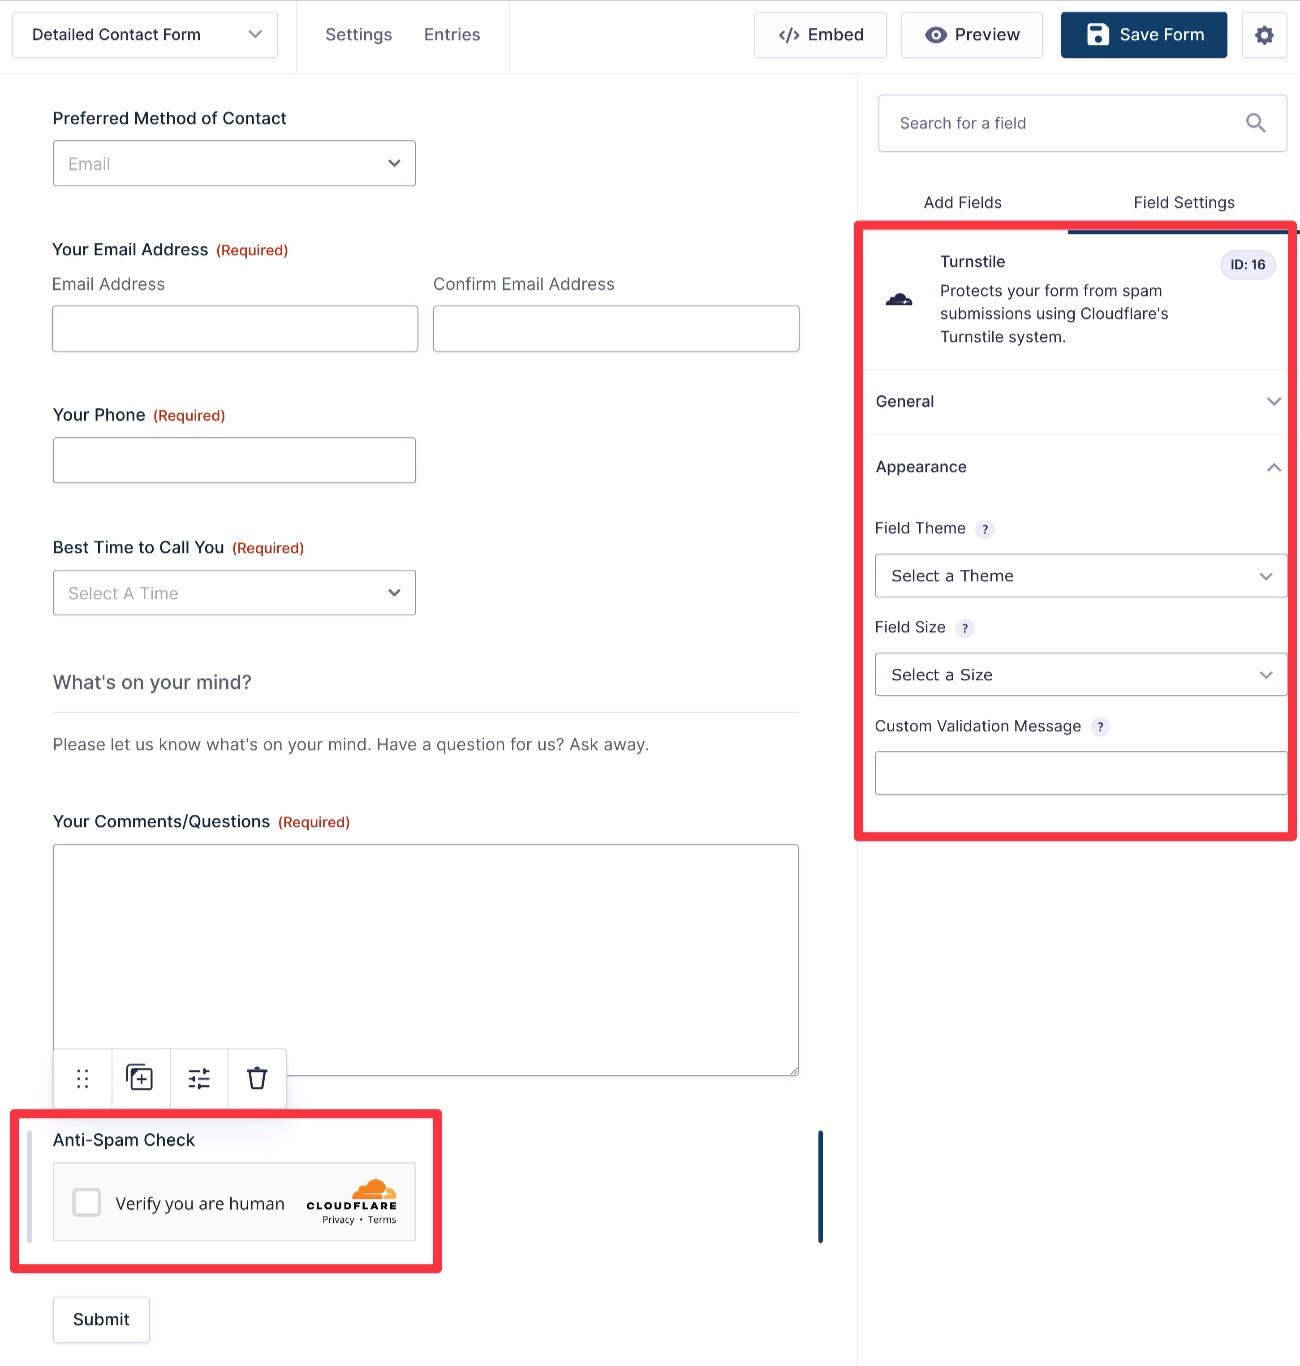
And that’s it! Your form will now be protected by Cloudflare Turnstile.
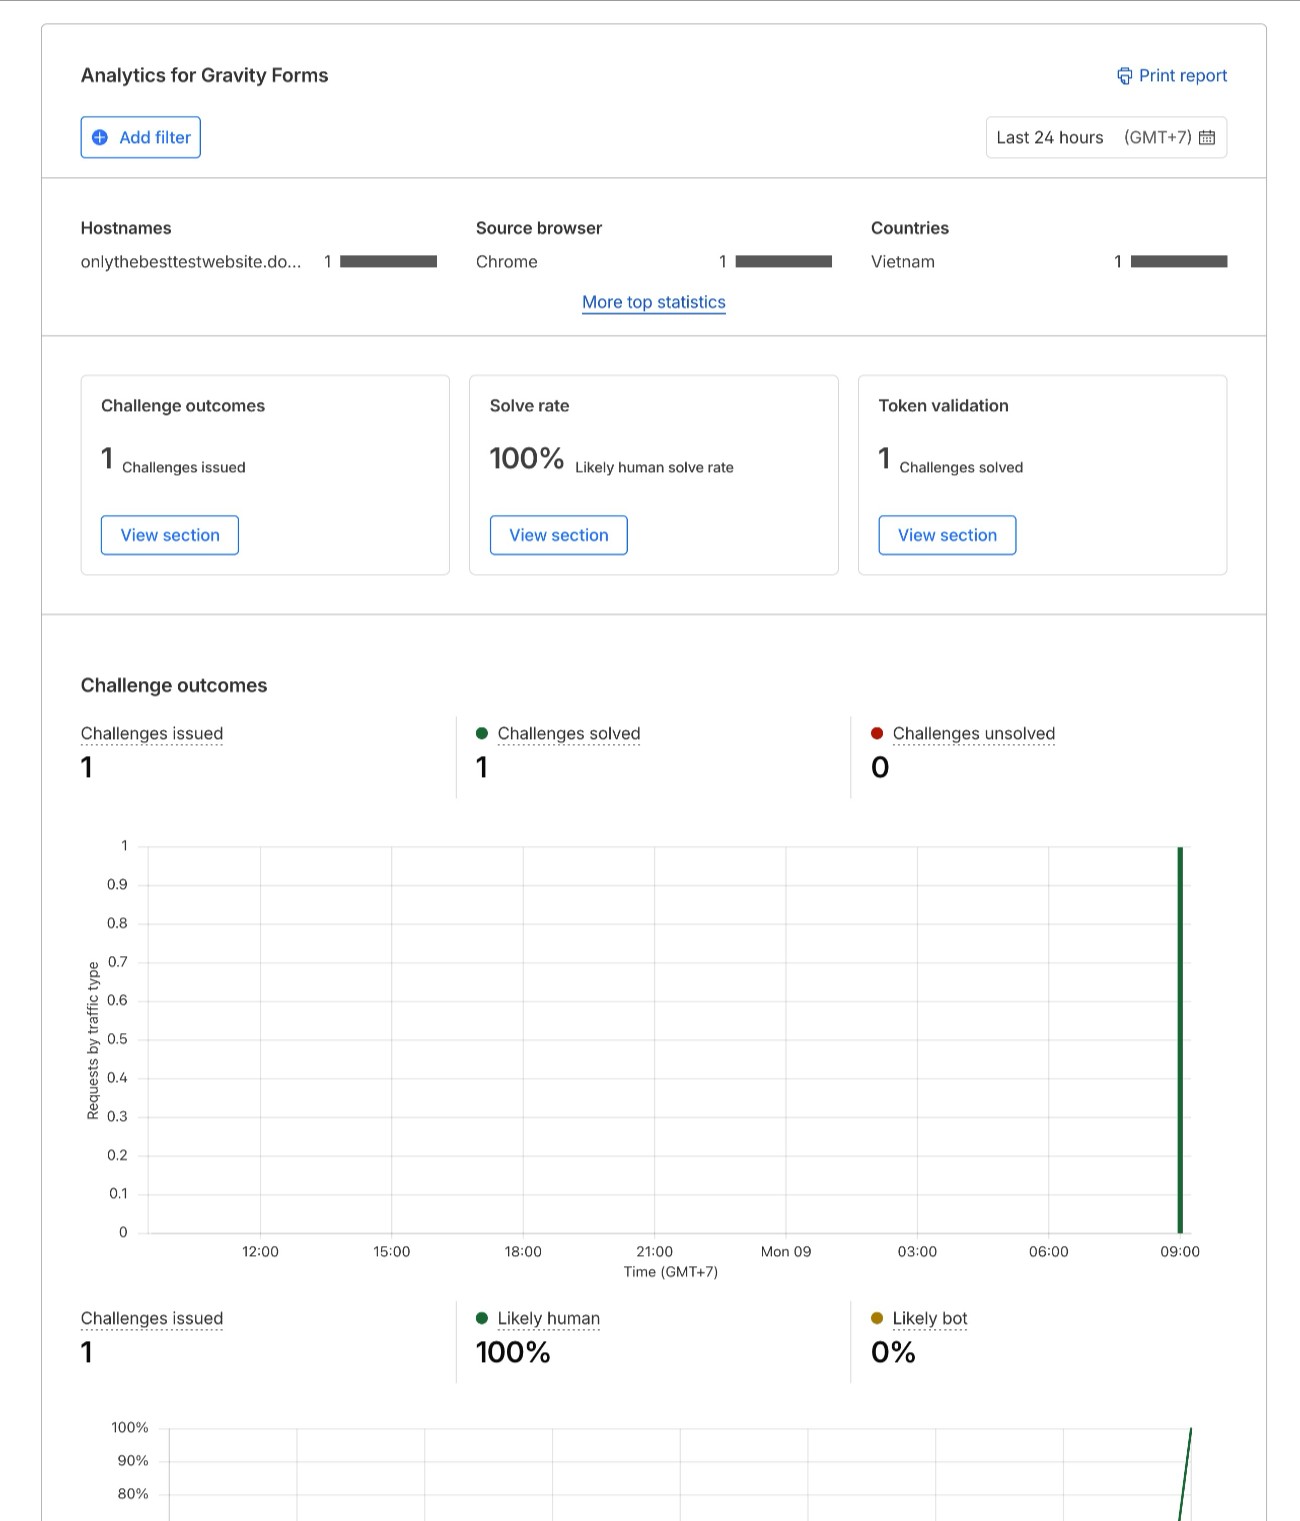
You can view stats about your Turnstile widget in Cloudflare’s dashboard.
Akismet
Akismet is a spam protection service from Automattic, the same company behind WordPress.com and a number of other popular products.
While Akismet is best known for protecting WordPress comment sections, it also works great for form spam.
It will not completely block spam form submissions. Instead, it will automatically filter them to the Spam tab, from which you can manually review them if you’re worried about false positives or just delete them in bulk.
Akismet is free to use for non-commercial websites. However, for any type of commercial site, you’ll need a paid plan. These start at $9.95 per month for up to 500 monthly spam checks.
You do not need to have the Akismet plugin installed to use it for form spam protection. The Gravity Forms Akismet Add-On handles everything by connecting directly to Akismet’s API – all you need to do is add your Akismet key (which we’ll cover below).
Here’s how to use Akismet for Gravity Forms spam protection…
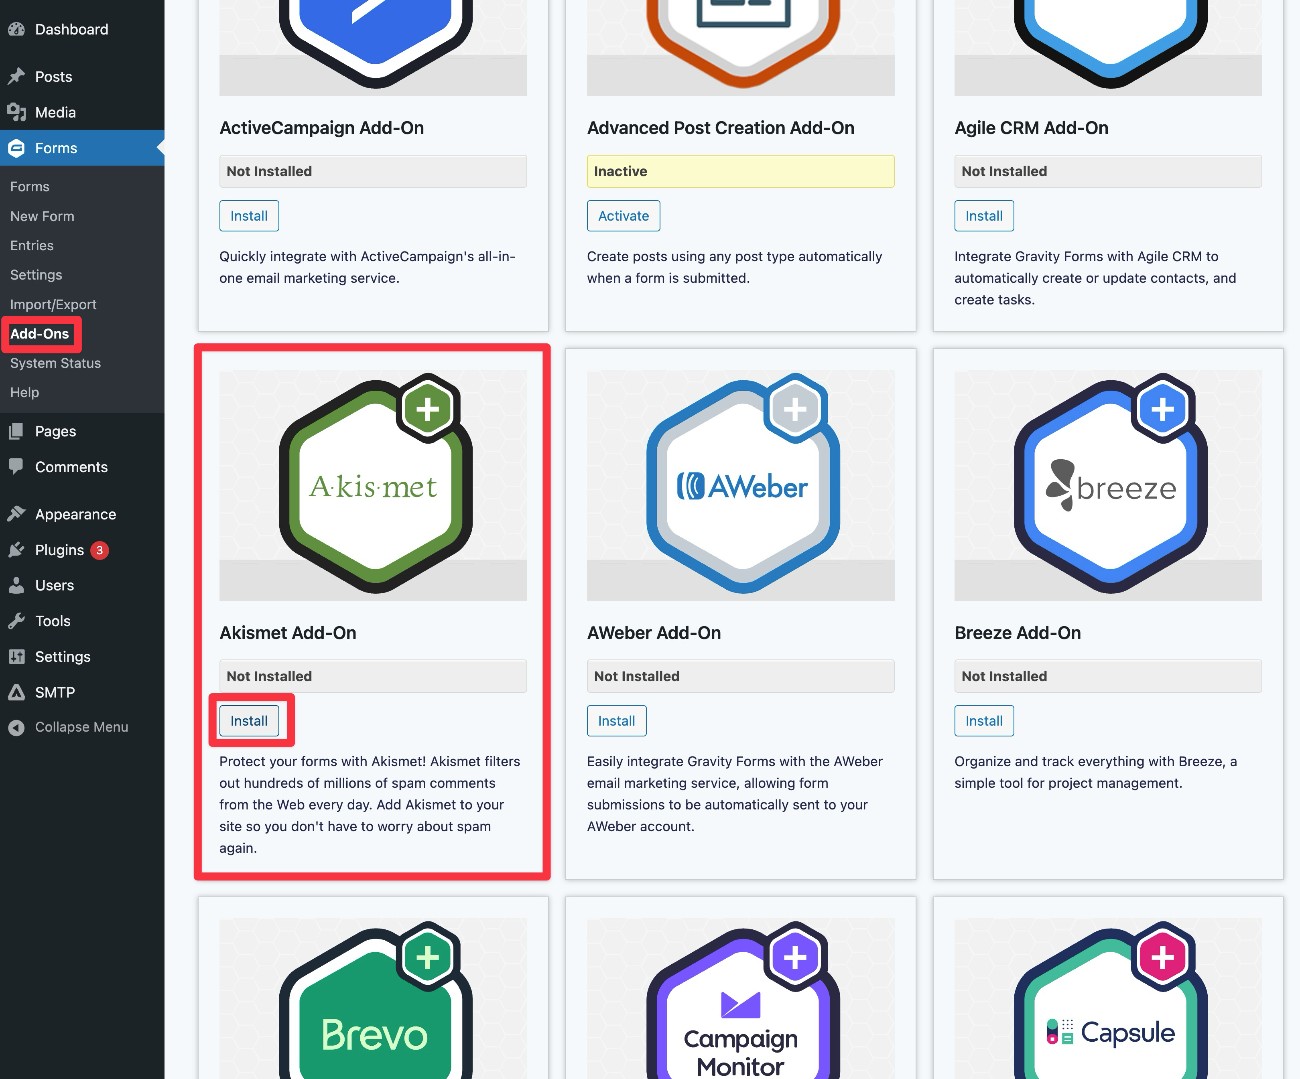
1. Install the Gravity Forms Akismet Add-On
To get started, install the Gravity Forms Akismet Add-On on the site that you want to protect. This add-on is available on all Gravity Forms licenses.
- Go to Forms → Add-Ons.
- Find Akismet in the list of available add-ons and click the Install button.
- Once the installation finishes, make sure to activate the add-on.
2. Locate your Akismet API key
Instead of needing to install the Akismet plugin on your site, all you need is an Akismet API key.
To get an API key, you’ll need to create a free WordPress.com account, if you don’t already have one.
Once you’re logged in to your WordPress.com account, you can open the Akismet Account overview page to find your API key.

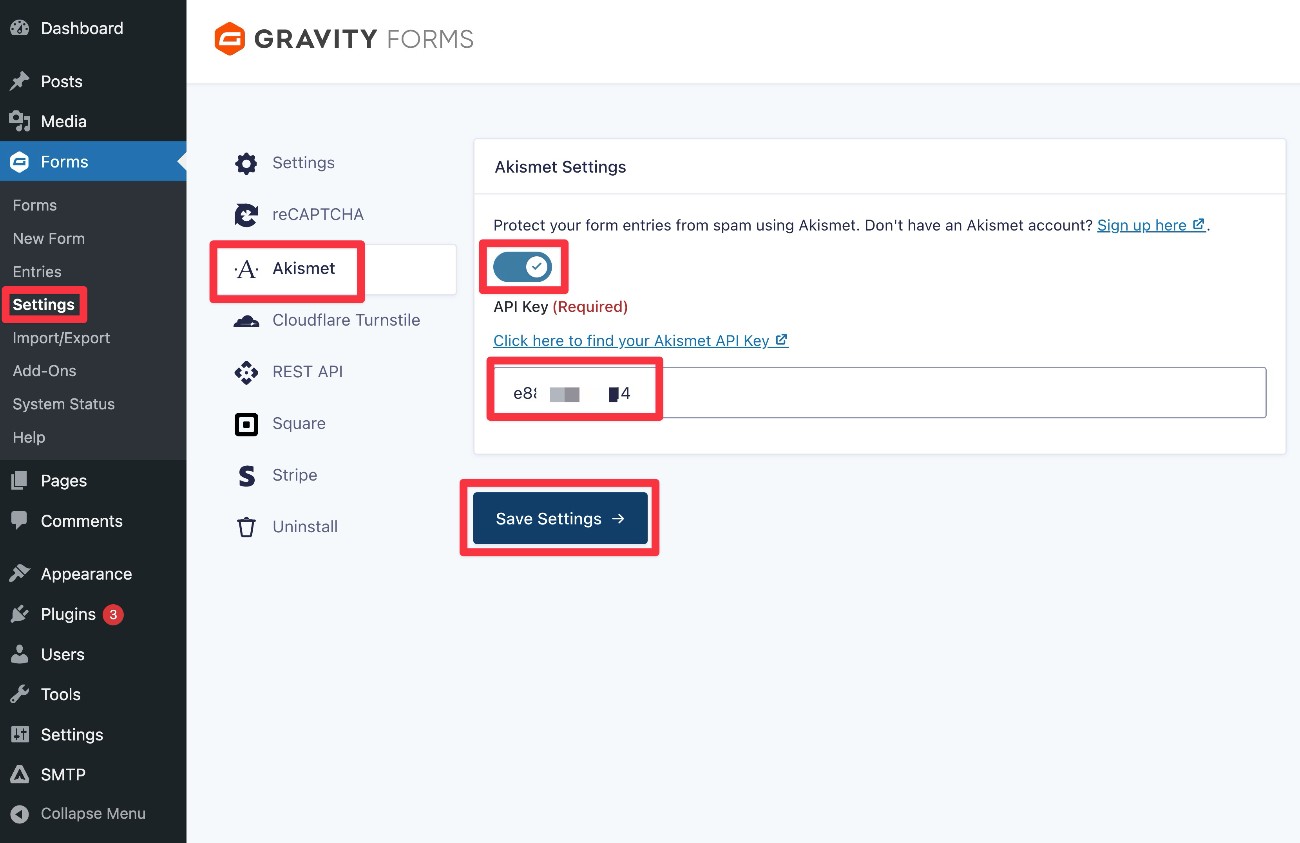
3. Connect Gravity Forms to Akismet
Now, you need to connect Gravity Forms to Akismet:
- Go to Forms → Settings in your WordPress dashboard.
- Select the Akismet tab in the settings area.
- Enable the Protect your form entries from spam… toggle.
- Paste your API key into the API Key box.
- Click the Save Settings button.
If the connection is successful, you should see a green checkmark appear next to your API key.
If you see a red “X” instead, check to see if you made a mistake when pasting in your Akismet API key.
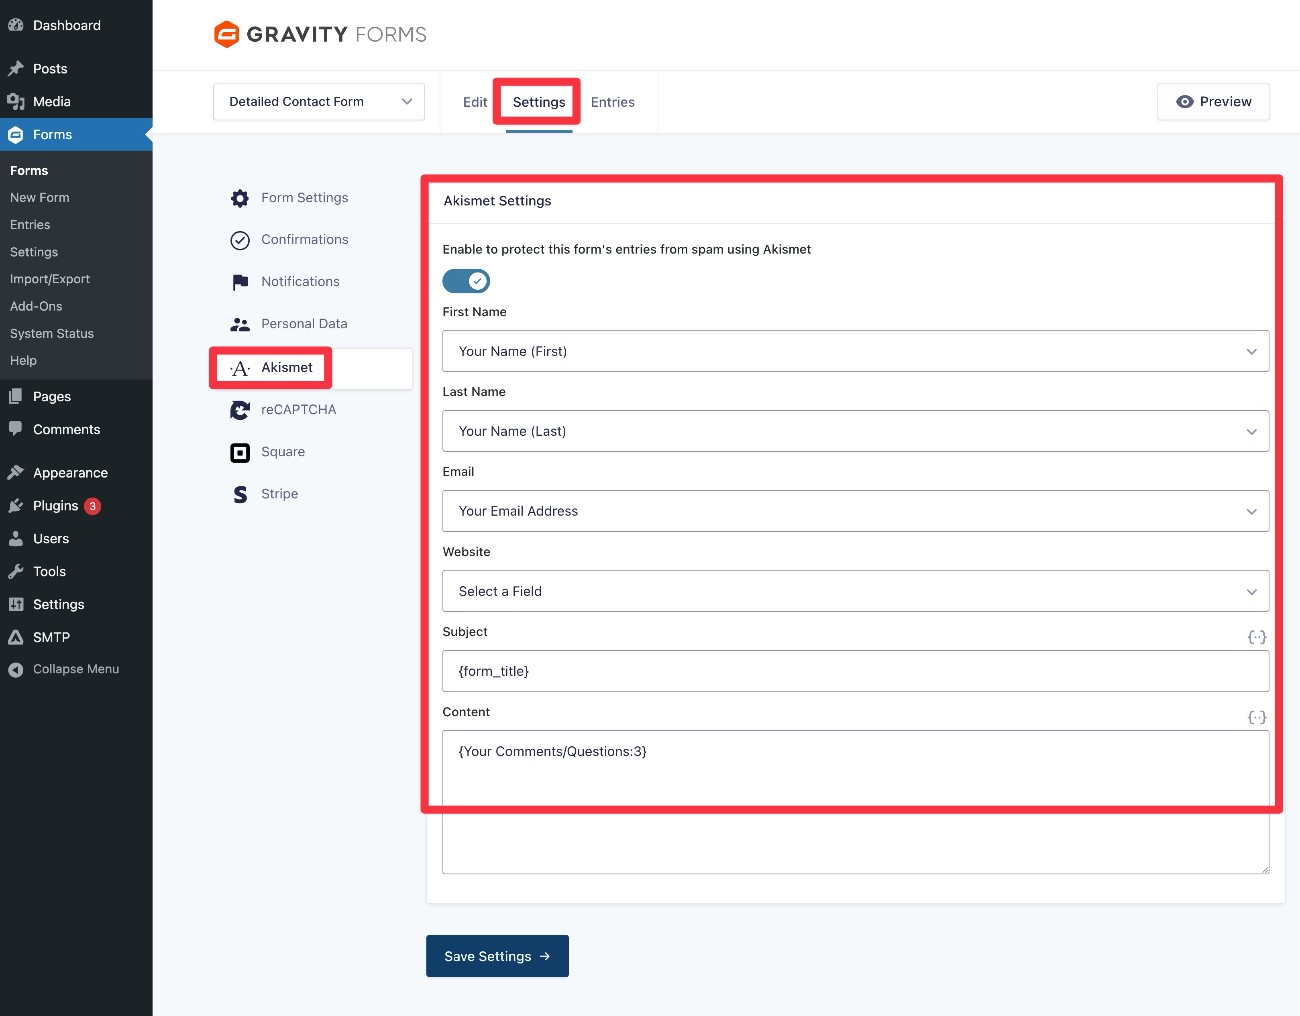
4. Enable and configure Akismet for individual forms
Gravity Forms also gives you some form-level options for configuring Akismet.
You can access these by going to Settings → Akismet inside the form editor for any form.
First, you can use the toggle to choose whether or not to enable Akismet spam protection for this specific form.
Below that, you can also map the fields from your form to the fields that Akismet will expect. While this isn’t an absolute requirement, mapping the fields will help Akismet understand what type of content to expect in each field, which can make its spam detection more accurate.
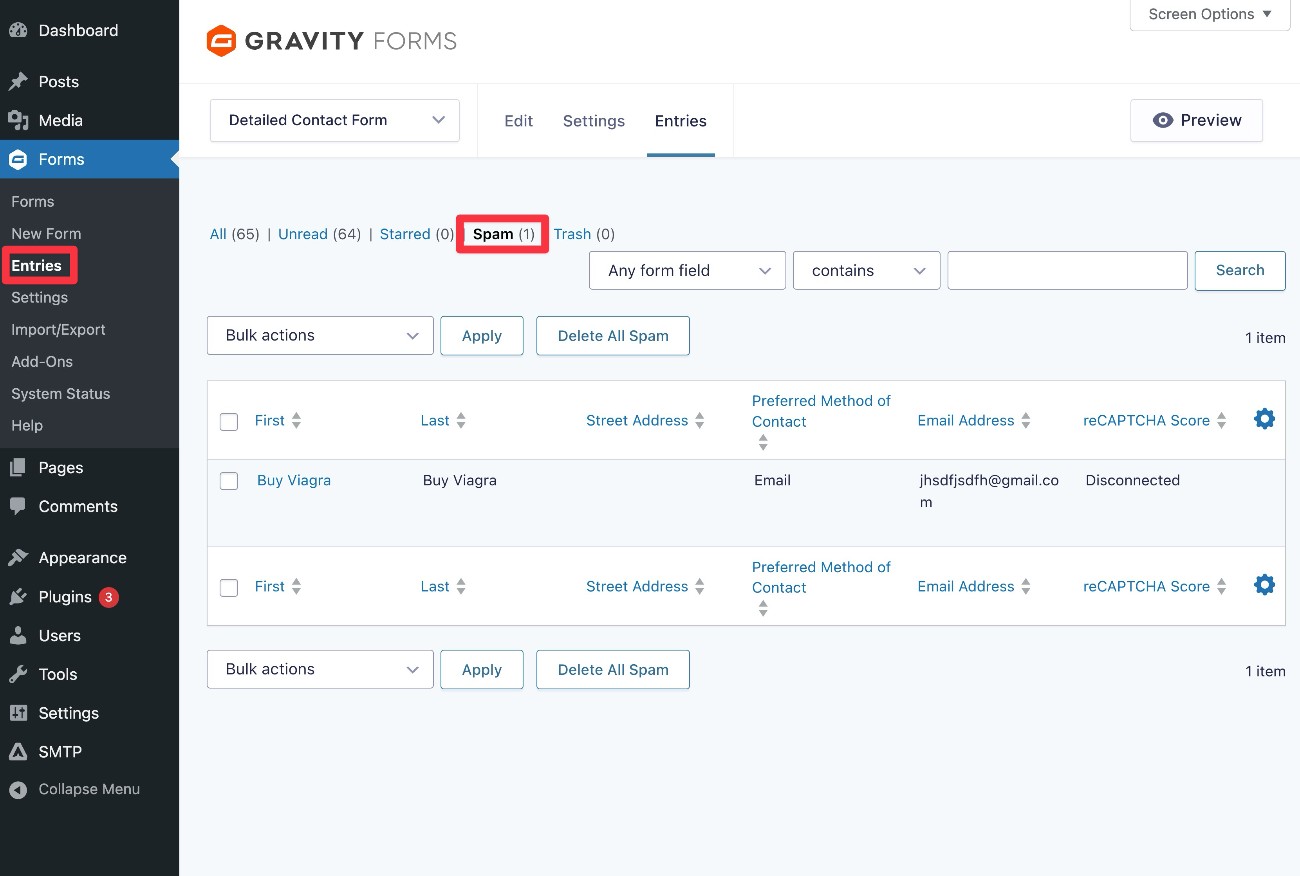
5. Check your “Spam” tab for flagged entries
As we mentioned earlier, Akismet will not outright block form submissions that it marks as spam.
Instead, it will just hide them in the Spam tab of the Gravity Forms Entries dashboard.
You can periodically check this tab to look for false positives and delete spam entries.
You can delete individual entries or click the Delete All Spam button to delete every entry flagged as spam.
Moderation (toxic comments)
Moderation differs from the other anti-spam solutions here in that its goal is to filter form entries that contain profane, insulting, threatening, and toxic language.
Therefore, if you’re looking for a way to protect yourself and your team from online abuse and harassment, this add-on could be just the thing!
The Moderation Add-On integrates your site and Gravity Forms with Perspective, a service that uses machine learning to reduce toxicity online.
When setting up the add-on, you can configure how the form entries are moderated in terms of what type of content is filtered.
You can also select a threshold to determine what level of toxicity causes a message to get flagged. Flagged messages can be filtered on the form entries page. Alternatively, you can set them to be deleted.

You can use conditional logic to display different confirmation messages to users, perhaps notifying them that their entry has been moderated.
When toxic language is detected in a form entry, conditional logic can also be used to send the notification for that entry to a specific team member for them to action.
The Moderation Add-On is available to Gravity Forms Elite License holders, and the required Perspective API key is free to use.
Our guide to using the Gravity Forms Moderation Add-On includes more information on this useful add-on, along with a detailed step-by-step tutorial on using it. However, for a quick overview of using this add-on and Perspective to moderate form entries on your site with Gravity Forms, read on…
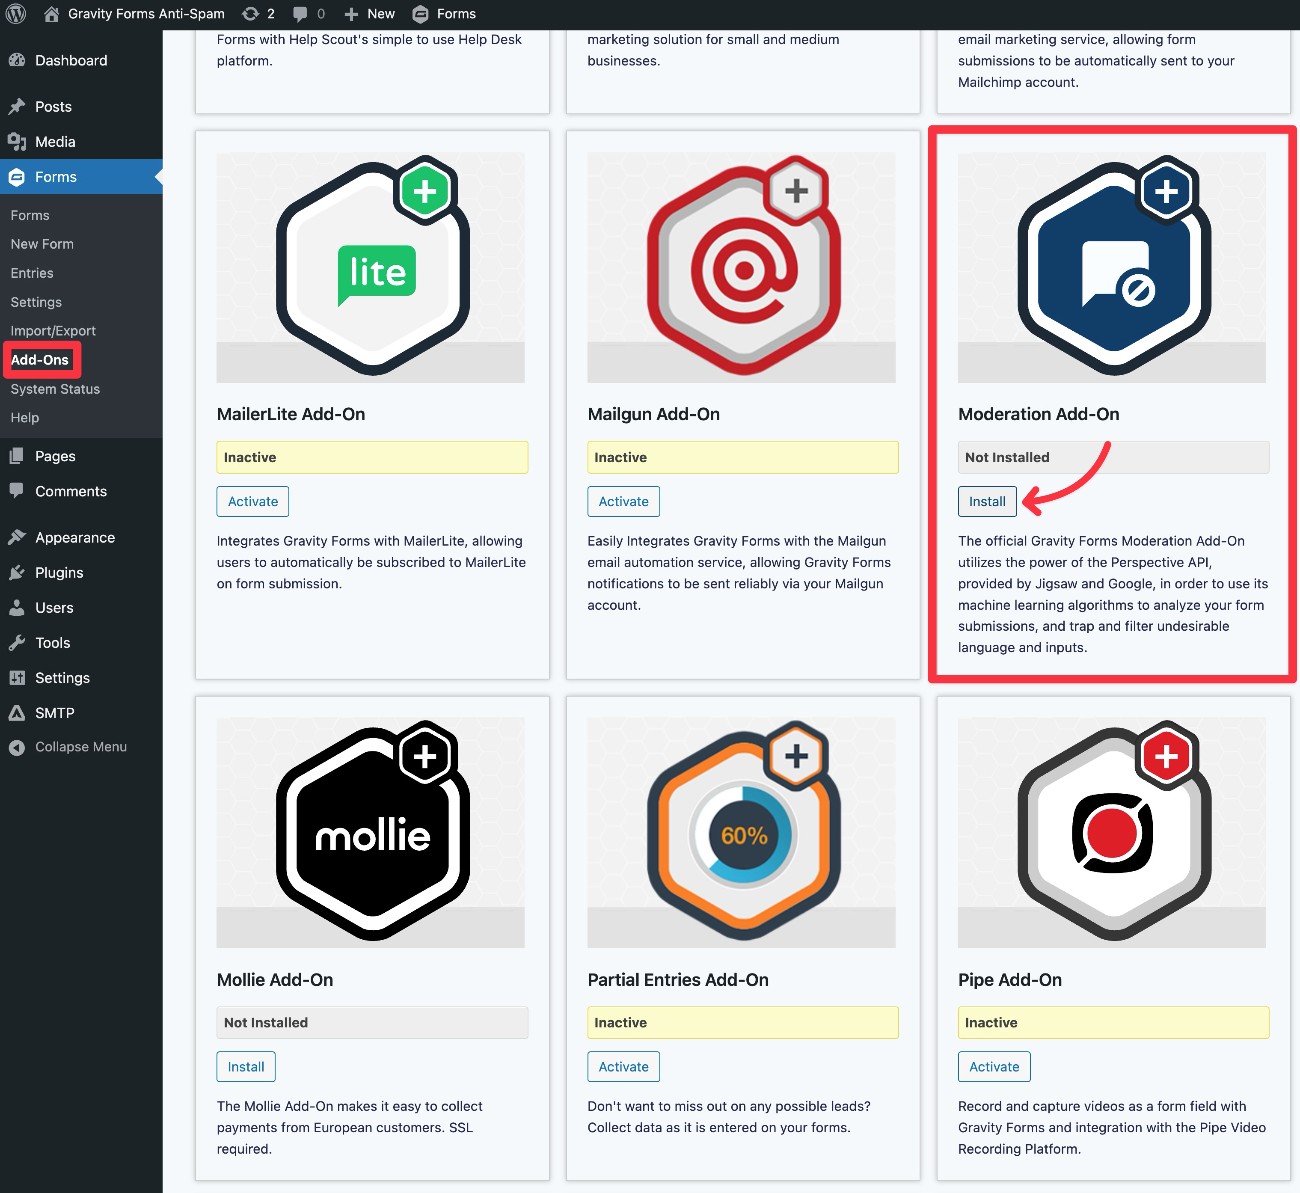
1. Install the Moderation Add-On
To get started, install the Moderation Add-On on your site:
- Go to Forms → Add-Ons.
- Find Moderation Add-On in the list of available add-ons and click the Install button.
- Once the installation finishes, make sure to activate the add-on.
2. Create a Google Cloud project and enable the Perspective API
Next, you’ll need to set up the Perspective API in the Google Cloud Platform dashboard.
The API is free to use and you can do everything using your existing Google account.
To get started, create a Google Cloud project for your website. Or, if you’re using reCAPTCHA as we showed you earlier in this post, you can use that same project for the Moderation Add-On.
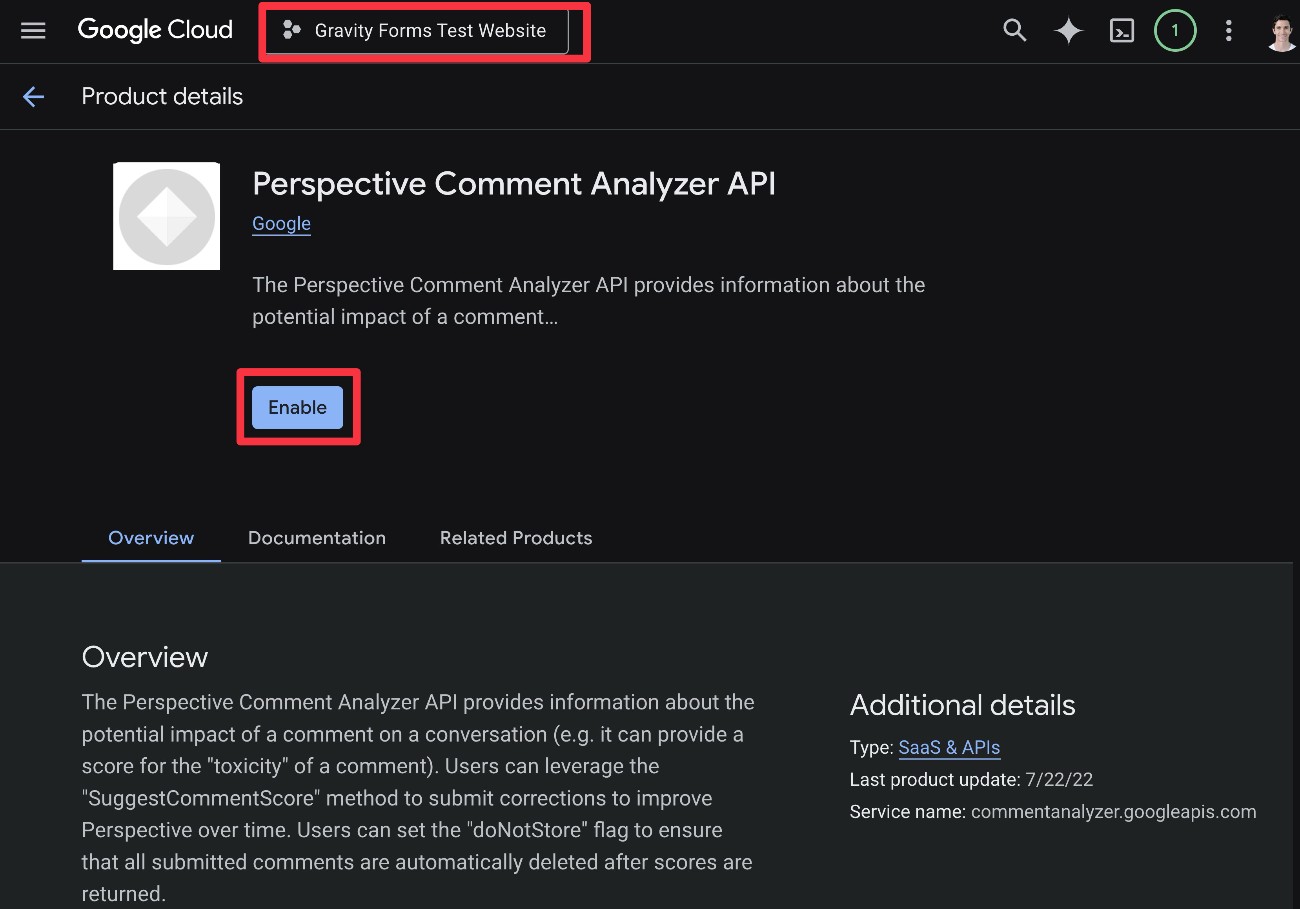
Once you have the project that you want to use, you need to enable the Perspective Comment Analyzer API:
- Click this link to open the API’s page in Google Cloud.
- Make sure that your project is selected at the top.
- Click the blue Enable button.
Create credentials
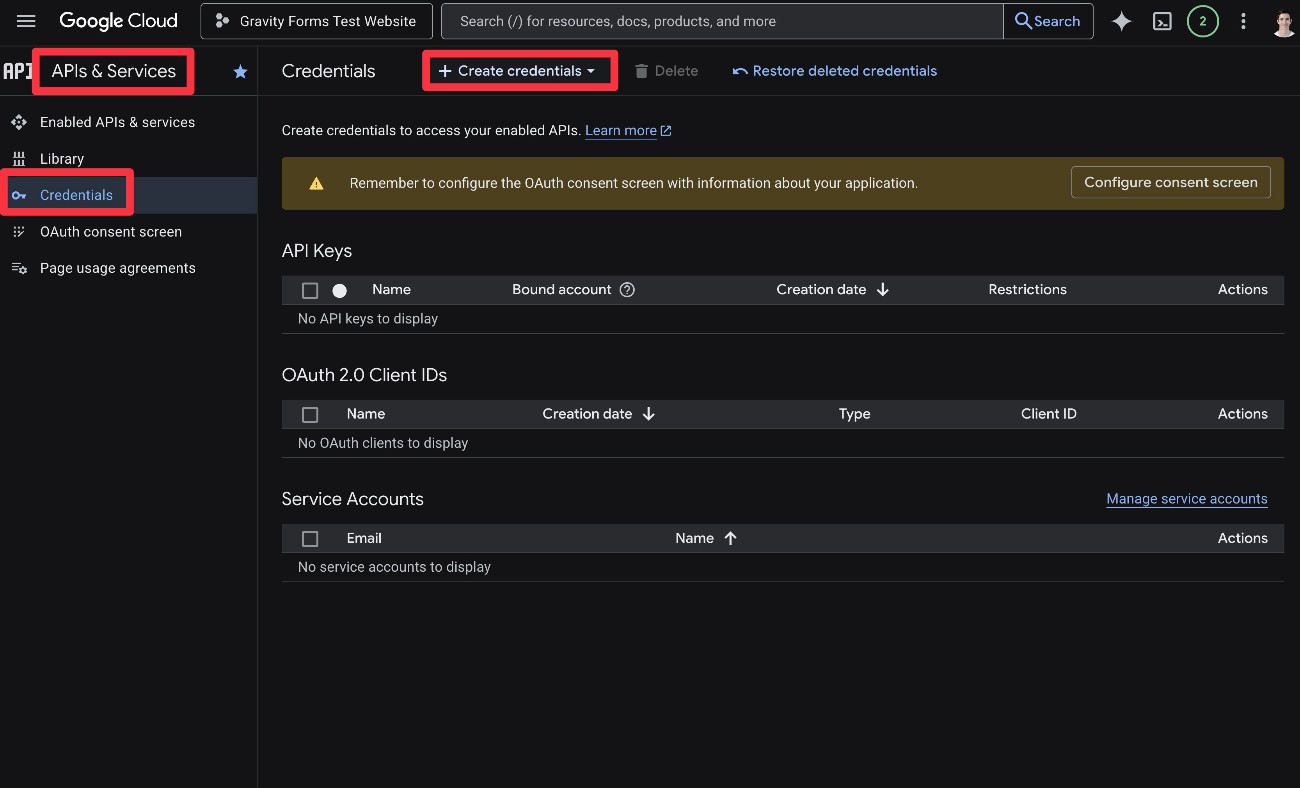
Next, you need to create an API key that Gravity Forms can use to access the Perspective API.
Go to the Credentials submenu under APIs & Services in the sidebar.
Then, click the + Create credentials link at the top.
In the drop-down that appears, choose the API key option.
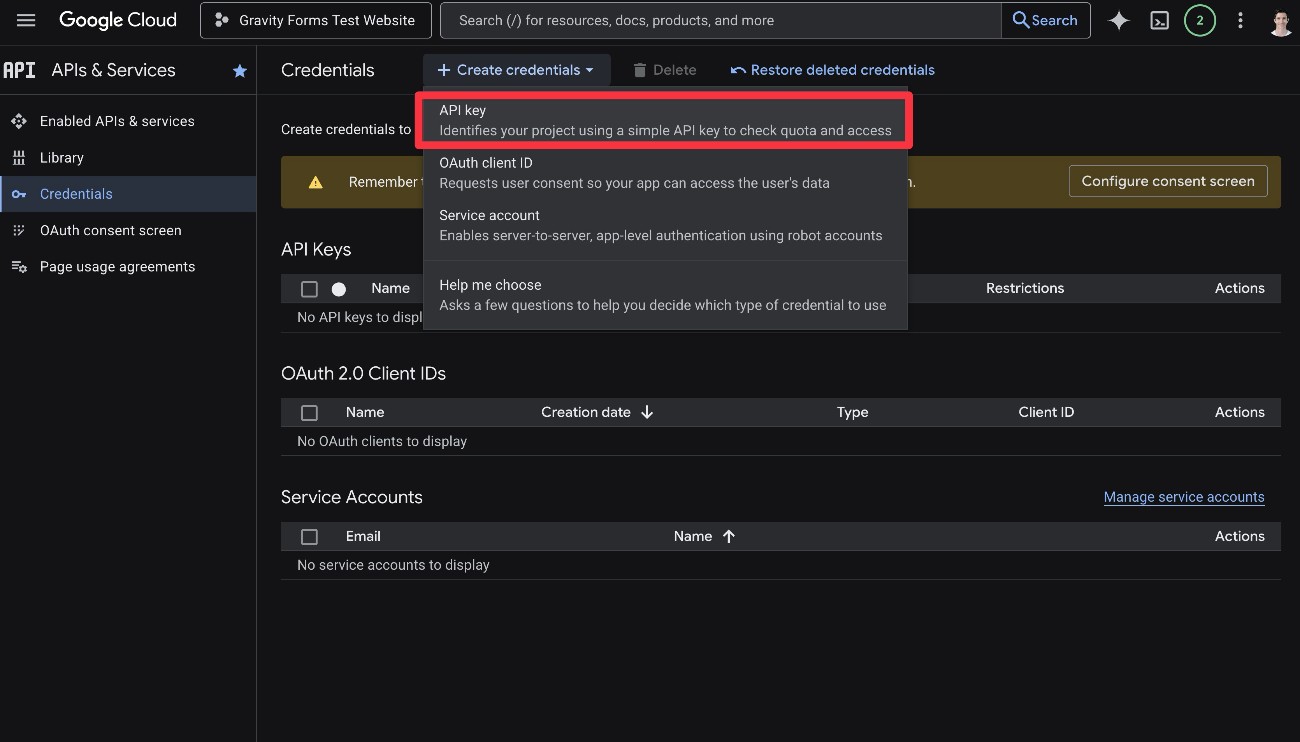
This should then display a slide-out with some new options.
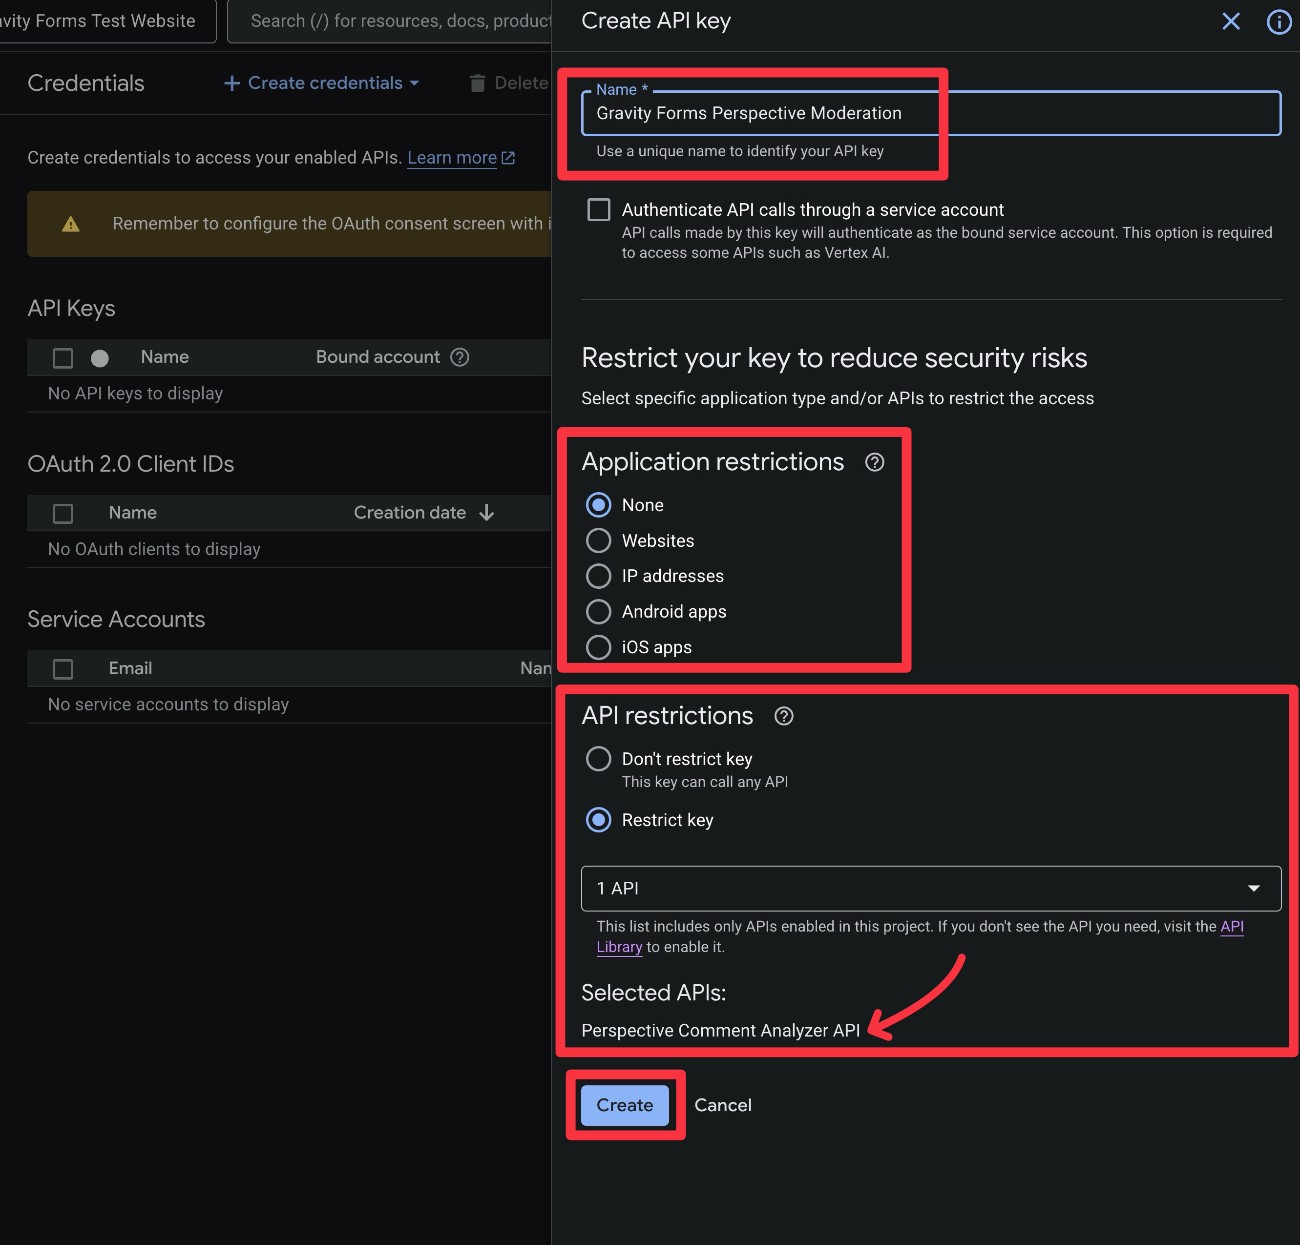
Give it a name to help you remember what it does.
Then, you can add some restrictions.
First, you have the option to choose Websites under Application restrictions, which lets you configure it so that only your WordPress site can use the API key. This is optional, but it prevents your API key from rare, but potential, unauthorized use.
Below that, you can use the API restrictions to restrict the API to only the Perspective Comment Analyzer API.
Click the Create button once you’ve made your choices.
Google will then display your API key. Copy the key to a safe place because you’ll need it in the next step.
If you accidentally misplace it, you can always come back to the Credentials area to find it.
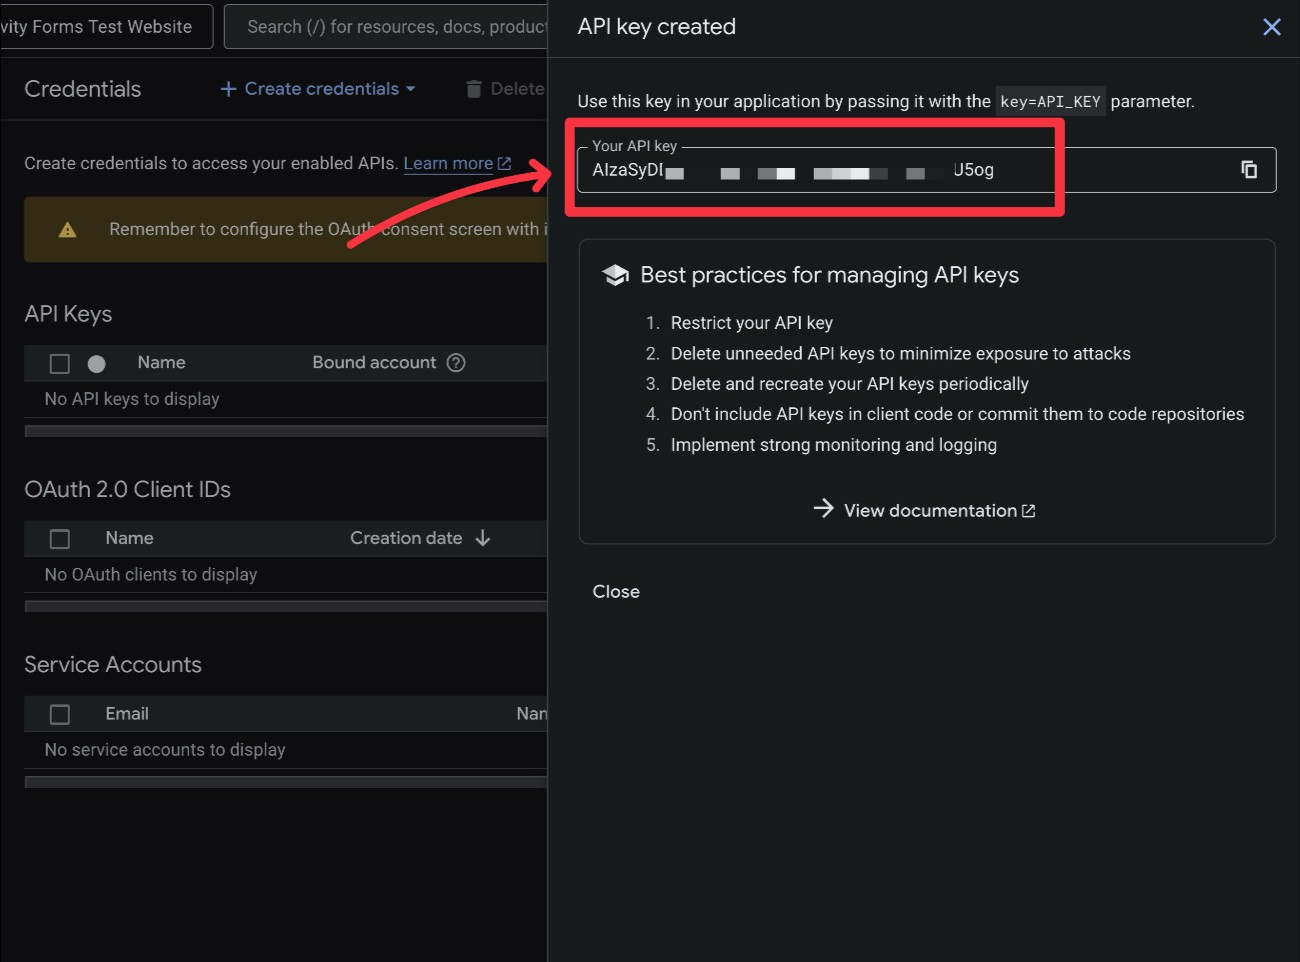
3. Connect Gravity Forms to Perspective API
Next, connect Gravity Forms to the Perspective API:
- Go to Forms → Settings in your WordPress dashboard.
- Select Moderation in the settings menu.
- Paste your API key into the Perspective API Key box. Don’t worry about the rest of the settings for now.
- Click Save Settings at the bottom.
If the connection is successful, you should see a green checkmark appear next to the API key after you click Save Settings.
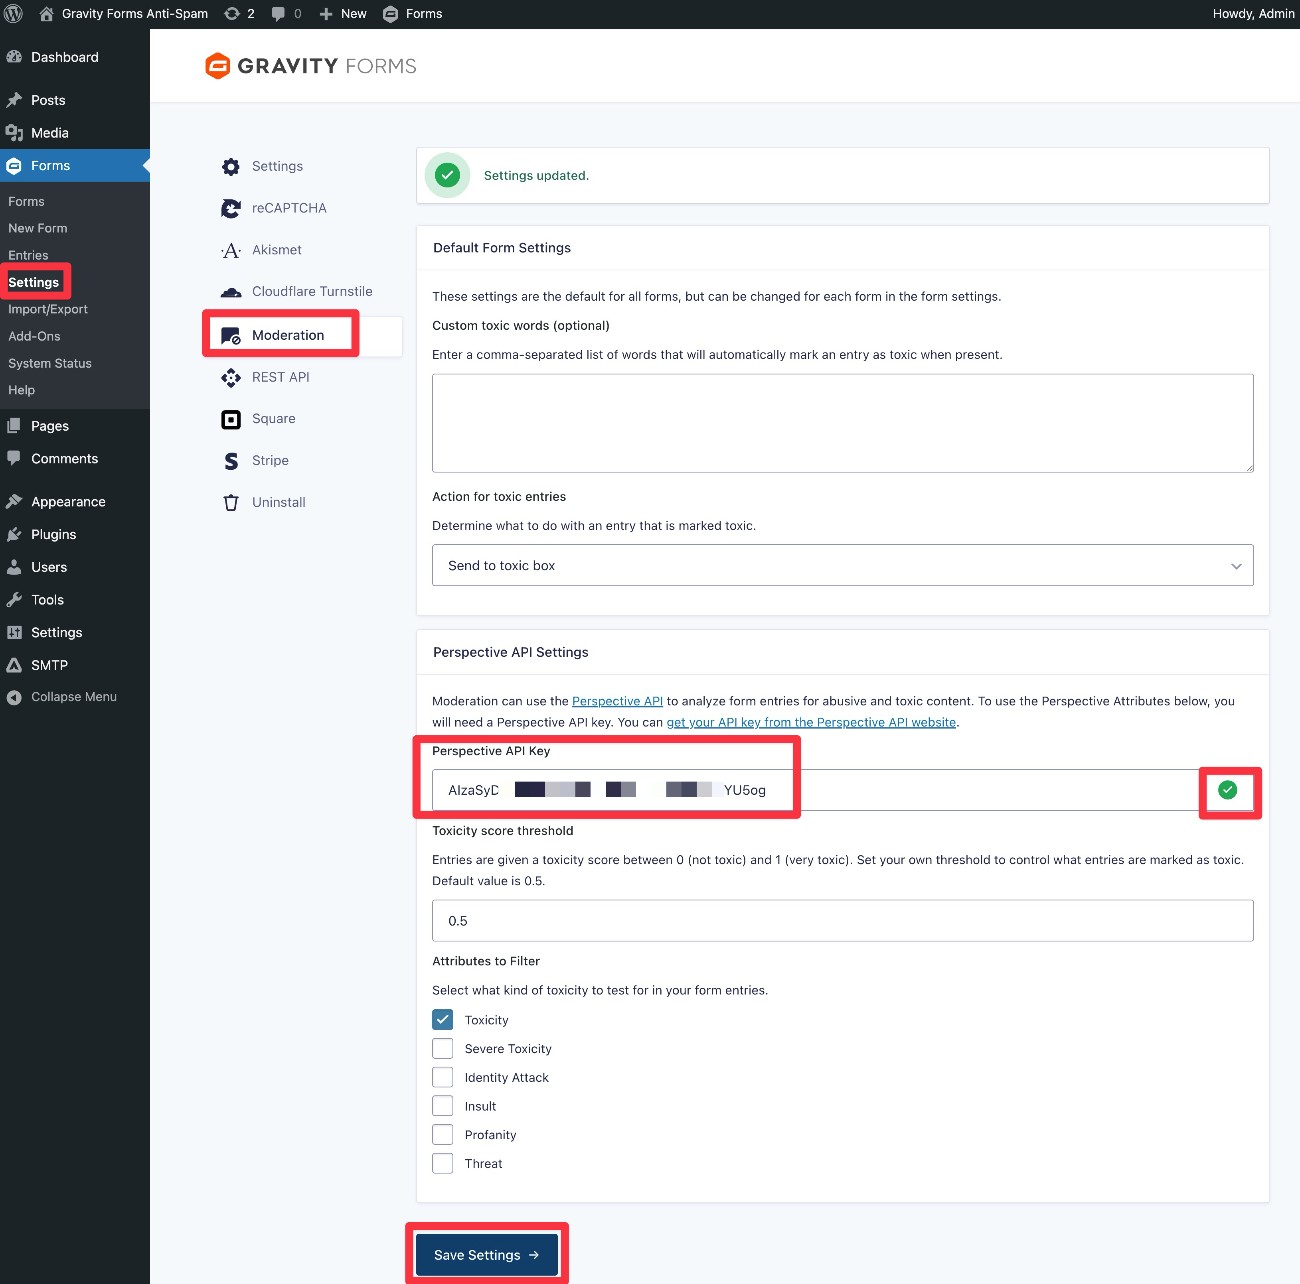
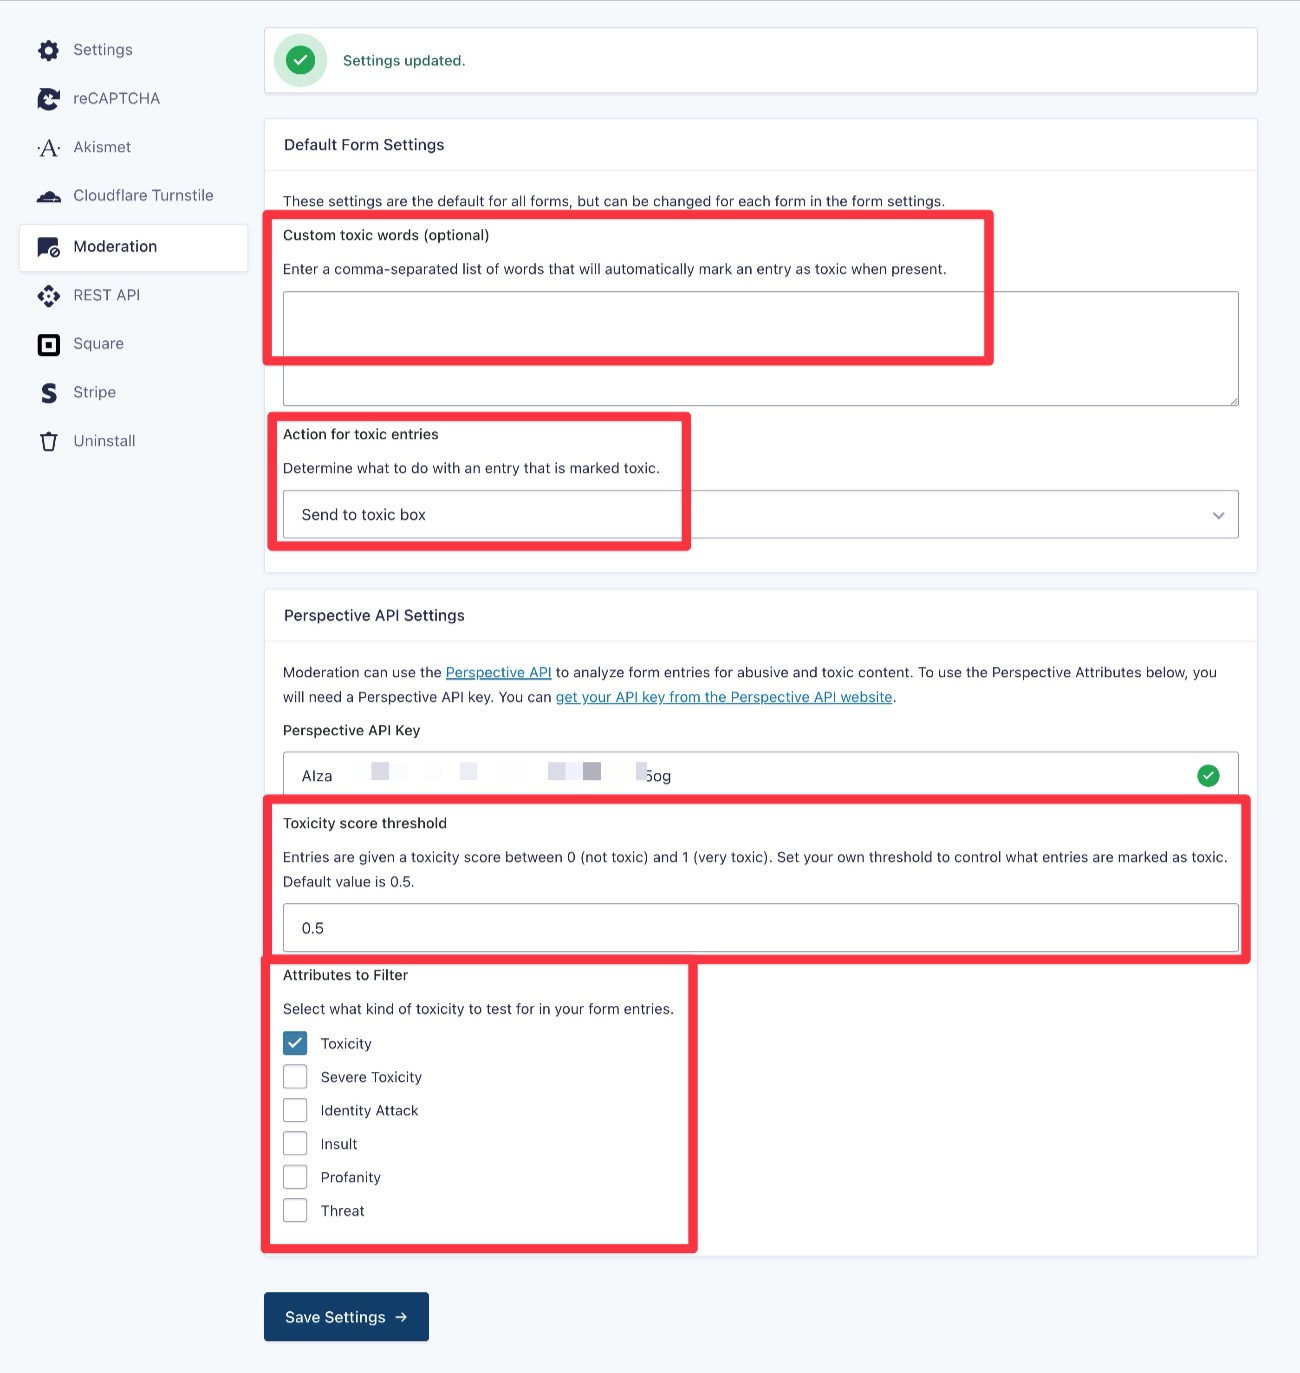
Once you’ve verified that your API key is working, you can make some additional choices about how to flag toxic comments:
- Custom toxic words (optional) – this gives you the option to add hard-coded words that will automatically flag a comment as toxic.
- Action for toxic entries – you can choose whether to save the entry but filter it to the “Toxic” tab in the entries dashboard or just delete toxic submissions automatically.
- Toxicity score threshold – you can make the filter more or less aggressive with flagging toxic entries.
- Attributes to filter – you can choose what “types” of toxicity to filter for.
Once you’ve made your choices, click Save Settings again.
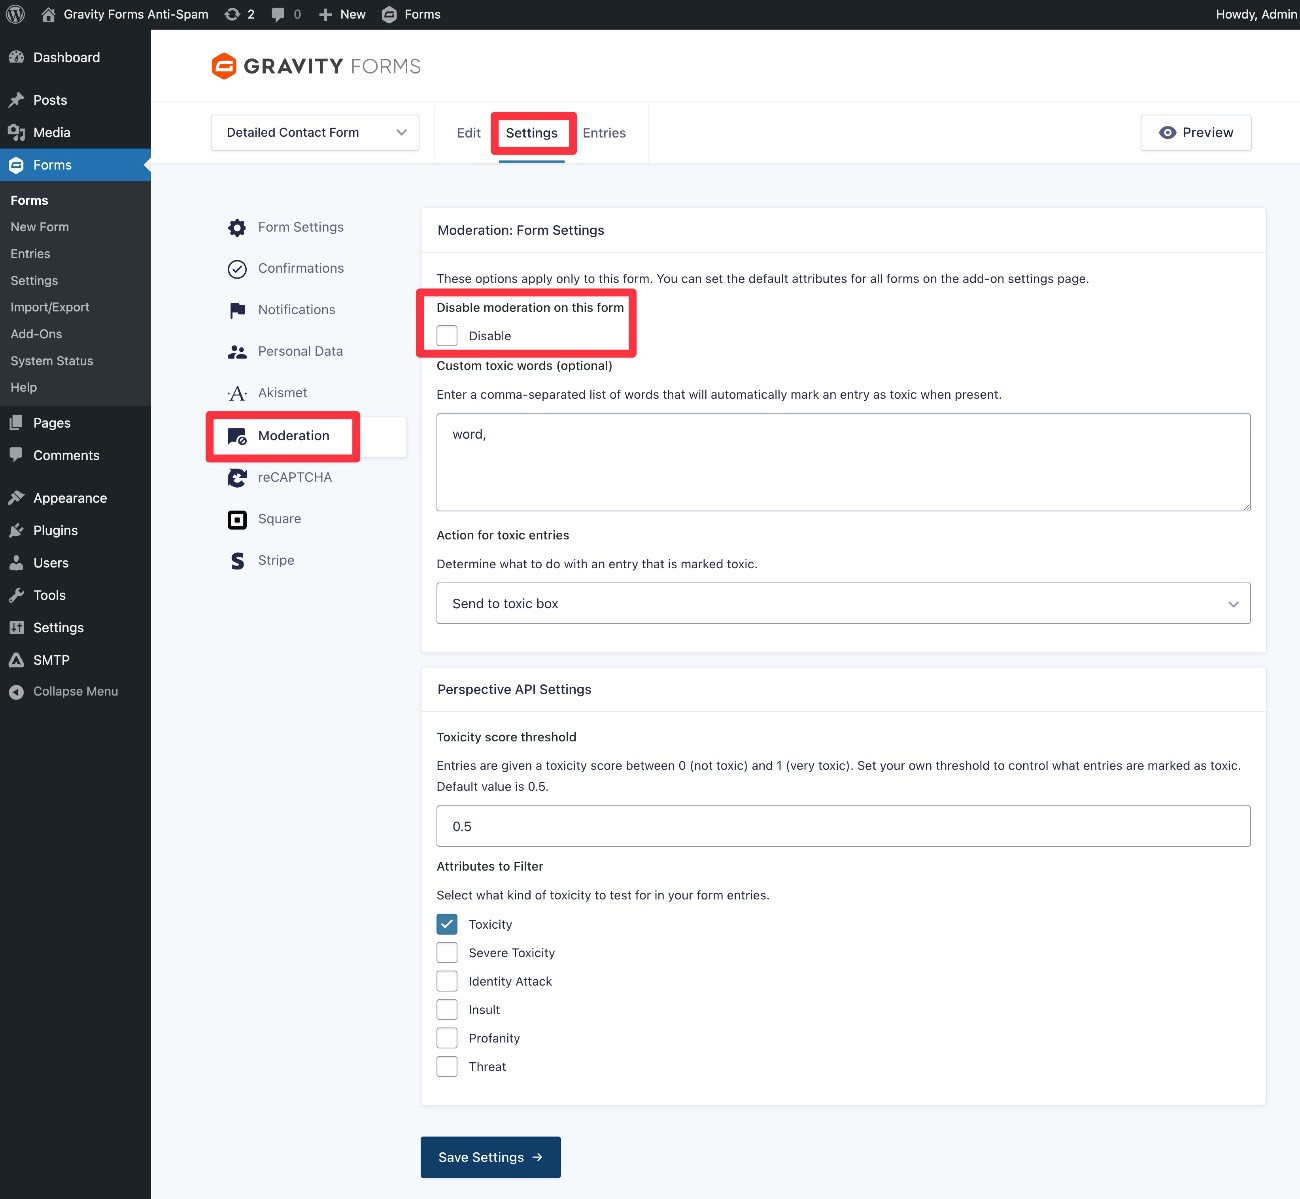
How to adjust moderation for individual forms
By default, the add-on will protect all of your forms from toxic entries.
However, you also get some form-level options to either:
- Disable the Moderation Add-On for just that form.
- Adjust the settings, such as changing the Toxicity score threshold for a specific form.
You can access these by going to Settings → Moderation in the form editor.
How to moderate toxic entries
If you choose the Delete toxic entry, the add-on will automatically delete entries that are flagged as toxic, which doesn’t require any additional moderation.
However, if you choose the Send to toxic box option, Gravity Forms will still save toxic entries. They will just be hidden in the Toxic tab of the entries dashboard, similar to spam entries with some other add-ons.
You’ll also see a new column that shows the Toxicity Score for each entry, which can help you adjust the threshold if needed.
Honeypot and Submission Speed Check
Honeypot and Submission Speed Check are both core anti-spam features in Gravity Forms that don’t rely on third-party services.
A “honeypot” is a field that you can add to your form to act as “bait” for spam submissions.
Your human visitors won’t see the honeypot field because it’s hidden using CSS or JavaScript. However, the automated tools that many spammers use will still see the field and fill it out.
Because a legitimate human visitor would never fill out the honeypot field, you can then flag any submissions that do fill out the honeypot field because such submissions are likely automated spam.
Gravity Forms 2.9.1 also added a new spam detection feature for submission speed. This lets you flag a submission as spam if the elapsed time between the page load and the form submission is under a certain amount of time.
Human visitors do not typically submit a lengthy form two seconds after loading the page, but this is something that spam bots do.
How to set up Honeypot and Submission Speed Check
Both of these methods are core anti-spam features, so you do not need to install any add-ons to use them.
To add them to a form, go to Settings → Form Settings inside the form editor.
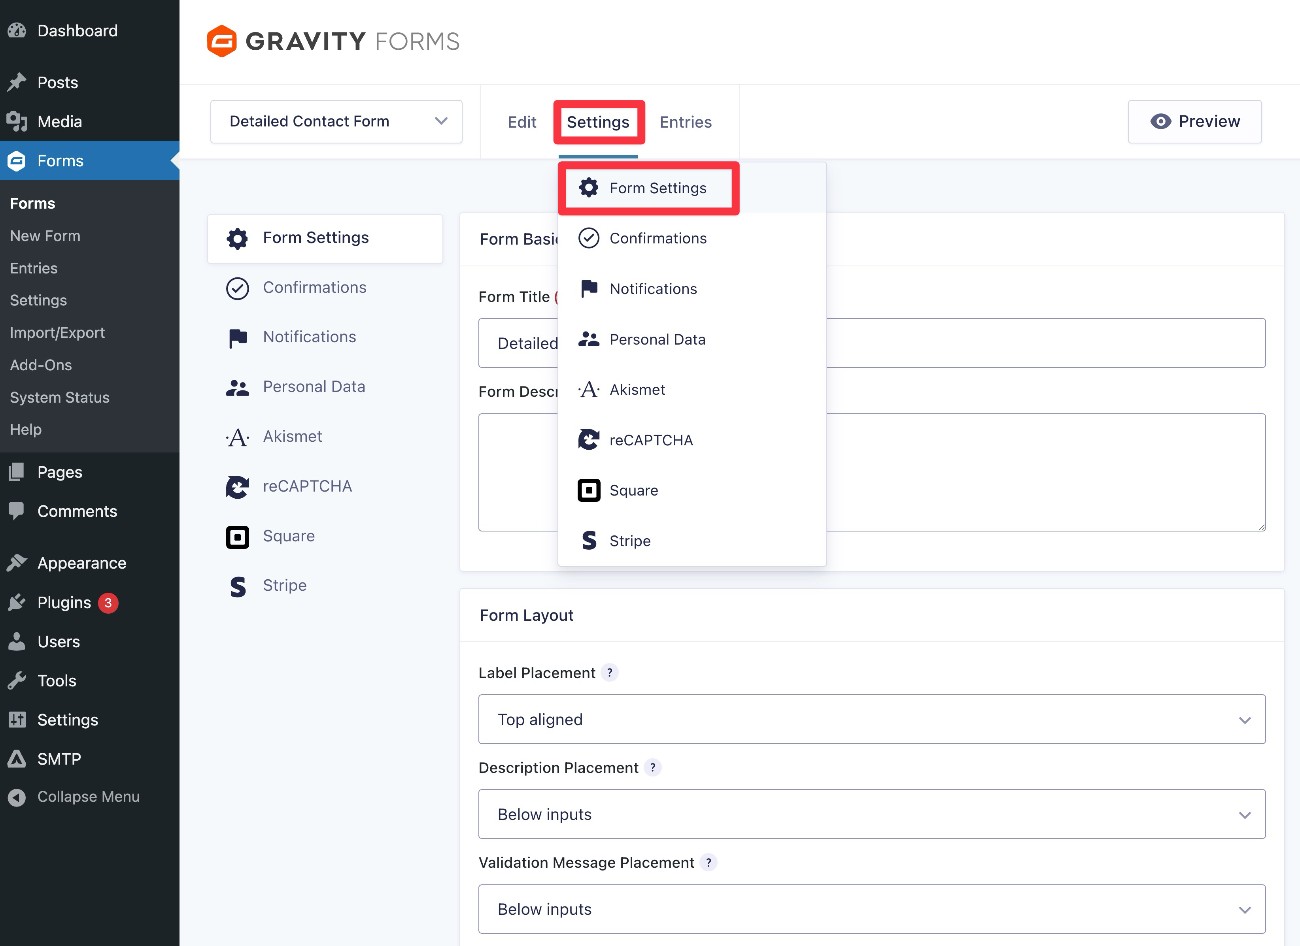
Then, scroll down to the Spam Detection settings box:
- Honeypot – To enable Honeypot, just turn on the Honeypot toggle.
- Choose what to do with submissions that are flagged as spam – You can choose not to create an entry, which will essentially block the spam submission. Or, you could still create an entry but flag it as spam so that it doesn’t appear with legitimate entries.
- Submission Speed Check – To enable this, turn on the Submission Speed Check toggle. You can then choose the speed threshold (in milliseconds) and choose how strict to be when it comes to multi-page forms and submission attempts after validation errors. We recommend starting with Normal mode and only switching to Strict if you’re still experiencing issues.

Make sure to click Save Settings when you’ve made your choices.
Other tools and tactics for Gravity Forms anti-spam
Beyond the methods above, there are also some other WordPress anti-spam tactics that can help with certain types of forms that you create with Gravity Forms.
Use conditional logic on the submit button
If you’re ok with requiring some manual effort from your users, you can use Gravity Forms’ built-in conditional logic functionality as a WordPress anti-spam tactic.
Here’s the basic idea:
- You add a “question” field to your form. For example, “A cow has how many legs? _____” or “4 + 7 = _____” or “A panda is black and _____”.
- You set up conditional logic routing based on the answer. If the answer is correct, you route the form like normal. If the answer is incorrect, you can skip sending a notification (or process the form in some other way).

While this strategy can be effective, one disadvantage is that it requires a little bit of extra effort from your readers.
Some legitimate human visitors might also accidentally answer the question wrong because they’re confused or make a typo, which can add some frustration. To avoid this, make sure that your question is clear and simple enough for any human visitor to answer.
Require double opt-in (for opt-in forms)
If you want to avoid spam submissions polluting your email lists on opt-in forms, you can require double opt-in before adding someone to your list.
This means that new subscribers will need to click a link in an email in addition to filling out your form. If a user doesn’t click this link, they won’t be added to the list.
While this does add some friction to the signup, it ensures that every subscriber on your list is a real person who is interested in receiving emails from you. This can cut your costs (because many email services charge based on how many contacts you have) and improve your email engagement metrics.
Many of the official email marketing add-ons that Gravity Forms offers include options to set up double opt-in from the feed settings.
For example, if you’re using the official Mailchimp Add-On to create Mailchimp opt-in forms, you can require double opt-in as part of the feed:

Use multi-page forms (especially for payment forms)
Another useful Gravity Forms anti-spam tactic is to utilize multi-page forms, which is a built-in feature in Gravity Forms. This can be especially helpful for payment forms, though it can also benefit other form types.
To use this approach, split your form into multiple pages and try to require certain fields on each page.
Then, if you’re processing payments with your form, make sure to include the payment field on the last page of the form.
In addition to just generally stopping spam, this approach can also cut down on fraudulent credit card activity, as some spammers use spam submissions to test stolen credit cards.
To break your forms into multiple pages, all you need to do is add the Page field where you want to create a page break.

Use a third-party Gravity Forms anti-spam add-on
If you want even more Gravity Forms anti-spam solutions, you can turn to some of our Certified Developer anti-spam add-ons.
While these add-ons do not come directly from the Gravity Forms team, we have certified them and they all have a long track record of quality.
Here are some great options to consider:
- Zero Spam (GravityKit) – Works automatically to protect against spam, with no user input or settings configuration required.
- Gravity Forms Blocklist (Gravity Wiz) – Validate form submissions against the WordPress disallowed comments keys.
- Gravity Forms Limit Submissions (Gravity Wiz) – limit the number of entries that can be submitted by a variety of conditions including IP address, user, email, and so on.
Set up custom form validation rules (requires code)
If you’re a developer, Gravity Forms lets you set up your own custom validation rules using the gform_field_validation and/or gform_validation filters.
Many spam submissions will fail your validation rules, which has the added bonus of protecting your form from spam submissions.
Stop WordPress form spam for good
While there’s an army of spammers who’d like to spam your WordPress forms, the Gravity Forms anti-spam features can help you stop that army in its tracks.
For most people, using tools like Google reCAPTCHA, Cloudflare Turnstile, and/or the built-in Gravity Forms honeypot and submission speed check features should be enough to stop form spam without inconveniencing your legitimate human visitors.
If you want to go further or try a different approach, you also have lots of other strategies that you can implement.
If you’re already using Gravity Forms, you can set up these spam protection strategies today. All of the main strategies that we discussed are available on all Gravity Forms licenses.
If you’re not already using Gravity Forms and you want to create spam-proof WordPress forms, purchase a license today.

If you want to keep up-to-date with what’s happening on the blog sign up for the Gravity Forms newsletter!
"*" indicates required fields