Venmo for Nonprofits: Accepting Donations on WordPress
If you want to make it easier for people to donate to your nonprofit organization, Venmo (owned by PayPal) is a great payment option to support.
If your nonprofit website uses WordPress, it’s also fairly simple to set up Venmo for nonprofits, as long as you have the right tools for the job.
With the Gravity Forms plugin and its PayPal Checkout Add-On, you can easily start accepting donations via Venmo.
At the same time, you can also still offer other options like the regular PayPal Checkout flow and credit cards, which gives donors the option to choose the best payment gateway for them.
In this post, you’re going to learn everything that you need to know about using Venmo for nonprofits, including the following:
- How Venmo works for nonprofits, including its special Charity Profiles feature
- Venmo’s fees for processing nonprofit payments (they’re lower than regular payments)
- The benefits of using Venmo and Gravity Forms for your organization
- How to create a Venmo donation form on WordPress
How Does Venmo Work for Nonprofits?
Before we get any further, let’s talk about the basics of using Venmo as a nonprofit organization.
While you could sign up directly to Venmo and just start accepting payments, Venmo actually has a dedicated feature for nonprofits called Venmo Charity Profiles.
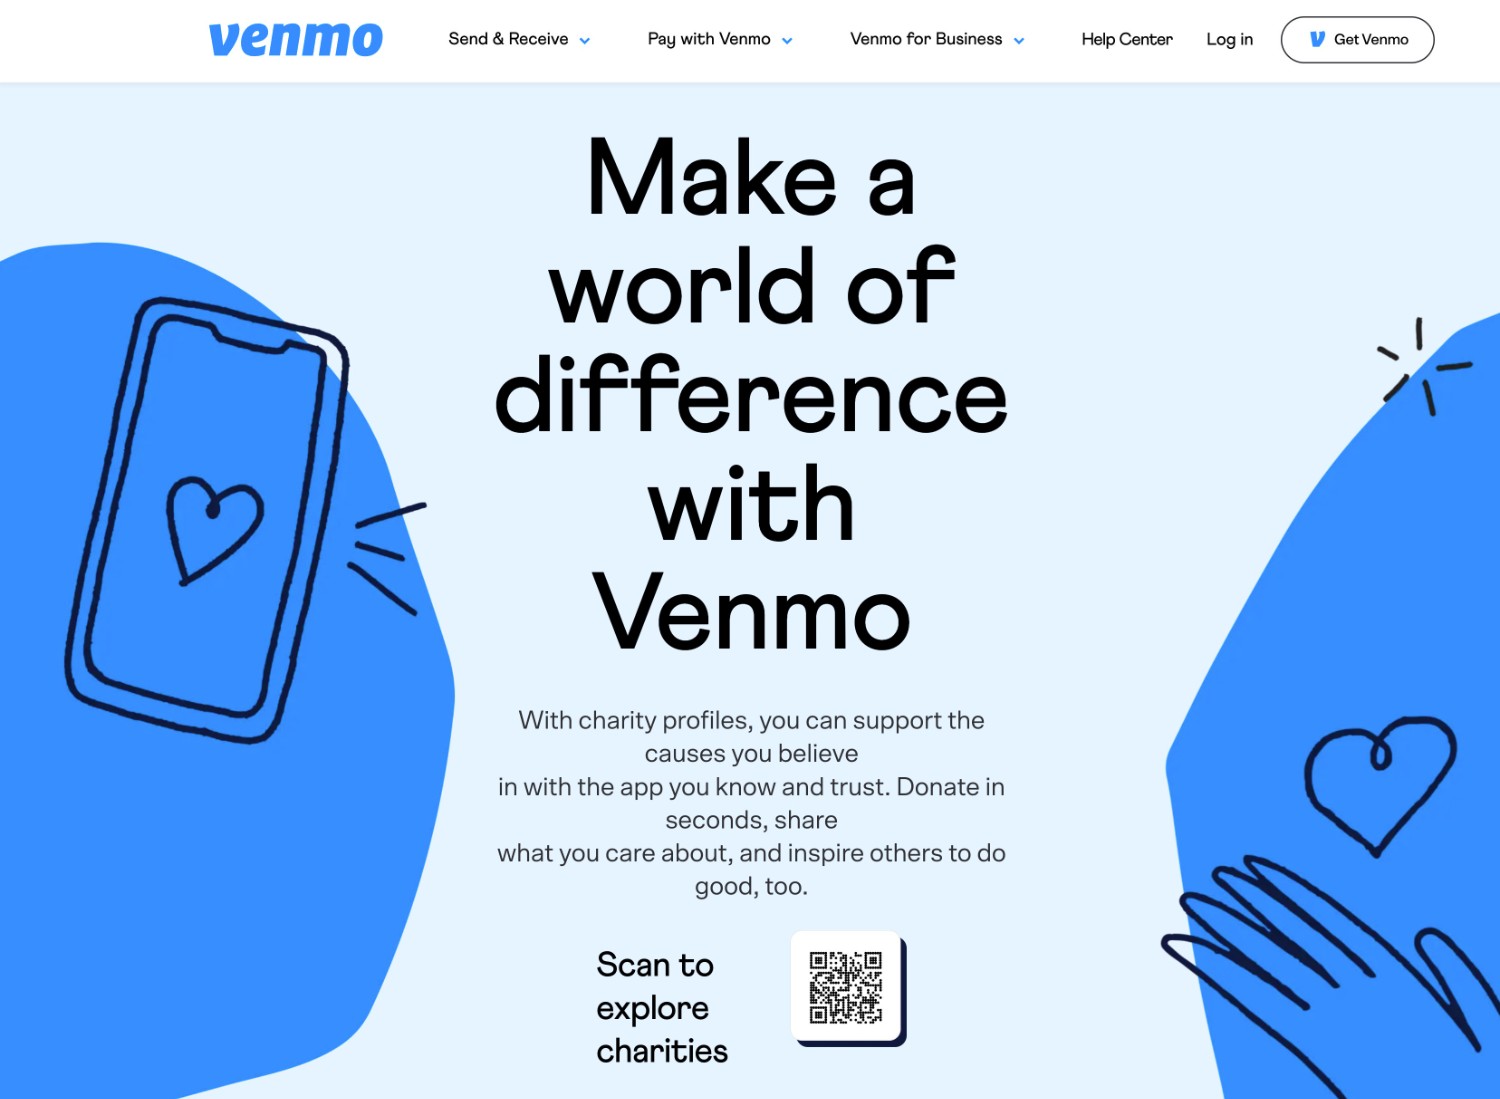
If you already have a verified PayPal charity account, you can set up your own verified charity profile page on Venmo, which lets you stand out from for-profit organizations and build more trust with your donors.
Here are some of the key details on how the Venmo Charity Profiles feature works for nonprofits:
- Lower transaction fees – just $0.10 + 1.9% for each donation
- Easy account setup based on your linked PayPal charity account
- Special verification badge that lets donors know you’ve been verified as a nonprofit by Venmo/PayPal
- Donation history and account statements, including donor contact information
- A special photo gallery feature to help you tell your organization’s story
- Same-day access to donation funds (for an extra fee)
Why Should Nonprofits Accept Venmo Payments?
At a high level, the main reason to consider accepting Venmo donations is because it makes it easier for people to donate and lets you “meet your donors where they are”.
Venmo has over 78 million users, and it’s especially popular with younger people – 50% of Venmo’s users are between ages 25-34 and 33% are between ages 18-24 (at time of writing).
It’s even become its own verb – people say “I’ll Venmo you the money” instead of “I’ll transfer you the money”.
Beyond that, Venmo also offers a more frictionless way for people to donate money to your nonprofit, right from their mobile devices.
By making it easier for people to donate, you create a better experience for your donors and you can also increase the likelihood that people give you money.
This is especially true if your nonprofit attracts younger donors, as there’s a sizable contingent of young people who might be willing to donate with Venmo, but not with a credit card (which they may or may not even have).
With its lower nonprofit transaction fees, the Venmo Charity Profiles feature also lets you keep more of the money that people donate to you, which means you can spend more money on your charitable goals and less on payment processing.
Are There Any Downsides to Using Venmo for Nonprofits?
The main downside of using Venmo for donations is that there’s not currently an option to set up automatic recurring donations – you can only use it for one-time donations.
However, when you use Gravity Forms to create your Venmo donation form, you can set up your form so that you don’t miss out on the ability to collect recurring donations via other payment processors. You can do this using the conditional logic functionality in Gravity Forms.
Why Use Gravity Forms for Nonprofit Venmo Payments
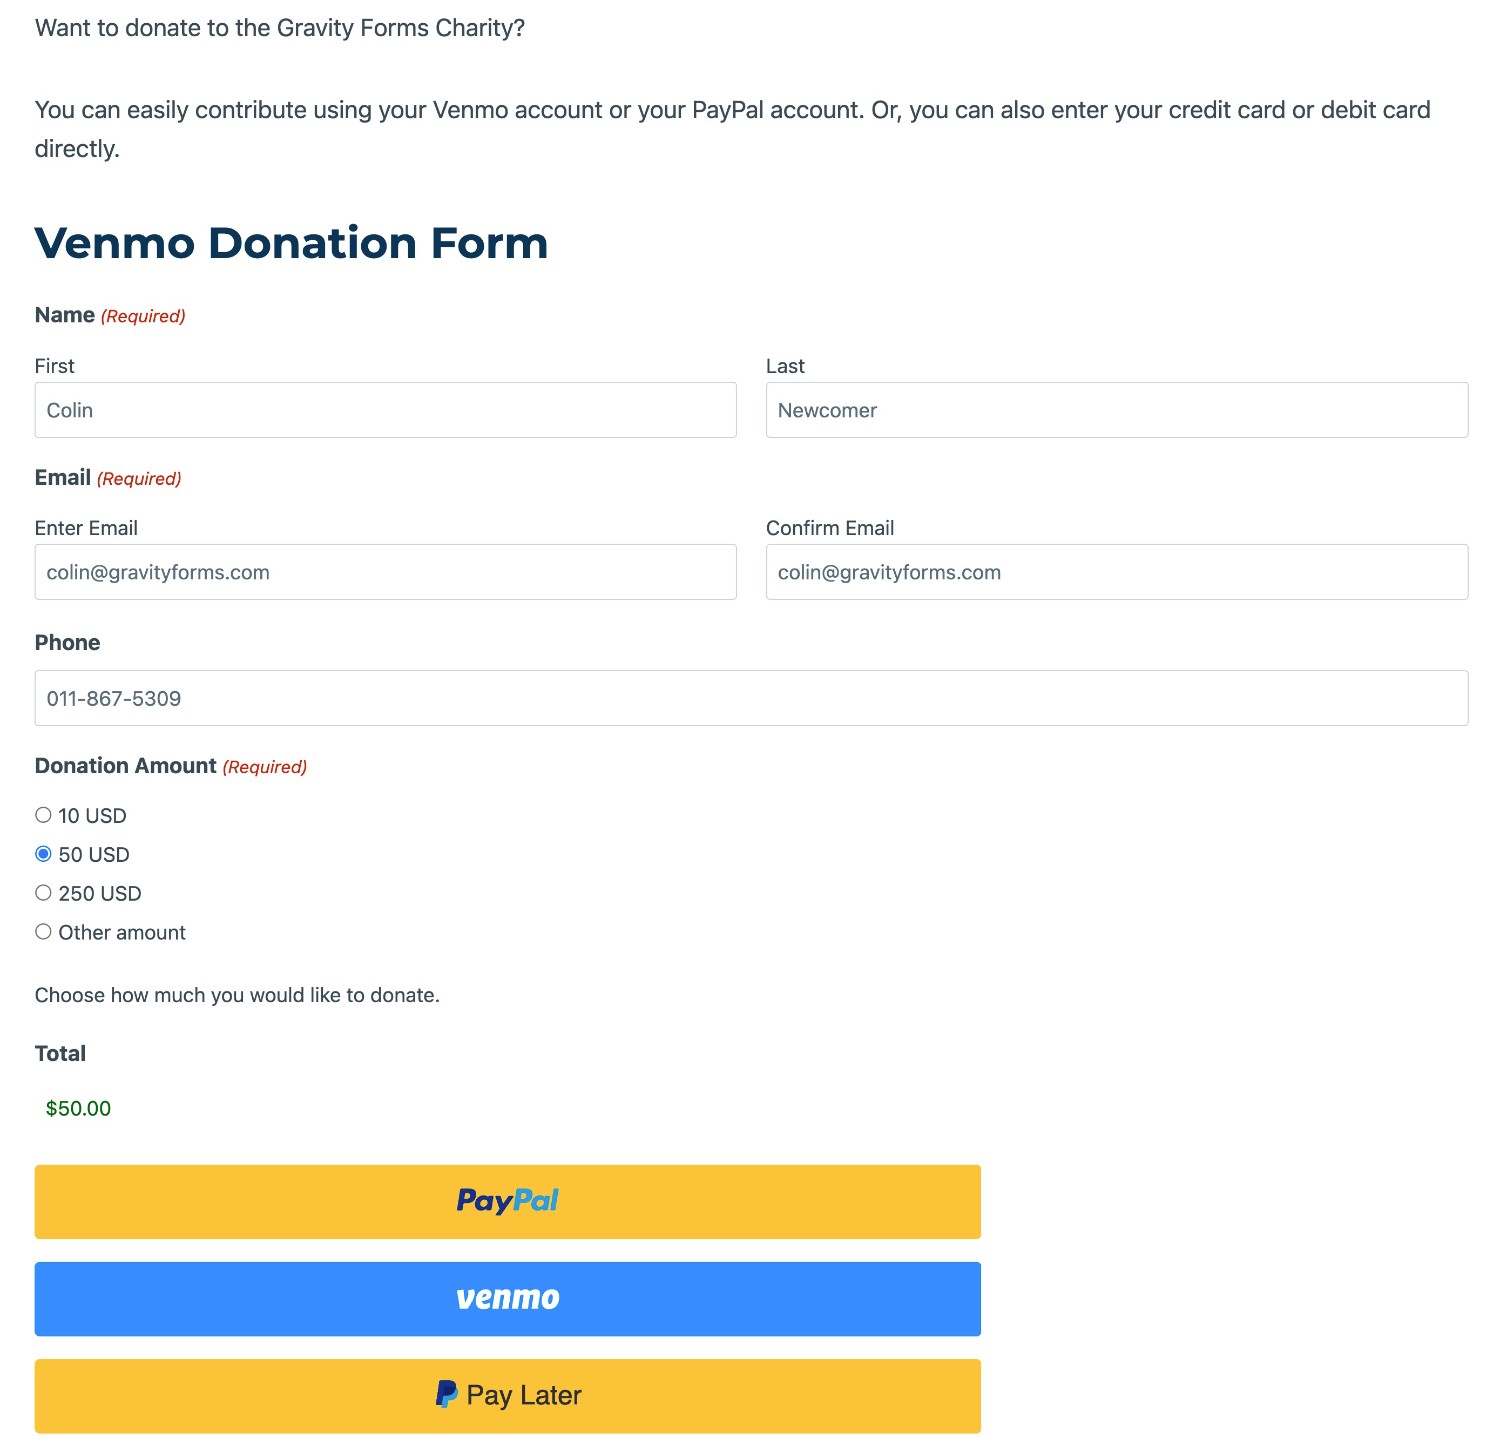
If you want to accept Venmo donations at your nonprofit, Gravity Forms makes a great option for PayPal and Venmo giving.
Here are some of the biggest reasons to consider Gravity Forms:
- Easy Venmo integration – all you need to do is tick a box to add Venmo payments to your form.
- Flexible donation amounts – you can offer preset donation amounts, as well as a custom amount (or both at the same time).
- Fully customizable – you can collect as much information about donors as you want.
- Drag-and-drop builder – you can easily set up your donation forms without needing a Computer Science degree.
- Support for automatic recurring donations via other payment options – Venmo doesn’t support recurring subscription donations, but Gravity Forms lets you easily add this option to the same form via other payment processors using conditional logic.
- More than just donation forms – you can use Gravity Forms for all of the forms that your nonprofit needs, including volunteer application forms, surveys, contact forms, and more.
Gravity Forms also has a special Nonprofit license that lets you access all of these features for a much lower price than commercial businesses.
How to Accept Venmo Donations Using WordPress and Gravity Forms
Now that you know more about using Venmo for nonprofits, let’s get into the actual step-by-step guide on how you can create your first Venmo donation form using WordPress and Gravity Forms.
The only thing that we’ll assume is that your nonprofit already has a WordPress website – we’ll cover everything else in the guide below.
1. Set Up Your PayPal and Venmo Accounts
We won’t spend too much time on this first step because we’re more focused on the technical details of actually building your Venmo donation form.
However, before you go any further, you’ll want to make sure that you’ve set up your PayPal and Venmo accounts, as you’ll obviously need them when setting up your donation form.
If you’re a registered nonprofit, you’ll first want to create a PayPal Business account for your charity and verify your charity’s credentials with PayPal (e.g. providing proof of your 501(c)(3) status) – instructions here. You must create your PayPal account before you can create your Venmo Charity Profile.
You can go here to create your PayPal charity account.
Once you have your PayPal charity account, you can go to the Business Tools page in PayPal. Find the option for Venmo and click Get Started.
This will take you to Venmo, where you can either:
- Create a new Venmo account.
- Sign in to an existing Venmo account.
Note – the legal first and last name of your Venmo account must match the name of your charity’s PayPal Business account.
Once you do that, you’ll be able to provide Venmo with information to populate your Venmo Charity Profile page.
This help doc from Venmo covers everything in more detail.
If you don’t need access to the special Venmo Charity Profile features, you can also follow our guide using a regular PayPal/Venmo account. However, you won’t be able to access the lower fees (1.9% + $0.10) unless you verify your charity.
2. Install Gravity Forms and the PayPal Checkout Add-On
Next, you’ll want to go to your WordPress dashboard and install the core Gravity Forms plugin, along with the PayPal Checkout Add-On (which is what you’ll use to offer Venmo as a donation option).
If you don’t have your Gravity Forms license yet, you can apply for the Gravity Forms Nonprofit license here (or view commercial licenses here).
3. Connect Gravity Forms to PayPal (and Venmo)
Next, you’ll need to connect Gravity Forms to PayPal. Because your Venmo account is already connected to your PayPal account, there’s no need to set up a separate connection between Gravity Forms and Venmo.
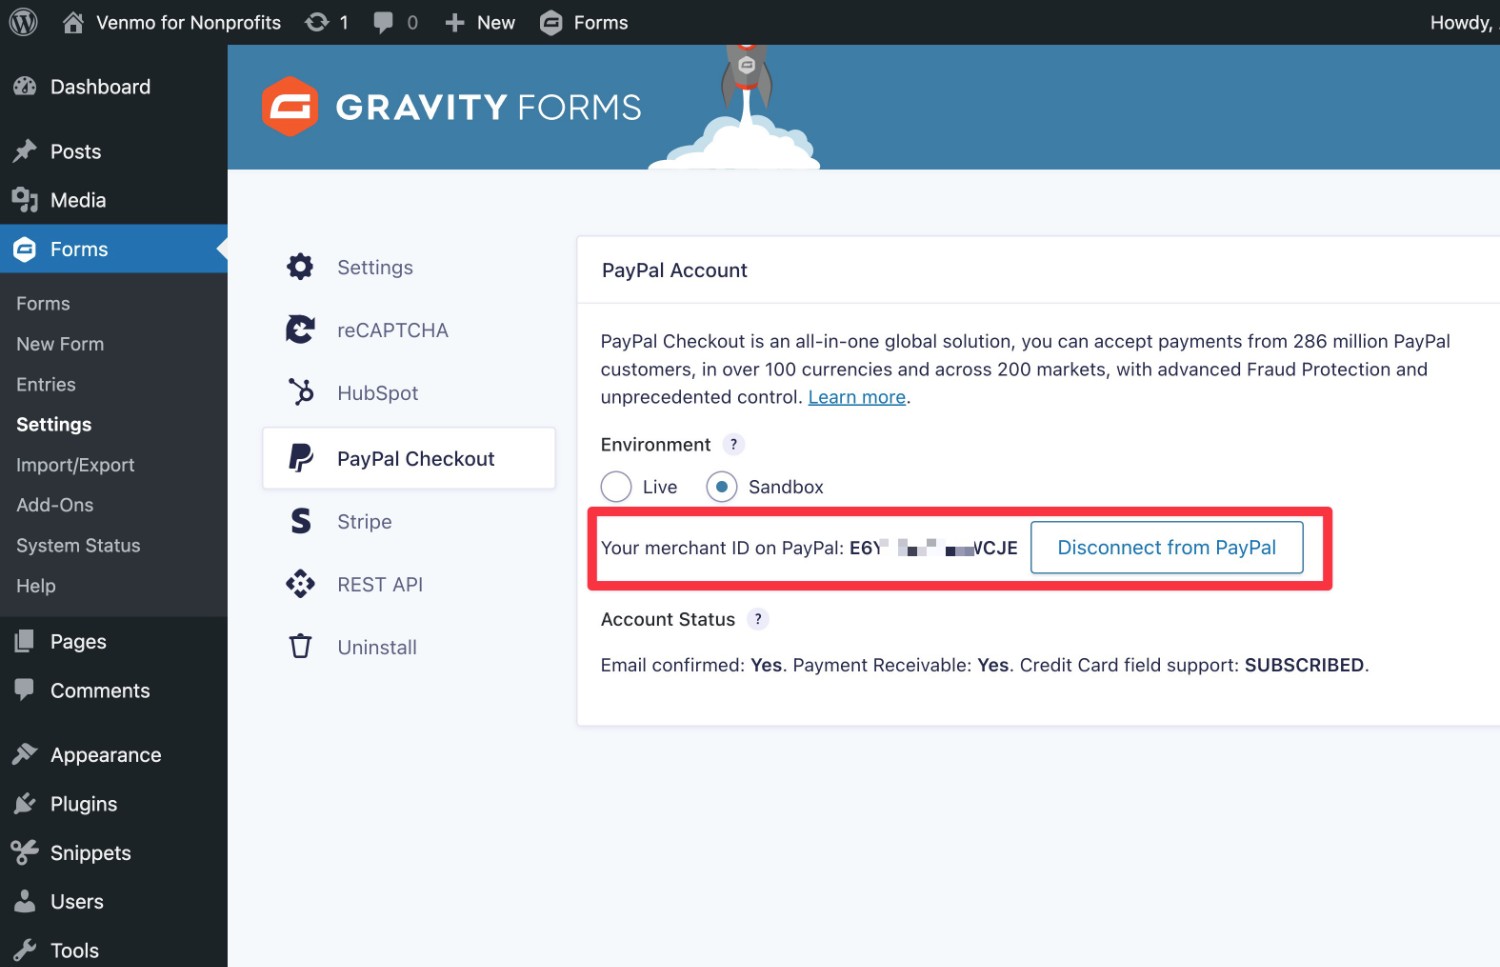
To connect everything, go to Forms → Settings → PayPal Checkout.
First, you’ll choose your payment mode:
- Live – your site will start processing real donations as soon as you make your form public.
- Sandbox – you can test your form in a safe sandbox before you start processing real donations. However, you’ll need to create a separate PayPal Developer account to use Sandbox mode (instructions here).
We recommend using Sandbox mode if you want to thoroughly test your donation form, though you can go straight to processing live donations if you want the simplest setup process.
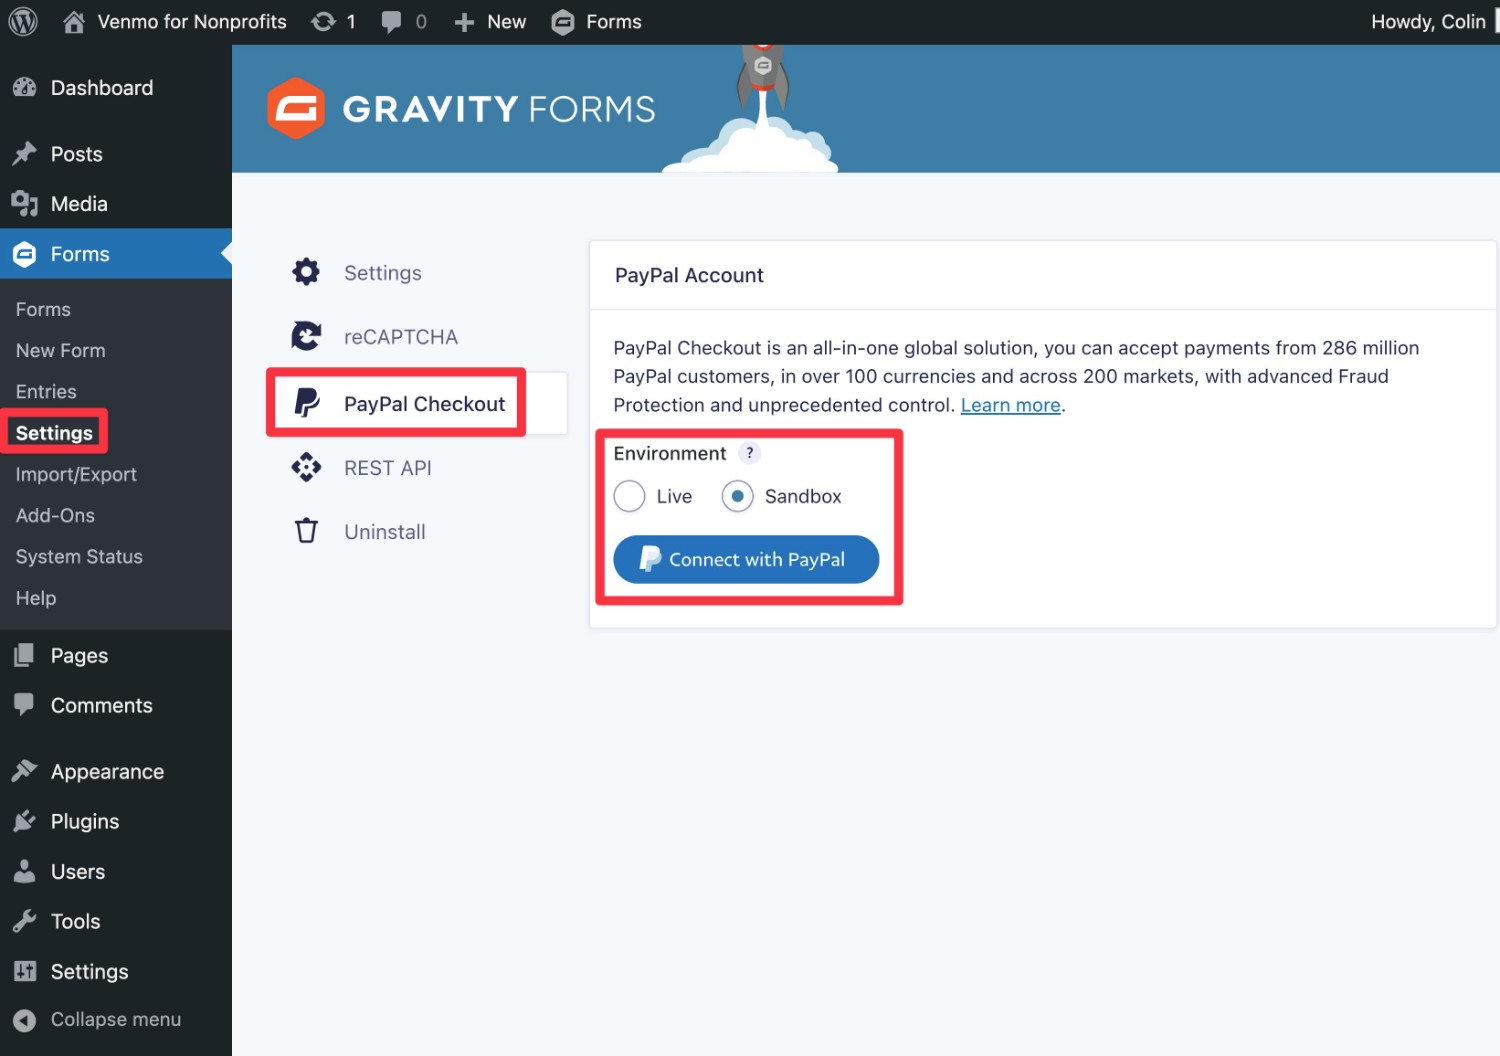
After choosing your option, you’ll need to log into your PayPal account (or PayPal Developer account) and complete a short authorization flow.
Then, you should see information showing that your site is connected to your PayPal account.
4. Create Your Venmo Donation Form
Once you’ve connected Gravity Forms to PayPal, you’re ready to create your actual Venmo donation form.
Go to Forms → New Form to get started.
You can either build your form from a blank slate or choose the premade Donation Form template.
For this guide, we’ll use the Donation Form template, which you’ll still be able to fully customize to make it your own.
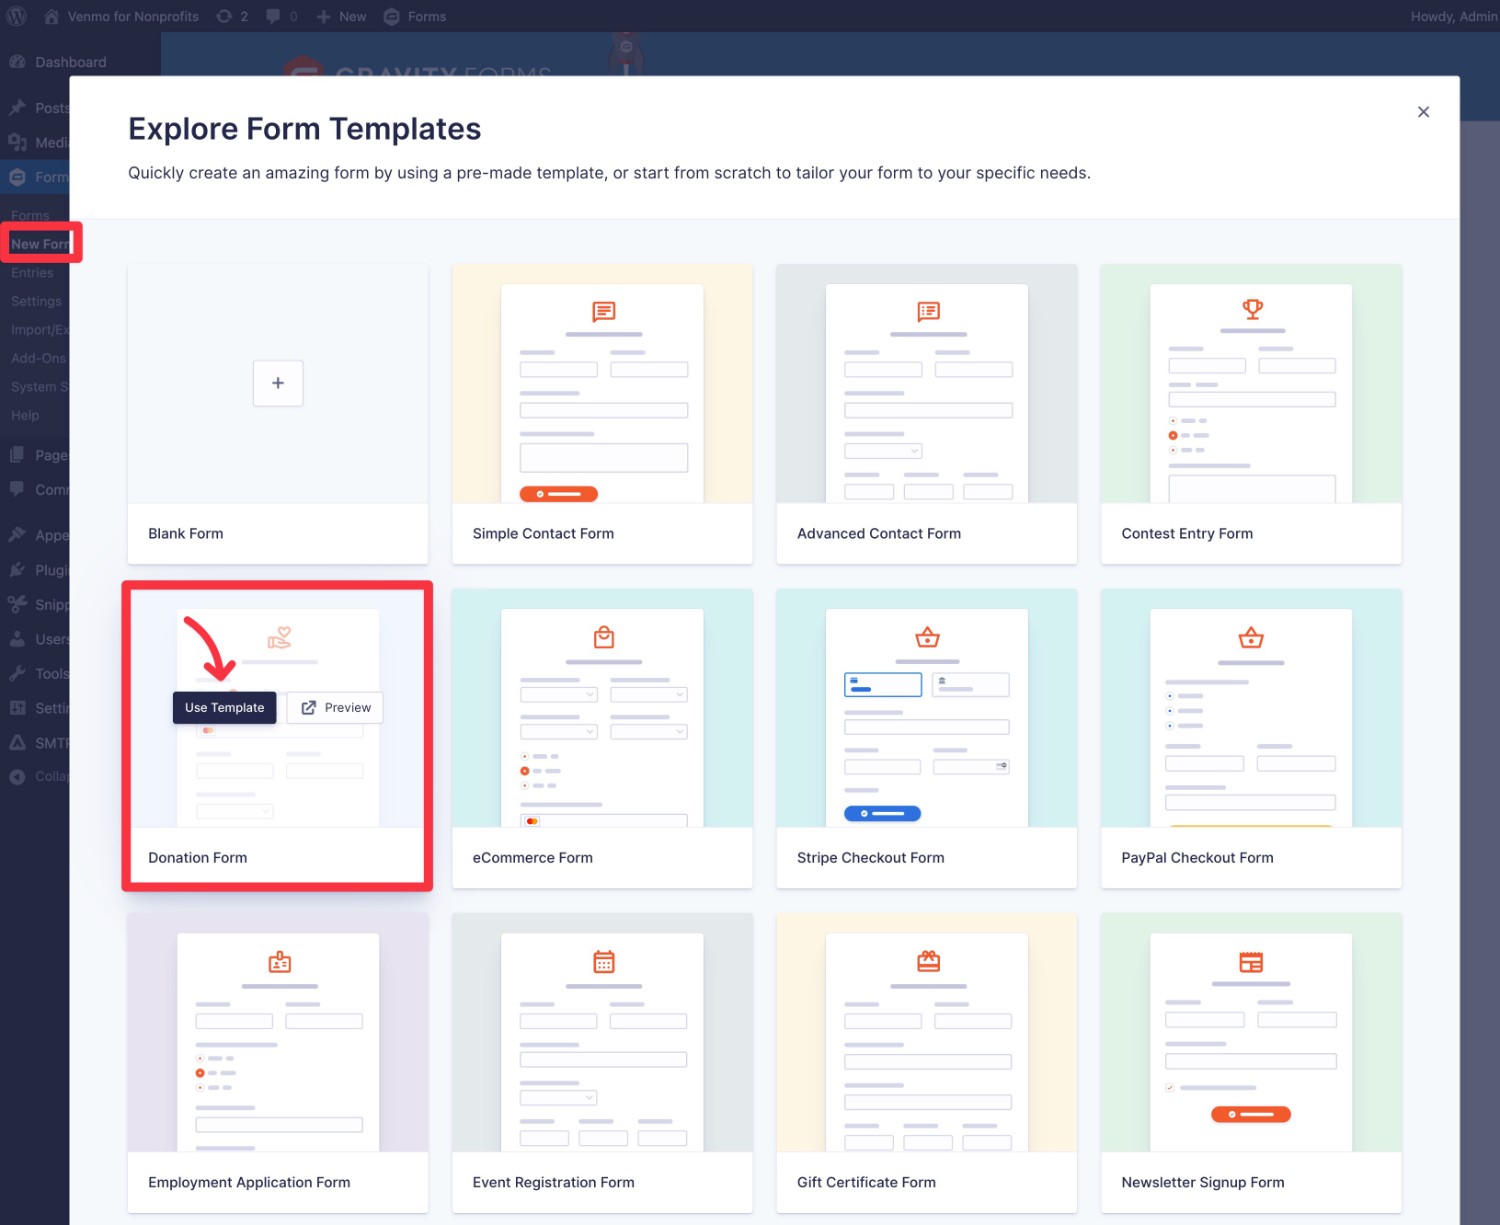
On the next screen, give your form a name and then click Use Template to advance.
Set Up Your Form Fields
Whether you used the Donation Form template or chose a blank slate, you should be in the drag-and-drop form editor.
Now, you’ll want to add, edit, and/or delete form fields to make the form your own.
To start, you might want to add fields to collect information about your donors. However, we don’t recommend asking for too much information, as making your form longer than needed could decrease your donations.
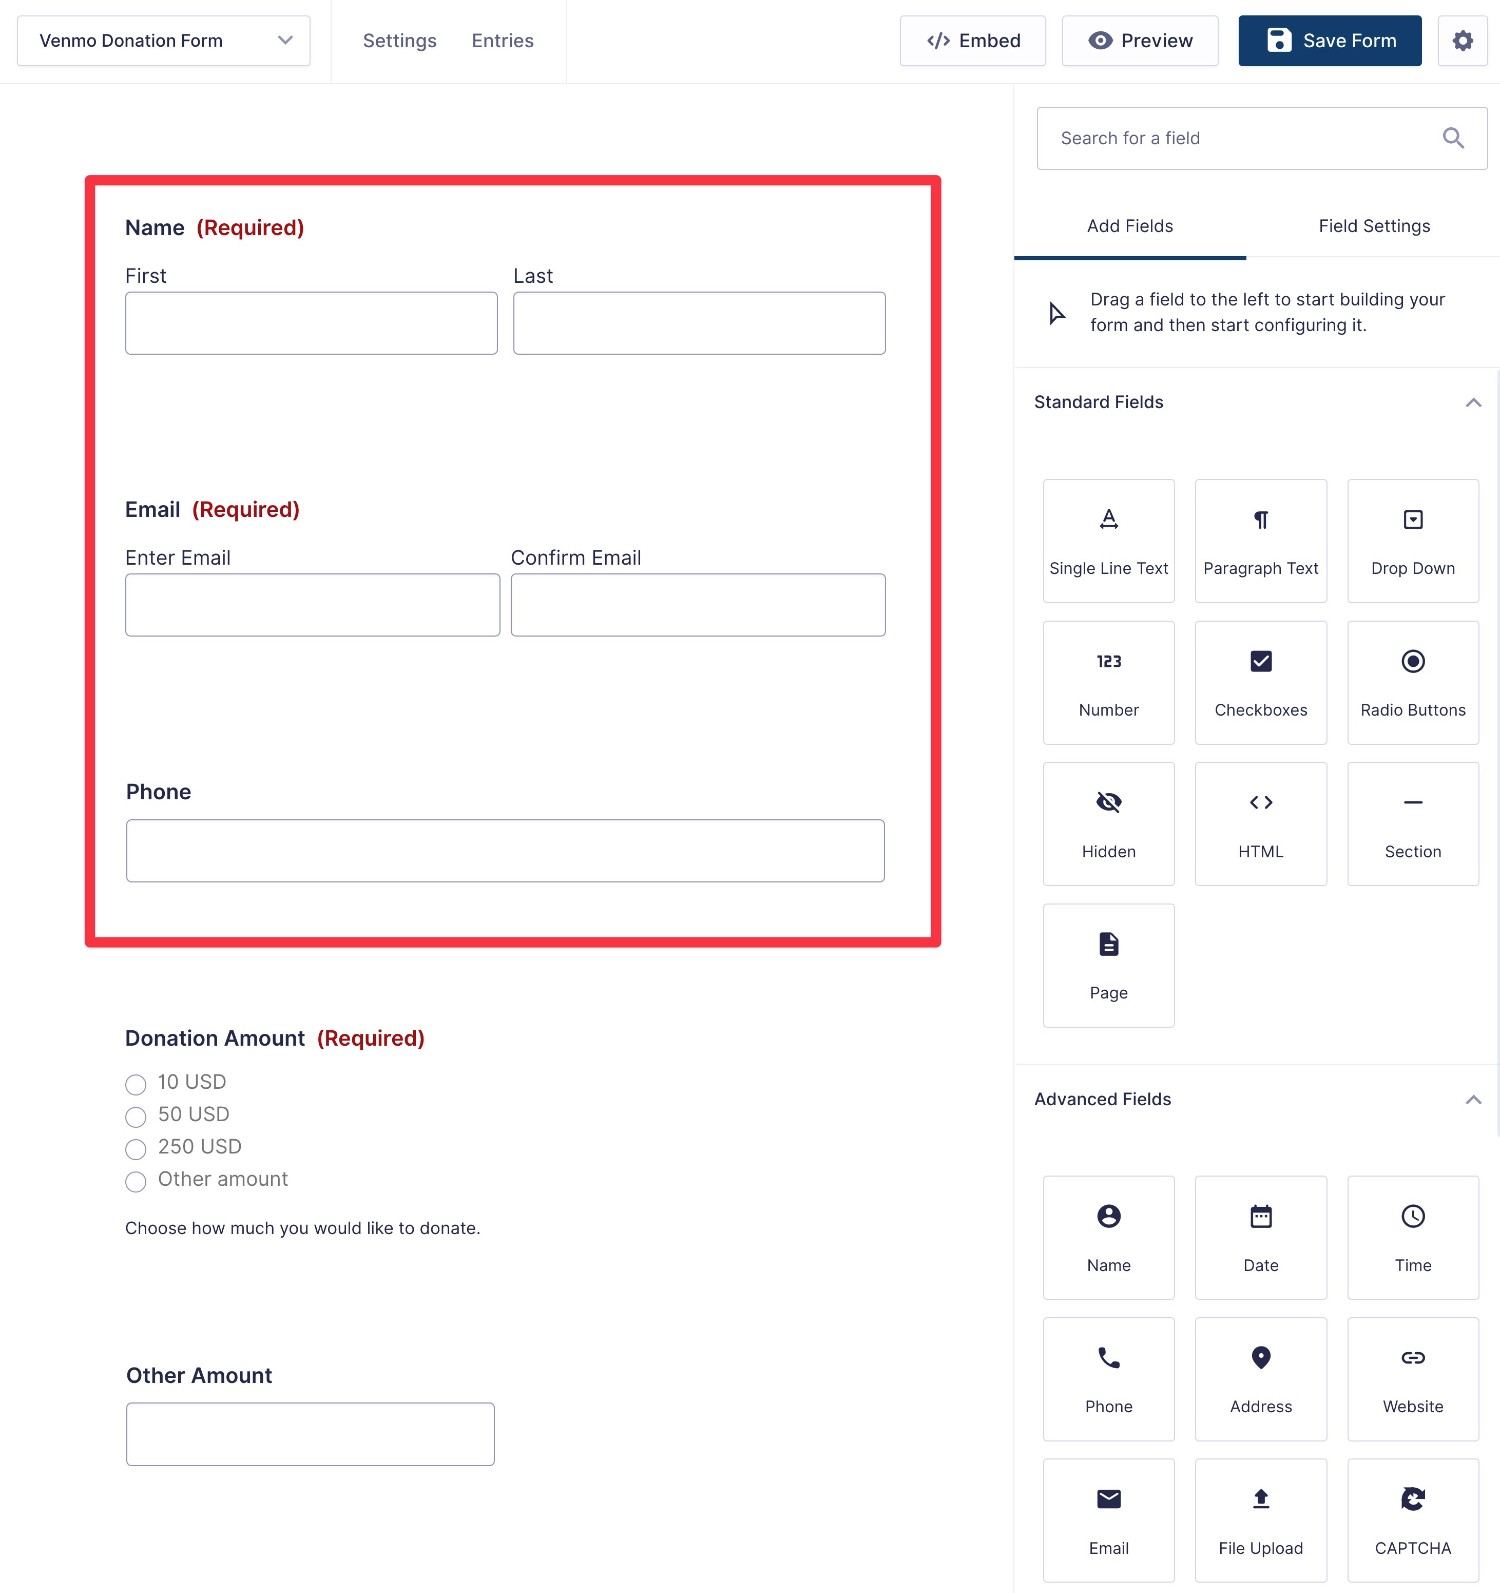
In addition to basic information fields, you’ll also want to add product fields to control the donation amounts.
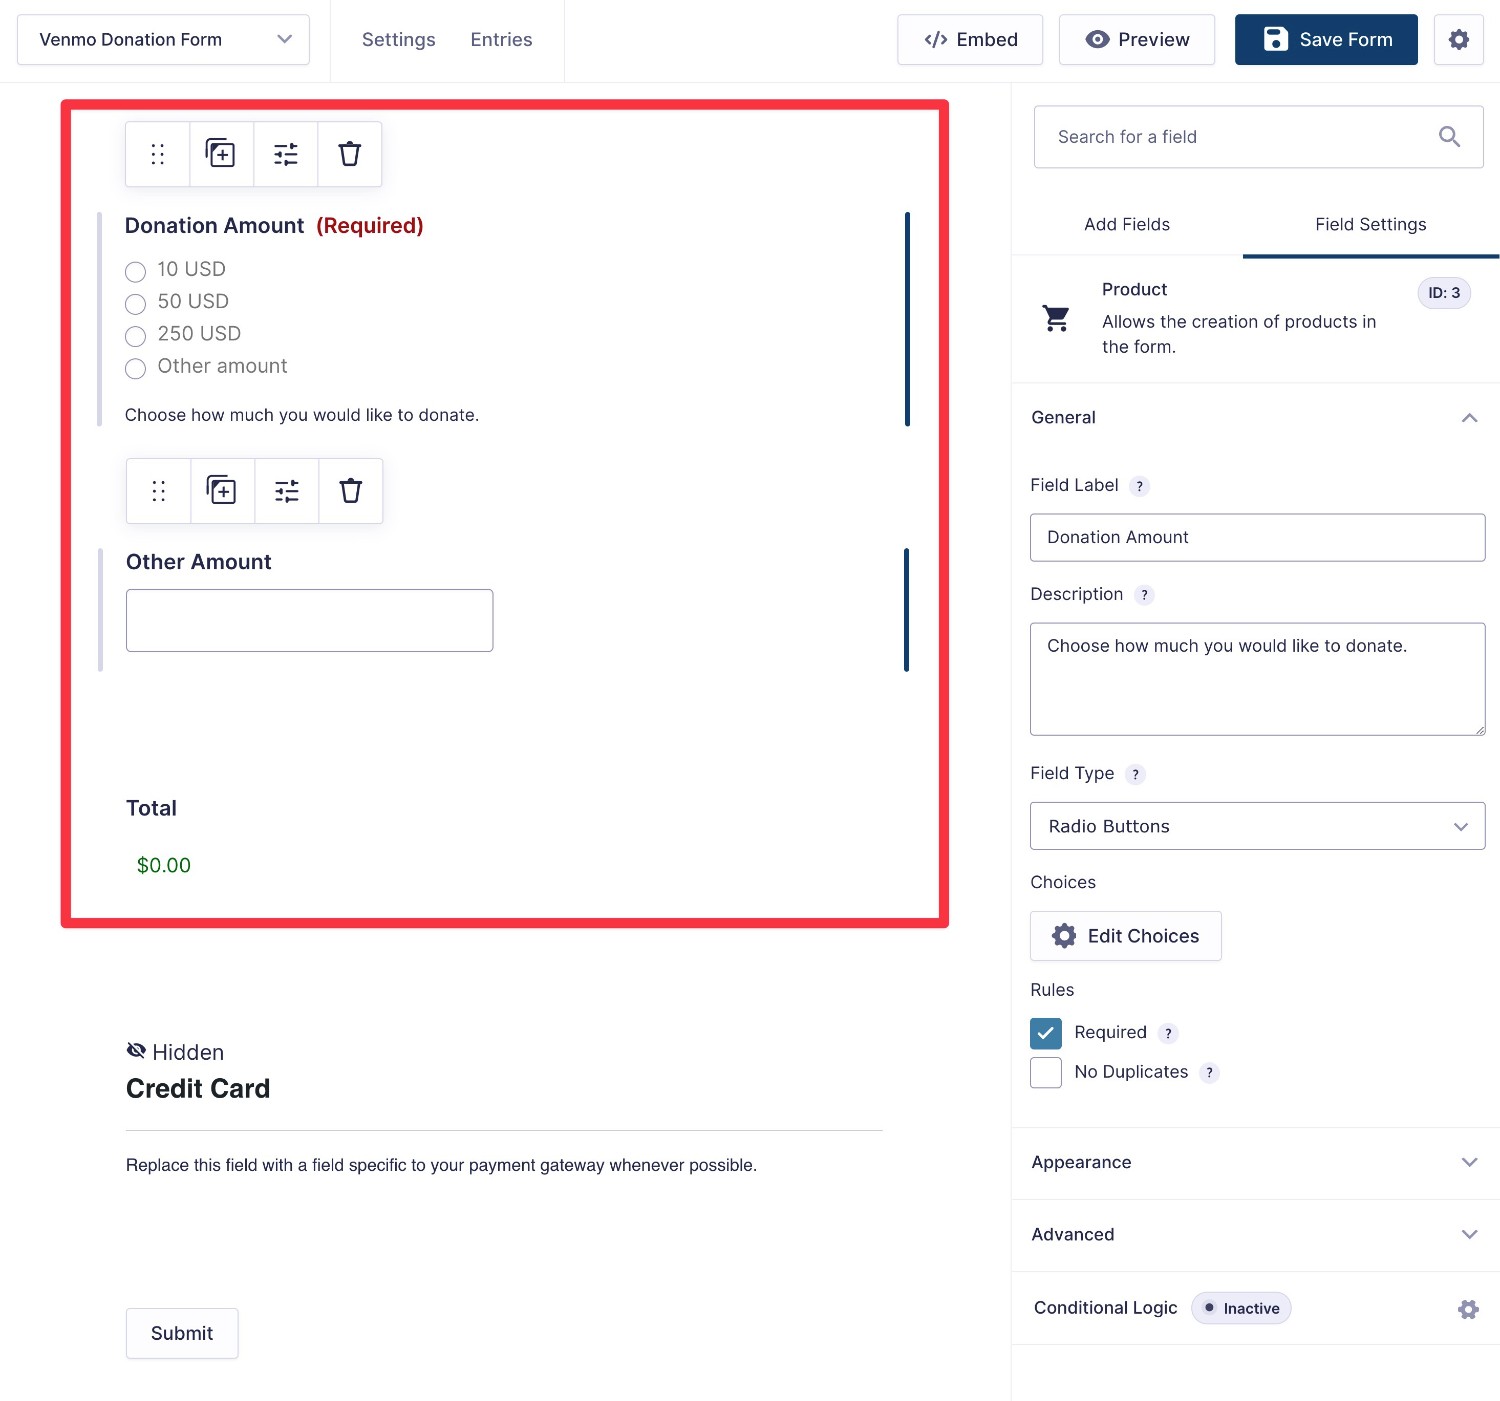
You can use one or more Product fields to collect the donation amount and then a Total field to show the total amount that the person will be charged (documentation here).
If you use the Donation Form template, it will already include three preset donation amounts, along with a custom amount option.
Add a PayPal Field
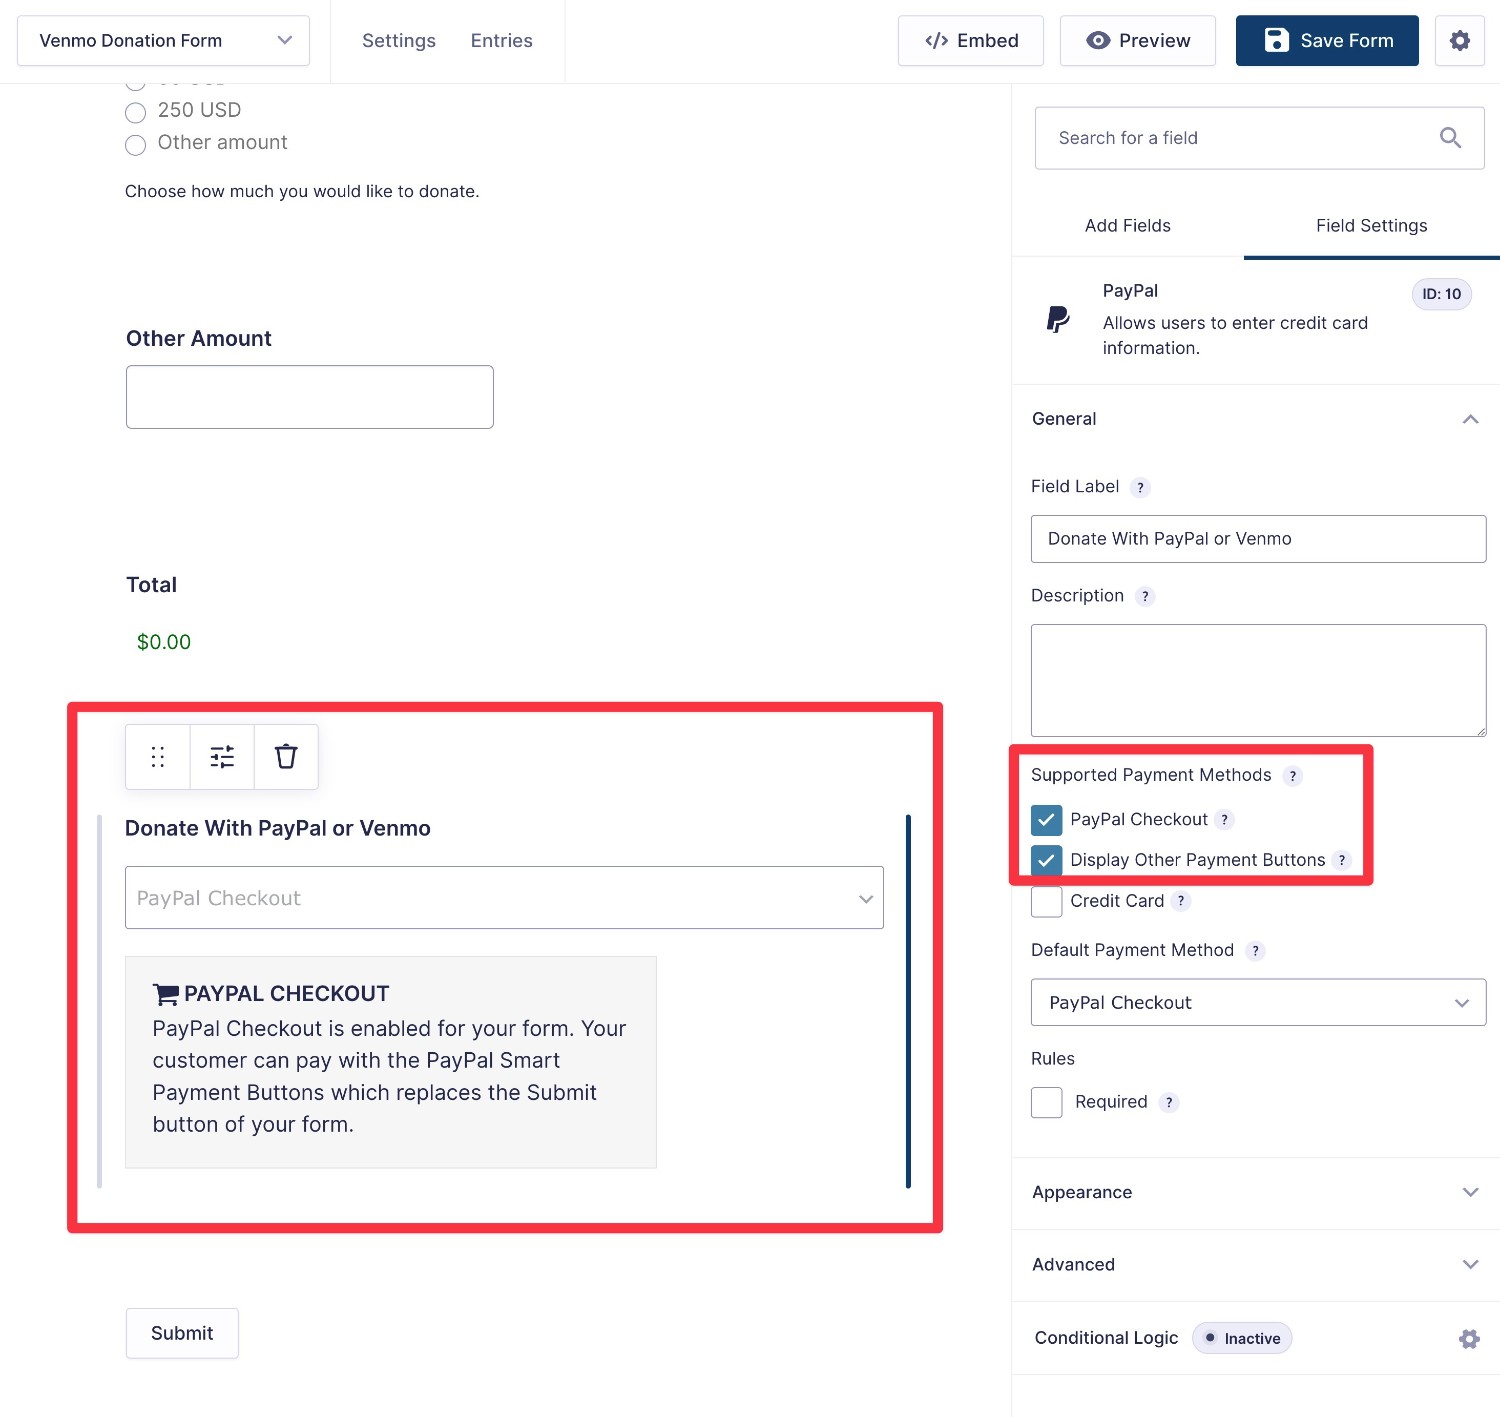
To finish things out, you’ll want to add a PayPal field, typically at the bottom of your form. While the field name is “PayPal”, this is also what will allow you to add the Venmo donation option to your form.
To add the Venmo option, go into the PayPal field’s settings and enable Display Other Payment Buttons under Supported Payment Methods.
You’ll also need to enable the PayPal Checkout option, as offering the regular PayPal Checkout option is a requirement to show the Venmo button.
However, you’re free to disable the Credit Card option if it doesn’t fit your needs. When enabled, this lets donors enter their credit card details directly, without needing to go through the PayPal Checkout flow.
Note – you will not see the Venmo option in the form builder, but it will be there on the frontend of your site. More on that later.
5. Set Up Your PayPal Checkout Feed
To configure how to process your donation form’s payments, you’ll set up a PayPal Checkout feed.
In the form editor, go to Settings → PayPal Checkout. You can edit the default feed (if you’re using the Donation Form template) or add a new feed if there aren’t any feeds yet.
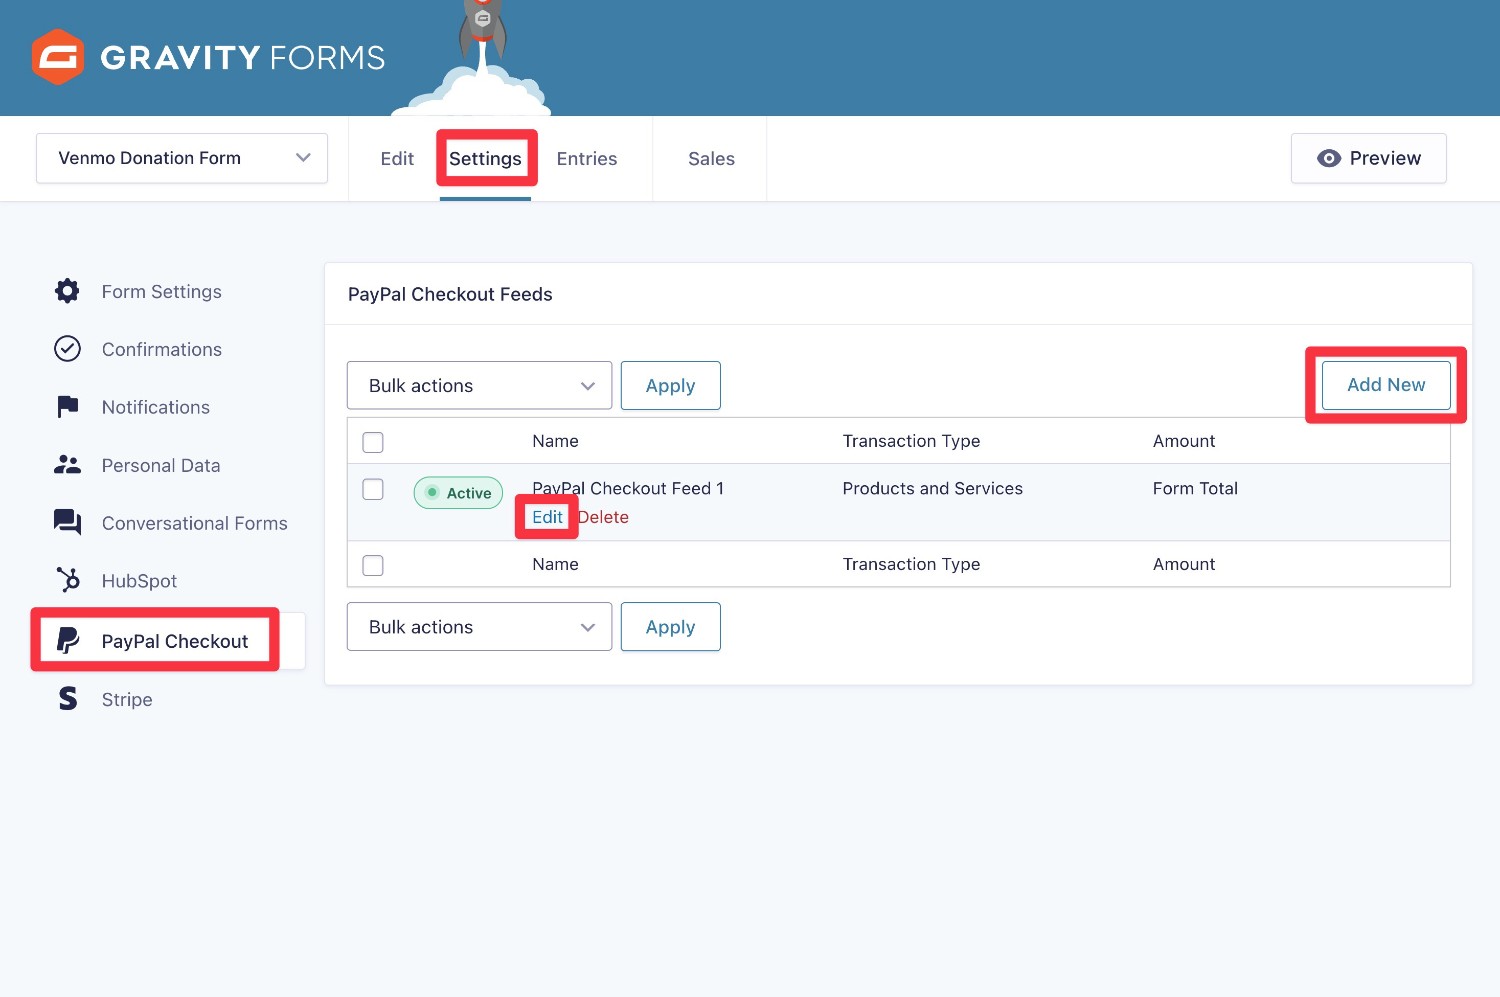
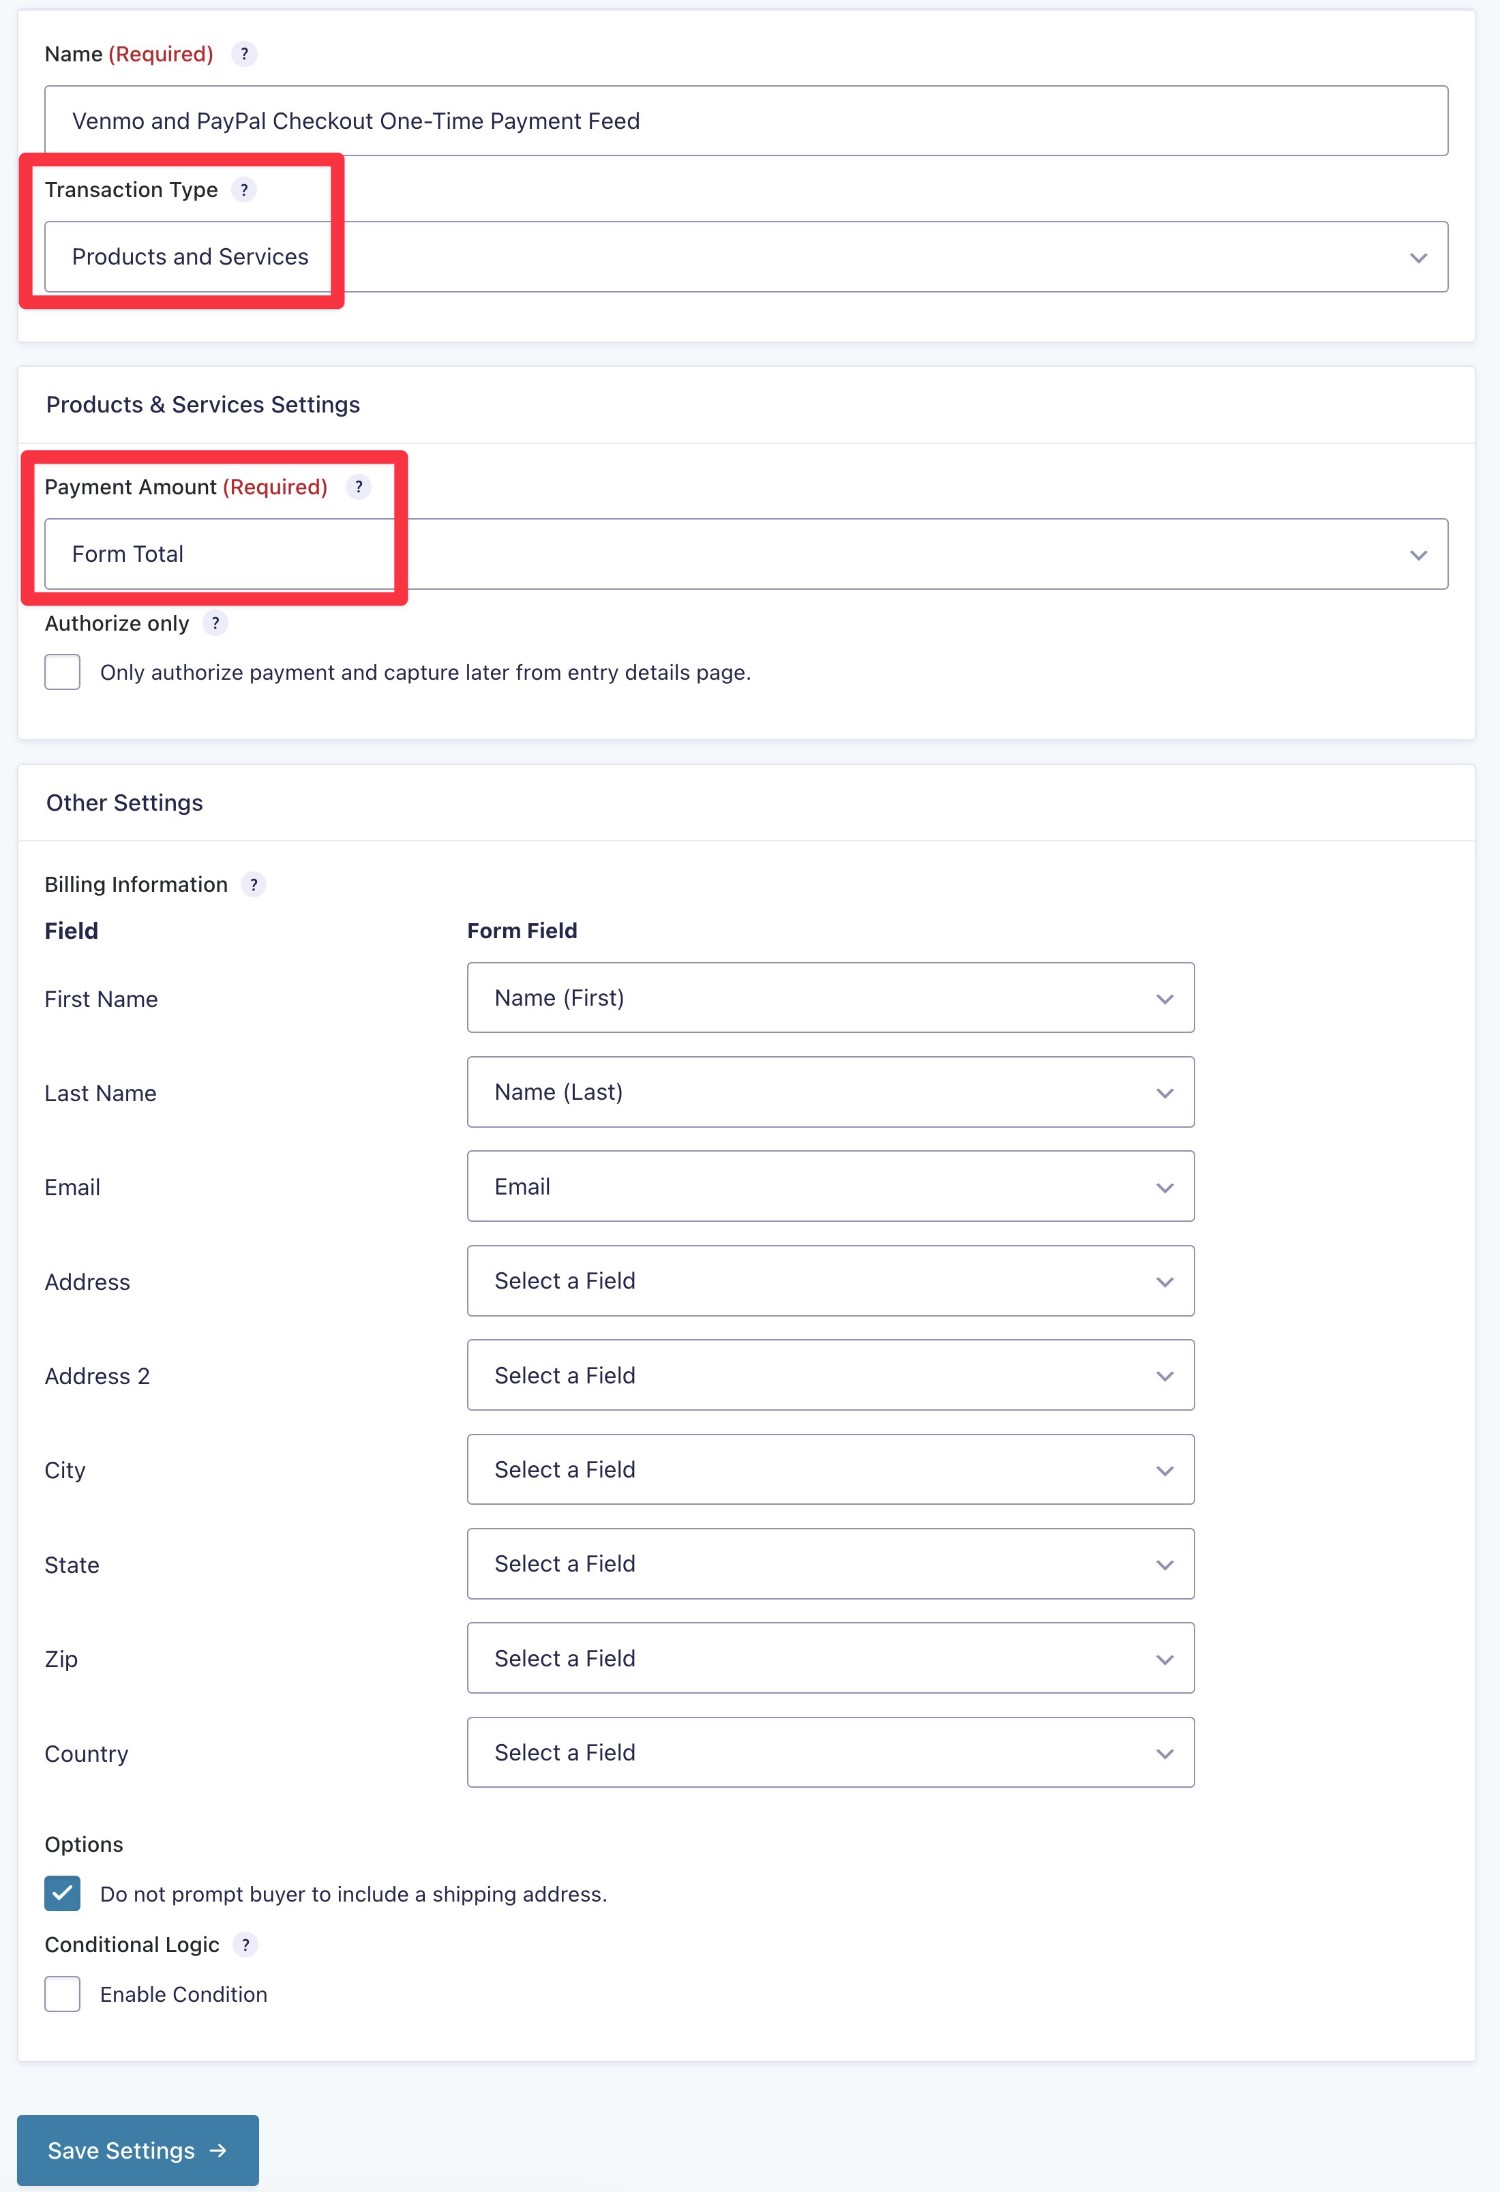
Under Transaction Type, you an choose Products and Services, which indicates a one-time payment, or Subscriptions, if donors want to set up a monthly donation,
Set the Payment Amount equal to the Form Total and then map the applicable fields from your form to the billing information in PayPal.
For donations, you’ll typically want to also check the Do not prompt buyer to include a shipping address, as most charities won’t be shipping physical items to donors.
Make sure to click Save Settings when you’re done.
6. Set Up Notification Emails and Confirmation Messages
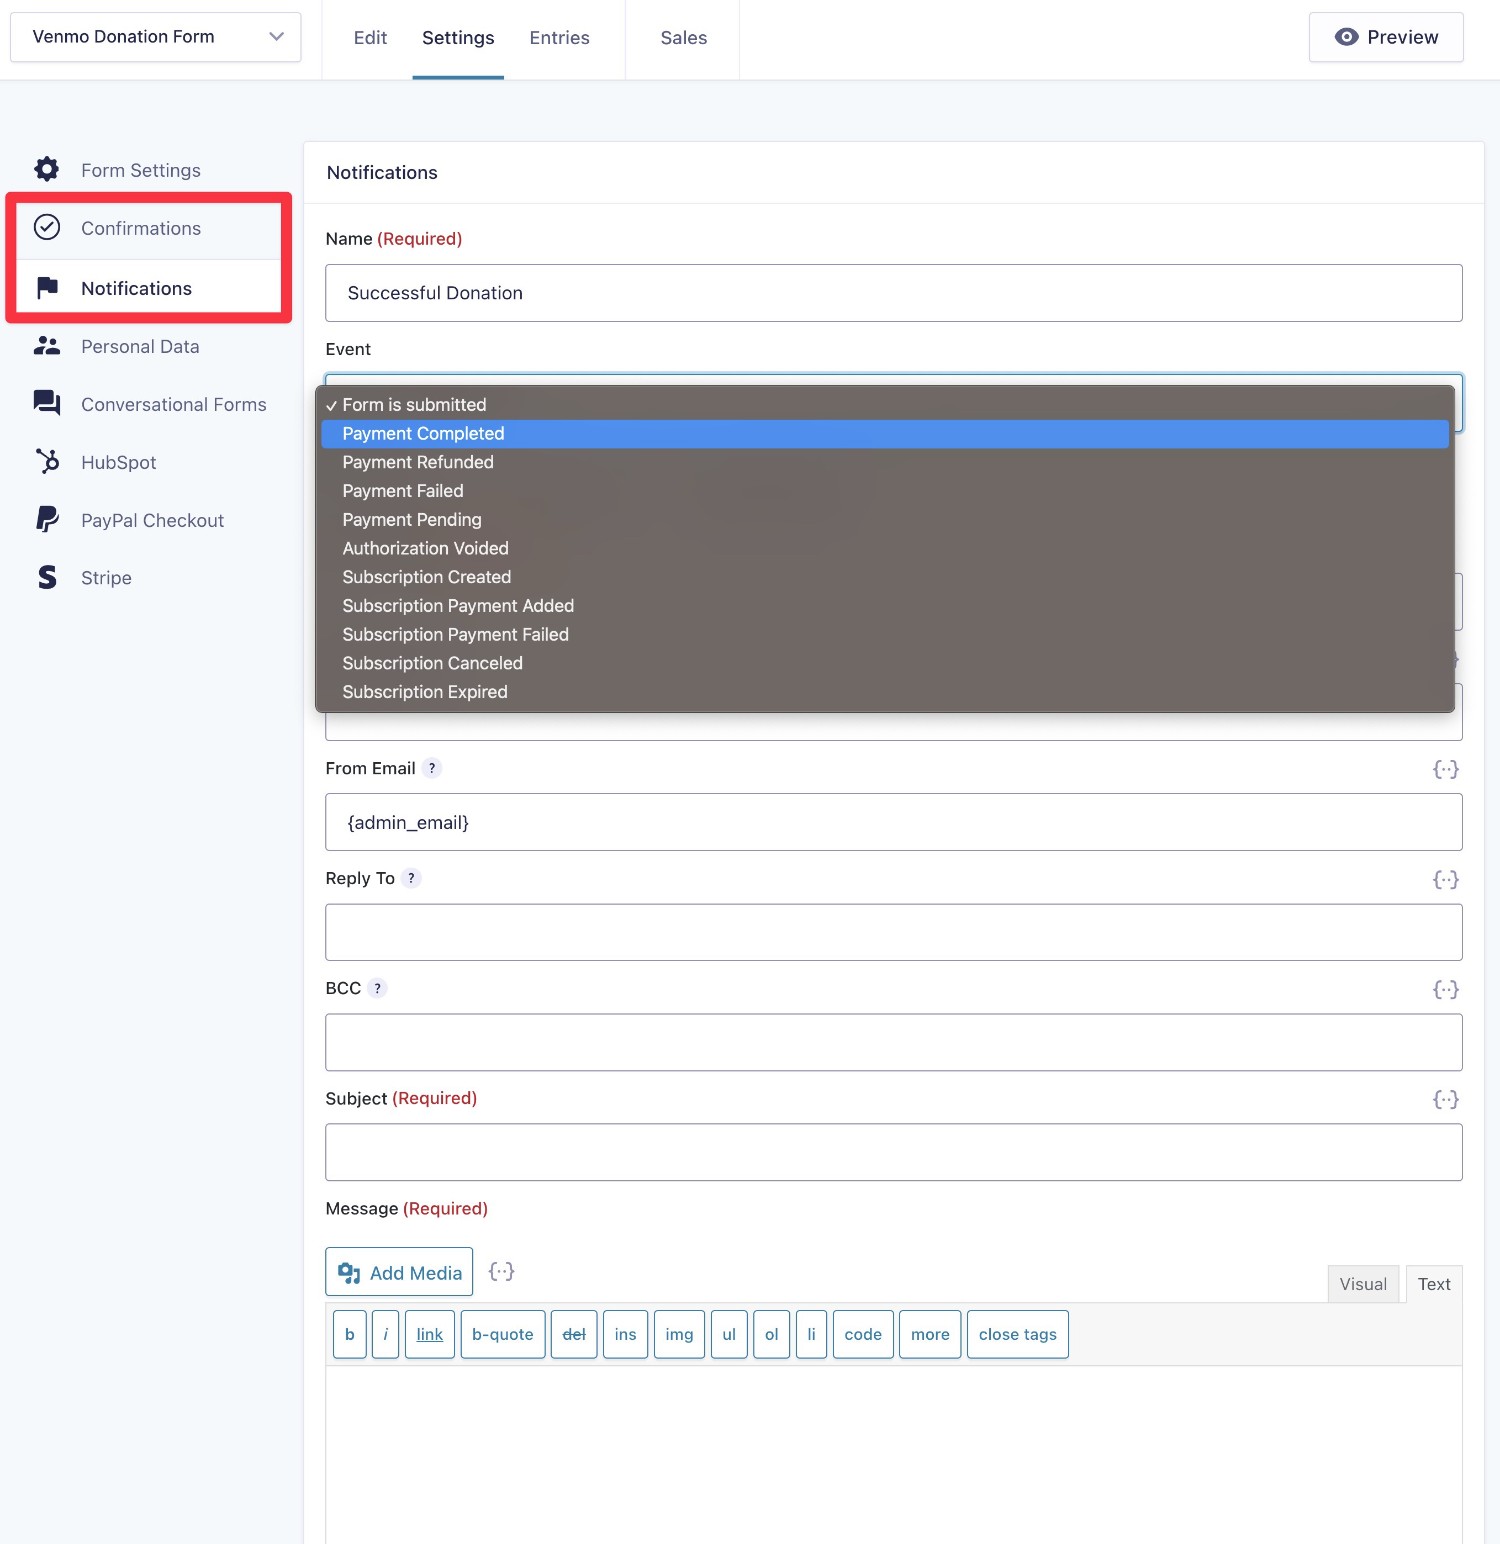
Next, you’ll want to set up your form’s notifications and confirmation messages:
- Notifications – these are emails that you can send to the donor, yourself, or anyone else.
- Confirmations – this is the message that displays after someone makes a donation (or you can redirect people to a different page, such as a special thank you page).
In addition to sending an email right when someone submits your Venmo donation form, Gravity Forms also offers some special payment-related triggers that let you send emails based on various payment details (more on this below).
You can set all of these up by going to Settings → Notifications or Settings → Confirmations.
7. Add Other Integrations As Needed
Another nice thing about using Gravity Forms for your Venmo donation forms is that you can also take advantage of the many other Gravity Forms add-ons and products that are available.
You can browse all of the add-ons here, but here are a few quick examples of useful ways to enhance your Venmo donation forms:
- Automatically subscribe new donors to your email newsletter.
- Add donors’ details to your nonprofit’s CRM.
- Generate PDF receipts for you and/or your donors’ records.
- Build multi-step workflows with Gravity Flow, such as having one of your admin staff approve new donations before triggering other actions.
- Send follow up email notifications with Gravity SMTP.
8. Embed and Test Your Venmo Donation Form
Once you’ve finished setting up your form, the next step is to embed the form on your live website.
You can embed your form using the Gravity Forms block, shortcode, or PHP function.
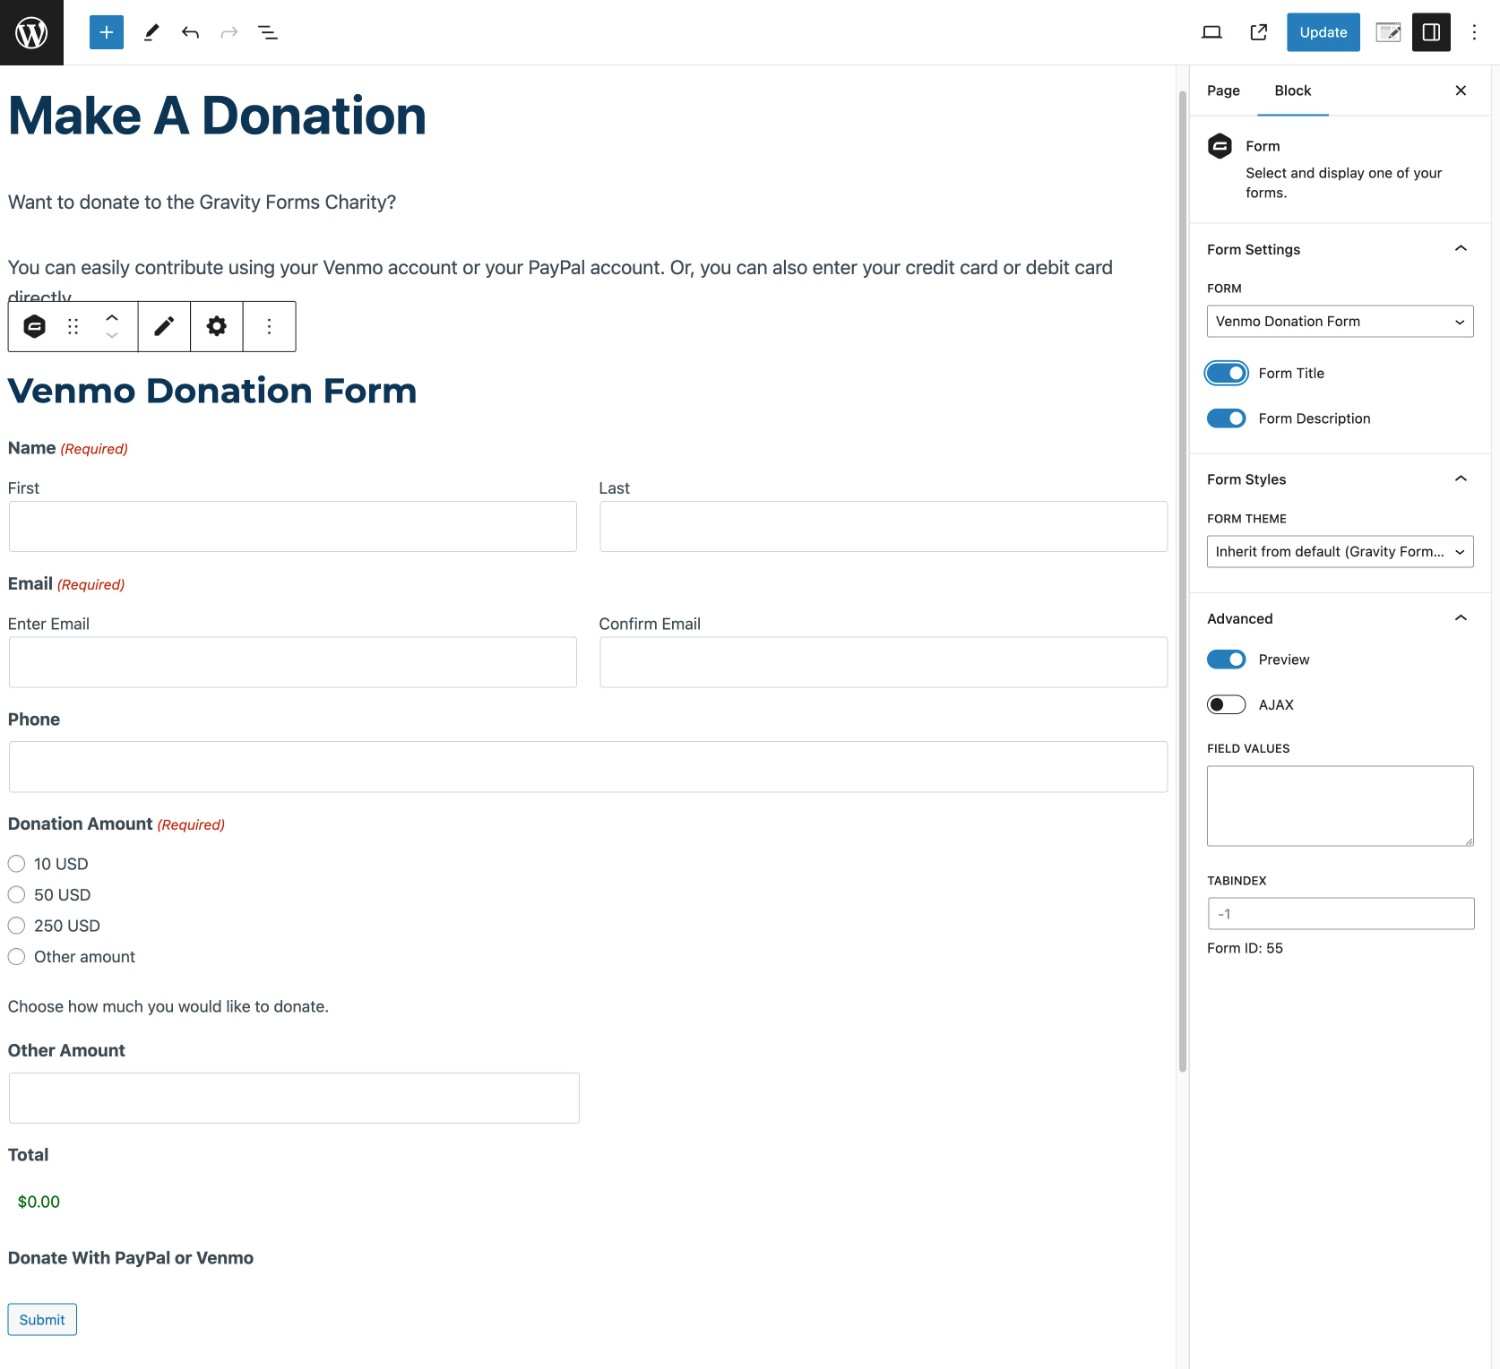
Then, you can open the live version of your donation form to test it.
You should see the regular PayPal Checkout button, along with a separate button for Venmo.

Not seeing the Venmo option on your donation form? PayPal’s Smart Button functionality will only show the Venmo option if you’re browsing from the USA. If you’re not, you can use a VPN to simulate browsing from the USA, which should let you test your form.
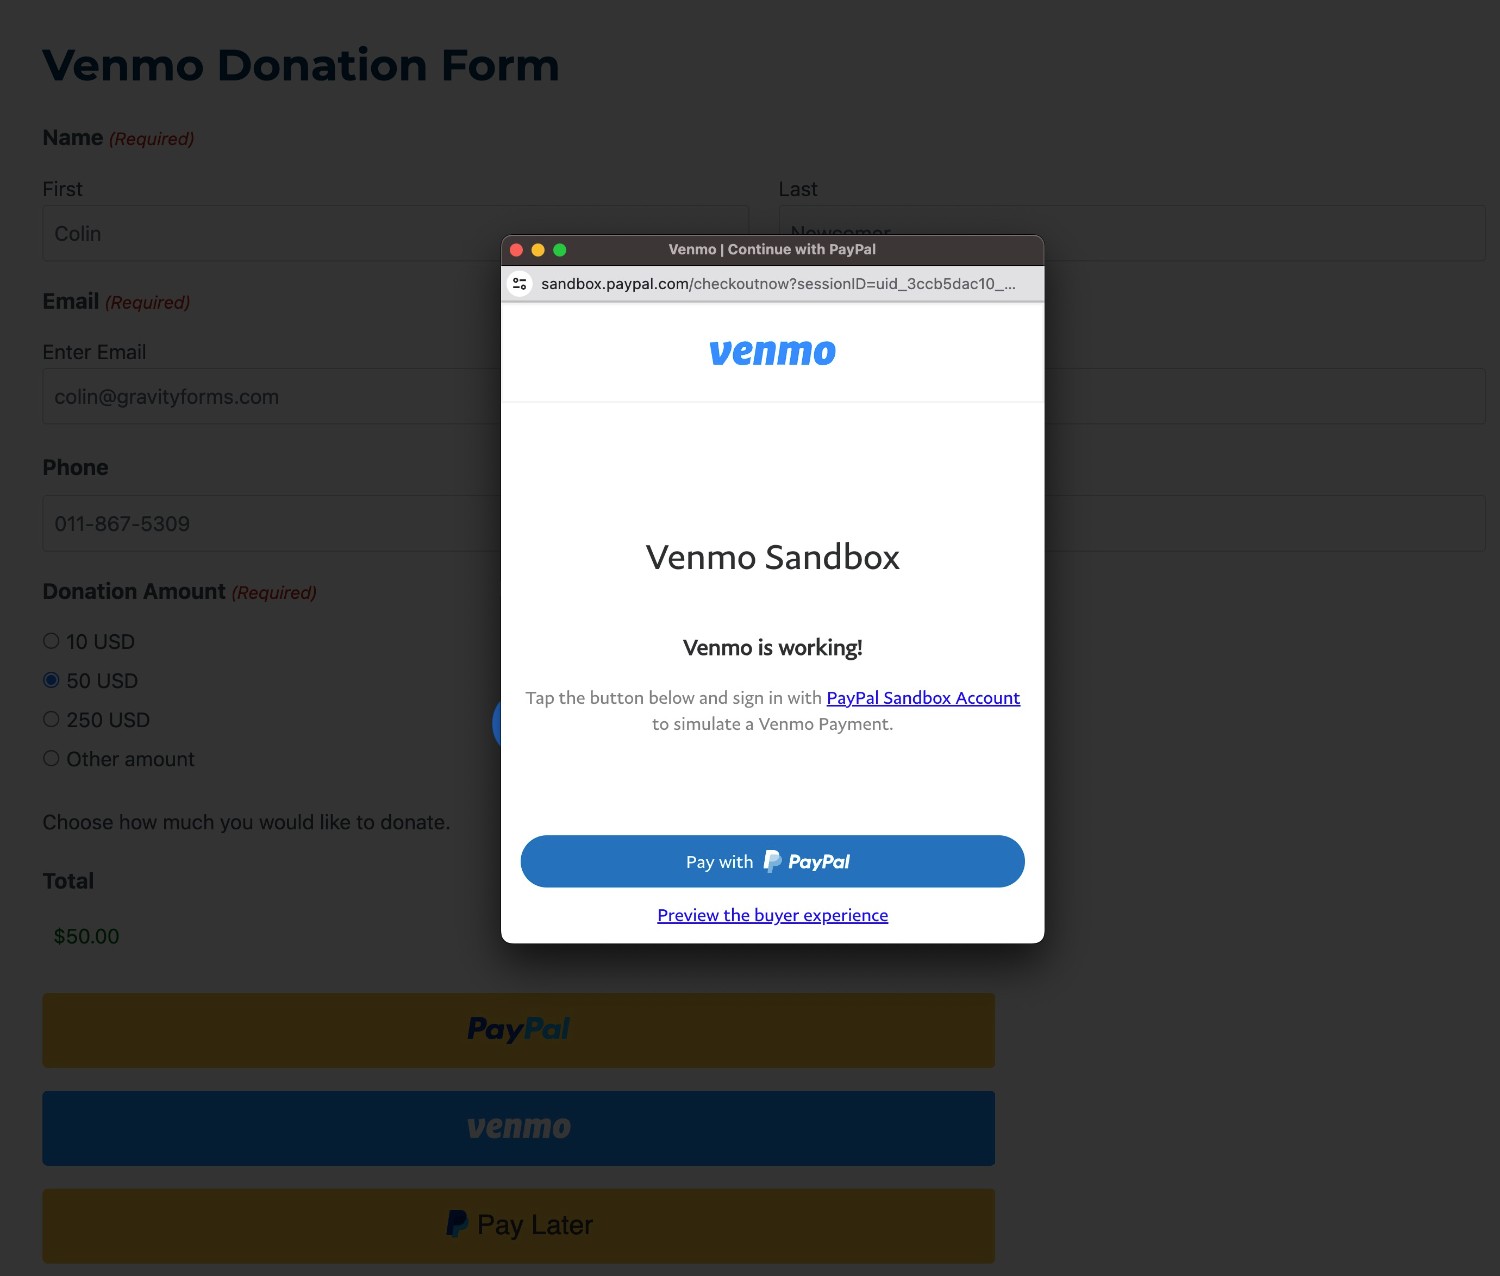
If you click on the button, you should see a screen telling you that Venmo has been configured properly, along with an option to continue the payment flow.
9. Enable Live Payments (If Using Sandbox Mode)
If you chose Sandbox mode in Step #3, you’ll need to switch your Gravity Forms <-> PayPal connection to Live mode when you want to start accepting real donations.
Here’s how:
- Go to Forms → Settings → PayPal Checkout.
- Select Live mode.
- Follow the authorization flow for your real PayPal account (make sure it’s the PayPal account that’s associated with your Venmo Charity Profile, if applicable).
- Save your settings.
Once you enable live mode here, your donation form will start processing live payments right away. There’s no need to make any changes to the form itself.
10. Manage Your Donations
Once you start receiving donations, you’ll be able to manage them from both your WordPress dashboard and your PayPal and Venmo accounts.
To view donations in WordPress, there are two interfaces that you’ll likely want to use:
- Go to Forms → Entries and select your donation form. Each donation/payment will show up as its own entry and you can select an entry to view more details.
- Select the Sales tab to view overall stats for how much money you’ve raised.
You can also view donations in PayPal and/or Venmo.
Get Started With Venmo for Nonprofits Today
If you want to “meet your donors where they are”, supporting Venmo donations for your nonprofit is a great thing to consider, especially if your donors tend to be younger in age.
With Venmo for nonprofits, you can also access lower payment rates and also create a special Venmo Charity Profile.
There are some limitations, such as only being able to accept one-time donations. But if you use Gravity Forms, you can make it so that donors can easily set up recurring donations using a different gateway from the same donation form.
If you want to get started with Gravity Forms and Venmo, apply for the Gravity Forms Nonprofit license today and then follow this guide to get started.

If you want to keep up-to-date with what’s happening on the blog sign up for the Gravity Forms newsletter!
