Connect Zendesk to WordPress with Zapier and Gravity Forms

Using a customer retention and support software like Zendesk for your business is a great idea to improve client communication. When someone contacts you for support, it helps keep track of your entire communication with them.
You can make this process more seamless by connecting Zendesk directly to your WordPress web forms. By using Gravity Forms, and its Zapier Add-On, you can easily do so, and in this tutorial we will show you how.
In the following, you will learn why Zendesk is an excellent solution to manage your customer support, why it’s a good idea to team it up with Gravity Forms, and how to establish a connection between the two.
We have a lot to go through, so let’s get started.
Why Use Zendesk Together With Gravity Forms on Your WordPress Site?
Before getting into how to connect Gravity Forms with Zendesk, let’s first talk about what makes the latter a great candidate to manage the customer experience on your WordPress site:
- Many support options — From bots and messaging, over email and a help center, to customer support tickets and voice chat, Zendesk allows you to care for your customers across many channels.
- AI features — Zendesk offers AI-powered bots for customer support and automation that can work together with human agents or on their own. For example, the Zendesk AI can suggest replies to support requests and connect customers with the right person for their inquiry.
- Analytics and reporting — See all customer data in one place so you always know where they are in their journey. Zendesk also allows you to gain useful insights from the collected data and use it for personalization.
- Support management — Collect feedback on the performance of your support team to improve staffing and use it for quality assurance.
- Many integrations — Zendesk integrates well with other software and allows you to offer customer support via WhatsApp, Facebook, Slack, and more.
More than 100,000 customers trust Zendesk. Their plans start from $19/month and there is a free trial.
Of course, Zendesk also works for customer queries coming in through your contact forms, which is why it combines so well with Gravity Forms. Plus, there are more reasons to go for Gravity Forms as your web form plugin:
- The drag-and-drop builder allows you to create an array of complex support forms for your business needs and customize them without any technical knowledge.
- Gravity Forms’ powerful conditional logic lets you to filter support requests at the source.
- In addition to Zendesk, a wide range of extensions enable you to connect your forms with many other software solutions and add any functionality you need.
Zapier and the Gravity Forms Zapier Add-On

As mentioned in the introduction, the connection between Gravity Forms and Zendesk will be established using Zapier. In case you are not familiar with it, Zapier is a platform that lets you connect different apps and create automatic workflows between them, so-called “Zaps”. Its library includes almost 7,000 web apps you can link together in this way, such as:
- Google Sheets, Docs, Drive, Gmail, and more
- Facebook, Pinterest, LinkedIn, Instagram, and other social media networks
- Project management tools like Asana and Trello
- Accounting tools such as Freshbooks
You can find the full list on the Zapier website. Naturally, Gravity Forms and Zendesk are also on it. To be able to connect Gravity Forms to Zapier and take advantage of the possibilities Zapier offers, you need the Gravity Forms Zapier Add-On.
It is one of our most popular extensions and allows you to work with the information you collect through your forms in many different ways. We have other use case examples on the blog such as working with Pipedrive, Brevo, or Excel. It’s also what we will be using below.
The Zapier Add-On is available with Gravity Forms Pro and Elite licenses. Get yours today or upgrade your license and only pay the pro-rated price. Alternatively, if you don’t feel ready to commit yet, you can also follow along the tutorial by creating a free demo site. It comes with all the necessary add-ons and functionality you need for this purpose.
How to Connect Your WordPress Forms and Zendesk Via Zapier
For the following tutorial, we will assume that you already have a WordPress website with the Gravity Forms main plugin installed. One thing that is very important to note is that using Zendesk is part of Zapier’s premium features. So, in order to take advantage of it, you will need to sign up to a paid Zapier plan. We will talk more about this below.
1. Sign Up to Zendesk
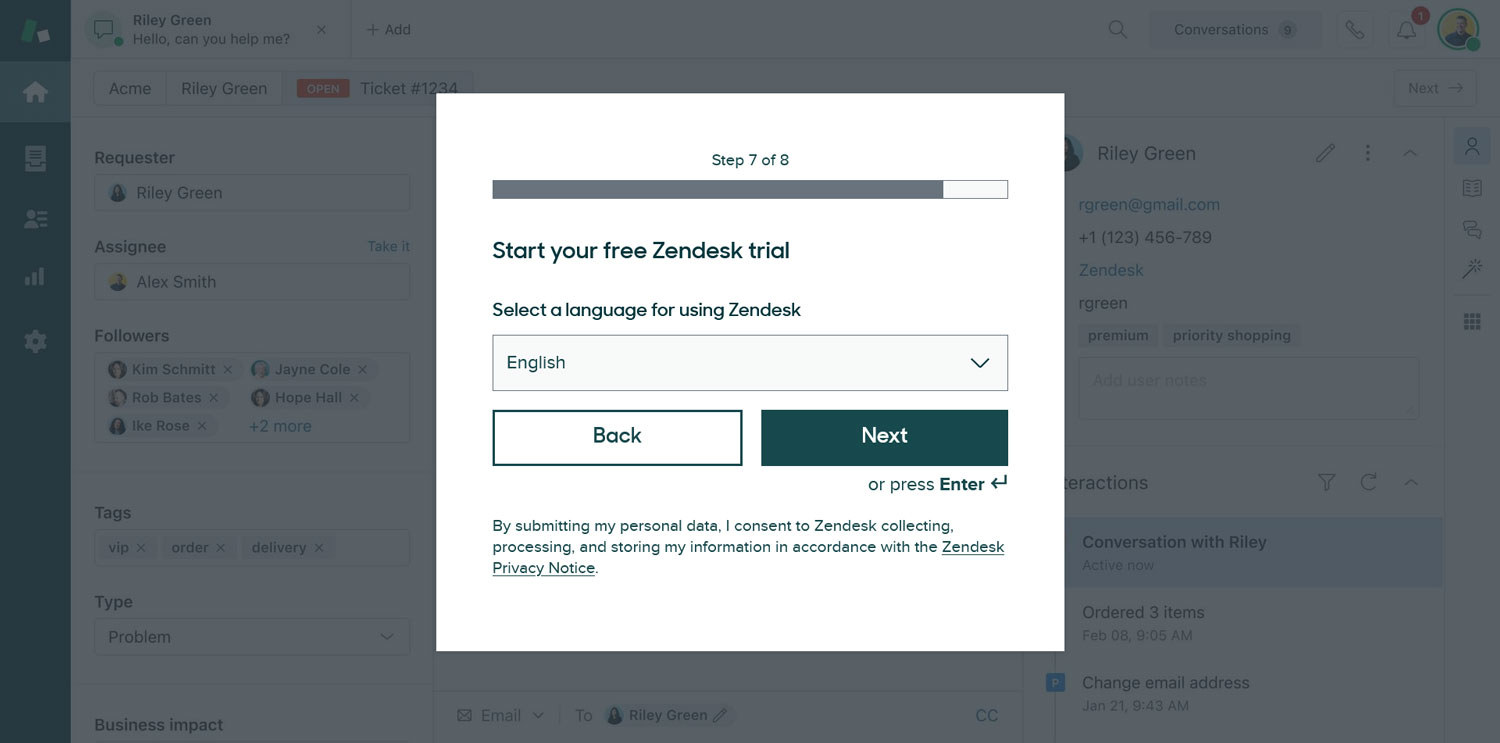
The first thing you need is a Zendesk account. You can get that over at the Zendesk homepage by clicking on one of the buttons to start a free trial.
This will start the sign-up process.
They will ask you for the following information:
- First name and last name
- Email address and phone number
- Company name, number of employees
- Preferred interface language
- Password of choice
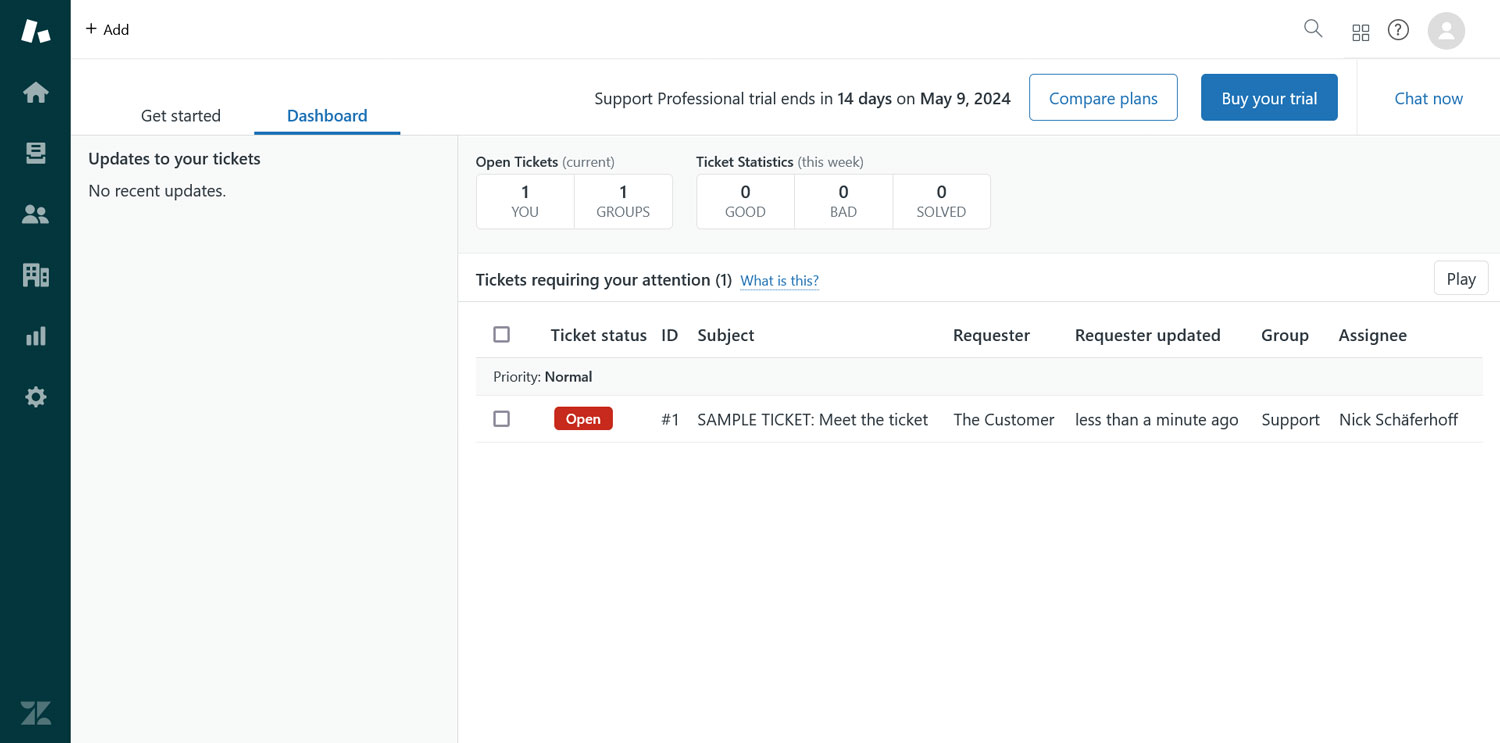
Zendesk will also ask you to verify your email address before you can continue. After that, you land on the Zendesk dashboard.
2. Create an API Token
To establish a connection between Zendesk and Zapier (and consequently, your WordPress website), you will need an API token. Since you are already logged into Zendesk, how about we create that right away?
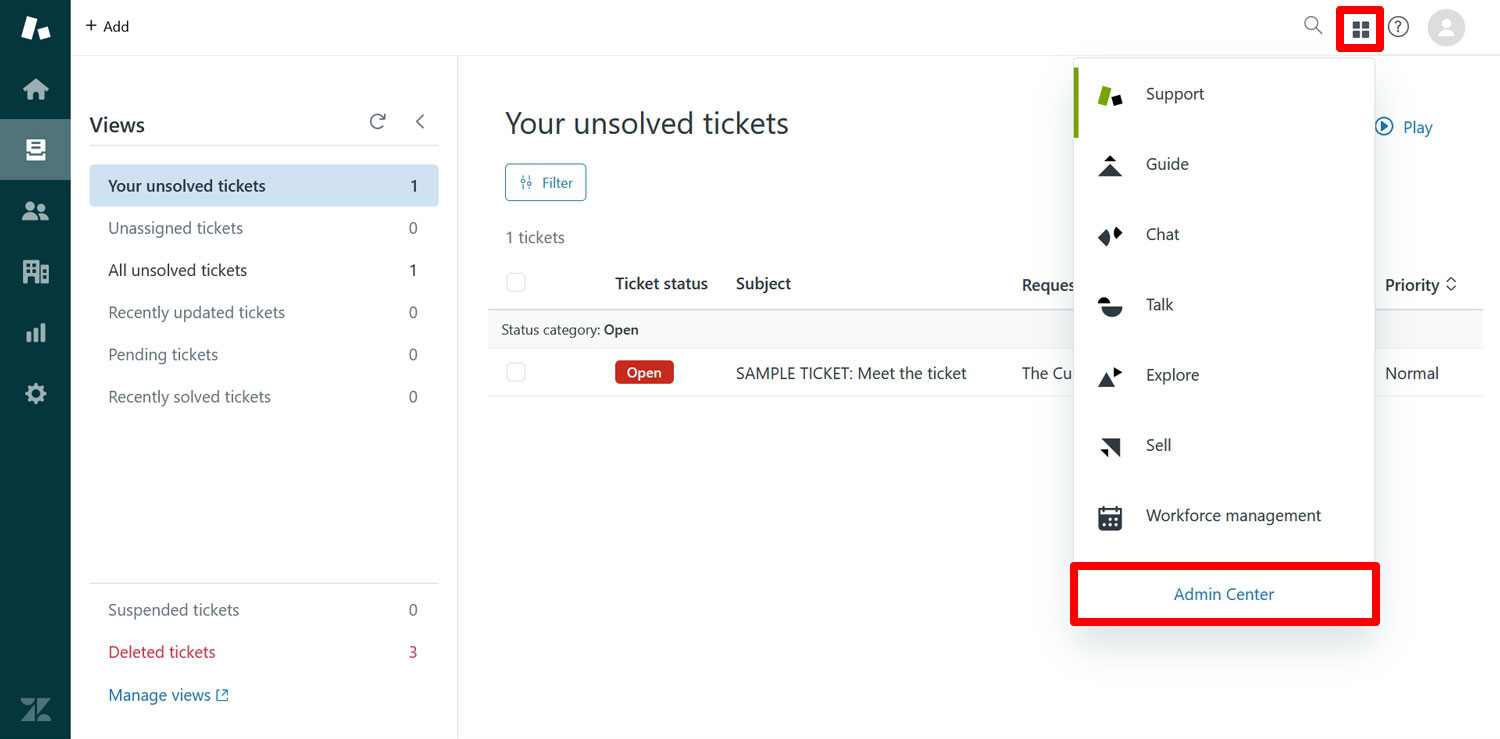
You do this in the Admin Center. You access it by clicking the Zendesk Products option (it looks like four small squares) and then choosing Admin Center.
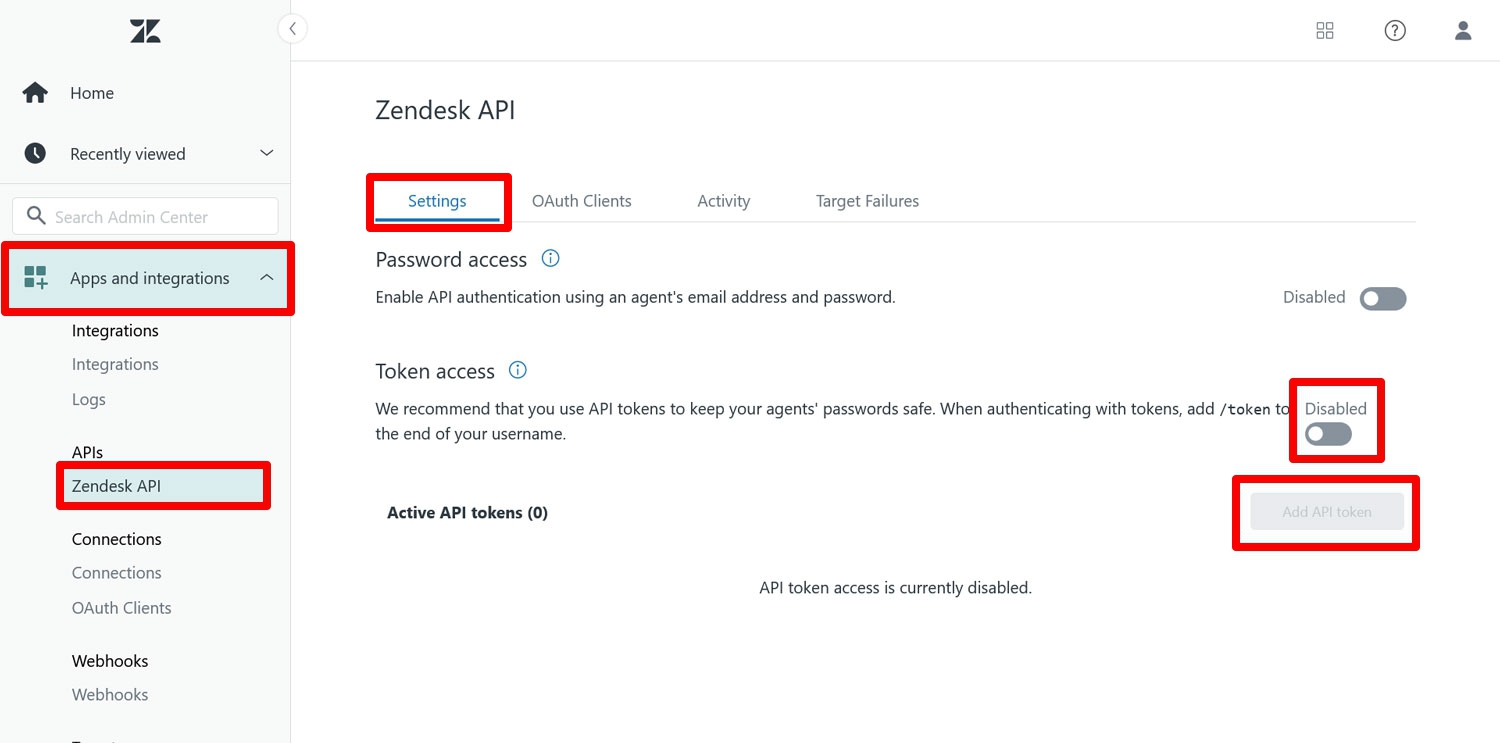
Once there, in the left sidebar, access Apps and integrations, then Zendesk API under APIs. Here, flip the switch under Token access, then click the button that says Add API token.
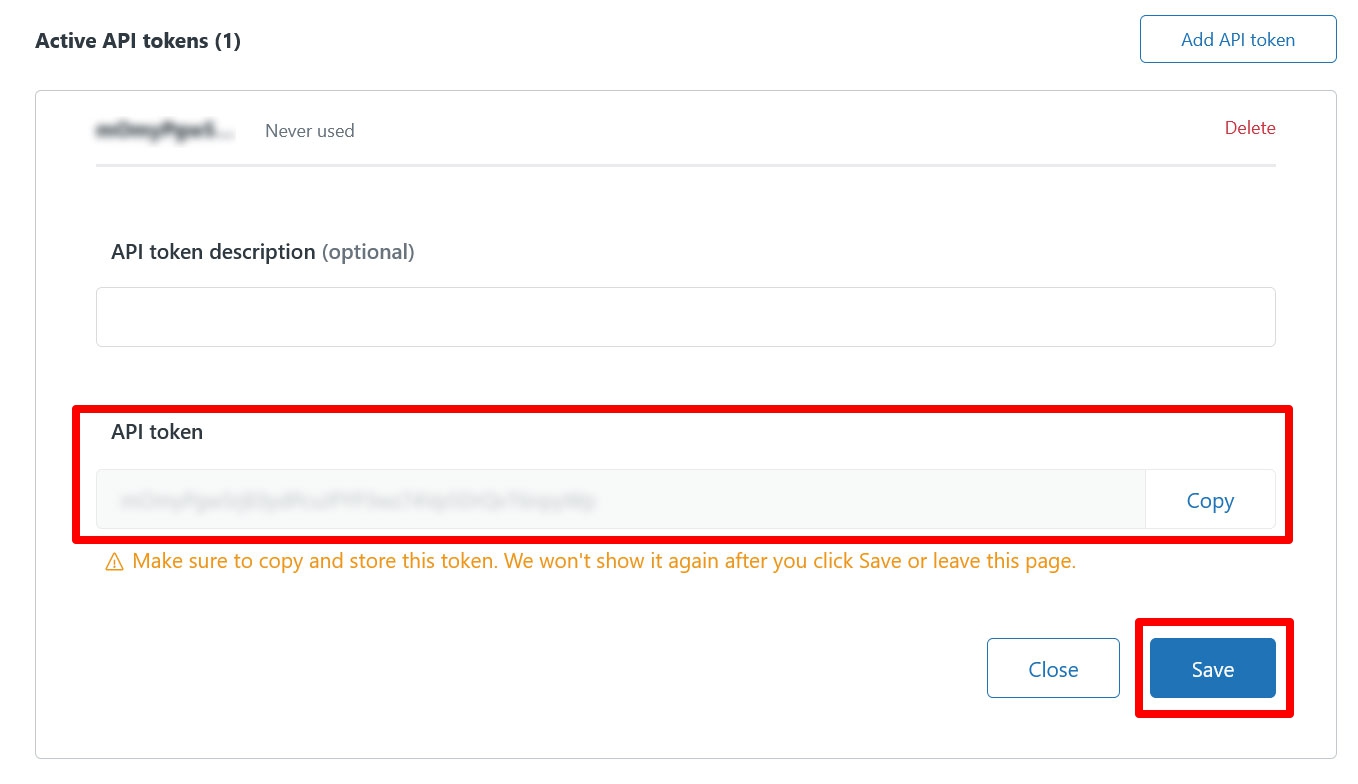
This will open up a panel showing you the API token. Input an optional description so that, if you use several tokens, you know what this token is for. Then, be sure to copy your token, since this is the only time Zendesk will show it to you.
Once you are sure that you stored it somewhere safe and sound, save at the bottom.
3. Get a Zapier Account
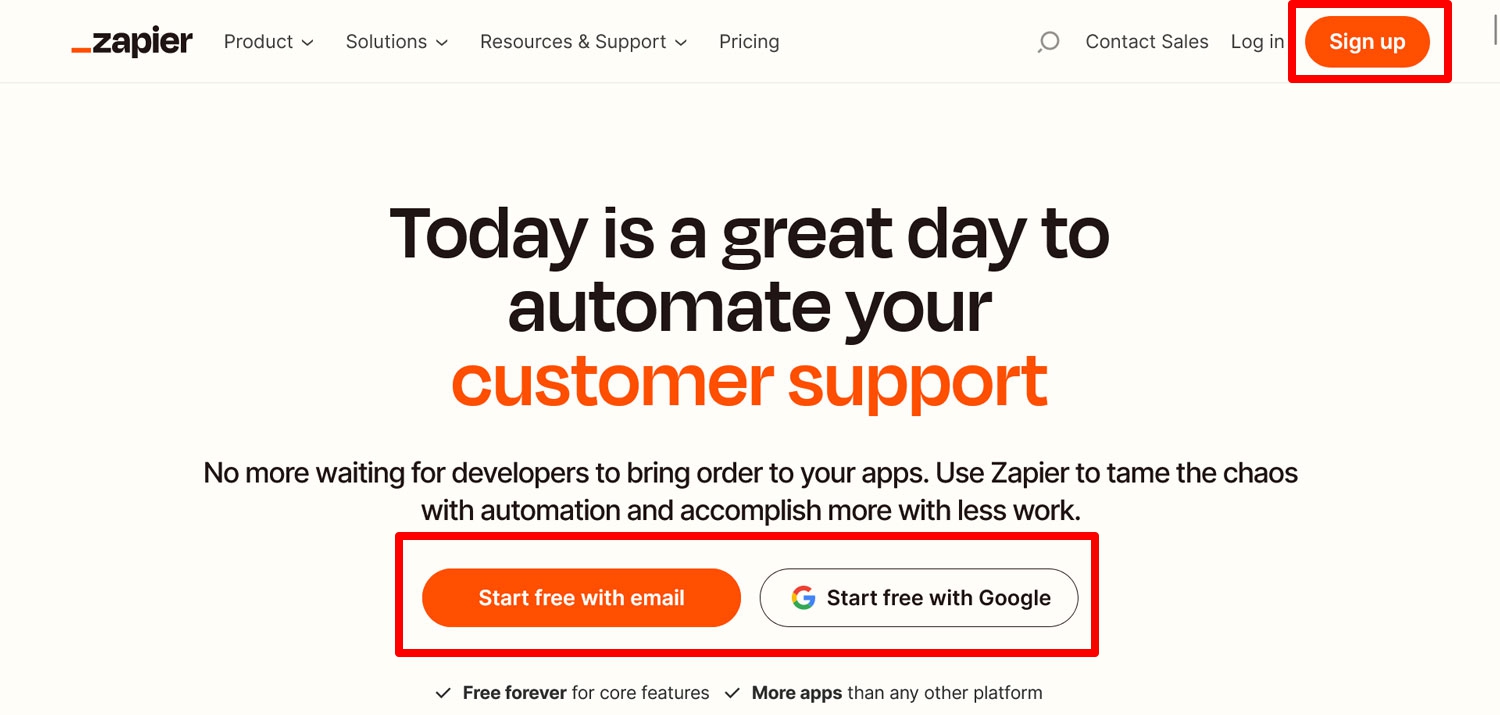
The next thing you’ll need to connect WordPress to Zendesk is a Zapier account. You can create one by visiting the Zapier homepage. Click one of the many calls to action here.
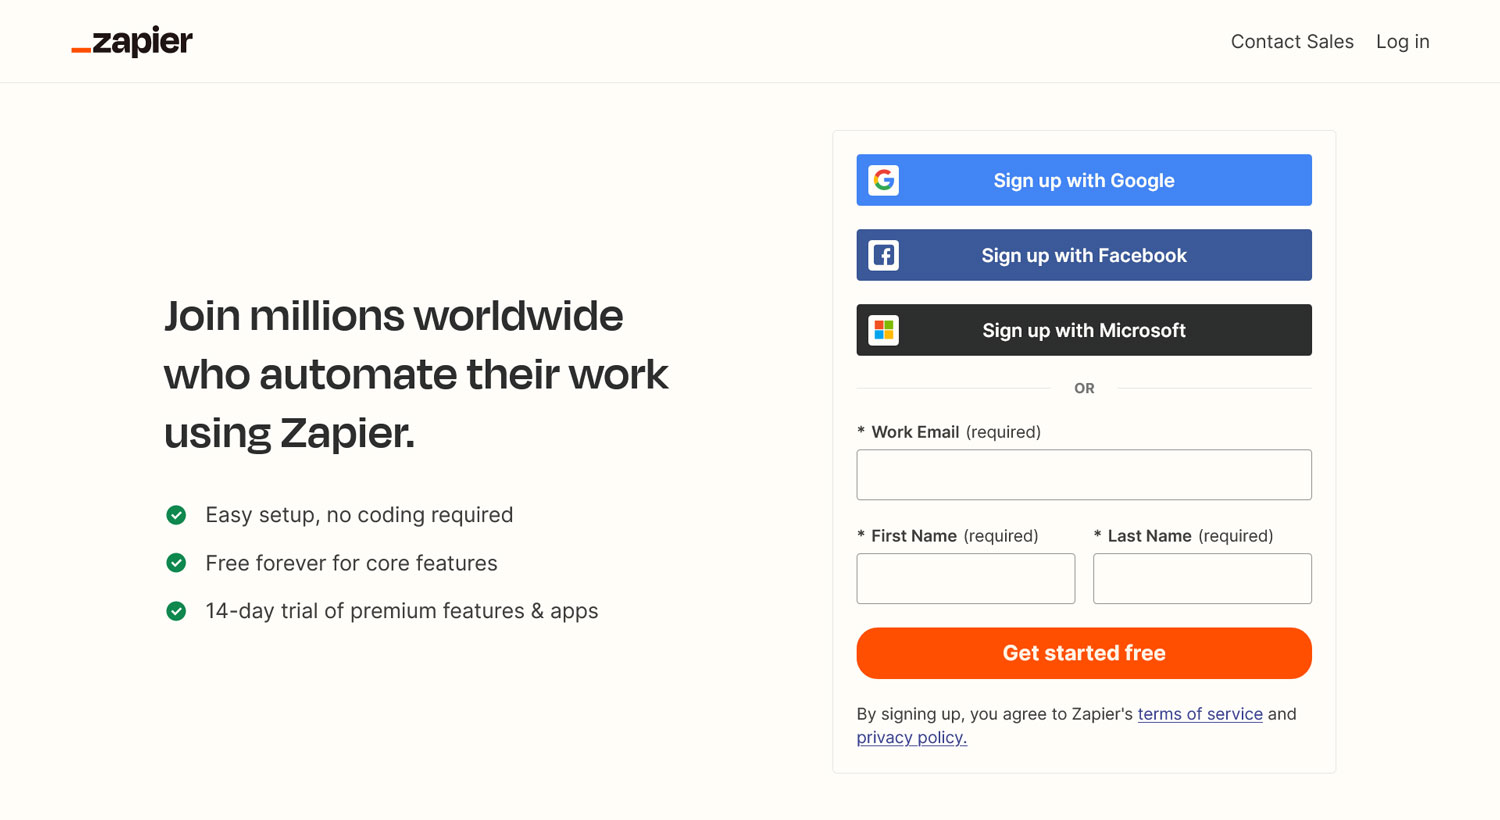
You can use an email address to sign up as well as your Facebook, Google, or Microsoft account.
As mentioned, using Zendesk is part of Zapier’s premium features. Therefore, if you want to connect your WordPress website to Zendesk, you need to sign up to one of their paid plans. You can either do that now or wait until you get prompted while creating your Zap. Their lowest tier, the Professional plan, is enough and they also have a free trial so you can get your bearings.
Once this is set, it’s time to turn to your WordPress website.
4. Create Your Form
You need a form on your WordPress site to connect to Zendesk. In this case, since our goal is to create a ticket in Zendesk when someone submits it, it makes the most sense to create a contact form. That way, when someone gets in touch via your website, the request pops up in your customer experience software so you can take care of it.
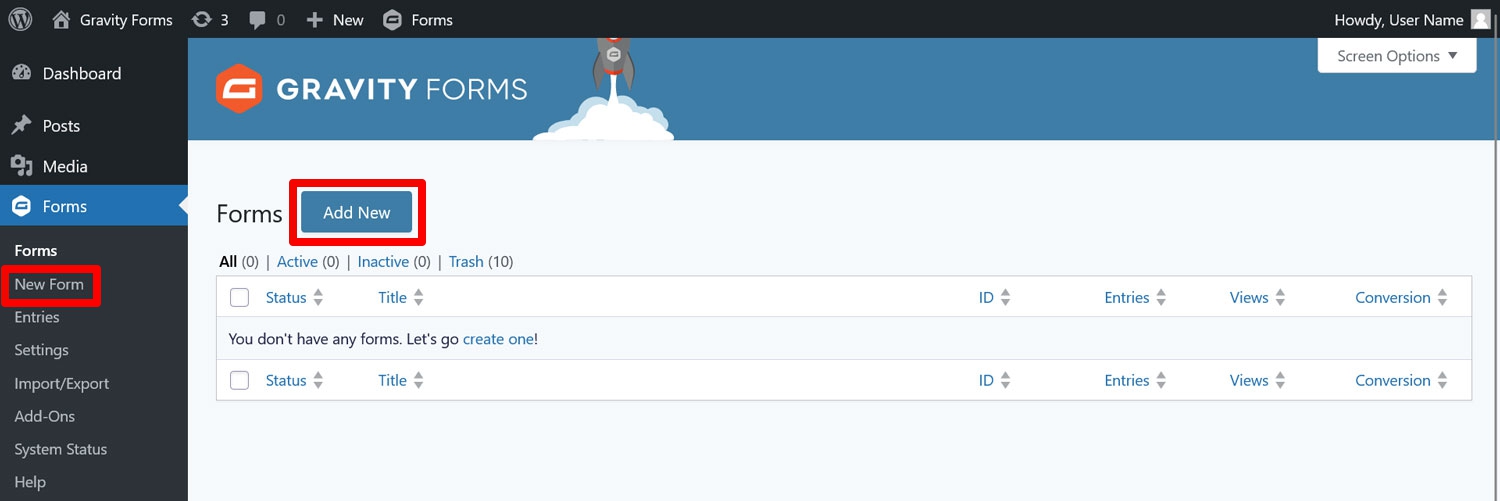
Create a form by going to Forms → New Form.
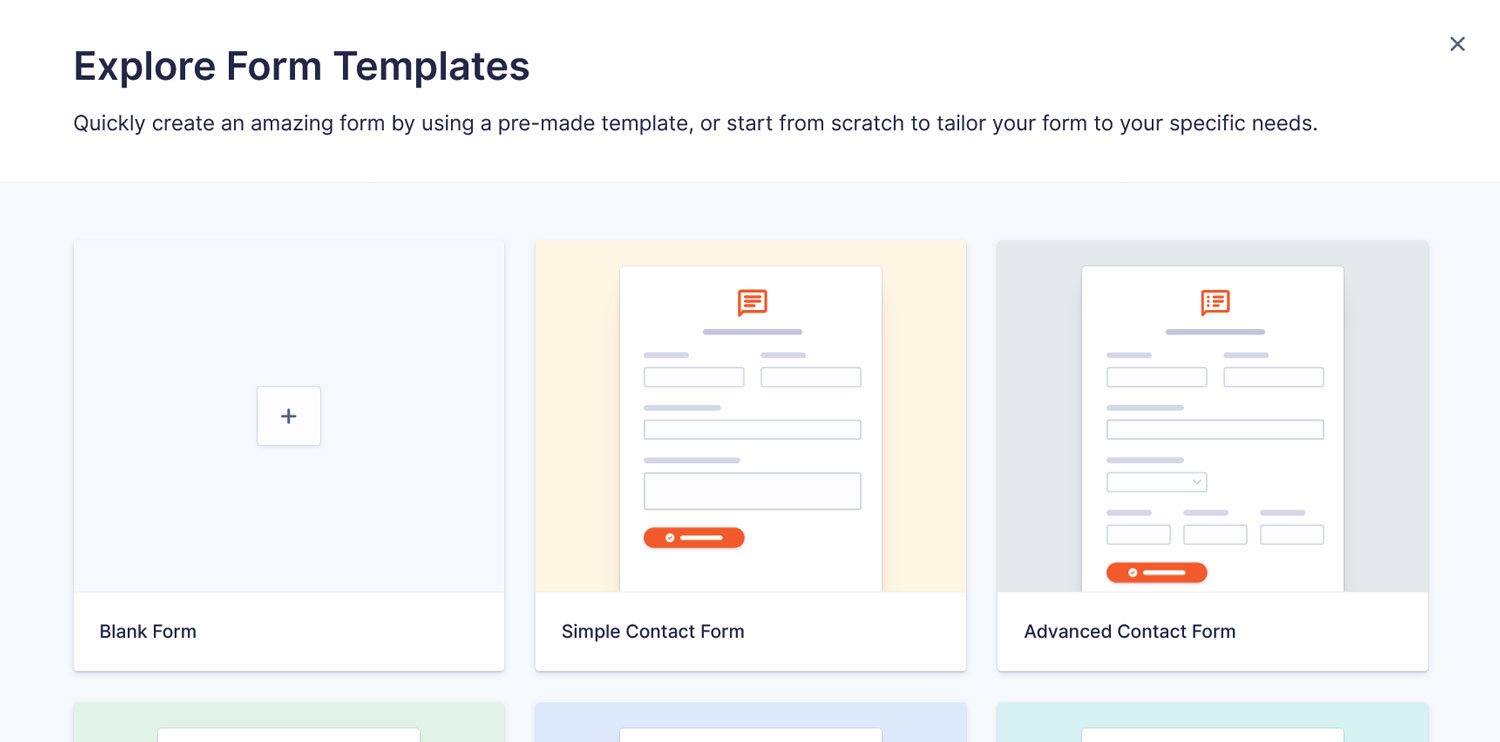
Doing so opens up a pop-up with the option to start with an empty form or hit the ground running with a pre-built template.
For contact forms, you have two options: the simple contact form or advanced contact form. The first mainly consists of fields to enter a name, email address, and for sending the message. The second has more options such as an address field or the preferred method of contact.
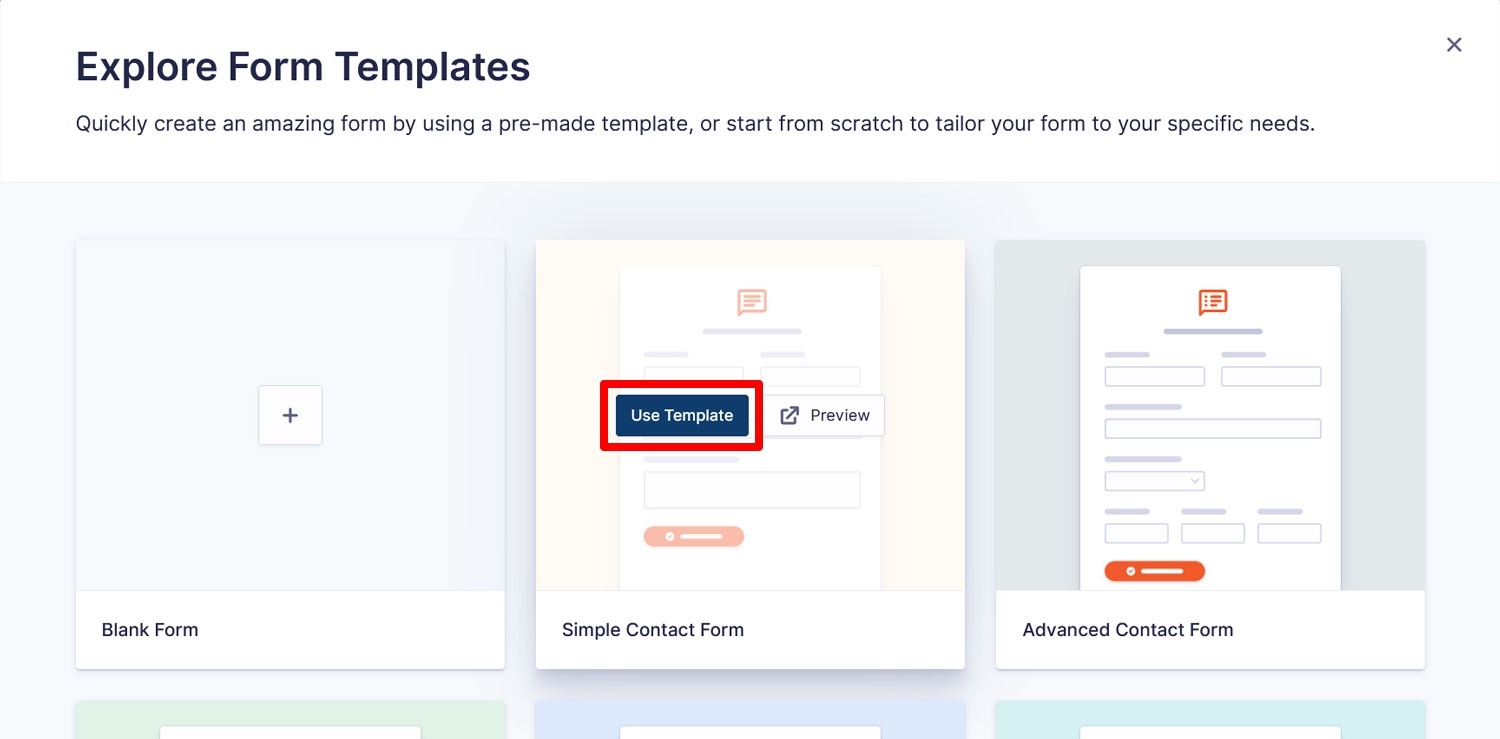
For our purpose, the simple option is enough. Hover over it and click Use Template.
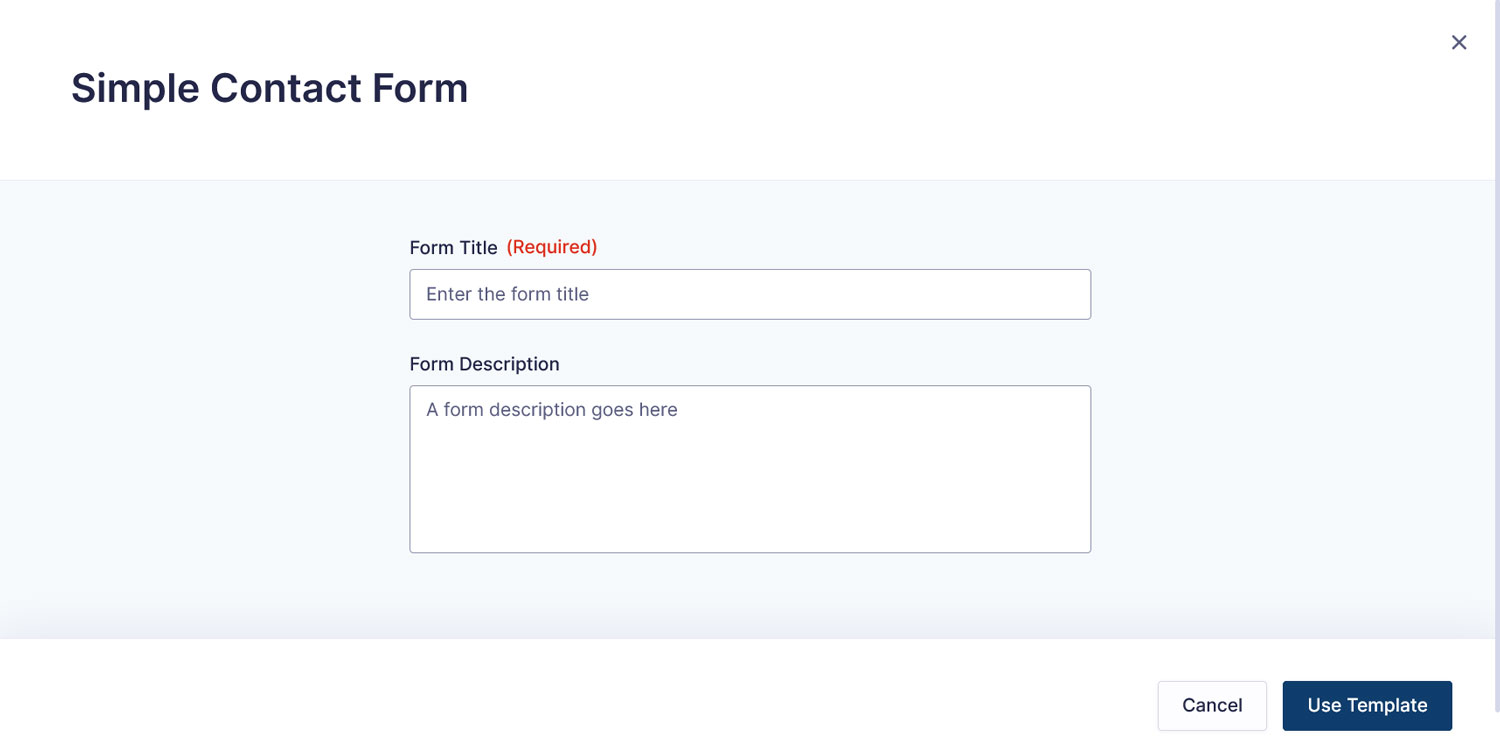
There will be an intermediate step in which you need to name the form and proceed.
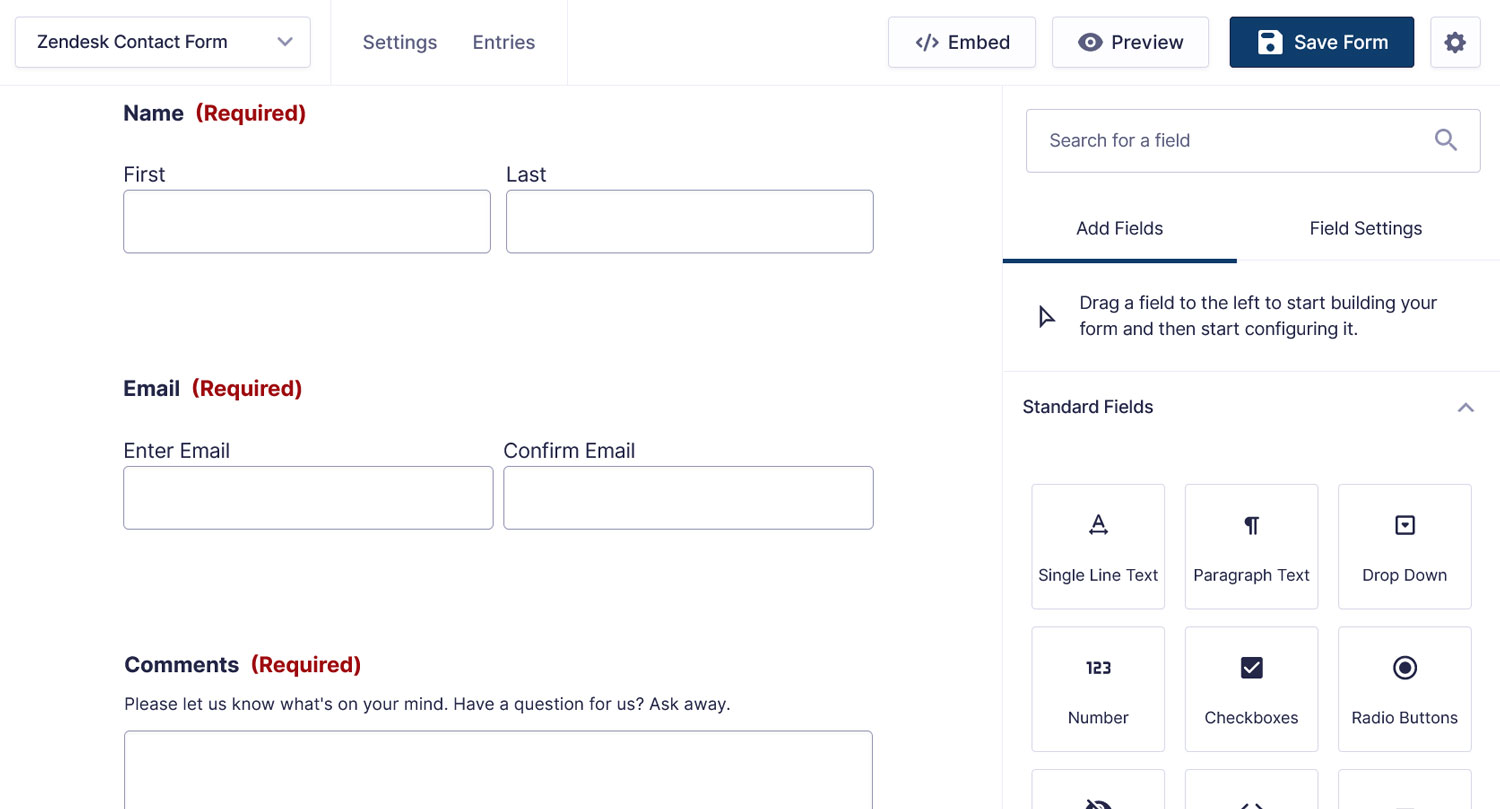
After that, you land on the form editor screen.
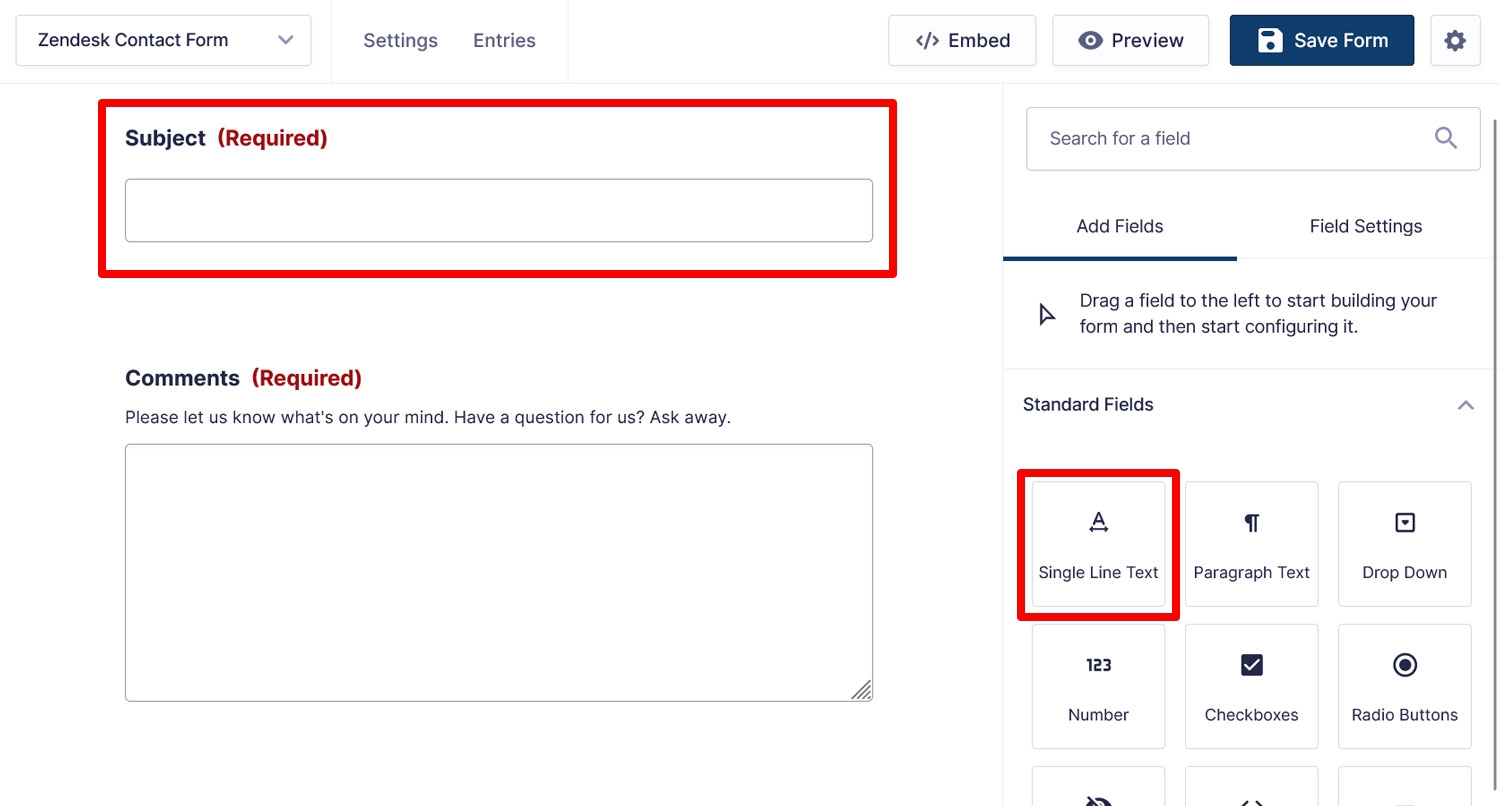
As you can see, it already includes all the aforementioned form fields. If you want to customize the form to your needs, click on existing fields and make changes on the right or add more fields from the same sidebar. For example, in this case, we are adding another single-line text field called Subject and making it required.
This makes it much easier to configure the Zendesk tickets later on. If you make changes to your form, be sure to save them at the top.
5. Install and Set Up the Zapier Add-On
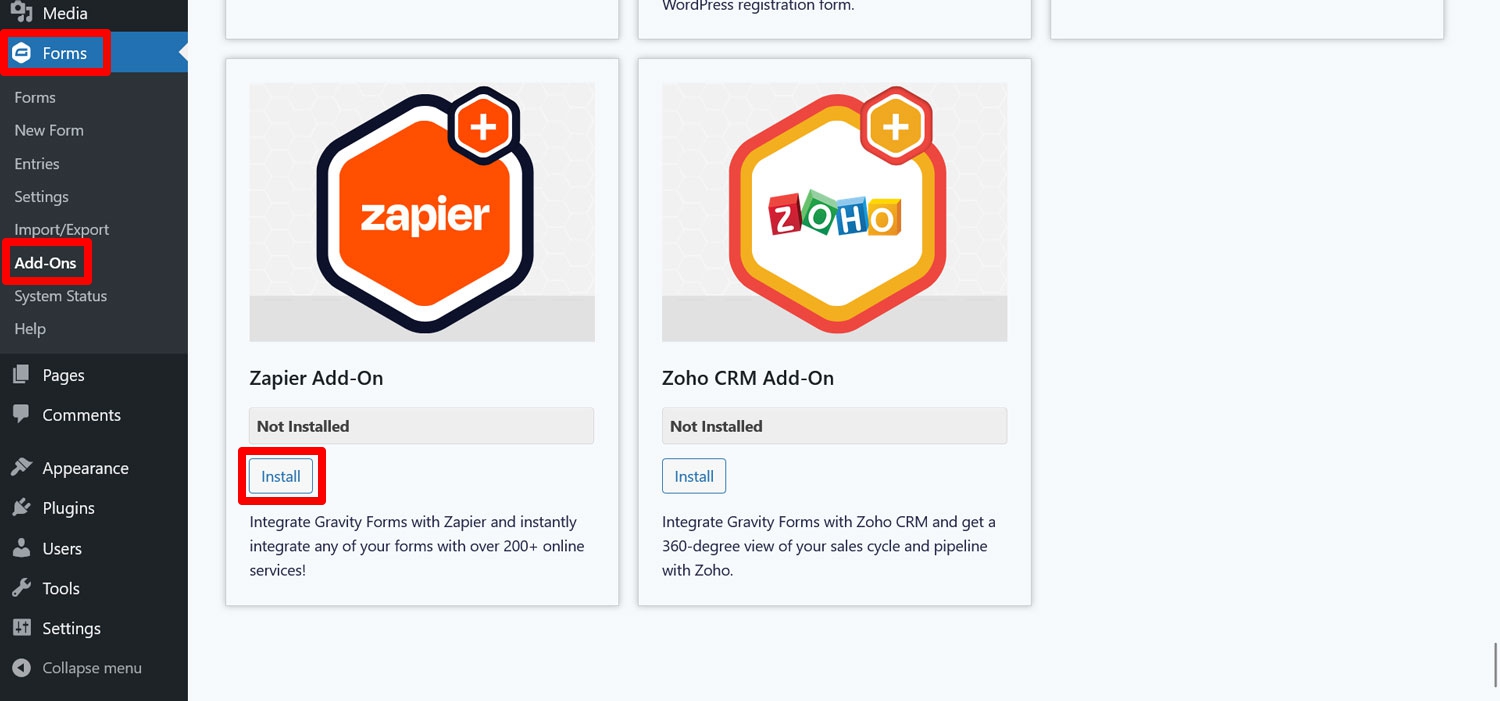
Now it’s time to get the Gravity Forms Zapier Add-On onto your site. For that, go to Forms → Add-ons in your WordPress dashboard, find it by name and click on Install.
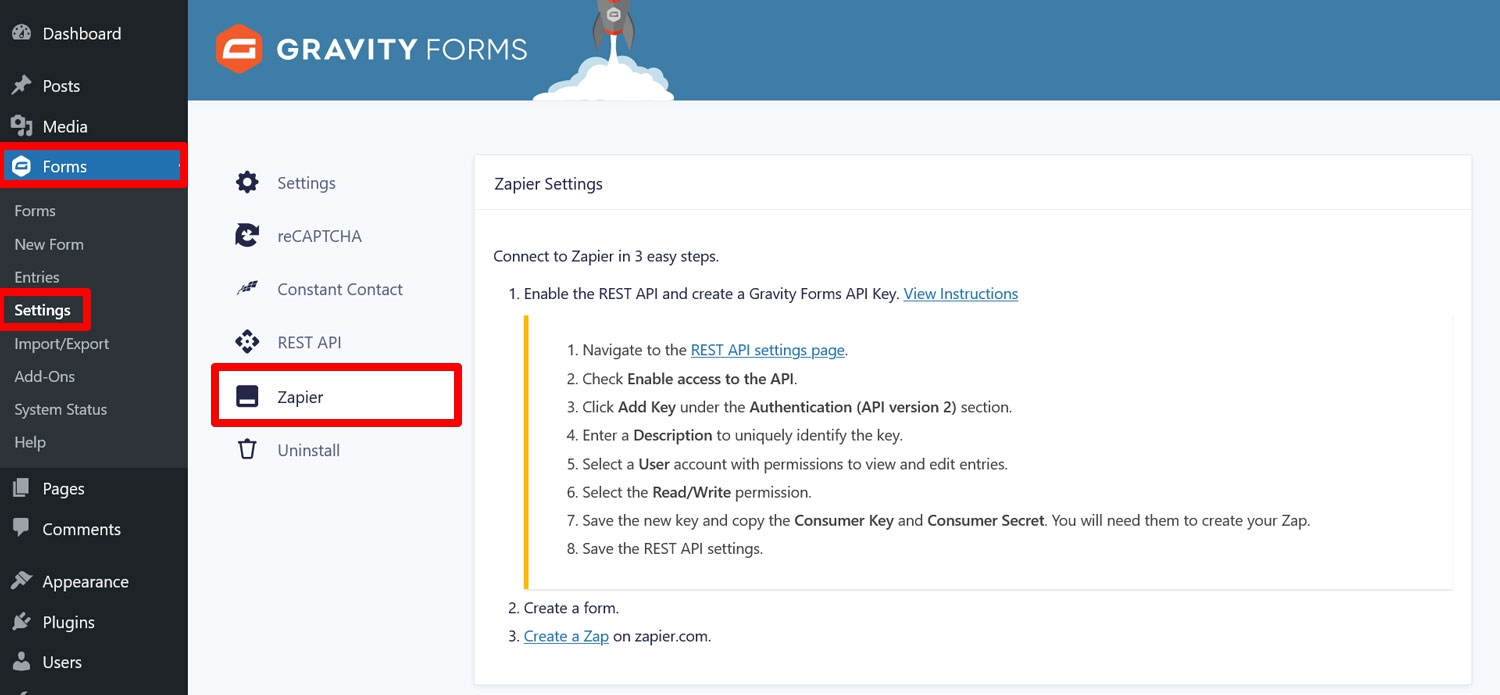
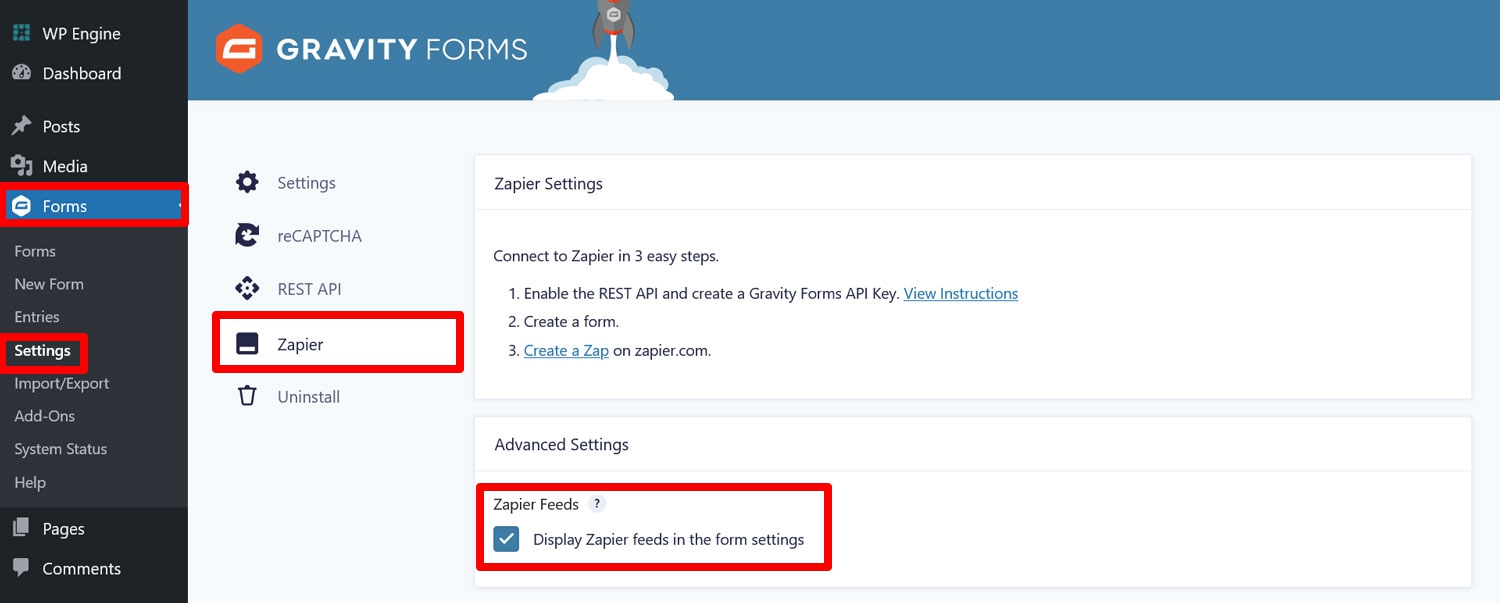
Make sure to activate the add-on when installation is complete. After that, you need to create an API key for the Gravity Forms REST API. Instructions for this are available in the Zapier Add-On settings (Forms → Settings → Zapier, click on View Instructions) but we’ll also go over it here.
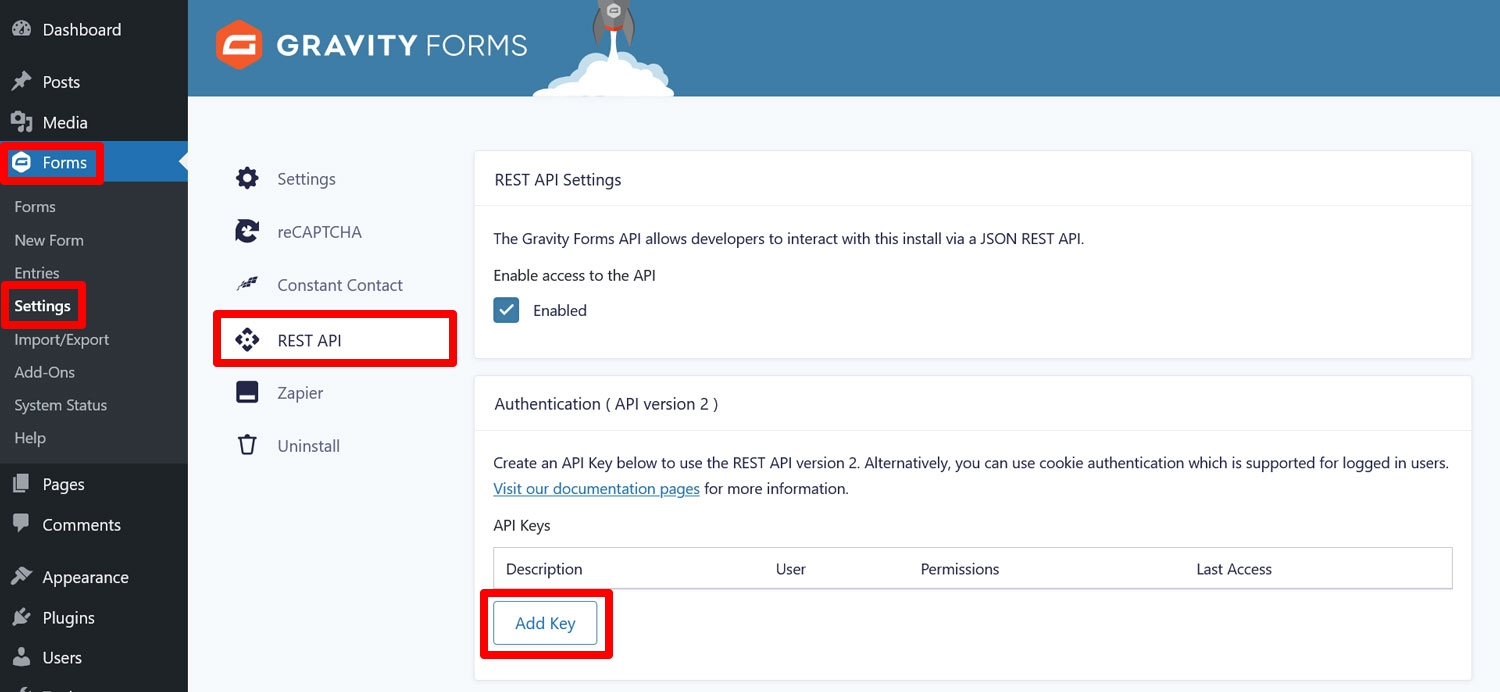
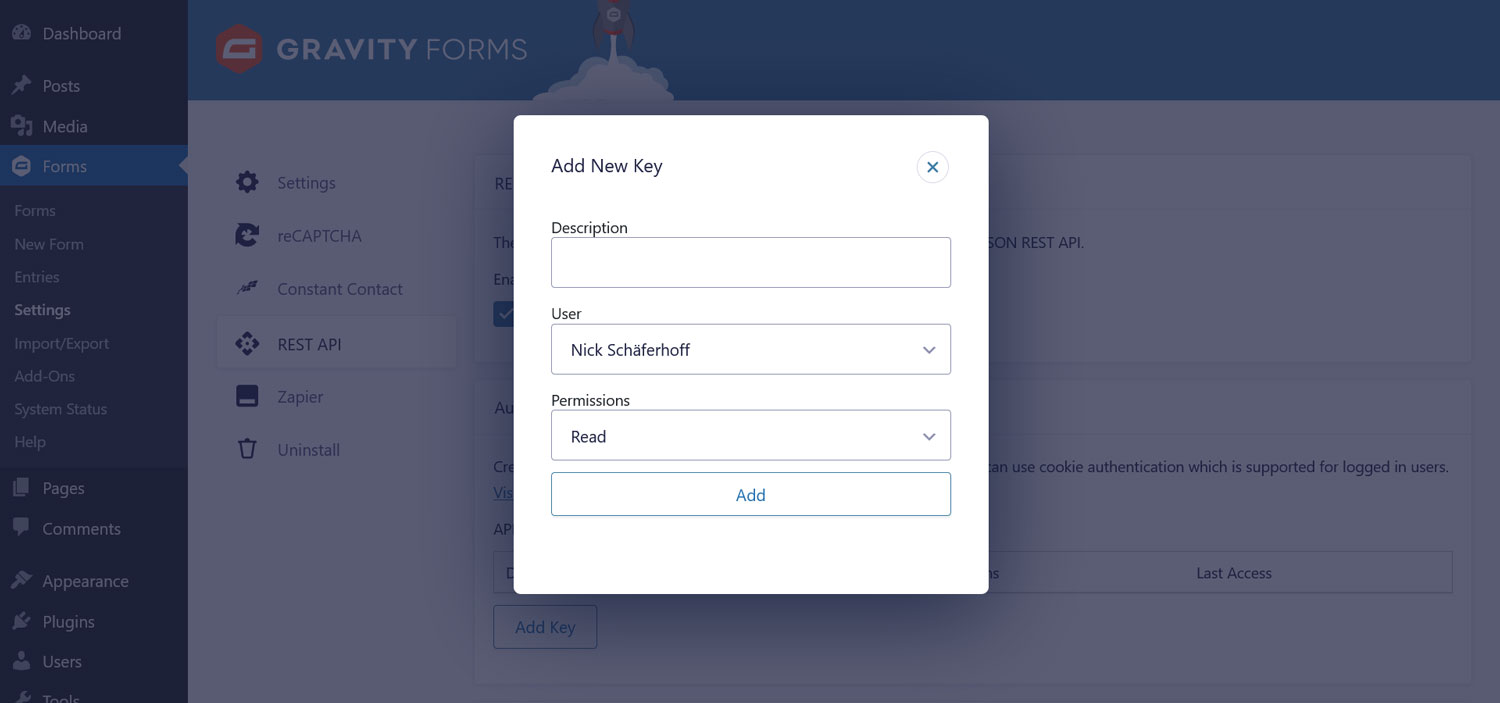
Your first stop is the REST API settings page. You can get there either by clicking the link in the instructions or via REST API in the settings menu on the left. Check the box to enable the API, then click on Add Key under Authentication (API version 2). Be sure to use the right version number!
Fill out the pop-up that appears as follows:
- Description: This helps you distinguish between different API keys.
- User: Select a user with the permission level to view and edit entries.
- Permissions: Choose Read/Write from the drop-down menu.
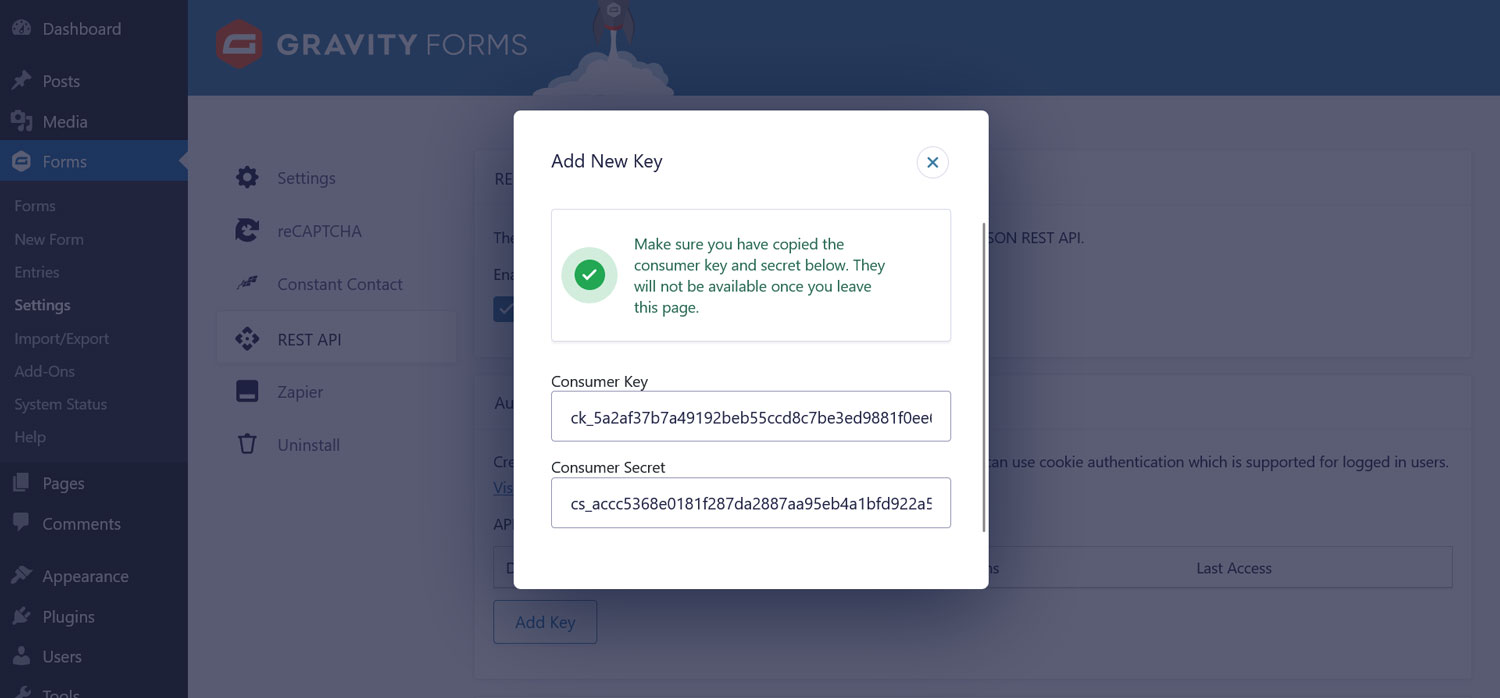
Click the Add button to reveal your consumer key and consumer secret.
Copy and store those somewhere safe. This is the only time you will see them once you close this window. When you have done so, save the settings by clicking Update.
6. Create Your Zap and Connect Zapier to Gravity Forms
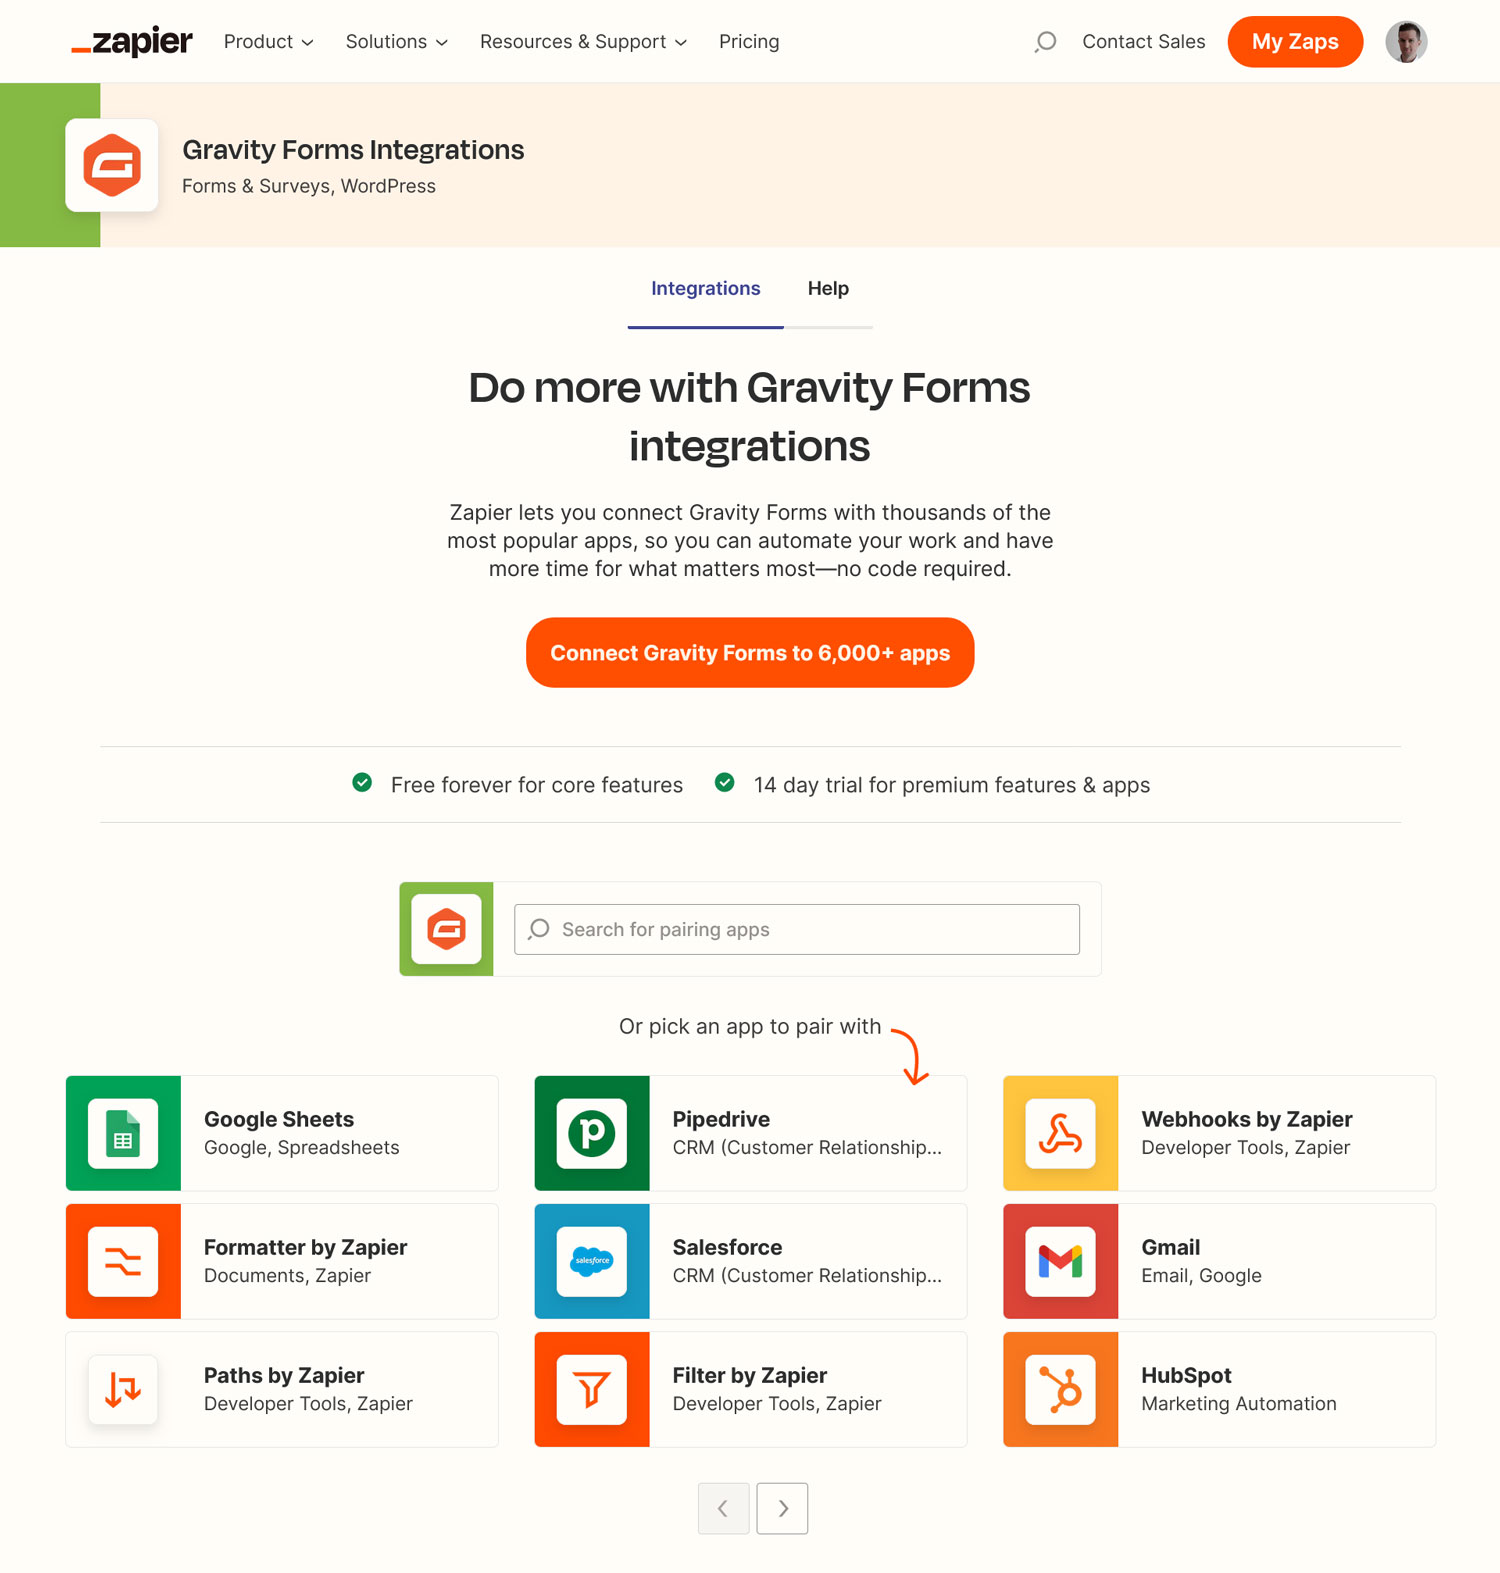
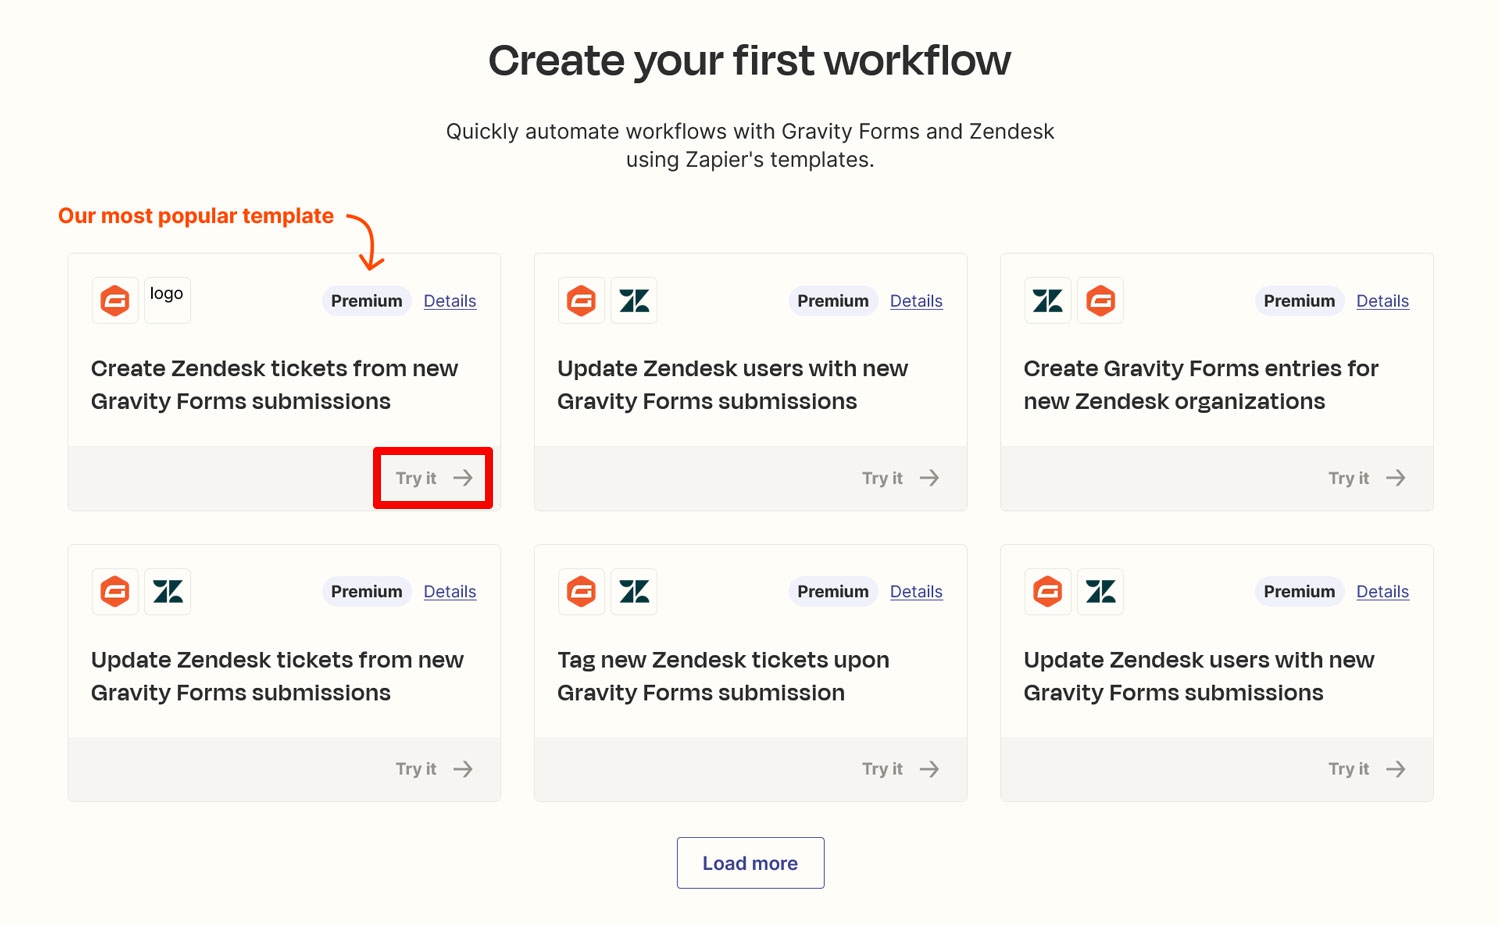
Now, it’s time to set up your Zap in Zapier. You have the option to use a pre-built one or create a Zap from scratch. The Integrations page contains every Zap already available for Gravity Forms.
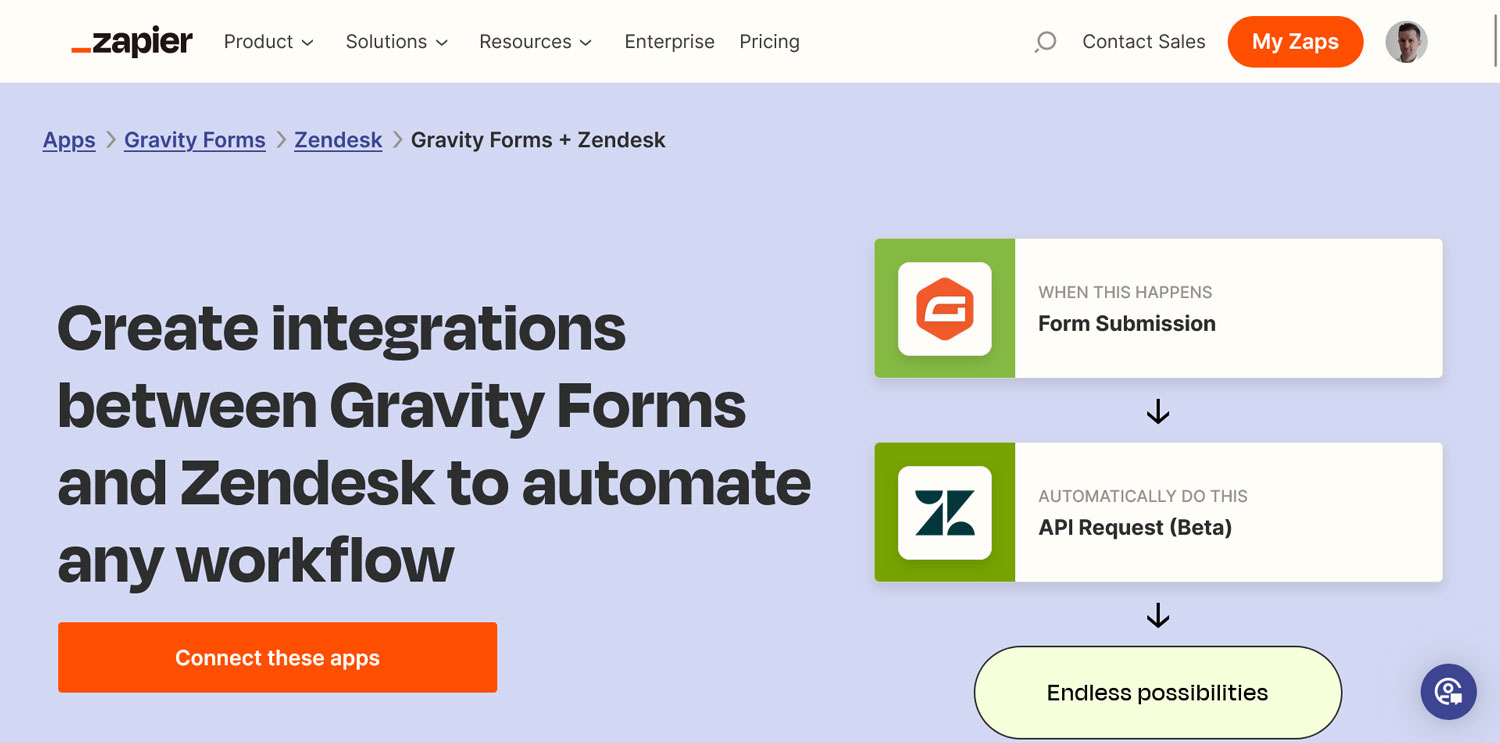
Search for Zendesk to see what Zaps existing for the combination of the two.
The page shows you available triggers and actions for both apps. In our case, the trigger will be a form submission, and the action creating a ticket in Zendesk. It’s the most popular zap for this combination, too. Click on Try it.
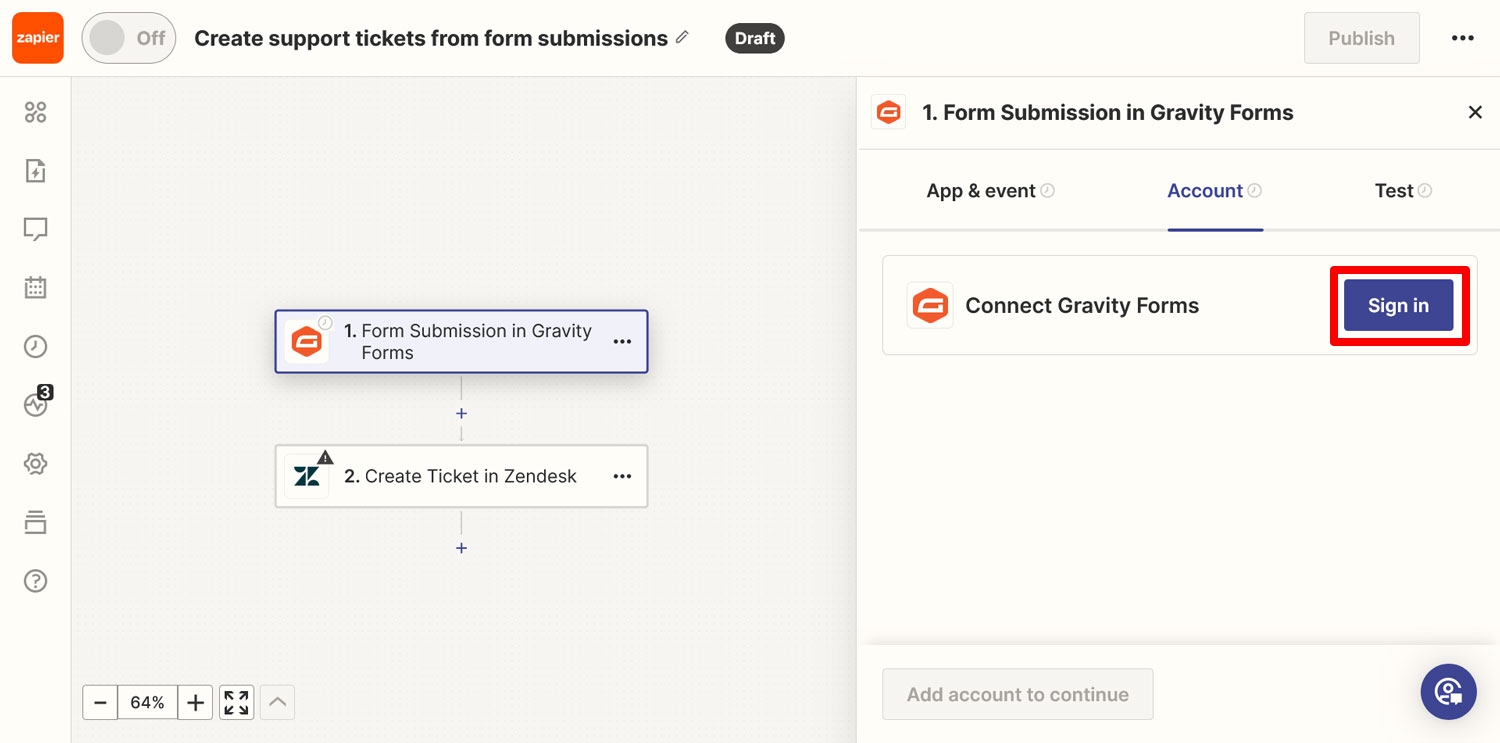
On the next screen, your first task is to input a name for your Zap in the upper left corner. Then, you’ll be asked to log in to both apps. Start by clicking Sign in for Gravity Forms.
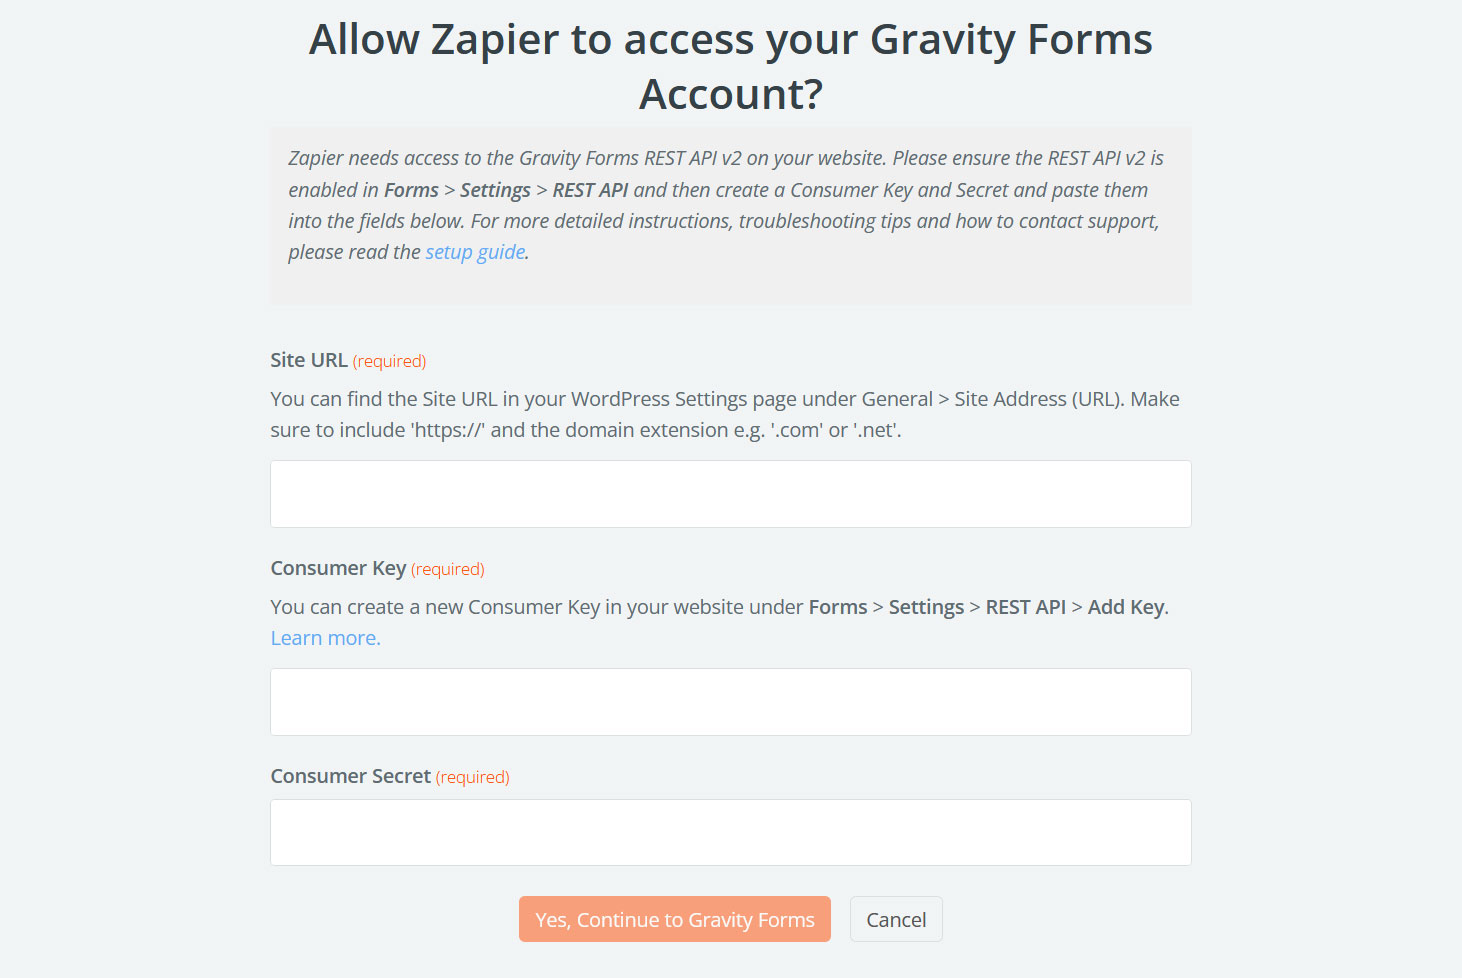
A new form will appear where you need to enter your enter your site URL and the Consumer Key and Consumer Secret you created earlier.
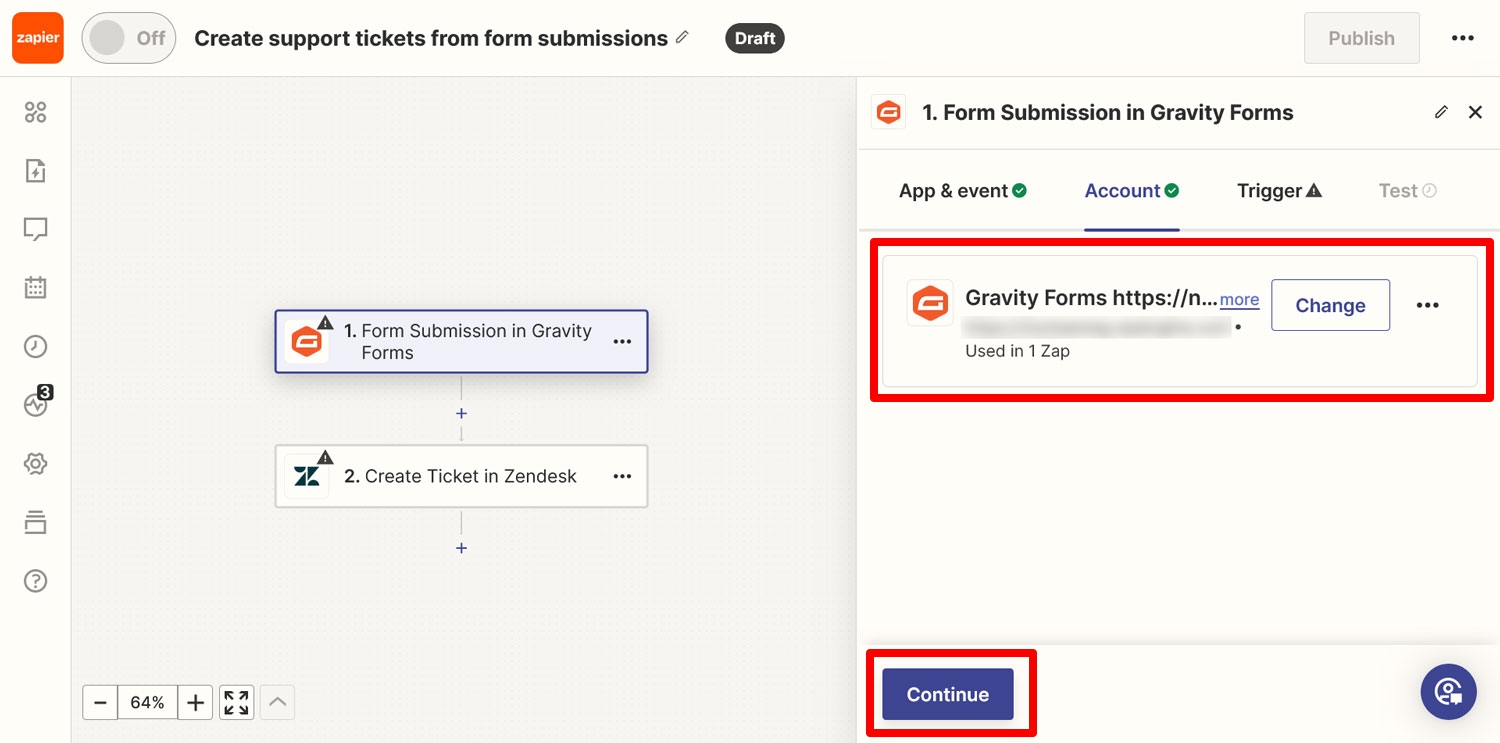
Do so and click Yes, Continue to Gravity Forms. After that, the connection should appear as established on the right side. Click Continue to move on.
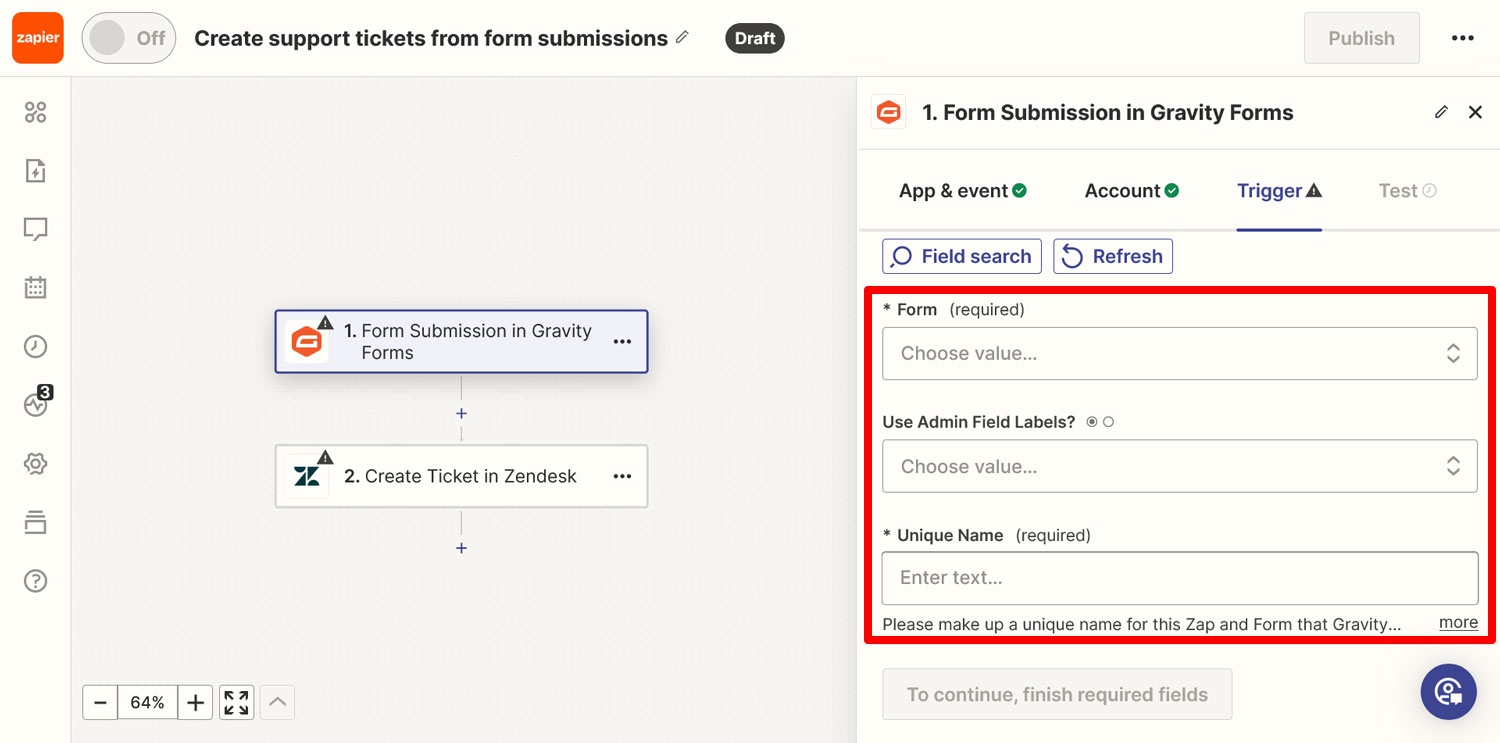
The next step will show you three drop-down menus.
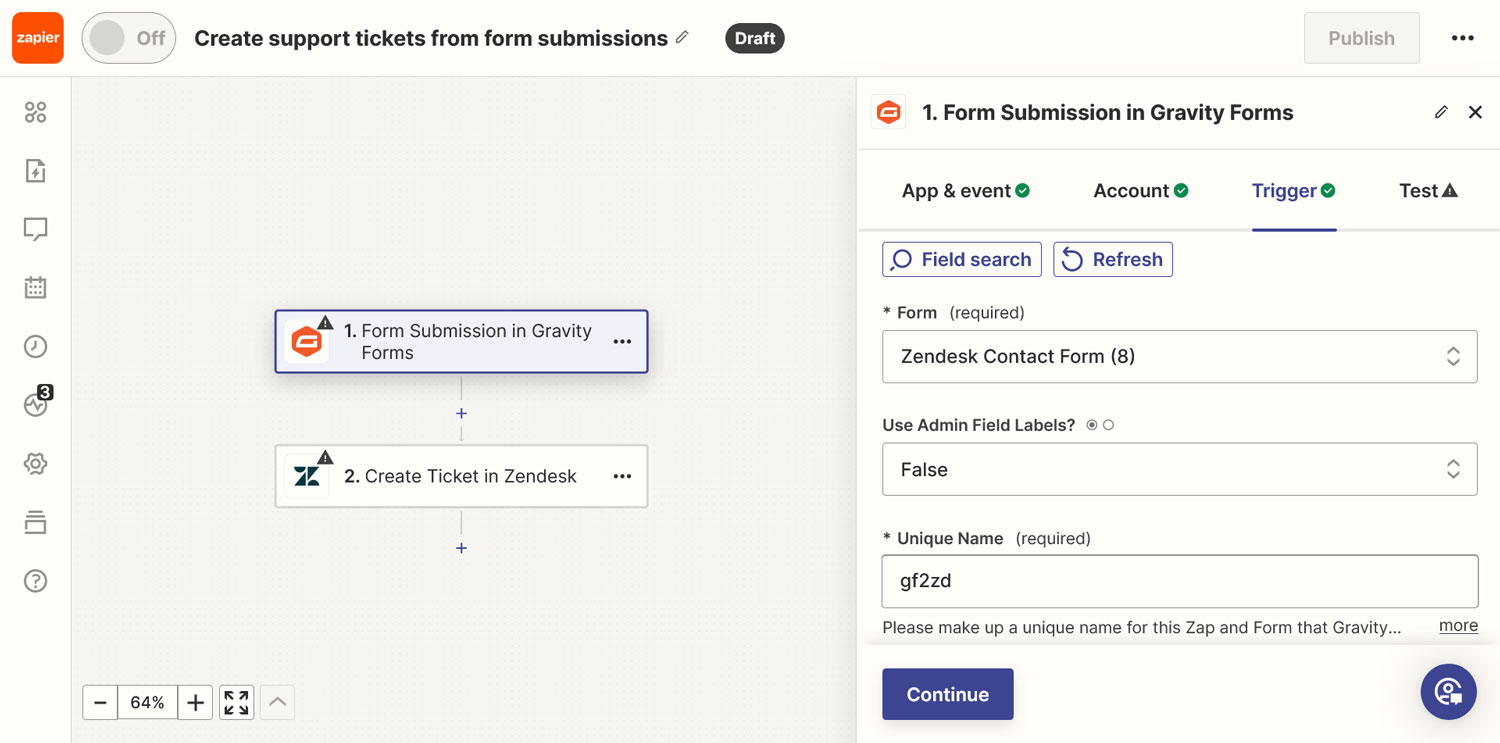
The first is to choose the form you want to use as the trigger. Pick the one you created earlier or whichever form you want to connect to Zendesk.
The Use Admin Field Labels? section only matters if you added Admin Labels. You can usually set it to False.
That leaves Unique Name, where you need to enter a unique descriptor for this Zap and form. Gravity Forms uses this process the data so it needs to be one of a kind. Below is the setup we used for this tutorial.
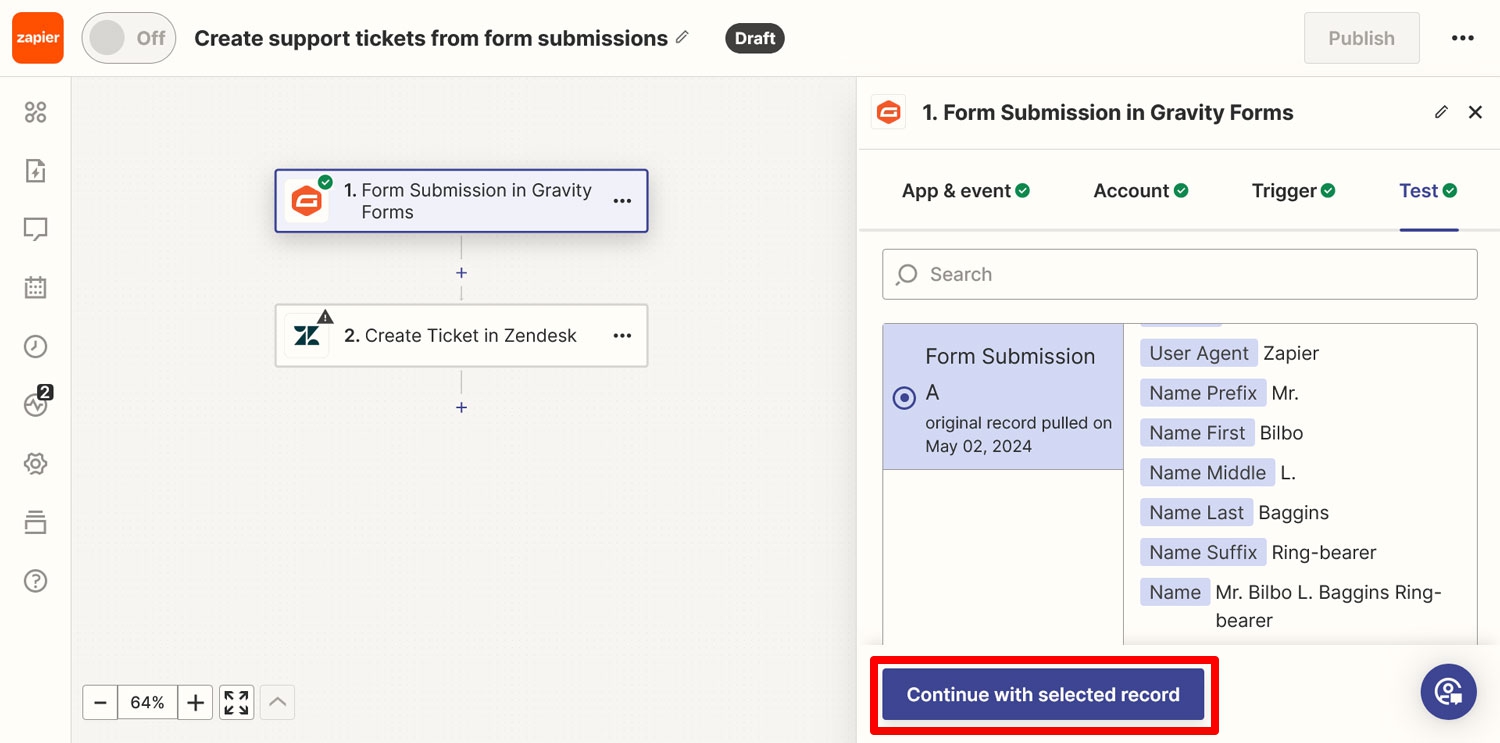
After that, click Continue again. Zapier will then load example data from Gravity Forms for testing the connection. When that has happened, click Continue with selected record to run the test. If all works as it should, Zapier will continue to the next step.
7. Establish a Connection to Zendesk
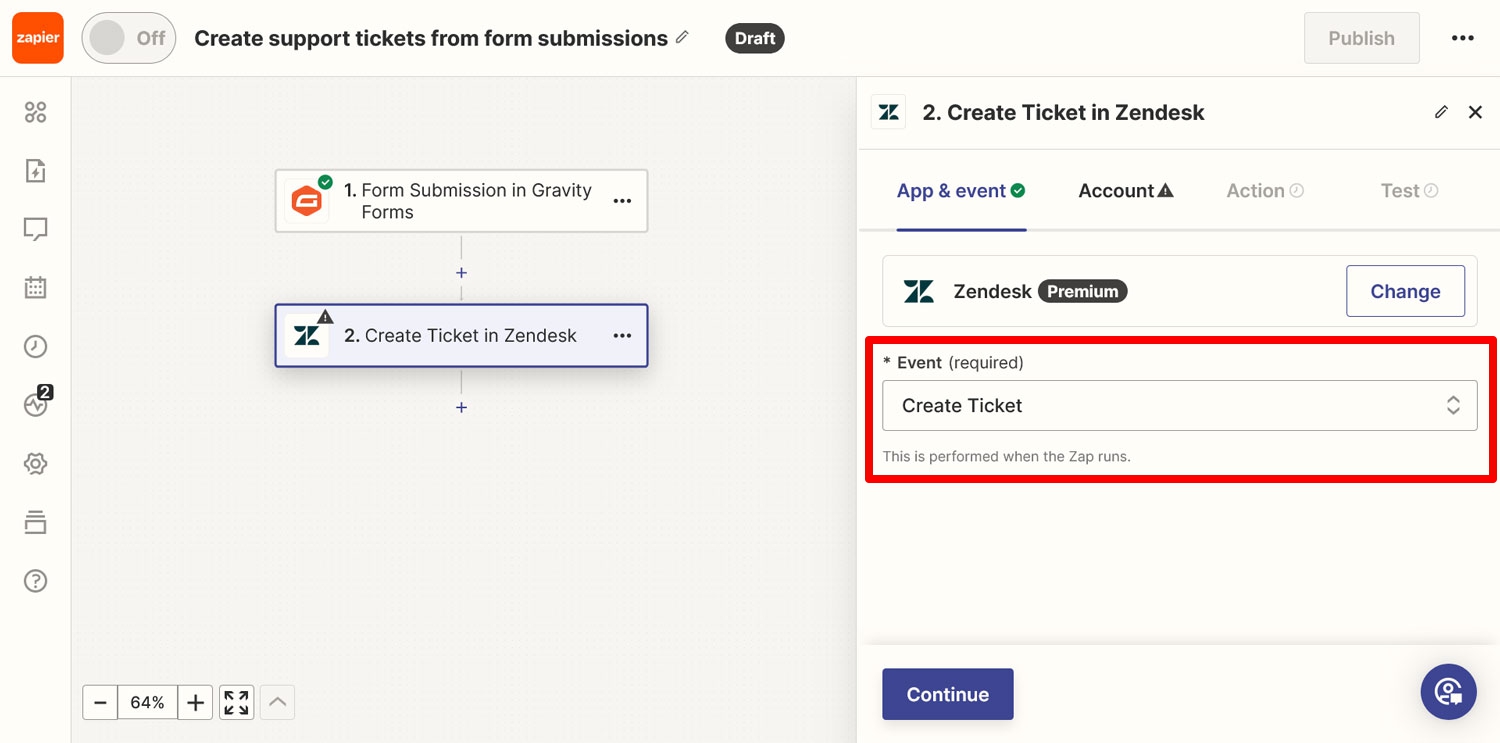
In the second half, we need to establish a connection to the other part of the equation – Zendesk. Here, the first step is to choose the action Zapier should perform in Zendesk when triggered by a WordPress form submission.
Based on the chosen Zap, it should already be set to Create Ticket. There are also other options such as adding a comment or tag to a ticket, creating a user, updating a ticket, and more. For this tutorial, we’ve everything as it is.
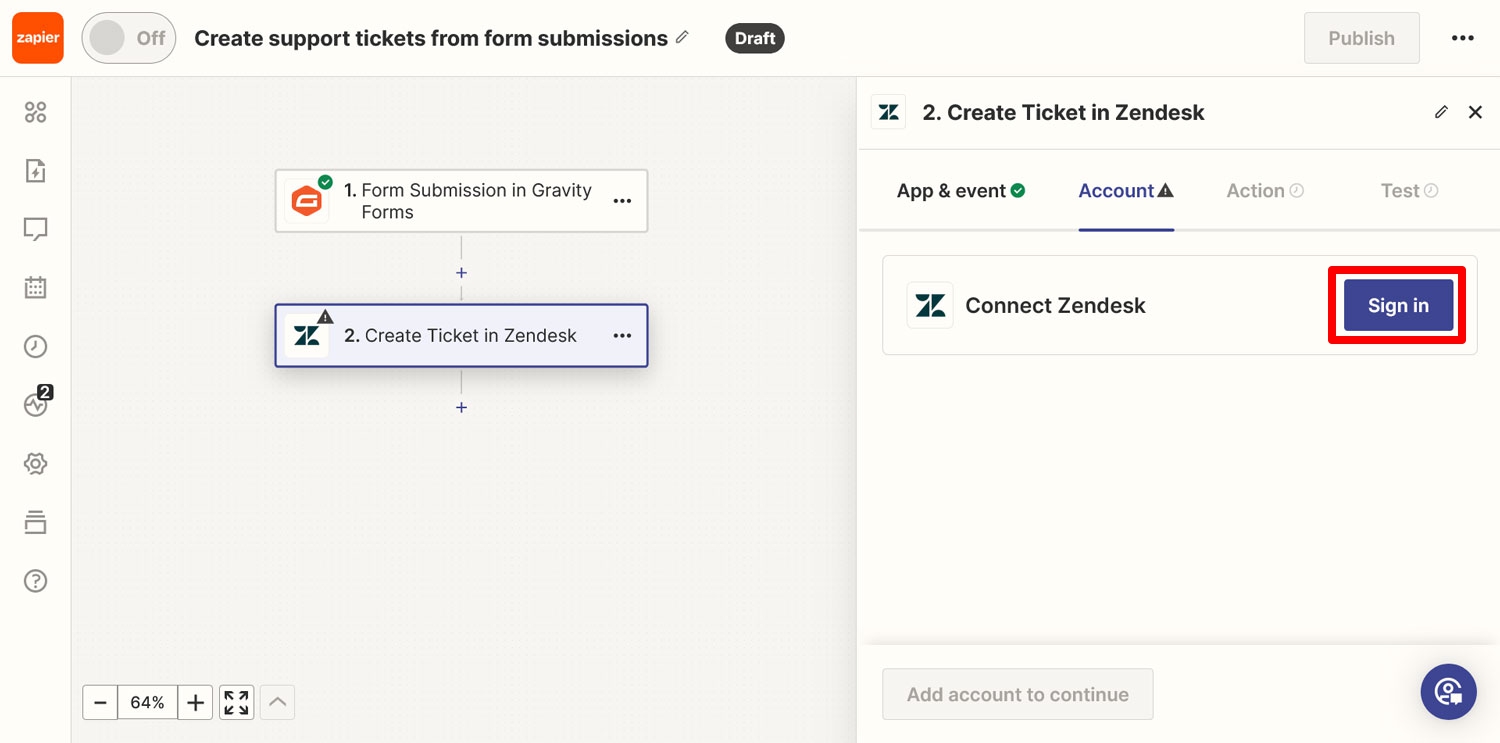
In the following step, you are asked to sign in to Zendesk.
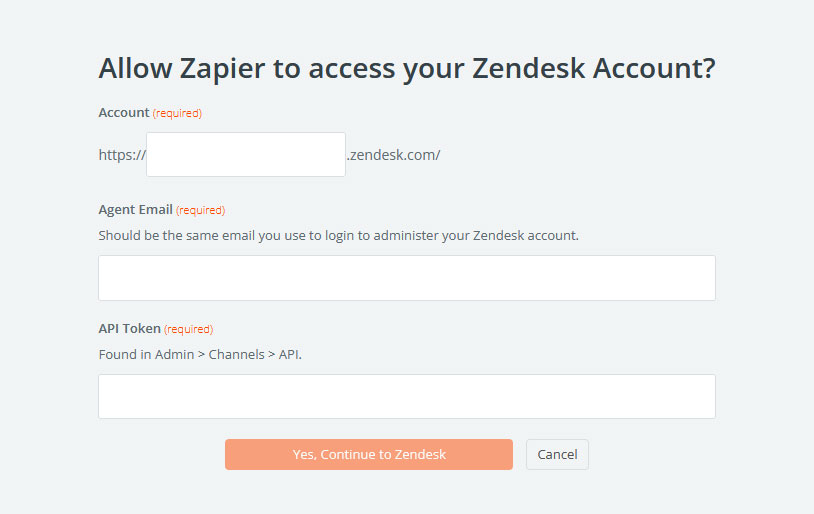
When you click the respective button, it also opens up a window where you need to input the information to authenticate yourself.
In this case, you need your:
- Account URL
- Login email
- API token
In case you don’t know, the account URL appears in your browsers address bar when logged into your Zendesk dashboard.
For the email, you hopefully still remember which one you signed up with. We talked about the API token earlier, so you should have that at hand as well.
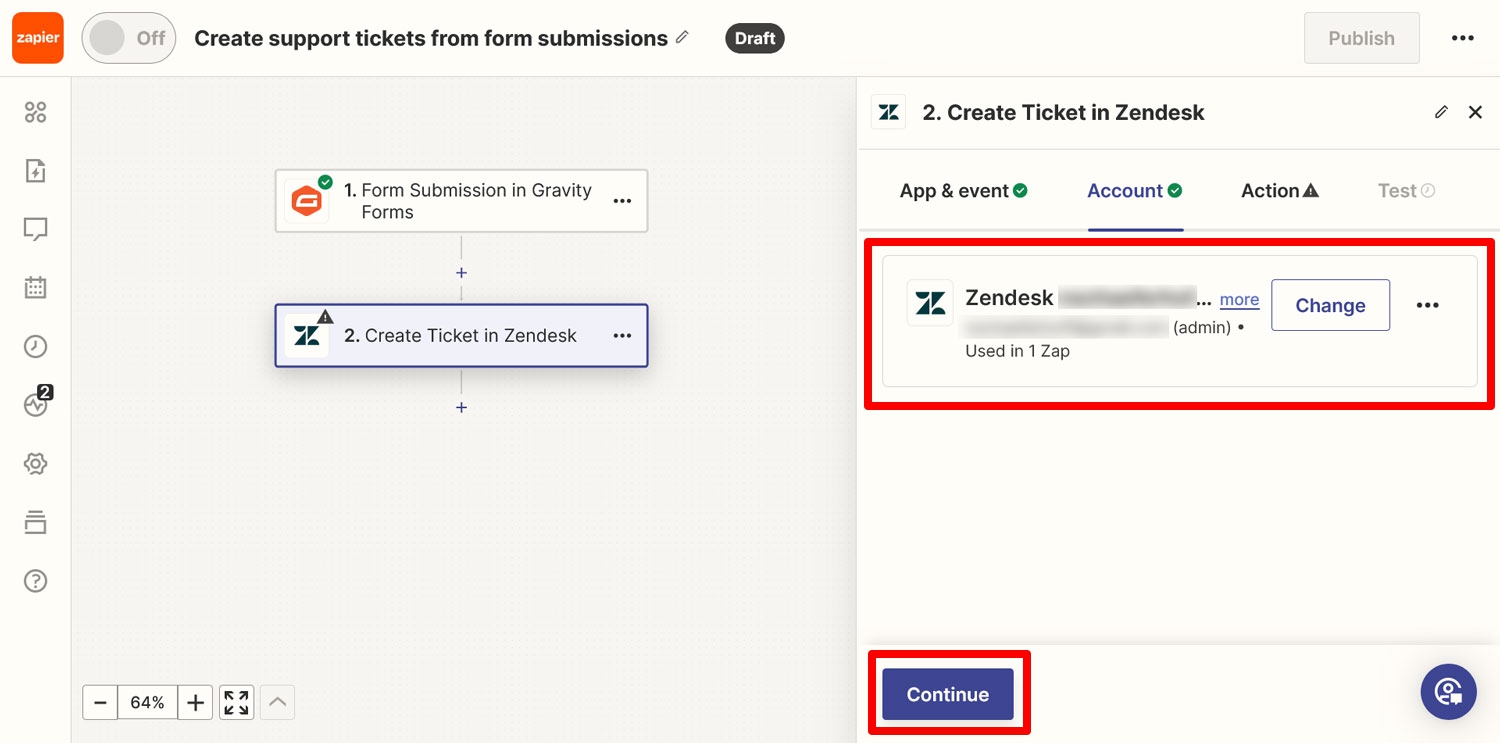
Input everything in the respective fields, then confirm at the bottom. If all went well, you should be logged in and be able to continue now.
8. Configure the Action
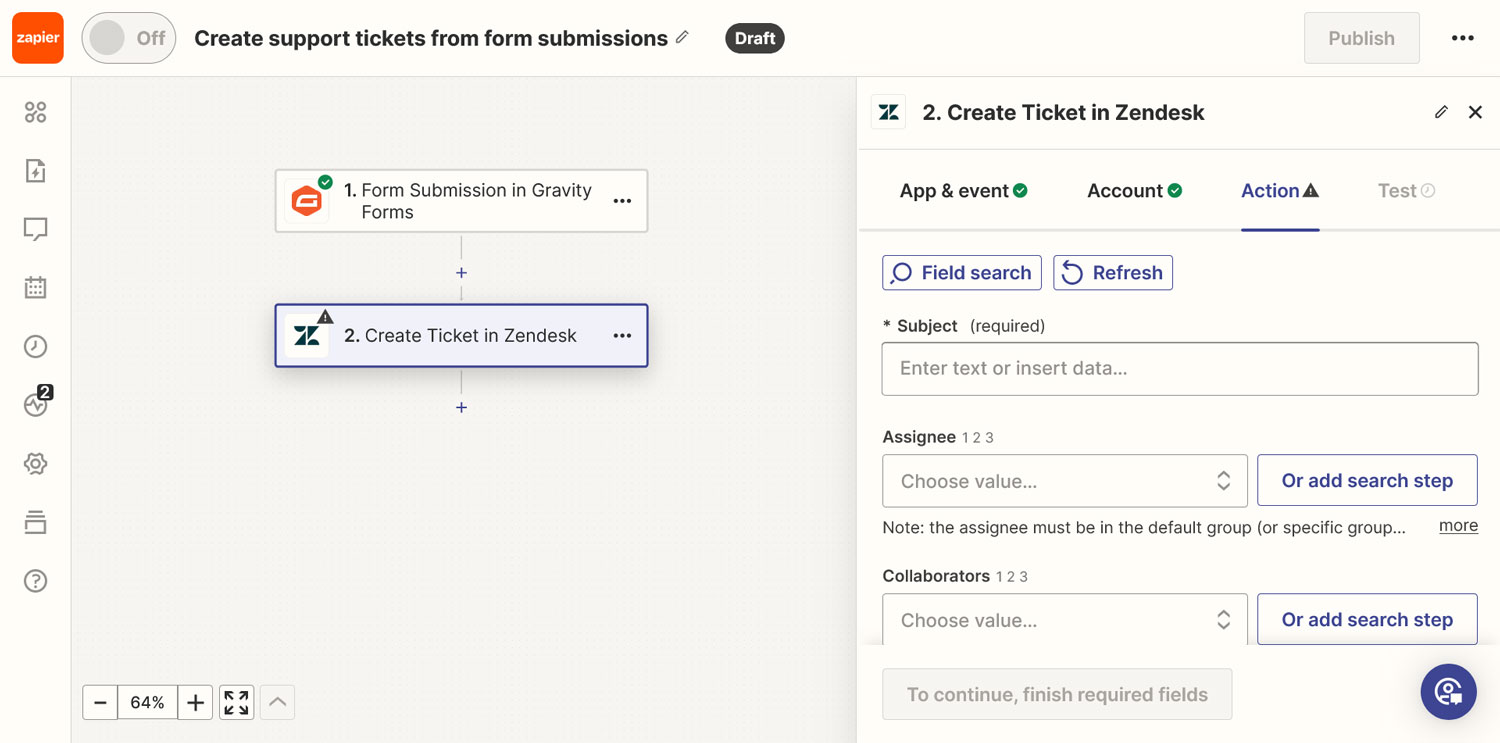
In this step, you determine how the ticket is created.
There are a lot of options you can configure. For example, you can automatically assign the ticket to someone (or even insert an intermediate step where Zendesk looks for the right person), assign the ticket to a group, add tags to it, set a priority or type, add email addresses to send the ticket to, and a lot more.
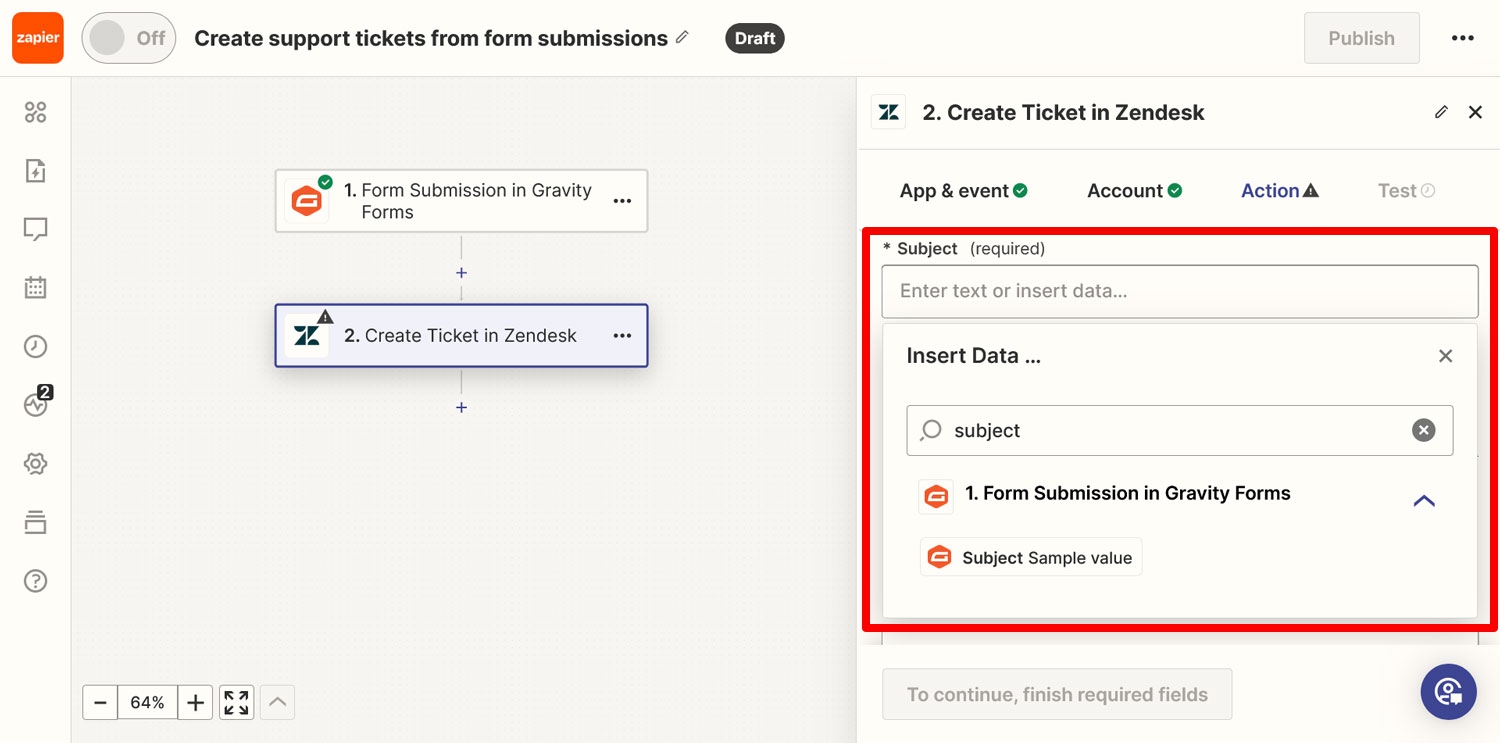
However, the only two required data sets are the ticket subject and content. In order to send them over correctly from WordPress to Zendesk, you need to insert the respective Gravity Forms data into those fields.
Do that by clicking into the Subject line and choosing the correct example data that we imported earlier. In this case that’s Subject: Sample value.
If it makes sense, you can also add your own text to the field that will become part of the subject line when submitted as a ticket.
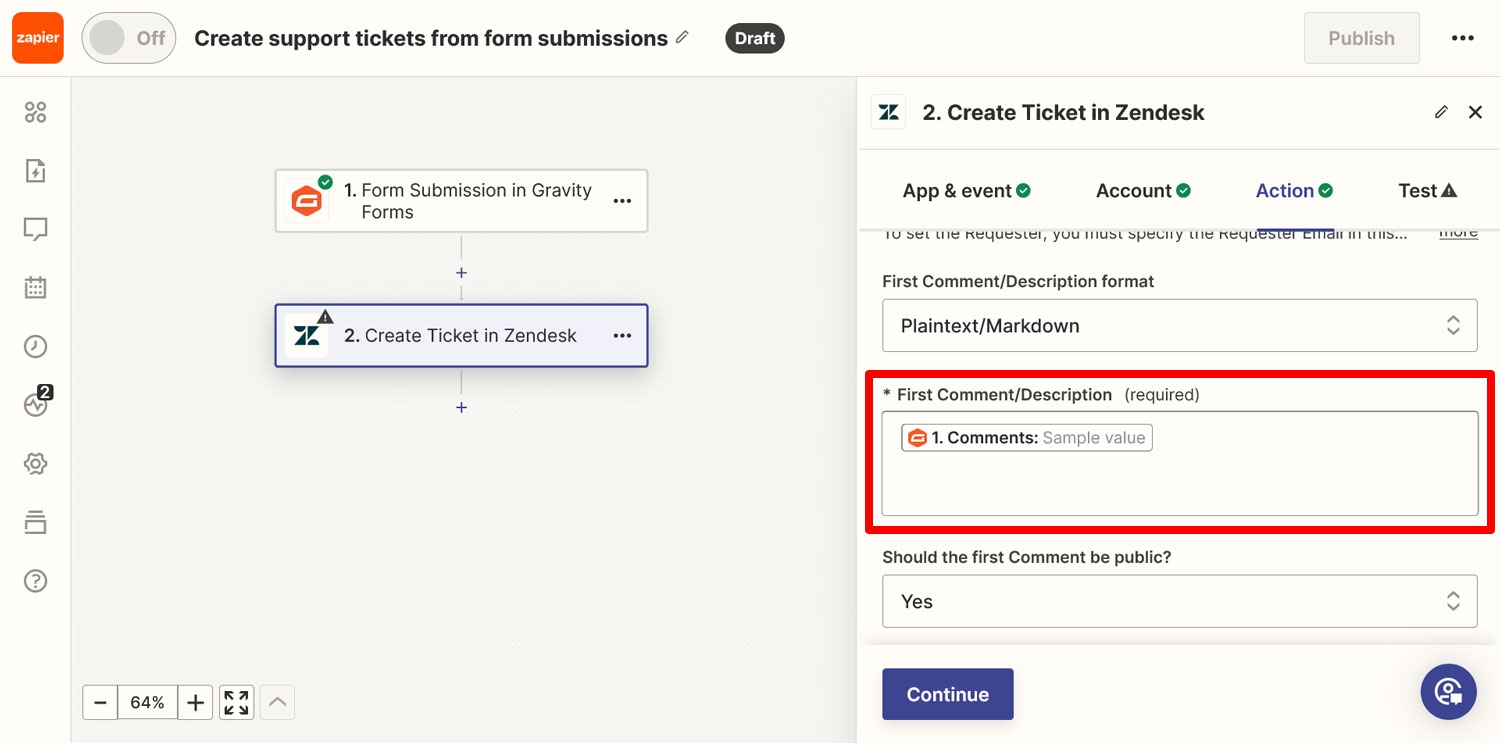
When you are done with this, do the same thing for First Comment/Description. Here, the correct choice is Comments: Sample value.
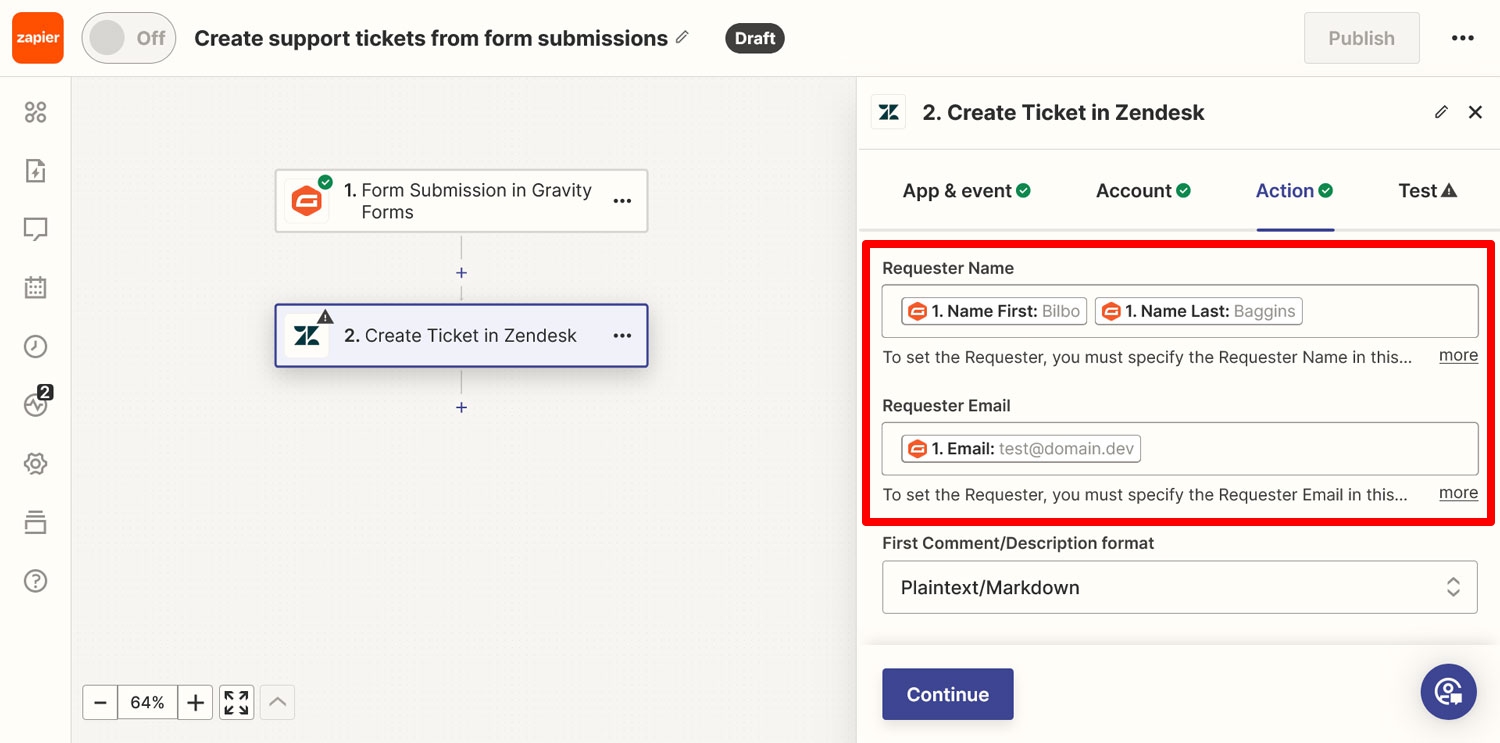
It also makes sense to add the name data to the Requester field and the email to Requester Email.
Of course, if there is other information you want to include for your use case, feel free to configure that as well. However, for checking the main functionality, the above is enough. When you are ready, click Continue.
9. Test and Publish
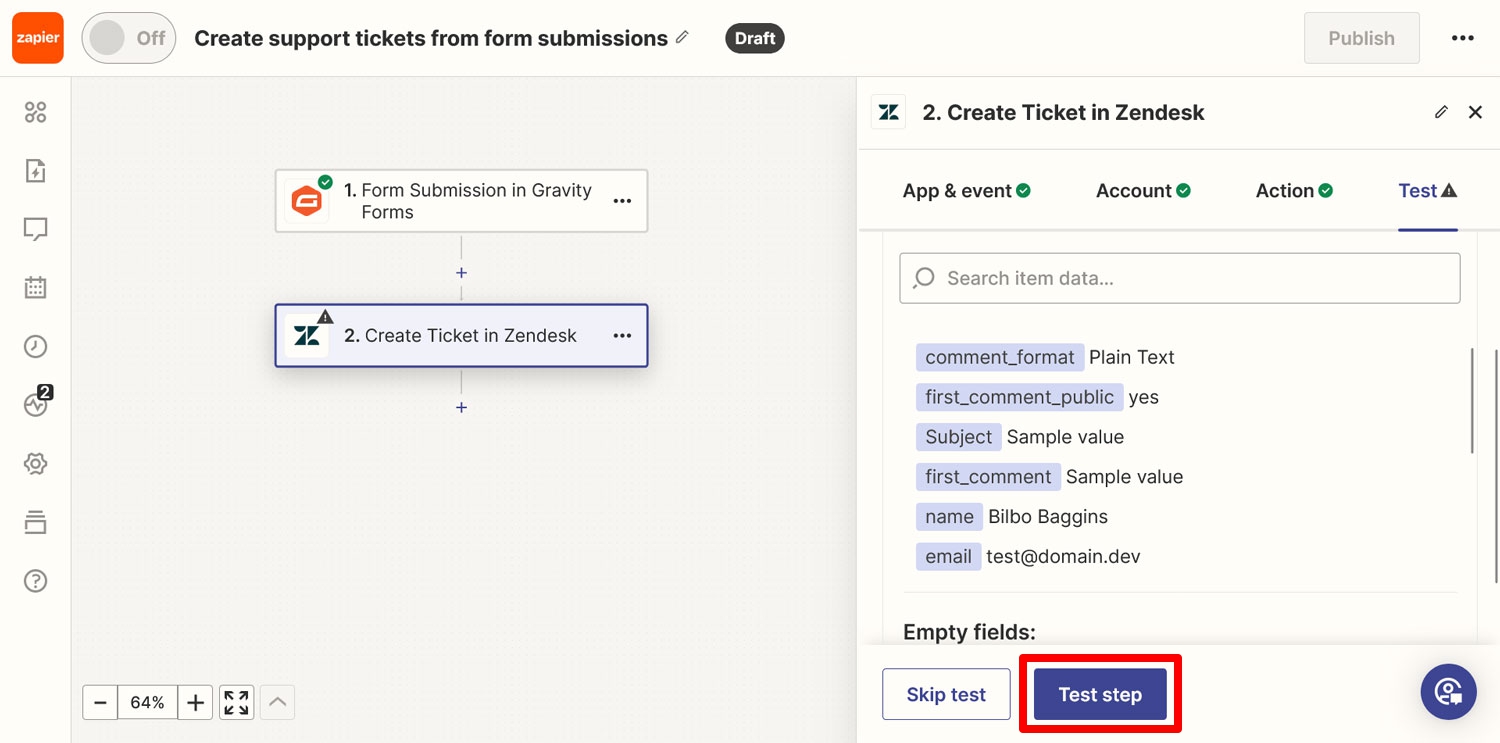
Zapier will then show you the configuration and offer you to test your setup.
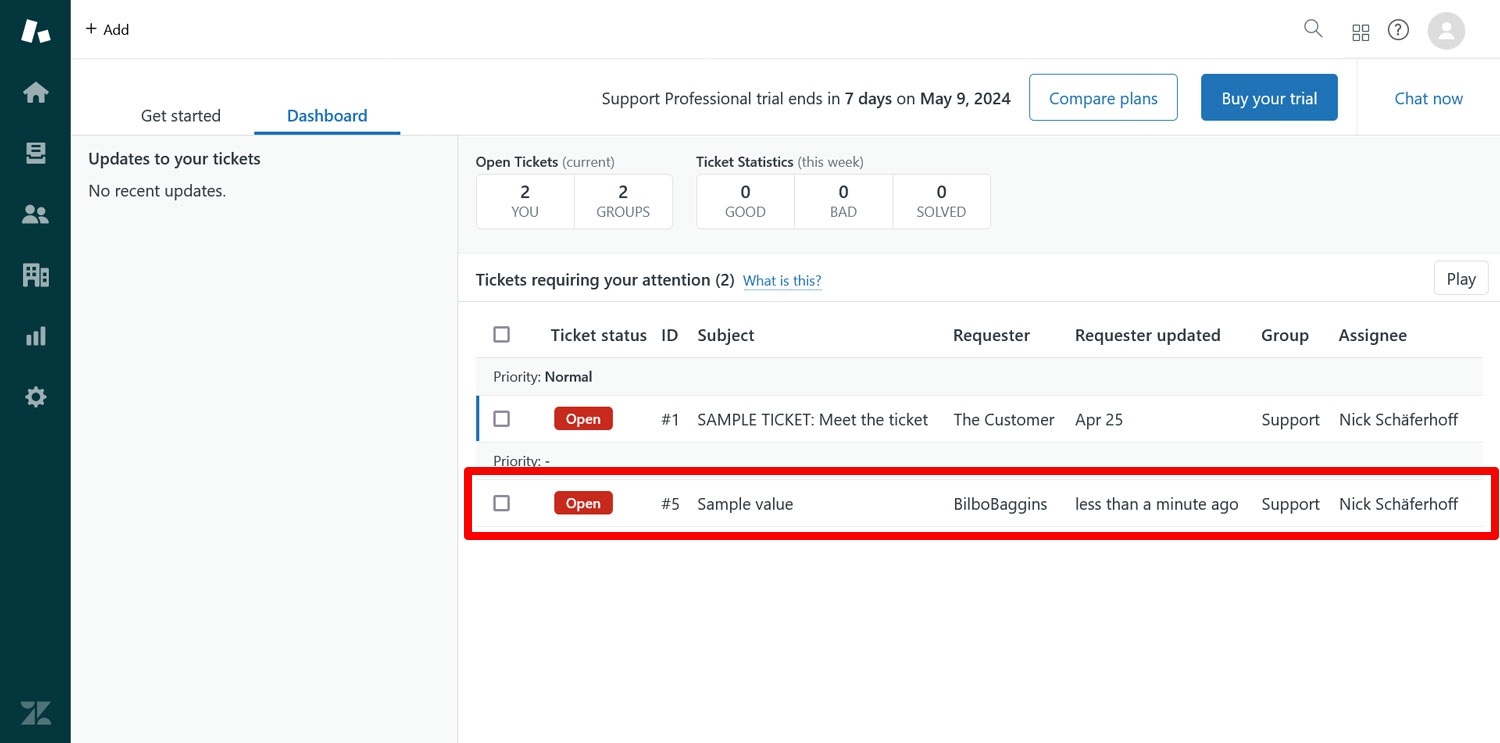
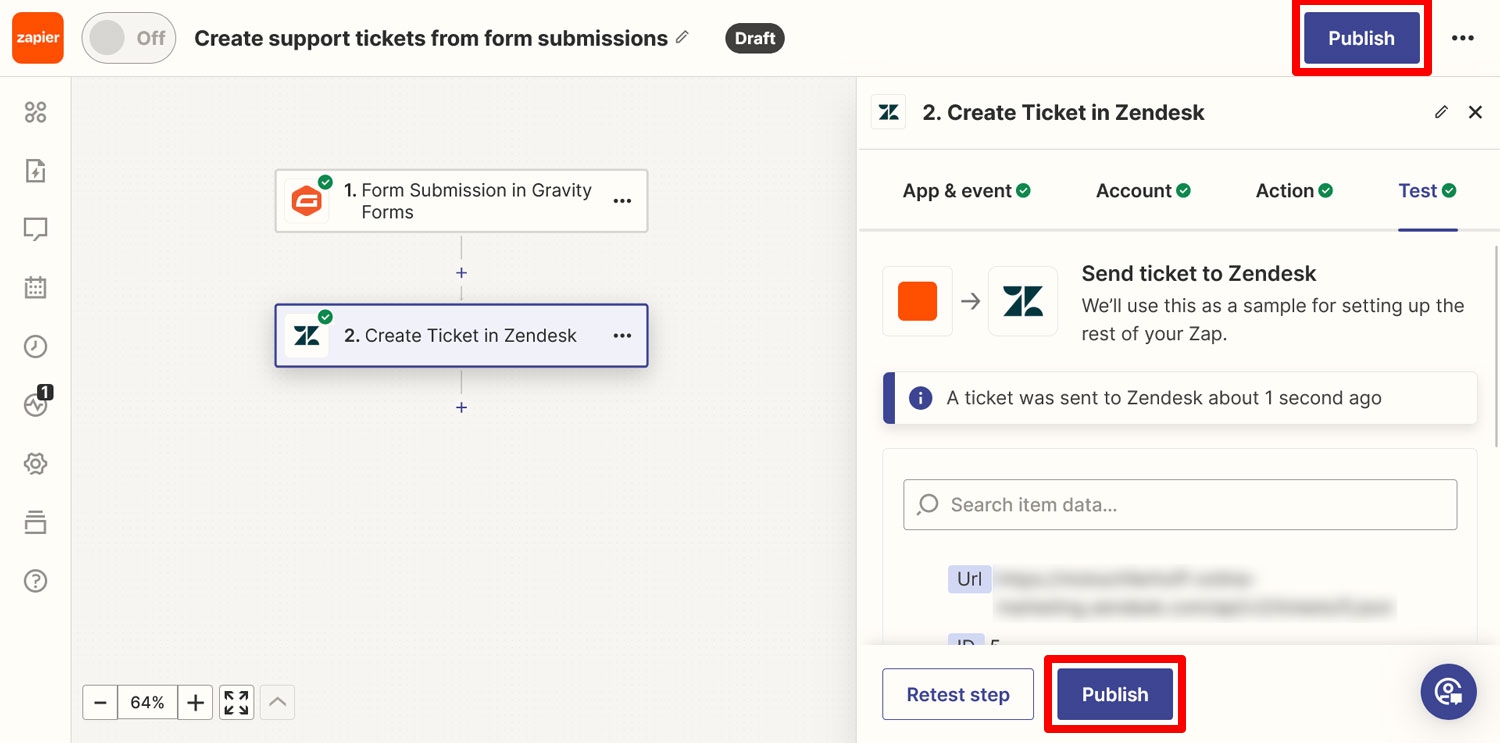
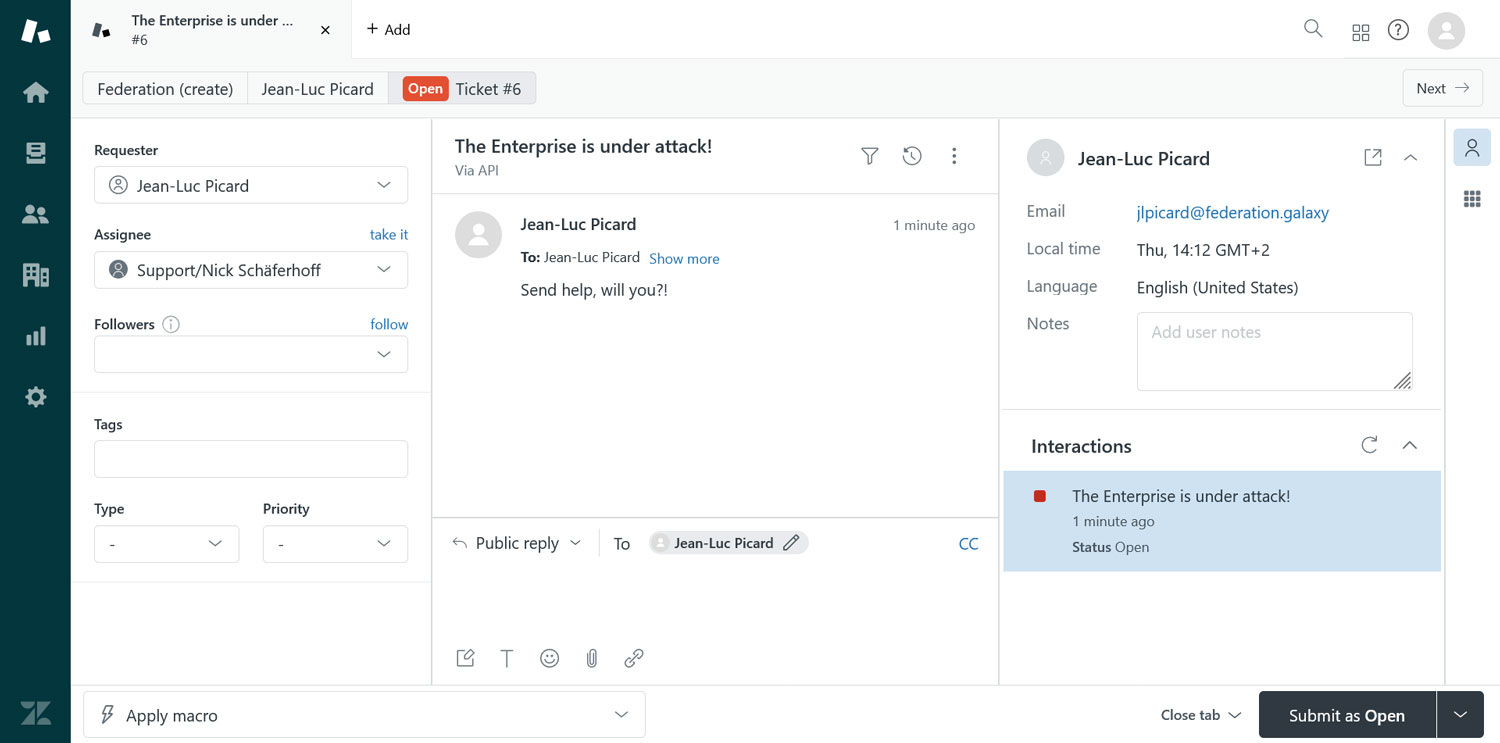
Click Test Step to run it and send a ticket to Zendesk. When finished, go back to your customer experience dashboard. If everything went well, you should see a ticket with the sample data there.
Nice! To make the functionality available on your site, you need to publish the Zap by clicking a button of the same name.
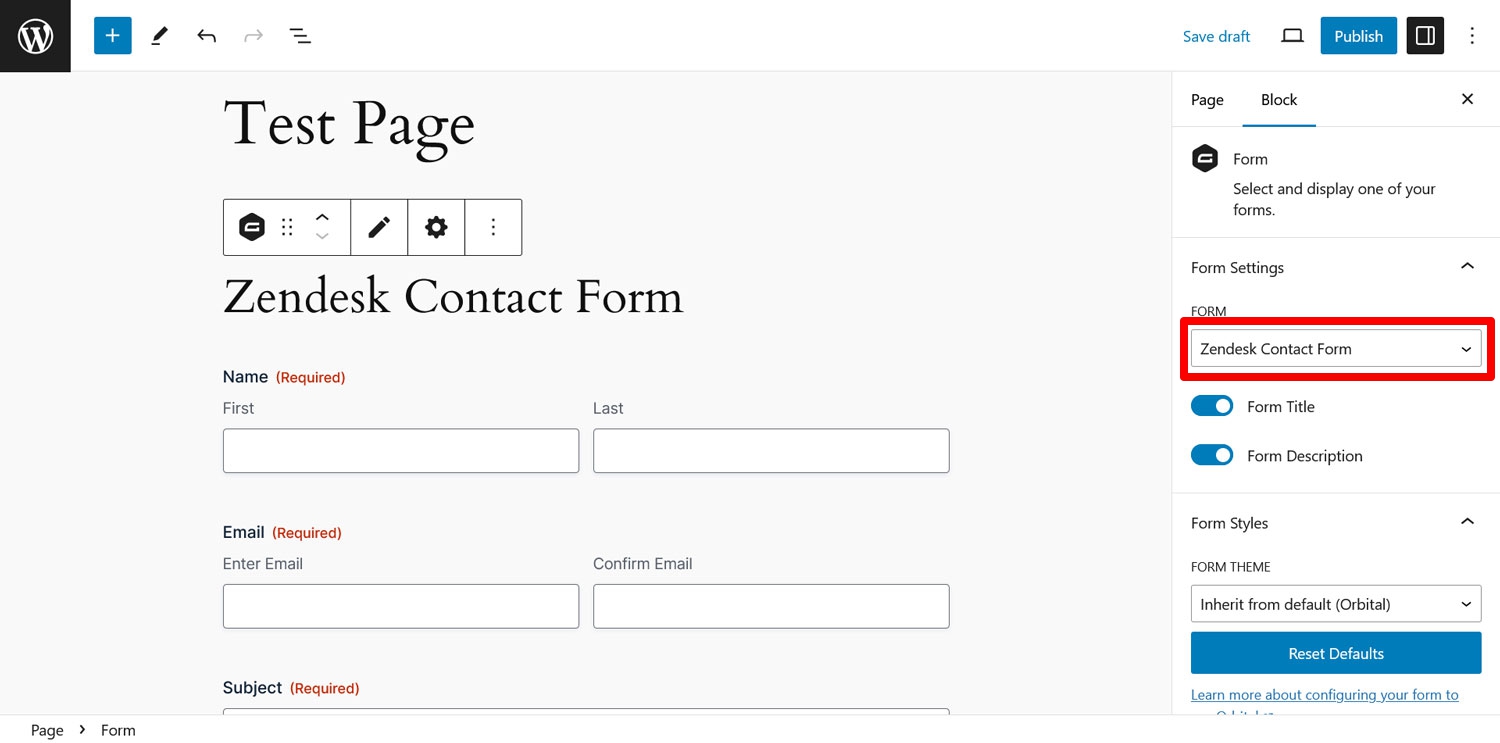
After that, for the final test, embed your form somewhere on your site using either the Gravity Forms block or shortcode.
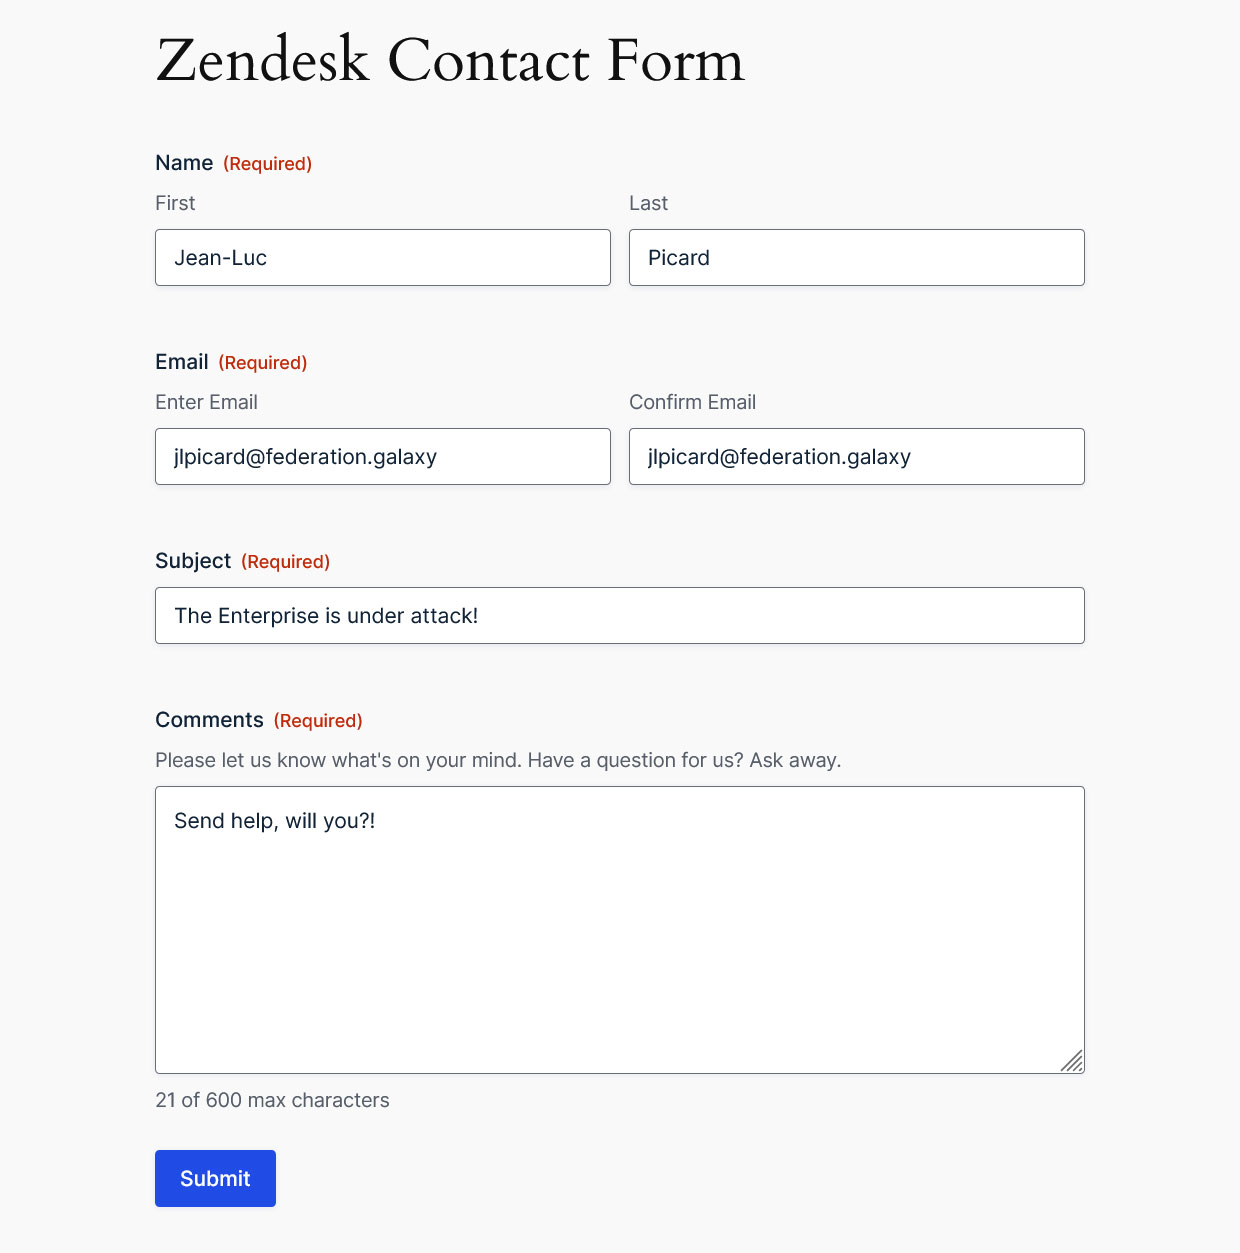
In preview mode or on the published page, input some sample data of your own and submit the form.
If this, too, arrives in your Zendesk dashboard, you are all good.
10. Use Conditional Logic (Optional)
If you want every single submission from your form to arrive in Zendesk, this last step is not for you. However, it often makes sense to only send a form entry if a user has filled out the form in a certain way. That way, only valid requests show up as tickets in Zendesk. Gravity Forms has a powerful tool for this: conditional logic.
If you want to use it go to Forms → Settings → Zapier in your WordPress dashboard and check the box for Display Zapier feeds….
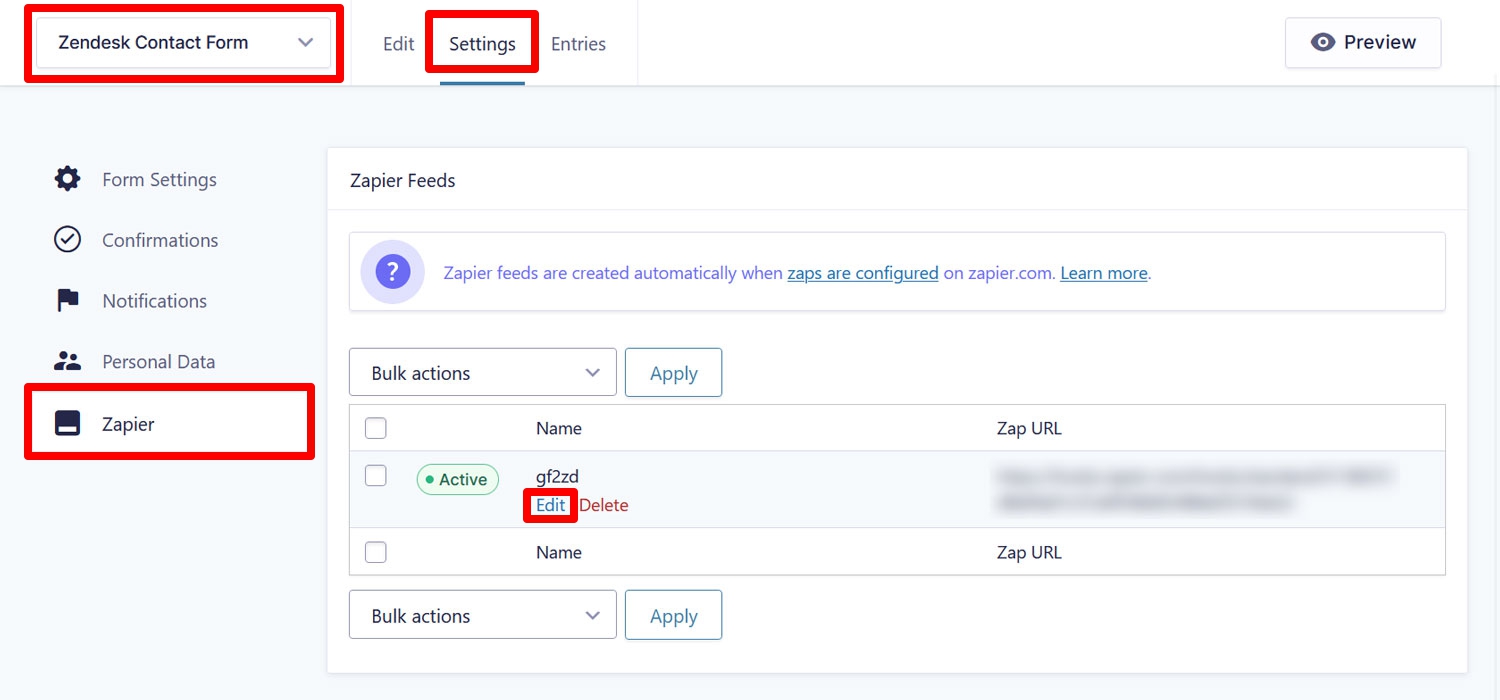
Now go to your form’s settings and open the Zapier tab. Click Edit under the Zapier feed that you should find there.
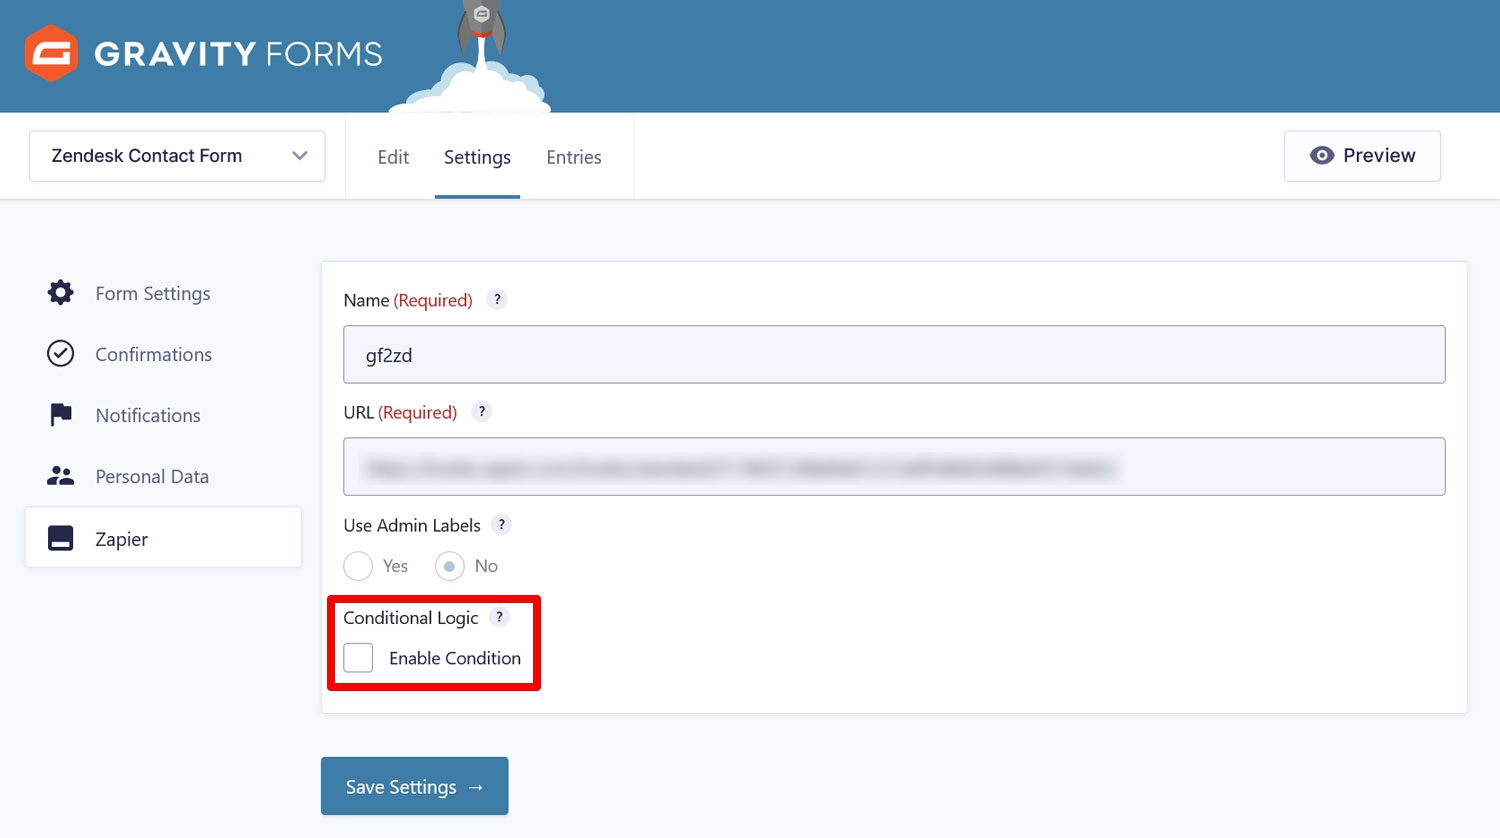
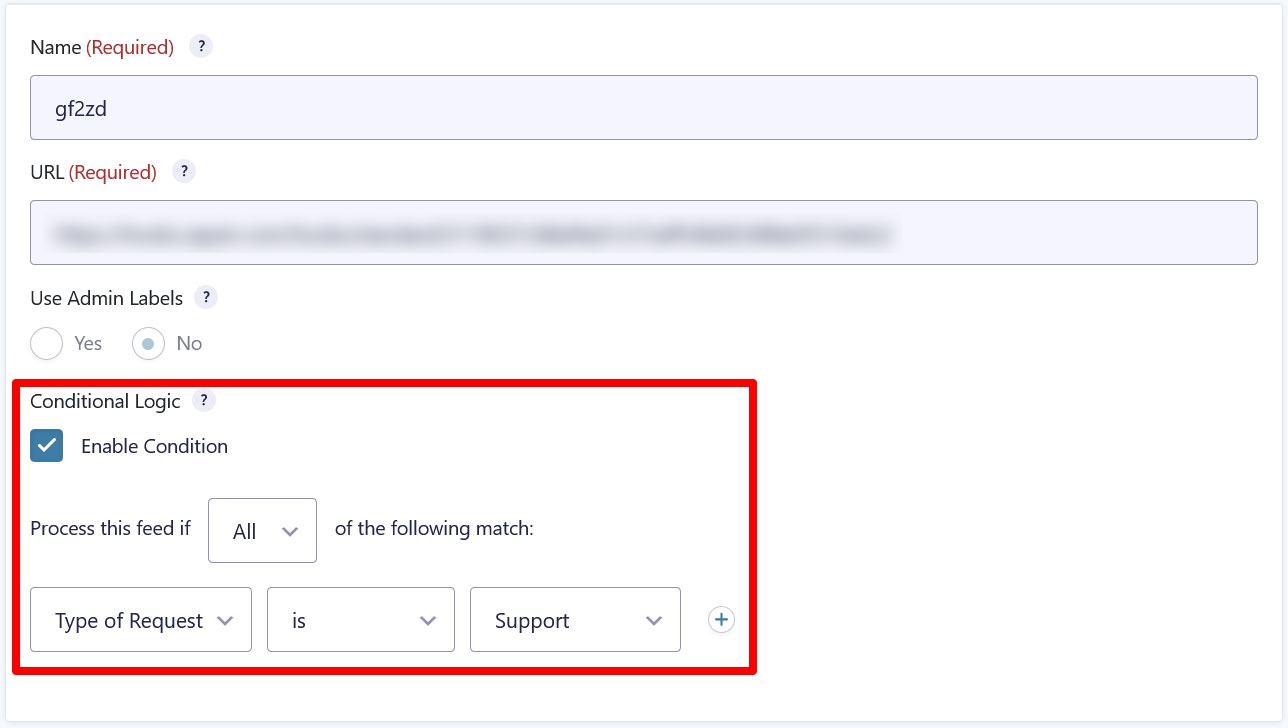
In the screen that follows, you can enable conditional logic at the bottom.
What’s a good condition for this use case? You could include a drop-down menu in your form and then set a condition that the information is only sent to Zendesk when someone picks “support request” from it.
For more information on conditional logic, visit the Gravity Forms Documentation.
How Will You Use Zendesk With Your WordPress Site?
Customer support and experience management is tricky and you can use all the help you can get for it. Zendesk is one of the most popular and powerful solutions out there for this.
If you want to use the service together with your WordPress website, the Gravity Forms Zapier Add-On and Zapier make it pretty easy to hvae all the contact requests on your site automatically routed to Zendesk. That way, nothing ever falls through the cracks. The best part: there is no need for any type of coding or technical knowledge, you can pretty much set it all up with a few mouse clicks.
Just keep in mind that using Zendesk with Zapier is part of Zapier’s premium features. To use the Gravity Forms Zapier Add-On, you need a Pro or Elite license. It’s also possible to upgrade your existence license or test drive Gravity Forms on a free demo site.
