How to Use Google Workspace / Gmail to Send WordPress Emails
Interested in using Gmail to send your WordPress site’s emails?
With the Gravity SMTP plugin, you can configure your WordPress site to send its transactional emails using a free Gmail account, or a paid Google Workspace account, if you have one of those.
While using a free Gmail account is probably not the right solution for every single WordPress site’s transactional emails, this approach can be a great free email sending solution for some sites.
In this post, we’ll explain when it makes sense to use Gmail for WordPress emails, along with the sending limits of free Gmail accounts and Google Workspace accounts.
Then, we’ll show you step-by-step how to use the Gravity SMTP plugin to configure your WordPress site to send emails using Gmail – no technical knowledge needed!
When Should You Use Gmail/Google Workspace for WordPress Emails?
Gmail can be an affordable option for some WordPress email sending use cases, but we don’t recommend it for every single site.
More specifically, we recommend considering a dedicated transactional email service for mission-critical emails, high-volume sending, and/or emails that you’re sending to your website’s users. This is largely because Gmail is not specifically built to be a solution for sending a website’s emails, and it lags behind more focused services when it comes to timing, high-volume sending, and so on.
For example, if you’re sending order confirmations and password resets to users in your membership community, Gmail might not be the best fit. Instead, consider one of the other services that Gravity SMTP supports such as Brevo, SendGrid, Postmark, or Mailgun.
Where Gmail can make sense is for less-critical email sending use cases, especially if you’re sending emails to yourself or members of your team.
For example, Gmail can be a great solution if you want to send yourself email notifications, such as notifications that you receive when someone submits a form on your site.
Gmail is reliable enough for this use case and you can always manually create a filter in your email client to make sure emails go straight to your inbox.
What Are the Email Sending Limits for Gmail/Google Workspace?
You can use both a free Gmail account and a paid Google Workspace account to send WordPress emails.
However, you’ll have different email sending limits depending on the type of account:
- Free Gmail account – up to 500 emails per day.
- Paid Google Workspace account – up to 2,000 emails per day.
While we say “per day, the limits are technically applied in a 24-hour rolling period. That is, the limits don’t reset at midnight like a true “per day” limit.
Beyond the daily sending limits, Google also rate-limits the emails that your account can send. There are no hard numbers for the rate limiting because it’s based on your account’s “normal” sending practices, but it generally starts at around 20 emails per hour.
For example, if you go from zero to sending 499 emails within the first hour, Google is probably going to temporarily suspend your email sending or start flagging those emails as spam, even though you’re technically within your account’s limits.
On the other hand, if you slowly build up your account’s sending volume, Google will consider the higher volume “normal” and you’re less likely to run into problems.
These types of opaque rate limits are why we recommend being careful with using Gmail for mission-critical email sending.
How to Send WordPress Emails Using Gmail and Gravity SMTP
If you think that Gmail can be a good option for sending your WordPress site’s emails, we’re now going to get into the actual step-by-step guide for how to set up everything using the Gravity SMTP plugin.
Because you need to work through Google Cloud to do this, the setup process is a little bit more involved than some of the other email sending services that Gravity SMTP supports.
However, it’s a one-time setup process. So, while you will need to invest a little bit more time upfront, there’s no added burden when it comes to future maintenance.
The basic process works like this:
- Create a web app in Google Cloud. While this sounds super technical, it really just involves clicking a bunch of buttons. So – don’t worry if you’re not a developer! The whole process will probably take around 10-20 minutes, depending on your familiarity with the Google Cloud interface.
- Connect your website to your Google App using Gravity SMTP. You can do this using the normal Google OAuth protocol (after some basic setup steps). It will only take a couple of minutes.
For this guide, we’ll assume that you already have a Google account that you want to use. If you don’t, you’ll first want to register for an account. You can use either a free Gmail account or a paid Google Workspace account.
Let’s go through it…
1. Install Gravity SMTP and Locate Authorized Redirect URI
Before you start setting up your app in Google Cloud, you’ll first want to install and activate the Gravity SMTP plugin on your site.
You need to install Gravity SMTP first because you’ll need to copy one value from the plugin’s settings when setting up your app in Google Cloud.
Currently, Gravity SMTP is available at no extra cost to anyone holding the Gravity Forms Elite license. You can download it from the My Account area in Gravity Forms.
Gravity SMTP is a standalone plugin, so you do not need to have Gravity Forms installed to use it (though it is a great solution for sending your form notification emails).
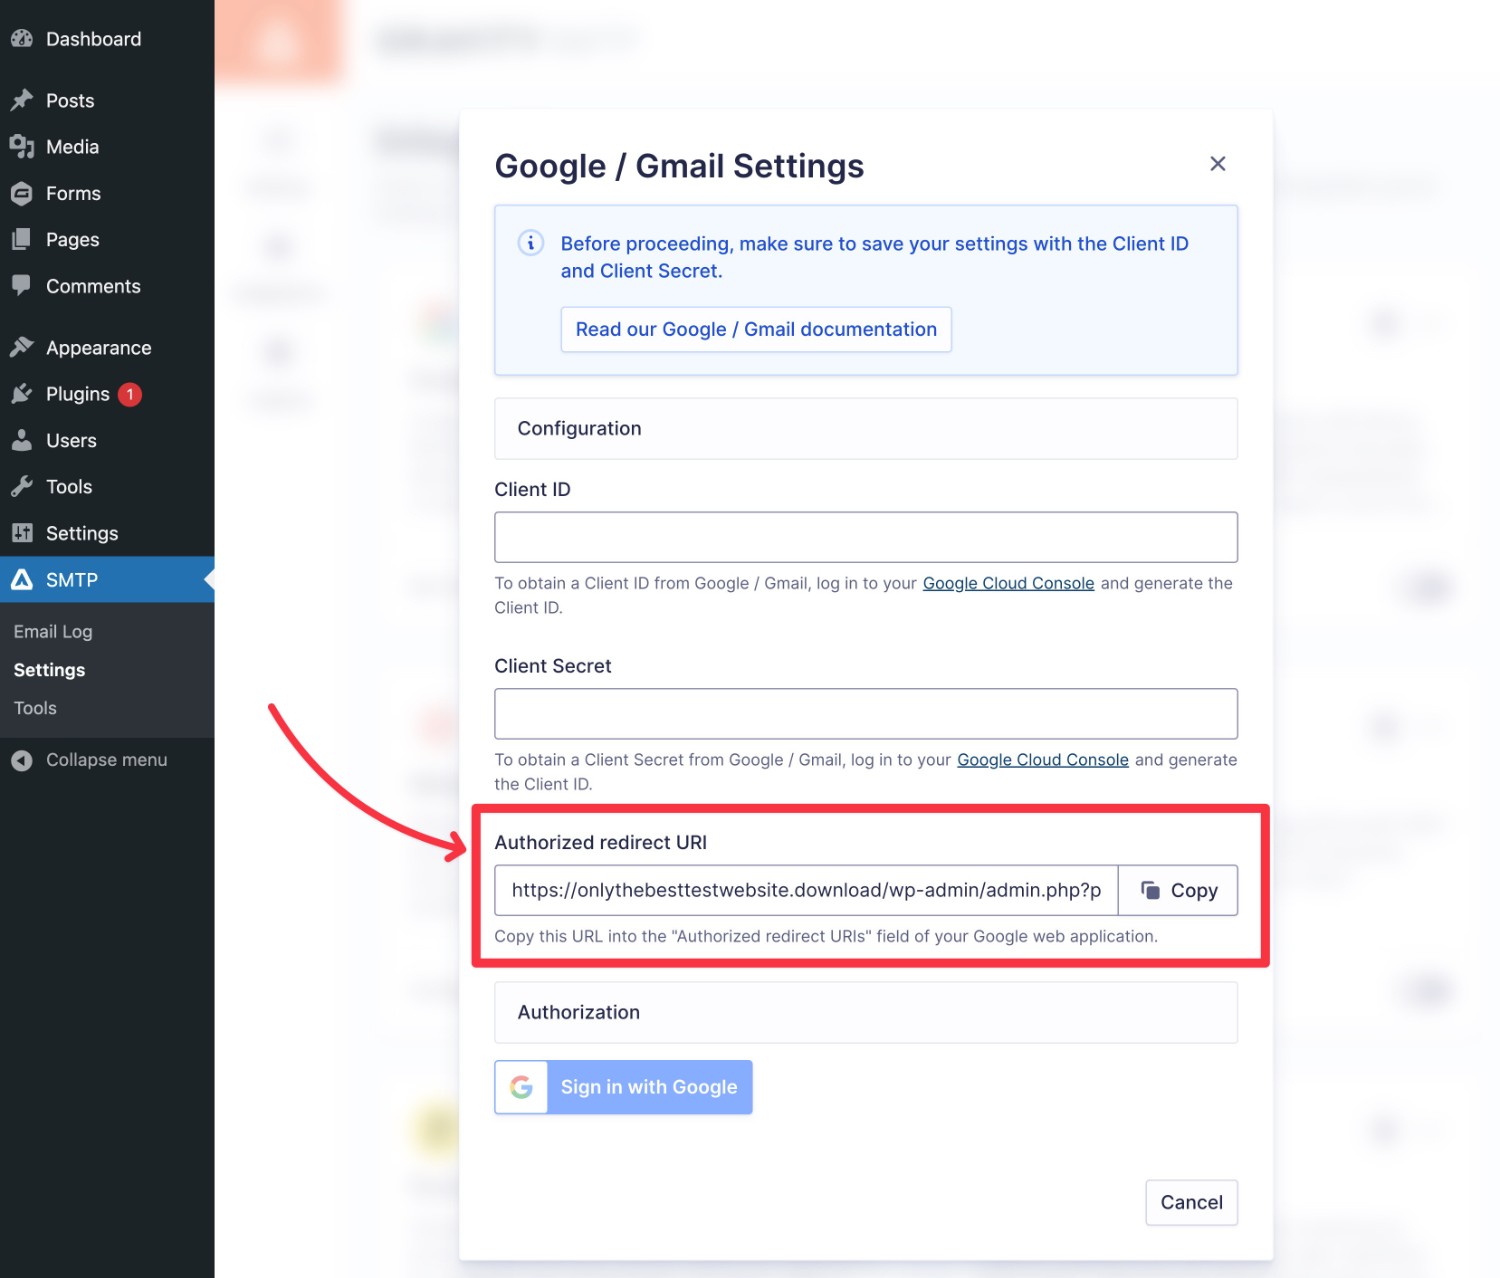
Once you install and activate the Gravity SMTP plugin on your site, here’s how to find the Authorized redirect URI value that you’ll need when setting up your app in Google Cloud:
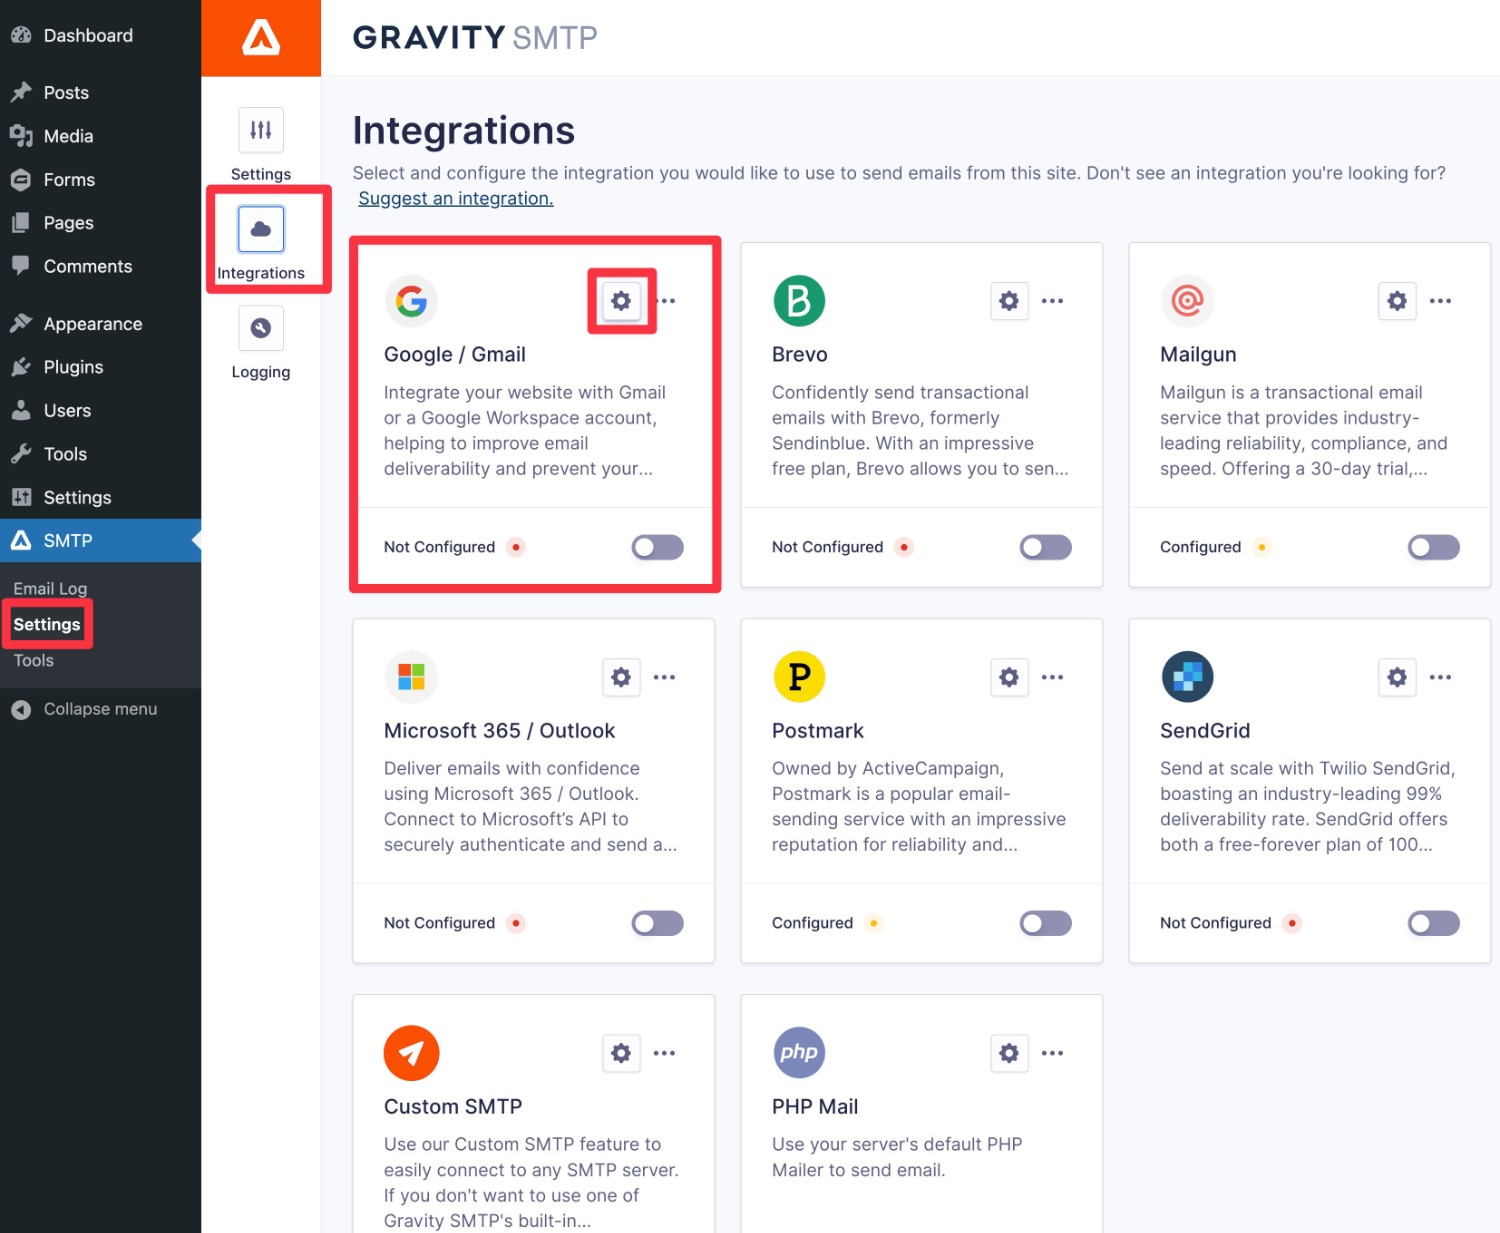
- Go to SMTP → Settings in your WordPress dashboard.
- Select the Integrations tab.
- Click the gear icon next to Google / Gmail to expand the settings popup.
- Copy the value from the Authorized redirect URI box and store it in a safe place. You’ll need this value in the next step when you’re creating your web app in Google Cloud.
2. Create a Web App in Google Cloud
In order to connect Gravity SMTP to your Google account, you need to create your own application using Google Cloud.
In this part, we’ll take you through every step in that process. Again, you should expect to budget around 10-20 minutes for this part, depending on your familiarity with Google Cloud.
Log In to Google Cloud Console
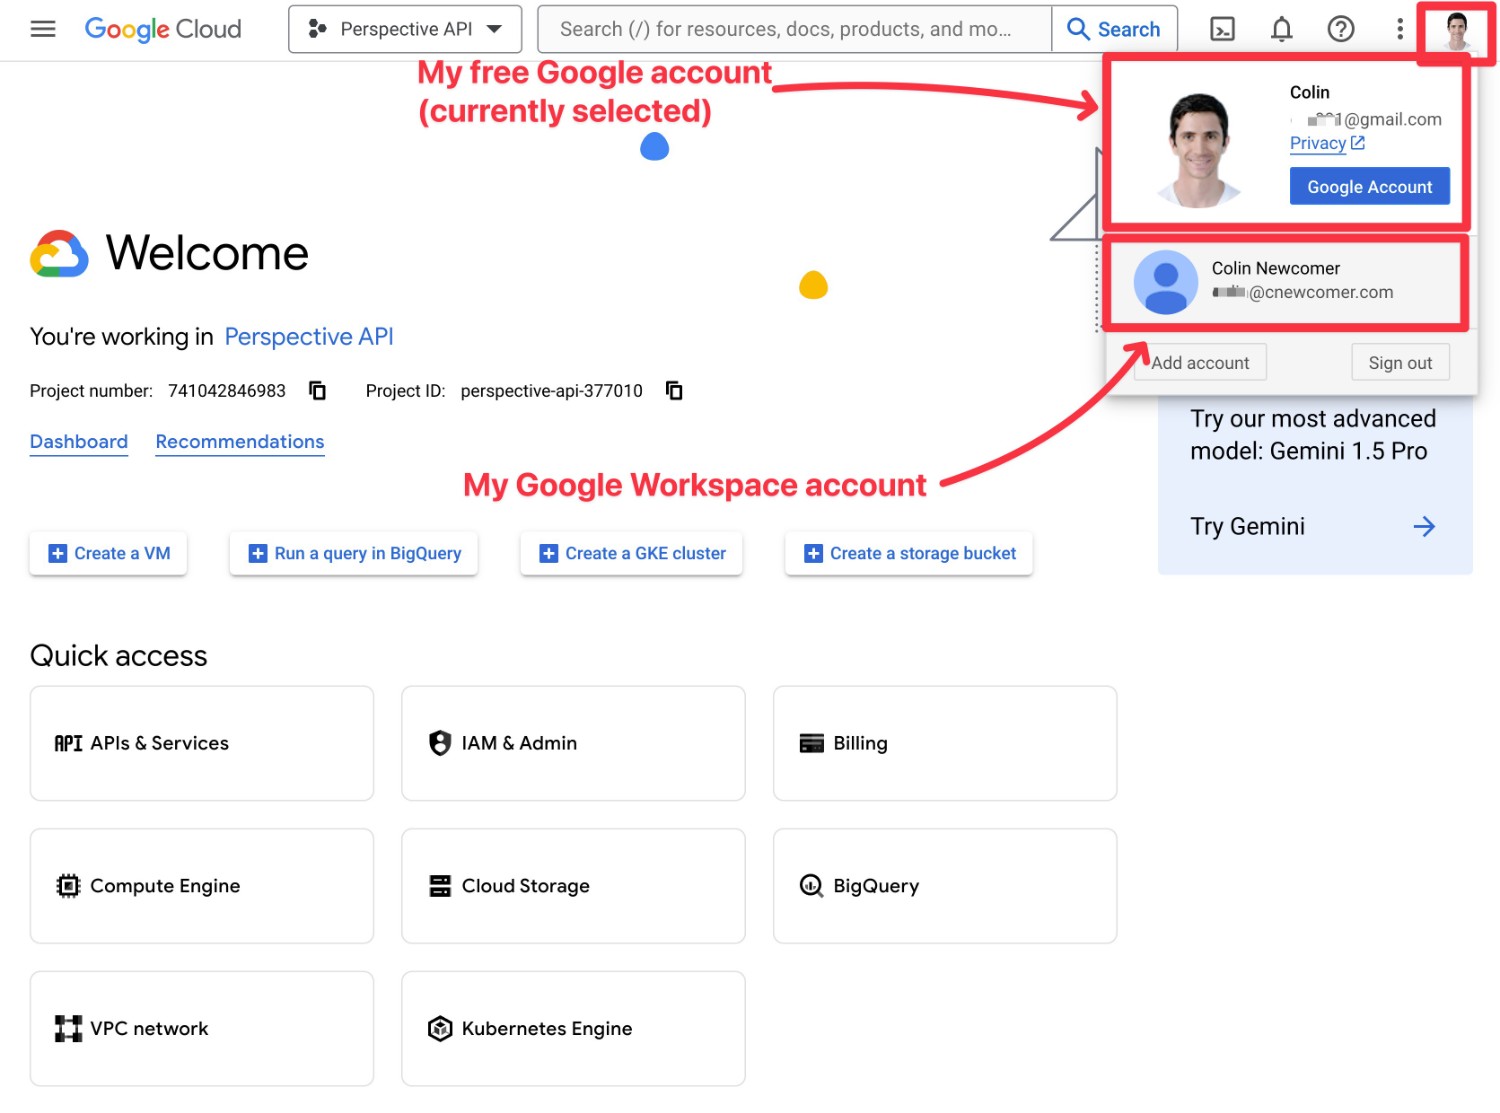
To begin, you need to log into the Google Cloud console, which you can do using your existing Google account.
If you have multiple Google accounts (e.g. a free account and a Workspace account), make sure that you’ve selected the account that you want to send emails from by clicking your profile picture in the top-right corner.
If you haven’t done so already, you might need to enable billing on your account in Google Cloud. However, you won’t need to actually pay anything to create your app and send email.
Create a New Project (or Choose an Existing One)
Next, you should create a project for Gravity SMTP.
You can also work within an existing project if you prefer, but we’re not going to use that approach for this tutorial.
Here’s how:
- Click the drop-down that’s immediately to the right of the Google Cloud logo in the top left corner. This should display a popup.
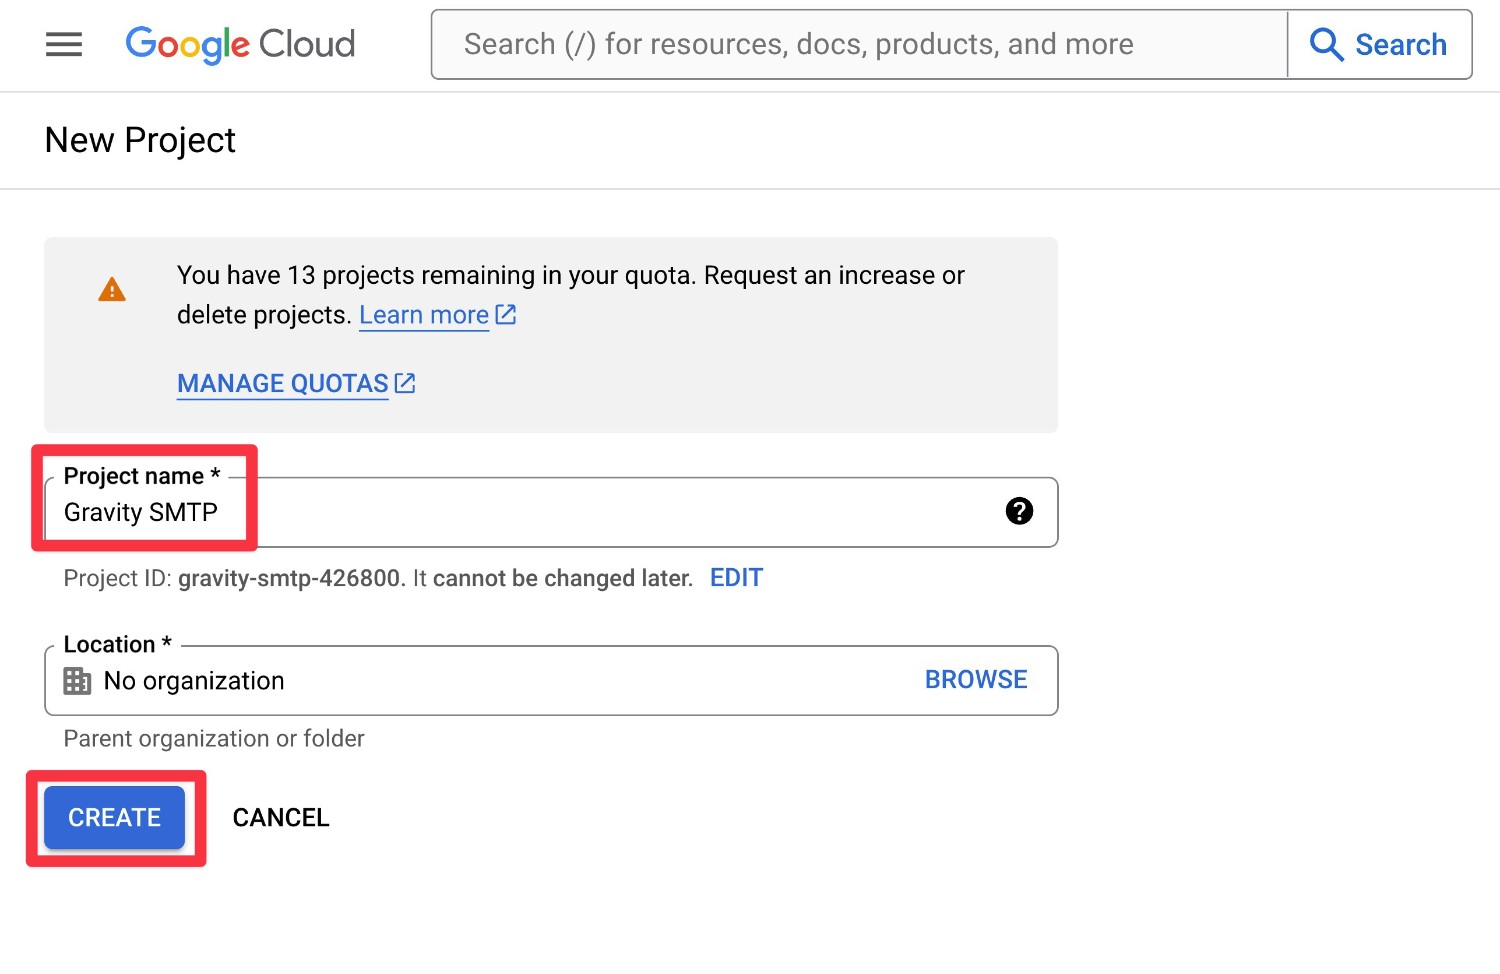
- Click the New Project link in the top-right corner of the popup.
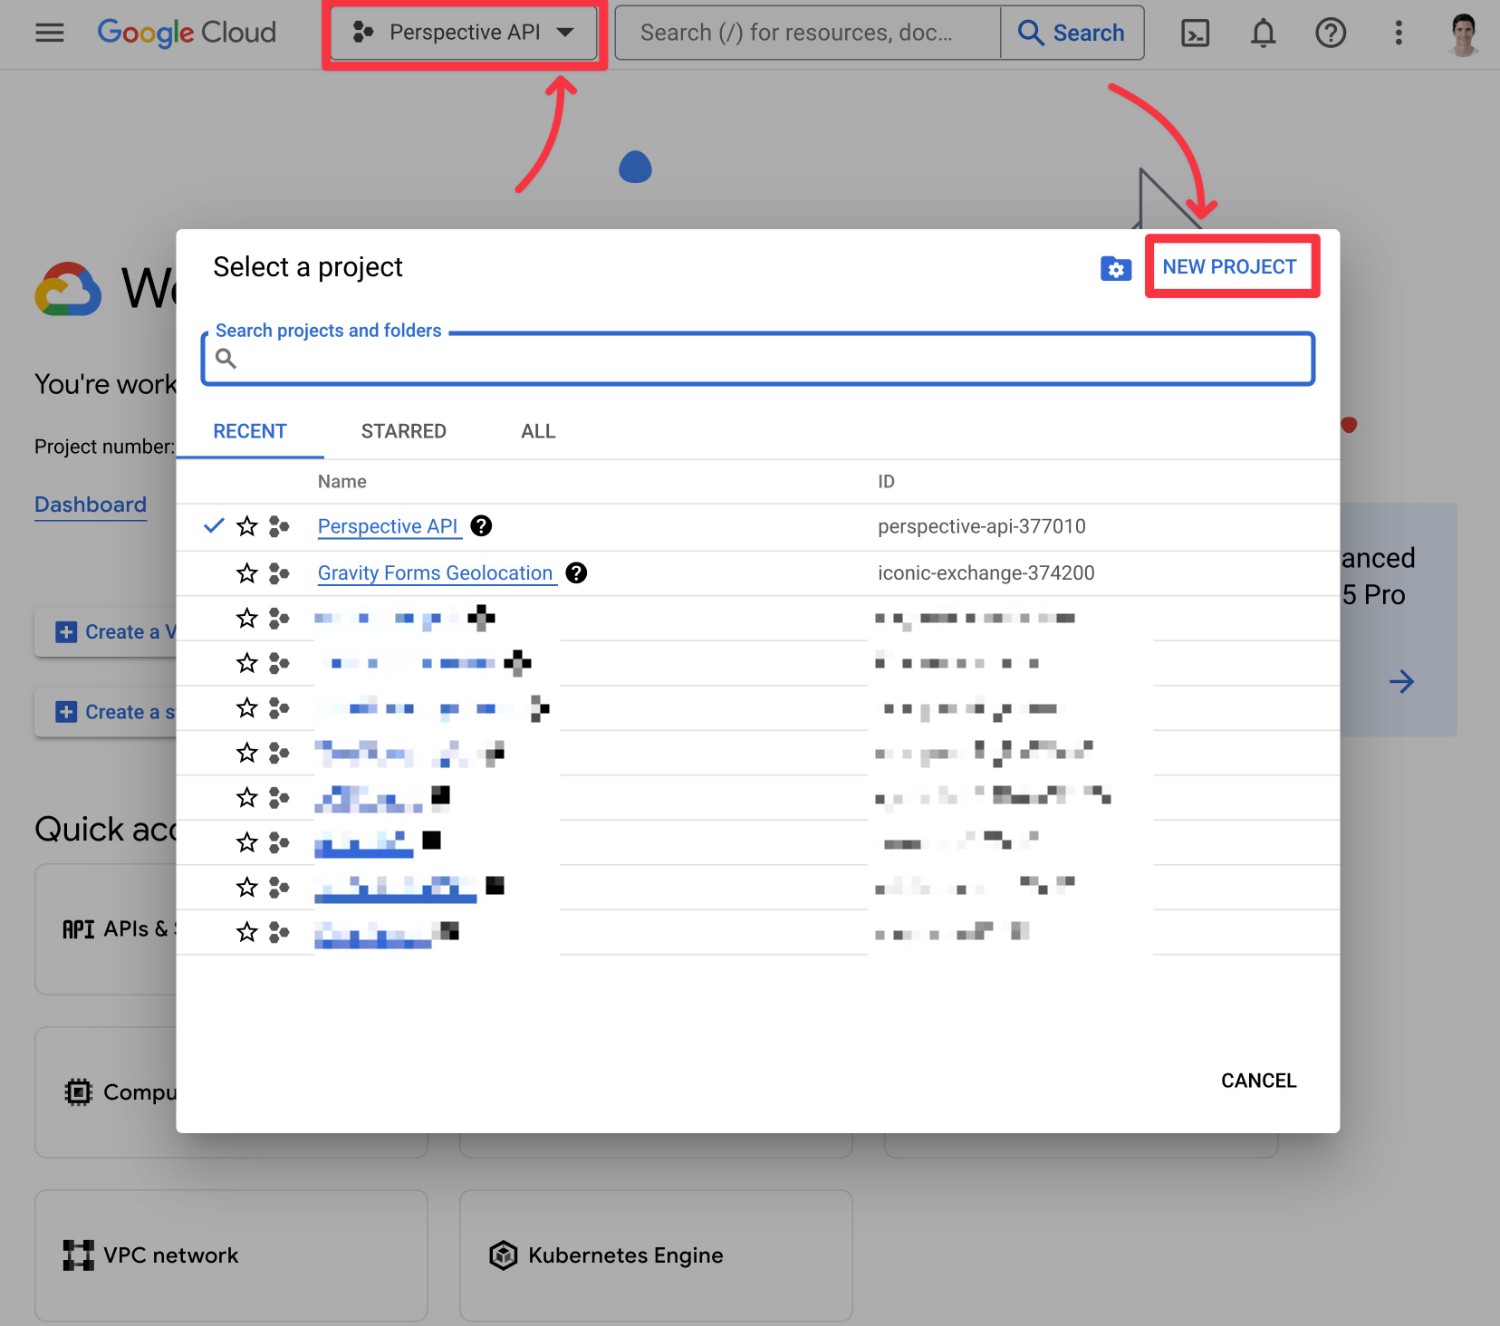
Then, give it a name to help you remember it – e.g. Gravity SMTP – and click Create.
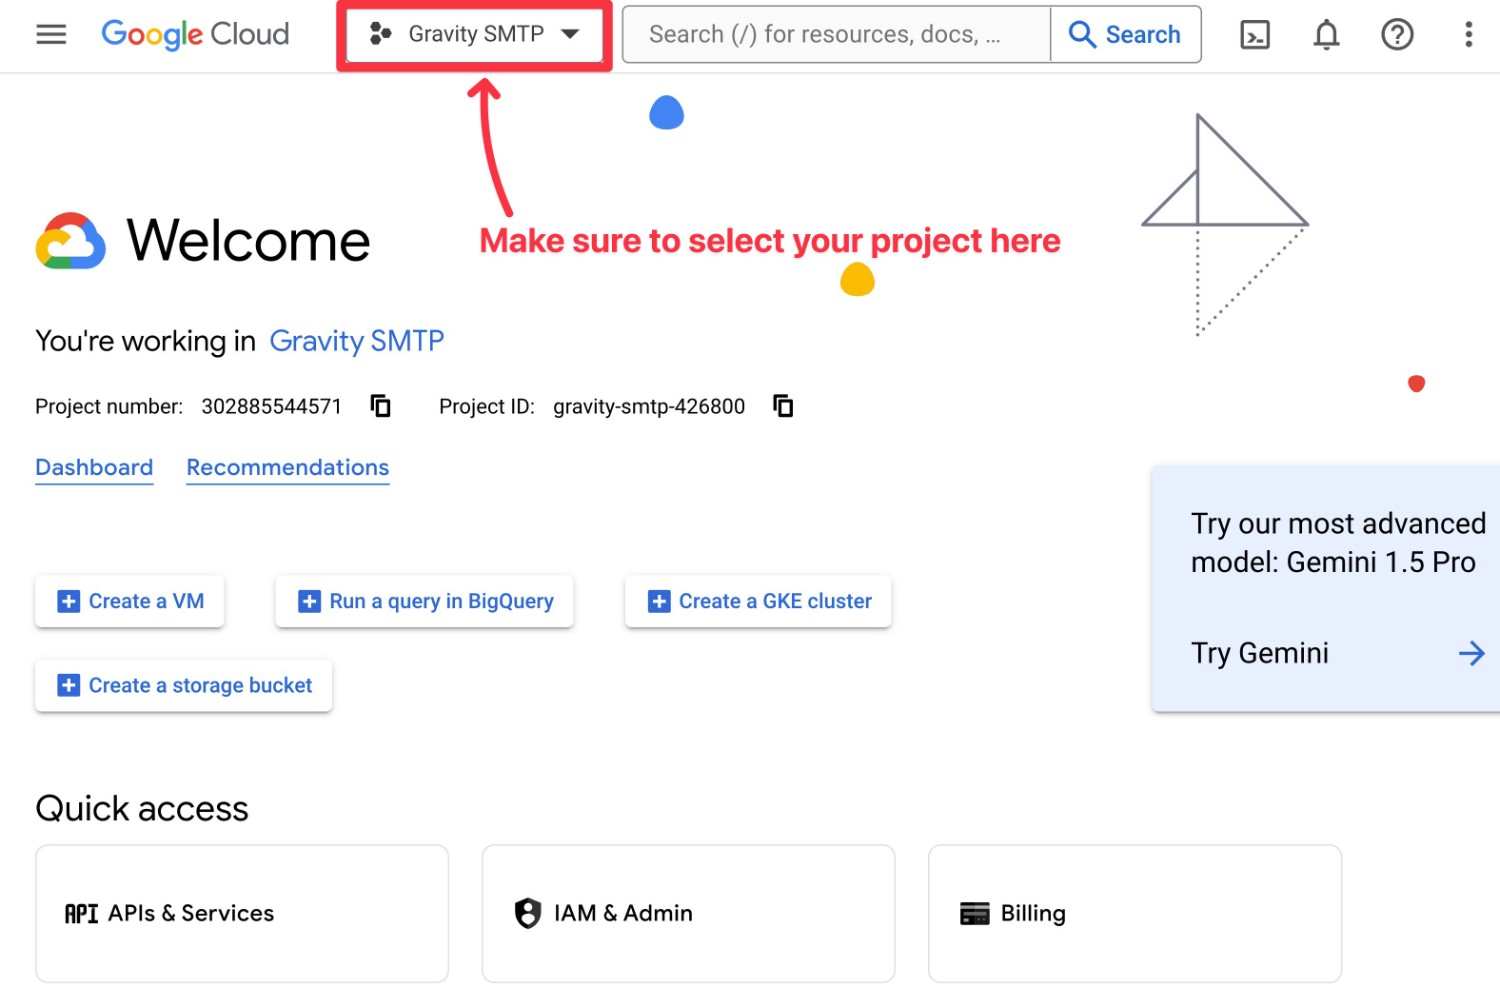
Once you create your project, make sure that you use the drop-down at the top to change your active project to the one that you just created.
Enable the Gmail API for Your Project
Once you’ve created your project, you need to enable the Gmail API so that your project can send emails:
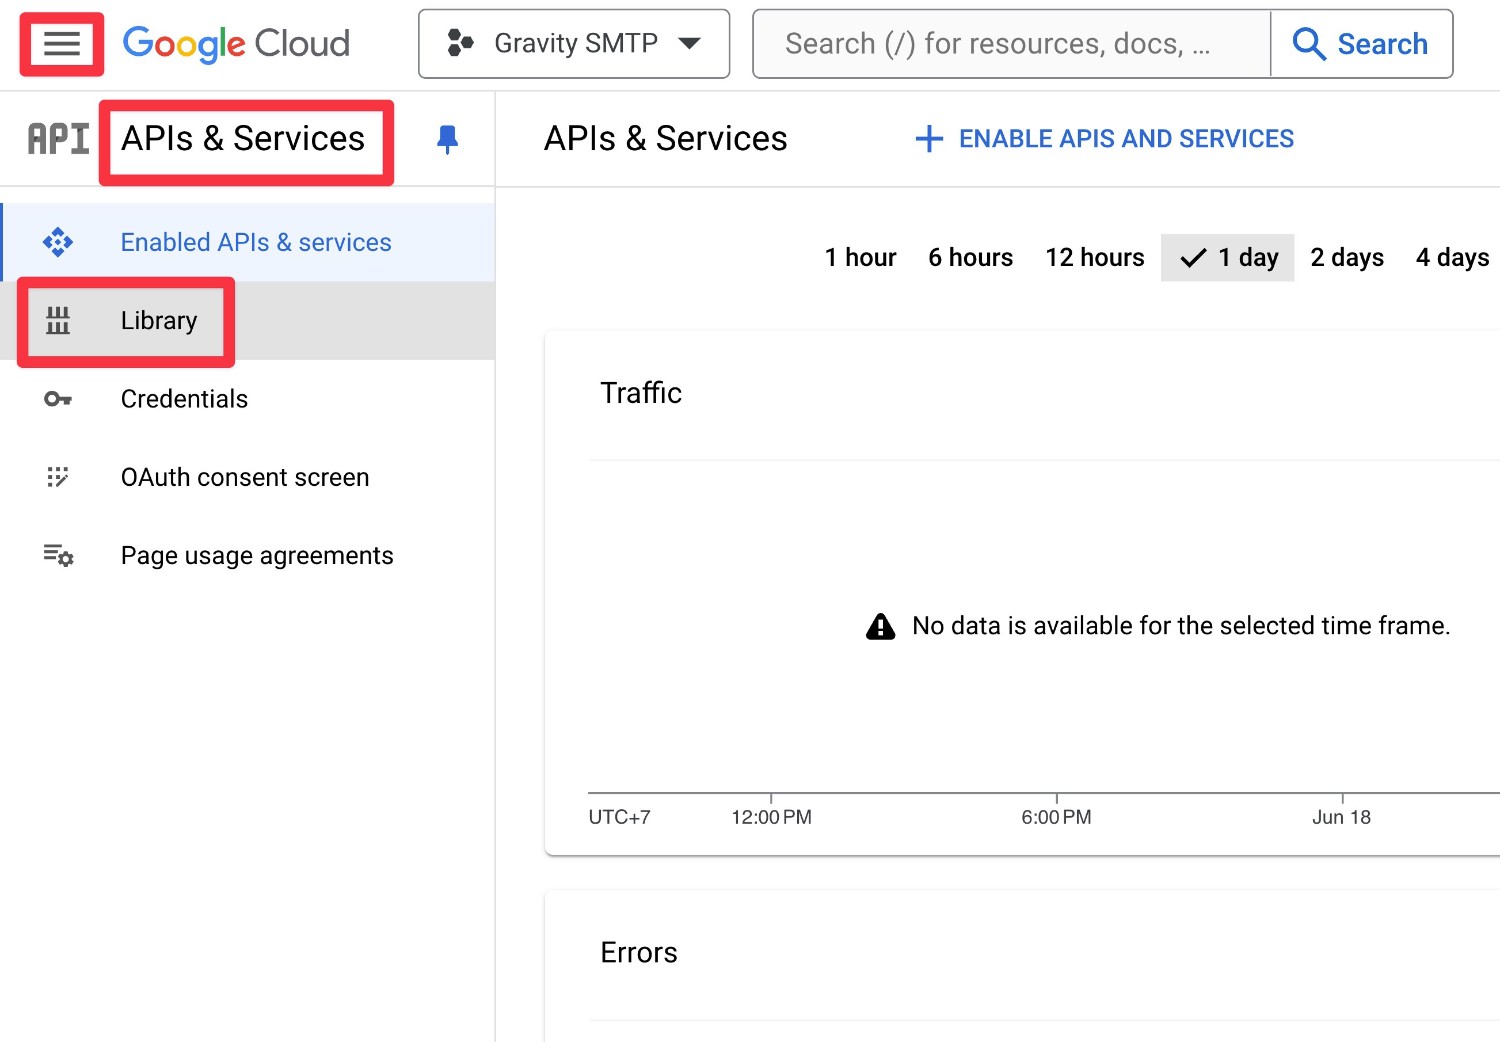
- Click the Hamburger icon in the top-left corner to expand the navigation menu.
- Select APIs & Services.
- In the sub-menu options that appear, choose Library.
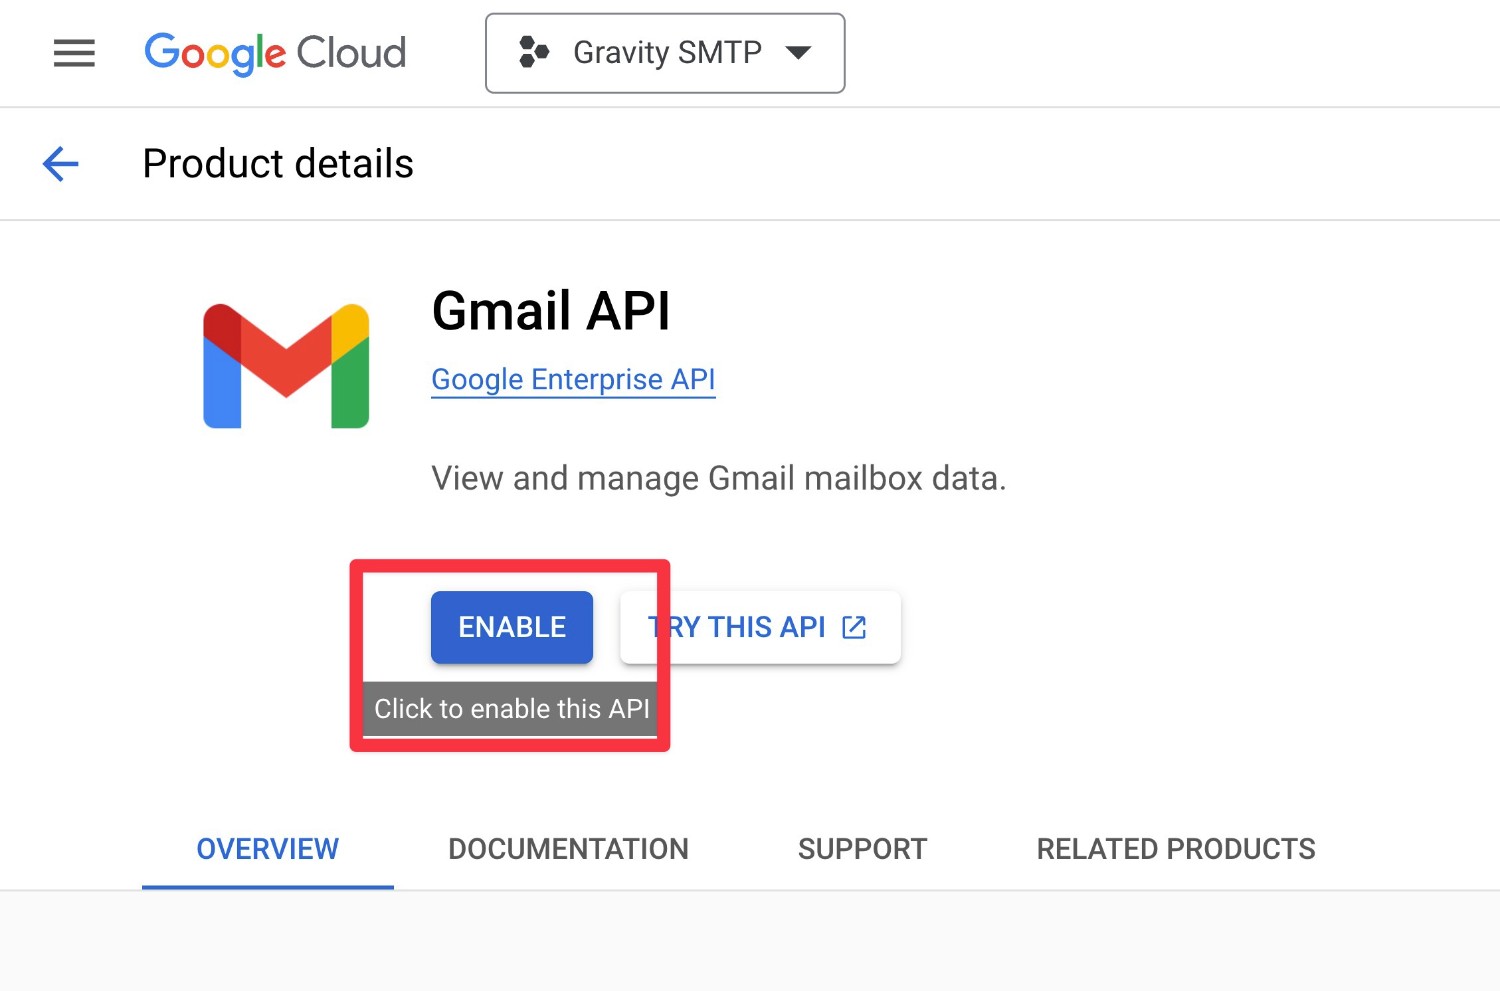
In the search box that appears, search for “Gmail API” and then select the result.
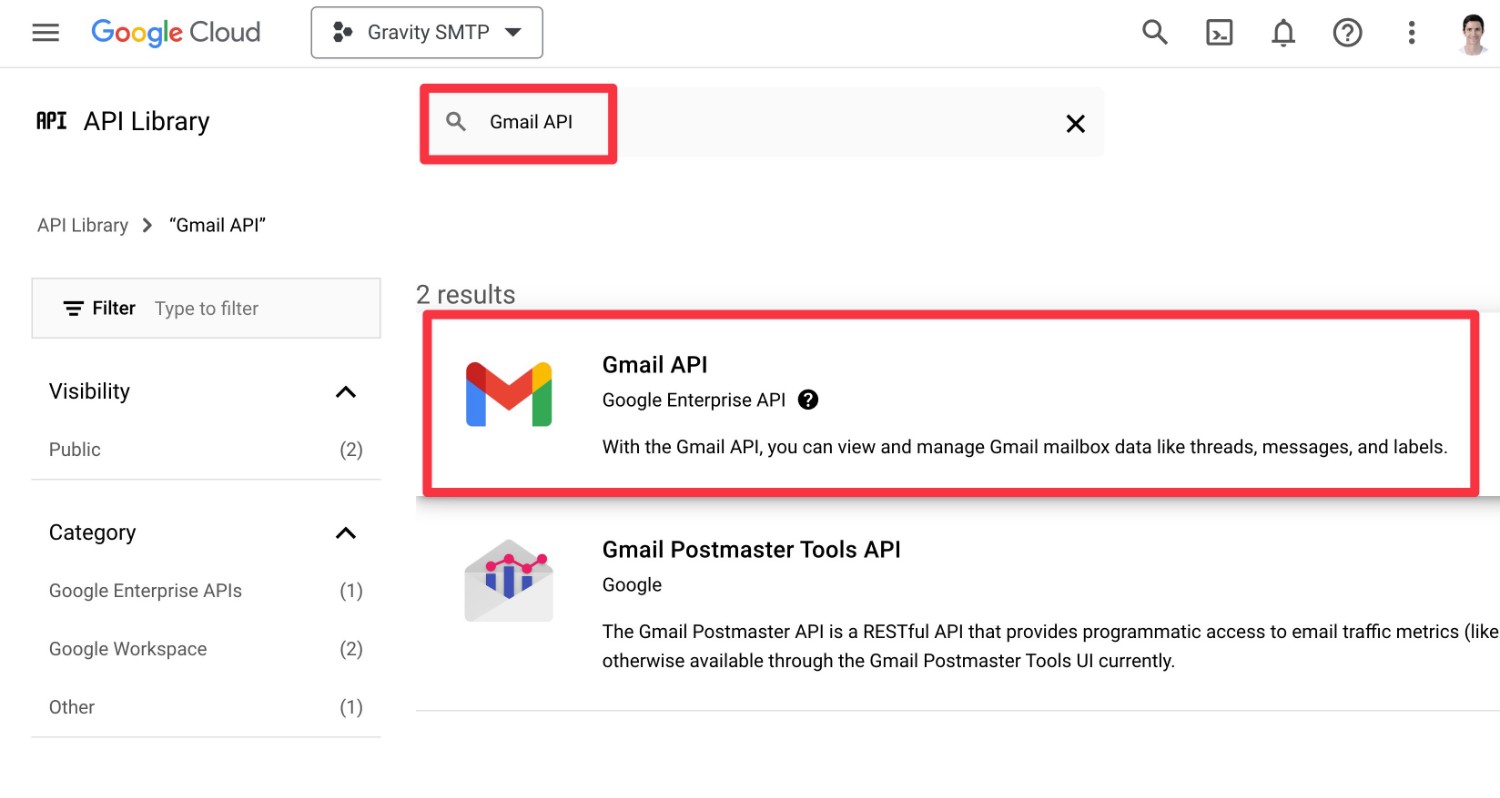
On the Gmail API listing page, click the blue Enable button.
Register Your App for OAuth Consent
Now, you’ll switch gears a bit and work on setting up your app and OAuth consent screen.
While you’re still in the APIs & Services area, here’s how to get started:
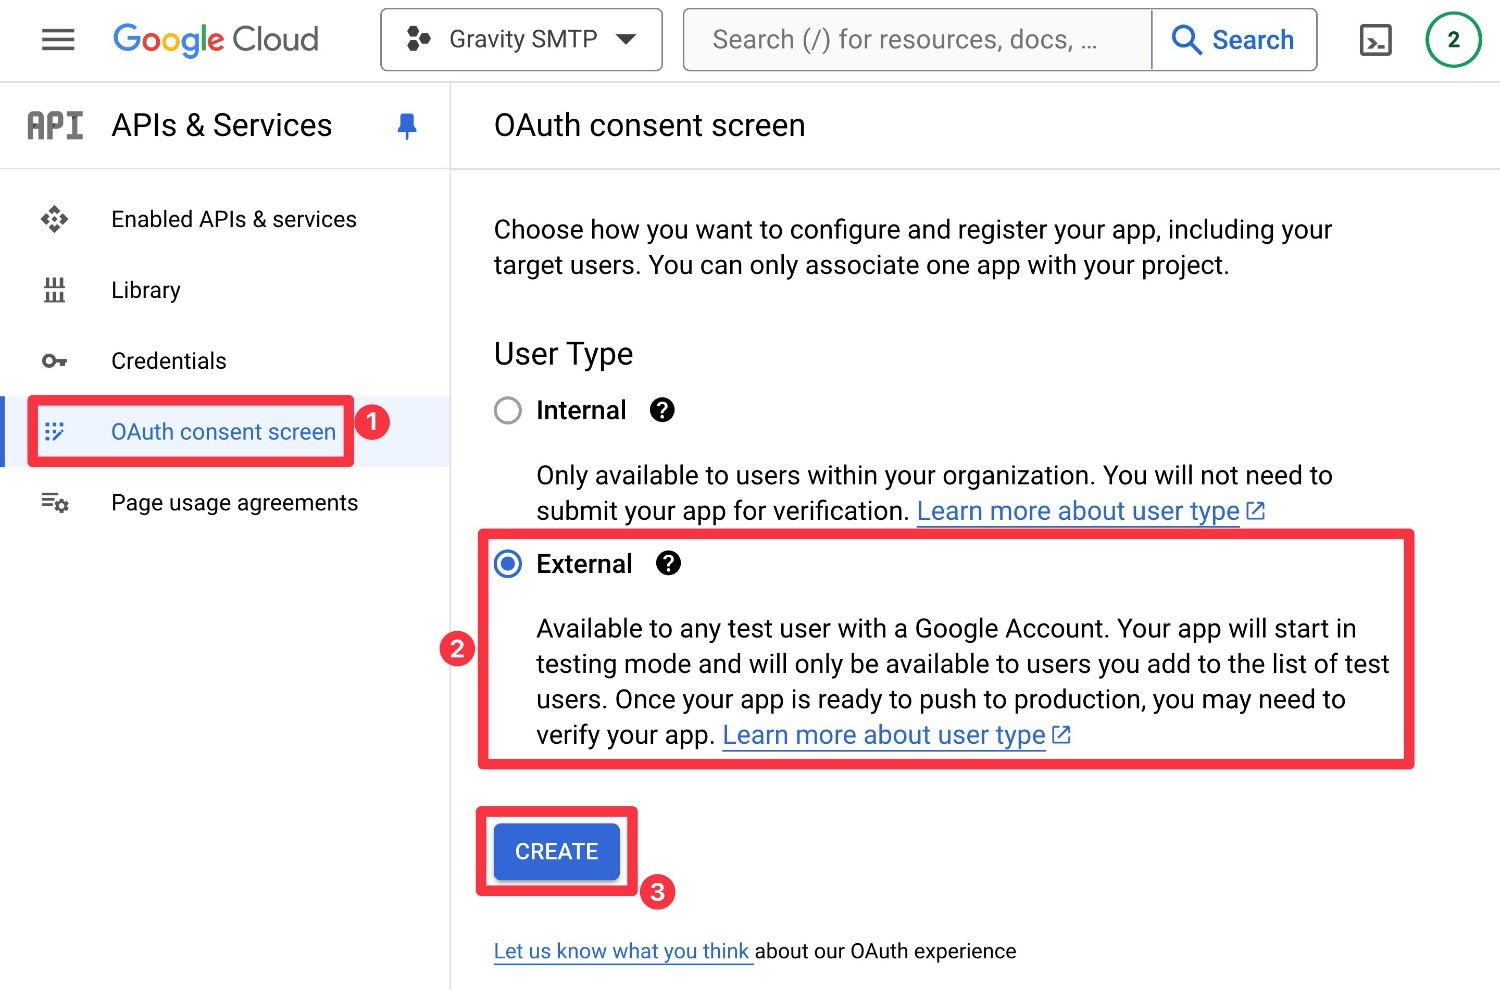
- Select OAuth consent screen from the menu sidebar.
- In the interface that appears, choose External under User Type.
- Click the Create button.
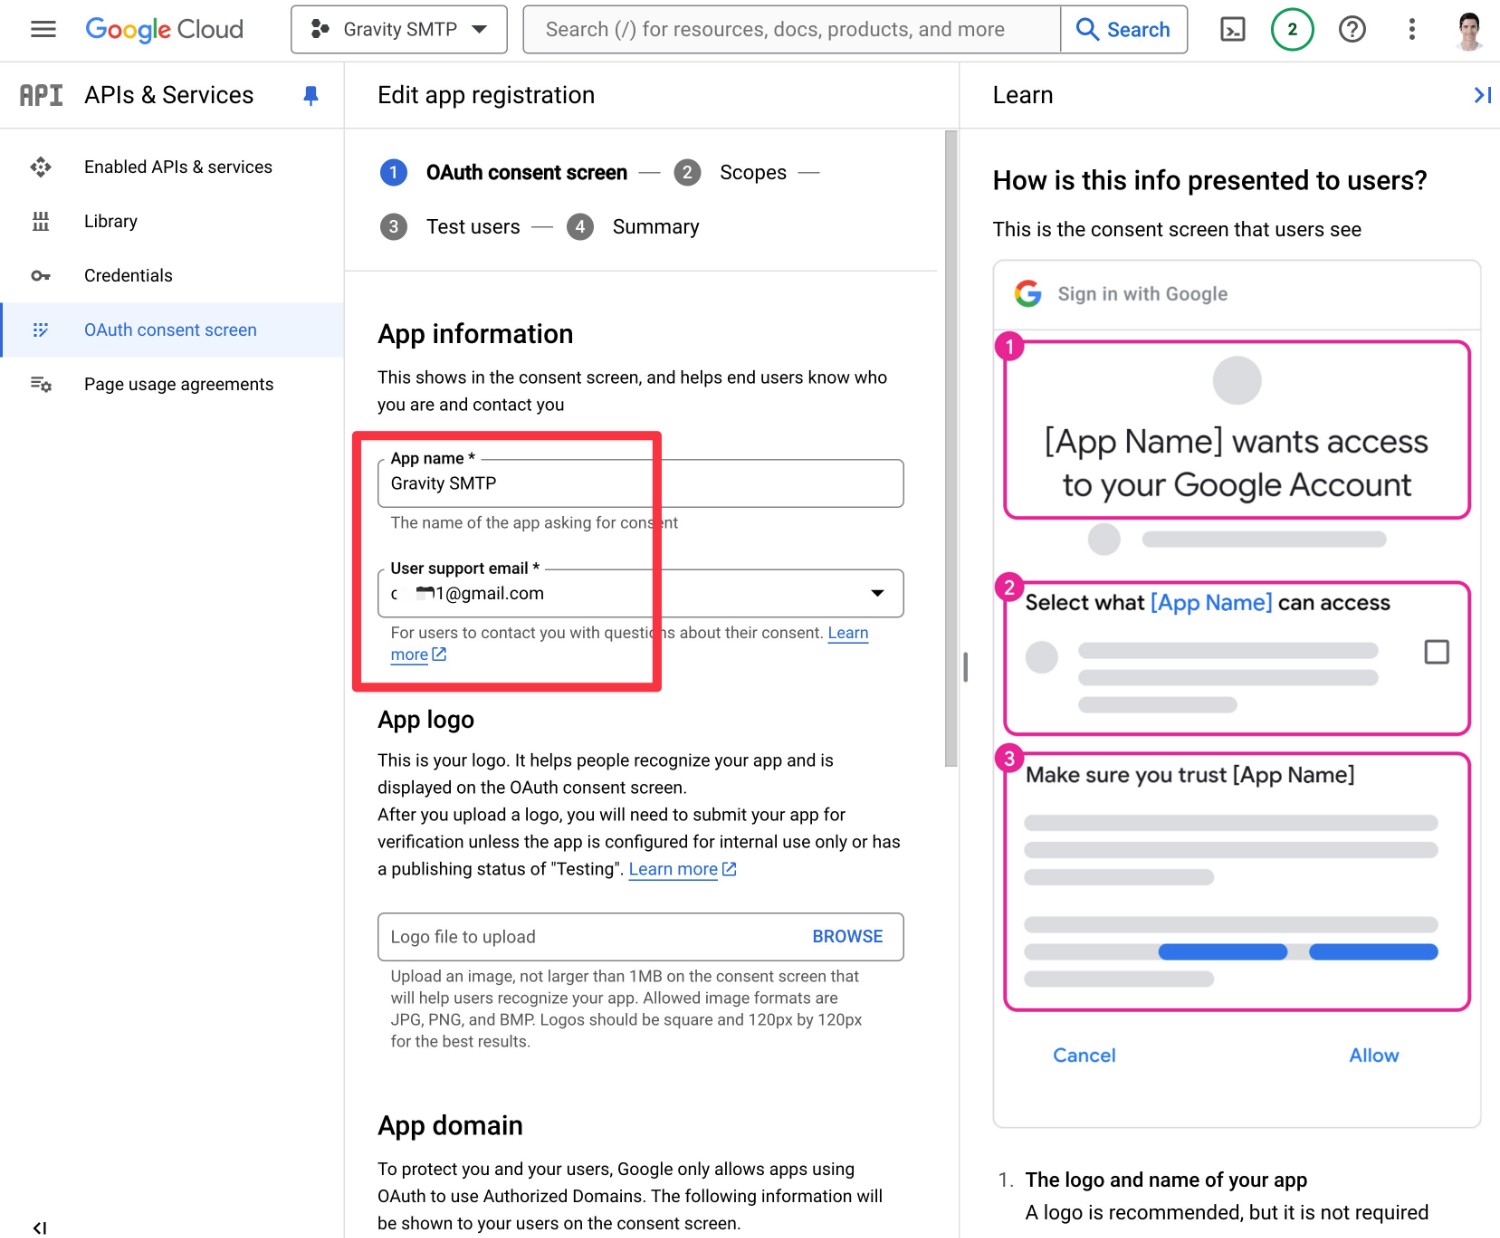
On the next screen, you’ll need to enter some information:
- App name – enter the name of your site.
- User support email – enter your own email address.
- Developer contact information – enter your own email address.
You can leave the rest of the fields blank.
Once you’ve entered the three pieces of information above, click the Save And Continue button at the bottom.
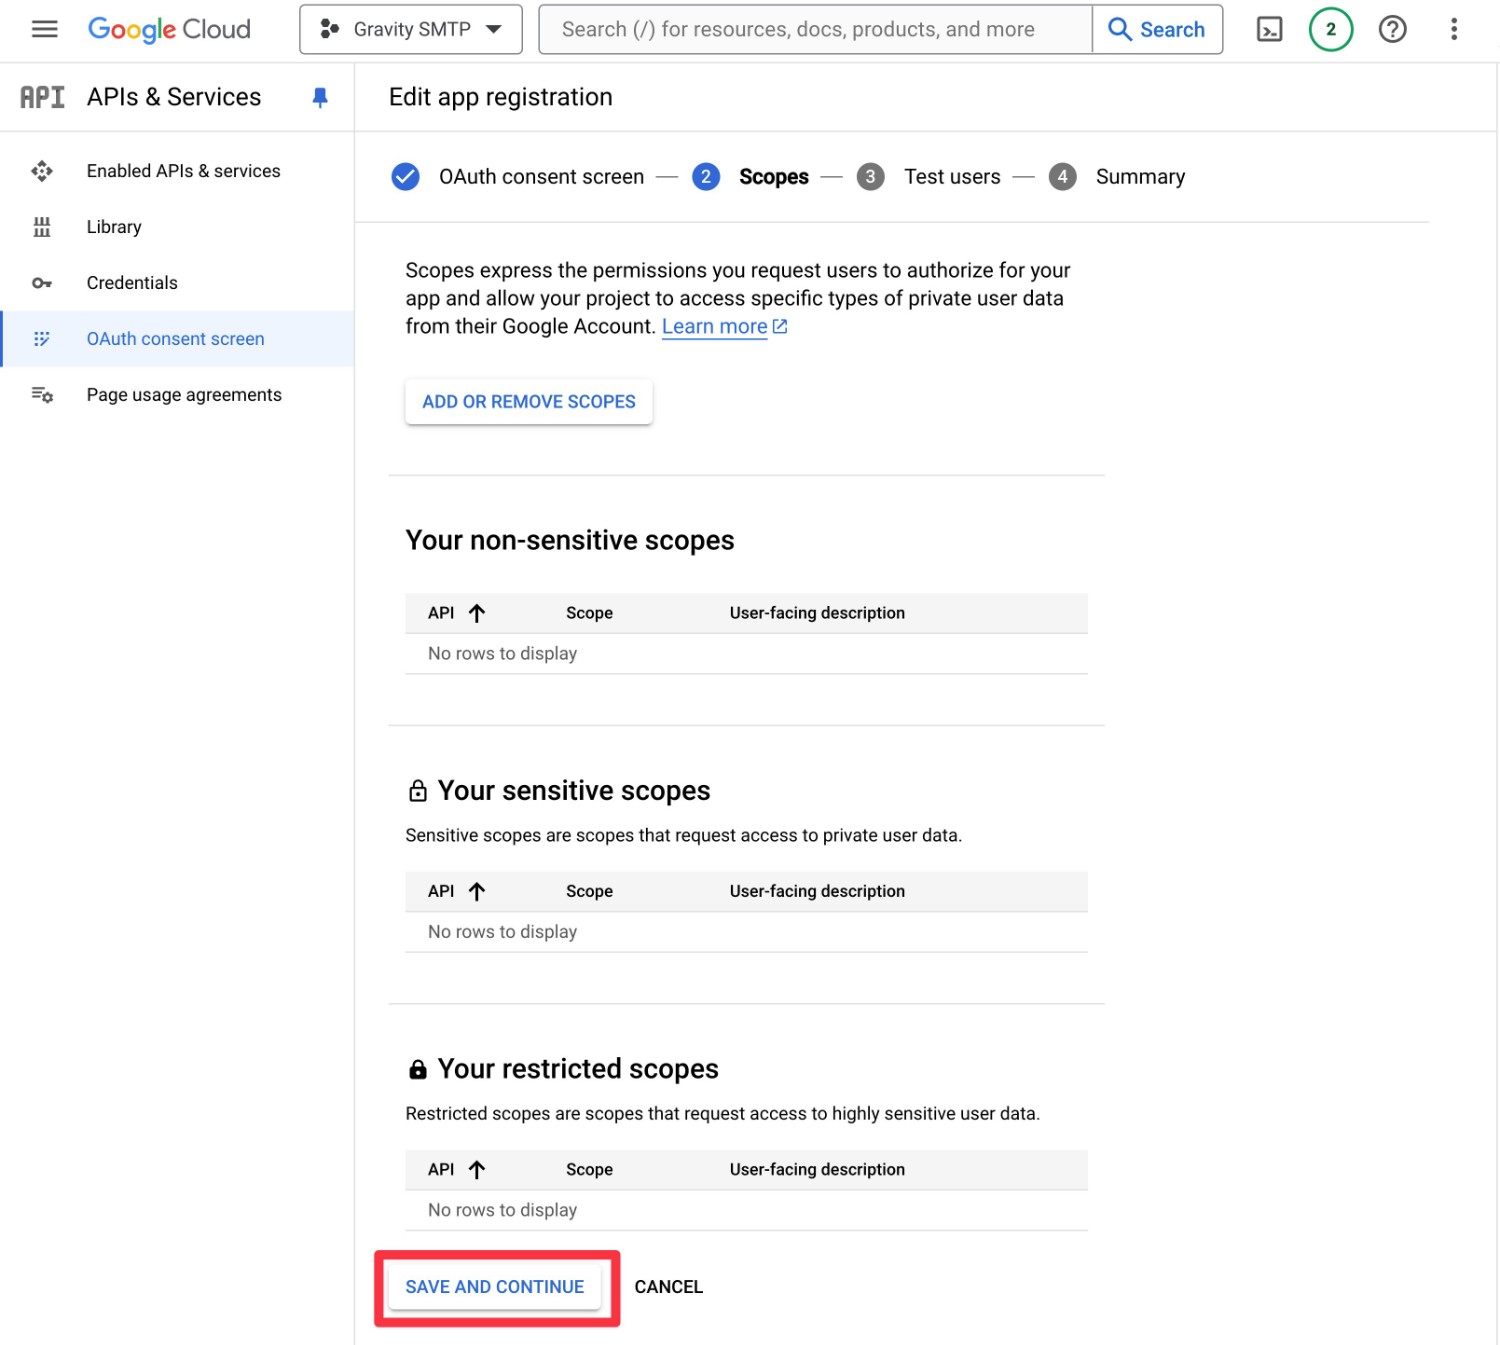
You should now be in the Scopes part of the configuration.
You can leave all of the settings here as the defaults – just click the Save And Continue button at the bottom to advance.
On the next screen (Test users), you can just click Save And Continue again to advance.
You’ll then see a summary screen. You’re finished with this part and no further actions are needed in this interface.
Set Up OAuth2 Credentials
Next, you need to set up your OAuth2 Credentials:
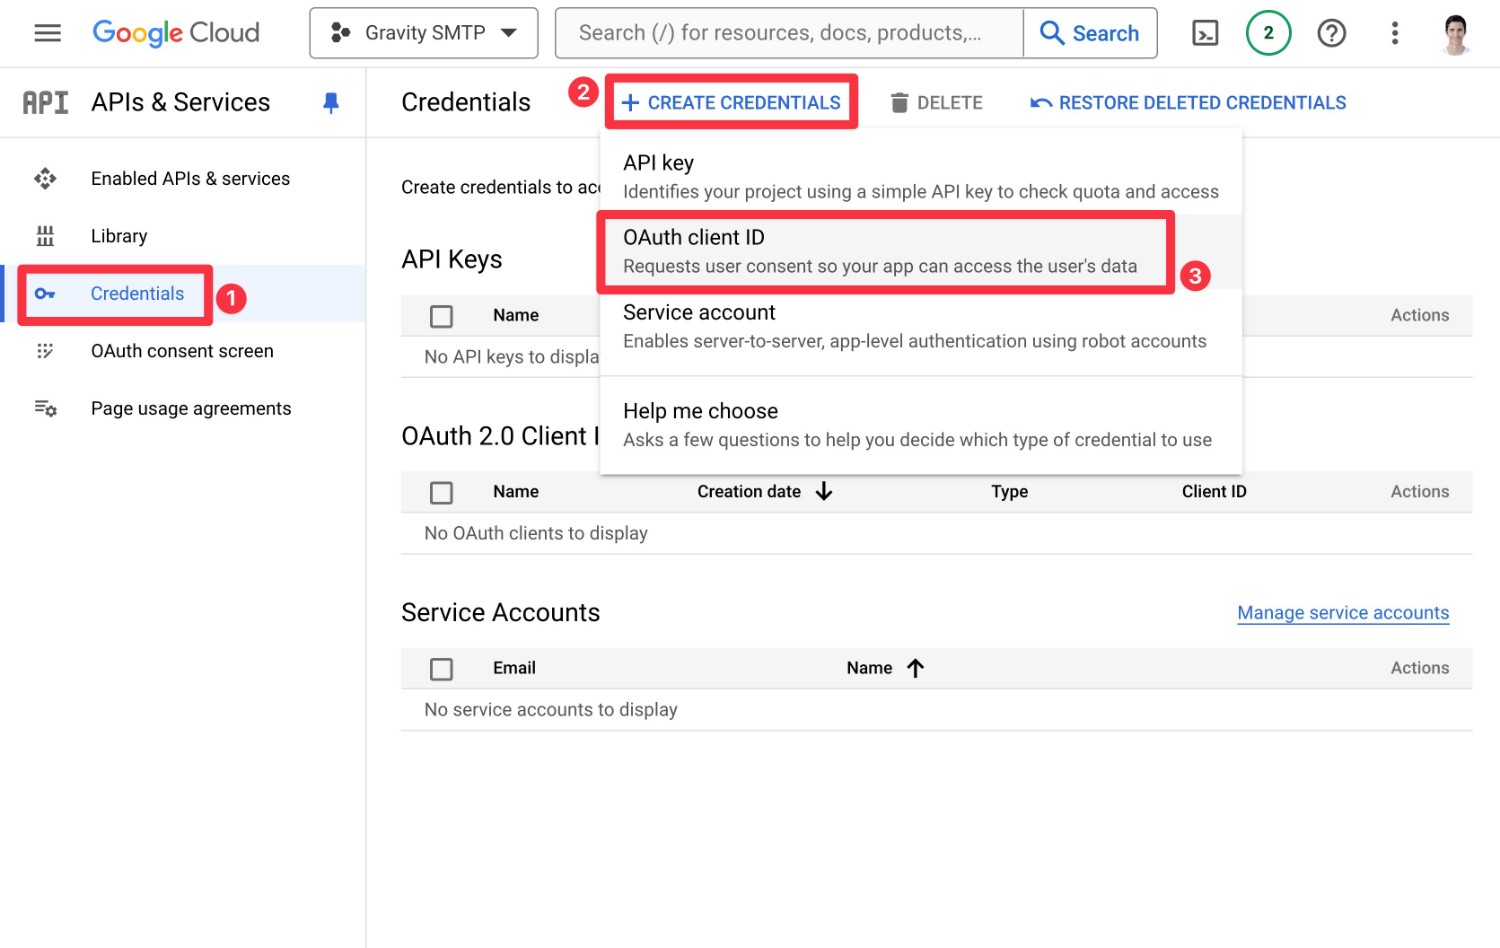
- While still in the APIs & Services area, select Credentials in the sidebar menu.
- Click the + Create Credentials link.
- In the drop-down that appears, select OAuth client ID.
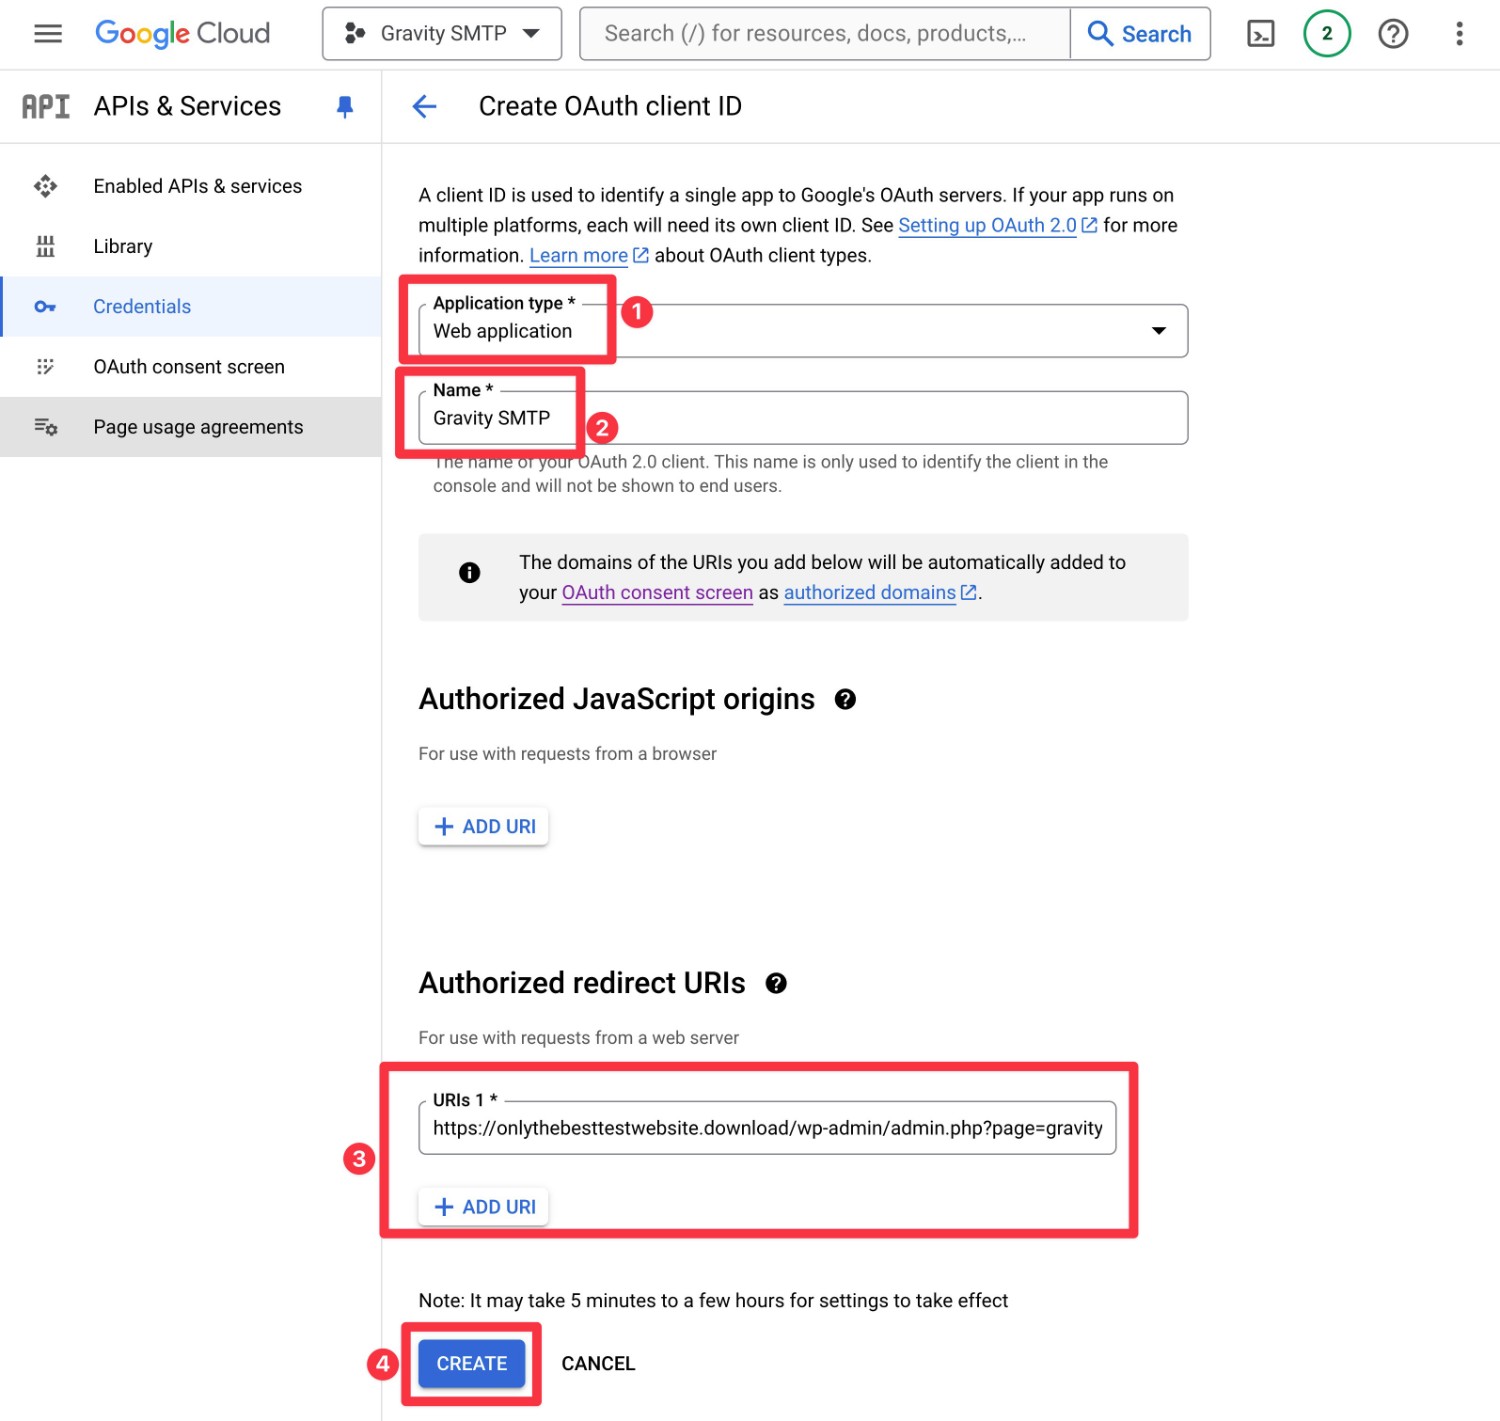
On the next screen:
- Choose Web application from the Application type drop-down. This should expand some additional options.
- Give your app a name to help you remember it. E.g. Gravity SMTP.
- Click the Add URI button to add the Gravity SMTP redirect URI. We showed you how to find the Gravity SMTP Authorized redirect URI in Step #1 of this tutorial. You get it from the Gravity SMTP Gmail settings in your WordPress dashboard.
- Click the Create button at the bottom.
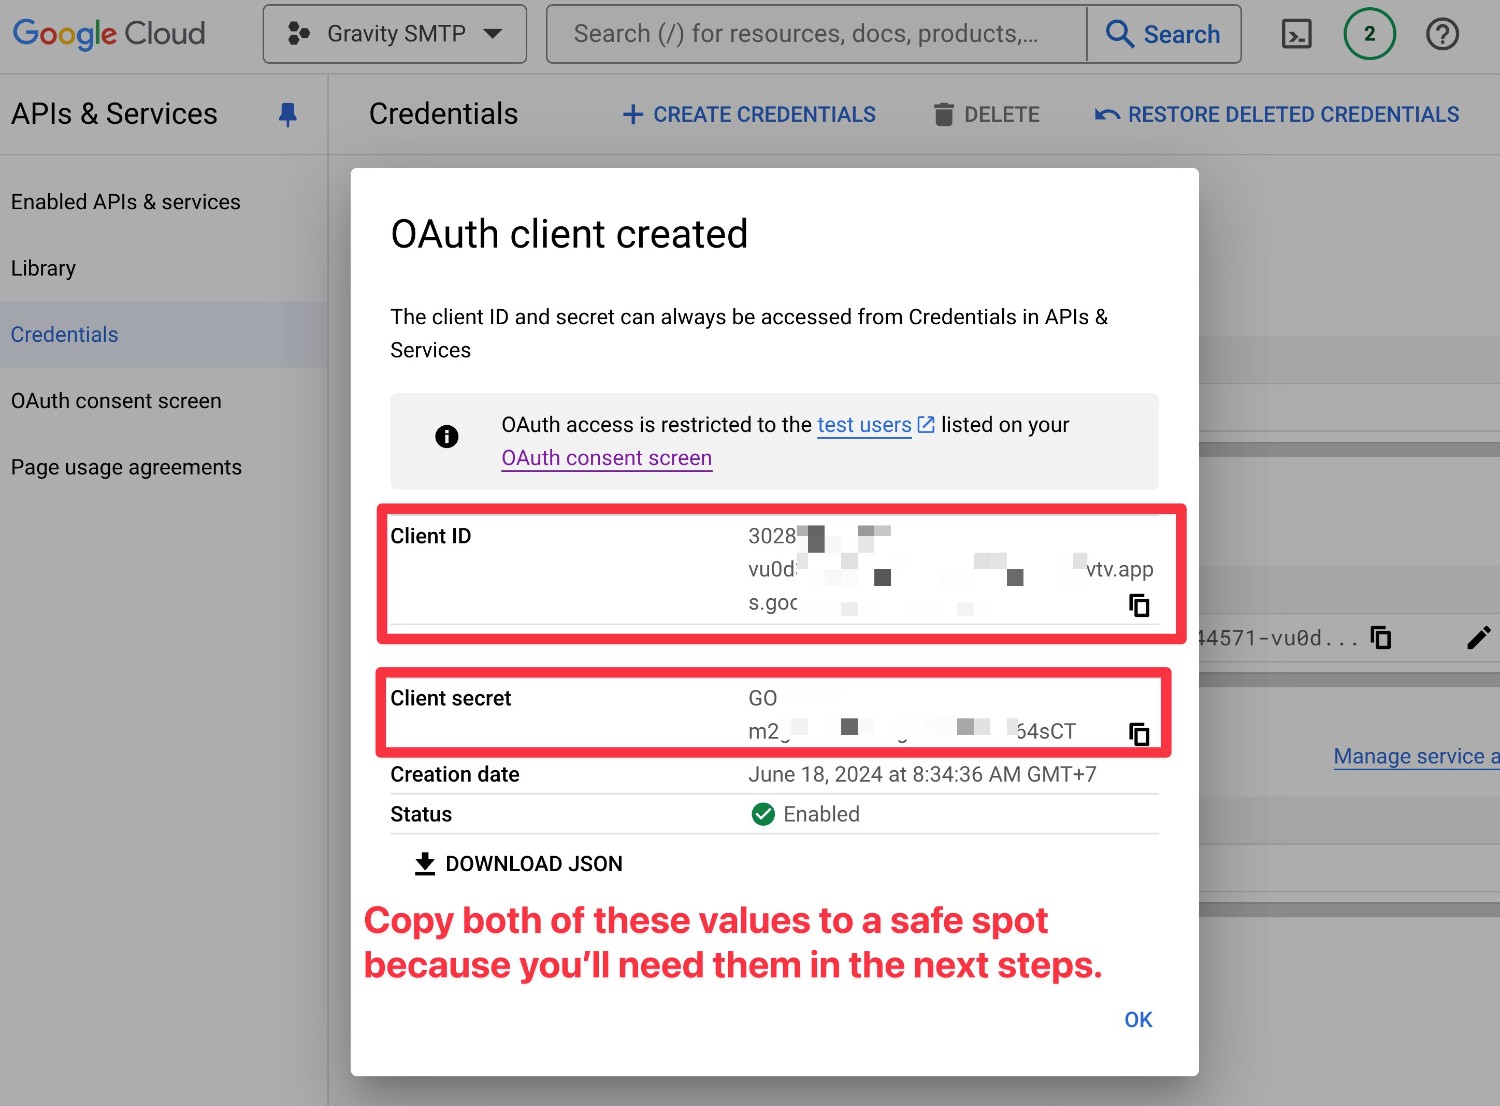
After clicking the Create button, Google will show you a popup screen that contains two important pieces of information:
- Client ID
- Client secret
Copy both of these values to a safe spot because you’ll need them in future steps.
Once you’ve copied both values to a safe spot, you can move to the next step.
Publish Your App
You’re almost at the end! For the last part of the app setup process, you’ll need to publish your app:
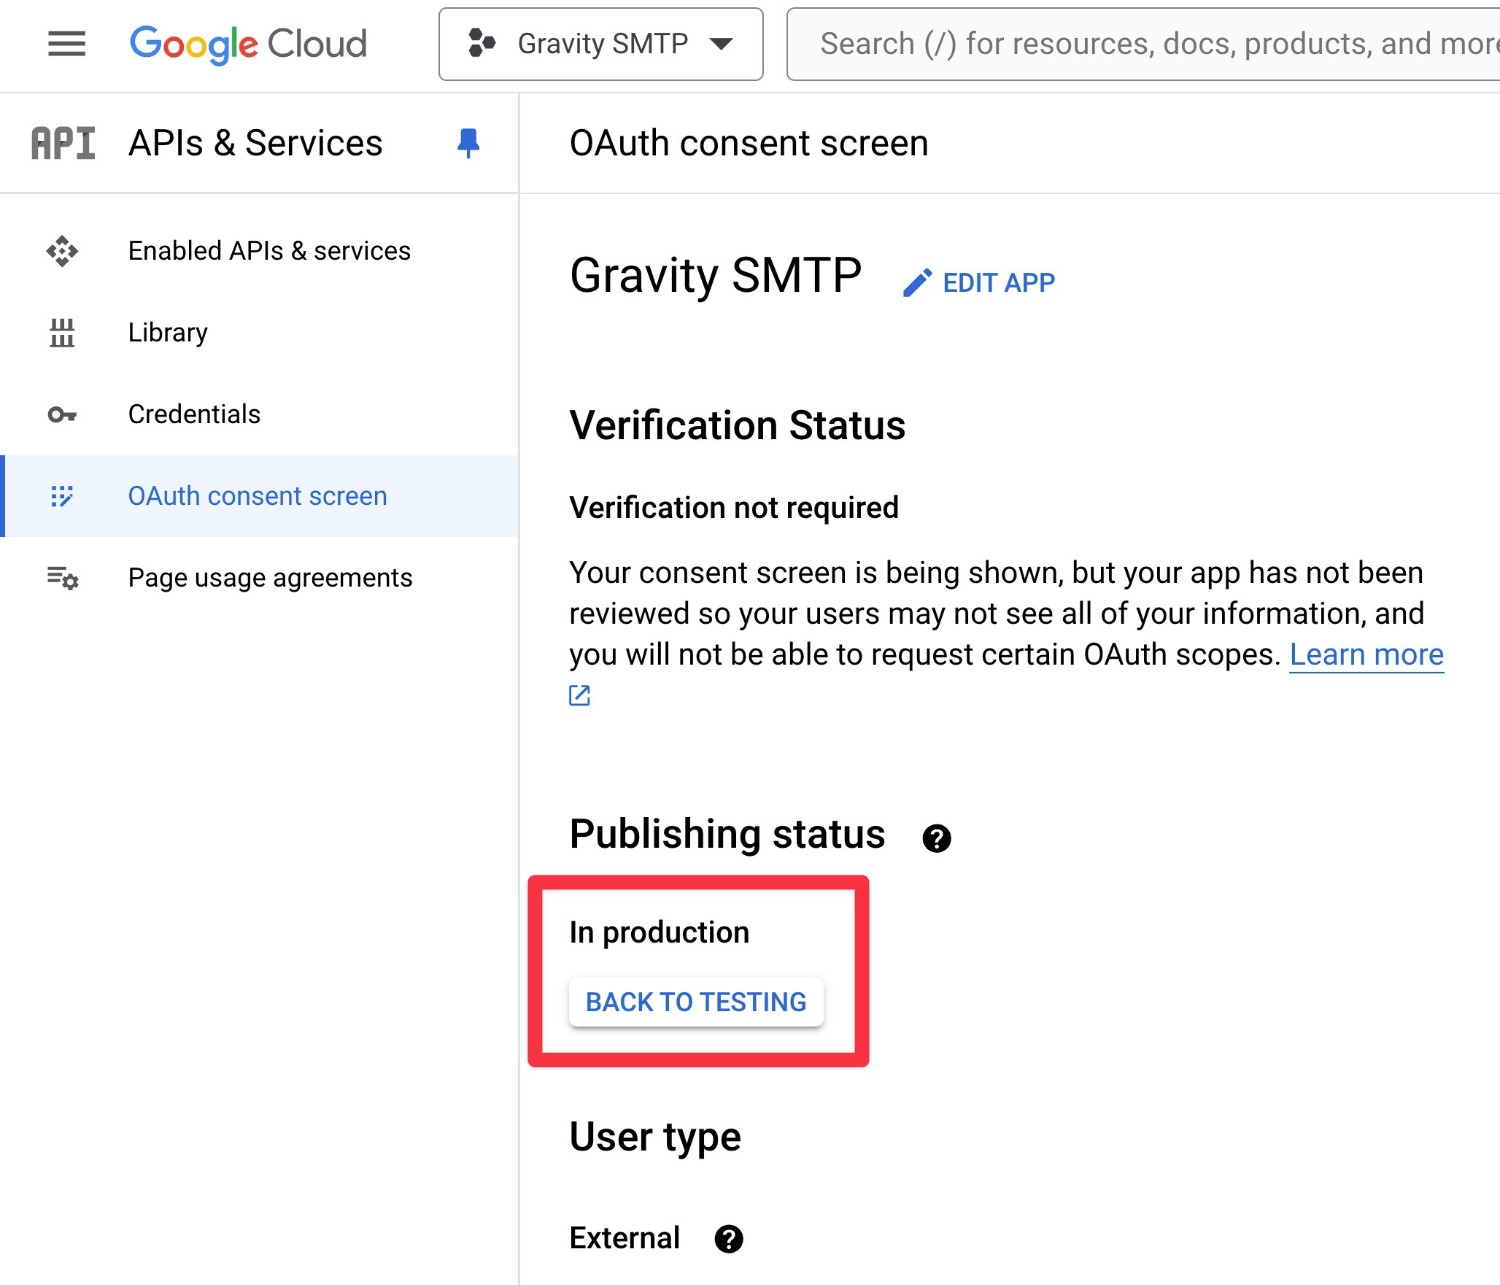
- While in the APIs & Services area, select the OAuth consent screen option in the sidebar.
- Under Publishing status, click the button to Publish App.
- In the Push to production? popup that appears, click Confirm.
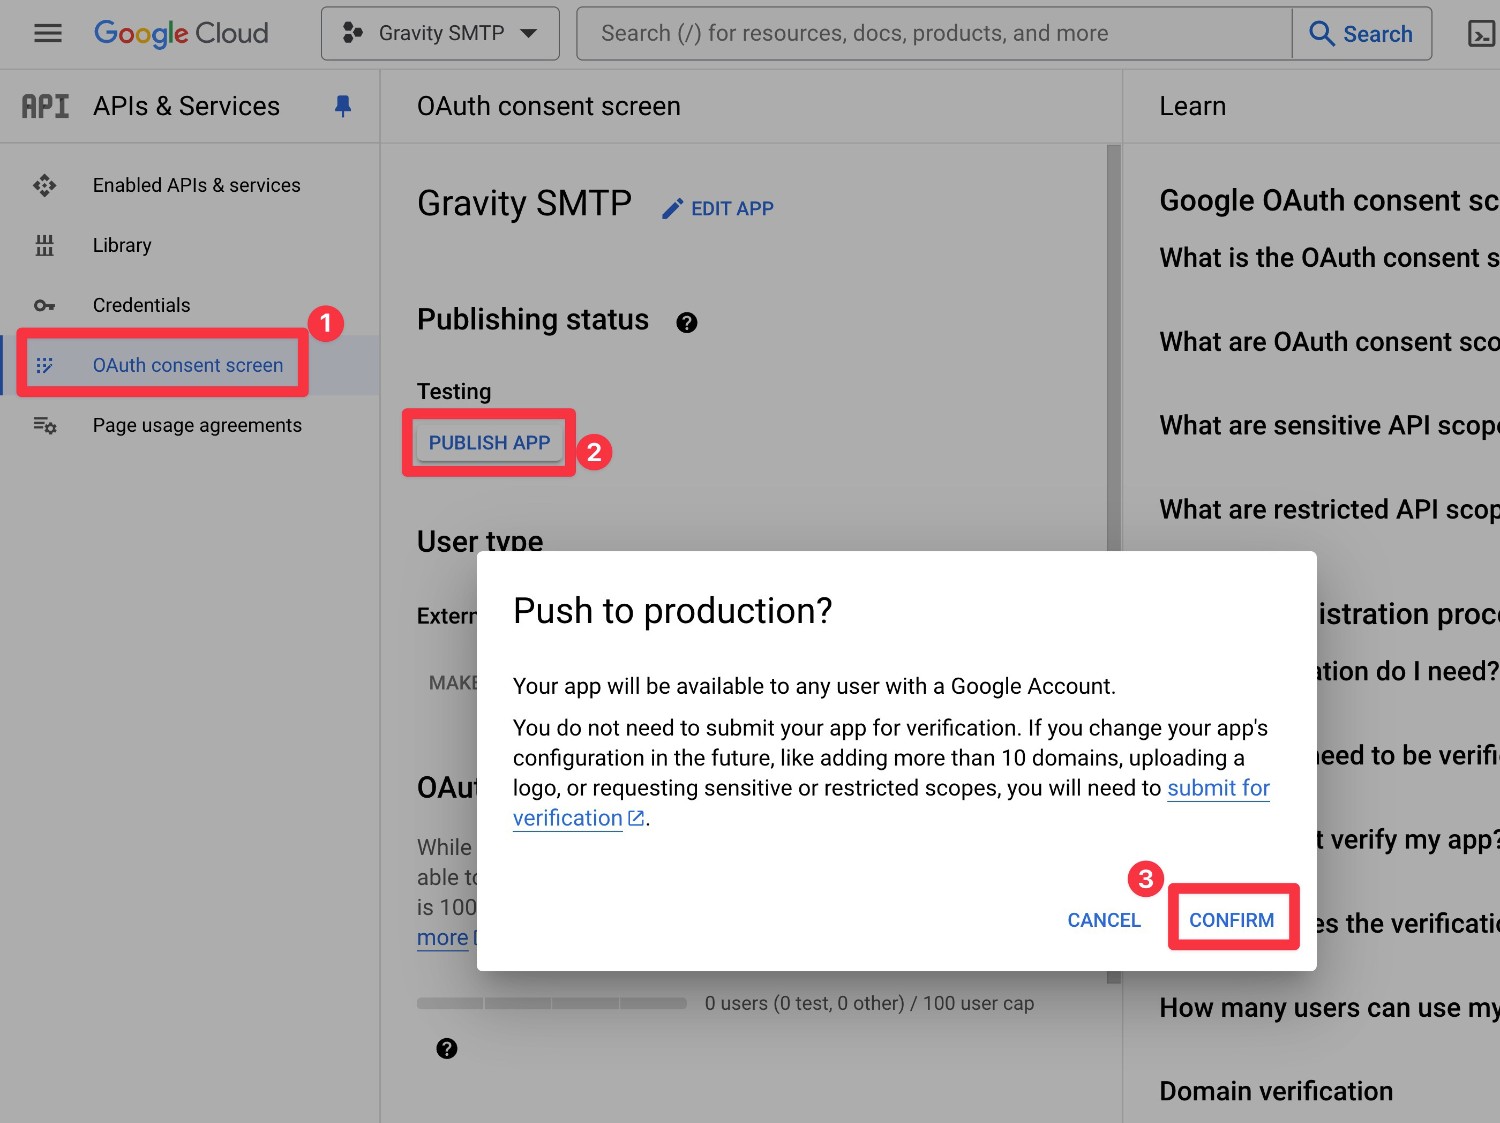
After you hit Confirm, you should see the Publishing status change from “Testing” to “In production”.
And that’s it! You’ve made it to the end of the app creation process. Compared to what you just went through, the rest of the setup process is pretty simple.
3. Connect Gravity SMTP to Your Google Cloud App
Now, you’ll perform the rest of the setup from your WordPress dashboard.
To begin, open the Gmail settings in Gravity SMTP:
- Open your WordPress dashboard.
- Go to SMTP → Settings.
- Select the Integrations tab.
- Click the gear icon next to Google / Gmail to expand the settings popup.
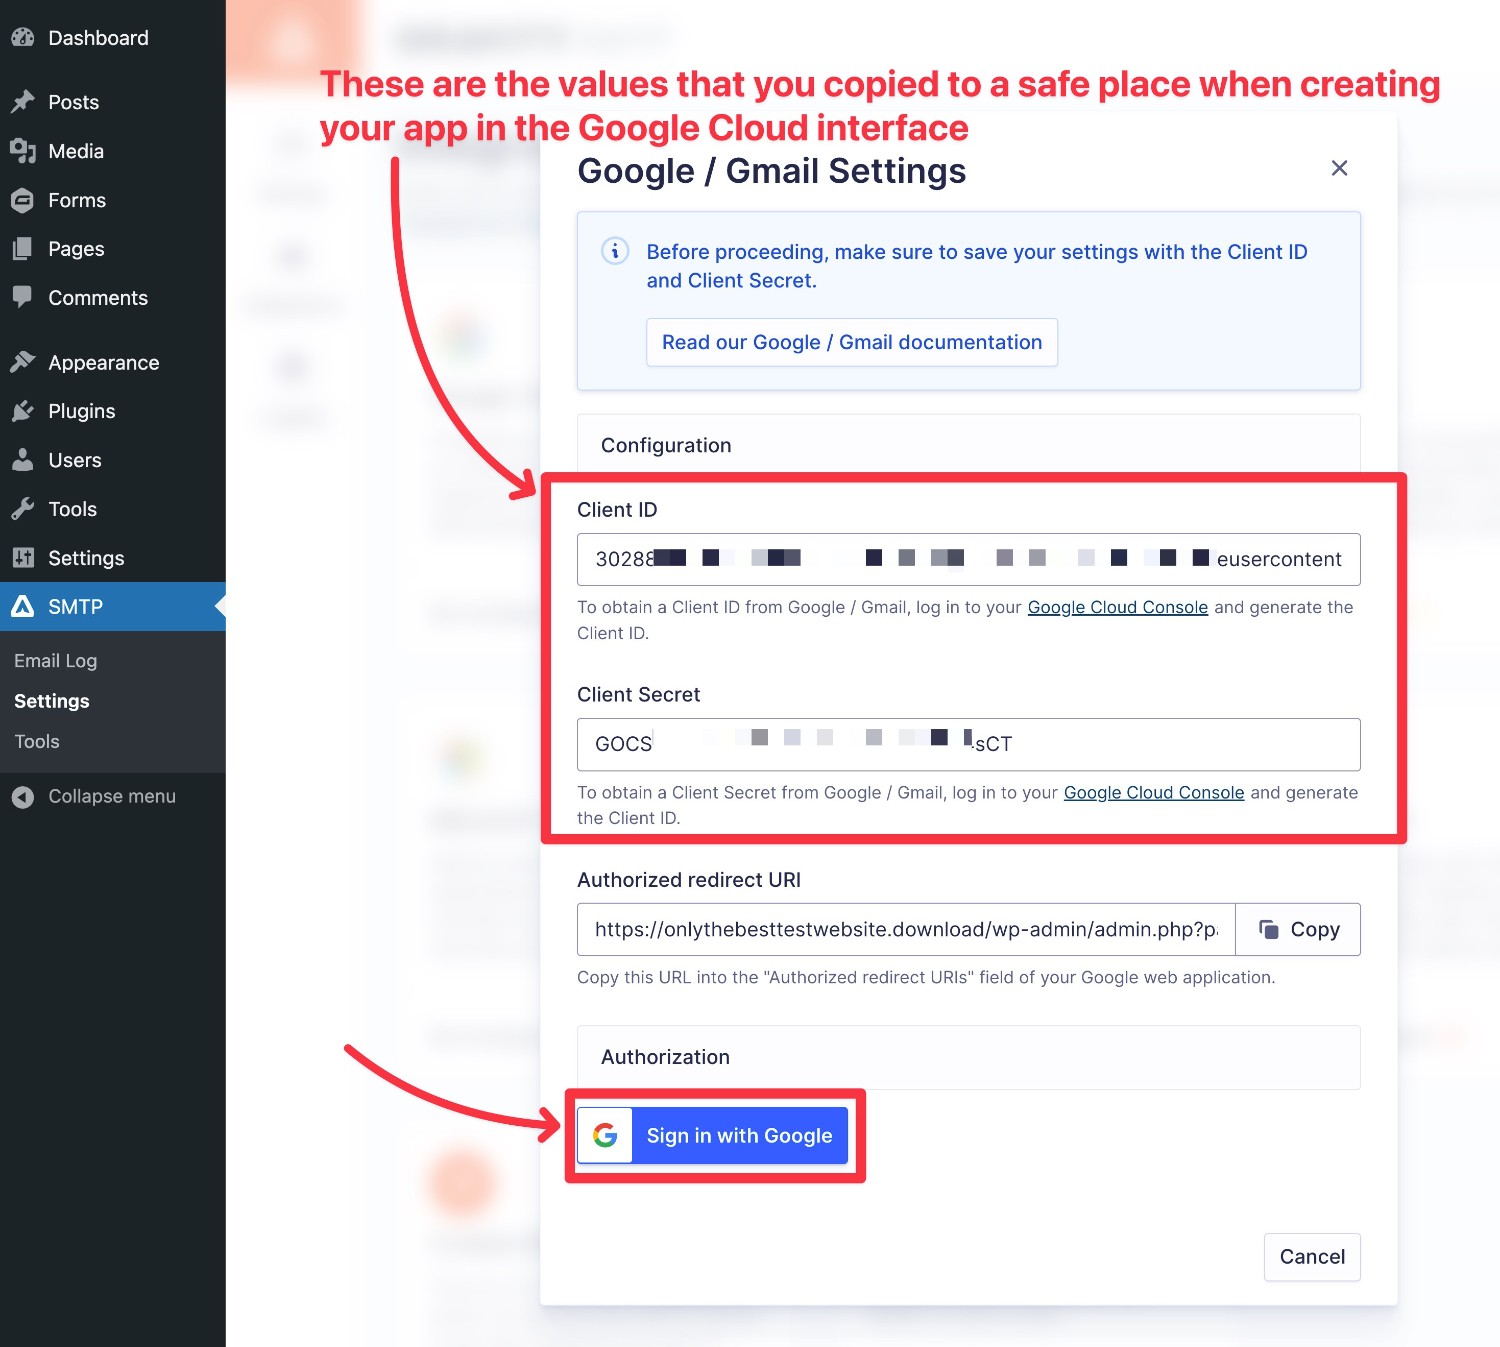
In the settings popup, paste in the Client ID and Client Secret for your Google app. These are the values that we told you to copy to a safe place in the previous section.
Then, click the Sign in with Google button.
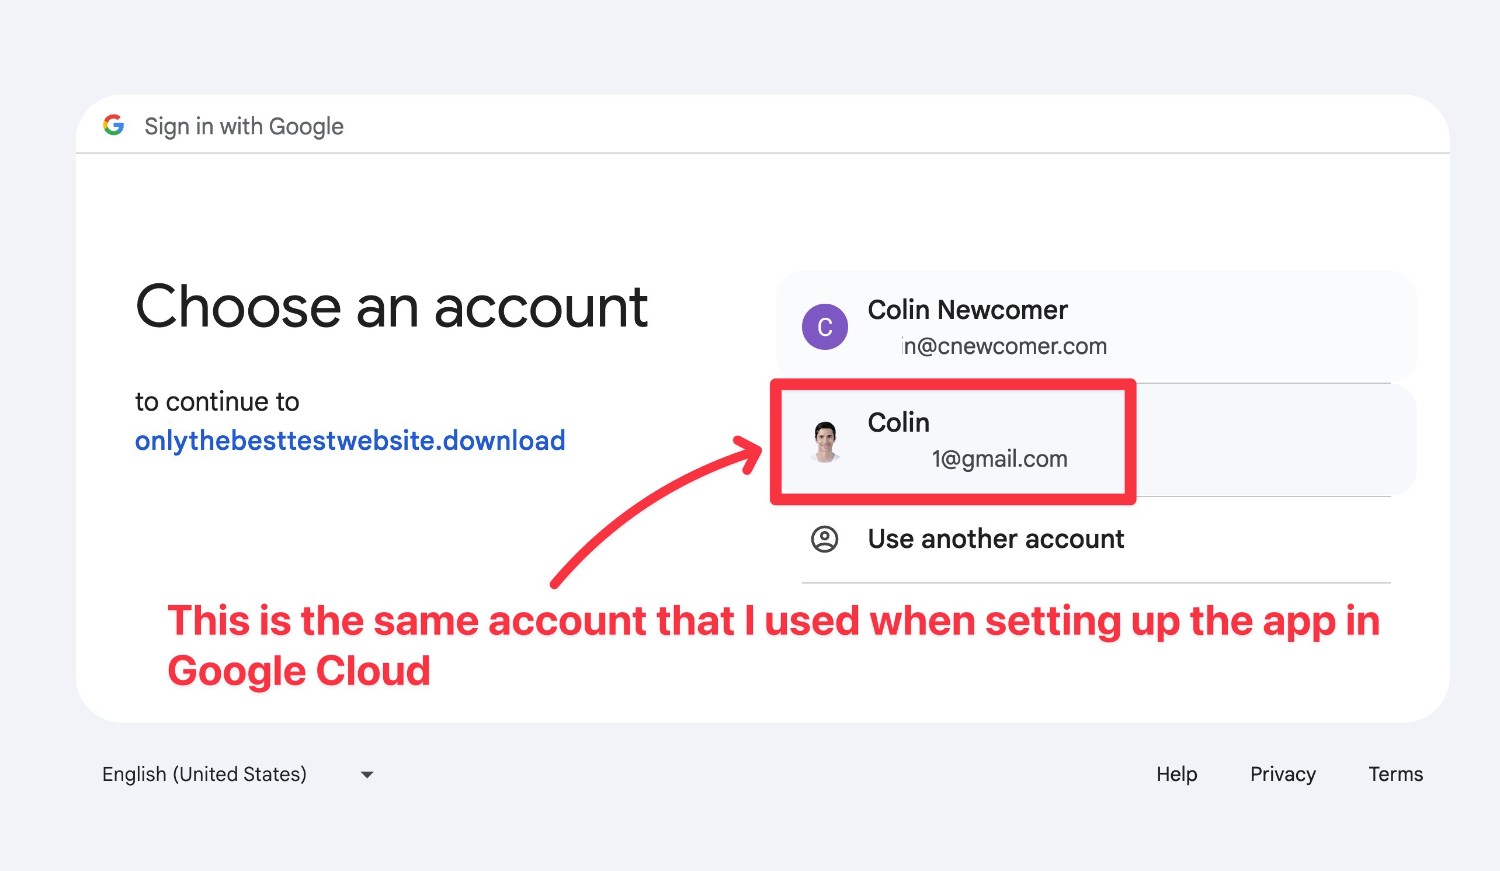
This should display the normal Google authorization process. If you have multiple Google accounts, make sure to choose the Google account that you used when setting up your app.
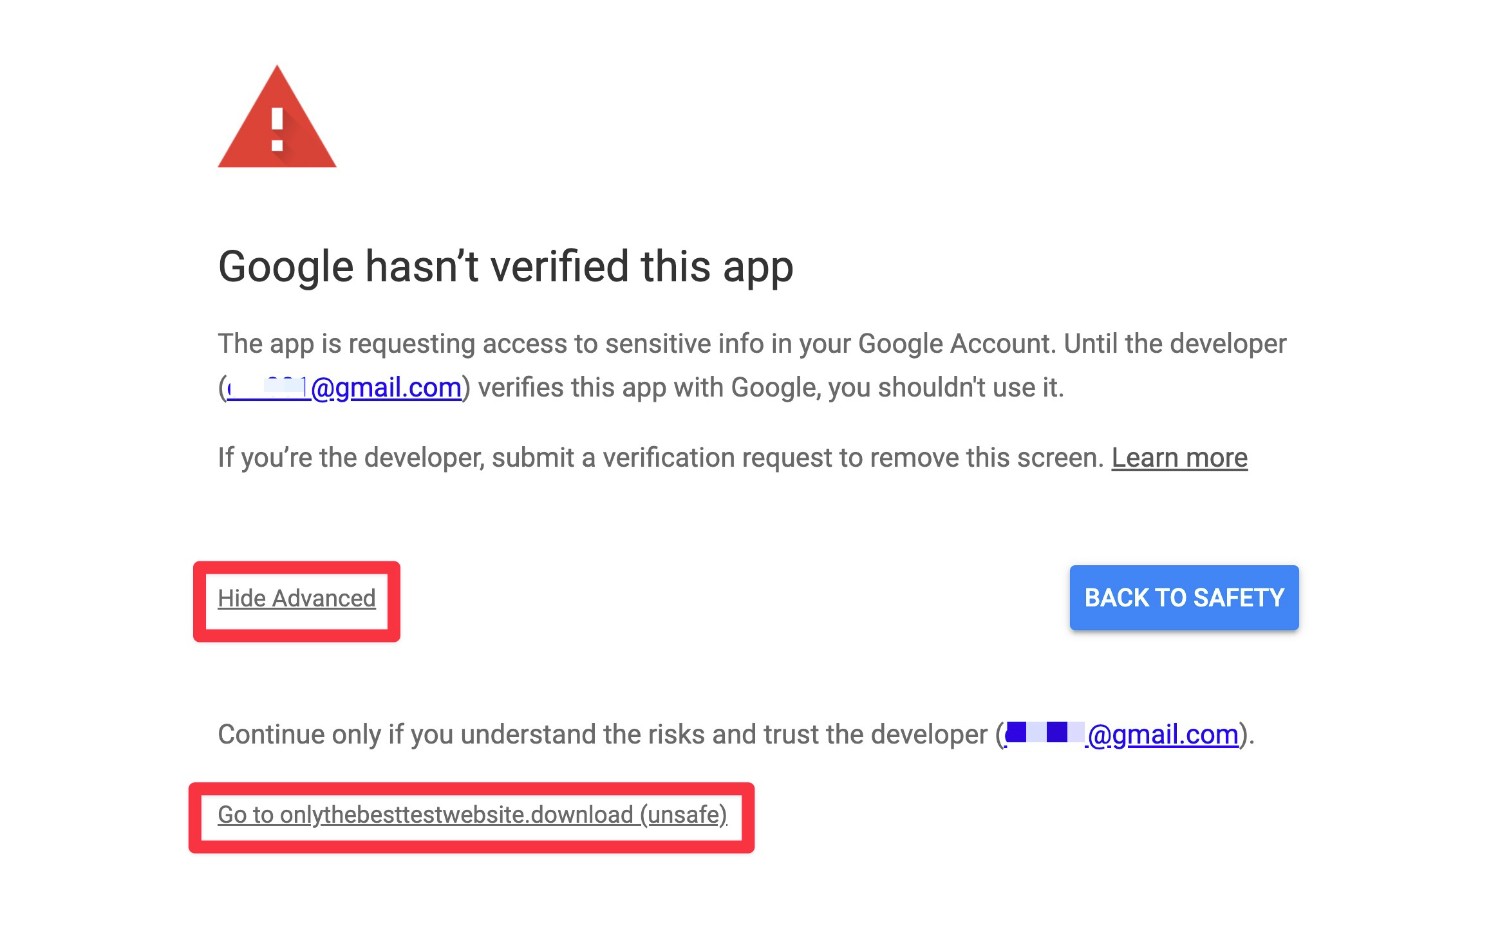
You might see something like “Google hasn’t verified this app”. However, because you’re the person who created the app, you don’t need to worry about safety.
Click the Advanced link and then click the Go to [website name] link that appears.
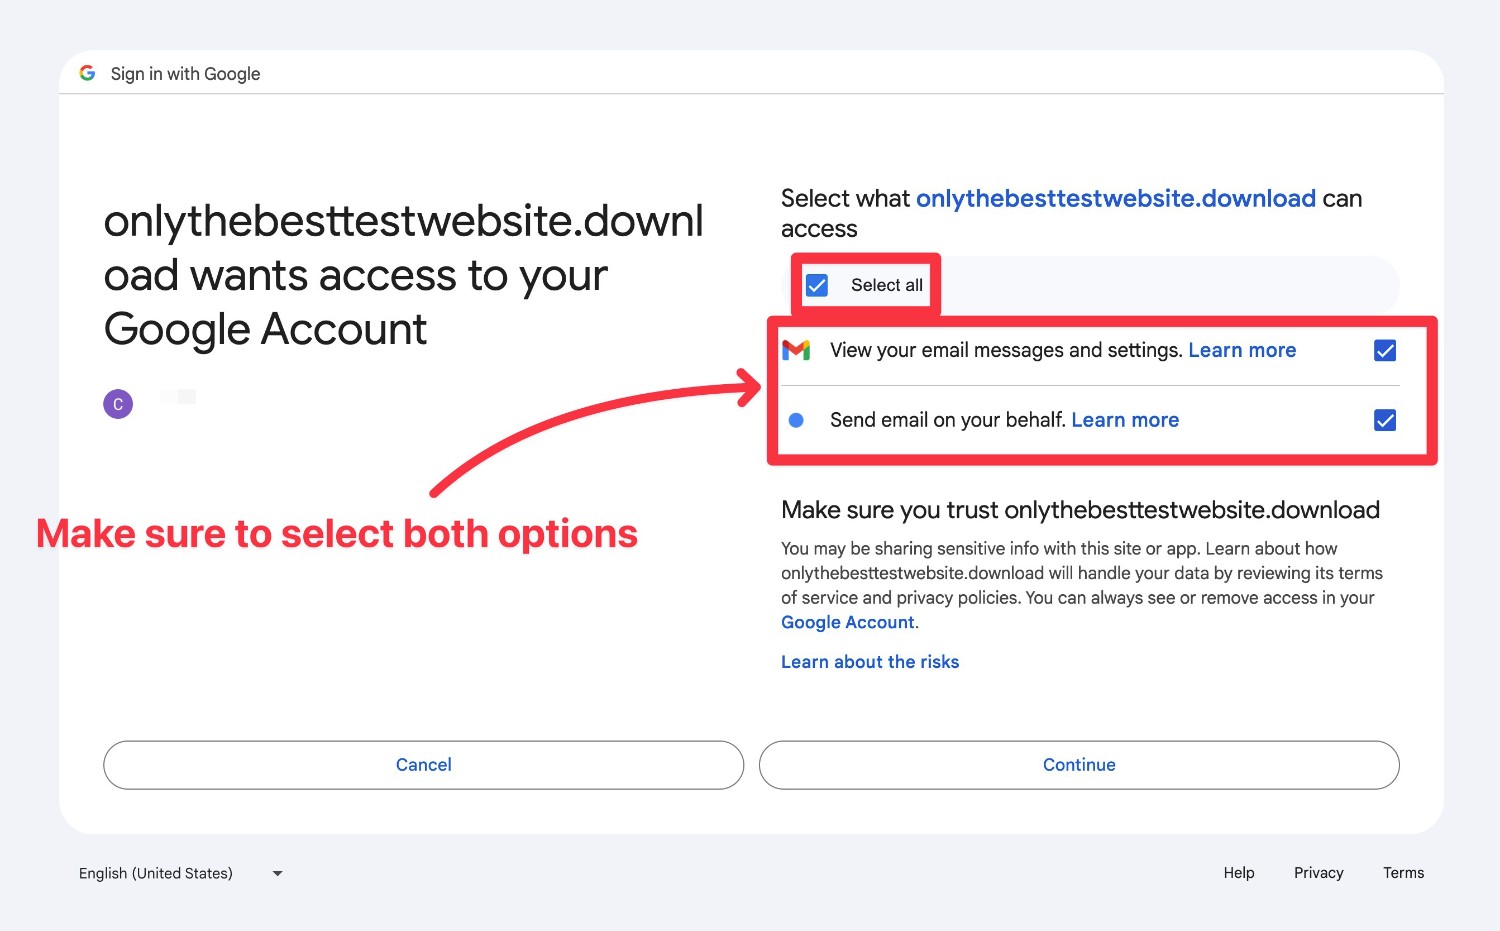
On the next screen, choose Select all to add both privileges and then click Continue. You must choose both View your email messages and settings and Send email on your behalf to have the integration work.
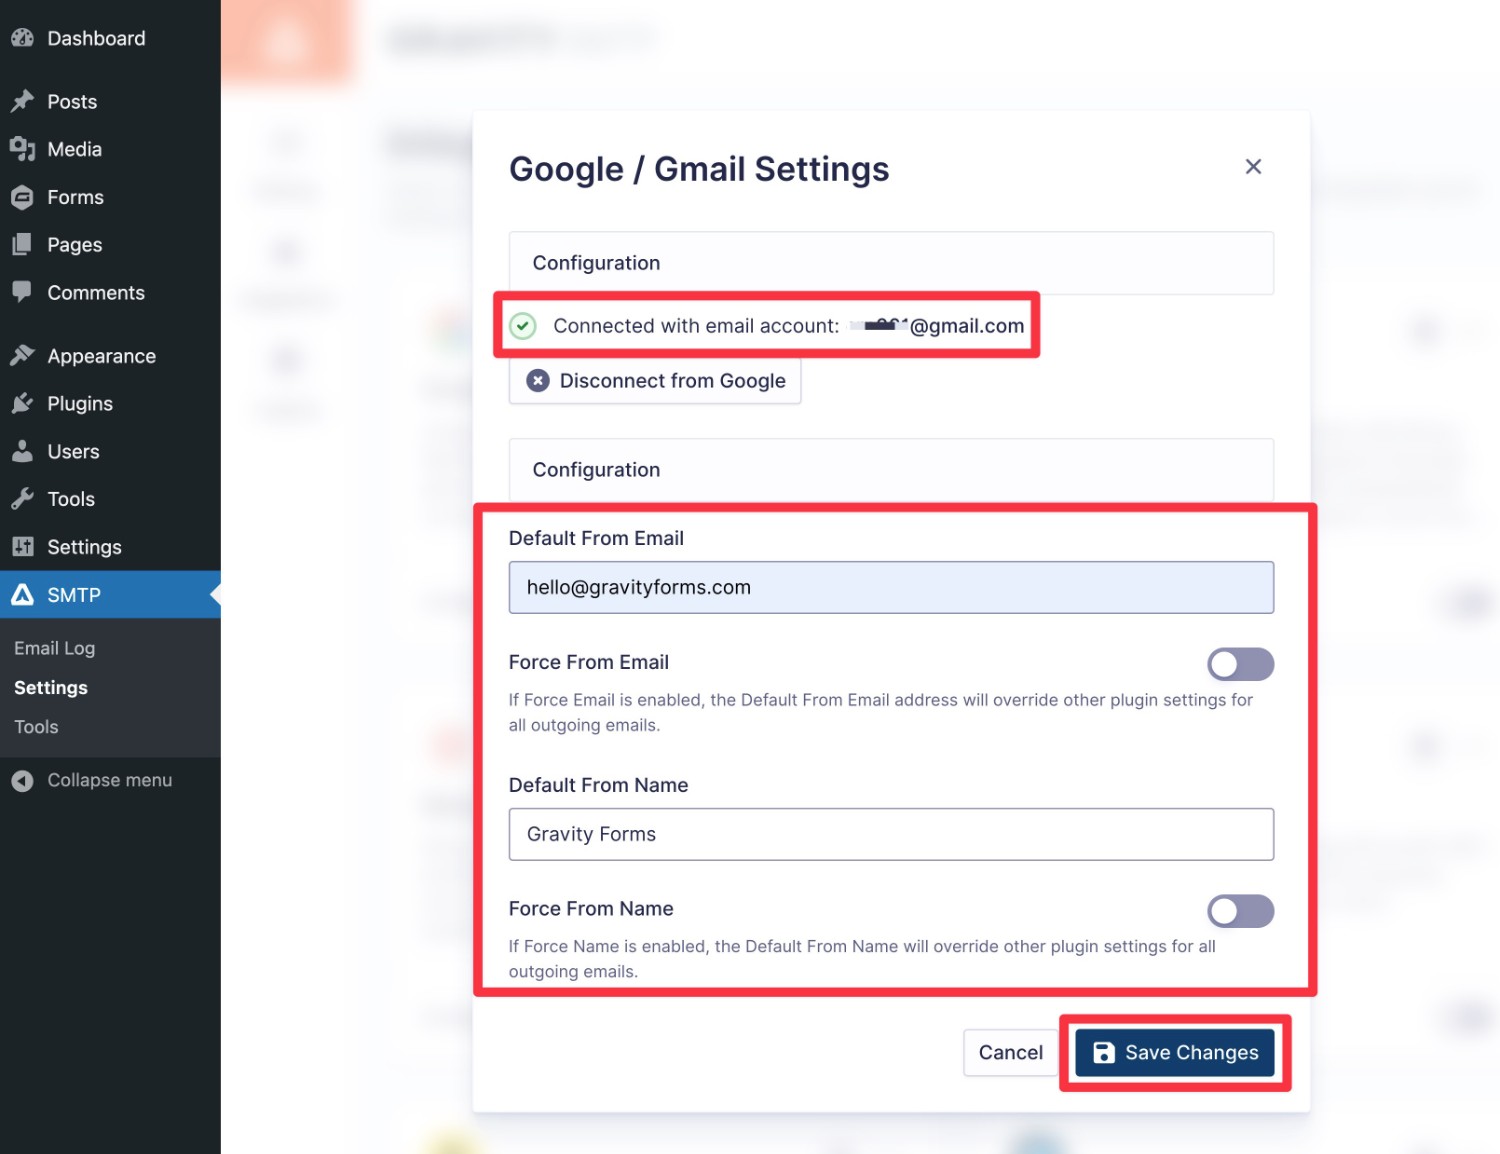
You’ll then be taken back to your WordPress dashboard and you should see a message that says “Connected with email account: [your Google email address]”.
To finish things out, you can set a default from email and from name. Once you’ve made those choices, click the Save Changes button.
4. Enable Gmail As Your Sending Service
At this point, your site is connected to Gmail.
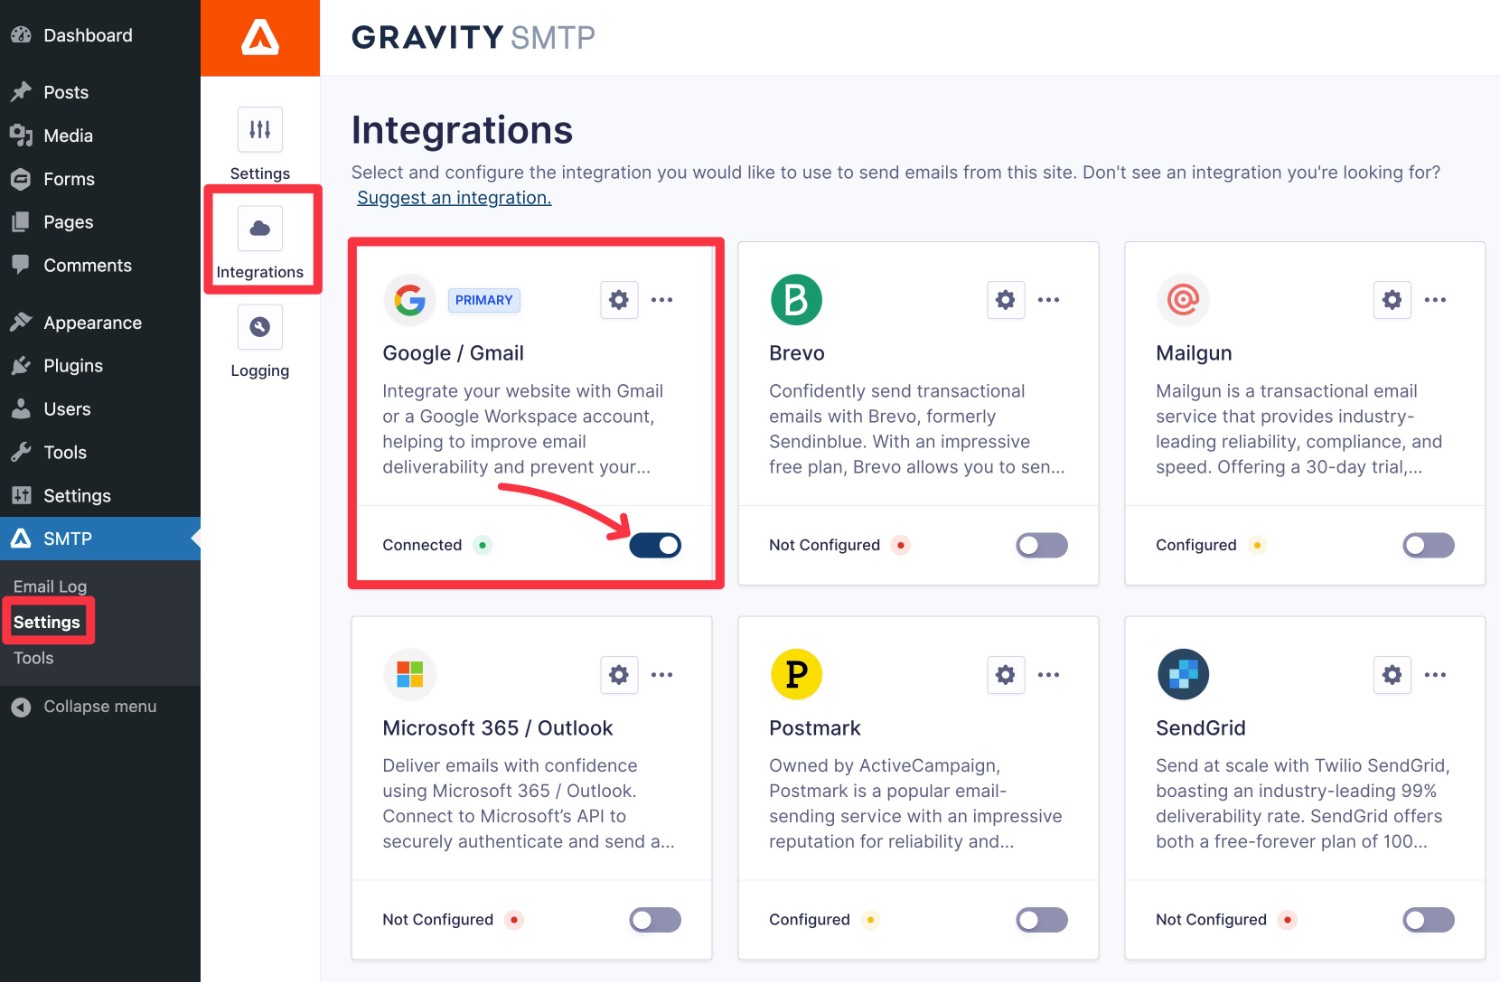
To actually make Gmail your site’s active sending service, though, you need to enable the toggle in the Gravity SMTP integrations list.
This should change the text from Configured to Connected. You should also see the Primary indicator next to the Google logo.
You can also set up a backup option, which helps to ensure email deliverability and gives you peace of mind that your emails will be sent, even if there’s an issue with your primary email service.
5. Send a Test Email
Now, your site is actively sending its emails using Gmail, rather than the default WordPress sending method.
To make sure that it’s working properly, Gravity SMTP includes a feature to send a test email:
- Go to SMTP → Tools.
- Select the Send a Test tab if it’s not already selected.
- Enter the email address to which you want to send a test email in the Send To box.
- Click the Send Test button.

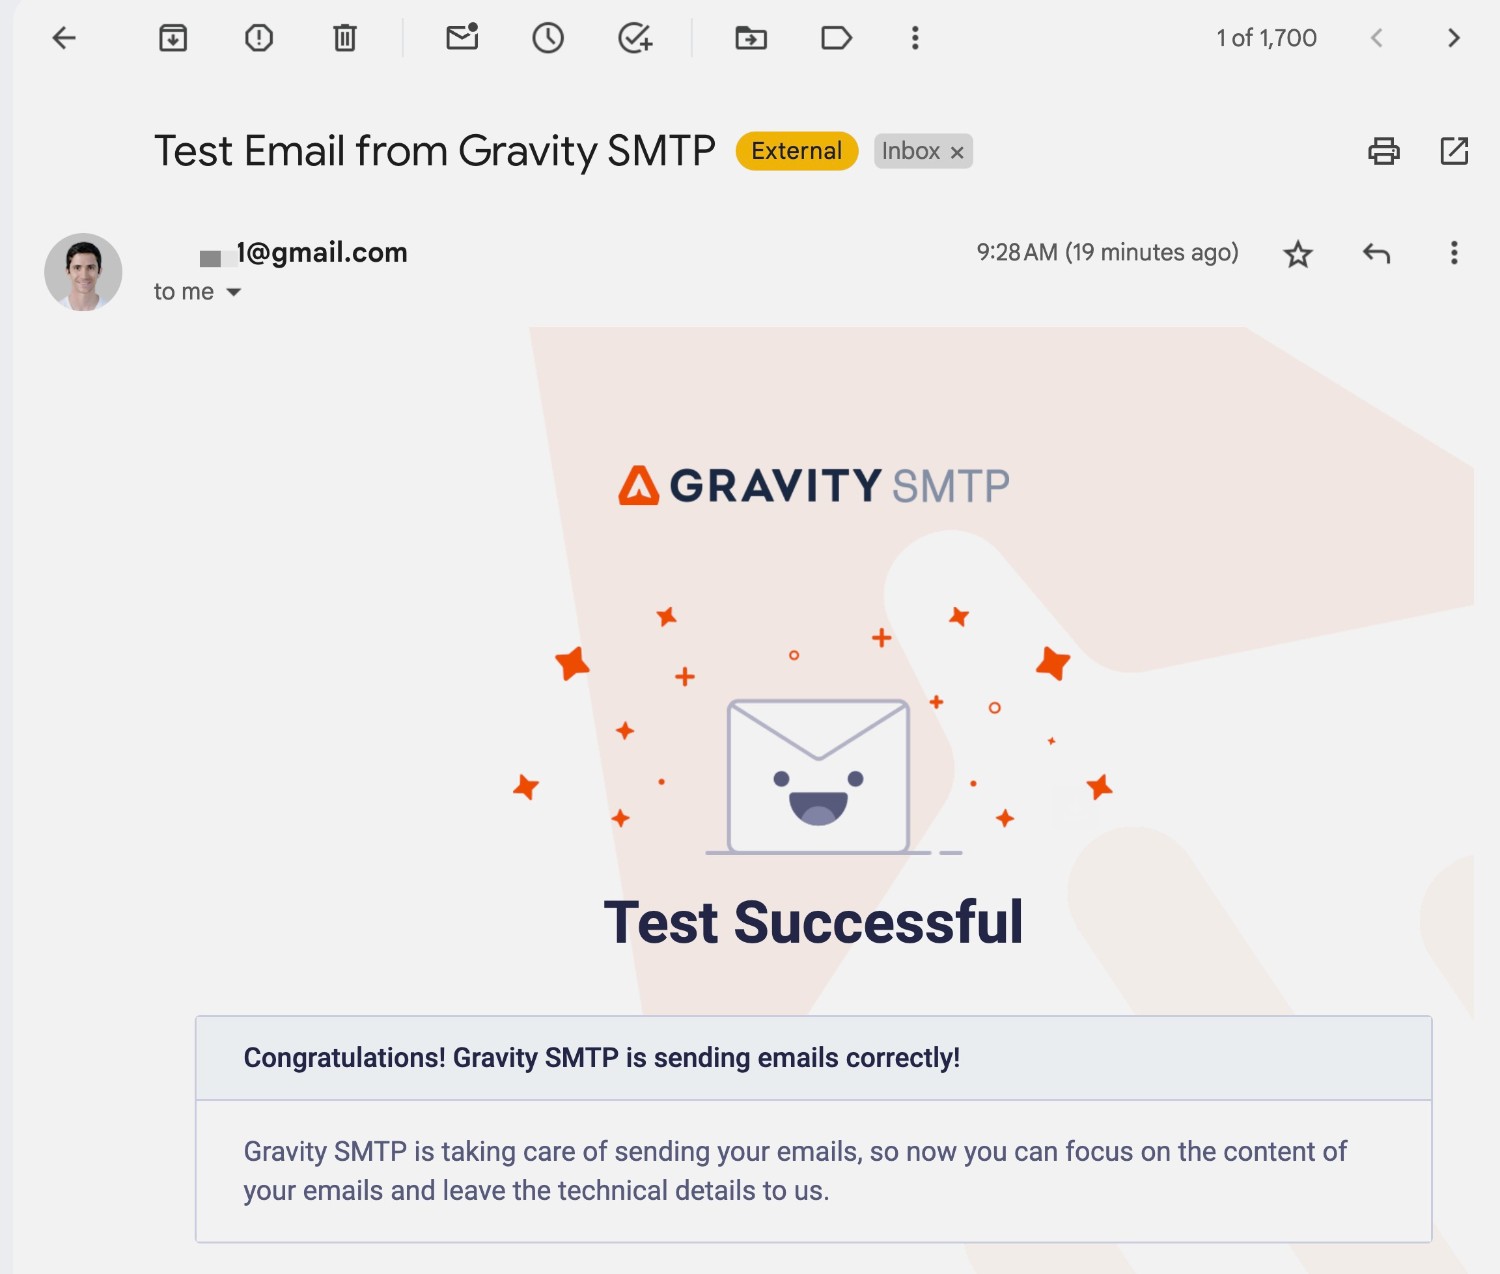
You should then see a success message in the Gravity SMTP interface. And then if you open your email inbox, you should see a test email that looks something like below.
In addition to making sure that you received the email, you should also check the From Name and From Email to make sure that they display as you intend them to.
6. Monitor Your Emails Going Forward
At this point, you’ve connected WordPress to Gmail and verified that it’s able to successfully send emails.
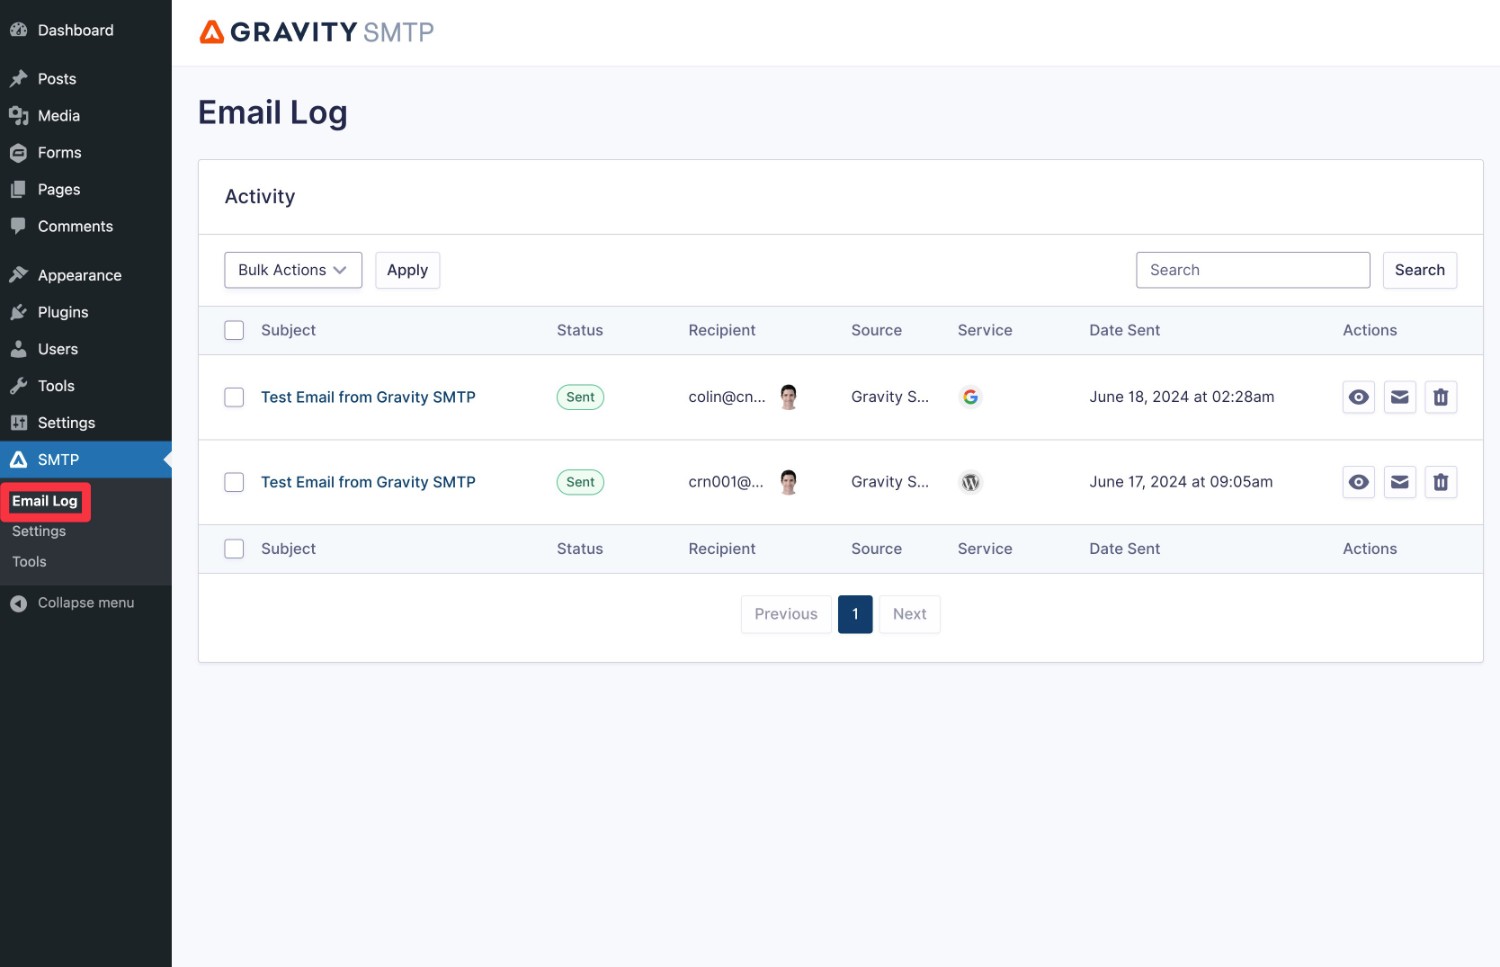
To help you stay on top of your site’s emails going forward, Gravity SMTP also includes a built-in email logging feature that lets you see the content and technical details of every email that your site sends.
You can access this log by going to SMTP → Email Log.
By default, Gravity SMTP will store this log permanently. However, you can adjust this logging period by going to SMTP → Settings → Logging.
Final Thoughts on Gmail for WordPress Emails
While Gmail probably isn’t the best option for mission-critical emails (especially high-volume sending), Gmail can be a great free email solution for a lot of WordPress sites, especially if you’re primarily sending emails to yourself.
With the Gravity SMTP plugin, you can easily configure your WordPress sites to send emails using a free Gmail account or a paid Google Workspace account.
While the setup process is a little intensive (which is true regardless of which SMTP plugin you use), you’ll only need to go through the setup process one time.
If you have a Gravity Forms Elite license and you’re ready to get started, install the Gravity SMTP plugin today and then follow this guide to start sending your WordPress emails with Gmail.

If you want to keep up-to-date with what’s happening on the blog sign up for the Gravity Forms newsletter!