How to Configure WordPress to Send Email Using Zoho Mail
Want to use Zoho Mail to send WordPress transactional emails?
With the Gravity SMTP plugin, you can easily configure your WordPress site to send its transactional emails using your free or paid Zoho Mail account, which offers a free solution for improving the reliability of your WordPress transactional emails.
In this post, we’ll show you step-by-step instructions on how to configure WordPress Zoho Mail email sending for transactional emails using the Gravity SMTP plugin. If you already have a Zoho Mail account, the entire process will only take a few minutes.
Let’s get into it…
Advantages of Using Zoho Mail for Sending Email on WordPress
One of the biggest reasons to use Zoho Mail for WordPress transactional emails is its free plan.
Zoho Mail is one of the few email hosting services that allows you to set up a custom domain name for free. That is, you can set up an email address like [email protected].
In addition to receiving emails at this address, Zoho also lets you use the Zoho API to send your WordPress site’s transactional emails using your Zoho Mail account.
For most WordPress websites, you’ll be able to send transactional emails without paying a penny, even while using a custom domain name.
In general, Zoho Mail can work great if you’re primarily looking for a free solution to send basic transactional emails – especially if you and your team will be the primary recipient(s) of these emails.
However, we do not recommend using Zoho Mail for mission-critical, user-facing emails, such as transactional emails sent for an ecommerce store or membership website. This is because Zoho Mail is not a dedicated transactional email service like SendGrid, Postmark, and others.
For example, Zoho Mail doesn’t publish email sending limits, only specifying that it’s for normal email usage. The limits are dynamic and based on what the system deems to be “normal”. In general, you should be able to send around 500 emails per day without issue, which should be fine for most WordPress sites.
If you need a transactional email service with clear limits and mission-critical reliability, we recommend considering other services like Postmark, SendGrid, Mailgun, and Mailchimp Transactional. To find out more about transactional e-mail services that sync with Gravity SMTP, check out this article.
Why Use Gravity SMTP for the WordPress Zoho Mail Integration?
Gravity SMTP is a WordPress SMTP plugin that offers a dedicated integration for Zoho Mail. After a short setup process to connect Gravity SMTP to the Zoho API, Gravity SMTP can send all of your site’s transactional emails using Zoho Mail, including core WordPress emails and emails from any plugins that use wp_mail.
Beyond the easy Zoho Mail integration, Gravity SMTP also offers a number of other helpful features:
- Email reports – See detailed information about your site’s email sending efforts, including email open rates, top sending sources, top recipients, and more.
- Email logging – Log every single email that your site sends, and view technical information, content, design, and attachments of each email (optional).
- Backup email sending methods – Select a backup email sending service that Gravity SMTP will automatically use if Zoho Mail ever stops working for some reason.
- Email resends – Easily resend an email just by clicking a button.
- Real-time alerts – Receive real-time notifications via Slack or SMS (Twilio) if there are ever issues with your site’s emails.
- Dedicated support – If you ever need help, you can get direct, one-on-one support from the friendly Gravity Forms team.
The team behind Gravity SMTP is also regularly adding new features and integrations – you can see what’s coming and vote on your preferred features on the Gravity SMTP product roadmap.
Currently, Gravity SMTP is available at no extra cost to anyone holding the Gravity Forms Elite, Nonprofit, or Developer licenses. You can download the plugin from the Gravity Forms My Account area.
Gravity SMTP is still a 100% standalone plugin, though. That is, you do not need to have Gravity Forms installed to use Gravity SMTP, though it does work great for sending form notification emails.
How to Set Up Zoho Mail for WordPress With Gravity SMTP
Now, let’s get into the actual guide for how to use Gravity SMTP to send your WordPress transactional emails using Zoho Mail.
If you’ve already set up your basic Zoho Mail account, the entire process should only take you a few minutes. All you need to do is fill out a four-field form to set up the Zoho API and then you can authorize your WordPress site with just a few clicks.
Here’s how to set up everything…
1. Install the Gravity SMTP Plugin and Locate Redirect URI
To get started, install the Gravity SMTP plugin on the site where you want to set up WordPress Zoho Mail email sending.
Currently, Gravity SMTP is available for free to anyone holding one of these Gravity Forms licenses:
- Elite license
- Nonprofit license
- Developer license (a legacy license that’s no longer available to new customers)
If you’re holding one of those licenses, you can download Gravity SMTP from the Gravity Forms My Account area and install it like any other plugin.
Again, you do not need to have Gravity Forms installed in order to use Gravity SMTP.
Once you’ve activated the Gravity SMTP plugin on your site, you can add your license key by going to SMTP → Settings and using the License Key box.
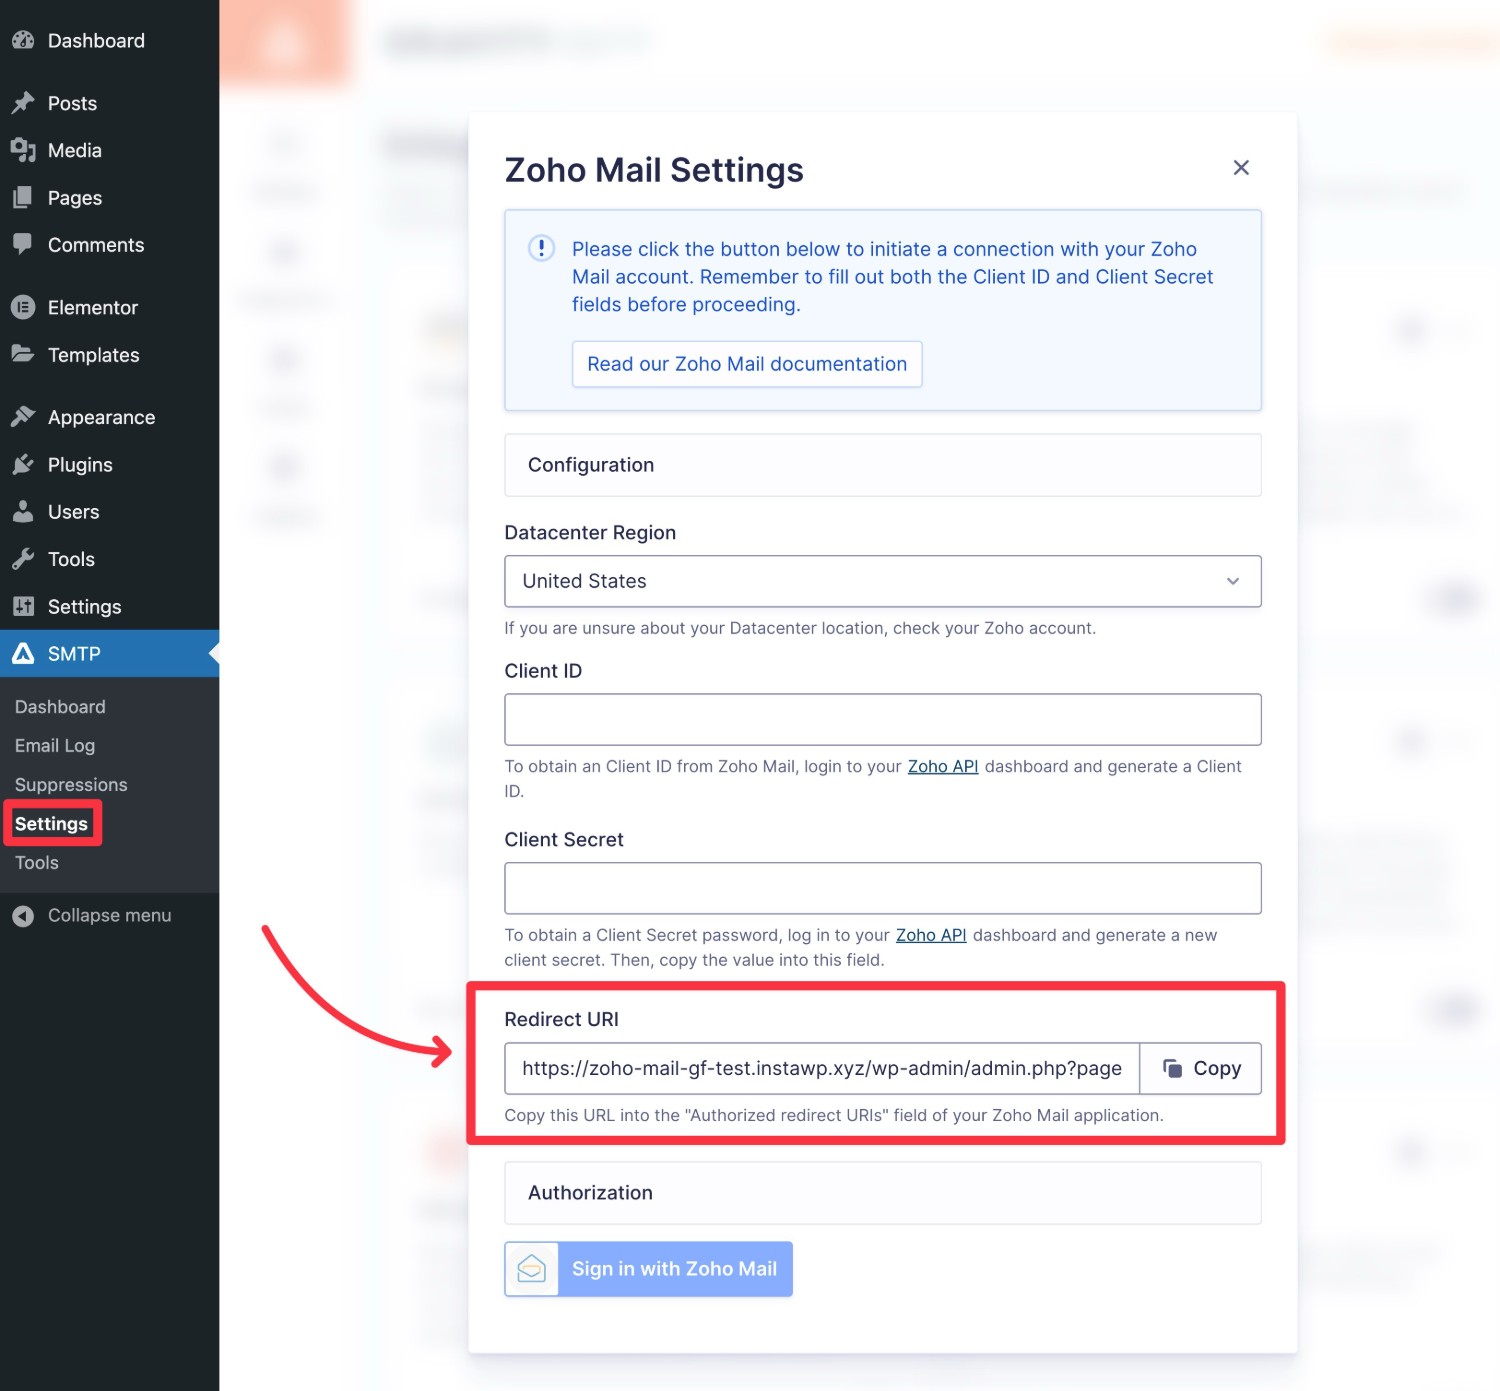
2. Locate Your Gravity SMTP Redirect URI
Once you’ve added the plugin, you need to locate Gravity SMTP’s Zoho Mail Redirect URI in the Gravity SMTP settings.
You’ll need this URL in later steps to connect WordPress to Zoho Mail.
Here’s how to find it:
- Go to SMTP → Settings in your WordPress dashboard.
- Select the Integrations tab in the Gravity SMTP settings area.
- Click the gear icon next to Zoho Mail to open its settings.
- Locate the redirect URI field at the bottom.
- Copy this value to a safe spot or keep this tab open because you’ll need it in the next steps.
3. Set Up Your Zoho Mail Account (If You Haven’t Already Done So)
Before going any further, you’ll want to make sure that you’ve registered for and set up your Zoho Mail account, if you haven’t done so already.
To begin, you can register for a Zoho account here. If you already have a Zoho account for other services, you can use that same account for Zoho Mail.
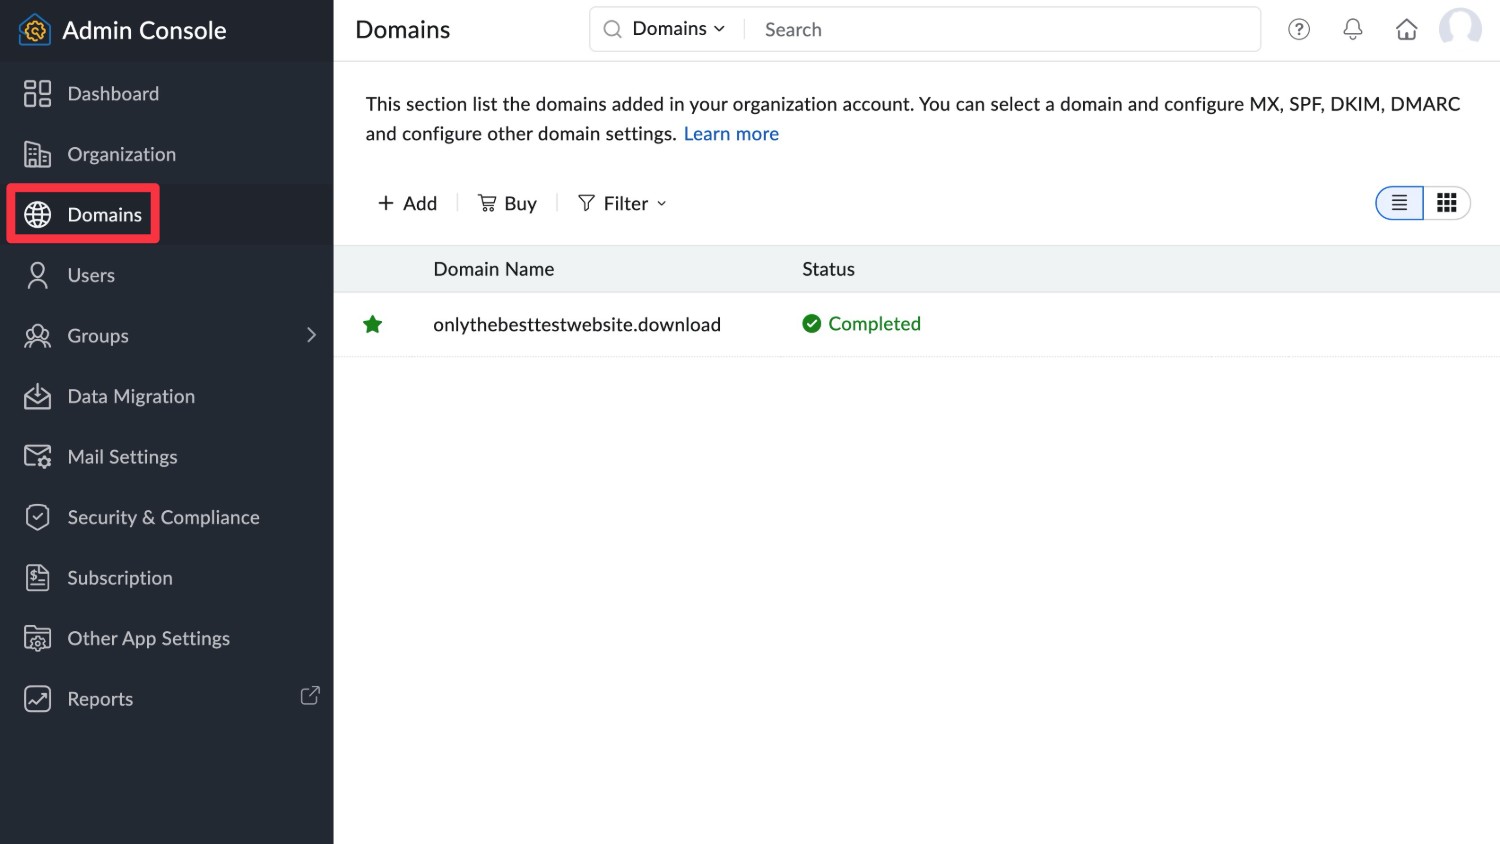
Once you have your Zoho account, you can follow these steps to add your WordPress site’s domain name to Zoho Mail.
You can perform all of these steps from the Zoho Mail Admin Console. For example, you can add your domain name in the Domains tab of the console.
4. Create Your Zoho Mail App
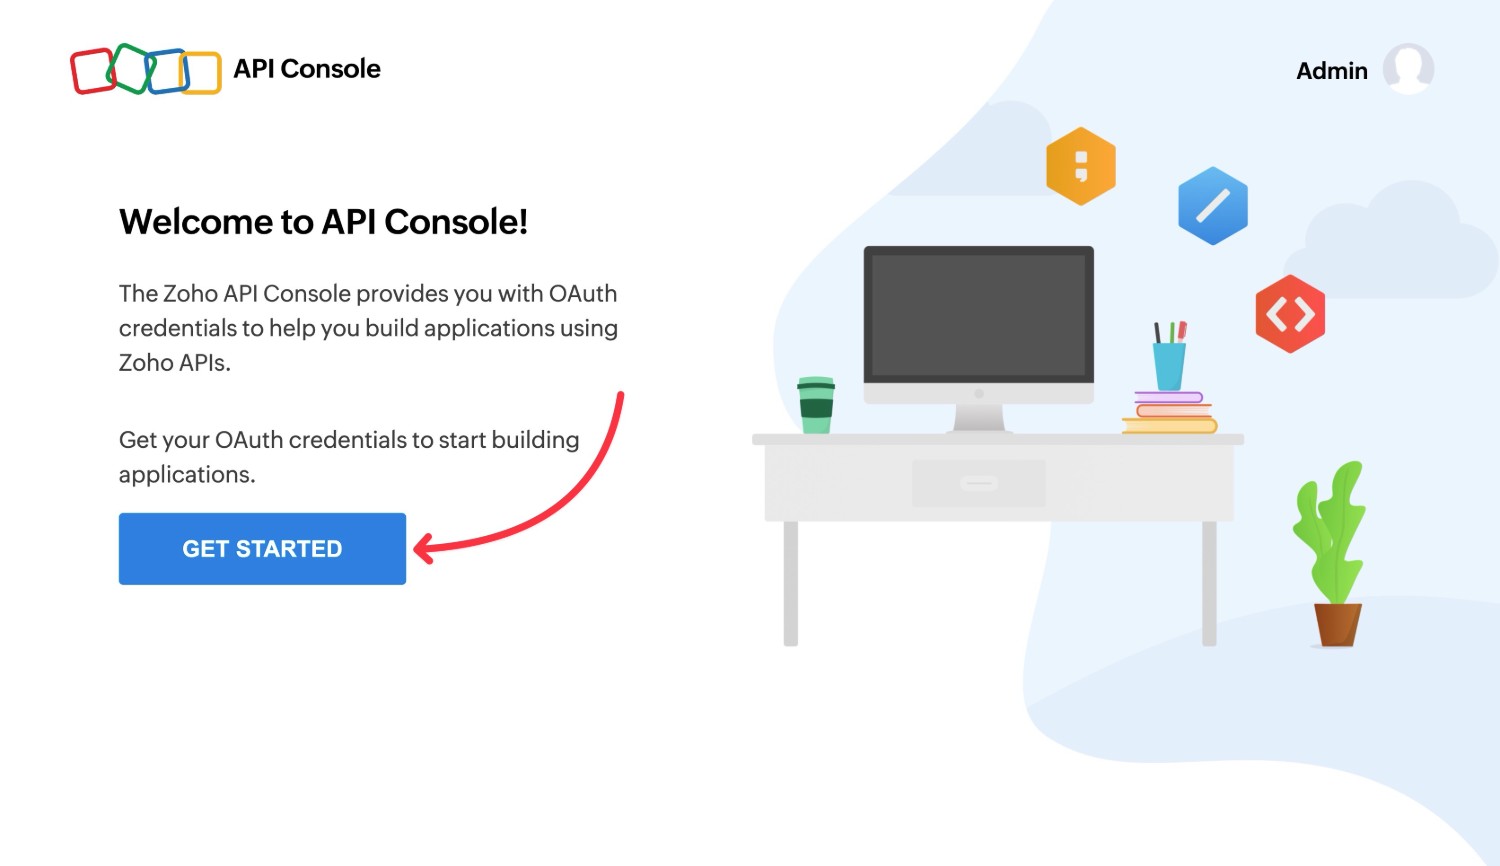
Now, you need to create your “app” using the Zoho API console.
While this might sound a little complex, don’t worry! You don’t need any technical knowledge to set this up. Instead, you’ll just fill out a short form and you’re good to go.
First, make sure to log in to your Zoho account. Then, click this link to open the Zoho API console.
If this is your first time using the API Console, you can click the blue Get Started button to begin.
You’ll then be prompted to choose a Client Type. Select Server-based Applications in the list.
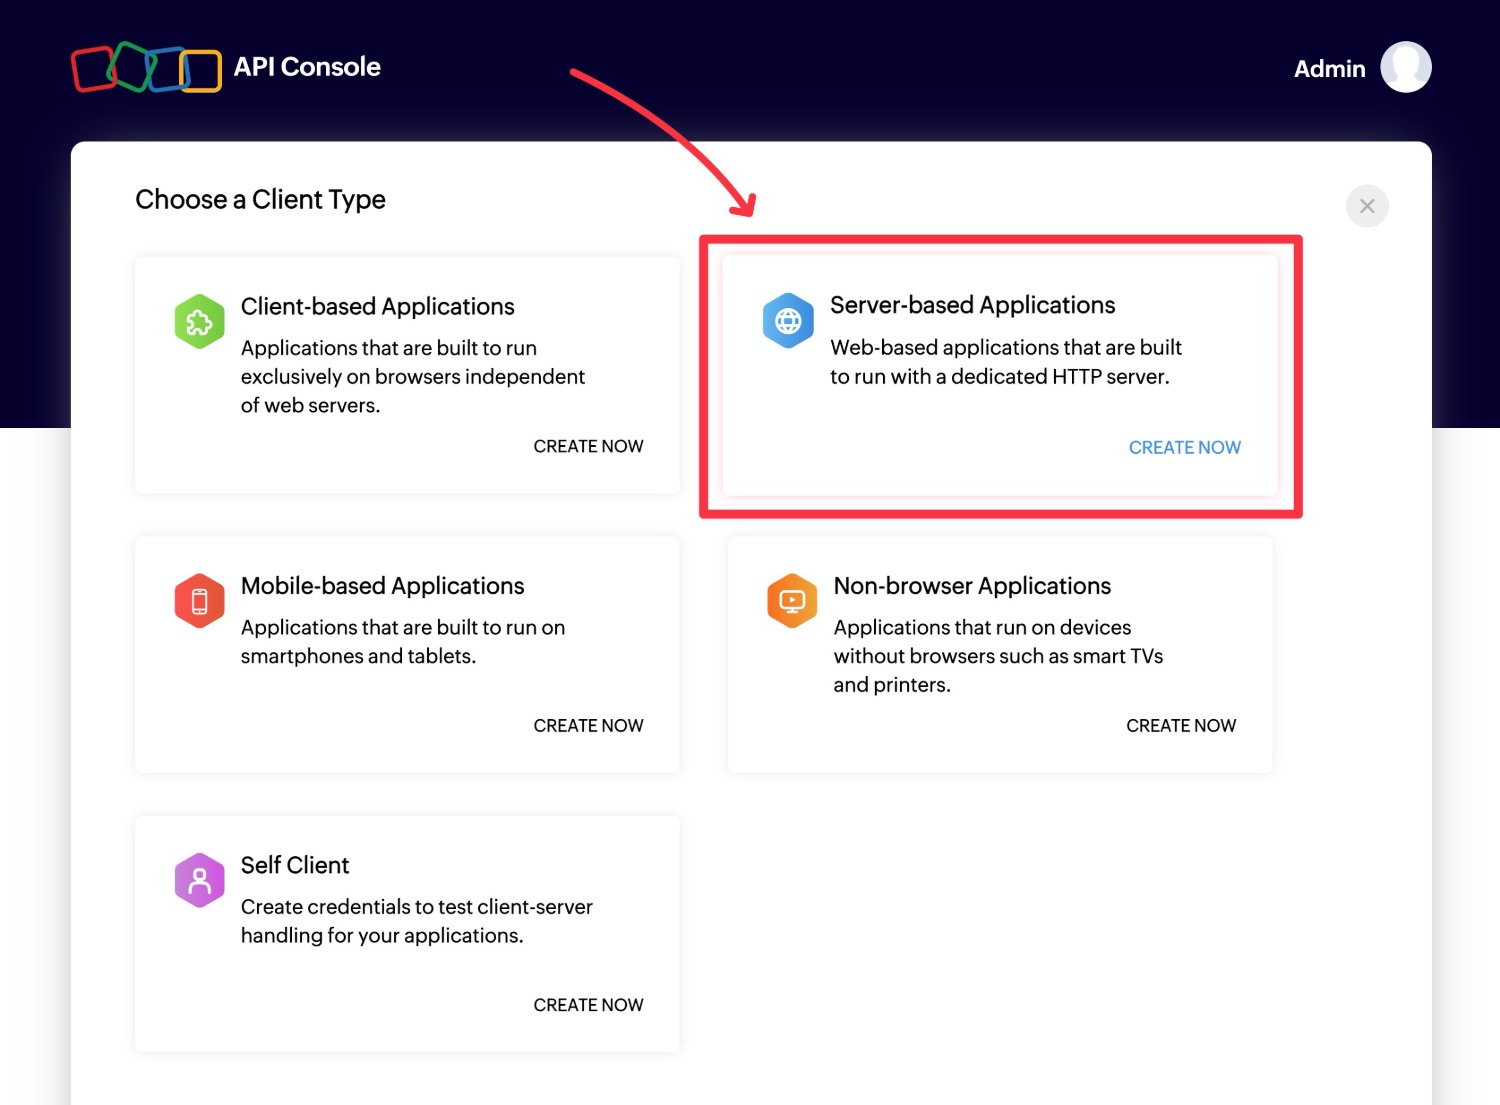
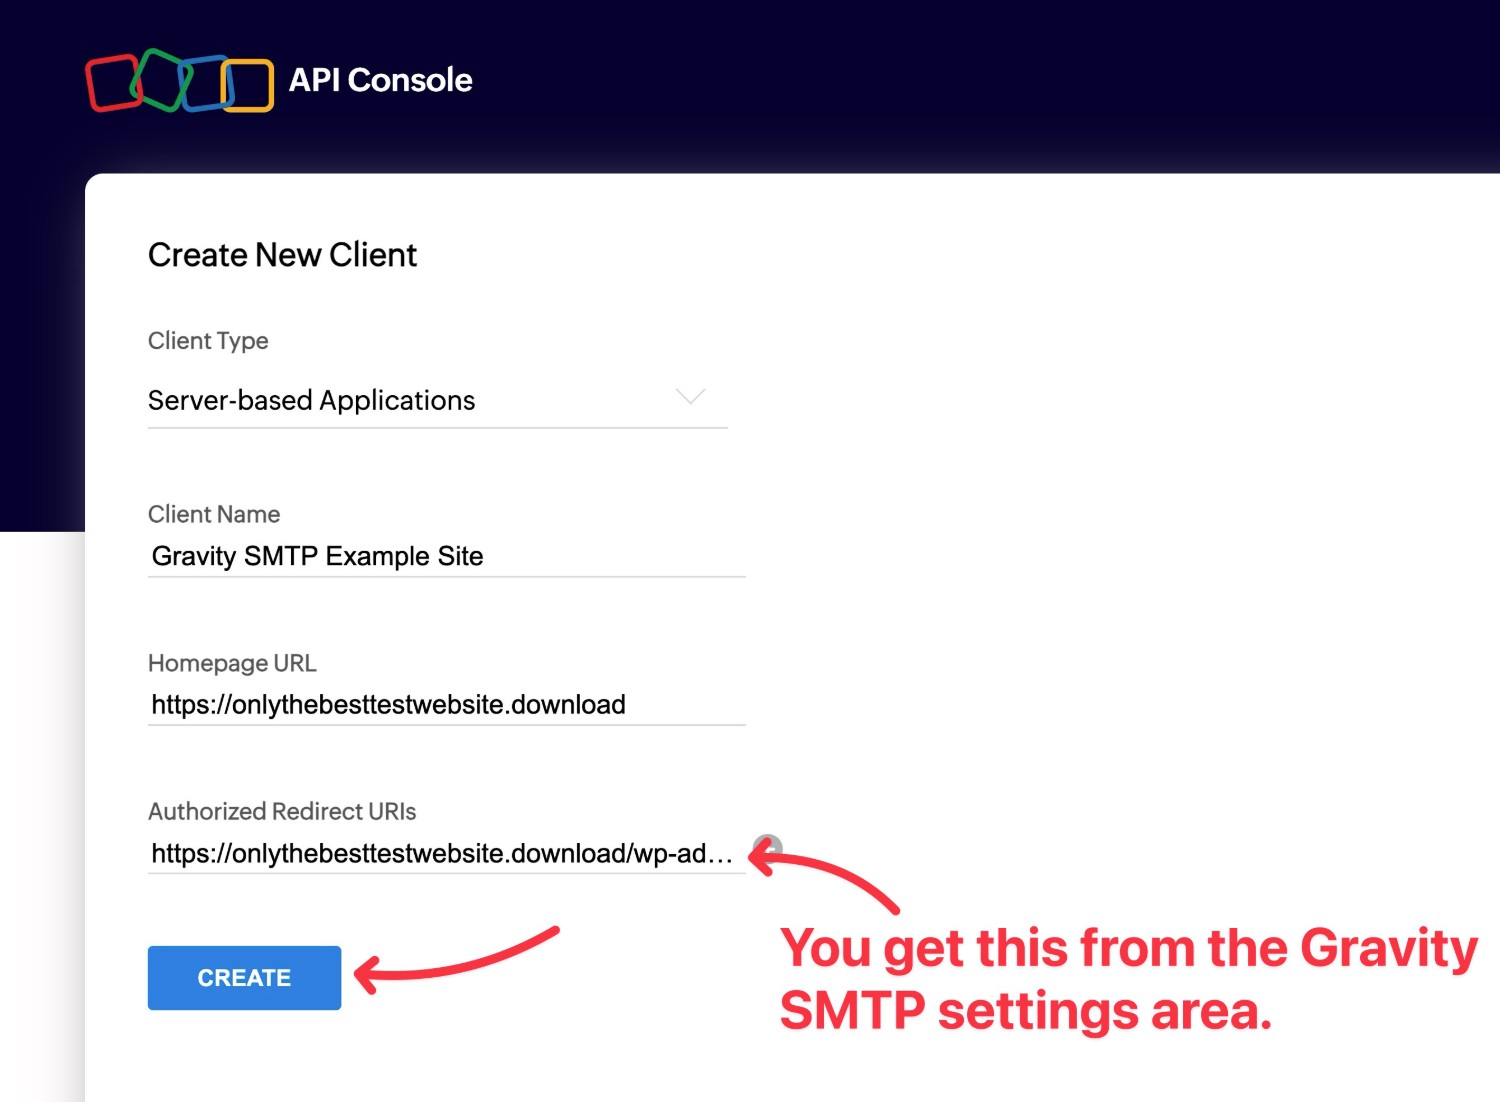
In the Create New Client interface, fill out the form as follows:
- Client Type – Make sure this drop-down is set to Server-based Applications.
- Client Name – This is an internal name to help you remember what this app does. For example, “Gravity SMTP [Your Site Name]”.
- Homepage URL – Enter your site’s main URL. For example, https://yoursite.com.
- Authorized Redirect URIs – Paste in the Gravity SMTP Redirect URI that you got in the previous step. It should look something like this: https://yoursite.com/wp-admin/admin.php?page=gravitysmtp-settings&integration=zoho&tab=integrations
Once you’ve added everything, click Create.
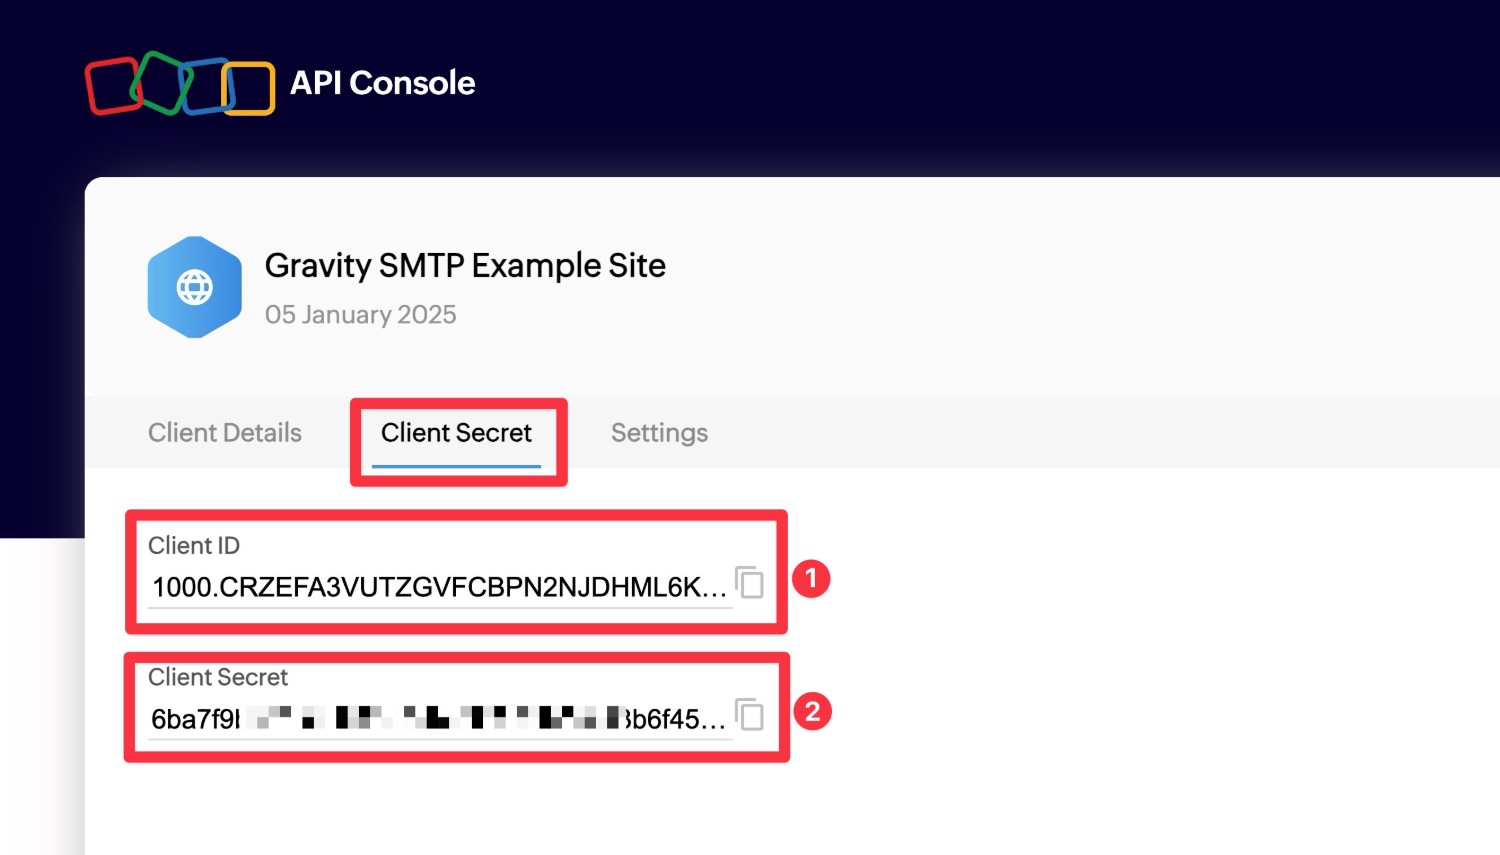
Zoho will now display two important pieces of information:
- Client ID
- Client Secret
Copy both of these values to a safe spot because you’ll need them in a future step.
5. Locate Your Zoho Data Center Region
Next, you need to locate the data center region for your Zoho account, as you’ll need this information when connecting Gravity SMTP to Zoho Mail.
When you register for your Zoho account, Zoho will automatically assign a data center region based on your IP address. You cannot change the region yourself, but you can reach out to Zoho’s support for them to change the region for you.
You can determine your data center region by looking at the domain extension for your Zoho account.
Here are what the different domain extensions mean when it comes to your data center region:
- zoho.com – United States
- zoho.eu – Europe
- zoho.in – India
- zoho.com.au – Australia
- zoho.jp – Japan
- zohocloud.ca – Canada
- zoho.sa – Saudi Arabia
If you’re not located in one of these countries/areas, Zoho will generally just assign your account to the United States data center region (zoho.com).
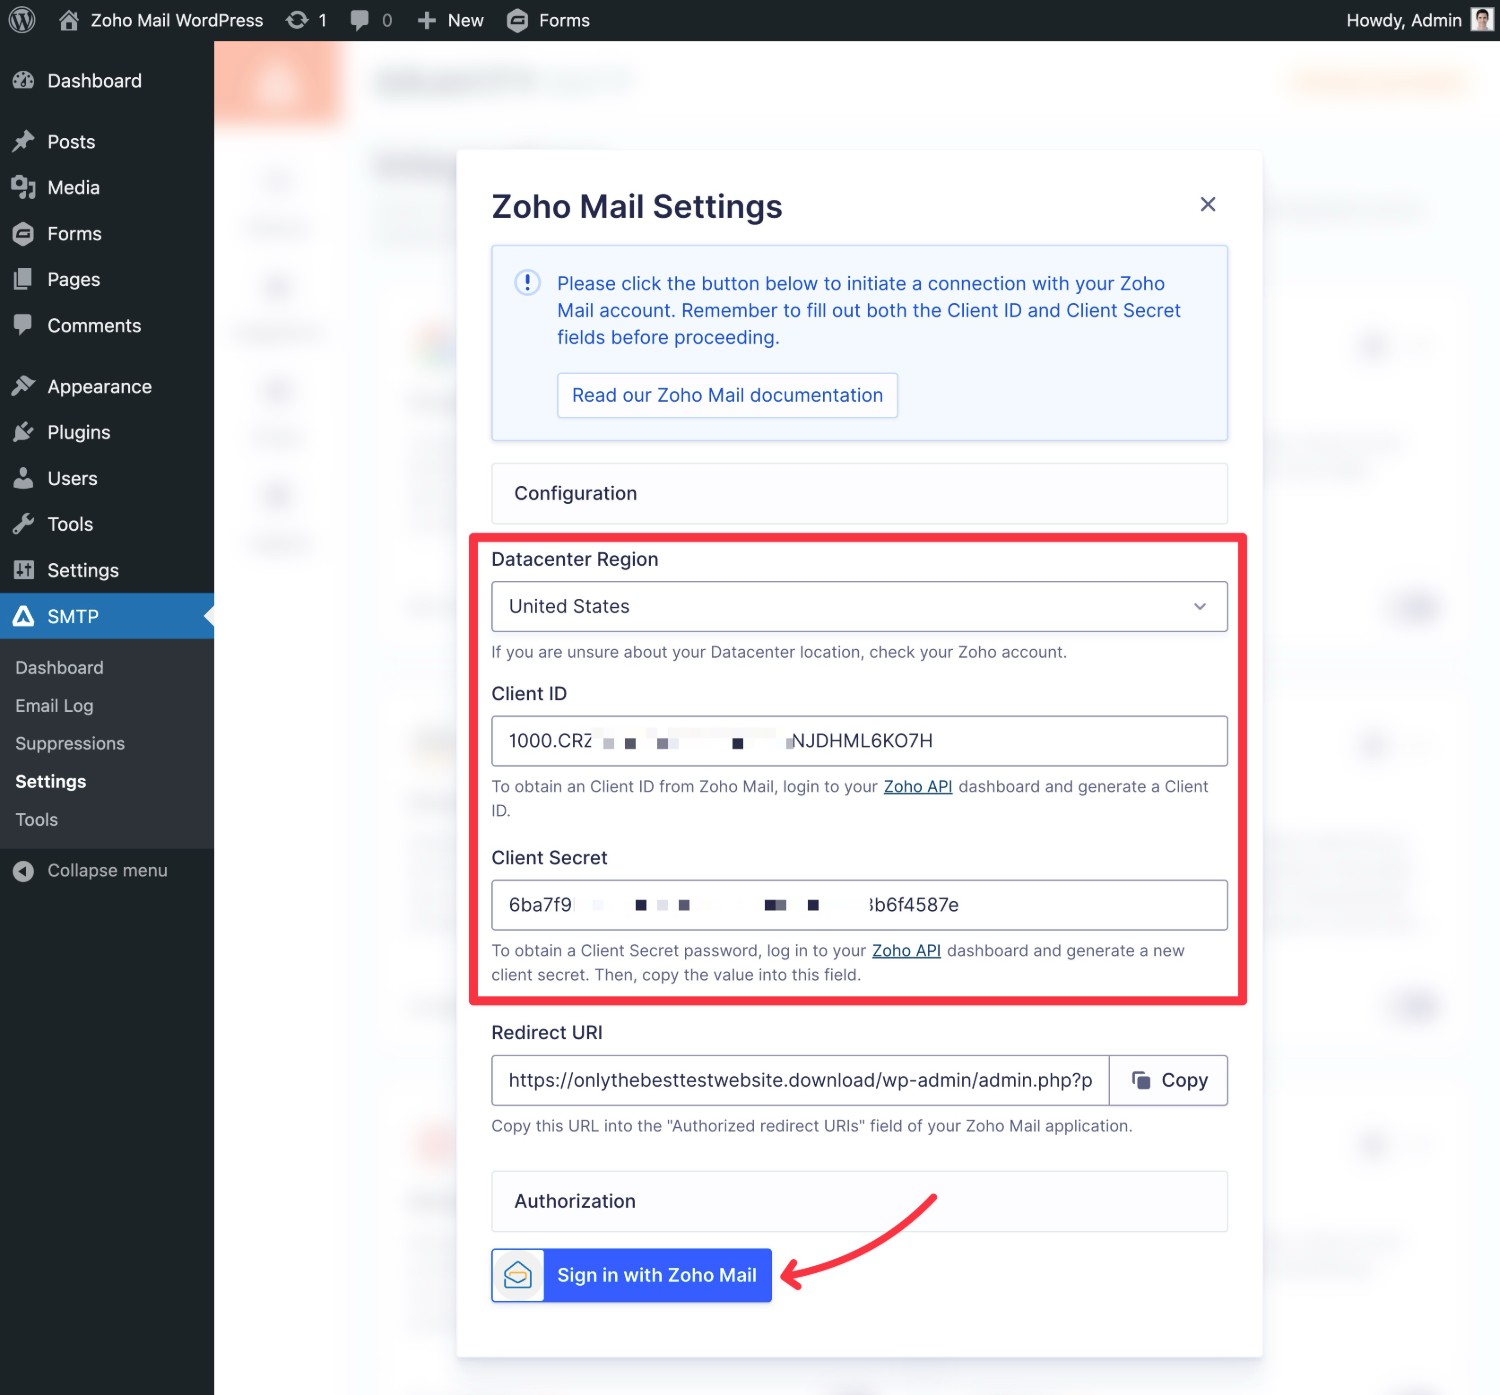
6. Configure Gravity SMTP Zoho Mail Settings and Authorize Site
At this point, you should have three pieces of information from Zoho:
- Data center region (Step #5)
- Client ID (Step #4)
- Client Secret (Step #4)
With these three pieces of information, you’re ready to connect WordPress and Gravity SMTP to Zoho Mail:
- Open your WordPress dashboard.
- Go to SMTP → Settings.
- Select the Integrations tab in the Gravity SMTP settings area.
- Click the gear icon next to Zoho Mail to open its settings.
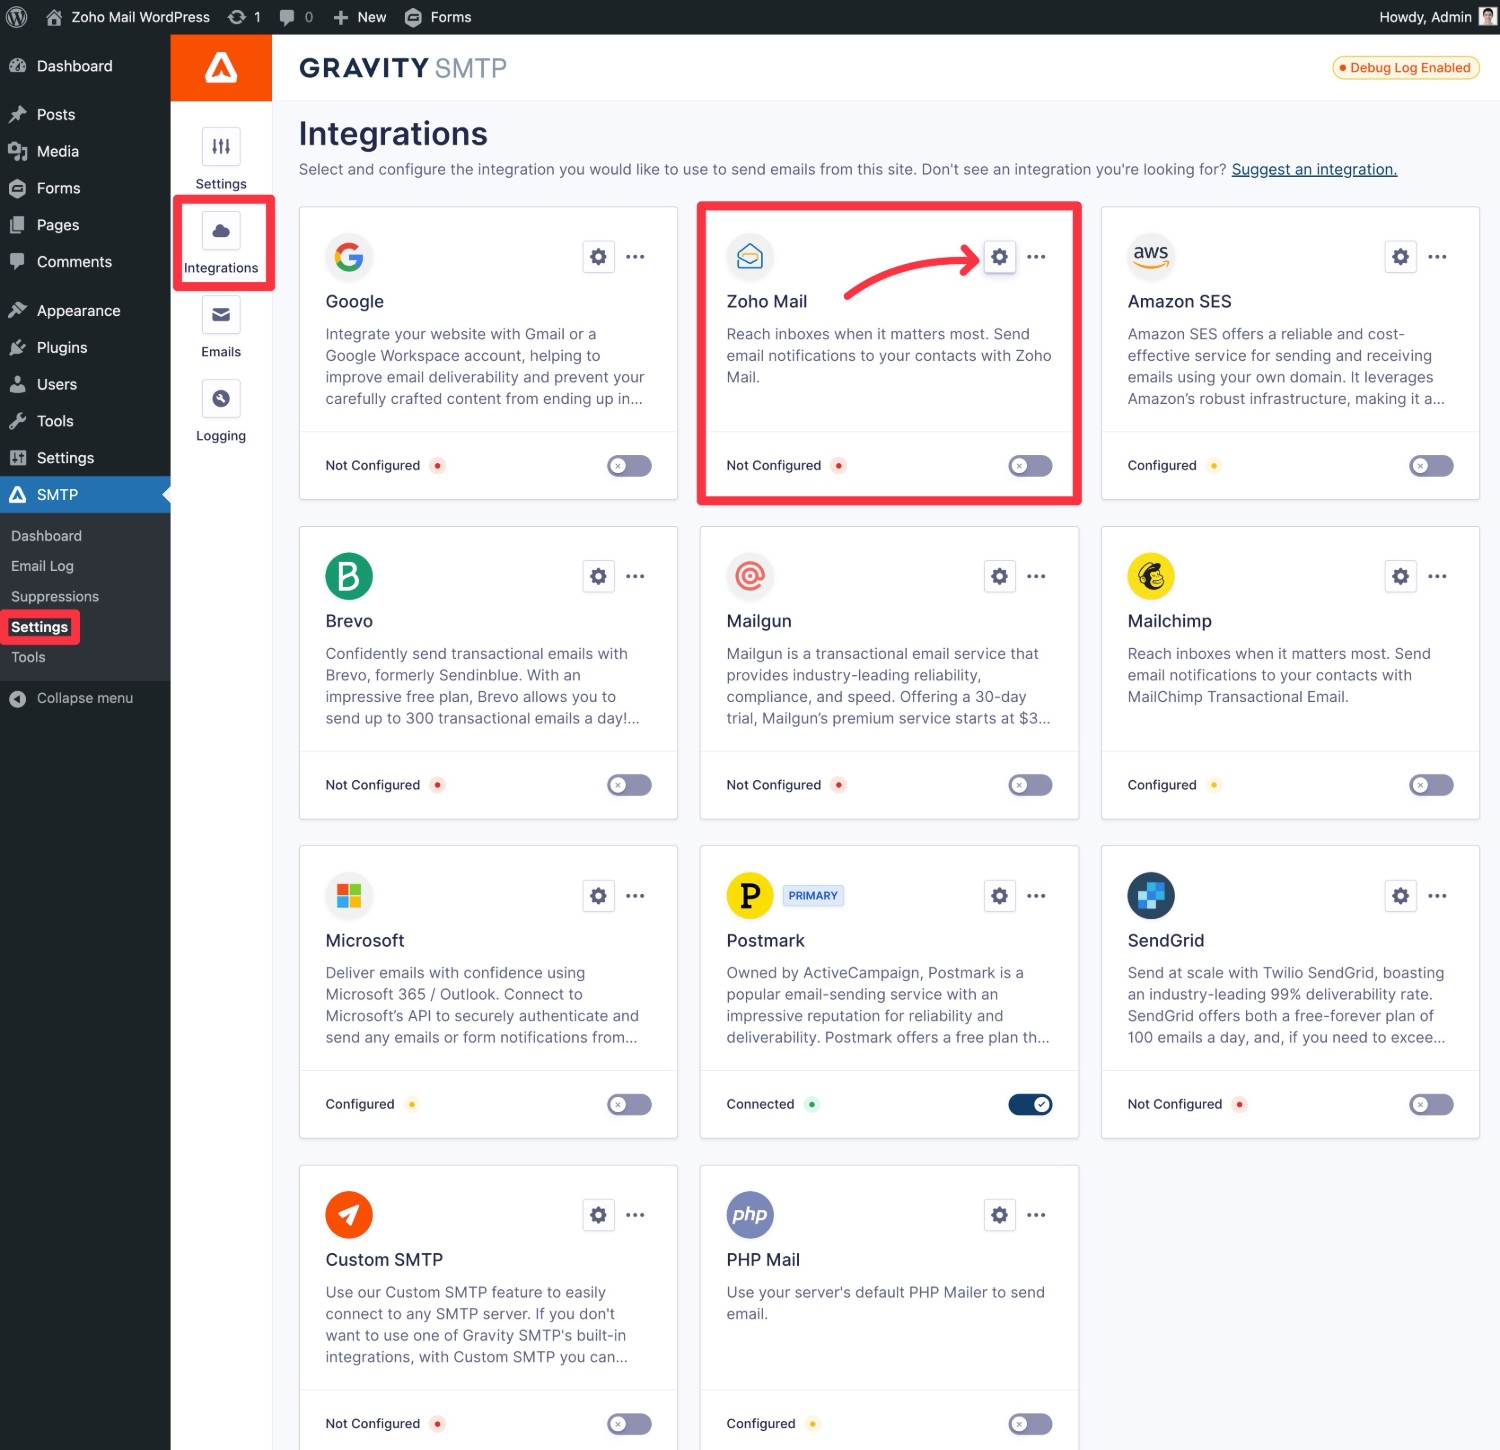
In the settings popup, add the Data Center Region, Client ID, and Client Secret.
Once you’ve added those details, you can authorize your site with your Zoho app by clicking Sign in with Zoho Mail.
This should take you to a short authorization flow on the Zoho website. All you need to do is click Accept.
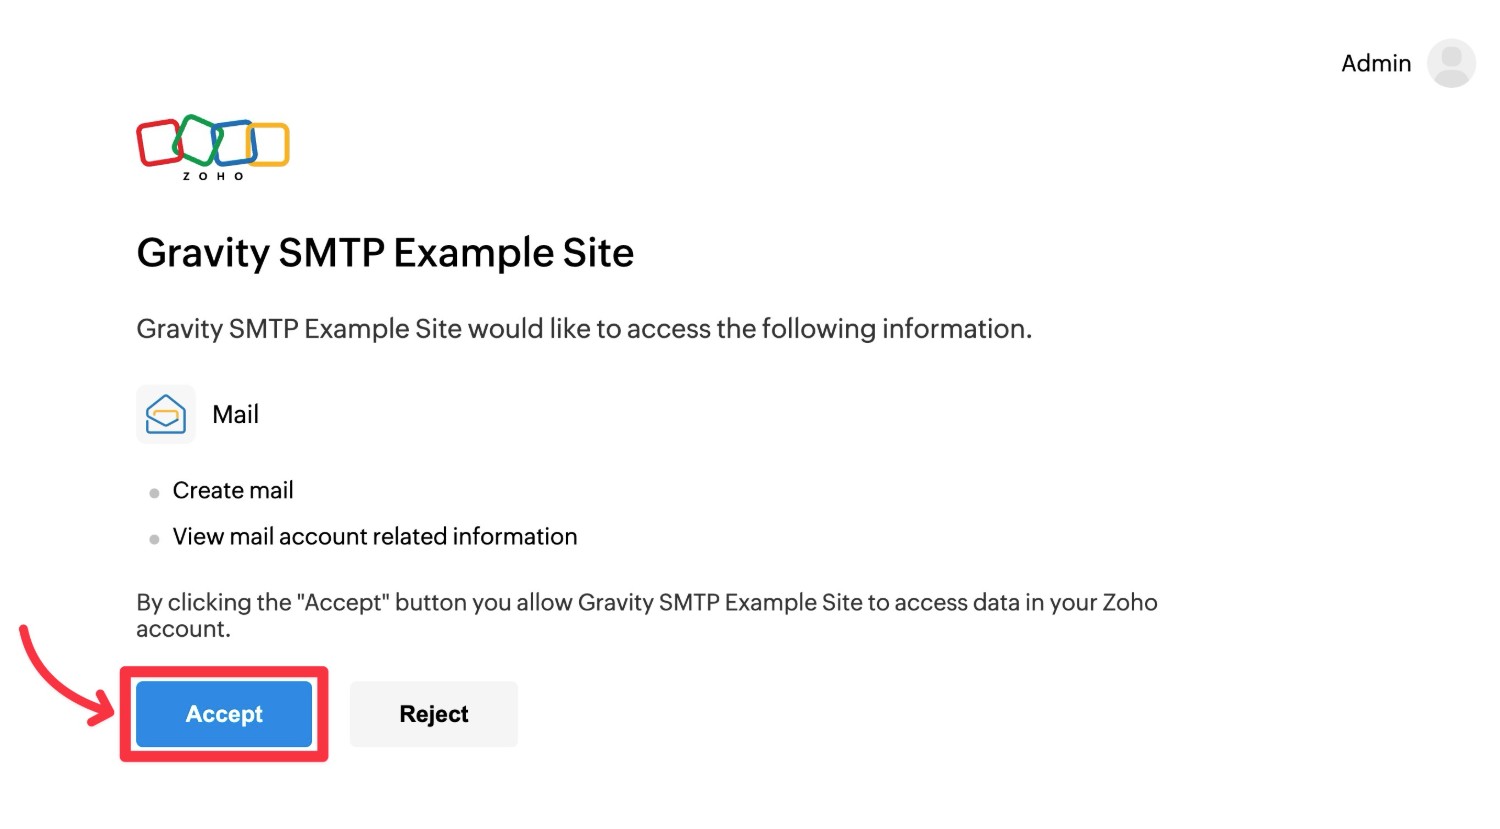
After clicking Accept, you should be redirected back to your WordPress dashboard.
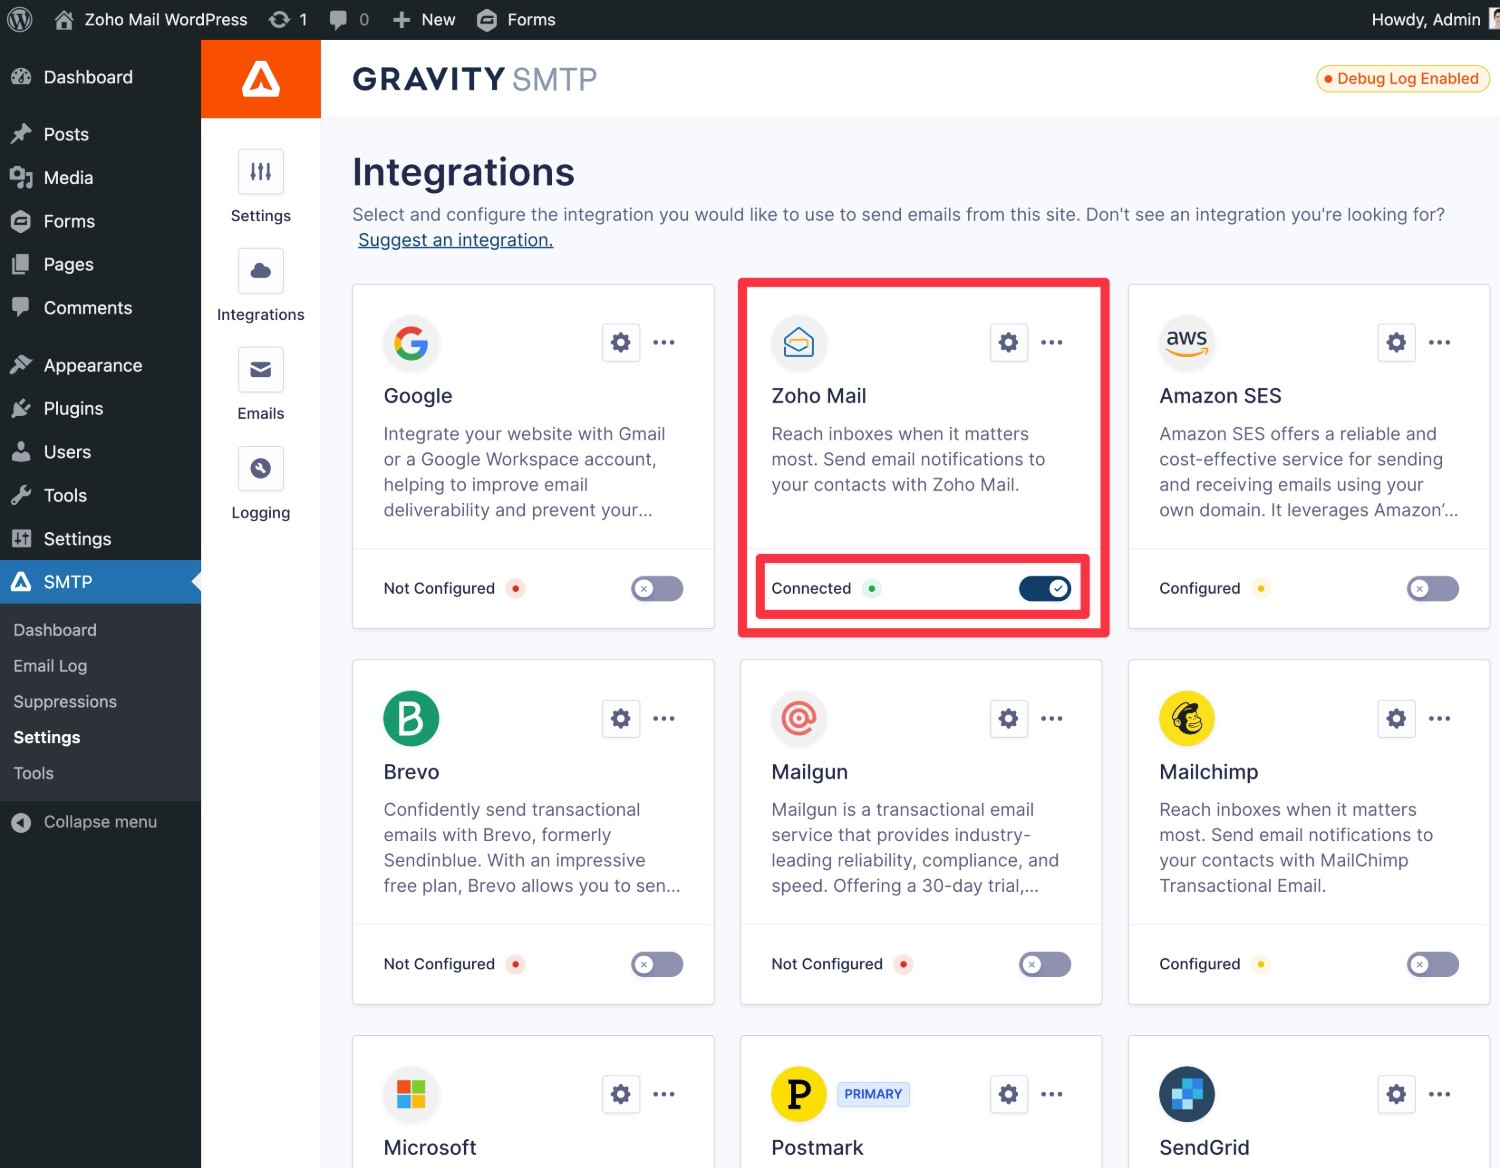
In the settings popup, you should now see a message that says “Connected to Zoho Mail with account: [Account Number]”.
Below that, you’ll see some new options that let you control the From Email and Name for the emails that your site sends.
You must set the “From Email” to the same email address associated with your Zoho Mail account. You can check what email this is by looking at your Zoho Mail profile page.
You can set the “From Name” to anything, however.
After making your choices, click Save Changes.

To finalize things, you need to enable Zoho Mail as your site’s primary email sending service.
You can do this by enabling the toggle in the Zoho Mail box. When you enable the toggle, you should see the text change from “Configured” to “Connected”. You’ll also see a “Primary” indicator appear next to Zoho Mail.
7. Send a Test Email
At this point, your WordPress site should be sending all of its transactional emails using Zoho Mail.
To make sure everything is working properly, Gravity SMTP includes a feature that lets you send a test email:
- Go to SMTP → Tools in your WordPress dashboard.
- Select the Send a Test tab.
- Enter the e-mail address to where you want to send a test email in the Send To box.
- Make sure to select Zoho Mail in the Send With drop-down.
- Click Send Test.
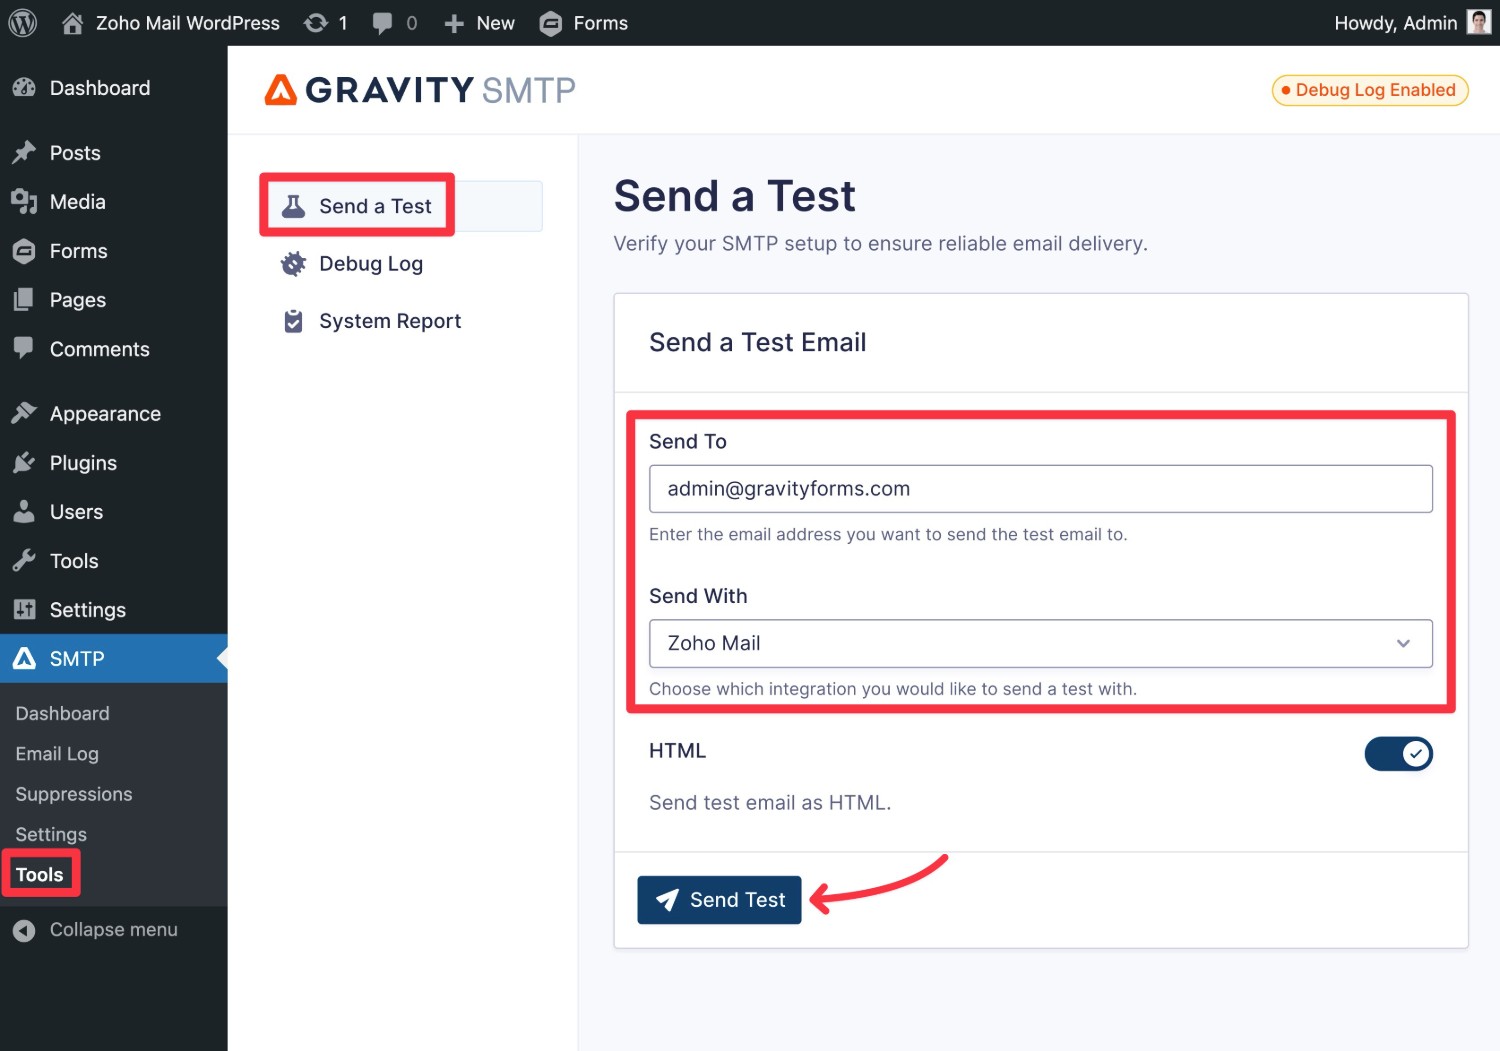
You should see a success message in the Gravity SMTP interface. Then, if you open your email inbox, you should also see an email with the following subject line: “Test Email from Gravity SMTP”.
If your email fails to send for some reason, here are some quick troubleshooting tips:
- Make sure the “From Email” in Gravity SMTP’s settings is the same email address of your Zoho Mail account. Emails will fail to send if you try to use a different email address.
- Check that you chose the correct data center for your Zoho Mail account. Again, you can determine your Zoho Mail data center by looking at your account URL.
8. Select a Backup Email Sending Method (Optional)
This step is 100% optional and you’re free to skip it if it doesn’t fit your needs.
One of the nice things about using Gravity SMTP for Zoho Mail WordPress email sending is that Gravity SMTP also gives you an option to set up a backup email sending service.
If an email ever fails to be sent via Zoho Mail for any reason, Gravity SMTP will automatically resend that email using your chosen backup service.
This lets you ensure email deliverability even in situations where Zoho Mail fails for some reason.
If you do want to set up a backup email sending service, you’ll first need to set up that integration on your site. Here are guides for all of the email sending services that Gravity SMTP supports:
- SendGrid
- Mailgun
- Postmark
- Brevo
- Amazon SES
- Gmail/Google Workspace
- Outlook/Microsoft 365
- Mailchimp Transactional
Gravity SMTP also has a Custom SMTP option that you can use if you’d like to choose a different service.
Once you’ve set up the integration, click on the three dots icon next to that service in the integration area. Then, choose Set As Backup in the drop-down.
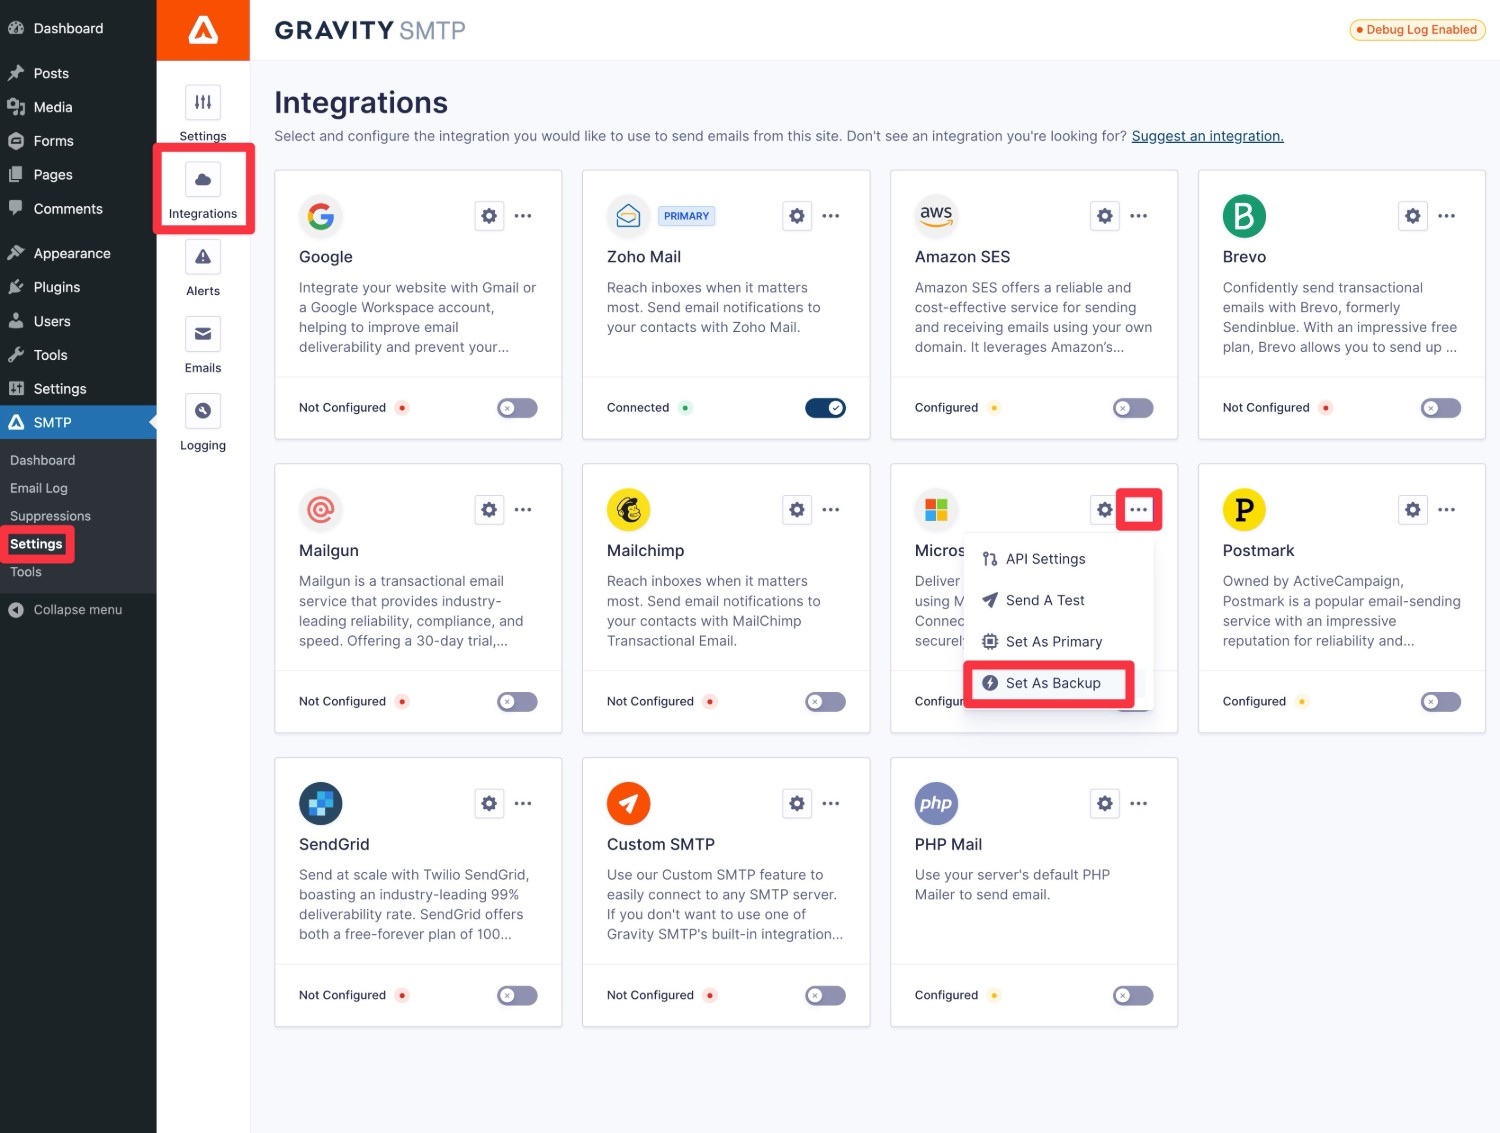
The service should then show as Connected and you’ll see a Backup label that tells you it’s the active backup service.
How to Monitor Your Site’s Emails
To help you stay on top of all the emails that your site is sending via Zoho Mail, Gravity SMTP includes some really handy reporting and logging features.
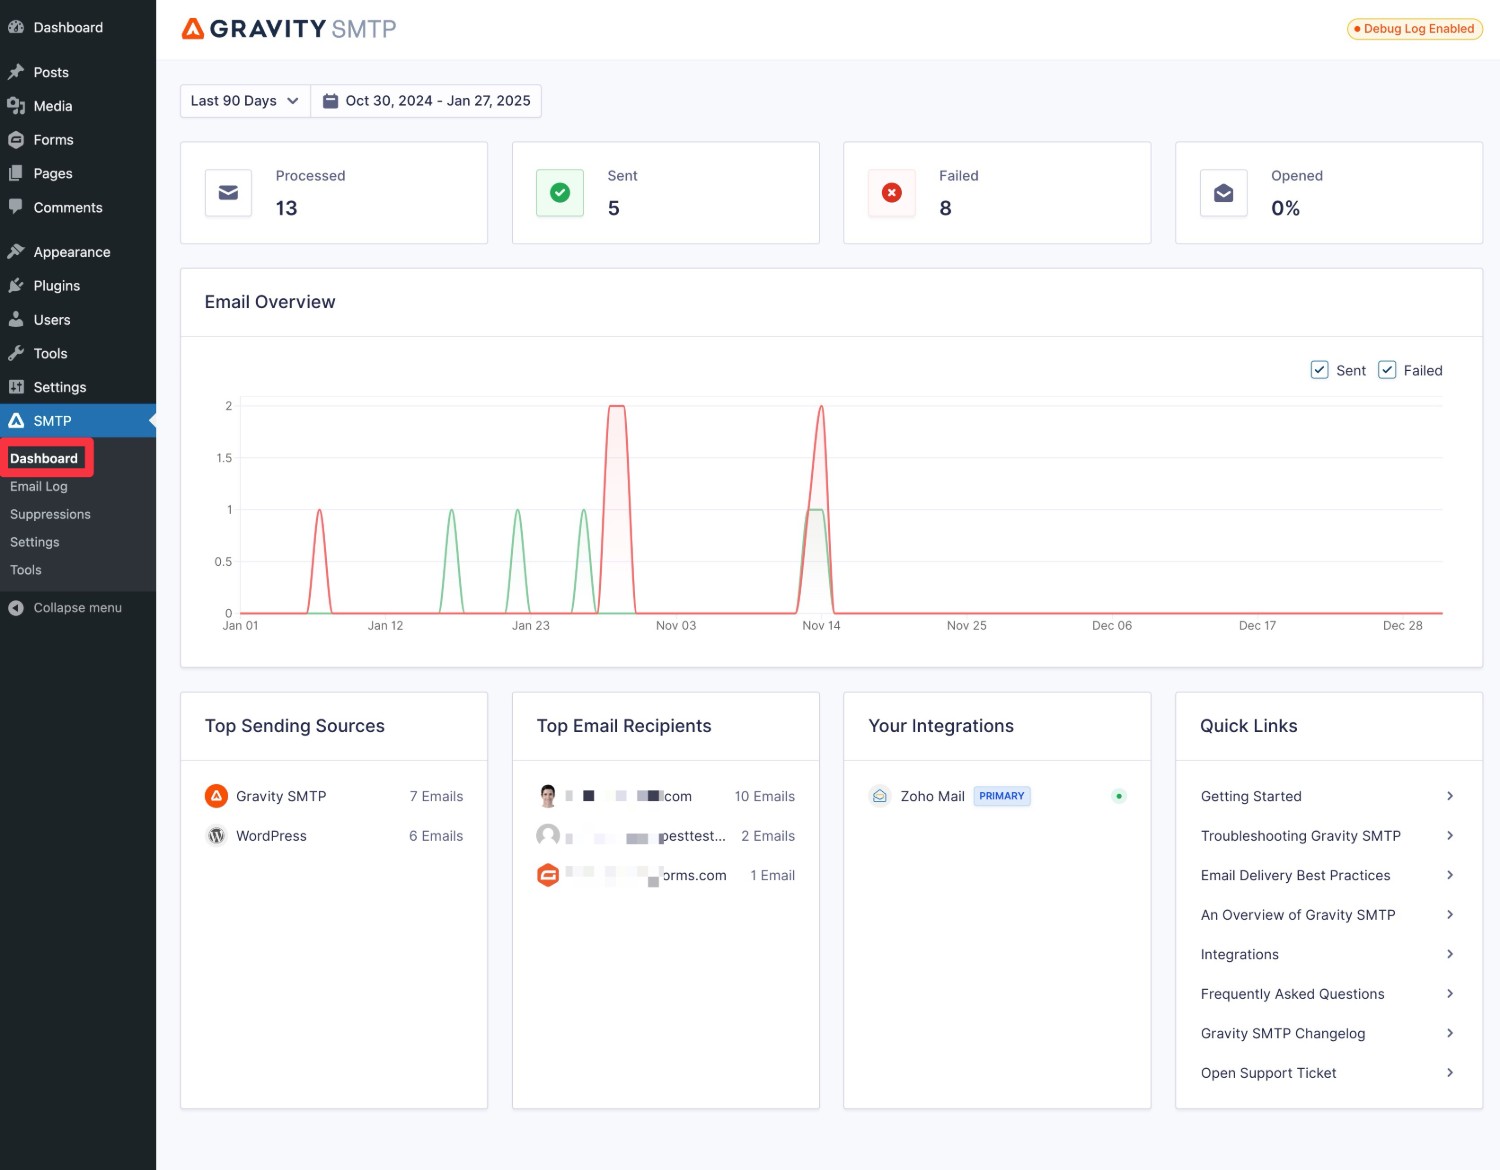
To start, you can go to SMTP → Dashboard to view high-level reporting for your site’s transactional emails, including the top sending sources (e.g. core WordPress versus a specific plugin) and top email recipients.
You’ll also see the open rate for your emails, if you choose to enable open rate tracking.
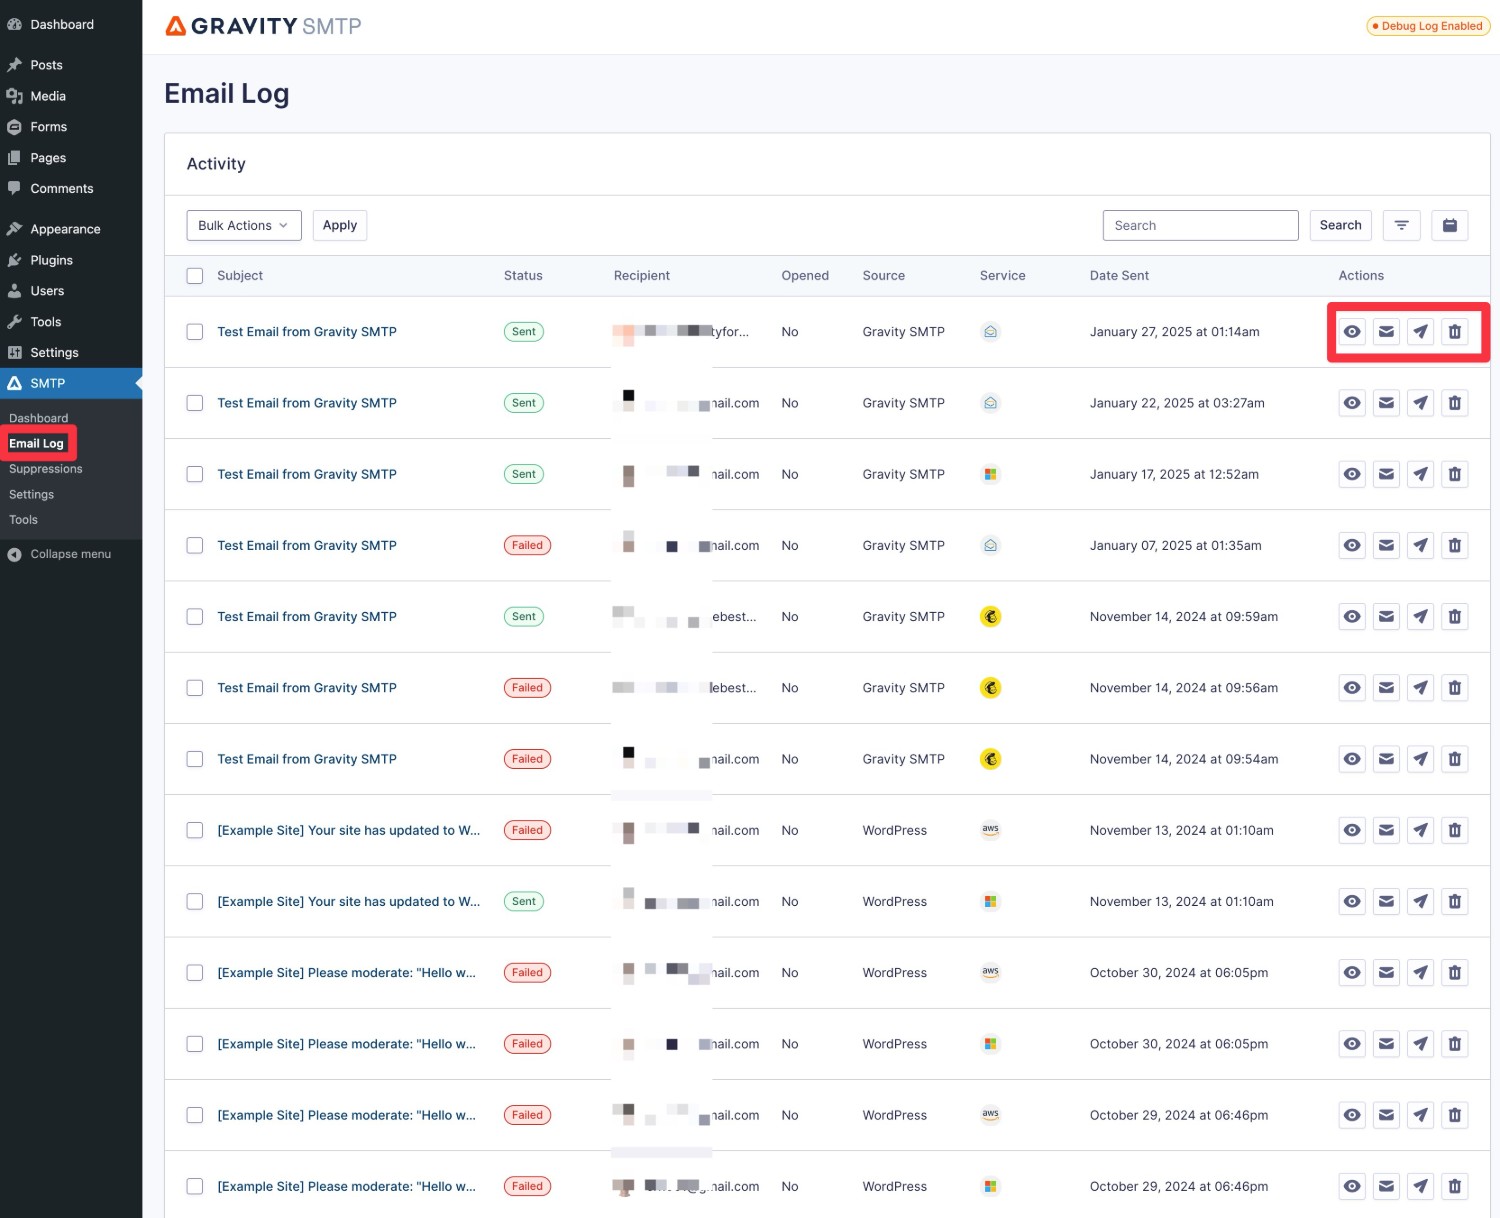
To see more details about individual emails, you can go to SMTP → Email Log.
This will show you a log of every single email that your site has sent, along with options in the Action column to view additional technical information or even see the actual content/design of each email.
You can also control what to log and how long to store the log for by going to SMTP → Settings → Logging.
Set Up WordPress Zoho Mail Sending Today
If you want to make your WordPress site’s transactional emails more reliable but you’re on a tight budget, using your Zoho Mail account can be an excellent solution.
While we don’t recommend it for mission-critical transactional emails (such as an ecommerce store or membership website), it can work great for a lot of the basic transactional emails that most “regular” WordPress webmasters are dealing with.
With the Gravity SMTP plugin, you can easily set up WordPress Zoho Mail email sending in just a few minutes. Plus, you also get lots of other helpful reporting and logging features, along with an option to set up a backup email sending service in addition to Zoho Mail.
If you’re ready to get started, install the Gravity SMTP plugin on your site today. Then, follow this guide to set up everything that you need.

If you want to keep up-to-date with what’s happening on the blog sign up for the Gravity Forms newsletter!