Gravity SMTP: Receive Twillio Alerts When WordPress Email Fails

If you’re sending emails from your WordPress site, you know the importance of email deliverability. Problems with email failure can lead to lost revenue, unhappy users, and other negative business outcomes.
With the Gravity SMTP plugin, you can avoid issues with your site’s transactional emails with a few different features, including the topic of this post – real-time Twilio SMS alerts for transactional email failures.
With real-time Twilio SMS alerts, you can configure Gravity SMTP to immediately send an SMS to one or more phone numbers whenever your site’s emails are failing.
If you combine this with Gravity SMTP’s other features such as backup email sending services, logging, and reports, you can build a rock-solid transactional email setup for your WordPress site.
In this post, we’re going to introduce you to Gravity SMTP’s Twilio SMS alerts for WordPress transactional emails and show you step-by-step how to set up SMS alerts on your own site.
Why Set Up Twilio SMS Alerts for WordPress Transactional Emails?
WordPress transactional emails are an important part of pretty much every website, but they’re especially essential for e-commerce stores, membership sites, or any type of website where emails serve an important business or user experience function.
However, because transactional emails aren’t something that you “see” when you visit your site, it’s not always easy to know when your site’s emails are having problems.
If you’re using the Gravity SMTP plugin, Gravity SMTP already includes features to give you more insights into your emails via its reporting and logging tools. However, you still need to access your WordPress dashboard to view these tools, which means issues could go unnoticed if you aren’t frequently checking your WordPress dashboard.
Gravity SMTP’s Twilio SMS alerts give you immediate visibility, and therefore a more immediate solution for WordPress transactional email problems. This means that you can solve the problem and get your site’s emails working as quickly as possible.
Gravity SMTP also lets you set up rules to avoid false alerts and limit how many messages you receive. For example, you could choose to only trigger an SMS alert if multiple emails fail to send, and you can limit the number of alerts that are sent within a certain time period.
Note – Gravity SMTP also lets you set up real-time Slack alerts for transactional emails, which can be another good option. You could pair it with SMS alerts or just use one of the real-time alert methods.
How to Set Up SMS Alerts for Transactional Email Problems Via Twilio
Now that you know why these alerts can be helpful, let’s get into the actual step-by-step guide for how you can set up Gravity SMTP Twilio SMS alerts for WordPress transactional emails.
In order to follow this tutorial, we’ll only make a few assumptions:
- You’ve already installed Gravity SMTP on your site – If you haven’t, you can download it from the Gravity Forms My Account area. Gravity SMTP is currently available for free to anyone with a Gravity Forms Elite, Nonprofit, or Developer license (though you don’t need to have Gravity Forms installed in order to use Gravity SMTP).
- You’ve connected Gravity SMTP to at least a primary email sending service – Optionally, you can also set up a backup email sending service that Gravity SMTP will automatically use if your primary service ever fails for some reason.
If you haven’t set up your primary email sending service yet, our ultimate Gravity SMTP guide covers the process in broad detail and we’ve also written guides for all of the direct integrations that Gravity SMTP supports (there’s also a Custom SMTP option that lets you use other services):
- SendGrid
- Mailgun
- Postmark
- Brevo
- Amazon SES
- Gmail/Google Workspace
- Outlook/Microsoft 365
- Mailchimp Transactional
- Zoho Mail
Once you’ve set up the basics, here’s how to configure Twilio SMS alerts for transactional email failures…
1. Enable the Alert Feature in Gravity SMTP
At the time that we’re writing this post, Gravity SMTP alerts are an experimental feature that is disabled by default.
Before going any further, you’ll need to enable the alerts feature on your site:
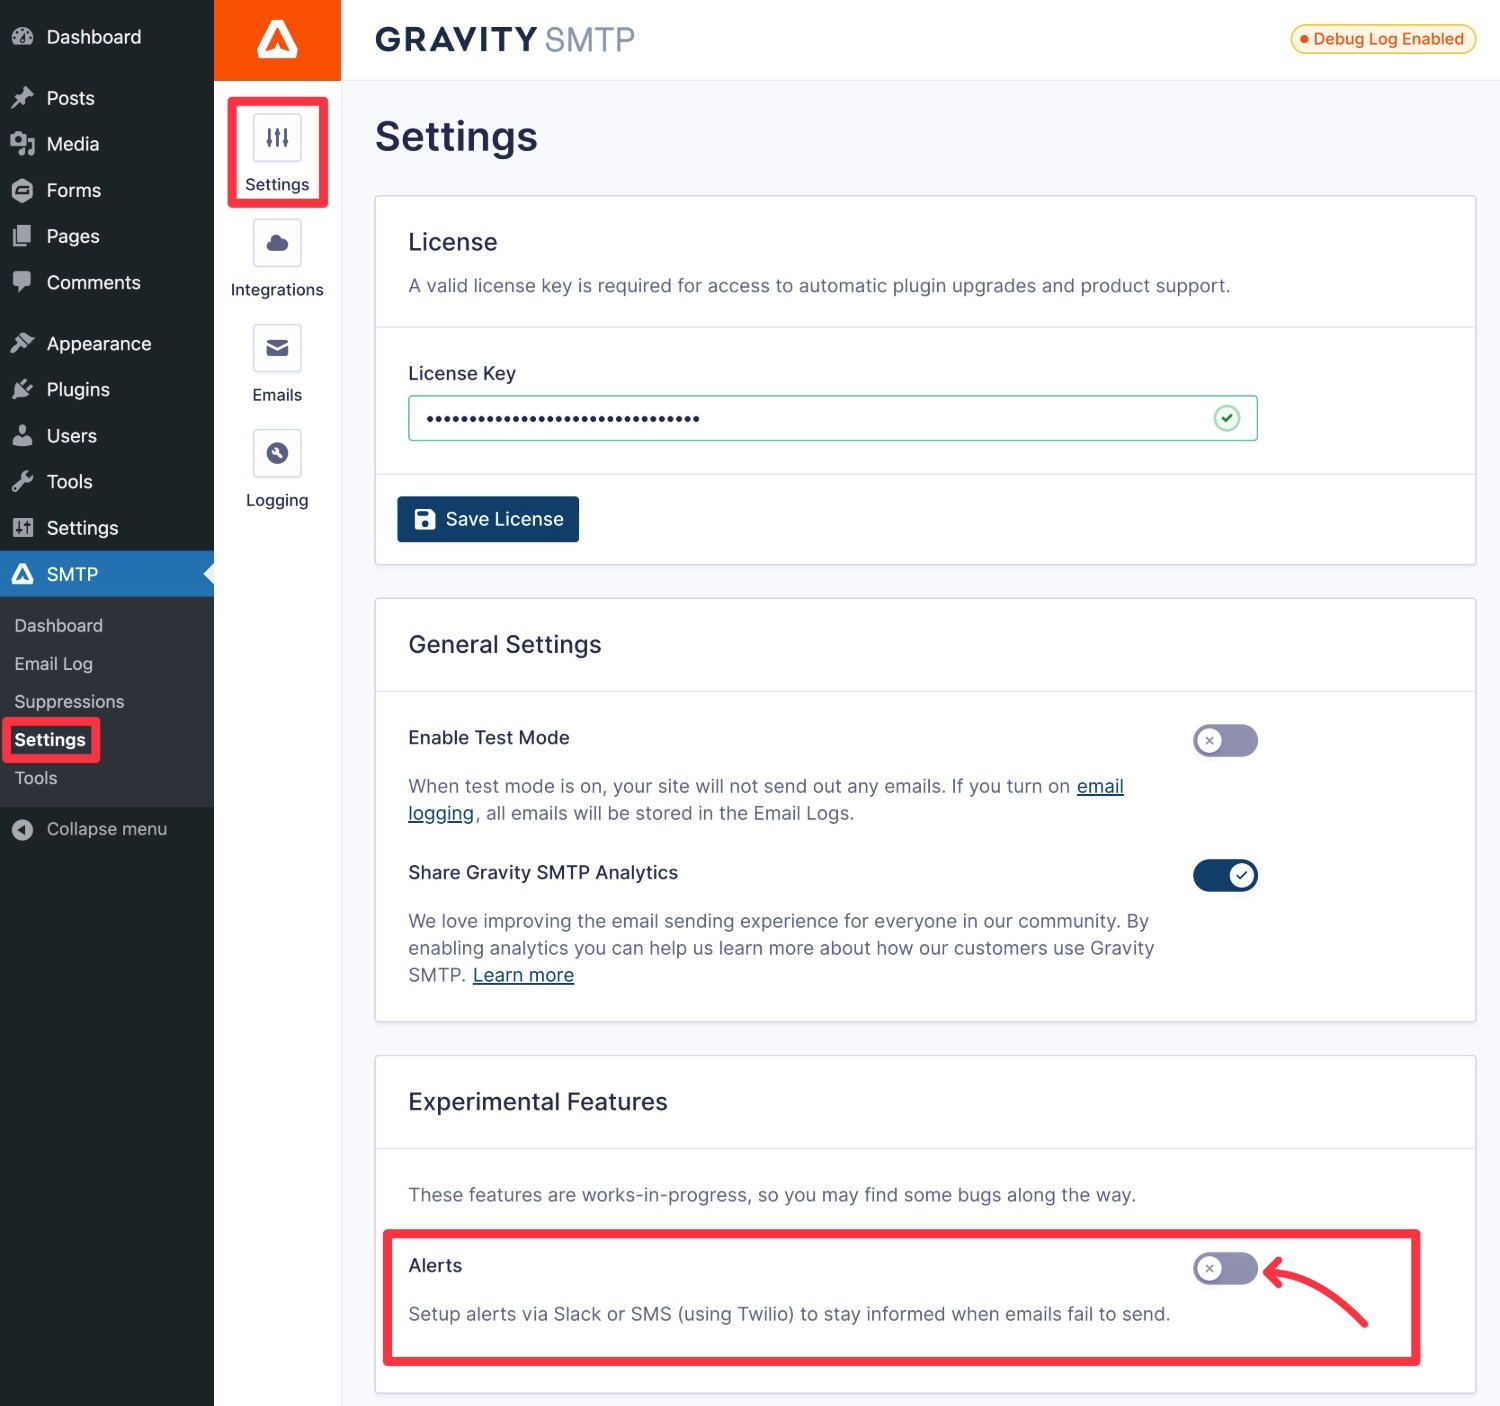
- Go to SMTP → Settings in your WordPress dashboard.
- Enable the Alerts toggle. It will be listed under Experimental Features in the main Gravity SMTP settings area.
- After enabling the feature, you should see a new Alerts tab appear in the settings area, which you’ll use later in this guide.
2. Set Up Twilio Account and Phone Number
Now, you need to set up your Twilio account and phone number.
To get started, register for a free Twilio account, if you haven’t done so already.
Create Your Twilio Phone Number
Once you register, you’ll need to get your Twilio phone number, which is the phone number from which you’ll receive text message alerts.
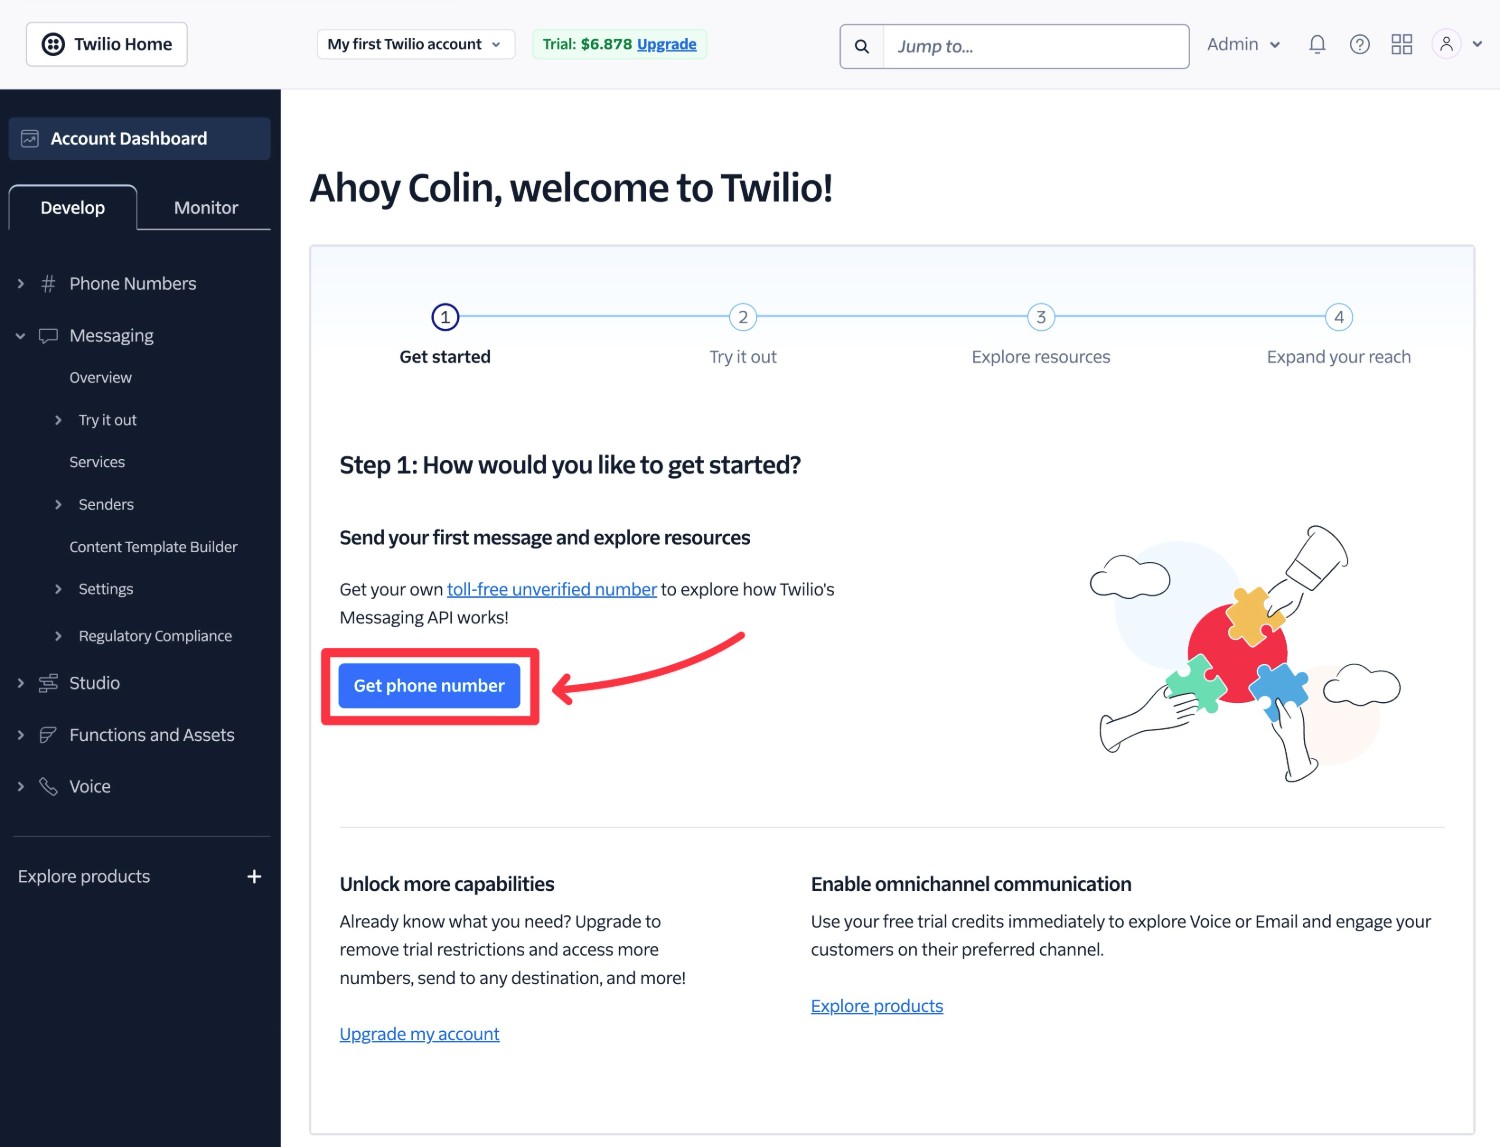
When you log into Twilio, you should see a prompt to Get phone number. Click that button to get started.
On the next screen, you should see your phone number. Keep this phone number handy because you’ll need it when configuring Gravity SMTP.

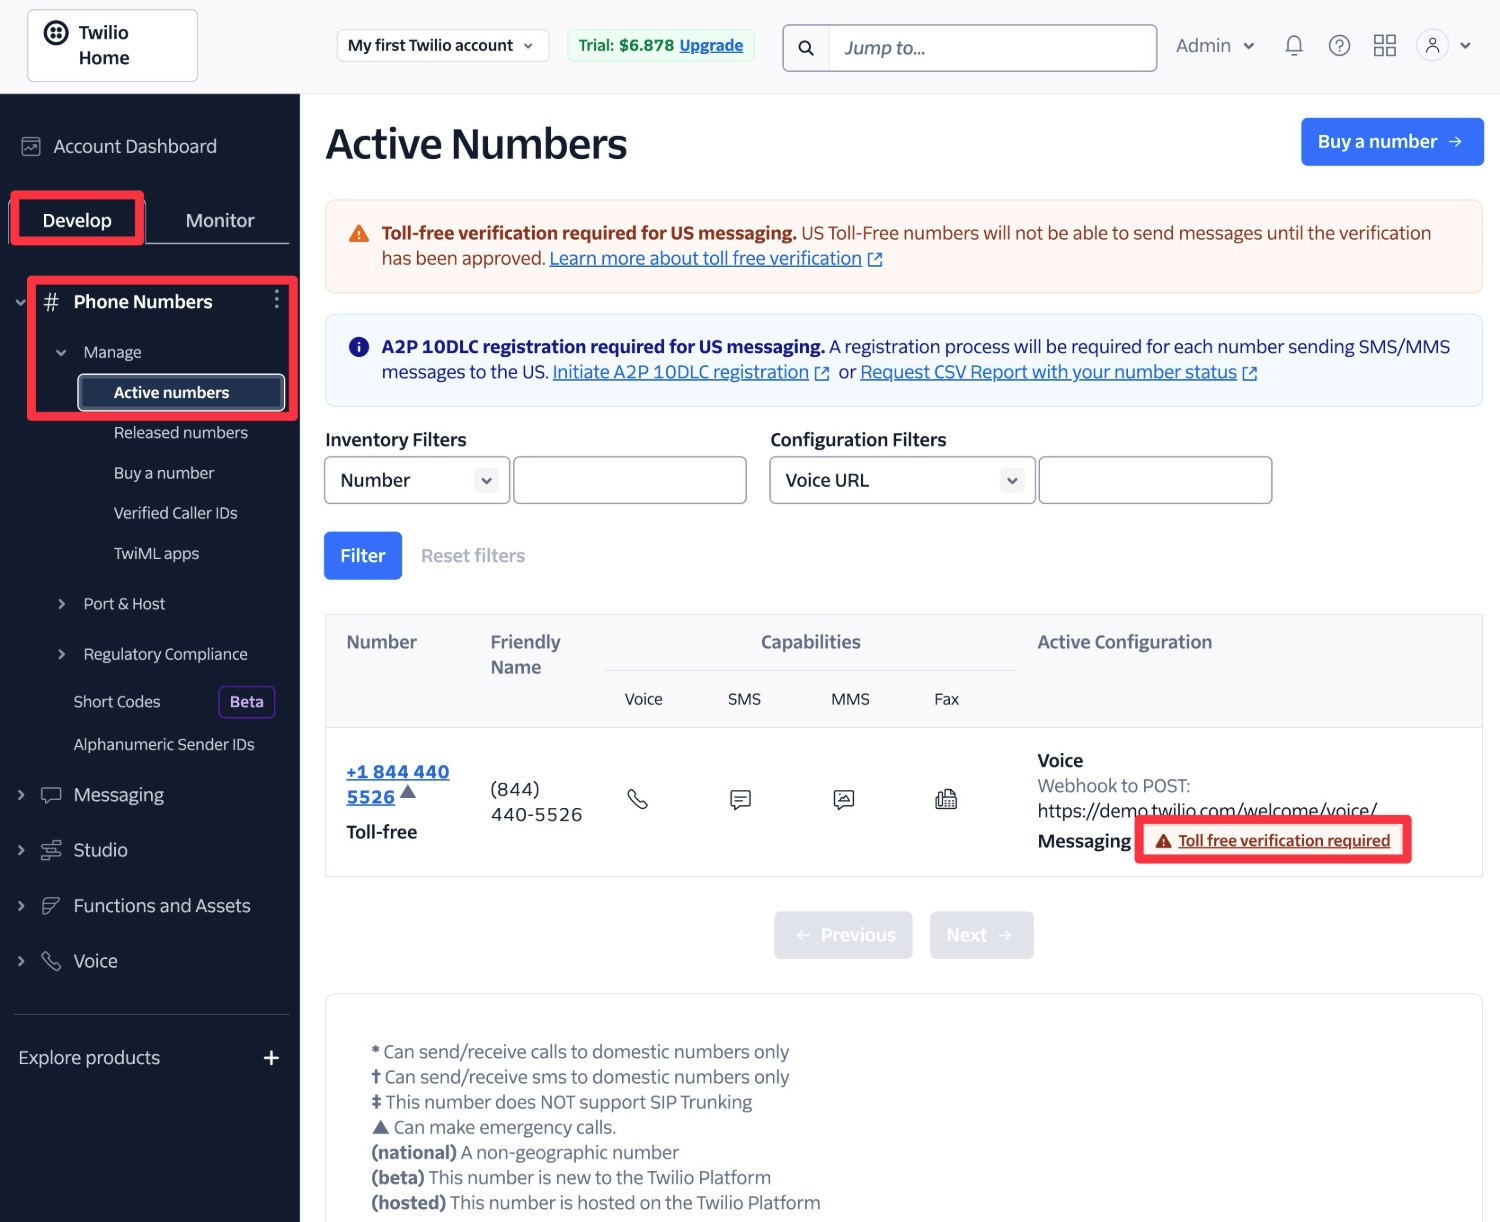
Don’t worry – if you accidentally close this window, you can always find your phone number by going to Phone Numbers → Manage → Active numbers.
If you’re using a toll-free phone number, you’ll also need to verify the number before you can send any SMS.
If you want to verify your toll-free phone number, go to Phone Numbers → Manage → Active numbers in your Twilio dashboard and then click the Toll free verification required message next to your phone number.
The verification process will take around five minutes and you’ll need to provide some basic information about your business and use case.
If you’re using a local phone number, the process is a little less vigorous, but you still will need to register for A2P 10DLC if you want to send messages to USA phone numbers.
Locate Twilio API Credentials
In addition to your Twilio phone number, you’ll also need to locate some other account credentials:
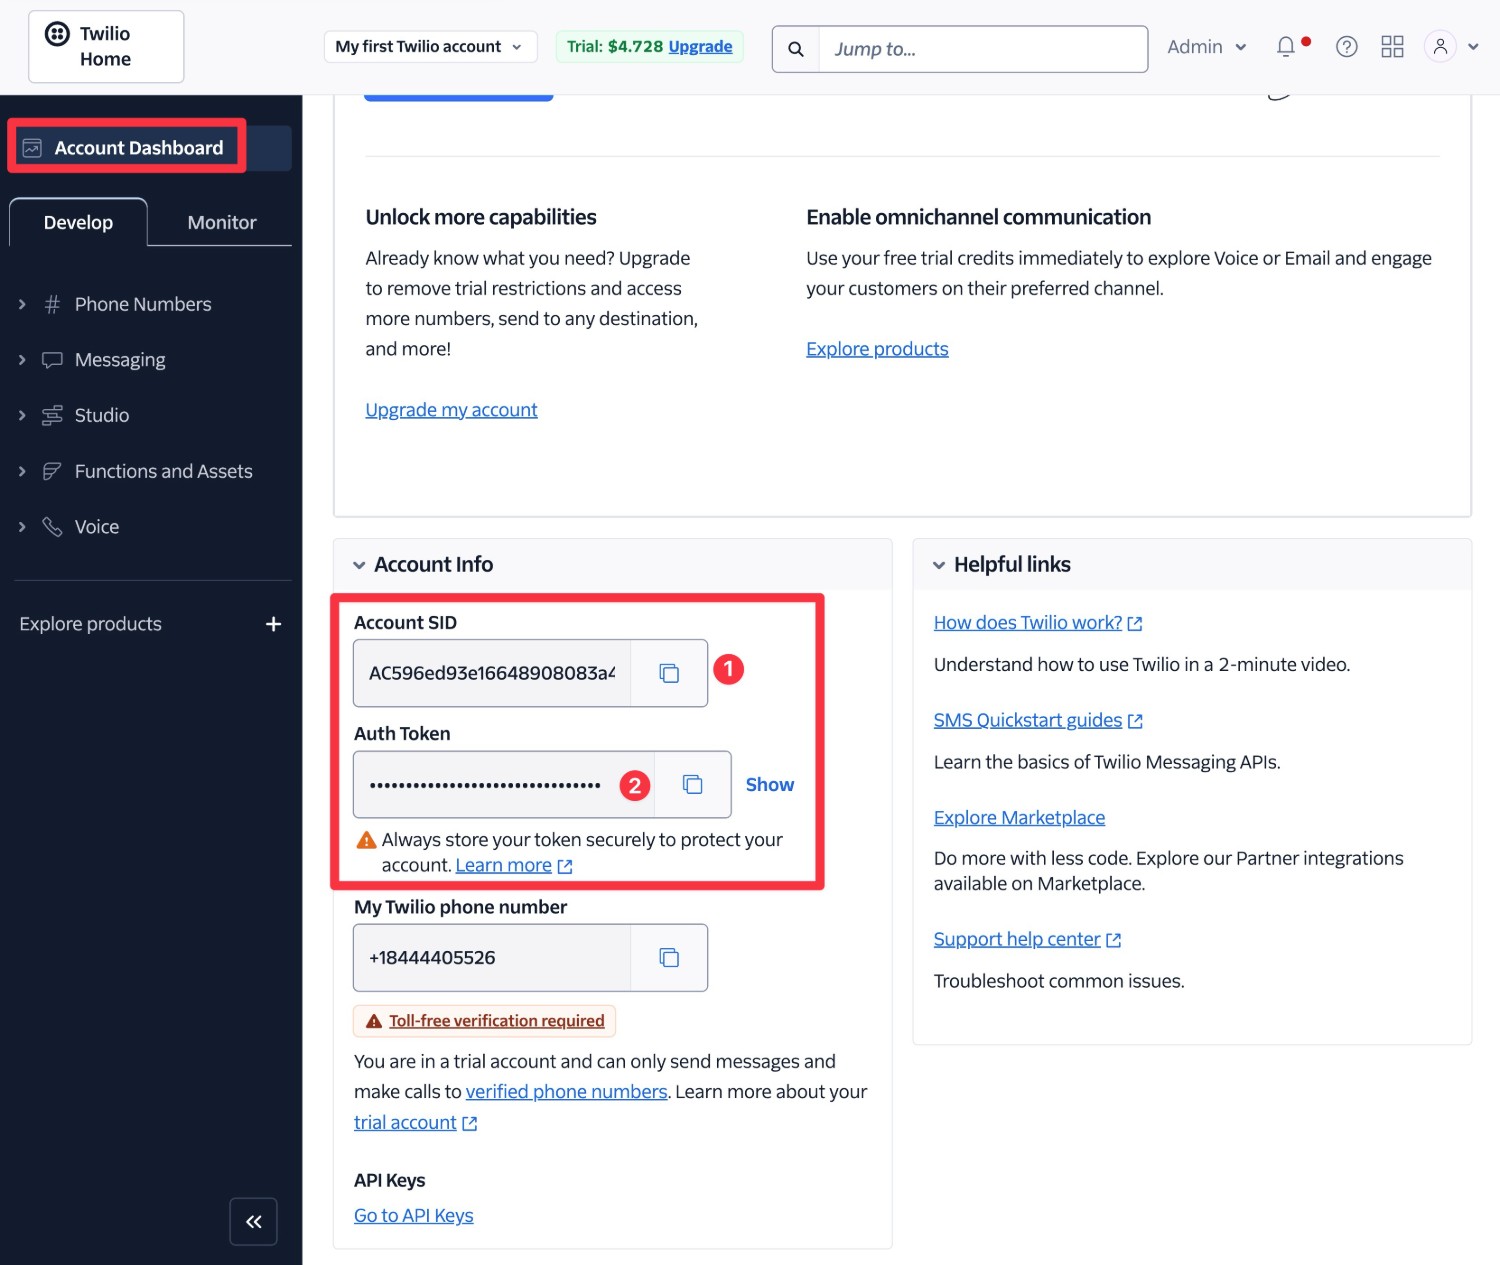
- Account SID
- Auth Token
You can find these two pieces of information by clicking Account Dashboard and then scrolling down to the Account Info section.
Note – Twilio also provides test credentials that you can use to test this functionality without needing to complete any additional verification. If you want to use these test credentials before connecting to your live Twilio account, you can access them by clicking this link and scrolling down to the Test credentials box. You will need to connect to your live Twilio account to send real text messages, though.
3. Configure Gravity SMTP Twilio SMS Alerts
At this point, you should have three pieces of information for your Twilio account:
- Twilio phone number
- Account SID
- Auth Token
With these three pieces of information, you’re now ready to set up Twilio SMS alerts in Gravity SMTP.
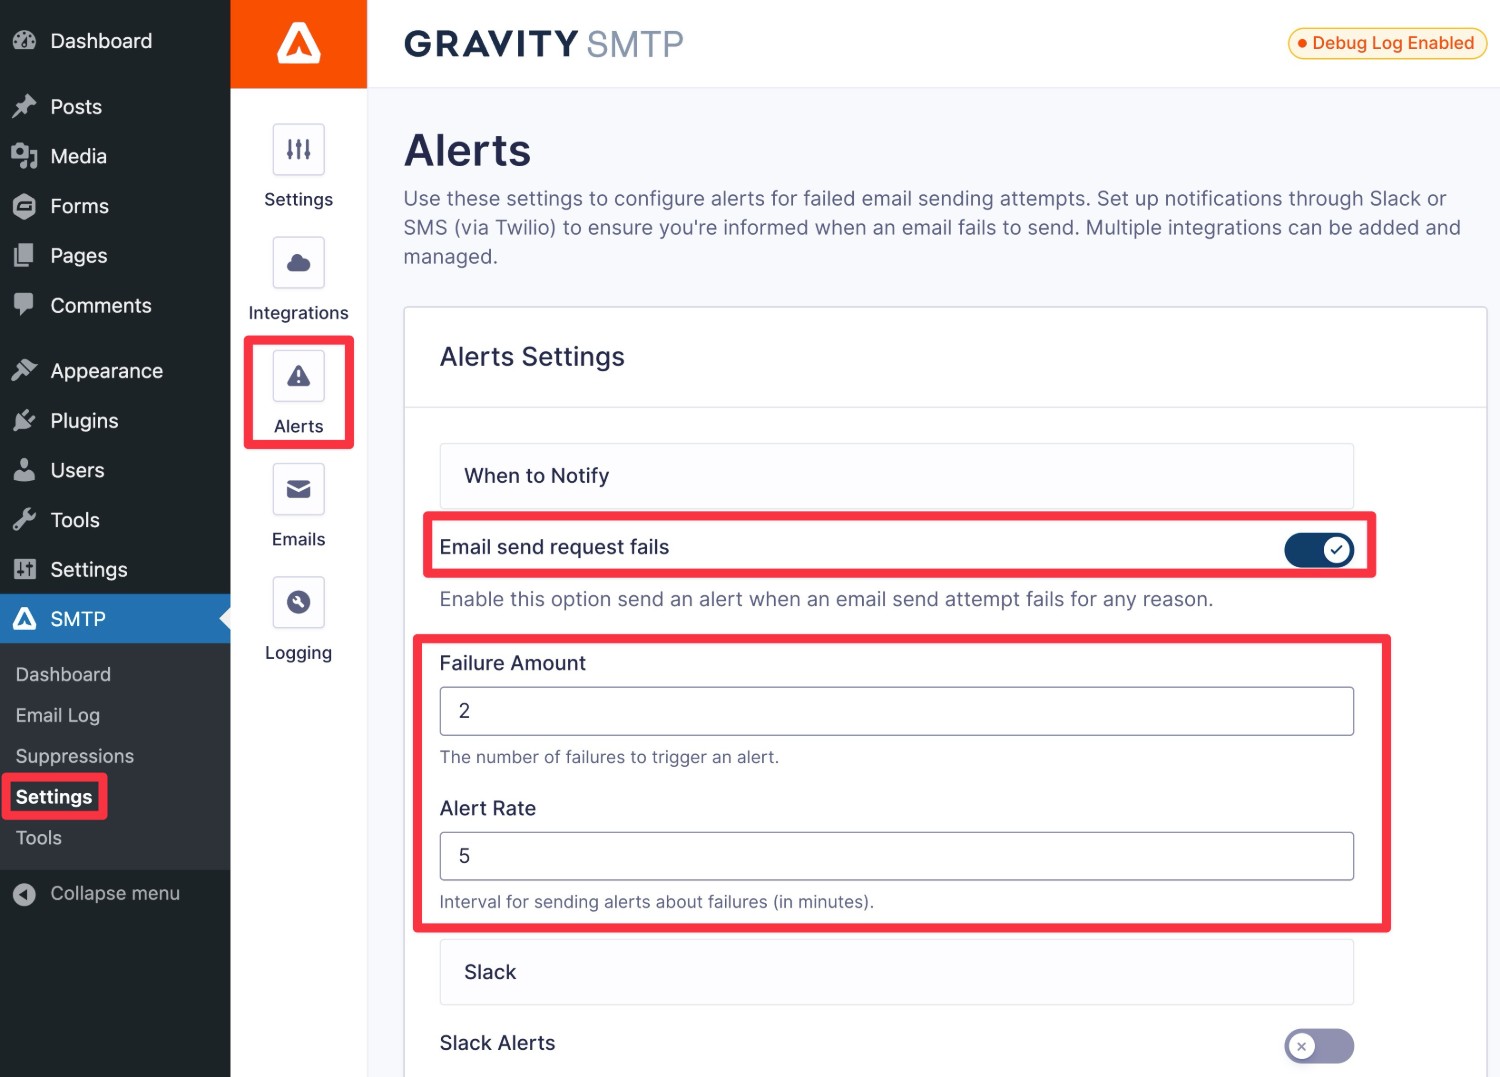
Open your WordPress dashboard and go to SMTP → Settings → Alerts to access the alert settings.
To start, you need to enable the Email send request fails toggle to turn on alerts for emails failing to send.
This is currently the only alert type that Gravity SMTP supports, but there might be more alert choices in the future.
After you enable the alert, you can make two choices:
- Failure Amount – This is the number of failed emails that will trigger an alert. If you set it to “1”, Gravity SMTP will send an alert for a single failed email. If you want to avoid false alarms, you might require more than one failed email. For example, if you set it to “5”, Gravity SMTP won’t send an alert until there have been five failed emails.
- Alert Rate – This lets you limit how often to send alerts, to avoid spamming yourself with alerts in situations where many emails fail in a short period of time. For example, if you set it to “10”, Gravity SMTP will only send one alert for every ten-minute period. After the ten-minute period elapses, it will send another alert if emails continue to fail.
Once you’ve made those choices, scroll down to the Twilio section and enable the SMS via Twilio Alerts toggle.
After enabling the toggle, you’ll be prompted to add five pieces of information:
- Account Name – This is an internal name to help you distinguish between your Twilio accounts. This is important because Gravity SMTP gives you the option to connect to multiple Twilio accounts. You can enter any name you want.
- Twilio Account SID – Paste in your Twilio Account SID. It should look something like this – AC596ed93e15548901083a4e8cbdf3be0r
- Twilio Auth Token – Paste in your Twilio Auth Token that you got in the previous step. It should look something like this – e0br502fdf105191872c739904435bc4
- From Phone Number – Enter your Twilio phone number that you created in the previous step.
- To Phone Number – This is the phone number to which you want to send alerts. It could be your own phone number, your developer’s phone number, or anyone else. We recommend entering your own phone number while setting this up, so that you can quickly validate whether testing the connection is successful. You can change this later. If you haven’t completed the Twilio phone number verification, you’ll only be able to send messages to phone numbers that you’ve added as Verified Caller ID numbers in Twilio.
4. Test, Test Test!
Once you’ve entered that information, click Test Connection. If you entered your own phone number, you should then receive a text that says something like, “Gravity SMTP Test: Twilio is set up!”
Finally, click Save Settings at the bottom.

And that’s it! Your SMS alerts should now start sending based on the rules that you set.
If you’re having issues receiving messages, the Twilio console includes a testing tool that can help you debug why SMS aren’t sending. You can access this by going to Messaging → Try it out → Send an SMS in your Twilio console.
5. Set Up Additional Phone Numbers or Twilio Accounts (Optional)
This step is 100% optional.
If you want to send text messages to additional phone numbers and/or set up a different Twilio account, Gravity SMTP lets you add multiple Twilio account configurations in the alert interface.
All you need to do is click Add Another Account at the bottom. Then, simply fill out the same five pieces of information for each account that you add.
For example, if you want to send messages to an additional phone number, you could use the same Twilio Account SID, Auth Token, and From Phone Number and then just add a different To Phone Number. Again, be sure that you’ve added this and any additional phone numbers as Verified Caller ID numbers in Twilio.
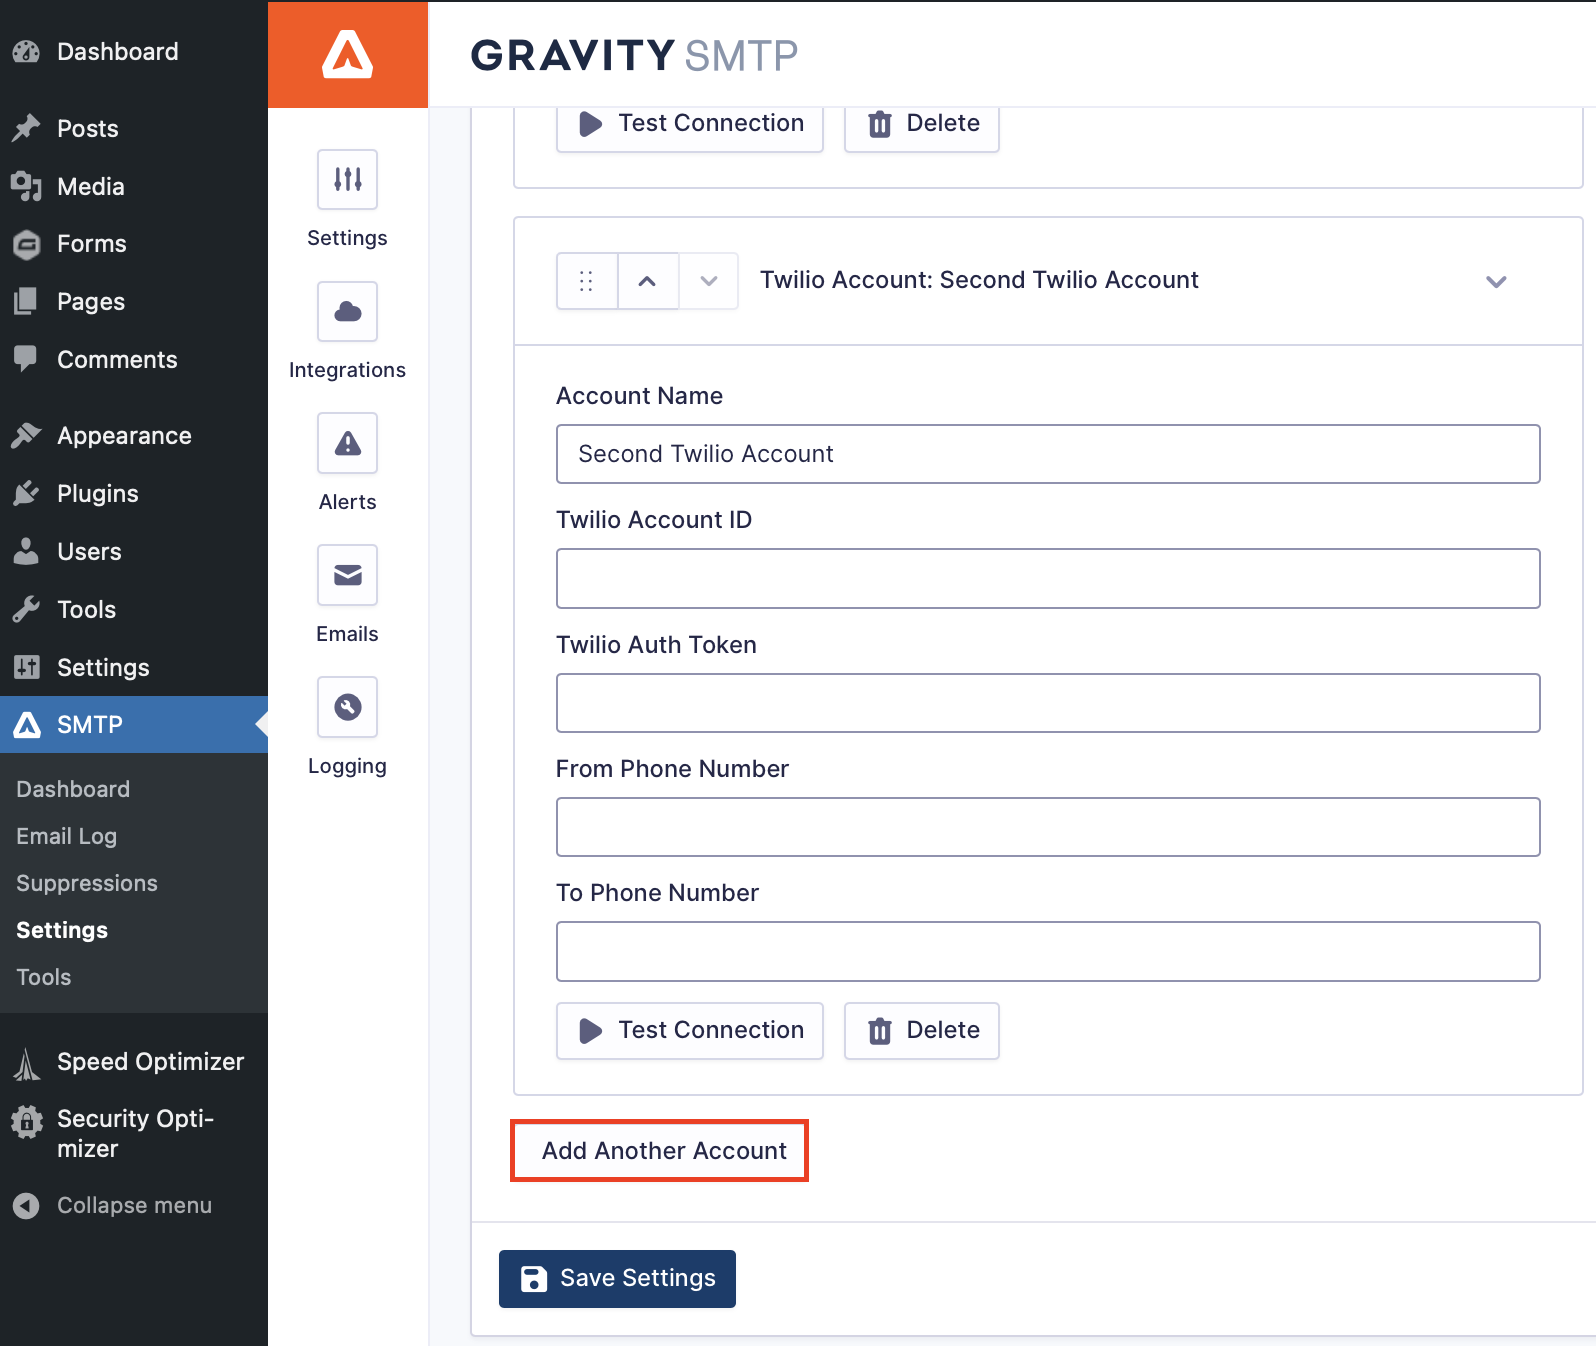
You can keep clicking Add Another Account to add as many accounts as needed. Just make sure to test each one, and then click Save Settings whenever you’re finished.
Get Started With Twilio SMS Transactional Email Alerts Today
With Twilio SMS alerts, you can get real-time text messages whenever there’s a problem with your WordPress site’s transactional emails, subject to the Failure Amount and Alert Rate rules that you specify in Gravity SMTP.
That way, you can immediately fix any problems with your site’s emails and avoid lost revenue or negative business outcomes.
By combining these real-time alerts with the other reporting and logging features in Gravity SMTP, you’ll have a lot of insights into your site’s emails and the confidence that your site’s emails are working properly.
If you’re already using Gravity SMTP, set up Twilio SMS alerts today by following this guide.
New to Gravity SMTP? Follow our ultimate Gravity SMTP guide to get started and then come back here to set up your Twilio SMS alerts.

If you want to keep up-to-date with what’s happening on the blog sign up for the Gravity Forms newsletter!