How to Use Amazon SES to Send WordPress Emails
Searching for a way to send WordPress emails using Amazon SES?
In our step-by-step Amazon SES WordPress tutorial, you’ll learn exactly how to start sending your site’s emails with Amazon SES and the Gravity SMTP plugin.
We’ll cover every single step, from setting up the SES service in your AWS Console Dashboard to configuring WordPress to properly send emails and testing to make sure everything is working.
Before we do that, though, let’s quickly run over what Gravity SMTP is and some of the main reasons to consider using Amazon SES on WordPress.
Or, you can click this link to jump straight to the tutorial.
Why Use Gravity SMTP for the WordPress Amazon SES Integration?
If you want to send WordPress emails with Amazon SES, you can use the Gravity SMTP plugin.
Gravity SMTP is a full-service WordPress SMTP plugin that helps you connect your site to one or more transactional email sending services, while also giving you helpful features to manage your site’s emails, such as testing tools, detailed logs, reporting dashboards, and so on.
Gravity SMTP comes from the same team behind the popular Gravity Forms plugin, but it’s a 100% standalone plugin. That is, Gravity SMTP works for all of your site’s emails and you do not need to have Gravity Forms installed to use it (though it does work great for sending your form notification emails).
Here are some of the main reasons why Gravity SMTP works great for setting up your WordPress Amazon SES integration:
- Easy Amazon SES integration – it offers a straightforward way to connect your site to Amazon SES.
- Backup email sending services – in addition to SES, it also lets you connect your site to other transactional email sending services and use one of those services as an automatic backup method. If an email fails to send via SES for some reason, Gravity SMTP can automatically resend it using your chosen backup service.
- Email testing tools – you get multiple tools to test your site’s emails and make sure everything is working.
- Detailed email logging – you can log all of the emails that your site sends, with a log storage period of your choice. For each email, you can see technical information and the content/design of the email. You also have the option to log email attachments.
- Reporting dashboards – you also get general reporting tools to track your email usage, including the top sending sources (e.g. core WordPress emails vs emails from a plugin) and top recipients.
- Reliability and support – it comes from the same team behind Gravity Forms, so you can be confident in the quality of the plugin. You also get direct support.
- More features coming – in addition to everything that it already offers, the Gravity SMTP team is also hard at work on adding new features. You can see these features on the public product roadmap and vote on those that you’d like to see added.
The Advantages of Using Amazon SES Email Sending on WordPress
The main advantages of using Amazon SES for your WordPress emails are its low cost and pay-as-you-go pricing.
While Amazon SES doesn’t offer a forever free plan like some other transactional email services, it is one of the cheapest email sending services out there when it comes to the actual cost per email.
You’ll pay just $0.10 per 1,000 emails that you send (at time of writing).
There are some potential additional fees depending on your usage – for example, if you’re sending attachments, you’ll also be billed $0.12 per GB of data in the attachments. But in general, Amazon SES is very affordable and flexible because you’re only billed based on your actual usage and there are no minimums.
Amazon also does offer a free usage tier for the first year. For the first 12 months that you use Amazon SES, you can send up to 3,000 emails per month for free. However, after those 12 months, you’ll need to pay for all of your usage.
Beyond that, Amazon SES will just generally be a lot more reliable than relying on the default PHP Mail method that WordPress uses, and the API lets you securely connect WordPress to Amazon SES.
How to Set Up WordPress Amazon SES Email Sending With Gravity SMTP
Now, we’ll go through the full step-by-step process of configuring WordPress to send emails using Amazon SES and Gravity SMTP.
Here’s a high-level look at the steps – keep reading for the full instructions and screenshots:
- Install the Gravity SMTP plugin
- Create your AWS account (or log in to your existing account)
- Enable Amazon SES in your AWS account
- Create an IAM user to generate access keys
- Locate your AWS region
- Connect Gravity SMTP to Amazon SES
- Send a test email
- (Optional) Set up a backup email sending service
1. Install the Gravity SMTP Plugin
To get started, you should install the Gravity SMTP plugin on the WordPress site that you want to connect to Amazon SES.
Currently, Gravity SMTP is available at no extra cost to anyone holding one of these Gravity Forms licenses:
- Elite license
- Nonprofit license
- Developer license (legacy)
You can download it from your Gravity Forms My Account area.
While Gravity SMTP is currently available via your Gravity Forms license, it’s still a completely standalone plugin. That is, you do not need to have Gravity Forms installed to use Gravity SMTP, though the two do work well together.
2. Create Your AWS Account (If You Haven’t Done So Already)
Next, you’ll want to sign up for an AWS account, if you haven’t already done so.
You can register for a free account by clicking this link.
Once you register, you should also set up your billing details, if you didn’t do so during the signup process.
If this is your first time using Amazon SES, you can send up to 3,000 emails per month for free for the first 12 months (at time of writing). However, you’ll still need to add your billing details, in case there’s any overage.
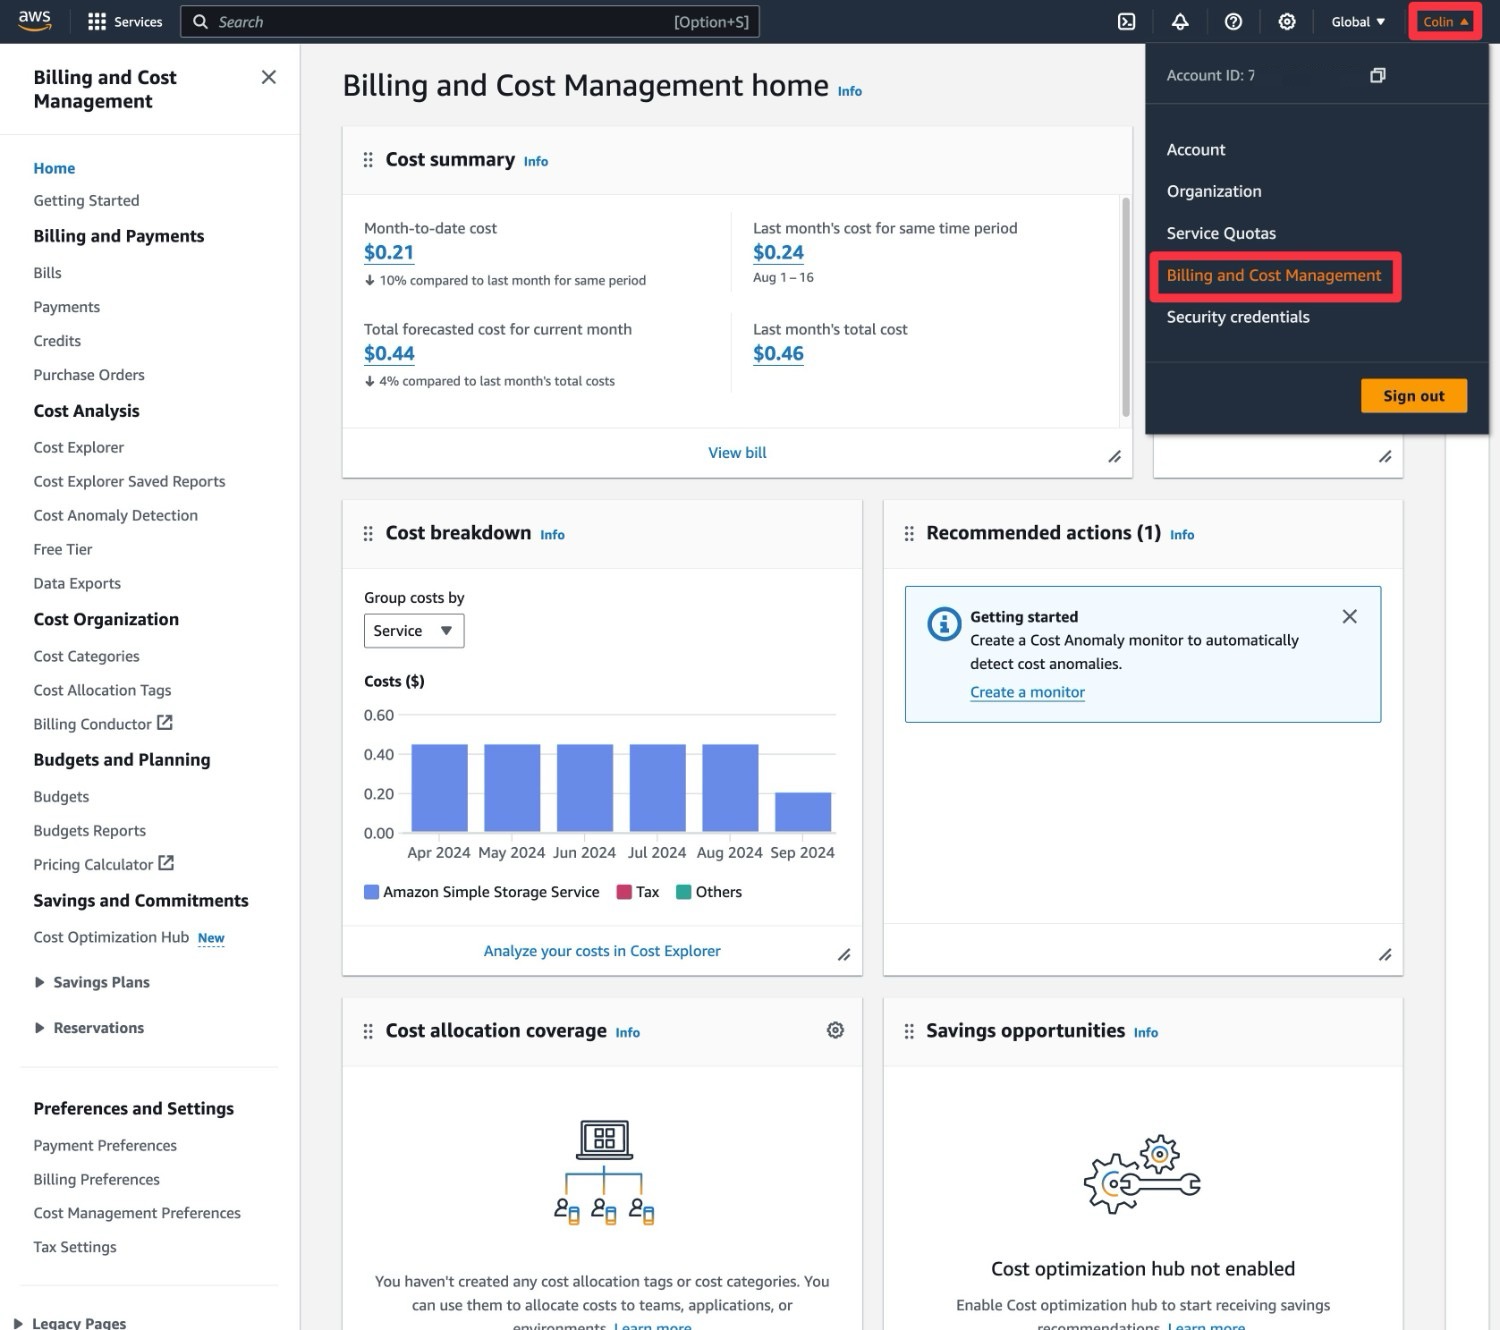
You can manage billing details by clicking on your account name in the top-right corner and selecting Billing and Cost Management from the drop-down.
If you’re worried about costs, you can also set up a budget for Amazon SES. That way, you’ll be notified when you reach certain cost thresholds.
With that being said, unless you’re sending millions of emails per month, your costs will be quite low, and likely within the free limit for the first 12 months.
3. Enable the Amazon SES Service in AWS
Next, you’ll need to enable/set up the Amazon SES service in your AWS Console Dashboard.
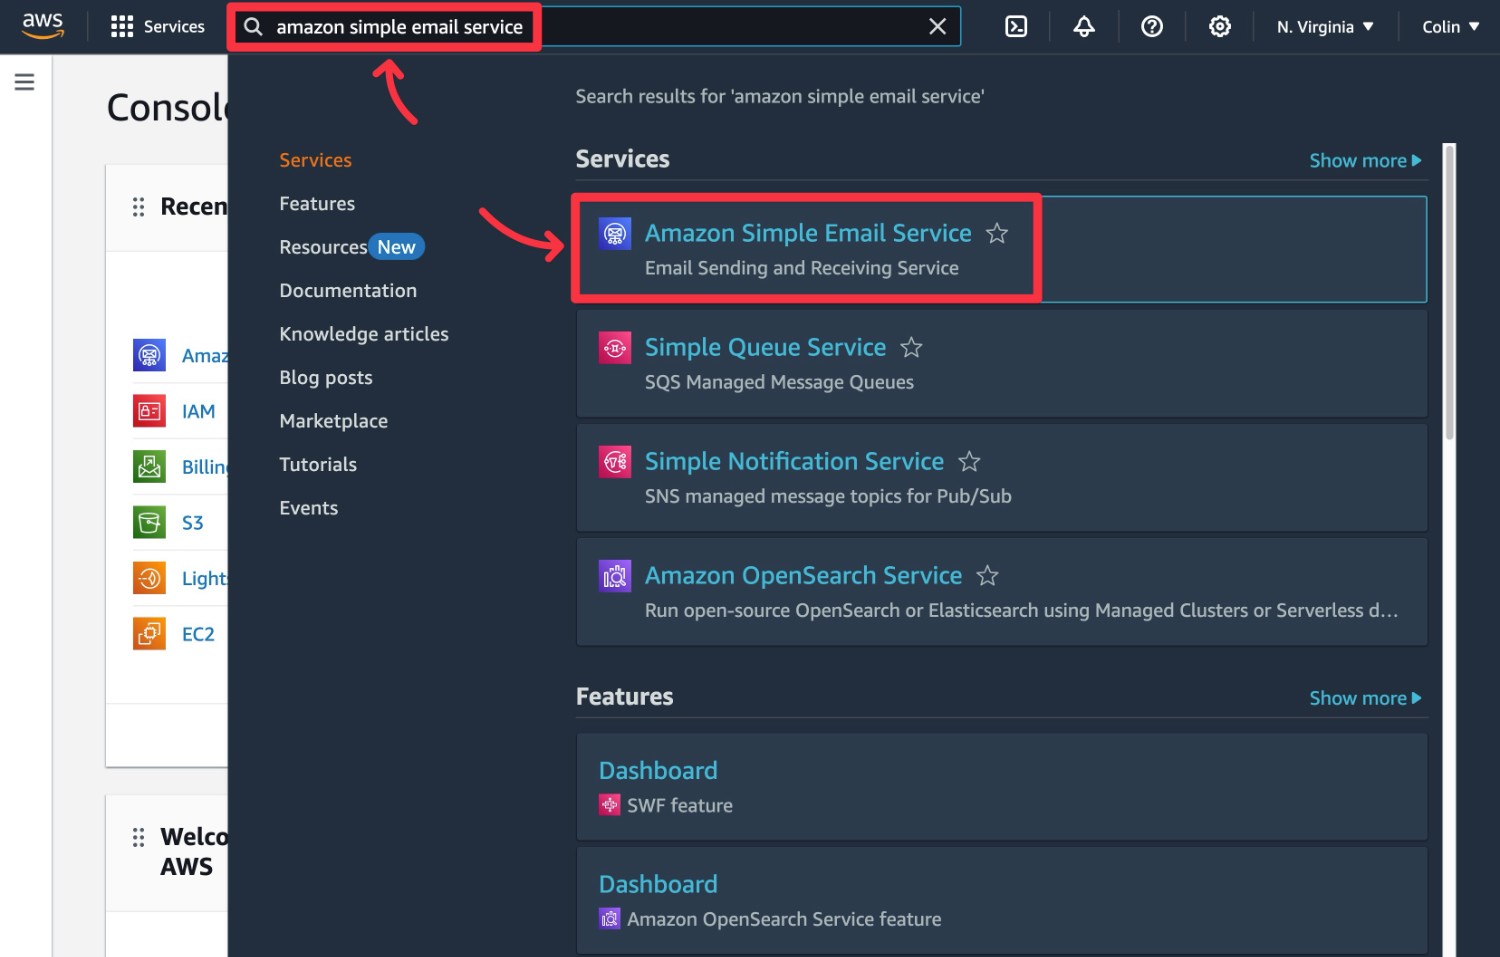
To access the service, search for and select “Amazon Simple Email Service” using the search bar at the top of your AWS Console Dashboard.
To send emails using Amazon SES, you need to add something called an “Identity”. There are two types of identities:
- Domain – you can verify your domain name by adding DNS records, which lets you send from any email address using that domain.
- Email address – you can verify a single email address by clicking a link that Amazon sends you.
Whenever possible, we recommend verifying your domain name, as it will improve deliverability and give you more flexibility.
While you can jump straight to creating your first identity, we recommend using the Amazon SES setup wizard instead, which will have you configure both a domain and email address.
Complete the Amazon SES Setup Wizard
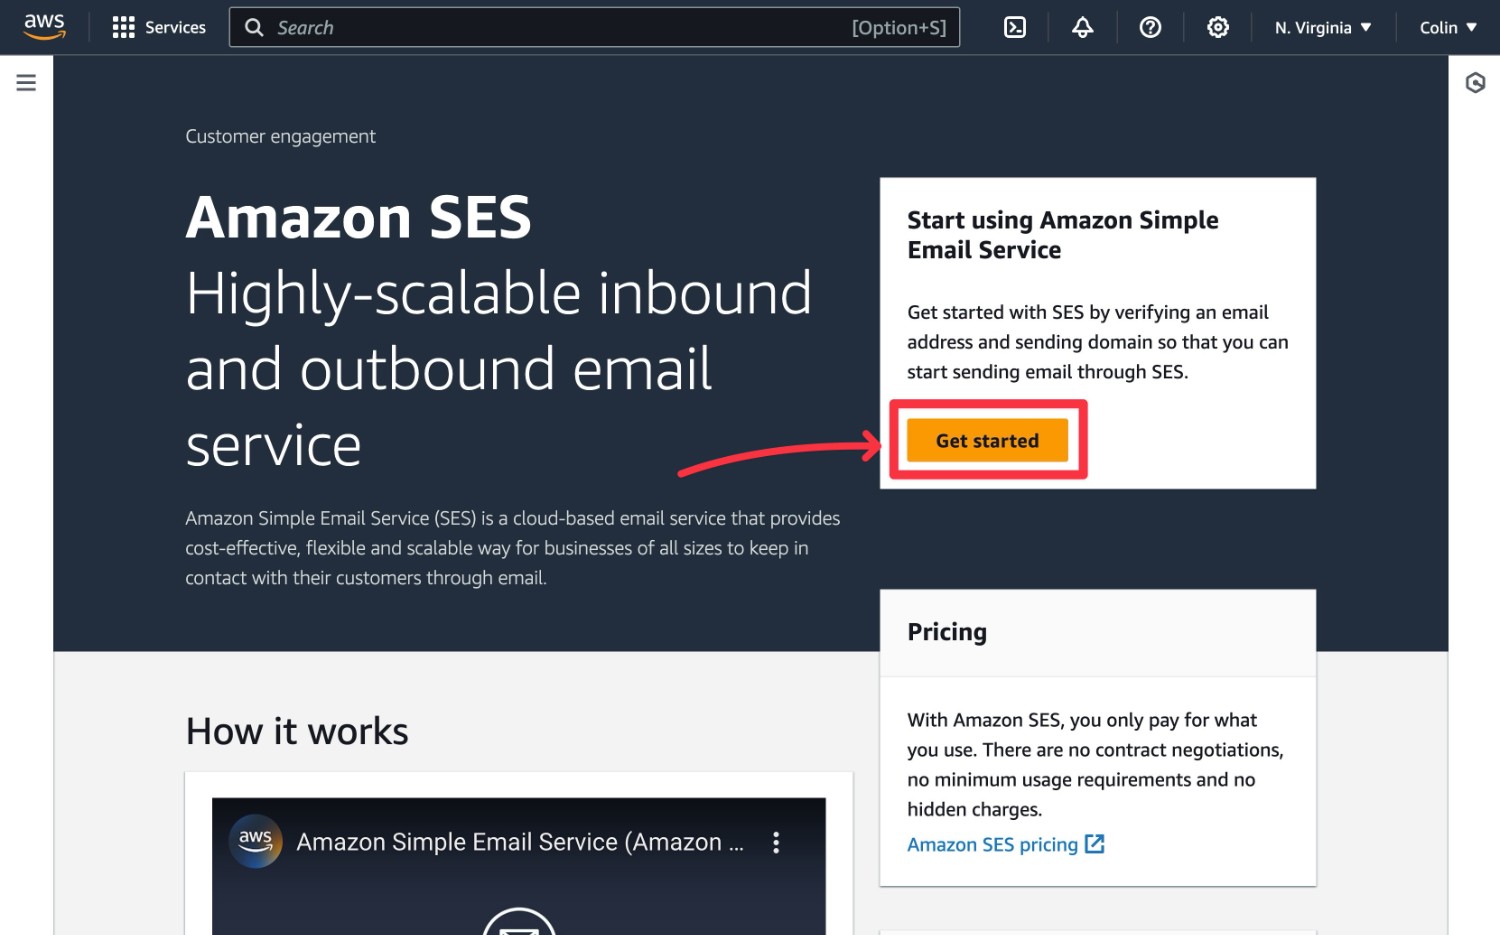
You can launch this setup wizard by clicking the Get started button or selecting Get set up in the menu sidebar.
Note – you will not see this setup wizard if you’ve already created an identity. In that case, you’ll need to add your identity directly by using the Identities option in the sidebar.
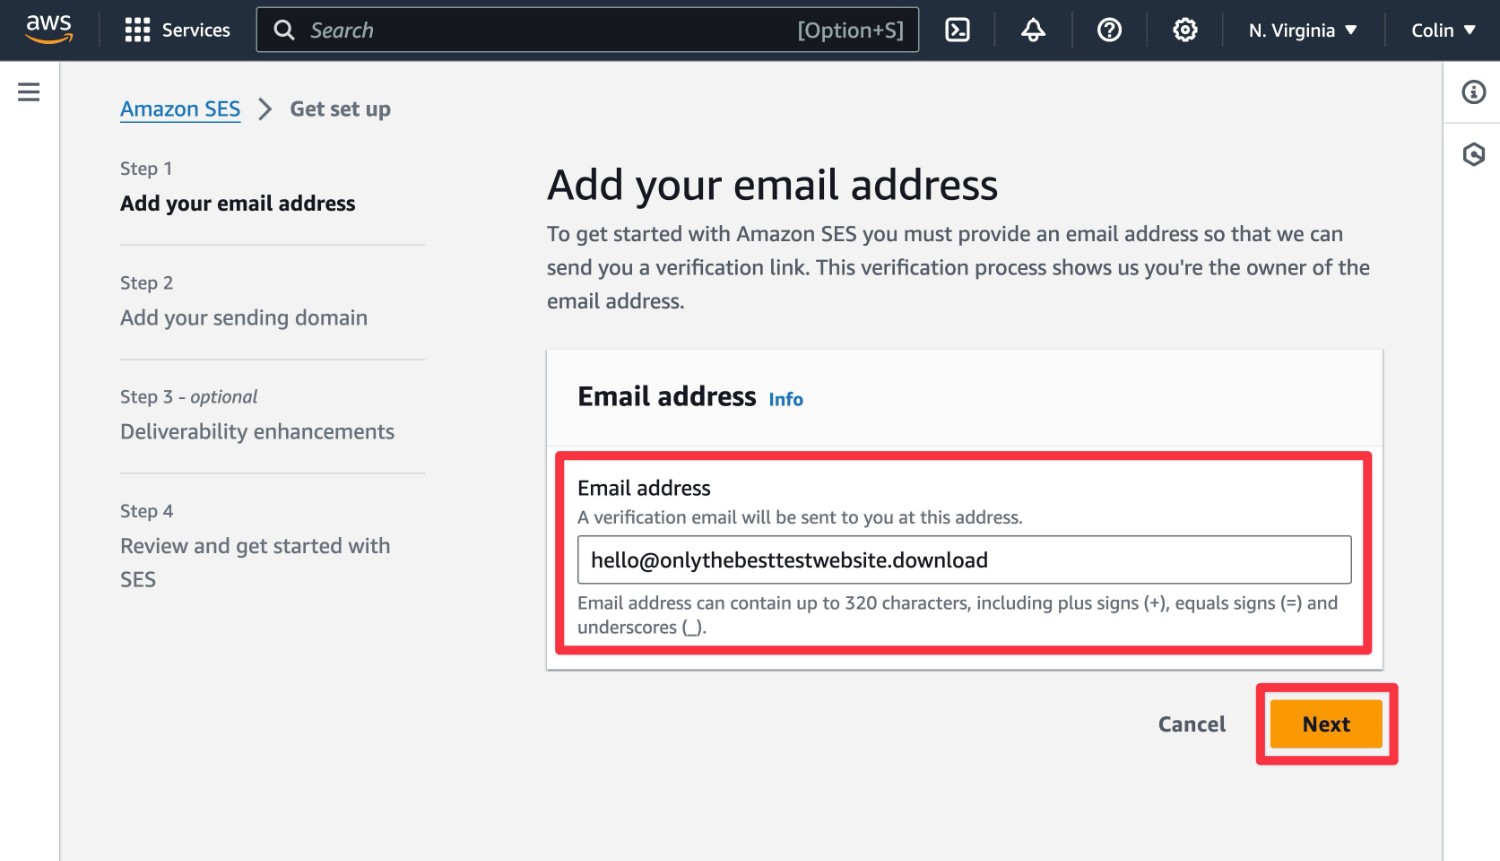
In the setup wizard, you’ll first need to enter the email address that you want to use to send emails. Amazon will send a verification link to this email address, which you need to click to prove that you control this address.
For example, if you want to send your site’s emails from “[email protected]”, you should enter that email address. Then, click Next to advance.
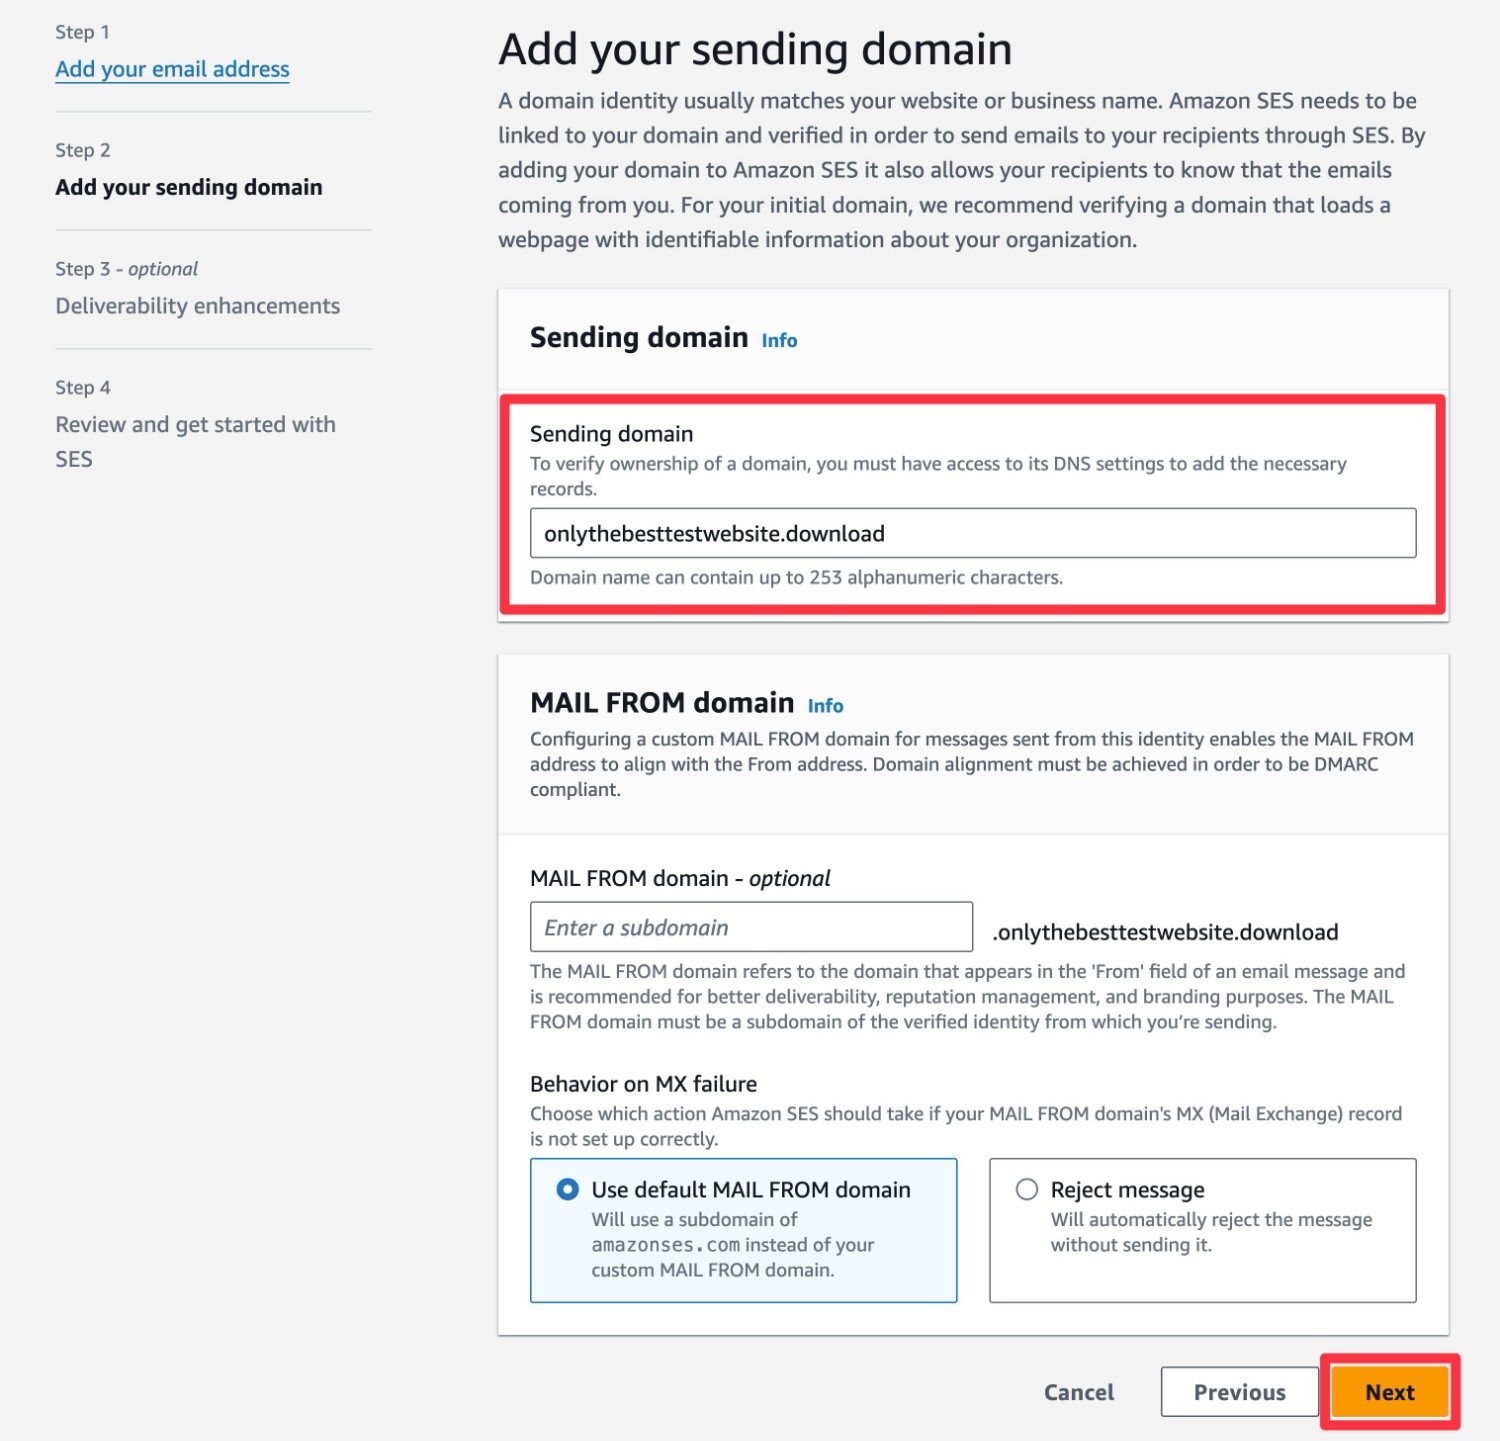
On the next screen, you’ll need to add your WordPress site’s domain name to the Sending domain box. Then, click Next to advance.
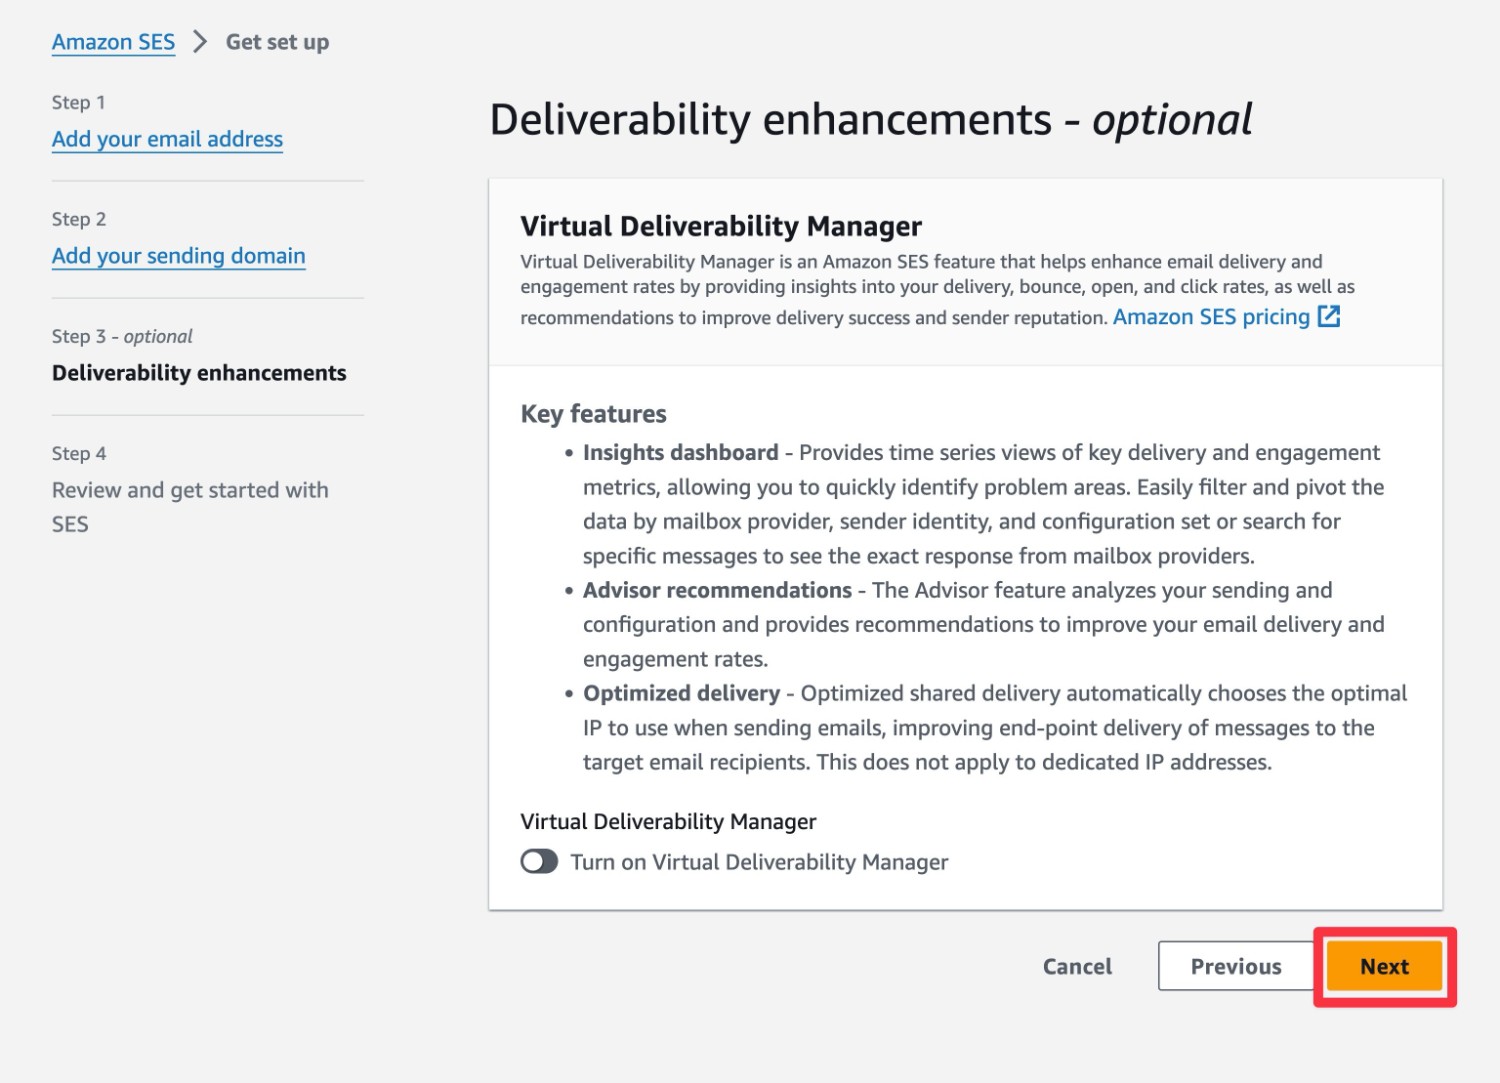
On the next screen, Amazon will give you the option to set up the Virtual Deliverability Manager service. This is optional – it can help you improve your deliverability, but it will also cost extra.
It’s an additional $0.07 per 1,000 emails that you send, which would raise the total cost to $0.017 per 1,000 emails.
You can use the toggle to enable it if you want, but we’re going to leave it disabled for this example.
Once you’ve made your choice, click Next.
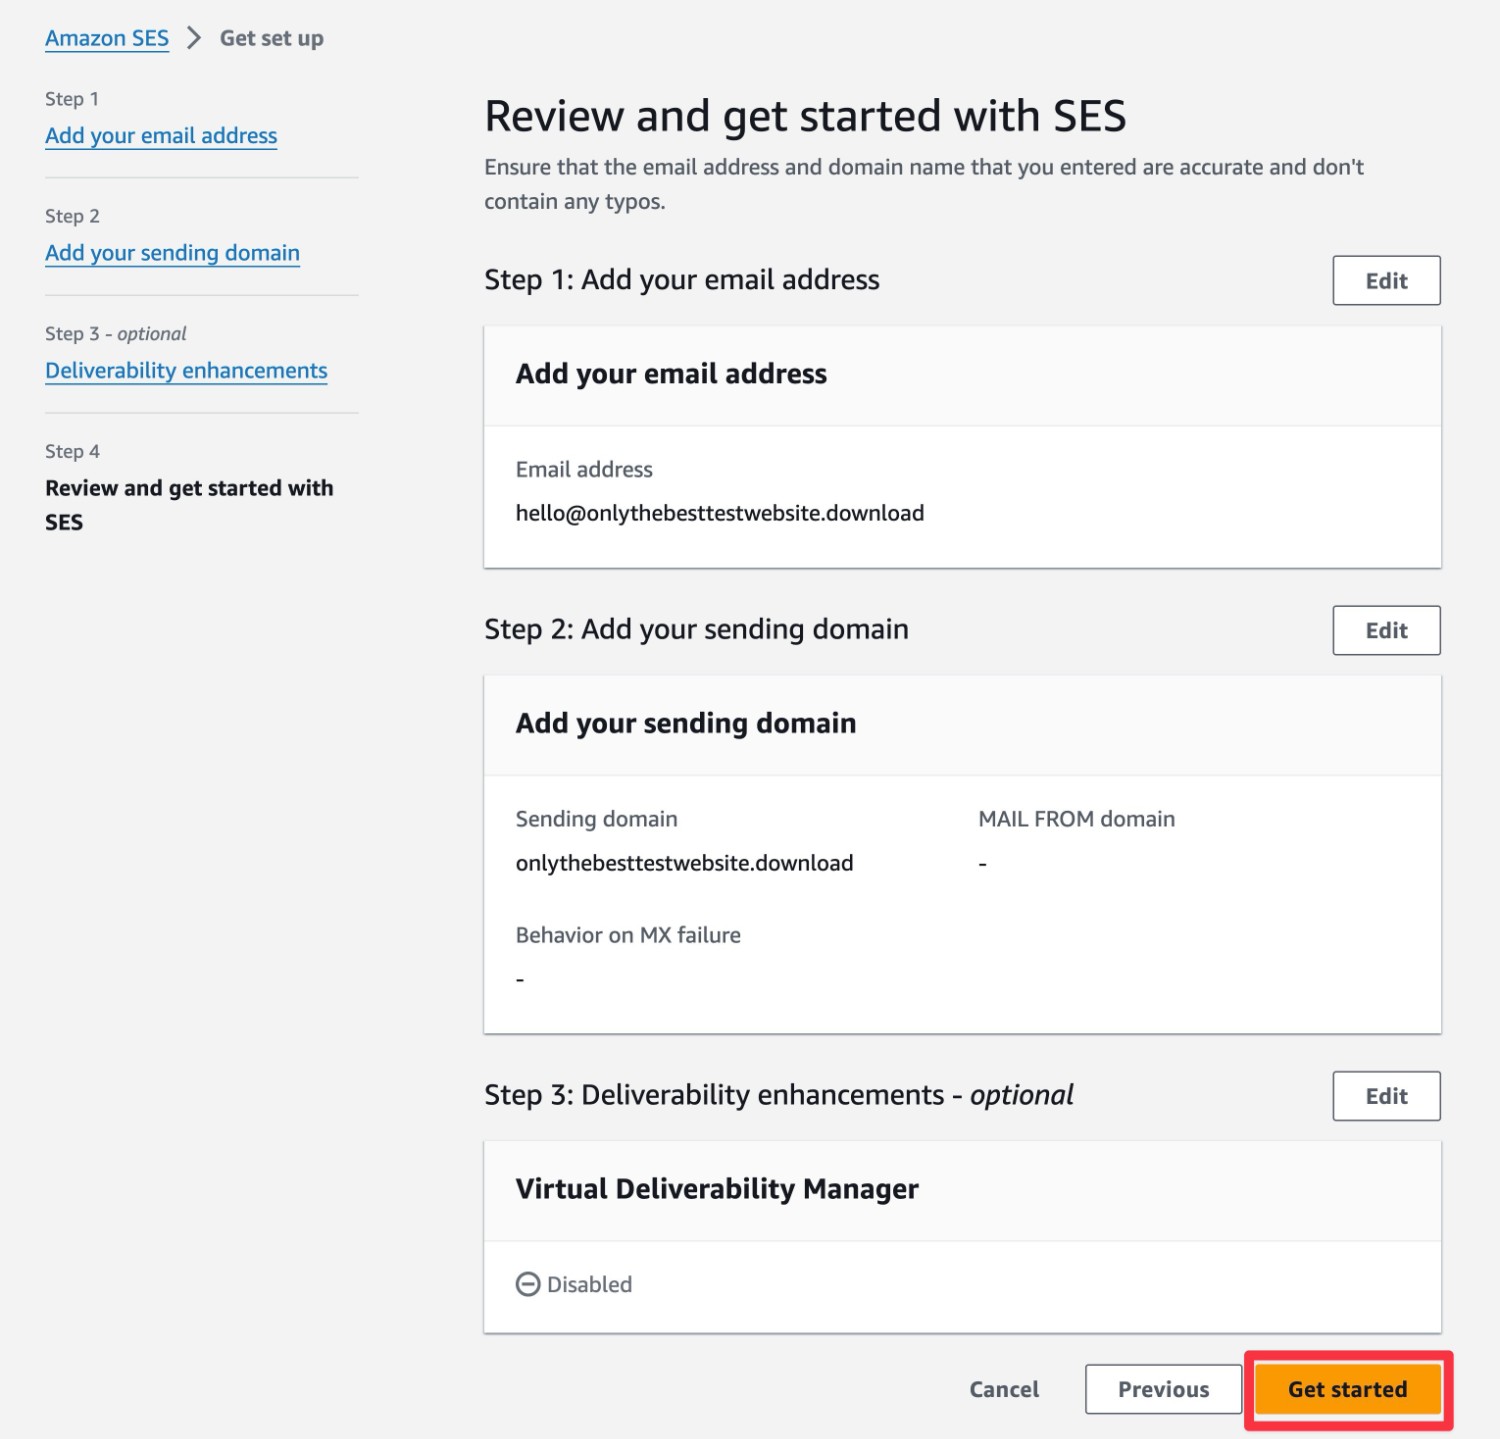
On the last screen, you can review the information that you’ve added. If everything looks good, click the Get started button to finalize the setup process.
Verify Your Email Address and/or Domain Name
Now, you should be in the Get set up area, which will show a number of tasks in the Open tasks list.
First, you should click the verification link in the email that Amazon sent to the address you entered. This will verify that email address with Amazon. If you didn’t receive the email, you can resend it from the Open tasks list.
To verify your sending domain name (which we recommend), you can locate the necessary DNS records by clicking Get DNS Records under Verify sending domain.
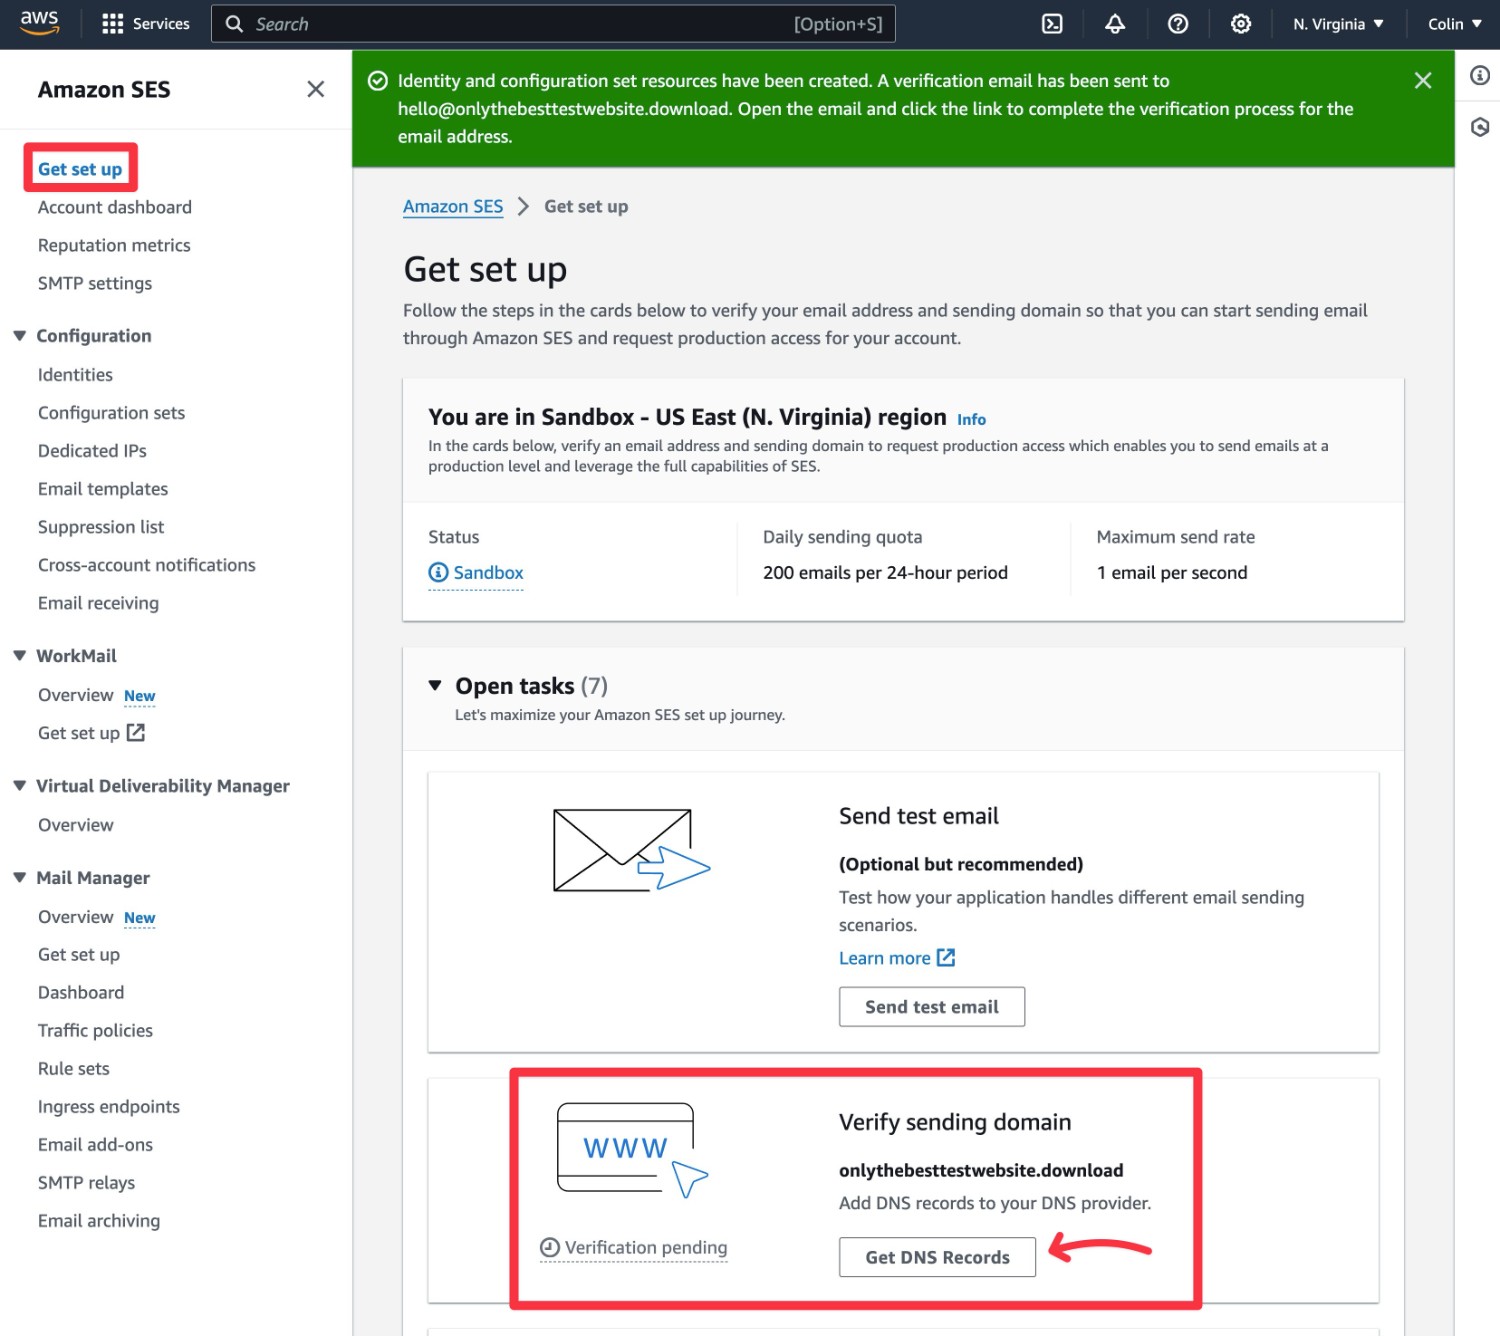
This will show four different records – three CNAME and one TXT/DMARC – that you’ll need to add wherever you manage your domain name’s DNS settings.
Request Production Access
When you first set up SES, Amazon puts you in “Sandbox” mode. This means that you can only send 200 emails per 24 hour period, with a maximum send rate of one email per second.
To remove these rate limits, you need to request production access. Doing this is easy – you just need to click the Request production access button in the open tasks list.
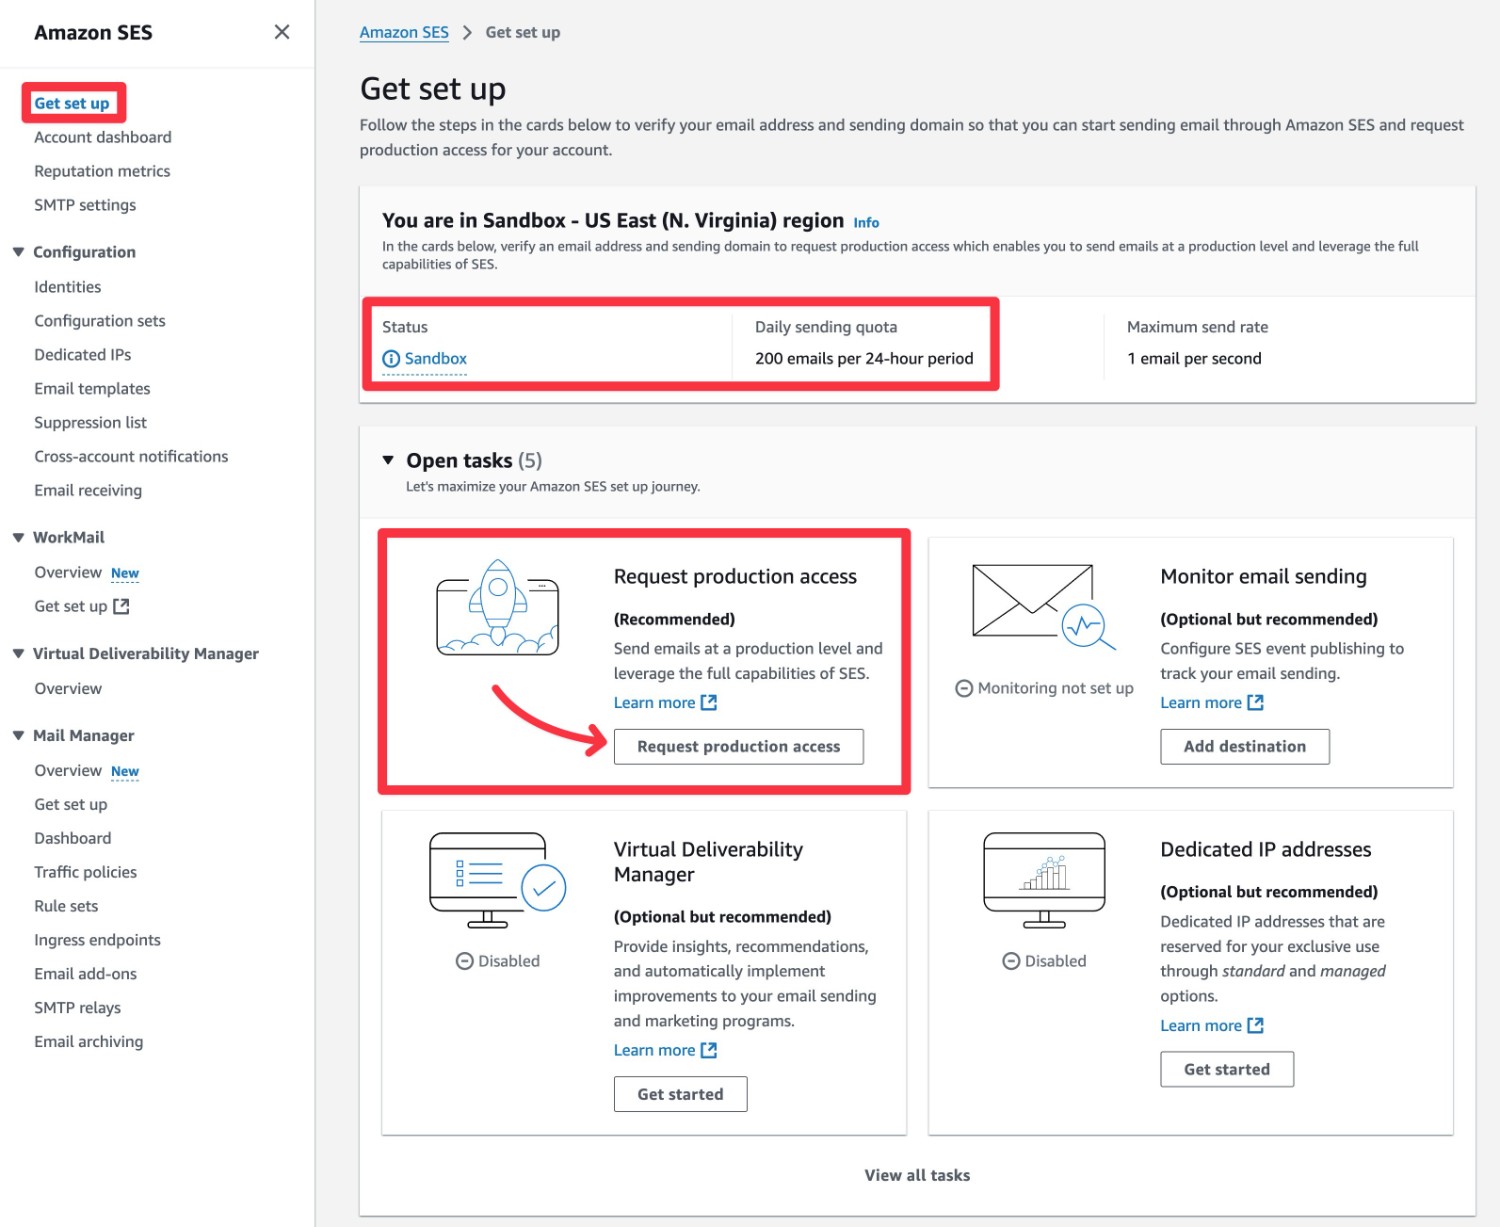
However, it might take some time for Amazon to approve your request. If you have high-volume email sending needs, we recommend verifying that Amazon has enabled production access before you activate Amazon SES as your site’s primary email sending service.
4. Generate Your Amazon SES Access Keys
To connect your WordPress site to Amazon SES, you need to create/generate access keys in your AWS dashboard.
Create a New IAM User
To start, you’ll need to create a new IAM user in your AWS Console Dashboard.
To do this, search for and select “IAM” using the search box at the top of the AWS Console Dashboard.
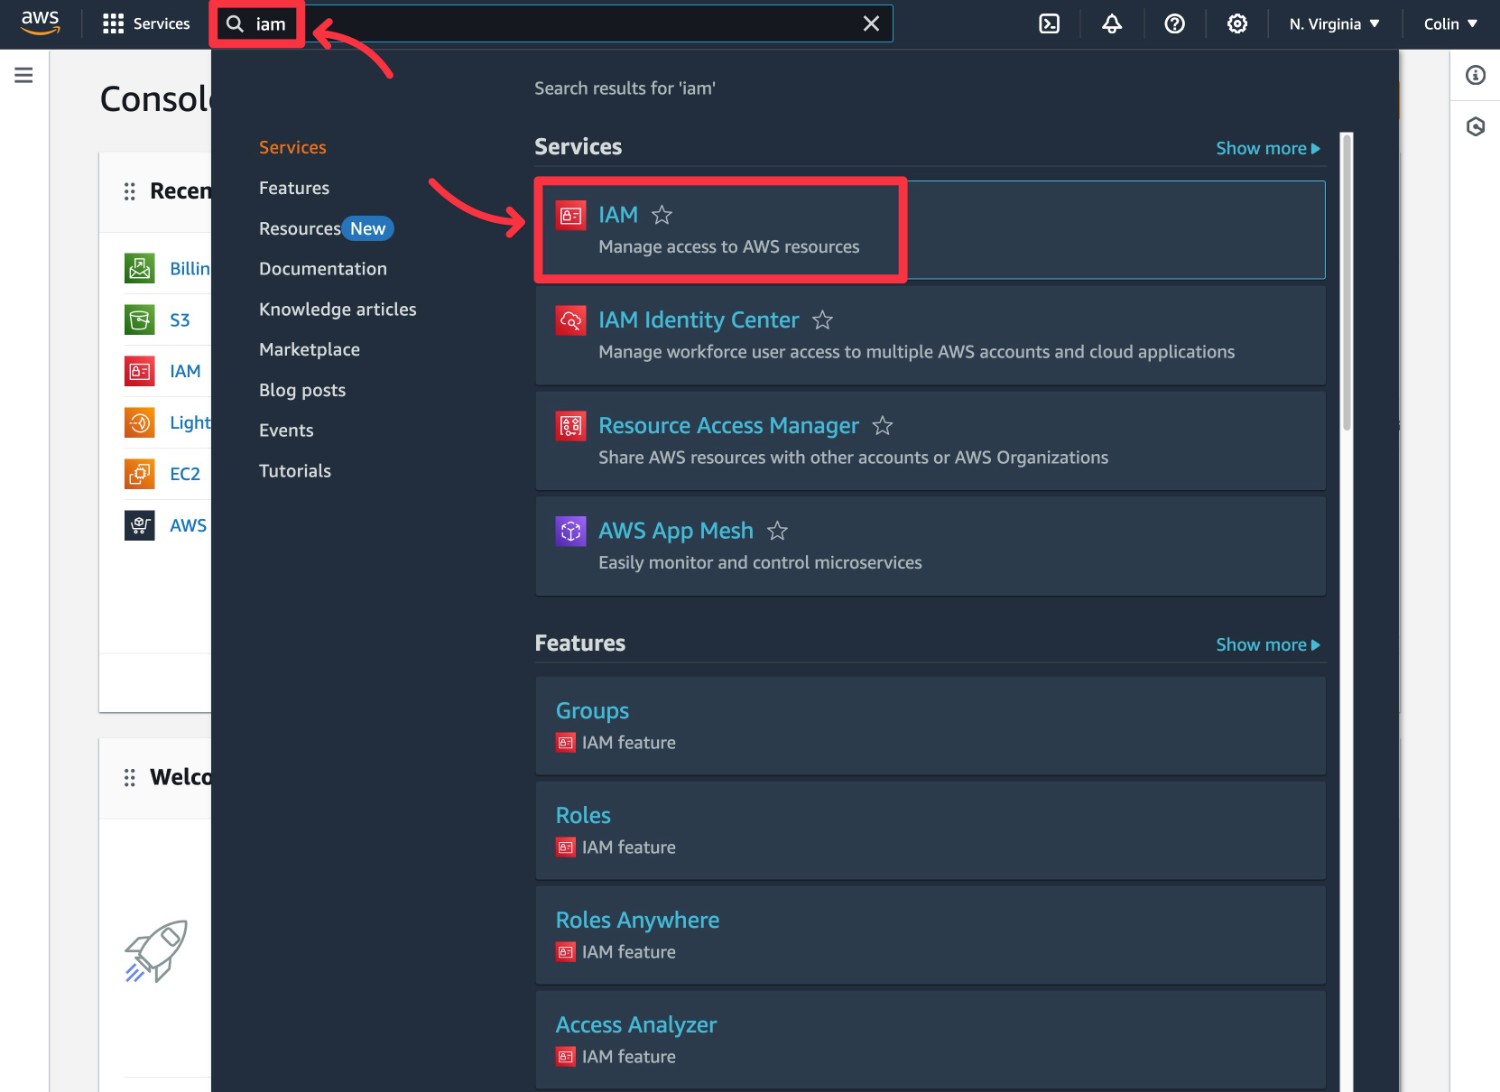
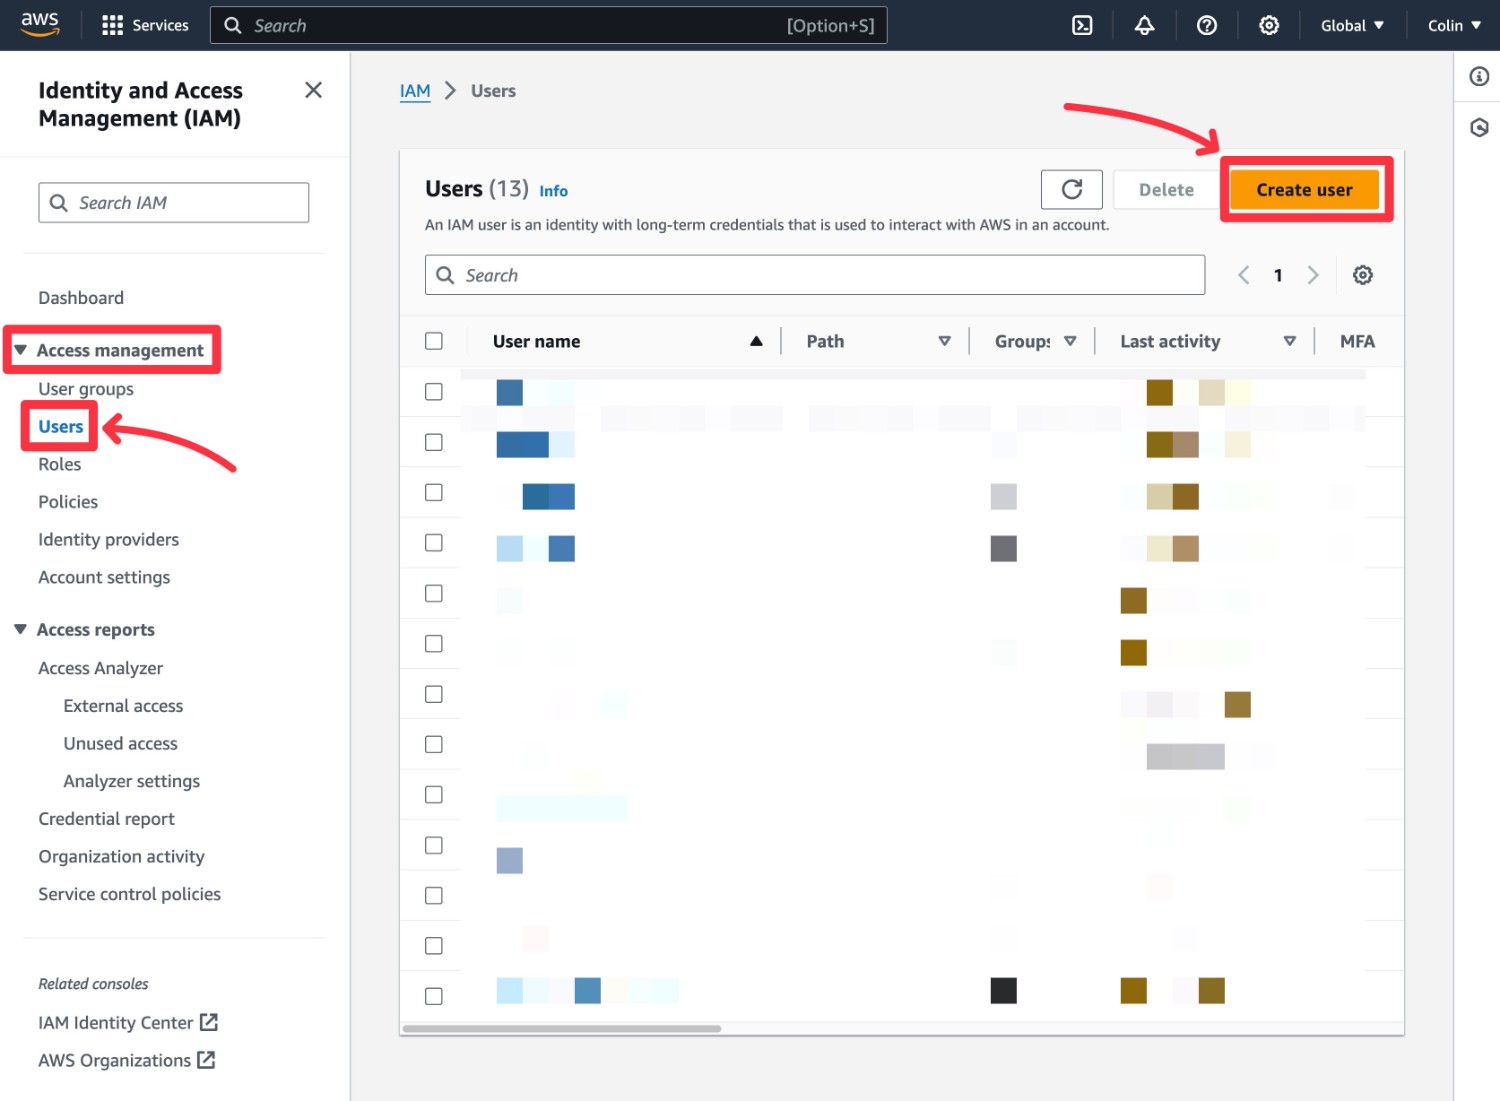
In the IAM Dashboard, select Users in the sidebar (under Access management) and then click Create user.
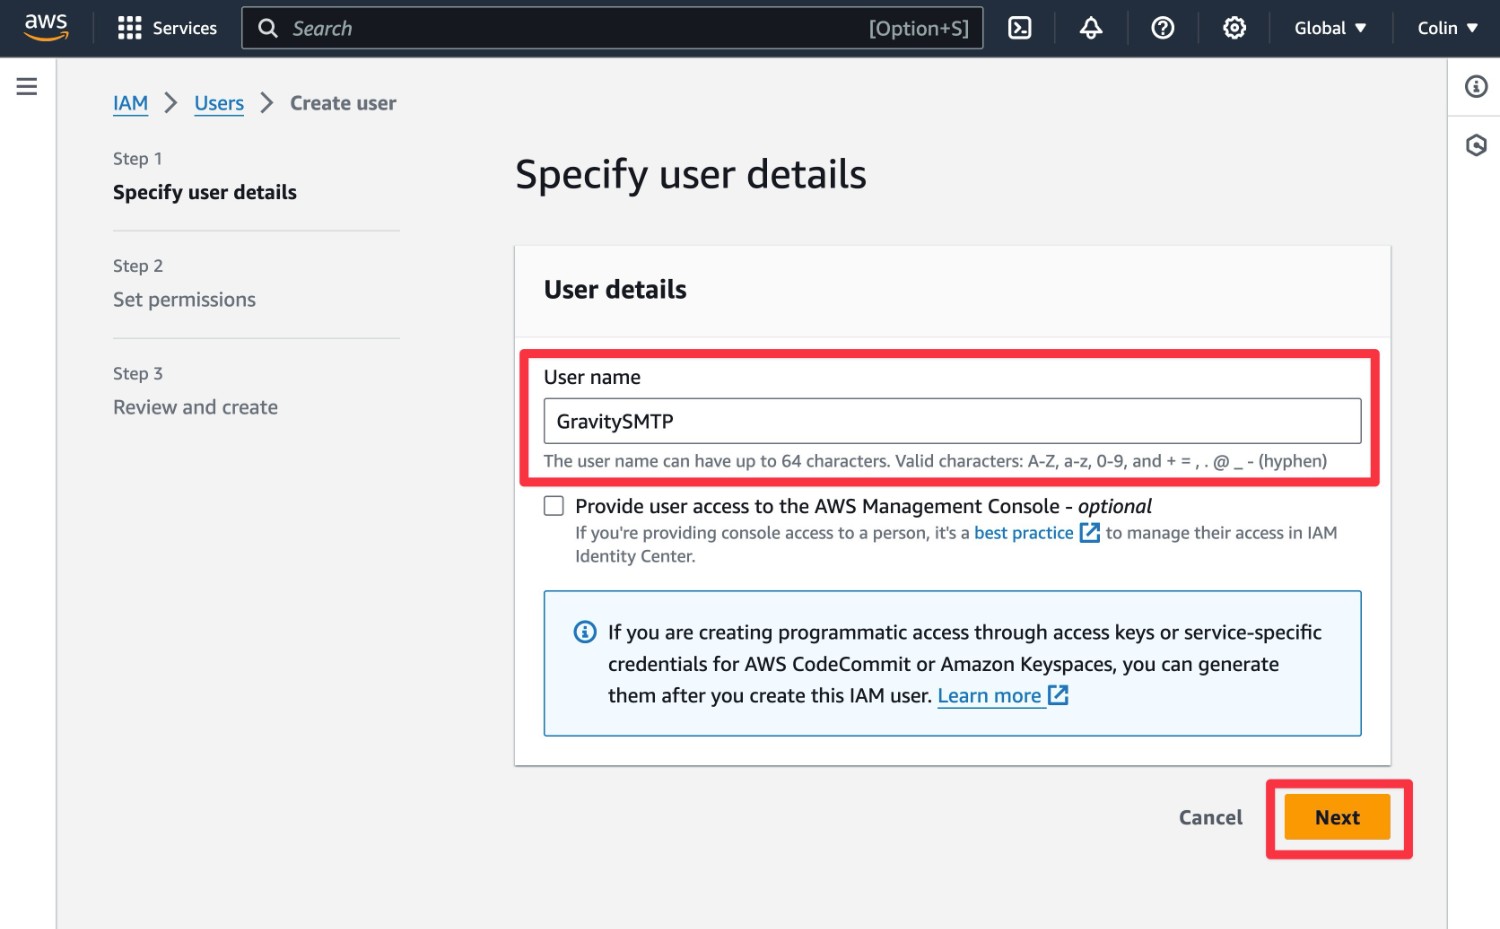
Specify User Details
On the Specify user details page, give your user an internal name to help you remember it. For example, “GravitySMTP”.
Then, click Next.
Set Permissions
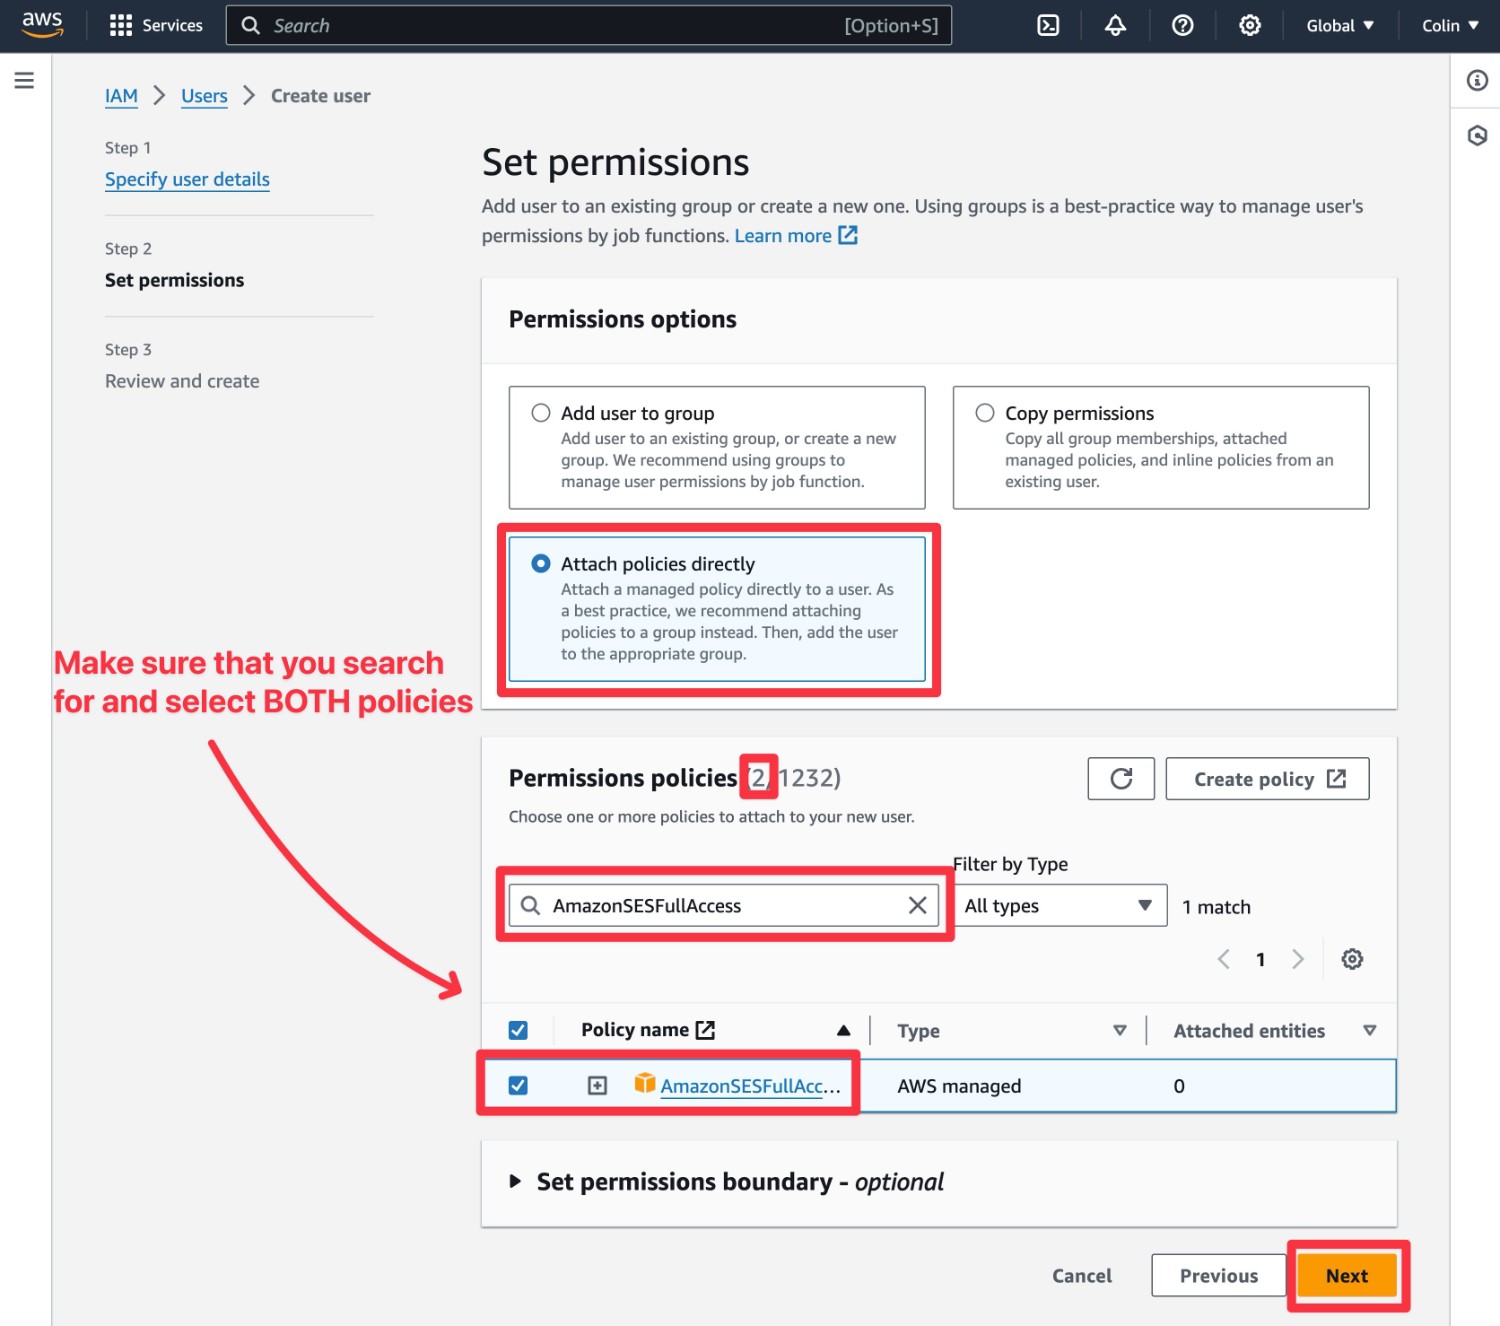
On the Set permissions page, choose the Attach policies directly option.
This should expand a search interface named Permission policies. In this search box, you’ll need to search for and select two policies:
- AmazonSESFullAccess
- AmazonSNSFullAccess
Make sure that you check the boxes for both policies. You can verify that you’ve selected two policies by looking at the number next to Permissions policies.
Once you’ve checked the boxes for both policies, you can click Next to advance.
Review and Create
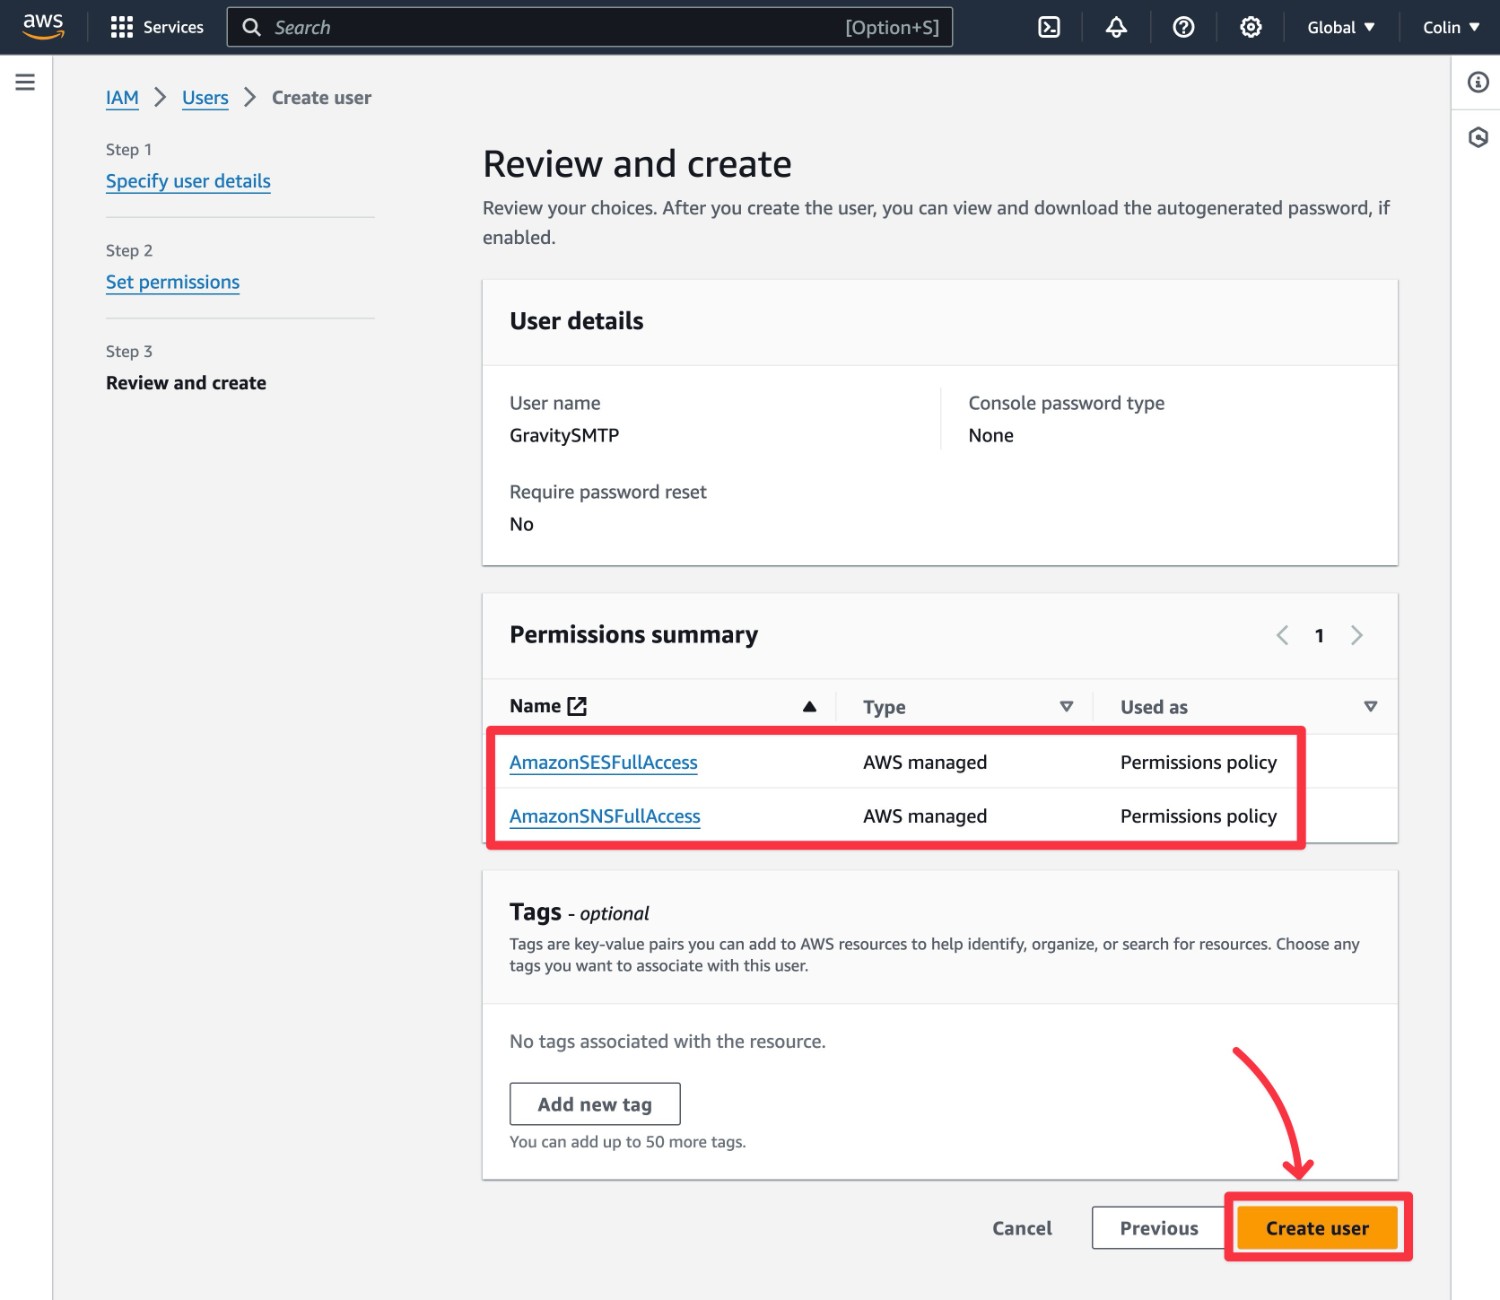
On the Review and create page, you can verify again that you’ve selected both policies.
Then, just click the Create user button to finish creating the user.
Create the Access Keys
You should now be in the Users list again. To create your user’s access keys, you need to select it in the list.
Or, you can click the View user button that appears at the top of the page, if the notification prompt is still visible.
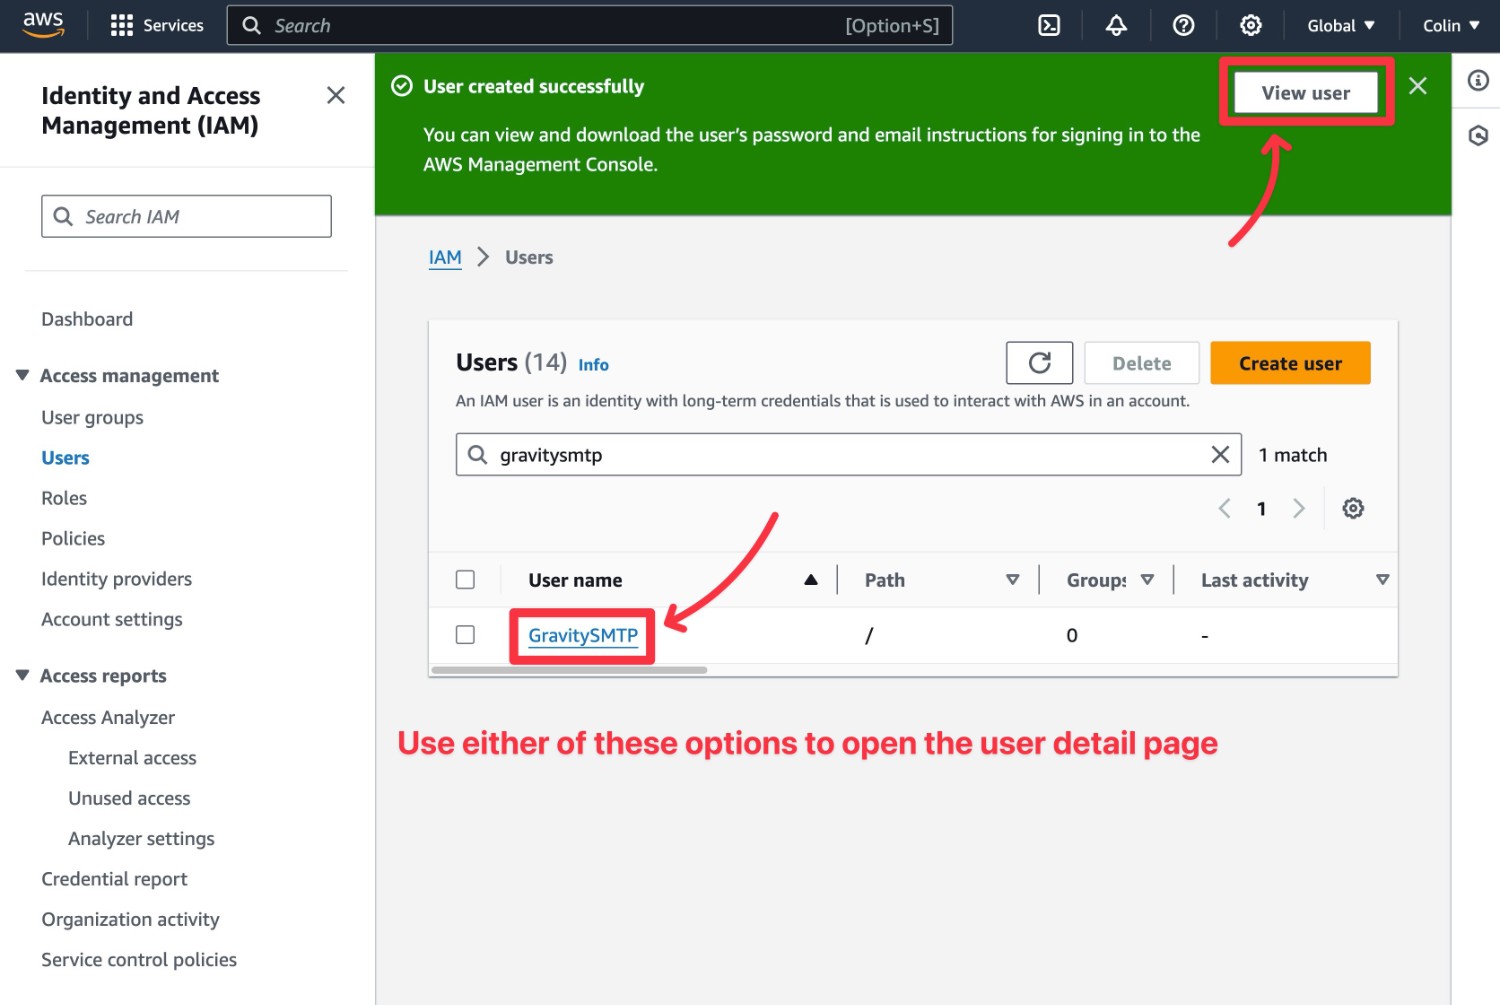
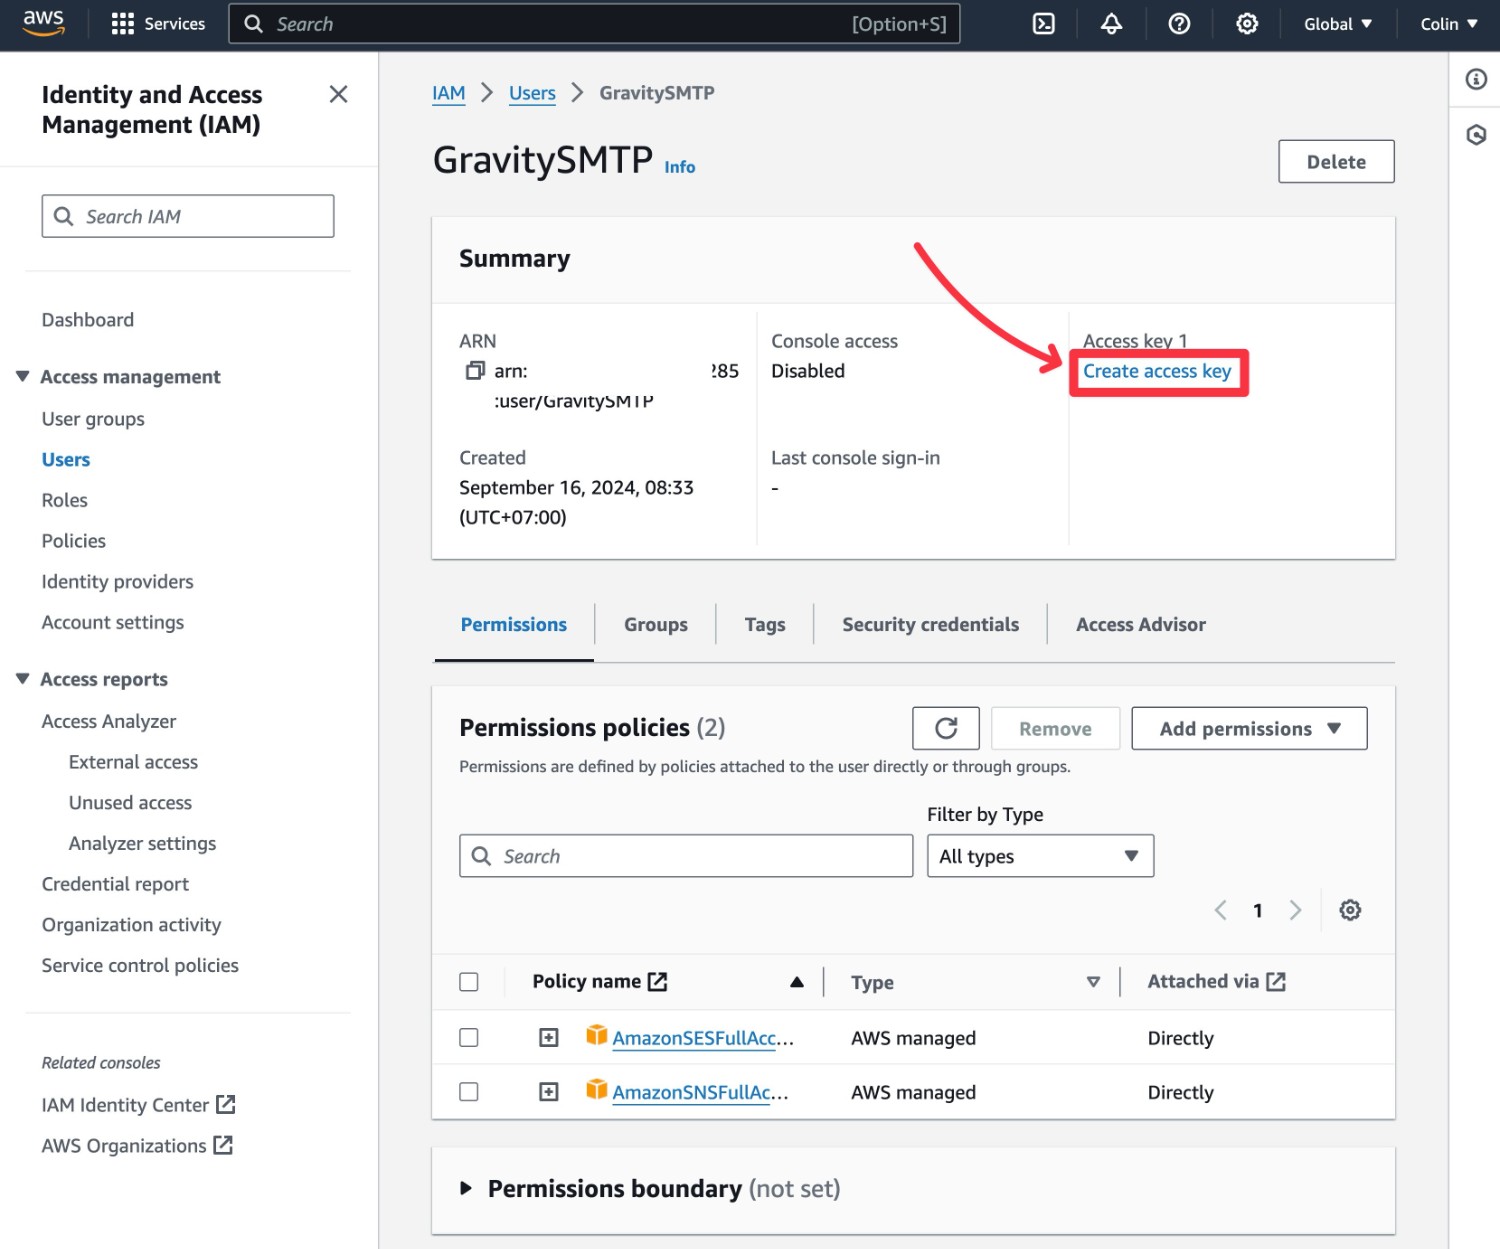
In the user detail page, click on the Create access key link.
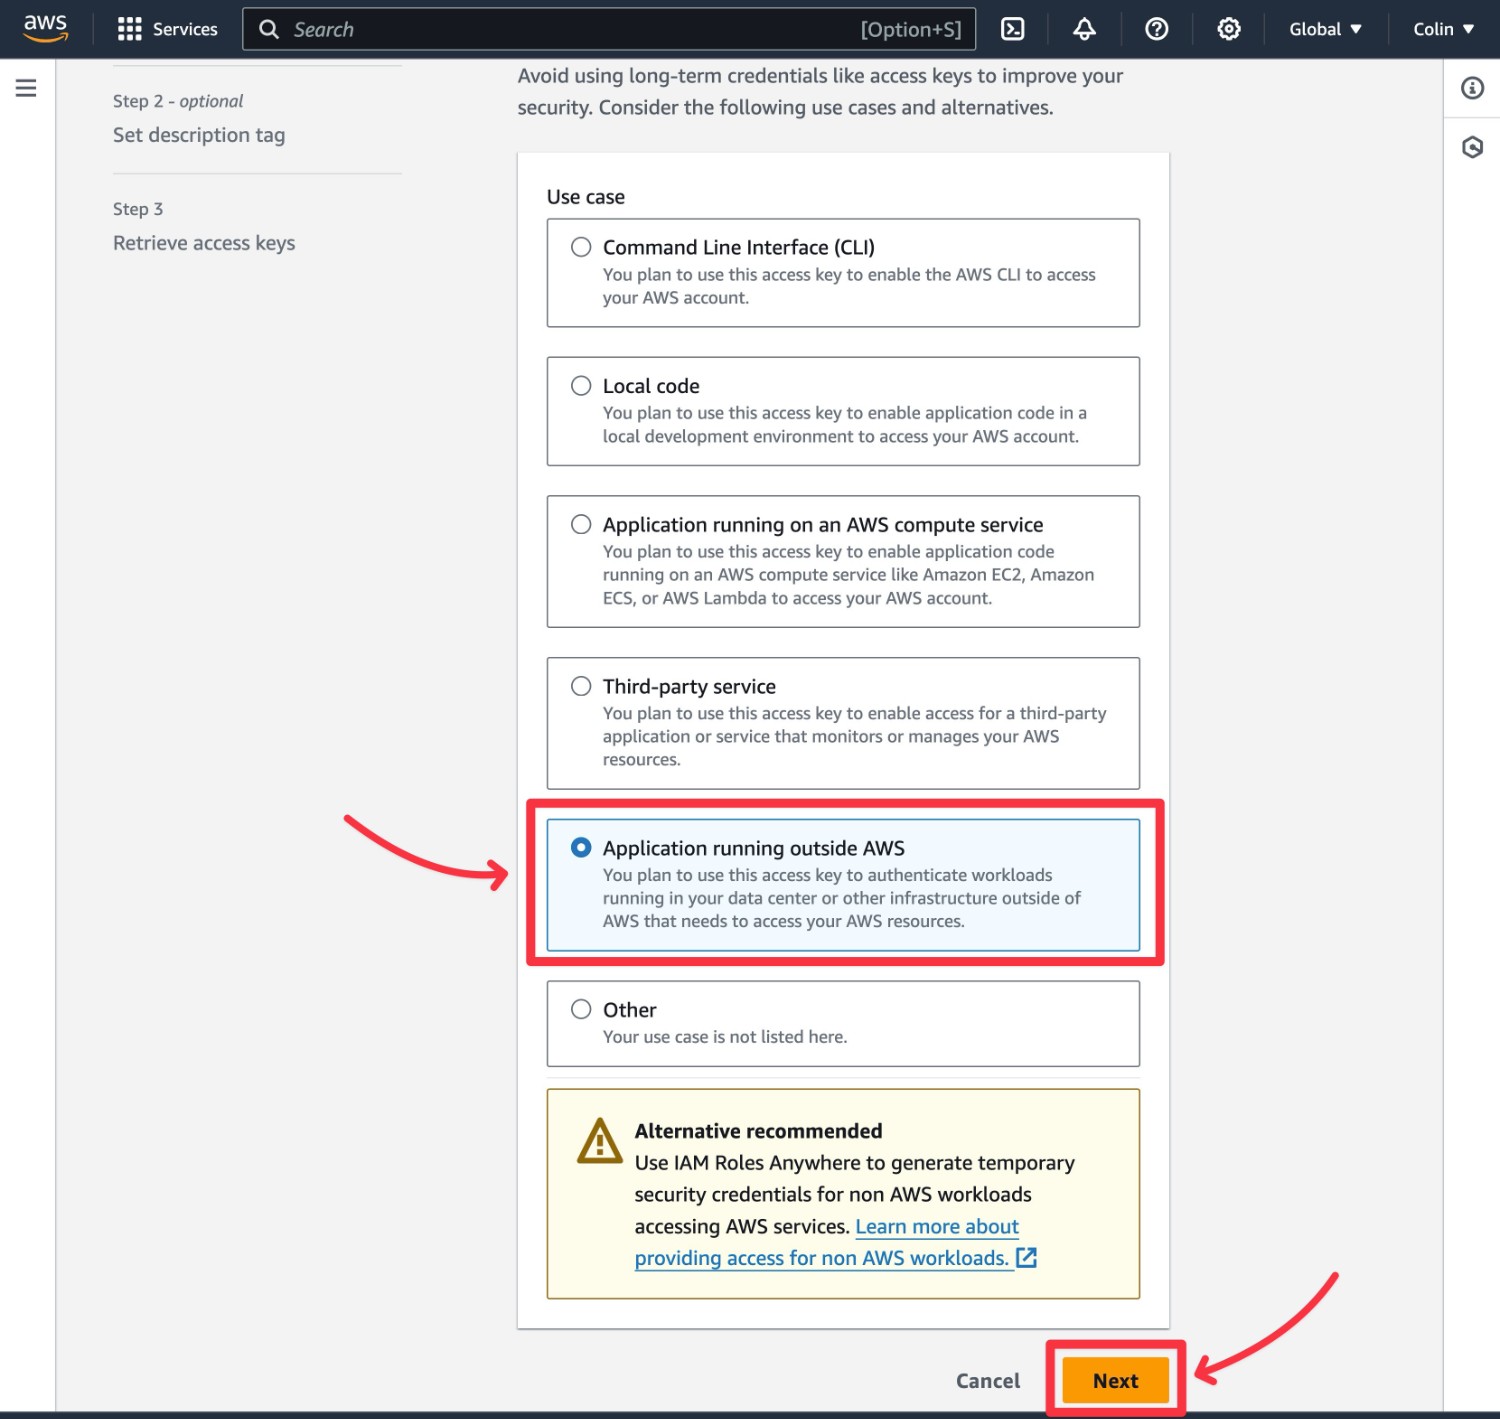
On the next screen, choose the option for Application running outside of AWS.
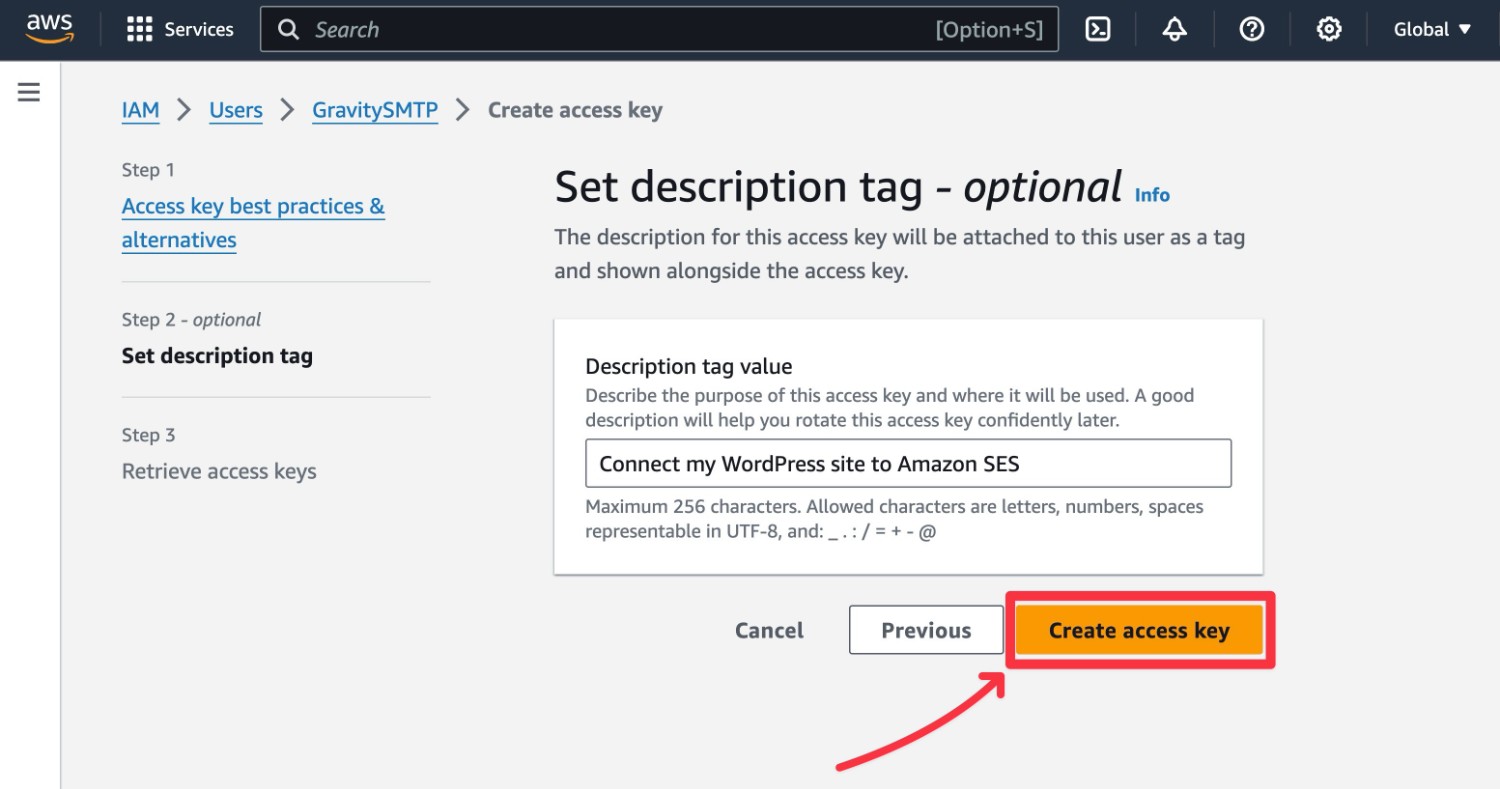
Then, give your access key an internal description to help you remember what it does (optional) and then click Create access key.
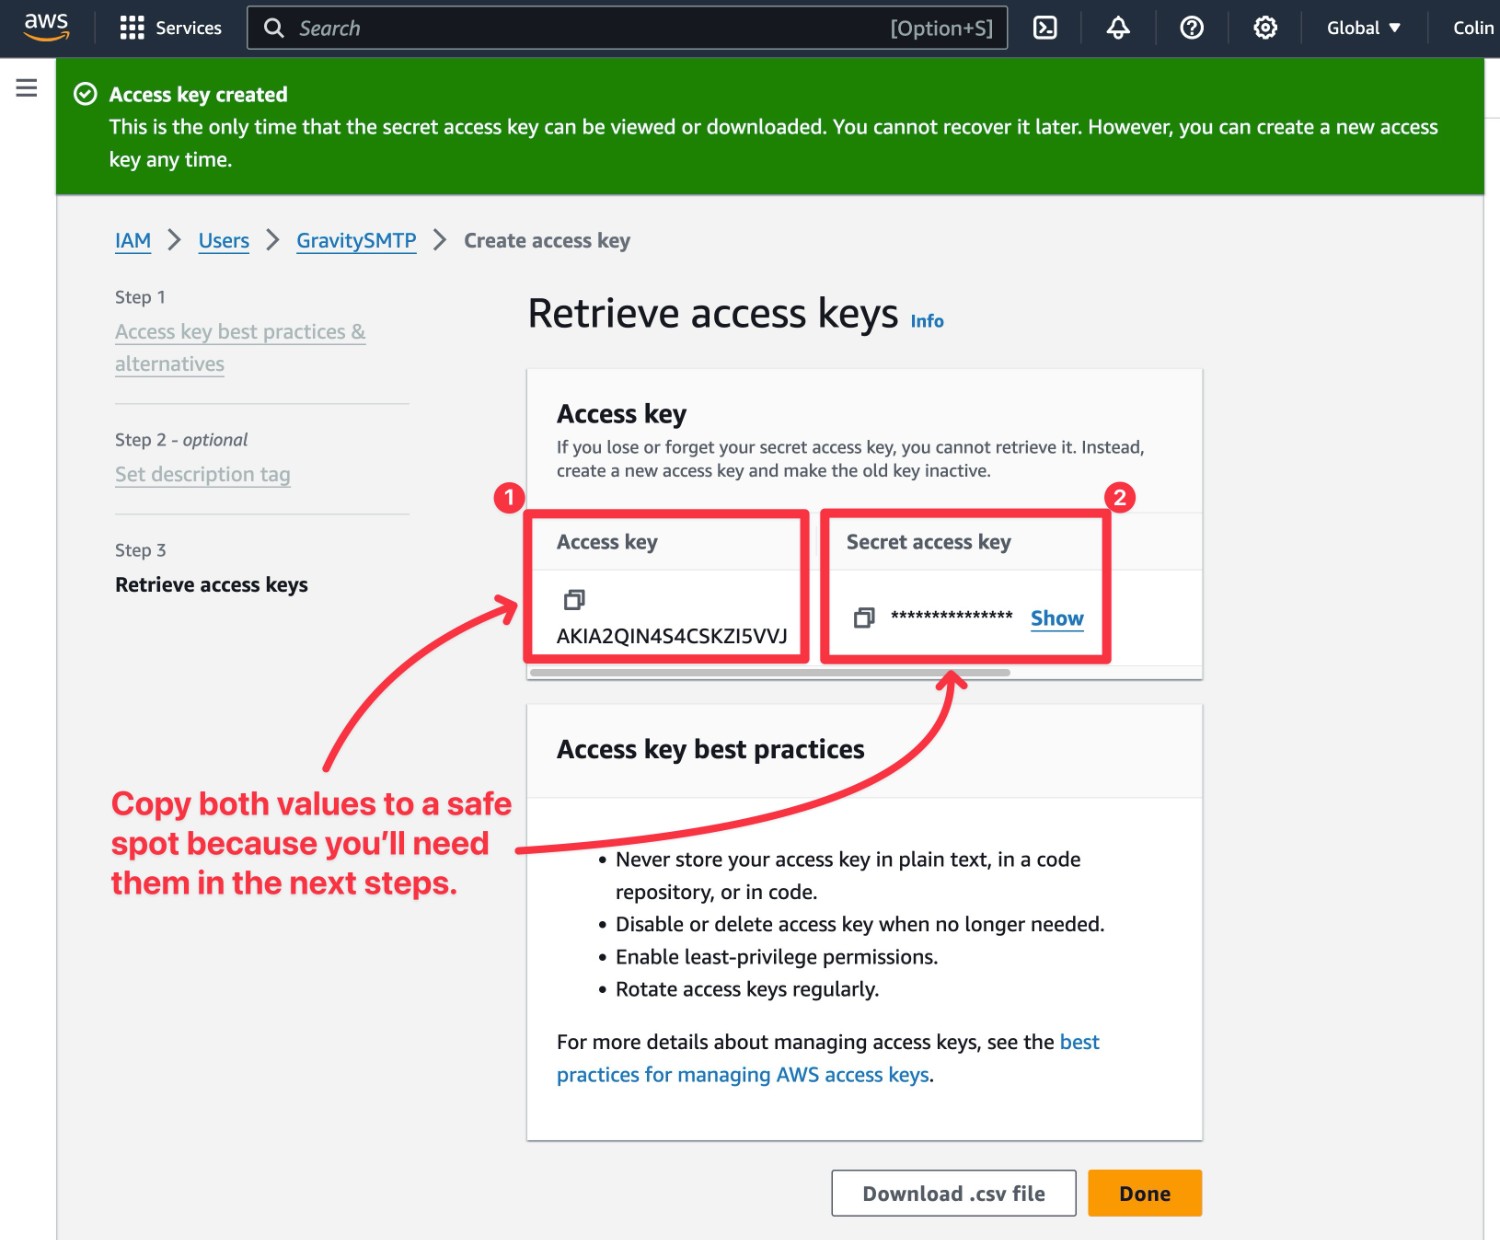
Amazon will then display two important pieces of information – copy both values to a safe spot because you’ll need them in the next steps:
- Access key
- Secret access key – Amazon will only display this once, so make sure to copy it to a safe place. If you accidentally lose it, you’ll need to repeat these steps to create another access key.
Again – if you misplace the secret access key, you can just go back to the user details page and click the Create access key option to create a new one.
5. Locate Your Amazon Region
At this point, you should have safely stored your Access key and Secret access key in a safe spot.
To connect Gravity SMTP to Amazon SES, you’ll need one more piece of information – your AWS Console Region.
You can find this in the top-right corner of your main AWS Console Dashboard, to the left of your name. If you click on the drop-down, you’ll see your active region highlighted in orange.
The full text will look something like below, though the actual region might be different:
US East (North Virginia) [us-east-1]
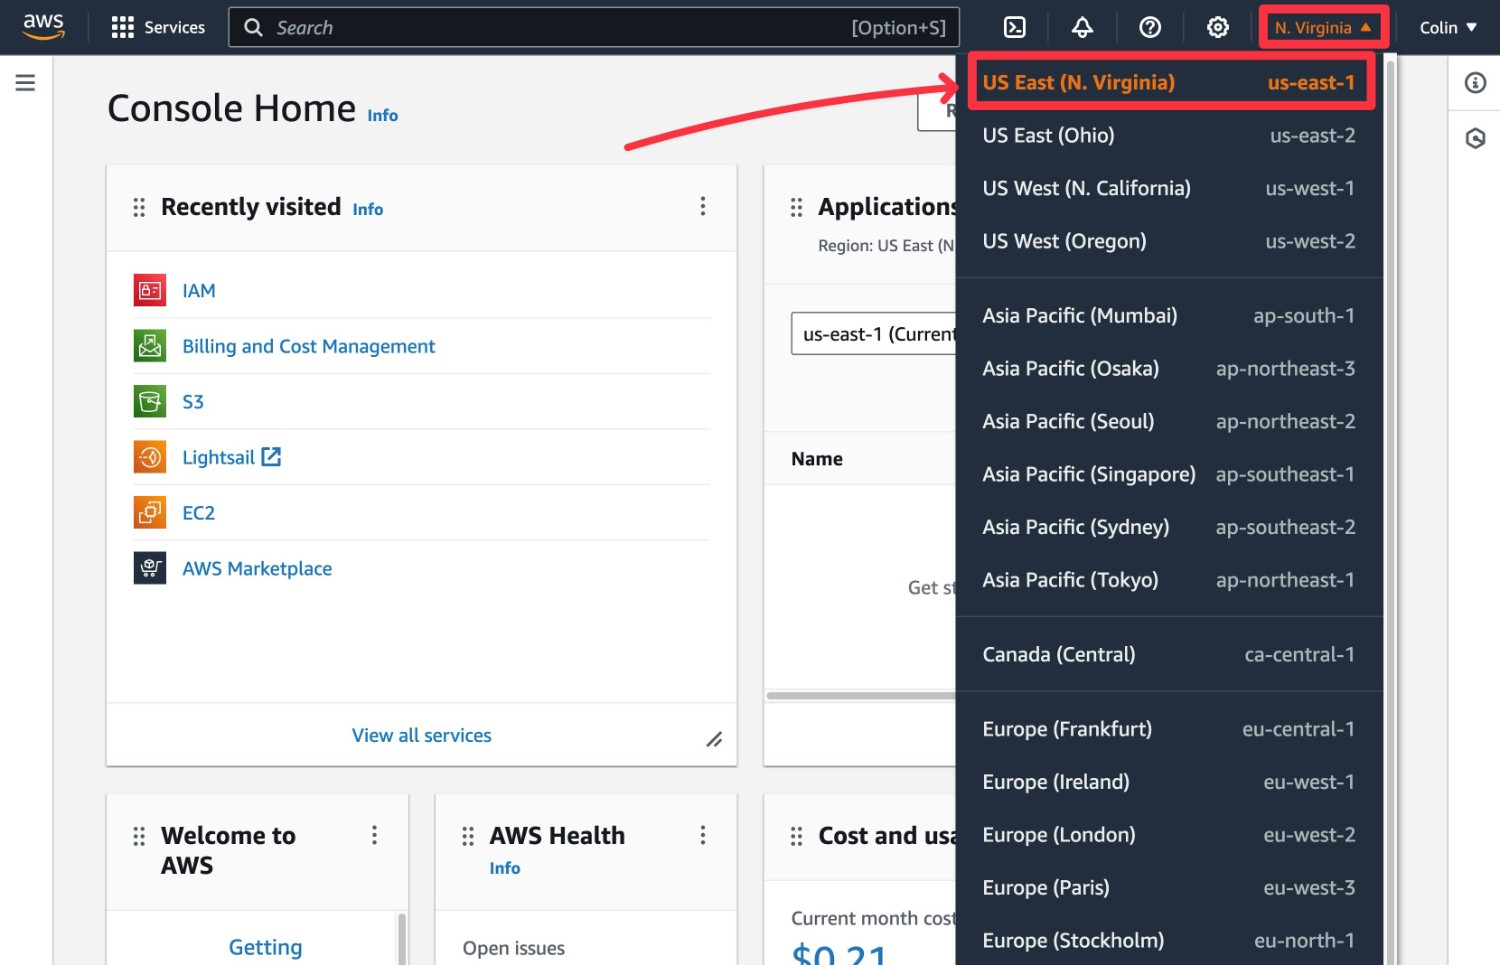
You don’t need to copy the exact text. Just make sure to note the region because you’ll need to select it from a drop-down in the next step.
6. Connect Gravity SMTP to Amazon SES and Enable As Primary Sending Service
Now, you’re ready to connect WordPress and Gravity SMTP to Amazon SES.
Here’s how to get started:
- Open your WordPress dashboard.
- Select SMTP → Settings in the sidebar.
- Click on Integrations in the Gravity SMTP settings area.
- Click the gear icon next to Amazon SES to open the Amazon SES settings.
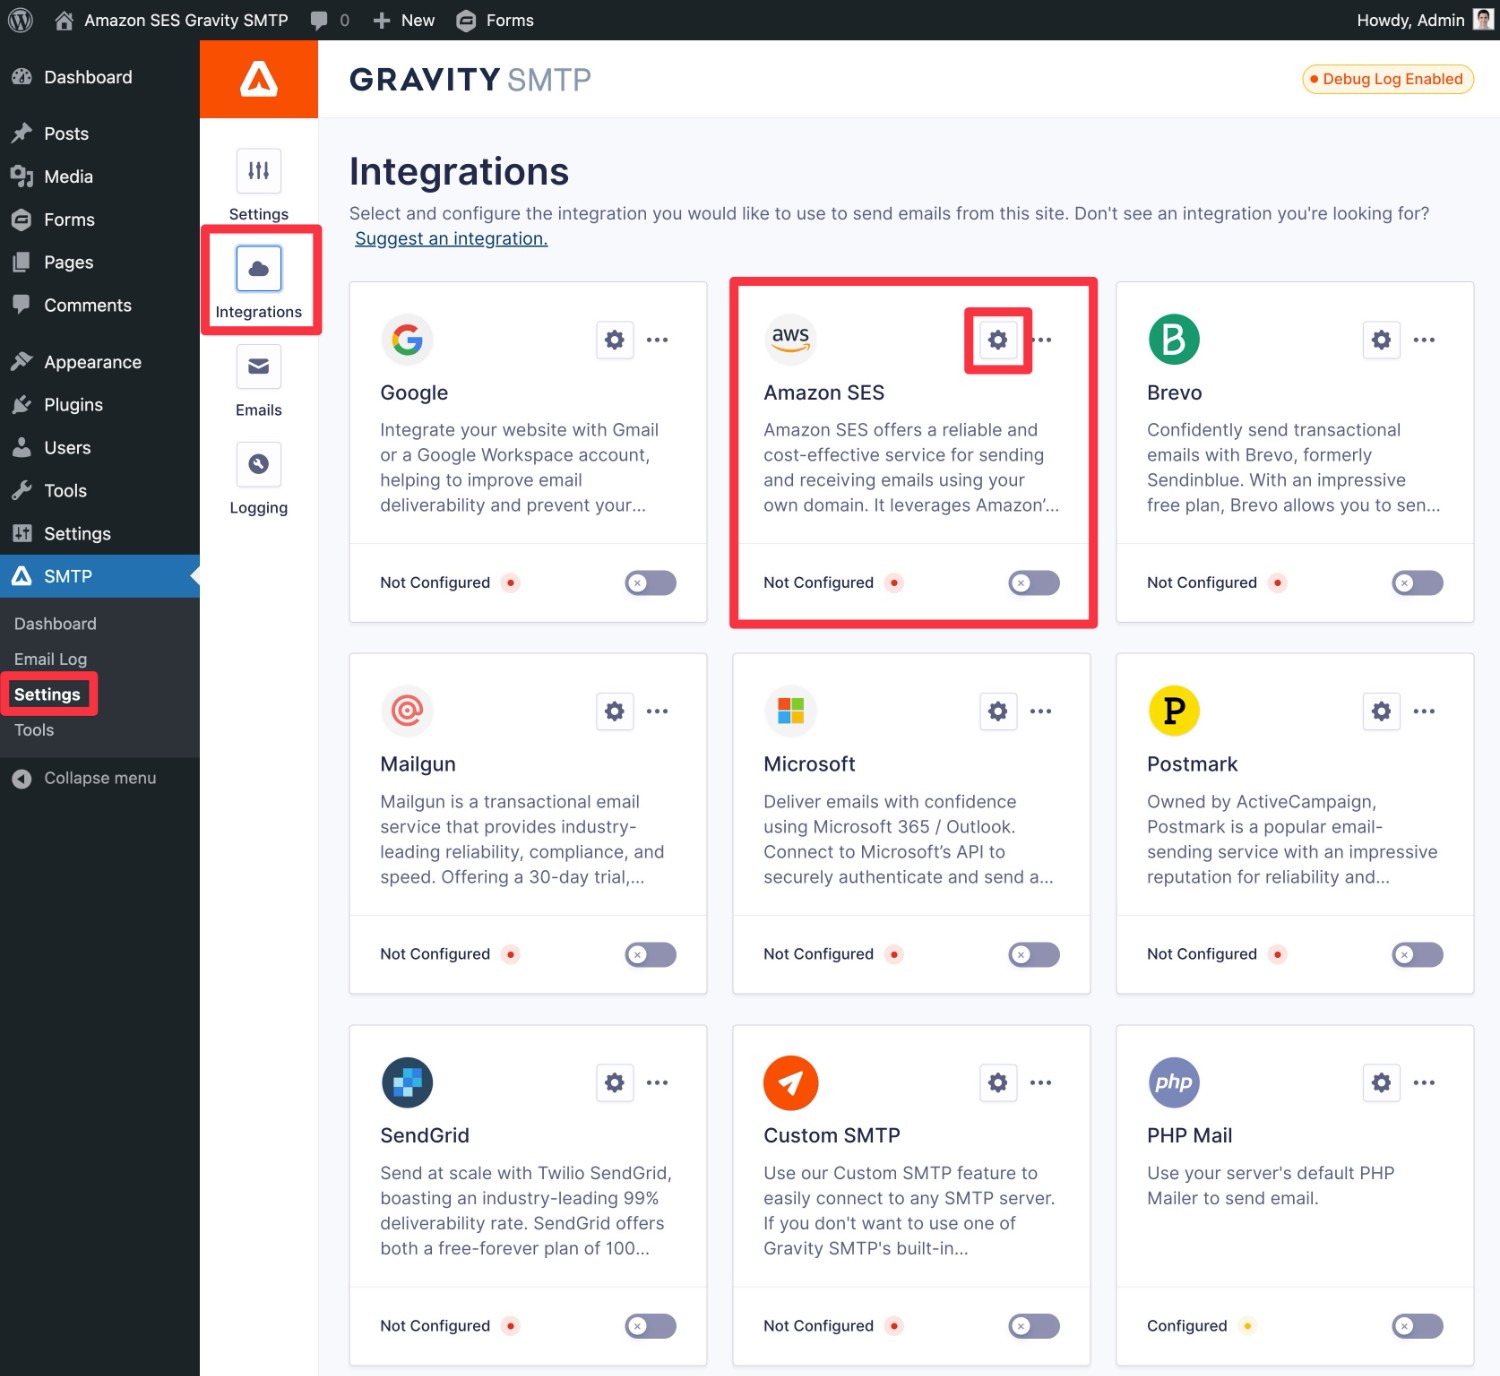
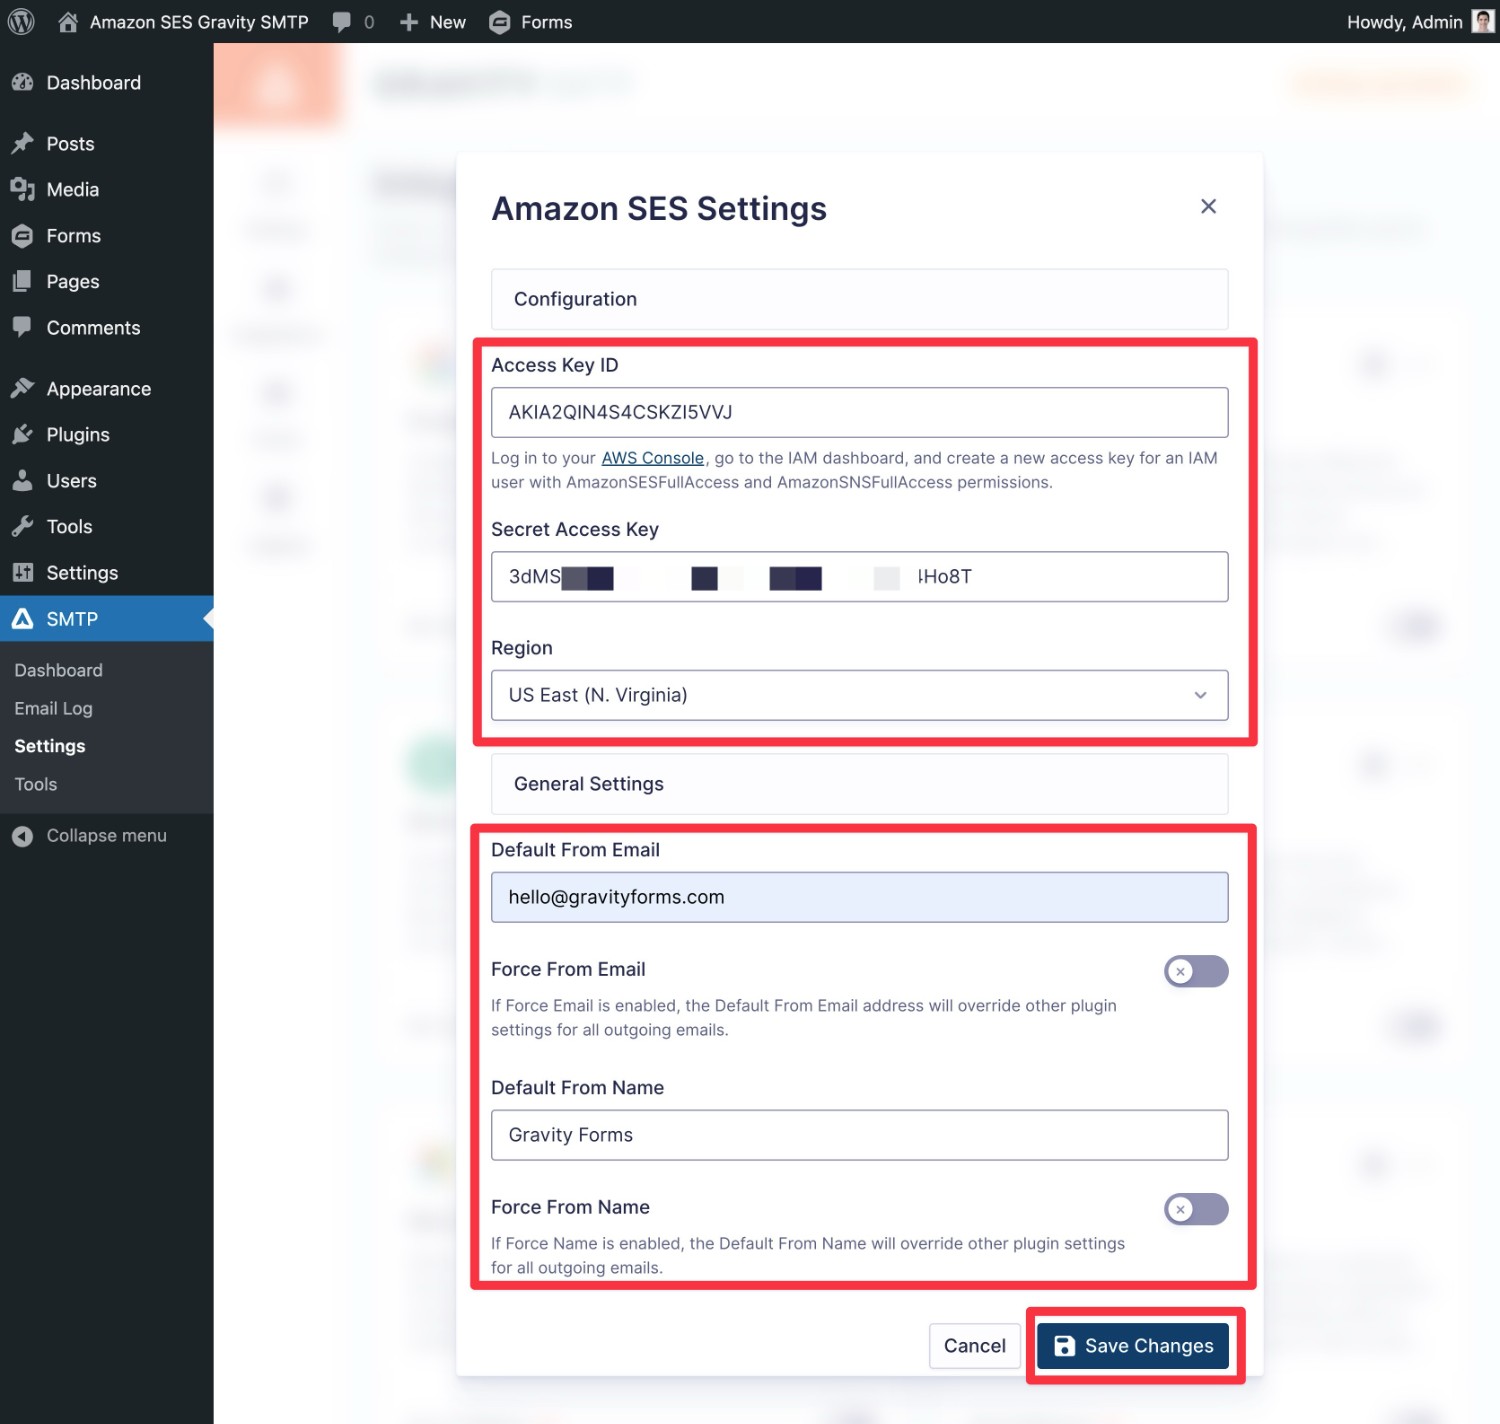
This will open a popup where you can configure the connection:
- Access Key ID – paste in the Access key you copied from AWS.
- Secret Access Key – paste in the Secret access key you copied from AWS.
- Region – use the drop-down to select the same region that you’re using in your AWS Console Dashboard. This is the region that we showed you to locate in the previous step (Step #5).
You can then enter the From Email and Name that you want to send emails from, along with whether to force other plugins on your site to use the same email and name when sending emails.
Once you’ve added everything, click Save Changes.
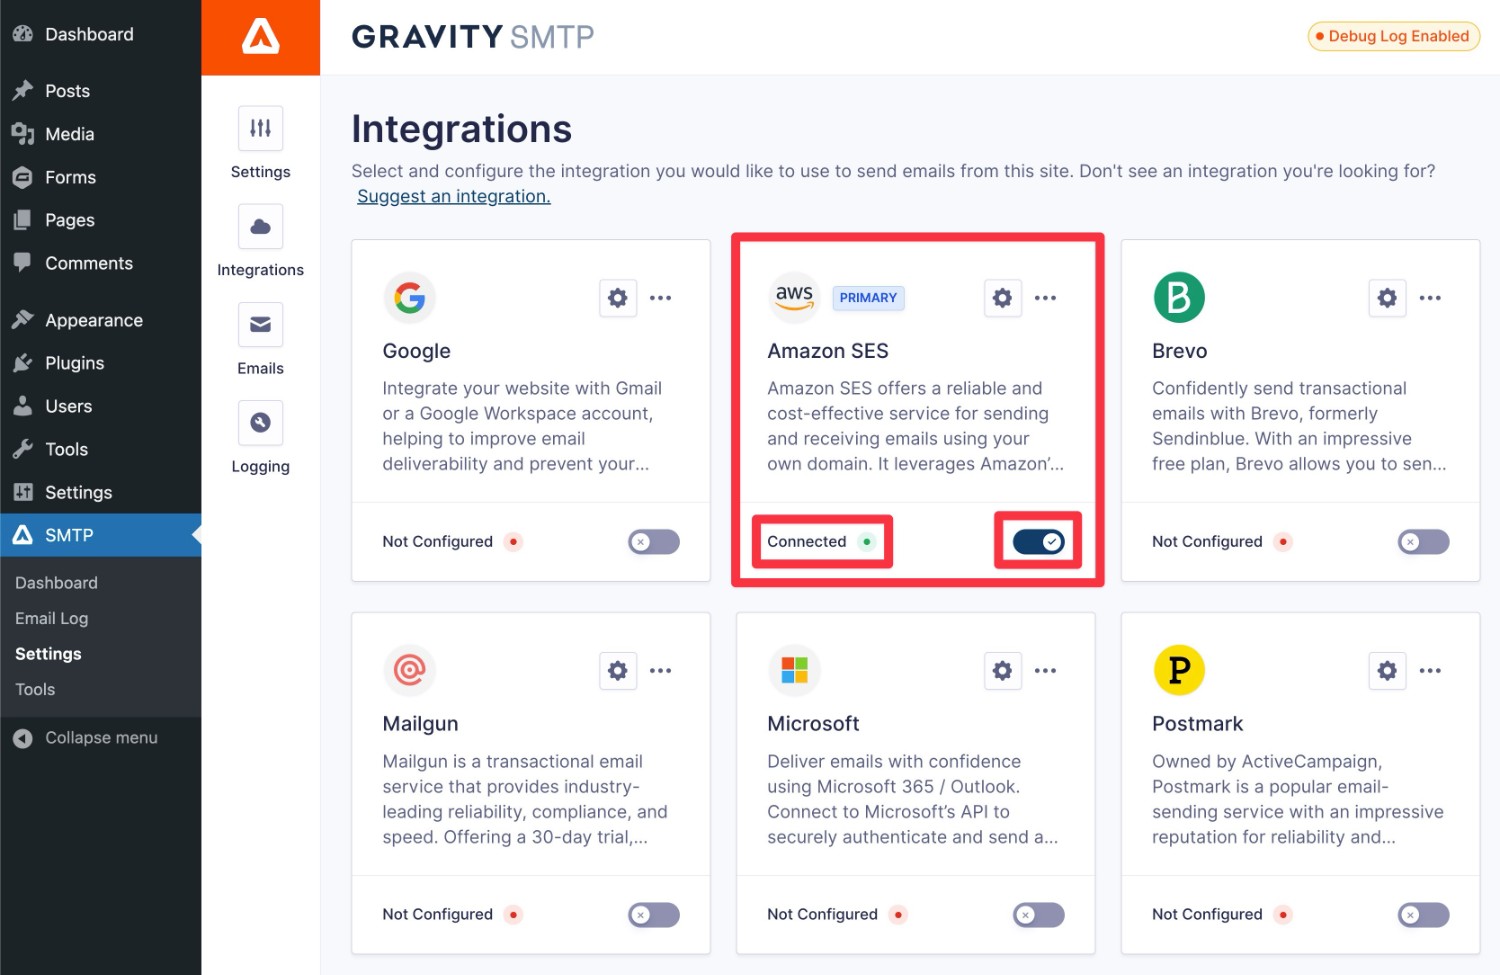
Now that you’ve set up the Amazon SES integration, you should see a yellow Configured indicator appear under it in the integrations list.
To enable Amazon SES as your WordPress site’s primary email sending service, all you need to do is enable the toggle button.
When you enable the toggle, you should see it change from a yellow Configured label to a green Connected label.
7. Send a Test Email
To make sure the connection is working properly, we recommend sending a test email:
- Go to SMTP → Tools in your WordPress dashboard.
- Select Send a Test in the tool’s dashboard sidebar, if it’s not already selected by default.
- Enter the email address to which you want to send a test email.
- Make sure to choose Amazon SES in the Send With drop-down.
- Click the Send Test button.
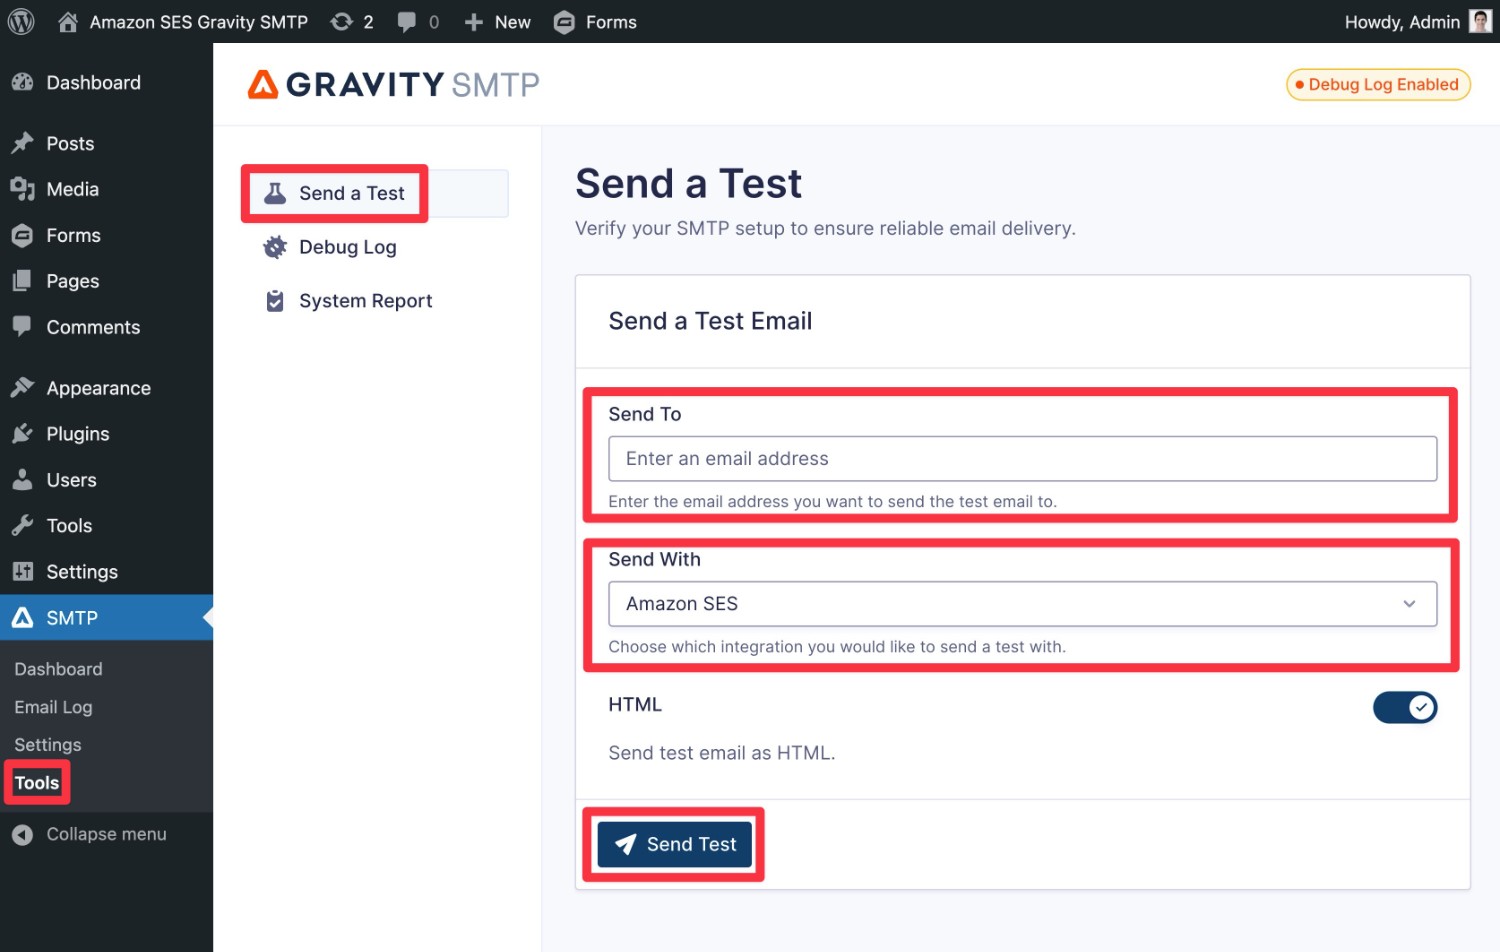
You should see a success message appear in the interface. Then, if you open your email inbox where you sent the test email, you should see an email that looks something like this:
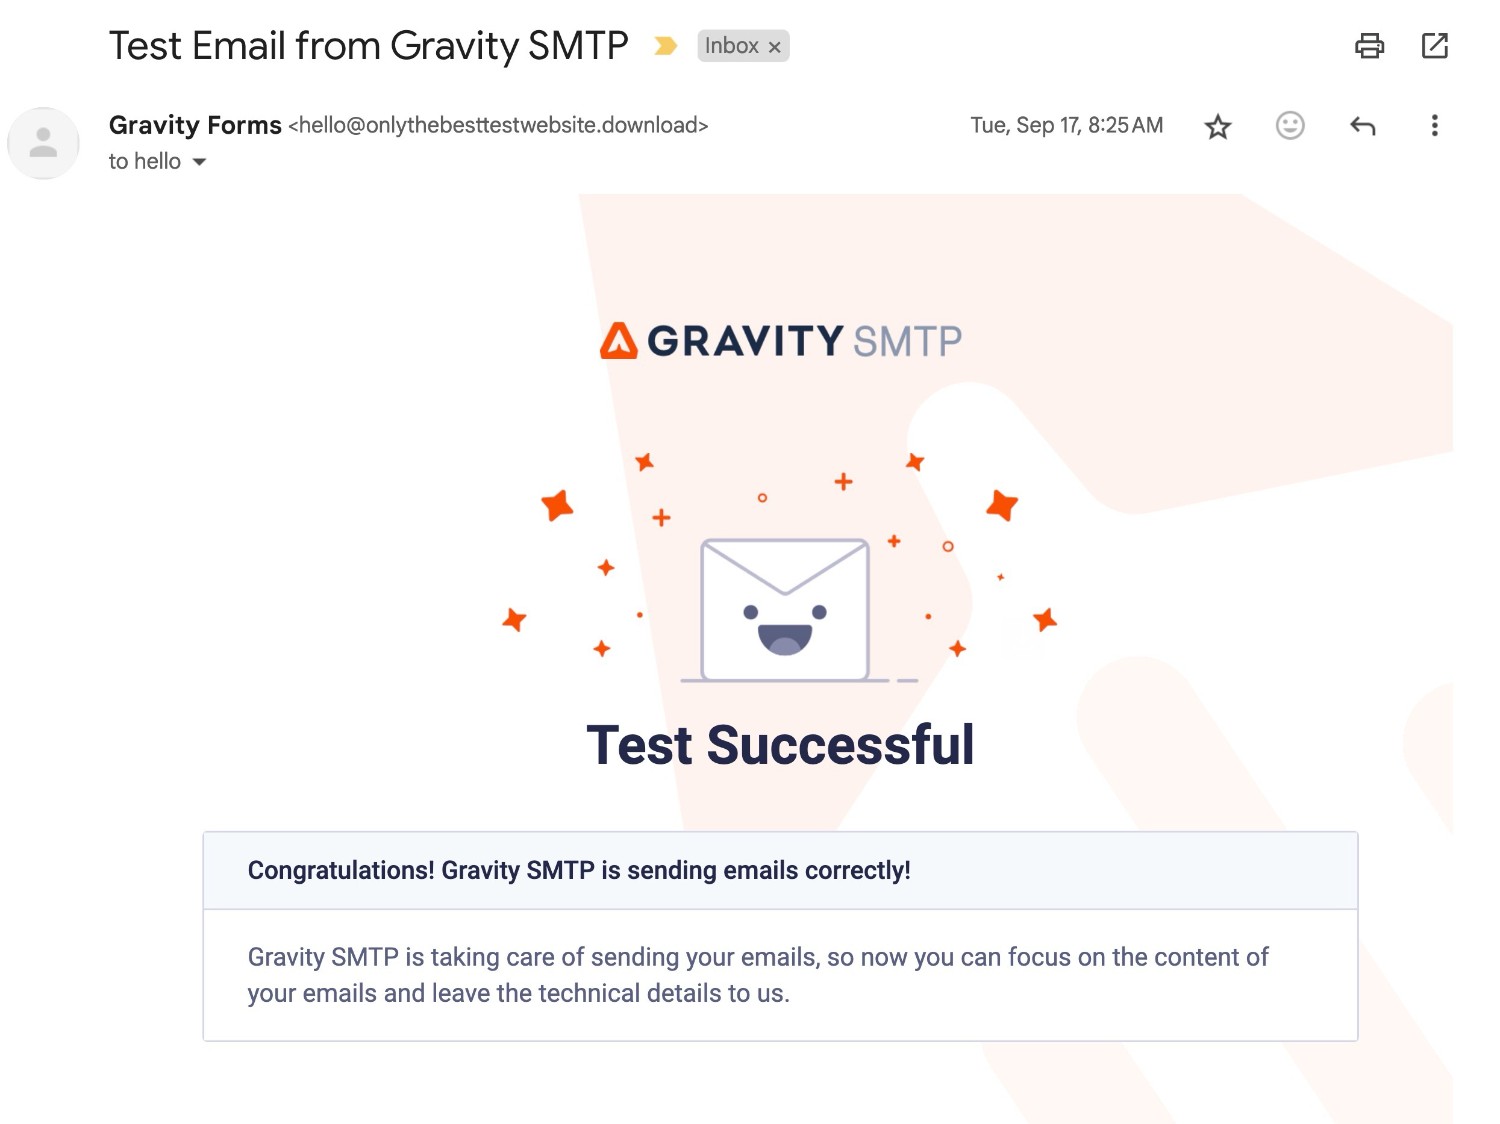
If the email fails to send and you just completed the Amazon SES set up process, consider waiting around 30 minutes and trying again. Sometimes it takes some time for SES to update the identities that you set up, so your email might fail to send for that reason.
If your emails are still failing to send after waiting, here are a few things to check:
- Make sure you’re sending emails from the domain that you verified with SES. If you try to send from a different identity, the email will be rejected.
- Verify that you attached both policies to your IAM user.
- Check if you accidentally made a typo when adding the access keys.
- Check if you’re using the wrong region.
8. Set Up Backup Email Sending Service (Optional)
This step is 100% optional.
However, one of the nice things about using Gravity SMTP for setting up WordPress Amazon SES email sending is that you can also specify a backup email sending service.
If Amazon SES were to ever fail to send an email for some reason, Gravity SMTP will automatically resend the email using your chosen backup service.
If you want to use a backup sending service, you first need to set up that service. Here are detailed guides for the other services that Gravity SMTP supports:
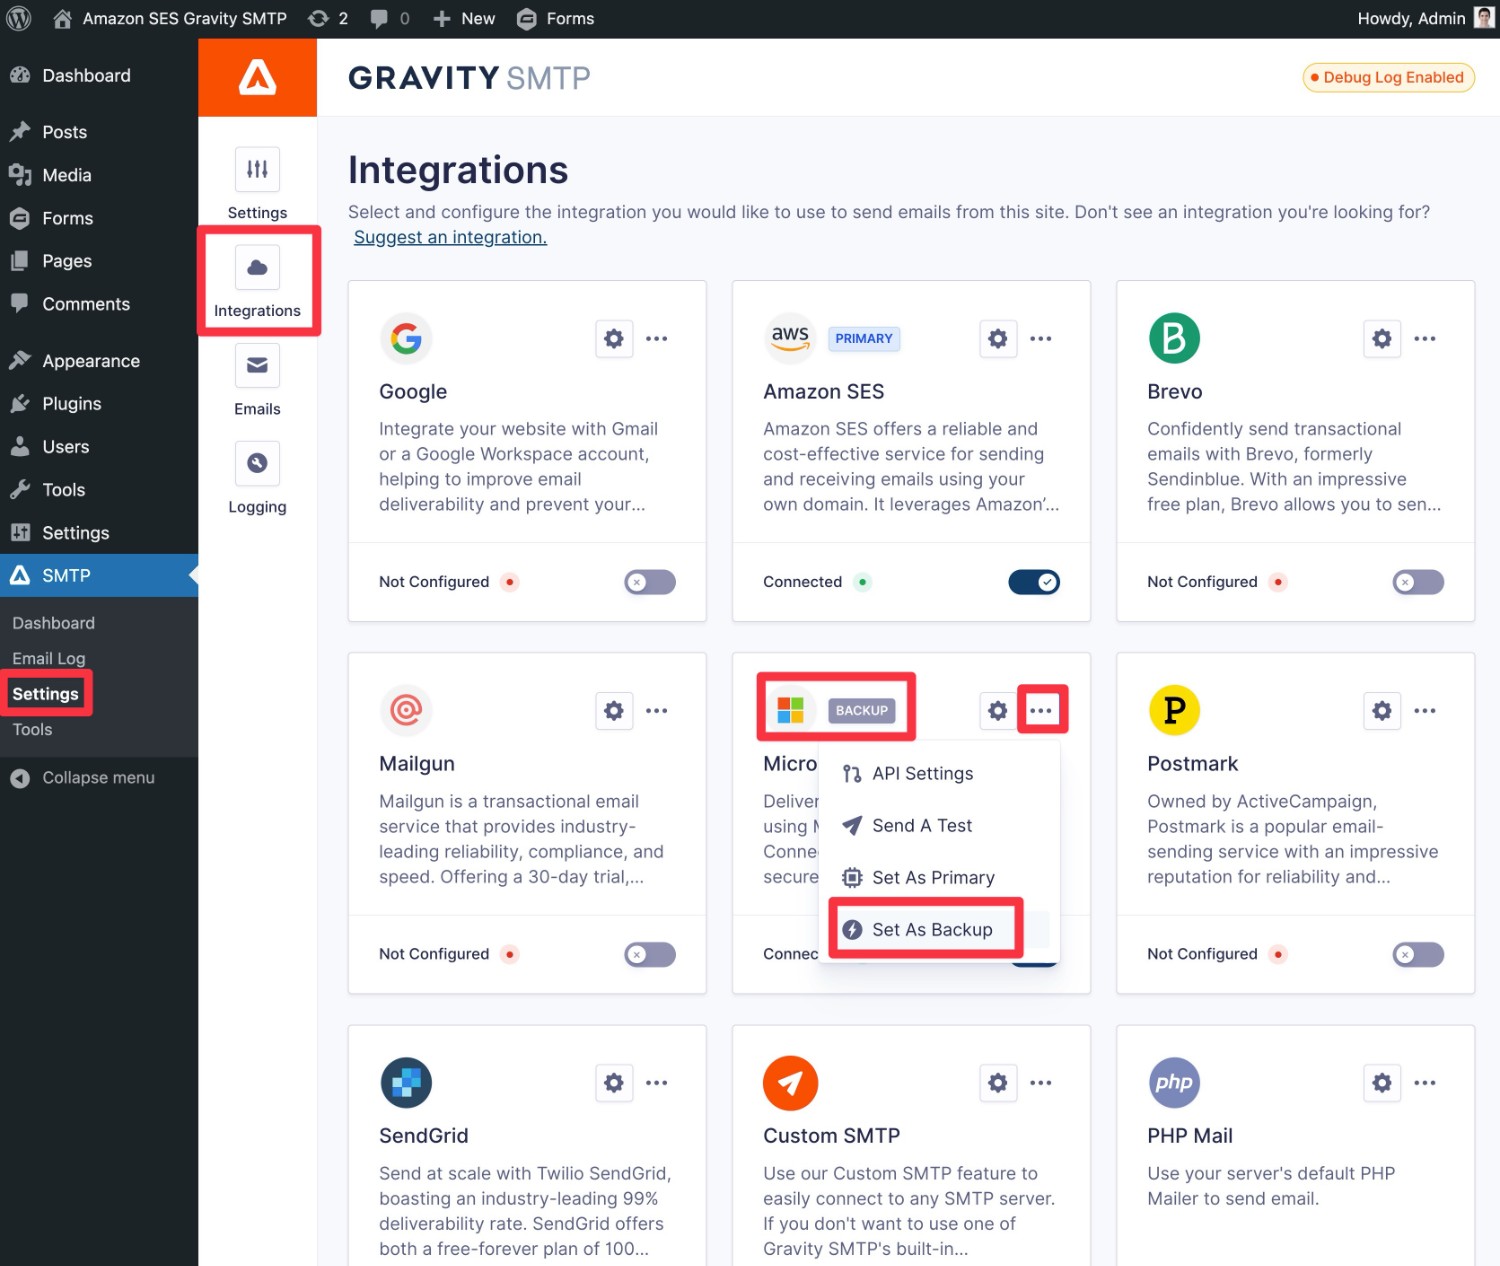
Once you’ve done that, you can enable the service as your backup sending method from the integrations list (SMTP → Settings → Integrations).
Click the three dots icon next to the service and choose Set as Backup.
How to Monitor Your Amazon SES Email Sending
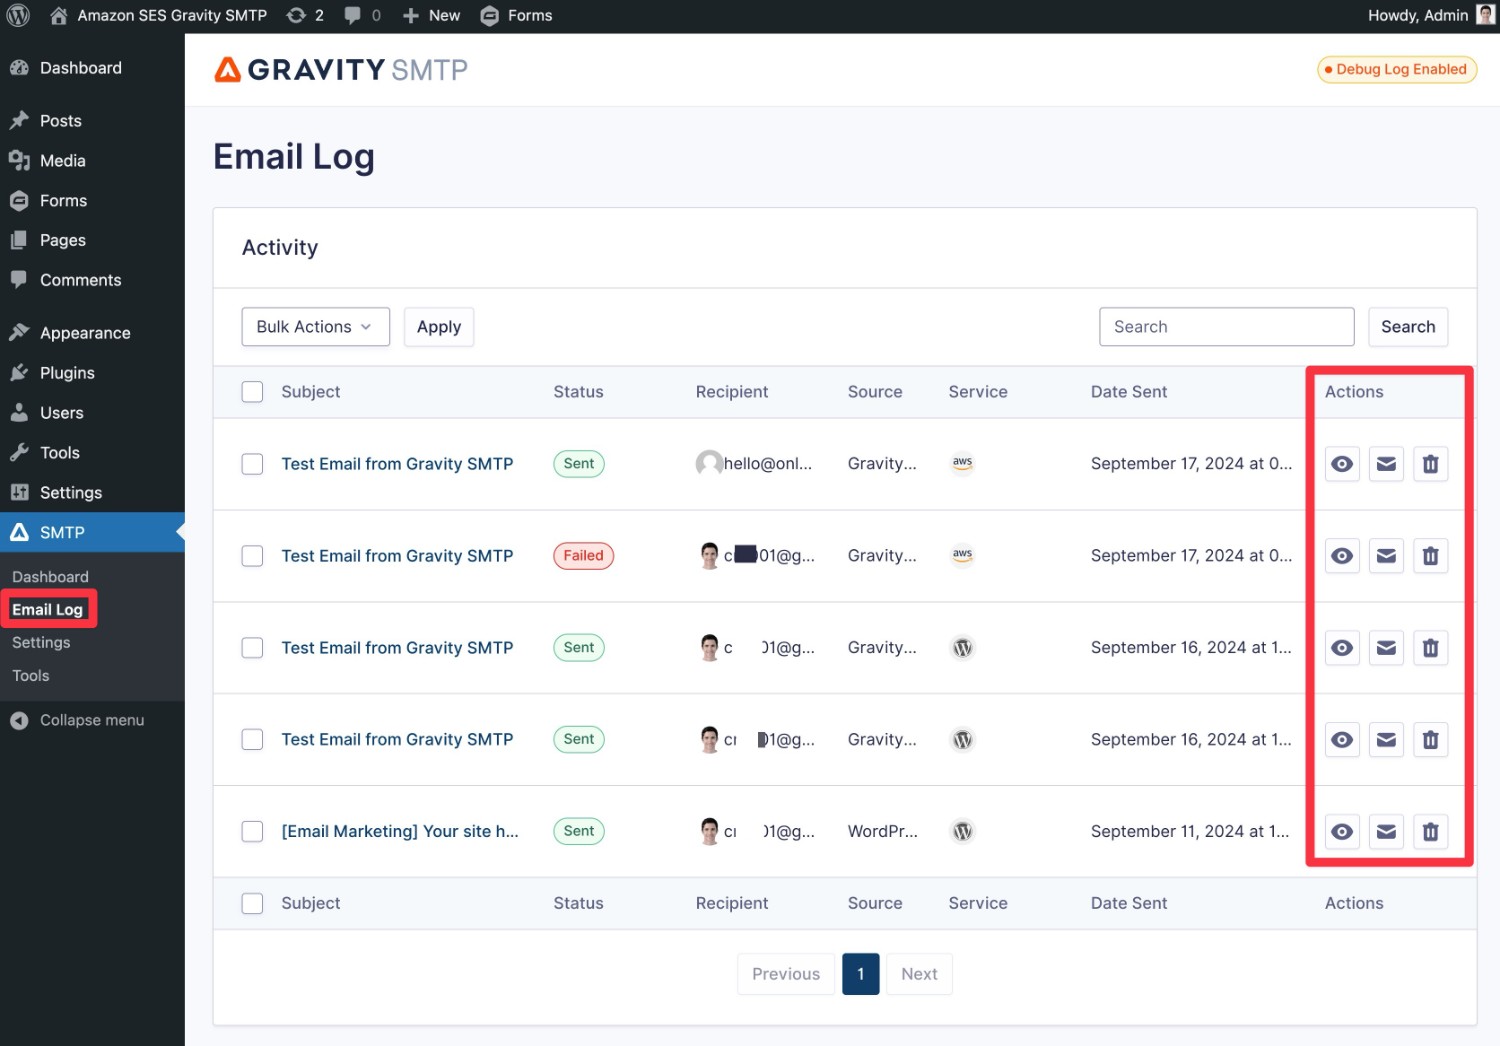
To help you keep track of the emails that your site sends, Gravity SMTP also includes a reporting dashboard, as well as a detailed email logging tool.
These tools help you monitor your email usage and flag potential problems.
You can view the report dashboard by going to SMTP → Dashboard.
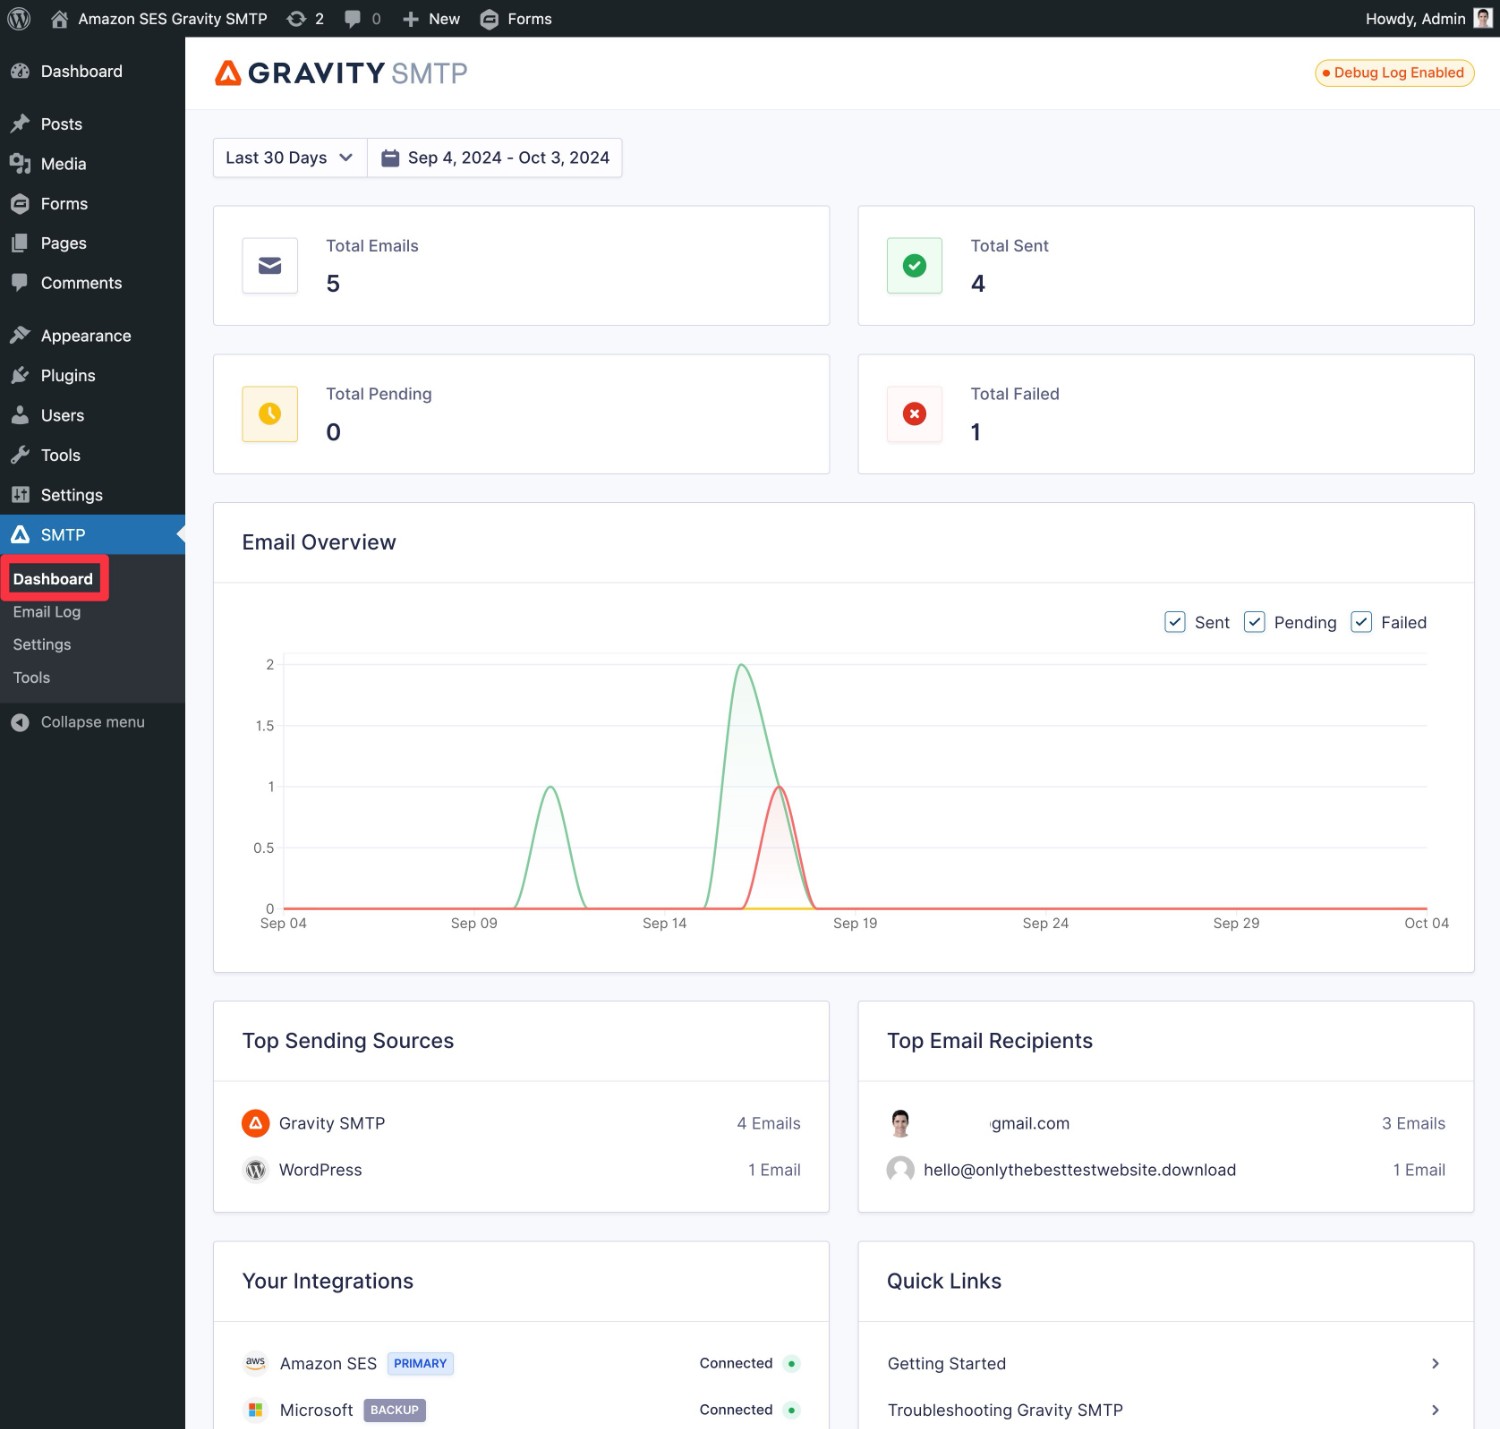
You can check the email log by going to SMTP → Email Log. Using the buttons in the Actions column, you can also view more technical information about each email, along with the content and design of each email.
For more information on all things Gravity SMTP, check out the documentation.
Start Using Amazon SES for WordPress Today
That wraps up our guide on how to use Amazon SES to send WordPress emails with Gravity SMTP.
If you’re searching for affordable email sending with pay-as-you-go pricing, it’s hard to beat Amazon SES. At just $0.10 per 1,000 emails with no minimum spending, it offers a very budget-friendly solution for WordPress emails.
With the Gravity SMTP plugin, you can easily configure your WordPress site to send emails using Amazon SES, while also accessing a bunch of helpful features such as email logs, reports dashboards, testing tools, backup email sending services, and more.
Follow this tutorial today and start enjoying more reliable WordPress emails!
Gravity SMTP is available at no extra cost to all Gravity Forms Elite, Nonprofit, and Developer license holders. You can download it directly from your Gravity Forms account dashboard and get started right away.

If you want to keep up-to-date with what’s happening on the blog sign up for the Gravity Forms newsletter!
