An Intro to WordPress Templates and Template Parts in the Site Editor
If you want to use the new WordPress Site Editor to build your site (AKA Full Site Editing), you’ll need to thoroughly understand templates and template parts.
These are the fundamental building blocks that you can use to control all of your site’s important layouts, including the header, footer, blog post layout, page layout, and so on.
You can also use templates to override your site’s default layouts when needed, which gives you control over every single piece of content on your site.
In this post, we’ll introduce you to templates and template parts in the Site Editor, formerly known as Full Site Editing.
Then, we’ll get into the actual step-by-step guides for how you can use templates on your site, including creating, managing, and editing both templates and template parts.
We’ll also cover how you can incorporate forms from Gravity Forms in your site’s templates using the Form block, which opens up some interesting use cases.
Let’s get into it…
What Are WordPress Templates in the Site Editor?
Templates let you use blocks to control the layout of your site’s content, such as the layout for blog posts and pages on your site.
For example, a template lets you say, “put the title of the blog post here, put the content of the blog post here, add the comments section here“, and so on.
You can also create multiple templates and use them in different situations. For example, you might have one template for blog posts in the “News” category and a different template for blog posts in the “Interviews” category.
With a “classic” WordPress theme, you would need to edit your theme’s templates using PHP, HTML, CSS, and so on. But with the Site Editor and a block theme, you can control everything using blocks, which we’ll show you how to do below.
What Are WordPress Template Parts in the Site Editor?
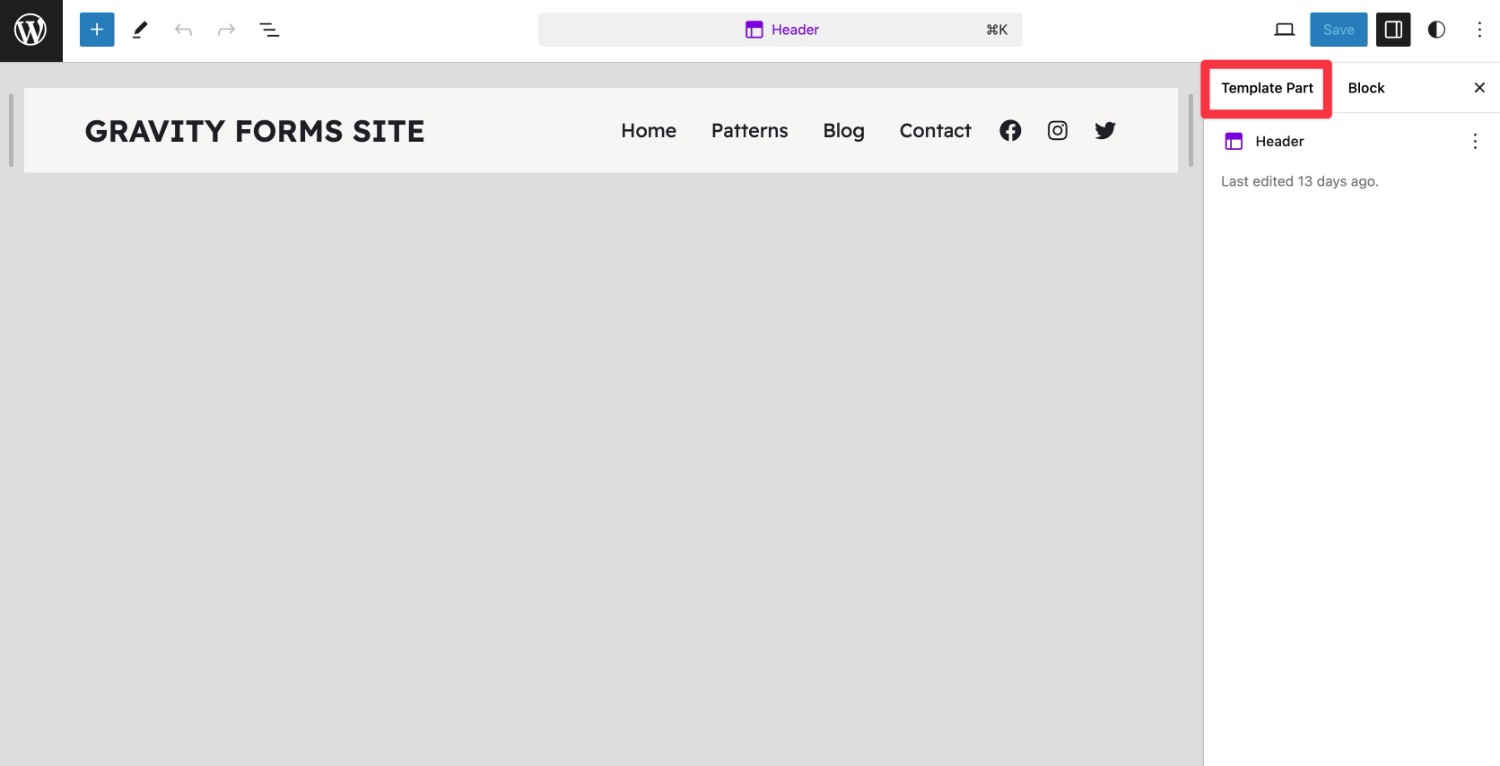
A template part is a piece of a layout that you can reuse across multiple areas on your WordPress site. You can kind of think of it as a “template within a template”.
Two of the most common template parts are your site’s header and footer.
Let’s look at an example of how a template part works and why you need them.
You’ll probably include your site’s header in almost every single template on your site. What’s more, you’ll likely want your header to be the same even across different templates.
For example, you might have one template for a full-width blog post and then another template for a blog post with a sidebar. Even though the template for the body content is different, you’ll still typically want the header to be exactly the same.
However, if you had to recreate the header in every template, that would be a pain. Plus, if you ever wanted to change your site’s header in the future, you would need to manually go into every single template and update the header.
The template part system lets you avoid that. Instead of manually creating the header in each template, you just tell the template to pull in the header design (via the header template part). If you ever need to tweak your header in the future, you can just edit the template part and those changes will automatically apply to every template where you used the header template part.
Technically, a template part is actually an advanced block, rather than a “template”. However, I still think it makes the most sense to think of a template part as a “template within a template”.
Most block themes come with their own template parts for important areas, but you’re also free to create your own template parts.
How to Create or Edit Your Website’s Templates in the Site Editor
Now, let’s take things a bit more hands-on and go through how you can manage your site’s existing templates and create new templates if needed.
In the next section, we’ll also take you through how you can edit your site’s template parts (such as the header, footer, and navigation).
How to Manage Your Site’s Templates
To manage your site’s templates, you’ll first need to open the Site Editor. To do this, go to Appearance → Editor in your WordPress dashboard.
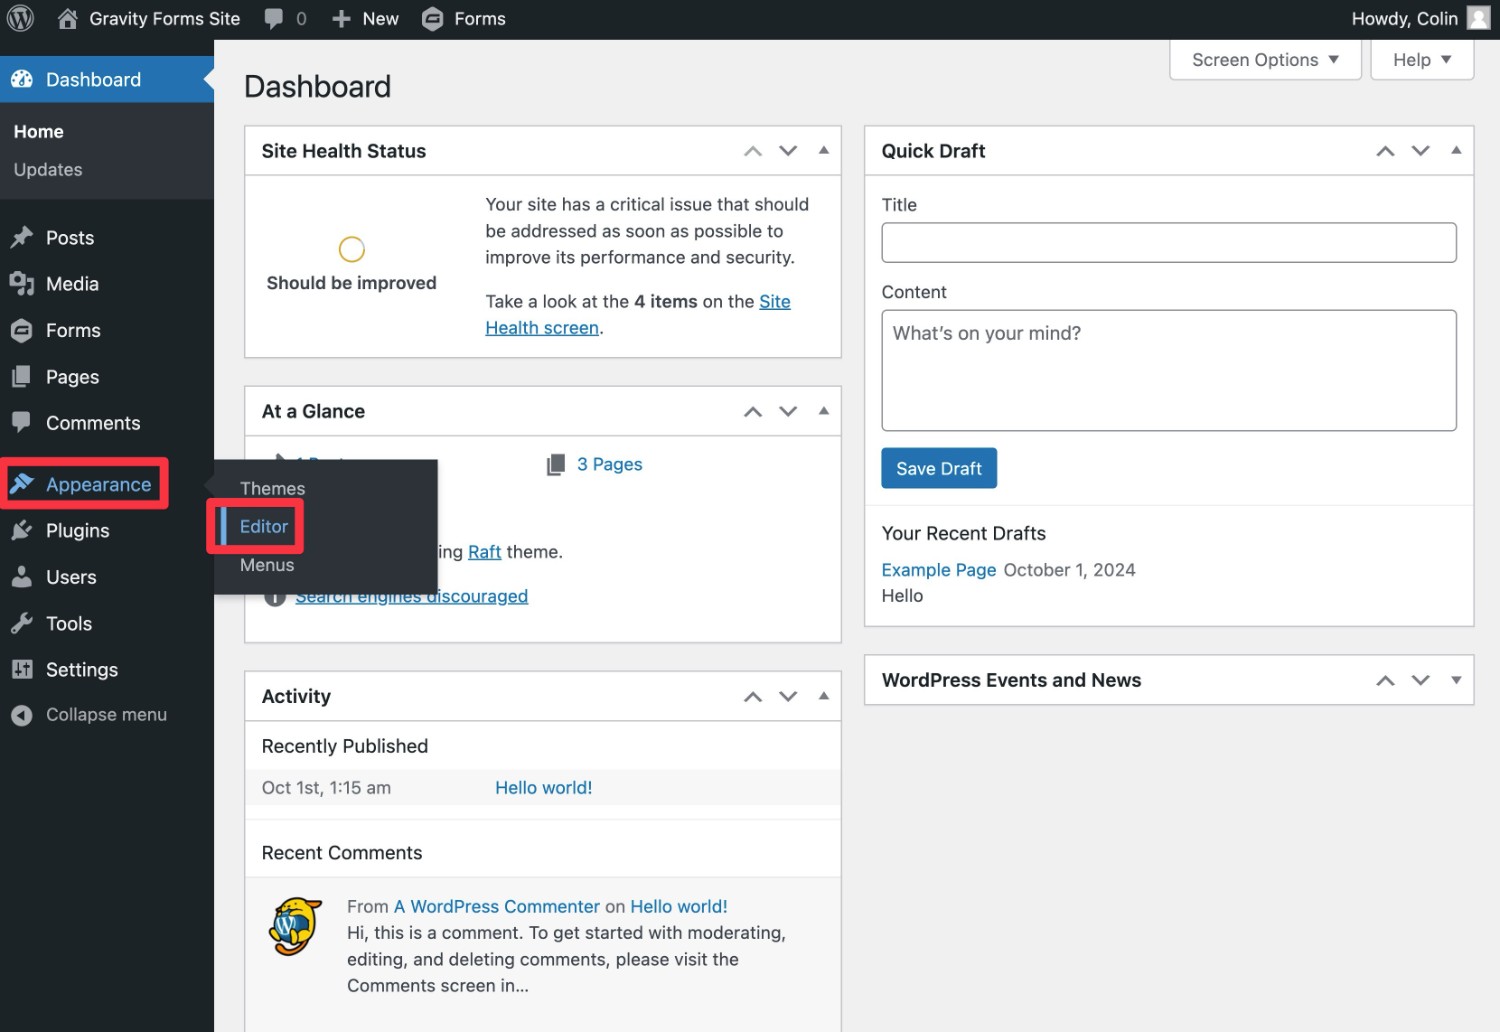
If you don’t see the “Editor” option, it might be because you’re not using a block theme. Again, in order to edit your site’s templates through the Site Editor, you must be using a block theme.
If you see options like Customize, Widgets, Menus, and Theme File Editor, then that means you’re using a classic theme and you won’t be able to manage your site’s templates in the Site Editor.
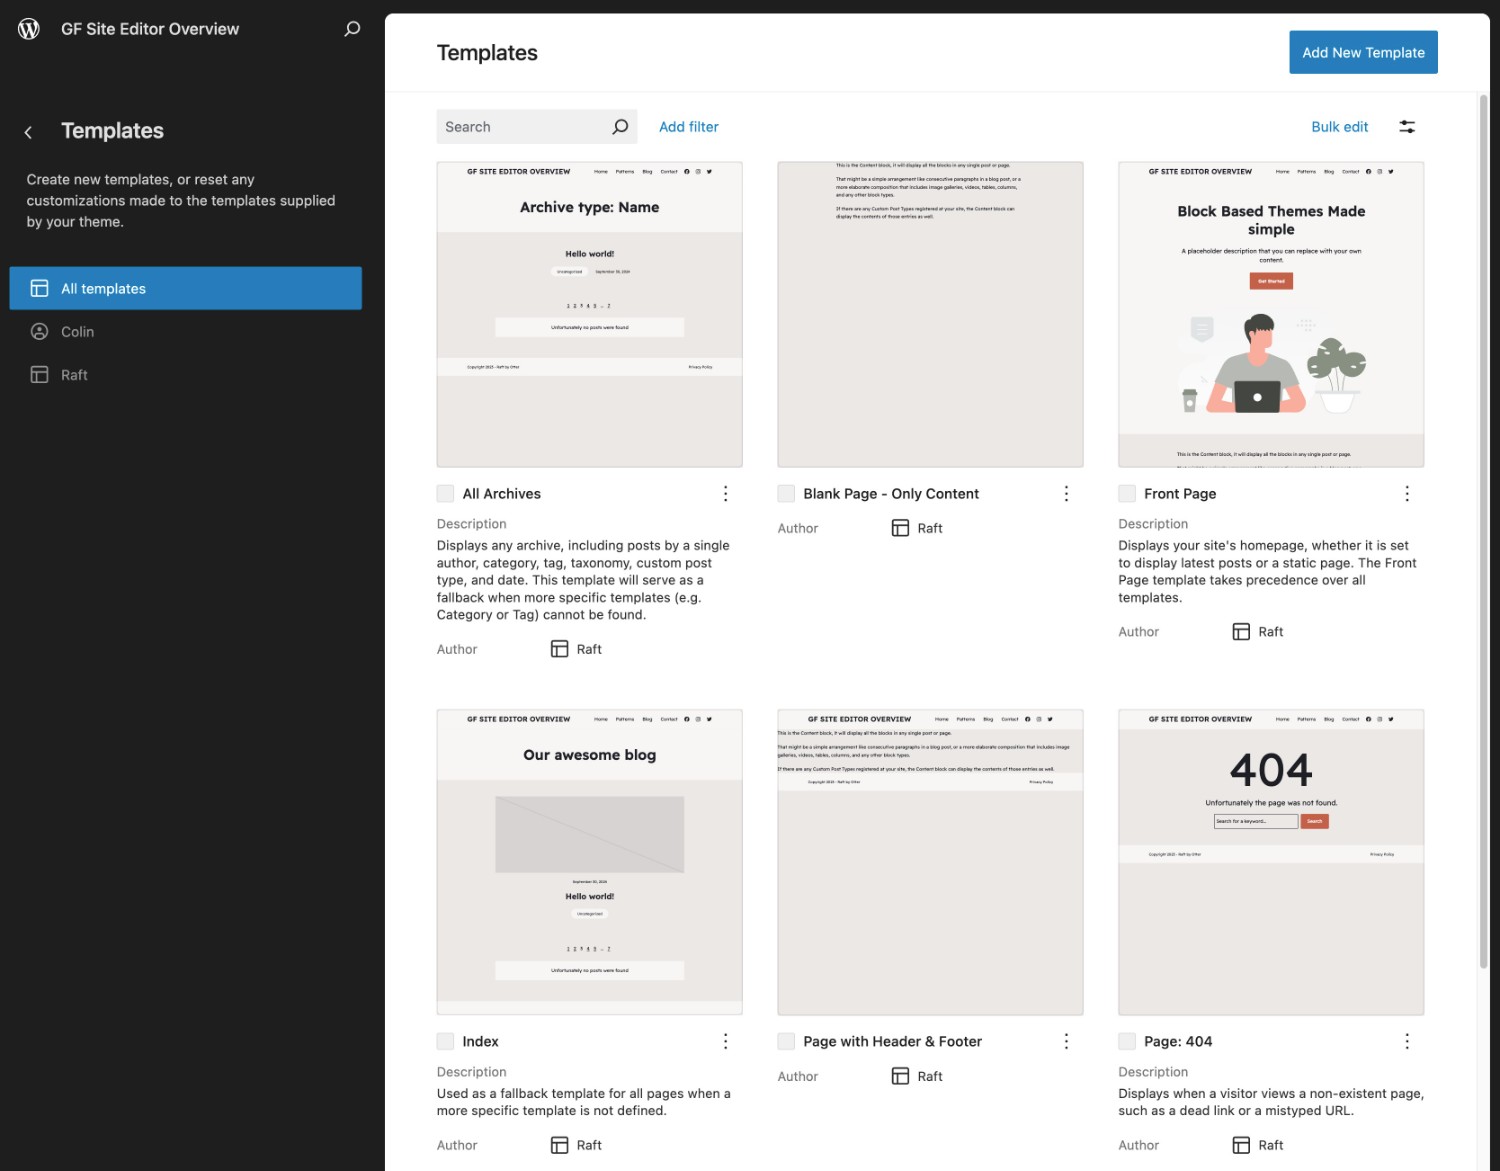
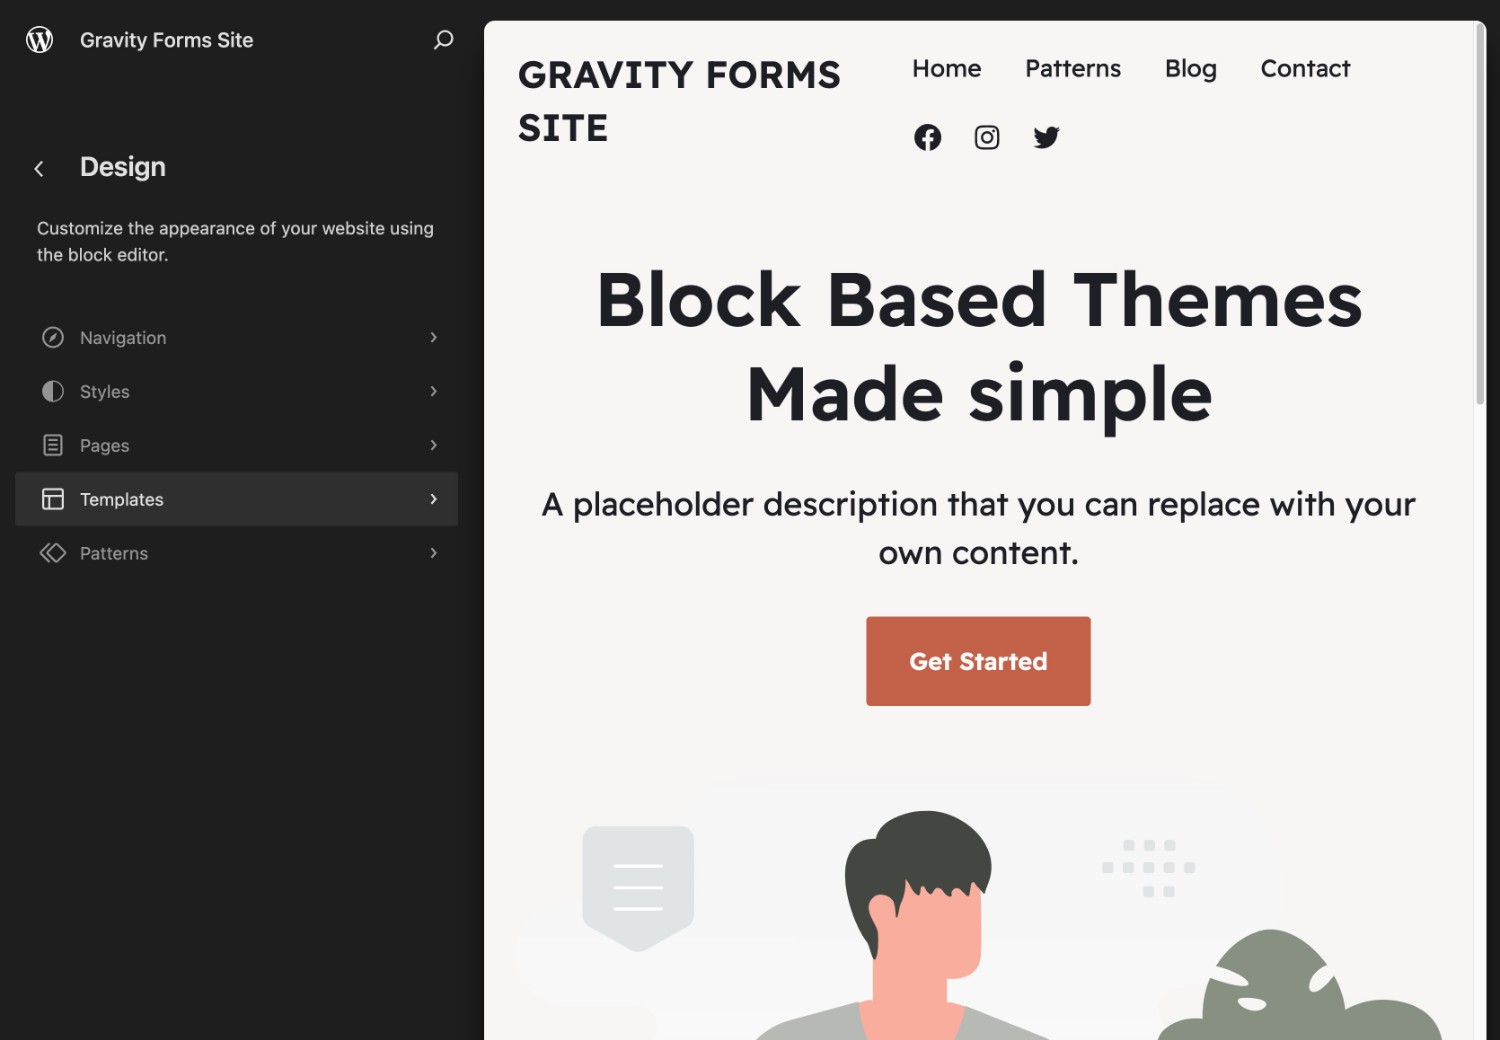
Once you’ve opened the Site Editor, select the Templates option in the Site Editor sidebar.
How to Edit an Existing Template
When you use a block theme, it will usually come with a bunch of its own templates. However, you’re free to edit those templates as needed.
To edit a template, click the three dots icon and choose Edit.
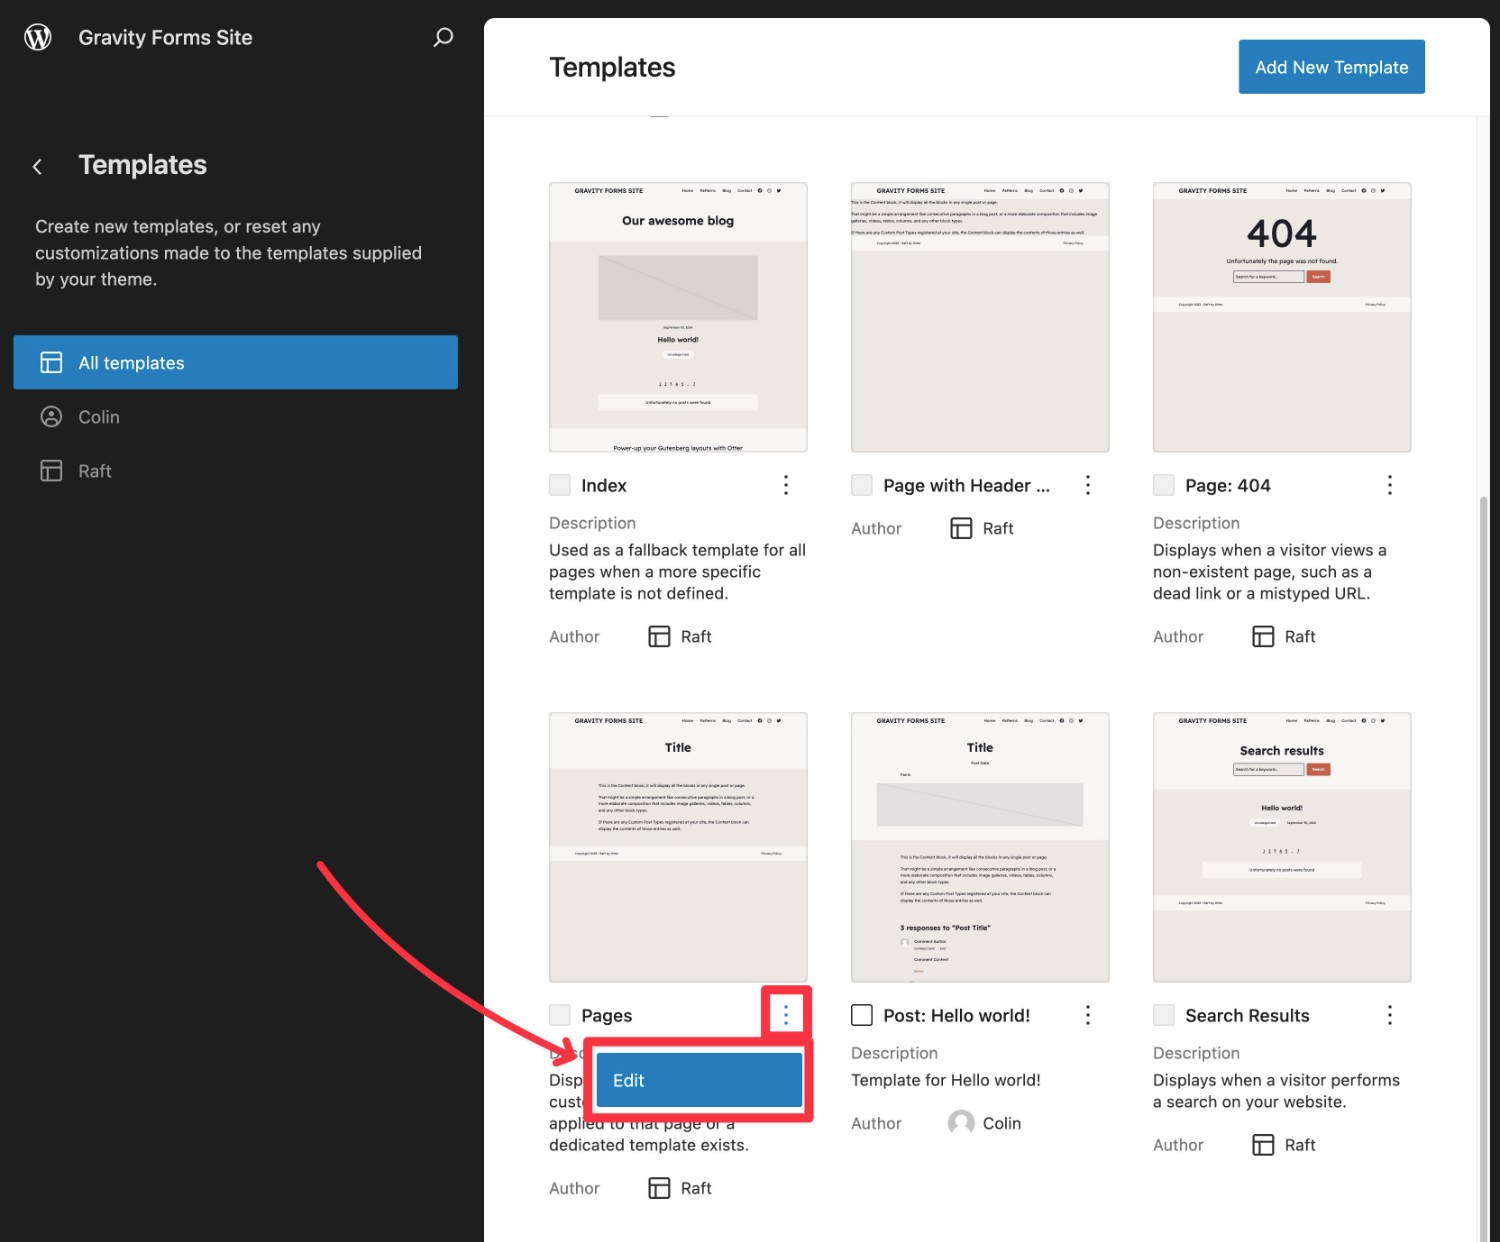
This will open the block editor interface. You’re free to use the editor to customize every aspect of the template.
Below, we’ll go a little deeper into how you can actually use blocks to customize your template. But first, let’s talk about creating your own template from scratch.
How to Create Your Own Custom Template
In addition to editing the templates that come with your theme, you can also create your own templates.
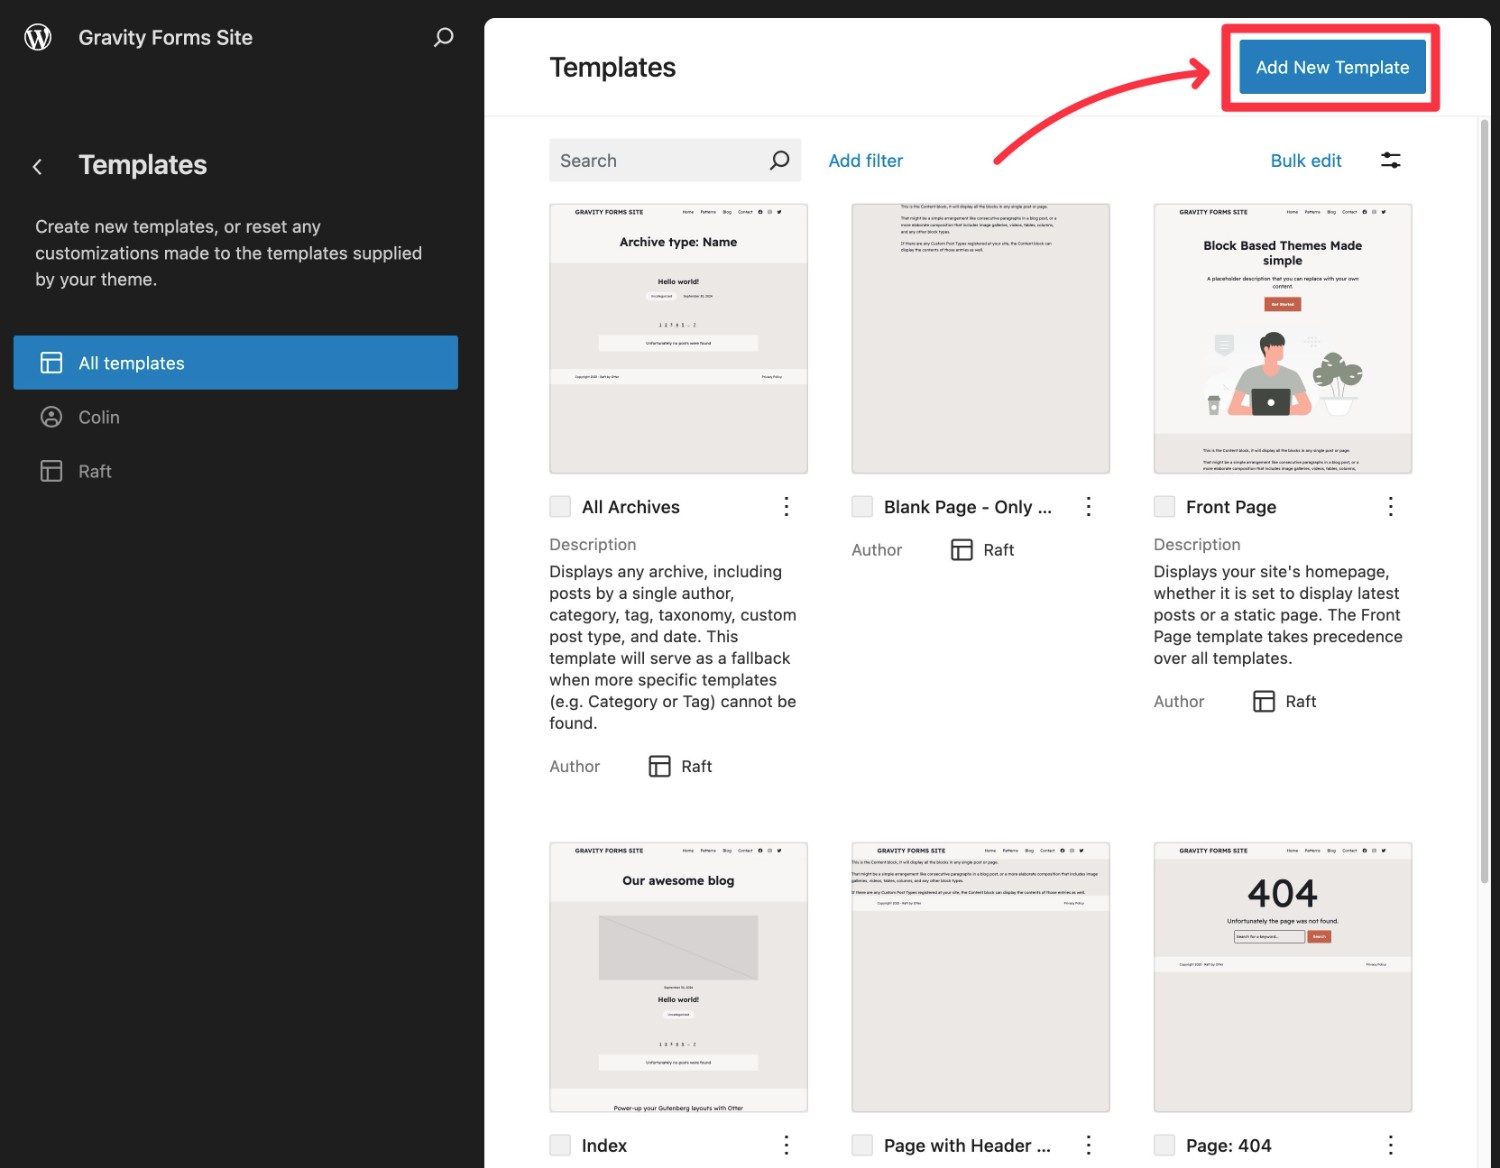
In the template management area of the Site Editor, click the Add New Template button in the top-right corner.
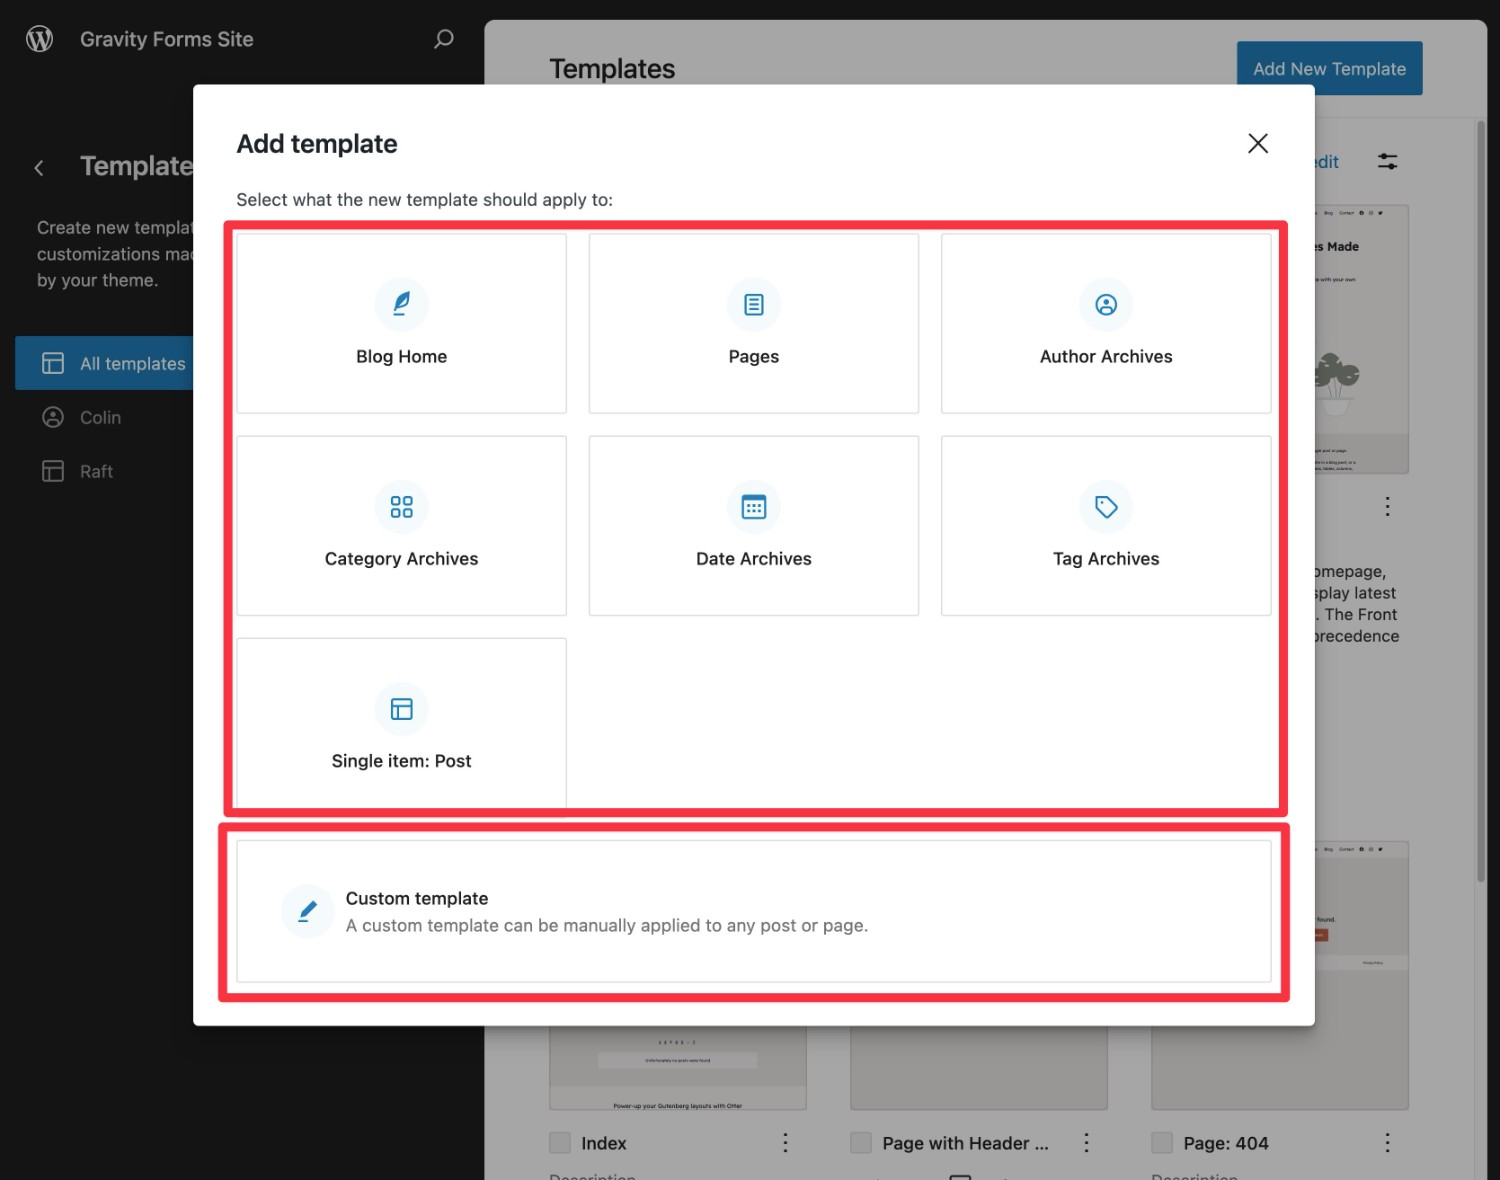
When you create a template, you can assign it to a specific piece/type of content or save it as a Custom template, which lets you manually assign this template to content later on.
We’ll cover these options a bit more later on. But when in doubt, you can always just start by saving it as a Custom template.
If you go to the main template management area, you’ll also be able to filter between templates that came with your theme and templates that you’ve created.
How to Use the Editor to Customize a Template
Whether you edit an existing template or create your own template from scratch, you’ll use the block editor to customize your template.
You can make use of all of the blocks on your site, including core blocks and blocks from plugins (more on that in a second).
When you’re designing templates, you’ll rely mostly on the special blocks in the Theme section, though.
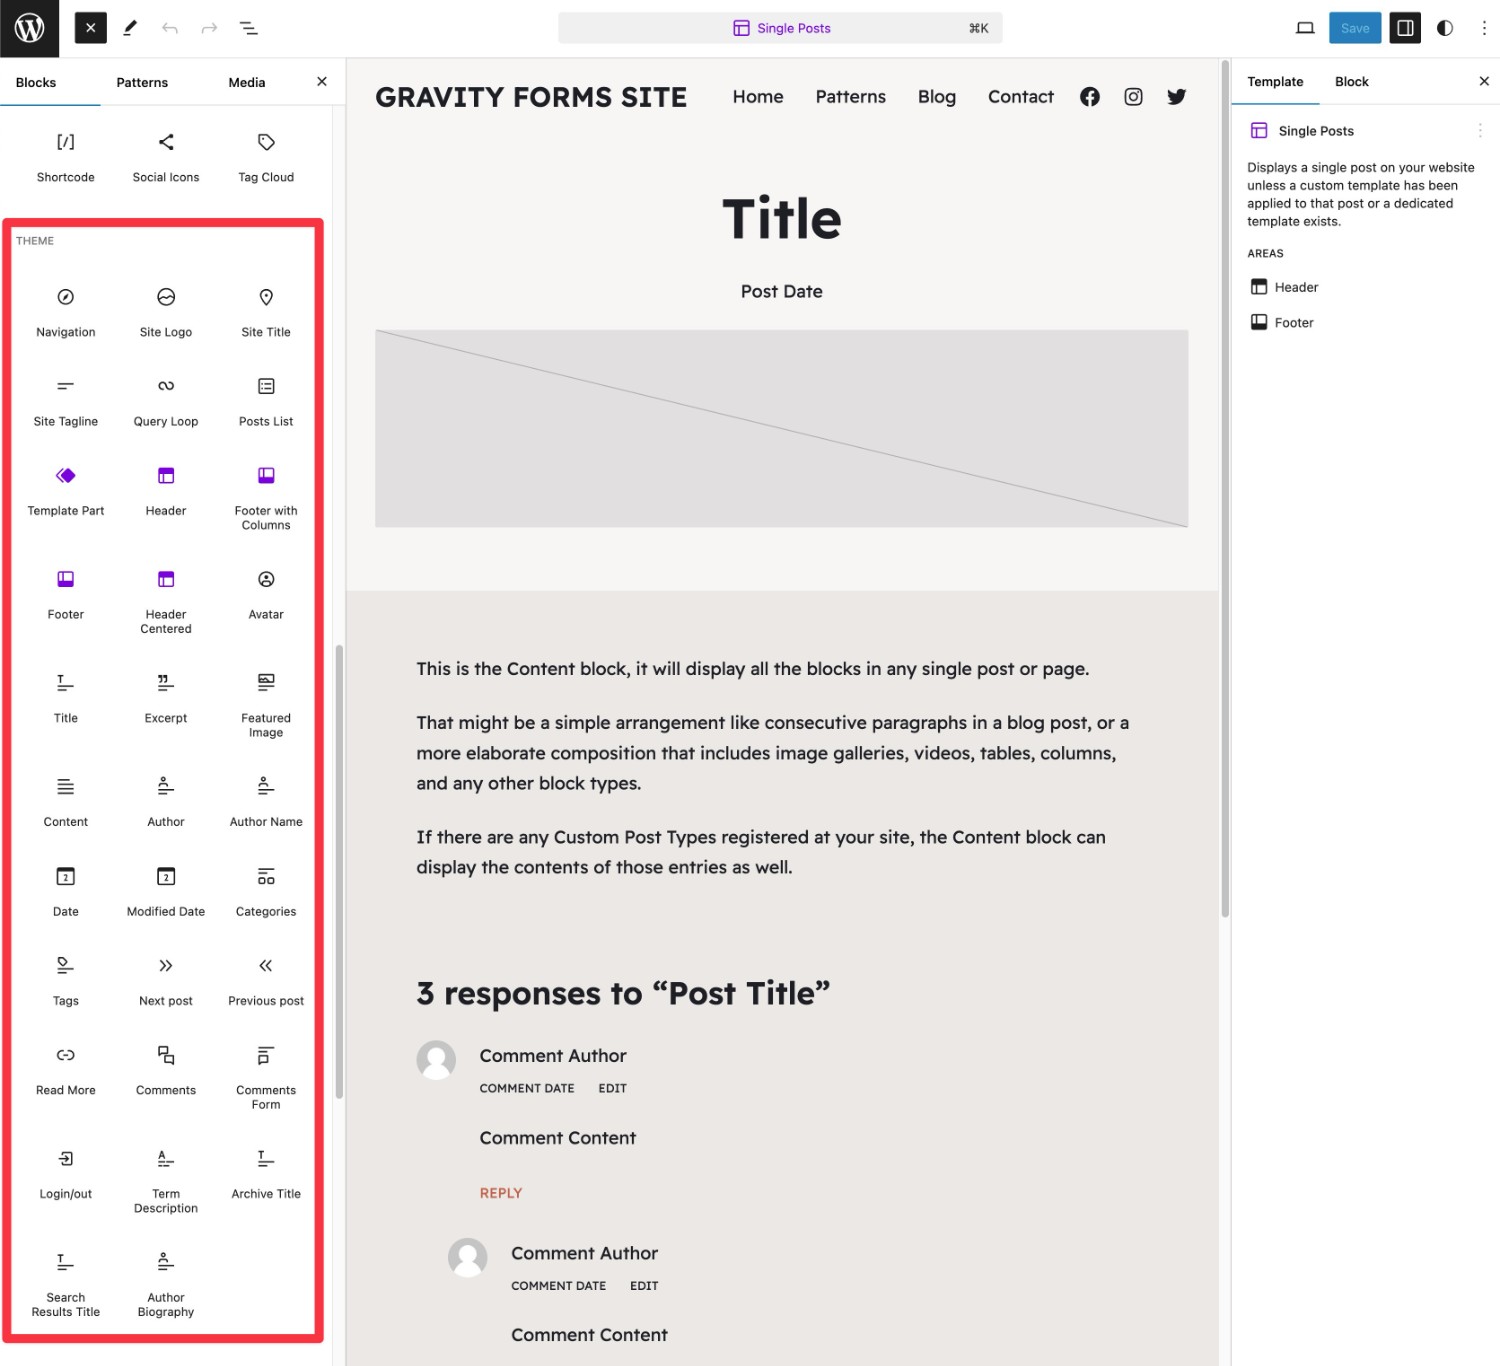
For example, let’s say that you’re designing your site’s default single post template, which is the template that will control how all of your site’s blog posts will appear.
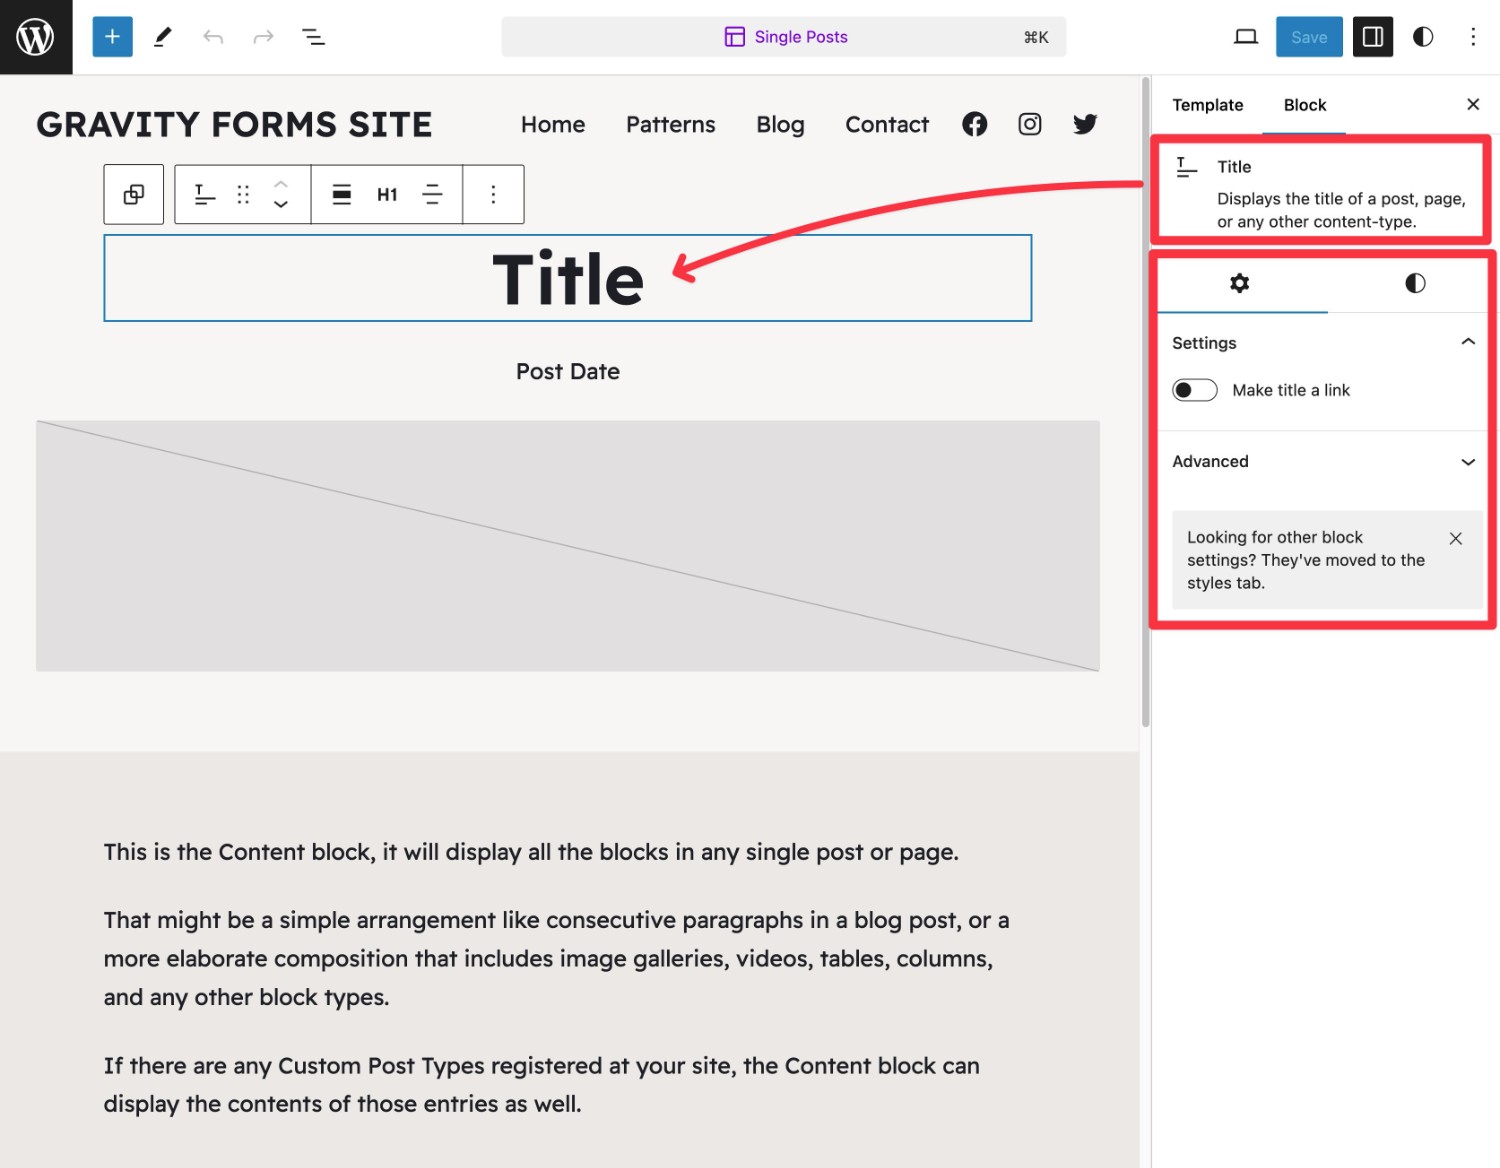
To control where each post’s title will appear, you would add the Title block, which you’ll find in the Theme section of the block inserter.
The block then gives you some settings, such as whether or not to make the title a link. You can also use all the regular block styling options to control the design.
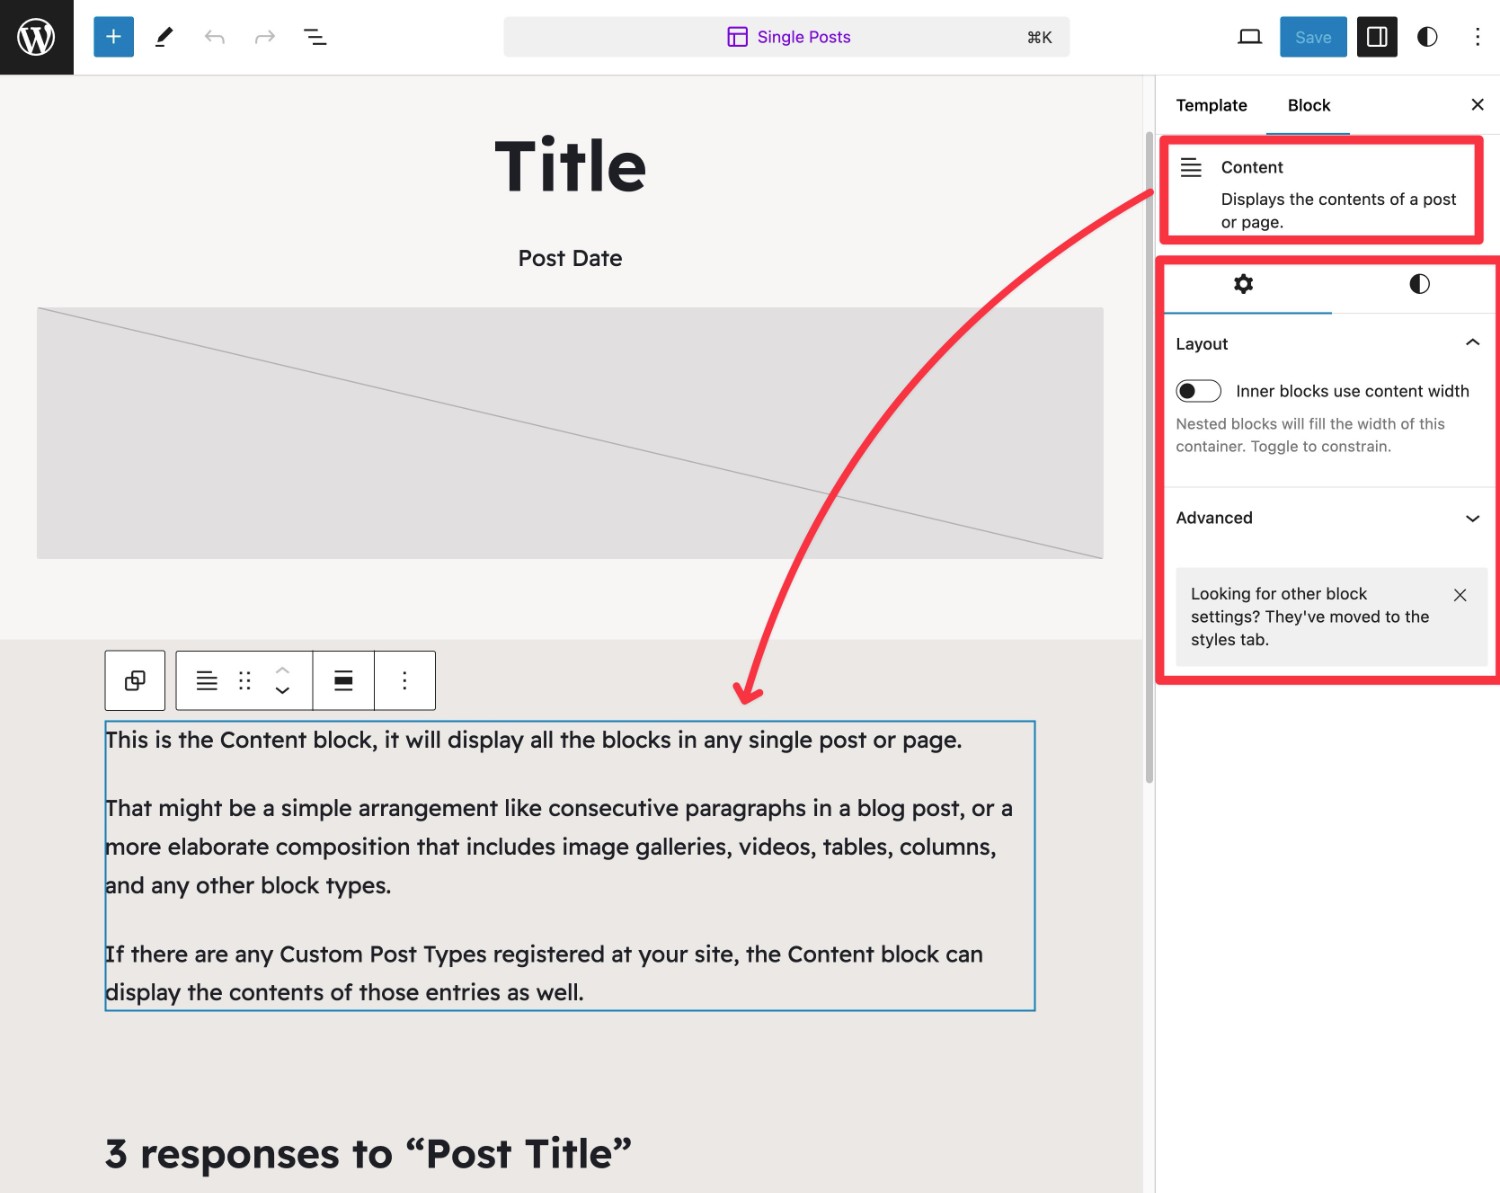
To control where the actual content of the post will go, you would then add the Content block.
You can then keep adding blocks for all the important parts of your template. Within the Theme block category, you’ll find dedicated blocks for everything that you need, including featured images, post meta (categories, tags, author, etc.), comments, and so on.
In the Themes section, you’ll also find all of your site’s template parts. You can actually create your own template parts for important elements, such as post meta or the comments section. We’ll cover working with template parts a little later in this post.
How to Add Forms From Gravity Forms in Your Template
In addition to the core blocks, you can also use blocks from any plugins that you have installed, which opens up some interesting use cases.
For example, let’s say that you’ve used Gravity Forms to create an email opt-in form or some type of lead gen form.
Now, you want to include that form at the bottom of every blog post on your site – below the content but above the comments section.
Instead of trying to manually place the form in every post, you can just add the Form block directly to your default single post template. You can then use the Orbital form theme to customize the style of your form right from the block editor.
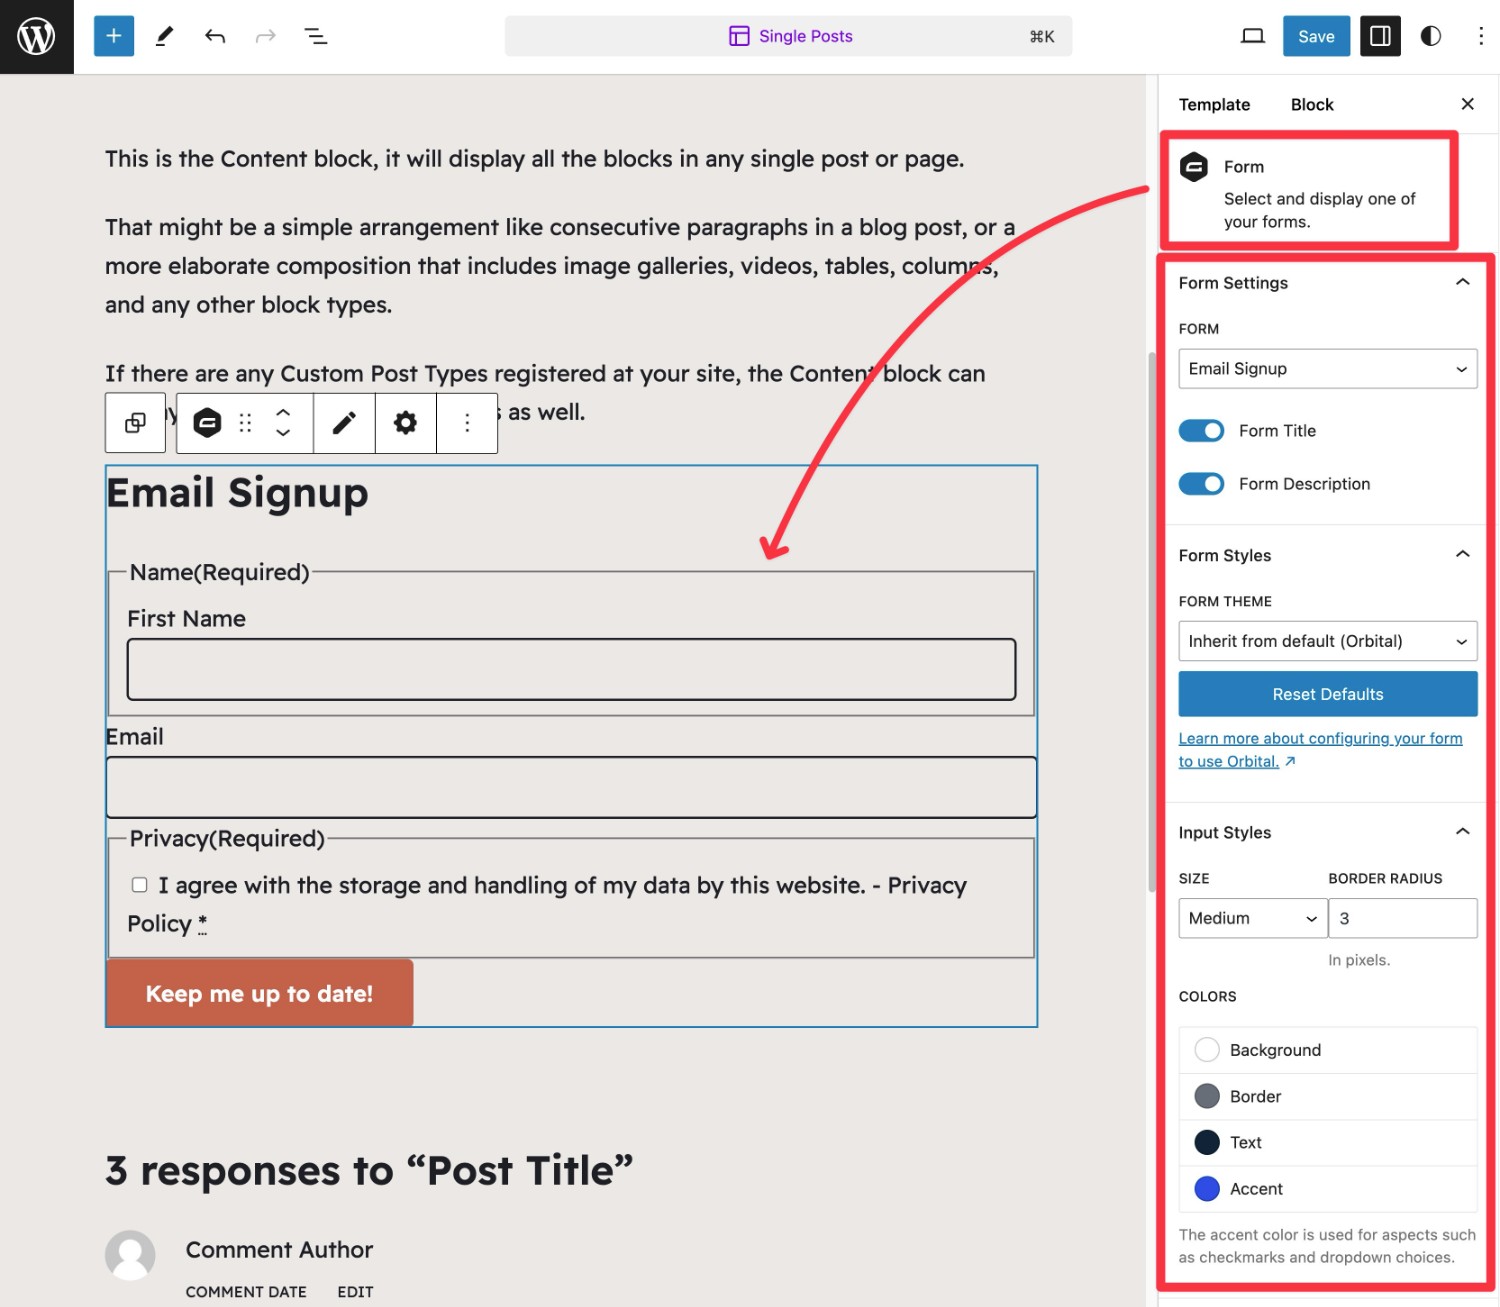
Now, the form that you choose will appear at that location on every single post that uses that template. If you ever want to switch to a different form in the future, you can just change the form in your template and that change will automatically apply to every single post that uses the template.
How to Edit Your Website’s Template Parts
Because template parts are technically an advanced block rather than an actual template, they don’t show up in the Templates area of the Site Editor like “full” templates. Instead, you’ll need to edit them from the actual block editor interface.
Below, we’ll take you through how to edit the existing template parts on your site, as well as how to create your own template parts and add them to your templates.
How to Edit Existing Template Parts
There are two main ways that you can edit template parts, which we’ll take you through below.
For this example, let’s say you want to edit your site’s header, but the same principles will apply to other template parts.
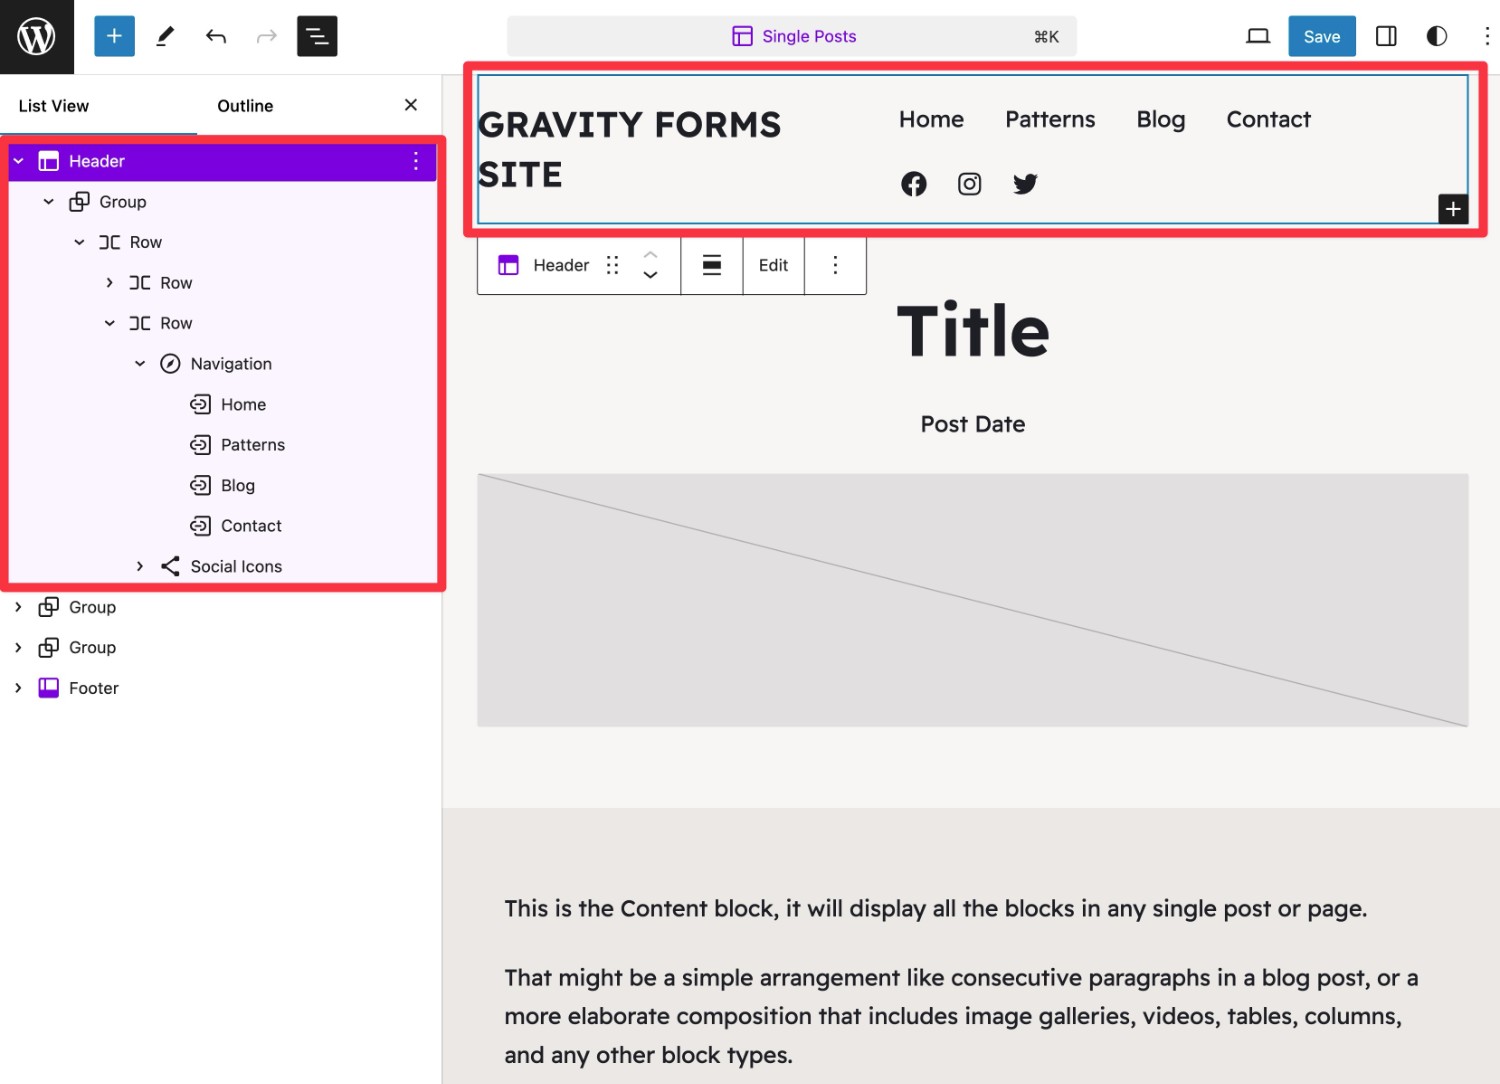
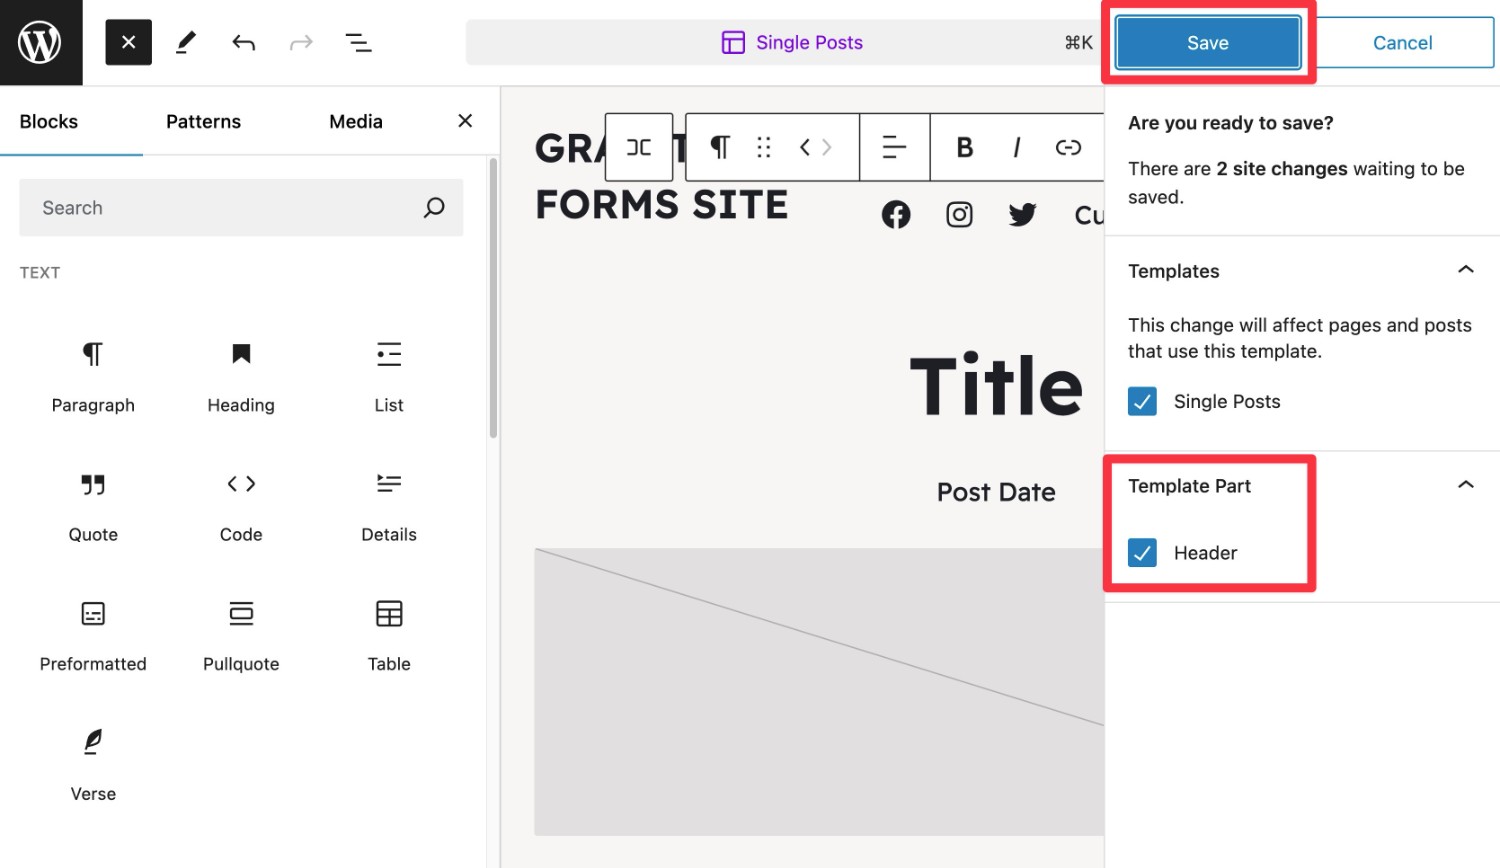
First off, you can open any template on your site and then edit the header area. You can just click into the header area or you can open the Template tab of the sidebar and choose Header to automatically select it.
When you hit the blue Save button in the top-right corner, you’ll see an option to choose whether or not to save the changes you made to the header to all instances of the header:
- If you check the Header box, any changes that you made will apply to every single instance of the header.
- If you uncheck the Header box, the changes that you made to your header will only apply to this specific template.
Second, you can also use the finder box to search for the specific template part that you want to edit. If you use this method, WordPress will open just the template part in the editor.
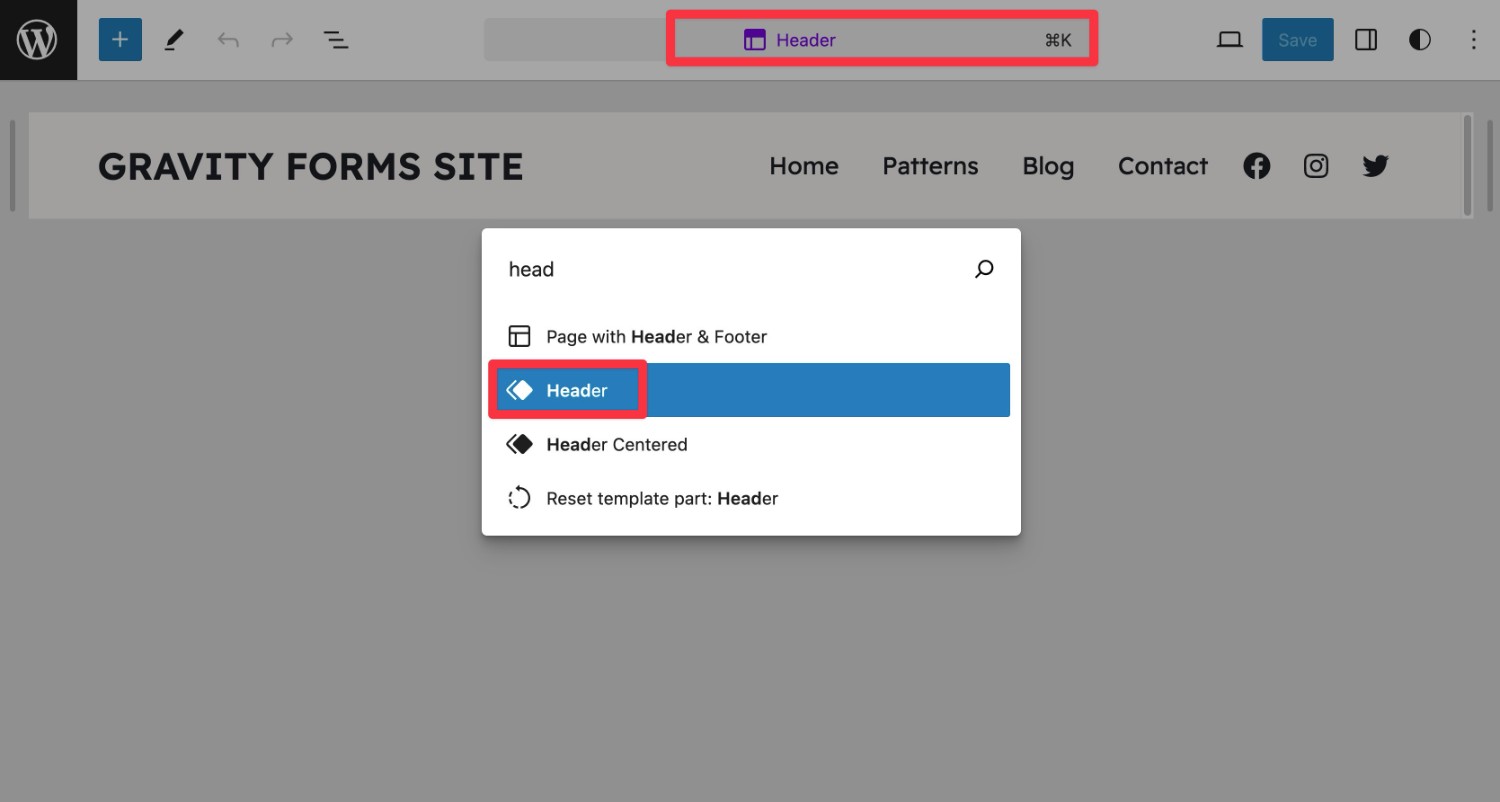
If you click the Save button while working in this interface, the changes will automatically apply to every instance of that default template part.
How to Add Template Parts to Your Designs
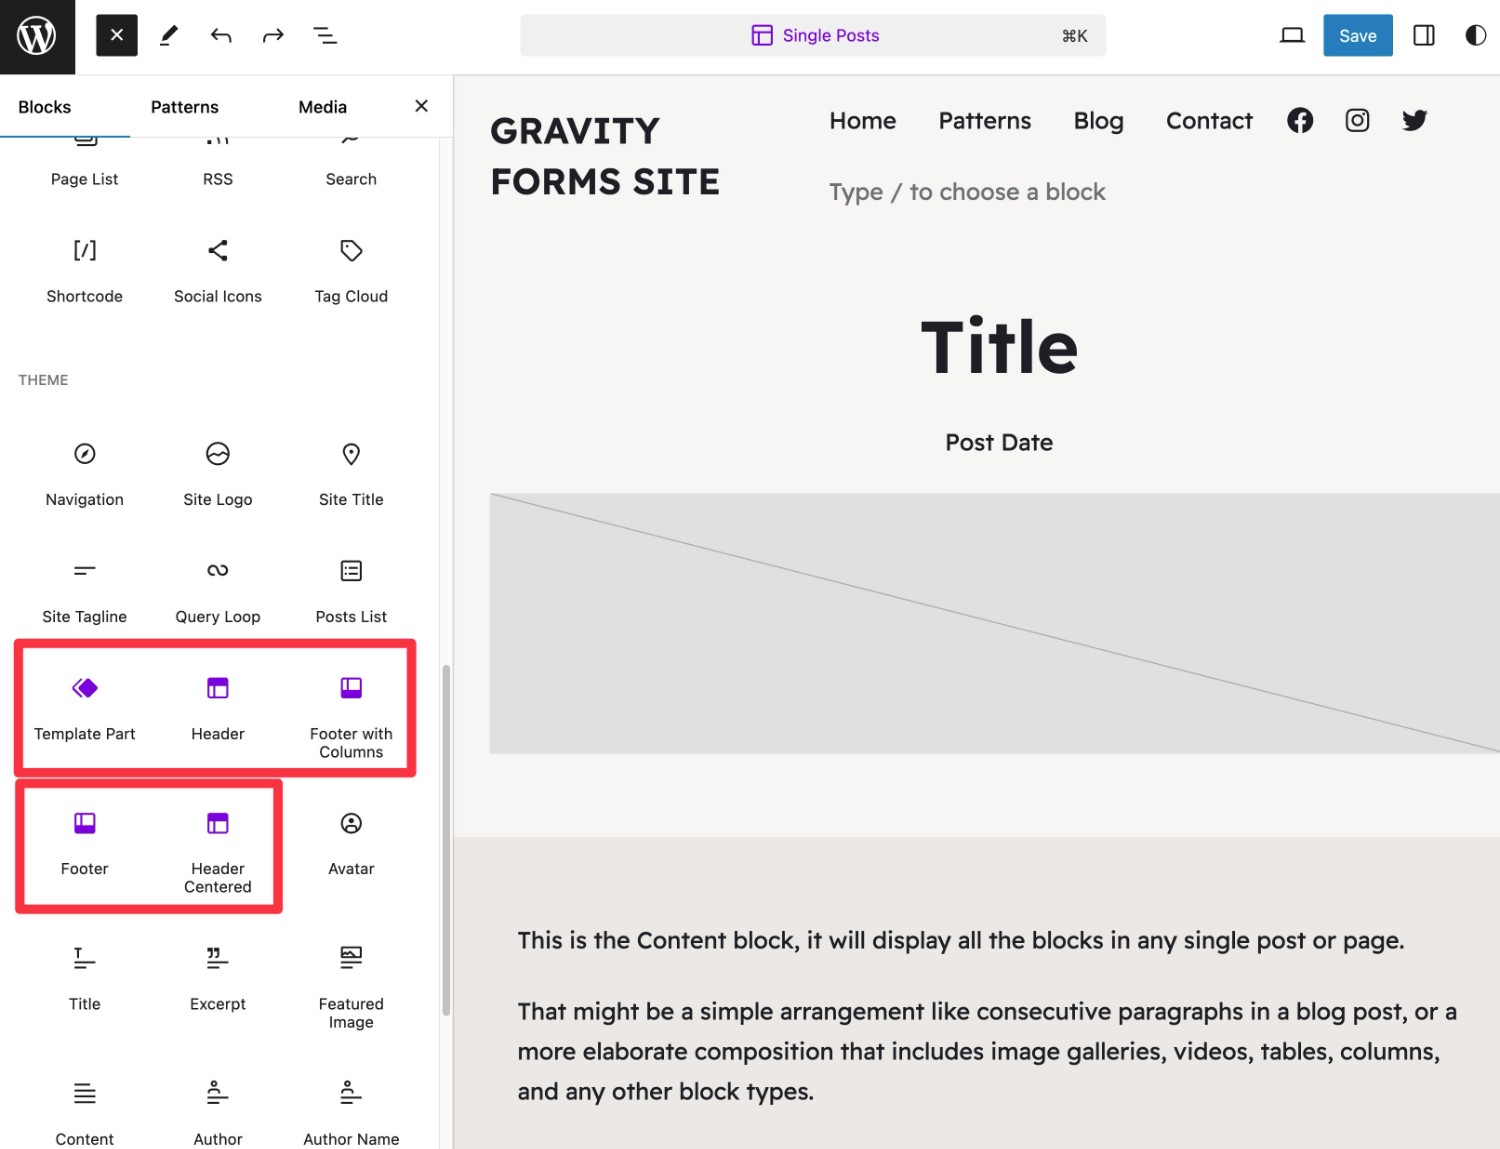
Because template parts are technically an advanced block, you can add them to your templates just like any other block.
If you open the block inserter, they should appear in the Theme blocks. To differentiate them from regular blocks, template parts use purple for the icon color.
How to Create Your Own WordPress Template Parts
In addition to using and editing the template parts that come with your theme, you can also create your own template parts.
Here’s how to do this:
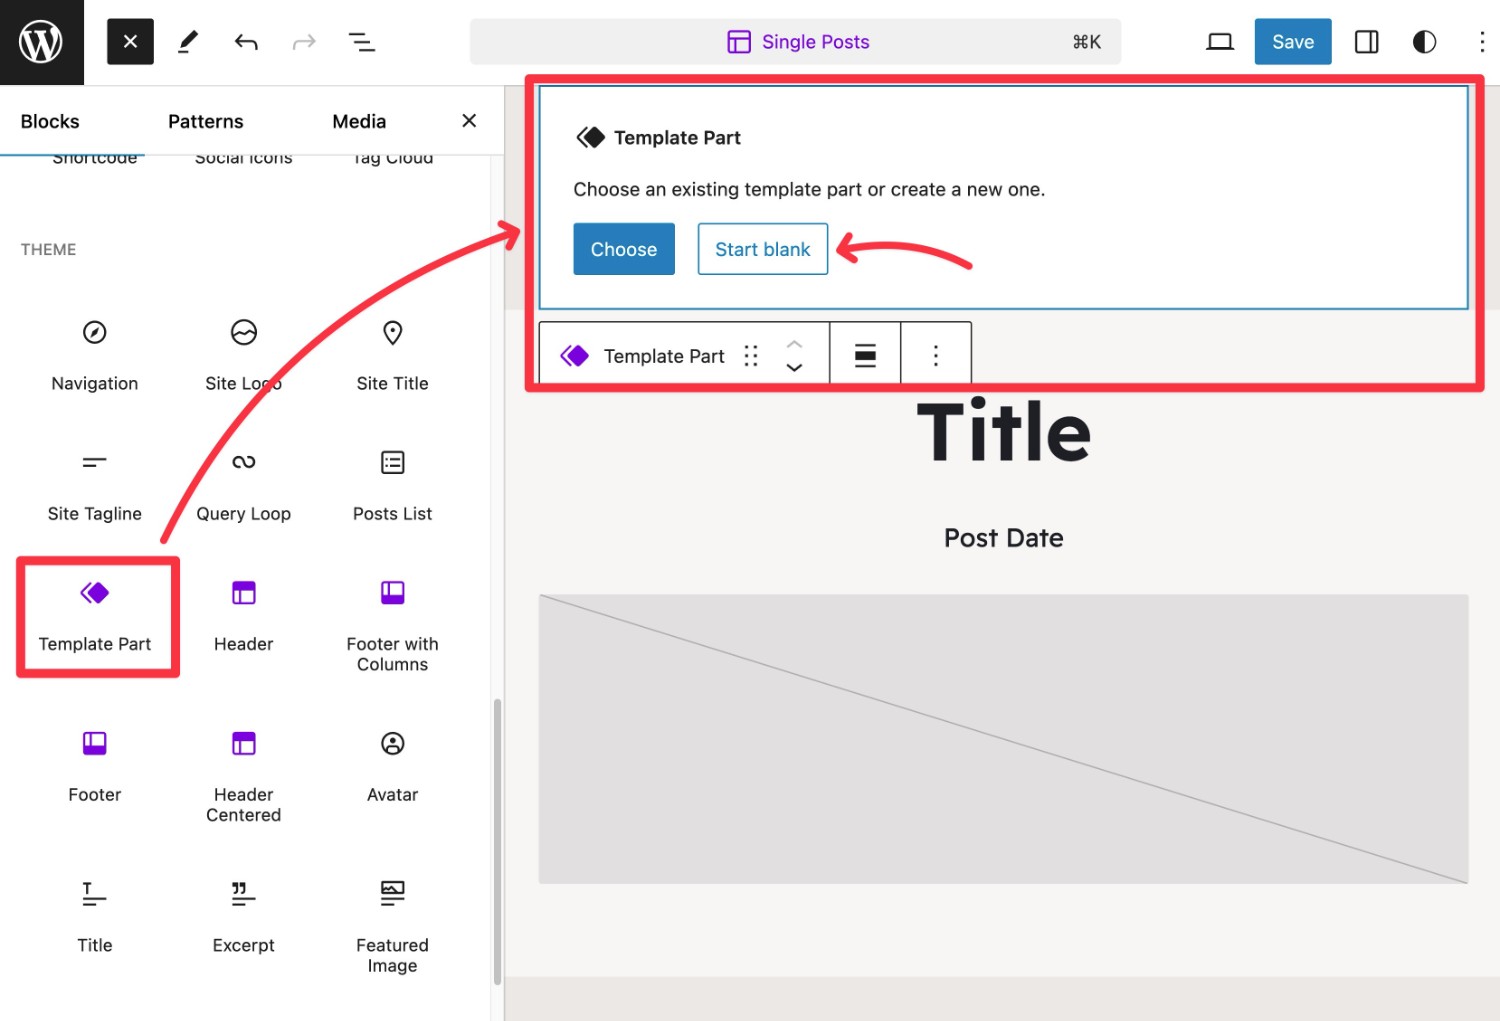
- Open a template where you want to add your new custom template part.
- Add the Template Part block.
- Choose the Start Blank option in the block’s settings.
- Give your template part a name.
From there, you can add blocks inside the template part to control its content. Once you’re finished, make sure to Save your template.
After you’ve saved the template, you’ll be able to insert your custom template part just like any other template part.
As an alternative approach, you can also go to the pattern library in the Site Editor. If you click the blue Add New Pattern button in the top-right corner, it will display a drop-down that gives you an option to create a new template part.
How to Assign Templates to Content (or Change Default Template)
There are two ways that you can assign templates to your content:
- You can set one default template that will apply to every new piece of content by default.
- You can manually override the default template to choose a specific template for a piece of content.
If you want to override the default template, there are two ways to assign a template to content on your site:
- When you create a template, you get an option to set it as the default template or assign it to specific posts.
- When you edit an individual page, you can manually select the template for that piece of content (which will override your site’s default). You can only do this for pages – it won’t work for posts.
Let’s go through everything…
Edit the Default Template in the Site Editor
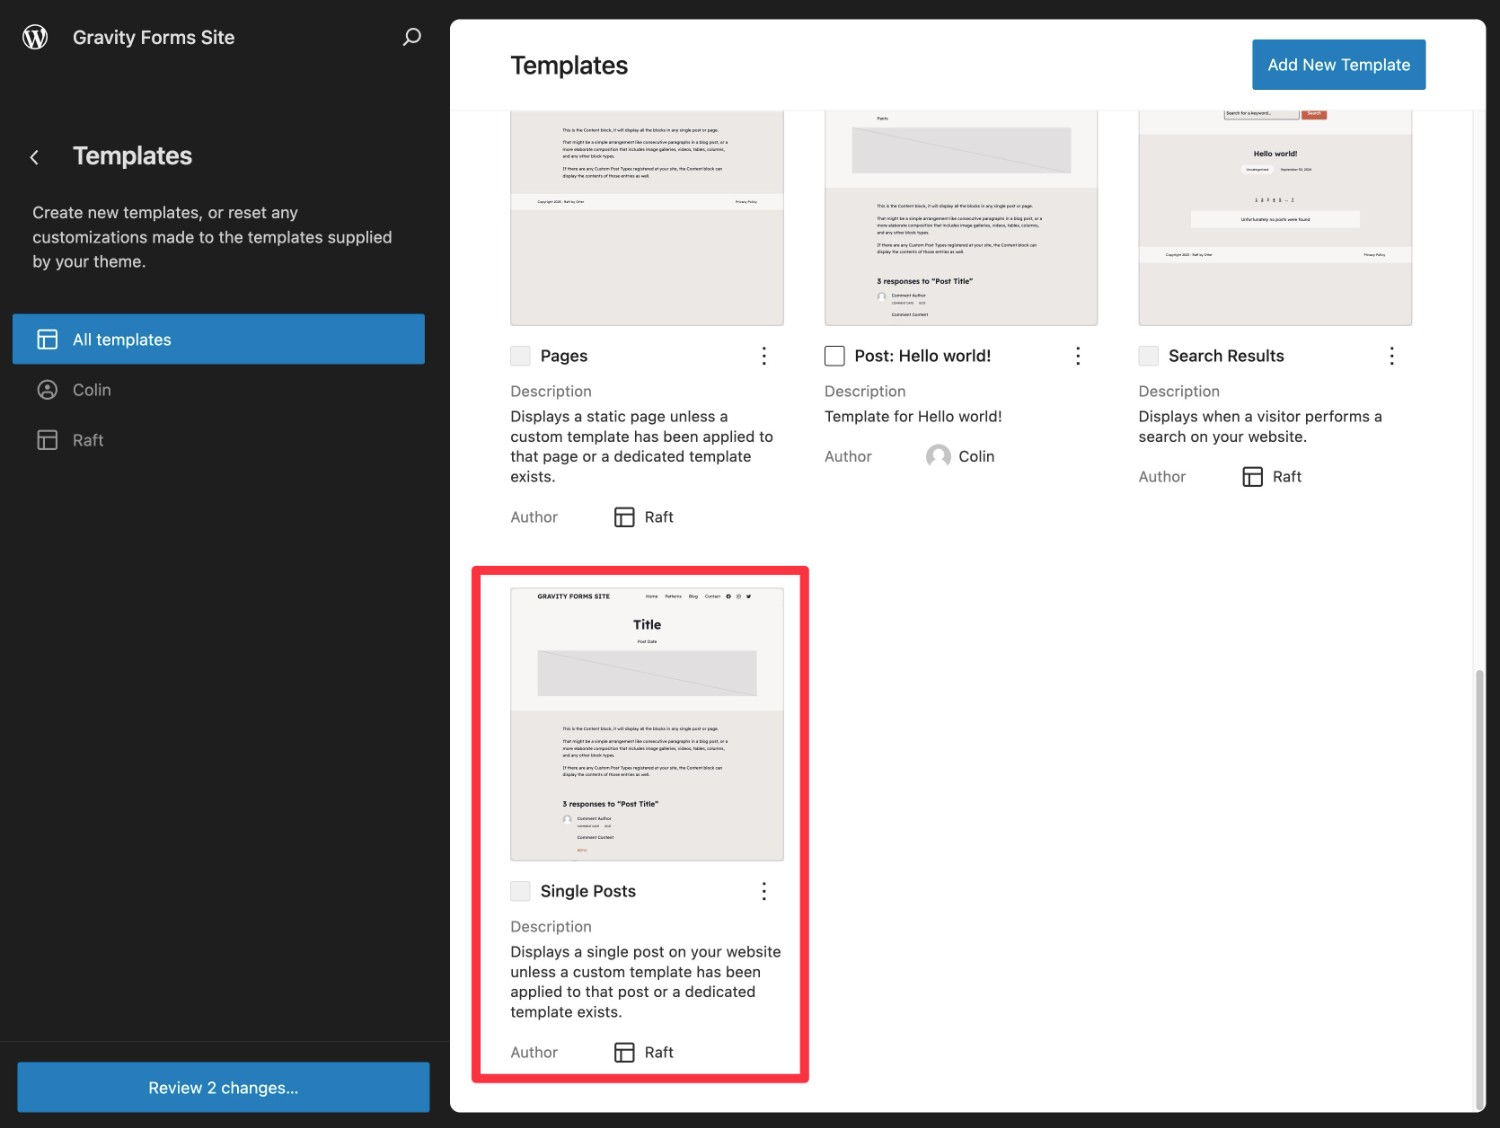
Currently, the Site Editor doesn’t give you an option to manually change the default template for your site’s key pages, such as the default Single Post template.
Instead, you need to edit the existing default template if you want to make changes to your site’s defaults.
For example, let’s say you want to edit the default single post template for all of your blog posts. To do that, you would need to find the existing Single Posts template that came with your theme and make your edits there.
Assign a Template When Creating the Template
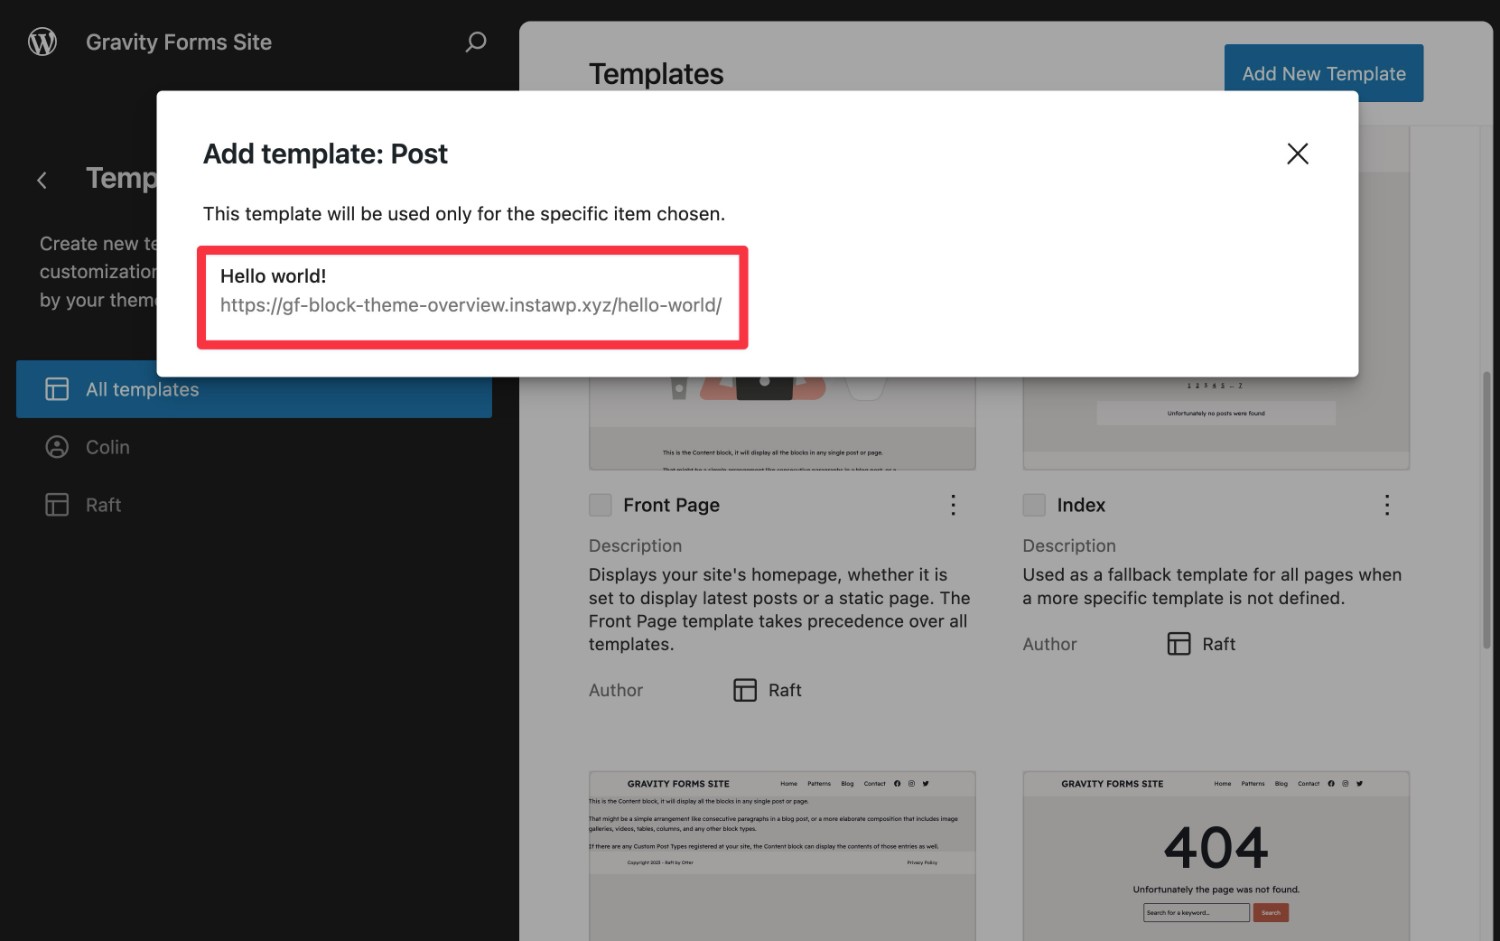
When you create a template in the Site Editor, you can choose between two options:
- You can assign the template to a specific piece of content (or specific type of content). For example, you could assign the template for a specific post. This template will automatically override that post’s existing template.
- You can create a Custom template, which you can then manually apply to any post or page on your site (using the method in the next section).
Assign a Template from the Post/Page Editor
If you ever want to override the default template for an individual page, you can also manually choose a specific template from the post/page editor:
- Open the editor for the piece of content for which you want to edit the template.
- Open the editor sidebar, if it’s not already open.
- Select the Post or Page tab in the sidebar, if it’s not already selected.
- Find the Template option in the list.
- Click the blue link for the currently selected template.
- Select Swap template from the list that appears.
- Choose the new template that you want to use from the template library.
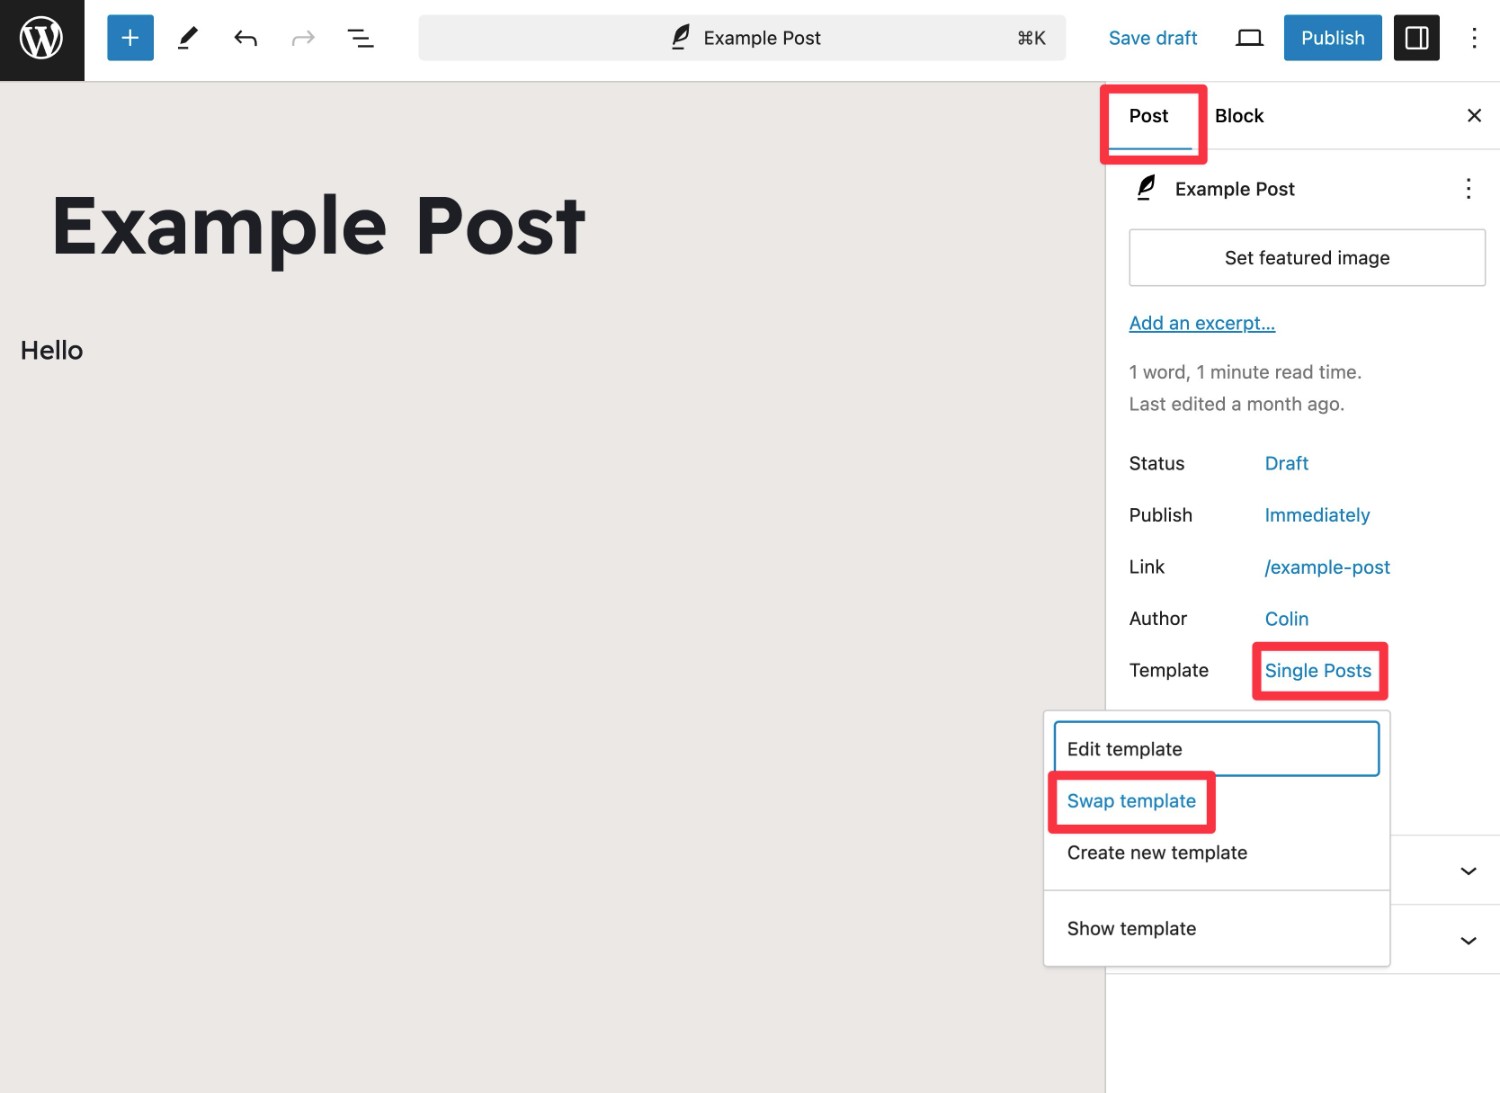
Note – you will only see the Swap template option if there are multiple eligible templates to choose from. In order to make a template eligible for selection, you need to choose the Custom template option when you create it.
For example, if you chose to apply the template to a specific post when you created it, you would not be able to swap another post to that template.
Get Started With WordPress Templates Today
That wraps up our guide on how to use templates and template parts in the new WordPress Site Editor (AKA Full Site Editing).
If you’re using a block theme, understanding how templates work will give you the ability to customize your site’s layouts without needing to use code.
With the Form block from Gravity Forms, you can also easily insert any of your forms directly into your theme’s templates. For example, you could add an email subscribe form or lead gen form to the template for your blog posts, which will let you more efficiently promote your forms (and easily tweak them in the future, without needing to update every post).
If you’re already using Gravity Forms or planning to purchase a license, give it a try today.
If you’re not using Gravity Forms yet, you can spin up a fully functioning demo site here. You’re able to install a block theme on the demo site, which will let you play around with using Gravity Forms in the Site Editor.

If you want to keep up-to-date with what’s happening on the blog sign up for the Gravity Forms newsletter!
