An Ultimate Guide to Email Marketing for WordPress Websites
If you’re interested in WordPress email marketing but you’re not sure where to begin, this post is for you.
There are a lot of benefits to implementing email marketing on WordPress:
- You can connect directly with your audience, which lets you build an asset that’s not at the whims of algorithm changes at Google, Facebook, Twitter/X, and so on.
- You can more effectively promote your brand, whether that’s increasing traffic to your website, selling more products/services, or anything else.
- You can learn more about your audience and what makes them tick, which can provide you with all types of insights to improve your WordPress website/business.
However, WordPress is a bit lacking when it comes to built-in email marketing tools, which is why you might need a little help setting everything up.
In this post, we’re going to cover everything that you need to know when it comes to email marketing on WordPress, including the following:
- How to choose an email marketing tool for WordPress
- How to create effective email subscribe forms to grow your lists
- How to optimize your forms to get more subscribers
- What types of emails you should send your subscribers
- Some general tips for effective email marketing
Here we go…
Key takeaways
- WordPress doesn’t include built-in email marketing tools, so you’ll need a service like Mailchimp or a plugin like MailPoet.
- Gravity Forms makes it easy to create flexible opt-in forms that integrate with popular email marketing platforms.
- You can grow your list with dedicated subscribe forms or by adding opt-in checkboxes to contact, registration, or donation forms.
- Form placement, timing, and incentives like discounts or lead magnets can significantly increase conversions.
- Successful email marketing combines automation and campaigns, with personalization, A/B testing, and focusing on engaged subscribers for best results.
How to Choose a WordPress Email Marketing Tool
Let’s start at the beginning:
In order to implement your email marketing strategy, you’ll need some type of dedicated email marketing tool/service.
These services help you with essential tasks like managing your subscribers, writing/creating emails, and actually sending those emails to your subscribers. They’re also the foundation for all of the other email marketing tactics in this post.
If you built your website with WordPress, there are two high-level approaches you can use:
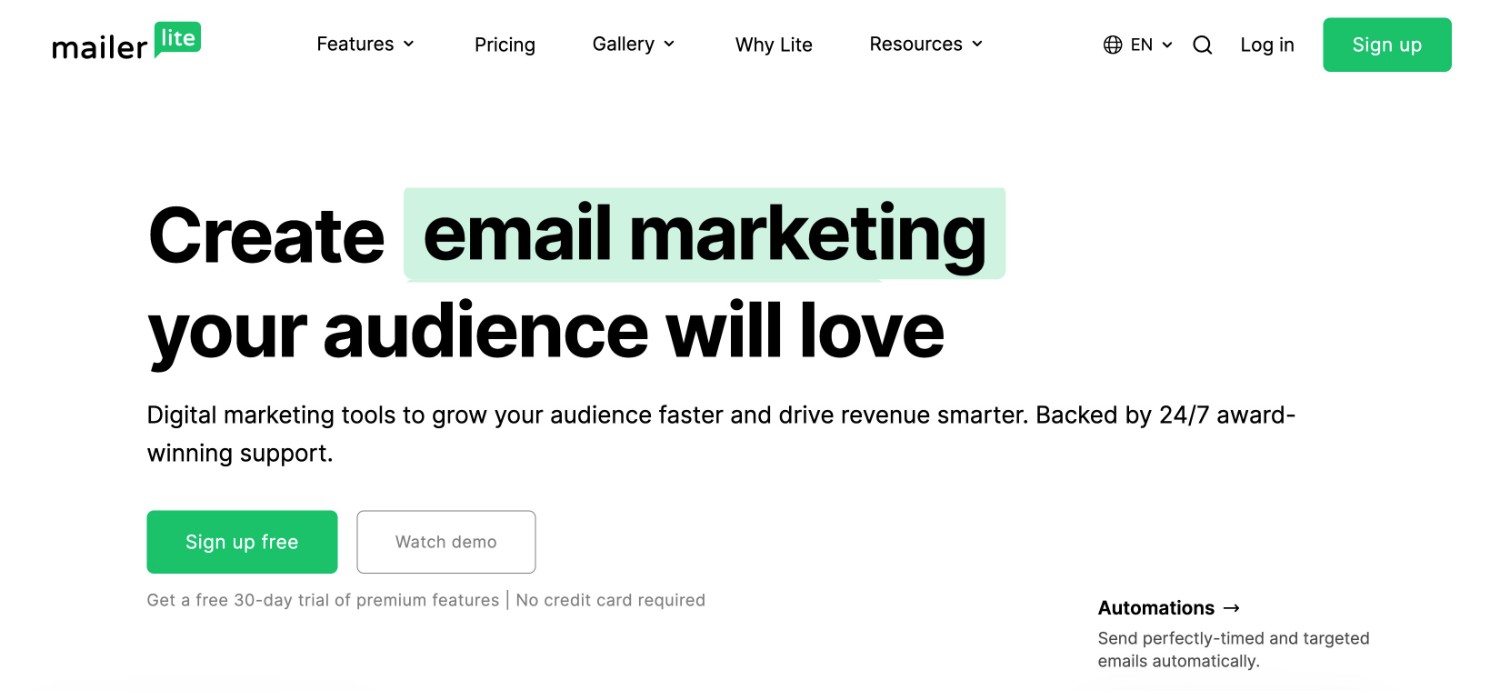
- SaaS email marketing service – you sign up for a service and manage everything from that service’s website. You can then sync subscribers from WordPress to your chosen service using Gravity Forms or other lead generation plugins. Some popular names for SaaS email marketing services include Mailchimp, Campaign Monitor, AWeber, MailerLite, ConvertKit, and many others.
- Email marketing WordPress plugin – you can use a self-hosted WordPress plugin to manage your email marketing efforts from your WordPress dashboard. Some plugins include their own built-in sending services (e.g. MailPoet), but most of them require you to integrate a third-party email sending service such as Amazon SES. Beyond MailPoet, other popular email marketing plugins include Newsletter, Mailster, and weMail.
Which is better? Well, it really just depends on your needs and how you prefer to work.
If you’re planning to primarily send one-off marketing emails or set up simple autoresponders, either approach should be fine. A WordPress email marketing plugin will let you work directly from your WordPress dashboard, while a SaaS tool will require you to work from that tool’s website.
However, if you’re interested in setting up more advanced types of email marketing automation, you might prefer the flexibility that the SaaS tools offer. For example, some advanced email marketing strategies involve using conditional logic to send different types of automated emails based on how users interact with your emails/website.
Of course, the tradeoff is that the SaaS tools will usually cost a bit more than putting together your own self-hosted email marketing stack.
How to Create Effective Email Subscribe Forms With Gravity Forms
Whether you use a SaaS email marketing tool or a WordPress email marketing plugin, you need to actually have some people subscribed to your email lists before you can start sending emails.
That’s probably not a mind-blowing insight, but it’s important to get the order right when you’re prioritizing everything.
A lot of email marketing tools will include some type of feature to build an email subscribe form. However, these features are not always very flexible, as these forms are usually an afterthought rather than a main focus.
If you want a more flexible way to build WordPress email subscribe forms, you can use Gravity Forms.
Why Use Gravity Forms for Email Marketing?
There are a few reasons why you should consider including Gravity Forms in your WordPress email marketing toolkit.
First off, Gravity Forms integrates with most popular email marketing plugins/services so that you can sync data from your forms to your email marketing tool.
For example, you could create a newsletter subscribe form with Gravity Forms. If someone submits that form, Gravity Forms will automatically sync that subscriber’s information to your email marketing tool. Depending on the tool, you might also get options to apply a certain tag to that user or set up some other type of segmentation.
You can browse all of the email marketing tool integrations here, but here’s a quick run-down of some of the most well-known names that Gravity Forms offers official integrations for:
- ActiveCampaign
- AWeber
- Campaign Monitor
- CleverReach
- Constant Contact
- Kit (formerly ConvertKit)
- EmailOctopus
- Emma
- GetResponse
- HubSpot
- iContact
- Mad Mimi
- Mailchimp
- MailerLite
- Mailgun
- SendGrid
You can also find tons of third-party plugins to add even more integrations for services such as MailPoet, Brevo, and lots more.
More importantly, Gravity Forms is also just generally more flexible and powerful when it comes to setting up your email subscribe forms.
You’ll have more control over where and when to display your forms, including how your forms look. For example, you can use the built-in styling options in Gravity Forms to customize your forms without code.
What’s more, you can also add email subscribe options to other forms on your site, such as letting people subscribe to your newsletter as part of your registration form.
Finally, for more advanced use cases, Gravity Forms also offers lots of useful features such as conditional logic, which lets you tag/subscribe users in different ways depending on how they answered a form.
Your Options for Creating Email Subscribe Forms With Gravity Forms
There are two main strategies you can employ to grow your lists with Gravity Forms:
- Creating dedicated email subscribe forms – you can create a form with the sole purpose of letting people subscribe to your email lists. Typically, these forms just include a couple of fields asking for a user’s name and email address, though you can collect additional information if needed.
- Adding an email subscribe option to other forms on your site – for example, if you have a user registration form, you could add a checkbox to that form that lets users subscribe to your lists. This gives you an opportunity to grow your email lists from different types of user interactions.
Let’s go through how to set up both types of email subscribe forms with Gravity Forms…
How to Connect Gravity Forms to Your Email Marketing Tool
Before you can build your actual forms, you first need to connect Gravity Forms to your chosen email marketing tool/service.
This generally involves two steps:
- Installing a Gravity Forms add-on for the service that you want to use.
- Authenticating the add-on with your email marketing service, typically by adding an API key or some other type of credential.
For example, let’s say that you’re using Mailchimp for your email marketing. The same basic process will be the same for other email marketing services, but we’ll just use Mailchimp to show the steps.
First off, we’ll assume that you’ve already installed Gravity Forms and activated your license. If not, you can purchase a Gravity Forms license here.
You can access most of the email marketing integrations on the entry-level Basic license, though a few CRM integrations require the Pro license.
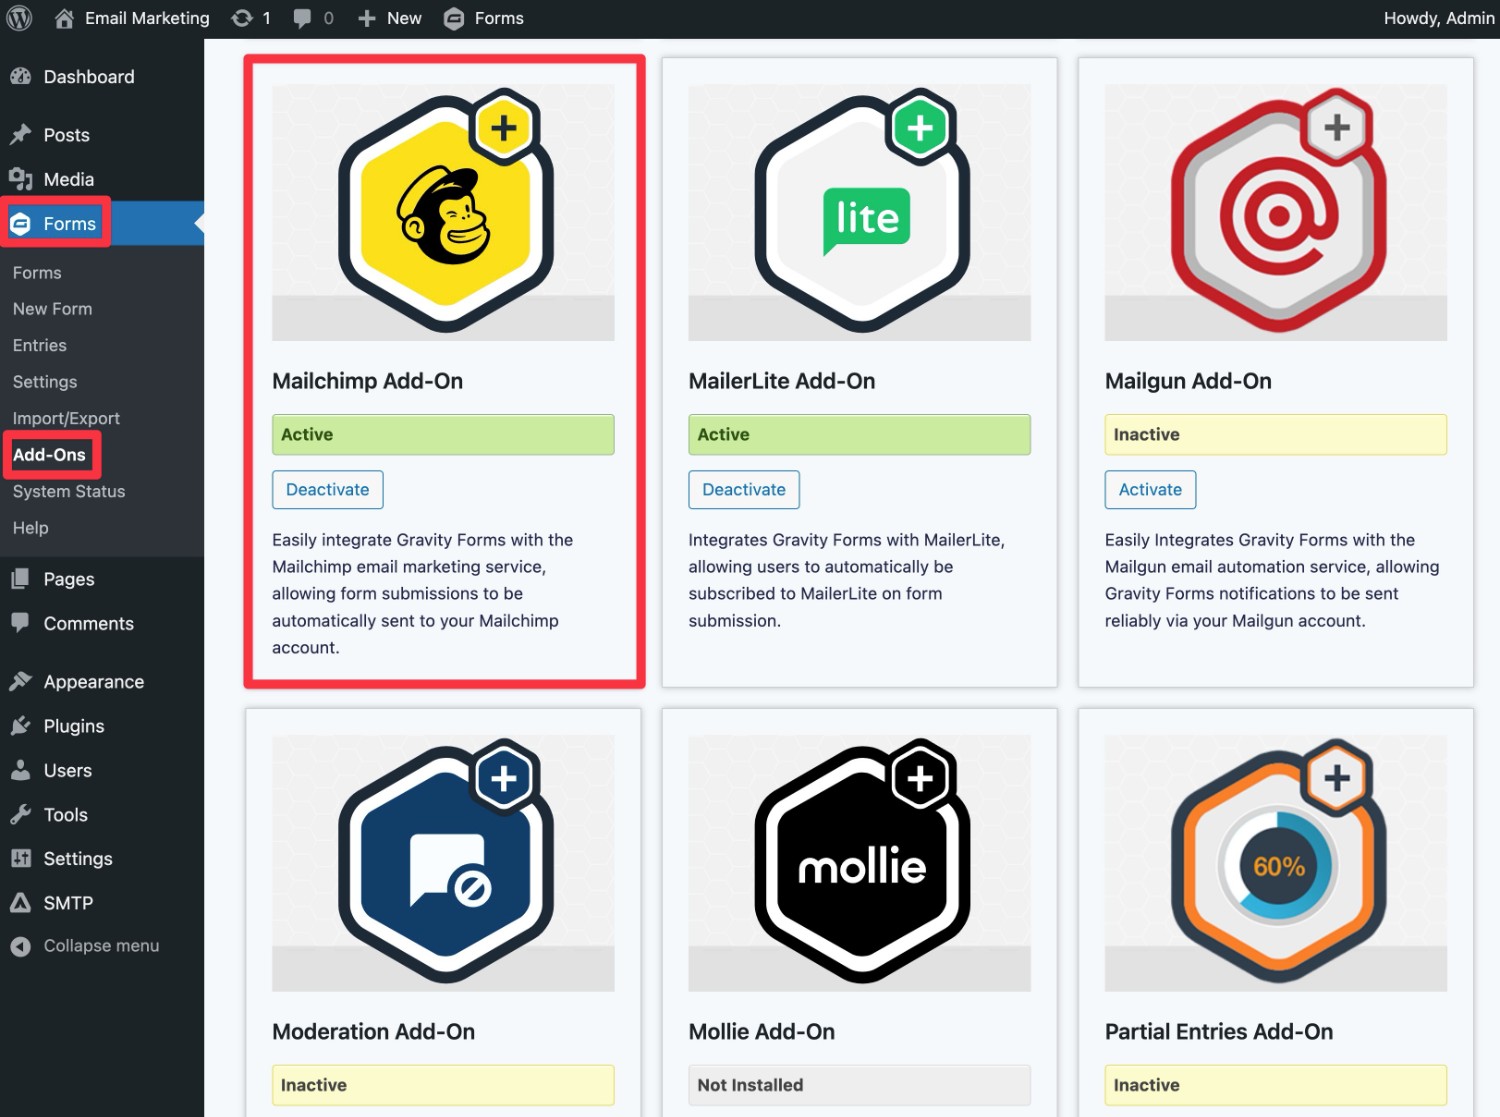
Once you’ve installed the core Gravity Forms plugin, you also need to install the official Gravity Forms Mailchimp Add-On on your site:
- Open your WordPress dashboard.
- Go to Forms → Add-Ons.
- Find the Mailchimp Add-On in the list.
- Click the Install button.
- Once the installation finishes, make sure to activate the add-on on your site.
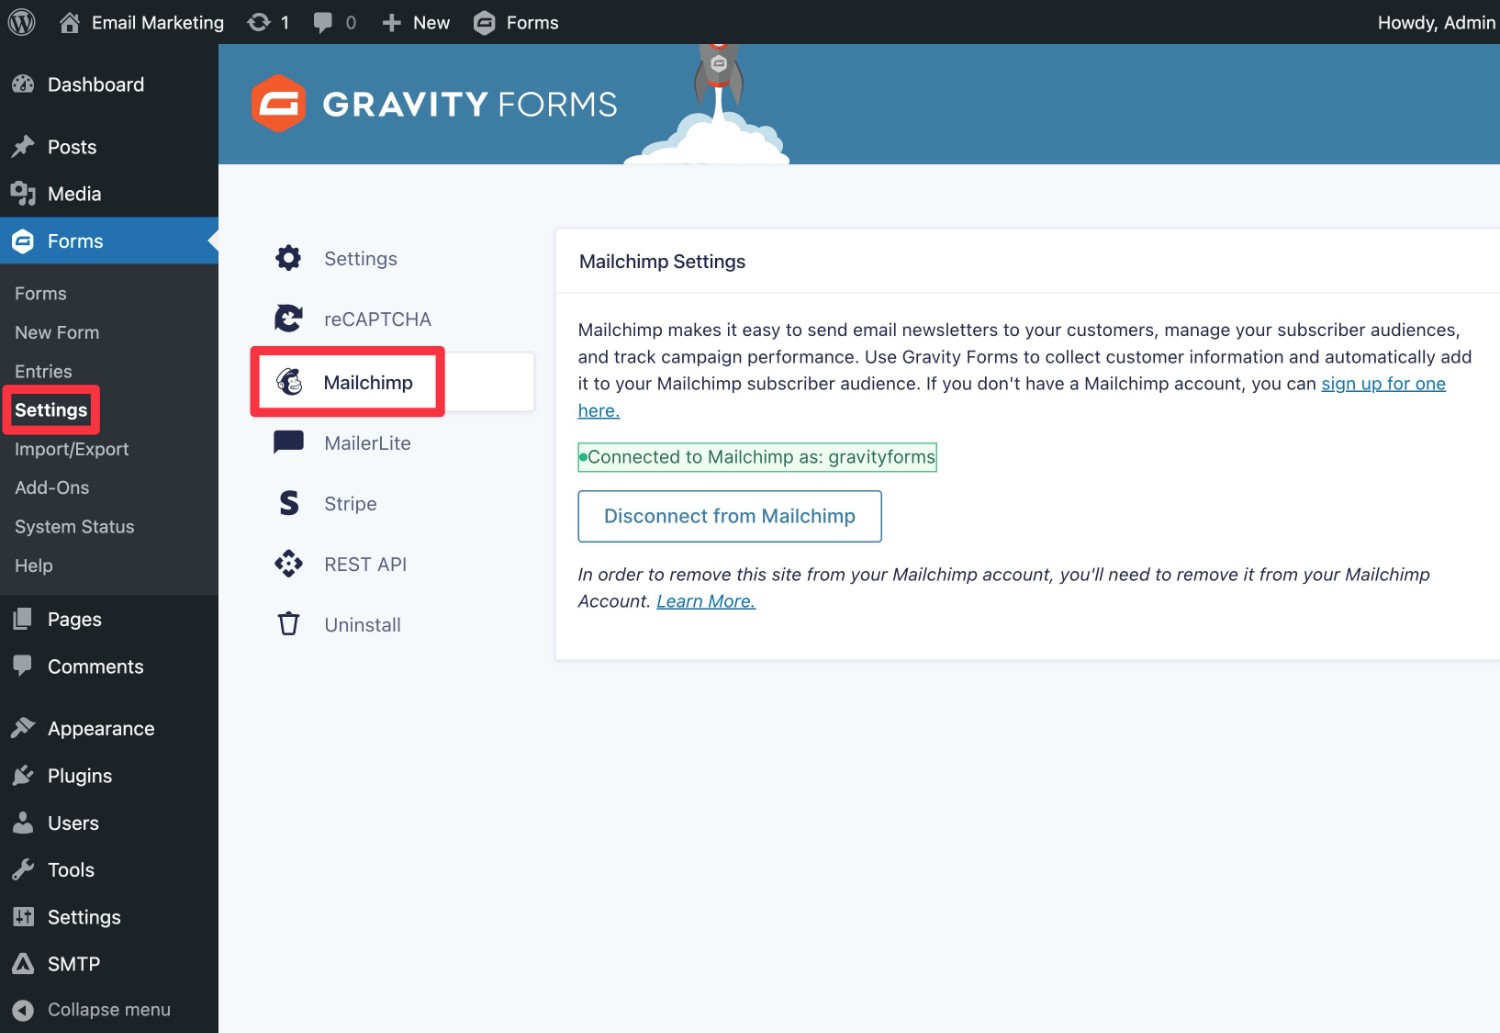
Once you’ve activated the add-on, you can connect Gravity Forms to Mailchimp by following these steps:
- Go to Forms → Settings.
- Click on the Mailchimp tab.
- Add your Mailchimp API key to the box. You can get this from the Mailchimp website by following these instructions.
- Once you add your API key, you should see an interface telling you that you’ve connected to Mailchimp.
The same basic process will apply to any other email marketing service. The only differences are typically in how you enter the API connection, as some services will work in different ways.
How to Create a Dedicated Email Subscribe Form With Gravity Forms
One of the most straightforward ways to start growing your email list is to create a dedicated email subscribe form that you can display at various spots on your site.
Generally, you’ll want to keep these forms very short, with just a couple of fields for a person’s email address and name. Some people even skip the name field and just collect a person’s email address.
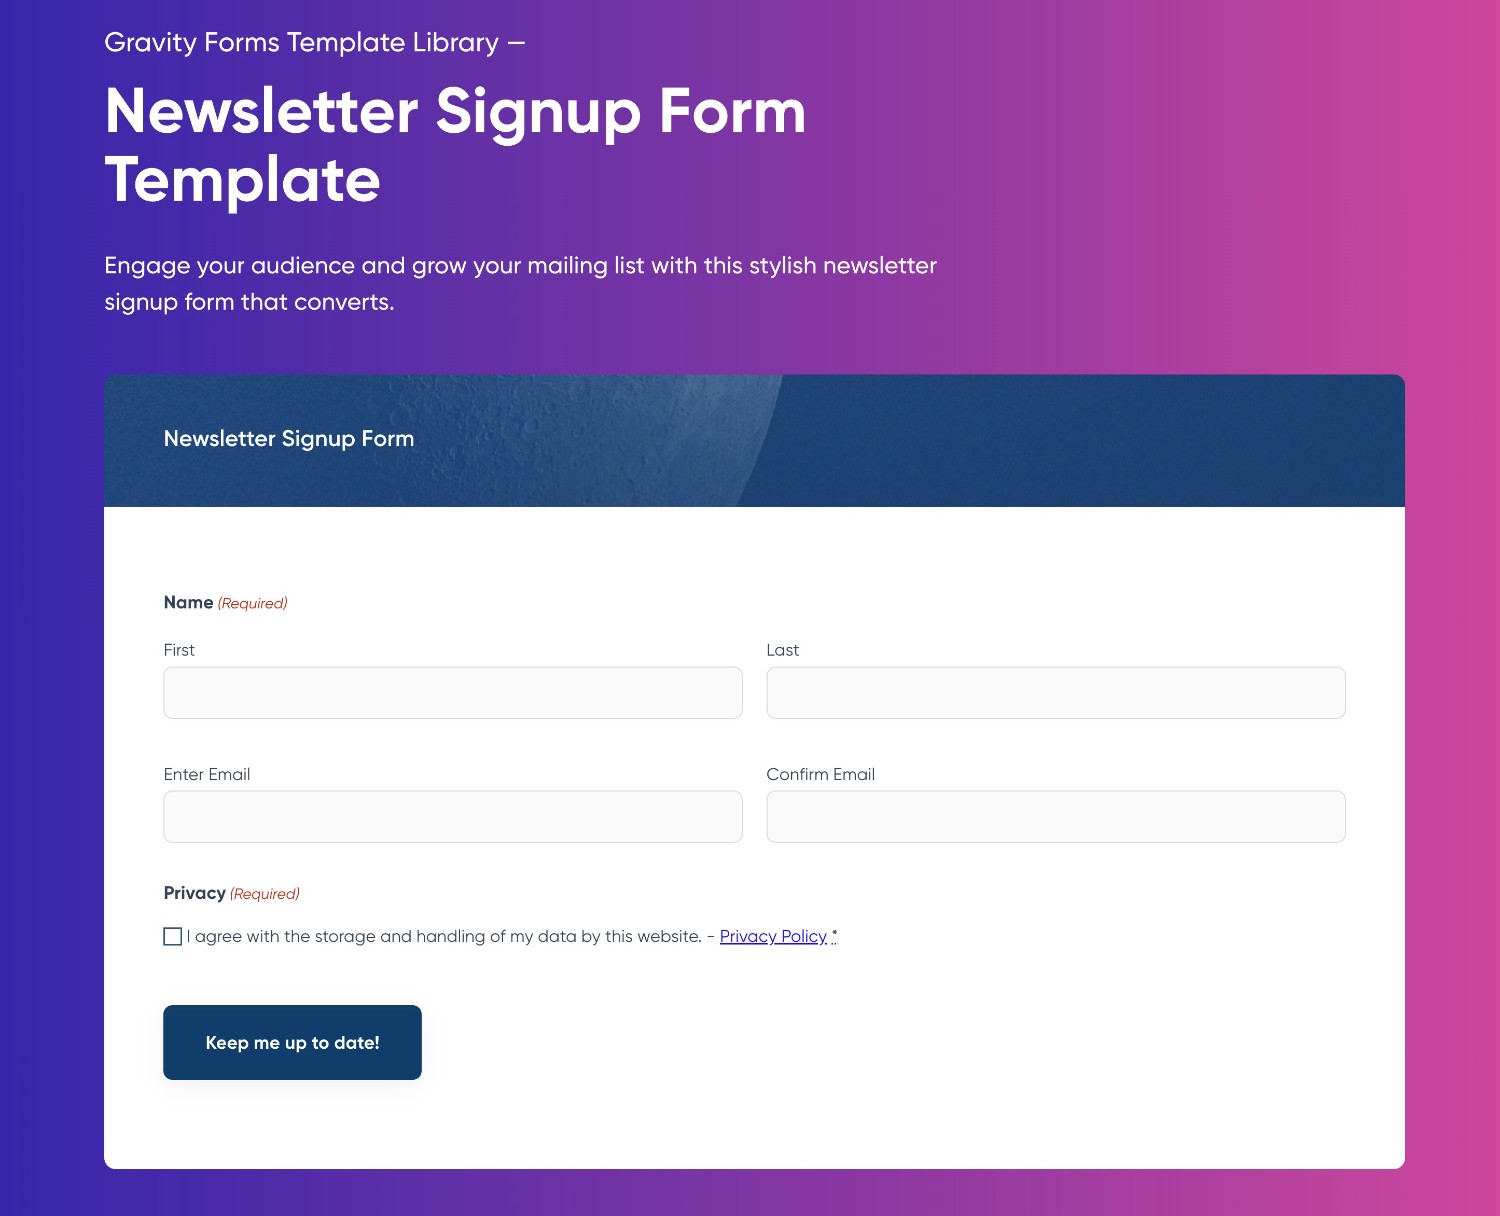
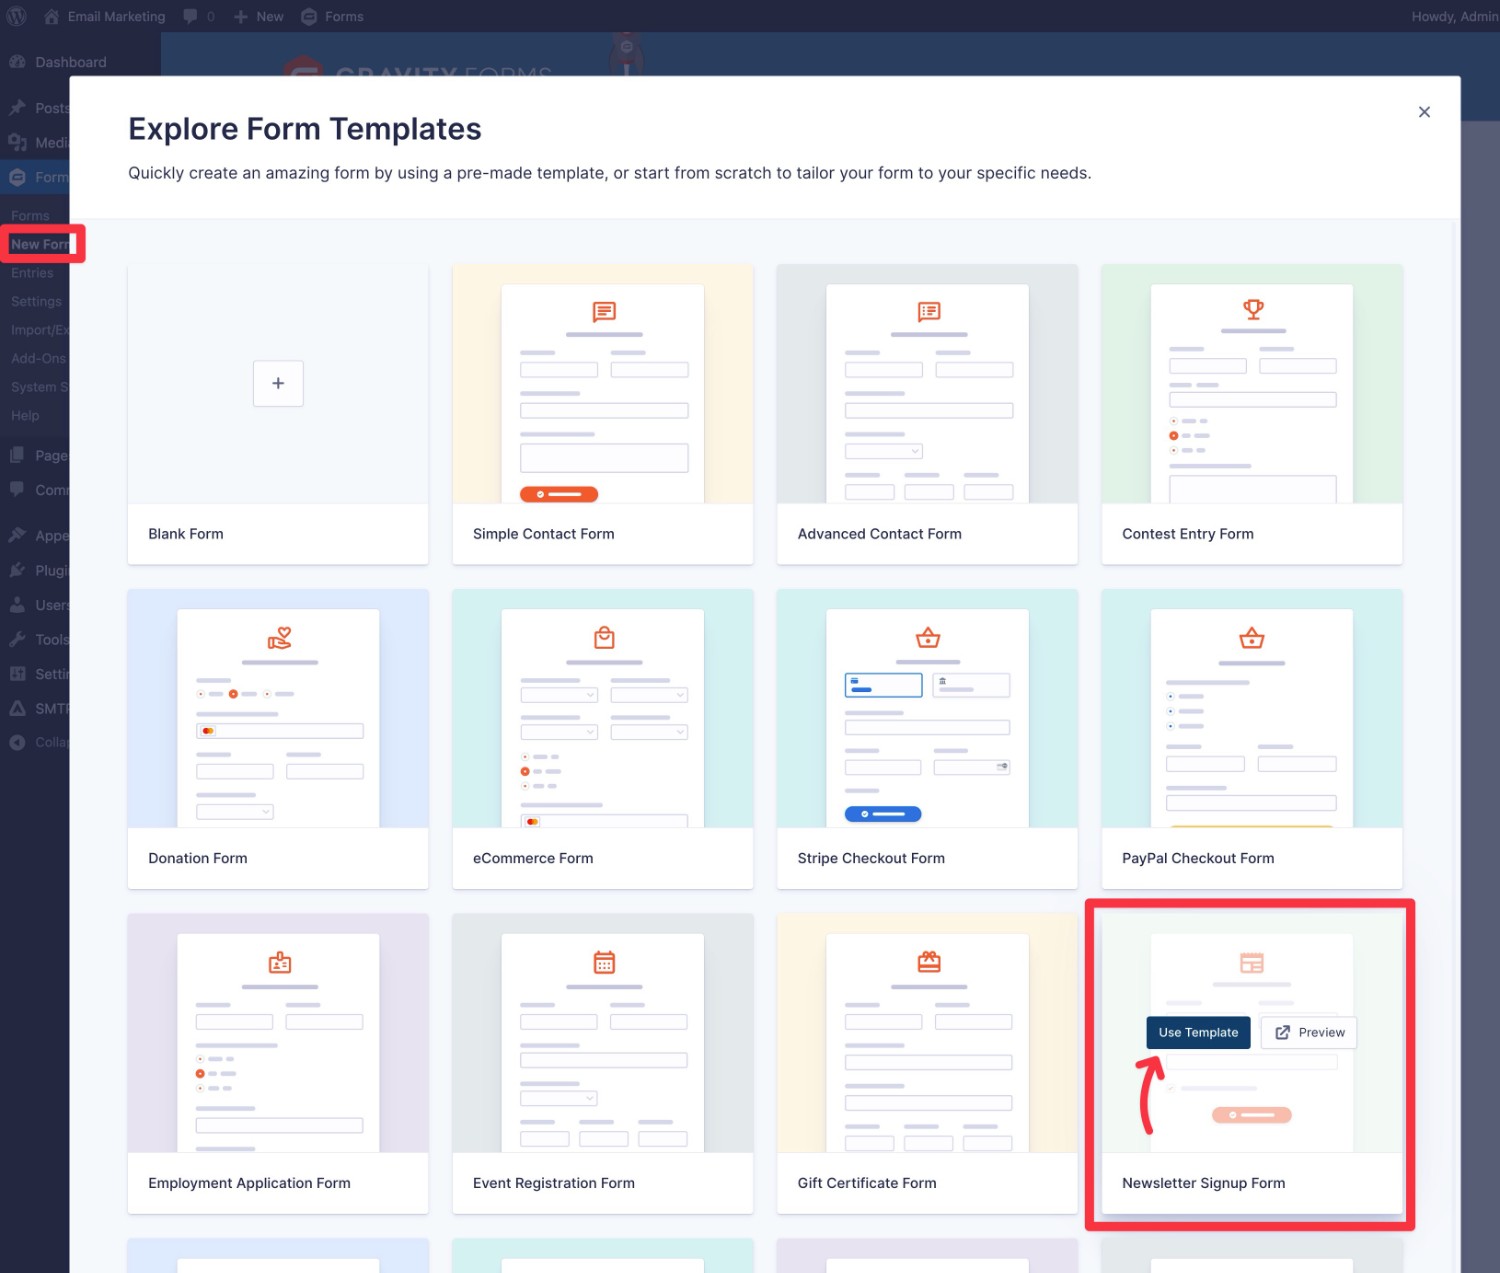
To help you quickly implement this, Gravity Forms offers a pre-built Newsletter Signup template. Or, you’re always free to build one from scratch.
Here’s how to get started:
- Go to Forms → New Form in your WordPress dashboard.
- Choose the Newsletter Signup template (or choose a blank template, if you prefer that approach).
- Give your form a name to help you remember it.
- Click the Use Template button to advance.
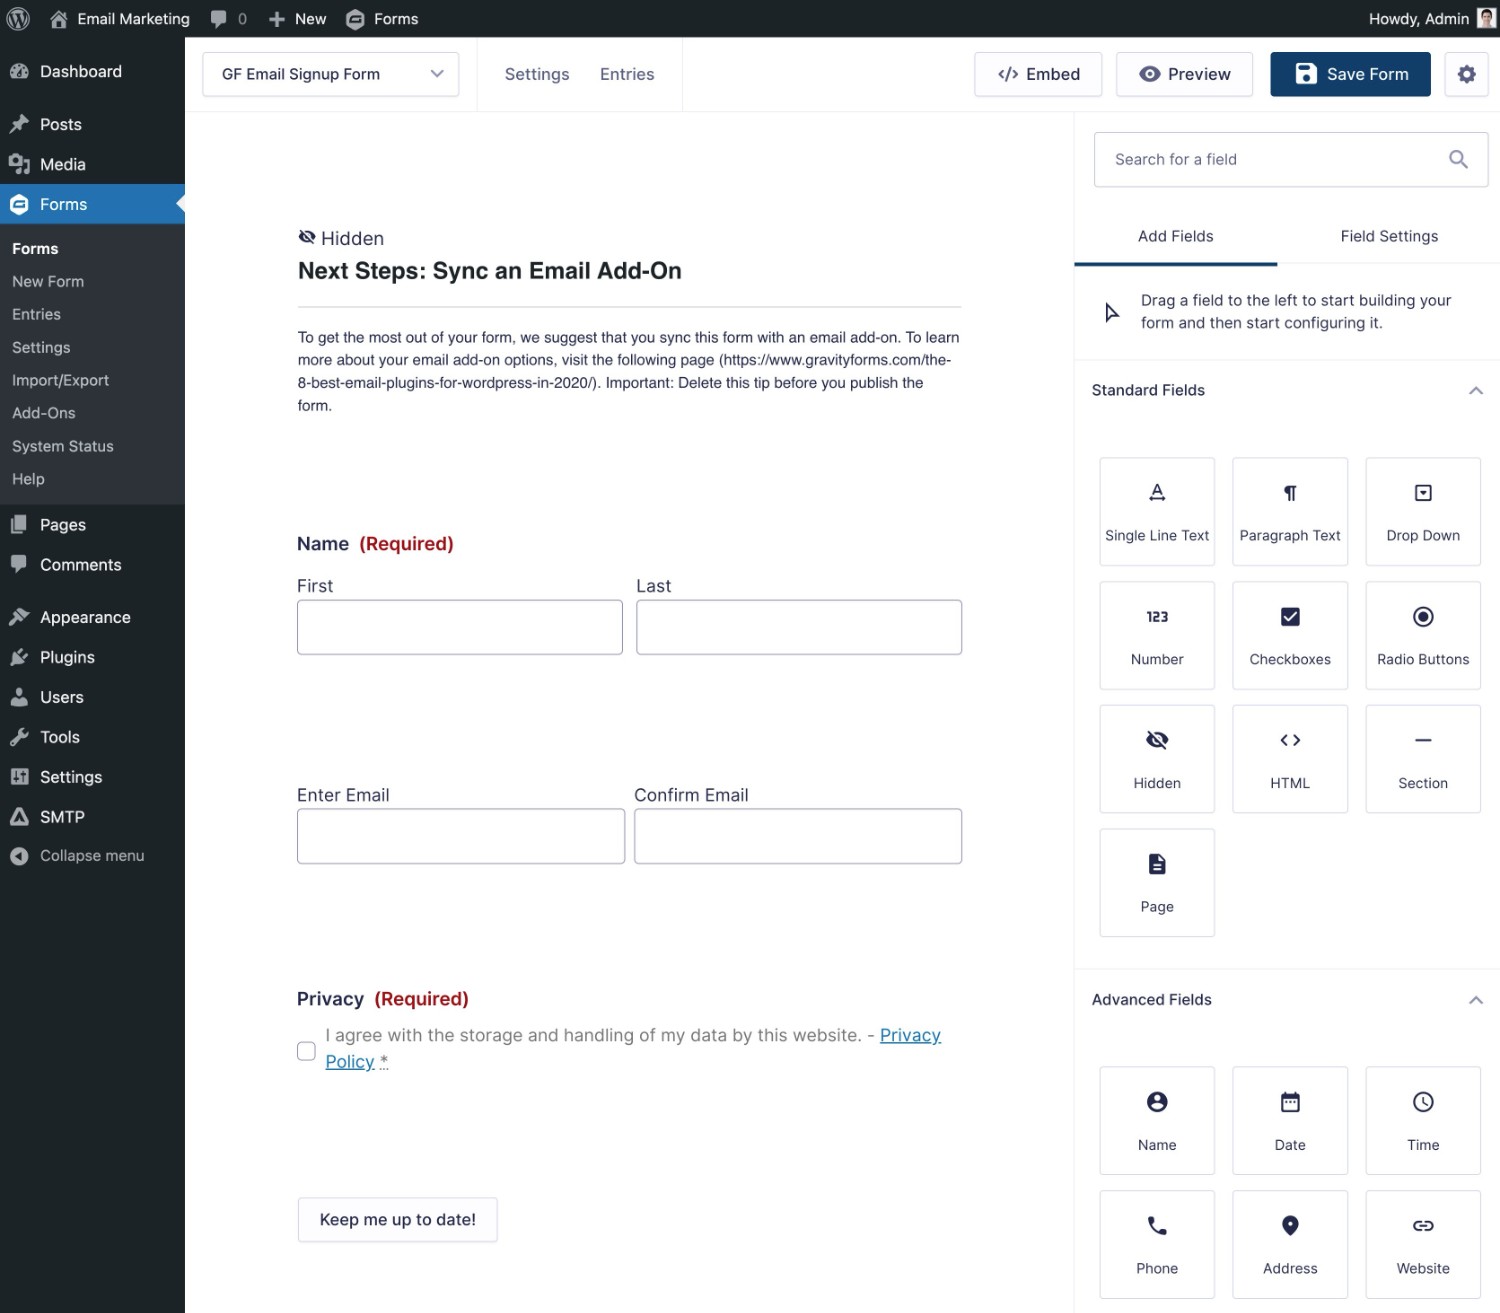
You should then be launched into the Gravity Forms editor. If you use the template, you shouldn’t need to do anything here. However, you’re always free to tweak everything according to your preferences.
Once you’re happy with the form fields, you need to connect your form to your chosen email marketing service. For this example, we’re using Mailchimp, as we showed you in the previous section.
Here’s how to do it:
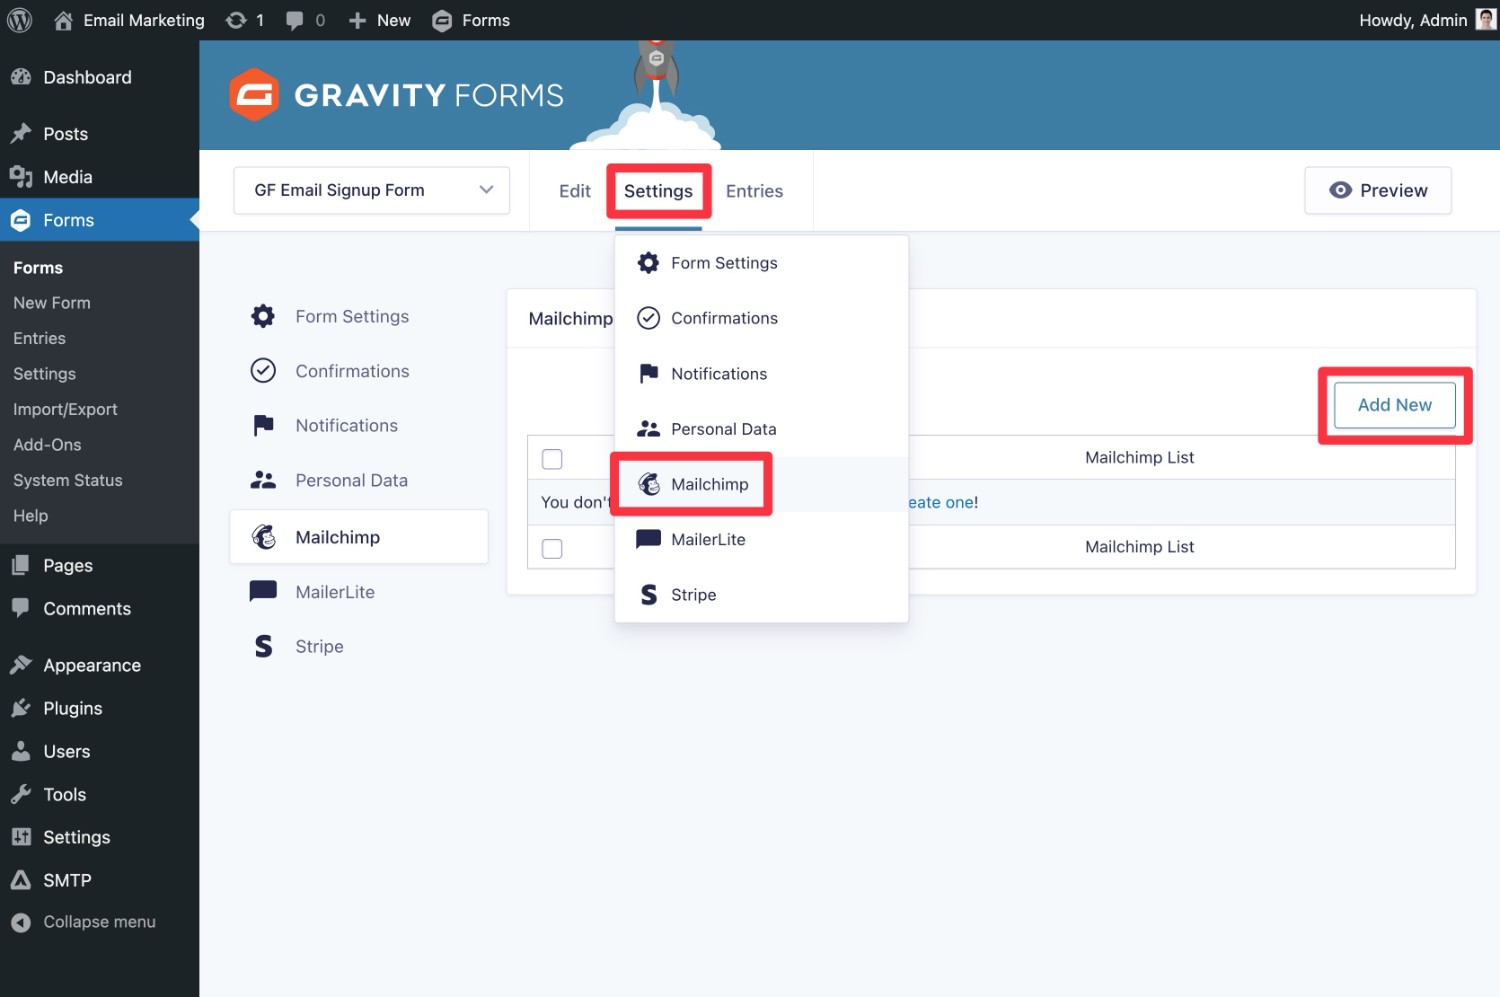
- Go to Settings → Mailchimp in the form interface.
- Click Add New to create a new Mailchimp “feed”.
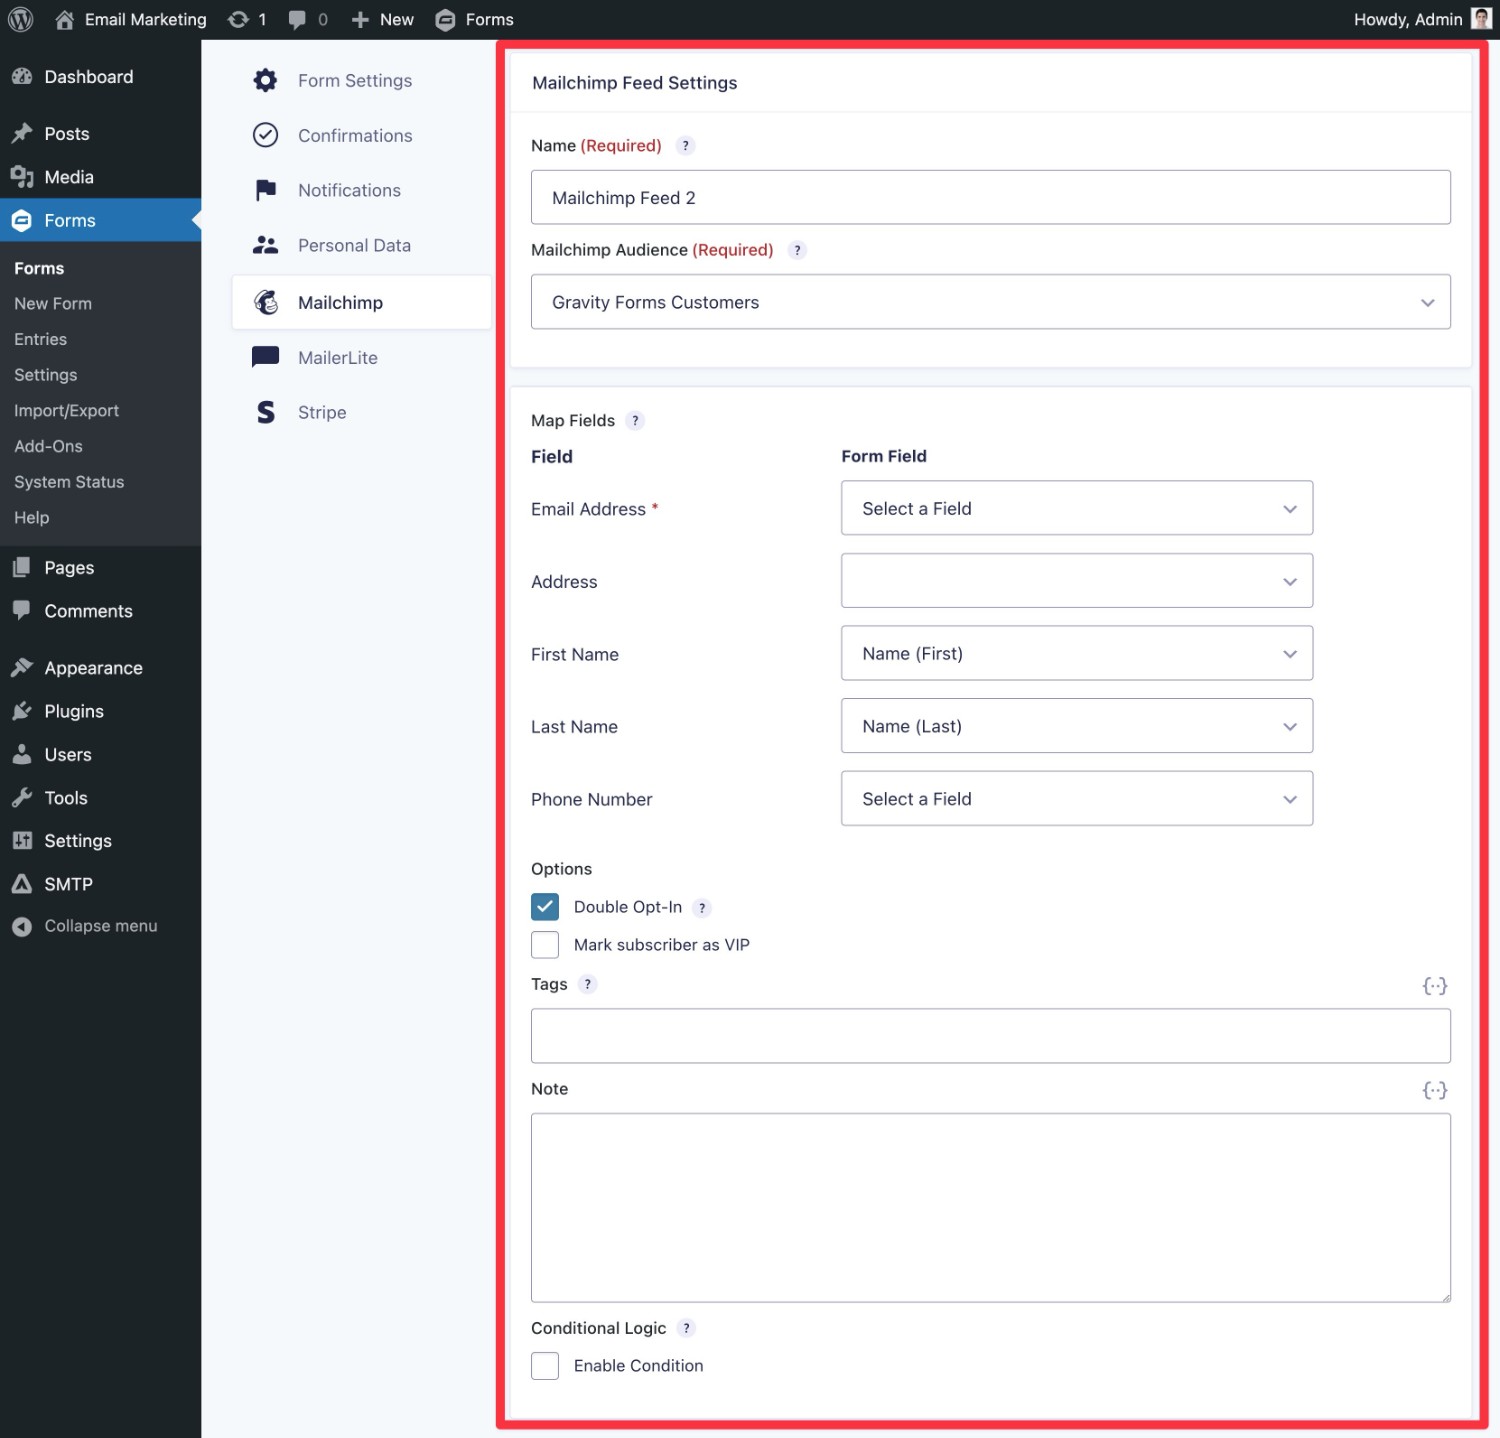
On the next screen, you can configure how you want to sync subscribers to your Mailchimp list, including mapping form fields and applying tags.
You can then embed your form wherever you want it to display to start getting subscribers.
How to Add an Email Subscribe Option to An Existing Form With Gravity Forms
One of the great things about using Gravity Forms for email marketing is that you aren’t limited to just creating standalone email opt-in forms. You can also add an email subscribe option to other forms that you’re using.
For example, let’s say you have a site that allows user registration and you regularly have people creating new accounts via your site’s registration form.
To capitalize on those user interactions, you could add a checkbox to your user registration form that lets people also subscribe to your email list as part of the signup. You’ve probably noticed this strategy a lot in your daily life, as it’s pretty common for websites with user registration.
Here are some other types of forms where you might want to consider adding an email subscribe option:
- Contact forms – if people are interested in contacting you, they also might be interested in receiving updates via your newsletter.
- Purchase forms – if you use Gravity Forms to sell products or services, you can add an email opt-in to your form.
- Feedback form – if you accept customer feedback, they might also want to subscribe.
- Donation forms – if you have a nonprofit, you could let people subscribe from your donation forms.
The basic process for adding an email opt-in to any type of form is the same.
First, make sure you already have a field to collect the user’s email as part of your form. If you don’t, you’ll need to add one.
Then, you can add a checkbox field that gives people the option to join your newsletter. Here’s an example of what it might look like:
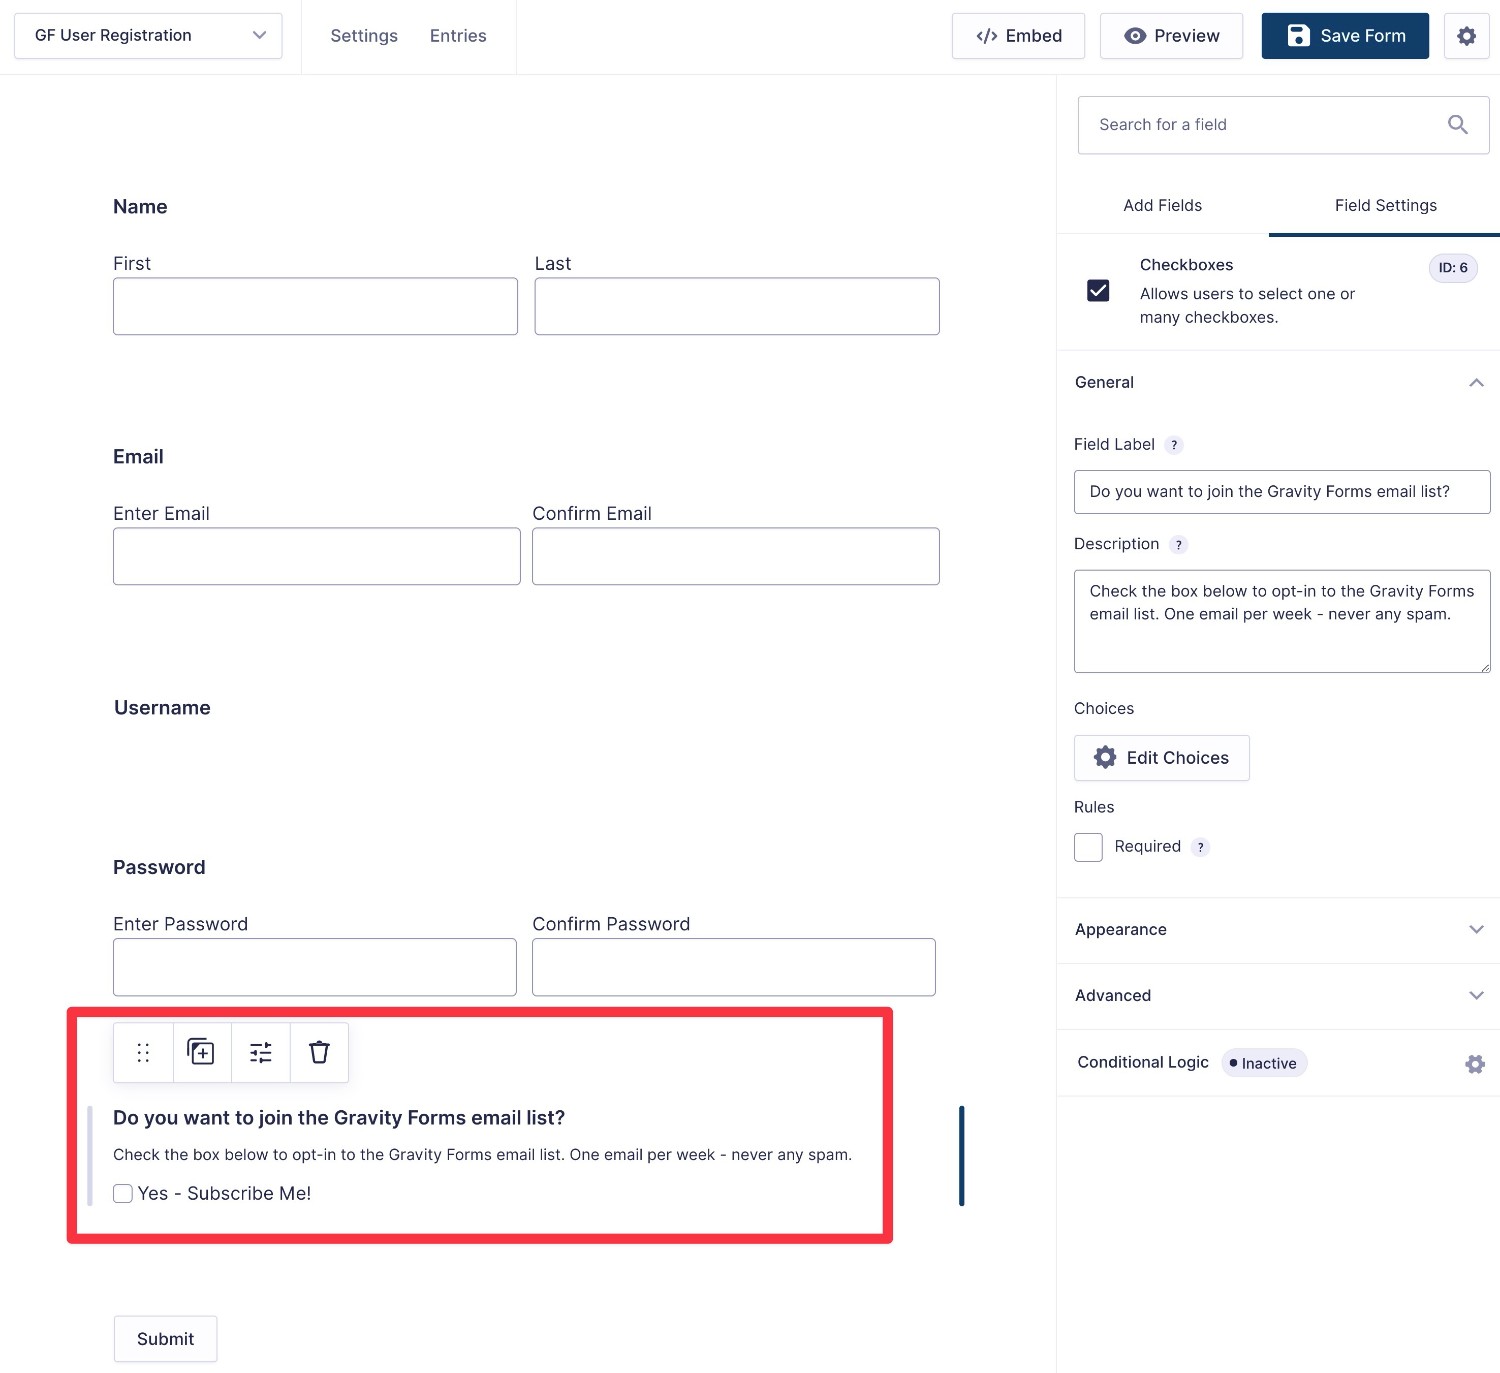
Once you’ve added the checkbox, you can create a new feed for your email marketing service, just like we showed you in the email subscribe section above.
There’s just one tweak…
Because you only want to subscribe people to your email list if they check the box to join, you’ll need to add a conditional logic rule to only execute the feed if the person has checked the email opt-in box:
- Find the Conditional Logic settings at the bottom of the feed creation interface.
- Check the box to enable conditional logic.
- Add a rule to only process the feed if the user checks the box.

How to Optimize the Subscribers That You Get From Your Forms
To get the best email marketing return from your website’s existing traffic, you should always be trying to optimize the conversion rate of your email signup forms.
In layman’s terms, your email opt-in conversion rate is essentially just the percentage of overall visitors who actually sign up for your list.
For example, if a page with one of your email optin forms has 100 visitors and you get three of them to sign up for your list, that form’s conversion rate would be 3%.
The average email optin form conversion rate is usually somewhere between 1-5%, though there are a lot of variables that can affect that.
Here are two quick tips to help you get more subscribers…
Experiment With Timing and Placement
Here’s a question:
If you land on a website, in which of these situations would you be more willing to provide your email address?
- You see an opt-in form right when you land on the website, before you can even read any content.
- You see an opt-in form after you’ve already engaged with the content in some way, whether that’s reading content, watching a video, leaving a comment, and so on.
If you’re like me, you probably chose the second one, which is a useful insight for optimizing your email signups.
Basically, you want to find a way to show people your opt-in forms once you already have a pretty good idea that they’re engaging with your content. To find when and where that is, you might need to experiment a little bit.
For example, if you want to include an opt-in form in each blog post on your site, you might experiment between placing the form all the way at the bottom and placing it at some midway point in the post:
- All the way at the bottom pretty much guarantees that the person engaged with your post, but some people might not see the opt-in form.
- Midway through the post makes it more likely that people will see the form, but they might not have fully engaged with your content yet.
There’s no hard rule that works for every single site. Instead, we recommend just experimenting with different placements until you find one that works best for your audience.
Create an Offer or Incentive to Join
This one is pretty simple…
You can offer people some type of incentive to give you their email addresses. There’s nothing wrong with a little quid quo pro when it comes to email marketing!
If you have an ecommerce store, you might offer a special coupon or discount to people who join your newsletter, which is a common strategy.
If you have a content site, you could offer some type of downloadable content that connects to the content that the person is viewing. You’ll often see this called a lead magnet or a content upgrade.
With Gravity Forms, you can easily trigger an email to send after someone subscribes. You can then include the special offer in this email. Or, if you’re offering some type of downloadable content, you could redirect users to the download page after they submit the form.
What Types of Emails Should You Send Subscribers?
Once you start getting some email subscribers, there are a lot of different types of emails that you can send them.
Here are some ideas for what you can send:
- Welcome email – send an automated email that welcomes the subscriber to your newsletter and tells them what to expect.
- New content notifications – send people an email or roundup whenever you publish new content, such as a new post on your blog, video on your YouTube channel, and so on.
- Brand/personal emails – you can send people emails updating them on what you or your brand are up to, which is a great way to build a connection with your audience.
- Sales funnels – if you’re selling some type of product or service, you can set up automated sales sequences to convert subscribers into paying customers.
- Promotional emails – if you’re selling products, you can also send emails to promote various offers that you’re running. For example, if you’re running a sale or special offer, it’s a great idea to promote that to your email list.
- Abandoned cart emails – if you have an ecommerce store, sending abandoned cart emails is a great way to bring customers back to complete their orders.
- Affiliate offers – even if you don’t sell your own products, you can consider promoting other people’s products as an affiliate. If this fits your business strategy, it can be a great way to monetize your newsletter.
Most of the time, you’ll want to combine automated email sequences with one-off emails that you send manually, which will help you get the best of both worlds.
For example, when someone signs up for your list, you might trigger an automated welcome email followed by an automated sales funnel sequence designed to convert people into customers. These emails will be delivered in a drip format, over a set period of time of your choosing.
Then, you’ll also want to send one-off email blasts for things like new content notifications, promotions, brand/personal emails, newsletters, and so on. All of your subscribers will receive these emails at the exact same time.
Tips for Effective Email Marketing
To finish things out, let’s run through a few tips for more effectively implementing your email marketing.
Nail Your Writing (Especially the Email Subject Line)
The writing/content of your emails is obviously going to play a big role in audience engagement and how successful your efforts are.
Writing high-quality emails really requires an entire guide of its own, but here are a few basic tips.
To start, you’ll want to pay special attention to your email subject line, as this is one of the most important parts of any email. It will play the biggest role in determining whether or not your subscribers actually open your email and engage with your content.
In general, you’ll want to keep your email subjects between 30-60 characters. Roughly four to seven words is the sweet spot, and try not to go over nine words. For the rest, MailerLite has a good guide to email subject lines, along with lots of examples.
For the rest of the email, you’ll want to develop a specific tone and voice for your brand, and then keep that consistent over all of the emails that you send. You could be playful or serious, you just want to keep that same energy in all of your emails to build a stronger connection with your audience.
Personalize Your Emails Whenever Possible
Personalizing your emails is a great way to engage your subscribers and create a better experience for them.
If you collect a person’s name in your email opt-in form, most email marketing tools make it easy to dynamically insert each person’s name in your emails, including both the email subject and email body.
If you want to go further, you can also personalize the emails that you send based on people’s actions or interests, though this approach is a little more complex.
For example, Gravity Forms lets you apply different tags to people based on how they filled out the email subscribe form. You could use these tags to segment your audience and send them personalized content that better matches their interests.
Use Your Data to Find What Works
When you first get started with email marketing, you’ll have no idea what works well. Don’t worry if you’re feeling a bit lost about the most effective way to implement things – that’s totally normal.
However, once you start growing your lists and sending emails, you’ll be able to also start collecting lots of data about what works well and what doesn’t work well. For example, you can see which emails get opened the most and drive the most clicks.
Don’t let this data go to waste. Instead, pay attention to which emails drive the most engagement so that you can double down on what’s working.
Run A/B Tests to Find the Best-Performing Emails
Tying with the previous point, you can also use A/B testing to give you even more data about what works well with your specific audience.
With A/B testing, you can send two or more variants of the same email. For example, one common strategy is to test different email subject lines to see which one engages the most people. You might send one subject to half your list and a different subject to the other half.
Once you see which variant performs better, you can incorporate that knowledge into future email campaigns.
Beyond subject lines, you can also consider A/B testing other parts of your email marketing efforts such as your opt-in forms, the design of your emails, the timing of your emails, and so on.
Listen to Feedback (and Ask for It)
While you can gain a lot of insights from the quantitative metrics that we covered above, you should also seek out more qualitative feedback from your subscribers.
One way to collect qualitative feedback is to simply ask your subscribers to respond to your email with their thoughts. You could send a dedicated email asking for feedback or do it as part of another email.
Or, you could create a dedicated feedback form with Gravity Forms and direct people to share their thoughts with that form instead.
Focus on Engaged Subscribers, Not Overall Subscriber Account
When you’re doing email marketing, it’s easy to get overly focused on the overall number of subscribers that you have (and seeing that number go up). This focus can push you to find ways to increase subscribers at any cost, even if those people don’t fit your target audience.
Instead of focusing on the overall subscriber count, we recommend focusing on the number of engaged subscribers that you have, which you can see via various metrics such as click and open rates.
Not only will this help you connect with the right audience, but it will actually save you money – many email marketing services charge based on the number of subscribers that you have, so having large numbers of unengaged subscribers can actually be a waste of money.
In fact, after you’ve been running your email marketing for a while, you might want to actually go in and “clean” your lists of unengaged subscribers.
Get Started With WordPress Email Marketing Today
That wraps up our high-level guide on email marketing for WordPress sites.
Because we tried to cover the whole process from start to finish, we weren’t able to go super in-depth on any one area. But by covering everything at least at a high level, we hope you now have the knowledge to get started with your email marketing efforts.
Choose an email marketing service or plugin that fits your needs and start growing your lists today. And if you’re looking for a companion plugin to help you grow those lists more effectively, consider adding Gravity Forms to your stack.
You can purchase a Gravity Forms license here or spin up a free demo site to try it for yourself.

If you want to keep up-to-date with what’s happening on the blog sign up for the Gravity Forms newsletter!
