How to Build a Podcast Email List: Turn Listeners to Subscribers
As a podcaster, it’s important to keep your audience engaged beyond the latest episode. Rather than relying purely on streaming platforms or social media for engagement, building an email list gives you a direct, reliable way to stay in touch with your podcast audience.
Luckily, starting one doesn’t have to be complicated. With Gravity Forms, you can create a professional-looking email sign-up form right on your WordPress website. And when you connect it to an email marketing platform like Mailchimp, new subscribers are added to your list automatically.
In this article, we’ll discuss reasons to build an email list for your podcast, how to create a sign-up form with Gravity Forms, and how to link it to an email marketing service to start growing your list.
Why Build an Email List for Your Podcast?
You might be wondering why, as a podcaster, you should start an email newsletter in the first place. After all, you already have an audience, why try to move it over to another medium?
Well, here are a few good reasons:
- Audience ownership – Unlike streaming or social media, your email list is yours. It’s not dependent on an algorithm or a platform outside of your control. You fully own your email list and can take it with you wherever you go.
- Direct communication – Having access to your audience via email allows you to directly talk to them, for example, to collect feedback using surveys and use it to improve your podcast.
- Additional promotion opportunities – With an email list, you can let subscribers know when a new episode is live to drive immediate listens and engagement. It also allows you to share bonus content and exclusives like behind-the-scenes updates.
- Traffic to your site or offers – An email newsletter lets you link to show notes, blog posts, merchandise, events, or paid subscriptions.
- List segmentation – Segmenting your audience allows you to send targeted messages to different listener groups, like new subscribers or supporters. This helps improve conversion rates.
- Monetization opportunities – An email list allows you to promote products, affiliate links, or sponsorship deals directly to your most loyal listeners.
Benefits of Using Gravity Forms for Your Podcast Email List
Below, we’ll use Gravity Forms to create an email sign-up form and start collecting subscribers on your website. Here’s why the plugin is a great tool for podcasters:
- Use the beginner-friendly drag-and-drop form builder – Gravity Forms lets you create even complex forms without any coding, in a simple yet powerful user interface. Lots of form field options allow you to collect almost any data you could ever need.
- Grow your list where your audience is active – You can easily embed sign-up forms on episode pages, blog posts, your homepage, or any other popular part of your website.
- Match your form to your brand – Customize the form look, fields, and layout to reflect your podcast’s style.
- Automate email list management – Automatically sync new subscribers with email marketing tools like Mailchimp or Kit (formerly ConvertKit). No need to manually export them.
- Segment your audience with ease – Tag or group subscribers based on interests, topics, or how they filled out your form. Gravity Forms comes with powerful conditional logic to filter subscribers at the source.
- Accept payments and donations – Use PayPal, Stripe, and many other payment platform integrations to collect listener support or sell access to premium content.
- Simplify your workflow – From opt-ins to automated email tagging, Gravity Forms allows you to automate most of the process of building your podcast email newsletter.
- Extend to your needs – Gravity Forms offers a large selection of add-ons, so you can add functionality according to your needs. For example, you could turn your forms into conversational forms.
You can also use Gravity Forms to create other forms for your podcast website:
- Contact forms to field business opportunities and fan inquiries.
- Payment forms for exclusive content, digital products, or merch.
- Guest registration forms to collect bios, contact info, suggested topics, and availability.
- Event registration forms for live shows, meetups, or webinars.
- Job application forms for when you start growing your team.
Now that you know why building an email list can be helpful for your podcast, we’ll show you how to do it using WordPress and Gravity Forms.
How to Create an Email List for Your Podcast
For the tutorial below, we’ll assume you have a WordPress website with the main Gravity Forms plugin installed already (find instructions here). If not, you can also follow along by using a free demo site which has all of the features you’ll need.
1. Install and Configure the Mailchimp Add-On
In this example, we’ll use Mailchimp as our email marketing platform of choice. The Mailchimp Add-On is included with all Gravity Forms licenses. If you ultimately choose to use something else, the process will be very similar.
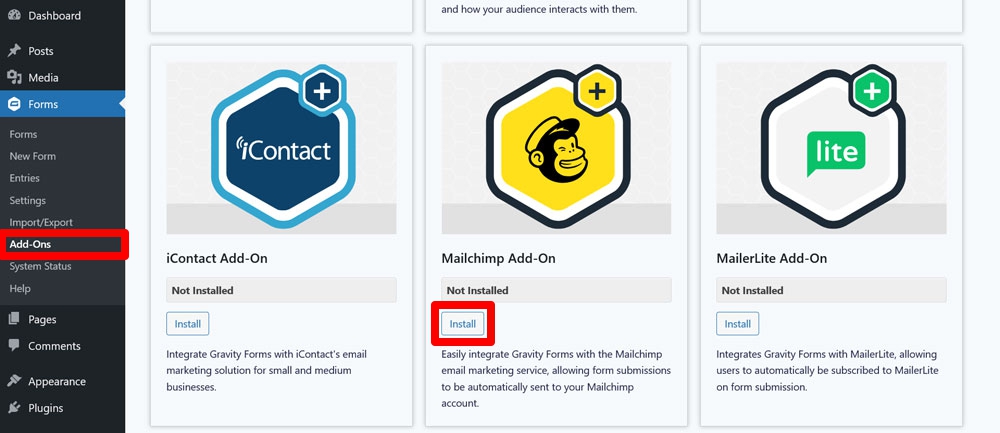
To install the add-on on your site, head over to Forms → Add-Ons. Here, scroll down until you see the Mailchimp Add-On and click Install.
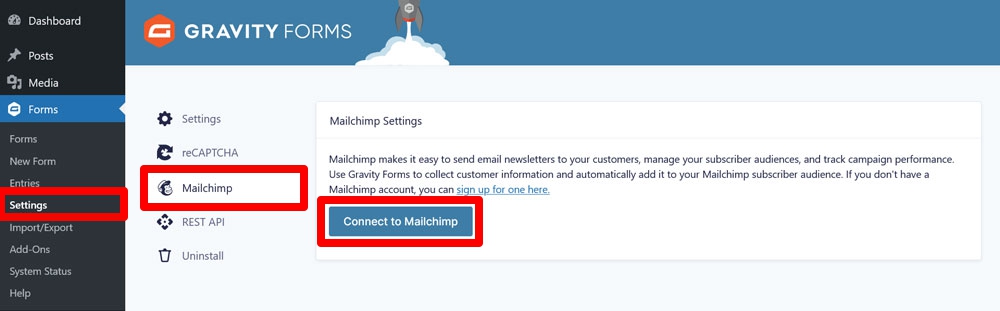
After it has downloaded and you have activated it, navigate to Forms → Settings → Mailchimp and click Connect to Mailchimp.
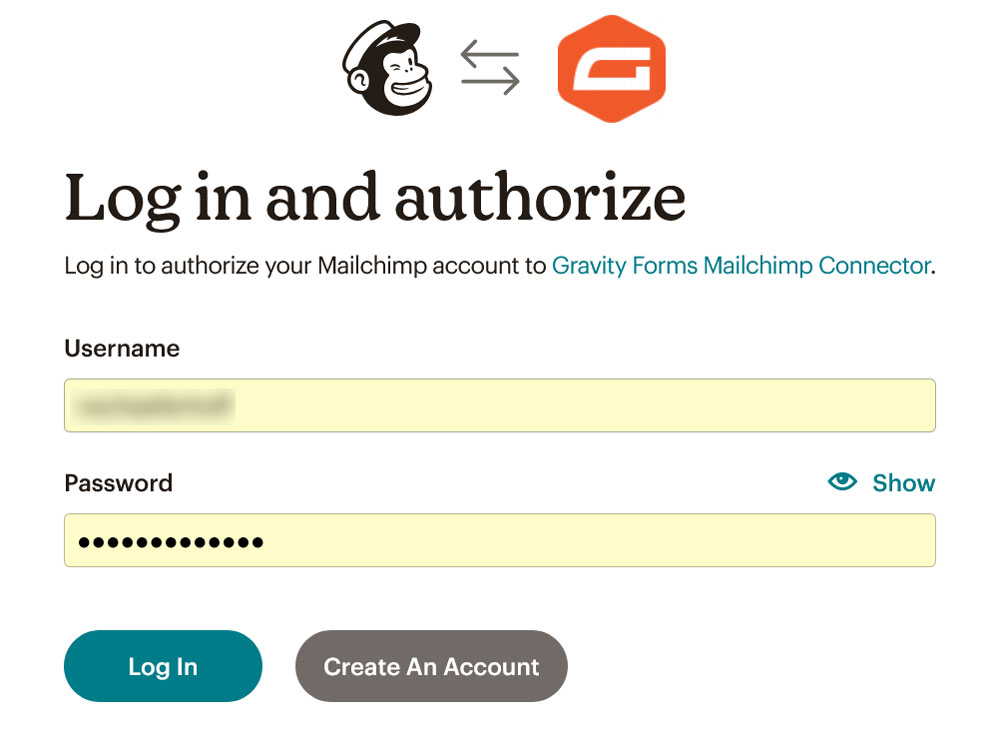
You’ll receive a prompt to log in to your MailChimp account and authorization access for Gravity Forms. Confirm to continue.
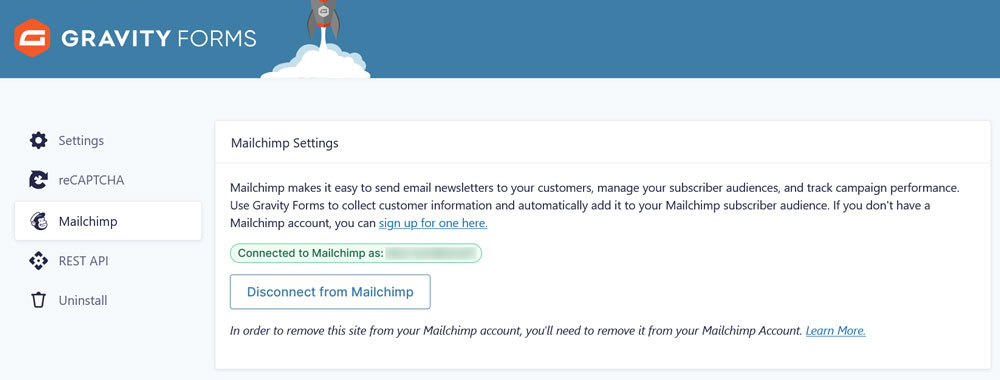
After that, you should automatically return to your WordPress site and see the connection has been established.
2. Create Your Email Sign-Up Form
To create a form, go to Forms → New Form.

You can either start from scratch or use one of the many one-click templates Gravity Form offers. You’ll see a prompt for that when you start creating your form. In this case, we’re going with the Newsletter Signup Form template.
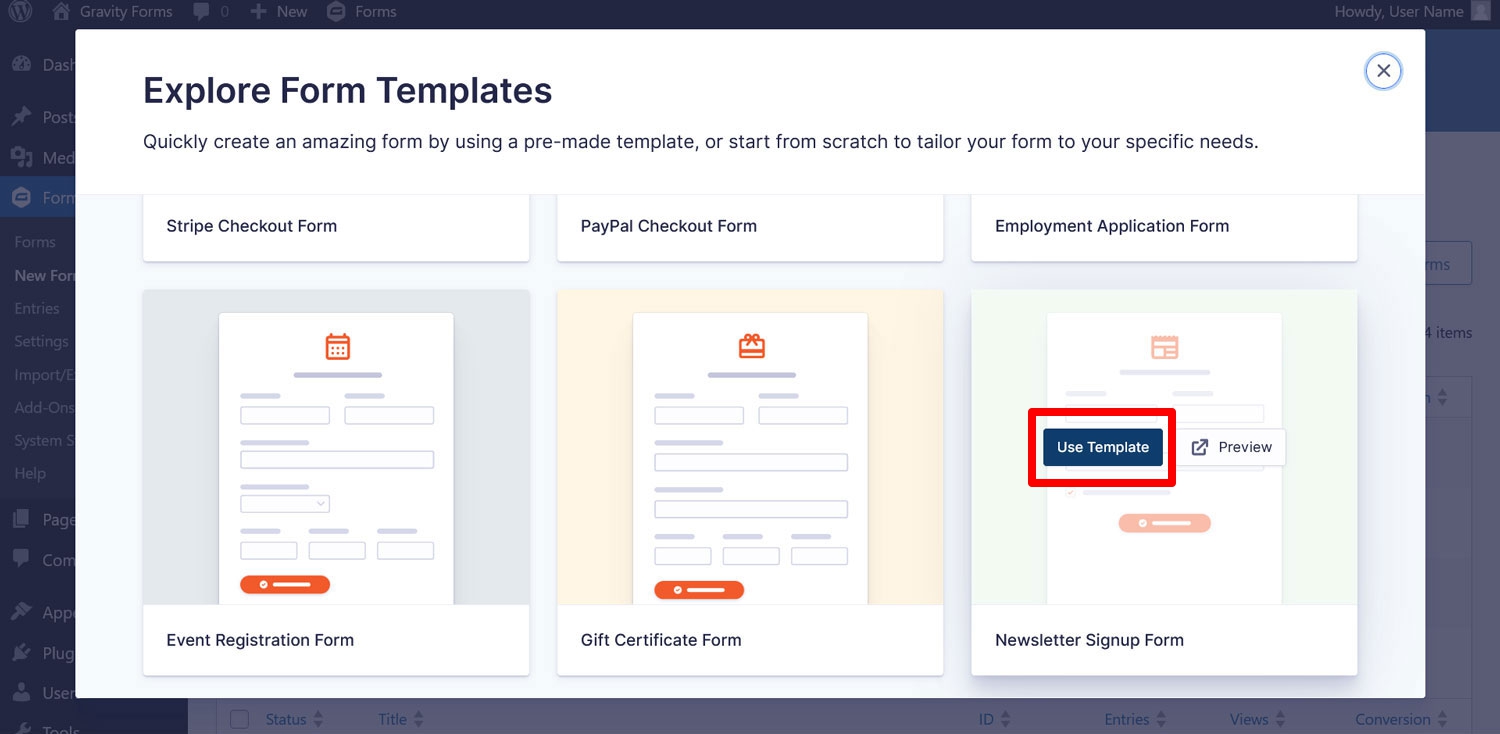
Hover over it and click Use Template. Enter a form title in the next step, then continue to the Gravity Forms drag-and-drop editor.
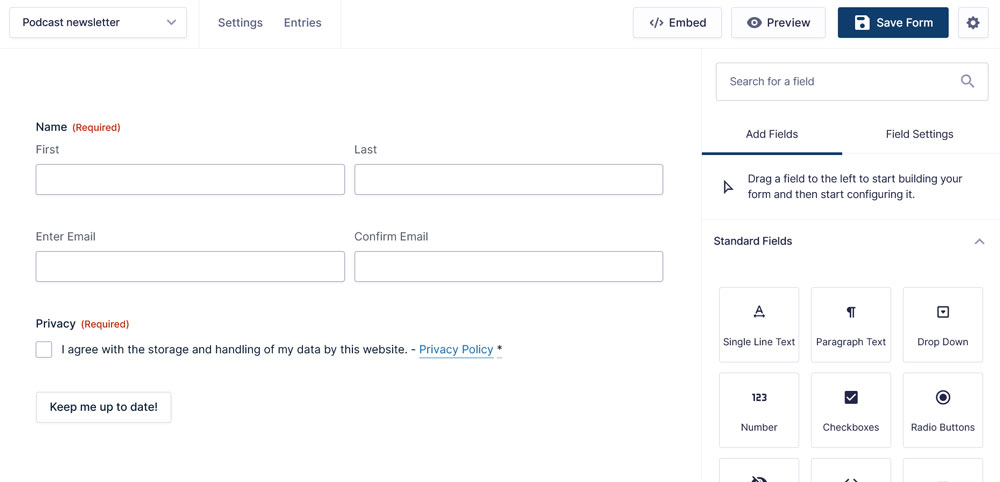
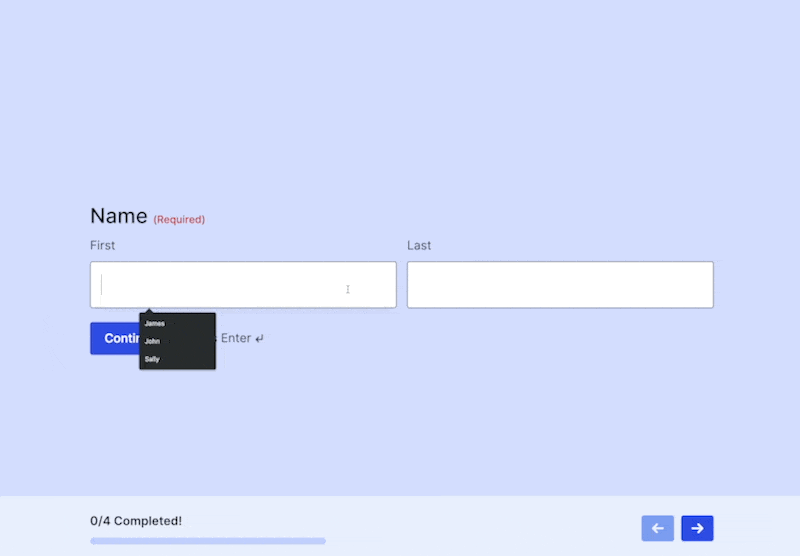
3. Customize the Form
Since we are using a template, the form already has some fields, specifically for collecting the first name, last name, email address, and consent from your subscribers.
If you need anything else, you can easily customize the form to your needs. For example, if you only want to address people by first name, you can click on the Name field and then switch off the last-name input in the sidebar and change the label of the first-name field.
You can also use the toolbar that appears at the top to move, duplicate, or delete existing fields.
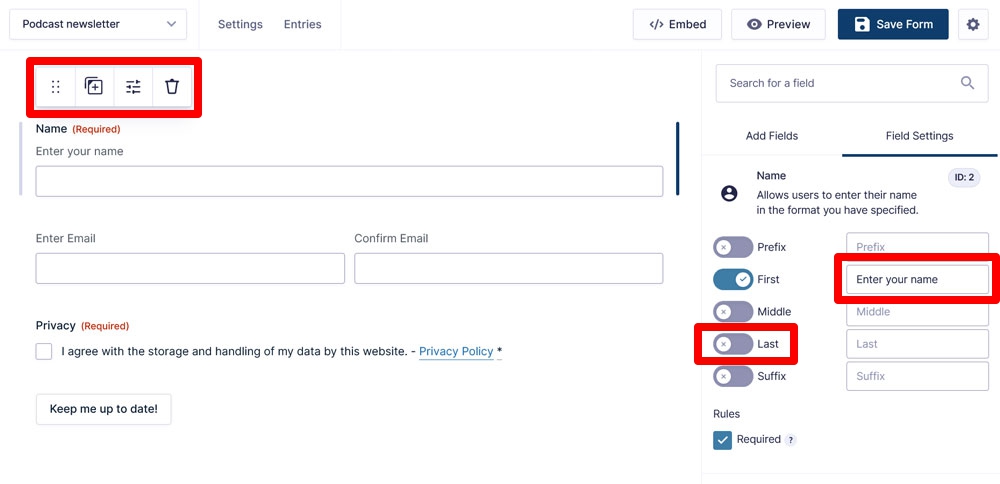
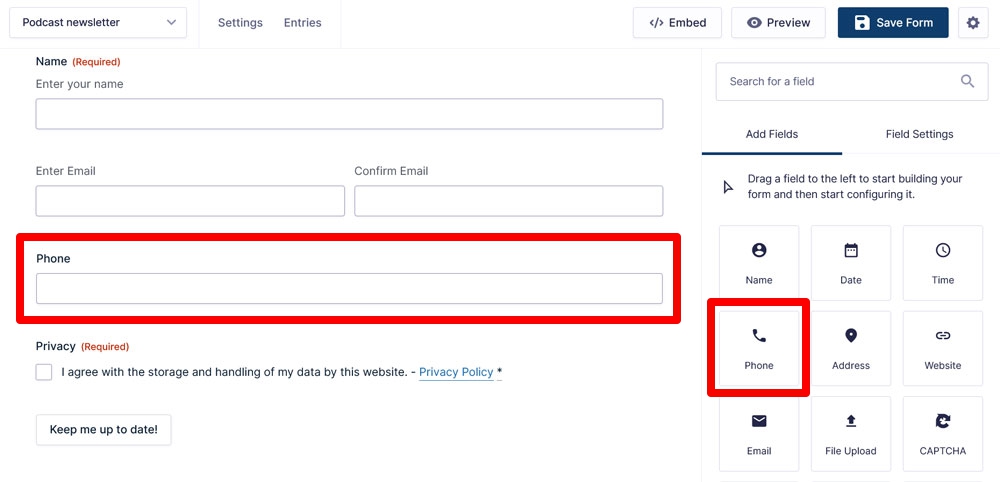
In the sidebar, you’ll also find the option to add other form fields available in your installation of Gravity Forms. Simply drag them to any place in the editor where you want them to appear and customize as needed.
Save any changes you make by clicking Save Form in the top right.
4. Create a Mailchimp Feed
With the form ready, it’s now time to configure a feed. A feed is responsible for determining how to process any data submitted to your form. In this case, we want it to be sent on to Mailchimp.
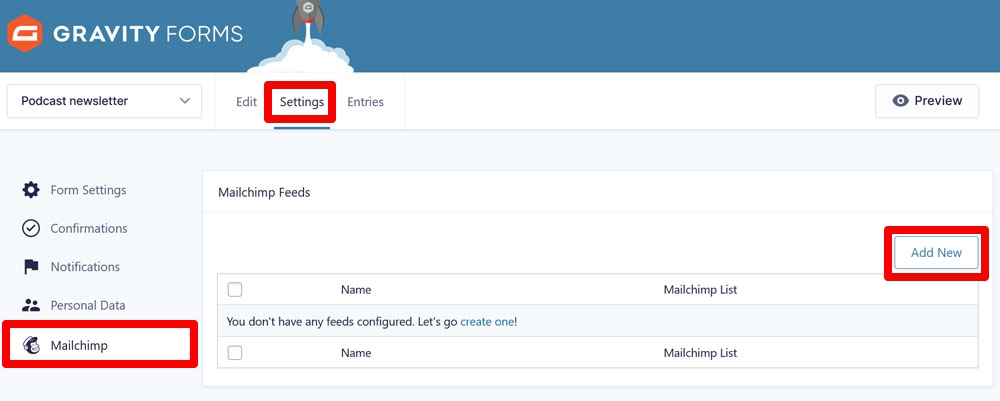
To get started, hover over Settings in the form editor and click Mailchimp.
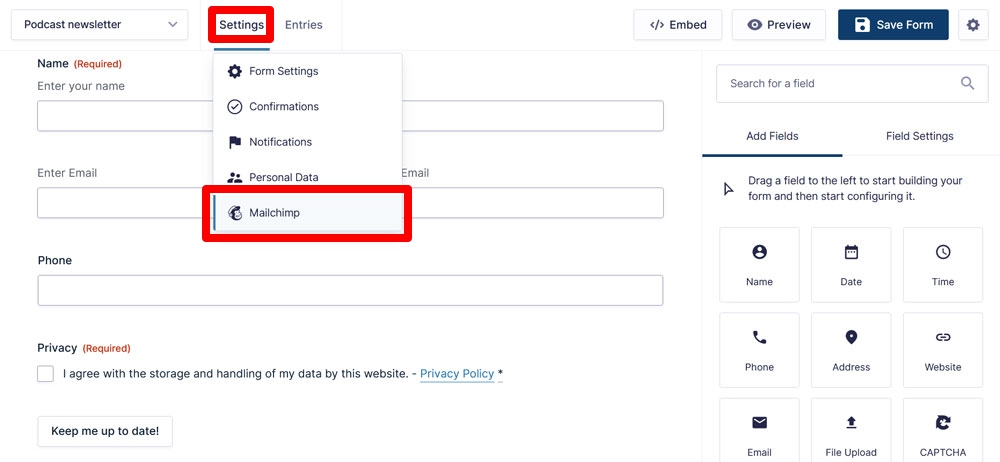
Next, click Add New to create a new feed.
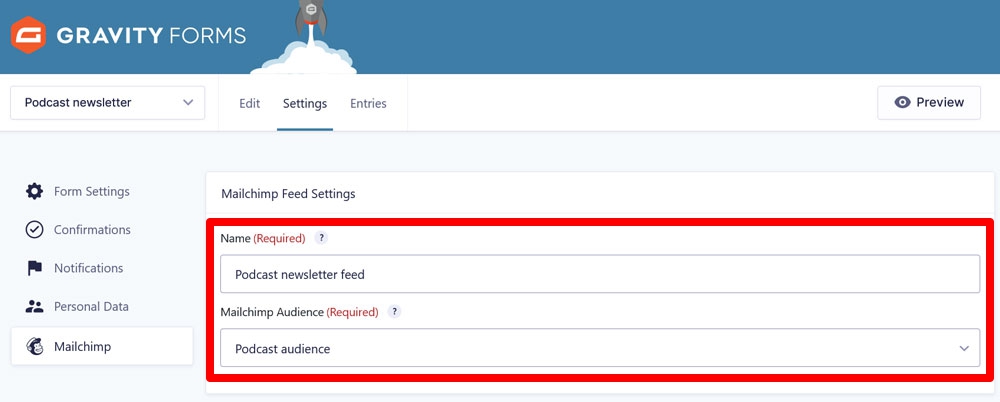
Next, give it a name and select the correct Mailchimp audience from the drop-down menu (if you don’t have an audience yet, you’ll need to first create it inside Mailchimp).
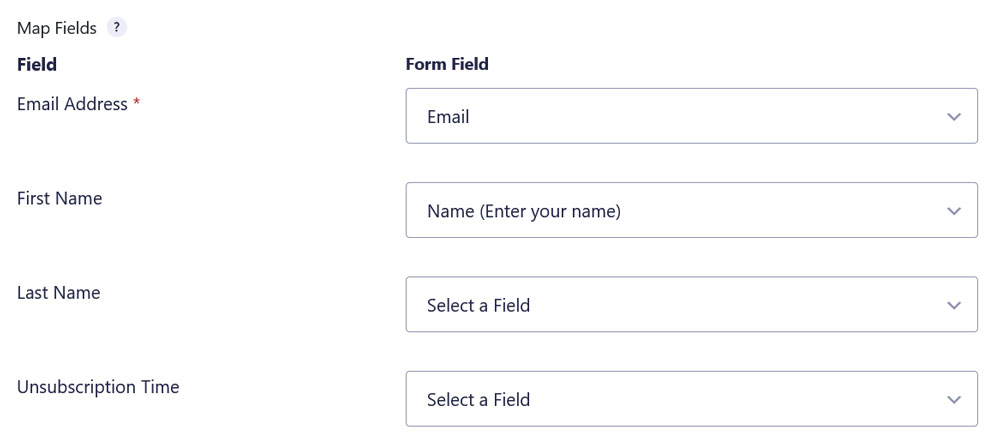
After that, use the dropdowns to map your form fields to the corresponding Mailchimp fields. This will ensure that whatever your visitors enter in your form will be saved correctly in Mailchimp.
There may be more options you can configure depending on your Mailchimp setup. For example, you could assign subscribers to groups or let them opt in to different marketing channels.
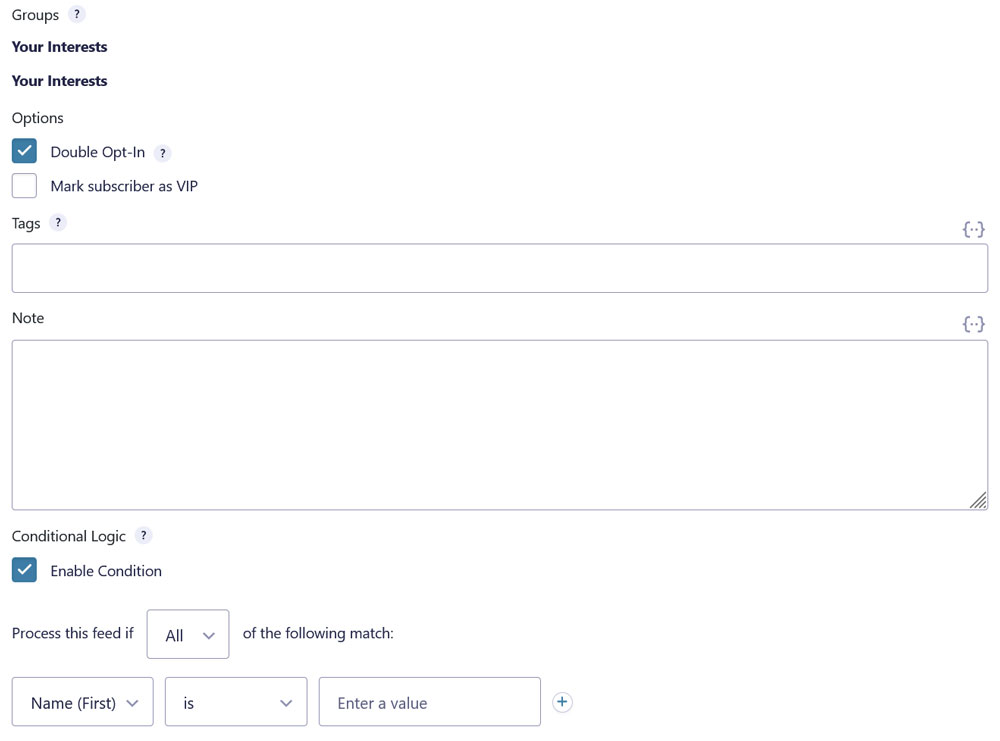
If you choose to enable the Double Opt-In option, subscribers will receive a confirmation link they need to click in order to confirm their intent to subscribe. To learn more about every setting, check the Mailchimp feed documentation.
Save at the bottom when you are done.
5. Customize Confirmations and Notifications
There are two more form features worth noting. Confirmations are the messages that appear after someone submits a form. They tell subscribers that their form submission was successful, and can also be used to provide additional information or invite further action.
You can customize them by heading to your form settings and clicking Confirmations.
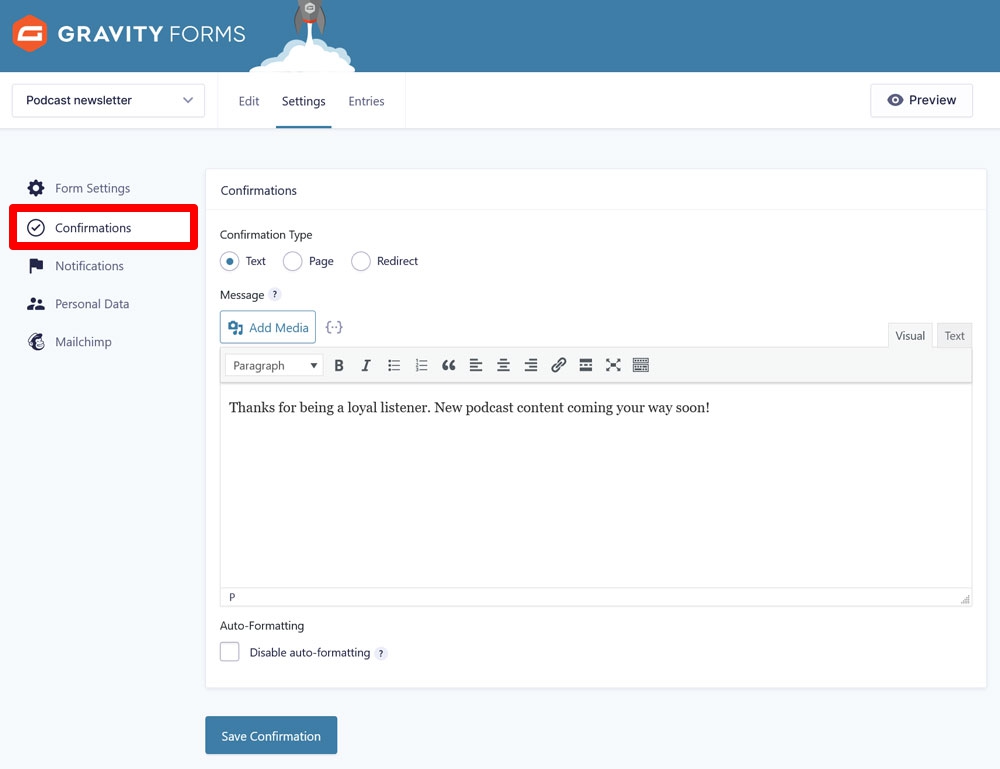
To learn more about the possibilities here, visit the Gravity Forms documentation..
Notifications, on the other hand, are the email messages sent to you and/or the people who submit your form. For example, you can use them to welcome new subscribers and send them links to your best episodes.
Options to customize notification can also be found in your form settings under Notifications.
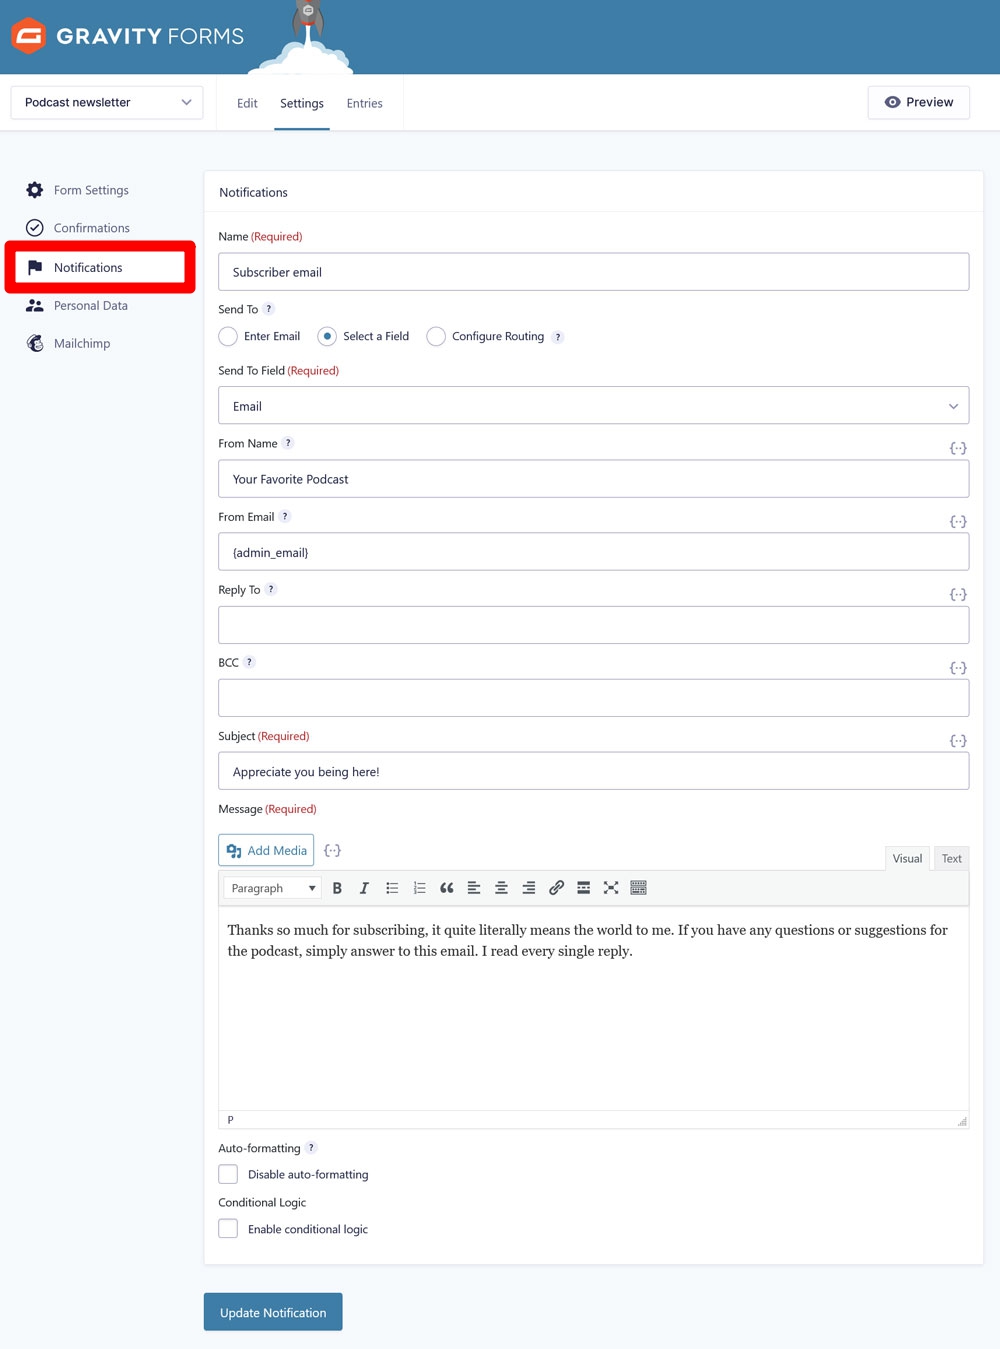
The documentation for notifications has more information.
6. Embed and Test Your Form
Once everything is set up to your liking, the last step is to embed the form and test that it works properly. To do this, create a page and input the form using the Gravity Forms block or shortcode.
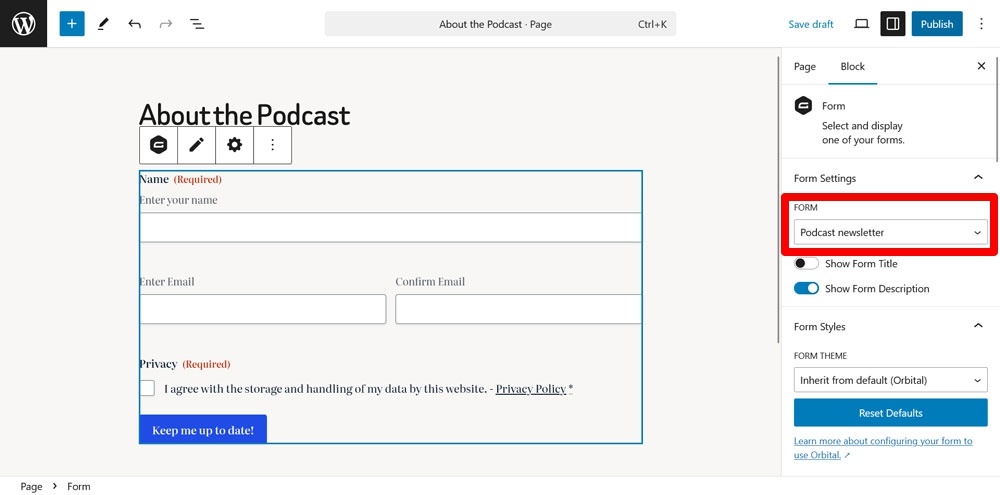
Then, either preview or publish the page and then complete the form using some dummy information.

If everything works, your new subscriber and all its information should appear in your Gravity Forms form entries as well as your chosen list in Mailchimp. If that is the case, your email sign-up form is ready for a permanent place on your podcast website.
Best Practices for Growing and Managing Your Podcast’s Email List
Setting up a sign-up form is just the first step. To make the most out of your podcast’s email list, consider these best practices:
- Mention your email list on-air regularly – Prompt listeners to sign up during your episodes, especially at the beginning and end when engagement is highest. If they only know you from streaming, they might not be aware that your email list even exists.
- Offer an incentive for signing up – Give subscribers something valuable like bonus content, early access, a downloadable guide, or behind-the-scenes material. Make it clear that they’ll get real value out of being part of your subscriber audience.
- Place forms in high-traffic areas – Embed opt-in forms on your homepage, episode pages, blog posts, or any other highly trafficked area of your website.
- Use clear CTAs – Instead of “Join my newsletter,” try “Get exclusive updates & bonus content” or something similar. Be specific about the benefits subscribers will receive.
- Segment your list from the start – Use form fields or tags to organize subscribers by interests, favorite topics, or content preferences. It will help you send more targeted messages in the long run.
- Set up a welcome email sequence – Make a strong first impression by automatically sending new subscribers a series of emails introducing your show and what listeners can expect.
- Stay consistent with your emails – Whether it’s once a week or twice a month, find and keep your own regular communication rhythm so your audience knows when they can expect to hear from you.
- Respect your audience’s attention (and inbox) – If you promise your listeners that you won’t spam them with emails, don’t spam them with emails. With the growing popularity and use of tools like AI and automation, earning and keeping your community’s trust is more important than ever.
Grow Your Podcast Email List With Gravity Forms
Growing a podcast isn’t just about releasing great episodes, it’s about building a lasting relationship with your audience. An email list gives you a direct, reliable way to talk to listeners, promote your content, and open doors for monetization and community building.
Gravity Forms makes setting up and managing your podcast’s email list simple. Customize your sign-up form, integrate it with your favorite email marketing software, and you are ready to go. Get started today with your own Gravity Forms license or continue testing the plugin with a free demo site.

If you want to keep up-to-date with what’s happening on the blog sign up for the Gravity Forms newsletter!