Create a Conversational Donation Form with Gravity Forms and PayPal
Conversational donation forms are a great alternative to classic ways of collecting donations. They make the payment process more interactive, eliminate distractions, and allow you to deliver additional information without overwhelming your customers. All good news for your conversions.
In addition, they are not that hard to implement. Using Gravity Forms, the Conversational Forms Add-On, and PayPal, you can create an interactive donation form in minutes. Below, we’ll show you how.
Inthis article, we’ll talk about why Gravity Forms and PayPal are great choices for your donation forms and give you easy instructions to follow for creating your own conversational donation forms. If you don’t know exactly what “conversational” means in this context, you’ll learn that as well.
If you don’t have Gravity Forms yet, you can sign up to our free demo for a test drive. For more conversational forms, check out the example gallery.
Why Use Gravity Forms for Your Donation Forms?
As a first step, let’s talk about why you should consider Gravity Forms to power your forms to collect donations on your WordPress site:
- User friendliness — The plugin comes with a beginner-friendly drag-and-drop editor that works seamlessly in the WordPress dashboard. Even if you don’t have a technical department, you can still quickly create even complex forms with just a few mouse clicks.
- Quick-start templates — While you can start with a blank form, Gravity also comes with blueprints such as the donation form template that make getting started easier.
- Flexibility — Our plugin supports many payment providers and other integrations, some of which are especially useful for nonprofits to add more features to your forms.
- Versatile — You can set up one-time and recurring donations, making digital fundraising very easy. Plus, you can use Gravity Forms for other nonprofit needs like lead generation, event registration, volunteer application forms, and more.
- Well-supported and secure — We adhere to the highest safety standards and offer comprehensive support and documentation in case you ever run into an issue.
Most importantly, Gravity Forms has a dedicated Nonprofit License all registered nonprofits can apply for. It comes at a reduced price and contains all current extensions and integrations. You can use it for three sites, unlimited forms, and form submissions. It also includes standard support (you hear back within 48 hours) but no Multisite.
In addition, we have numerous resources for nonprofit organizations such as tips for forms your nonprofit website needs and how to start a monthly giving program. You can find more resources here.
Why Should You Use PayPal to Collect Donations?
The other piece we are going to use to create a conversational donation form is PayPal. Here’s what makes it a great candidate as payment processor for your donation forms:
- Reliability and trust — With over 400 million customers worldwide, PayPal is a trusted household name. It has safeguards against fraudulent claims and chargebacks, offers dispute resolution, and protection for buyers. Using it on your website shows that you are serious about keeping your donors’ transactions safe.
- Variety of payment options — The service supports all major credit cards and over 100 currencies in more than 200 markets. It also offers numerous payment options such as Venmo, and other local payment methods, allowing people to easily make donations on your site.
- Great support options — You can find help via chat and phone, the PayPal resolution center, and a community forum if you run into any issues.
- Special conditions for charities — If you confirm your status as a charity, you can benefit from lower processing fees.
Despite their best efforts, if you are not a developer, implementing PayPal as a payment solution on your site can be a little daunting. That’s why we have created our dedicated PayPal Checkout Add-On to make setting it up as easy as possible.
The Gravity Forms PayPal Checkout Add-On
The Gravity Forms PayPal Checkout can be quickly and easily installed and activated on your WordPress website. Once done, you can simply connect Gravity Forms with PayPal, and start accepting payments via your donation forms.
Here are just a few of the features our extension offers:
- One-time and recurring donations — The PayPal Checkout Add-On can accommodate both one-time payments and ongoing donations. If you opt for recurring donations, you can set donation cycles to your chosen number of days, weeks, months, or years. You can also determine whether they should end automatically or be terminated by the donor by hand.
- Customizable donation amounts – Donations can be set in different ways, such as multiple choice, set amounts, letting donors manually enter a figure, and more.
- On-site donation management – Using Gravity Forms, donations can be canceled or even refunded directly in the WordPress user interface.
- Conditional logic – With Gravity Forms’ conditional logic functionality, you can create a myriad of pathways for how or when donations are processed. We’ll show you a practical example below.
- Additional extensions and functionality – The PayPal Checkout Add-On is compatible with other Gravity Forms plugins, such as the Conversational Forms Add-On, to use at the same time.
There are many more good reasons to use Gravity Forms and PayPal together.
Conversational Forms: What They Are and Why You Should Use Them
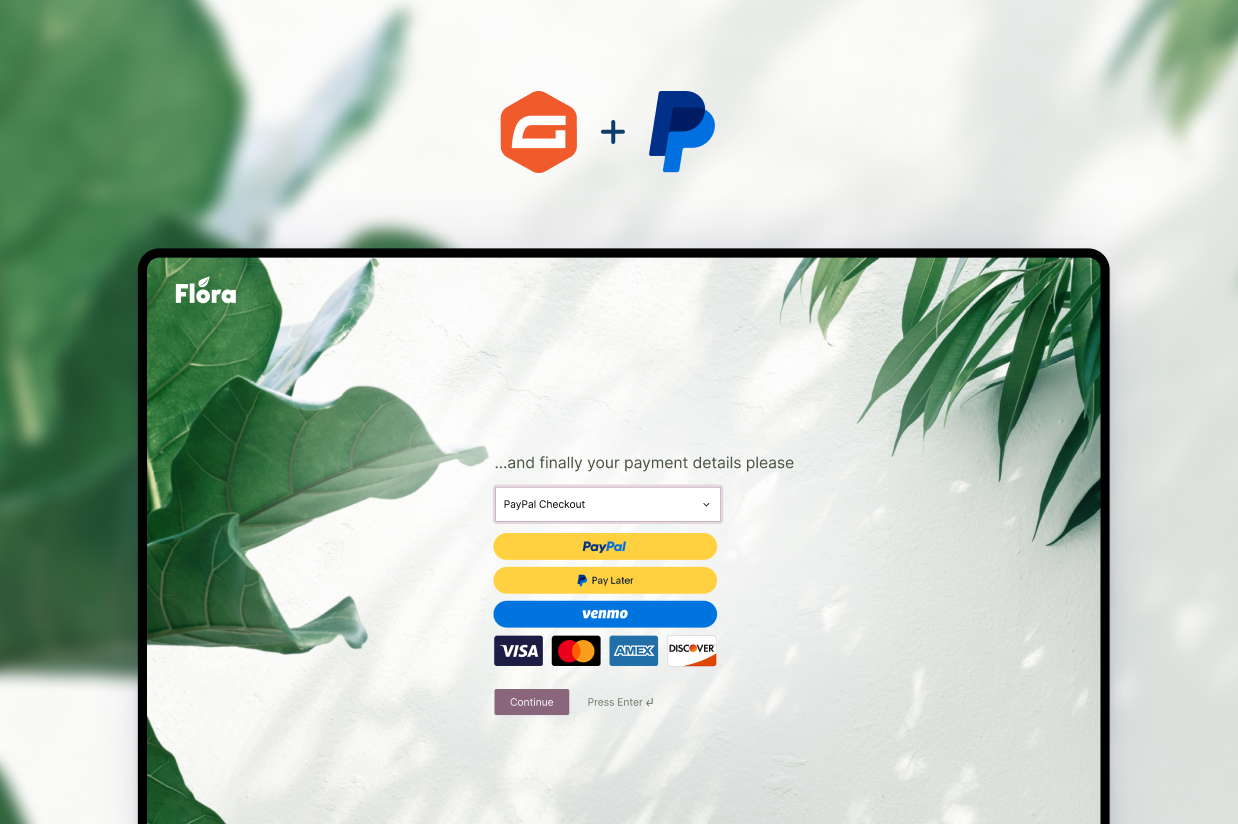
Finally, let’s talk about the meaning of conversational forms. In this form format, donors simply see the form fields in a step-by-step manner and click through them one at a time.
For example, a conversational form might first ask for a users name, then the billing address, donation amount, and finally the payment information — one screen at a time. This makes it feel more like a back-and-forth conversation, which is where the name comes from.
Conversational forms come with several benefits:
- Reduced overwhelm — Donors only have to focus on one piece of information at a time.
- More engagement — Your site visitors have to actively take part in the process, which makes the donation process more interactive.
- Mobile-friendliness — Less information on the screen makes these type of forms easier to use on phones and tablets.
- Better branding — As you will see below, there are more elements to customize in conversational forms, offering opportunities to reinforce your nonprofit’s brand and messaging. They also look sleek and modern, which makes your organization look good.
Conversational forms are especially suited for nonprofits because of their ability to tell a story. You can include more visual elements and information about your organization and how the donated funds will be spent.
The Gravity Forms Conversational Forms Add-On
To use this type of web form with Gravity Forms, you need the Conversational Forms Add-On. It’s part of the aforementioned Gravity Forms Nonprofit License. If you are not a nonprofit and also want to collect donations in this type of form, you’ll need the Elite license.
As you will see below, with the add-on on your site, you can turn any form into a conversational form simply by enabling it.
You don’t have to do any coding or learn a new interface. In addition, the forms in question still stay usable as traditional web forms and you can embed them in the usual way on your site. Your conversational forms are only available at a specified URL.
In addition, conversation forms are highly customizable so you can adjust them to the rest of your design and branding. We’ll cover that in detail below as well. Finally, you can also still use almost all Gravity Forms features and add-ons with conversation forms, there are just a few incompatibilities.
How to Create Conversational Donation Forms using Gravity Forms
Alright, let’s get to the implementation. For the following tutorial, we’ll assume that you have a working WordPress site with Gravity Forms installed.
You need a login for a PayPal business account. Make sure to pick Nonprofit as the business category when signing up. You find the information you need to provide to register as a nonprofit here. Plus, in order to use the sandbox environment for testing your payments, also get yourself a PayPal developer account.
Your website also needs to have an SSL certificate. This is crucial to process sensitive information like payment data. If your site doesn’t have one, talk to your hosting provider.
1. Install the PayPal Checkout and Conversational Forms Add-Ons
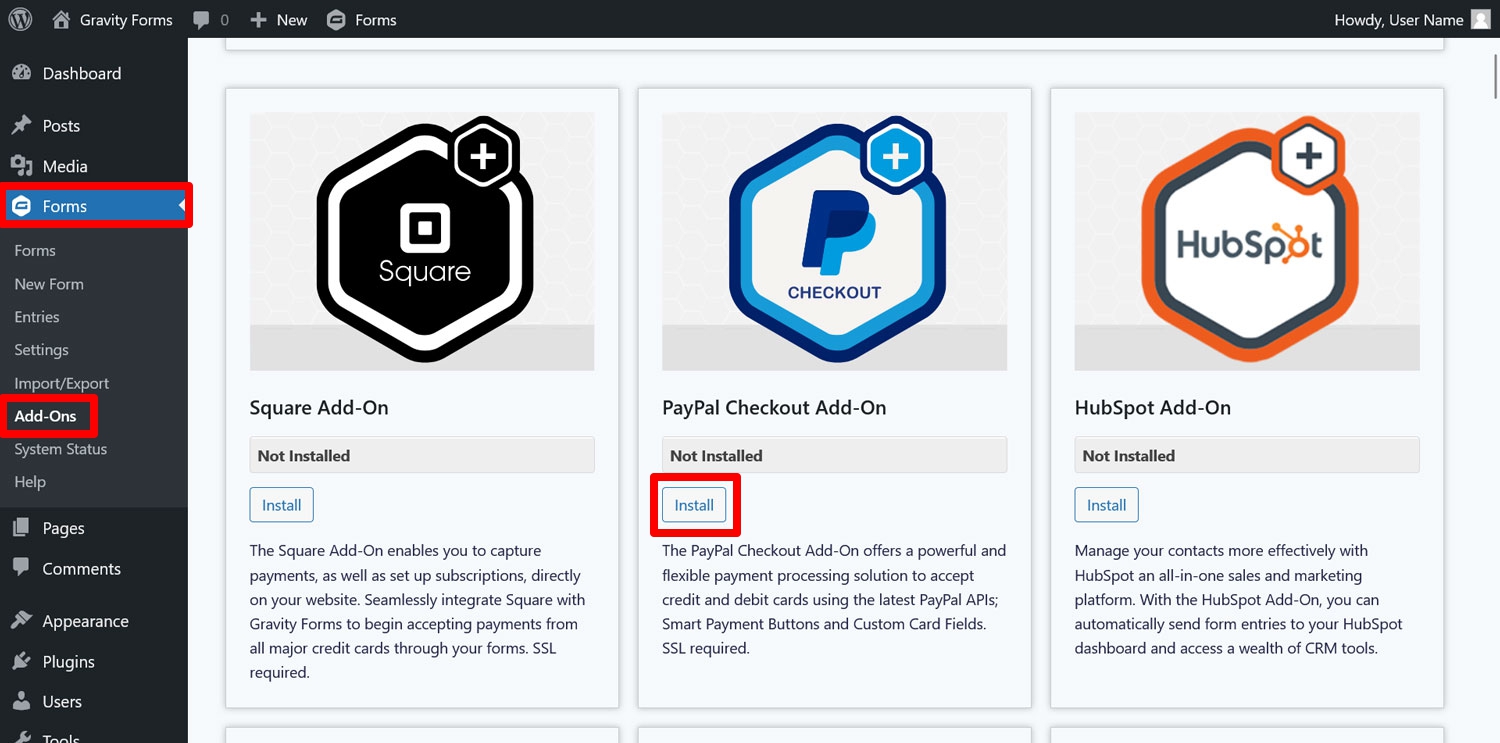
As a first step, you will need to install both add-ons we mentioned above. That’s the PayPal Checkout and the Conversational Forms Add-On. You find them under Forms → Add-Ons in the WordPress dashboard. Here, just look for each of them by name.
When you have located them, click Install. Be sure to activate each afterwards.
2. Connect Your Site to PayPal
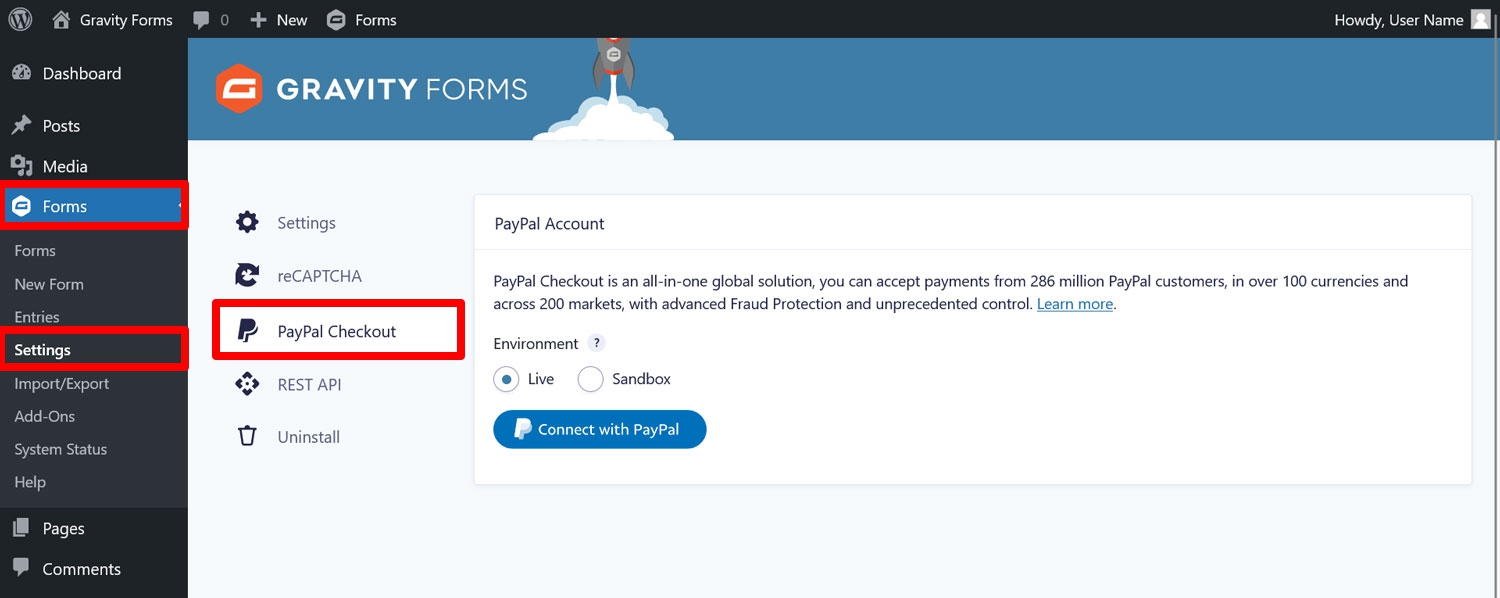
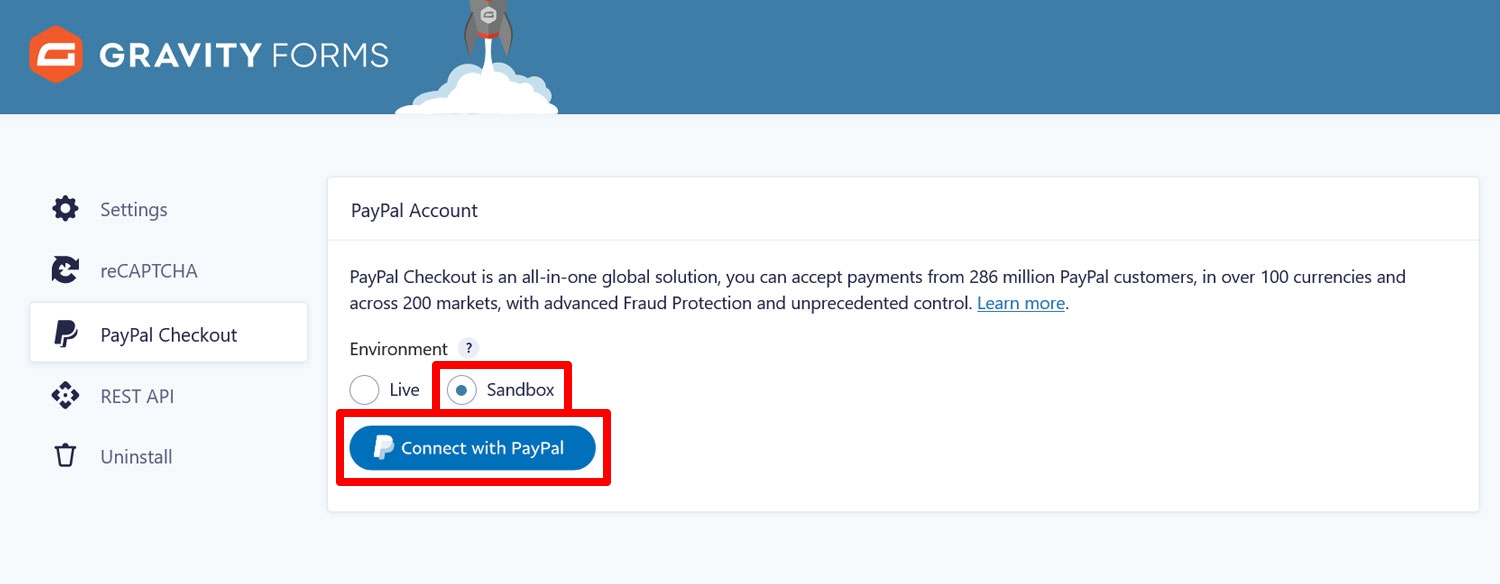
After that, you need to establish a connection between your WordPress website and PayPal. For that, go to Forms → Settings → PayPal Checkout.
As the first step, choose the Sandbox option. This allows you to test the setup without actual money on the line. Once everything is set up as it should, we will switch to live mode so you can start accepting real-life donations.
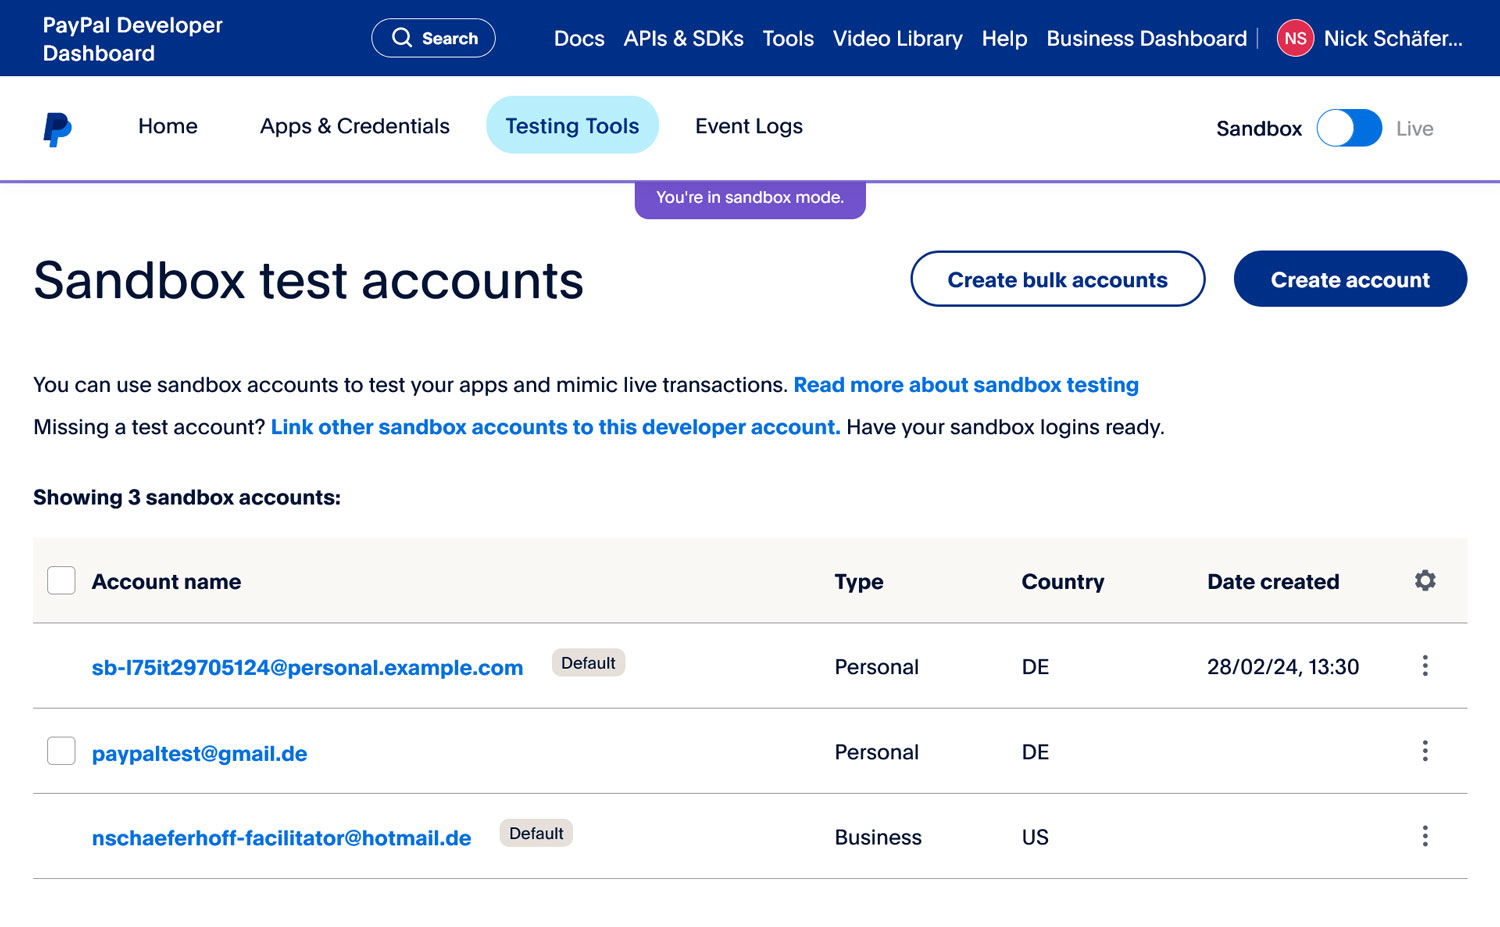
To use the PayPal sandbox, you need special credentials. you can find those in your developer account under Testing Tools → Sandbox Accounts.
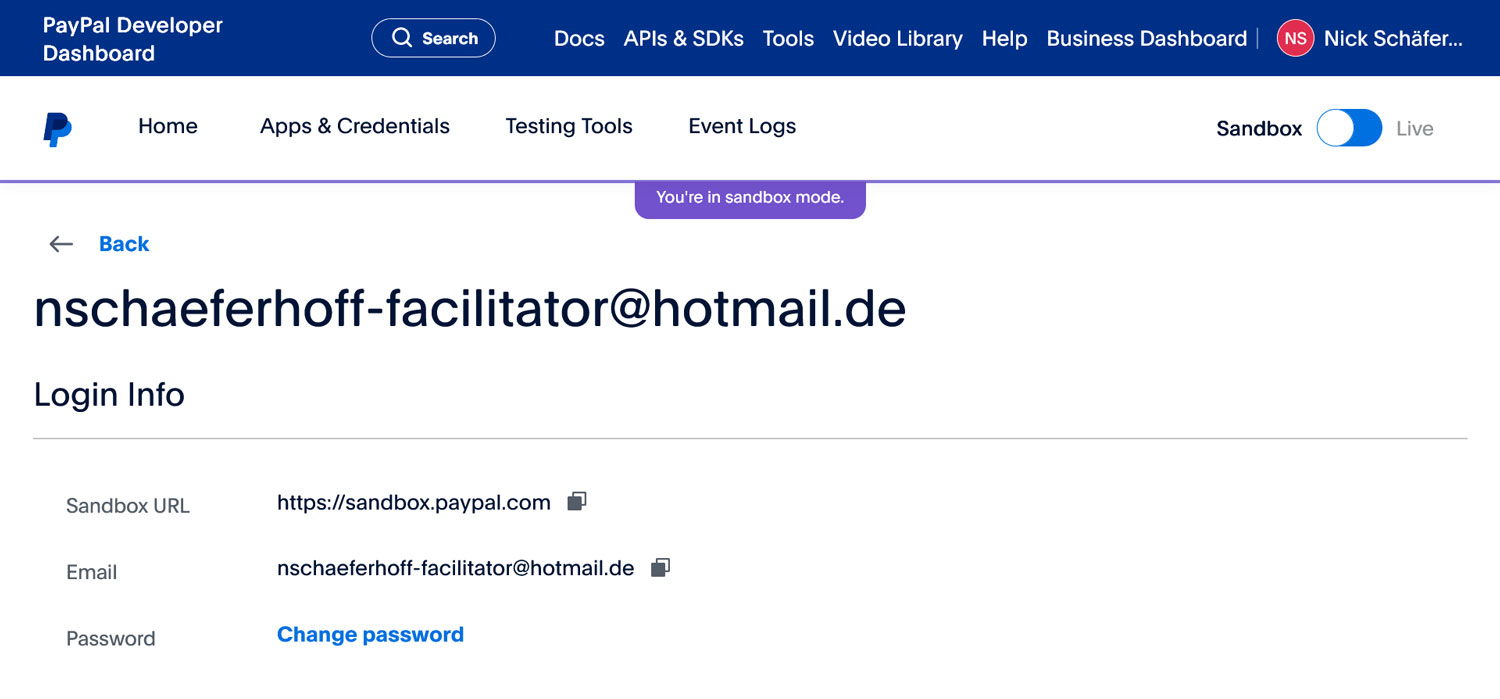
Either use an existing account or create a new one. You should be able to see the email address and set or copy the password when you click on one of them.
With those in hand, return to your WordPress site and click Connect with PayPal.
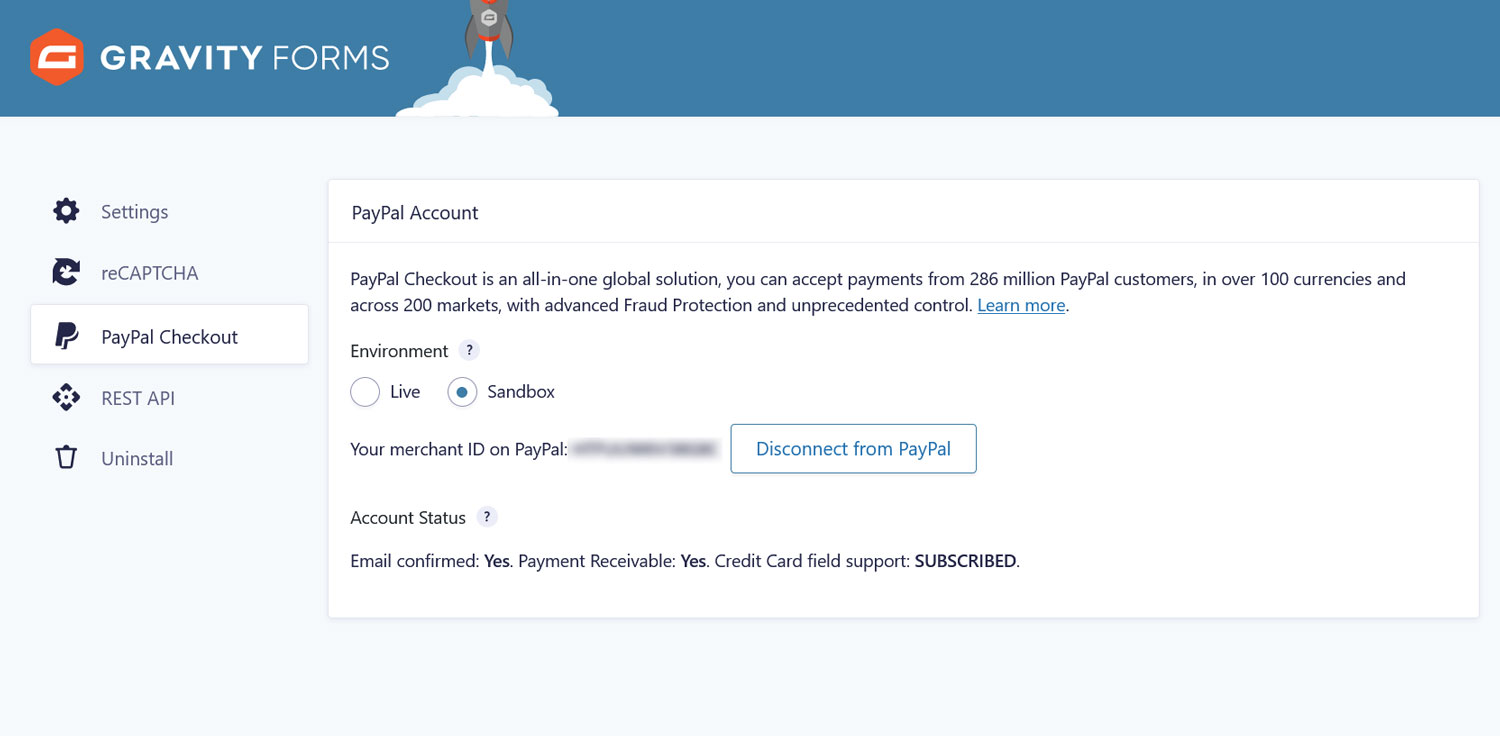
This will open the PayPal website and a sign-in form. Use the credentials from before to log in. After that, it should automatically return you to the WordPress dashboard where you should find the connection established and visible in the PayPal Checkout options.
3. Set Up Your Donation Form
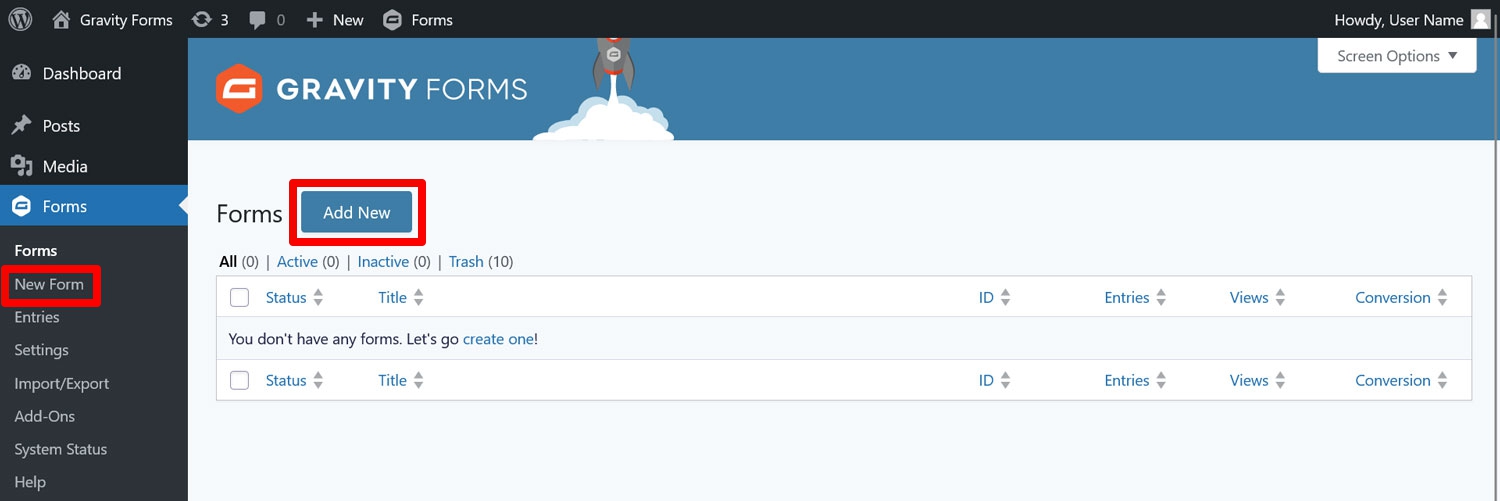
Next up, you need to create a donation form. You can do that via Forms → New Form.
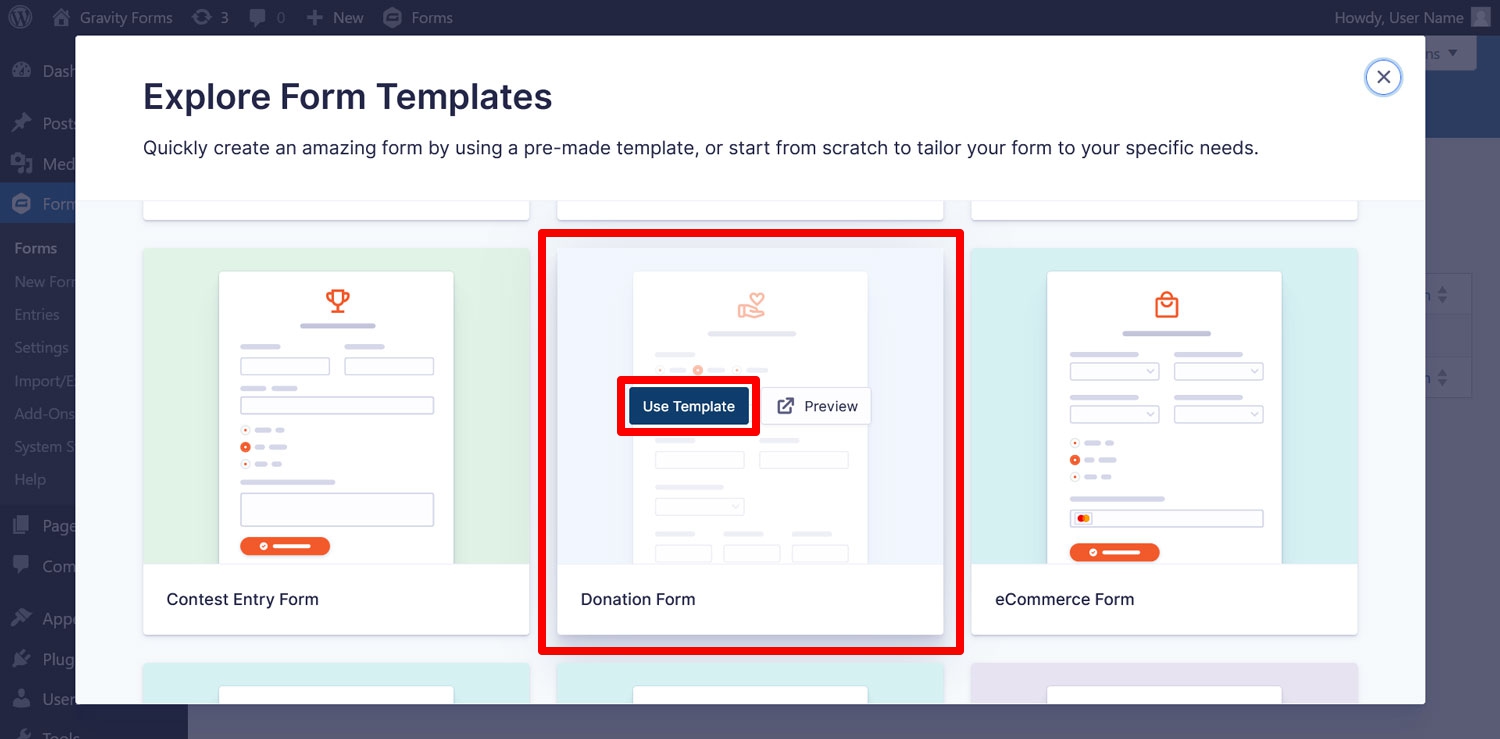
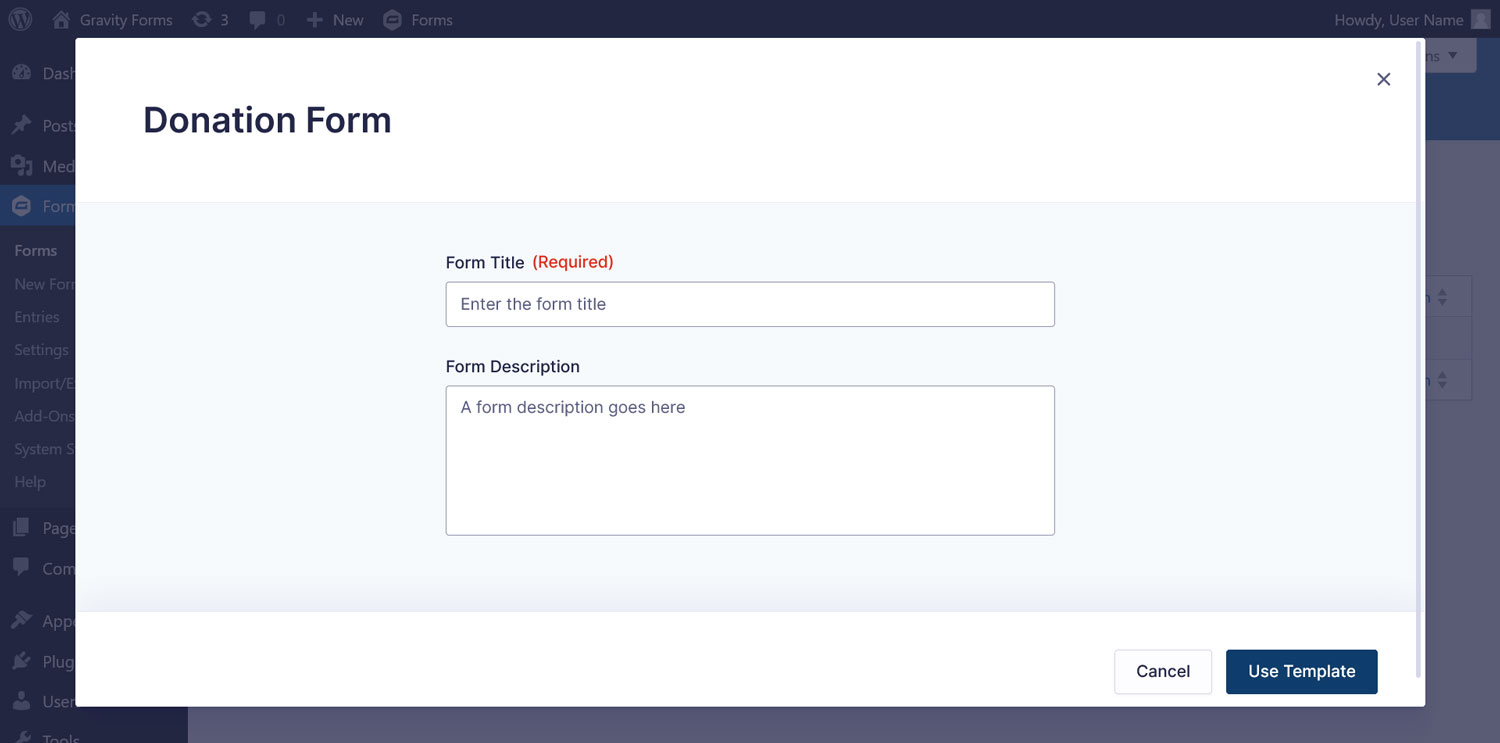
Clicking on one of the buttons opens up a menu where you can choose whether to start with an empty form or use one of the aforementioned templates. In this case, it makes sense to go with the Donation Form option. Hover over it and click Use Template.
In the next screen, give it a name and continue.
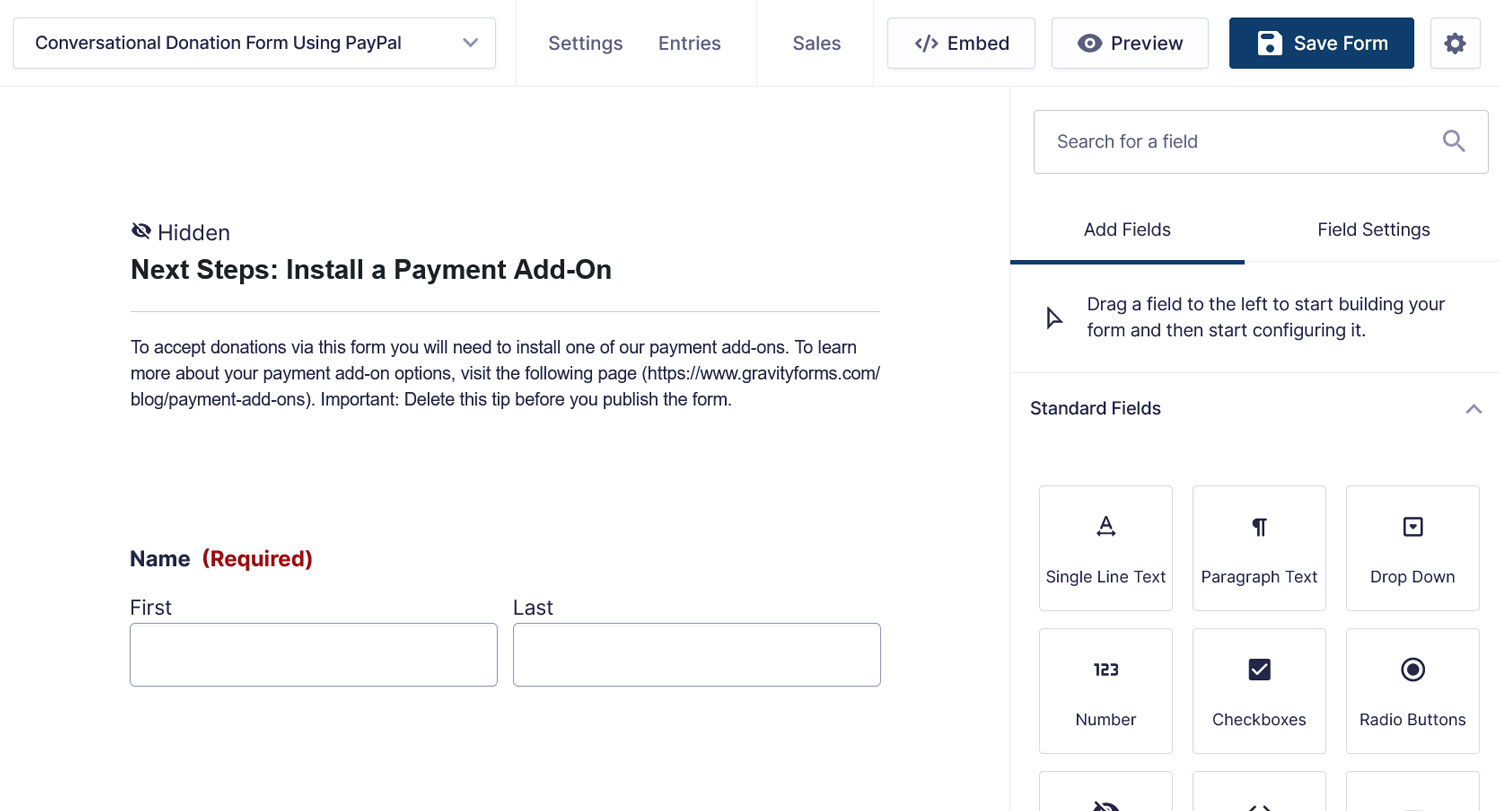
This will land you in the visual form editor.
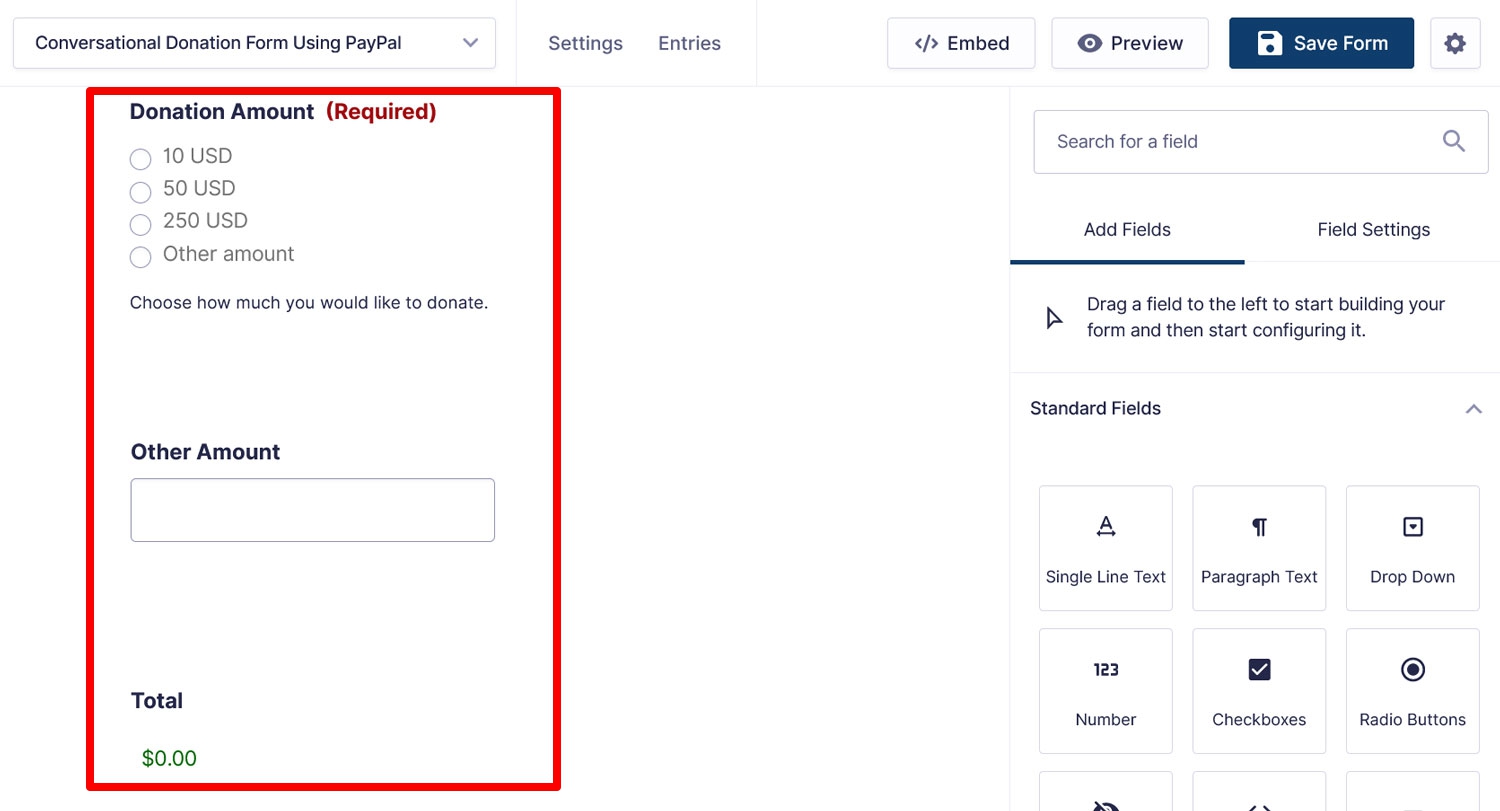
Since we are using a template, it already has everything you need for a basic donation form, namely fields to collect personal information and, most importantly, a list of amounts people can donate, including a custom amount, as well as a field to calculate the total.
4. Customize the Form
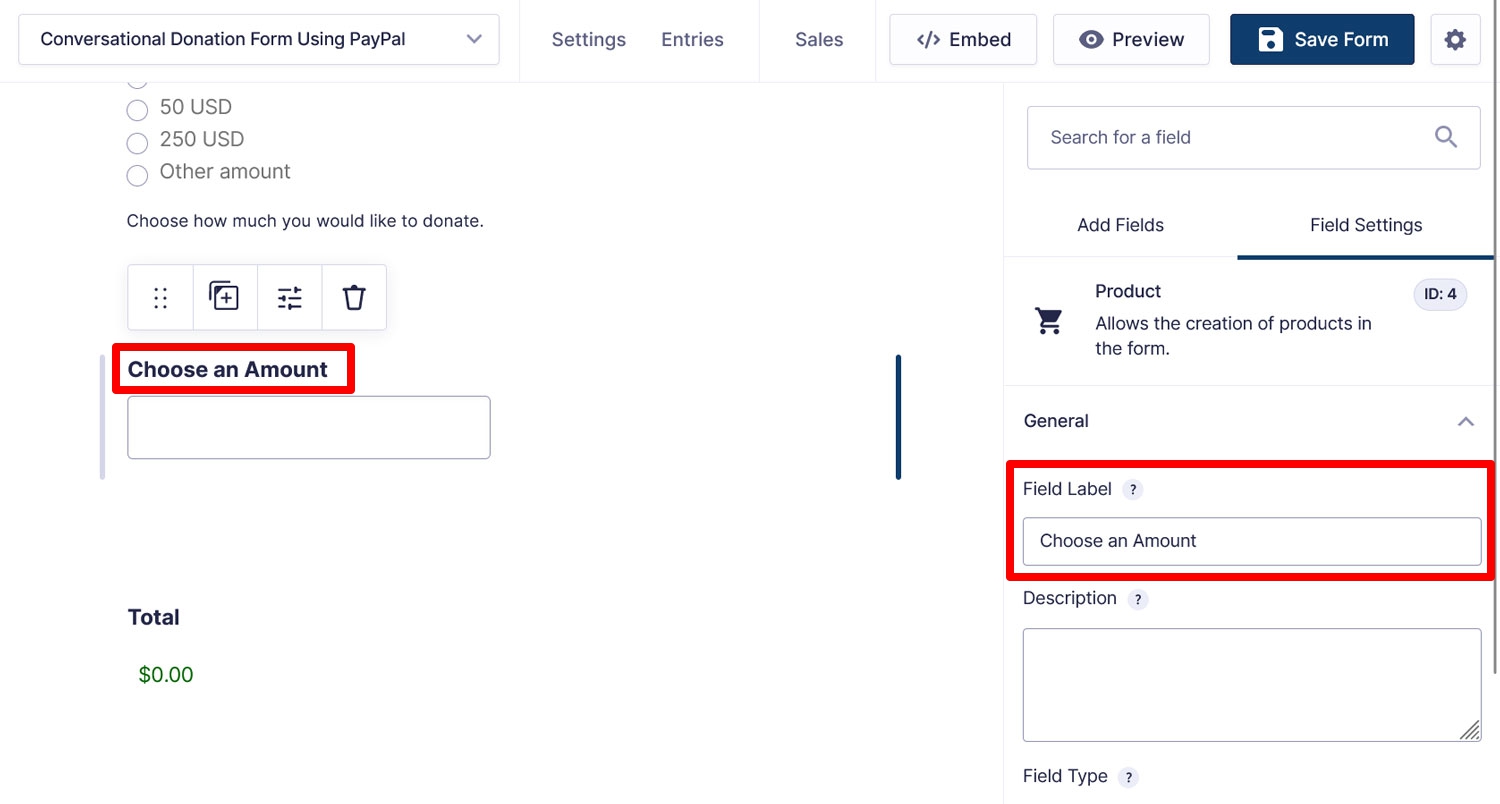
You can make any changes to this form that you need. You are able to add more fields from the right sidebar, move around existing fields, and/or customize them with a click and using the options on the right.
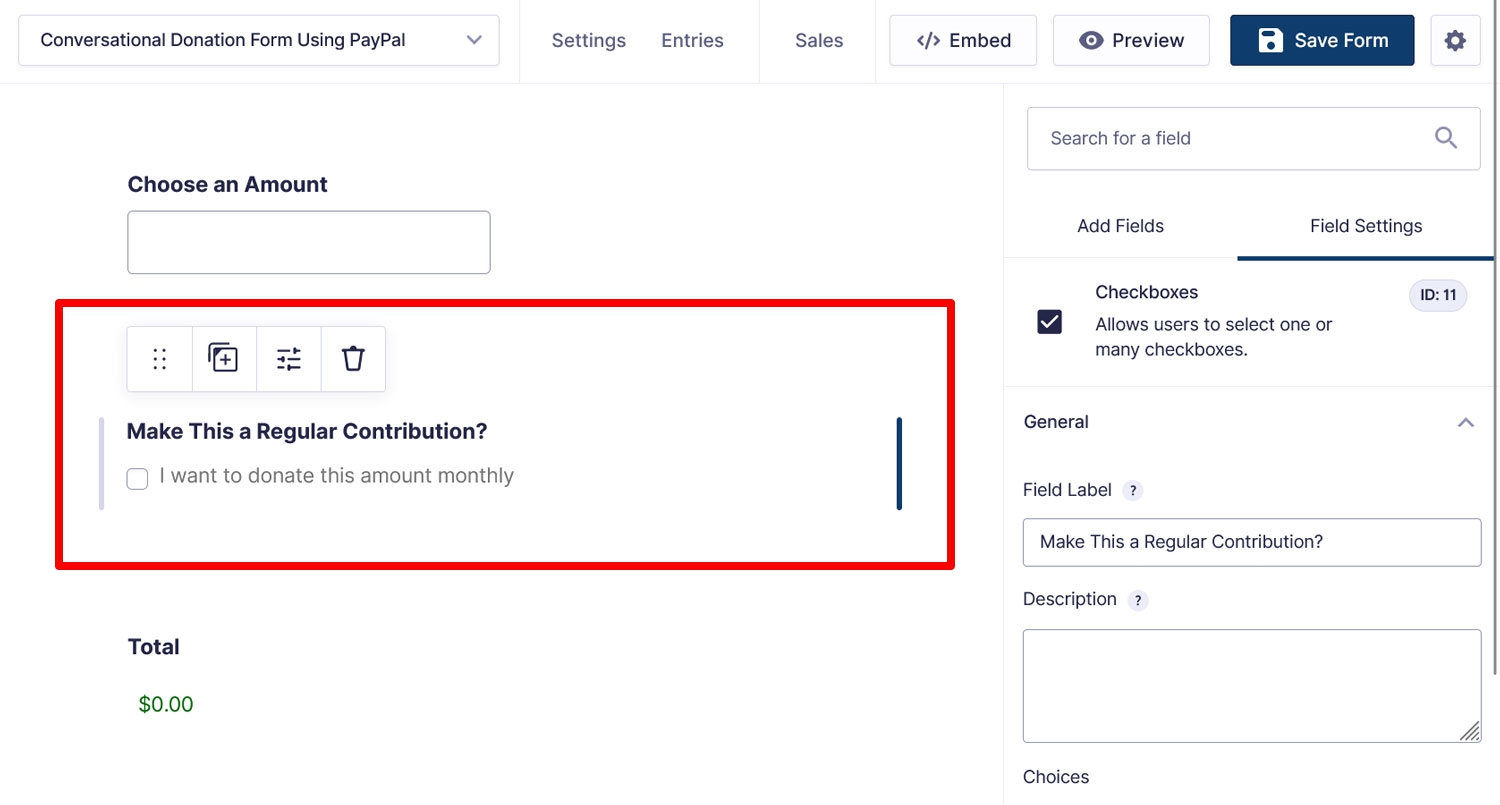
For example, you can use it to remove the two hints that the form comes with by default. In addition, in our form, we want to add an option for donors to turn their one-time donations into recurring ones. For that, we add a checkbox field that allows them to choose this option.
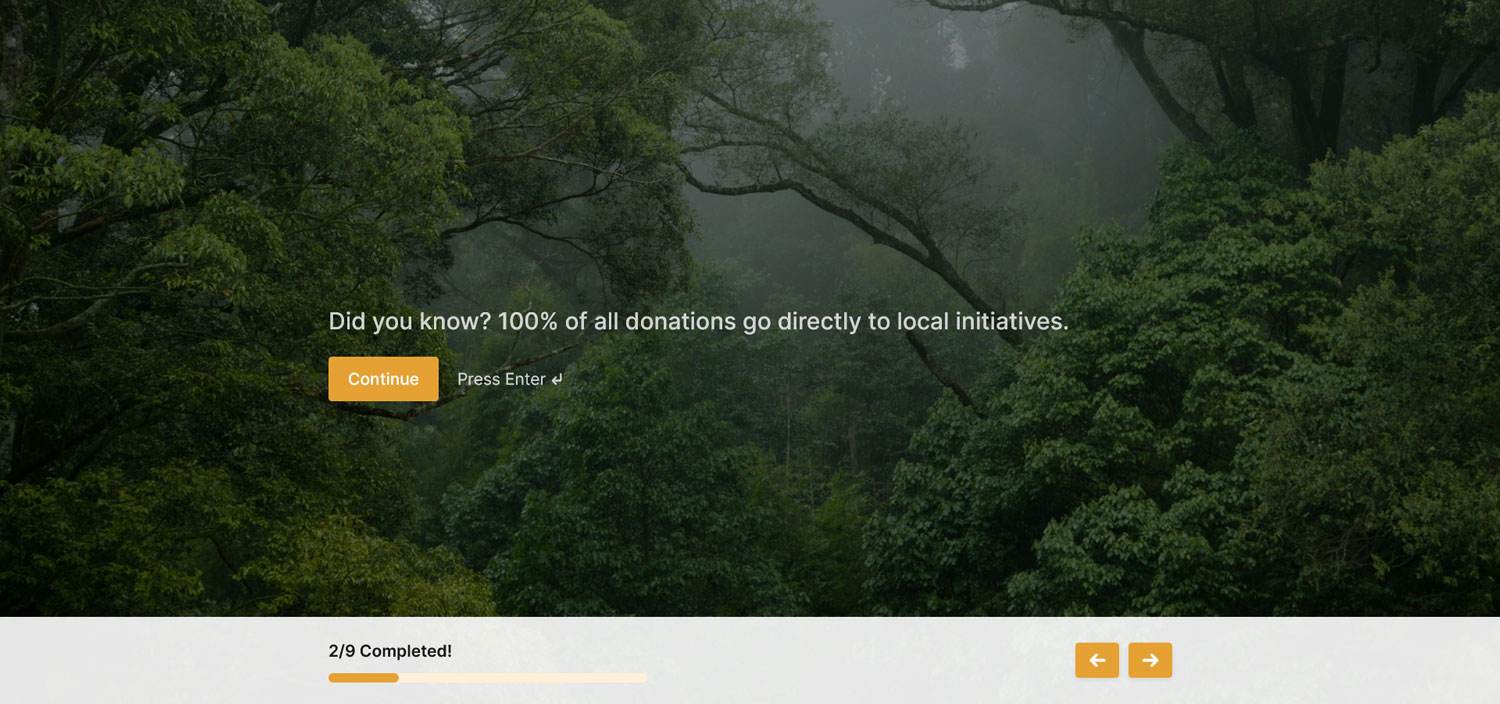
Be aware that, for conversational forms, the order matters. Fields appear one at a time, and Gravity Forms will use the order that you arrange the form in, from the top to the bottom. If there is more than one field in a single row, the left field will display before the right. You can also use this functionality, for example, to include rows with additional information that will show up as their own pages.
Just something to be aware of for your form’s user experience.
5. Add the PayPal Checkout Field
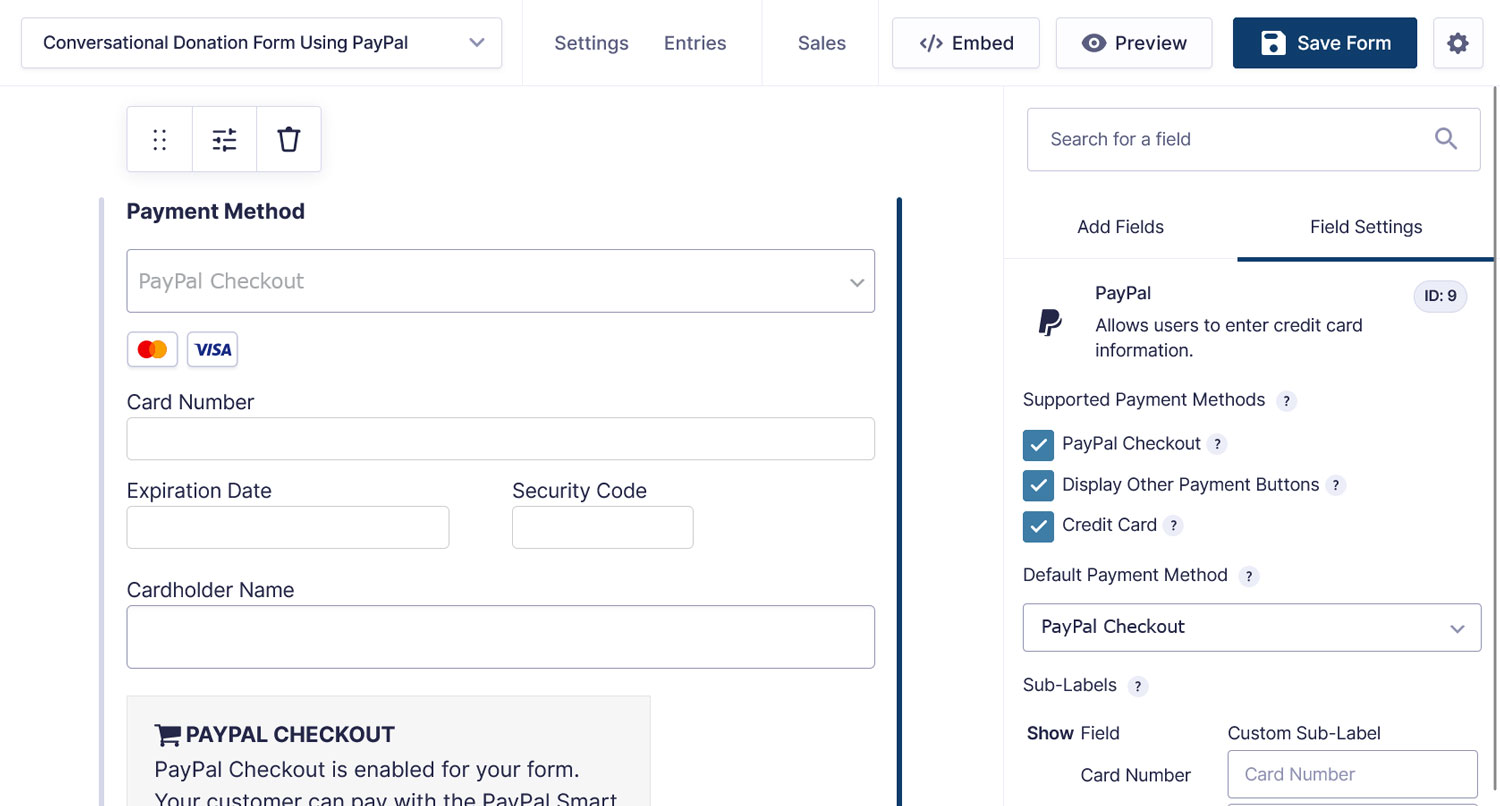
The final, very important field to include is the PayPal payment field.
This replaces your normal Submit button with the PayPal Smart Button. It also lets you configure which payment methods you want to offer (PayPal Checkout, credit cards, other payment methods such as Venmo).
PayPal will automatically display what is eligible for your location. For example, using credit cards directly is currently not supported for recurring donations. However, customers can still pay with them via PayPal.
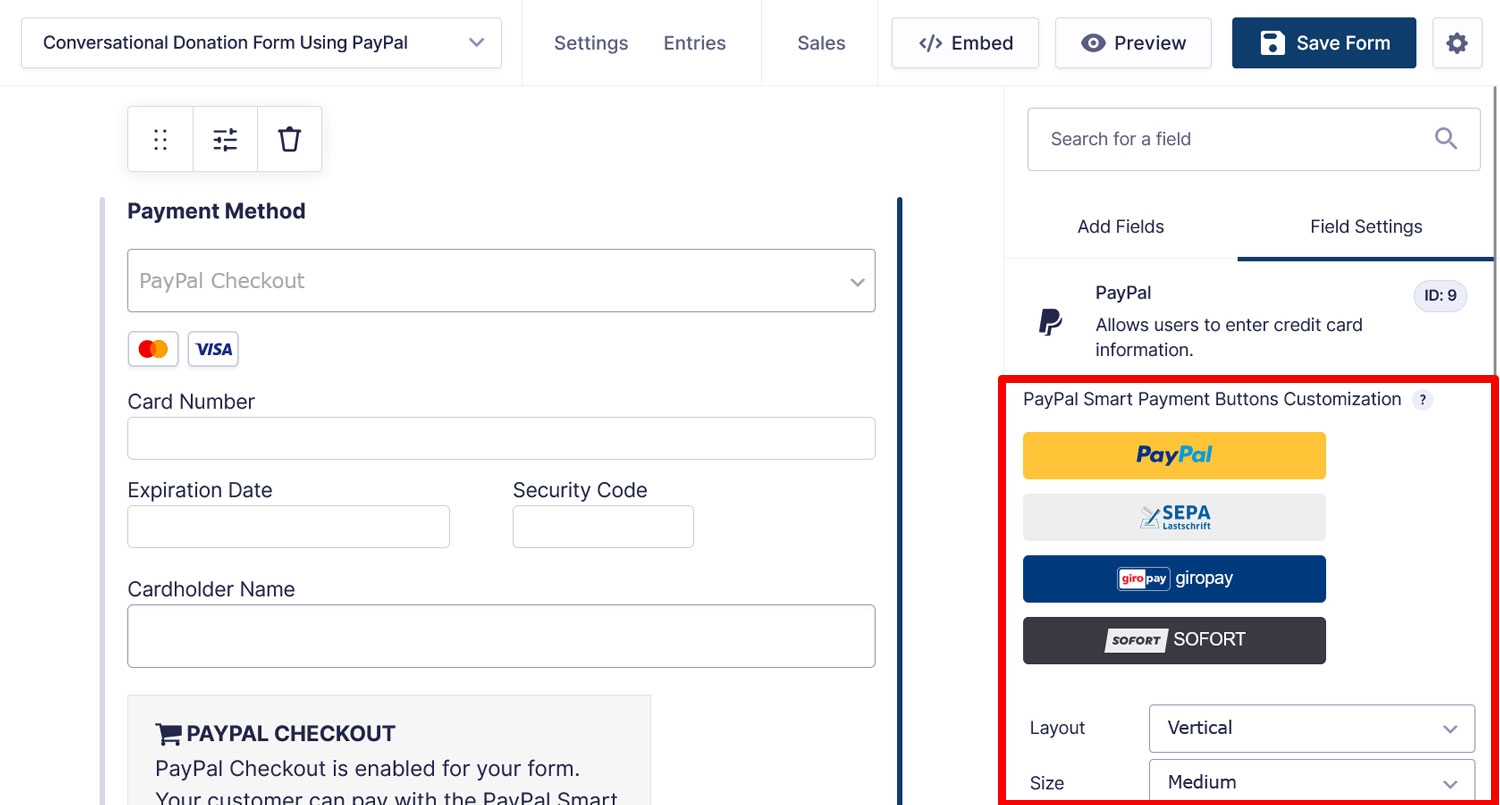
You also have options to customize the checkout button under Appearance. Play with its layout, size, shape, and color to make it fit the rest of your web design.
When everything is ready, save the form again.
6. Create Your First PayPal Feed
A “feed” controls what happens to your form data after someone submits it. In this case, that’s whether it will be a one-time or recurring donation. Because our form can do both, we actually need two feeds.
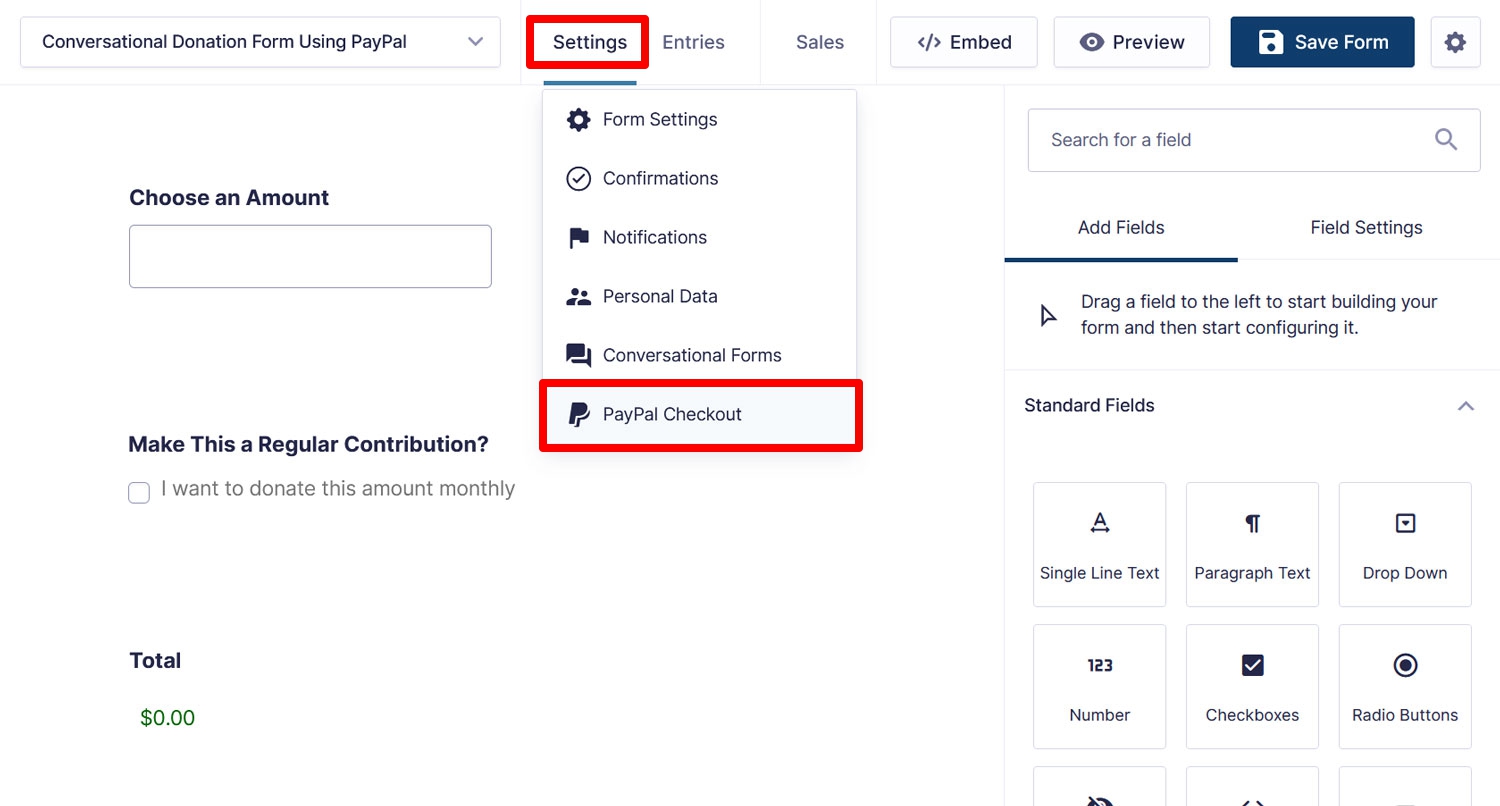
To create them, go to your form settings. You can get there either by hovering over Settings in the form editor or via your list of forms under Forms.
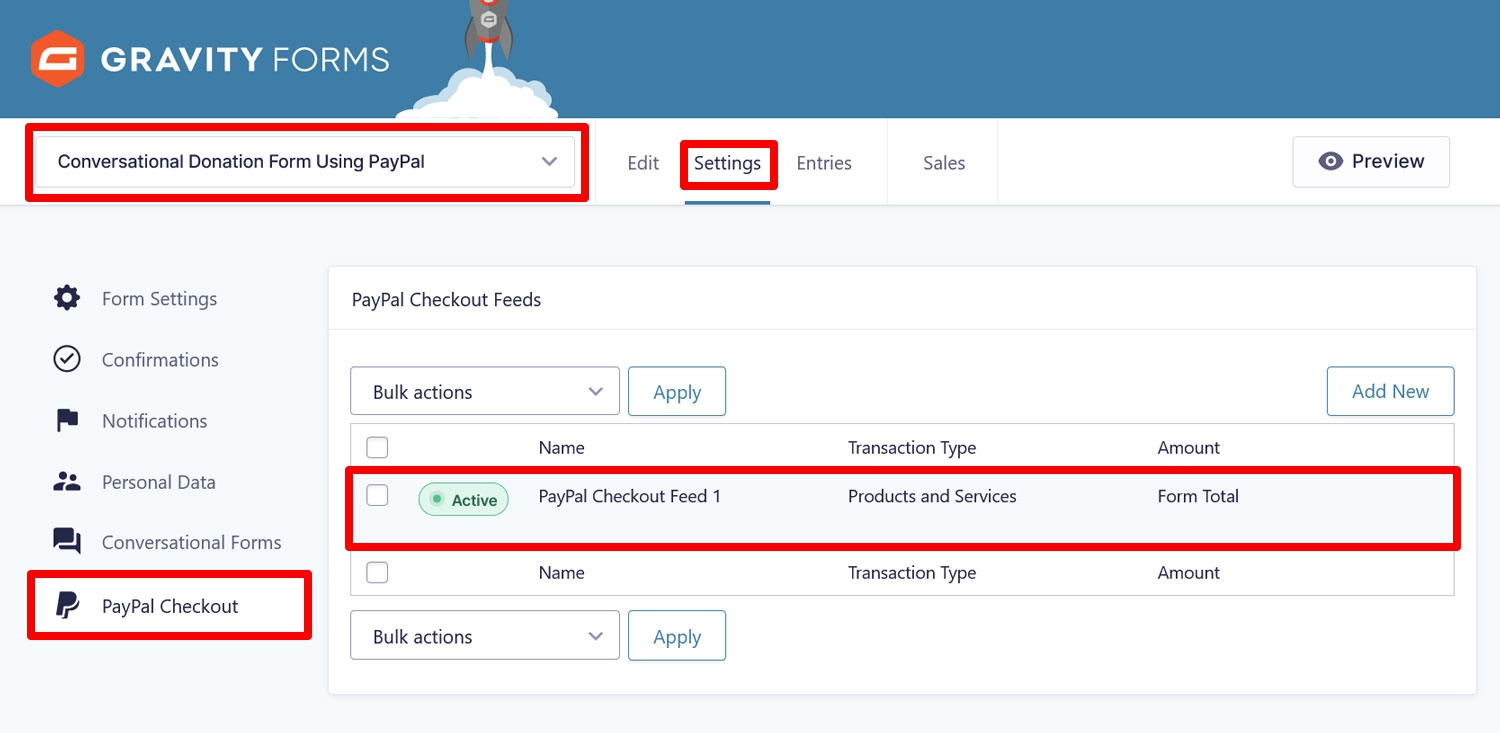
Your goal destination is PayPal Checkout. Here, you should already find a feed in your list. Hover over it and click Edit.
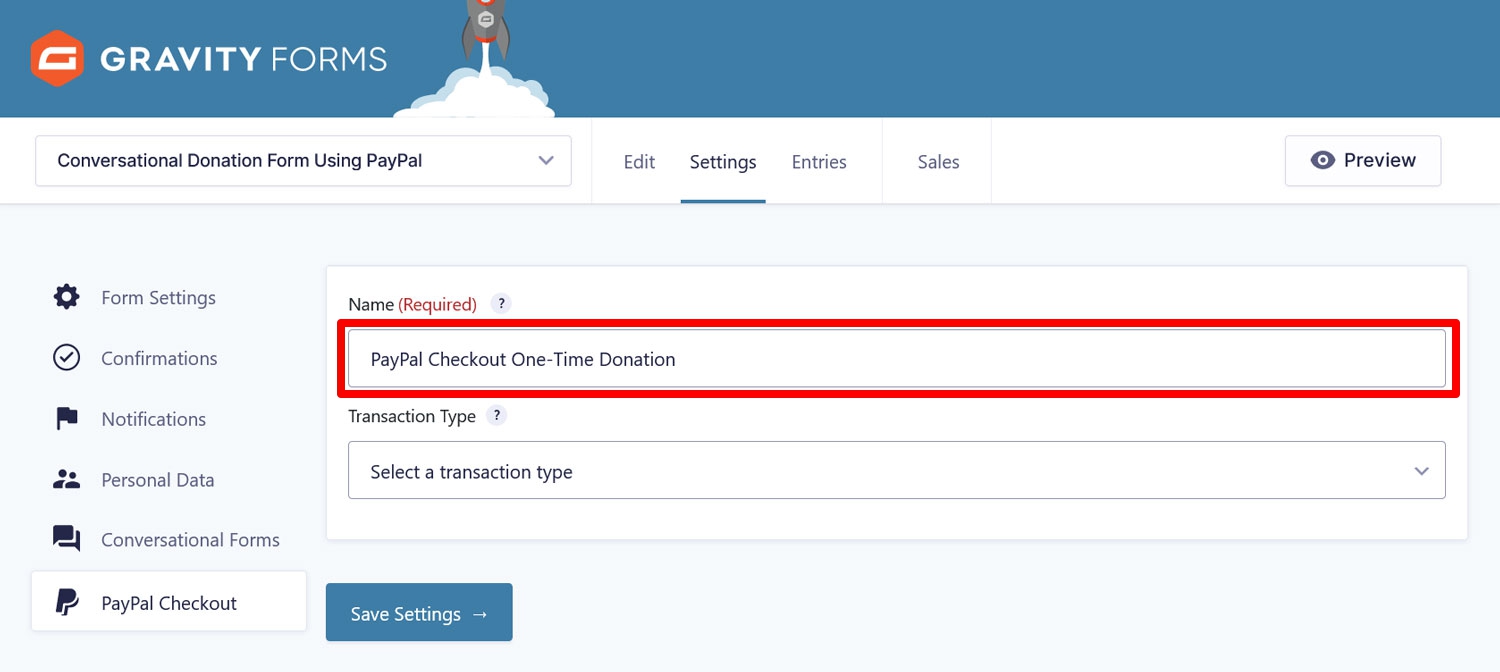
In the next screen, the first step is to edit the name at the top. This is important because we are creating two different feeds and need to be able to distinguish them.
To create a one-time donation, choose Products and Services under Transaction Type. Doing so opens up additional settings.
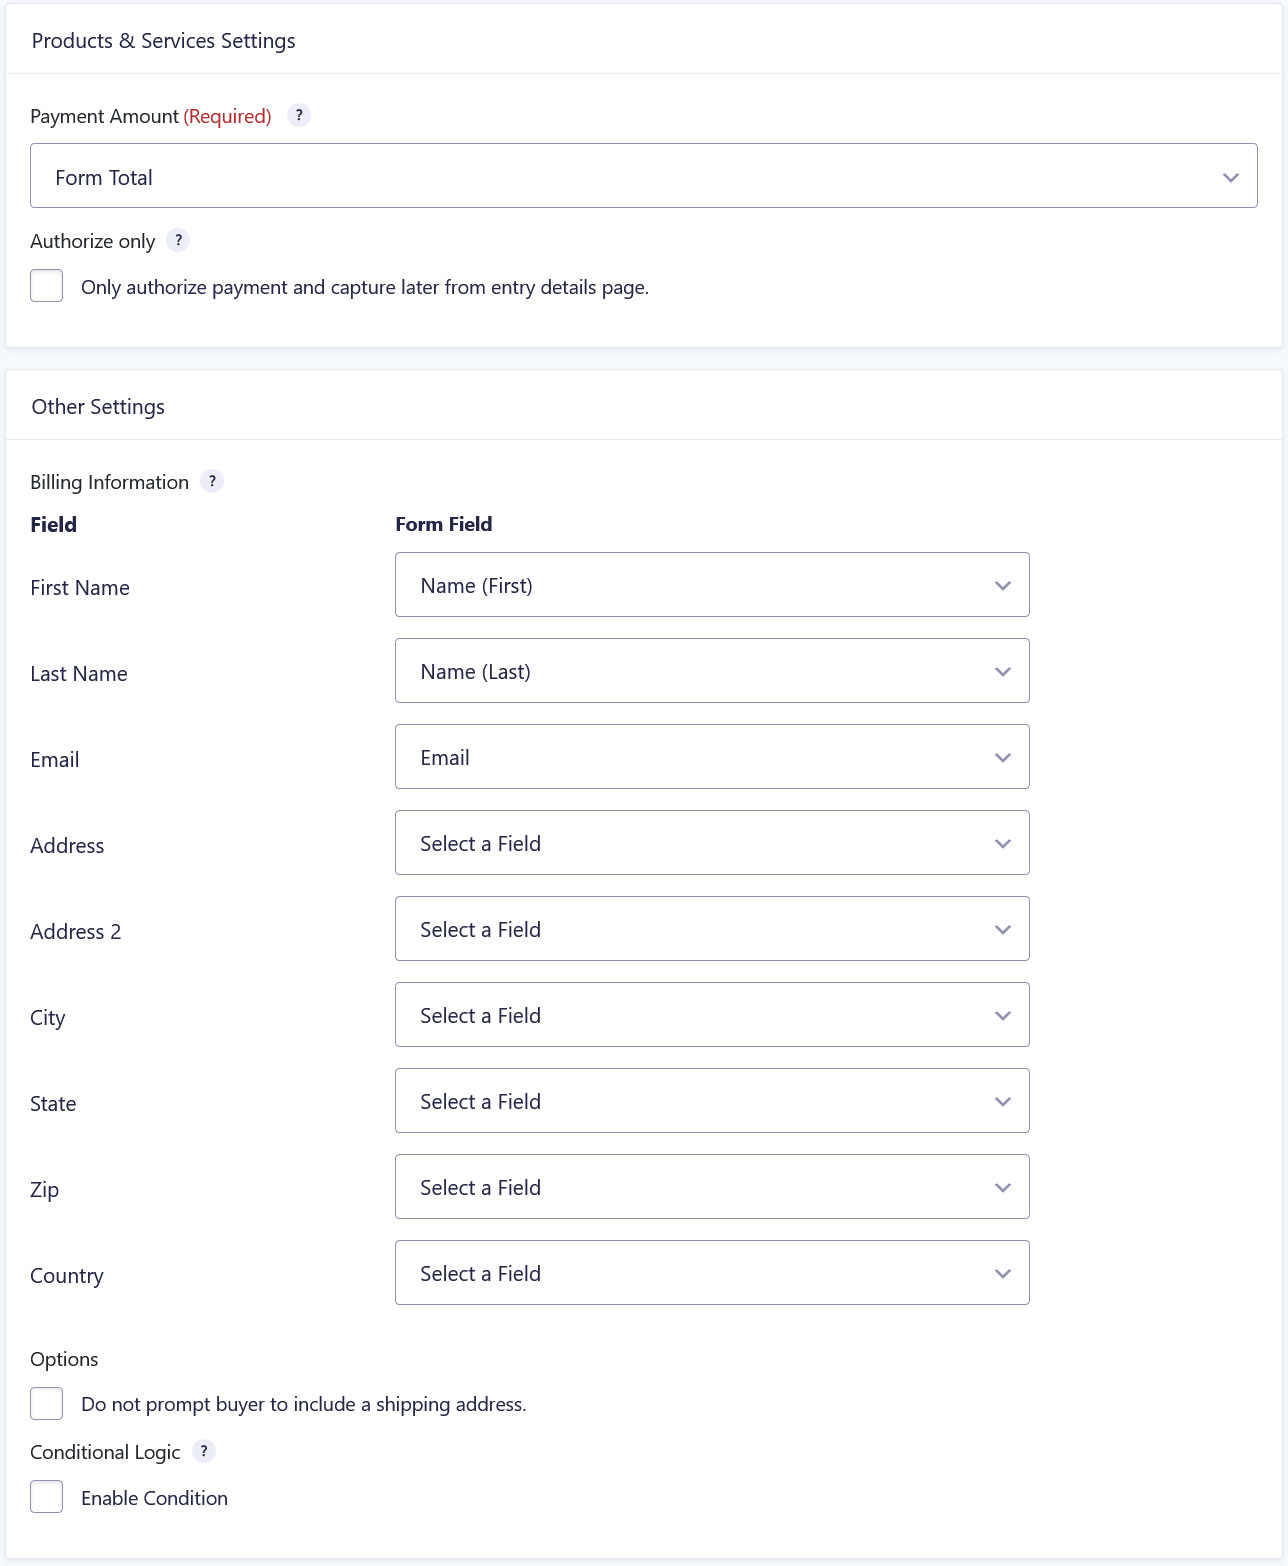
Here, under Payment Amount, you need to pick the Form Total field, if it hasn’t been done automatically. Underneath that, under Billing Information, you can map form fields to the information PayPal will use for the billing address.
In this case, that’s not more than the first and last name as well as the email address but your setup might be different. You can also check Do not prompt buyer to include a shipping address since a shipping address is usually not needed for donations.
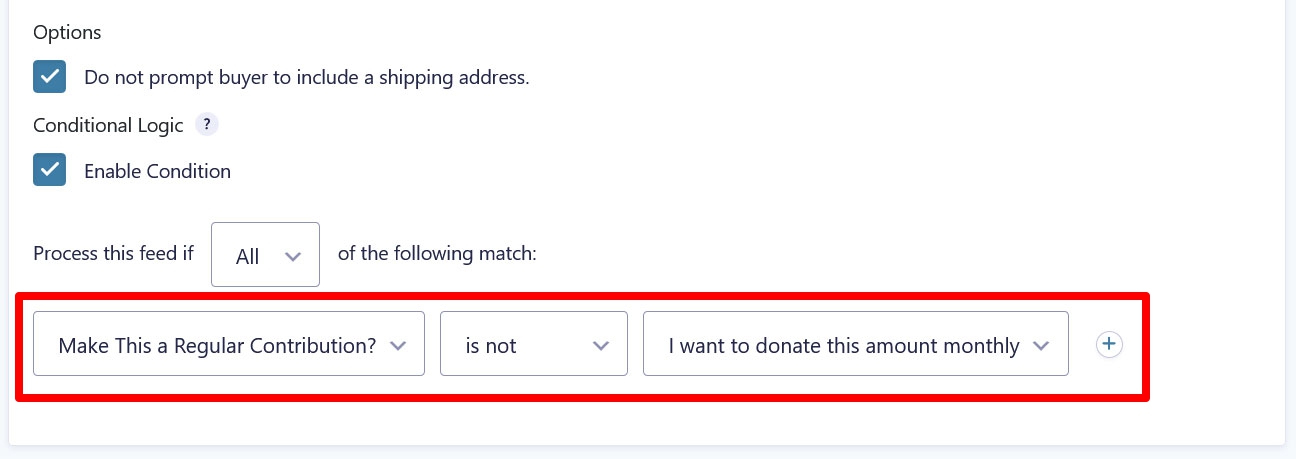
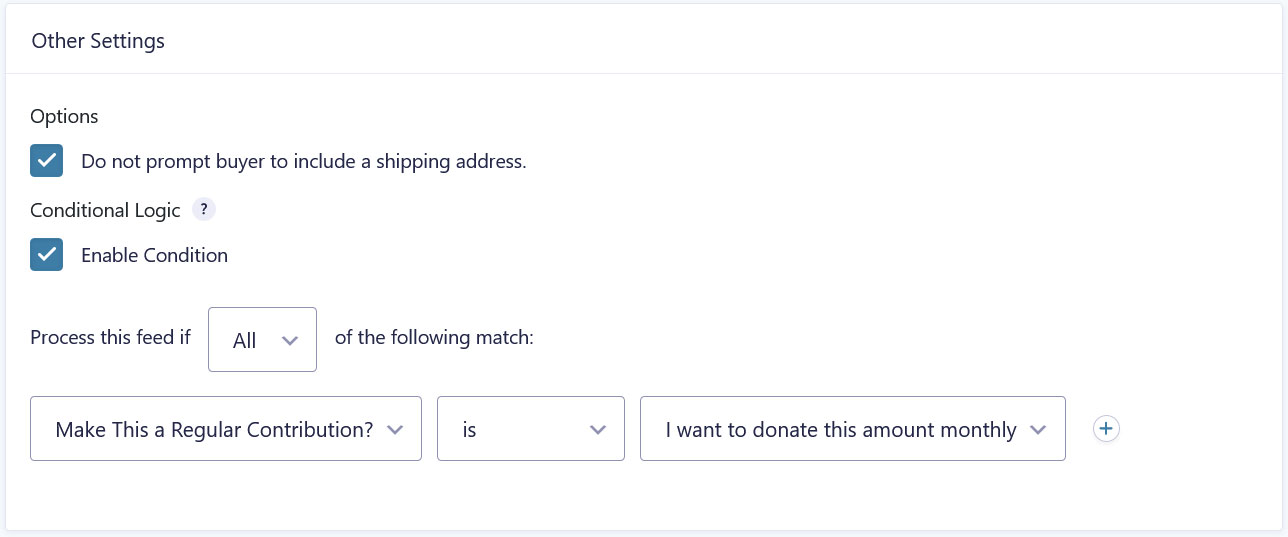
One of the most important parts is the Conditional Logic section. Because we are creating two feeds for two different use cases, you absolutely have to check the box here and then set it up so that this feed only fires if the checkbox for making it a regular donation has not been checked.
When this is all done, save at the bottom.
7. Set Up Recurring Donations
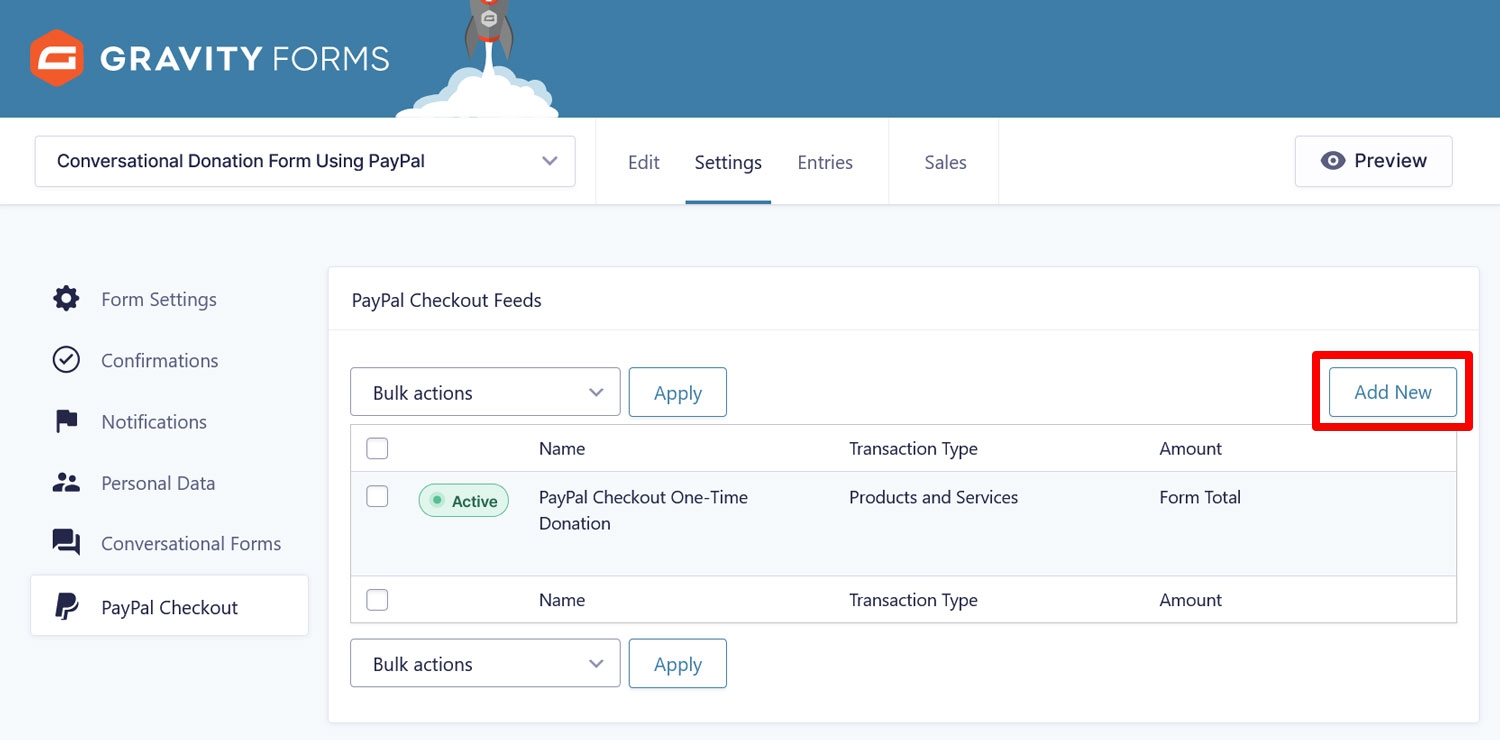
Go back to the PayPal Checkout settings and click Add New to create another feed.
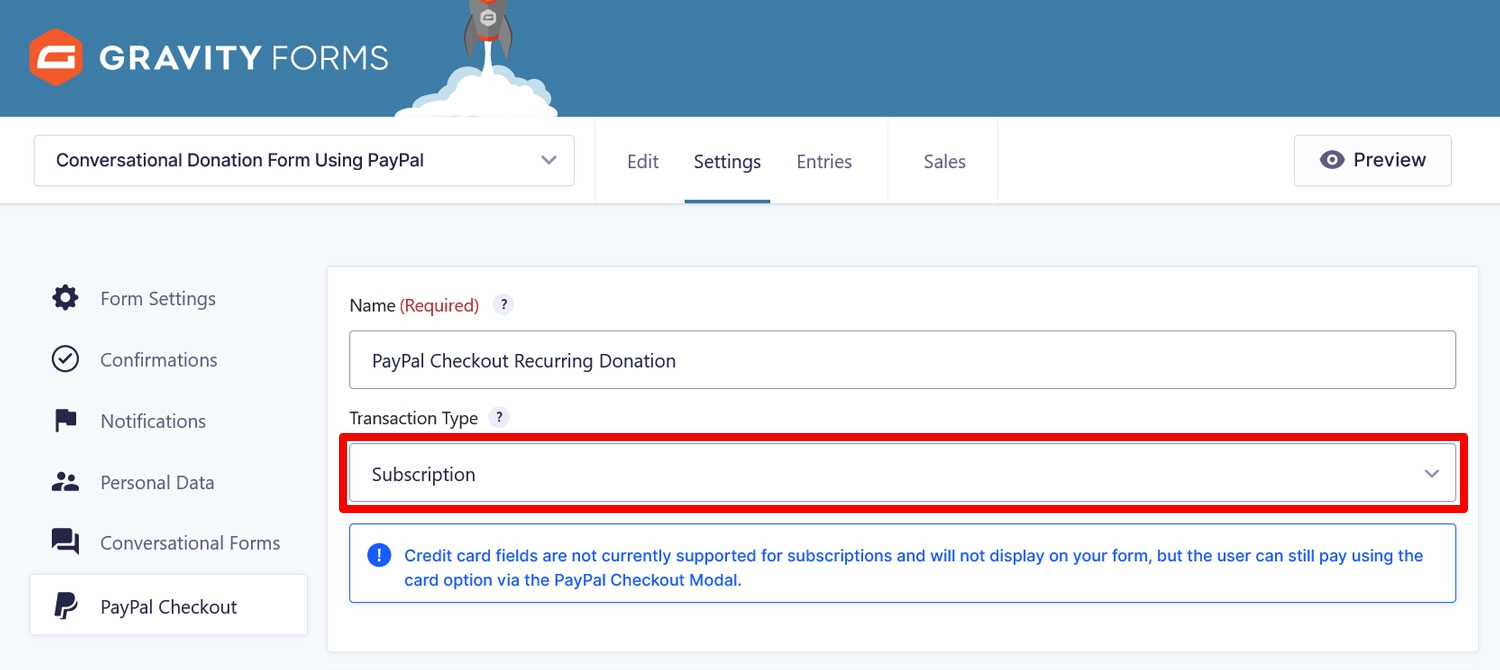
In the next screen, name it again but this time, set the Transaction Type to Subscription.
This will open up similar options as before.
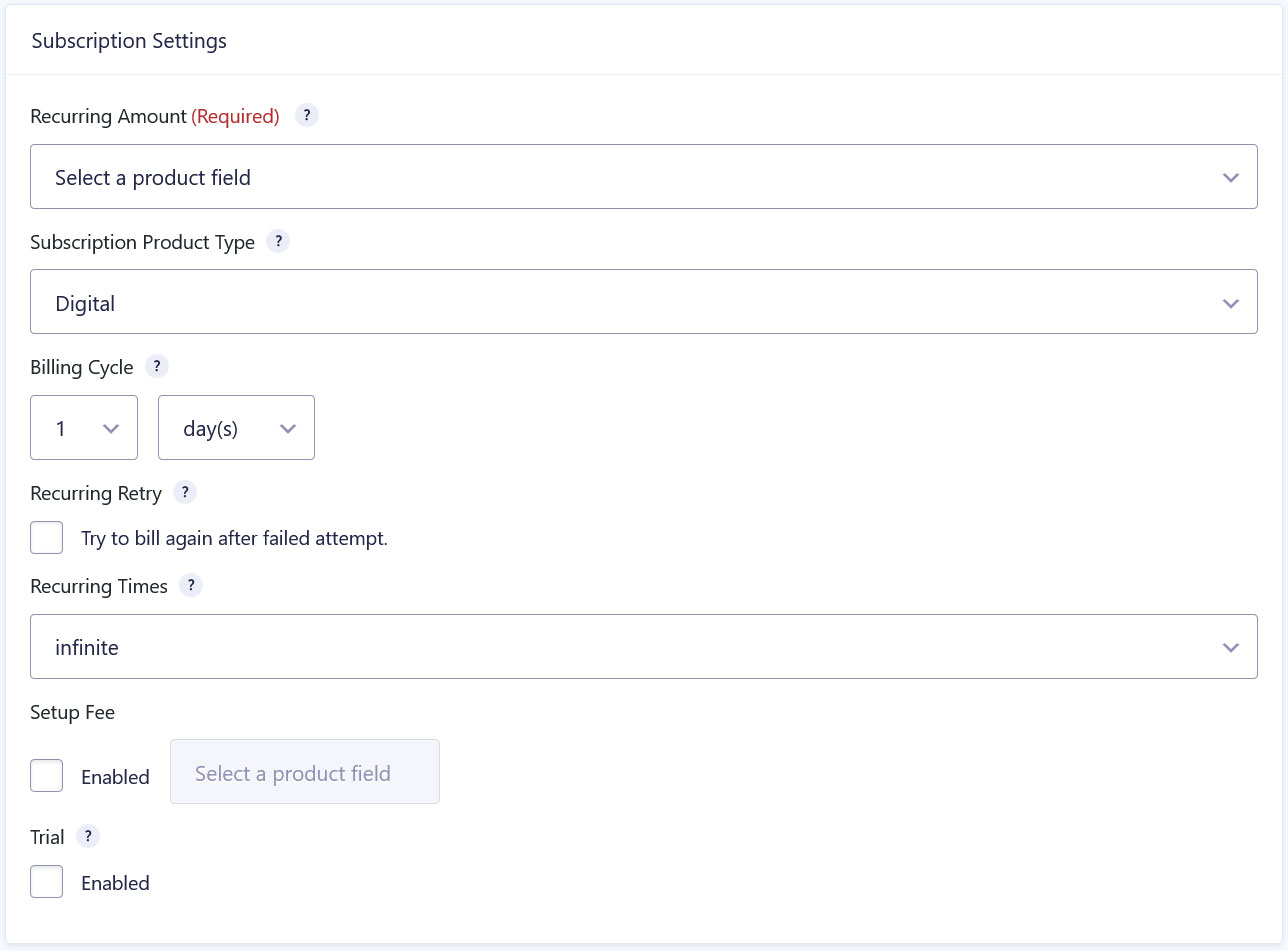
However, these are all about configuring the payment terms of the subscription:
- Recurring Amount — Here, pick Form Total again.
- Subscription Product Type — Set this to Digital.
- Billing Cycle — Use the drop-down menus to decide after what time the donor should be charged again. Since we went for a monthly subscription, this should be one month.
- Recurring Retry — Check this if you want PayPal to try and charge the donor again if the first time fails.
- Recurring Times — We are keeping this at infinite but you can also set this to a number if your donation is set to be for a certain amount of time.
Ignore Setup Fee and Trial. If you want to learn more about those, check the documentation.
Finally, be sure to check the option for ignoring the shipping address here as well and enable conditional logic, this time making the condition that the recurring payment checkbox has been checked by the donor.
Save when you are done.
8. Enable the Conversational Form Page
With the technical stuff out of the way, it’s time to move on to the design part. Since we want the donation form to appear as a conversational form, the first thing we need to do is to enable this feature.
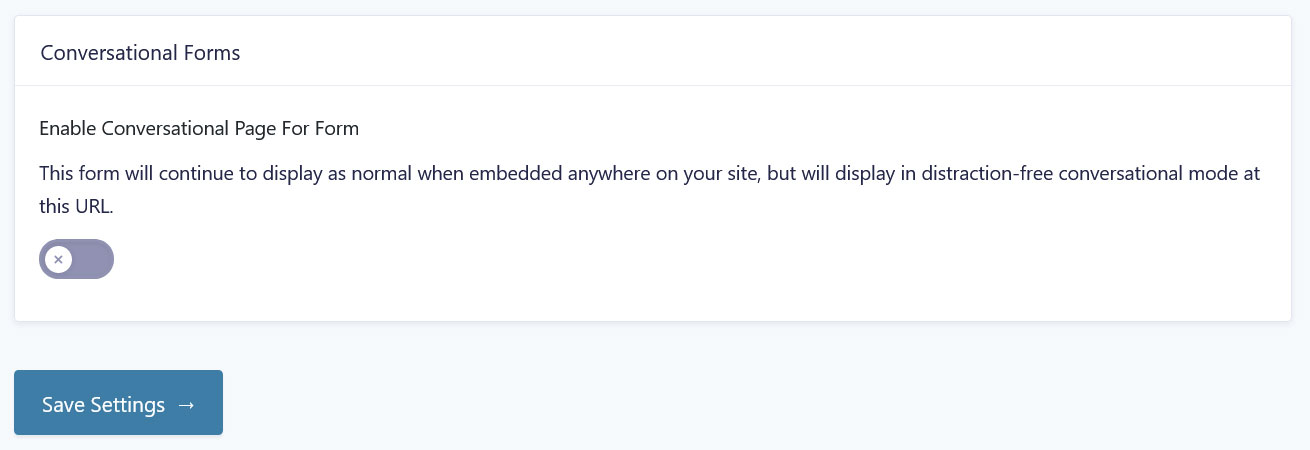
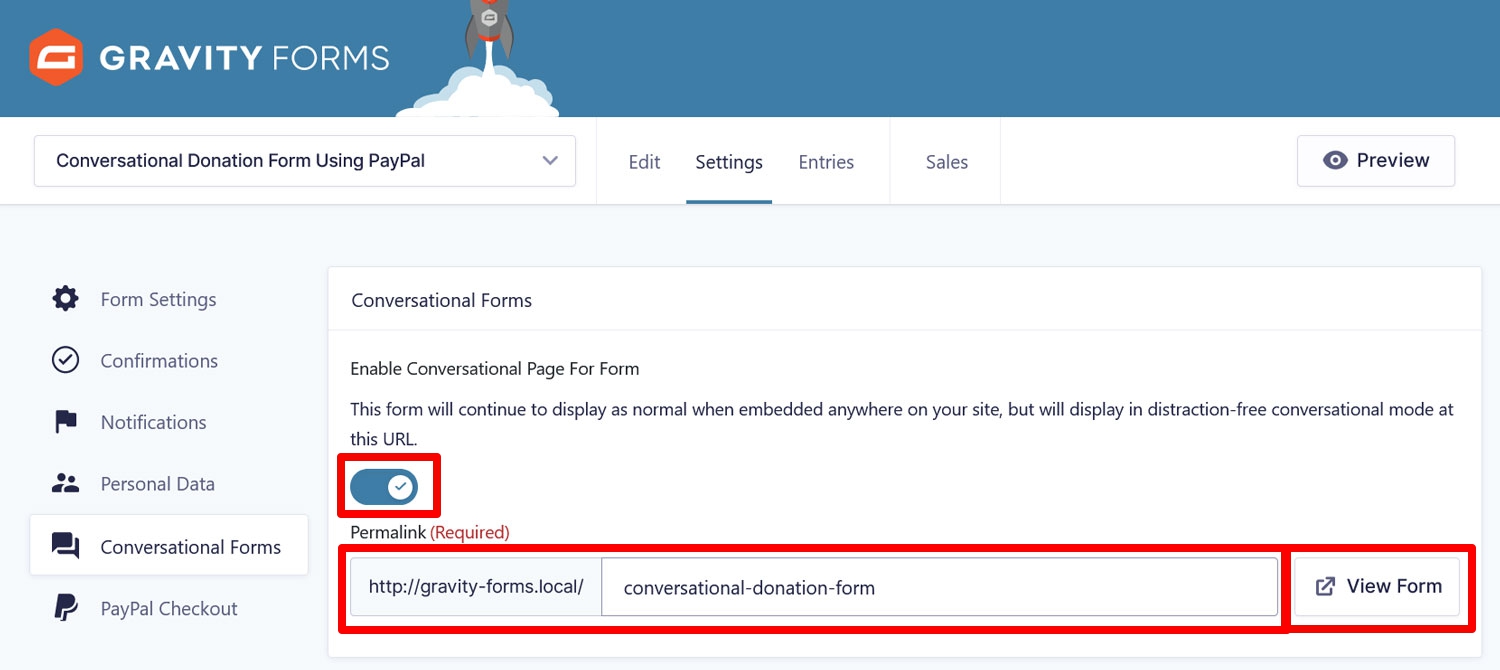
For that, head over to Conversational Forms, which you also find in the form settings. Once there, simply flip the switch to enable the form’s conversational form page and input the URL where you want it to be available.
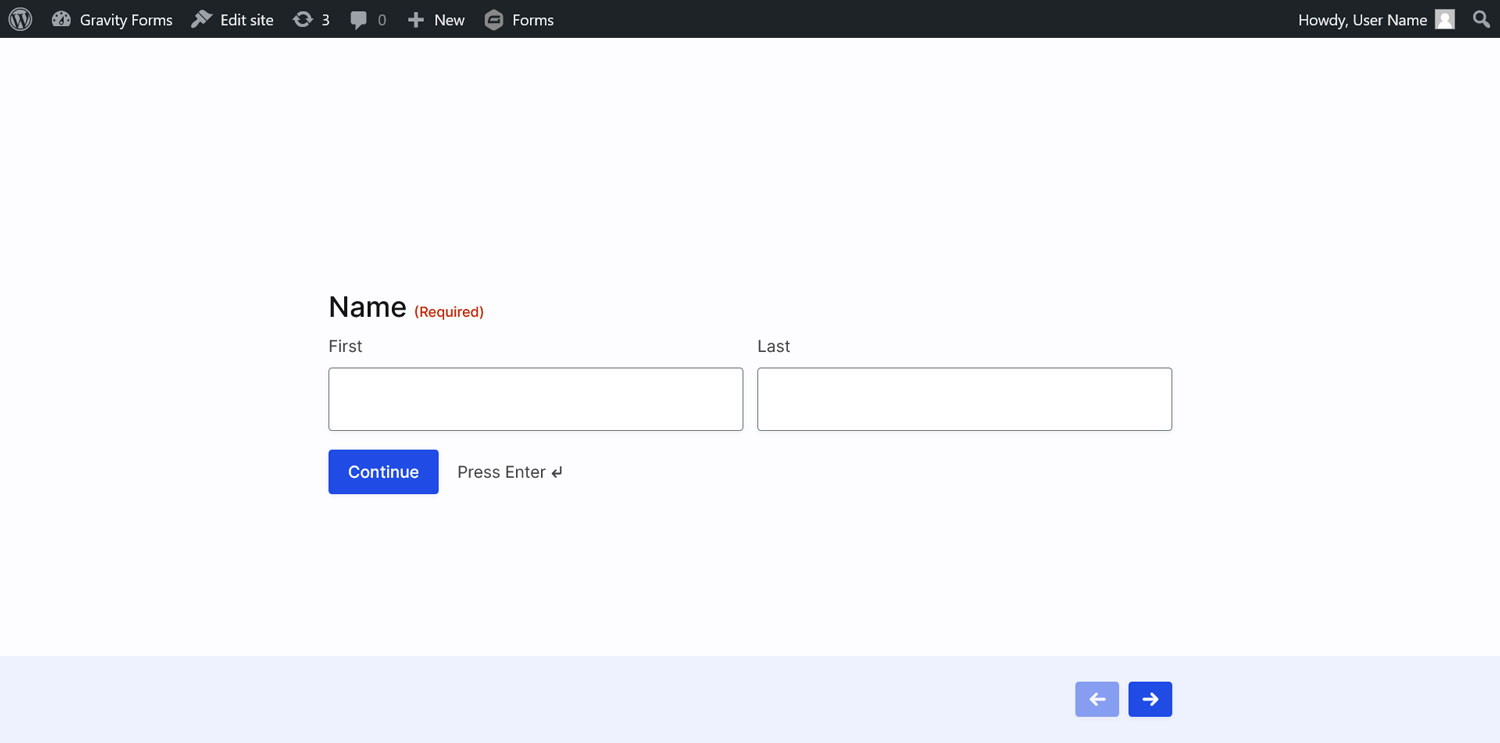
Make sure the URL is unique on your site. Gravity Forms should also warn you if you try to use a page address that already exists. Use the View Form button to preview your form.
Once more, the conversational form will only be available under this particular URL. If you embed your payment form using a block or shortcode anywhere else on your site, it will display in the regular way.
9. Customize the Design of Your Conversational Form
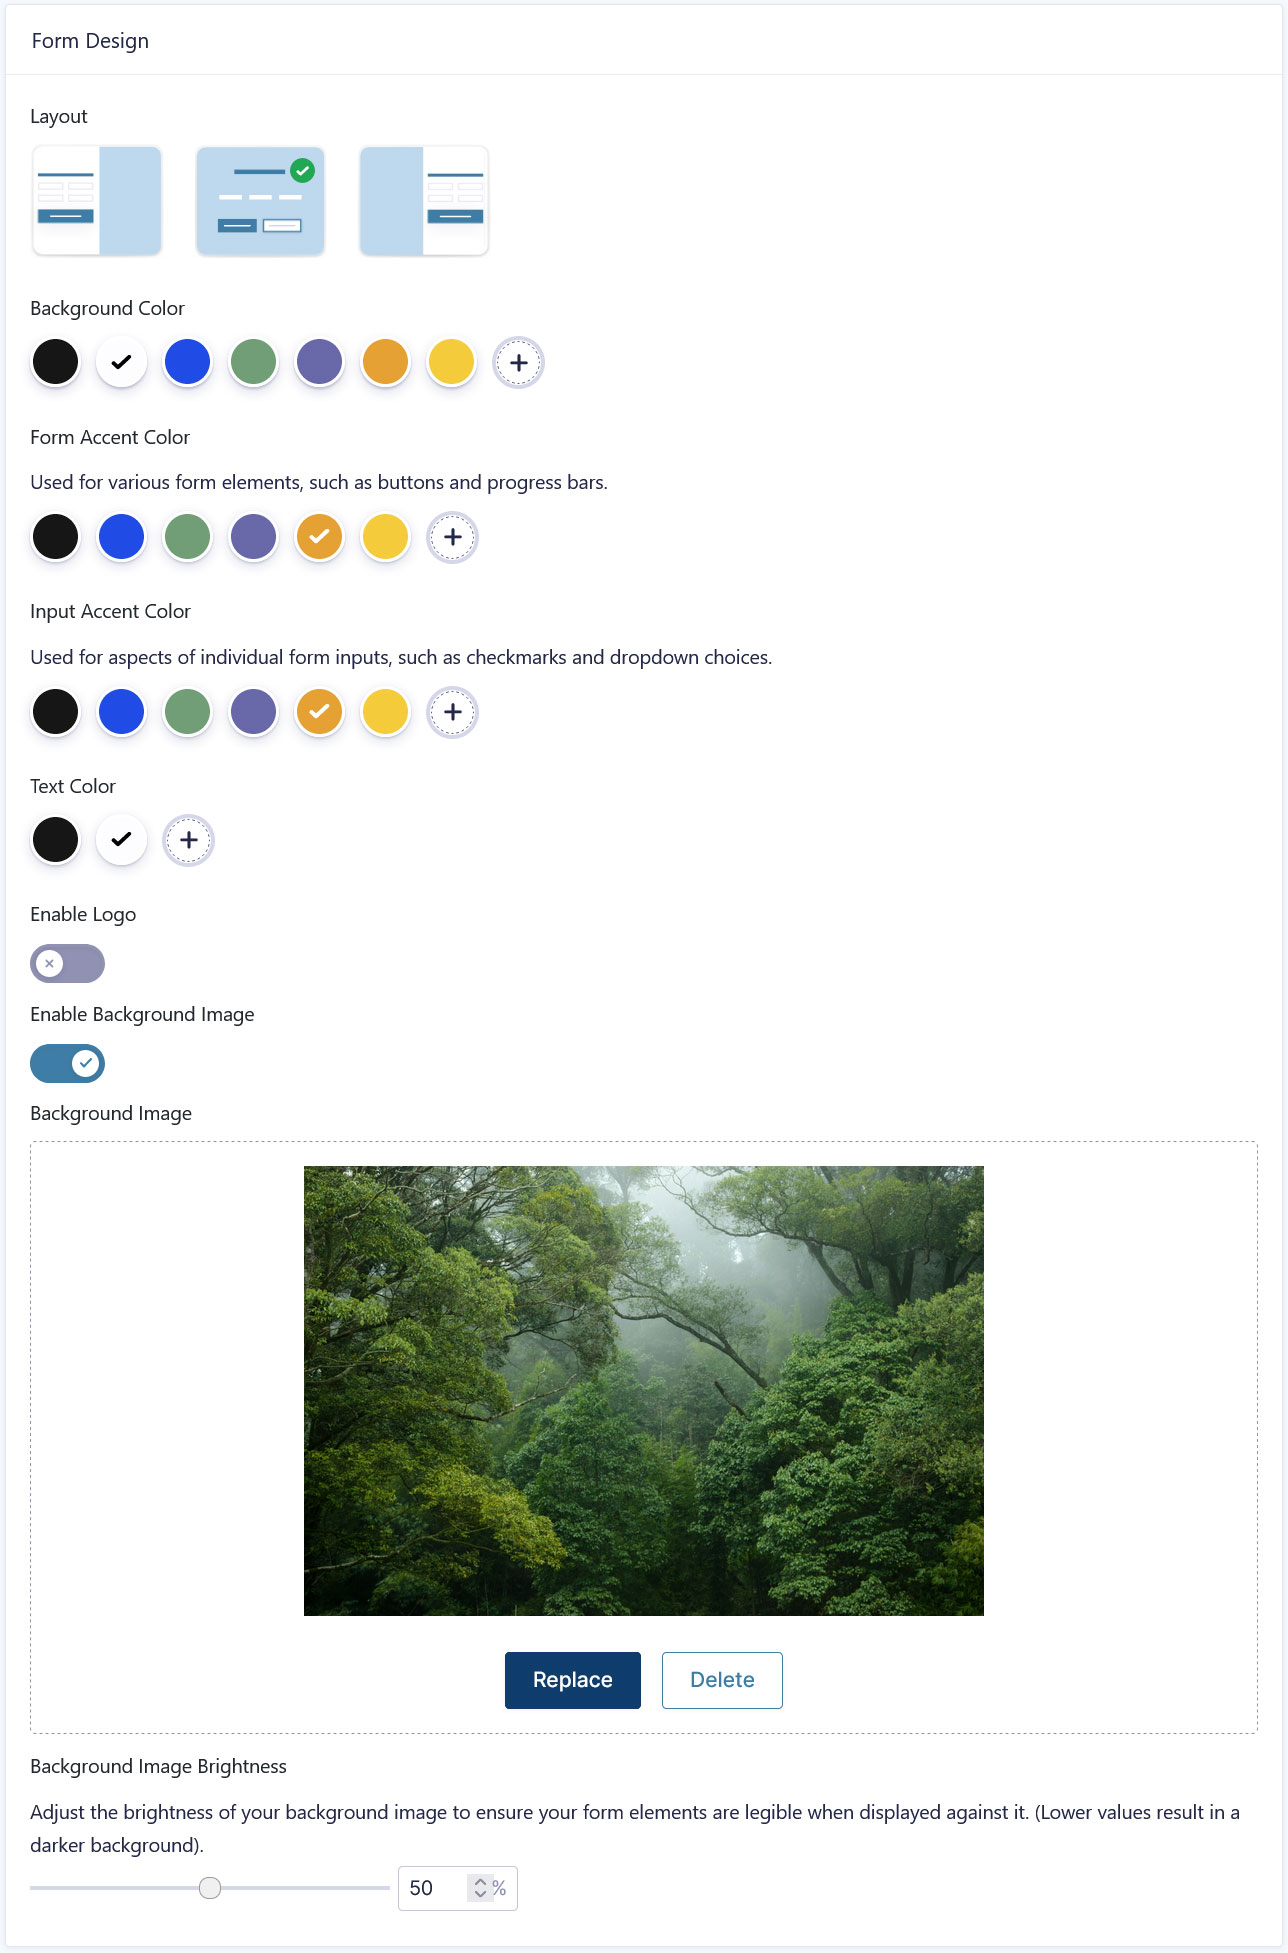
Once switched on, the Form Design section appears, where you can customize the appearance of your conversational form in multiple ways.
Most of the options are pretty self-explanatory. Under Layout, you can choose to display the form center stage or on the left or right side. There are different options to change the colors of the background, accents (e.g. buttons or progress bar), inputs (buttons, checkmarks, etc.), or form text.
You can also enable and upload a logo and decide where it should link to. Same for a background image.
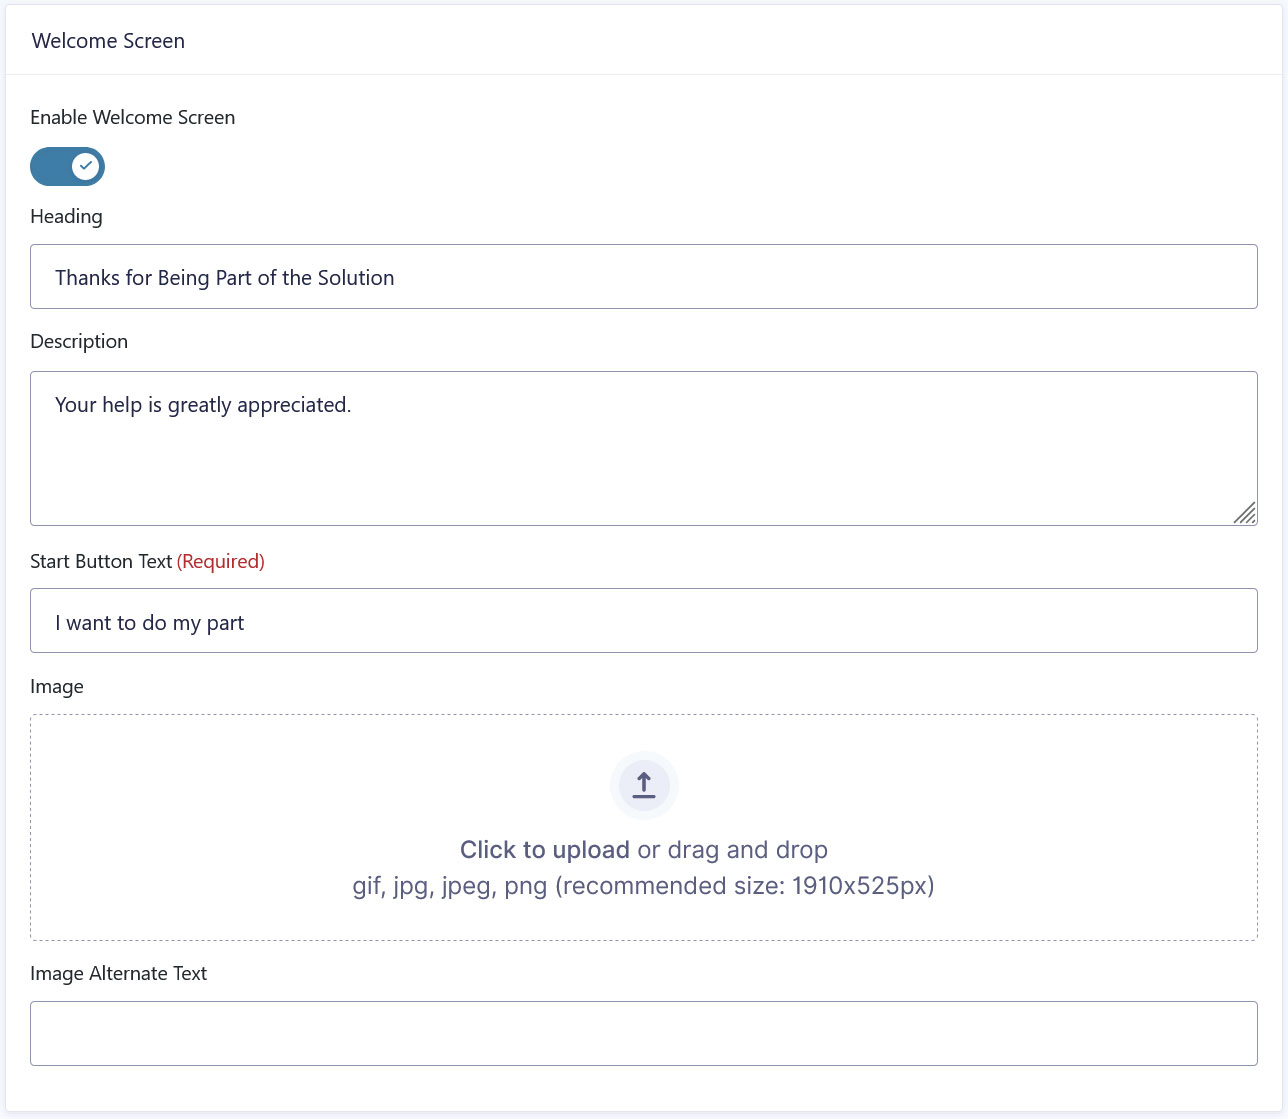
In addition, there is an option to add a welcome screen. This is a screen that appears before any of the form fields. You can use it to greet visitors and provide them with additional information.
Once enabled in the Welcome Screen section, you can add the following information to it:
- Heading
- Description
- Start Button Text (users click this to start the form experience)
- Image
- Image alternate text
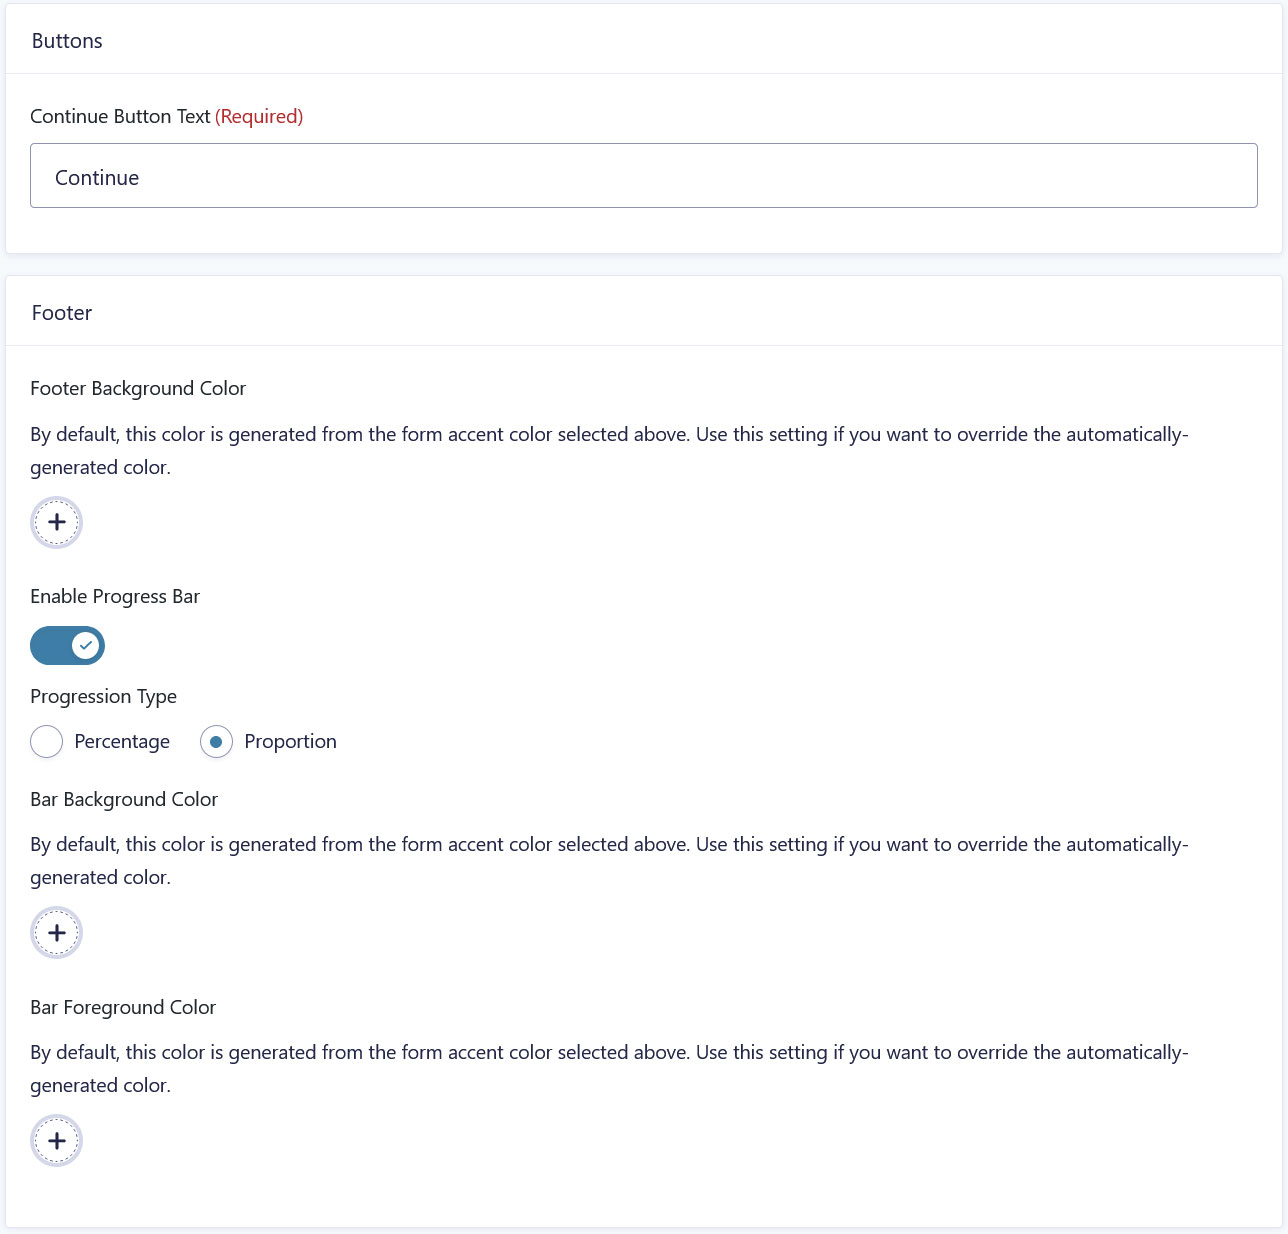
At the bottom, there are two customization options for Buttons and the form Footer.
Use the first box to modify the text of the button users click on to advance through the form.
The Footer section lets you (optionally) customize the footer background color. If you don’t set anything here, Gravity Forms automatically generates a color based on your accent color choices.
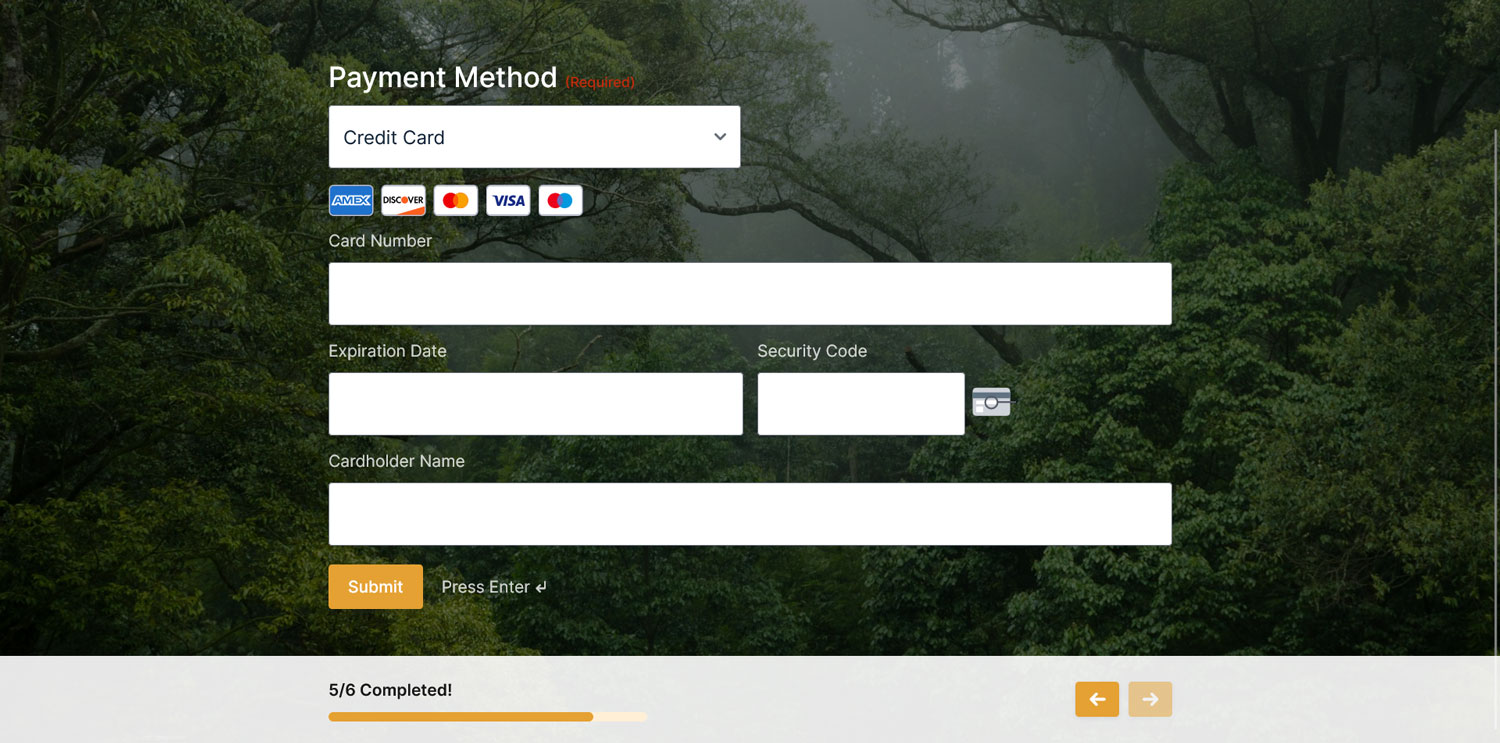
Finally, you can also switch on a progress bar. This shows visitors how far they are in the form completion process. It can either appear as a percentage or the number of steps. It, too, automatically gets colors assigned that you can override.
Save when you are done.
10. Test Your Form and Make It Live
The last step is to test your form. For that, click on View Form in the conversational forms menu to access your assigned URL in a new browser tab.
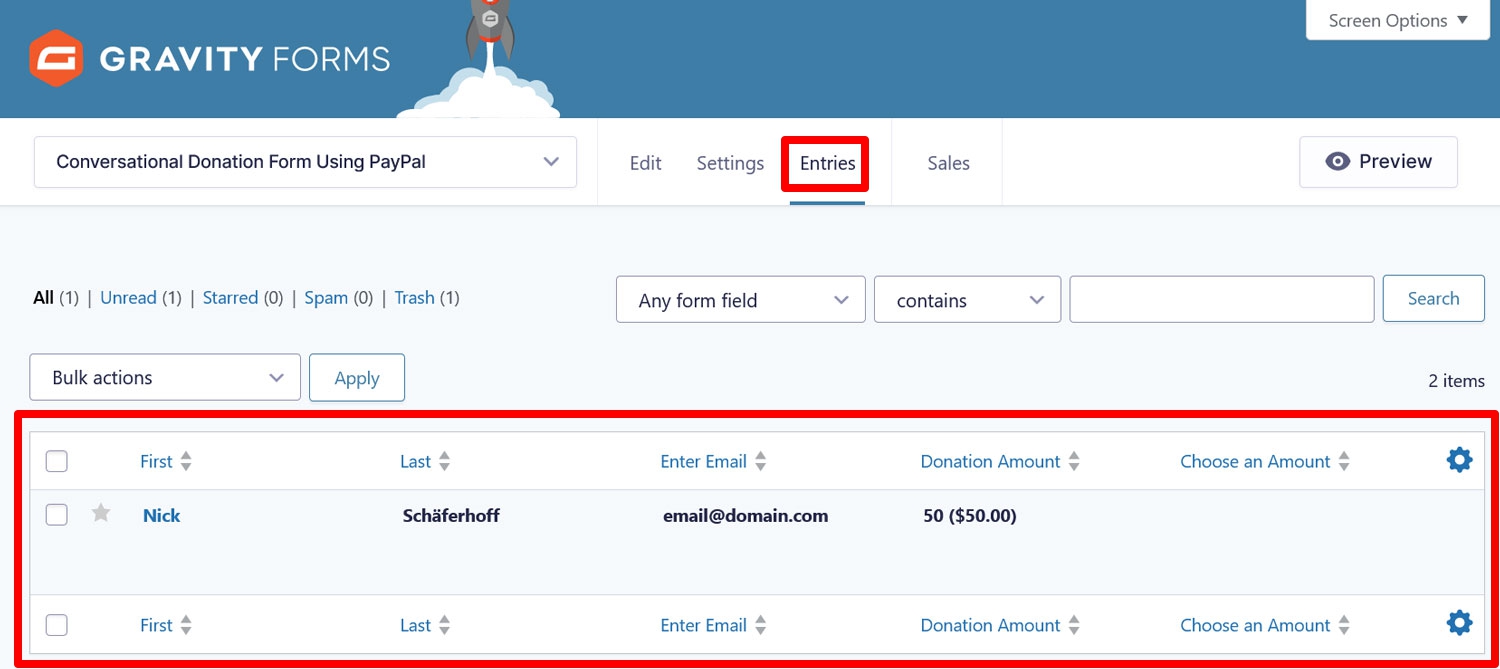
Go through the entire payment process and try out each option to make sure everything works and you receive all the relevant notifications. With PayPal in test mode, you can also make dummy payments, for example, using these credit card numbers. See if they show up in your WordPress dashboard under Entries.
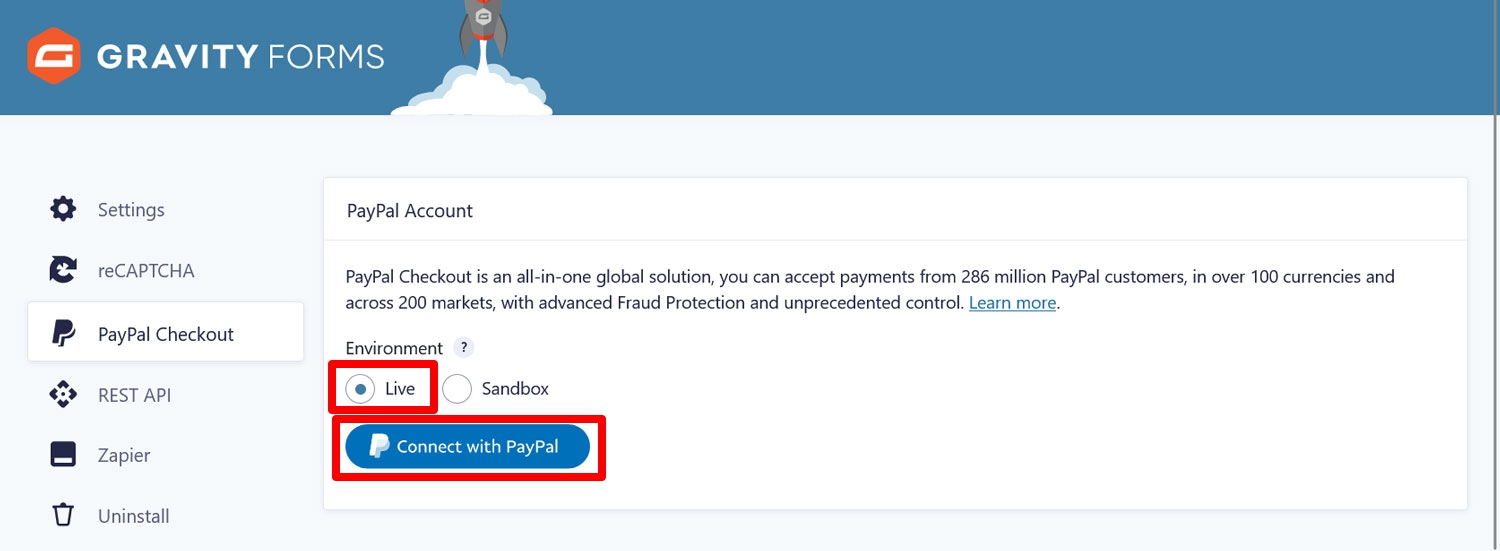
Once you are satisfied, in order to accept actual donations, you need to switch your PayPal account to live mode. For that, go back to the settings (Forms → Settings → PayPal Checkout) and switch the radio button from Sandbox to Live.
Then, click the Connect with PayPal button once more and re-authorize your account, this time with your real credentials. Once that has been finished, you are ready to raise funds for your cause.
For further reading, the Gravity Forms documentation site has indepth information on both the Conversational Forms Add-On and the PayPal Checkout Add-On.
In a Nutshell: Conversational Donation Forms
Collecting donations on your WordPress website is a great way to help your nonprofit work towards its goals. Thankfully, with Gravity Forms and PayPal, you have two reliable partners available to make it happen and the option to use the conversational form format for extra interactivity and excitement.
Above, we have gone over how to easily integrate all these parts together with two Gravity Forms extensions. It might seem complicated at first but as long as you take it step by step, it’s anything but. We have taken great pains to make the process as frictionless as possible, even for less technically-inclined people.
Just give it a go and you can start collecting donations in a fun and engaging way on your website in no time.
And if you’re a registered nonprofit but not yet a Gravity Forms customer, thanks to the Gravity Forms Nonprofit License, you can get access to our premium form builder plugin and plenty of add-ons at a reduced rate!
