How to Create a Net Promoter Score Survey With Gravity Forms

Are your customers loyal, or could they be swayed by your competitors? Would your customers recommend you to their friends?
As a business owner or manager, it’s critically important that you understand how your customers feel about your business. If they’re upset or disappointed, you want to know as early as possible so you can fix your product and service.
Today we’re going to teach how you to create a Net Promoter Score survey to capture that data.
You may think, “I know my customers are happy because they keep buying from me.” But their purchasing habits don’t tell the whole story.
For instance, a customer may purchase from you because you’re the only solution they’re aware of at the moment. They could abandon you the moment they learn about a competitor.
Or a customer may feel stuck with you because you offer a specific feature or tool they can’t live without. Once another business offers that feature, they’re gone.
So how do you gauge your customers’ loyalty? By asking them!
The Net Promoter Score (NPS) Survey
Net Promoter Score was designed by Frederick F. Reichheld, a consultant with Bain & Co. He wanted a fast way to know how customers feel about a product or service.
He tested a number of questions and survey techniques, but only one was fast enough to drive real change in the business: the likelihood to recommend. This question became the core of the NPS survey.
A Net Promoter Score survey is a simple and powerful way to understand your customers’ loyalty to your product or service and whether they can be swayed by other brands.
NPS surveys have two questions. The first goes something like this:
“How likely are you to recommend [company/product name] to a friend or colleague?”
Users can rate their willingness to answer this question by selecting a number from a scale of 0 to 10.
Depending on their responses, customers are divided into three groups. Those who reply with a zero through six are detractors. Those who rate you seven or eight are passives. And those who give you a nine or ten are promoters.
To calculate your score, subtract the percentage of detractors from the percentage of promoters (ignoring passives).
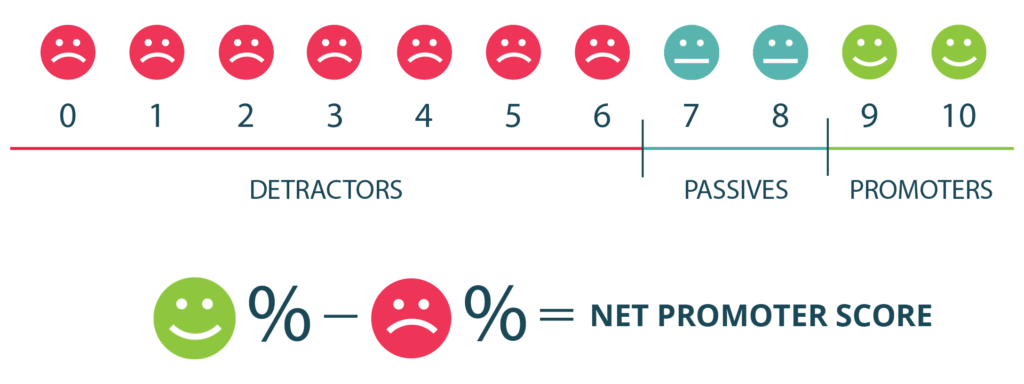
Image: hubspot.com
The second question is a follow up that asks the customer to give a qualitative response. You can ask any question you like (or none at all), but the goal is get a feel for the customer’s overall sentiment. Here are some good questions to ask:
- “Why did you give us that rating?”
- “How can we improve your experience?”
- “What was missing or disappointing in your experience with us?”
- “What is the one thing we could do to make you happier?”
Net Promoter Score surveys are simple for everyone. Your customers only have to answer two straightforward and uncomplicated questions.
As a business owner or manager, NPS surveys are useful big-picture metrics that summarize customer sentiment nicely. They can use it to track the change of the team’s work and compare internal teams against one another.
NPS is also useful because it’s one of the few survey tools that let you benchmark yourself against other companies like yours. Since everyone asks the same basic questions, your responses are comparable to your competitors’ results.
Most importantly, using NPS surveys can drive revenue.
There’s plenty of research that shows that NPS surveys correlate with increased business growth. That means companies grow their revenue when they administer NPS surveys and apply their learning to their business.
NPS Limitations
While NPS surveys are powerful tools, they aren’t perfect, and it’s important that you understand their limitations before you rely on them.
NPS surveys aren’t very specific. It’s nearly impossible to understand why the customer feels the way they do unless they answer your second question in detail. This means you’ll have to run other types of surveys to get answers to your specific questions.
Furthermore, the second question on the NPS survey is qualitative, meaning it can’t be counted or measured easily. In order to understand your customers’ responses, you (or someone on your team) has to go through them one by one. This can be quite tedious if you have thousands of responses.
How to Create a Net Promoter Score Survey
Follow these step-by-step instructions to create your own Net Promoter Score survey with Gravity Forms.
Step 1: Upload and Activate Gravity Forms
Your first step is to upload and activate the Gravity Forms plugin. Follow these instructions.
Step 2: Install the Survey Add-On
There are two ways to install the survey add-on.
The easiest way is to install it right from your WordPress dashboard. Click Add Ons underneath Forms. Find the Survey Add On and click Install.
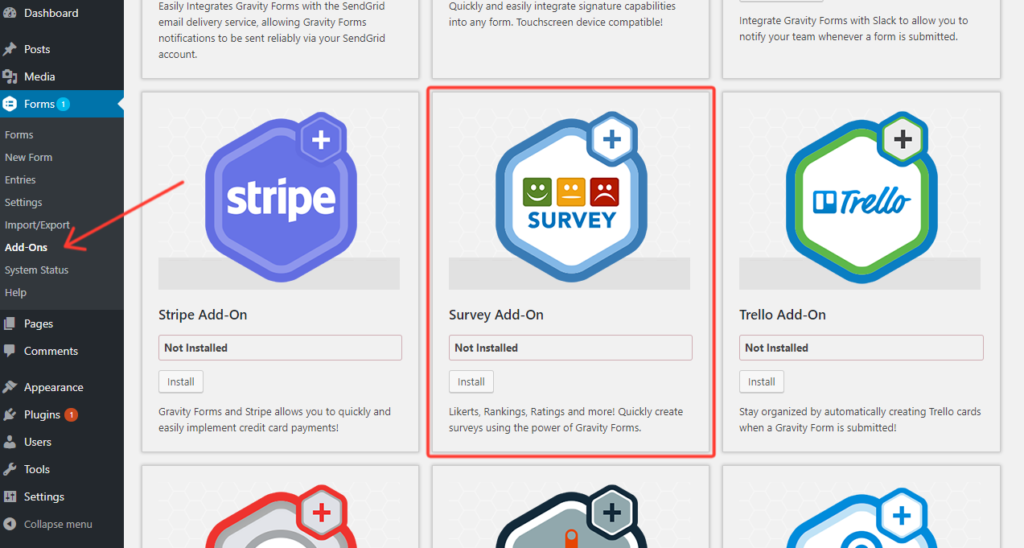
You can also install the plugin manually. Download the plugin from the Add Ons download page. In your WordPress backend, click Add New under Plugins.
On the plugin page, click the Upload Plugin button. Click the Choose File button, find the plugin file on your computer, and press Install Now. When it’s finished installing, make sure to click Activate.
Step 3: Create a New Form
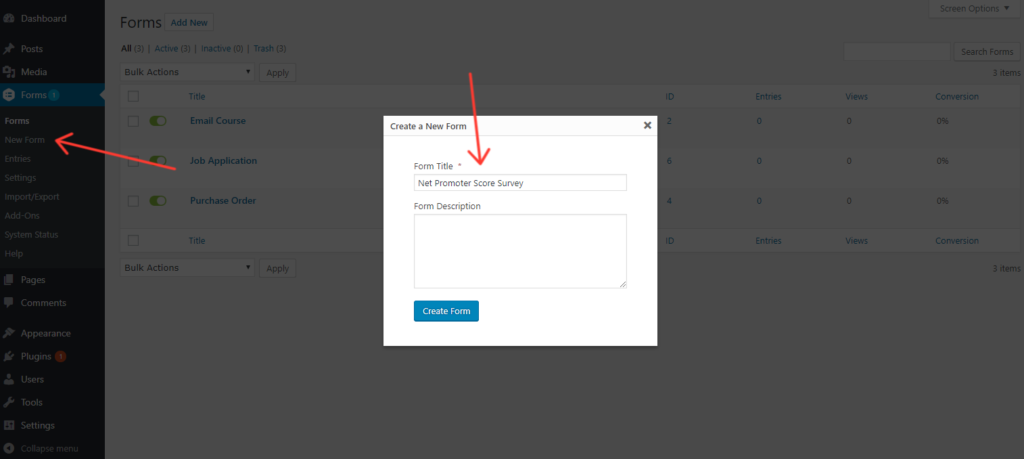
Next, you’ll need to create a new form. In your WordPress backend, click New Form under Forms. Give it a name you’ll understand in the future, like “Net Promoter Score Survey.” Then click Create Form.
Step 4: Build the Net Promoter Score Fields
As we mentioned, Net Promoter Score surveys ask two questions: A rating question and an open-ended follow up.
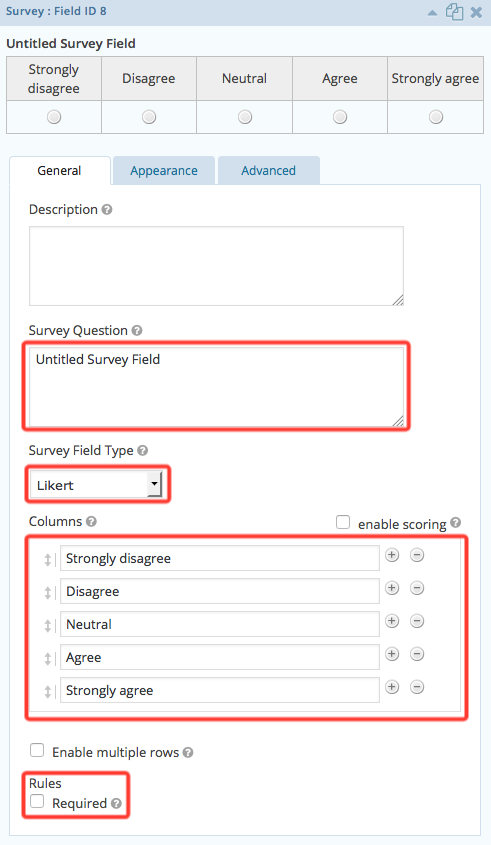
To create the rating question in your form, add a Survey Field from the Advanced Fields toolbox.
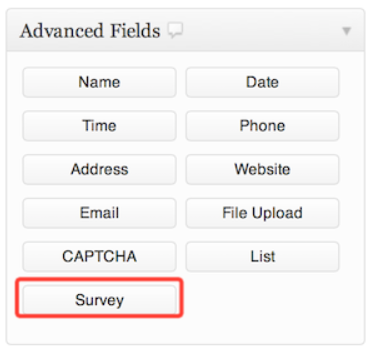
Once the field appears in the form editor, type your question in the Survey Question box. Make sure to use a question like “How likely are you to recommend our product to a friend?”
Next, set the Survey Field Type to Likert. Remove the text from each column and replace them with the numbers zero through ten. You’ll have to use the plus (+) icon to add five more columns.
Finally, check the Required box so users are forced to answer this question before submitting the form.
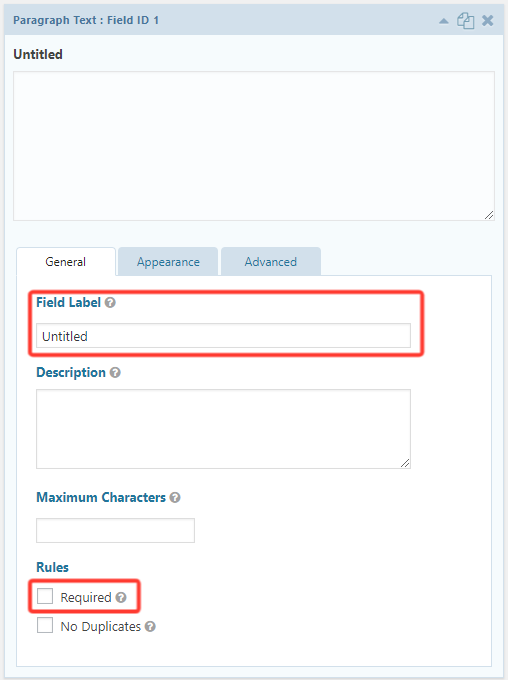
To ask the second question of your NPS survey, add a Paragraph Text field from the Standard Fields toolbox.
Type your open-ended question under Field Label and check the Required box.
Step 5: Configure Your Confirmations
Confirmations are messages sent to the user so they know they’ve completed the form. To edit these, hover over Settings and click Confirmations.
Within the Default Confirmation, you can stick with the on-page text confirmation, redirect to a page on your site, or redirect to an external URL.
Make sure to click save before leaving the page.
Step 6: Configure Your Notifications
Notifications are emailed messages that notify someone that a user has submitted the form. The default Admin Notification is configured to send an email to the WordPress admin, but you can change it to anyone you like.
(You could send each form submitter a notification email, but only if you ask for their email address in the form, which defeats the purpose of the super brief NPS format.)
Step 7: Add Your Form to a Page
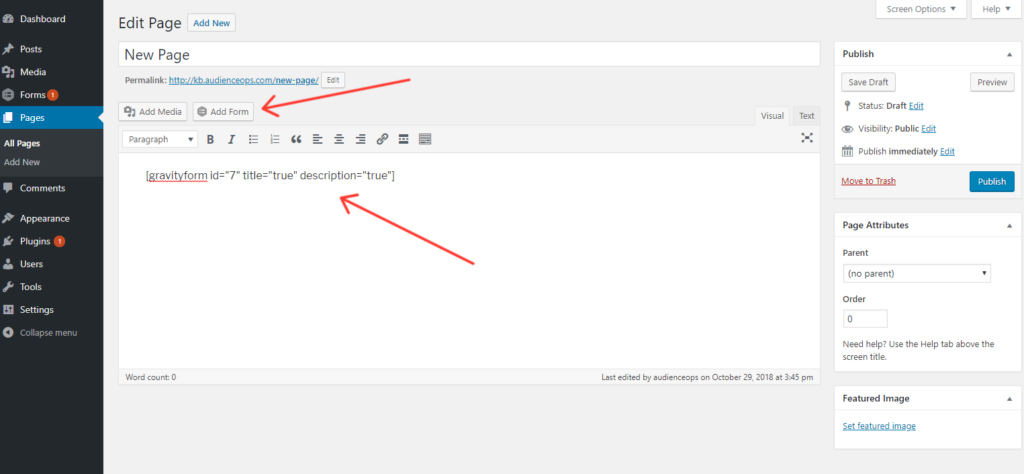
Add your survey to a page just like any other form. You can either paste the forms shortcode (found on the Forms list page) or use the Add Form button to select your form from a drop down menu.
Step 8: Access Your Survey Results
As people respond to your NPS survey, you’ll want to check out the results.
You can view the results by clicking into your NPS form and selecting the Survey Results tab beneath the form’s title. How Gravity Forms displays your data depends on the type of Survey Field you used. You can filter the data based on data and field selection.
Where to Place Your NPS Survey
Now that you’ve created your own Net Promoter Score survey with Gravity Forms, where should you place it to gather responses?
NPS surveys gauge customer sentiment, so they shouldn’t be available to non-customers who might taint your results. Don’t place your NPS survey on your home page, in your sidebars, at the end of blog posts, or anywhere else your web traffic might stumble upon.
Embed your NPS survey on a page that isn’t linked from anywhere else on your site. Then set up an email automation in your email marketing tool to send an email to every customer. Within the email, ask them to navigate to the NPS page and complete the survey.
When you ask your customers to take the survey is up to you. Some businesses like to make the request after a certain delay. For instance, a coach or consultant might set the email (with your request) to send thirty days after you add the “new customer” tag to their email address.
Other businesses like to wait until they’re sure the customer has had time to experience the product or service. For instance, a SaaS tool might send the email after the customer achieves a particular milestone within the tool.
Going Forward
Asking your customers questions isn’t enough. Don’t forget to use that data to drive changes in your business. Strive to raise your NPS score and your customers will stick with you forever!