Starter Guide: How to Create a Customer Complaint Form
Does your website have a customer complaint form? While they may seem like they carry a negative connotation, customer complaint forms can actually play a vital and positive role in the success of your brand, business and website.
Collecting feedback from customers – the good and the bad – is crucial. It allows you to hear what customers think directly from the source, so you can make informed decisions about your business based on data. Plus, customers generally like having a way to reach out for help with their challenges.
In this starter guide, we’ll show you how to create an effective customer complaint form. First, we’ll discuss the purpose of the customer complaint form and why it’s important to have one on your website, and then we’ll show you how to create one.
Let’s dive in.
What Exactly is a Customer Complaint Form?
In a nutshell, a customer complaint form is a web form people can use to provide negative feedback about their experience with your business. A good customer complaint form lets customers submit enough information to get the assistance they need. While it’s not always fun to receive negative feedback, it helps you as a business resolve customer problems as quickly and smoothly as possible.
Benefits of Complaint Forms
Why is it so important to have this kind of form on your website? We alluded to a few benefits above, but here are a few more things customer complaint forms allow you to do:
- Spot problems – Imagine there is a repetitive defect in something you are selling. Wouldn’t you want to know about it so you can make sure it doesn’t happen again in the future? The same applies to your services and all other parts of your company’s customer experience. If nobody points out the problem to you, it will persist.
- Create a better business – Knowing about recurring issues allows you to improve the way you do business in a targeted manner. Other people pay consultants good money to find out this kind of information, but with a customer complaint form you can get it for free.
- Manage your reputation – A complaint form provides an outlet for customers to privately make you aware of issues and gives you a chance to solve them. Alternatively, consumers may make their grievances public in the form of negative reviews which can be more damaging.
- Connect with customers – Often customers don’t mean to criticize but are simply looking for help or want to share their opinion. Taking them seriously and responding in both word and action is a way to communicate that you care about them. This can build trust and make customers feel valued, which fosters brand loyalty and repeat business.
What Kind of Complaints Can You Expect?
Typically, issues that come in through a complaint form tend to focus on the following areas:
- Product – Someone has issues with their purchase and is looking for help to resolve them.
- Value – This happens most often when a person thinks your product or service is too expensive for what it delivers.
- First buyers – People who didn’t have a great first experience with your business.
- Repeat customers – This type of complaint is often the most valuable. Repeat customers have more experience with your business and have likely put a lot more thought into their complaint before reaching out.
- Customer service – When someone had a negative experience with your support or customer service.
Understanding these scenarios beforehand allows you to anticipate customers’ complaints and better address them.
How to Build a Customer Complaint Form on WordPress
From here on out, we will cover how you can create a step-by-step customer complaint form on WordPress using Gravity Forms. Our plugin comes with all the necessary tools to make the process super easy:
- Drag-and-drop form builder – Create your form in a beginner-friendly user interface that doesn’t require any special technical skills.
- Flexibility – You have full control over the content, layout, and design of your form and what happens with the information you collect. Gravity Forms also enables you to build contact forms, newsletter sign-up forms, e-commerce payment forms, and much more.
- Numerous form enhancements – Gravity Forms comes with many features and add-ons that are useful for creating more effective customer complaint forms.
To follow the tutorial, you need a WordPress website with the main Gravity Forms plugin installed (learn how to install it here). If you are not a Gravity Forms customer yet, you can get your license here. Alternatively, you can also try the plugin out first by trying our free demo website, which has all of the functionality you need to follow along with this tutorial.
1. Determine the Content of Your Customer Complaint Form
The first step is to figure out what you need to include in your form to allow customers to effectively communicate their concerns and provide you with all the information you’ll need to provide a solution. For example:
- Customer contact information.
- Date and time of the incident.
- The exact nature of the complaint.
- Preferences for communication.
- Expected resolution.
- Ways to upload supporting documents.
Of course, this is just a starting point. The specifics will differ depending on your business, however, and it’s important that you think about it beforehand so you can make the right decisions.
2. Create Your Form
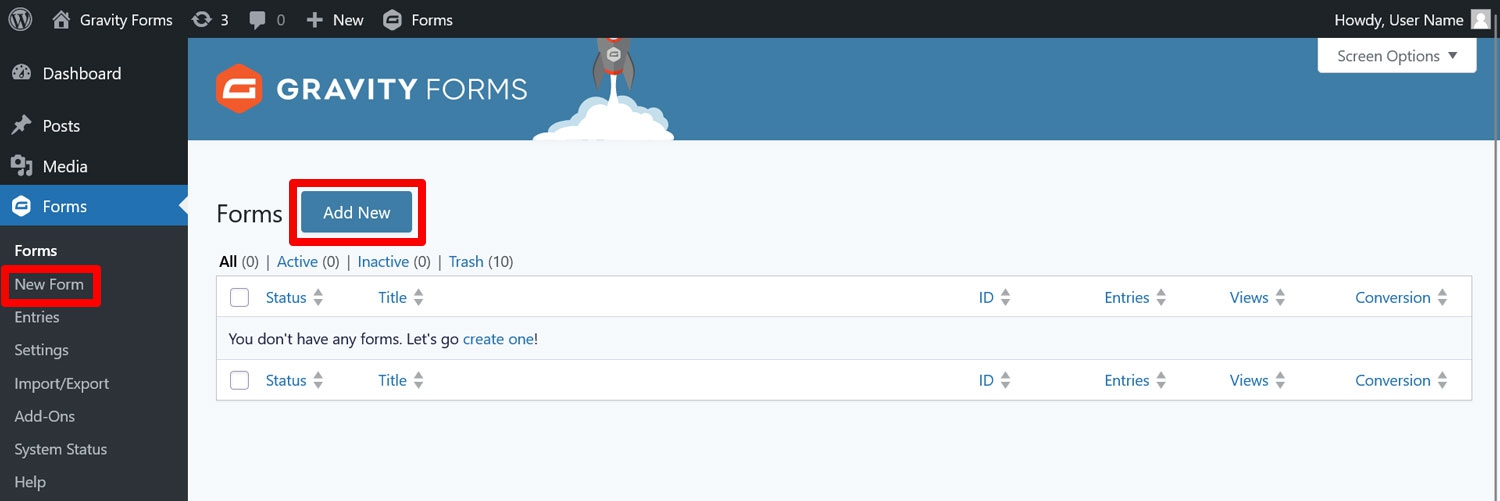
To start building your form, head to your WordPress admin and under Forms, click Add New.
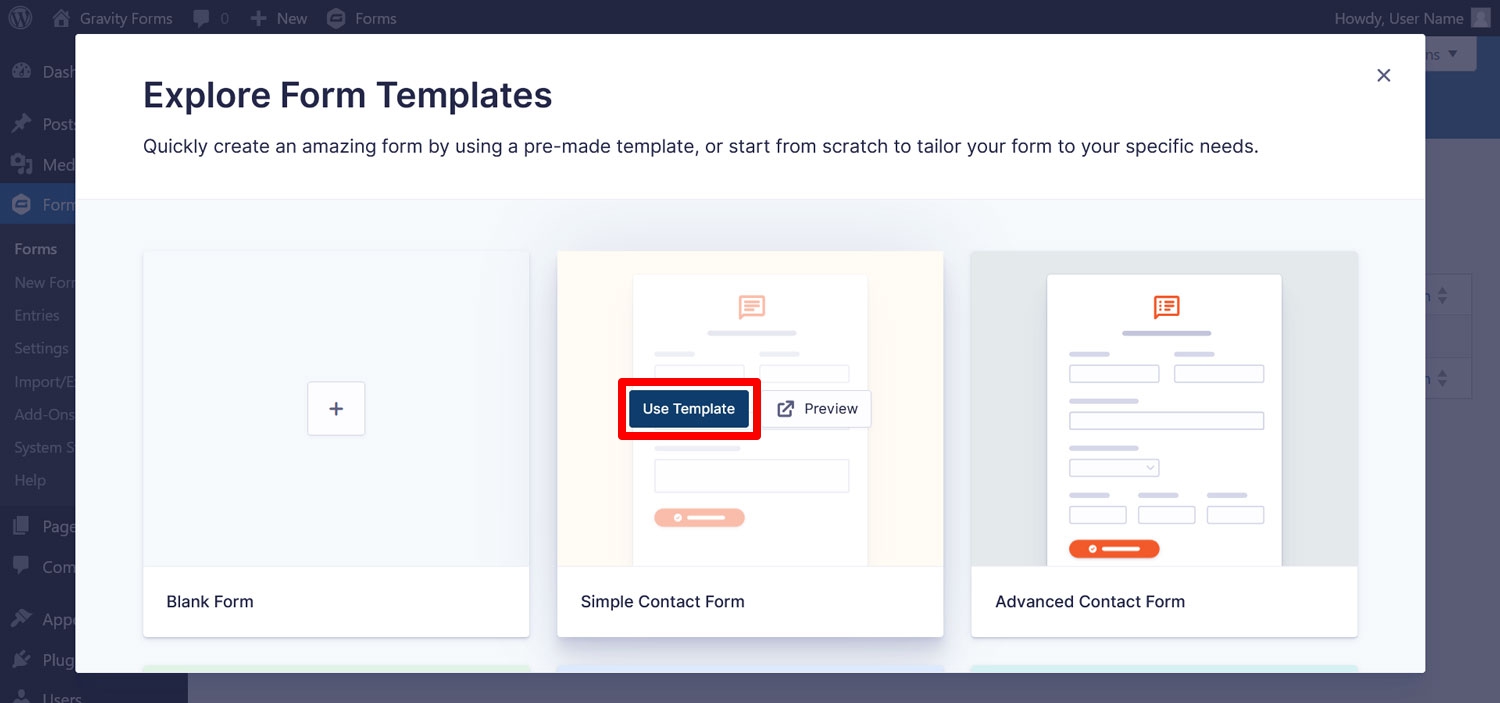
A new panel will open up allowing you to choose whether to start from a blank form or use a blueprint from the template library. Templates contain common form fields for their use cases. A good starting point for a customer complaint form is the Simple Contact Form template. To use the template, locate it in the list, then hover over it and click Use Template.
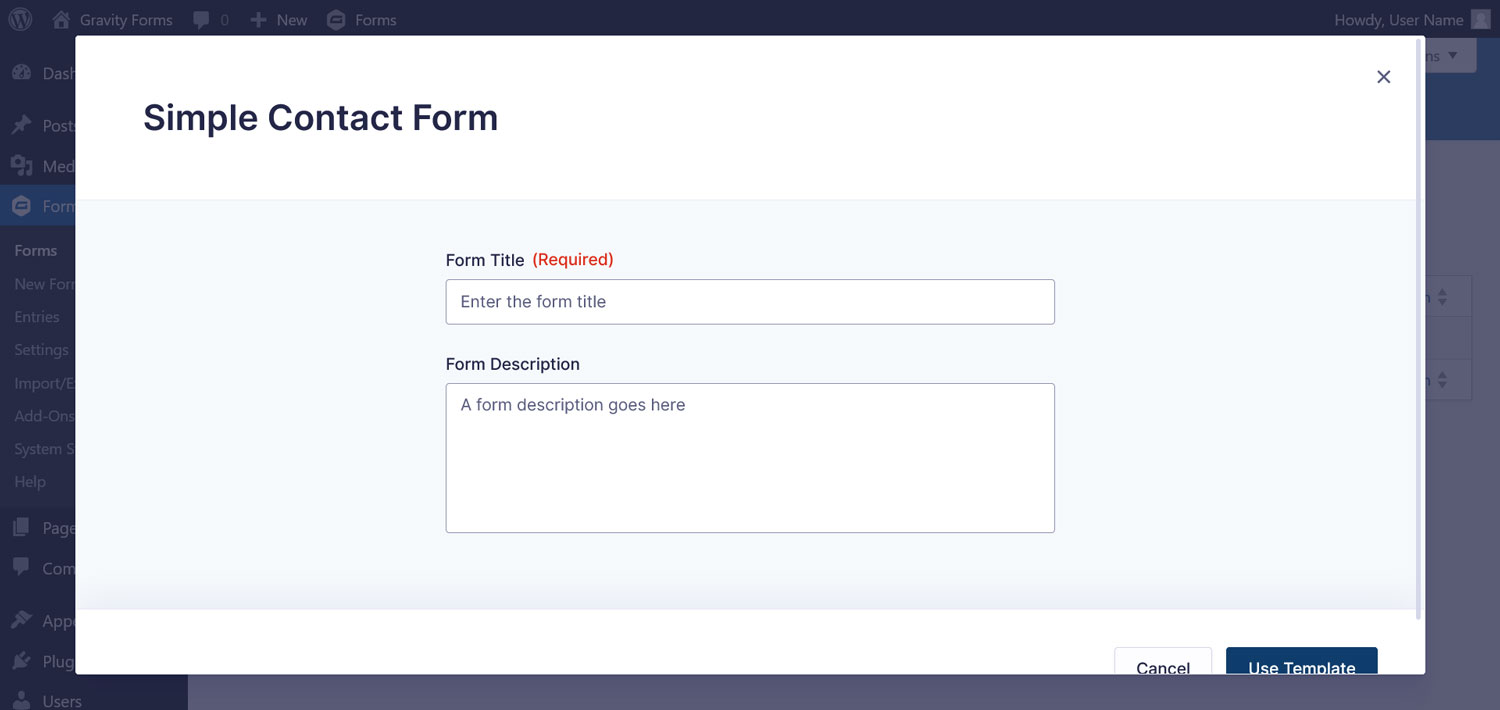
On the next screen, give your form a name and optionally a description. Then click Use Template.
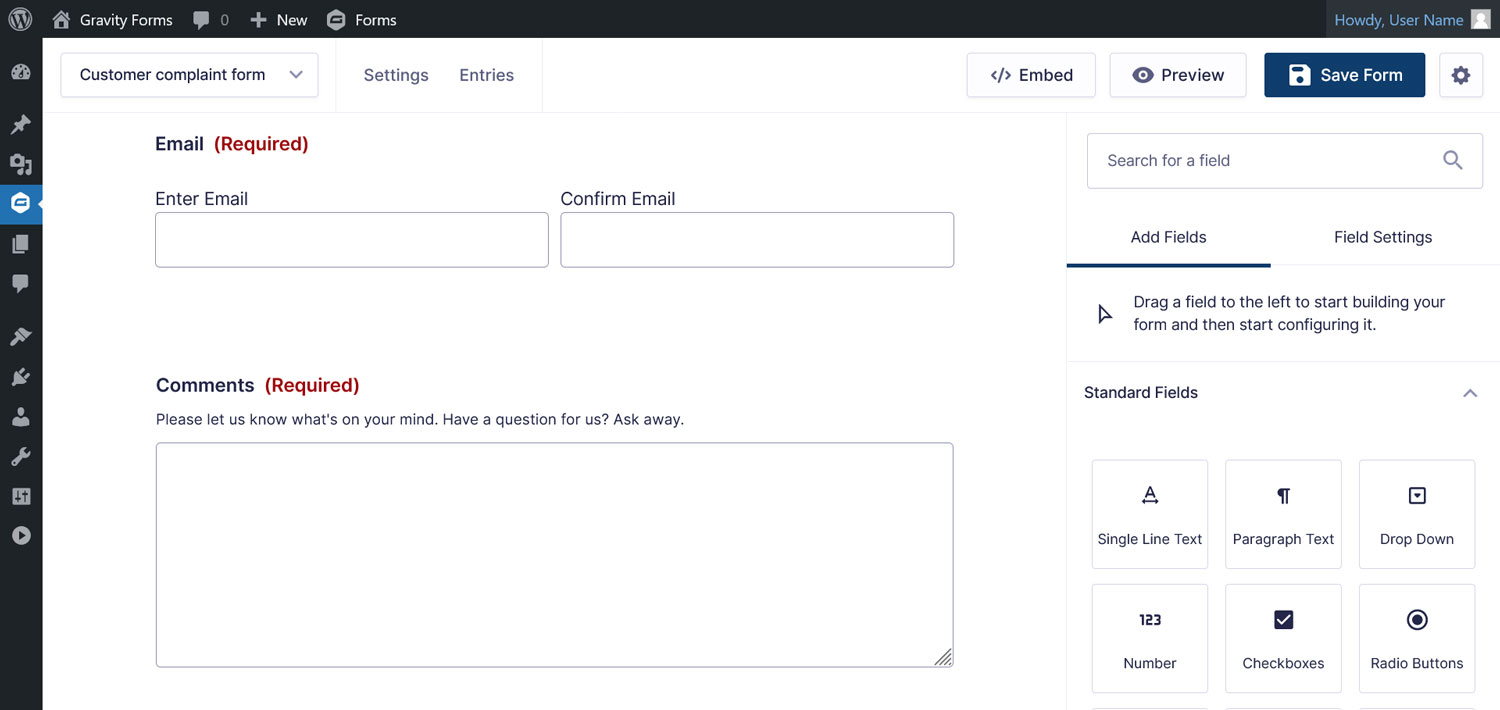
You will then land in the main Gravity Forms drag-and-drop form editor.
Since we are using a template, you should already find form fields to capture the following information:
- Customer first and last name
- Email address
- Text field to describe their issue
3. Customize the Form
As mentioned earlier, you can tailor the form completely to your needs.
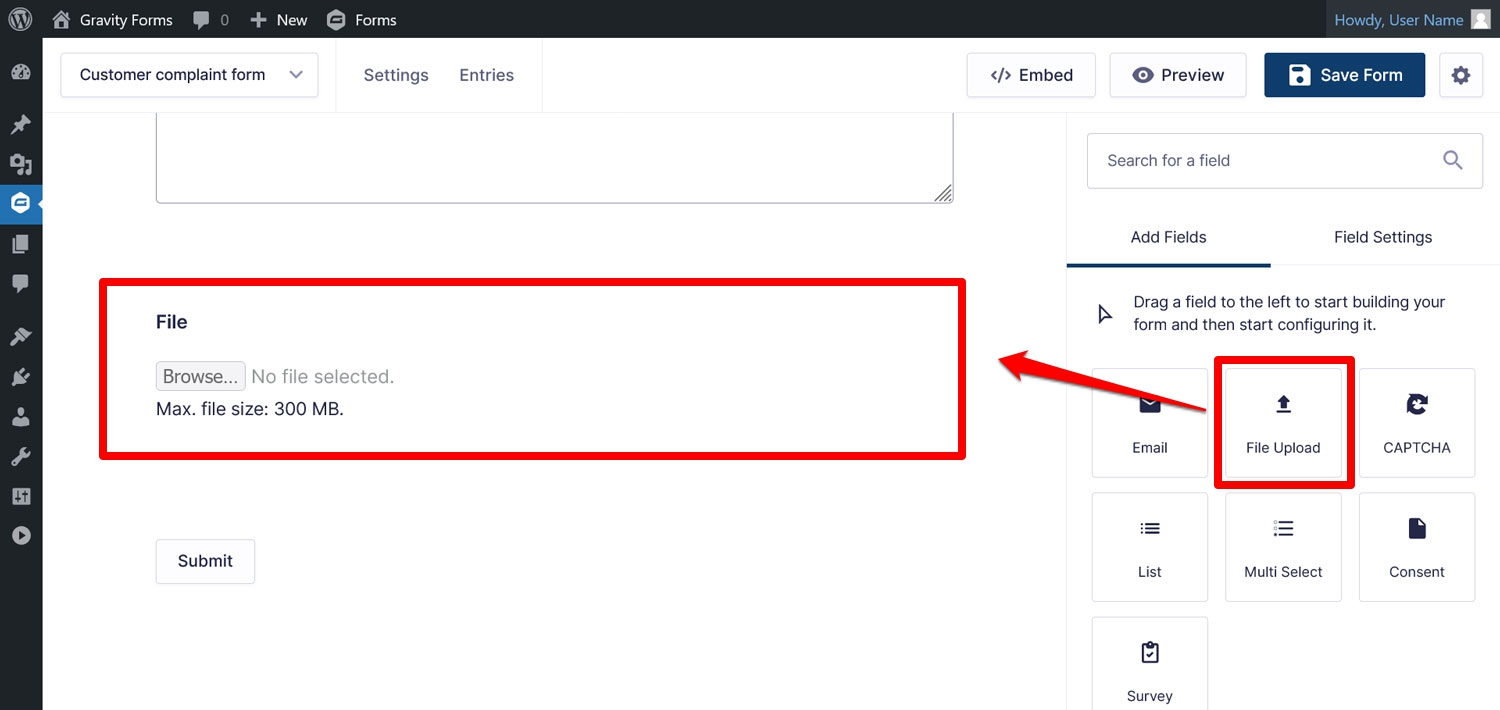
To add fields, drag and drop (or double click) them from the right sidebar to where you want them to appear on your form. For example, in this case we definitely want to add the File Upload field to our form to allow users to submit photos or screenshots of their issue for further clarification.
Since we started from a template, our form will already contain some fields, but depending on your unique needs, you might want to add more. With Gravity Forms, you have a wide range of field types you can select from, including but not limited to:
- Address – If your resolution involves sending a replacement product, you may need to collect your customer’s address.
- Phone number – Add a phone number field and invite your customers to request a call back.
- Date – Including a date field allows customers to indicate when their incident occurred.
- Multiple choice – This is a great field to use when asking for a customer’s preferred contact method.
- Consent – In the interest of data security, it’s a good idea to include this field on any form that asks for personal information.
- Page – Should your form get very long because you are collecting a lot of information, you can use the Page field to add pagination.
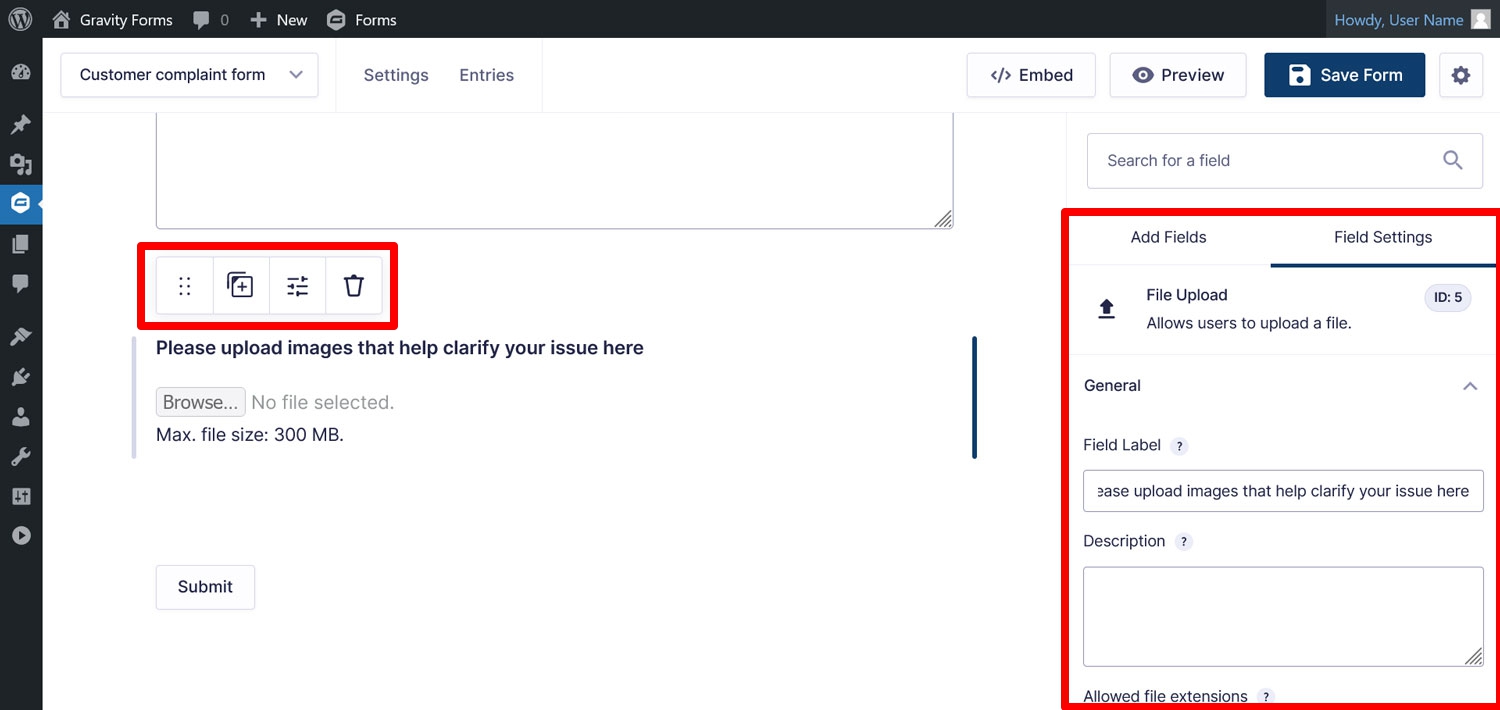
Once you have added fields to your form, you can further edit them. Clicking on a field displays a toolbar above it that allows you to move, duplicate, or delete the field. In addition, the field settings will appear on the right, which enable you to make more edits like:
- Editing the name/label of the field
- Toggling variables of the field on or off
- Editing field content
- Changing the appearance of the field
- Enabling conditional logic
Naturally, the field settings will differ depending on the field you are editing.
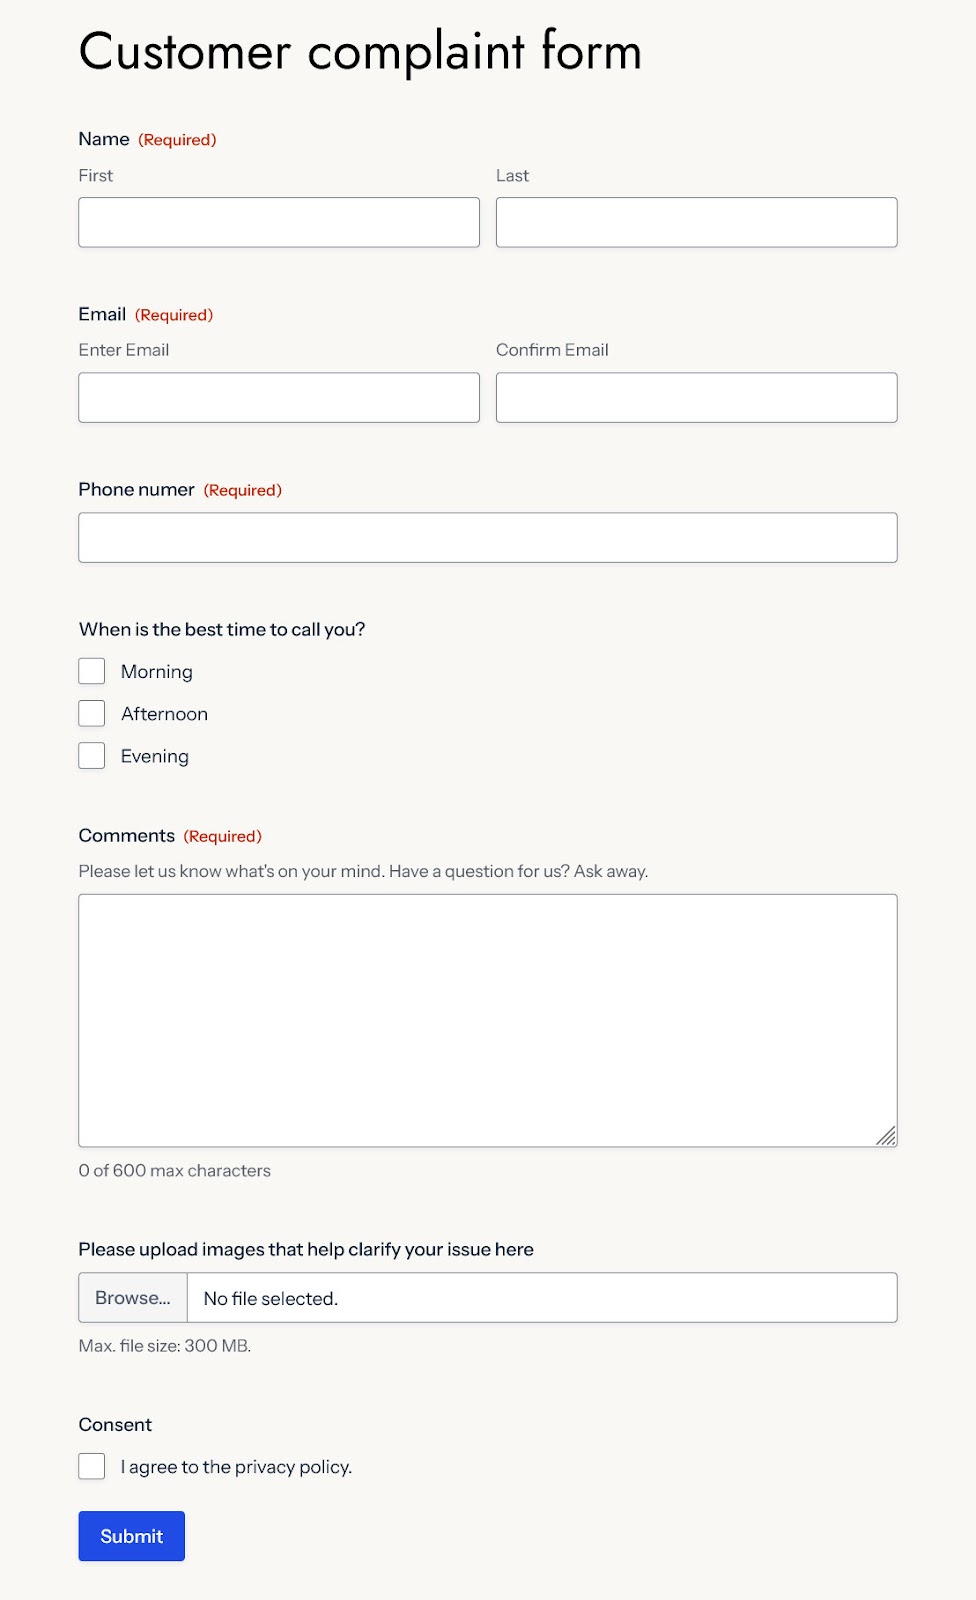
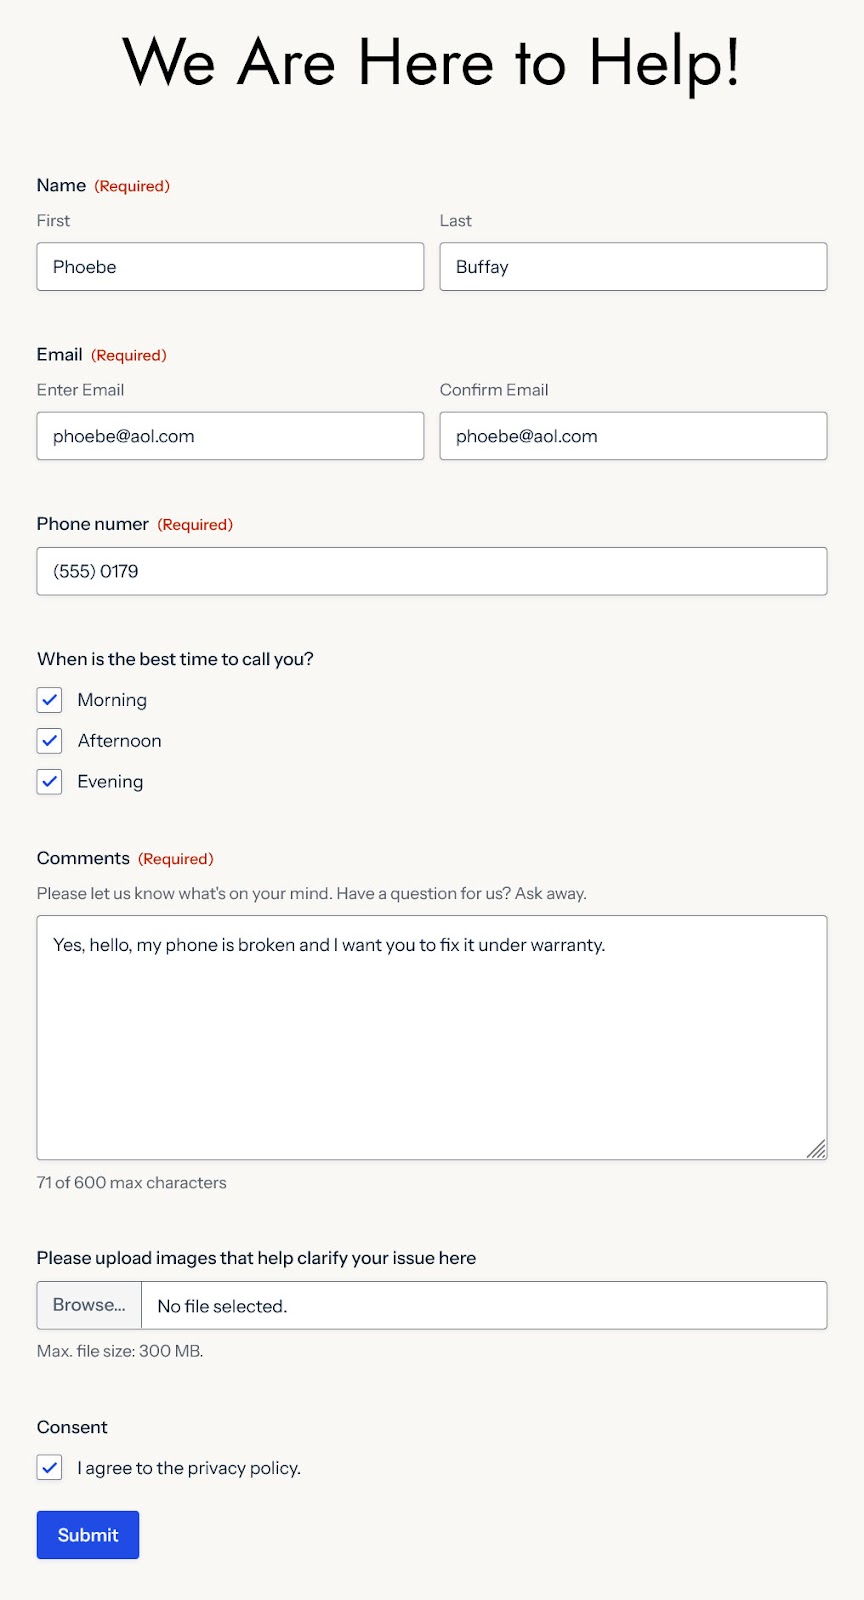
Once you are satisfied with the content of your form, make sure to save any changes by clicking Save Form at the top. Below you can see our example:
4. Extend Your Form’s Functionality
By now, the basic form is done and will work when you embed it on your site. But Gravity Forms has many more features and add ons that can enhance your customer complaint form and make it even more useful and engaging. Here are a few of them:
Connect Your Form to Project Management Tools
If you regularly deal with a decent volume of customer complaints, you most likely want to start using software tools that make taking care of them easier. Gravity Forms supports two main options for that:
- CRMs – Add your incoming complaints to a customer relations management tool. This makes it much easier to track and process them. Options include Zoho, HubSpot, Agile CRM, ActiveCampaign, Capsule, and the Help Scout help desk service.
- Project management software – Alternatively, or in addition, you can also connect your form with programs like Trello or Breeze.
Use a Conversational Form Layout
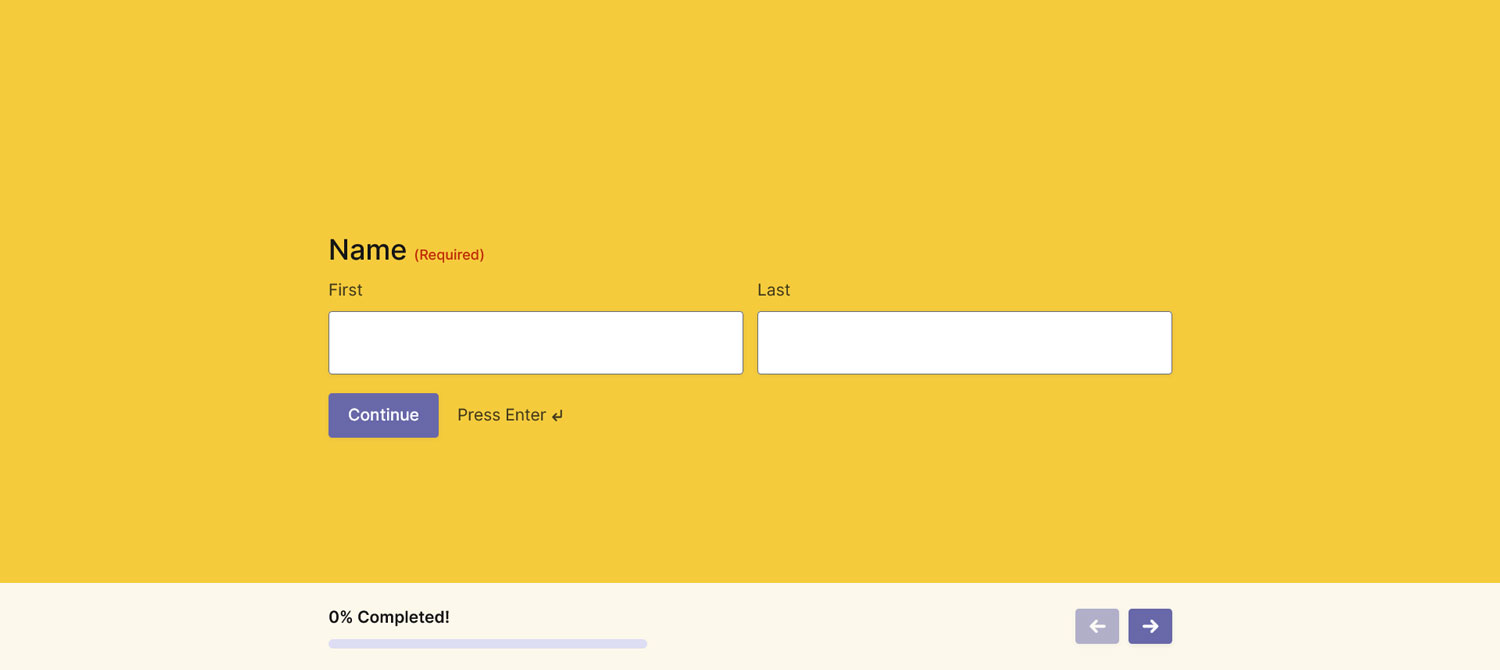
Conversational forms are generally more exciting and user friendly to fill out. Rather than showing all form fields at once, the fields are presented in segments that feel quick and easy to complete.
In addition, conversational forms offer a lot of opportunities to reinforce your branding by customizing things like color, background, the inclusion of your logo, and much more. You can find some cool examples of conversational forms here.
Apply Conditional Logic
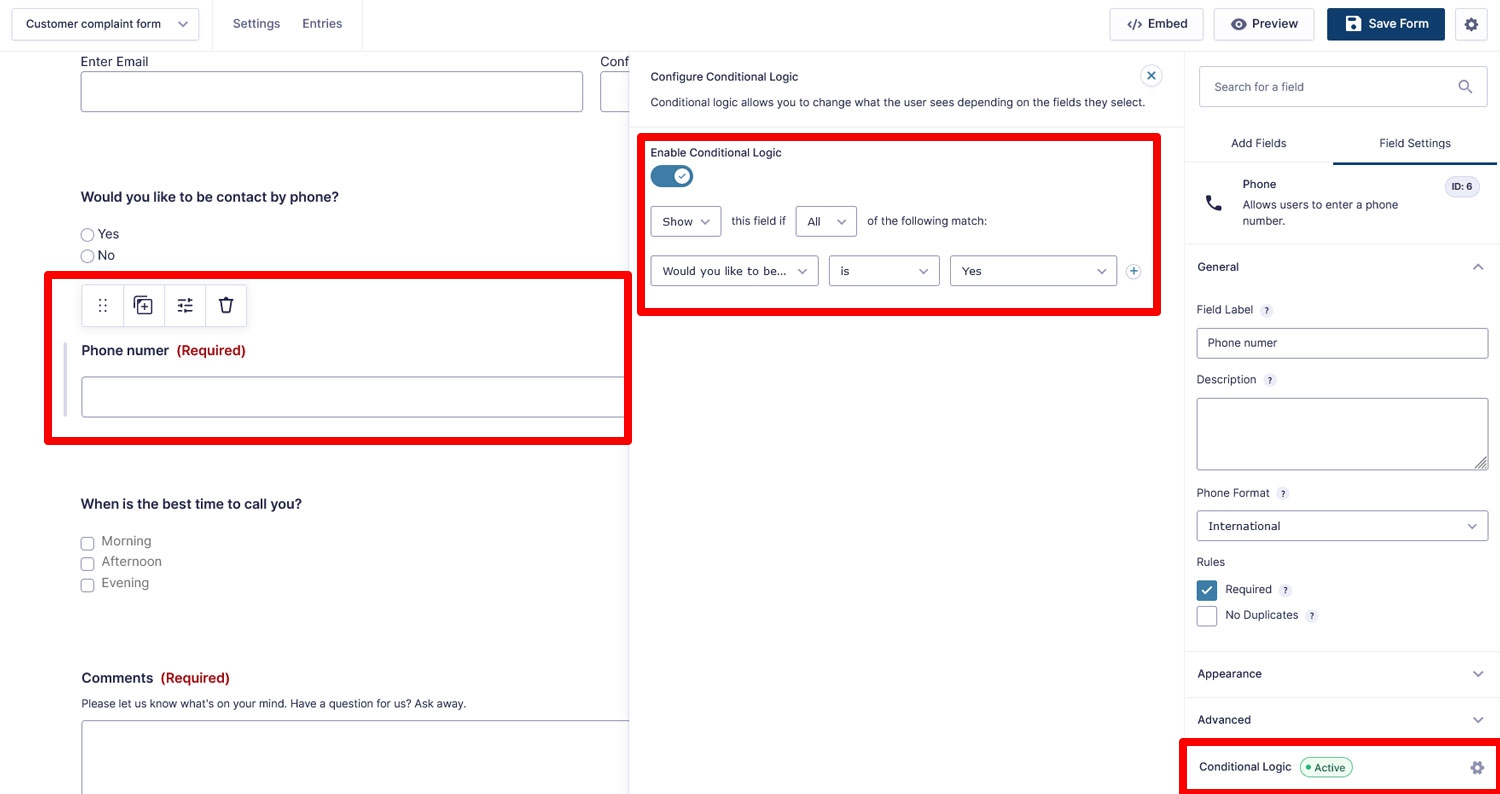
Enabling conditional logic allows you to display only the parts of your form that are relevant based on user inputs.
On a customer complaint form, this might look like adding a radio button field where customers can choose to be contacted by phone to resolve their issue. You can then enable conditional logic on the phone number field so that it appears only when the customer chooses ‘Yes’.
Learn more about conditional logic here.
Add Customers to Your Newsletter
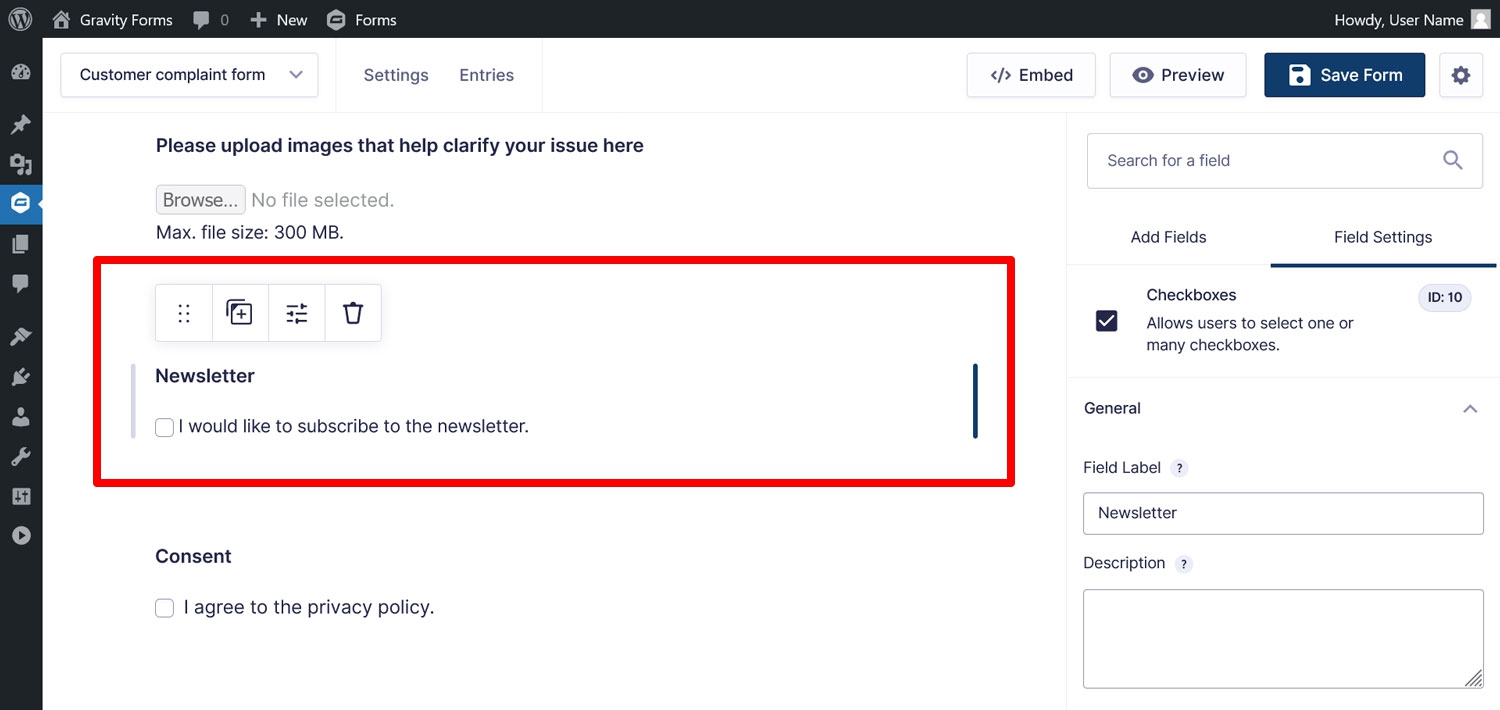
Gravity Forms has dedicated add-ons for many popular email campaign platforms. This includes Kit (formerly ConvertKit), AWeber, Campaign Monitor, Constant Contact, GetResponse, and Mailchimp.
With their help you can allow your customers to jump on your email newsletter directly from the customer complaint form. Just be sure to get their consent first!
Protect Your Form From Spam
If form spam is a problem on your site, Gravity Forms has several add-ons to combat it:
Connect to Even More Applications with Zapier
The Gravity Forms Zapier Add-On allows you to connect your forms to thousands of other applications and services that don’t have a dedicated extension. Here are just some examples of the many possibilities:
- Collect your customer complaints data in Google Sheets or Excel.
- Use third-party CRMs like Pipedrive, Zendesk or project management tools such as Asana or Podio.
- Connect to email marketing platforms like Brevo.
- You could even allow customers to sign up to a Zoom meeting.
5. Set Up Confirmation Messages and Notifications
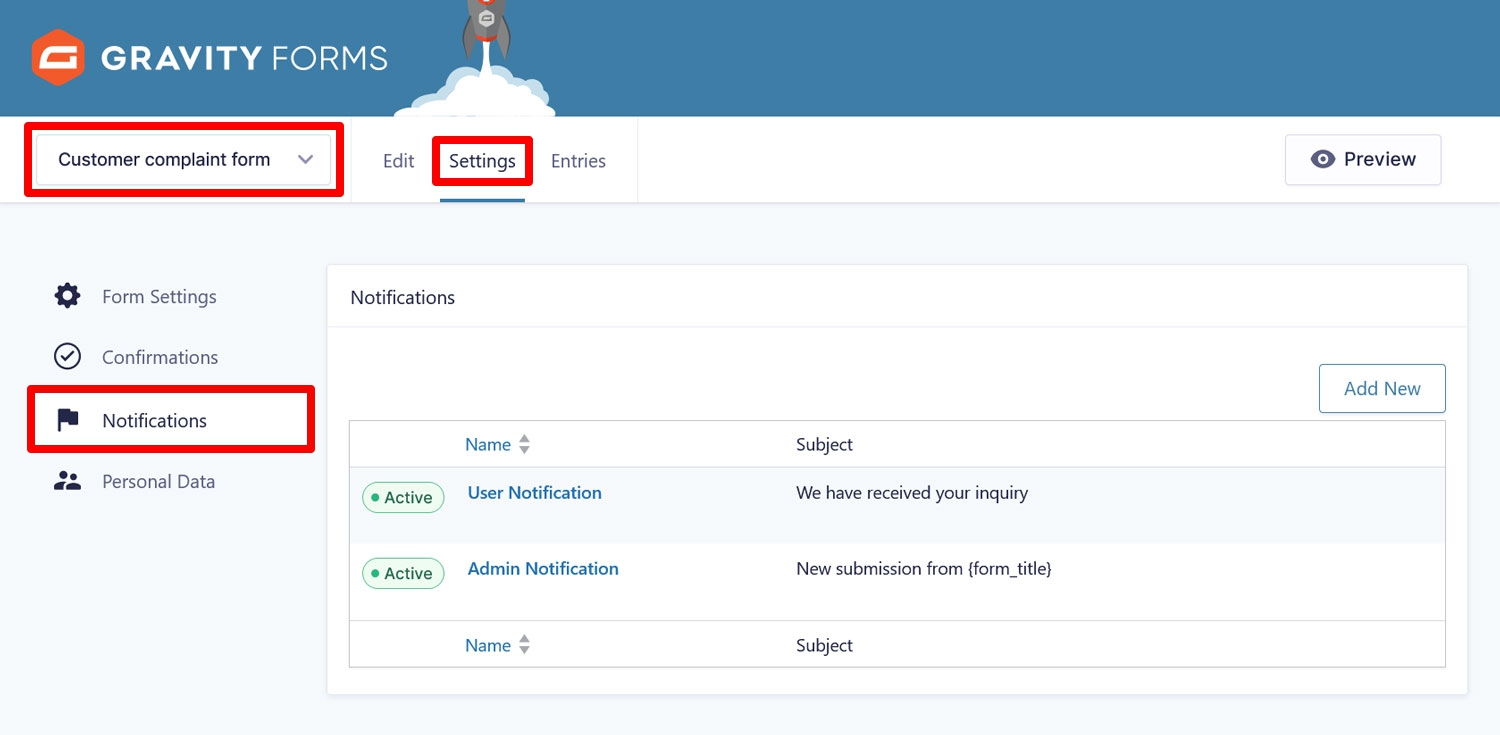
An important function of the customer complaint form is to manage expectations. One way to do this is to tell your customers when they can expect to hear back about their issue. With Gravity Forms, you can accomplish this with confirmation messages and/or email notifications.
A confirmation message is what appears on screen after your form has been submitted. At the very least it’s a good idea to let customers know their complaint has been submitted successfully, but there are many ways to use custom confirmations that can enhance your brand reputation. For example, you can redirect users to a new page or URL after form submission. For more on confirmation messages, check out the Gravity Forms documentation.
Notifications are the email messages that are automatically sent after a form has been submitted.
They can be sent to your customers to let them know about next steps, but they can also be sent to you and any other internal stakeholders who need to know that a complaint has been received.
Learn more about notifications in the Gravity Forms documentation.
Each form will have a default confirmation message and notification containing some generic language, but we recommend taking the time to edit them and provide your customers with the information that is unique to your business.
6. Embed the Form on a Page
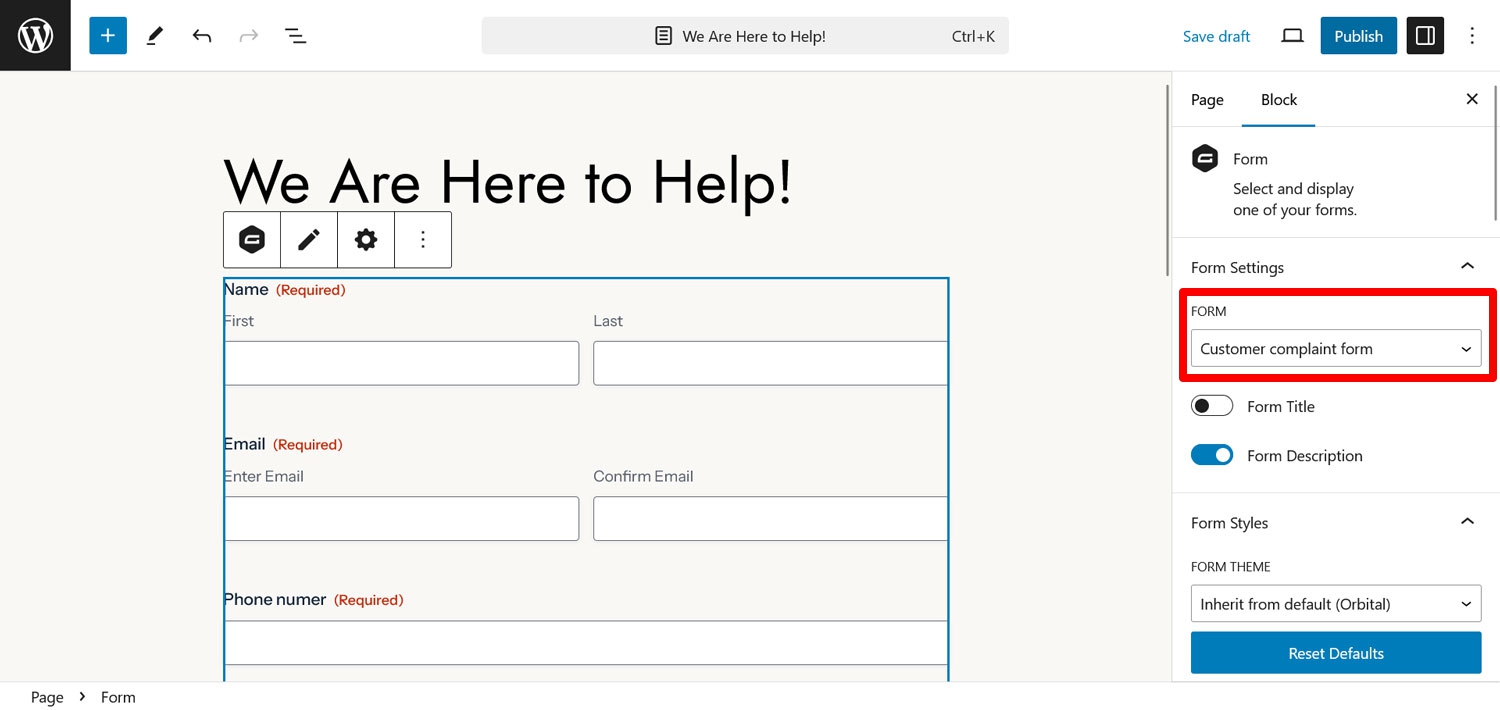
Once you have finished your customer complaint form, it’s time to publish it. To do this, you can embed it on a page using the Gravity Forms block or shortcode.
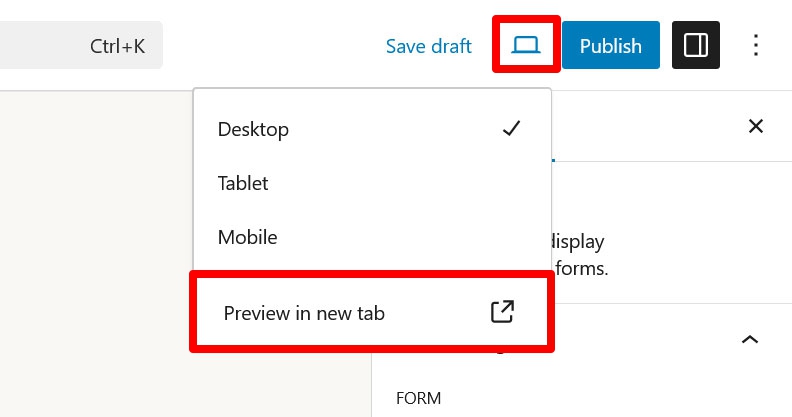
However, before you hit Publish, it’s a good idea to preview your form by clicking the small laptop icon and then Preview in new tab.
This allows you to test your customer complaint form and make sure it works as intended before making it public on your site. To test your form, simply fill it out and submit it.
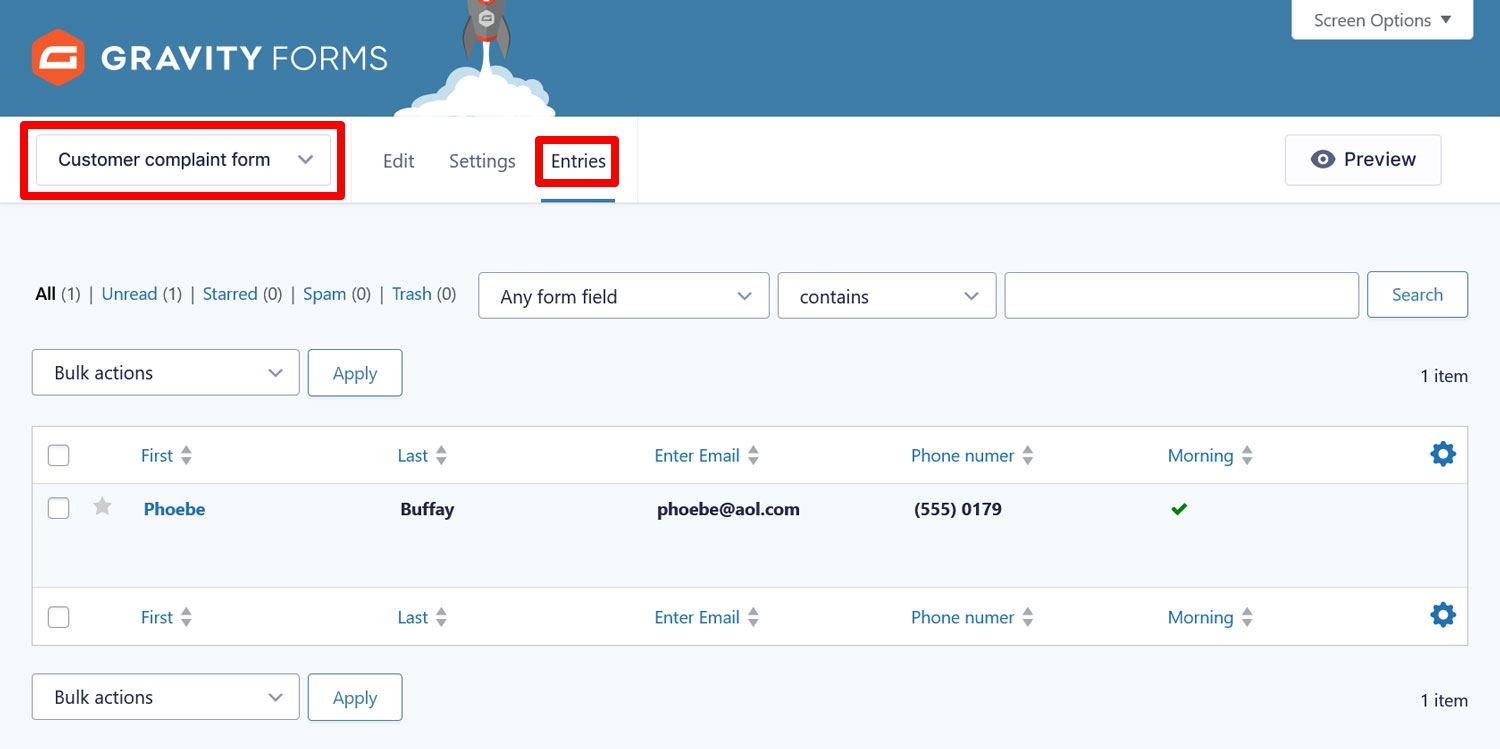
At this point, check to make sure you received the right email(s), confirmation message, and that the complaints land in all third-party systems where they belong (if applicable). You should also see them in the form’s Entries list.
Once you are satisfied with how things are looking, publish your form!
Improve Customer Communication With a Complaint Form
Adding a customer complaint form to your WordPress website will improve your customer experience, and provide you with the insights you need to improve your products and services.
Plus, with Gravity Forms, it’s easy to create and implement. With just a few clicks, you can quickly create, customize, and publish your form without even needing to code.
To take advantage of all of these features and more, purchase your Gravity Forms license today. If you want to keep testing out the forms and functionality, you can keep using our free demo site.

If you want to keep up-to-date with what’s happening on the blog sign up for the Gravity Forms newsletter!
