How to Use Gravity Forms and Gravity Flow to Generate PDFs After Form Submission
Need to generate a PDF after someone submits a form with Gravity Forms?
There are a lot of reasons you might want to generate a PDF after form submission, including both delivering a PDF file to the person who submitted the form or generating a PDF for your own internal records.
To easily set up this functionality in WordPress, you can pair Gravity Forms with Gravity Flow (which is now a Gravity product).
In this step-by-step tutorial, you’ll learn exactly how you can generate a PDF from a form that you’ve created with Gravity Forms.
Let’s dig in!
How Does Gravity Flow Help You Generate PDFs?
If you’re not familiar with Gravity Flow, it’s an automation tool that helps you set up all sorts of different workflows based on the forms that you’ve built with Gravity Forms.
You can use it for a bunch of different stuff. But for the purposes of this post, we’re interested in one of its automations – the ability to generate a PDF as part of a workflow.
Basically, this lets you take some or all of the form data from a submission and turn it into a formatted PDF. Here’s an example of what a generated PDF might look like:
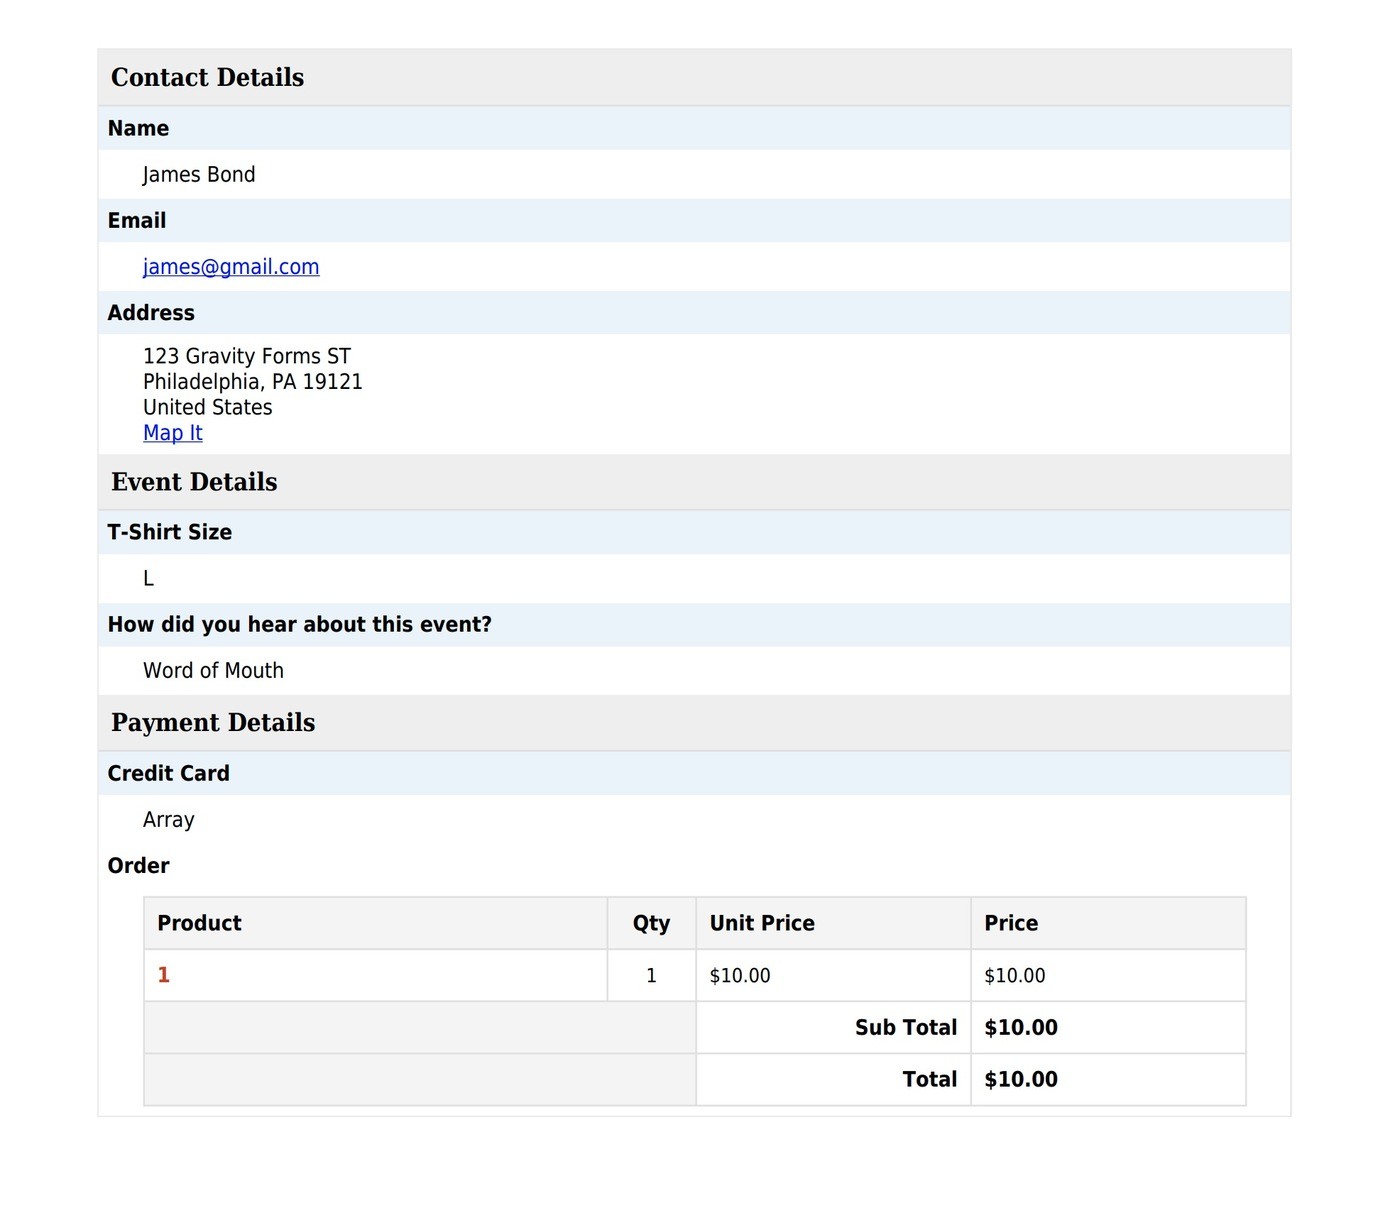
The simplest option is to just generate the PDF immediately after someone submits a form, which is the use case that we’ll cover in the tutorial below.
However, the cool thing about Gravity Flow’s workflow-based approach is that you can wait to include PDF generation as part of a later step.
Here’s an example:
Instead of generating the PDF immediately after the form, you could first send an email to an administrator to approve or reject the form submission. You could then only generate the PDF if the admin approves the submission.
In real-world terms, that could work something like this:
- Someone submits a request to book a meeting with you.
- You receive a message to approve/deny the meeting.
- If you approve the meeting, Gravity Flow automatically sends the person a PDF confirmation/receipt.
Once you learn the basic PDF generation steps in the tutorial below, you can start digging into Gravity Flow’s other features to start setting up these types of multi-step automations for your business.
How to Generate a Gravity Forms PDF After Form Submission
Now, let’s get into the step-by-step guide for how to generate PDFs from Gravity Forms using the Gravity Flow plugin.
To follow this tutorial, you’ll need a minimum of three plugins:
- The Gravity Forms plugin – purchase it here.
- The core Gravity Flow plugin – purchase it here.
- The official PDF Generator extension for Gravity Flow – purchase it here.
You also might want to install some other Gravity Forms add-ons to extend your forms in other useful ways. However, the three plugins above are all you need for basic PDF generation.
Once you’ve verified that you’ve installed everything, here’s how to set up everything…
1. Set Up Your Form
If you haven’t already done so, the first step in the process is to set up the form that you’ll use to generate the PDF file.
That is, the information that you collect via this form will be what you include in the finished PDF file.
If you already have a form in mind, you can skip ahead to the next step.
If not, head to Forms → New Form to create your form. Or, feel free to import one of the pre-built Gravity Forms templates to save some time.
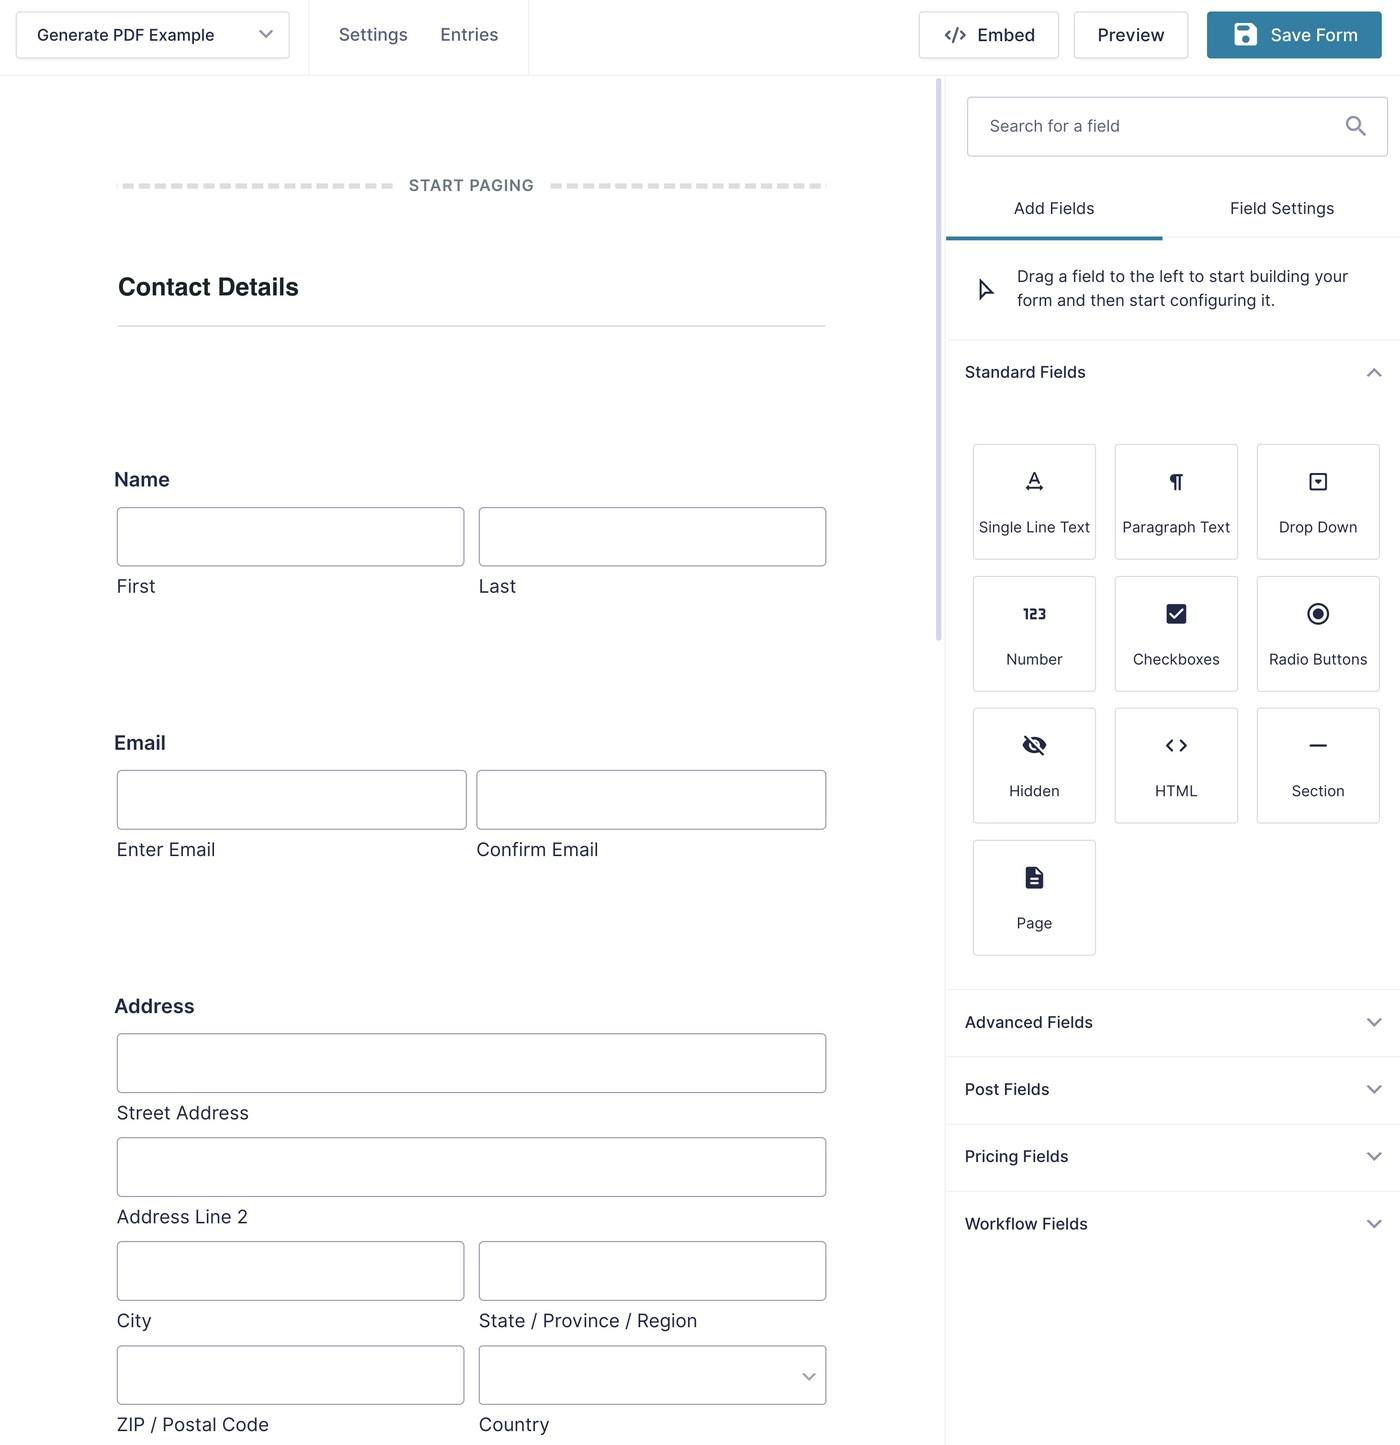
For this example, we’re using the Event Registration template, but you can generate a PDF from literally any type of form.
Here’s what it looks like:
2. Open the Workflow Settings
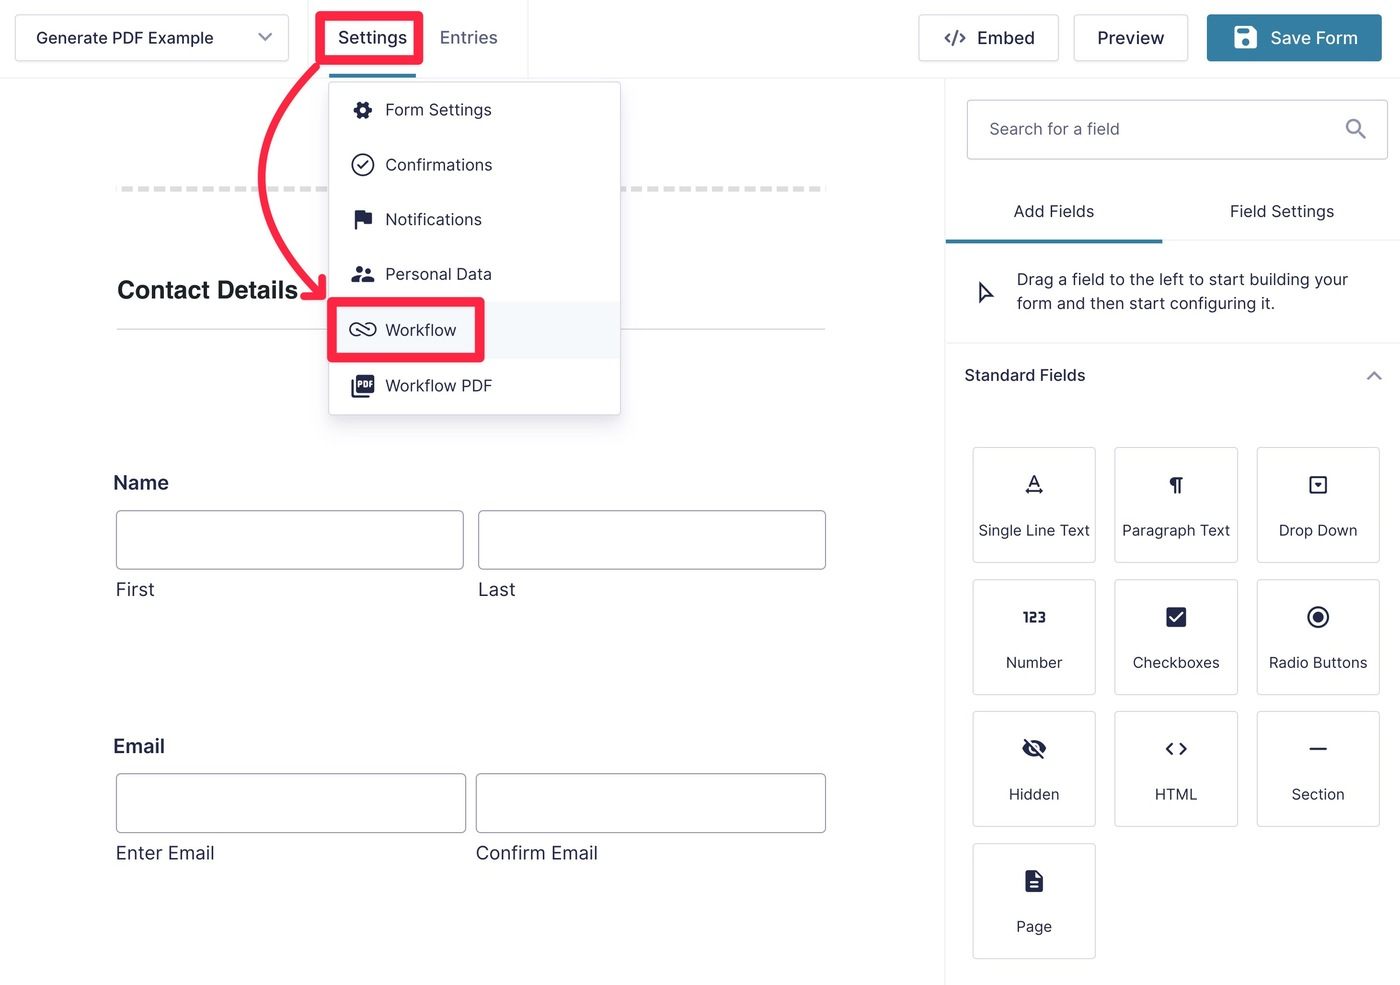
Once you’re happy with the fields and design of your form, you can dig into your “workflow” settings, which is where you can configure Gravity Flow to generate a PDF, along with other workflow steps.
To open these settings, go to Settings → Workflow:
3. Create Your PDF Workflow Step
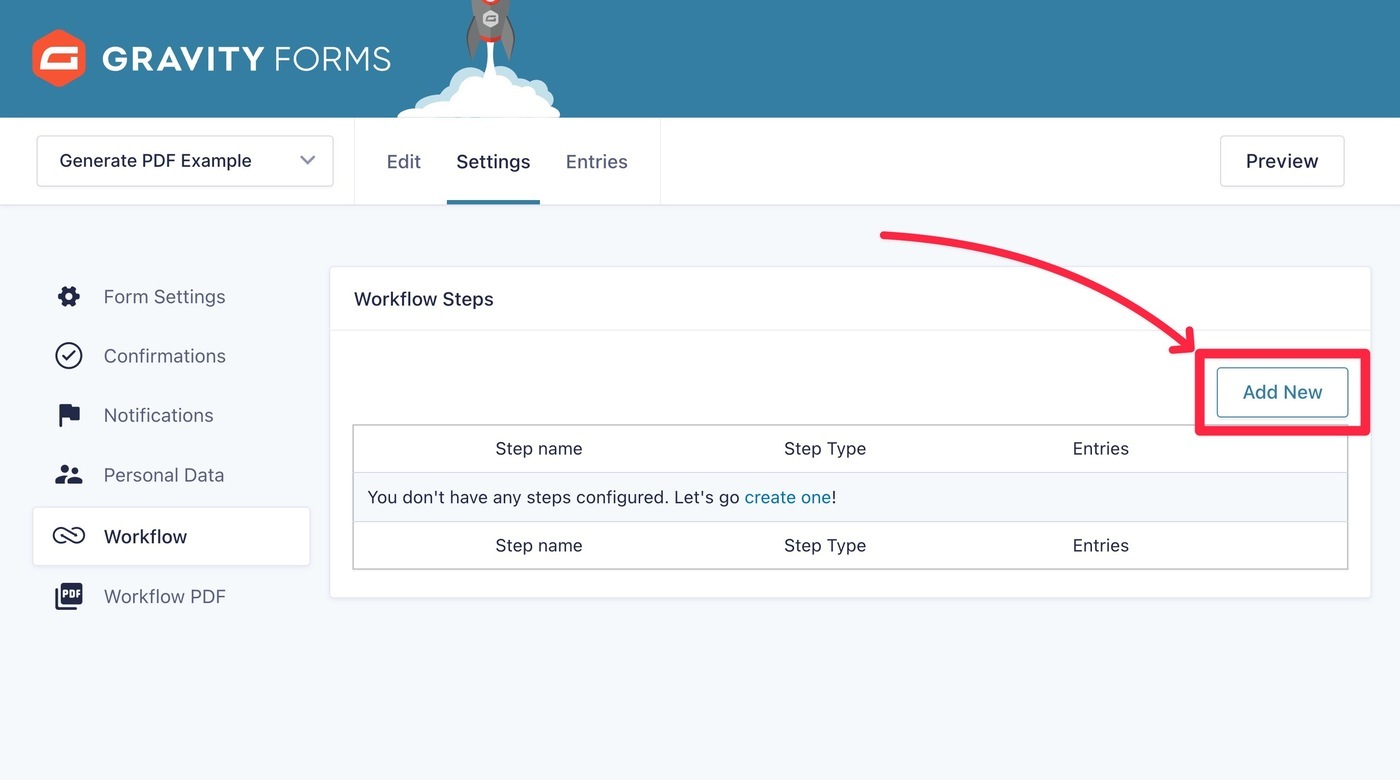
Now, you should see an empty list of workflow steps.
To create your first step, click the Add New button:
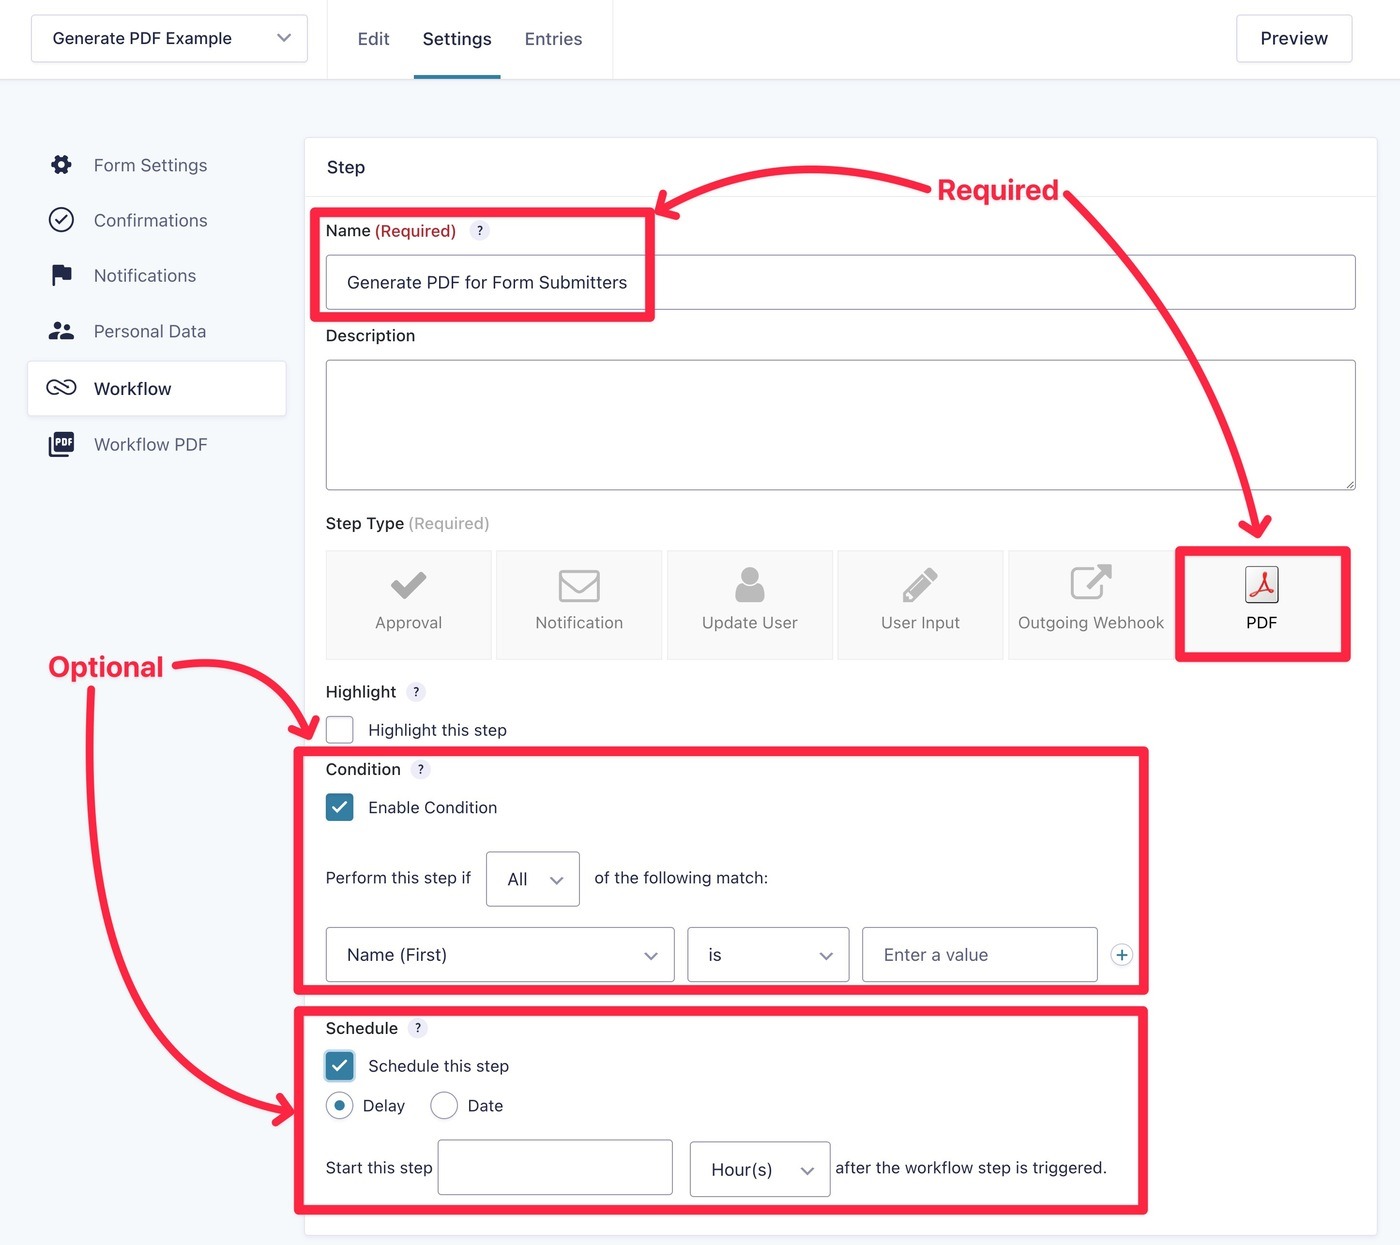
At the top, give your step an internal name to help you remember it – e.g. “Generate PDF for Form Submitters”. You might create a different step to generate a PDF for admins that uses a different template, so this can be helpful to differentiate them.
Below that, make sure to choose PDF under Step Type, which will expand some additional PDF-related options.
Finally, you also get two other important settings in the Step box:
- Condition – set up conditional logic rules to control when to execute this workflow. For example, you could add a form field to let users choose whether or not they want to generate a PDF and then only create the PDF if a user chose to.
- Schedule – if needed, you can wait to generate the PDF on a certain schedule. For example, you could send people the PDF via email 24 hours after they submit the form. More on attaching the PDF to emails in a second.
4. Configure PDF Template
Once you choose PDF as the Step Type, you should see a new PDF settings box appear below the Step settings box at the top of the page.
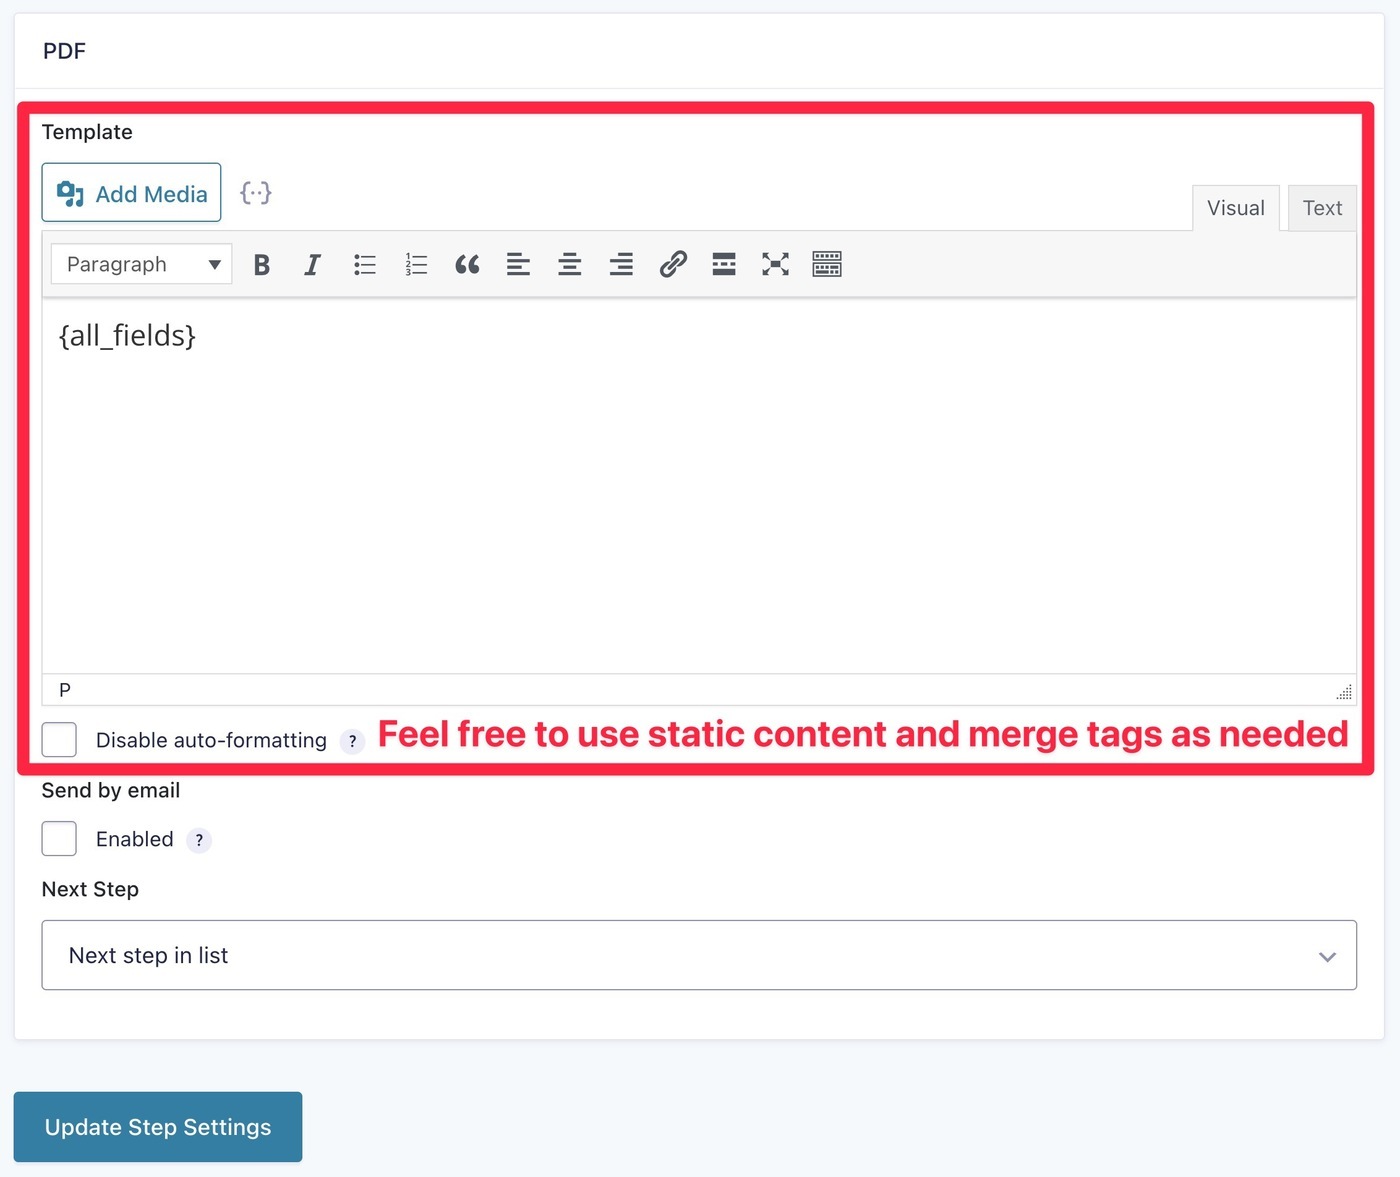
To start, you can use the Template box to choose what form fields to include in your PDF, using the standard Gravity Forms merge tags.
The simplest option here is to just use the {all_fields} merge tag to insert all of the information from the form.
However, if you want more control, you can use the merge tags for individual form fields, along with your own custom content if needed.
You can also use the <pagebreak /> tag to add page breaks to your PDF and split it into multiple pages.
Gravity Flow will also add some of its own styling to ensure that the PDF looks nice and is easy to read.
For example, here’s what the default design looks like for the Event Registration form using just the {all_fields} merge tag:

Note – if you need to actually fill field information into an existing PDF document, you might be interested in the Fillable PDFs Certified Add-On instead.
5. Choose How to Deliver PDF to User(s)
Gravity Flow offers two main ways to deliver/access the generated PDFs:
- Attach to email – you can attach the generated PDF to an email that you send to any user (including the form submitter).
- Download link via merge tag – you can add a merge tag to the form confirmation, form notifications, or other areas that accept merge tags.
You can also access the download link without using merge tags if needed – more on that at the bottom of the section.
Attach PDF to Email
To attach your PDF file to an email, check the box to Send by email. Then, you can use the additional options to make the following choices:
- Choose who to send the email to.
- Configure the subject, “From” name, and body of the email.
- Create a custom file name for the PDF attachment. You can use merge tags to dynamically generate a unique file name for each PDF.

Note – if you choose to send the PDF via email attachment, the file will be deleted from your server once the email is sent. If you want to keep a version of the PDF on your server, it would be a better option to just include the download link instead of attaching the file itself.
Include Download Link Using Merge Tags
The other option to deliver the PDF is to use merge tags to include a direct download link to the PDF.
You can use these pretty much anywhere that accepts Gravity Forms merge tags, but the two most common spots would be:
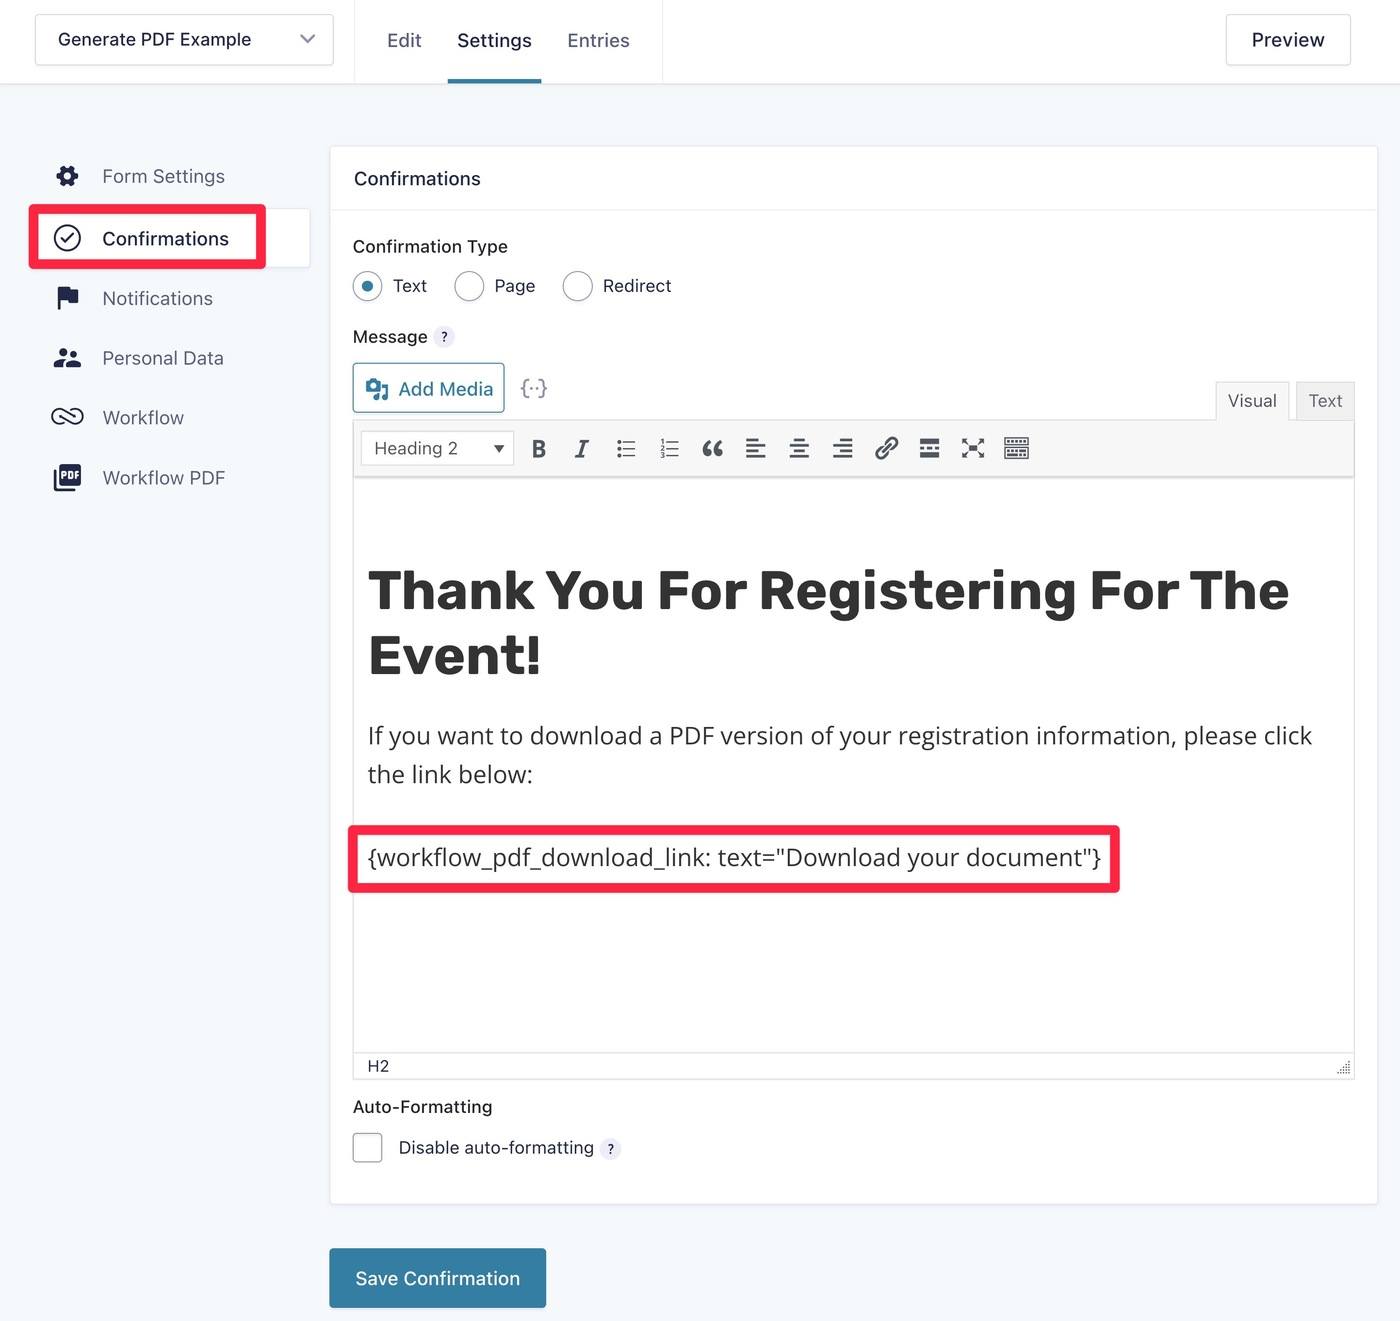
- In the confirmation message that displays on your website. You can set these up by going to Settings → Confirmations in your form.
- In the notifications that Gravity Forms sends via email (or other channels such as Slack). You can set these up by going to Settings → Notifications in your form (or other areas if you’re using add-ons to send different types of notifications).
You have two merge tags:
{workflow_pdf_download_link}– inserts a clickable download link, along with some additional options for controlling access.{workflow_pdf_download_url}– inserts just the raw URL to the PDF file on your server. For example, you could use this if you want to design a custom button instead of just showing a raw link.
The download link merge tag further supports the following optional attributes:
- text – customize the text. The default is “Download PDF”.
- signed – when enabled, this will override any permissions checks for letting the user download the PDF.
- expires – expire the link after a certain time (requires the signed attribute).
For example, to display a download link in the confirmation message that appears after a user submits the form, you could do something like this:
Construct Download Link Without Merge Tags
Alternatively, you can also construct a download link without using merge tags by using the following format:
yoursite.com/?gravityflow-pdf-entry-id=2
Make sure to replace the ID number with the actual ID of the form entry for which you want to download the PDF.
6. Publish Your Workflow Step (and Repeat As Needed)
Once you’ve configured everything, make sure to save your step’s settings by clicking Update Step Settings at the bottom.
Now, your form should start generating PDFs according to your settings after a user submits the form.
For further customization, you can explore adding in other Gravity Flow workflow steps as we discussed above. Here are some case studies of how real businesses use Gravity Flow’s automation features.
Start Generating PDFs from Gravity Forms Today
That wraps up our tutorial on how to use Gravity Flow to generate a PDF from a form that you’ve created with Gravity Forms.
If you’re not already a Gravity Forms and Gravity Flow user, you can get started by following these steps:
Then simply follow the tutorial above and remember to test your workflow once created to check it’s fully functional!

If you want to keep up-to-date with what’s happening on the blog sign up for the Gravity Forms newsletter!

