How to Get Started With the Mailchimp Add-On for Gravity Forms
If you want to get started with email marketing for your WordPress site, Mailchimp is a great option.
With Mailchimp, you can grow and manage email subscriber lists and then send them one-off or automated emails, along with accessing lots of other helpful email marketing features.
To get the most from your efforts, though, you’ll want to be able to connect WordPress to Mailchimp in a deeper way than just adding a basic subscribe form embed code to your site.
With the Gravity Forms Mailchimp Add-On, you can connect any form on your site to Mailchimp, including applying tags to users and mapping form field data to custom fields in Mailchimp.
You could create dedicated email subscribe forms or you could add an email subscribe option to other types of forms on your site, such as user registration forms, payment forms, event registration forms, and so on.
In this post, we’ll briefly introduce you to the Gravity Forms Mailchimp Add-On and then show you step-by-step how to connect WordPress to Mailchimp using the Gravity Forms plugin.
Why Use Mailchimp with Gravity Forms
Mailchimp offers a powerful email marketing solution for your WordPress site, which is why it’s popular among WordPress users.
However, if you want to set up a more flexible integration between your WordPress site and Mailchimp, you’ll need the help of a plugin like Gravity Forms.
With the official Gravity Forms Mailchimp Add-On, you’ll be able to connect any of the forms that you create with your Mailchimp lists. You’ll also get access to helpful features that give you more flexibility when syncing subscribers to Mailchimp.
Here are some of the key features that you’ll be able to access:
- Add contacts to Mailchimp lists – When someone submits your form, you can automatically add them to one or more of your Mailchimp lists. You can also add conditional rules for when to add subscribers, such as only adding someone if they check a box to join your newsletter or adding them to a different audience based on how they filled out the form.
- Segment users as needed – You can apply different tags to users based on how they filled out the form or even subscribe them to entirely different Mailchimp audiences. This gives you a lot of flexibility for segmenting your subscribers.
- Map data to Mailchimp fields, including custom fields – In addition to syncing a person’s email address and name, you can also sync additional form field data to any custom fields that you’ve added in Mailchimp.
- Enable double opt-in – You can easily enable double opt-in to automatically send an opt-in email after someone submits the form. Subscribers will only be added to your lists if they click the confirmation link in this email, which helps you make sure you’re only engaging with legitimate subscribers.
The add-on lets you connect any form that you create with Gravity Forms to Mailchimp. This lets you create dedicated email subscribe forms along and gives you the ability to add an email subscribe option to other types of forms on your site.
How to Use the Gravity Forms Mailchimp Add-On to Grow Your Lists
Now, let’s get into the full step-by-step guide on how to set up your WordPress Mailchimp integration using Gravity Forms.
We’ll cover every step in the process and you don’t need any special technical knowledge to follow along.
1. Install the Gravity Forms Mailchimp Add-On
To get started, you’ll want to install the official Gravity Forms Mailchimp Add-On alongside the core Gravity Forms plugin.
You can access the Mailchimp Add-On on all Gravity Forms licenses – Basic, Pro, Elite, and Nonprofit. So, as long as you have an active license, you can follow this guide.
If you don’t have a Gravity Forms license yet, you can purchase a license here.
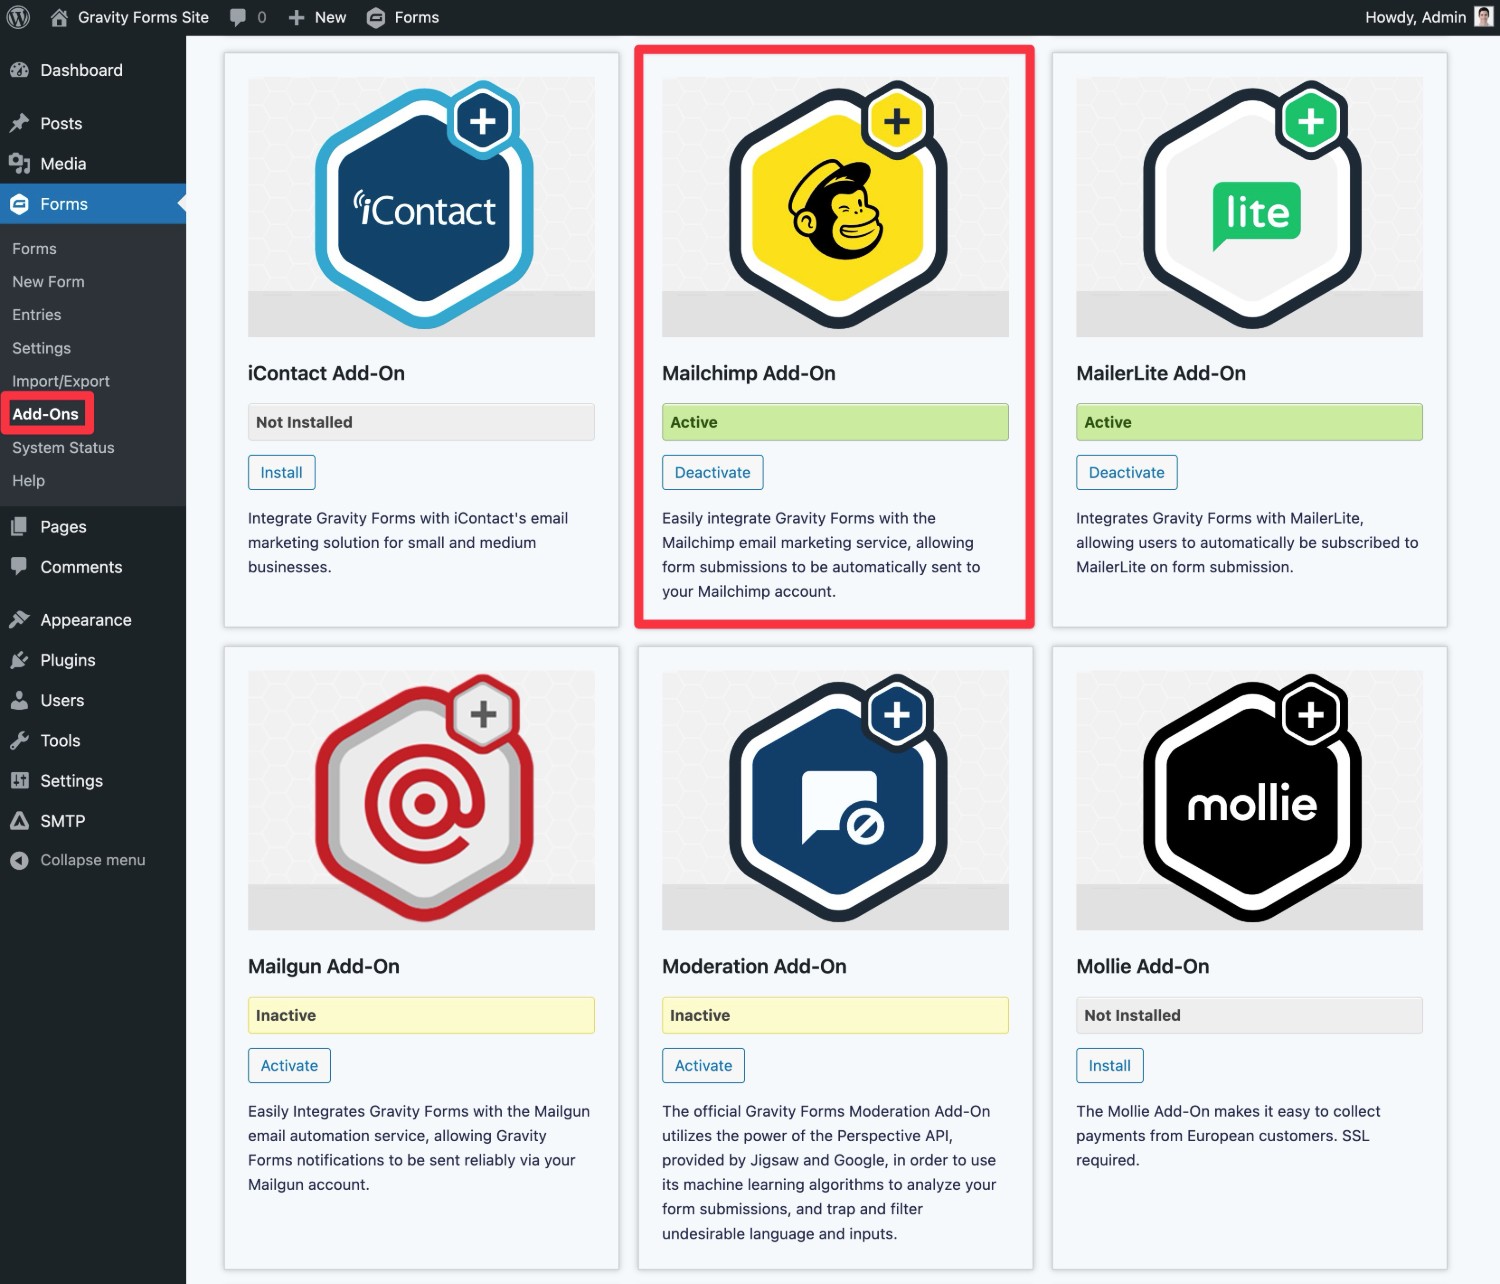
Assuming you’ve already installed the core Gravity Forms plugin and added your license key, you can install the Mailchimp Add-On directly from your WordPress dashboard:
- Go to Forms → Add-Ons.
- Find the Mailchimp Add-On in the list.
- Click Install to install it on your site.
- Once the installation finishes, make sure to also activate the add-on.
2. Create Your Mailchimp Account (If Needed)
Next, you’ll want to create your Mailchimp account, if you don’t already have one.
You can use Gravity Forms with any Mailchimp plan, including the free one.
So if you do have a Mailchimp account, you can just go ahead and move to the next step.
If you don’t have one, you’ll need to create your Mailchimp account by clicking this link.
For new accounts, Mailchimp offers a 14-day free trial to test the paid features at the time of this writing. After the free trial expires, you can choose whether to downgrade to the free plan or continue with one of the paid plans. You can also sign up for the free plan directly.
3. Connect Gravity Forms to Mailchimp
Once you have a Mailchimp account, the next step is to connect Gravity Forms and WordPress to Mailchimp:
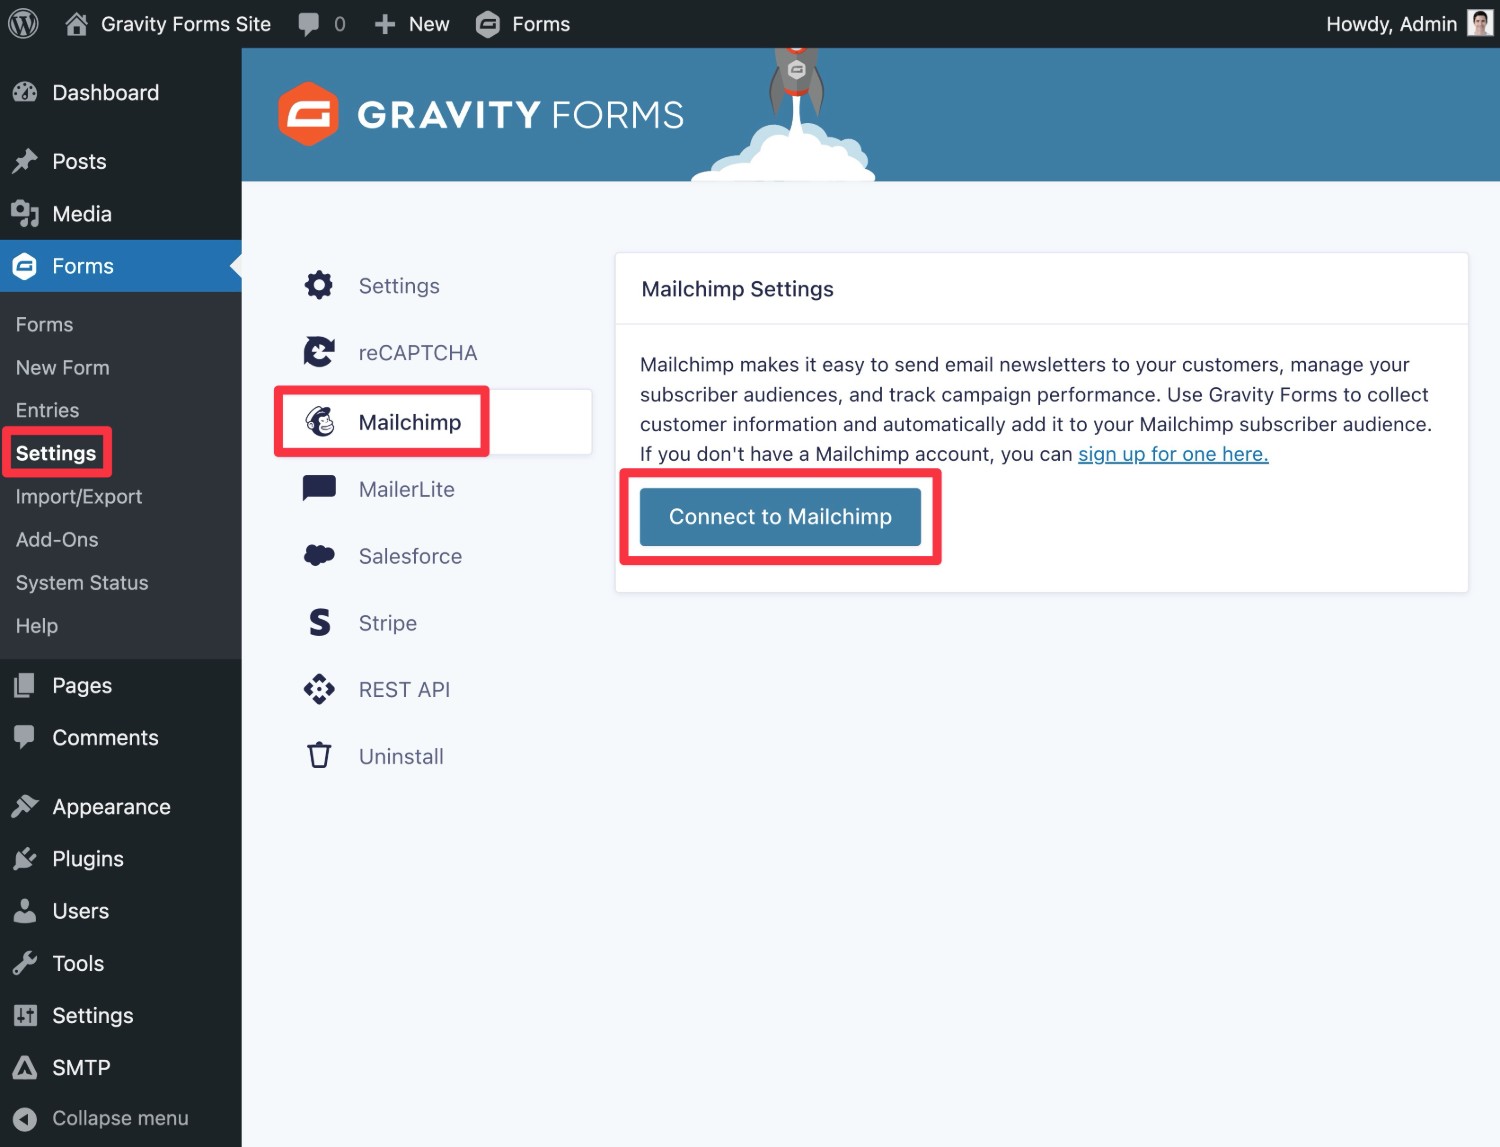
- Open your WordPress dashboard.
- Go to Forms → Settings.
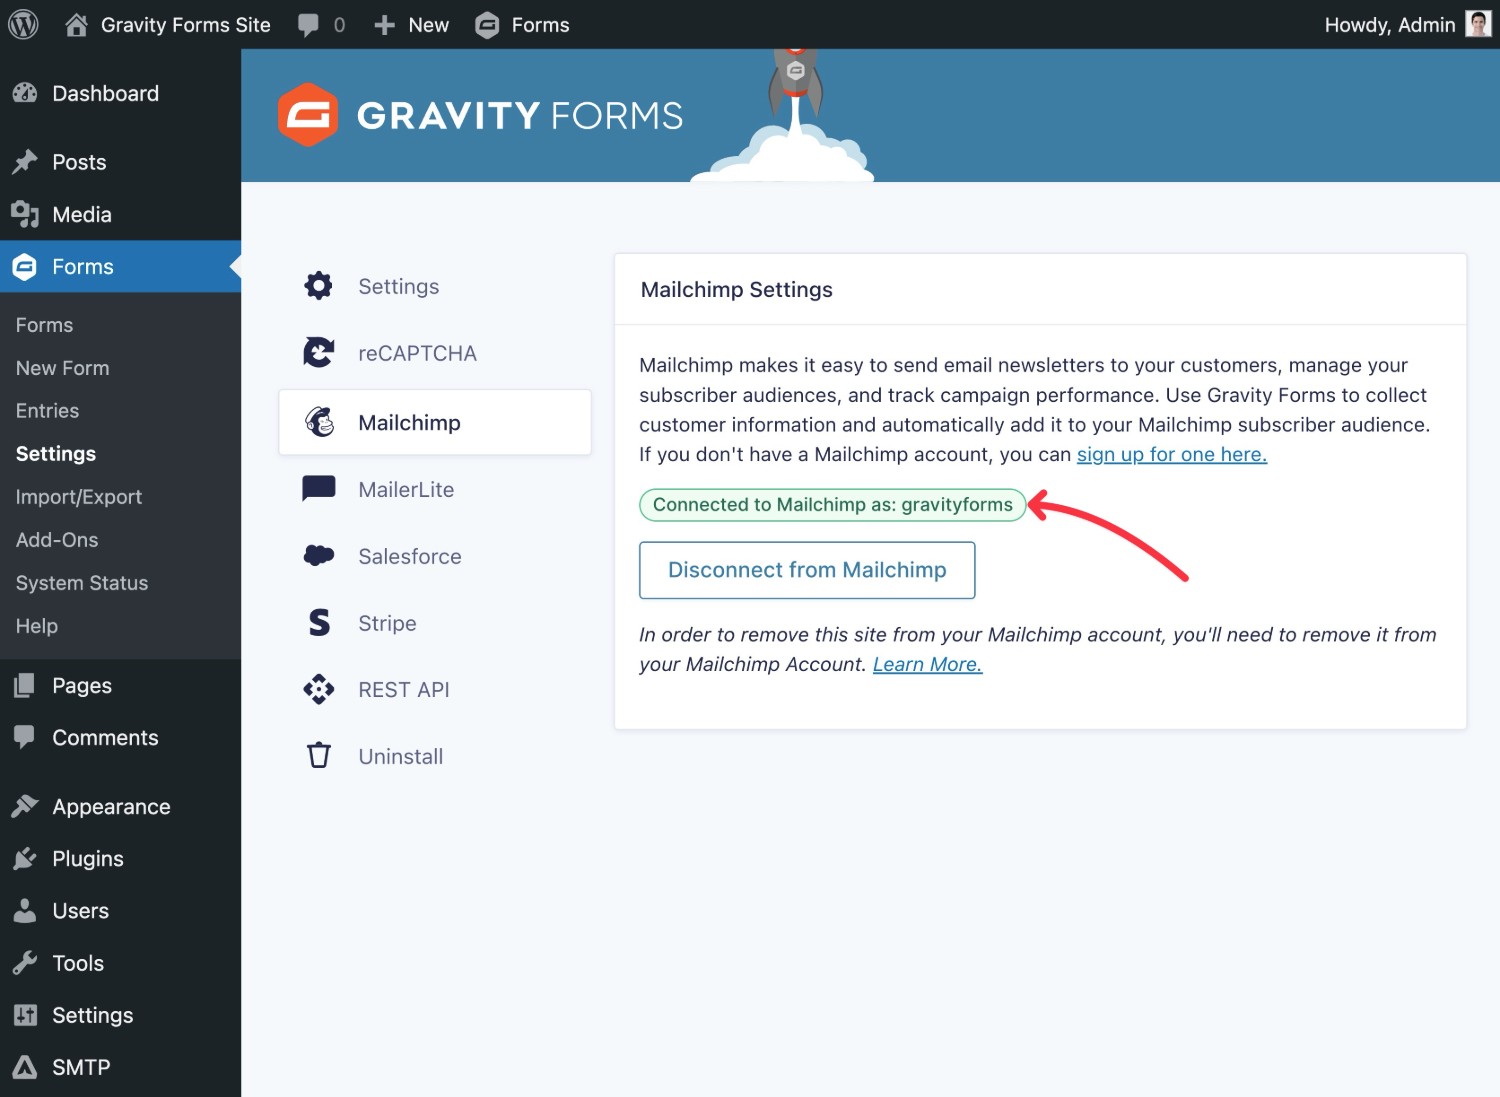
- Select the Mailchimp tab.
- Click Connect to Mailchimp.
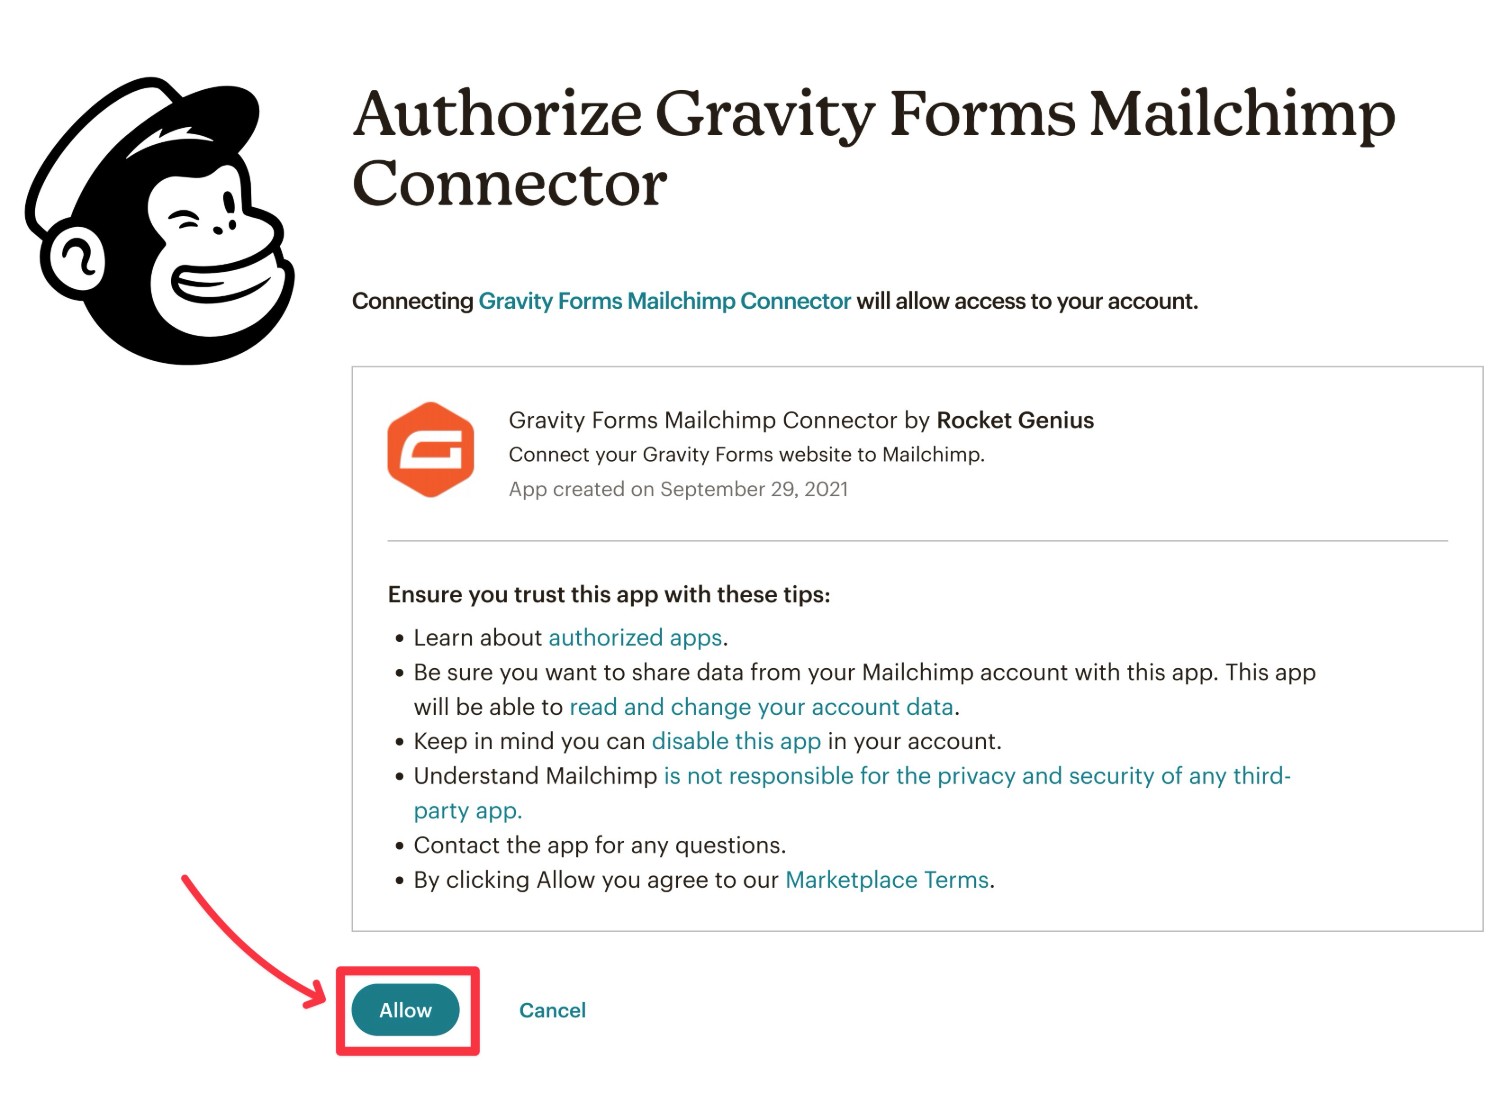
This should redirect you to Mailchimp’s website, where you’ll be prompted to log in to your Mailchimp account and then authorize Gravity Forms to connect to Mailchimp by clicking Allow.
After clicking Allow, you should be redirected back to your WordPress dashboard. In the Mailchimp Add-On settings area, you should now see a message that says “Connected to Mailchimp as: [account name]”.
4. Create or Edit a Form That You Want to Connect to Mailchimp
Now, you can choose to create a new form that you want to connect to Mailchimp or edit one of your existing forms.
You could create a dedicated newsletter subscribe form with the sole purpose of growing your Mailchimp lists. Or, you can add an email subscribe form to a form with a different purpose, such as a user registration form, payment form, contact form, and so on.
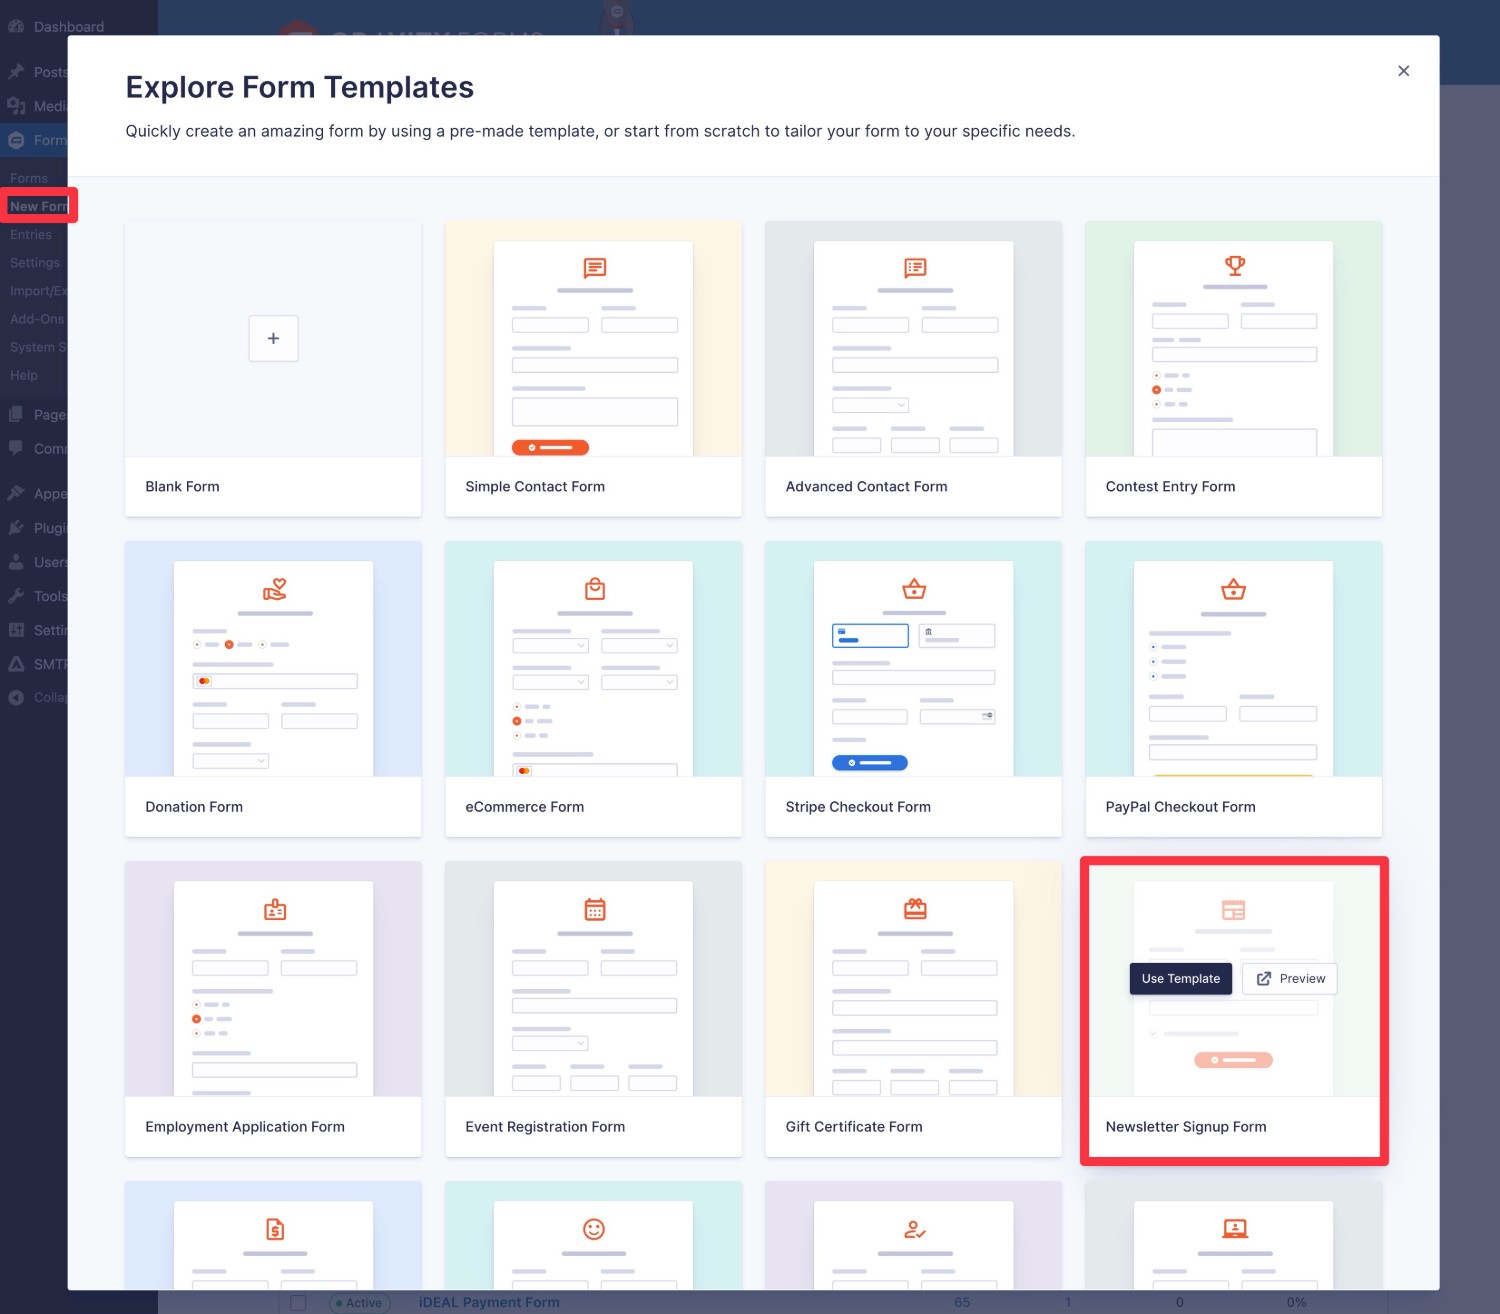
To create a new form, go to Forms → New Form in your dashboard.
Then choose from one of the premade templates or create your form from scratch. For this example, we’ll use the premade Newsletter Signup Form template.
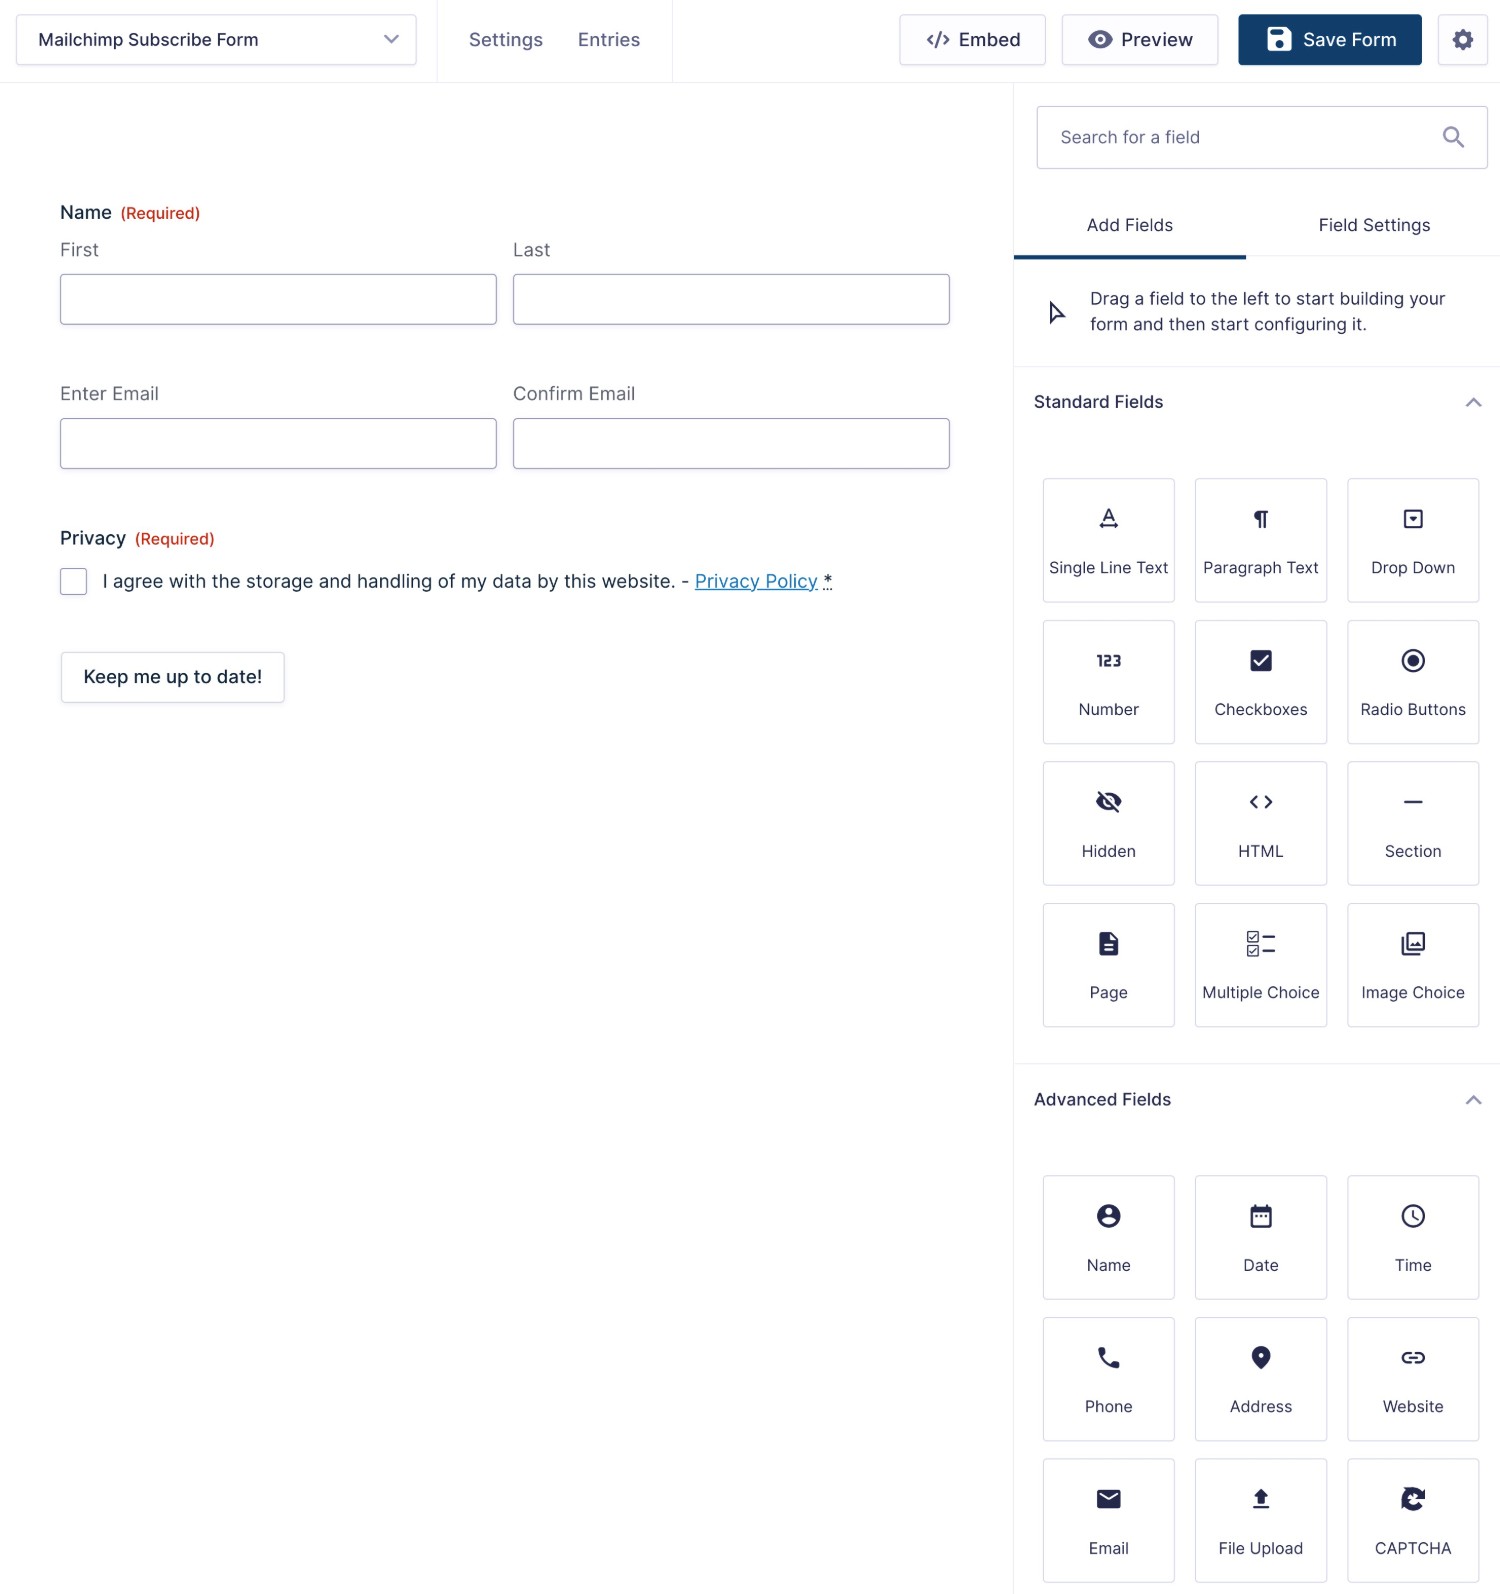
Once you give your form a name, you should be taken to the visual, drag-and-drop form builder interface.
You’re free to set up your form in any way. However, make sure you at least include an Email field to collect a person’s email address. You also might want to collect the person’s name.
If you want to collect data to map to any custom fields in Mailchimp, you’ll also want to add fields for that data to your form. You could also collect information that you can use to apply a certain tag to users in Mailchimp.
For example, you could collect information about a person’s interests and then use that to add users to a certain segment.
For our example, we’re keeping it simple, though. We just have fields for the person’s name and email address, along with an opt-in checkbox.
Another Example: Adding Email Subscribe to a User Registration Form
Just to give you some more ideas, we also wanted to share an example of what it might look like to add a Mailchimp integration to a different type of form.
Below, you can see that we created a WordPress user registration form using the premade User Registration template.
Then, we added a Checkbox field that gives users the option to join your newsletter as part of filling out the registration form. 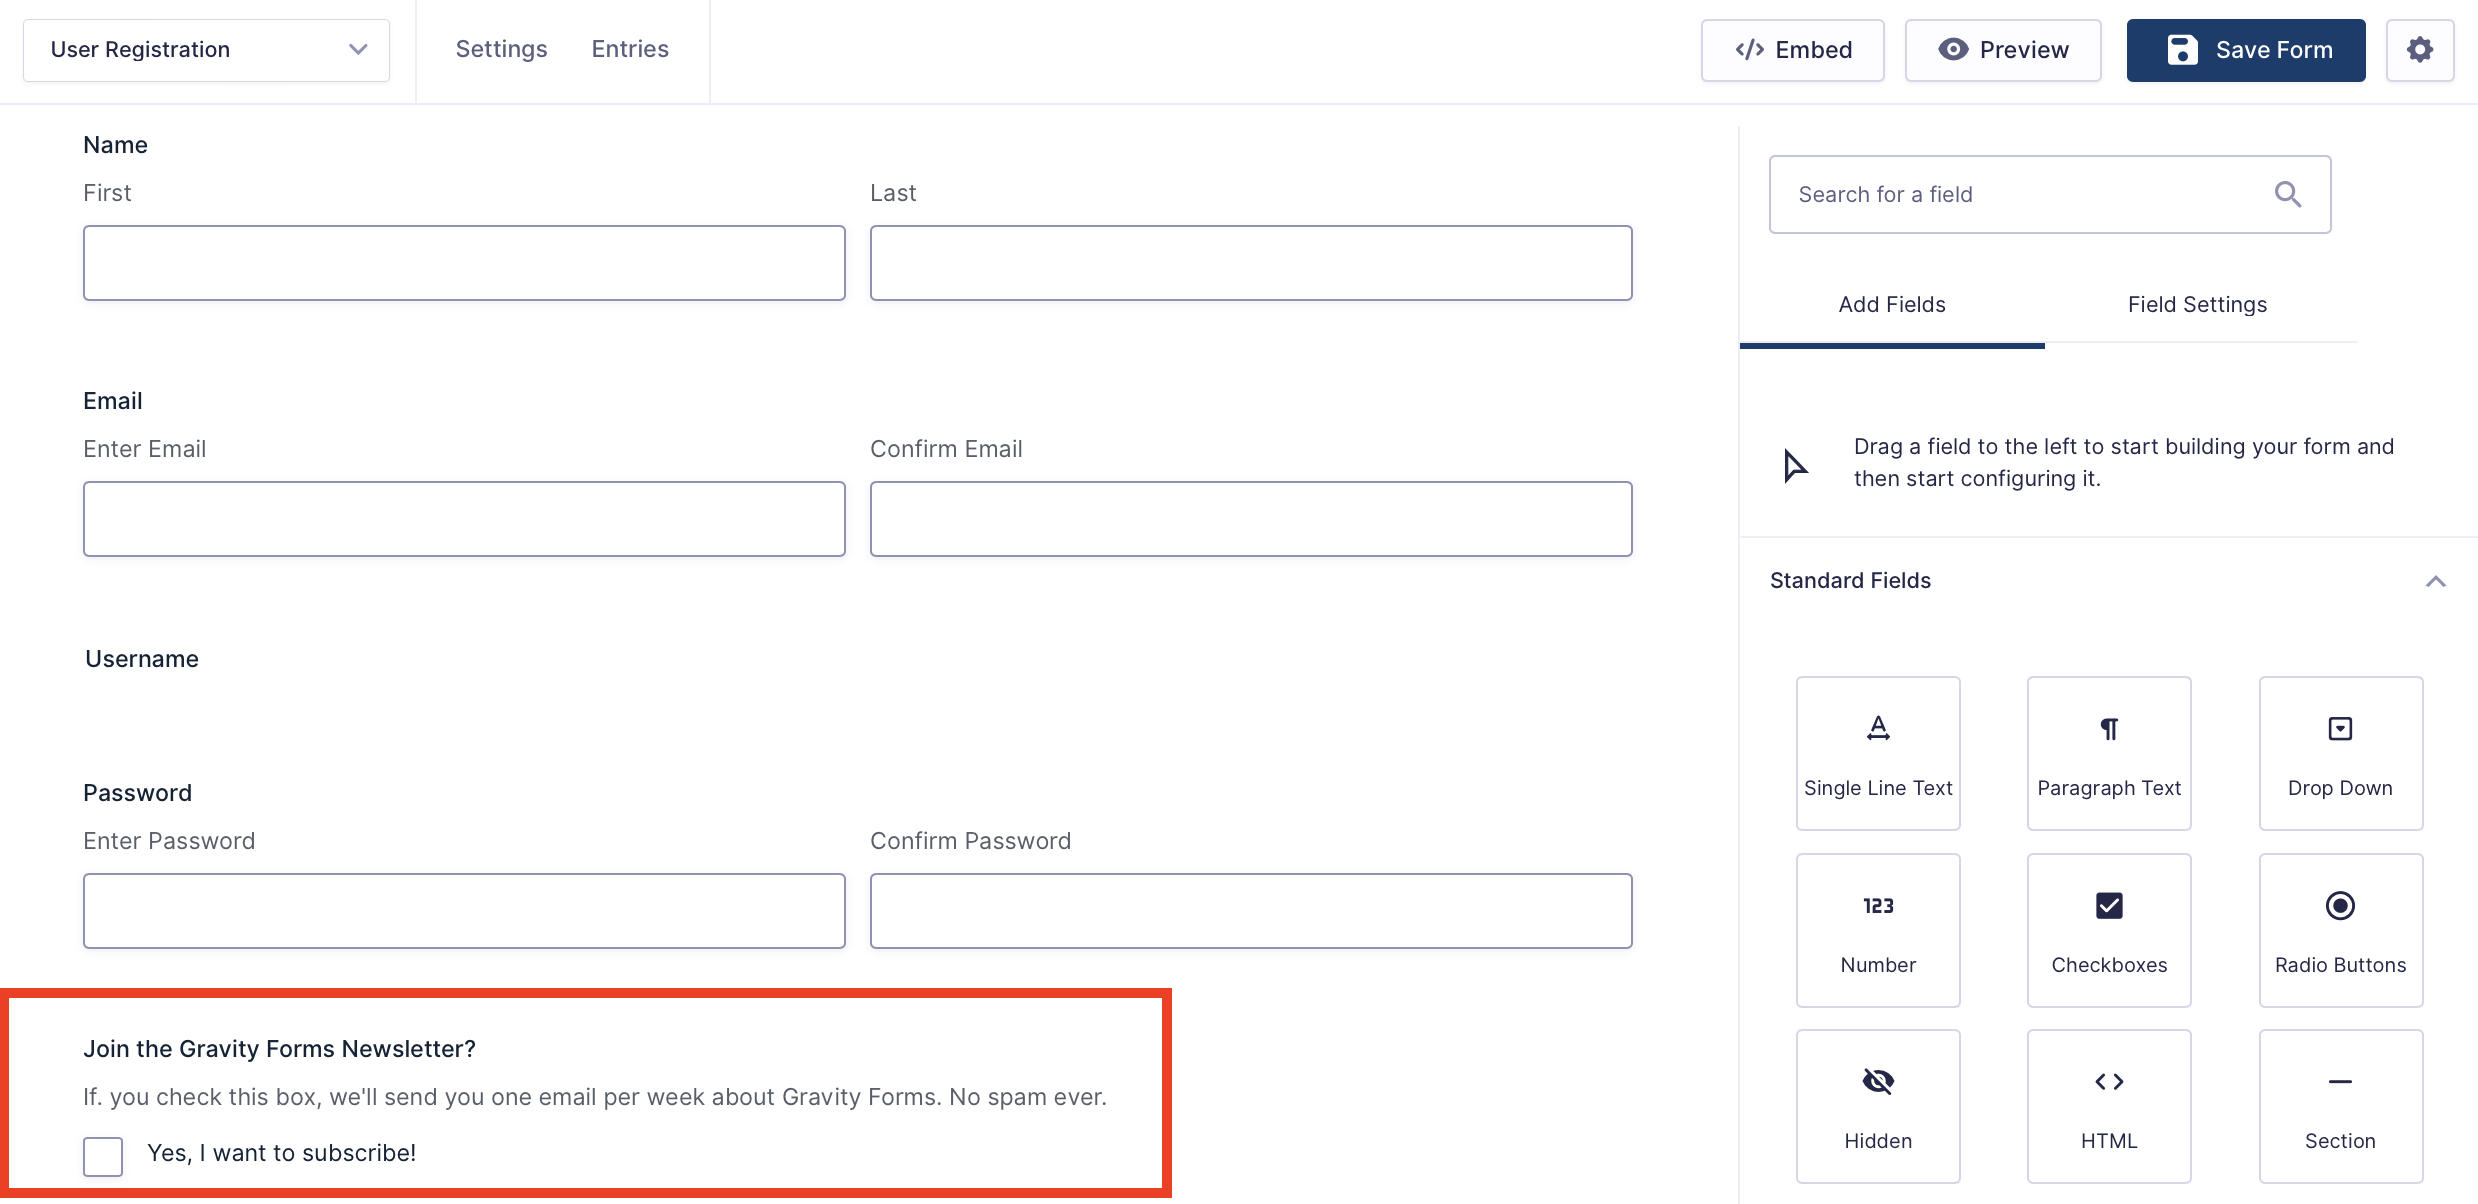
5. Create a Mailchimp Feed
Once you’ve finished setting up your form, you can set up the actual WordPress Mailchimp connection by creating something called a feed.
In Gravity Forms, a feed essentially lets you perform some type of action when a person submits the form. In this case, that action is adding a person to Mailchimp and mapping the data from your form in a certain way.
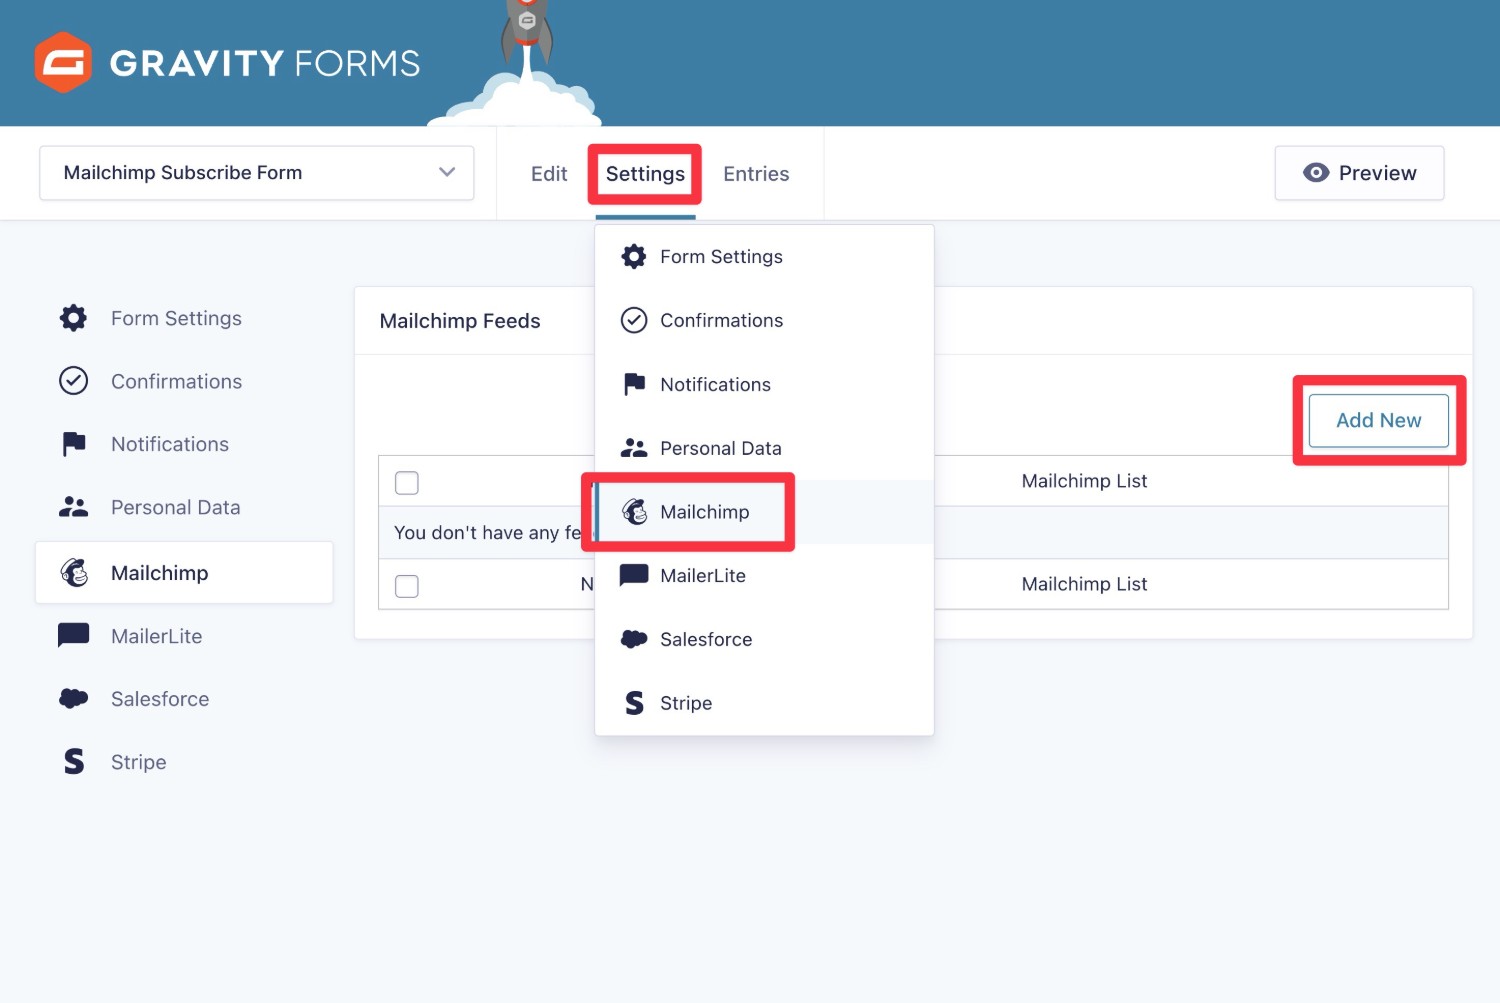
To create a Mailchimp feed, go to Settings → Mailchimp in the form editor interface. Then, click Add New to create a new Mailchimp feed.
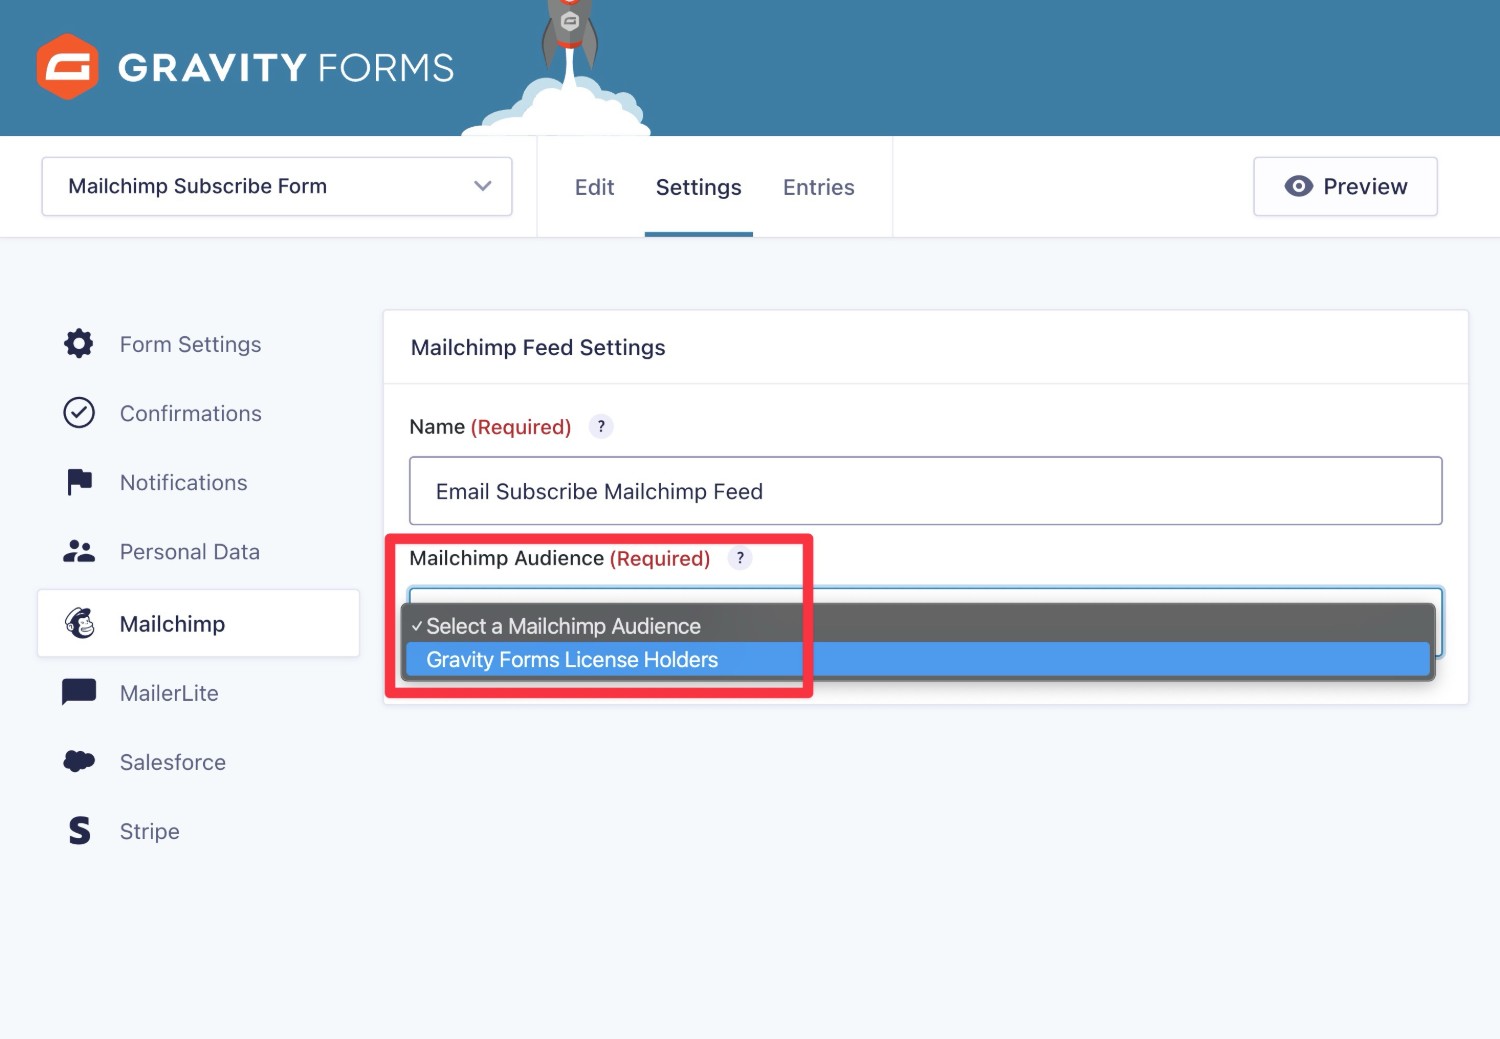
First, choose which Mailchimp audience you want to add people to. You can create and manage Mailchimp audiences from your Mailchimp dashboard.
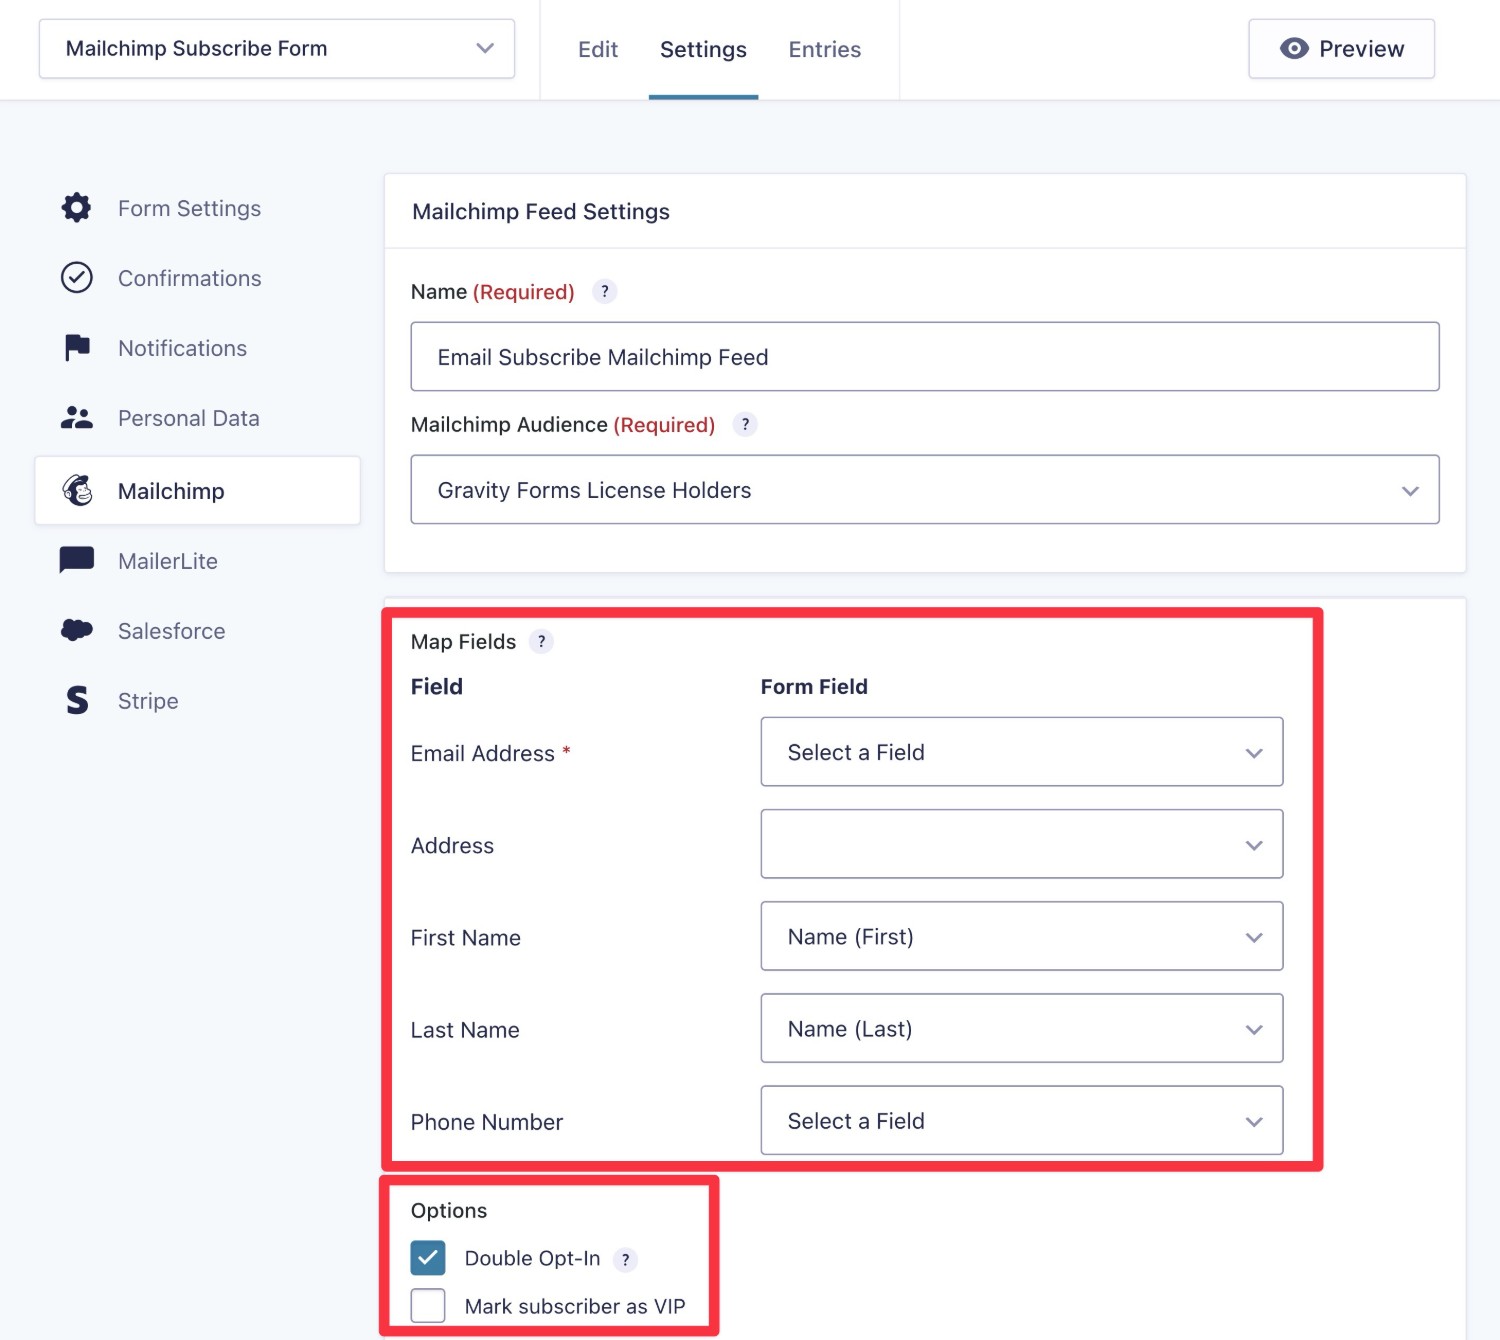
Once you choose the audience, you’ll see some additional options to control how to integrate your form with Mailchimp.
First, map the fields from your form to the fields in Mailchimp. You must set up the email address mapping, but you can also map form fields to other Mailchimp data (name, address, phone number), and any custom fields you’ve created in Mailchimp.
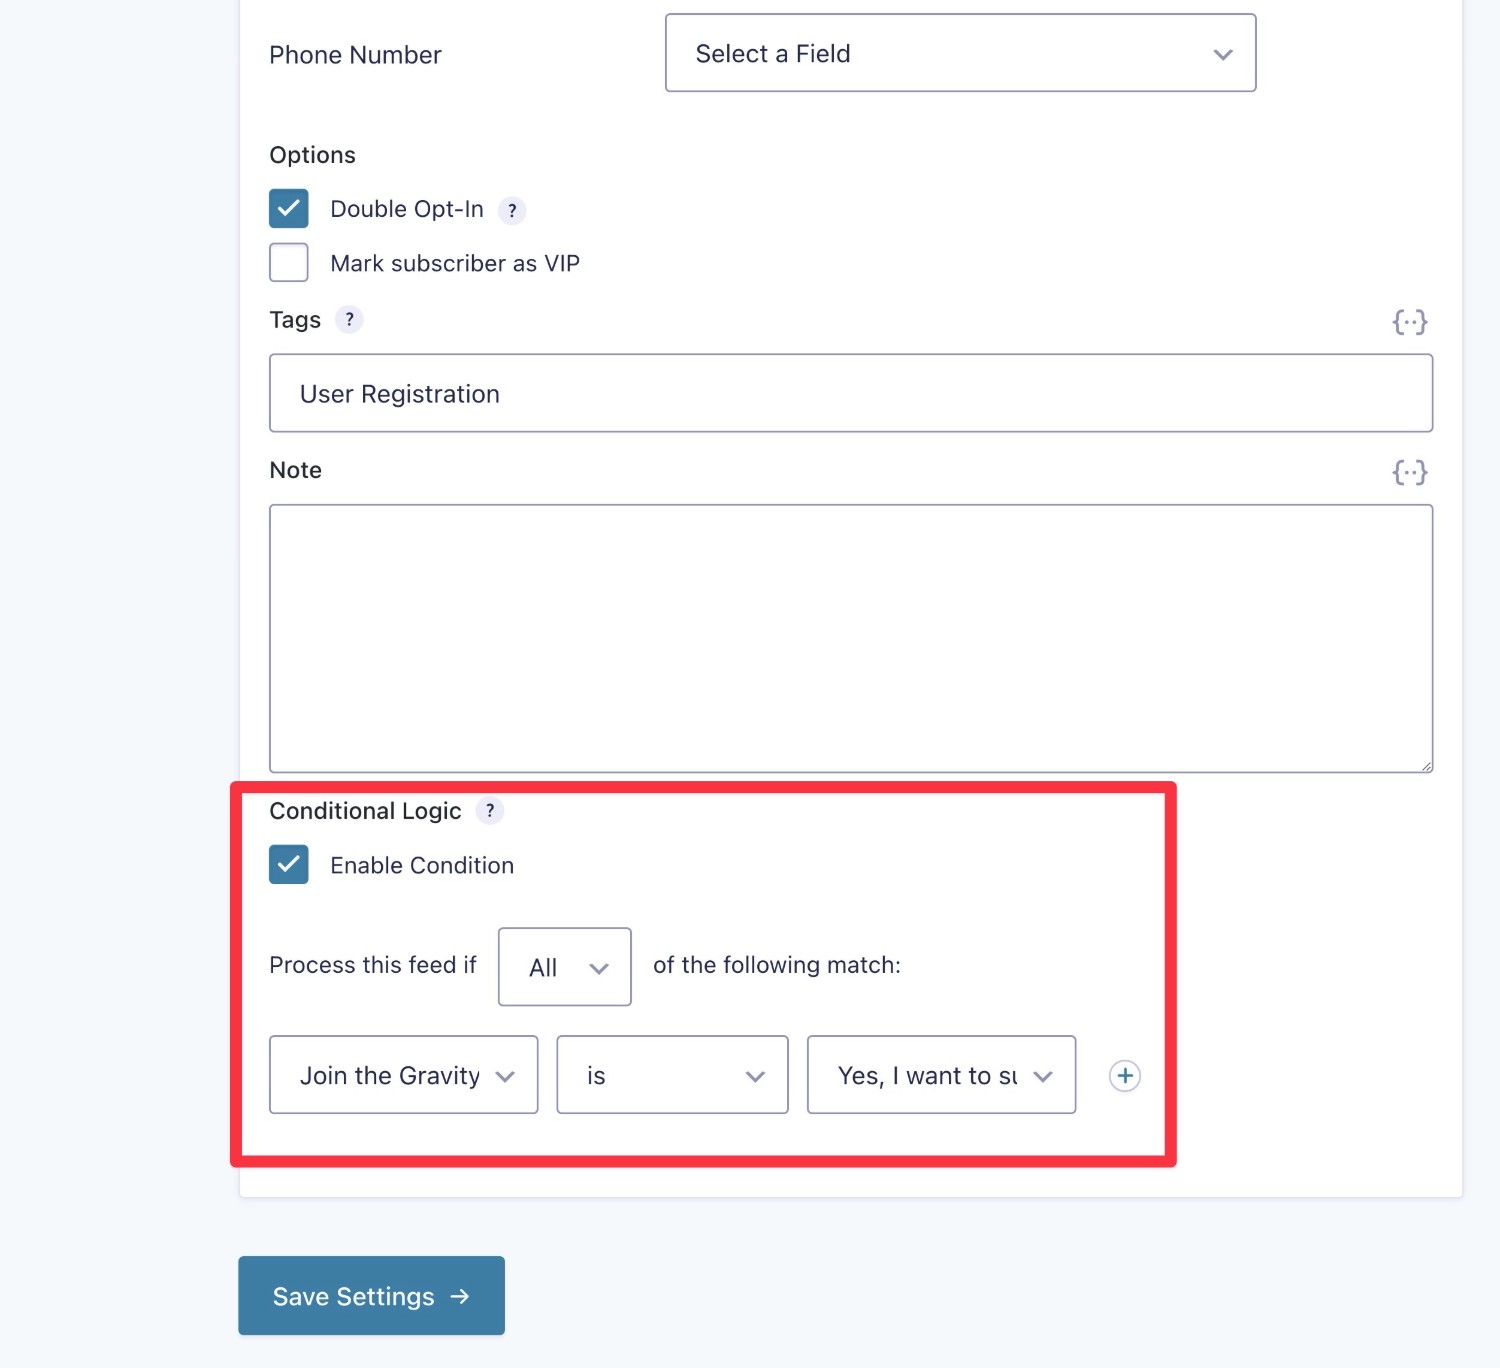
Below that, you can choose whether to require double opt-in and/or mark subscribers as VIP in Mailchimp.
If you choose double opt-in, subscribers will only be added to Mailchimp if they click the link in a confirmation email that Mailchimp sends them.
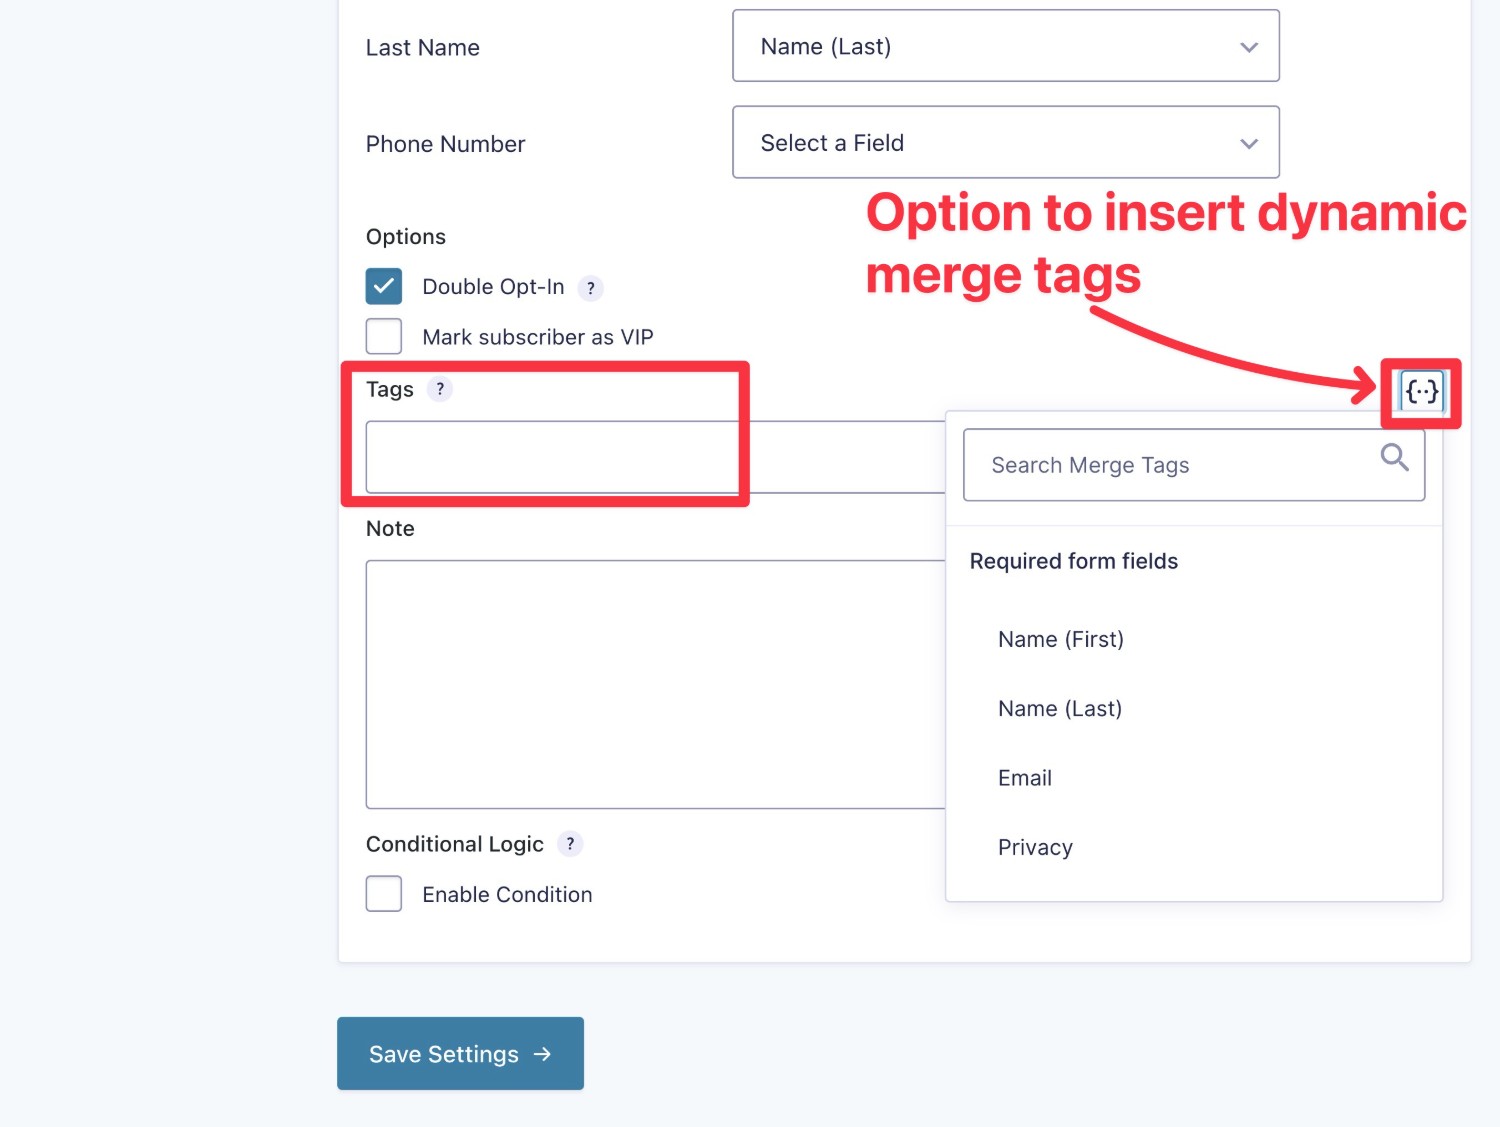
Next, you can use the Tags field to apply one or more tags in Mailchimp. If you want to apply multiple tags, you can separate them with commas.
One really useful option here is to use dynamic merge tags as Mailchimp tags. For example, you could add a Radio Button field that lets people choose their primary interest. You could then dynamically add whichever interest they chose as a tag, which would let you segment your lists.
Below that, you can add an internal Note. You also have the option to insert merge tags in the note.
Finally, there’s also an option to add conditional logic, but we’re going to cover that in its own dedicated section.
Once you’ve filled out everything, make sure to click Save Settings.
Using Conditional Logic for Your Feeds
With conditional logic rules, you can choose to only execute the feed if certain conditions are met.
For example, let’s say you want to add an email subscribe option to the user registration form that you created with Gravity Forms:
- If a user checks the box to subscribe, Gravity Forms should add them to Mailchimp.
- If the user does not check the box, Gravity Forms should not add them to Mailchimp.
To set this up, check the Enable Condition box to enable conditional logic for your feed. Then, use the drop-downs that appear to set up your rule.
For this example, you would set it up to only process the feed if the user checked the box to subscribe to the form:
Creating Multiple Feeds With Conditional Rules
Another useful thing that you can do with conditional logic is to create multiple Mailchimp feeds and then use conditional rules to control when to execute each feed.
For example, let’s say you have a situation where you have two different Mailchimp audiences and you want to add users to a different audience based on how they filled out the form.
In this use case, you could create two different feeds for your form, each of which connects to a different audience.
Then, you could add conditional rules to each feed to control which feed gets executed when a user submits the form.
6. Create Any Other Needed Feeds (Optional)
This step is 100% optional.
Depending on the purpose of your form, you might need to create some other feeds in addition to the Mailchimp feed.
For example, if you’re creating a payment form to process payments with Stripe, you would need to also create at least one Stripe feed. Or, if you’re creating a user registration form, you would need to create a User Registration feed.
However, if your form doesn’t require any integrations beyond Mailchimp, you can just skip this step and move to the next one.
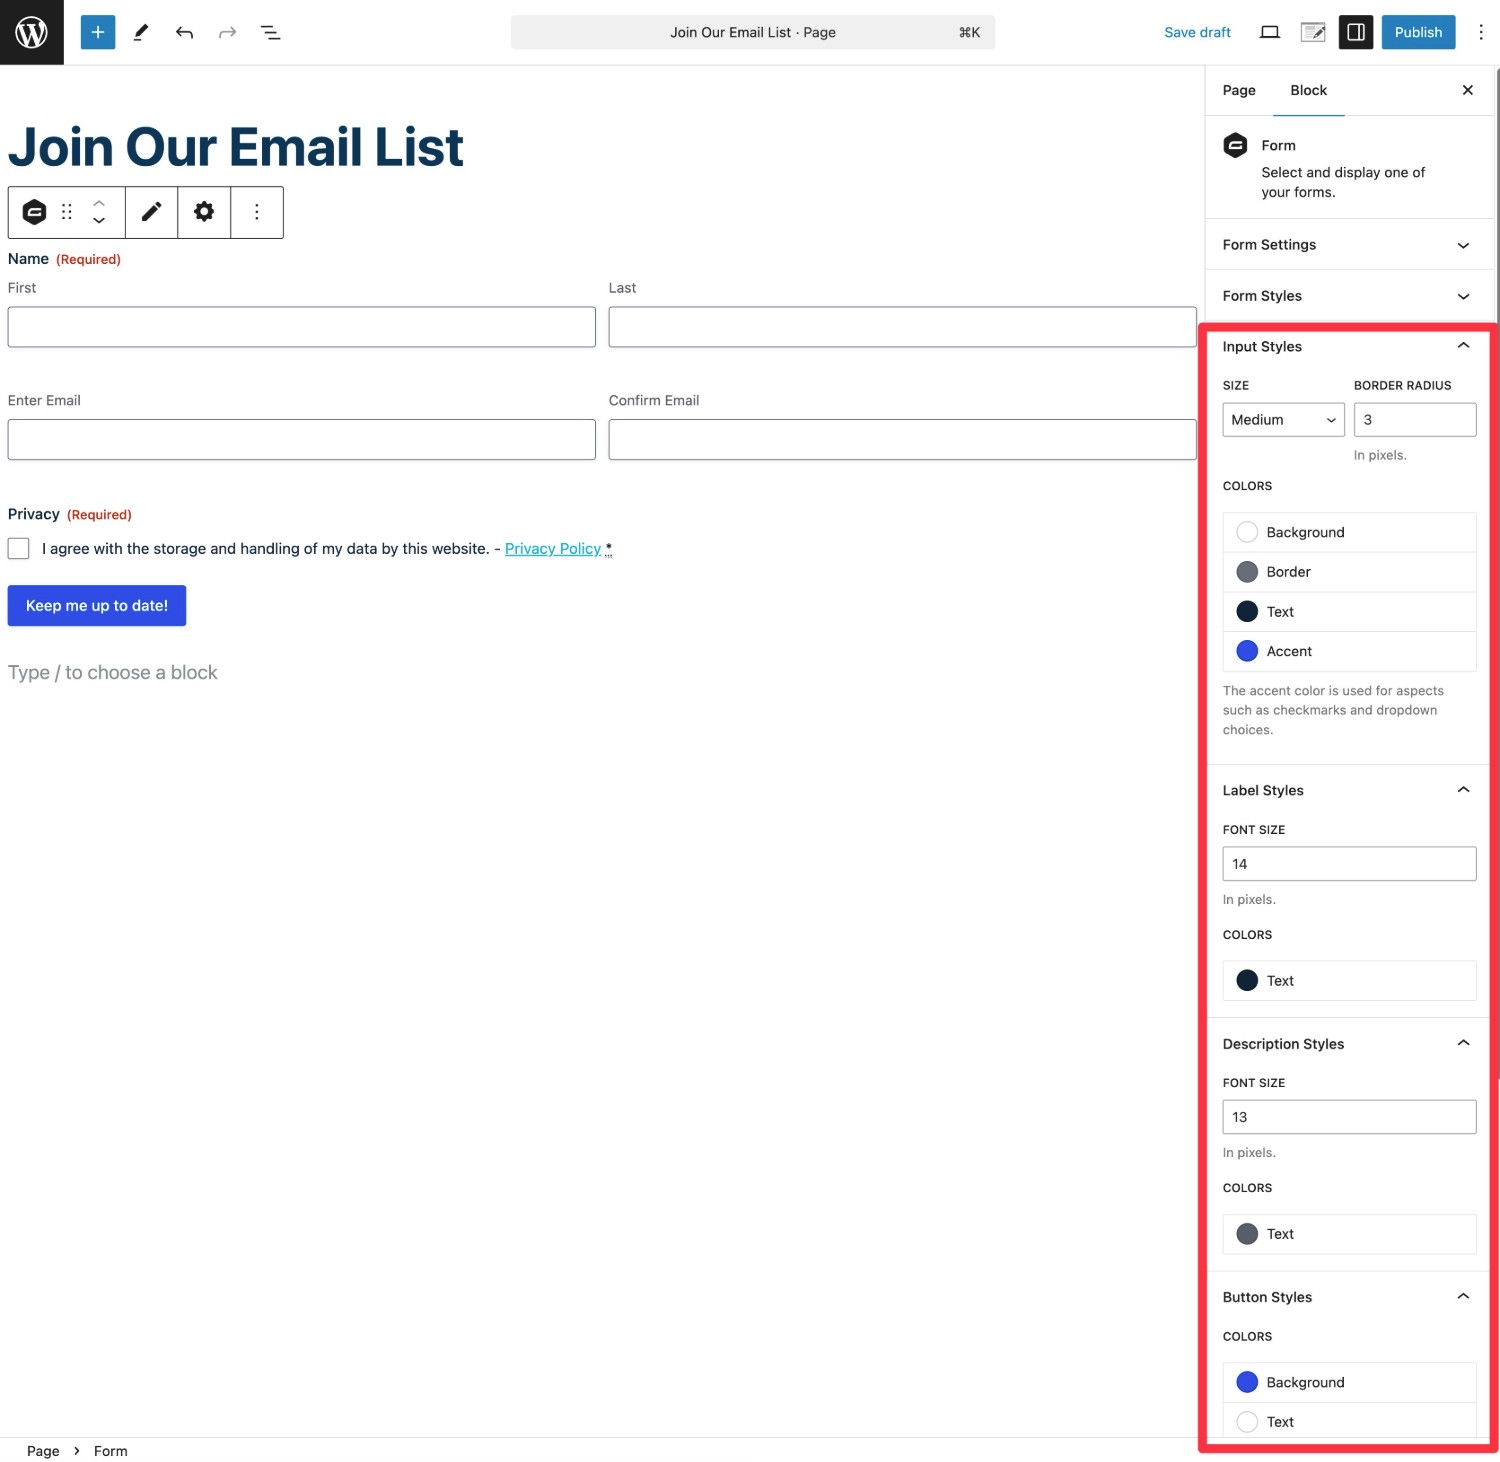
7. Embed Your Form
To finish things out, you’ll want to embed the form on your site.
You can embed the form anywhere on your site using the Gravity Forms block, shortcode, or PHP function.
If you use the block, you can style your form directly from the editor using the Orbital form theme.
Once you embed the form, you can submit some test data to make sure it’s working as you want it to.
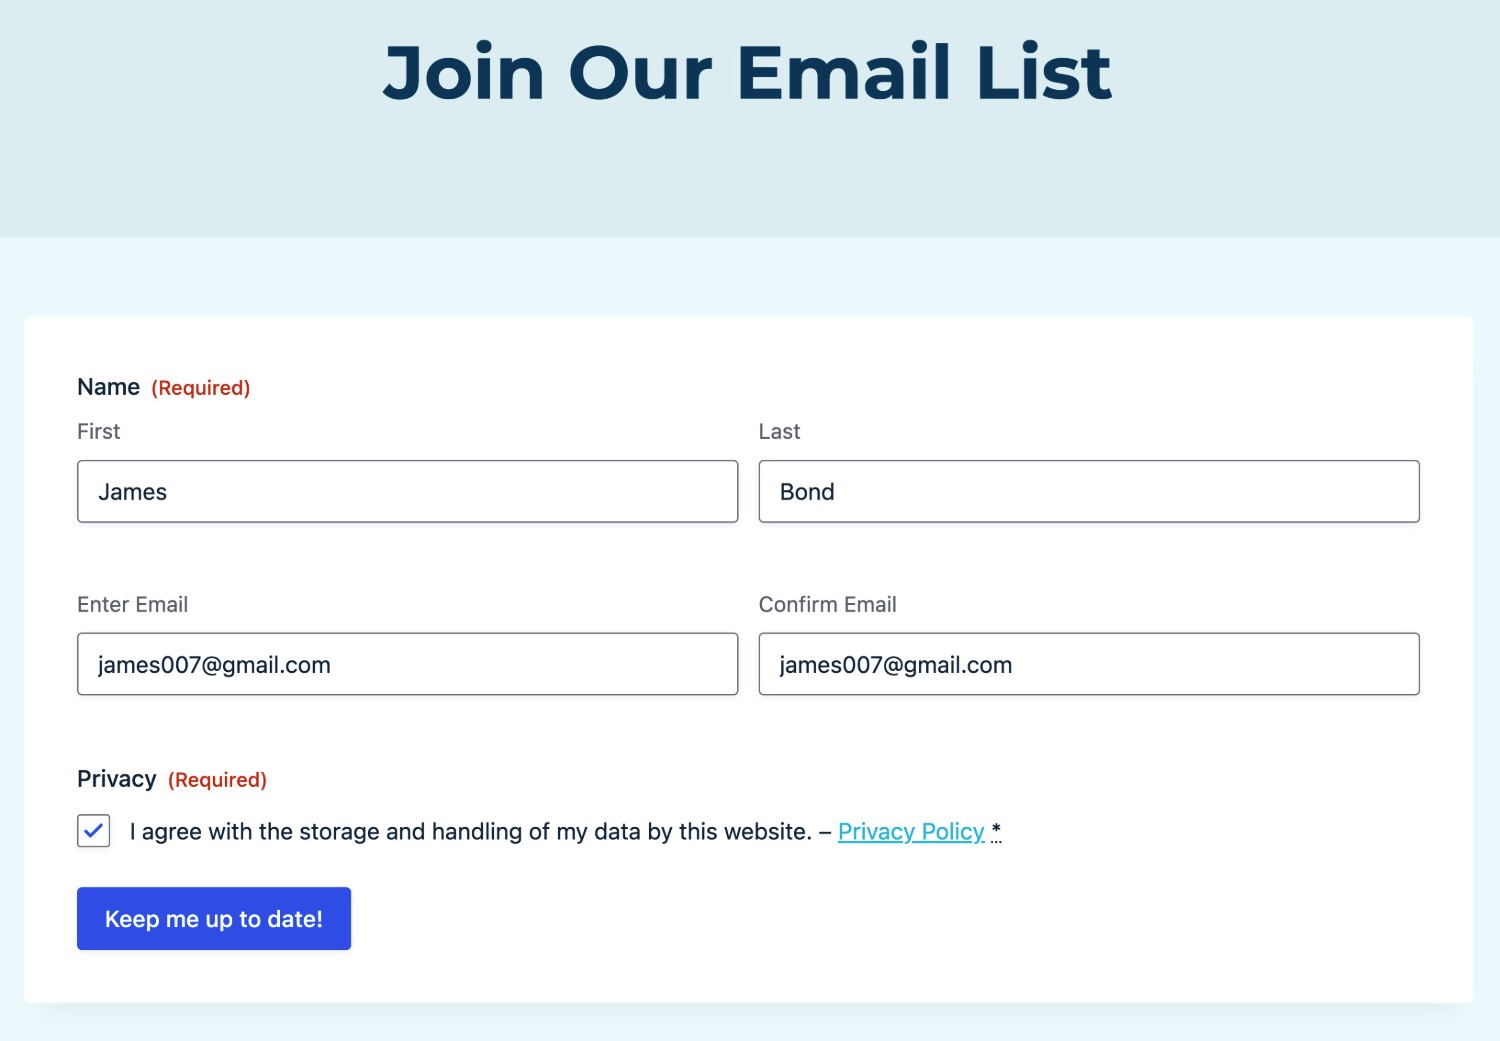
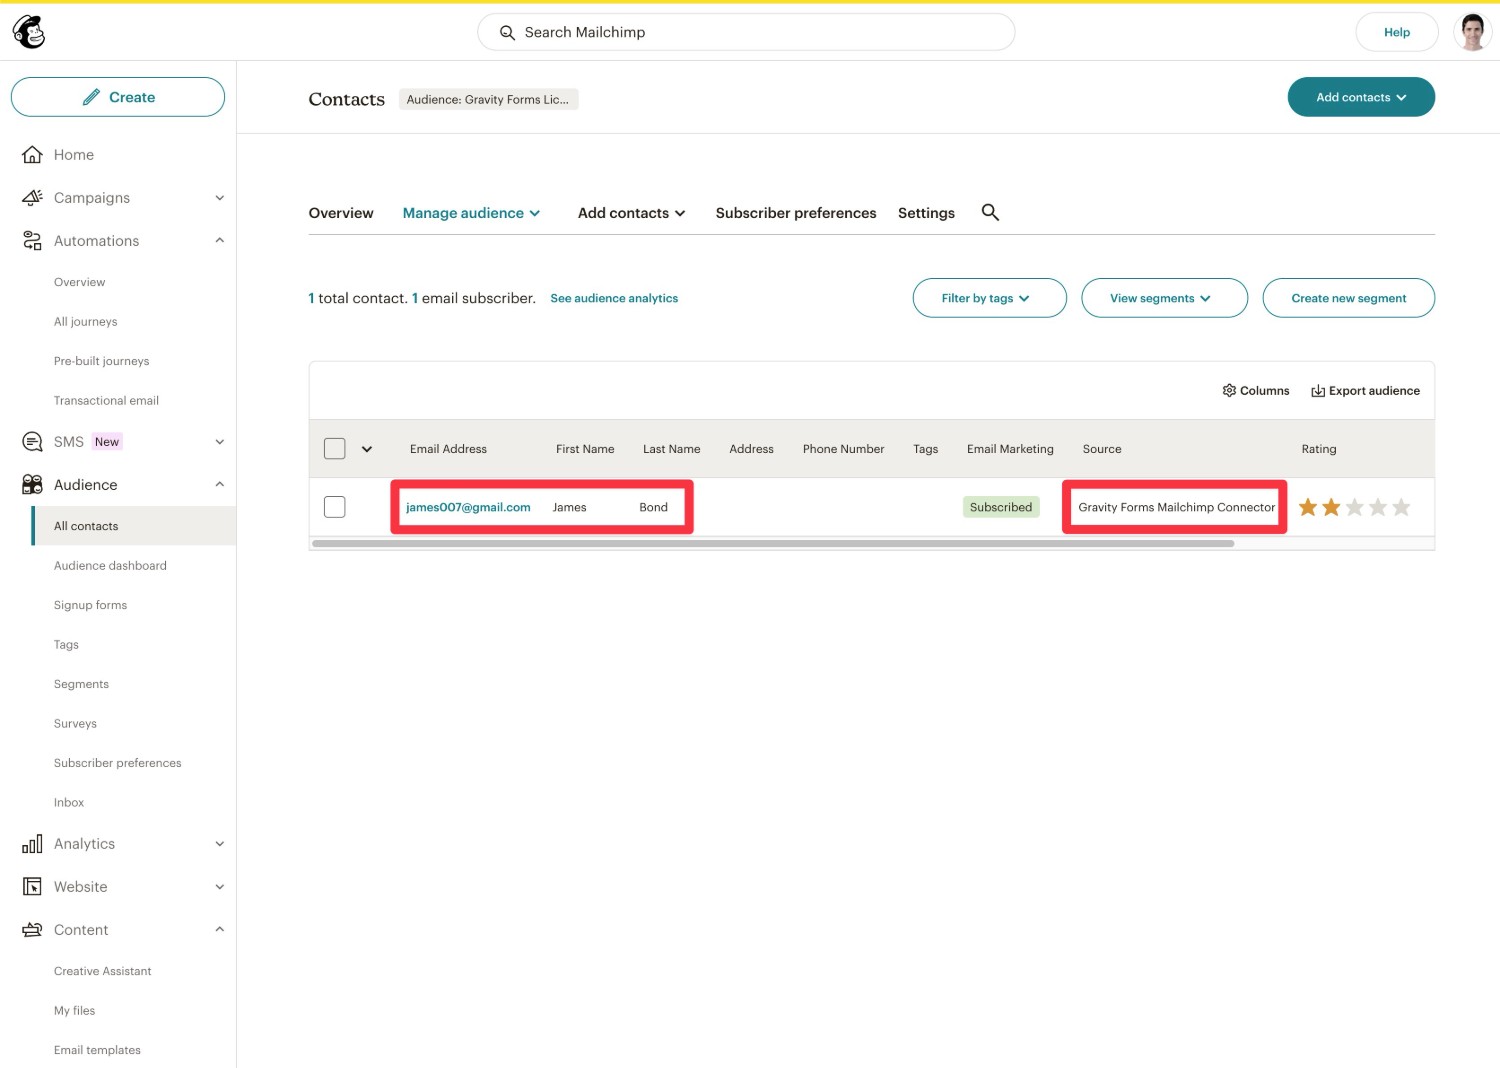
After submitting the form, you should see the user appear in your Mailchimp audience.
Note – If you enable double opt-in, the user will only appear after they also click the confirmation link in the email that Mailchimp sends them.
Get Started With Gravity Forms and Mailchimp Today
If you’re using Mailchimp for email marketing, Gravity Forms can help you connect your WordPress site to Mailchimp in all kinds of helpful ways.
With the Gravity Forms Mailchimp Add-On, you can easily connect all of your site’s forms to Mailchimp, including creating dedicated email subscribe forms as well as adding an email subscribe option to other types of forms.
If you’re already holding a Gravity Forms license, you can follow this guide to connect your first form to Mailchimp.
If you’re not a Gravity Forms license holder yet, you can purchase your license here.
The official Mailchimp Add-On is included with all Gravity Forms licenses, so you can choose whichever license best fits your needs.

If you want to keep up-to-date with what’s happening on the blog sign up for the Gravity Forms newsletter!