Gravity Forms, Zoom, and Zapier

It was during the pandemic that Zoom basically became the tool for video calls and conferences. Worldwide lockdowns and people scrambling to stay in touch online really helped the company, and its success endures to this day. So, wouldn’t it be great if you could somehow integrate Zoom with Gravity Forms?
It turns out, you totally can! And in this tutorial, we’ll show you how to do so.
Below, you’ll learn to configure your web forms so that your visitors can use them to sign up to a Zoom meeting or webinar. We’ll be using Zapier and the Gravity Forms Zapier Add-On to achieve that. Once established, this setup works fully automatically, without you having to do anything else.
Let’s jump in…
Zoom and Gravity Forms
Before tackling the how-to part of the tutorial, let’s first have a look at the why. Why should you consider investing in a Gravity Forms to Zoom integration? What benefits does Zoom offer, and what makes it a good candidate to use together with your favorite WordPress web form plugin?
Let’s tackle the first part first:
- Wide range of communication tools — As mentioned, Zoom is one of the most popular solutions for video calls and online conferences. But it also offers chat, email, and VoIP phone calls. It also comes with helpful utilities like call scheduling, a calendar, virtual whiteboards, notes, surveys, documents, and video clips.
- Offline scheduling— You might not know that the company also lets you manage real-life and hybrid meetings with room reservation and management.
- Artificial intelligence — True to current trends, Zoom also offers AI features, like an AI companion to compose messages more quickly or summarize meetings.
- Additional integrations — There is an app marketplace to connect Zoom with other popular apps like Hubspot, Salesforce, or Zendesk.
- Business solutions — If you want, Zoom can also function as your contact center, virtual agent, or tool to conduct webinars and other online events.
Despite its wealth of features, Zoom offers fair pricing, including a free plan.
So, Why Integrate Zoom with Gravity Forms?
When you use Zoom with our plugin, first of all, you can take advantage of our world-class drag-and-drop form builder. It allows you to create and customize almost any kind of web form, from contact over donation to payment forms. That includes complex forms with a lot of conditional logic.
The best part: you can do so with pretty much no technical knowledge. Everything happens in a beginner-friendly user interface and with just a few mouse clicks.
Secondly, Gravity Forms comes with a wide collection of add-ons and extensions. They enable you to connect your forms with many popular software solutions (e.g. PayPal, Constant Contact, and Slack) and enhance them with numerous awesome features. For example, you can easily turn your web forms into conversational forms, which offer a back-and-forth interactive experience and plenty of possibility to include your branding.
You can even connect your form using the Gravity Forms Zoom integration with a payment provider and accept payments for signing up to your Zoom webinar right away.
Finally, you can use Gravity Forms’ powerful conditional logic to filter potential attendees at sign-up. More on that below.
As you can see, there are plenty of opportunities for the two applications to work together and we have only scratched the surface.
Introducing Zapier – The Tool in the Middle

As we already established, we’ll make Gravity Forms and Zoom work together using Zapier. If you haven’t heard of it yet, Zapier is a service that lets you connect different apps and services (almost 7,500 of them) in a if-this-happens-do-that fashion. This allows you to create automatic workflows, so-called “Zaps”.
Thanks to Zapier, Gravity Forms also integrates with countless apps. All you need for that is the Gravity Forms Zapier Add-On, one of our most popular extensions. We already have use case examples on the blog, for example, how you can connect your forms with Pipedrive, Brevo, Google Sheets, Asana, or Excel. Zoom is another service you can set up a Gravity Forms integration with via Zapier.
The Zapier Add-On is available on Gravity Forms Pro and Elite licenses. Get yours today or upgrade your license and only pay the pro-rated price.
How to Allow Visitors to Register for a Zoom Meeting on Your WordPress Website
For the tutorial below, you need a WordPress website with the Gravity Forms main plugin installed. You can also follow along using the free Gravity Forms demo, which comes with everything you need.
1. Sign Up to Zoom
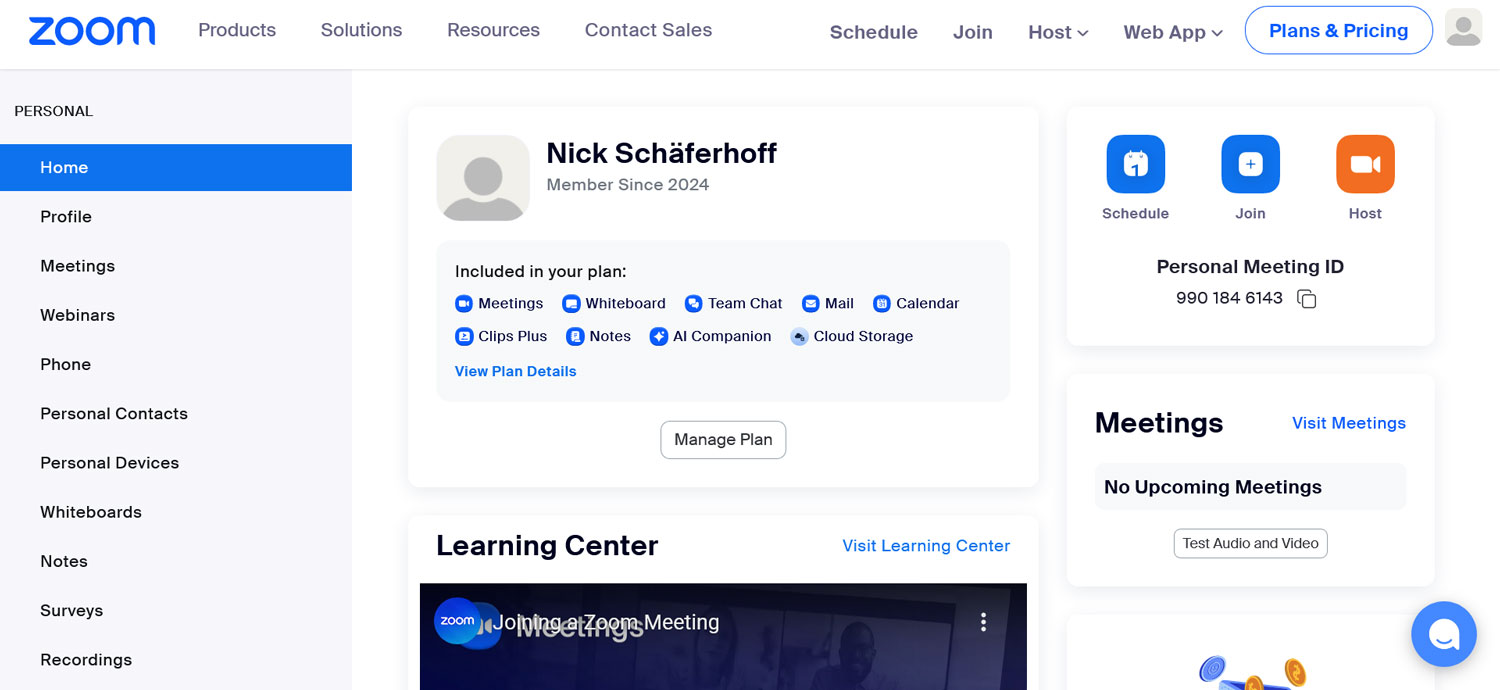
Since our goal is to use Zoom, our first step is to sign up to it. That’s pretty easy to do. Simply go to the Zoom website and click the Sign Up Free button.
It will ask you for some information, particularly your age, email address (you can also register with your SSO, Google, Apple, or Facebook id), name, and password. It’s nothing you haven’t done before, so simply follow along and you will end up in the Zoom dashboard with a Free Zoom plan.
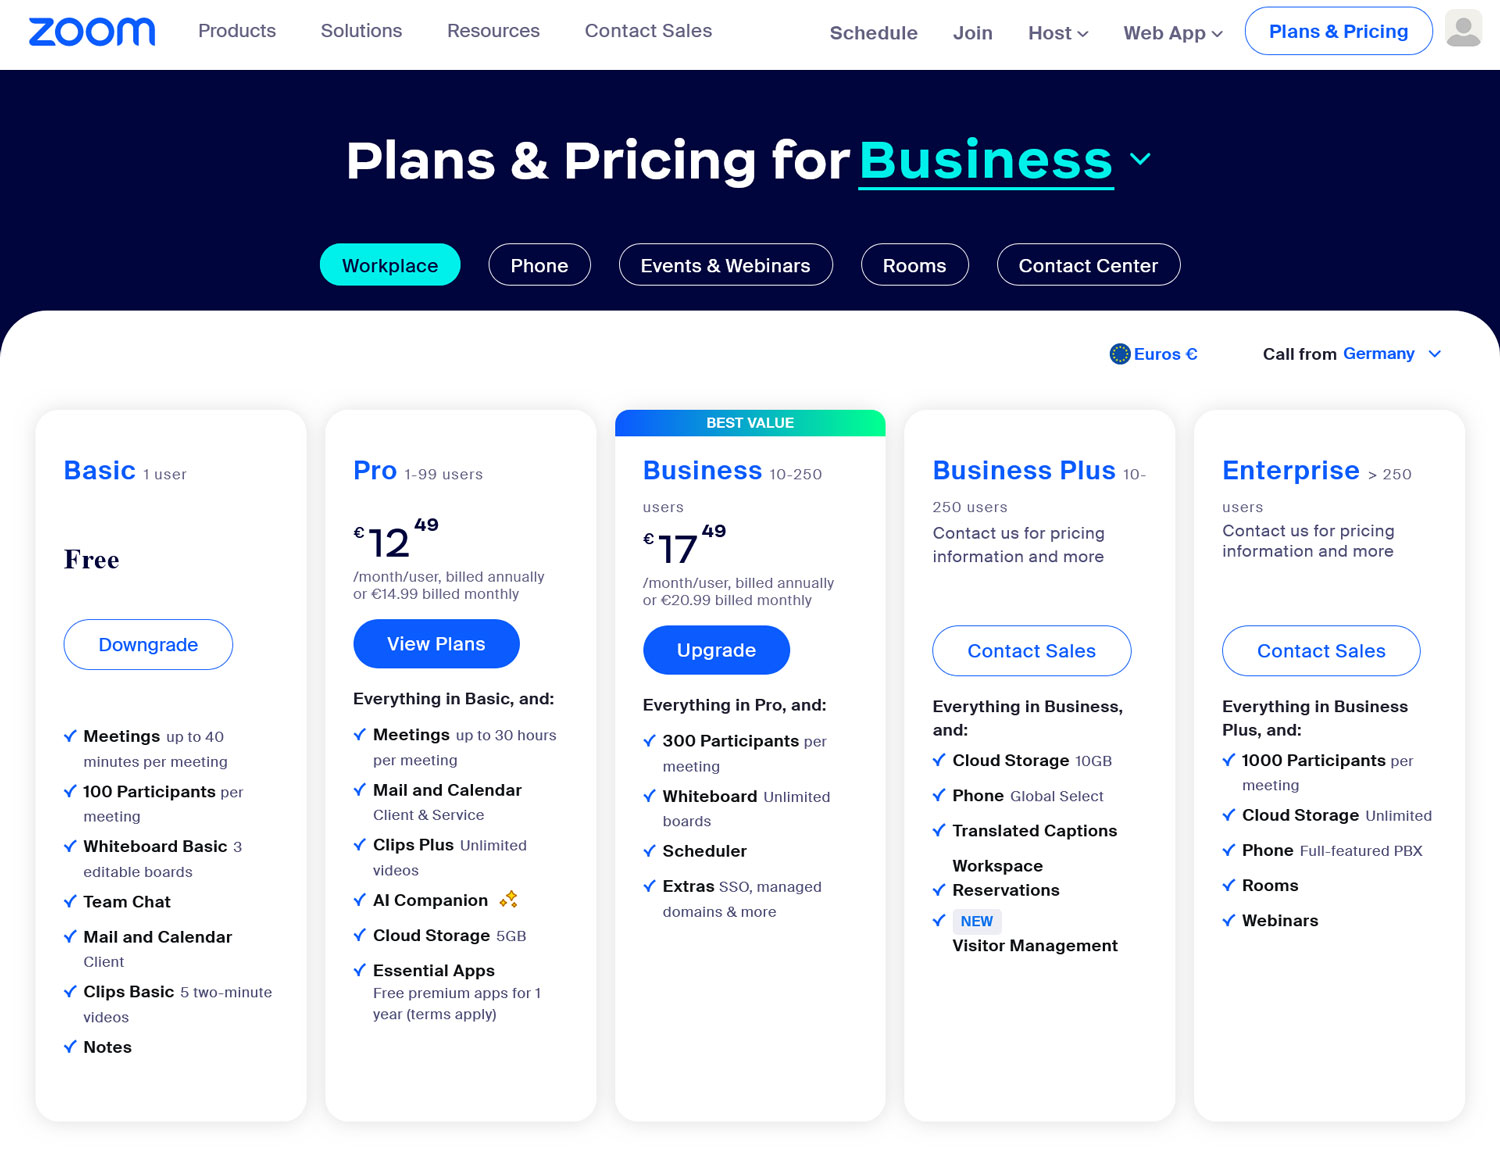
Registering attendees to your meetings and webinars in advance is a paid Zoom feature. Therefore, if you want to do this (as we do in this tutorial), you have to upgrade to a paid plan.
There are plenty of prompts for that in the dashboard. The easiest is to click on Plans & Pricing in the top menu and then choose the one you are interested in by clicking Upgrade.
Go through the checkout process, then continue with the next step.
2. Create a Meeting
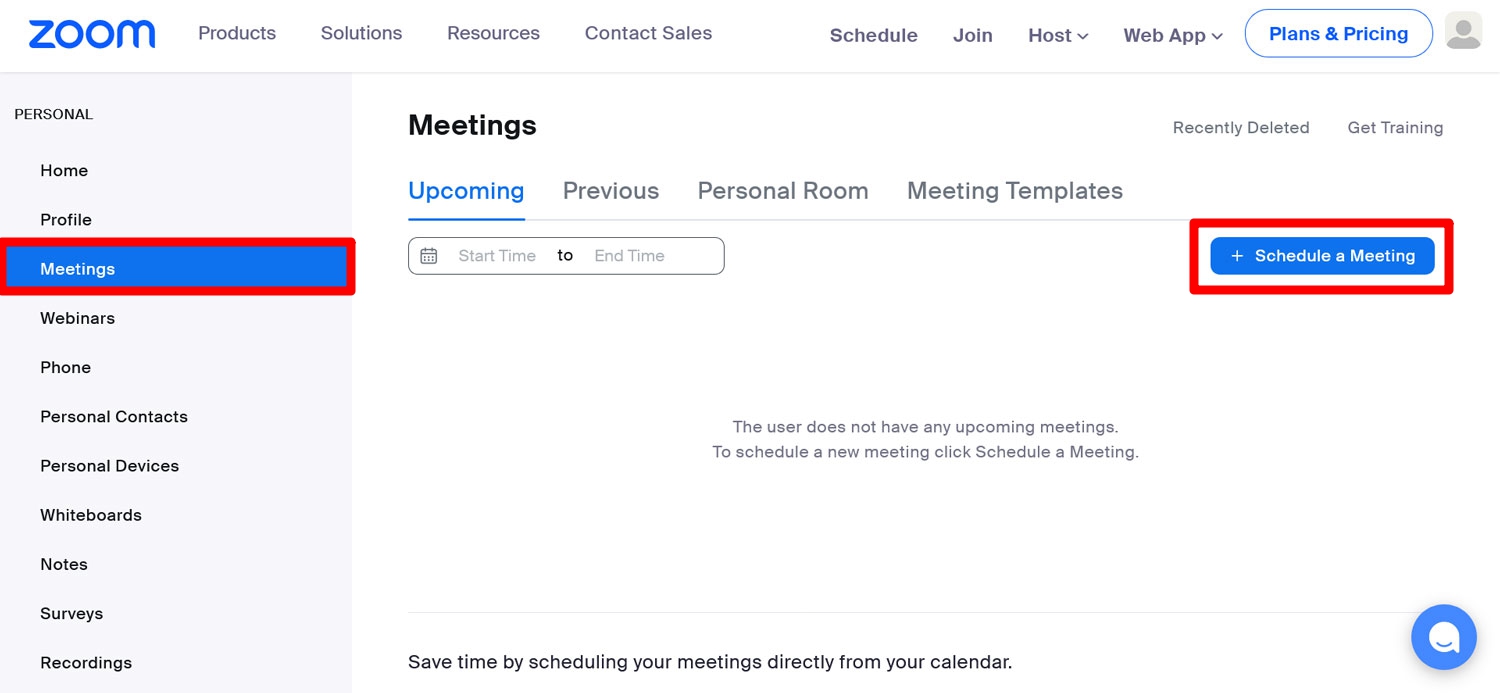
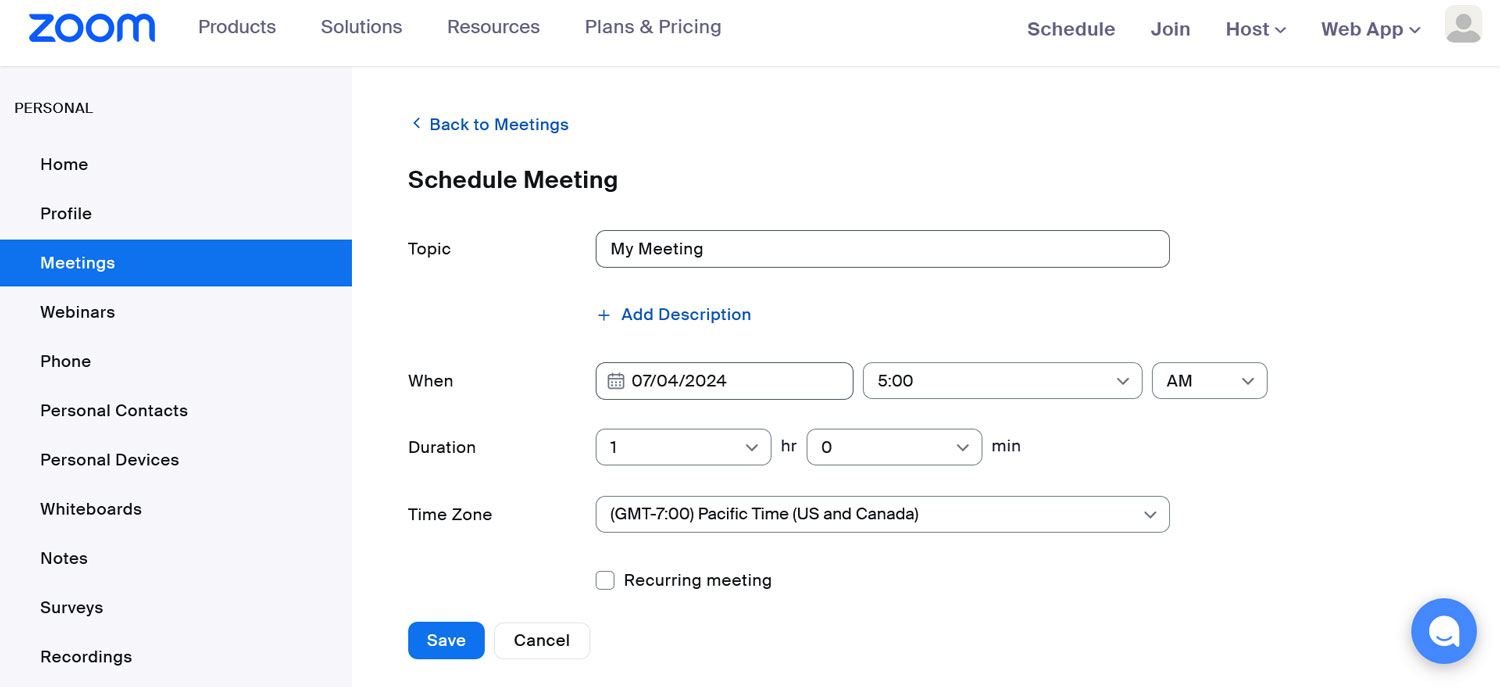
Next, we have to create a meeting our website visitors can register for. You do that in the Zoom dashboard under Meetings. Click on it and then on Schedule a Meeting.
This will lead you to an interface where you have to give the meeting a name/topic, choose a date, time, and duration.
You can also pick a time zone, already add attendees, switch on a whiteboard, configure a passcode, and more.
Click Save at the bottom to schedule the meeting, then move on.
3. Get Yourself a Zapier Account
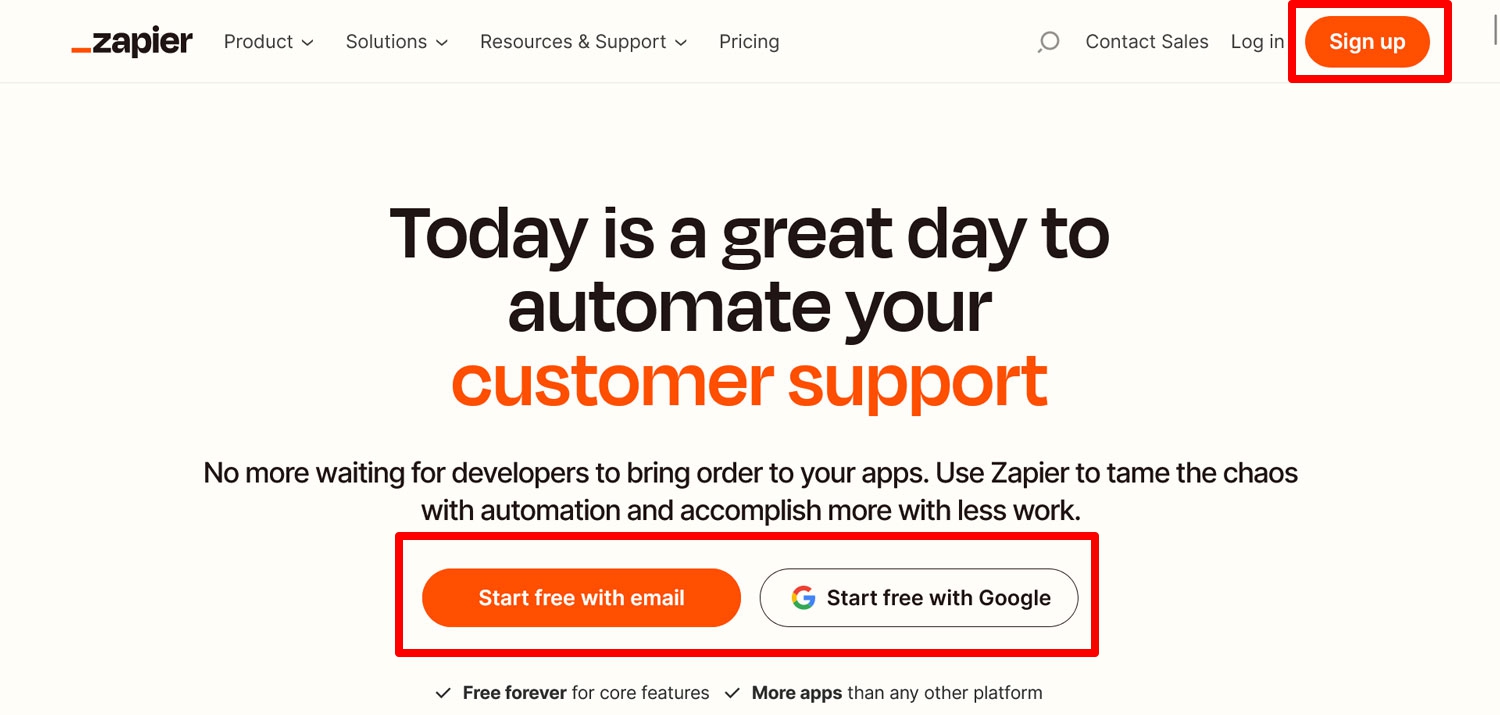
Another puzzle piece you’ll need for your Gravity Forms to Zoom integration is a Zapier account, which you can create via the Zapier homepage. Simply click one of the many prompts there, then register using an email address or your Facebook, Google, or Microsoft account.
For the use case we have planned, a free Zapier account is enough.
4. Install the Gravity Forms Zapier Add-On and Create an API Key
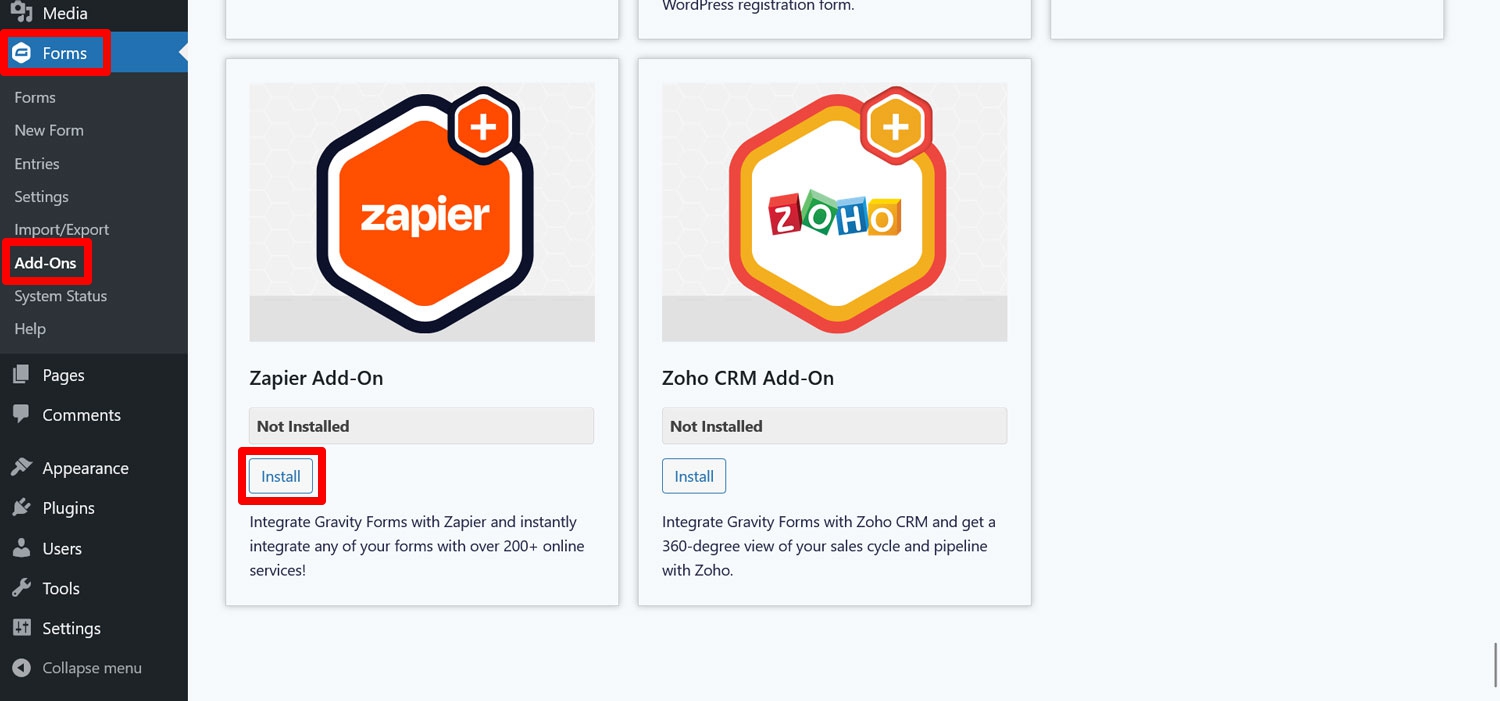
The next few steps happen on your WordPress website. The first thing you need to do is install the Gravity Forms Zapier Add-On under Forms → Add-ons. Simply find the extension in the list and click on Install, then activate it afterwards.
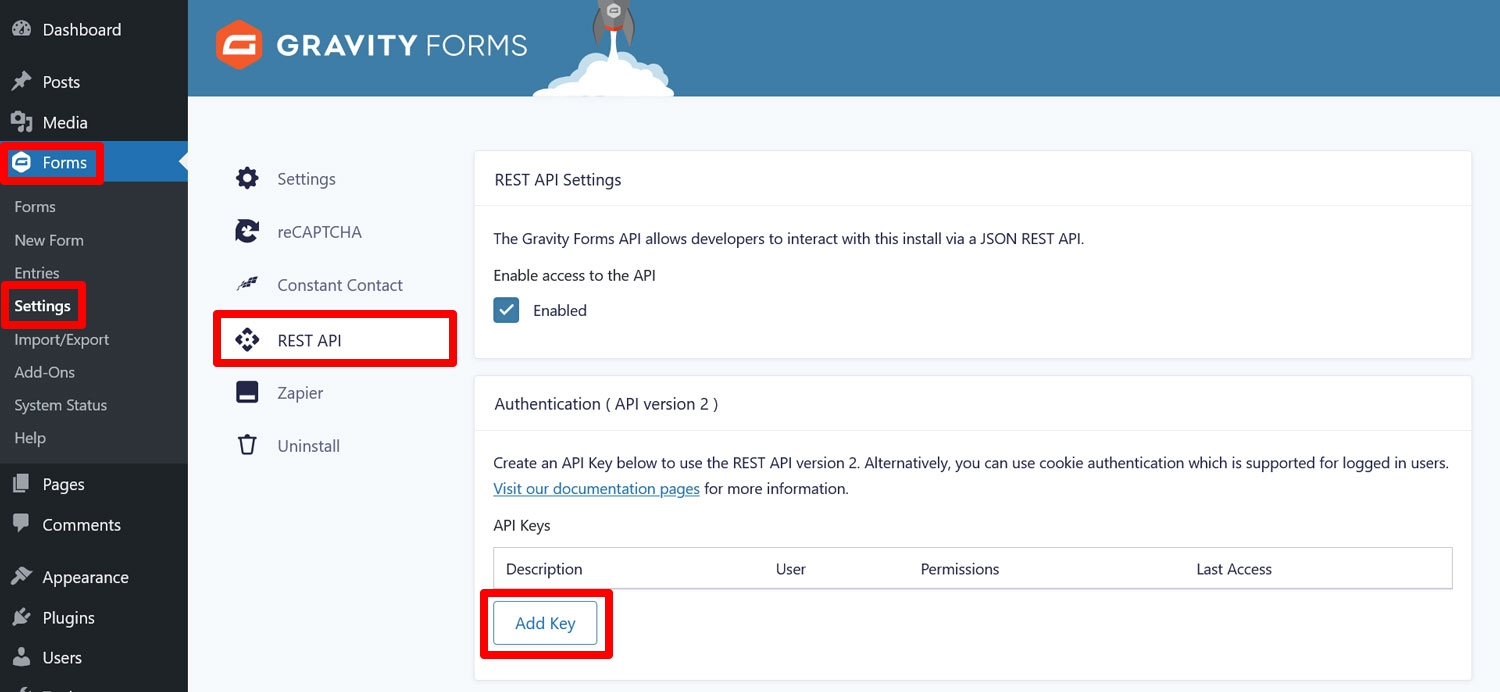
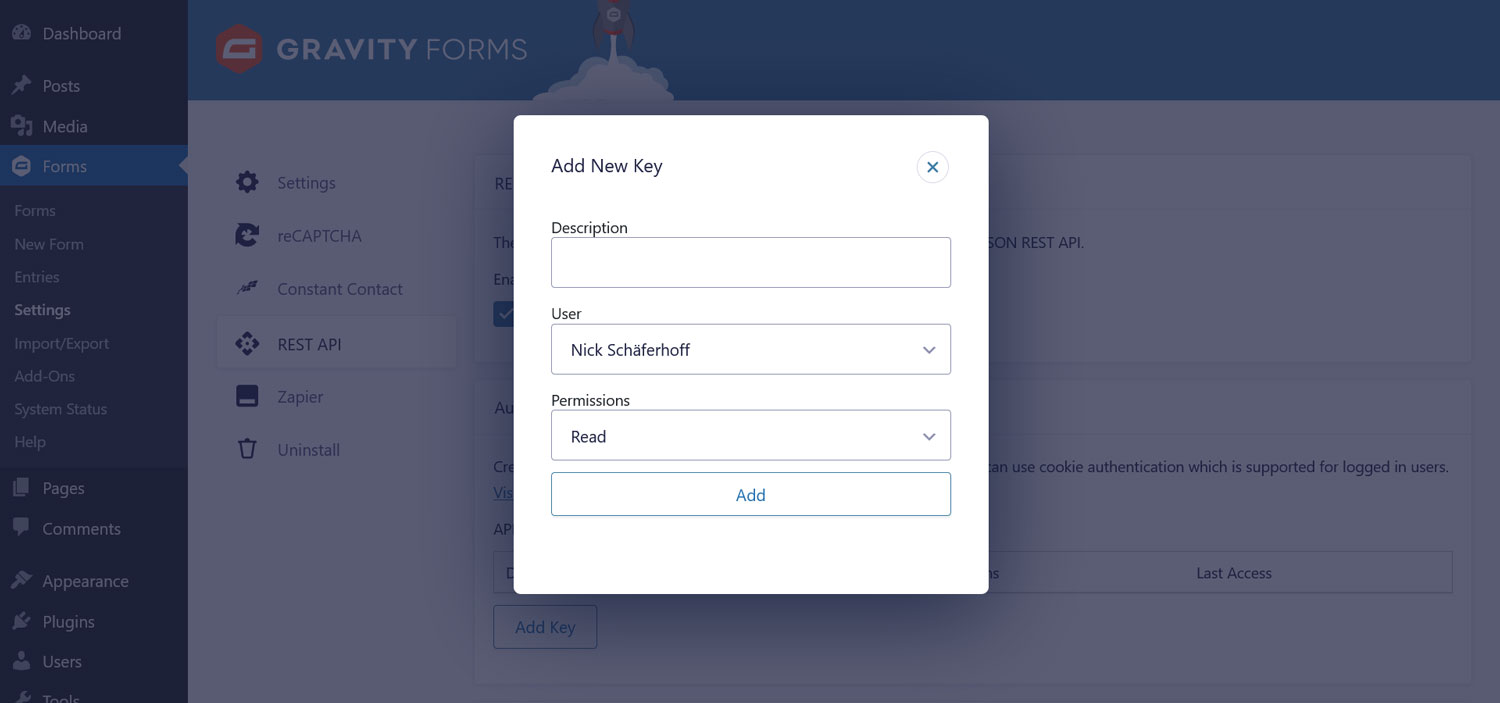
Next up, you need an API key to connect to Zapier later. For that, go to Forms → Settings → REST API. Once there, check the box to enable the API, then click on Add Key under Authentication (API version 2). The version number matters, so be sure you pick the right option.
A pop-up will appear that asks for the following information:
- Description: Use this to distinguish between different API keys.
- User: Make sure to select a user who has the permission level to view and edit entries.
- Permissions: Choose Read/Write here.
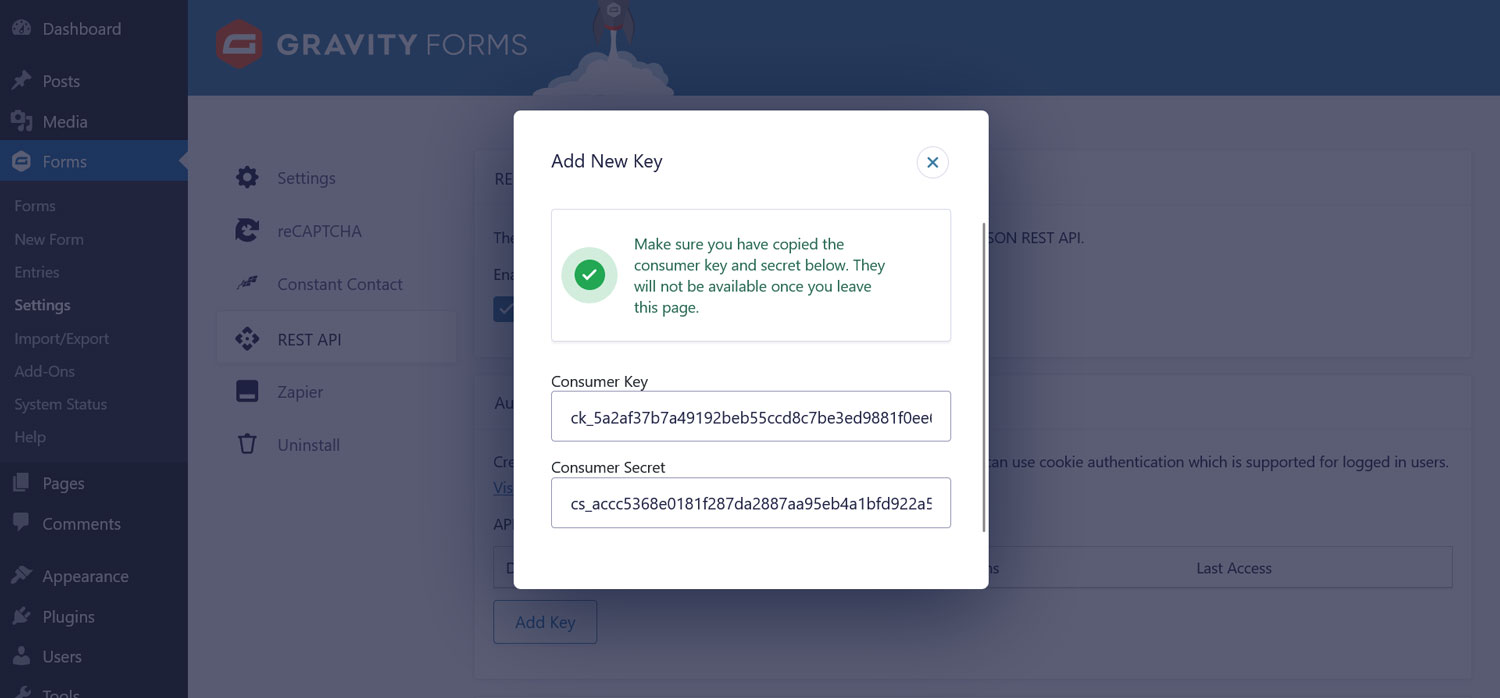
When you now click the Add button, Gravity Forms reveals your consumer key and secret.
Copy and store those somewhere since this is the only time you will see them. After that, close the window and save the settings by clicking Update at the bottom.
5. Create Your Sign-Up Form for Zoom
The next thing you need is a form to connect Zoom. There are different forms you can use for this purpose. As you will see below, the only information Zoom needs to register your visitors for a meeting is the attendant’s name and email address. So, theoretically, you can simply create a form with those two fields and call it a day.
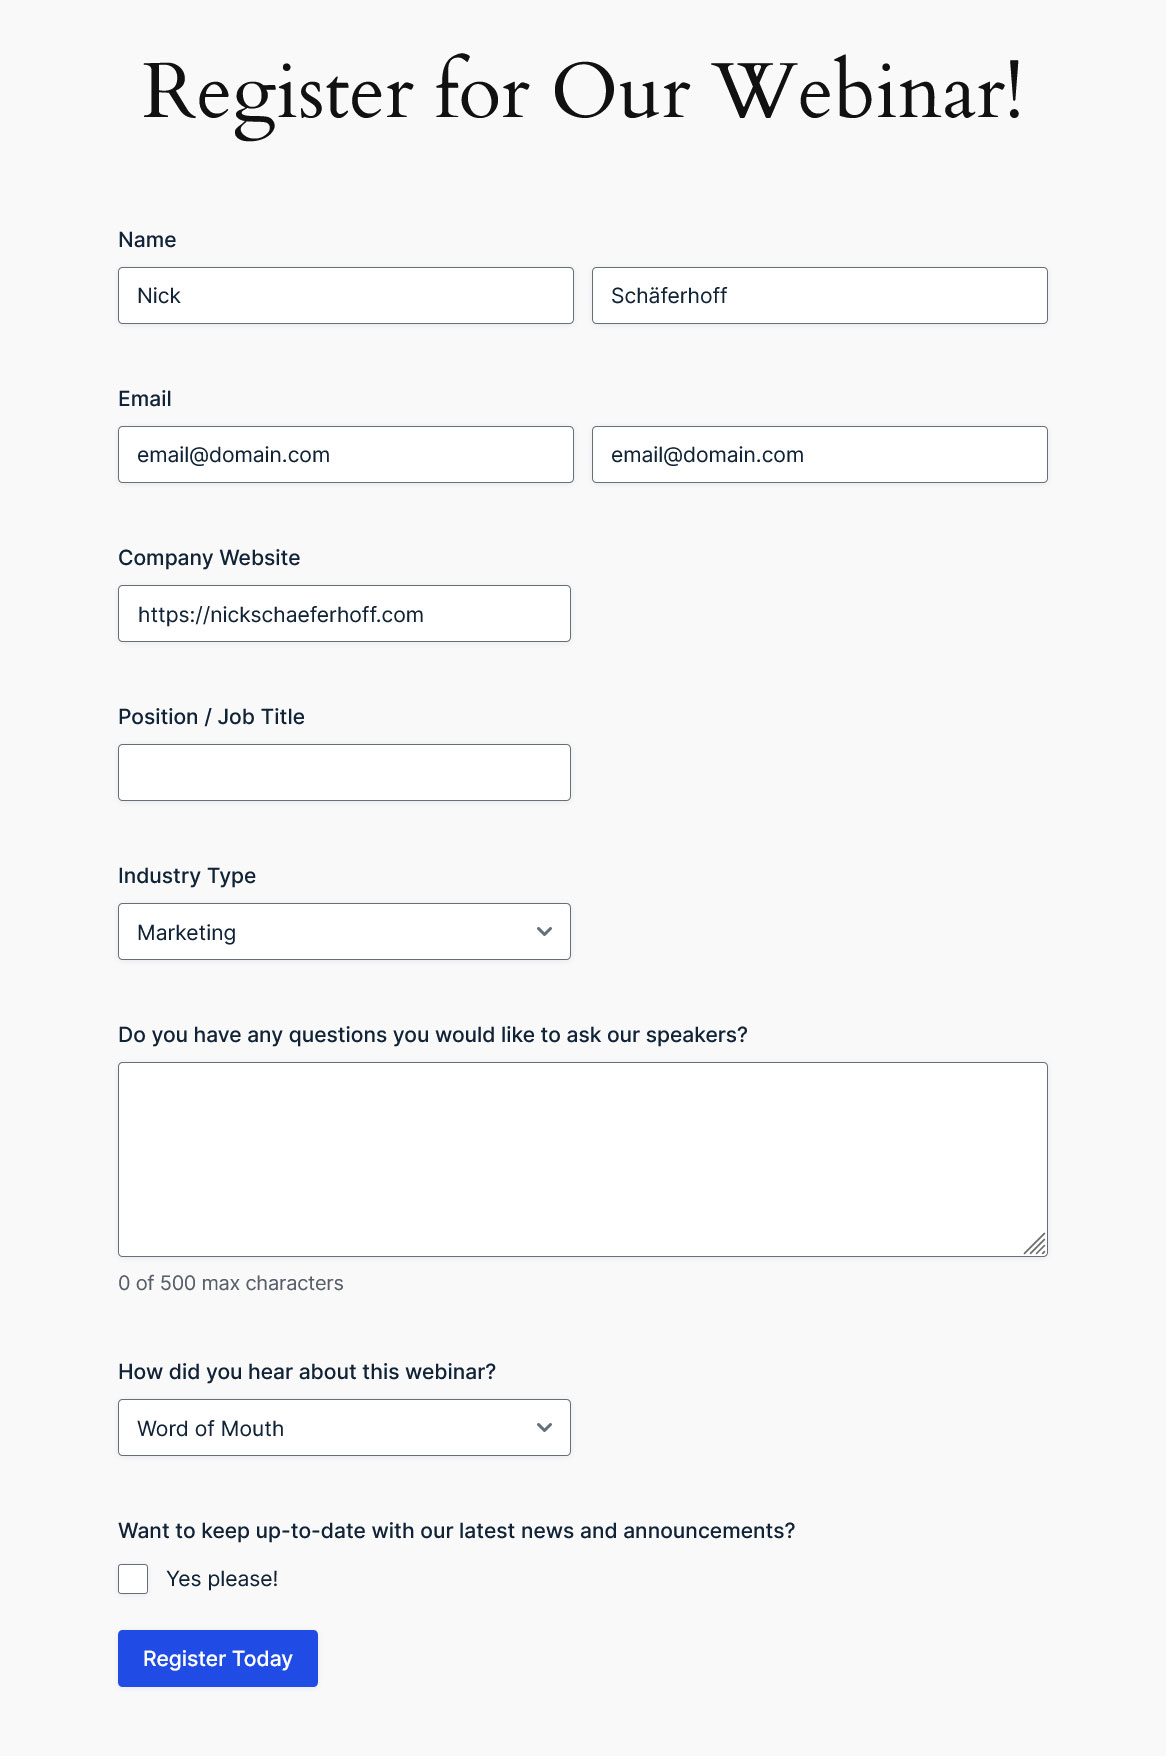
In this case, however, we want to take advantage of existing Gravity Forms templates and use the webinar registration form. This template has the advantage that a lot of the work has already been done for you. That’s because templates are blueprints for certain form types and come with common fields for their use cases.
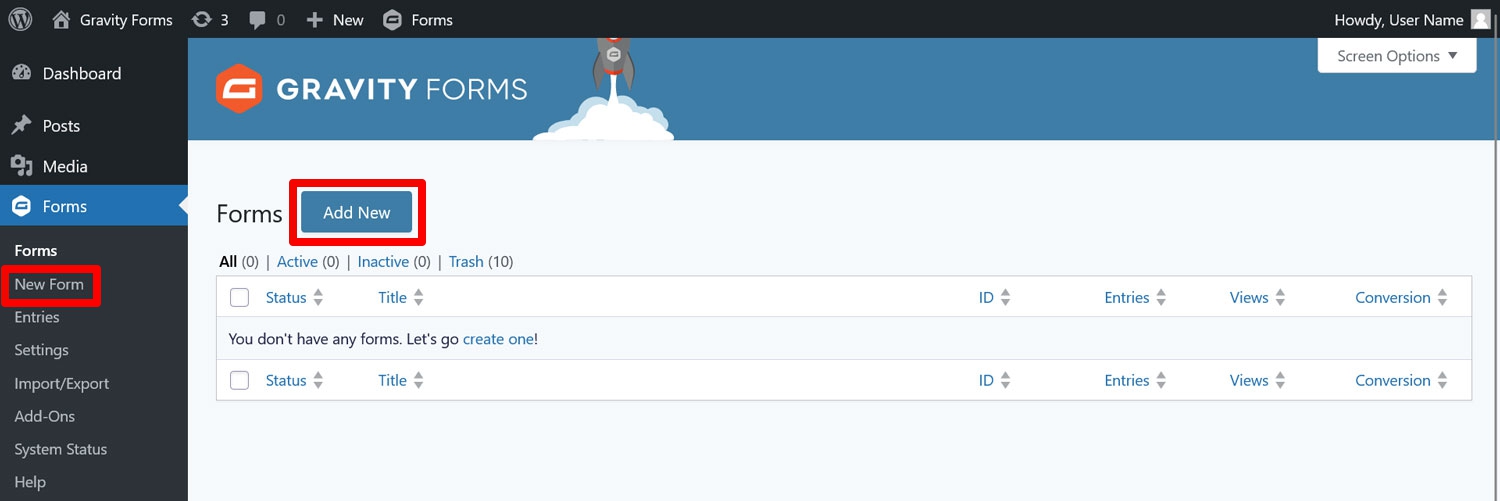
In your WordPress back end, go to Forms → New Form.
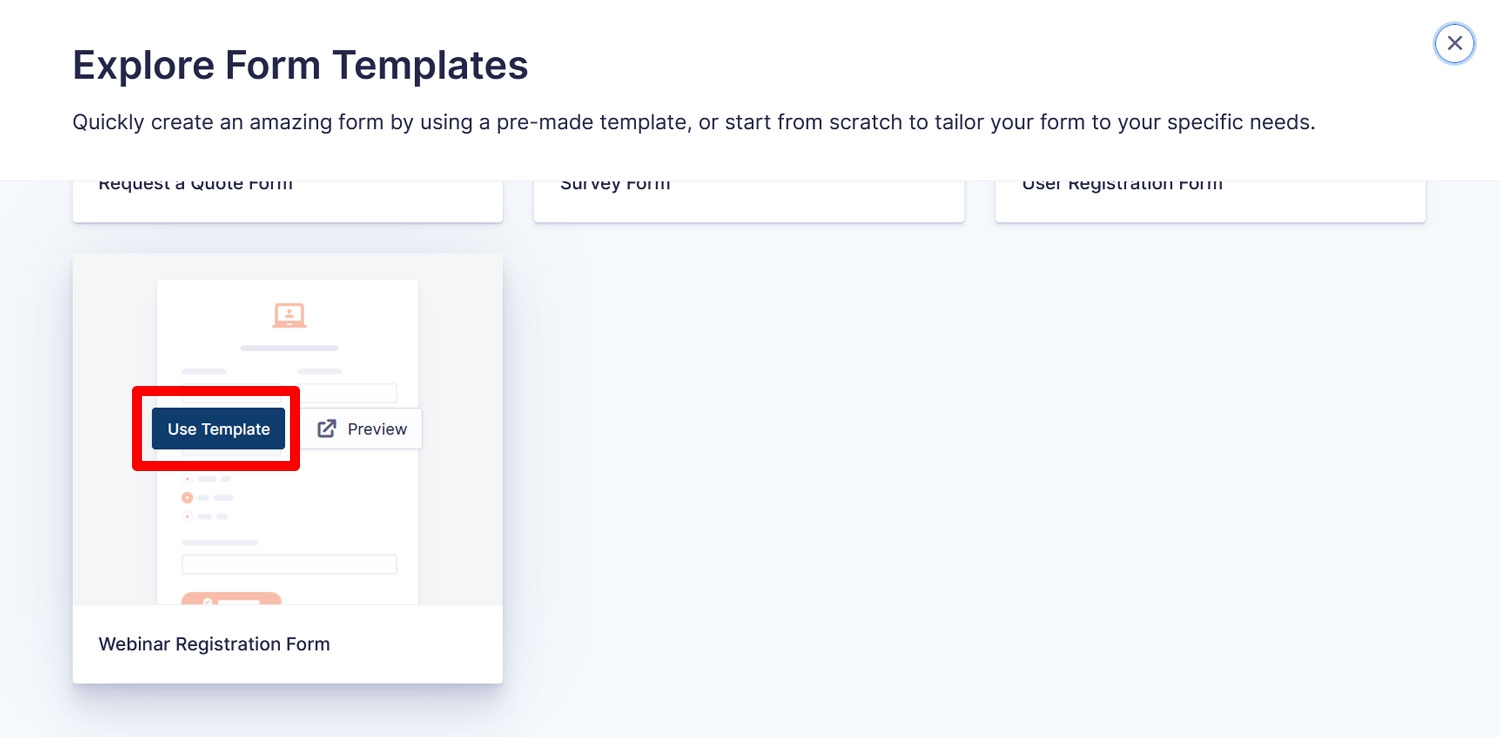
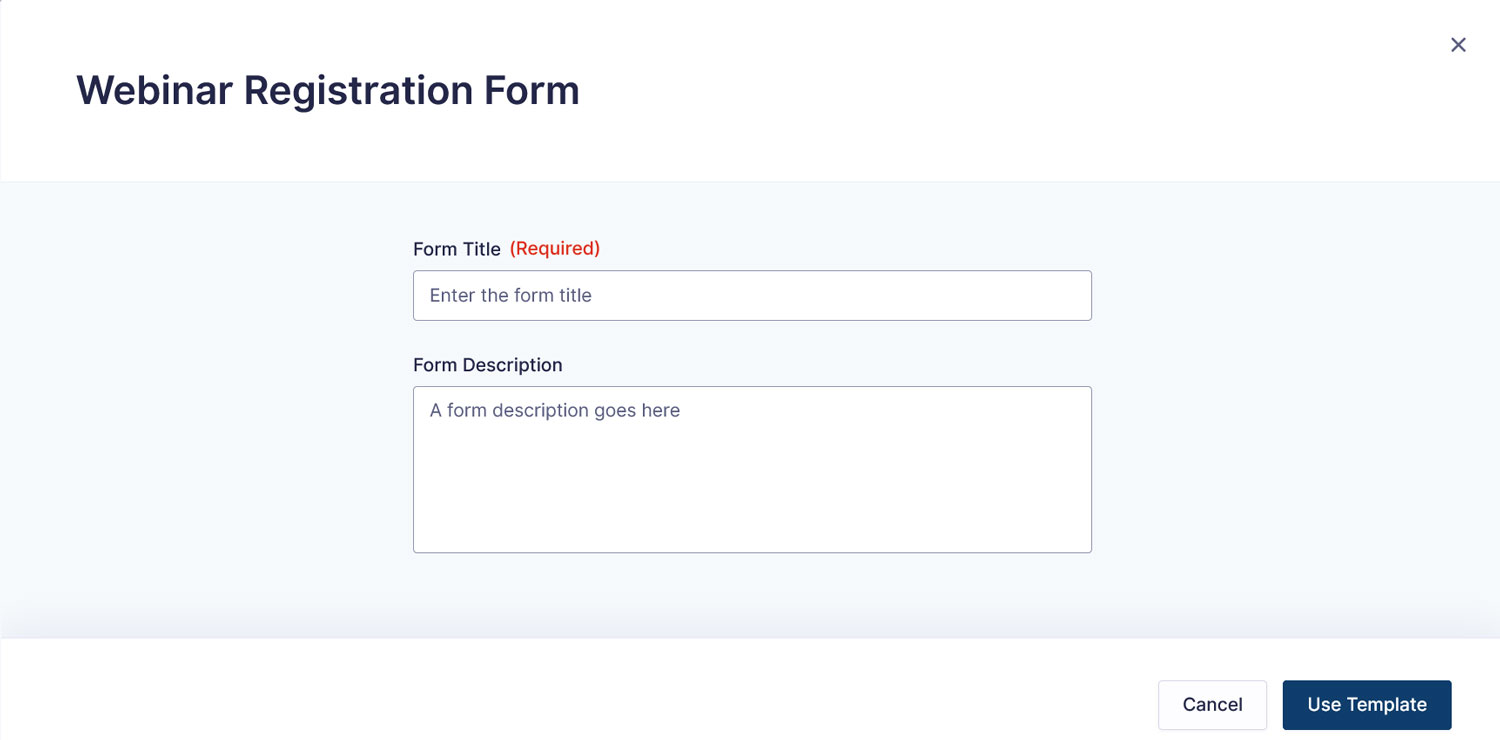
A pop-up with available templates automatically appears. The Webinar Registration Form is at the bottom. Hover over it and click Use Template.
In the next step, name your form, then continue.
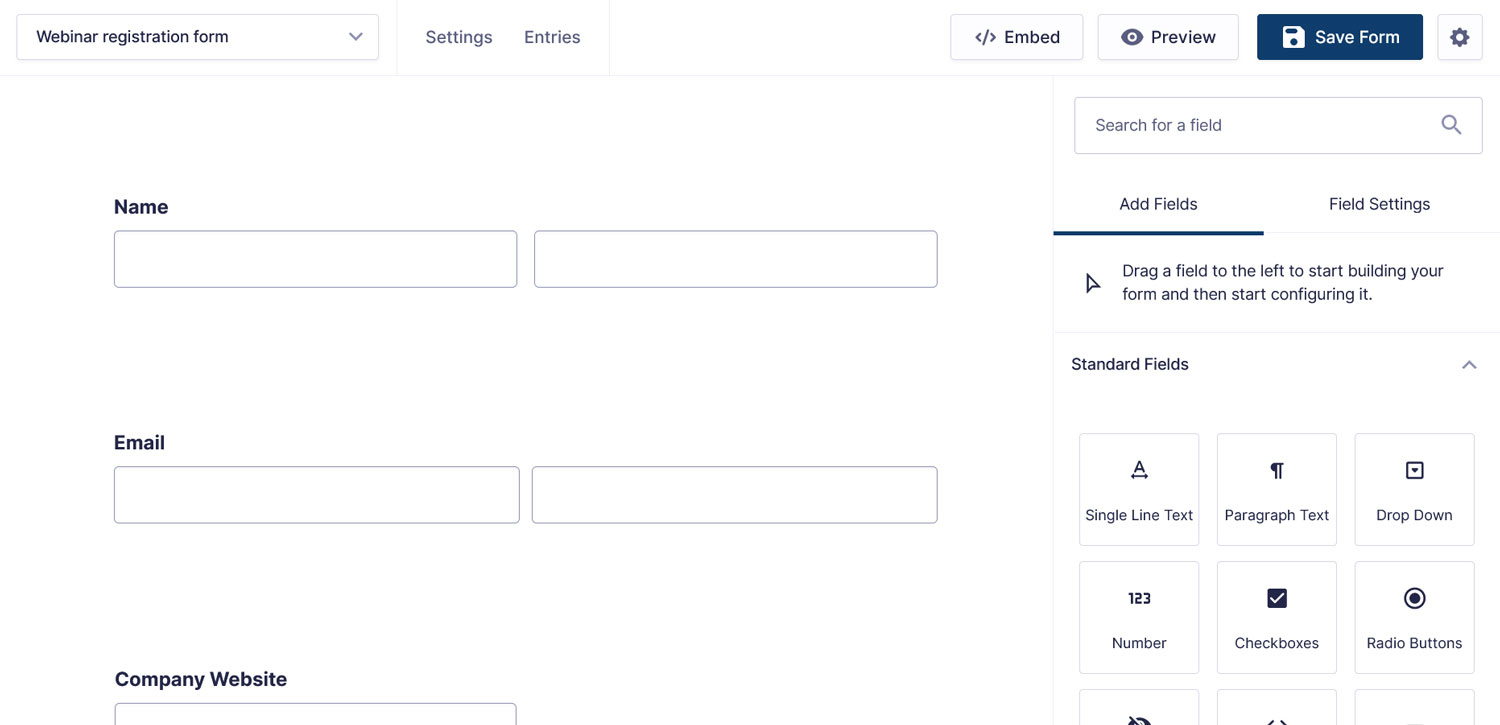
Doing so will land you in the Gravity Forms drag-and-drop form editor.
Because we are using a template, you will notice that it already has a number of form fields, namely for:
- Name
- Company website
- Position / Job title
- Industry type (drop-down menu)
- Questions/comments
- How did you hear about this webinar? (drop-down menu)
- Newsletter opt in
For the purposes of this tutorial, that’s completely enough and we will leave it as is. If you want to customize it further, feel free to drag and drop additional form fields from the right sidebar to where you want them appear in your form.
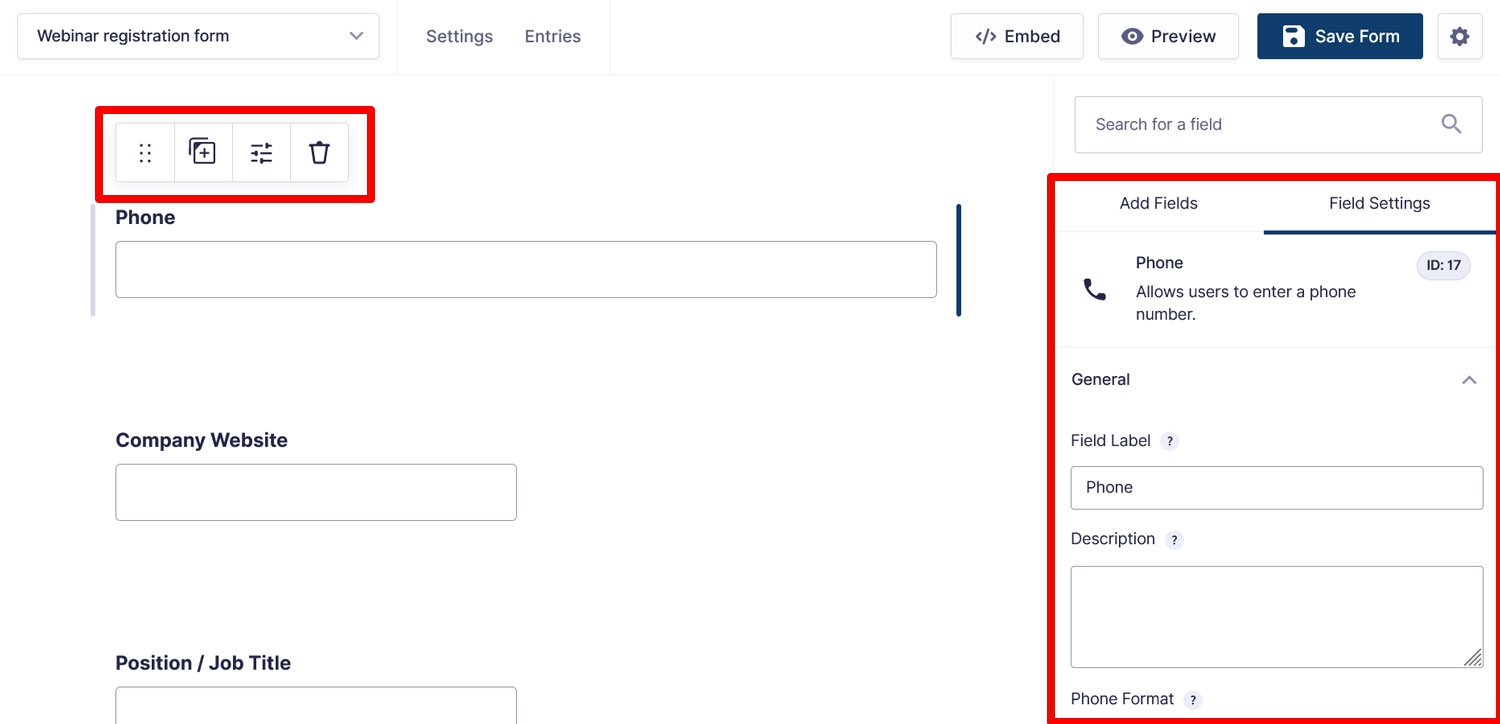
Additionally, you have the option to click on any existing fields to move, duplicate, and delete them via the upper toolbar or completely adjust their options in the right sidebar.
Once satisfied, be sure to save your form.
6. Start Building Your Zapier Automation
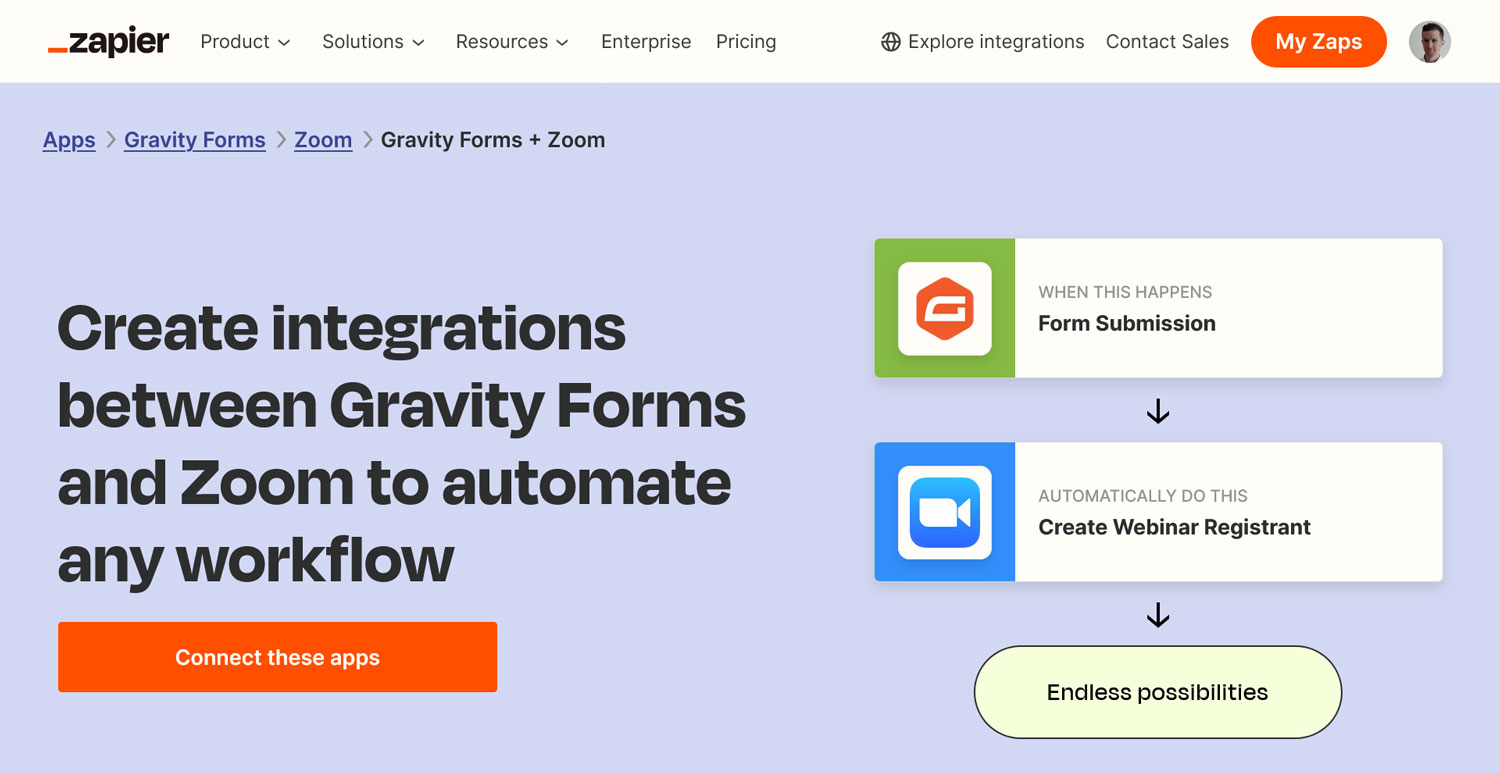
With your form ready, it’s time to turn to Zapier. You can configure your automation or Zap from scratch or use an existing one. You can find all pre-built Zaps on Zapier’s Gravity Forms Zoom integrations page.
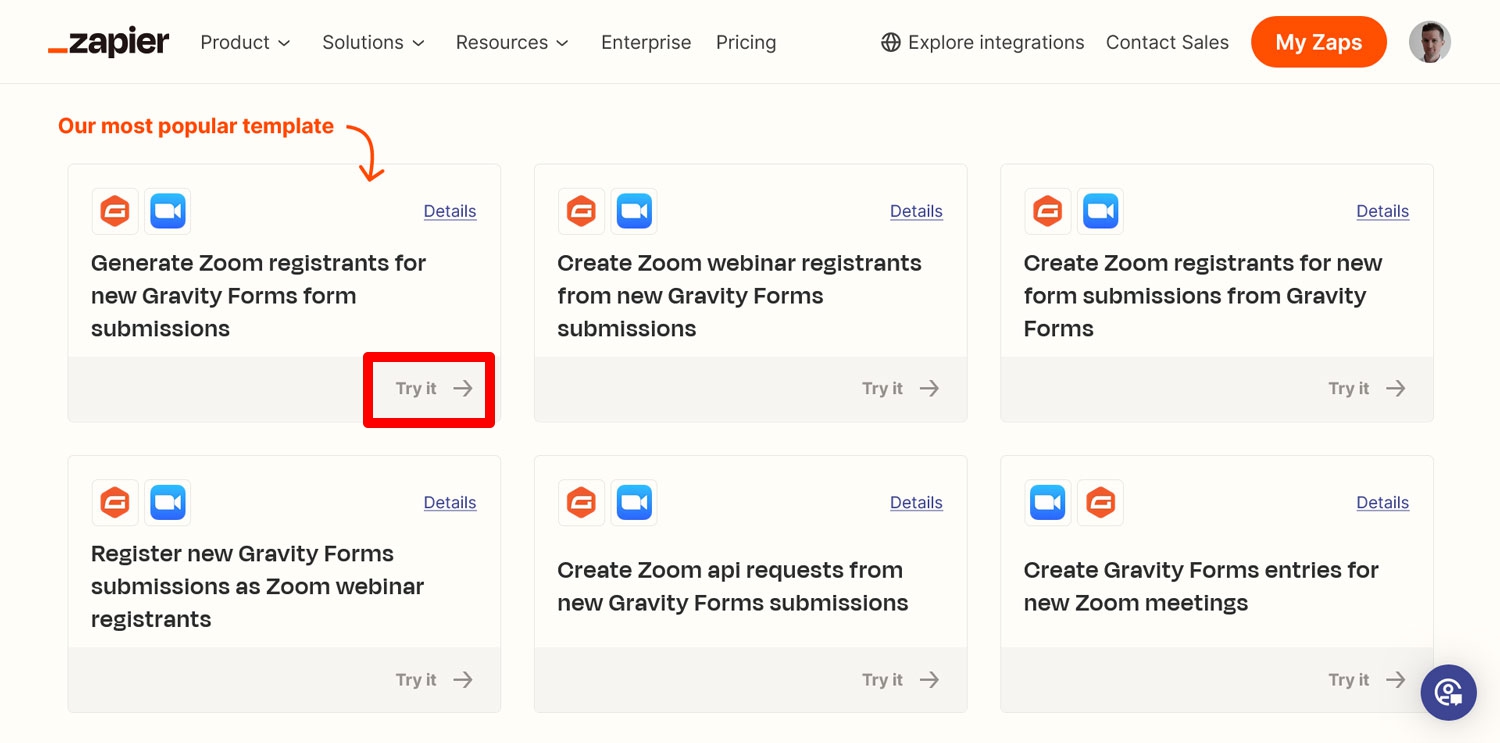
Zaps work with triggers and actions. In our case, we want the trigger to be a form submission, and the action to be creating a registrant for a Zoom meeting. It’s the most popular zap for this combination, too. Click on Try it to start.
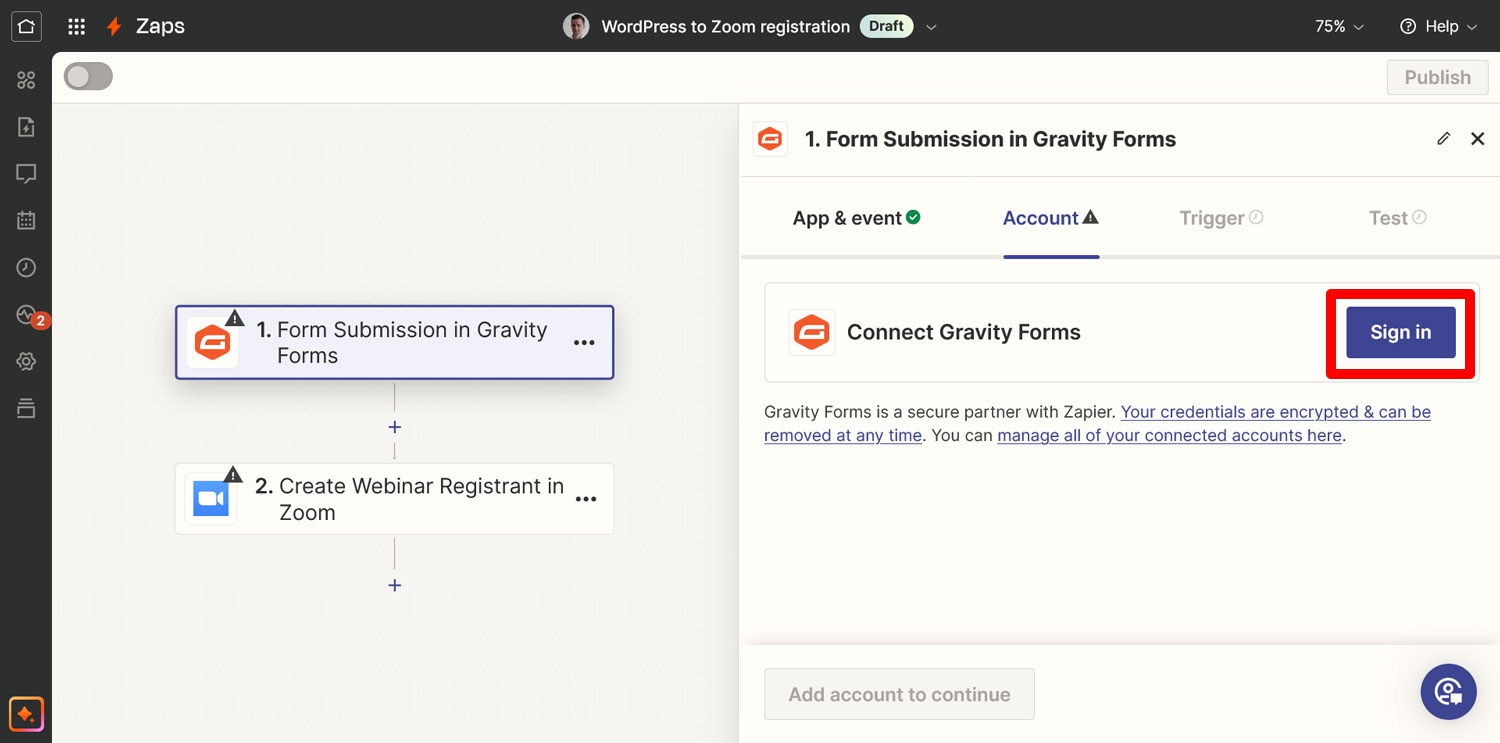
On the screen that follows, first name your Zap at the top. After that, click Sign in for your Gravity Forms trigger.
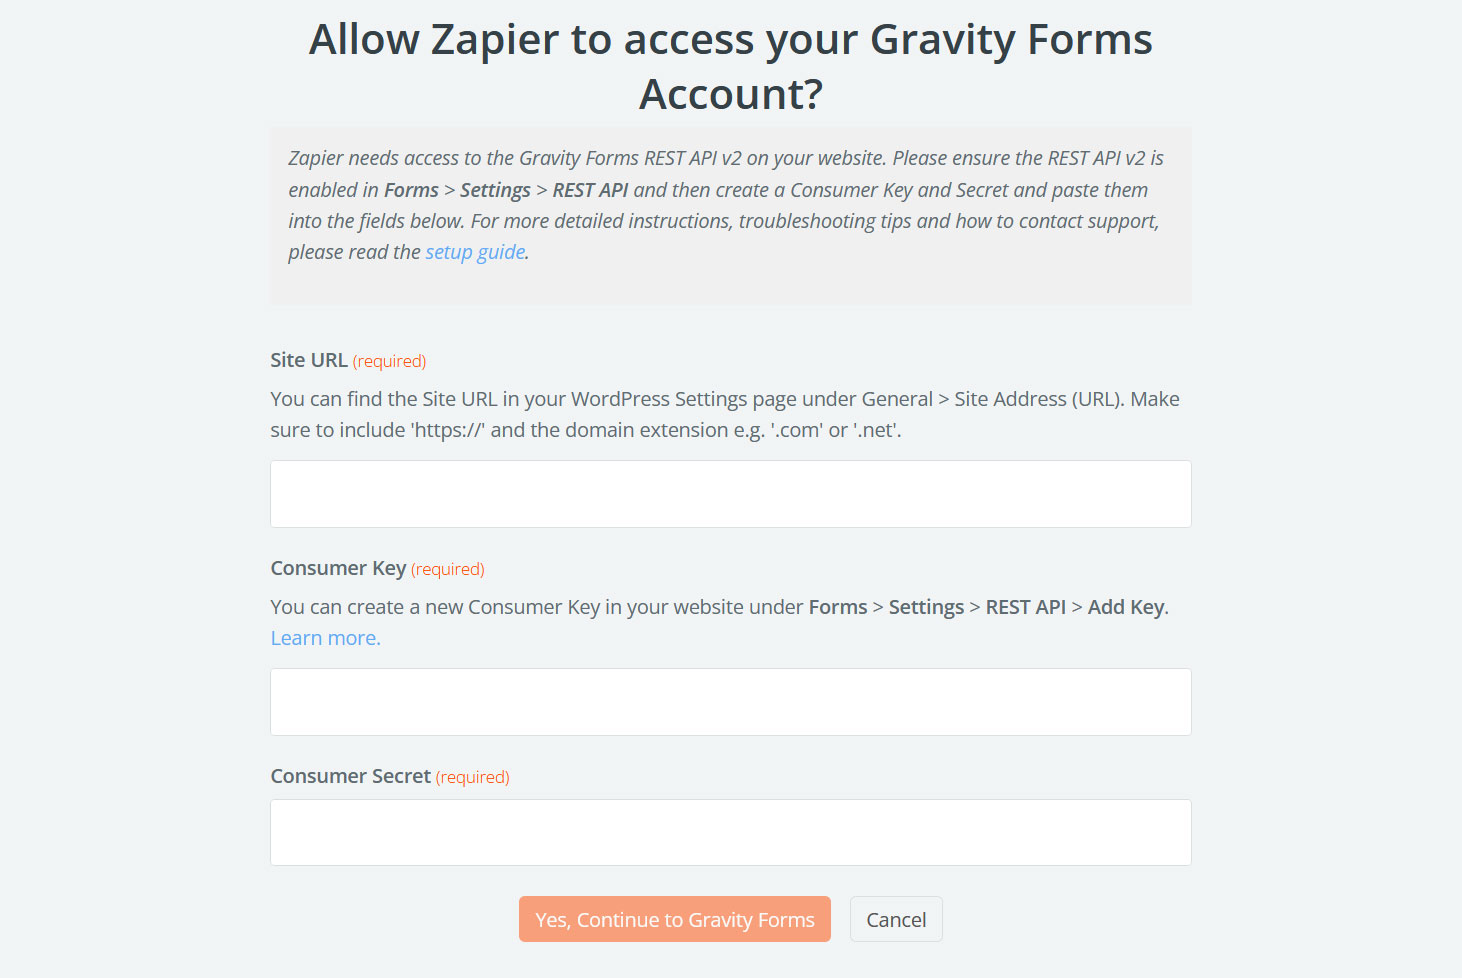
A form will appear in a new window asking you to enter your site URL as well as the Consumer Key and Consumer Secret you created earlier.
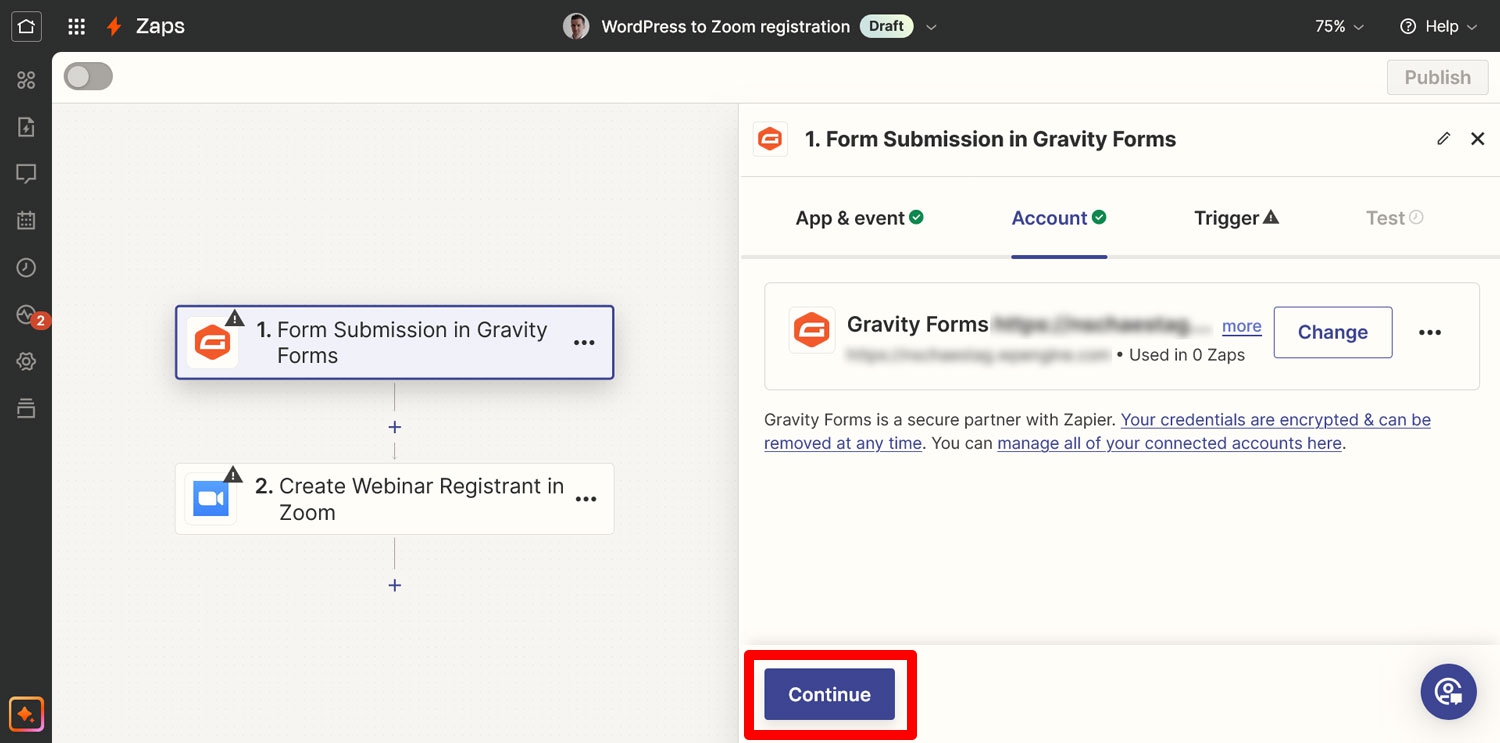
Do so, click Yes, Continue to Gravity Forms. You should see that the connection has been established in the Zapier interface afterwards and can click Continue to move on.
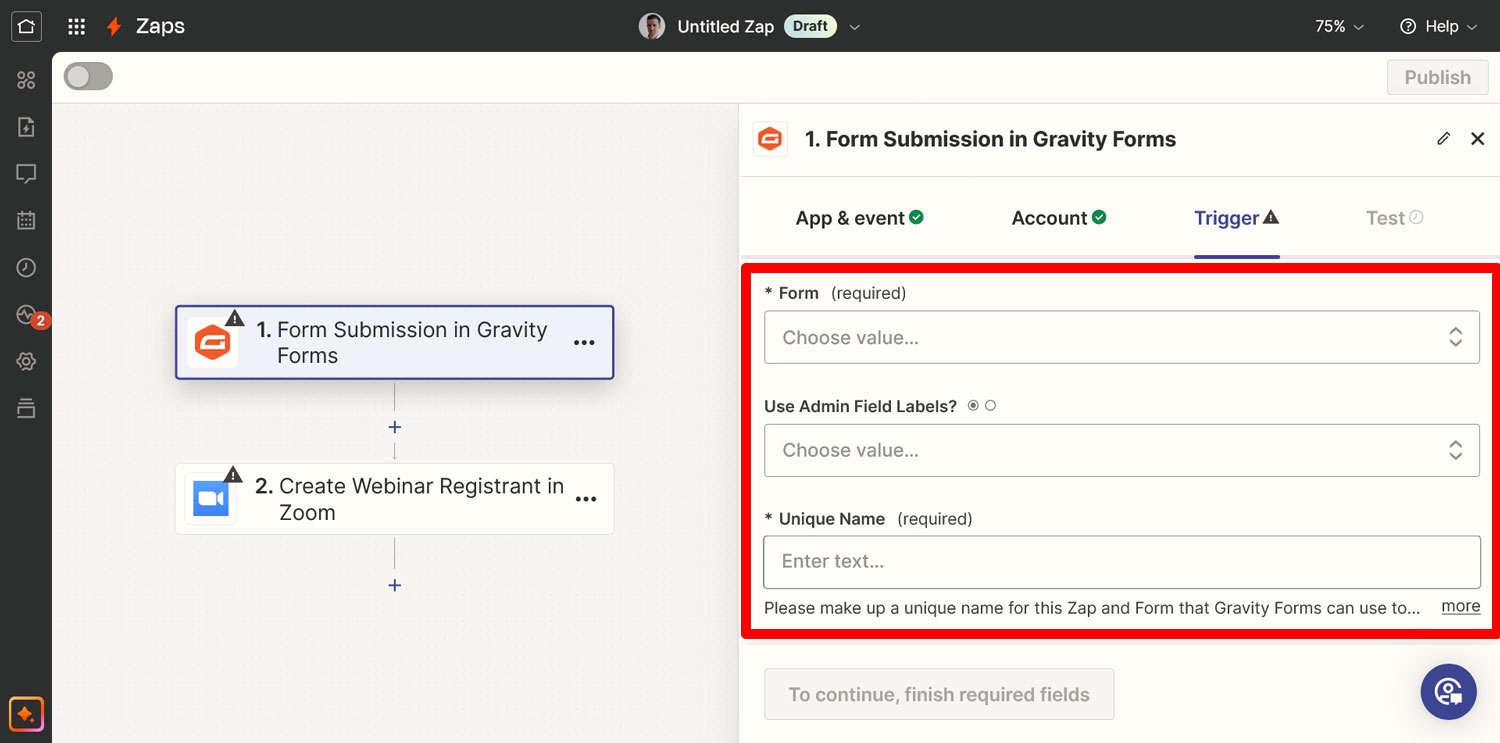
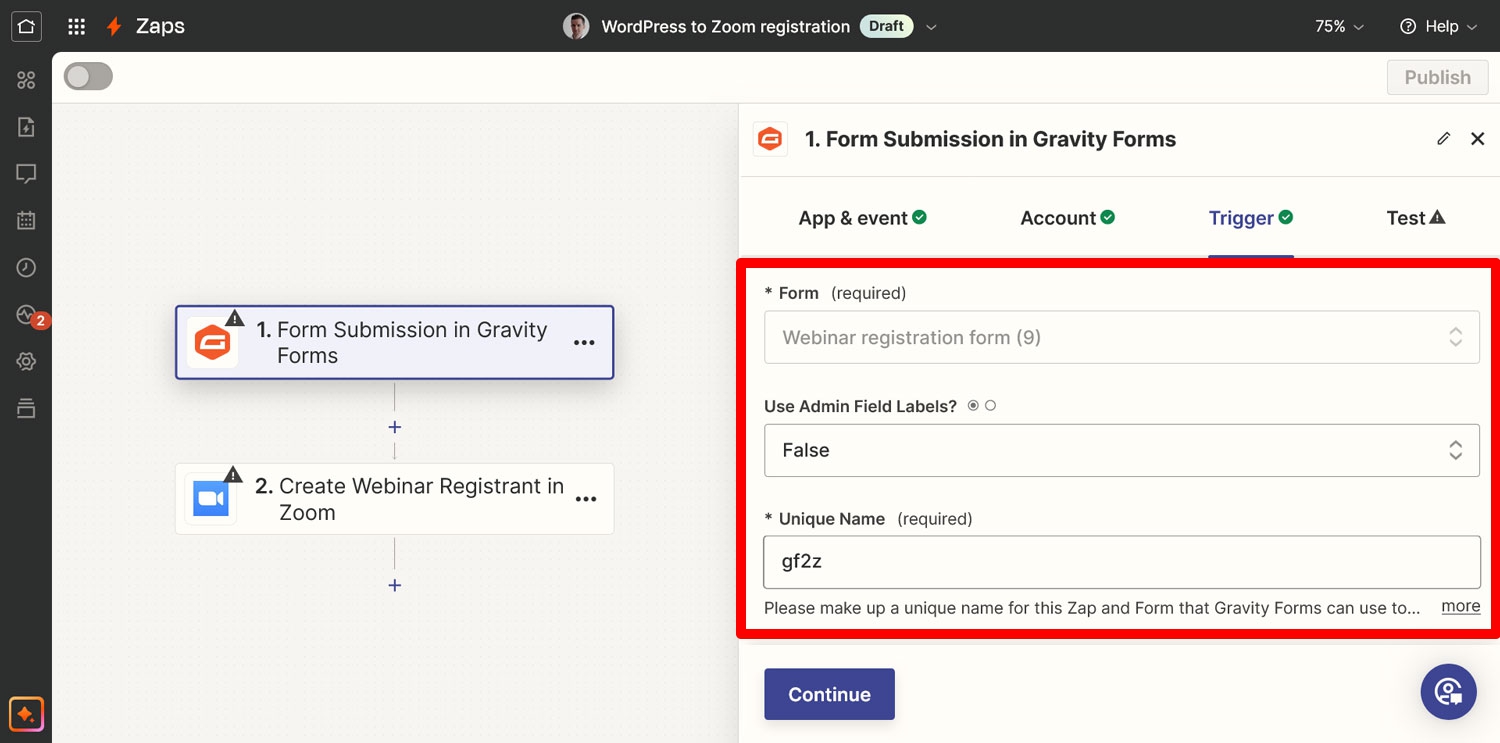
Next, you’ll see three drop-down menus.
Use the topmost one to choose the form you want to use as your trigger. In our example, that’s the Webinar Registration Form we created earlier.
Use Admin Field Labels? is only important if you added Admin Labels. In most cases, you can set it to False.
Under Unique Name you need to enter a descriptor for this Zap and form. It needs to be one of a kind to work properly. Below you can see the setup we used for this tutorial.
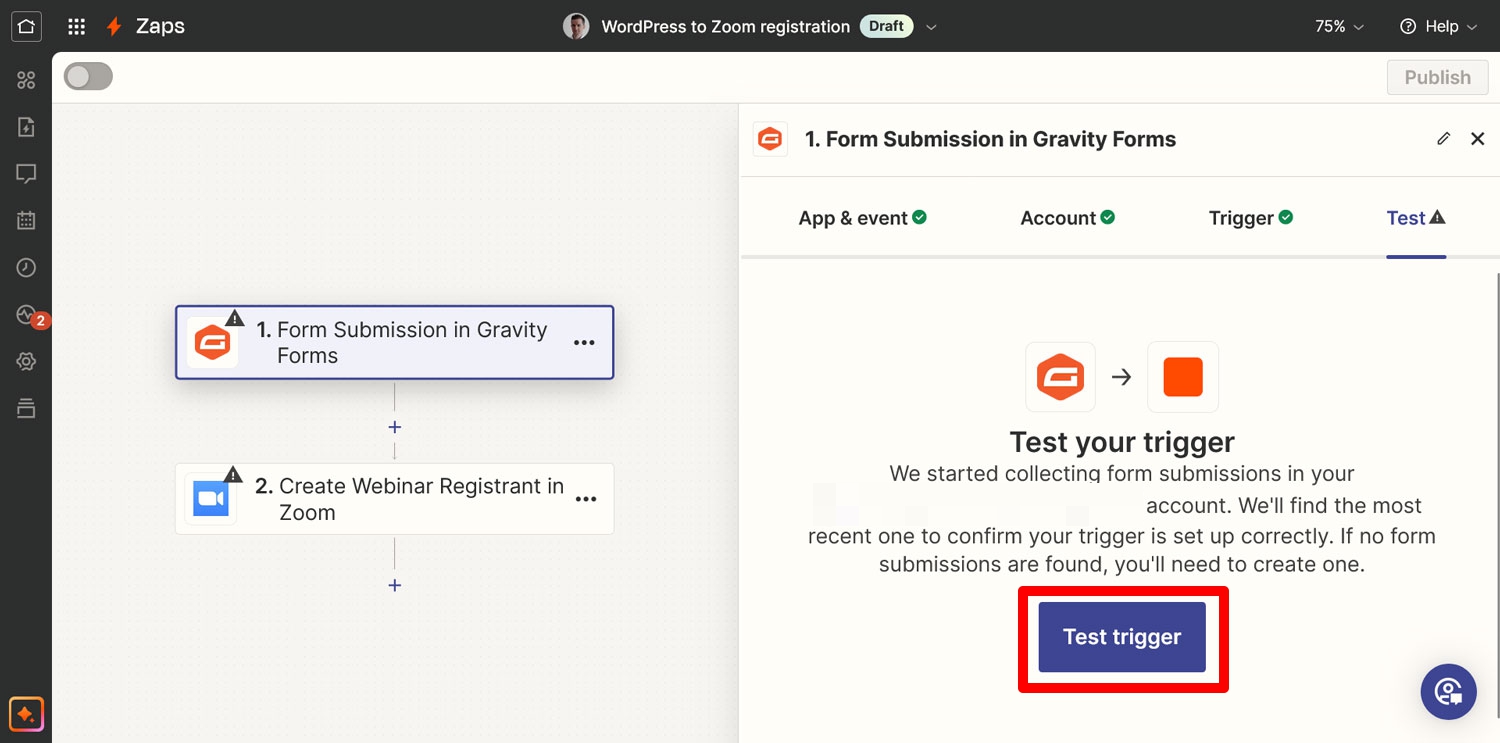
Click Continue again when you are done, then click Test Trigger in the next screen to have Zapier try and load example data from Gravity Forms.
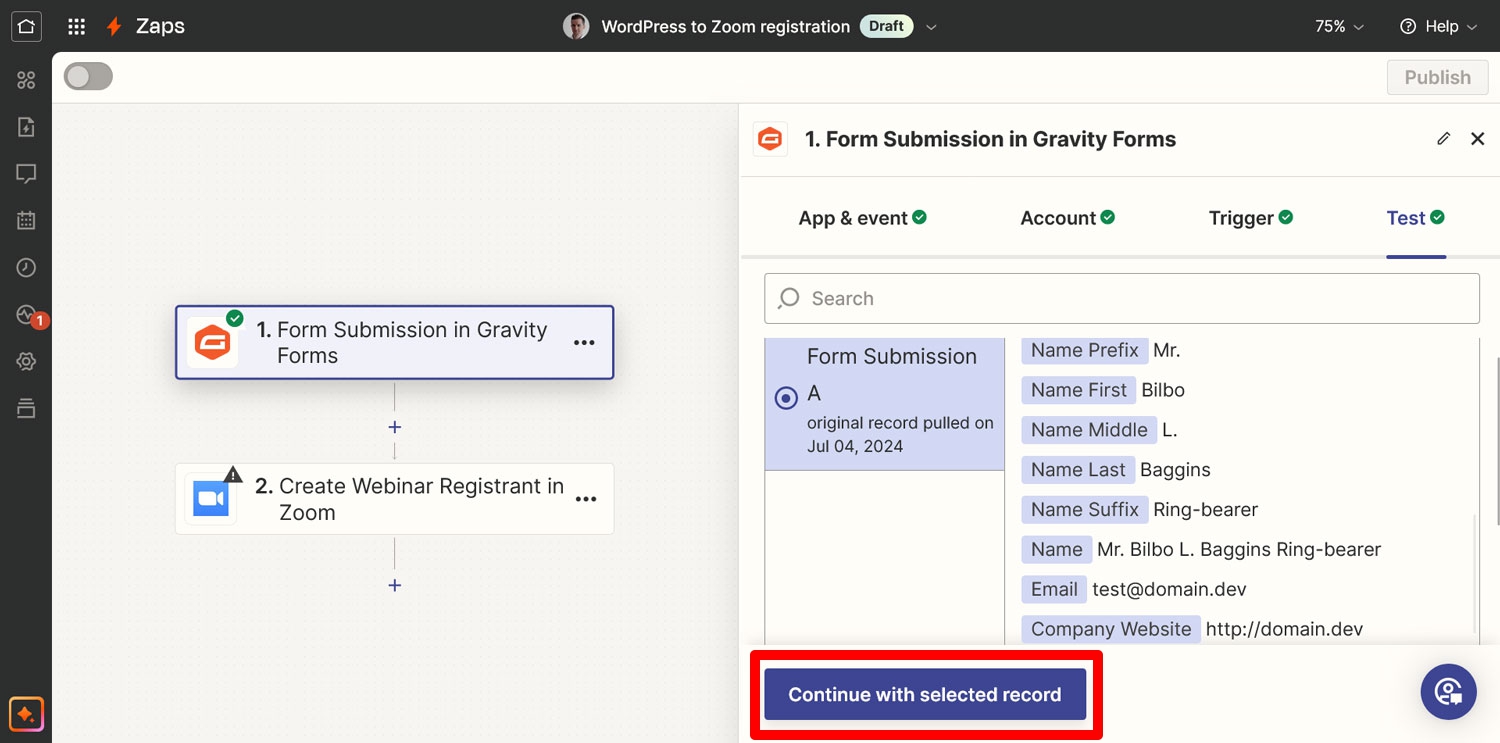
If all went well, choose to Continue with selected record.
7. Connect Your Zap to Zoom
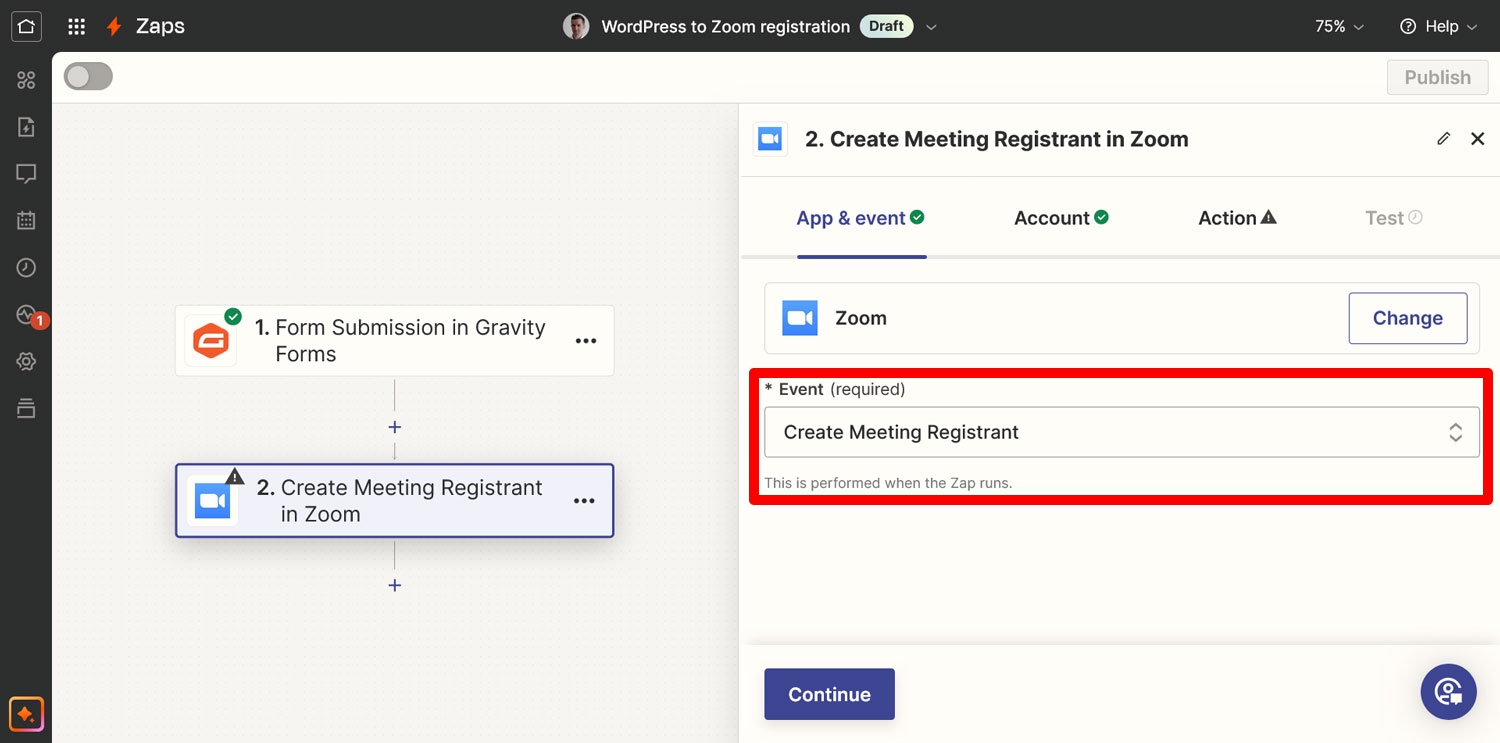
Next up, Zapier will need to connect with Zoom. In the first screen, check that the right event has been selected. There is a difference between registering people for a Zoom meeting or a webinar, including the Zoom plan you need.
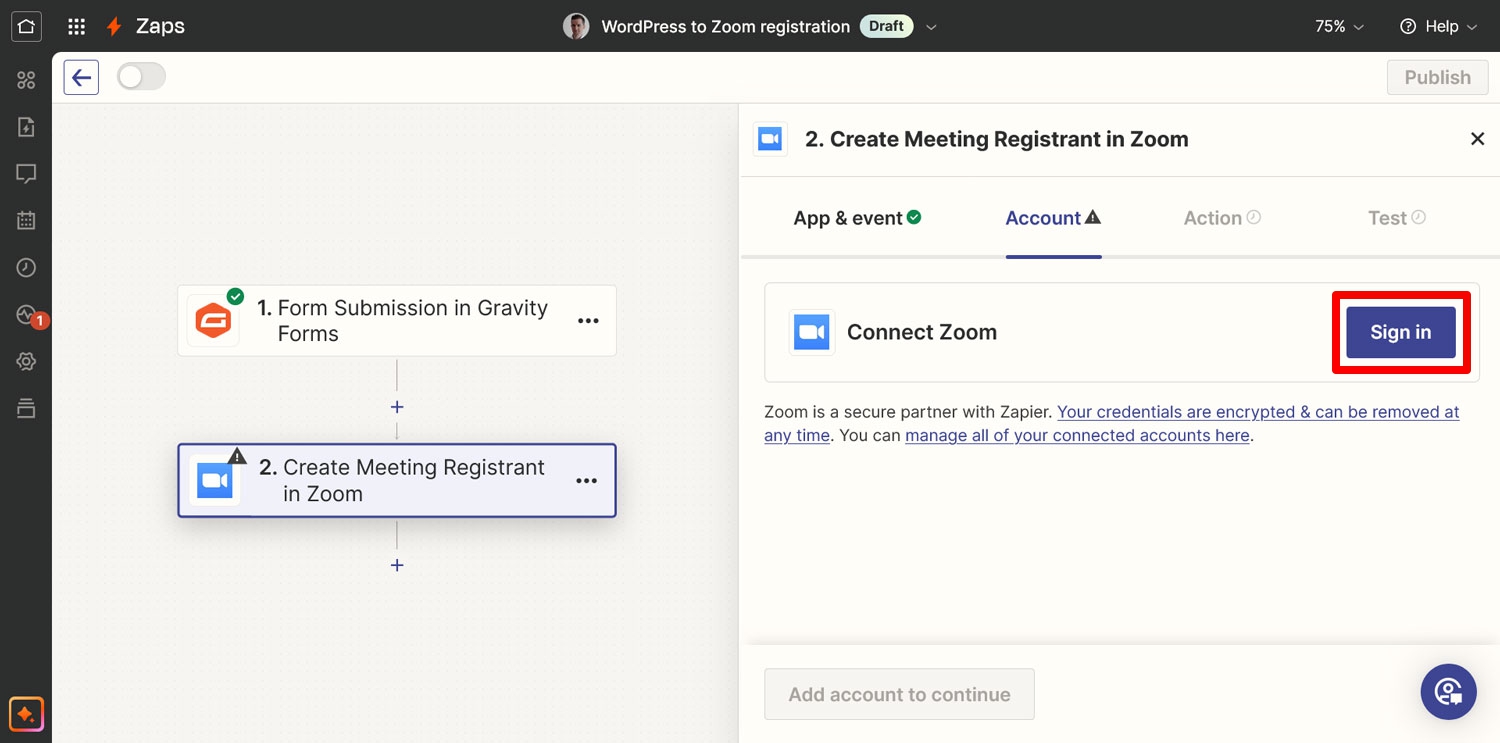
Then under Account, you need to establish a connection to Zoom. Here, too, the first step is to click the Sign in button.
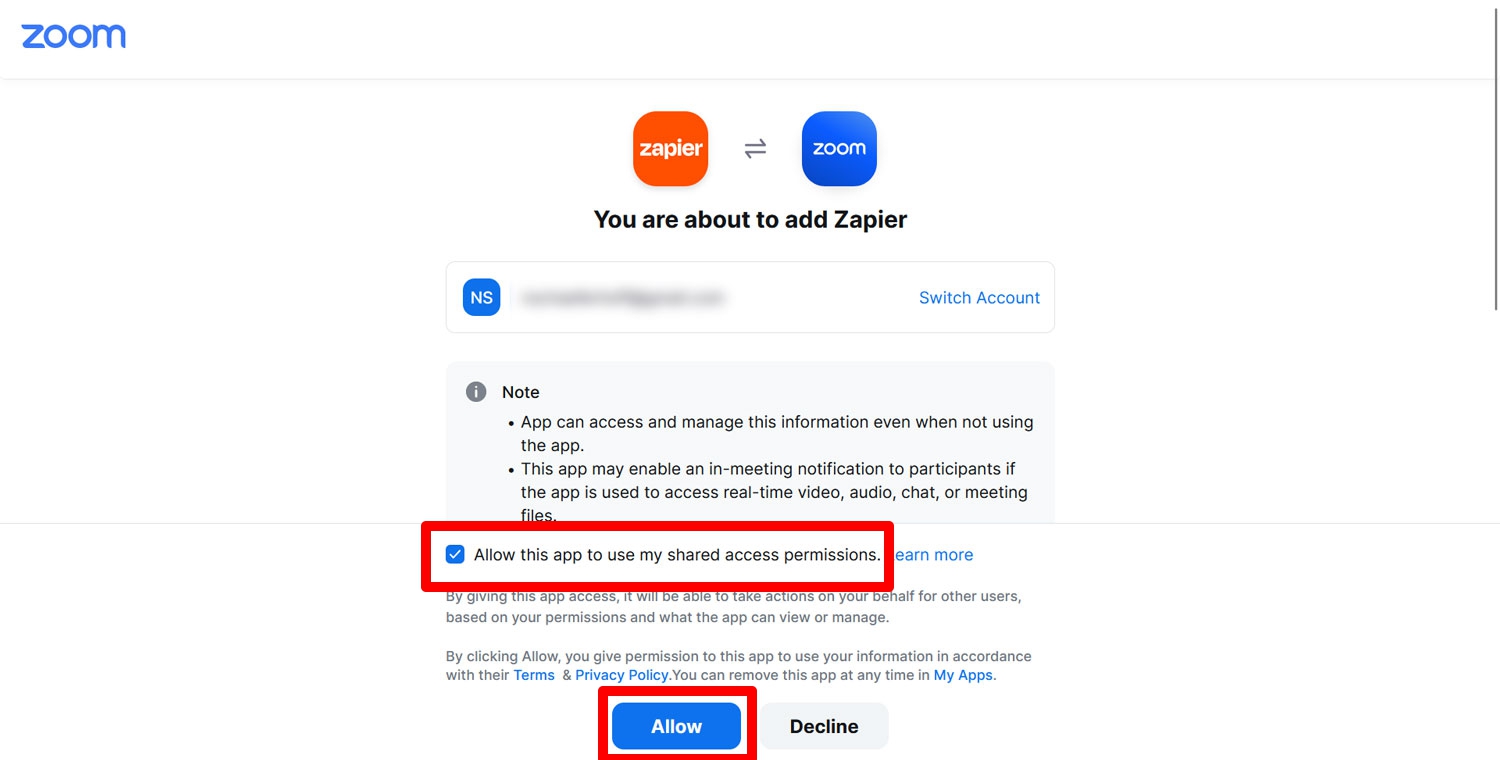
If you are already logged into your Zoom account, a new window opens and lists the permissions you will grant Zapier. All you need to do is check the box where it says Allow this app to use my shared access permissions and click Allow.
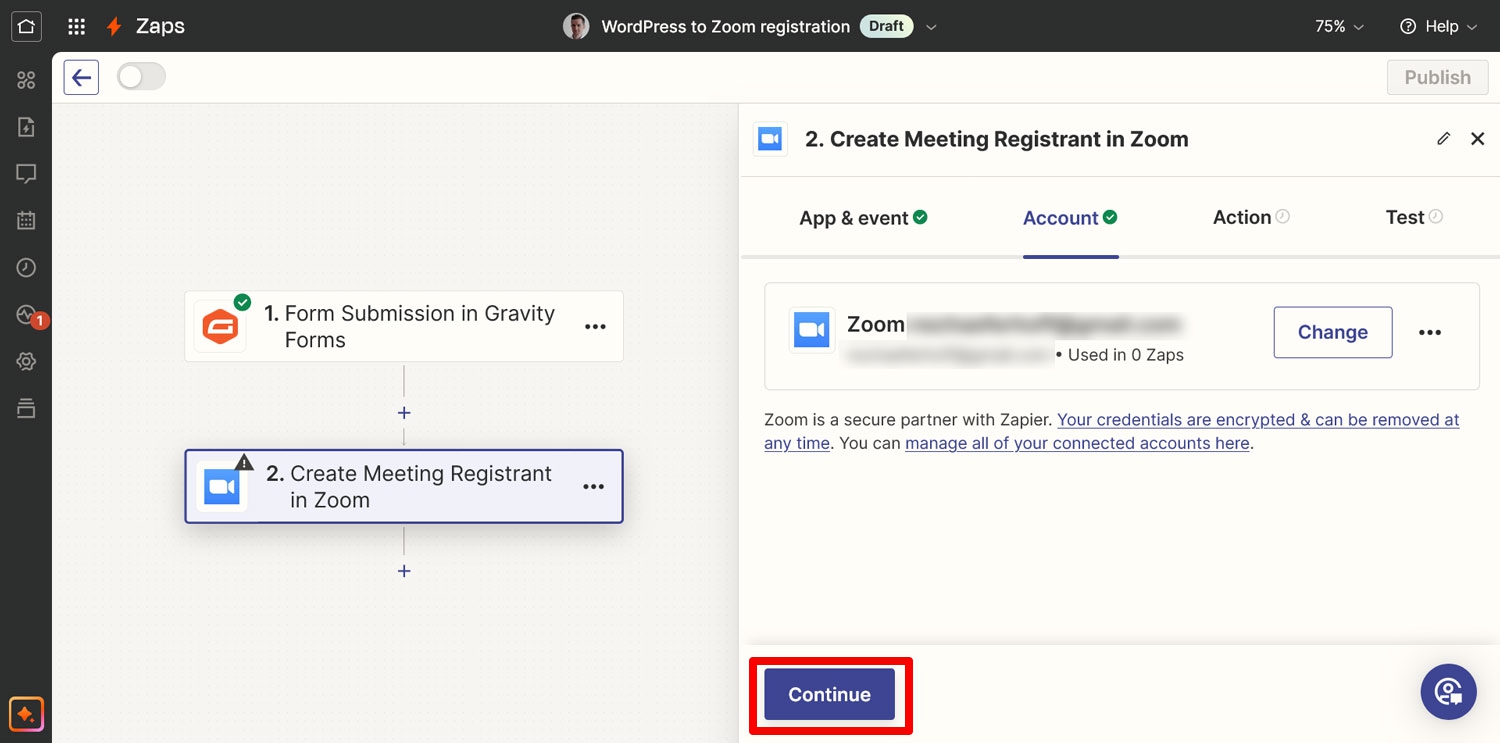
Once back on the Zapier interface, Continue again.
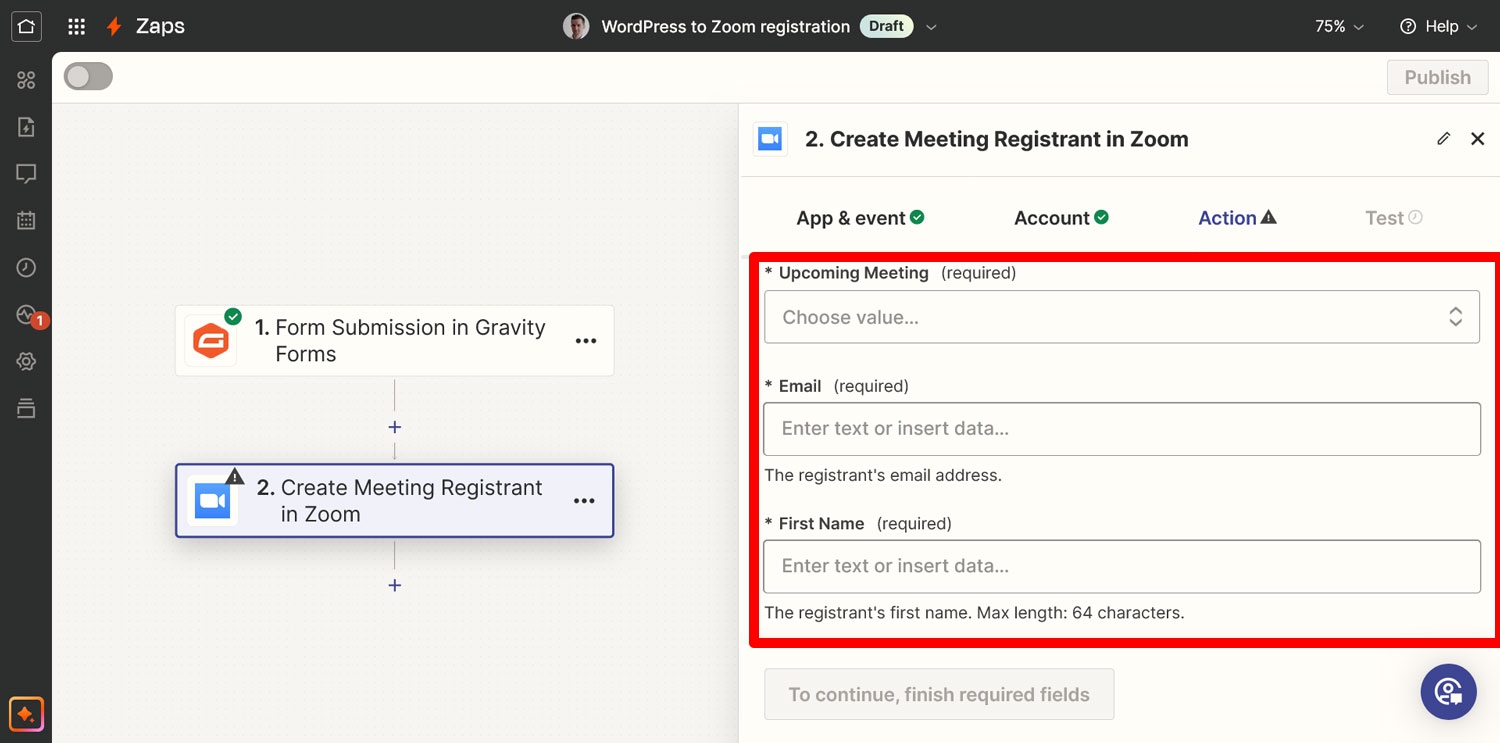
Now it’s time to ensure Zapier passes the correct information from Gravity Forms to the right location in Zoom. Again, you’ll find a number of drop-down menus.
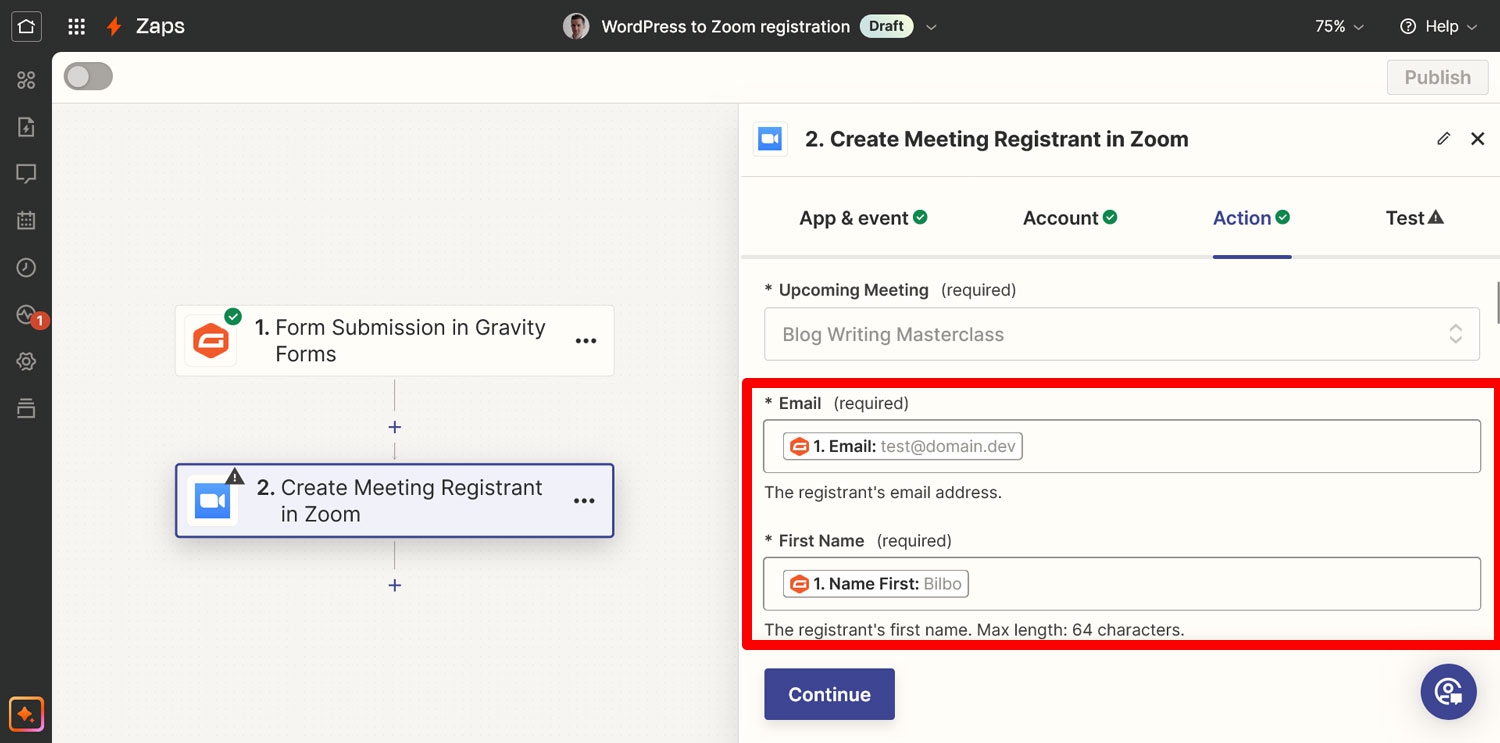
First pick the meeting that you want people to be able to register for from the Upcoming Meeting menu.
Then, fill in Email and First Name with the data from Gravity Forms. Simply click into each field and choose the respective example information.
If it’s relevant to you, you can also choose to pass on more data, like the registrant’s last name, address information, and a lot more. However, the first name and email address are the only ones required. Click Continue when you are done.
8. Test the Connection and Activate Your Automation
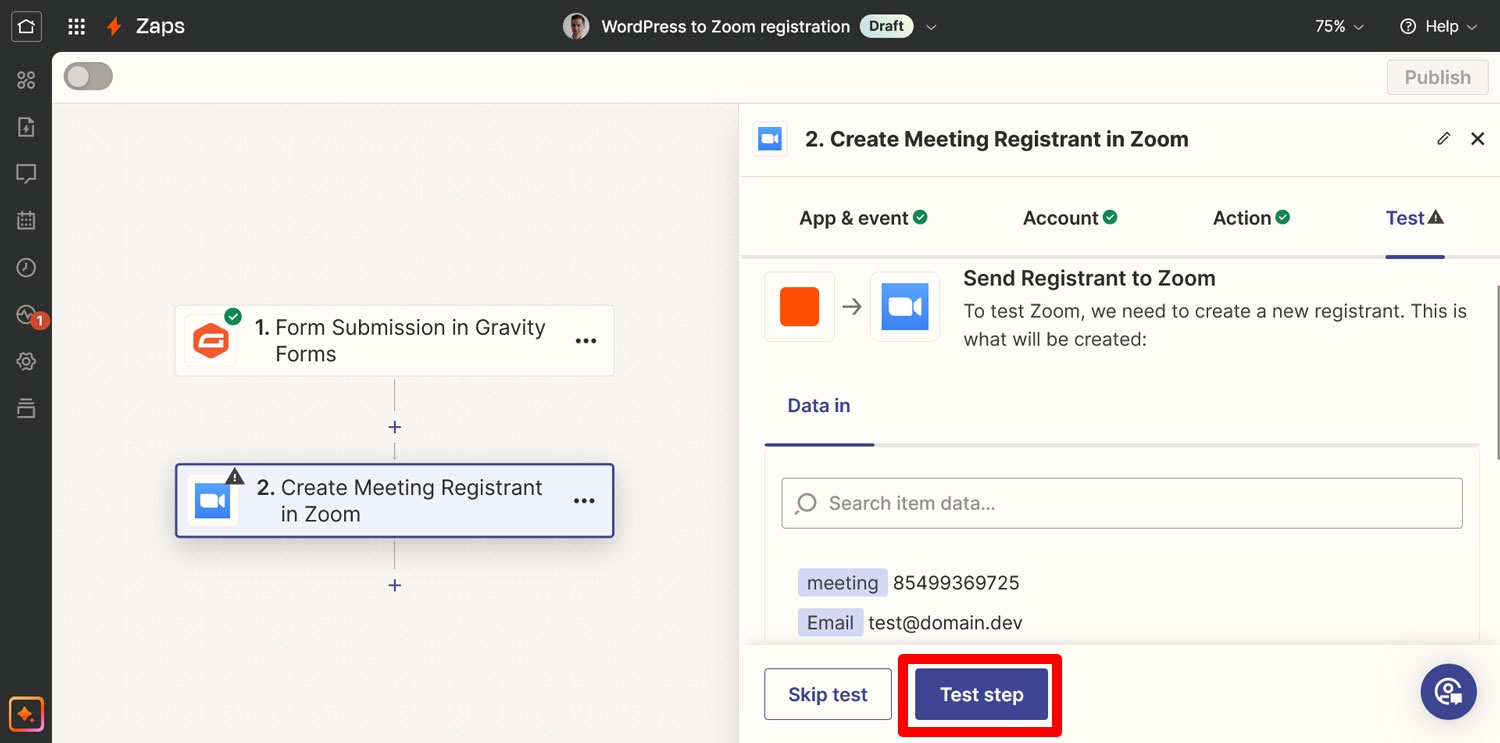
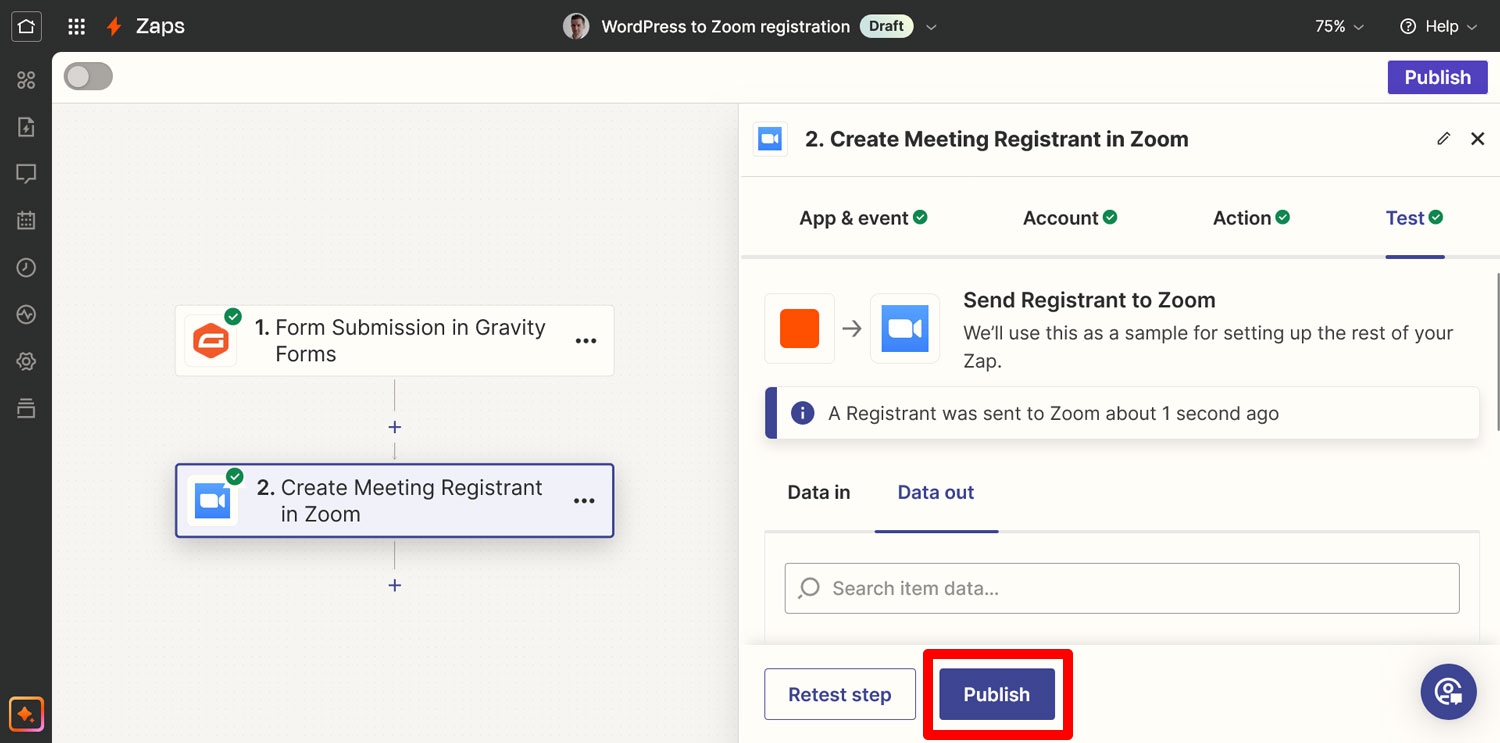
The last step happening inside Zapier is testing the connection and making your Zap active. For the first part, you should see a button that says Test step in the interface.
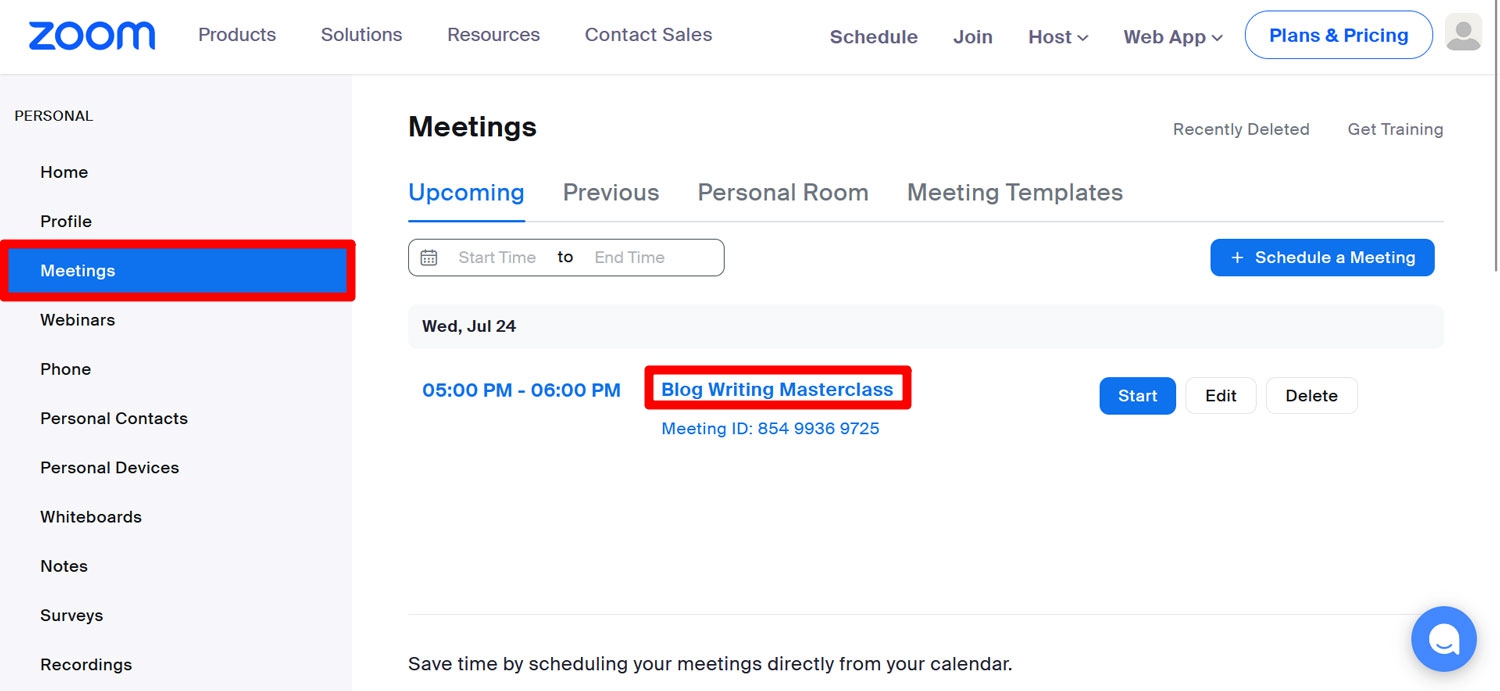
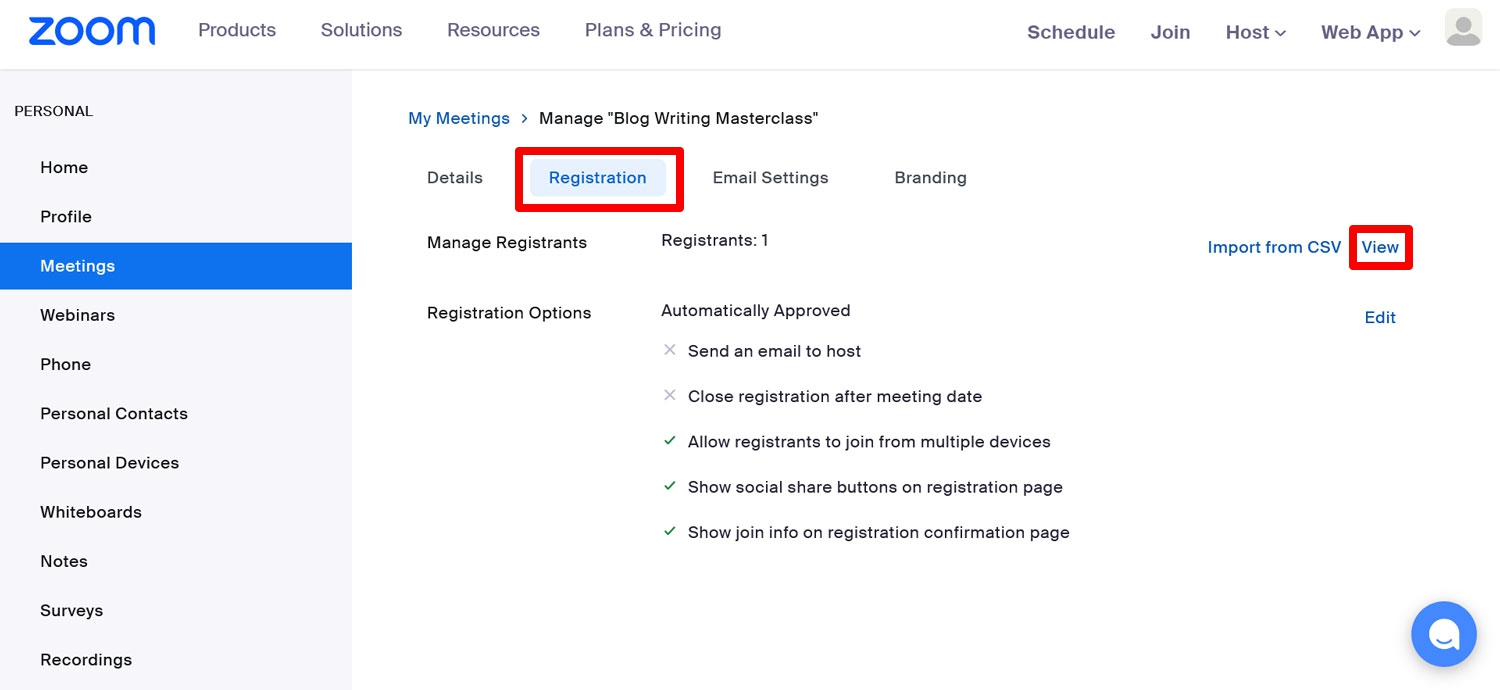
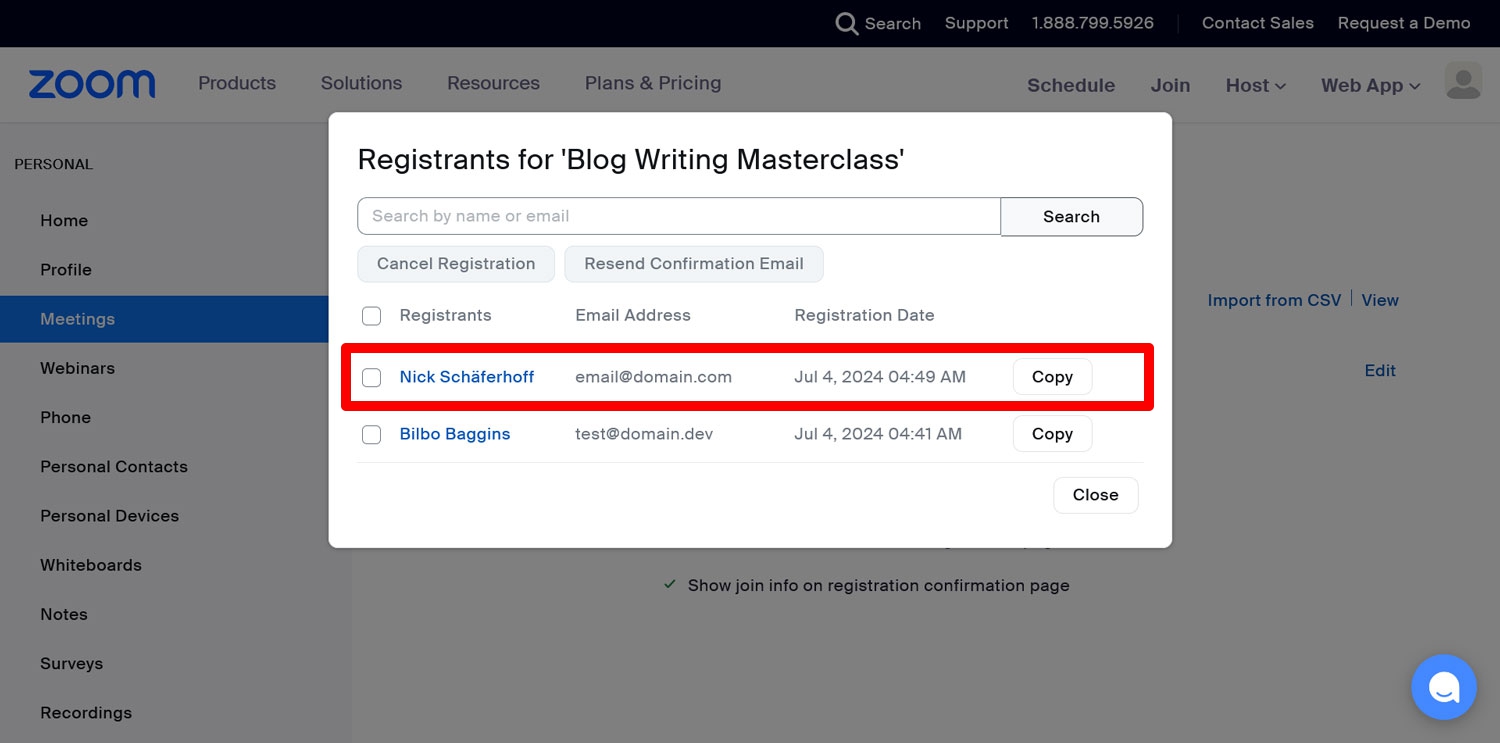
Click it and Zapier sends the Gravity Forms test data to Zoom. Then, go to Meetings in your Zoom dashboard, and click on the name of your meeting.
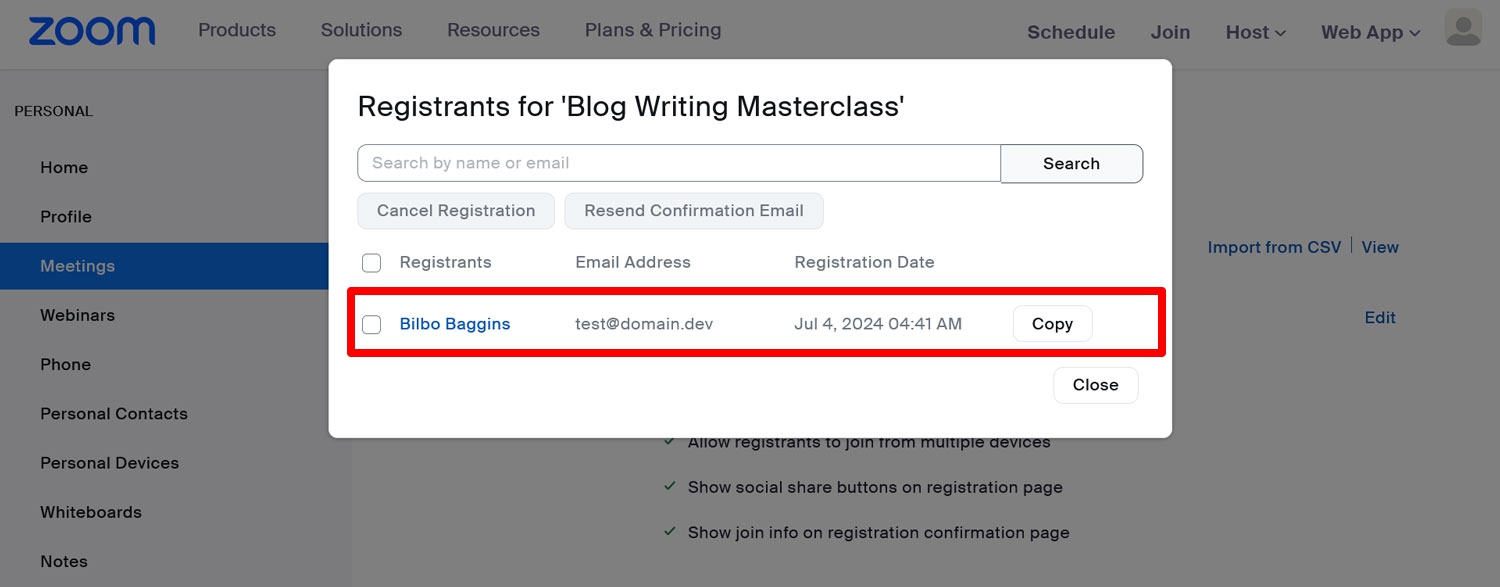
From here, go to the Registration tab and then View.
Check that the test user appears as a registrant.
If that’s the case, your last task is to click on Publish to make the Zap active.
9. Customize Form Confirmations and Notifications
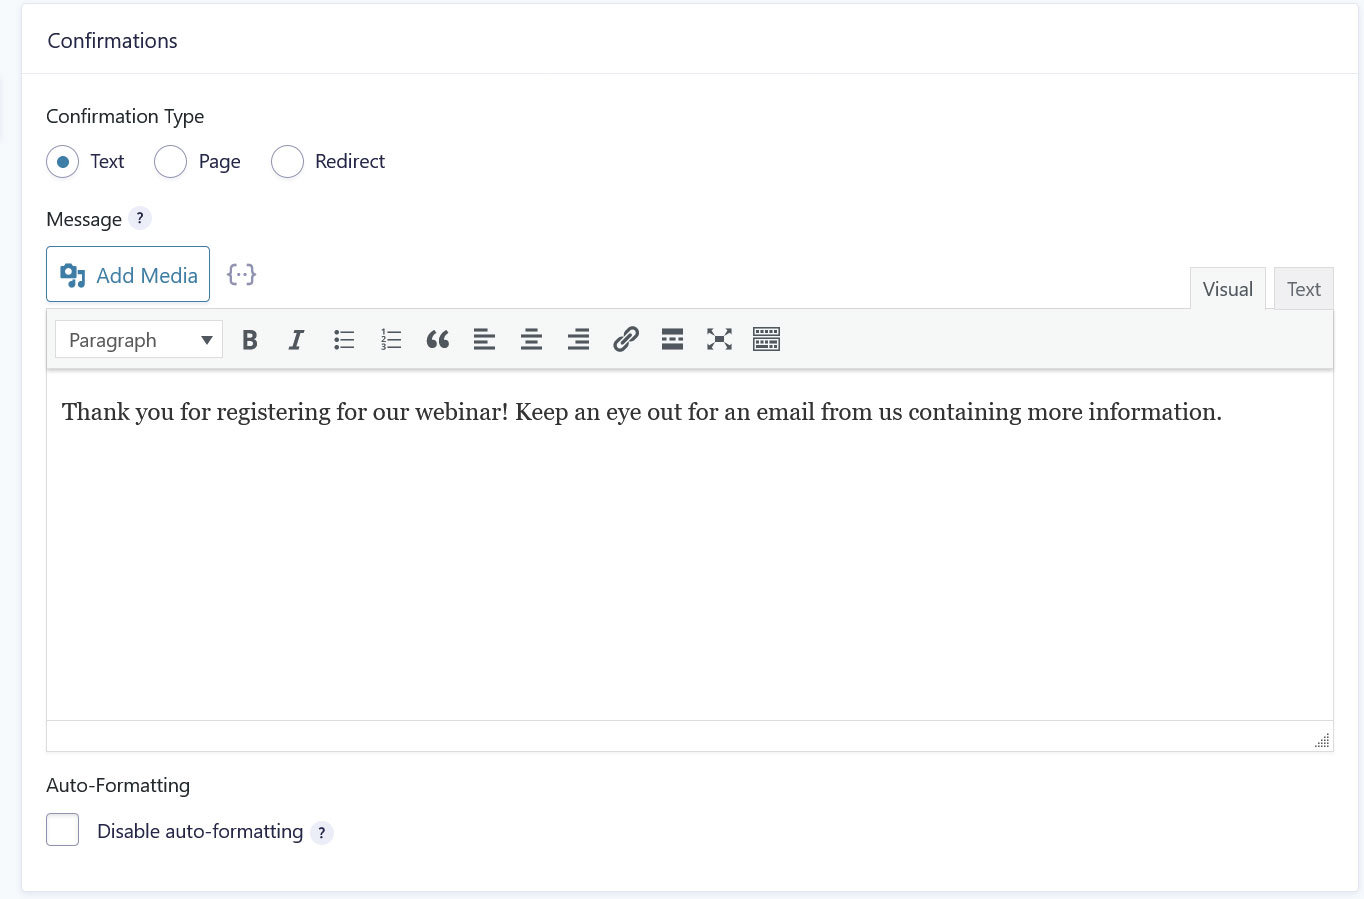
Before making your webinar registration form live, you might still want to look into some additional form configuration options. For one, there are Confirmations, which are messages that appear on your web pages after someone submits a form. They let visitors know that their submission was successful. You can also use them to provide additional information.
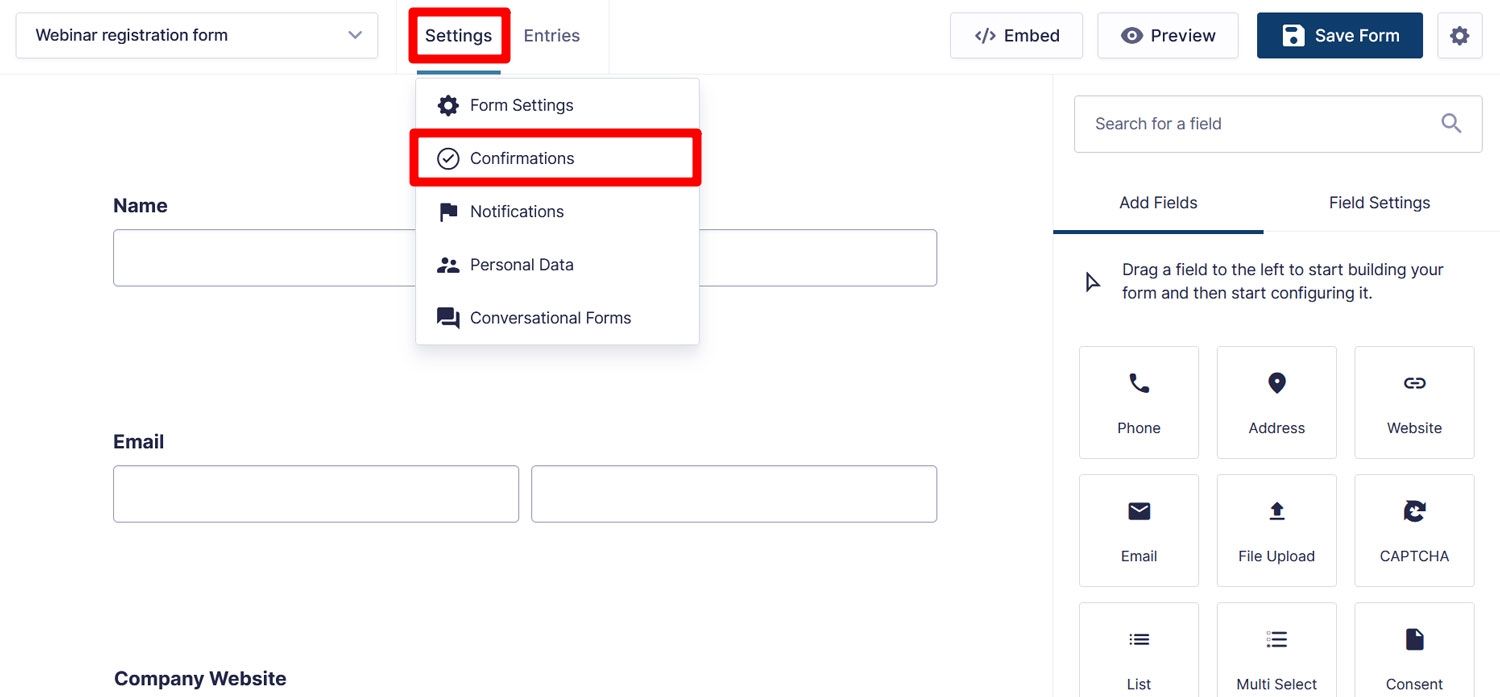
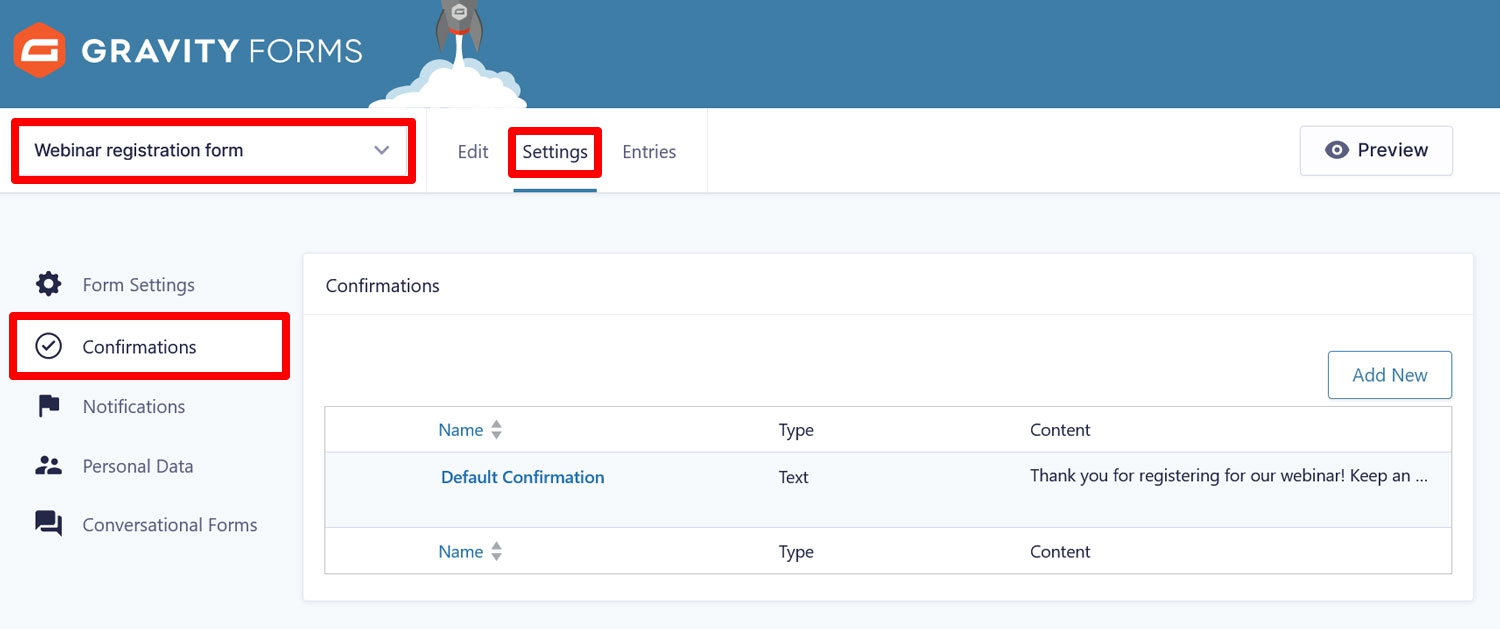
Confirmation messages are completely customizable and you find options for that in the form settings. Simply hover over Settings in the form editor and choose Confirmations.
Alternatively, go to the Forms menu, hover over your desired form in the list, then click on Settings → Confirmations from there.
You have the option to edit the default confirmation or create a new one. Gravity Forms gives you plenty of ways to customize it. You can even send form users on to a separate confirmation page.
Find more information on confirmations here.
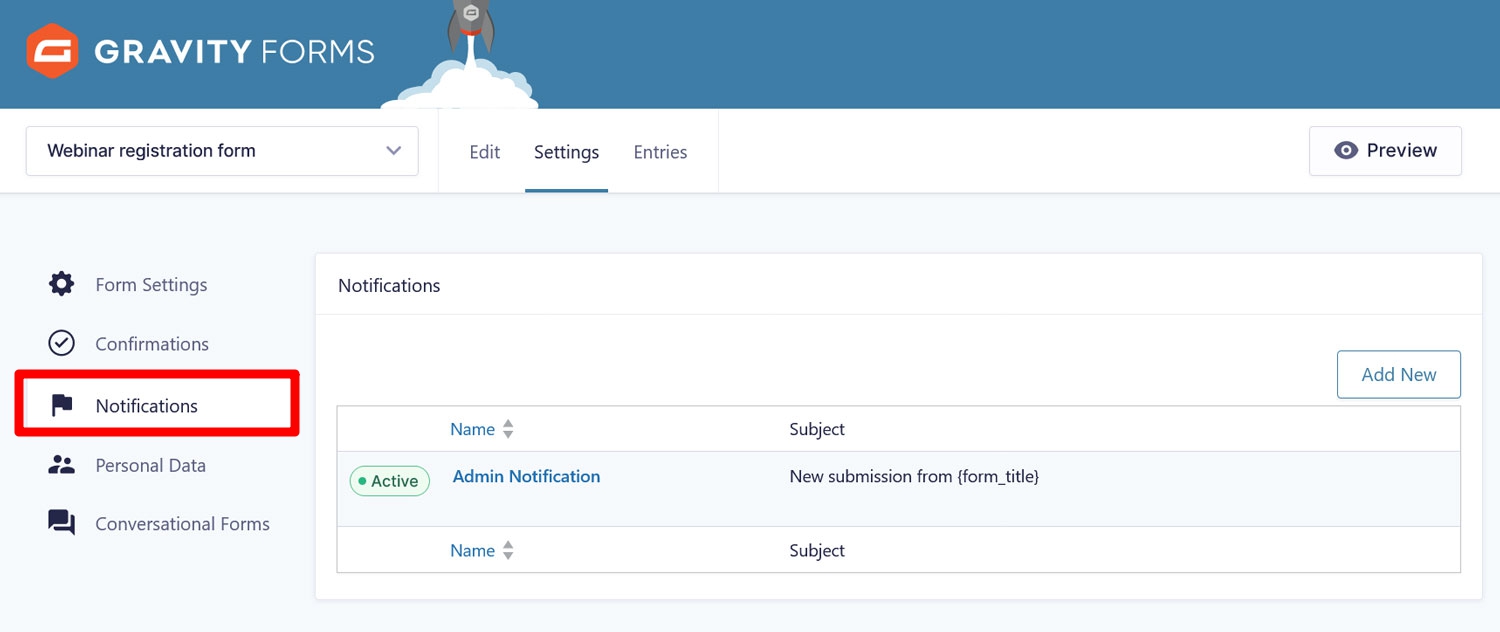
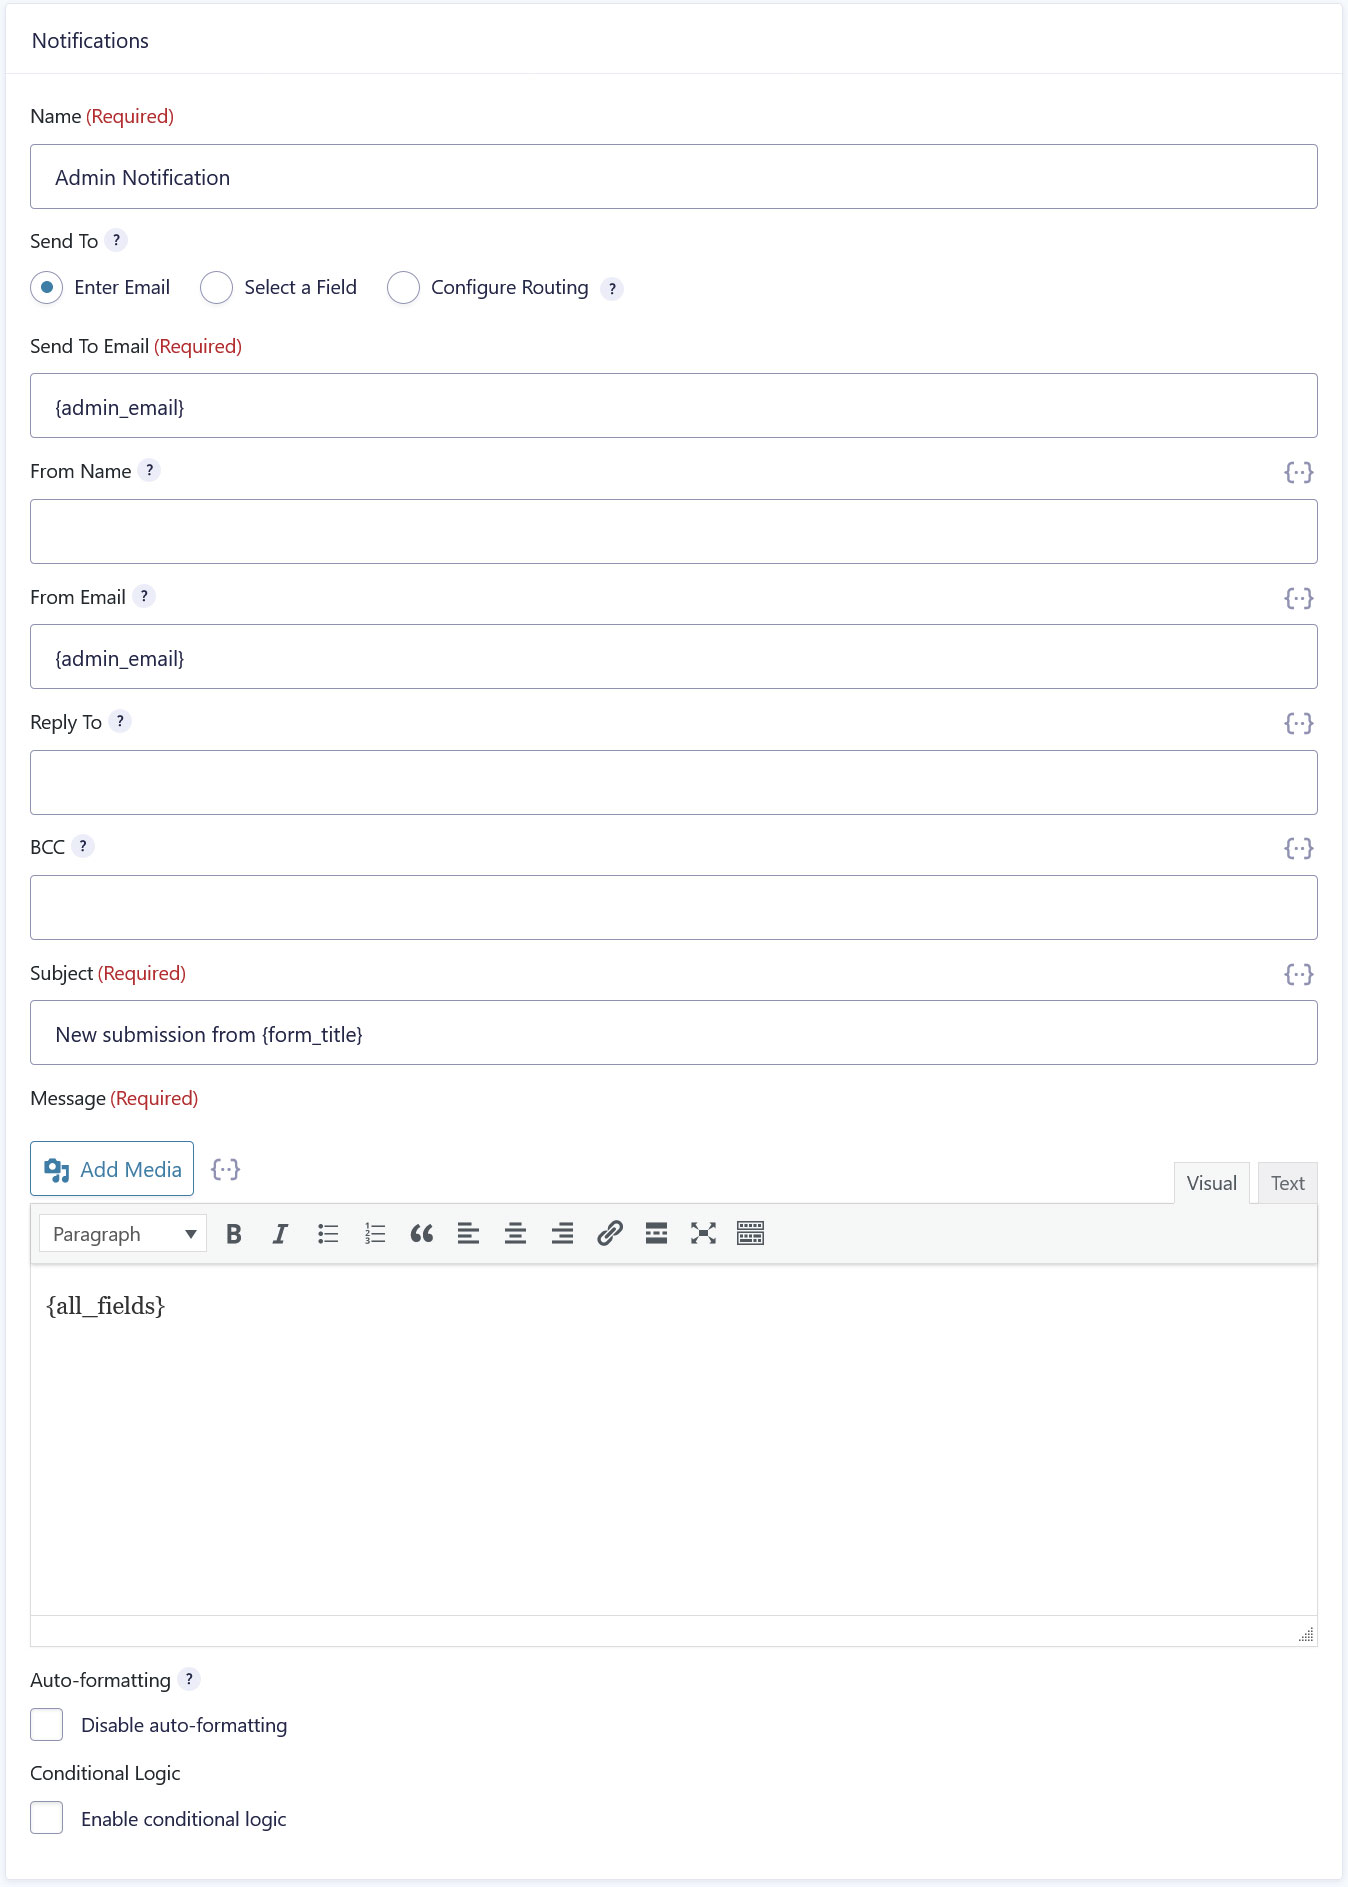
Notifications, on the other hand, are emails Gravity Forms sends to you and the people who submit your form. For a webinar registration they are quite useful to let users know they’ve been registered onto the webinar. You could, for example, send a notification with the link where they can join the Zoom meeting later.
The Notifications menu (also in the form settings) lets you access existing notification messages and create your own.
Similar to confirmation messages, you have many ways to customize your notifications.
Check out the documentation for more information.
10. Use Conditional Logic (Optional)
Finally, you have the option to use the aforementioned Conditional logic. This feature allows you to filter which form submissions go through to your webinar registration and which don’t.
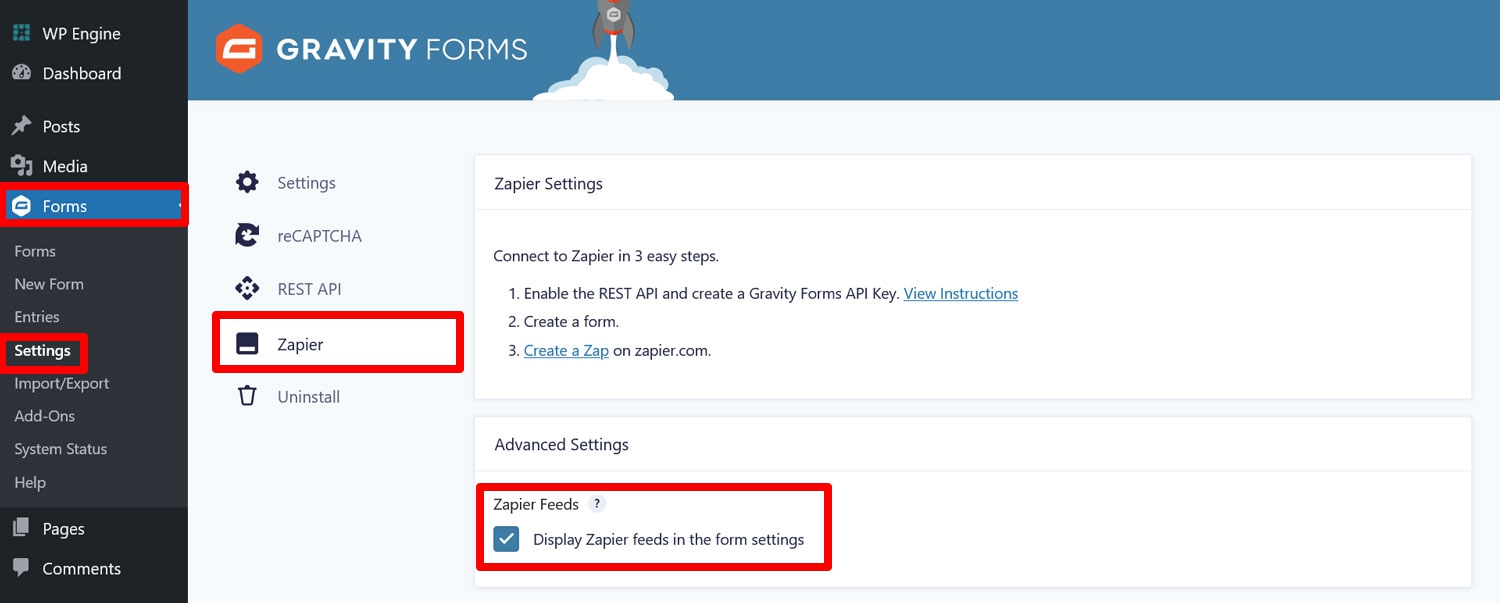
If you want to take advantage of it, your first step is Forms → Settings → Zapier. Here, check the box where it says Display Zapier feeds in the form settings.
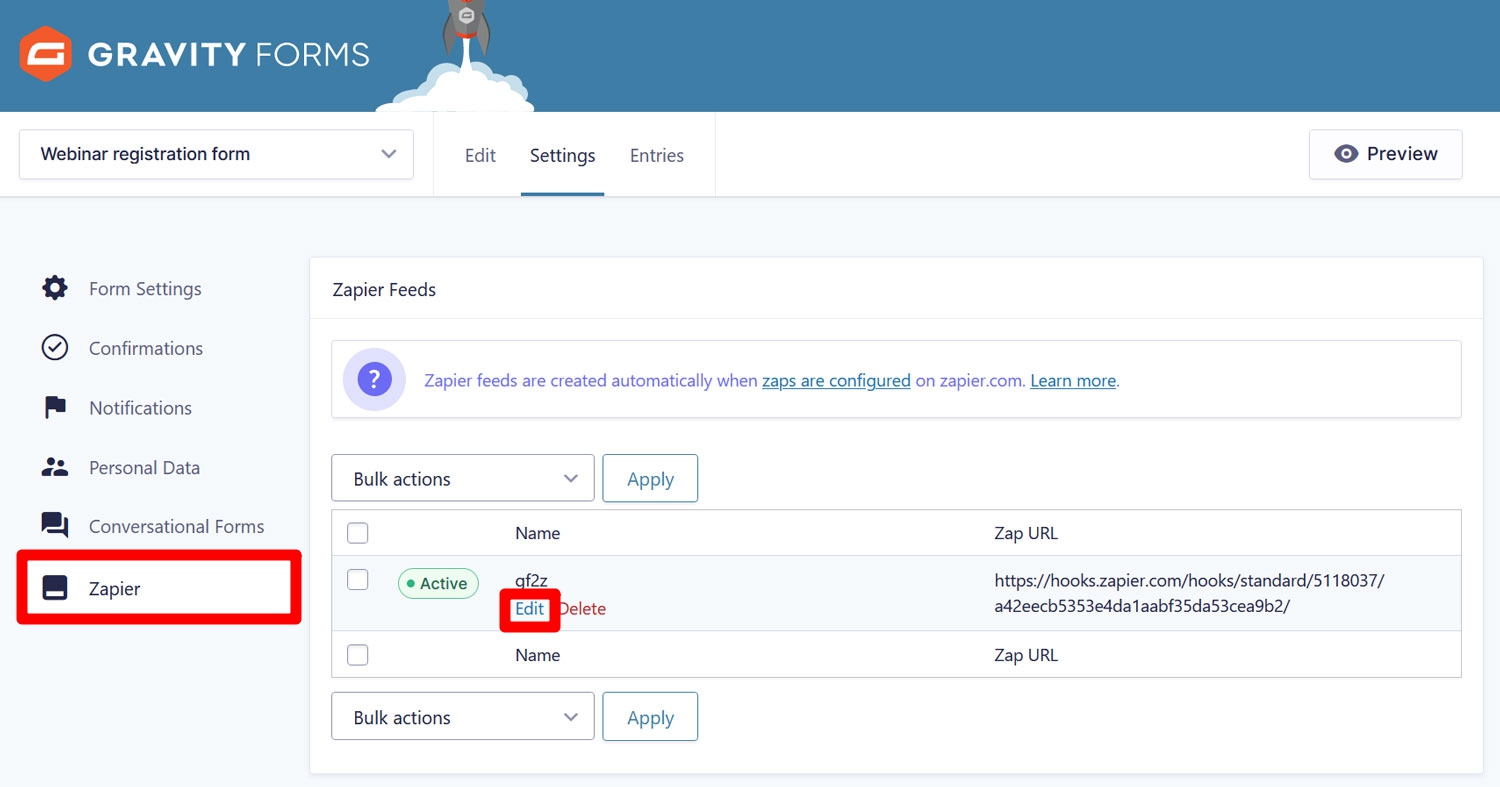
Now a new Zapier menu will become available in the form settings. It shows your Zapier feed, which controls what happens to form data after its submission. Usually, you create these manually, however, Zapier feeds are set up automatically. Hover over it and click Edit.
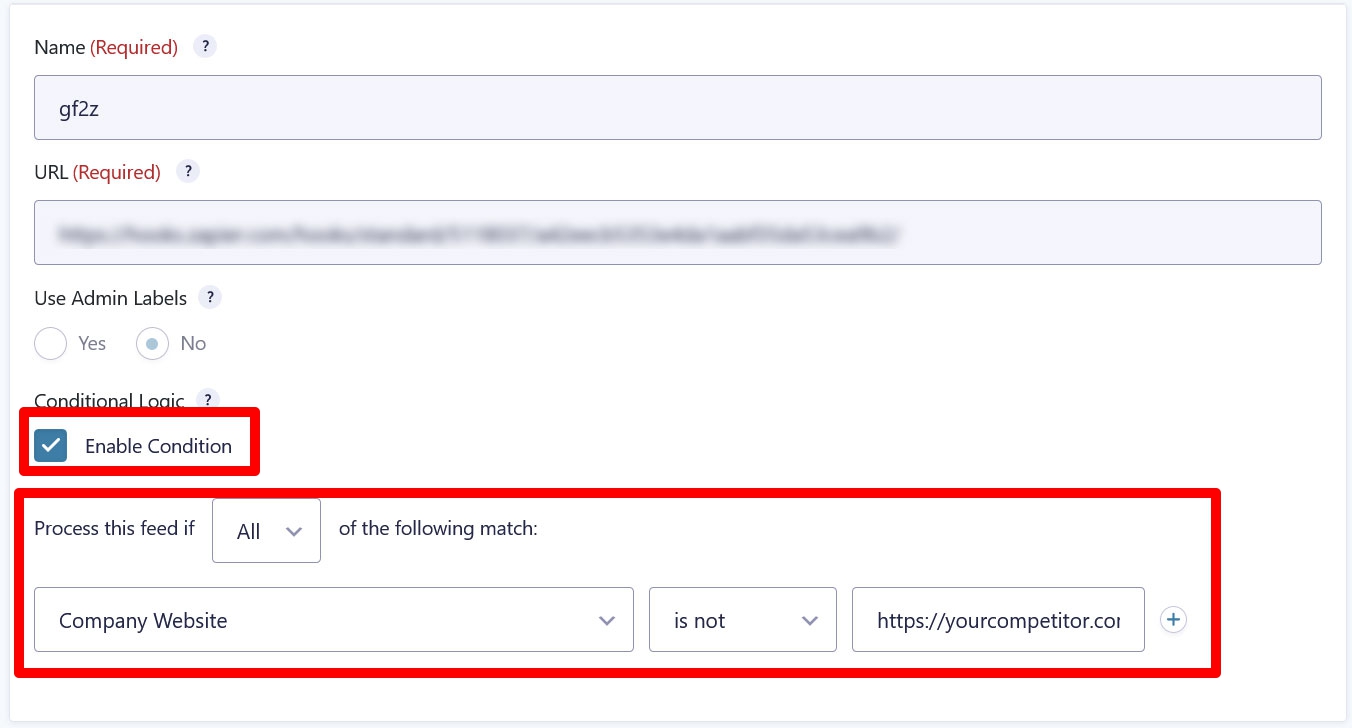
In the next screen, simply check the box next to Enable Condition. You can use the drop-down menus that appear to create your conditions. For example, you could use this option to exclude registrants who put your competitor’s web address as their website URL.
For more usage tips, again, check the documentation.
11. Embed Your Form on Your Site and Test It
At this point the only thing left to do is embed your form and do a test run.
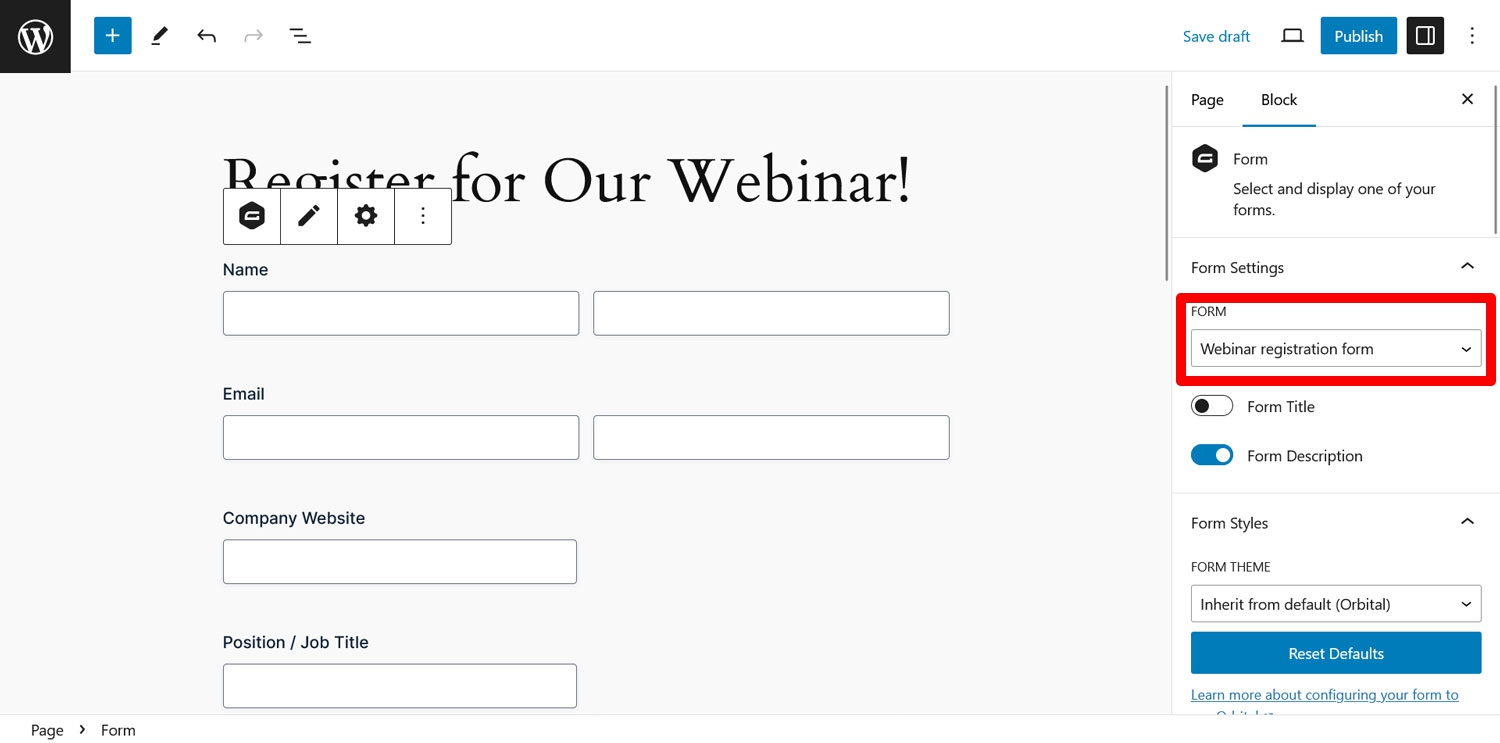
To do so, open the page where you want the form to appear in the WordPress editor and include it using either the Gravity Forms block or shortcode.
After that, use the page preview to complete your form with some example information. Then submit it.
Pay attention that you receive the right confirmation and notification messages. More importantly, check your Zoom meeting – everything should have arrived there as well.
If so, you’re all ready to go, it’s time to publish the page!
Set Up Your Zoom Integration in Gravity Forms Now
Gravity Forms makes it super easy to collect meeting or webinar participants infomation via web forms on your WordPress site. And with the Zapier Add-On you can eaily connect with Zoom and thousands of other applications without any coding, obliterating all obstacles for you to fill seats in your online meeting!
The Gravity Forms Zapier Add-On requires a Pro or Elite license. Upgrade your existence license or test Gravity Forms with a free demo site.
