How do you know if your WordPress site’s transactional emails are sending successfully? More importantly, how will you know when they aren’t?
With Gravity SMTP, you can not only set up a primary and backup email sending service for your site, you can also receive real-time Slack notifications when anything goes wrong so you can immediately address any interruptions.
In this article, we’ll introduce you to the Gravity SMTP Slack alerts feature, and then we’ll show you how to set it up on your own site.
We’ll start with some quick thoughts on why you might want to use this feature. Then, we’ll get into the full step-by-step guide on how to set it up for your site.
Why Set Up Slack Alerts for WordPress Transactional Emails?
Transactional emails are an essential part of most WordPress websites. They’re how you get notified of important events (like a new lead via your form), users receiving their order confirmations, users resetting their passwords, and so on.
Any issue with your site’s transactional emails can lead to lost revenue, upset users, and frustration for your team.
But transactional emails aren’t happening “in plain sight”, so it can be hard to detect issues right away. In some situations, it might even take a few days before you notice that your site’s emails aren’t sending.
With Gravity SMTP, you get detailed reporting and logging tools that can help you catch these issues from inside your WordPress dashboard. However, these tools still require you to be actively checking your WordPress site. If you don’t log in to WordPress every day, you might not notice.
Real-time Slack alerts can fix this discovery lag and ensure real-time visibility around any issues with your site’s transactional emails. If an email fails for any reason (service outage, connection issue, etc.), you will receive an immediate notification via Slack that looks something like this:

You can also set up rules for when to receive alerts and how many alerts to receive. For example, you can require multiple failures before sending an alert, and you can limit the number of alerts that are sent in a certain time period.
How to Set Up Slack Alerts for Transactional Email Issues
Now, we’ll go through the full step-by-step guide on how to set up Gravity SMTP Slack alerts for WordPress transactional email issues.
For this guide, we’ll assume that you’ve already installed Gravity SMTP on your site. If you haven’t, you can download it from the Gravity Forms My Account area.
Gravity SMTP is currently available for free to anyone with a Gravity Forms Elite, Nonprofit, or Developer license (though you don’t need to have Gravity Forms installed in order to use Gravity SMTP).
We’ll also assume that you’ve connected Gravity SMTP to your preferred email sending service(s). You can specify a primary email sending service, as well as a backup email sending service that Gravity SMTP will automatically try if the primary service fails to send.
If you haven’t set up your email sending service yet, we have dedicated guides for all of the direct integrations that Gravity SMTP supports:
- SendGrid
- Mailgun
- Postmark
- Brevo
- Amazon SES
- Gmail/Google Workspace
- Outlook/Microsoft 365
- Mailchimp Transactional
- Zoho Mail
Once you’ve done that, here are the steps you need to follow to set up Slack alerts for transactional emails…
1. Enable the Alerts Feature in Gravity SMTP
To start, you’ll want to enable the alerts functionality in Gravity SMTP.
At the time that we’re writing this post, Slack alerts are still listed as an “experimental” feature, so they’re disabled by default.
Here’s how to enable alerts in Gravity SMTP:
- Go to SMTP → Settings in your WordPress dashboard.
- Enable the Alerts toggle, which should be listed under Experimental Features in the main settings area.
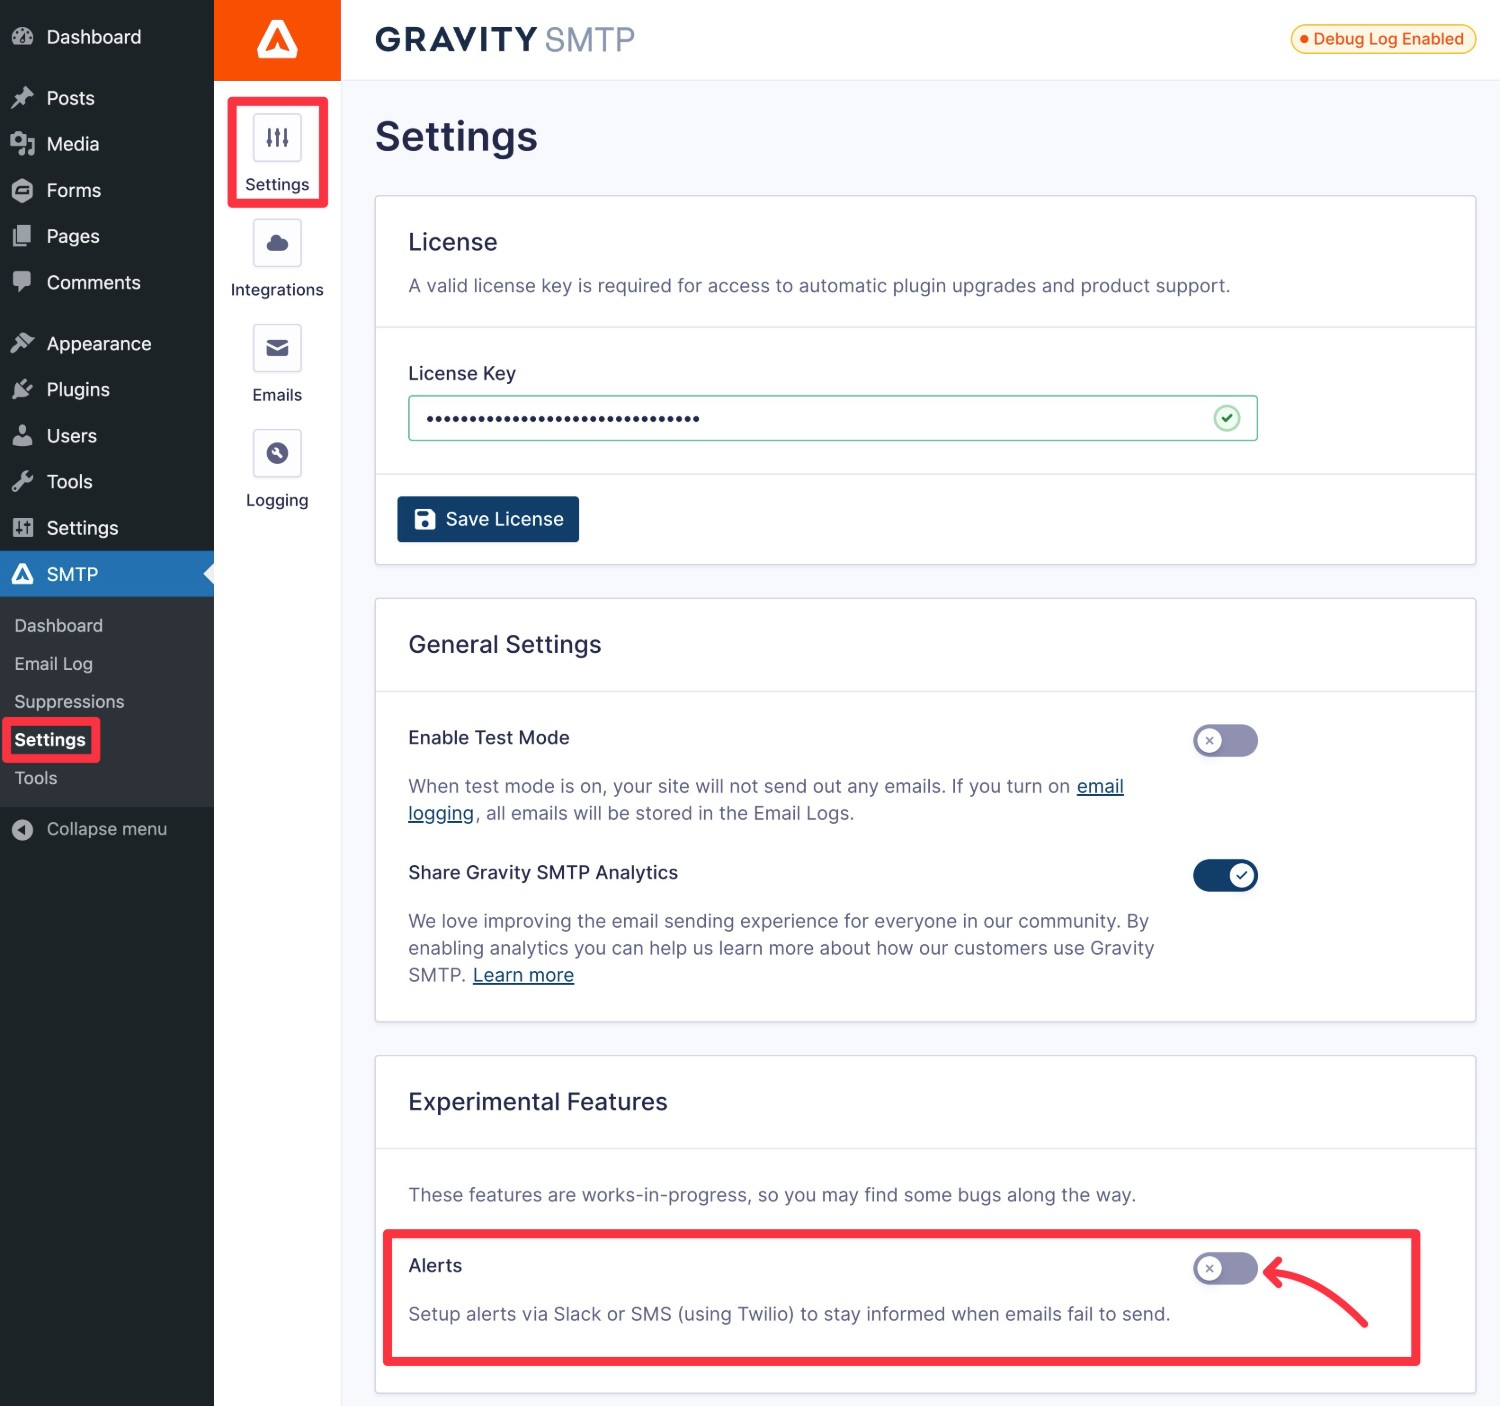
Once you enable the feature, you should see a new Alerts tab appear in the settings area.
2. Create Your Slack App and Locate Webhook URL
In order to connect Gravity SMTP to Slack, you need to create an “app” in Slack and then locate the webhook URL for that app.
Here, we’ll assume that you already have a Slack account that you want to use to receive notifications, along with the ability to create and install an app for your Slack workspace.
If you don’t, you’ll first need to create a Slack account for the Slack workspace where you want to receive notifications (or create your own Slack workspace).
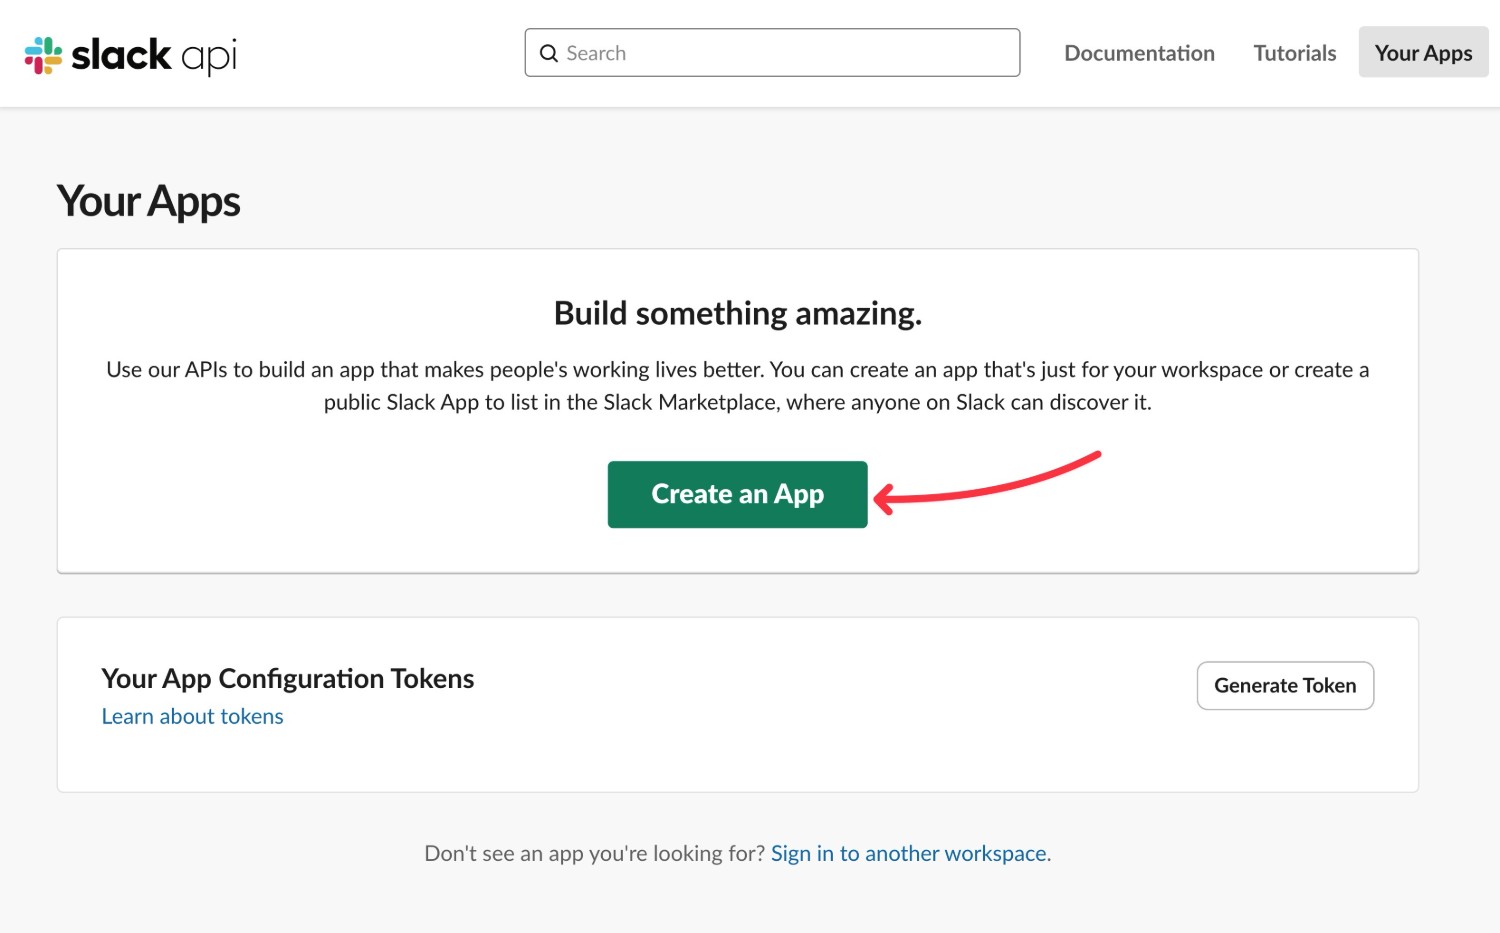
Create Your Slack App
Once you’re signed in to your My Account, click this link to open the Slack API app dashboard.
Then, click Create an App to create your Slack app.
In the Create an app popup that appears, choose the From scratch option.
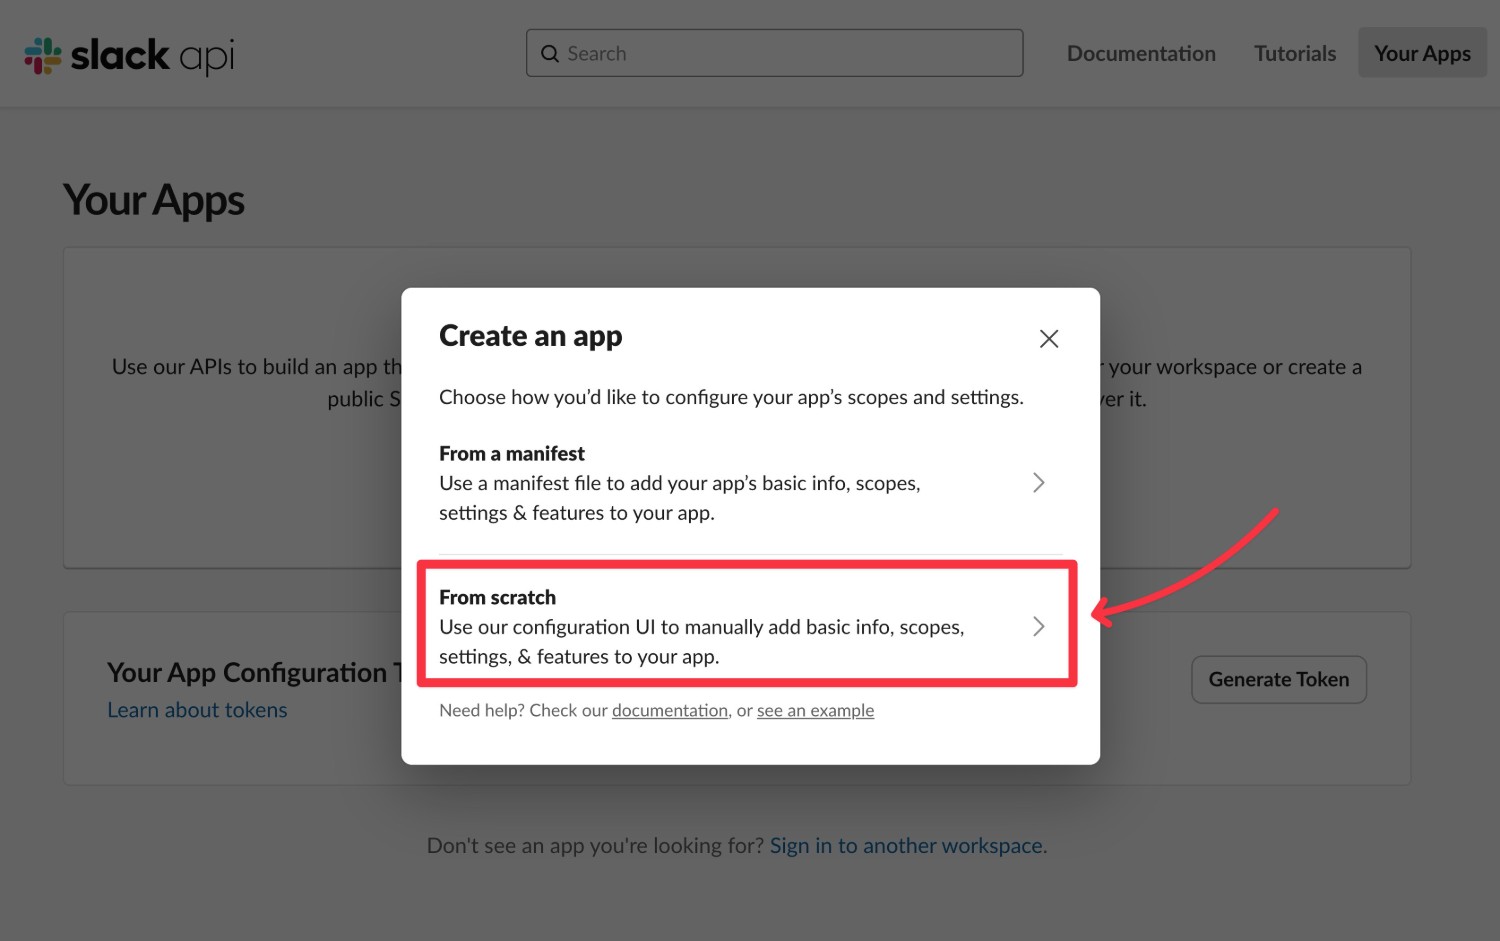
You can then give your app an internal name to help you remember it and choose which Slack workspace you want to create your app in. If you have multiple Slack accounts and you don’t see the right workspace, you can click the link to Sign into a different workspace.
Note – In order to create an app, you’ll need administration access to the Slack workspace where you want to receive notifications.
Once you’ve made your choices, click Create App.
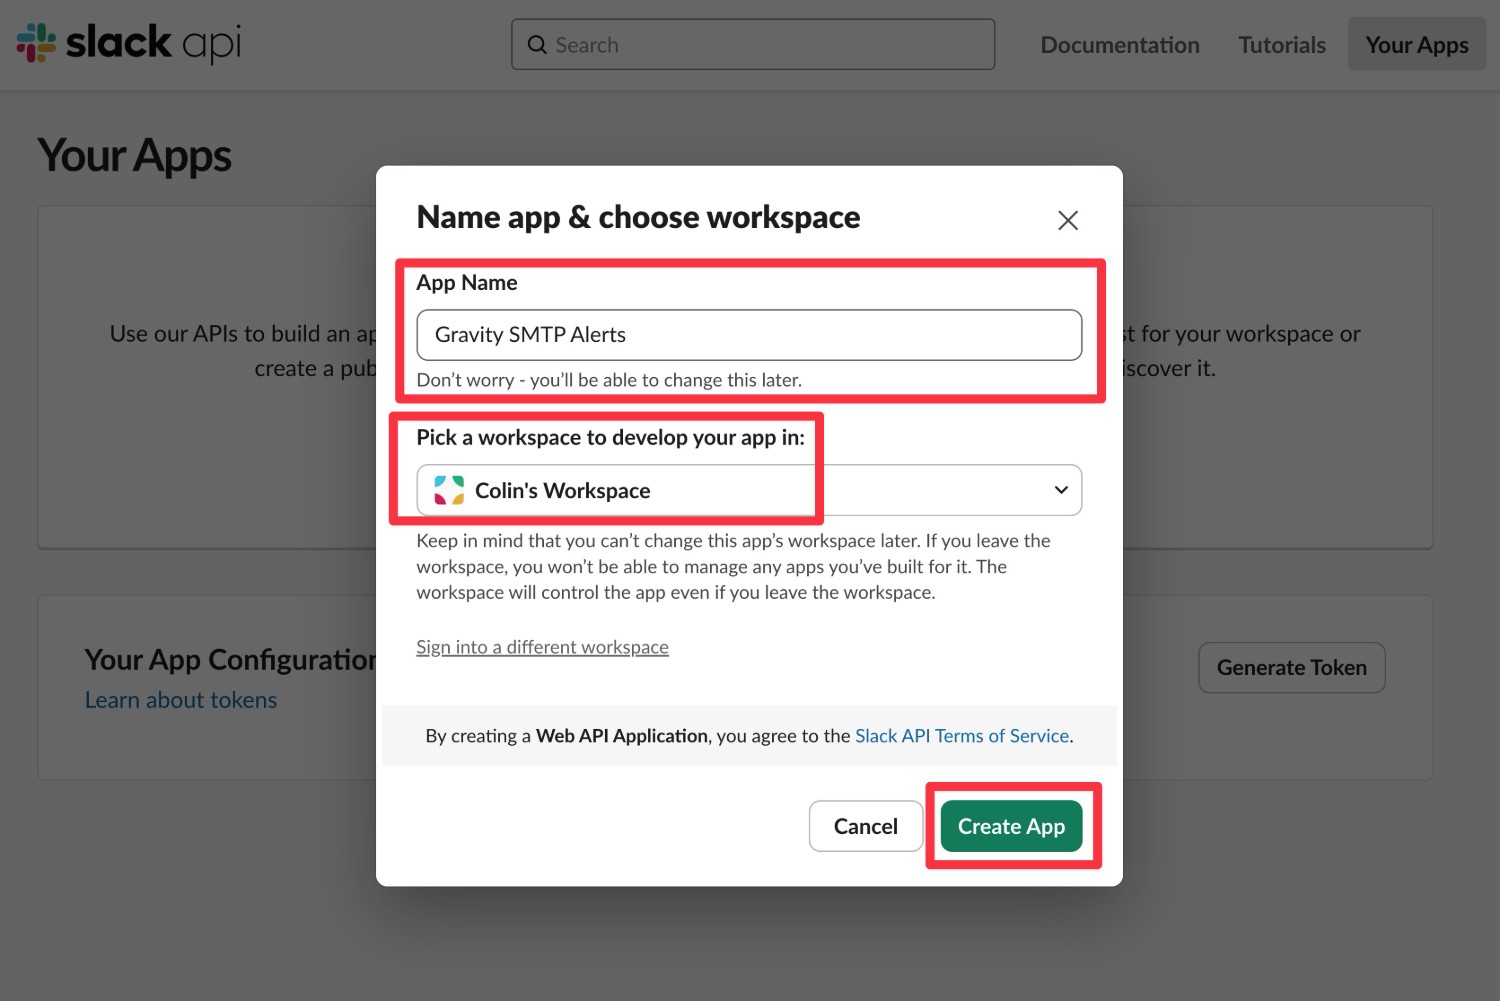
Slack should then take you to the app’s dashboard.
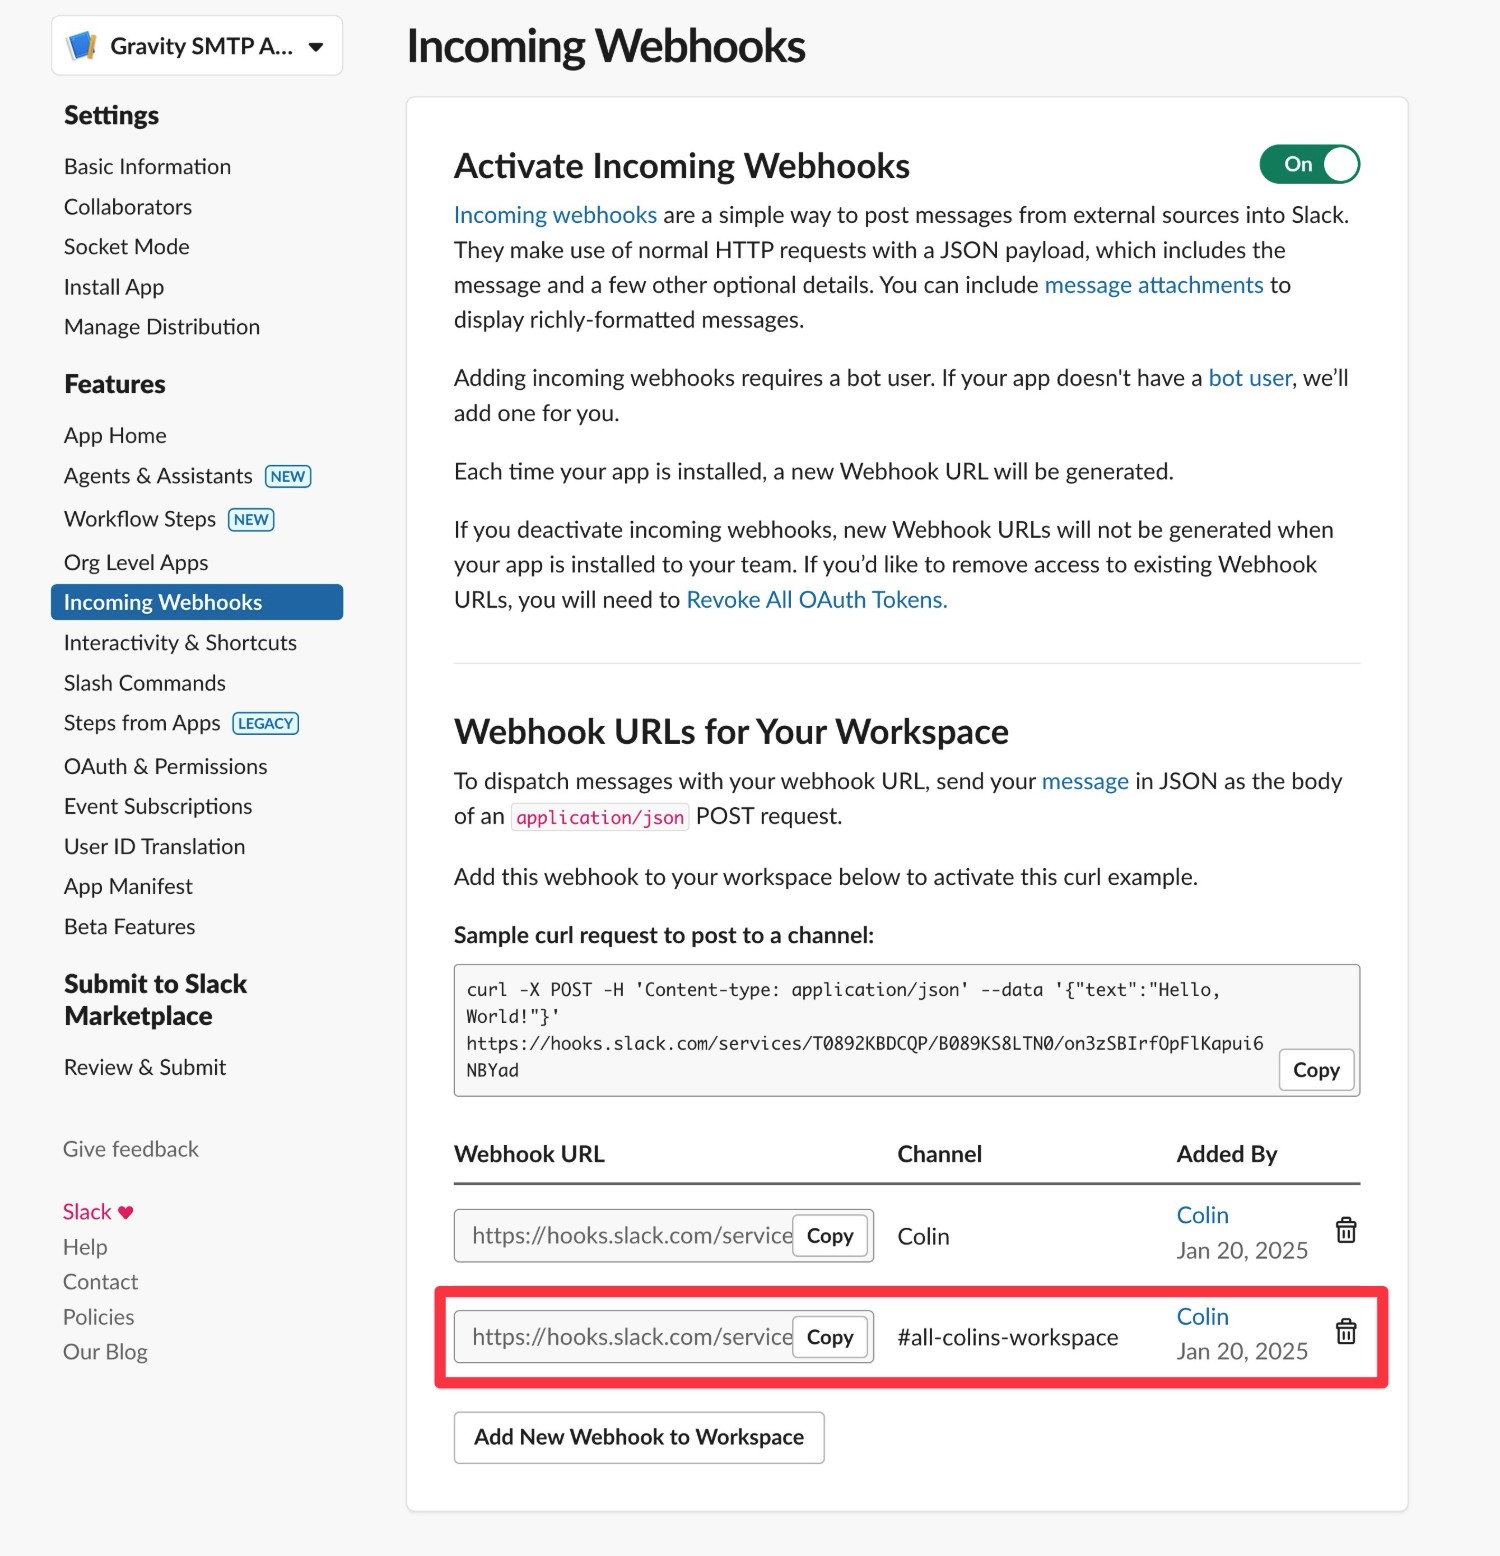
Locate Your Slack Webhook URL
Once you’ve created your app, you should be in the app dashboard.
If you don’t see this interface, you can access it by selecting your app in the main Slack API app dashboard.
In the app dashboard, select Incoming Webhooks under Features. Then, enable the toggle to Activate Incoming Webhooks.
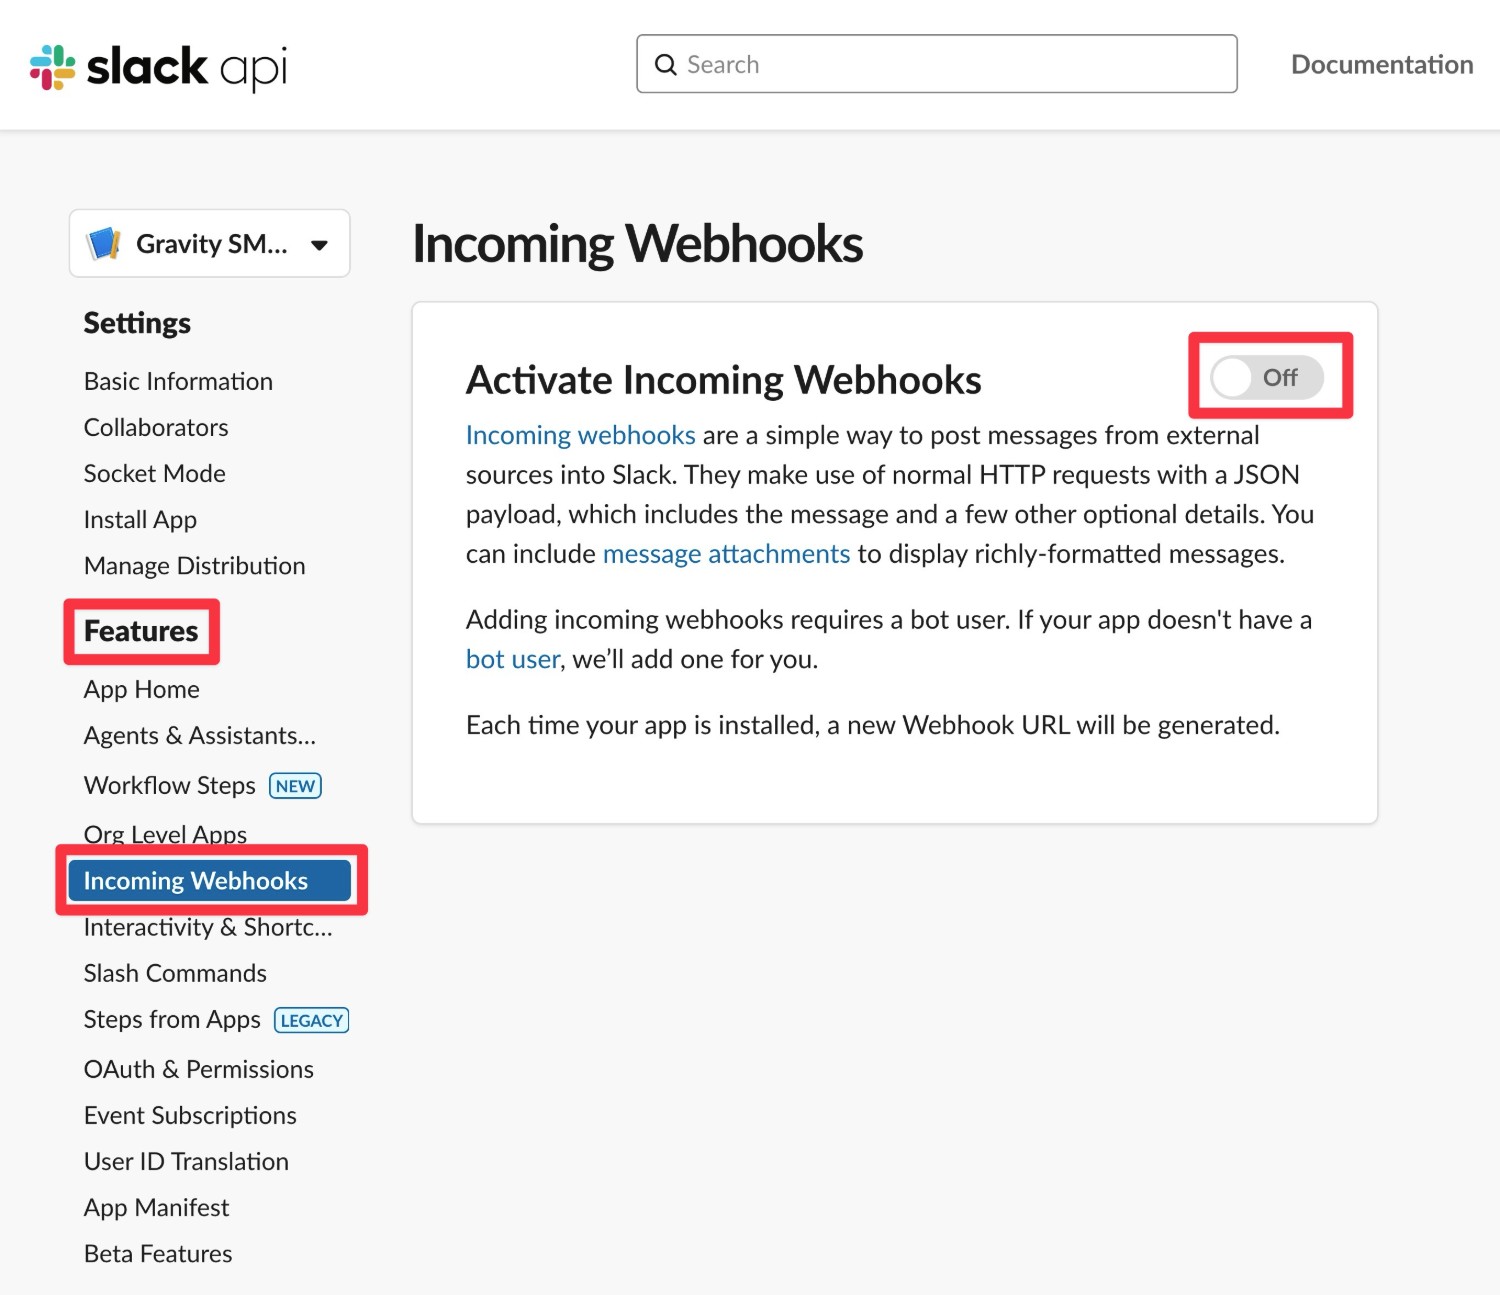
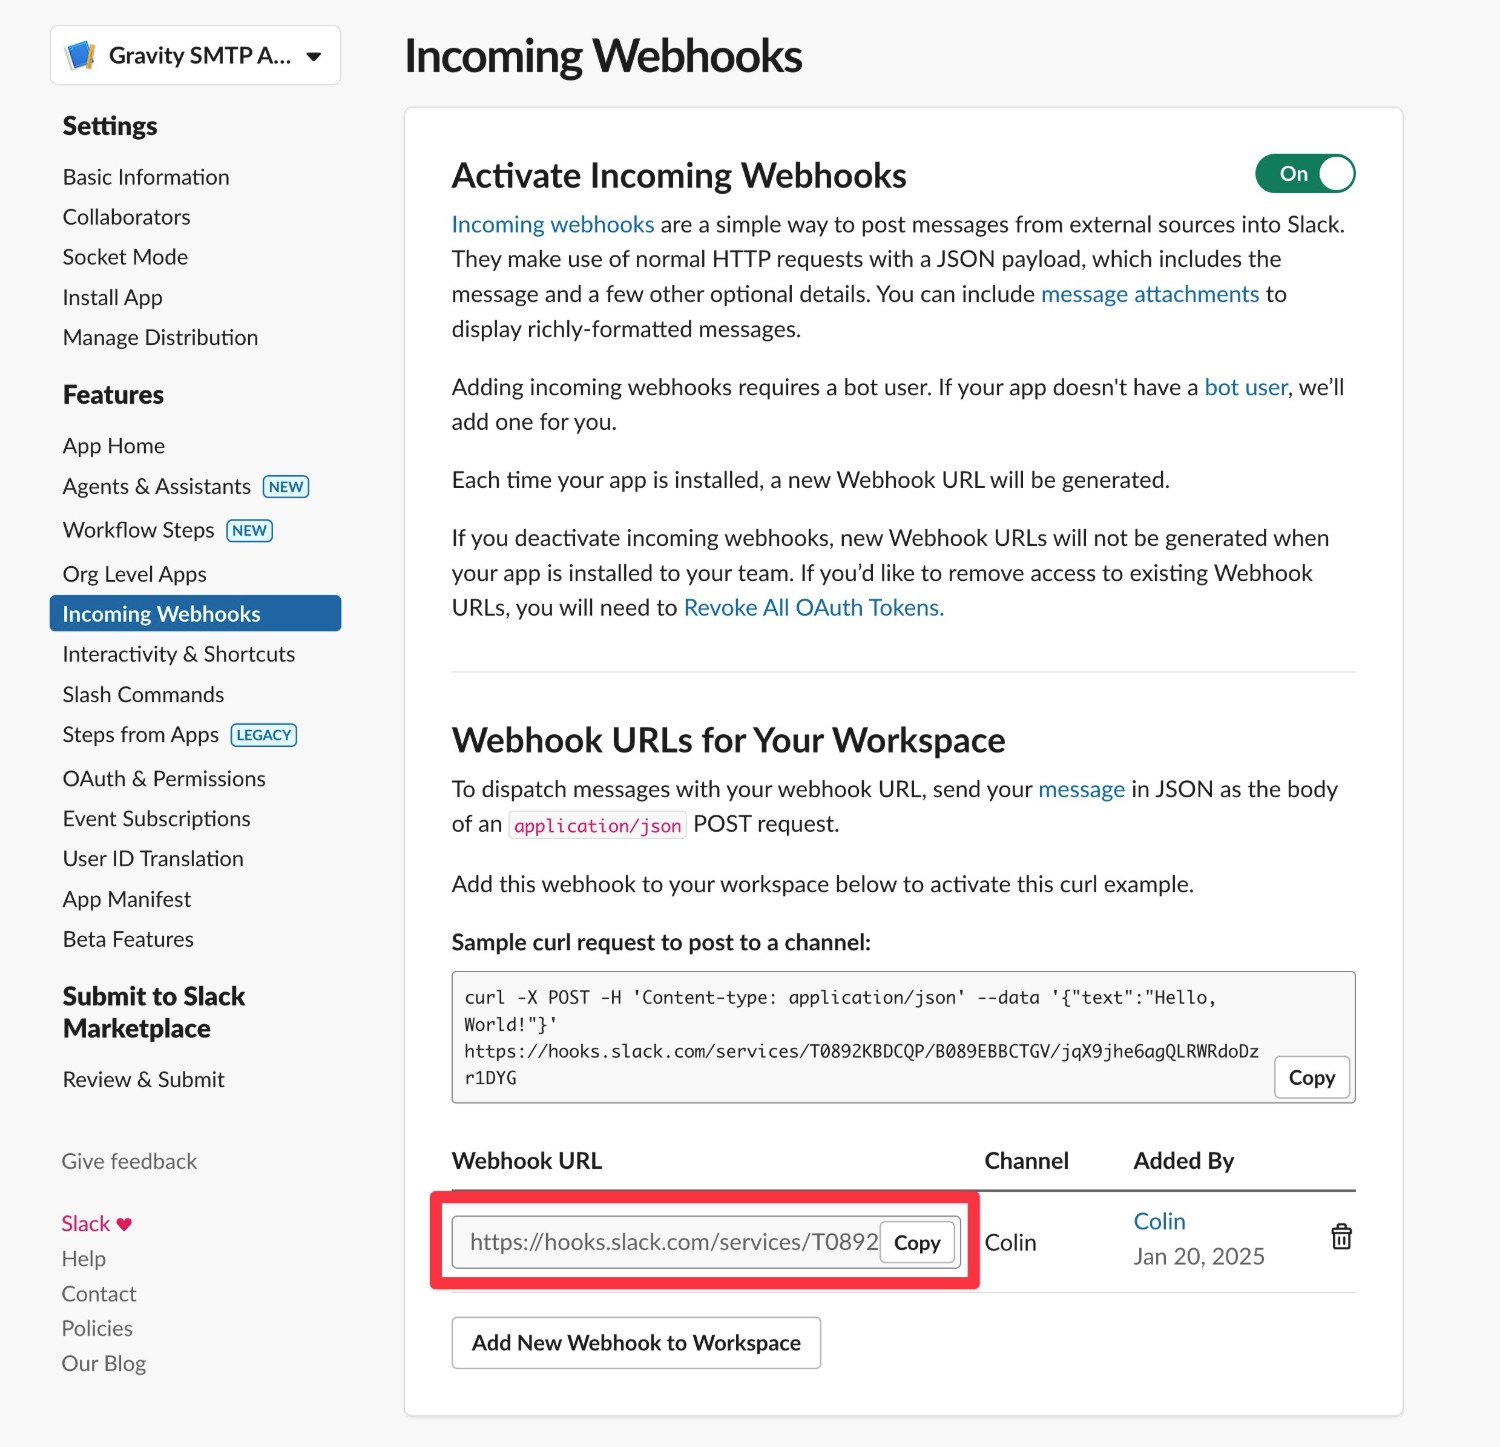
Once you activate incoming webhooks, you can click the Add New Webhook to Workspace button at the bottom to create a webhook URL.
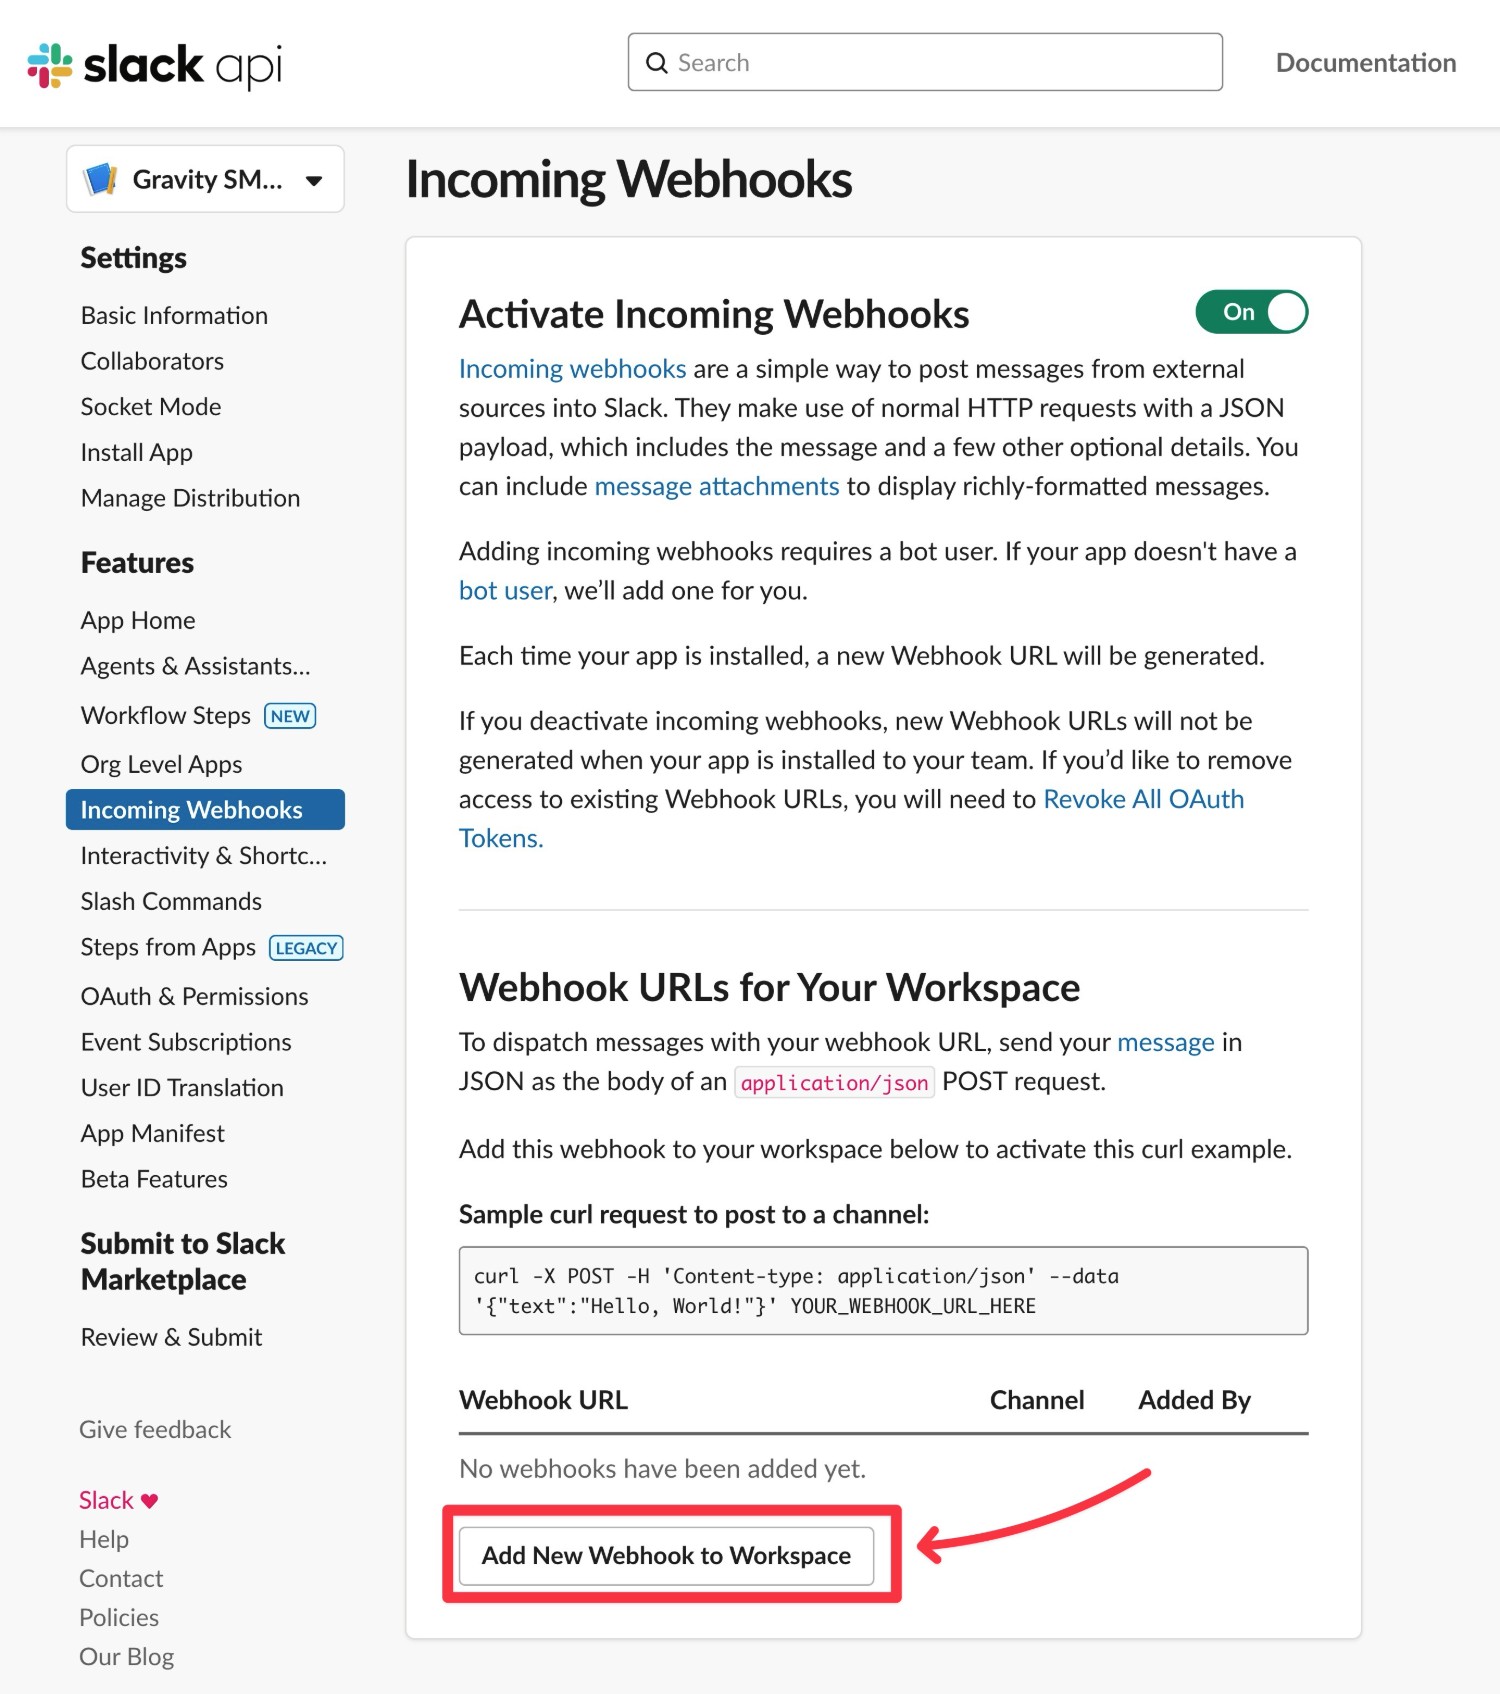
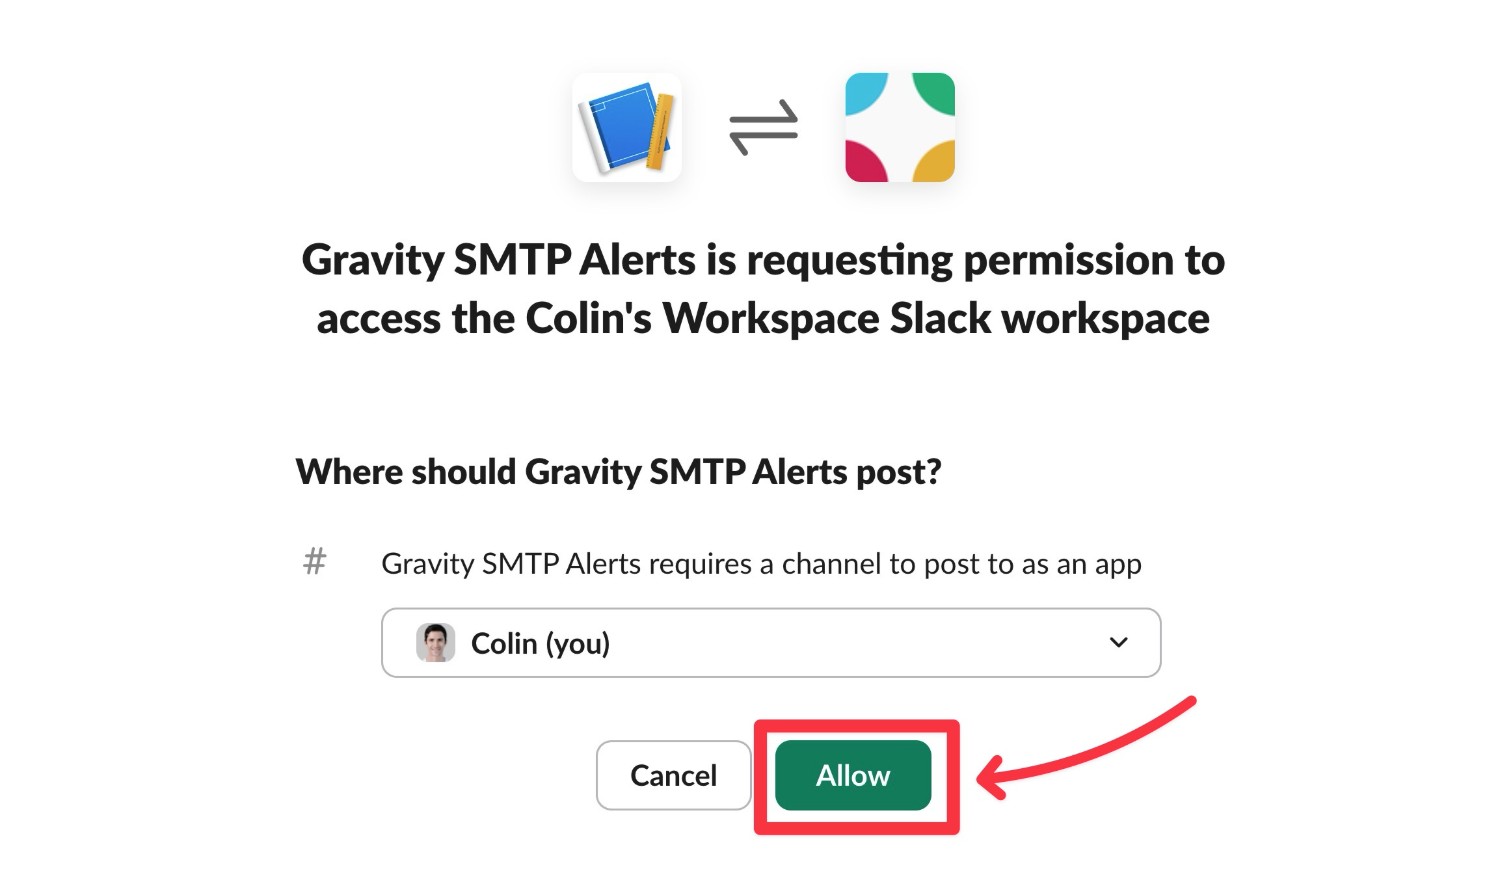
On the next screen, you can choose where to send the alert messages for this webhook. You could send messages to one of the channels in your workspace or you can send them as a direct message to an account.
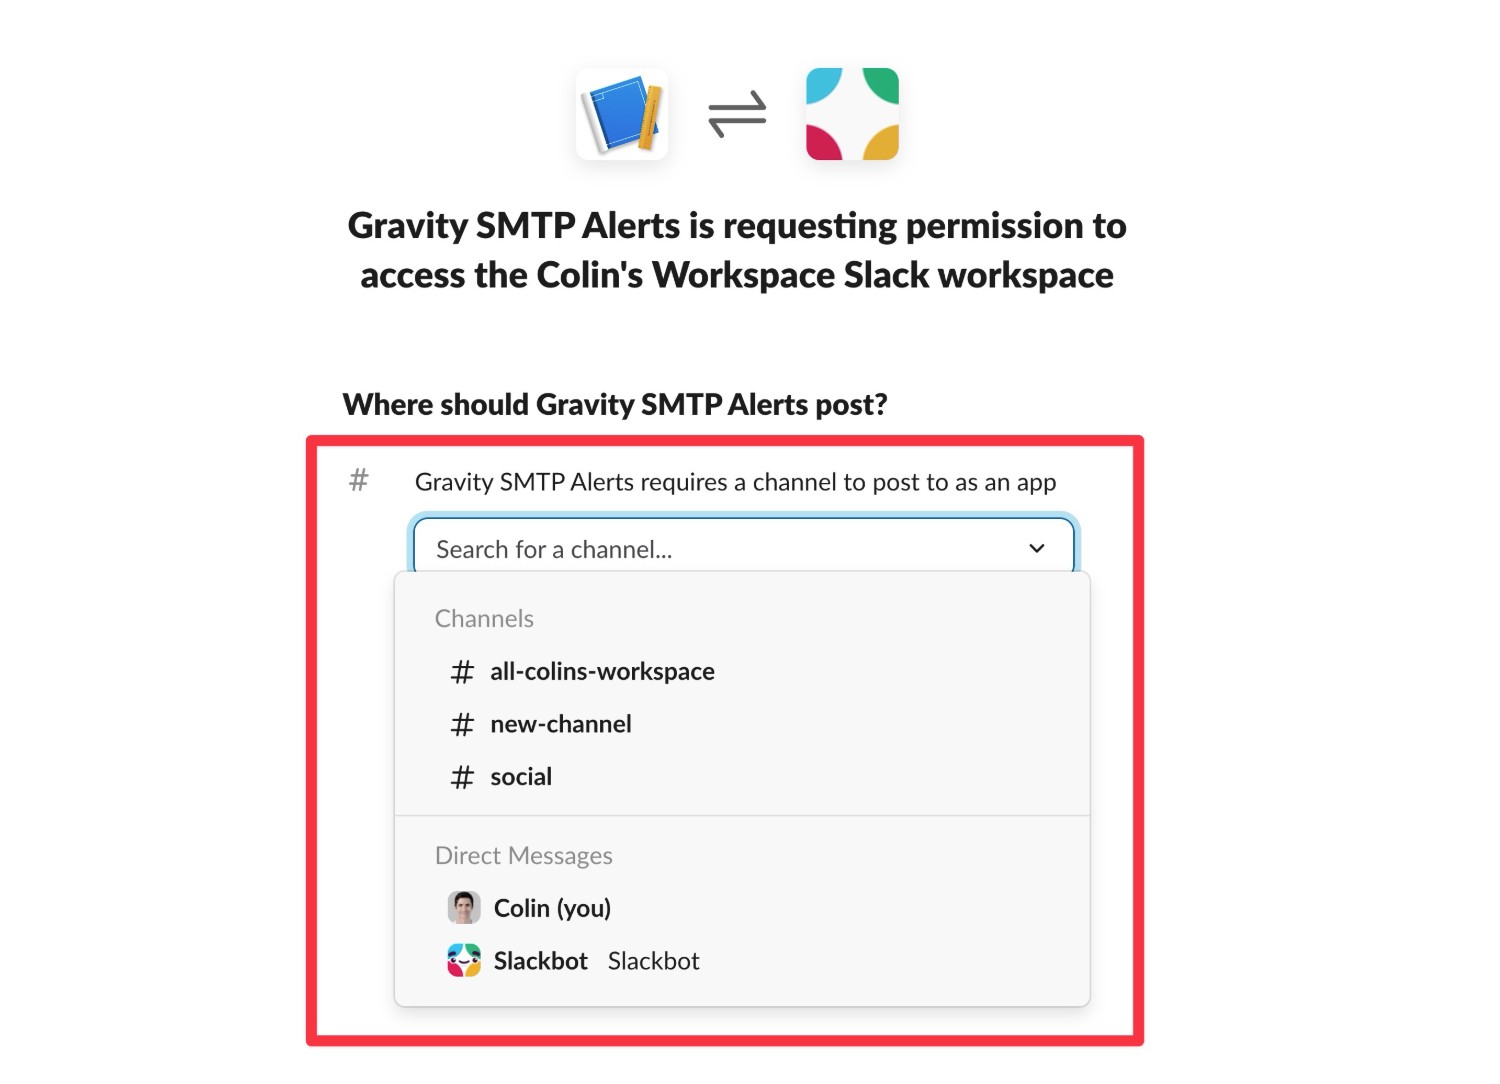
Once you’ve chosen the channel/account, click Allow.
You should now see the webhook URL listed under the Webhook URL column. Copy this value to a safe place because you’ll need it in the next step.
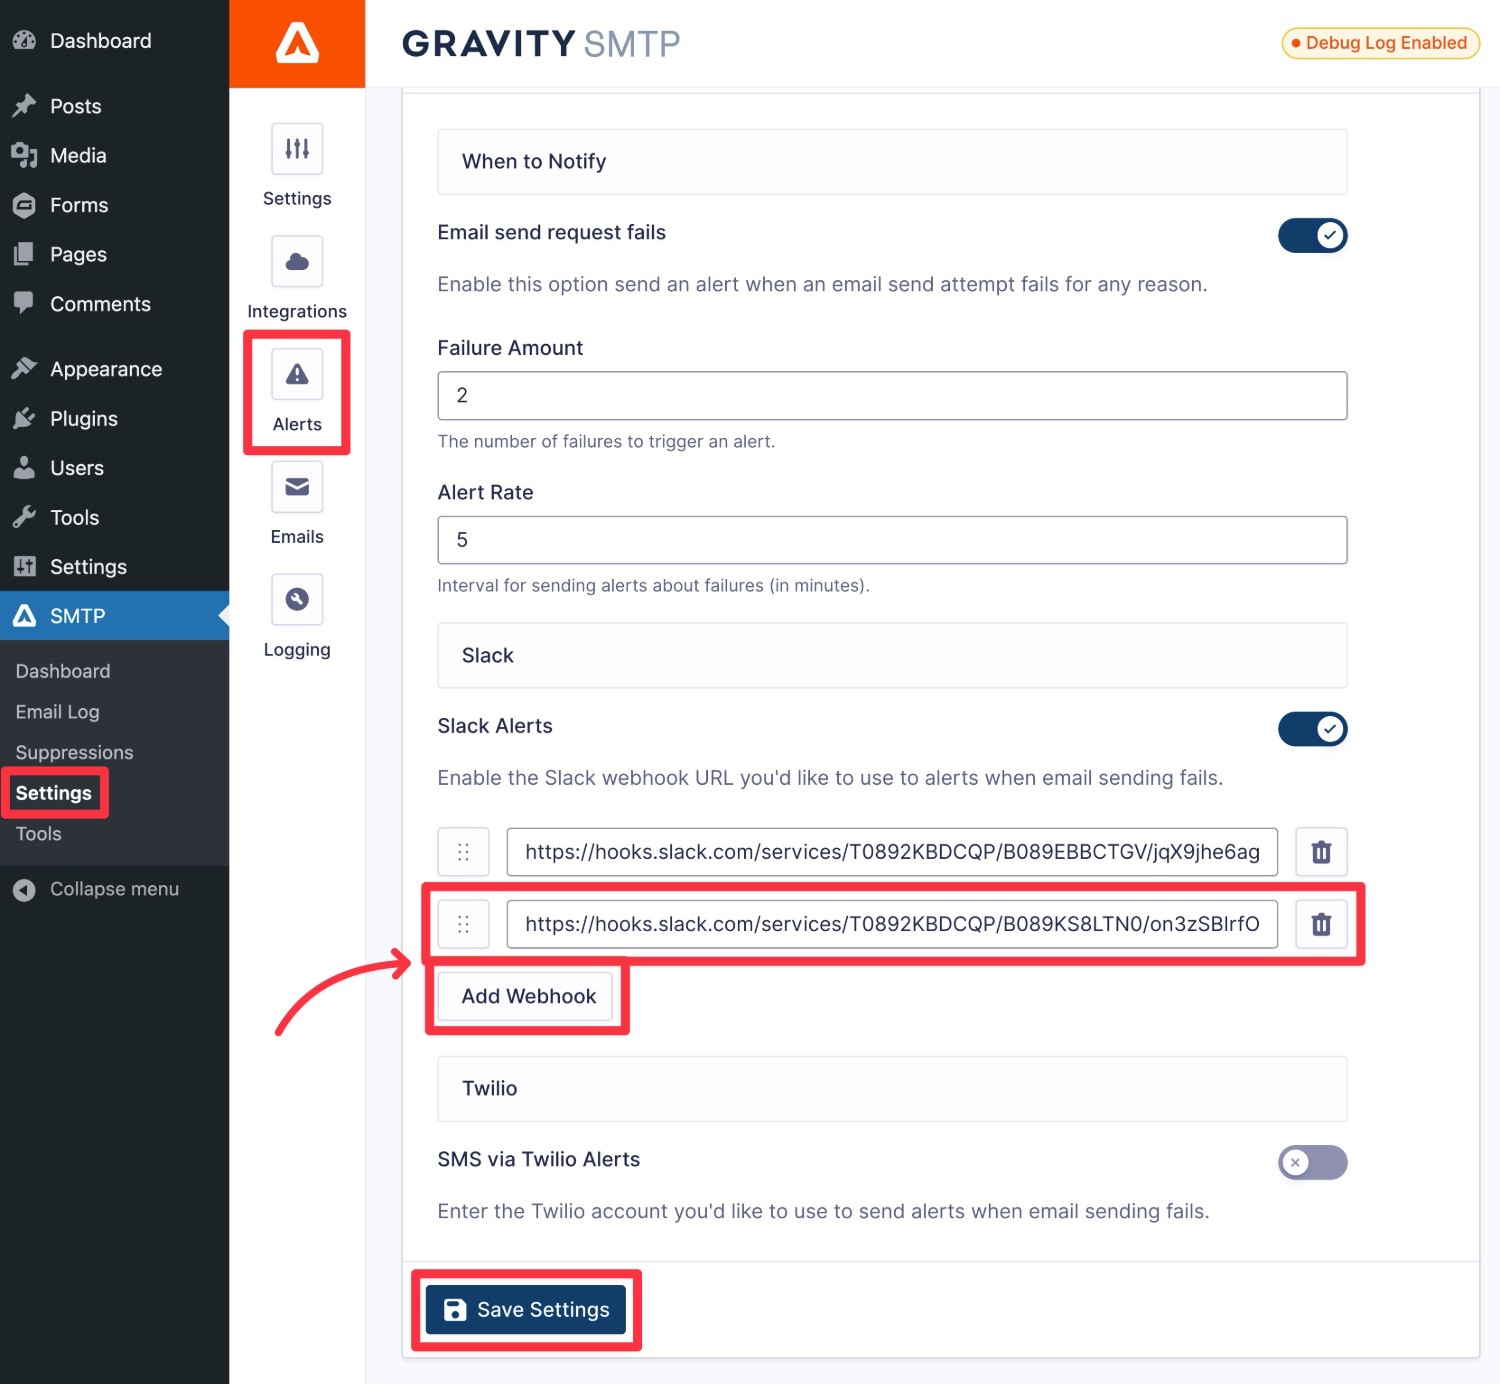
3. Configure Gravity SMTP Slack Alerts
Once you have your Slack webhook URL, you can finish the setup process from inside your WordPress dashboard.
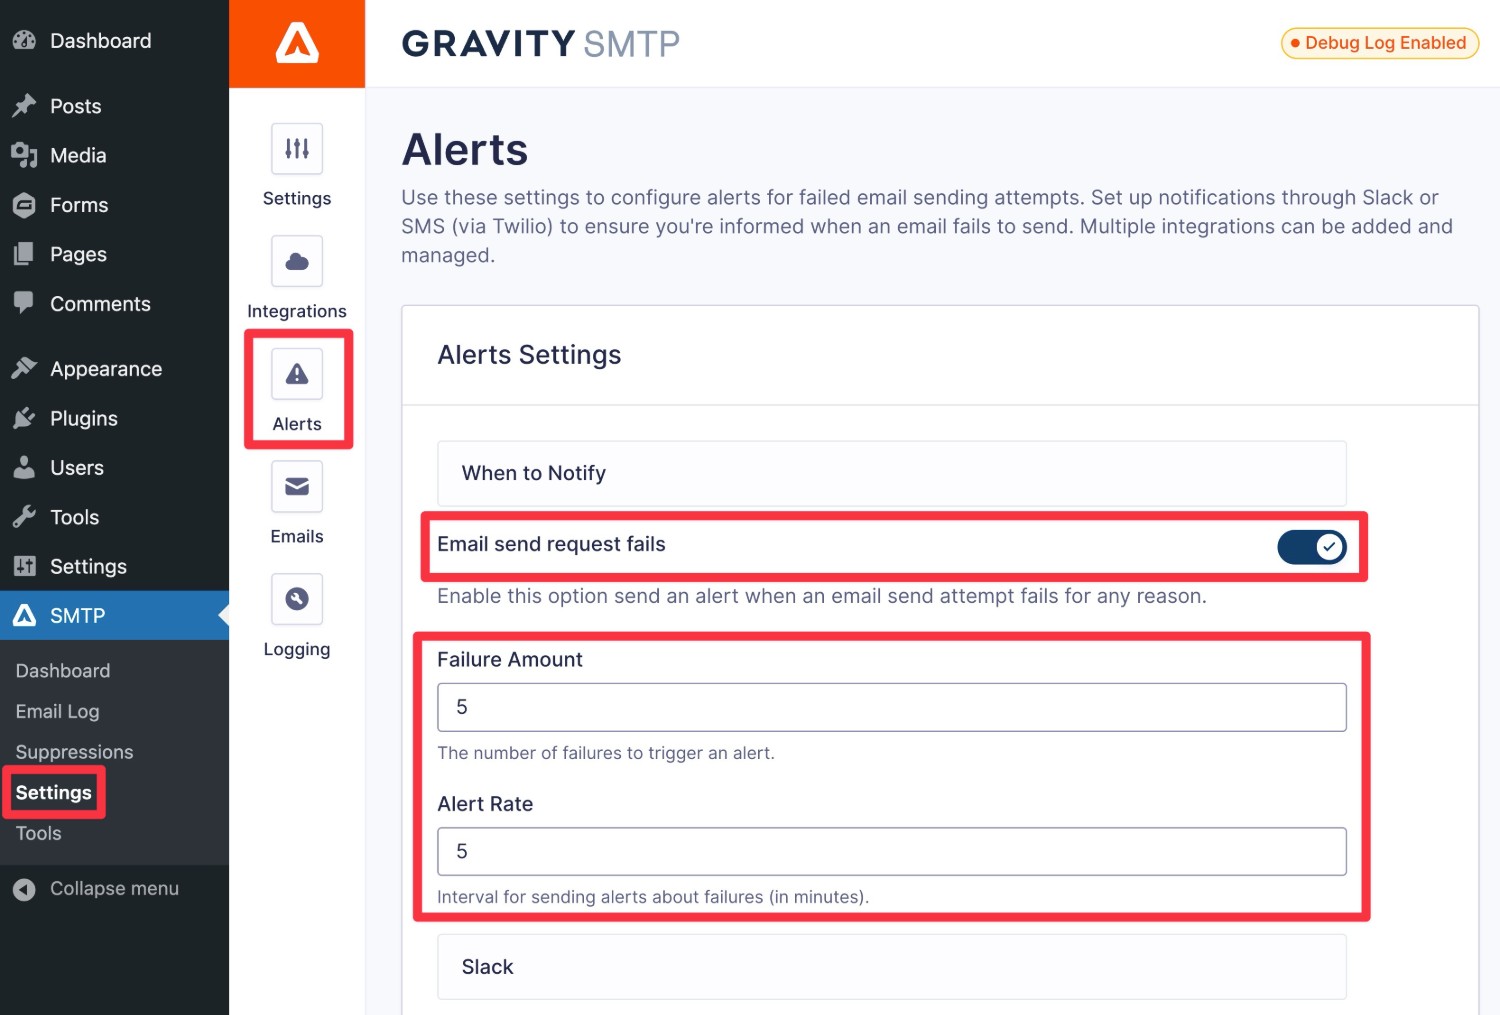
In WordPress, go to SMTP → Settings → Alerts to access the alert settings.
First, enable the Email send request fails toggle to turn on alerts for emails failing to send.
Once you enable it, you can make two choices:
- Failure Amount – This is the number of failed emails that will trigger an alert. If you set it to “1”, Gravity SMTP will send an alert for a single failed email. If you want to avoid false alerts, you might set it a bit higher. For example, if you set it to “5”, Gravity SMTP won’t send an alert until there have been five failed emails.
- Alert Rate – This lets you limit how often to send alerts, to avoid spamming yourself with alerts in situations where your site sends a lot of emails. For example, if you set it to “5”, Gravity SMTP will only send one alert for every five-minute period. After the five-minute period elapses, it will send another alert if emails continue to fail.
Once you’ve made those choices, scroll down and enable the Slack Alerts toggle to turn on Slack alerts.
Then, paste the Slack webhook URL you obtained in the previous step into the box and click Save Settings.
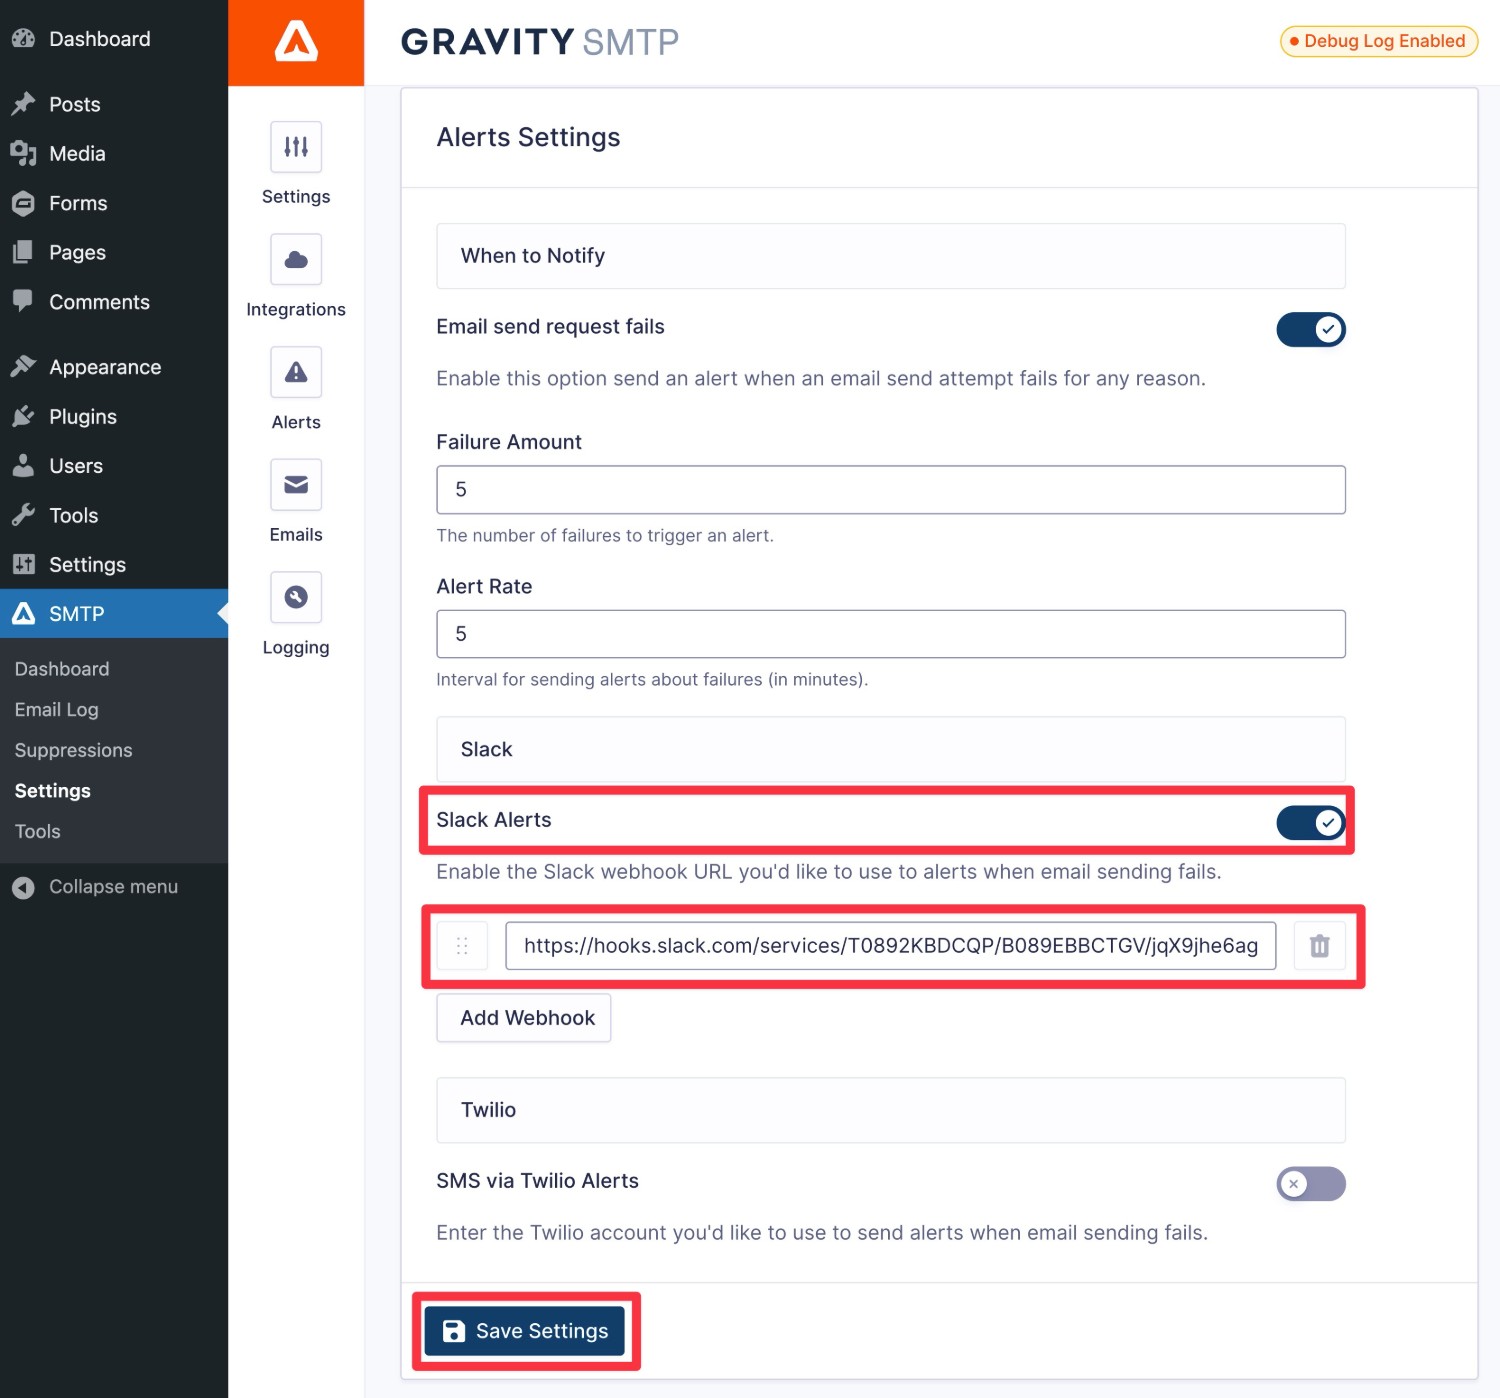
And that’s it! You should now start receiving Slack alerts whenever your site’s emails are failing, subject to the Failure Amount and Alert Rate rules that you chose.
Here’s an example of what a Slack alert might look like:
4. Add More Webhook URLs As Needed (Optional)
This part is 100% optional.
However, if you want to, Gravity SMTP lets you add multiple Slack webhook URLs. This would let you send notifications to additional channels/users in your workspace. Or, you could even send notifications to a different workspace.
If you do want to set this up, you first need to create another webhook URL in your Slack app (or, if you want to connect to a different Slack workspace, you might need to create another app for that workspace).
For example, you could create another URL that connects to a different channel or user.
Then, you can add that extra webhook URL to Gravity SMTP:
- Go to SMTP → Settings → Alerts in your WordPress dashboard.
- Click Add Webhook under Slack Alerts.
- Paste the new webhook URL into the additional box that appears.
- Click Save Settings.
You can repeat these same steps to add as many Slack webhook URLs as needed.
For more information on setting up alerts in Slack, check out the Gravity SMTP documentation.
Get Started With Slack Transactional Email Alerts Today
The transactional emails that your WordPress site sends are usually very important, so you’ll want to be able to address any issues right away.
With the Slack alerts feature in Gravity SMTP, you can receive real-time alerts on Slack whenever something goes wrong with your site’s transactional emails. That way, you can jump in, fix the problem, and resend the emails as soon as possible.
In addition to Slack alerts, you can also consider setting up a backup email sending service, which is another helpful feature that Gravity SMTP supports.
If you’re already using Gravity SMTP, set up Slack alerts today to start benefiting from this feature.
If you’re not using Gravity SMTP yet, follow our ultimate Gravity SMTP guide to get started and then come back here to set up your Slack alerts.

If you want to keep up-to-date with what’s happening on the blog sign up for the Gravity Forms newsletter!
"*" indicates required fields