How to Accept Payments with SEPA Direct Debit on WordPress Using Stripe
Looking for a way to accept SEPA Direct Debit payments on your WordPress website?
With its low fees and broad acceptance in the European Union, SEPA Direct Debit can be a great payment option to give your customers.
In this post, you’ll learn a code-free way to create your own flexible SEPA Direct Debit payment forms on WordPress using Gravity Forms and Stripe.
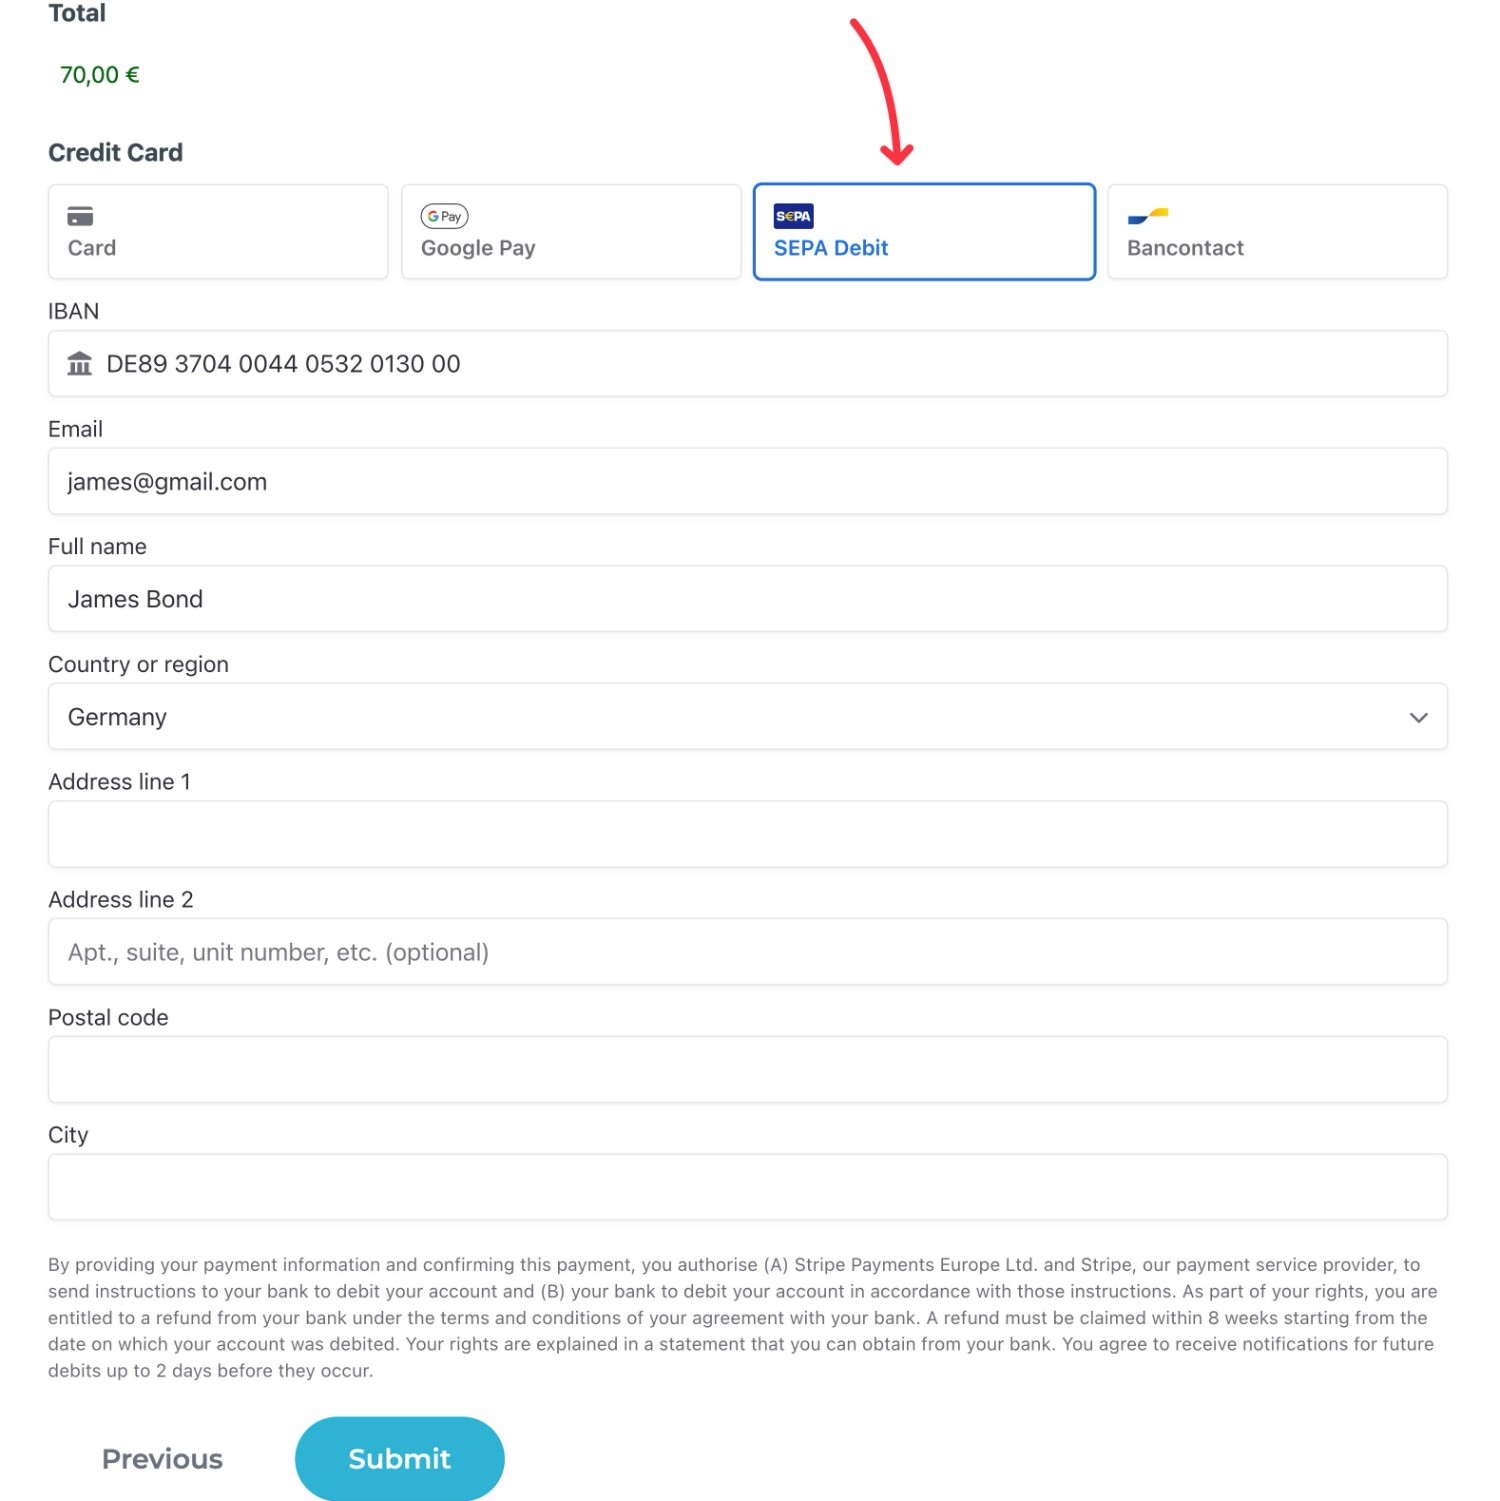
By the end, you’ll have your own unique payment form that might look something like this:
Let’s get into it…
Why Use SEPA Direct Debit for WordPress Payments?
Short for Single Euro Payments Area, SEPA is a European Union initiative designed to simplify payments with EU member countries.
Currently, all 27 European Union member states support SEPA Direct Debit payments, as well as a few additional European countries such as the United Kingdom, Switzerland, Norway, and more.
In total, 36 different countries support SEPA payments, which makes it a great option if you want a near-universal payment solution in Europe.
Beyond its broad acceptance in Europe, here are some other reasons to consider offering SEPA Direct Debit payments:
- Low fees – Generally, Stripe charges just a flat €0.35 per transaction (though this might vary depending on your location and any needed currency conversion). This is significantly cheaper than credit card processing fees, especially for large transactions.
- Especially cheap for large transactions – Because you only pay a flat fee regardless of the transaction amount, SEPA Direct Debit can be especially cost-effective for large transactions.
- Card-free payments – Because people can pay directly via their bank accounts, it’s a great option for people who don’t have credit/debit cards or just prefer not to use them.
What You Need to Accept SEPA Direct Debit Payments on WordPress
If you want to accept WordPress SEPA Direct Debit payments, you’ll need two things:
1. A free Stripe account. In addition to helping you process credit and debit card payments, Stripe also supports SEPA Direct Debit as well as a number of other payment methods.
2. Gravity Forms plugin. With the official Gravity Forms Stripe Add-On, you can use Gravity Forms to create flexible WordPress payment forms that integrate with Stripe and support SEPA Direct Debit payments.
Below, we’ll show you exactly how to set up everything, from start to finish.
How to Accept SEPA Direct Debit Payments With WordPress and Gravity Forms
Now, let’s get into the actual step-by-step guide on how you can start accepting WordPress SEPA Direct Debit payments using Gravity Forms and Stripe.
For this tutorial, we’ll only assume two things:
1. You have at least the Gravity Forms Pro license (or the Elite or Nonprofit licenses), which is what you need to access the official Stripe Add-On. If you don’t have one yet, you can purchase a license here.
2. You have a Stripe account. If you don’t have one yet, you can register for a free account here.
1. Install Gravity Forms and the Stripe Add-On
If you haven’t already done so, your first step is to install the core Gravity Forms plugin on your site and add your license key.
When you complete the short setup wizard, make sure to choose Euro as your site’s default currency, as SEPA Direct Debit payments only work for Euro payments. If you don’t see this option, you can always find it by going to Forms → Settings.
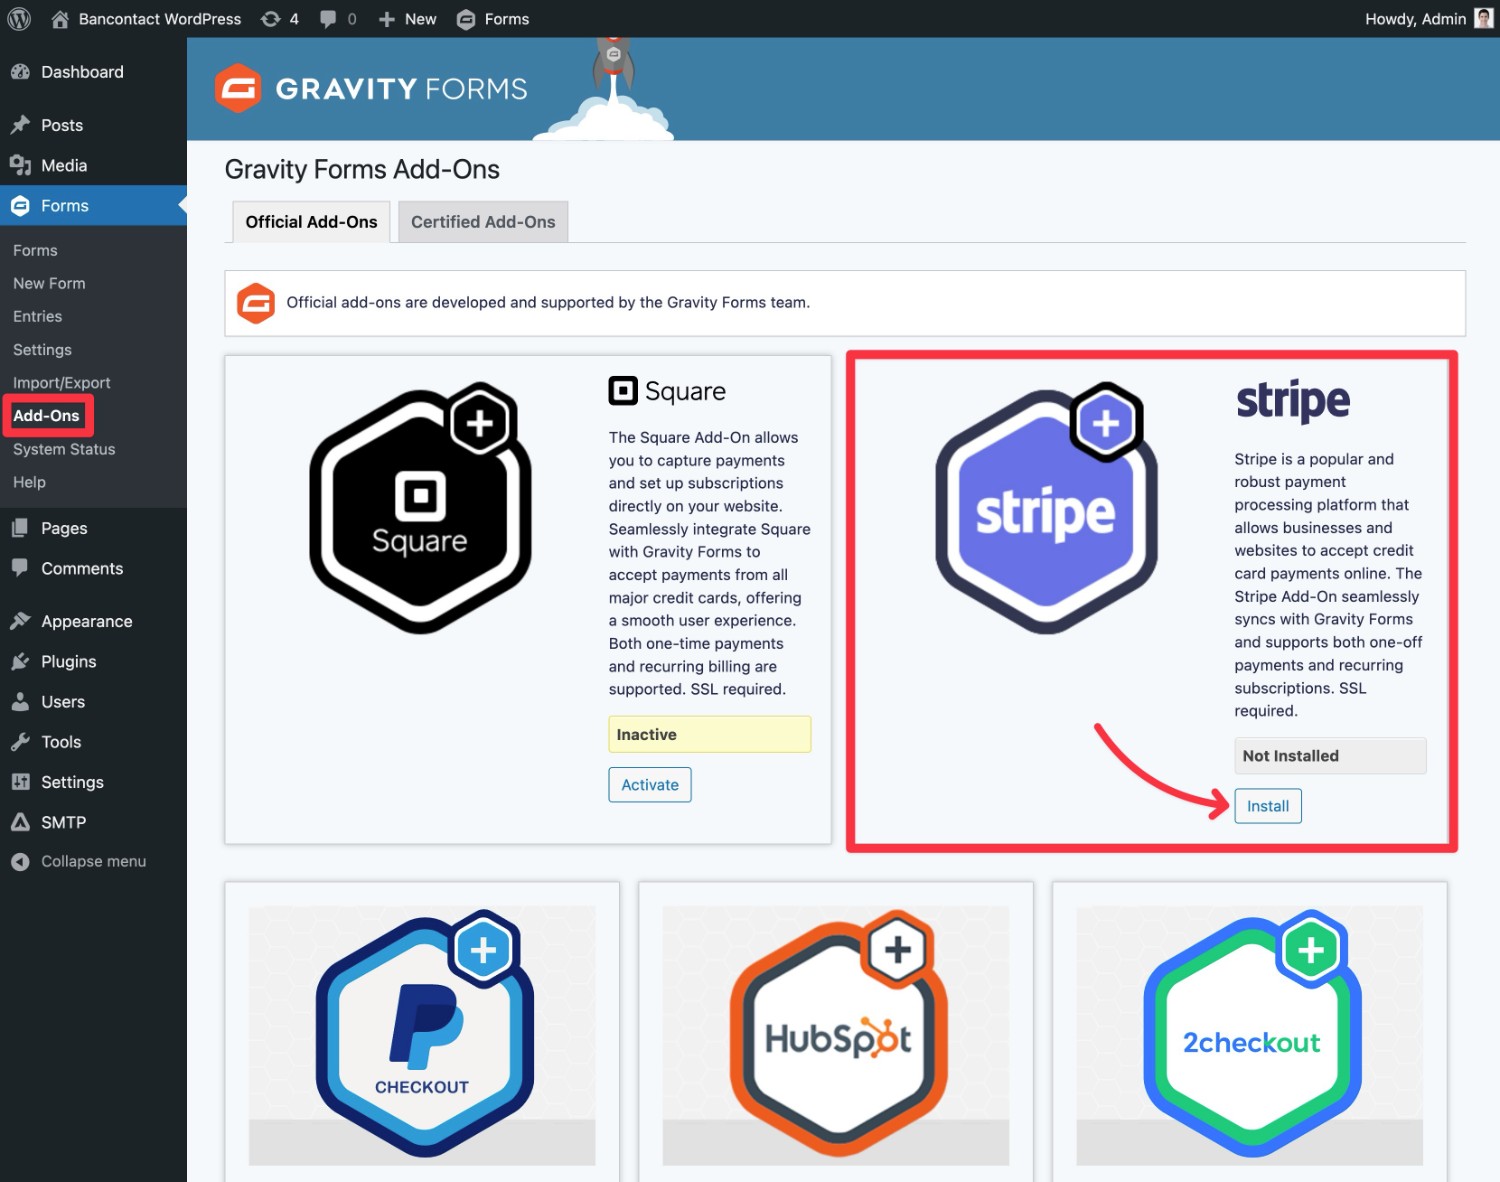
Once you’ve installed the core plugin, you also need to install the official Stripe Add-On, which is what lets you create SEPA Direct Debit payment forms:
1. Go to Forms → Add-Ons.
2. Find the Stripe Add-On in the list.
3. Click Install button to install the Stripe Add-On on your site.
4. Once the installation finishes, make sure to also activate it.
2. Connect Gravity Forms and WordPress to Stripe
Next, you’ll want to connect Gravity Forms and your WordPress site to Stripe.
In addition to completing a short authorization flow, this involves two important steps:
1. Adding the Gravity Forms webhook URL to your Stripe account.
2. Adding the Stripe Signing Secret key to the Gravity Forms settings area (which Stripe will give you after you add the webhook).
You can read the full documentation on using the Stripe Add-On and connecting your site to Stripe, but let’s go through the quick version.
Connect to Stripe
To begin, you need to connect Gravity Forms to Stripe:
1. Open your WordPress dashboard.
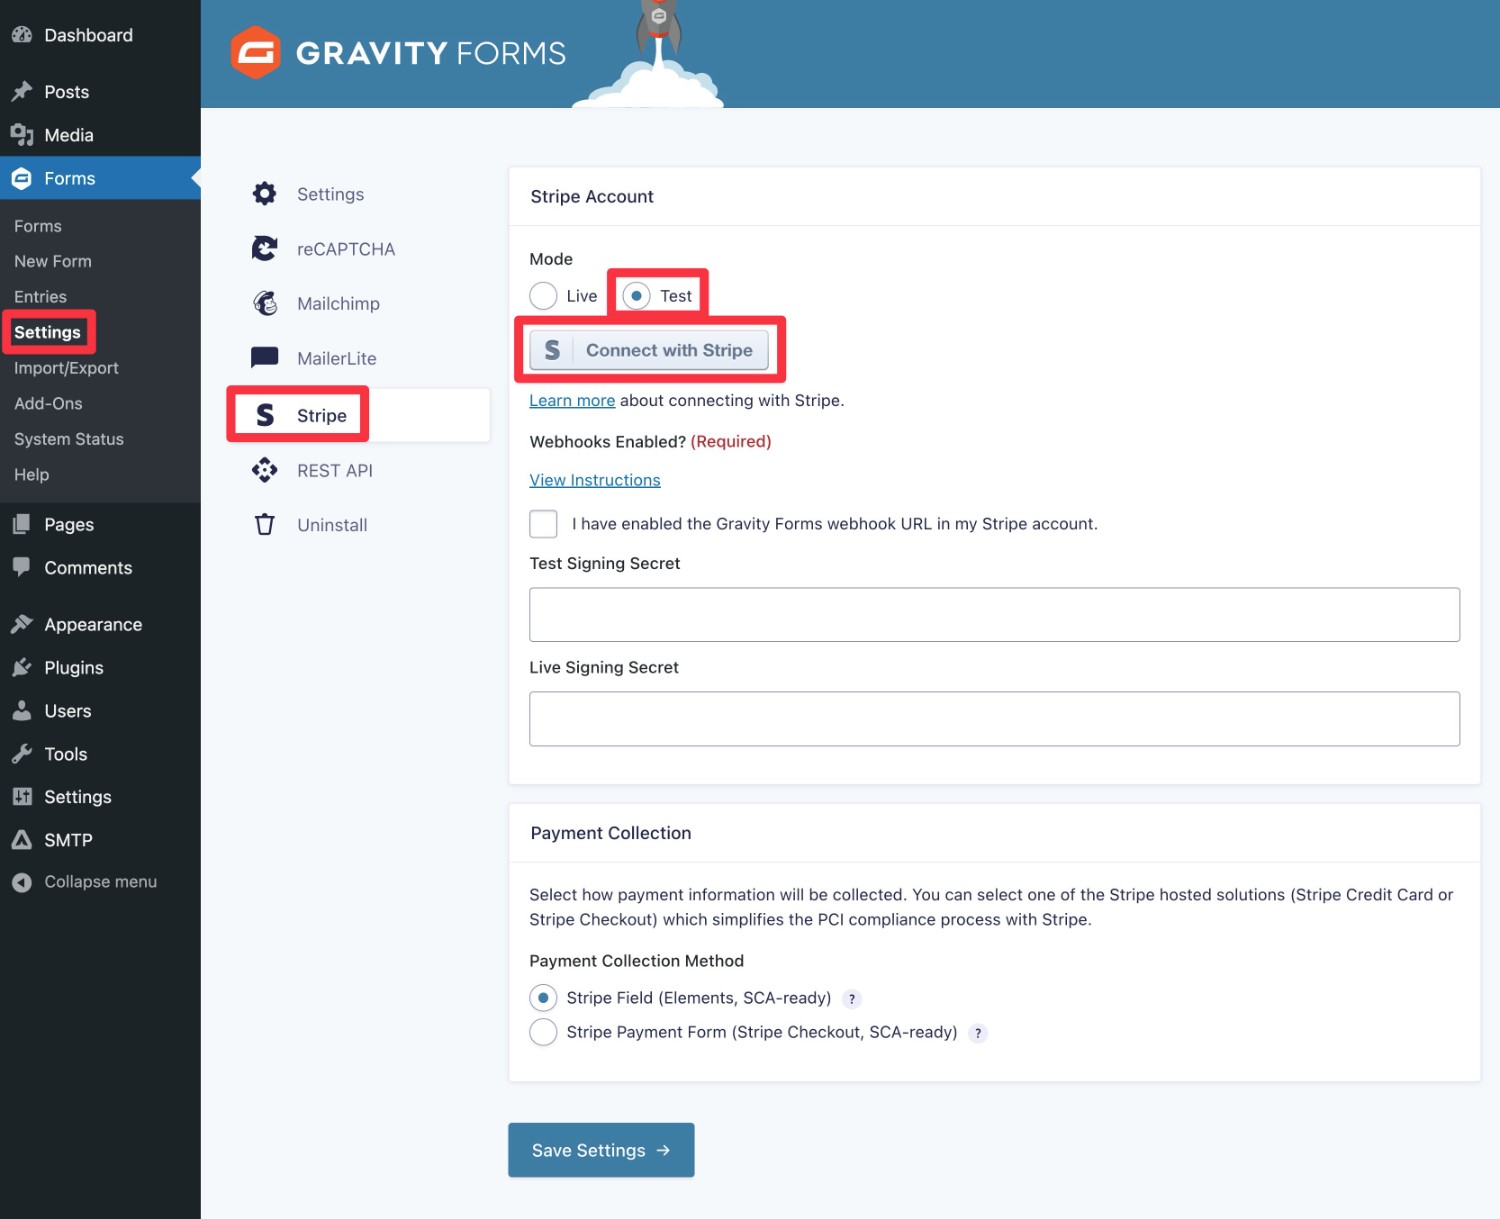
2. Go to Forms → Settings.
3. Select the Stripe tab in the sidebar.
When you’re first setting up your form, we recommend connecting to Stripe in Test Mode. This will let you test your form by submitting dummy payments rather than real payments.
Once you’ve verified that your payment form works as you want it to, you can come back and enable Live Mode, which will let you process real payments. We’ll cover this later in the tutorial.
Select the Test radio button and then click Connect with Stripe to authorize your WordPress site with your Stripe account.
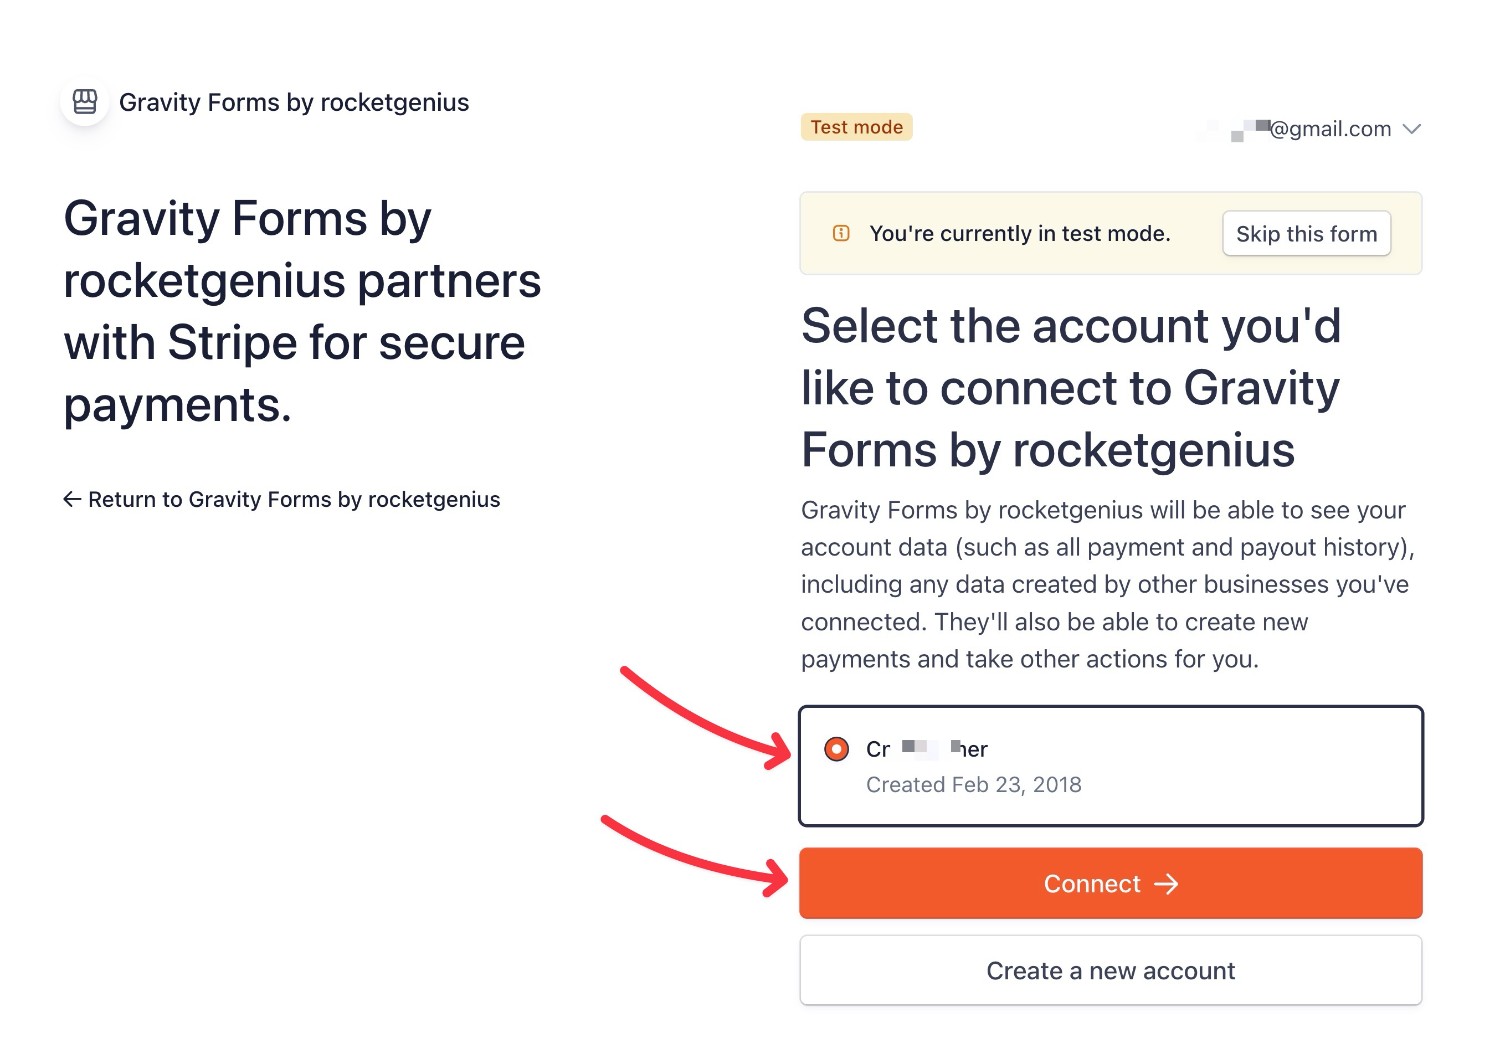
In the Stripe authorization flow, select the Stripe account that you want to use and then click Connect, which should take you back to the WordPress dashboard.
Add Webhooks and Signing Secret
After connecting to Stripe, the next step is to add the Gravity Forms webhook URL in your Stripe account.
To view instructions and locate the URL, click the View Instructions link:
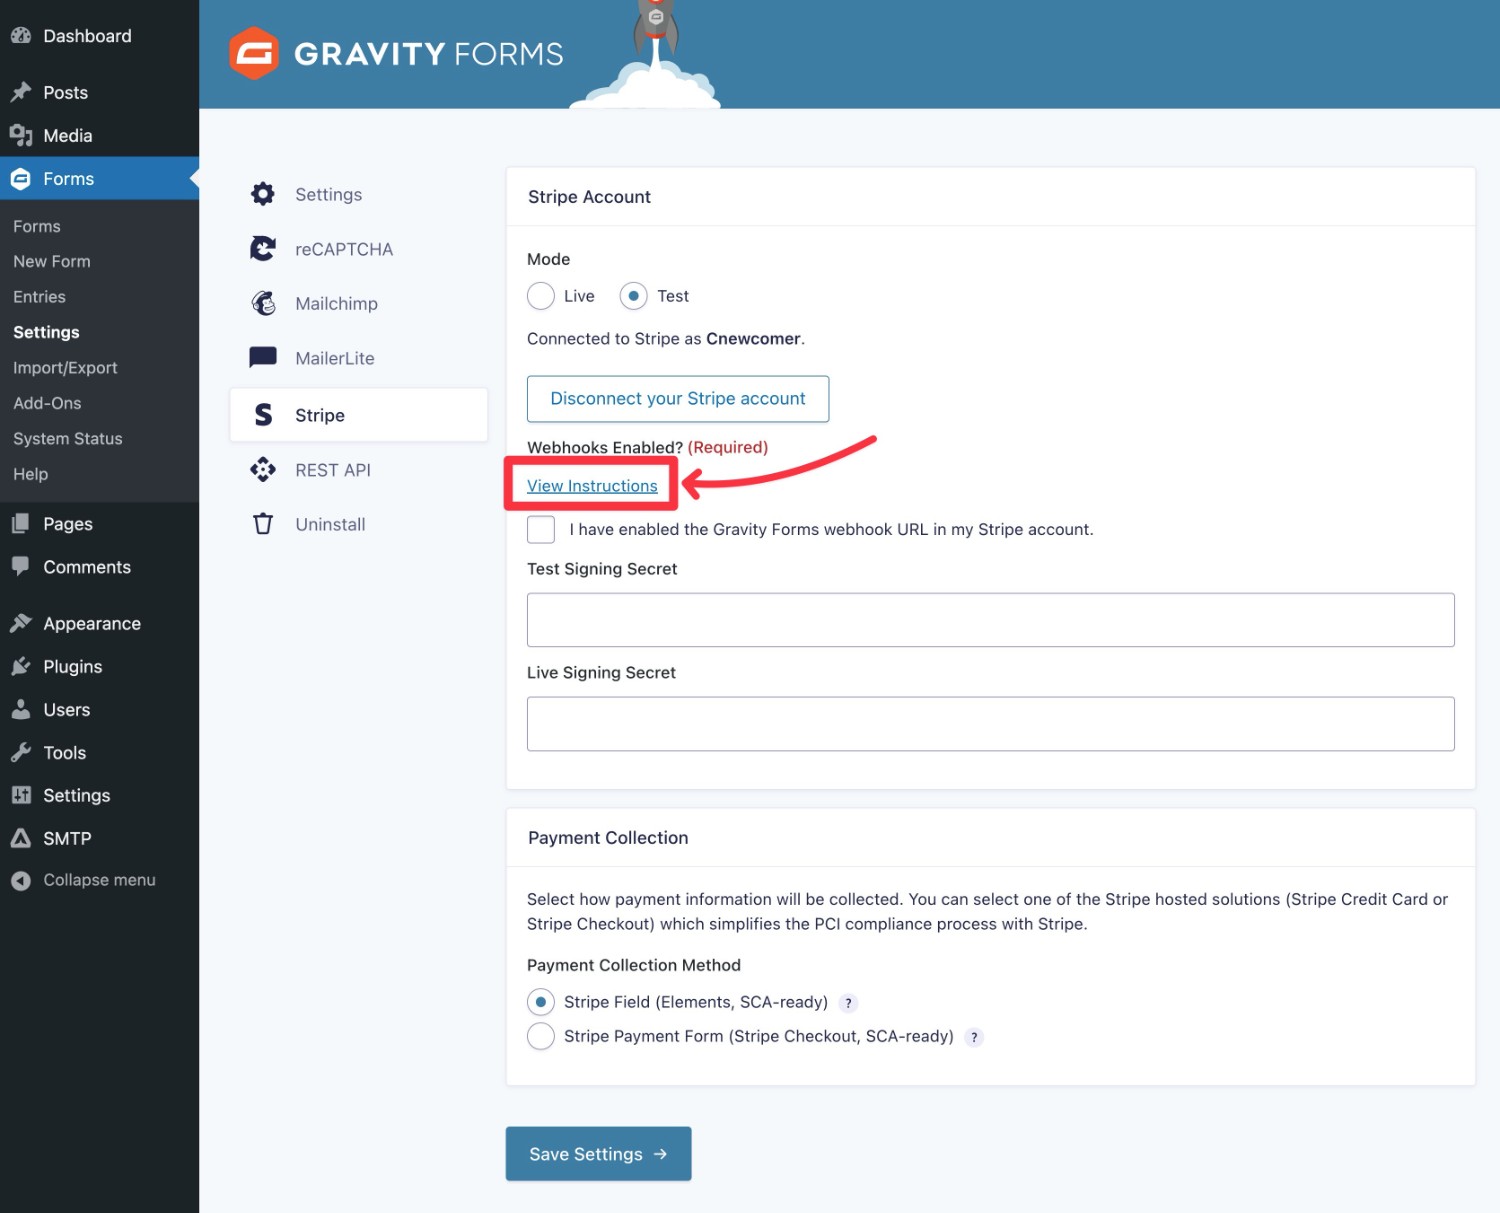
The popup will include the URL and instructions:
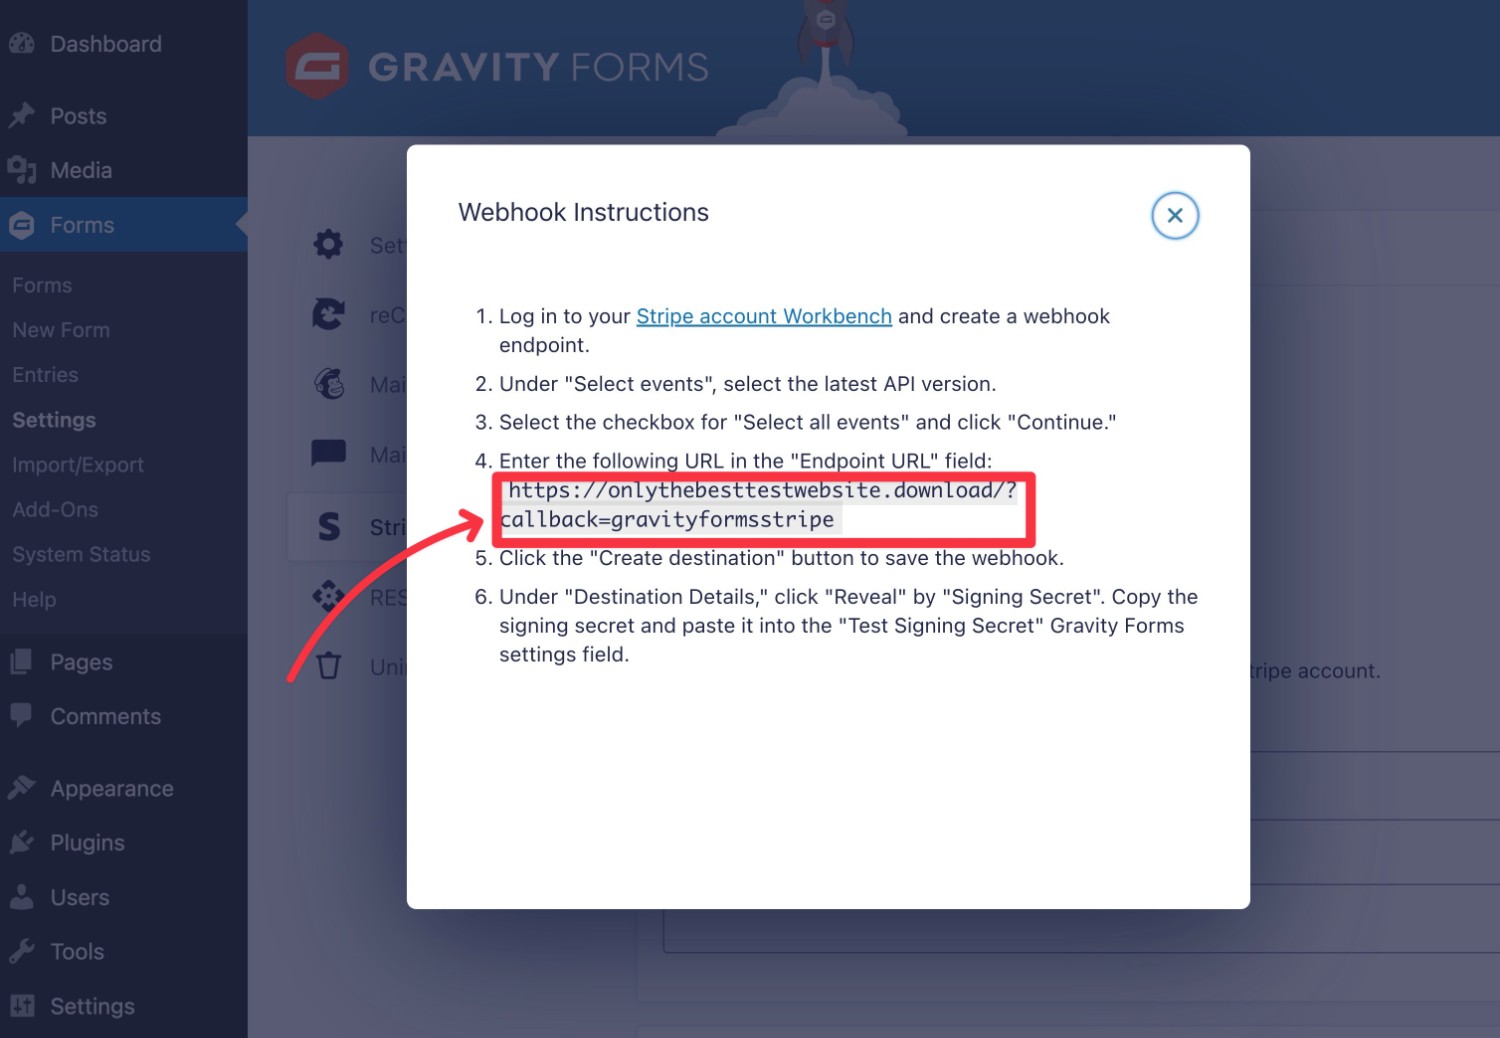
With this information, create a test endpoint URL in Stripe Workbench by clicking this link.
If you don’t see the Workbench interface and are instead redirected back to your main Stripe dashboard, you’ll first need to enable Stripe Workbench in the Stripe Developers settings. Stripe has made Workbench the default experience for new Stripe accounts, but existing Stripe account holders will not see Workbench unless they enable it.
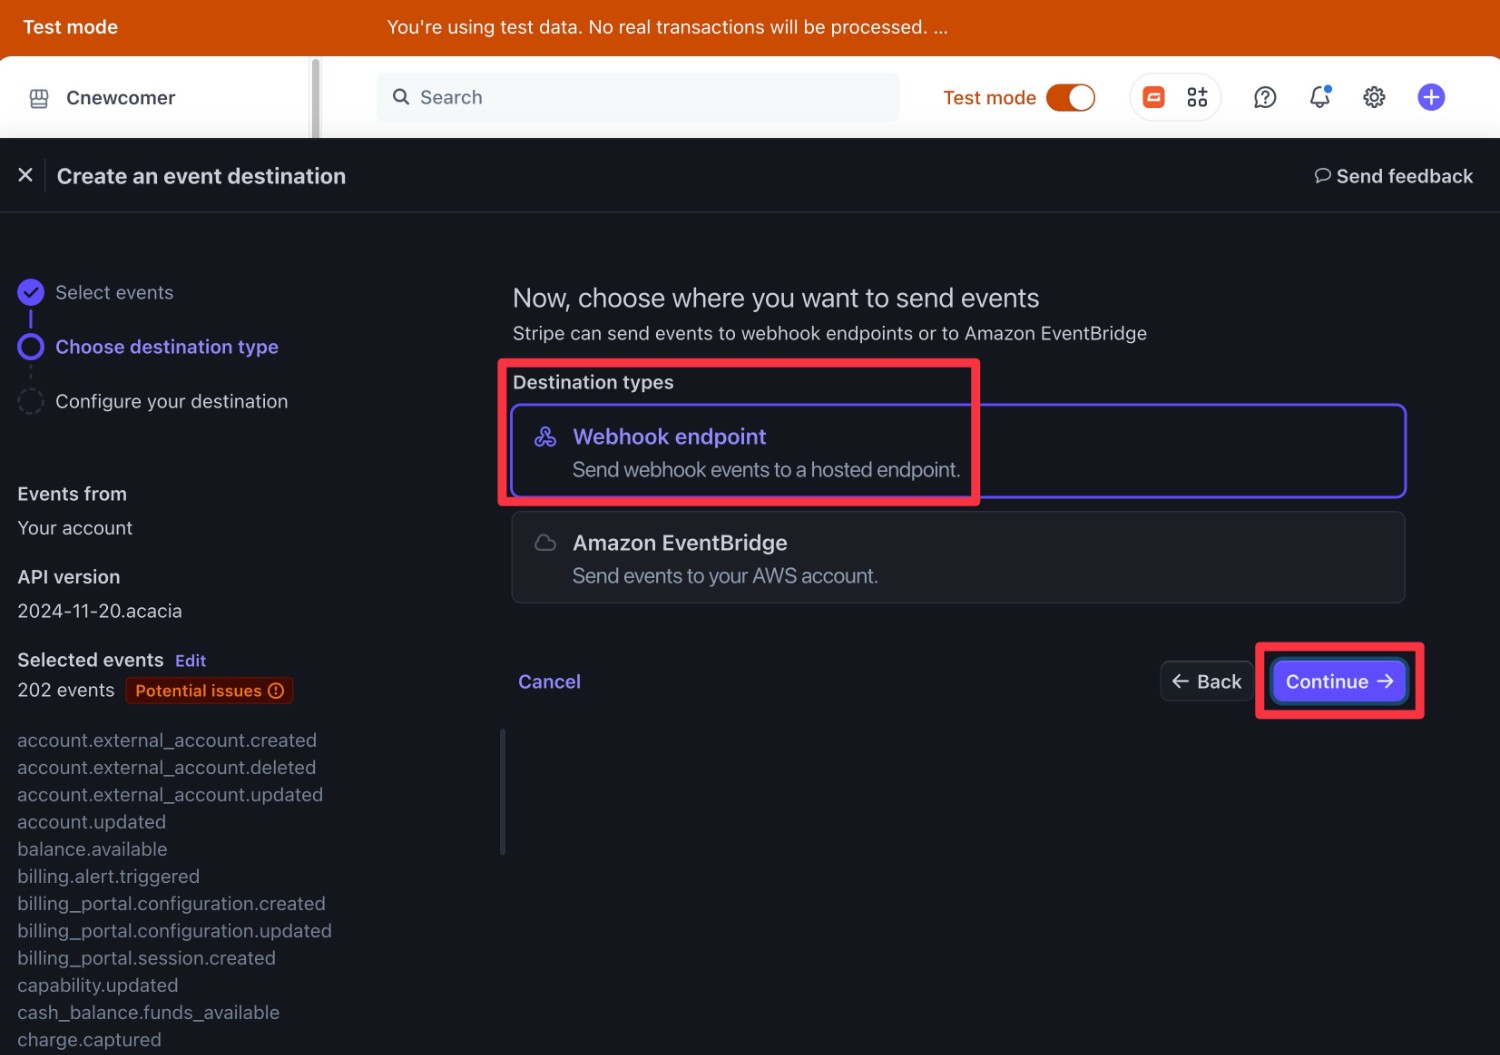
Here’s how to configure your webhook/event destination:
- Events from – Your account.
- API version – Latest version.
- Events – check the Select all events checkbox.
Then, click Continue.

Next, choose Webhook endpoint and click Continue again.
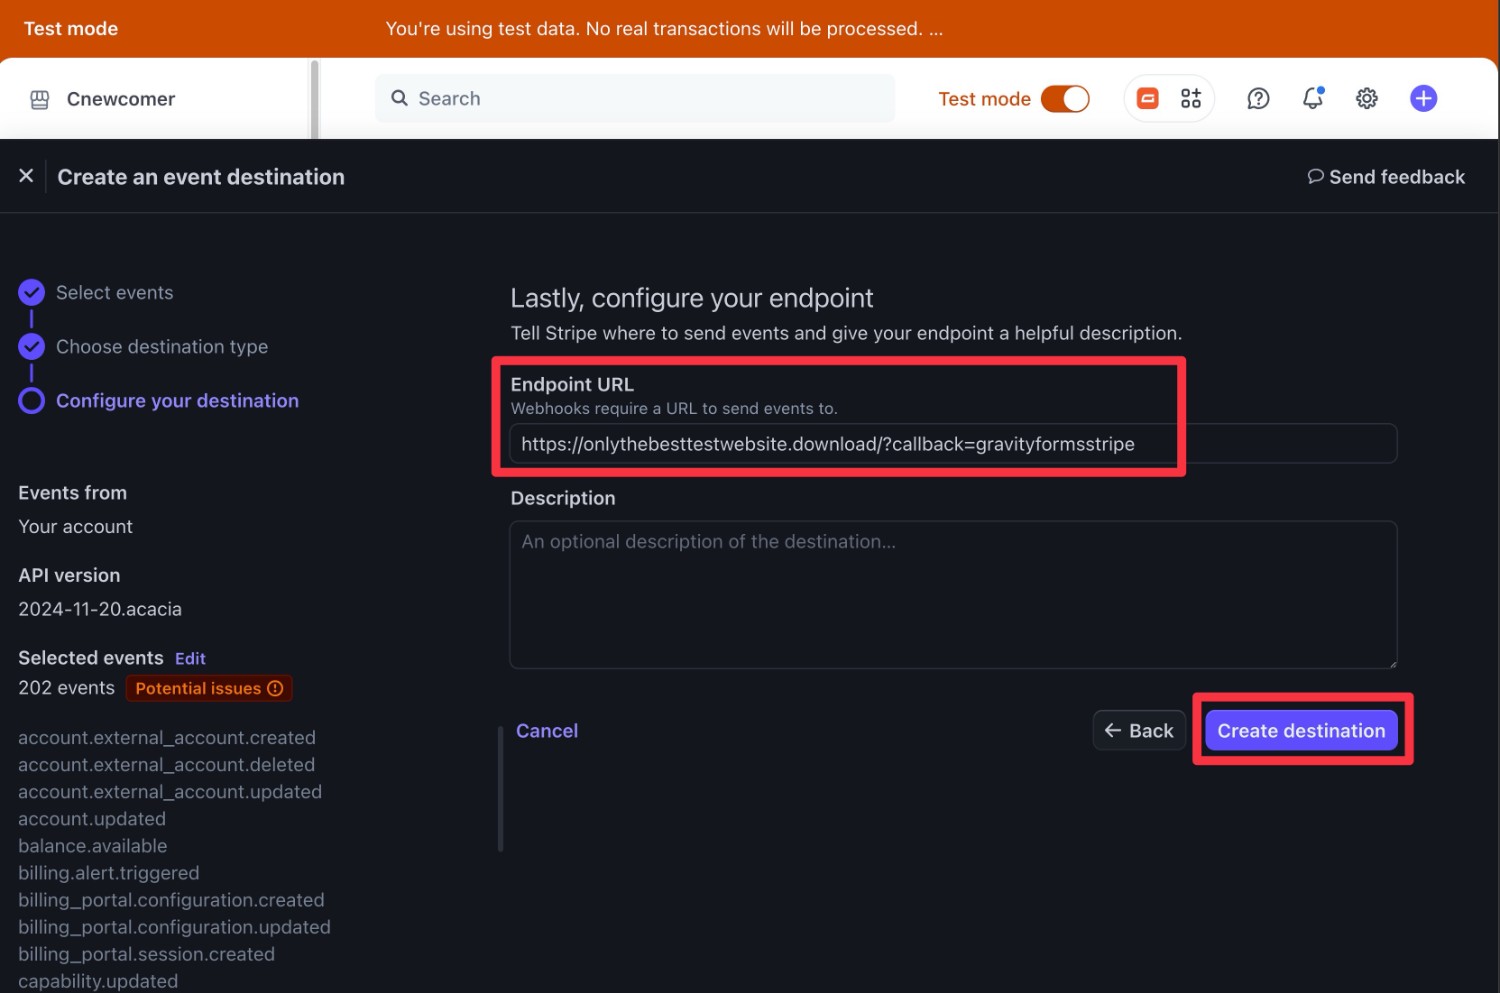
Finally, paste in the Gravity Forms webhook URL and then click Create destination.
On the next screen, find the Signing secret. It should be located in the Destination details column and it will start with whsec.
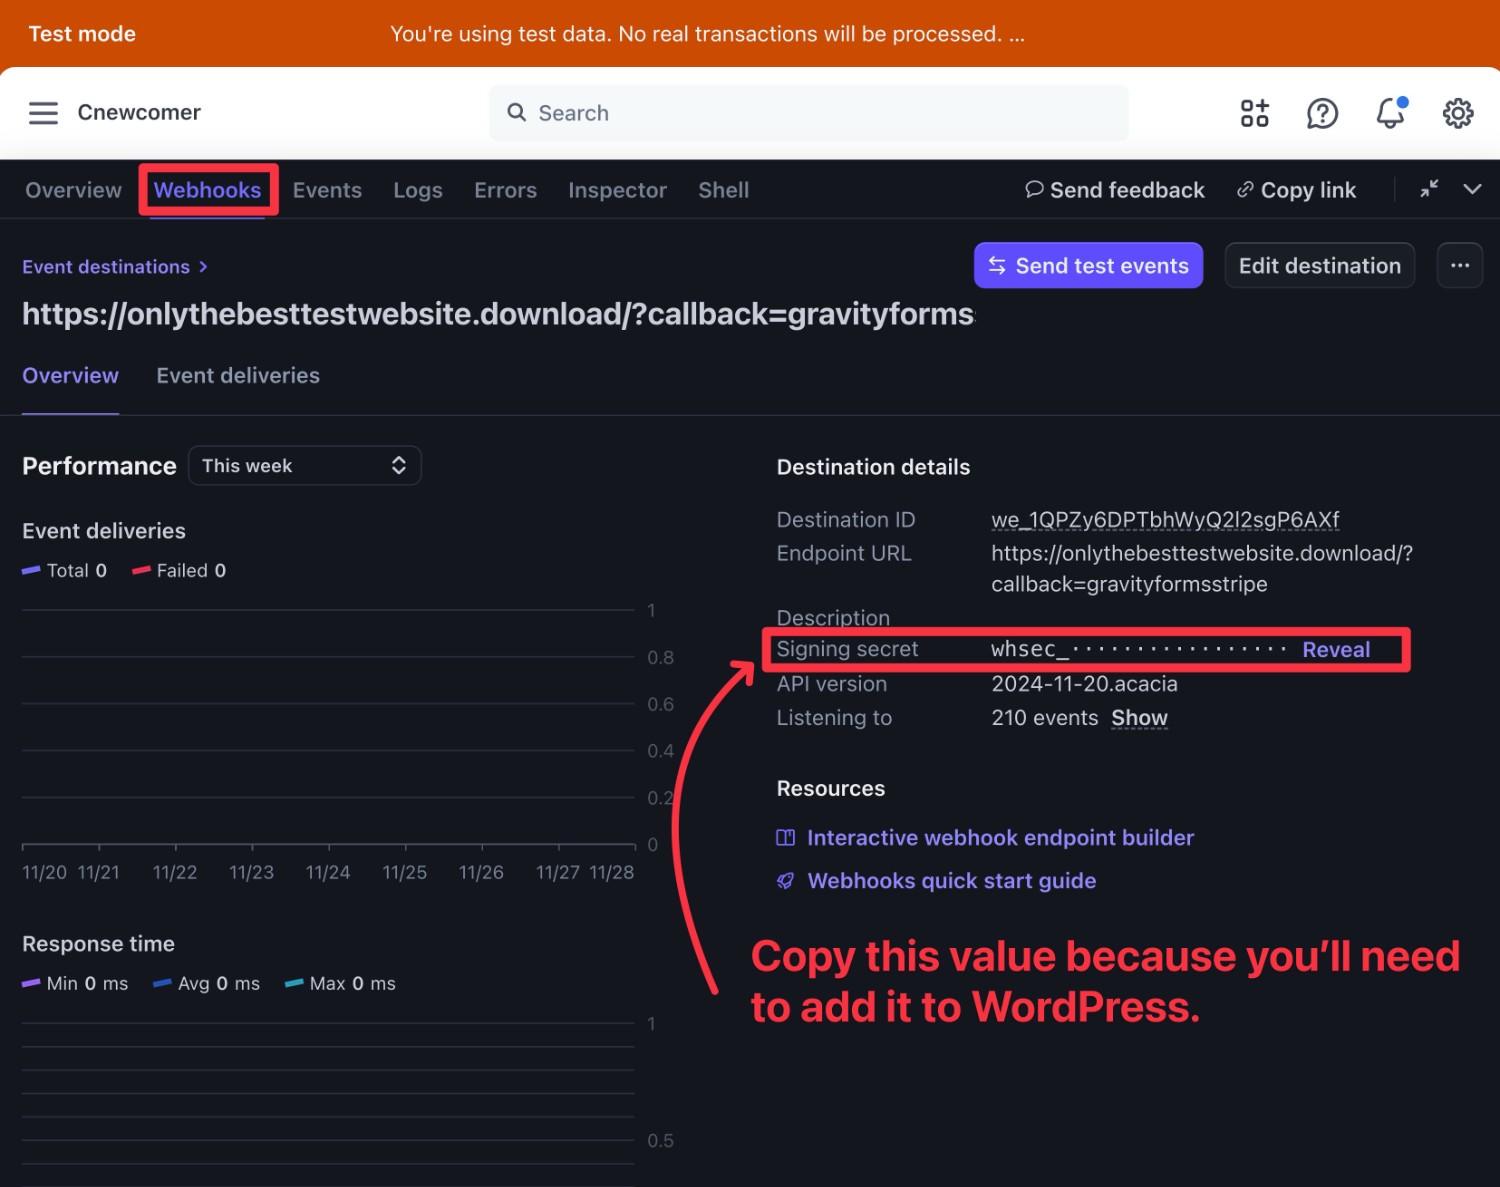
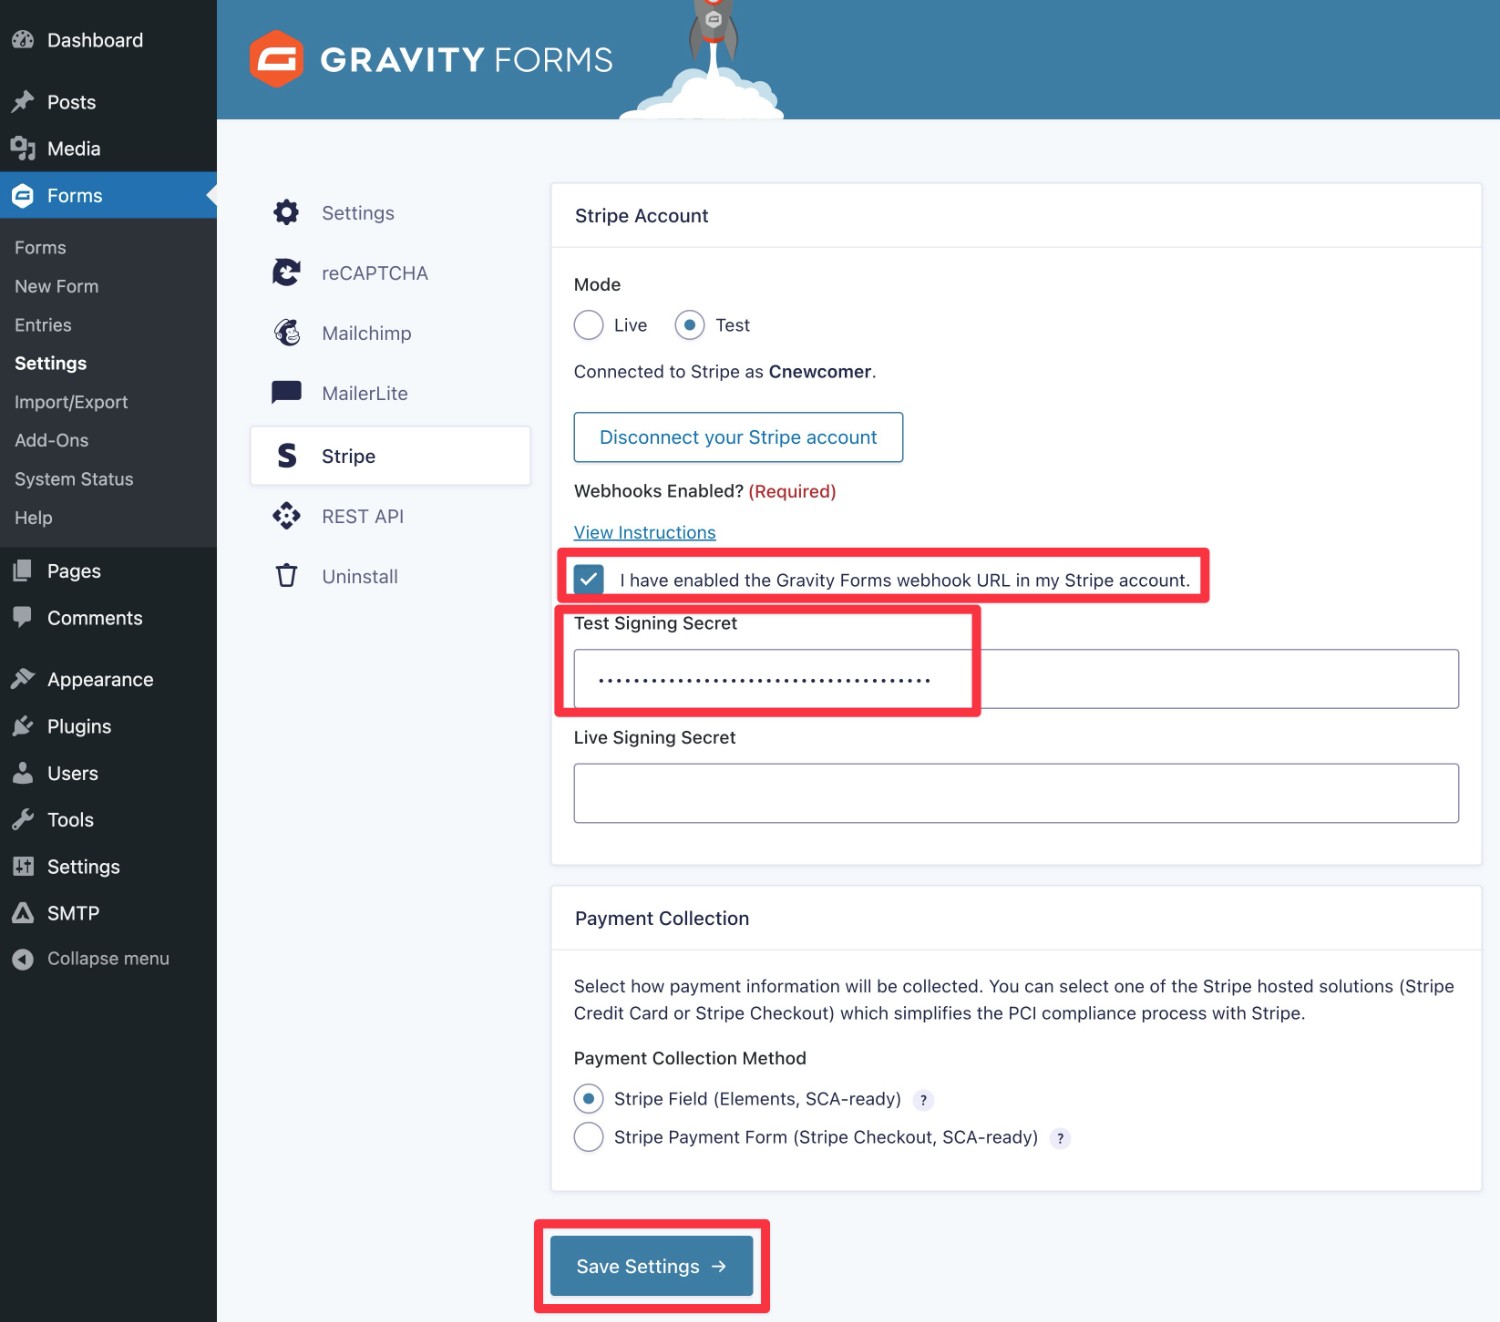
Once you’ve copied the test signing secret value, follow these steps:
1. Go back to your WordPress dashboard.
2. Paste the key into the Test Signing Secret box.
3. Check the box that you’ve enabled the webhook URL.
4. Click Save Settings at the bottom.
3. Enable SEPA Direct Debit Payments in Stripe
In order to offer SEPA Direct Debit as an option on your WordPress payment forms, you need to specifically enable SEPA Direct Debit as a payment option in your Stripe dashboard.
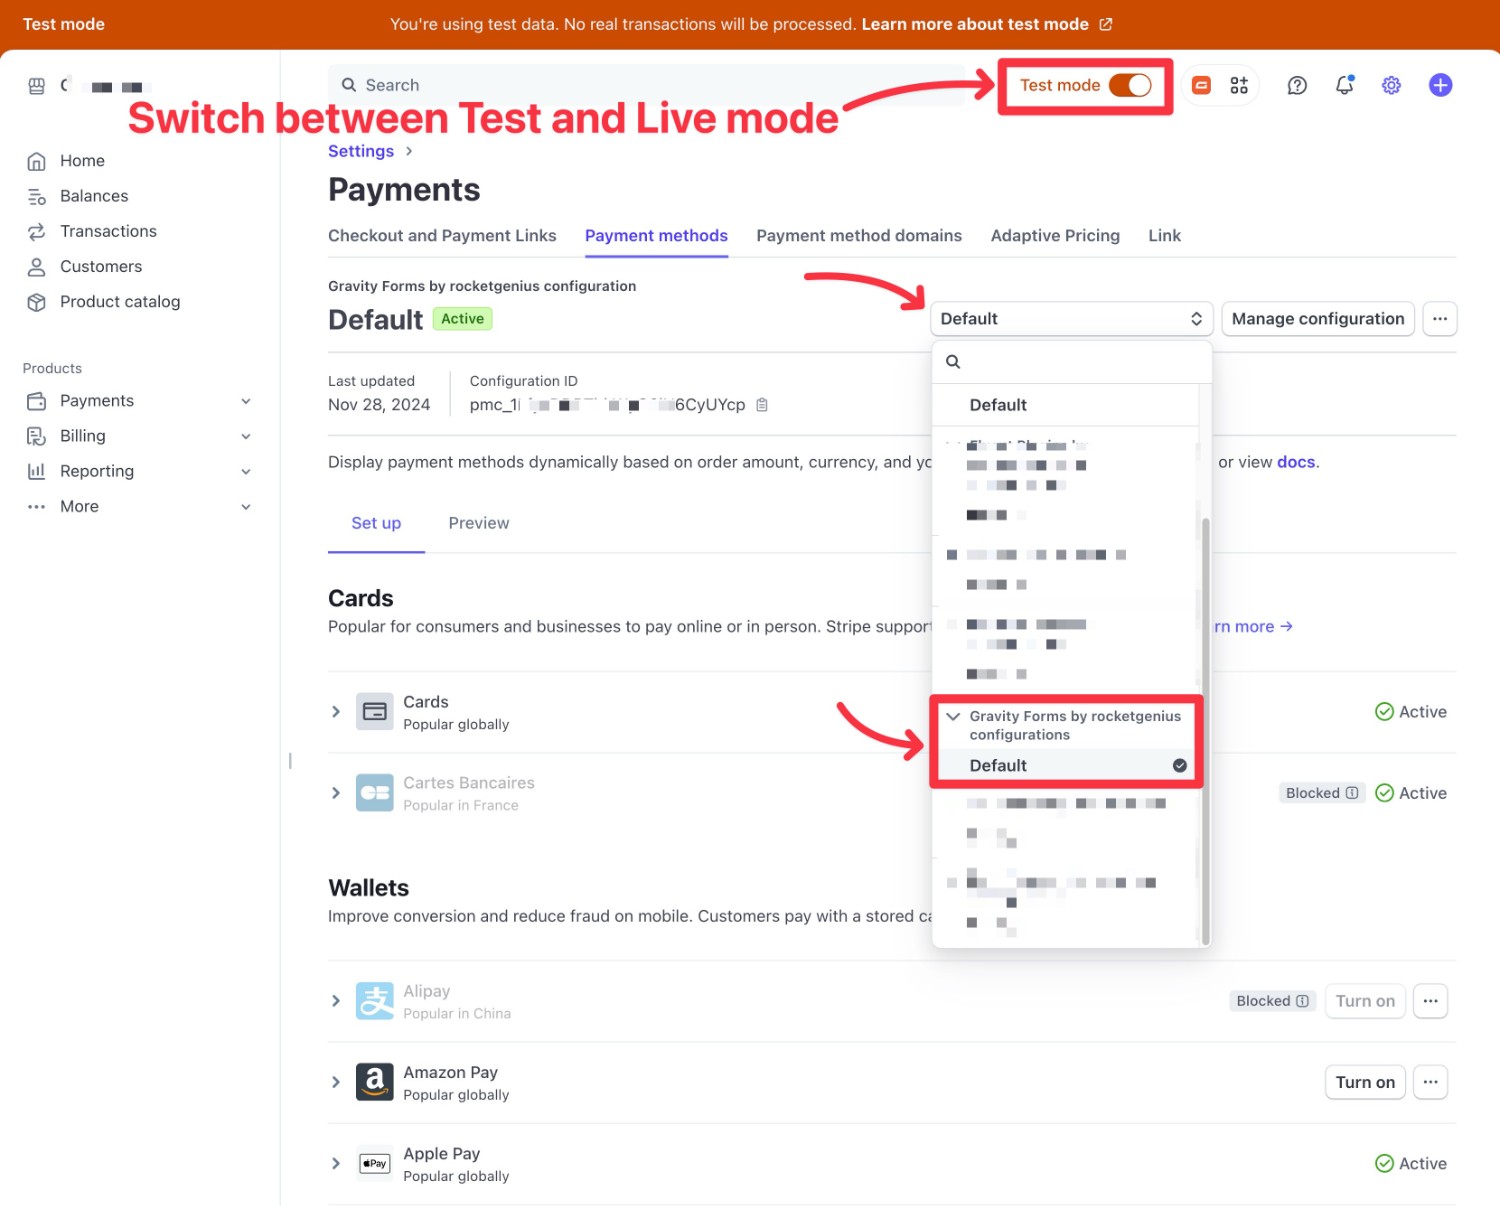
You will need to enable it in both Test and Live mode in your Stripe dashboard. You can switch between the two modes by using the toggle at the top of the Stripe interface.
Here’s how to enable SEPA Direct Debit:
1. Open the payment methods settings area in Stripe – you can click this link for live mode and this link for test mode.
2. Click on the Default drop-down and choose the Default option underneath “Gravity Forms by rocketgenius” configuration.
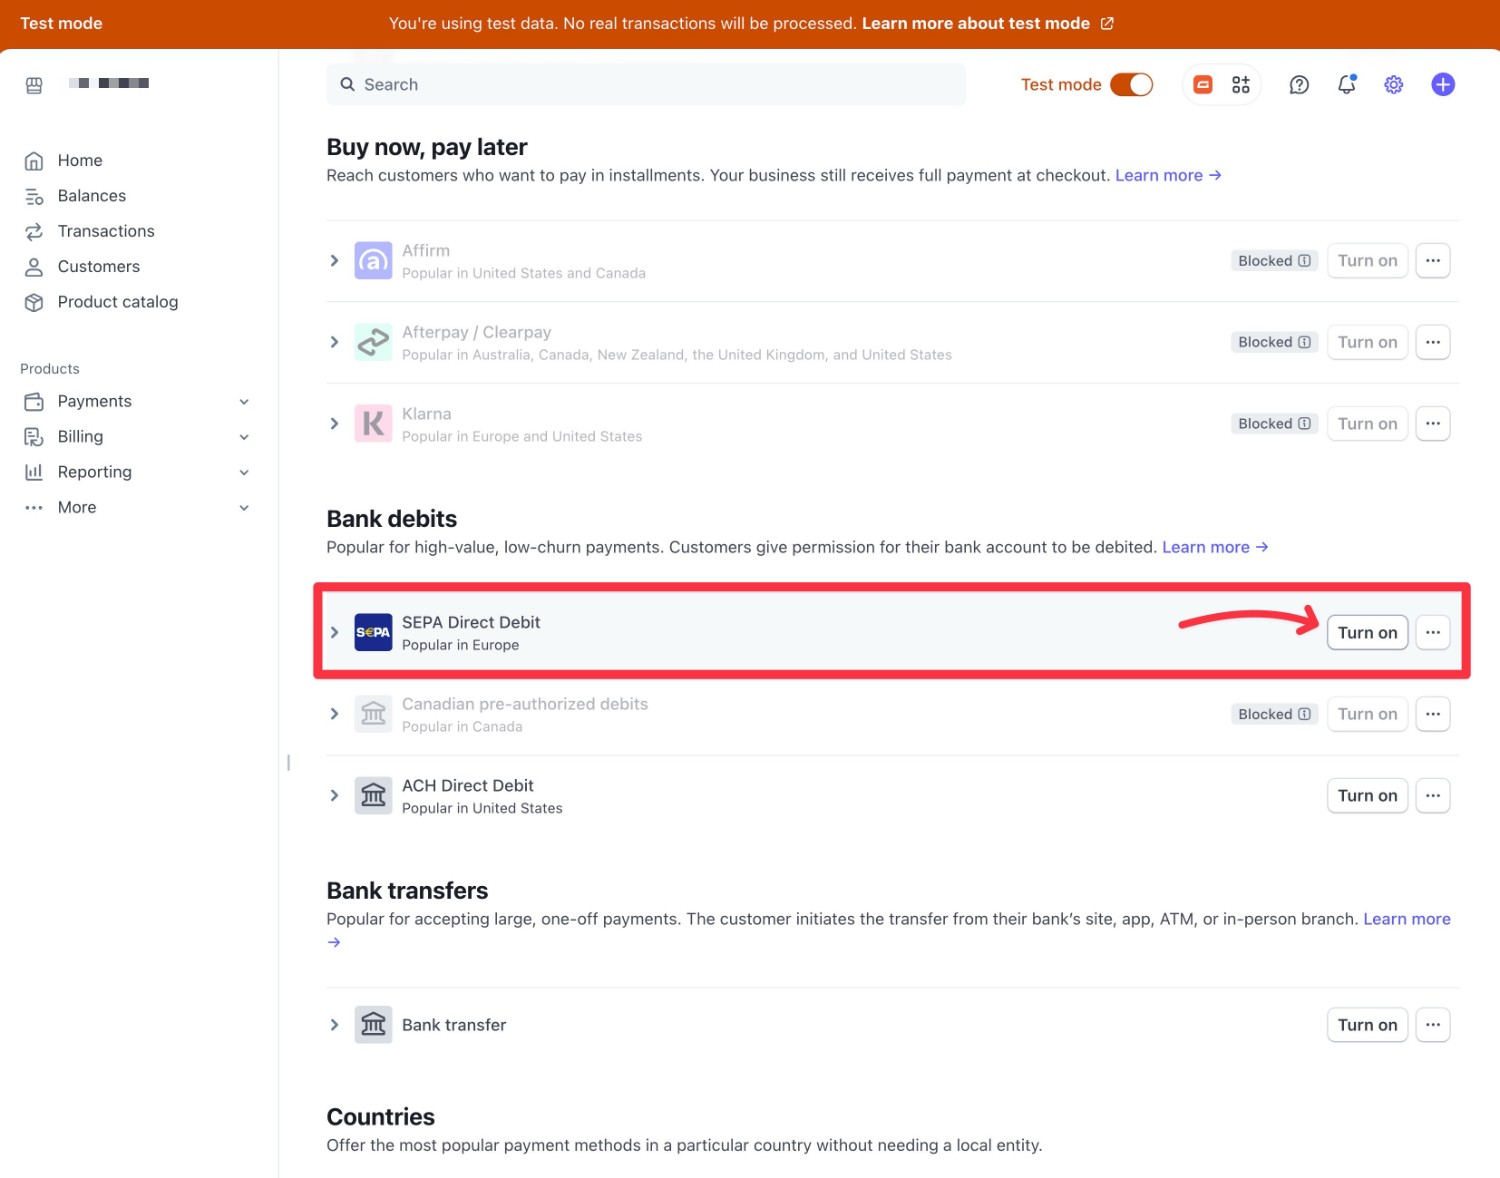
3. Find the SEPA Direct Debit option – it should be at the bottom under Bank debits.
4. Click Turn on. If a popup appears, click Continue.
5. Look for the green checkmark and Active text, which confirms that SEPA Direct Debit will be active for your payment forms. Be sure to do this in both Test and Live mode.
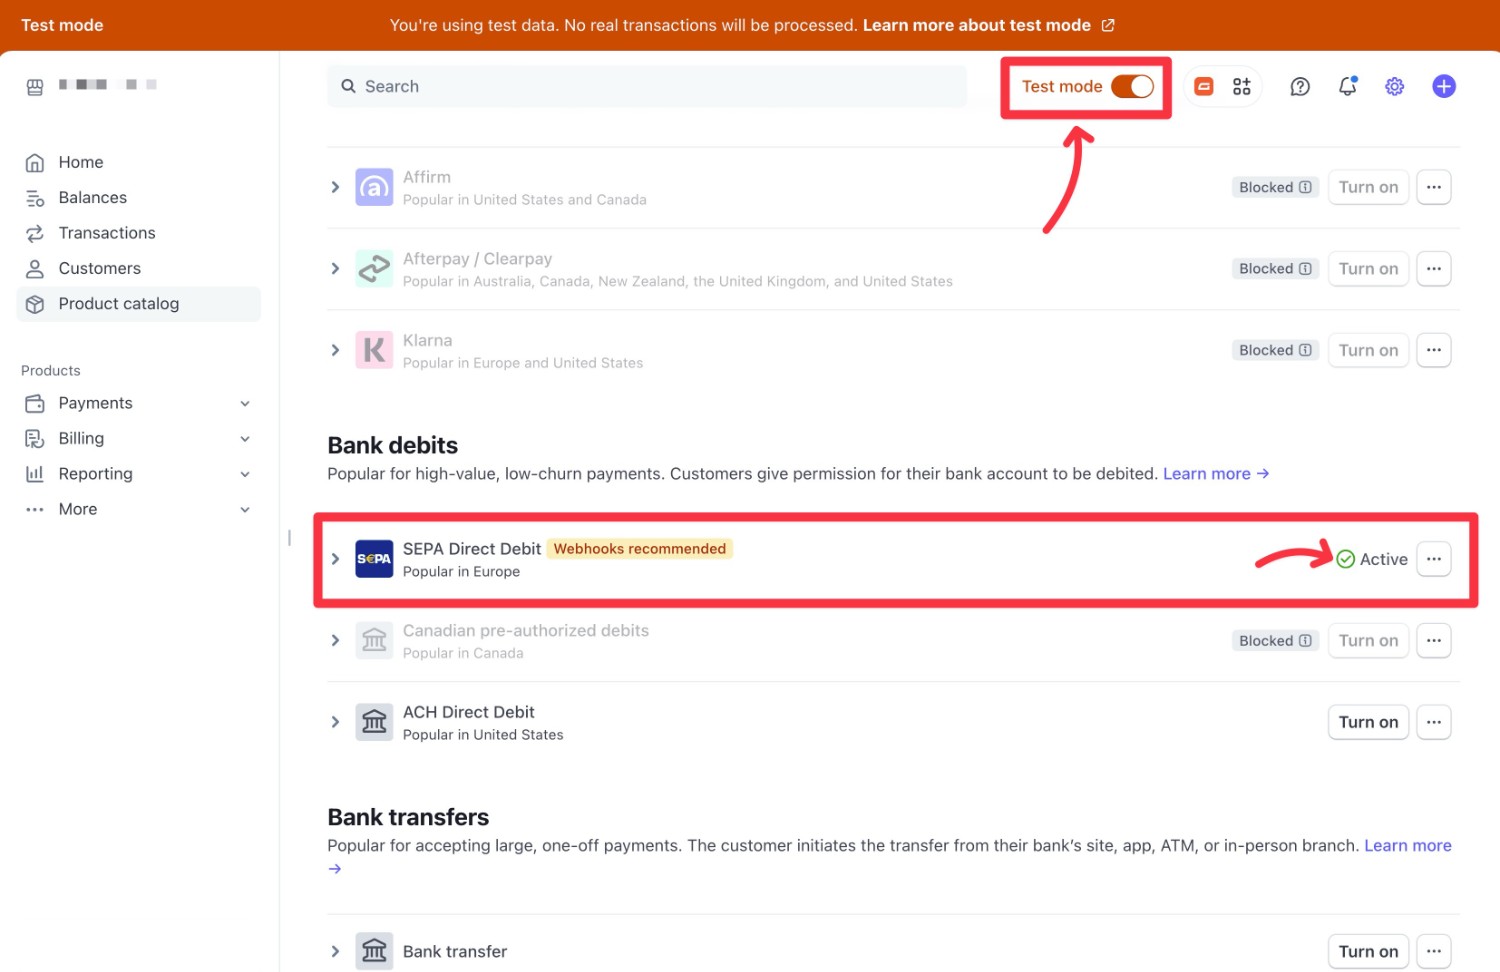
If you only want to display SEPA Direct Debit if the person is paying a certain amount, you can click the three dots icon and then set minimum and/or maximum transaction amounts for SEPA Direct Debit.
4. Create Your SEPA Direct Debit Payment Form
You’re now ready to create the payment form that your customers will use to make payments via SEPA Direct Debit and any other methods that you choose to offer.
To get started, go to Forms → New Form in your WordPress dashboard.
To help you save time, Gravity Forms includes a pre-made Stripe Checkout Form template that includes all the essential fields that your form needs.
While you are free to build your form from scratch, we recommend using the template to save time. This is what we’ll do in the tutorial.
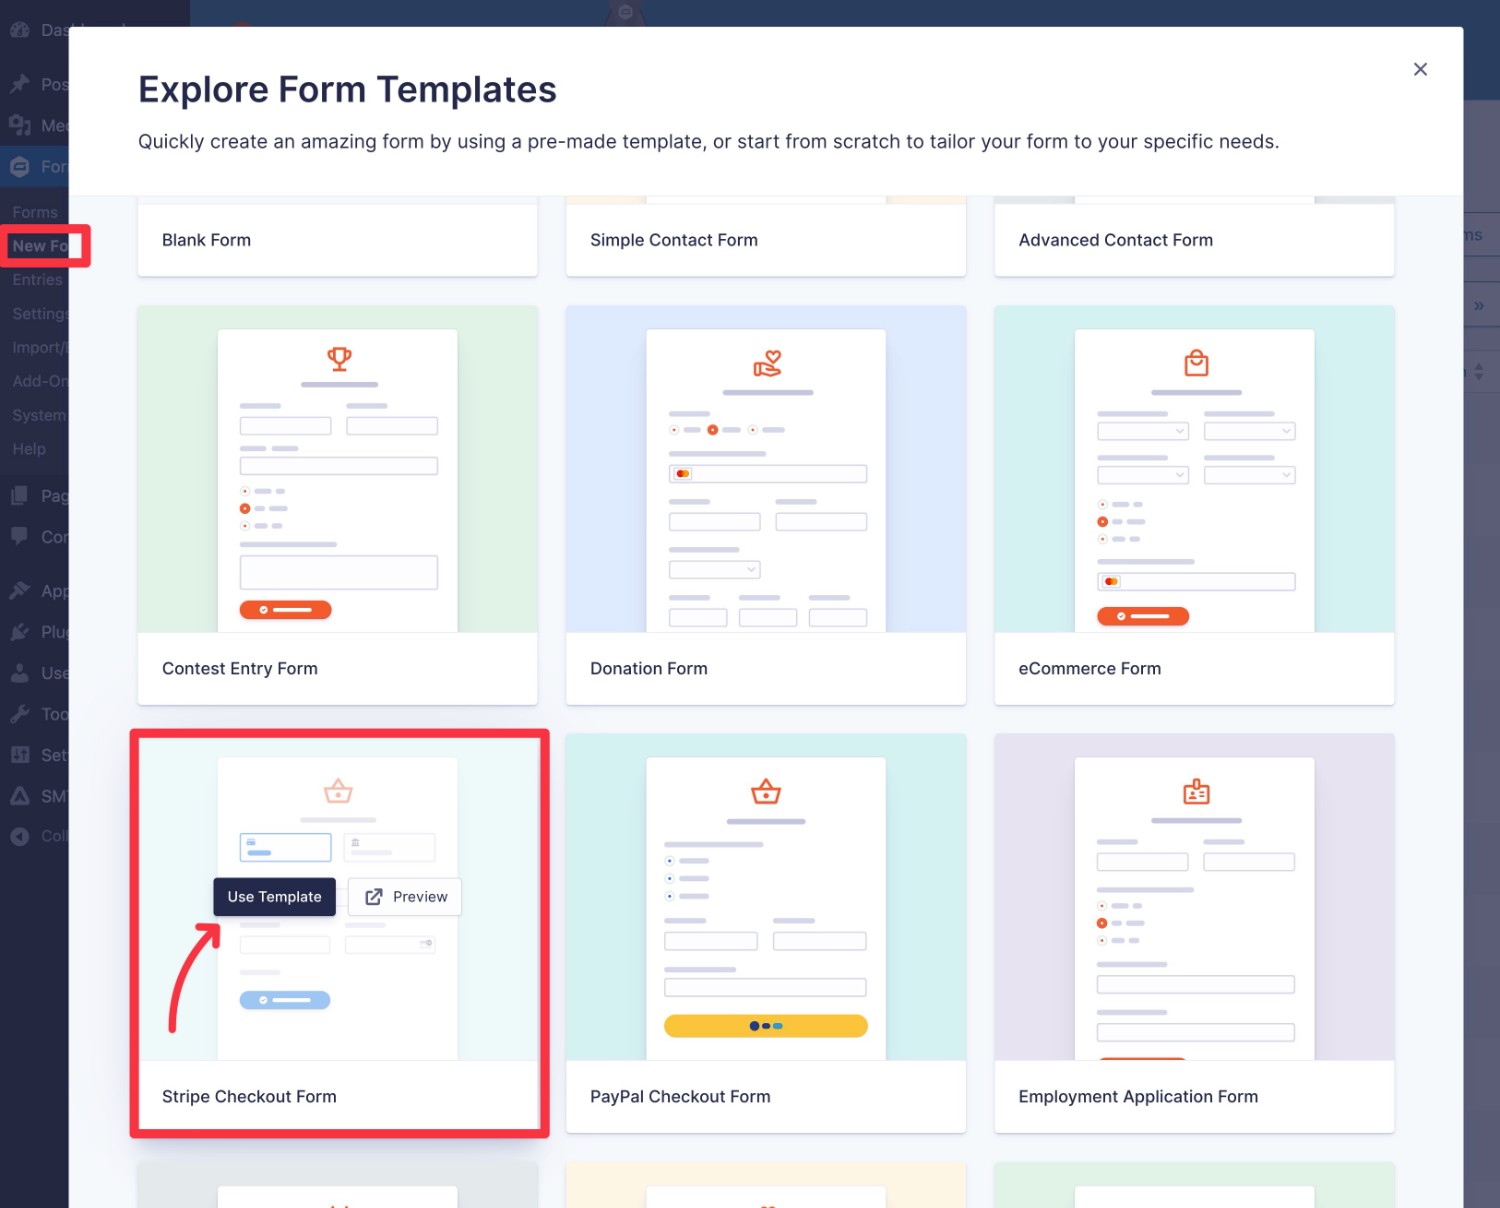
Once you give your form a name, you should be taken straight to the drag-and-drop form builder interface. This is where you can set up the fields on your SEPA Direct Debit payment form.
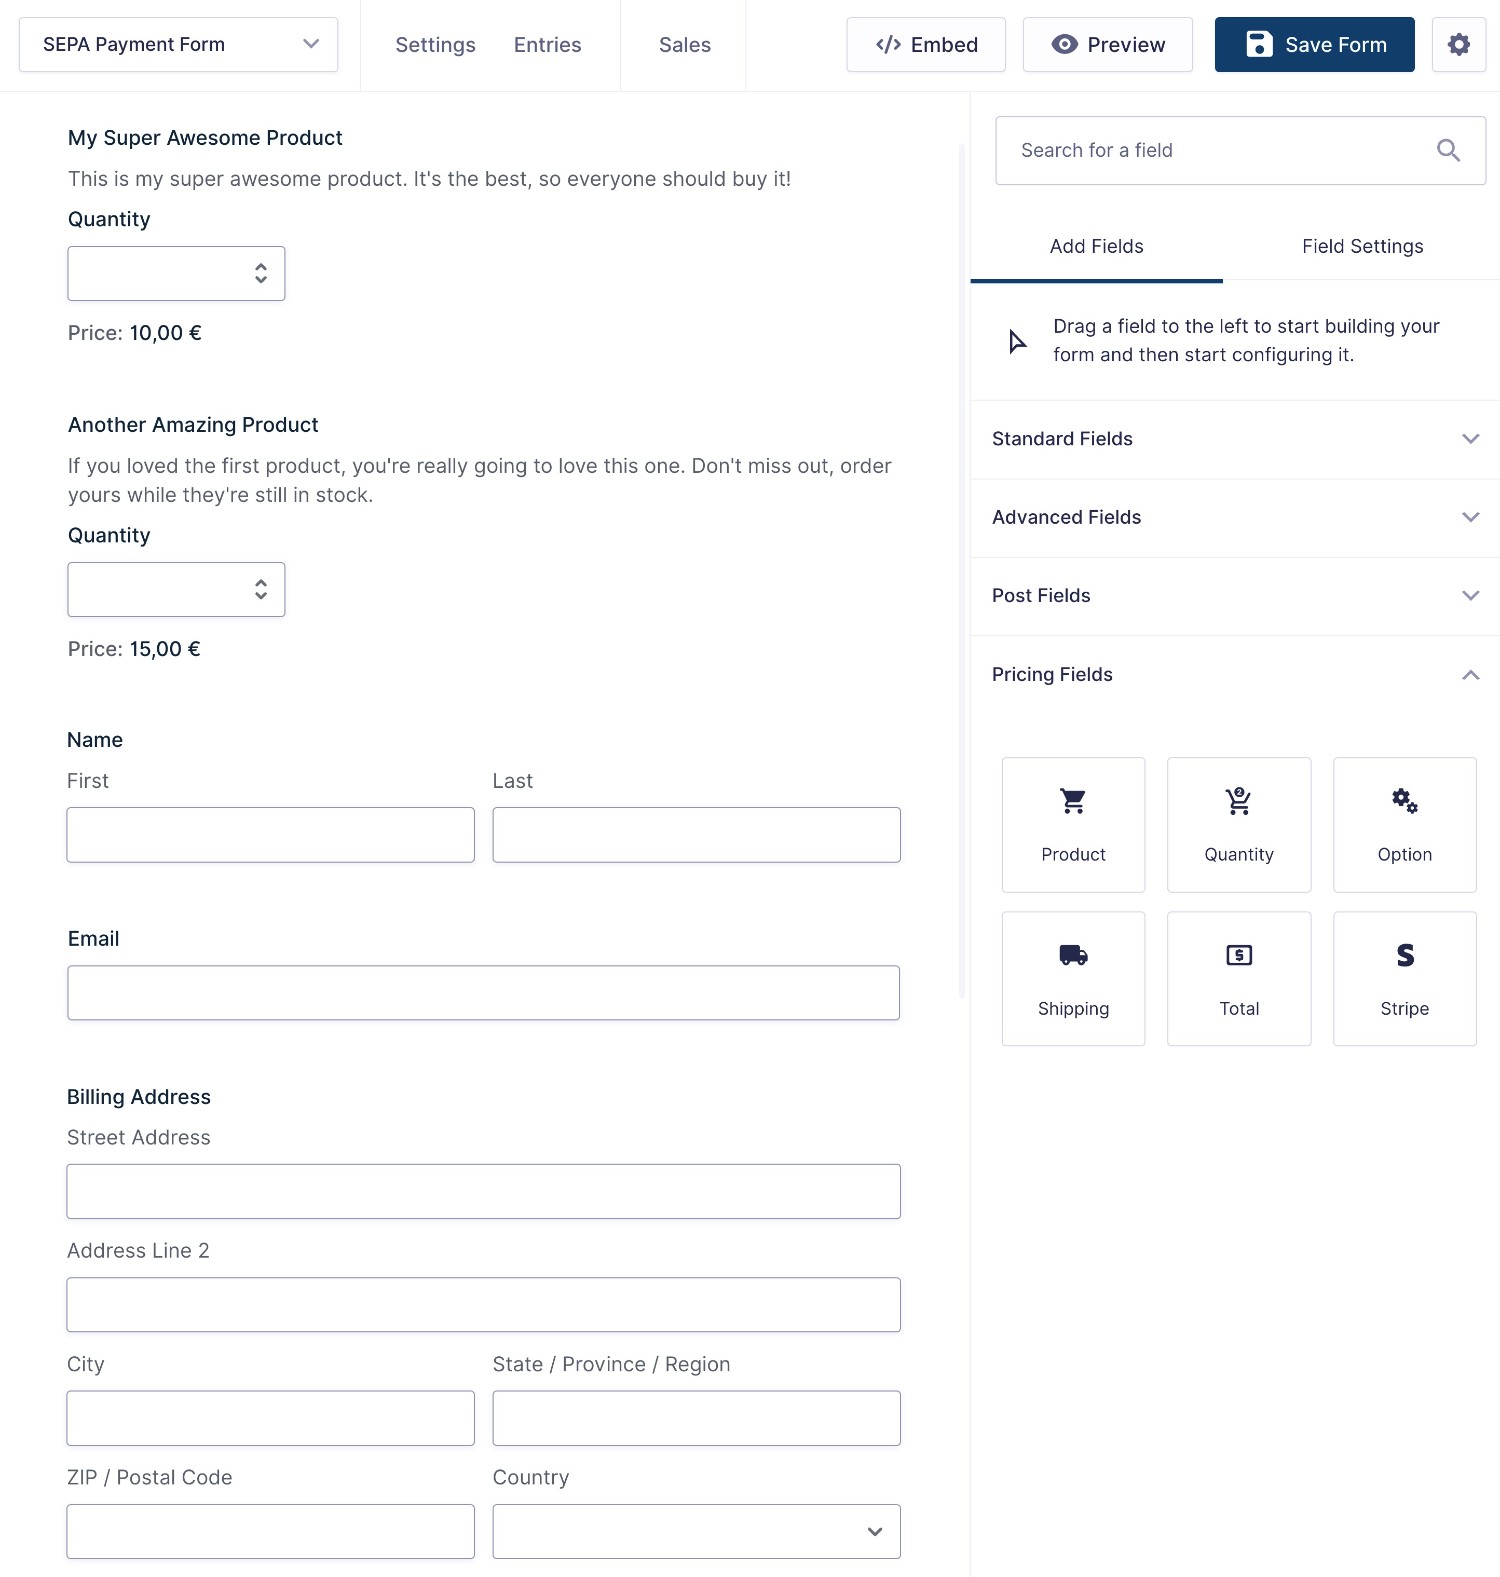
You’re free to customize the fields however you want, but you’ll generally want to include three types of fields at a minimum:
- General information fields
- Product fields
- Stripe field
General Information Fields
To start, you’ll want to add general information fields to collect essential information such as the person’s name, email address, billing address, phone number, and so on.
The pre-made template will include all of these fields already, but you can customize them or add more fields as needed. You’ll also be able to map all of the data in these fields to Stripe.
Product Fields
To control how much people will pay, you’ll use product fields.
You could set up the form so that every single person pays the same amount. Or, you could set it up so that users will pay different amounts based on how they answered the form.
There are a few different types of product fields, so we recommend checking out the pricing fields documentation to learn how each field works:
Stripe Field
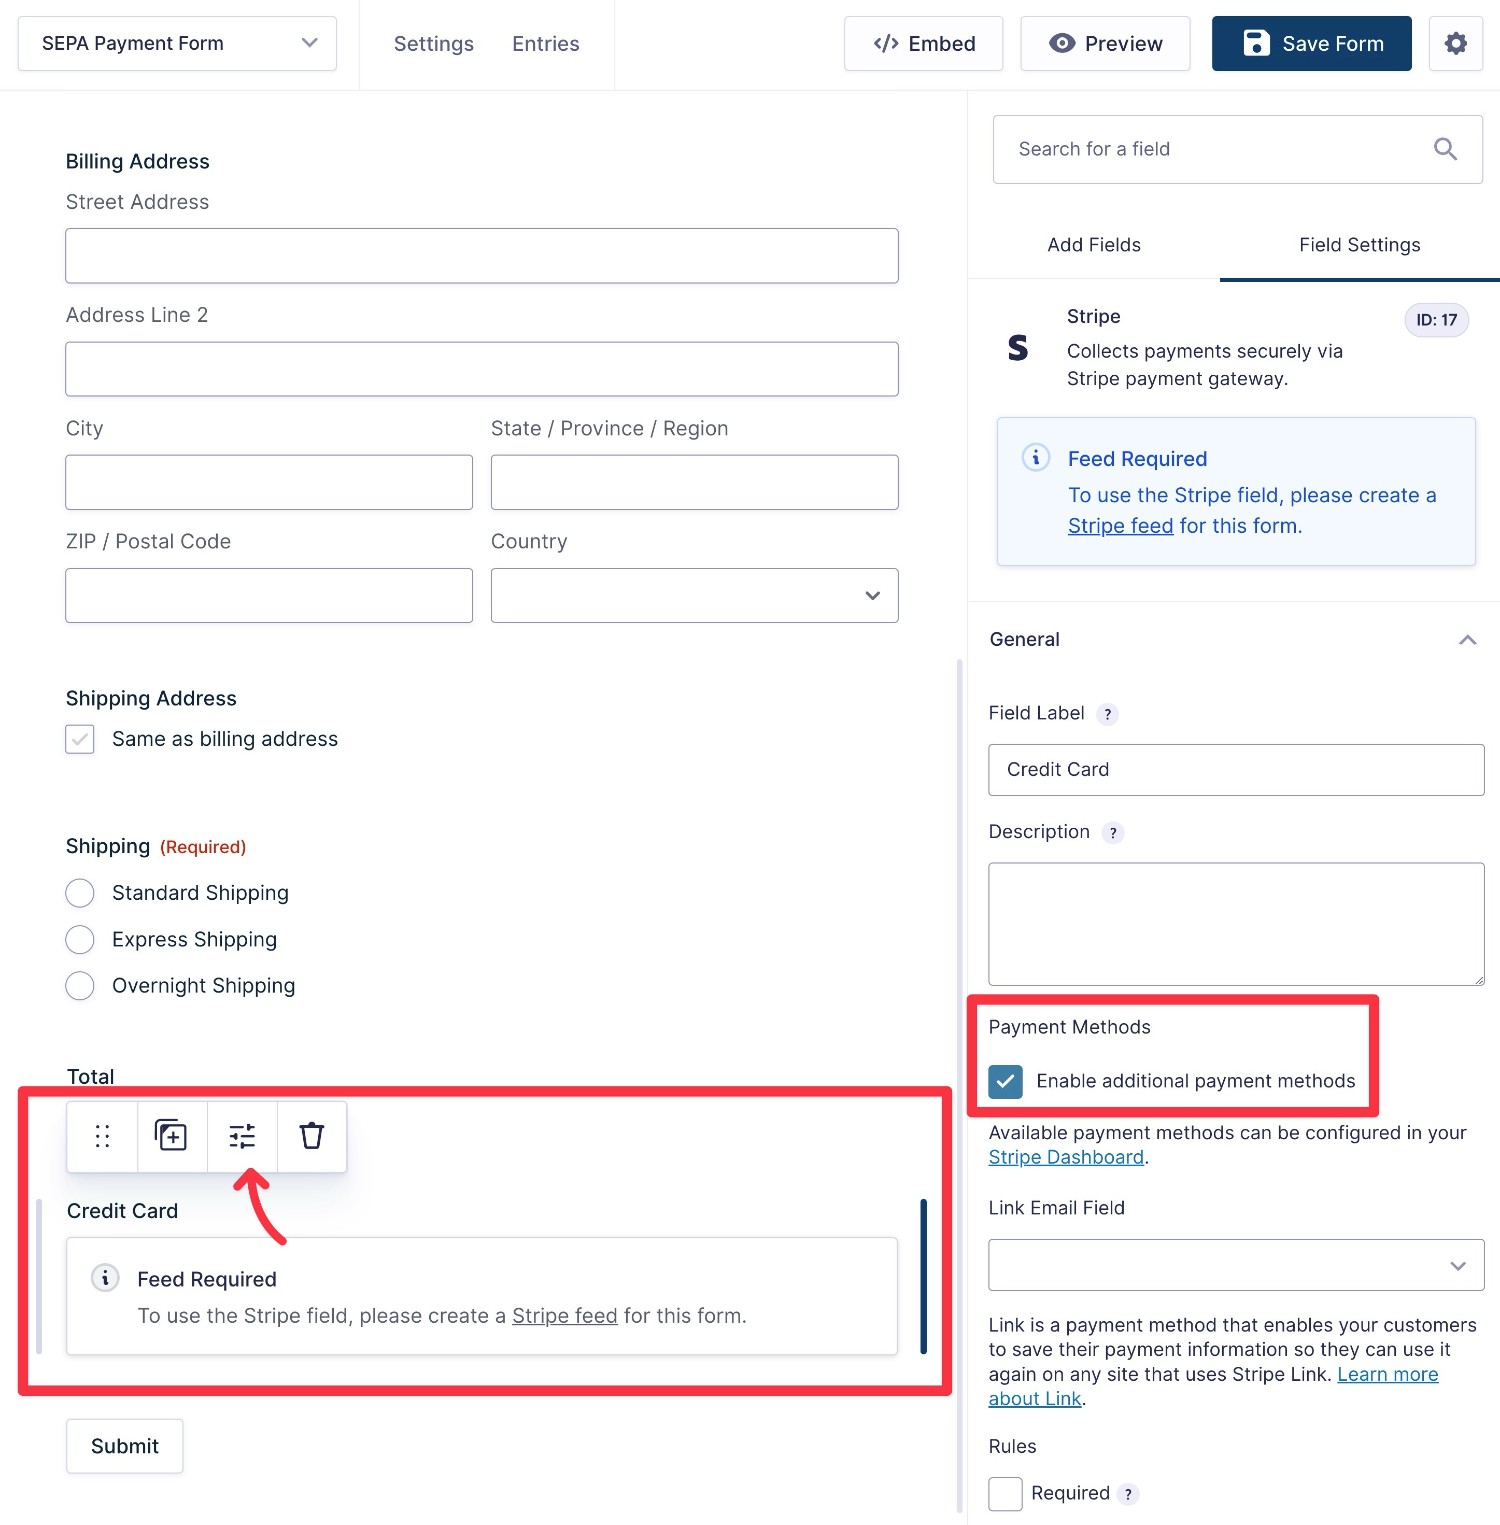
Finally, you’ll need to include a Stripe field, as this is what displays the payment methods that you’ve enabled in Stripe, including SEPA Direct Debit.
By default, the Stripe field will only display an option for credit/debit card payments.
To also add SEPA Direct Debit as an option (along with any other payment methods that you’ve enabled in Stripe), you need to open the Stripe field’s settings and check the box to Enable additional payment methods.
You will not see an actual live preview of the Stripe field until you create a Stripe “feed”, which we’ll cover in the next step.
Once you’re happy with all the fields in your form, make sure to save your settings.
5. Create a Stripe Feed to Control Payment Processing
To control how to connect the payment amounts and customer information in your form to Stripe, you’ll create a Stripe “feed”.
Go to Settings → Stripe in the form editor interface. Then, click Add New to create a new Stripe feed.
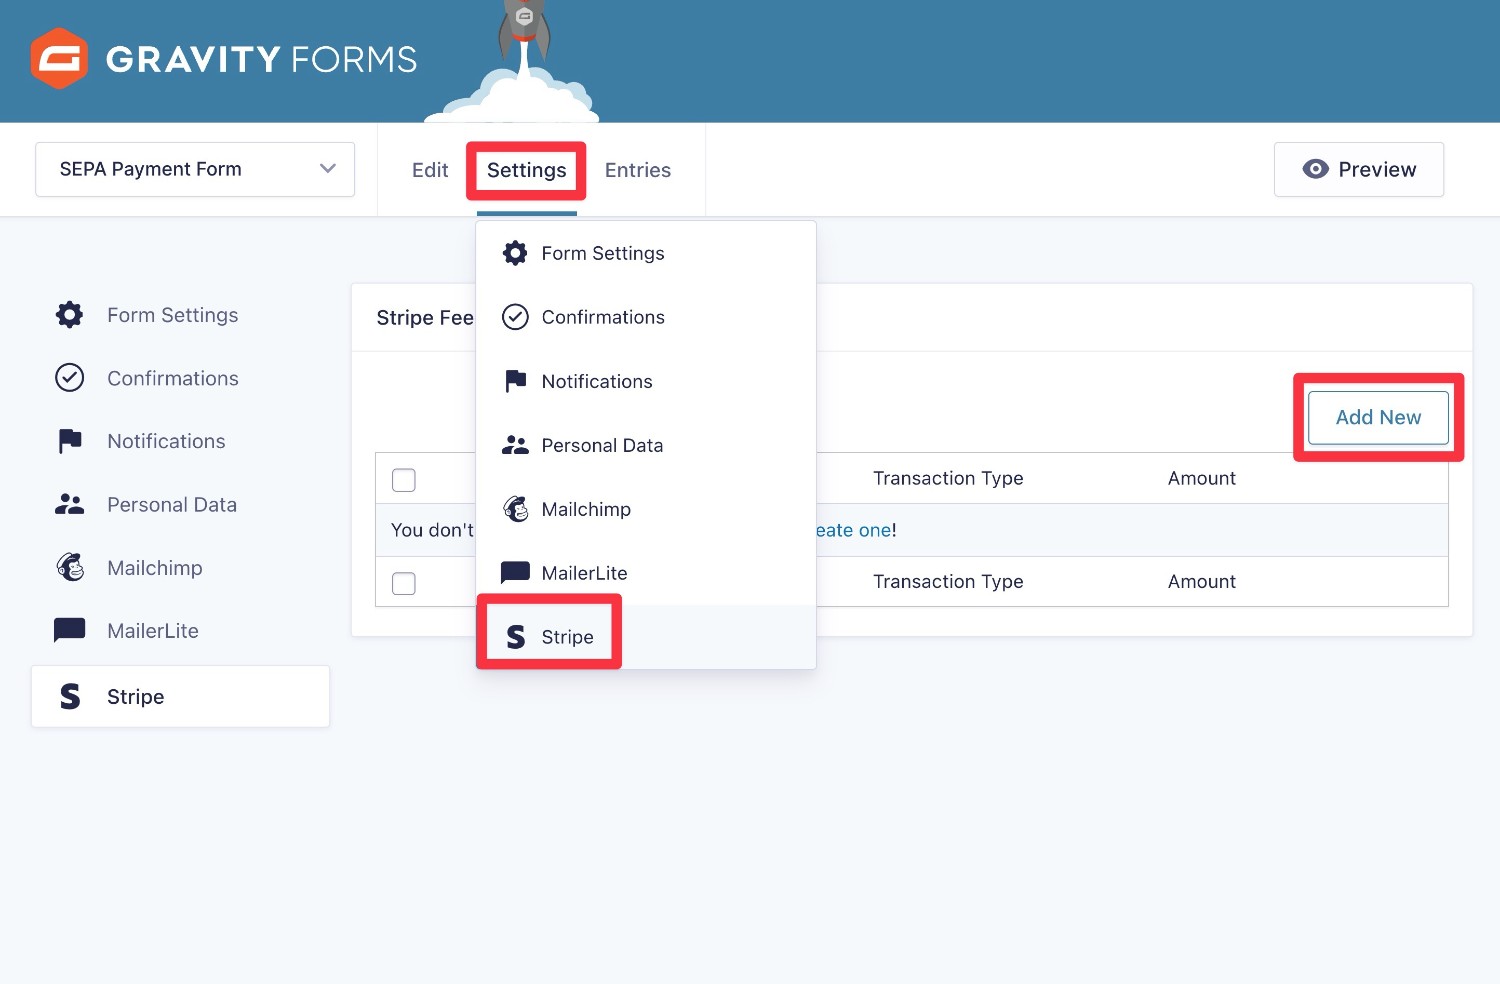
In the feed creation interface, you’ll first need to choose the Transaction Type:
- Products and Services – Choose this for one-time payments.
- Subscriptions – Choose this for recurring payments.
Below that, you can choose which form fields to use for the payment amount and map your form fields to Stripe. Once you’ve done that, click Save Settings.
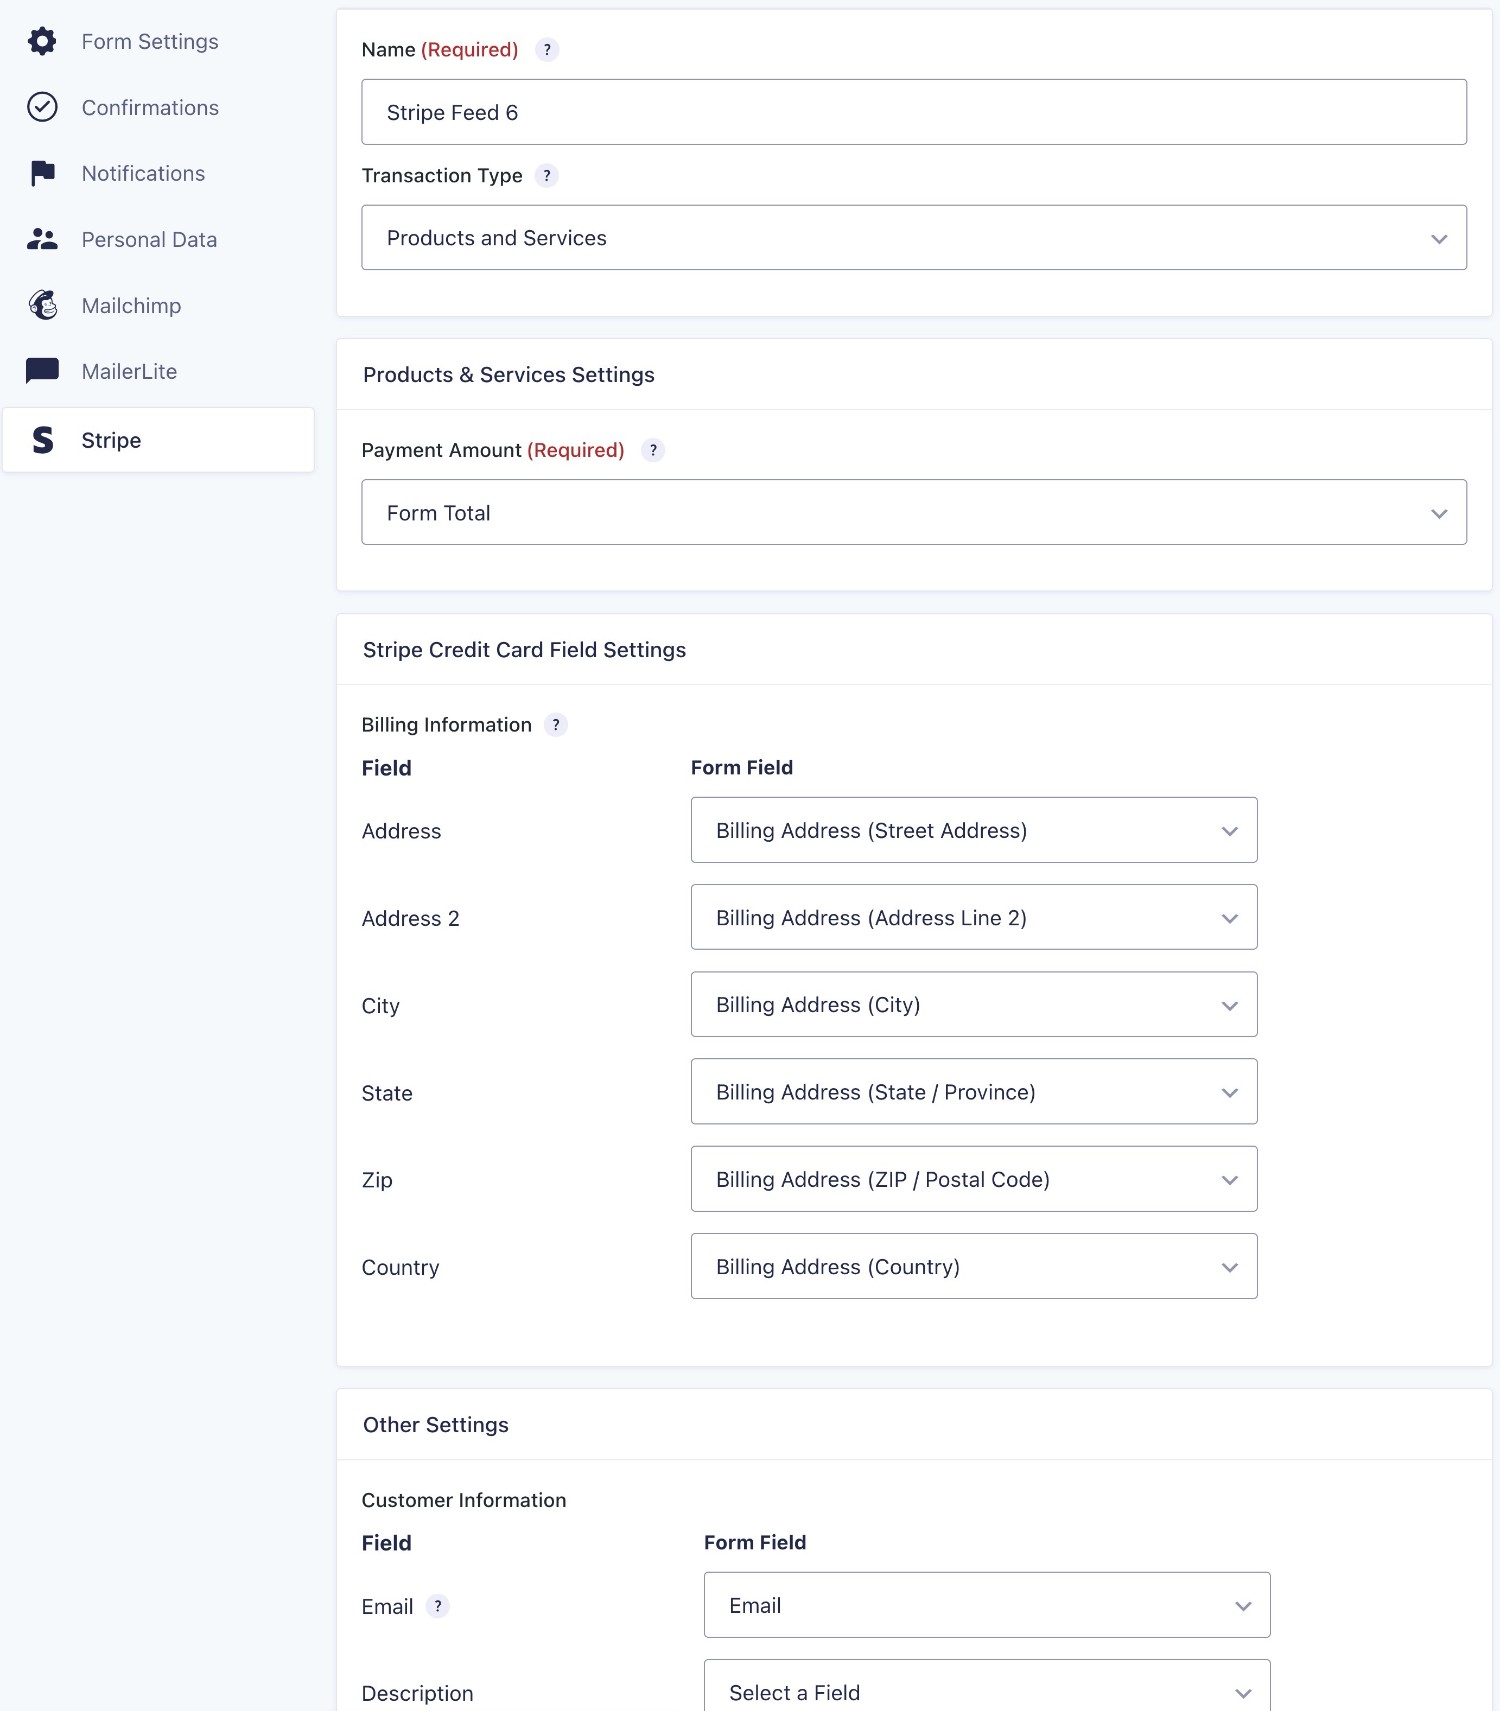
For more details about all of the options here, check out the Stripe feed documentation.
6. Set Up Other Integrations and Features (Optional)
This step is 100% optional.
However, one of the advantages of using Gravity Forms for WordPress SEPA Direct Debit payments is that you can also take advantage of all the other features and integrations in Gravity Forms.
Here are a few examples of what you can do, though this is by no means a complete list:
- Add a customer to your customer relationship manager (CRM) software after they make a successful payment.
- Give your customers an option to subscribe to your newsletter by checking a box on the payment form.
- Trigger an automation in other software using Zapier or webhooks.
You can browse all of the Gravity Forms add-ons here to get some more ideas.
The exact setup process will depend on the specific add-on in question. However, the basic process generally works something like this:
- Install the add-on for the integration/feature that you want to add.
- Connect your site to the other tool in the Gravity Forms settings area. For example, to connect to your CRM, you might need to add an API key or follow some type of authentication flow.
- Create a “feed” for that service in the form settings area, much like how you created a Stripe feed.
7. Embed Your Form and Make Some Test Payments
At this point, your WordPress SEPA Direct Debit form is pretty much finished. Now, it’s time to embed the form on your website and test it to make sure that it’s working as you want it to.
You can embed the form anywhere on your site using the Gravity Forms block or shortcode. If you use the block, you’ll also be able to style your form directly from the block editor if you choose the Orbital form theme option.
Once you’ve embedded the form, you can open that post or page on the fron tend of your site to submit some test payments. Remember – your form is still in test mode right now, so you’re free to submit payments with dummy information.
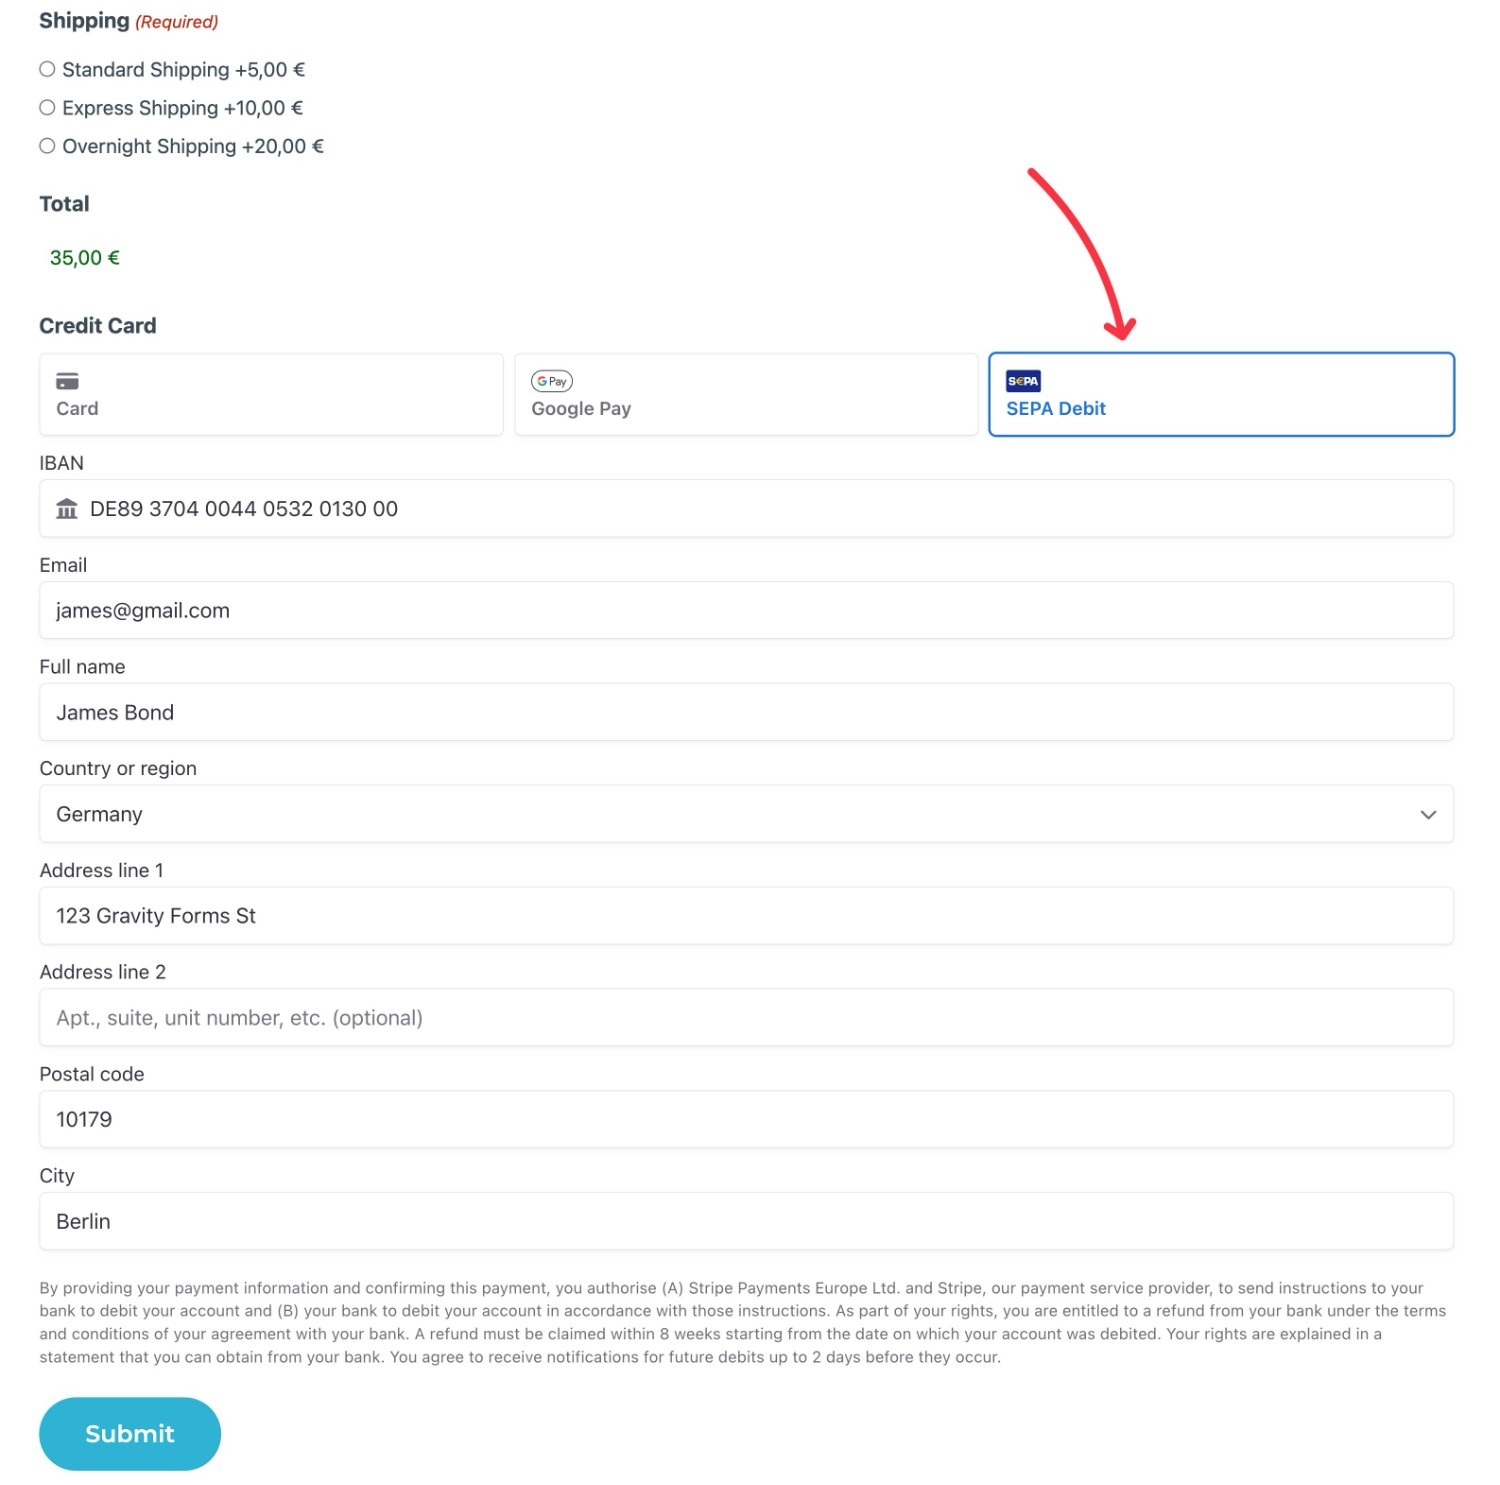
If you fill out the form, you should see SEPA Debit appear as one of the payment options. If you don’t, we’ll cover some basic troubleshooting in a second.
To test it, you can use test account information from this Stripe page. For example, to make a test payment from an account in Germany, you could use these details:
- Account number – DE89370400440532013000
- Country – Germany
- Other contact details – whatever you want
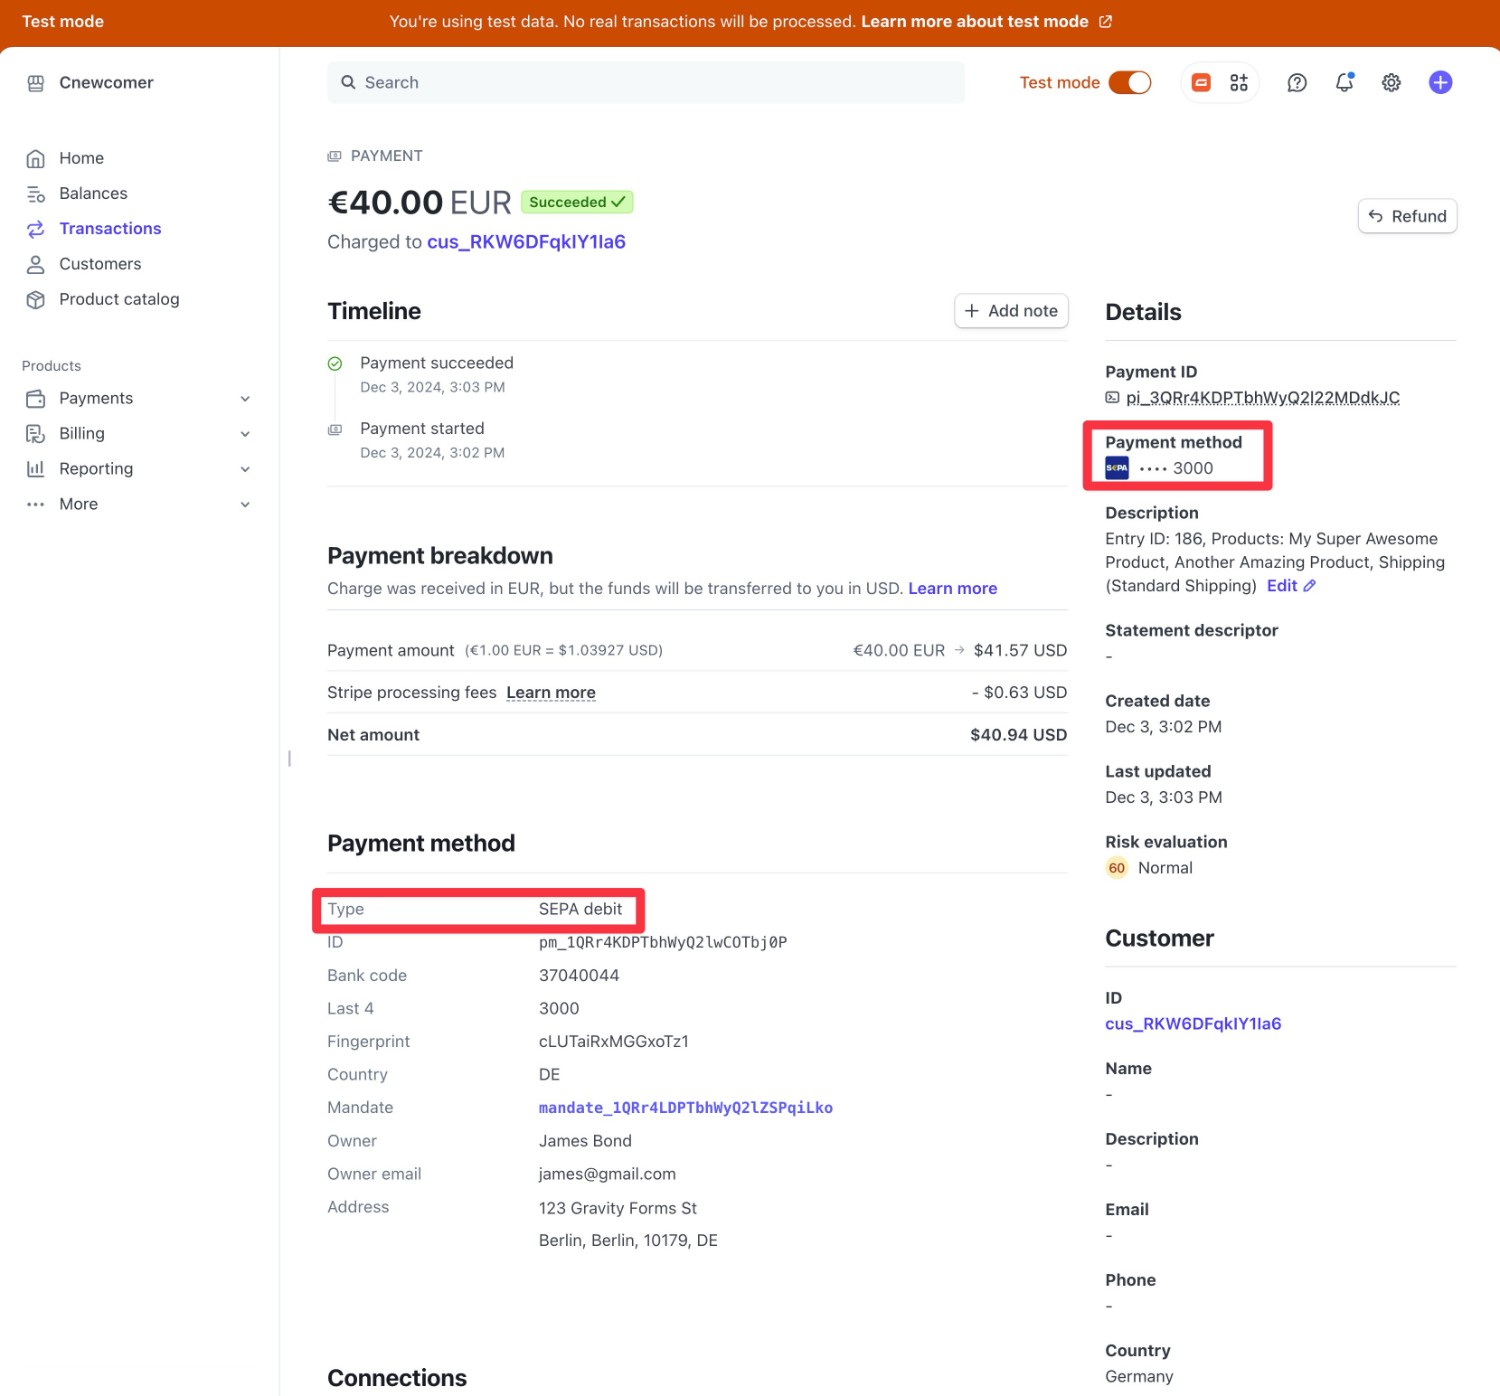
If you used one of the valid methods, you should see a successful SEPA Direct Debit payment appear in both your WordPress dashboard (Forms → Entries) and your Stripe test dashboard.
If you don’t see SEPA Direct Debit as a payment option, here are a few troubleshooting areas to check:
- Make sure you set the Gravity Forms default currency to Euro. SEPA Direct Debit will not display if you’re using a different currency. You can change this by going to Forms → Settings in your WordPress dashboard.
- In the Stripe payment methods list, make sure that you specifically enabled SEPA Direct Debit for “Gravity Forms by rocketgenius”. Also make sure that you enabled it for both test and live modes.
- Make sure that you checked the Enable additional payment methods box in the Stripe form field settings.
8. Enable Live Mode to Accept Real SEPA Direct Debit Payments
Once you’ve submitted some test payments to make sure that everything is working properly, the last step is to enable Live mode so that you can start processing real payments from your customers.
To do this, you’ll basically repeat the same steps for setting up Test mode. The only difference is that you’ll now set up everything using the live version of your Stripe account.
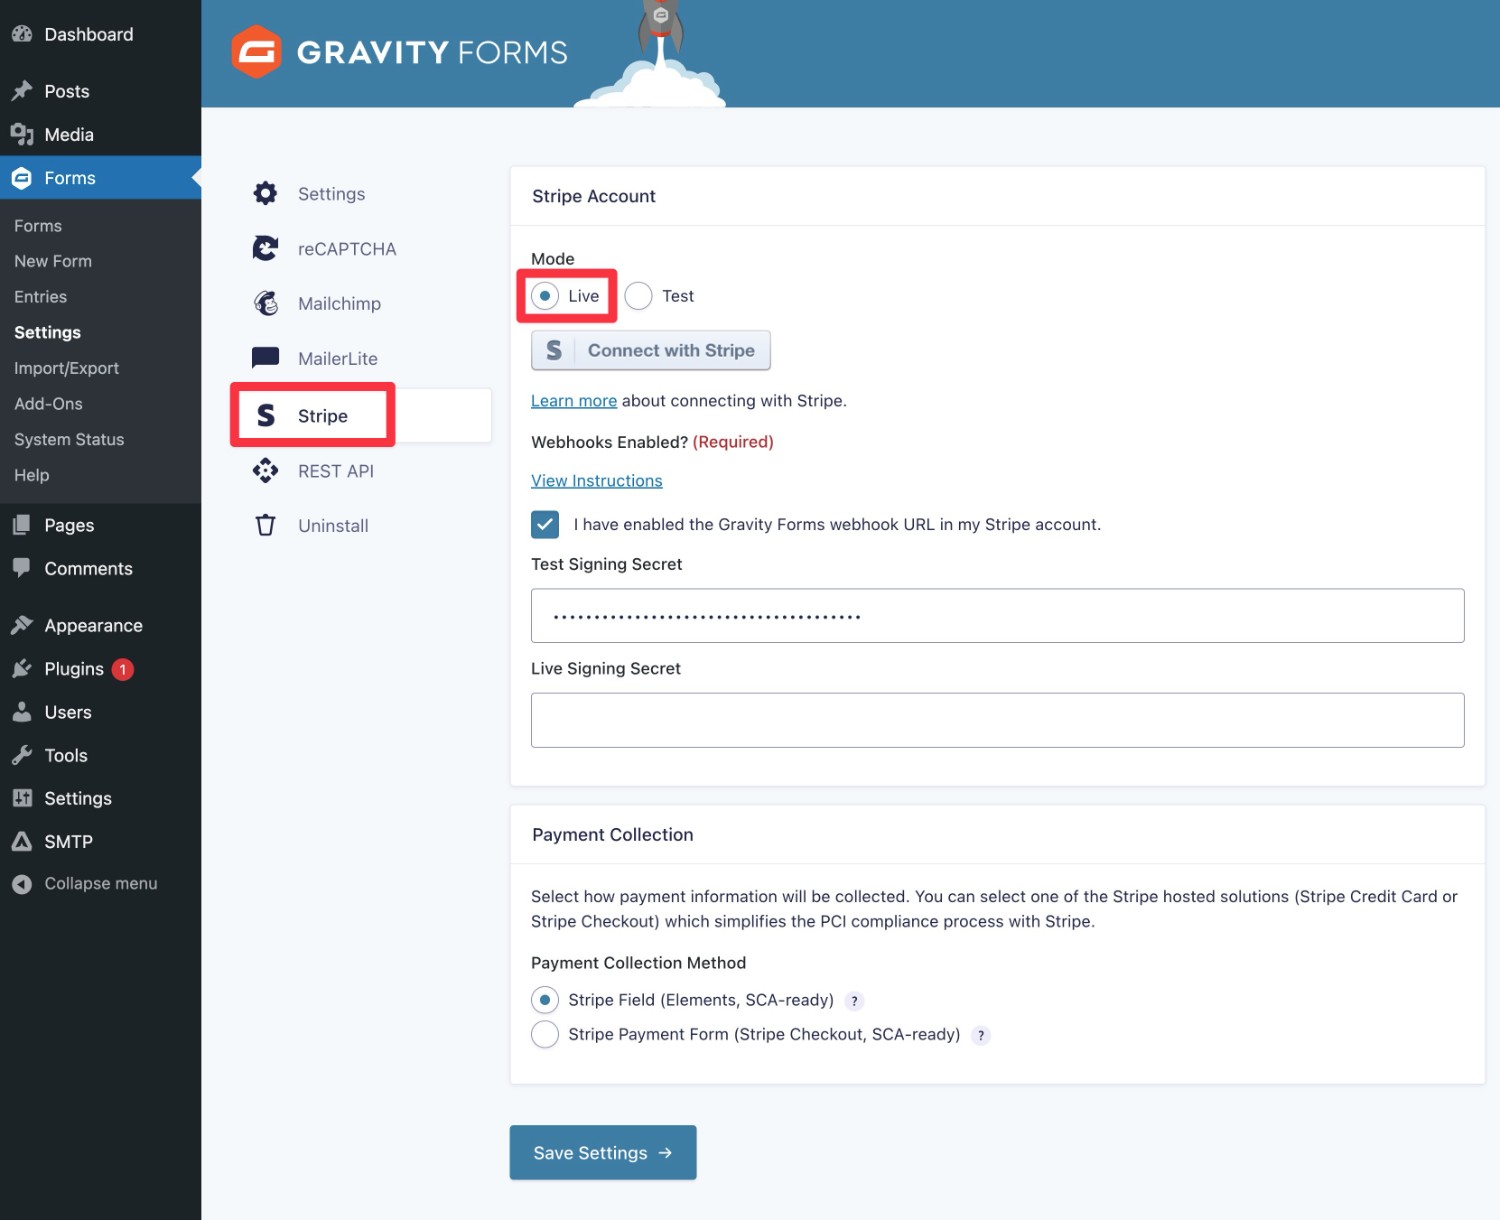
- Open your WordPress dashboard.
- Go to Forms → Settings → Stripe.
- Change the radio button from Test to Live.
- Click Connect with Stripe to authenticate with the live version of your Stripe account.
- Add the Gravity Forms webhook URL to the live version of your Stripe dashboard. You can follow the same instructions using Stripe Workbench.
- Copy the live signing secret from Stripe and paste it into the Live Signing Secret box in the Gravity Forms settings.
- Save everything.
After enabling live mode, your site will now start processing real SEPA Direct Debit payments from your customers.
Get Started With SEPA Direct Debit Payments Today
That wraps up our guide on how to accept SEPA Direct Debit on WordPress using Gravity Forms and Stripe.
If you want to accept payments from European customers, SEPA Direct Debit is a great option because of its low fees and broad acceptance.
With Gravity Forms and Stripe, you can easily create your own customizable payment forms that include SEPA Direct Debit as a payment option.
If you’re ready to get started, purchase your Gravity Forms Pro or Elite License today.

If you want to keep up-to-date with what’s happening on the blog sign up for the Gravity Forms newsletter!

