Starter Guide: How to Create a Flower Order Form

Trying to create a flower order form so that customers can place their floral orders directly on your website?
If you want to boost your sales and create a better experience for your customers, having an online flower order form is a great strategy.
It’s more convenient for your customers because they can place orders without needing to visit the store or make a phone call.
Beyond that, it’s more convenient for you because you can build workflows alongside your flower order form to simplify your admin processes.
You can also accept online payments, which means you already have the money in hand before you start preparing a customer’s order. Or, you’re still free to accept offline payments if you prefer that approach.
In this post, you’ll learn step-by-step how to create your own flower order form(s) using WordPress and Gravity Forms.
You can add as many form fields as needed, process payments using your preferred payment provider, integrate with other tools that you’re using, and more.
Best of all, Gravity Forms lets you create your flower order form without requiring any technical knowledge.
Here’s an example of the type of flower order form that you’ll be able to build by following this guide:
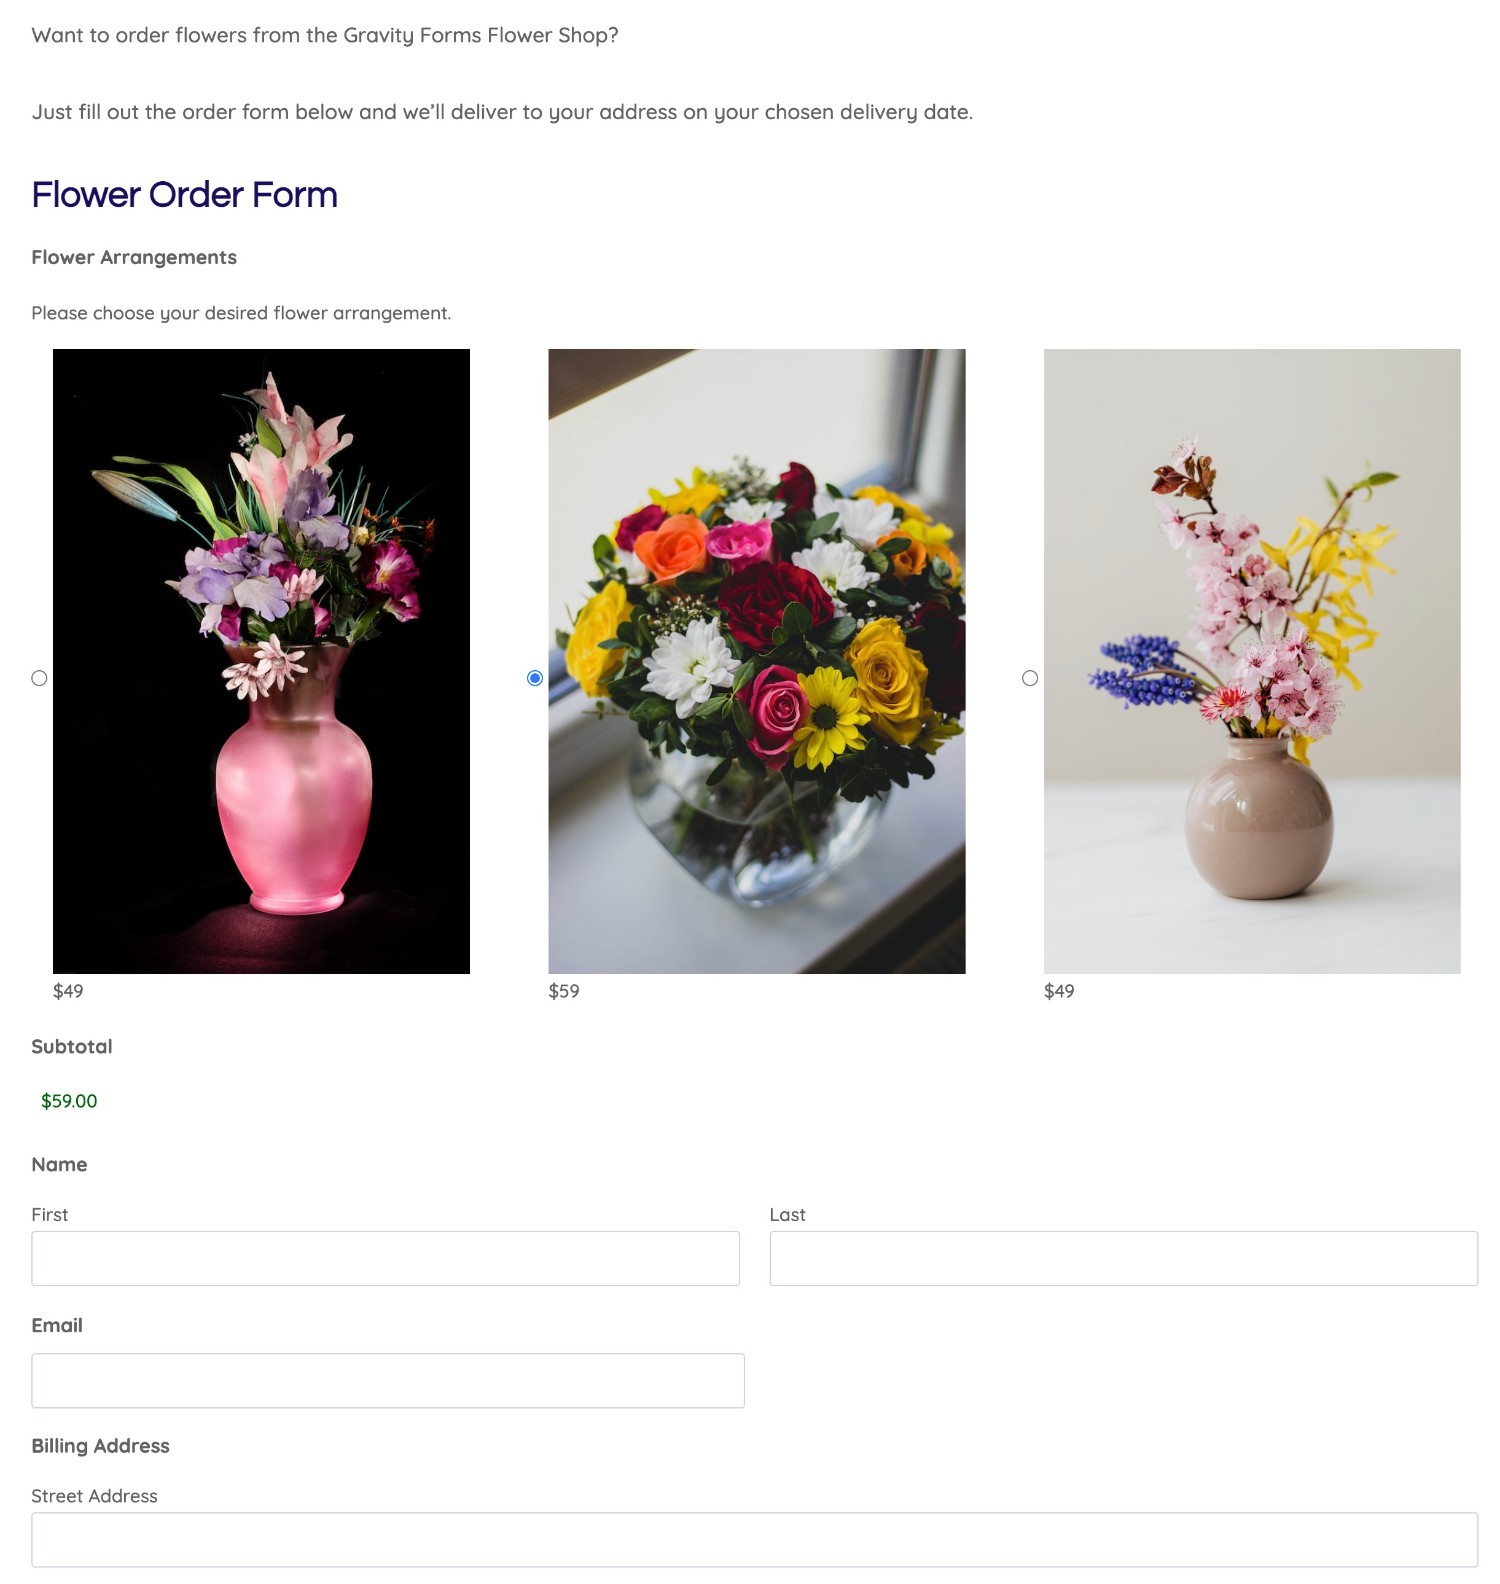
Keep reading to learn how to set it up!
Why You Should Use WordPress and Gravity Forms for Your Flower Order Form
While there are different ways that you can create a flower order form, we think that using WordPress and Gravity Forms offers the best blend of ease of use, flexibility, and cost-effectiveness.
First off, WordPress itself offers an excellent solution to create a florist website. The WordPress software is free, open-source, flexible, and easy enough for non-technical users to grasp.
But while WordPress can create a strong web foundation for your floral business, it doesn’t include built-in functionality to create a florist order form.
That’s where the Gravity Forms plugin comes in. Gravity Forms extends WordPress to help you create pretty much any type of form that your floral business might need, including a floral order form.
Here are some of the specific reasons why Gravity Forms makes a great option for your florist order form:
- Non-technical – you can set everything up using a visual, drag-and-drop interface.
- Form flexibility – you can configure your form to collect as much or as little information as needed from your customers.
- Payment processing – you can accept online payments using payment processors like Stripe, PayPal, and more. You can also offer coupons and discounts as needed.
- Integrations with other tools – you can connect to other tools that your floral business is using such as email marketing services, CRMs, order fulfillment tools, project management tools, and more. This helps you automate your business processes at a level that most other tools can’t match.
- Unlimited forms – you can create unlimited forms at no extra cost, which lets you use Gravity Forms for all of your business forms.
No matter where you are in your business journey, Gravity Forms can help:
- New florist business just starting up – Gravity Forms will help you get started on the right path. It can also help you create the other forms that your florist business will need, such as contact and customer support forms.
- Existing florist who wants to create an online shop – if you already have an online presence but you haven’t added eCommerce functionality yet, Gravity Forms can help you start selling online using WordPress.
- Existing online shop but limited functionality – if you are already selling online but you’re frustrated by the limitations of your eCommerce tool, Gravity Forms can offer more flexibility thanks to its long feature list and large library of official and third-party add-ons.
How to Create a Flower Order Form on WordPress
Now that you know a little bit more about Gravity Forms, let’s get into the step-by-step guide on how you can create your first flower order form.
If you don’t have your own WordPress site yet and you want to test this functionality before creating your site, you can create a free, fully functioning Gravity Forms demo site. This demo site will let you follow along with all of the steps in this tutorial.
Once you understand how it works, you can purchase your own Gravity Forms license to create your own flower order form.
1. Set Up Your WordPress Site and Install Gravity Forms
If you already have a working WordPress site for your florist business, you can skip ahead to the next step.
But if you don’t have any online presence yet for your florist business, you’ll need to create a basic WordPress site before you can install Gravity Forms and create your flower order form.
You’ll need to purchase your own web hosting and install WordPress there. Most web hosts offer simple WordPress installer tools, so this approach is still pretty easy to follow.
Some affordable hosts that you can consider include GreenGeeks, SiteGround, A2 Hosting, InMotion Hosting, and so on.
Once you have your WordPress site, make sure to install the Gravity Forms plugin. You can purchase your Gravity Forms license here.
2. Create a New Form
Next up, you’ll want to create a new form in Gravity Forms to act as your flower order form.
To get started, go to Forms → Add New in your WordPress dashboard.
While Gravity Forms doesn’t have a dedicated flower order form template, you can choose the generic eCommerce Form template and quickly tweak it to your needs.

Once you’re in the form editor, you’re free to add new form fields, edit existing form fields, and/or delete any fields that you don’t want to use.
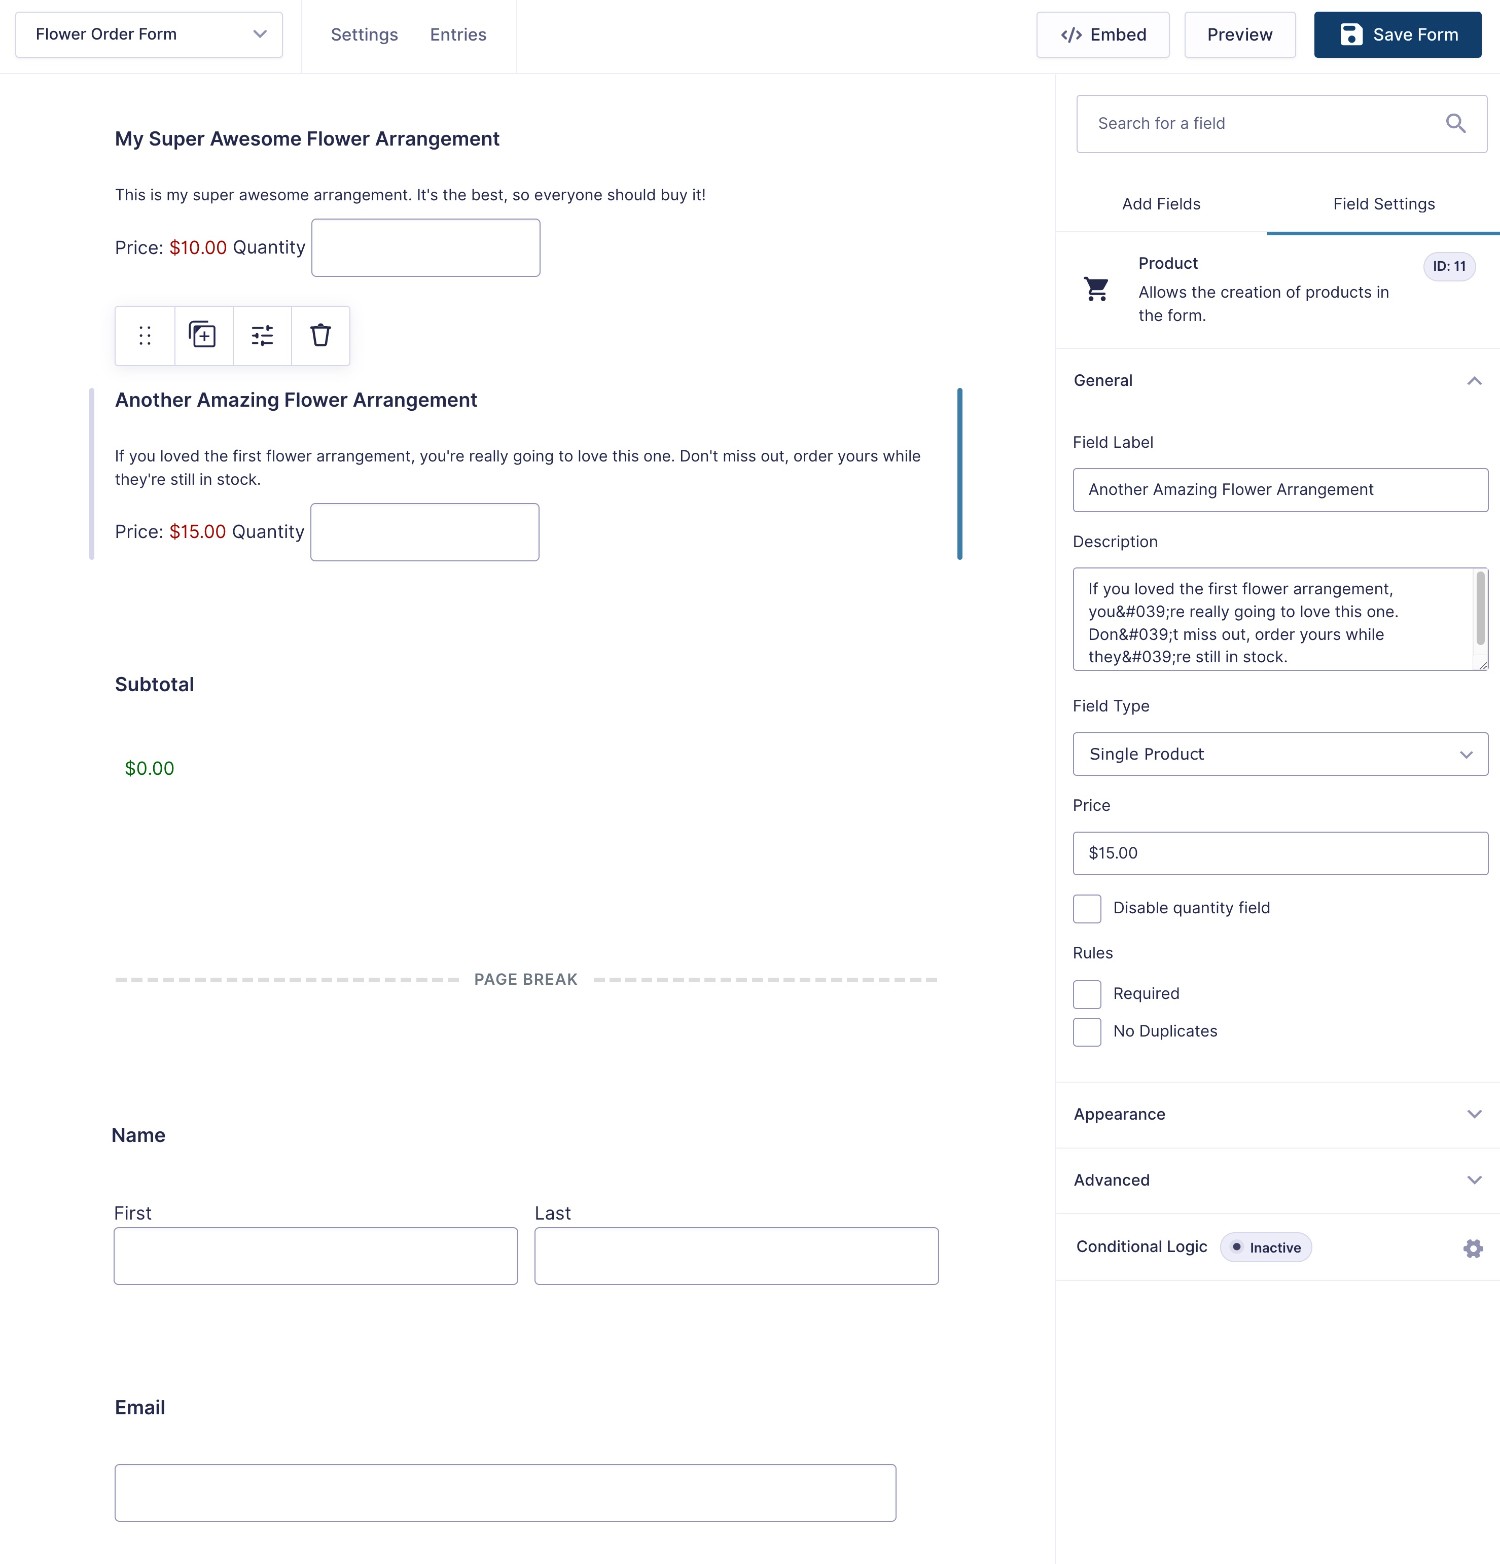
To add your flower arrangements, you can use the Products field. You can display flower arrangements in different ways, including as individual items or as lists.
For a flower order form, you might want to add images of the flower arrangements instead of just text.
You can achieve this using some simple code by following these instructions. Or, if you don’t feel comfortable working with code, you could install an add-on like Gravity Forms Image Choices, which comes from a Certified Developer.
For example, here’s what it might look like to use images:
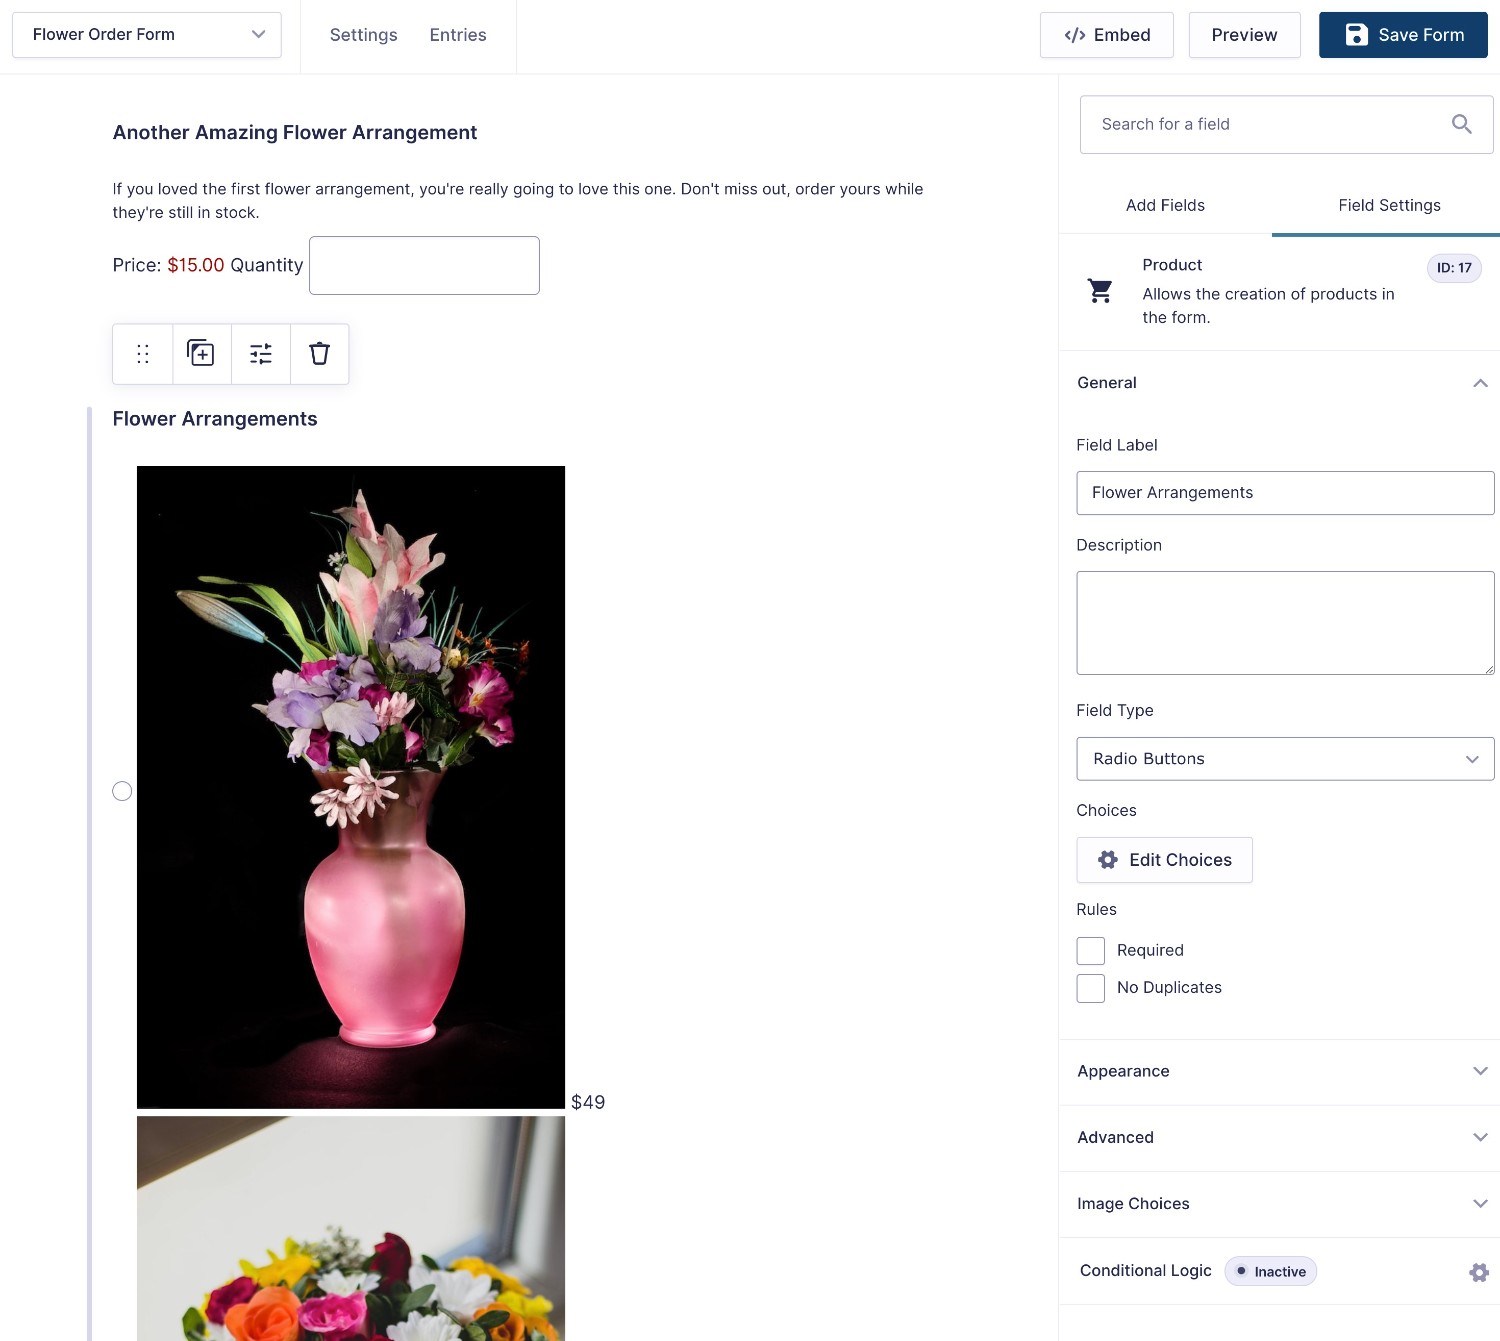
You can also add customization options and charge shoppers accordingly, such as adding different sizes, offering different add-ons (e.g. a different vase), and more.
In addition to adding your flower arrangements as products, you’ll also want to make sure that you’re collecting important information from your customers, such as their shipping information.
For longer forms, you’re free to break your forms into multiple pages using the Page field. For example, you might have them select their flower arrangements on the first page and then provide delivery/payment information on the next page.
3. Set Up Your Payment Provider (Optional)
One of the nice things about using Gravity Forms for your flower order form is that you can easily accept online payments as part of your form.
You don’t have to do this. For example, if you’d rather collect cash in person, you can just skip this part.
With that being said, processing payments as part of your order form can have some big benefits:
- You make sure that you get paid before you start the work.
- Most of your customers will probably prefer being able to use their credit cards.
To set up a payment provider, you’ll first want to install the add-on for that provider – e.g. the Stripe Add-On to use Stripe. Most of these payment add-ons are available on the Gravity Forms Pro license.
We’re going to use Stripe for this tutorial because it’s a great all-around option, but Gravity Forms also supports other payment processors.
To get started:
- Register for a free Stripe account.
- Install the Gravity Forms Stripe Add-On (instructions here).
- Go to Forms → Settings → Stripe.
- Click the button to connect to your free Stripe account.
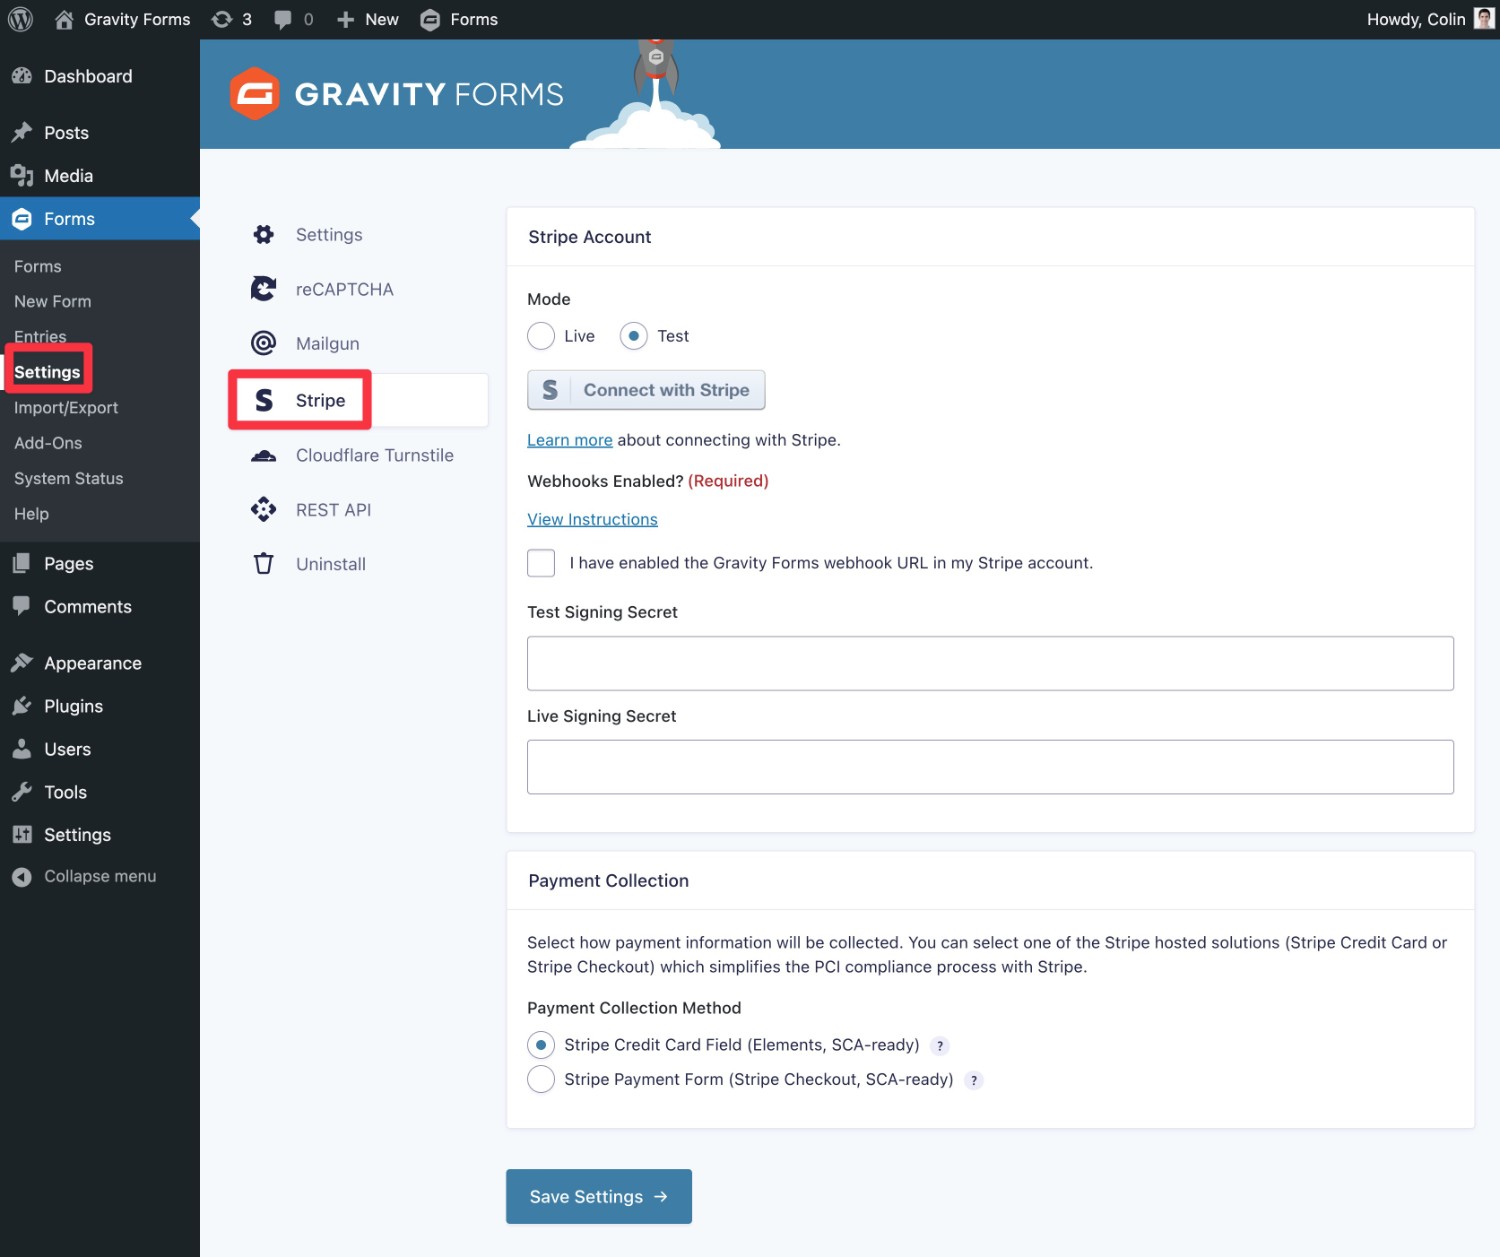
Check out the full Stripe documentation for a more detailed look.
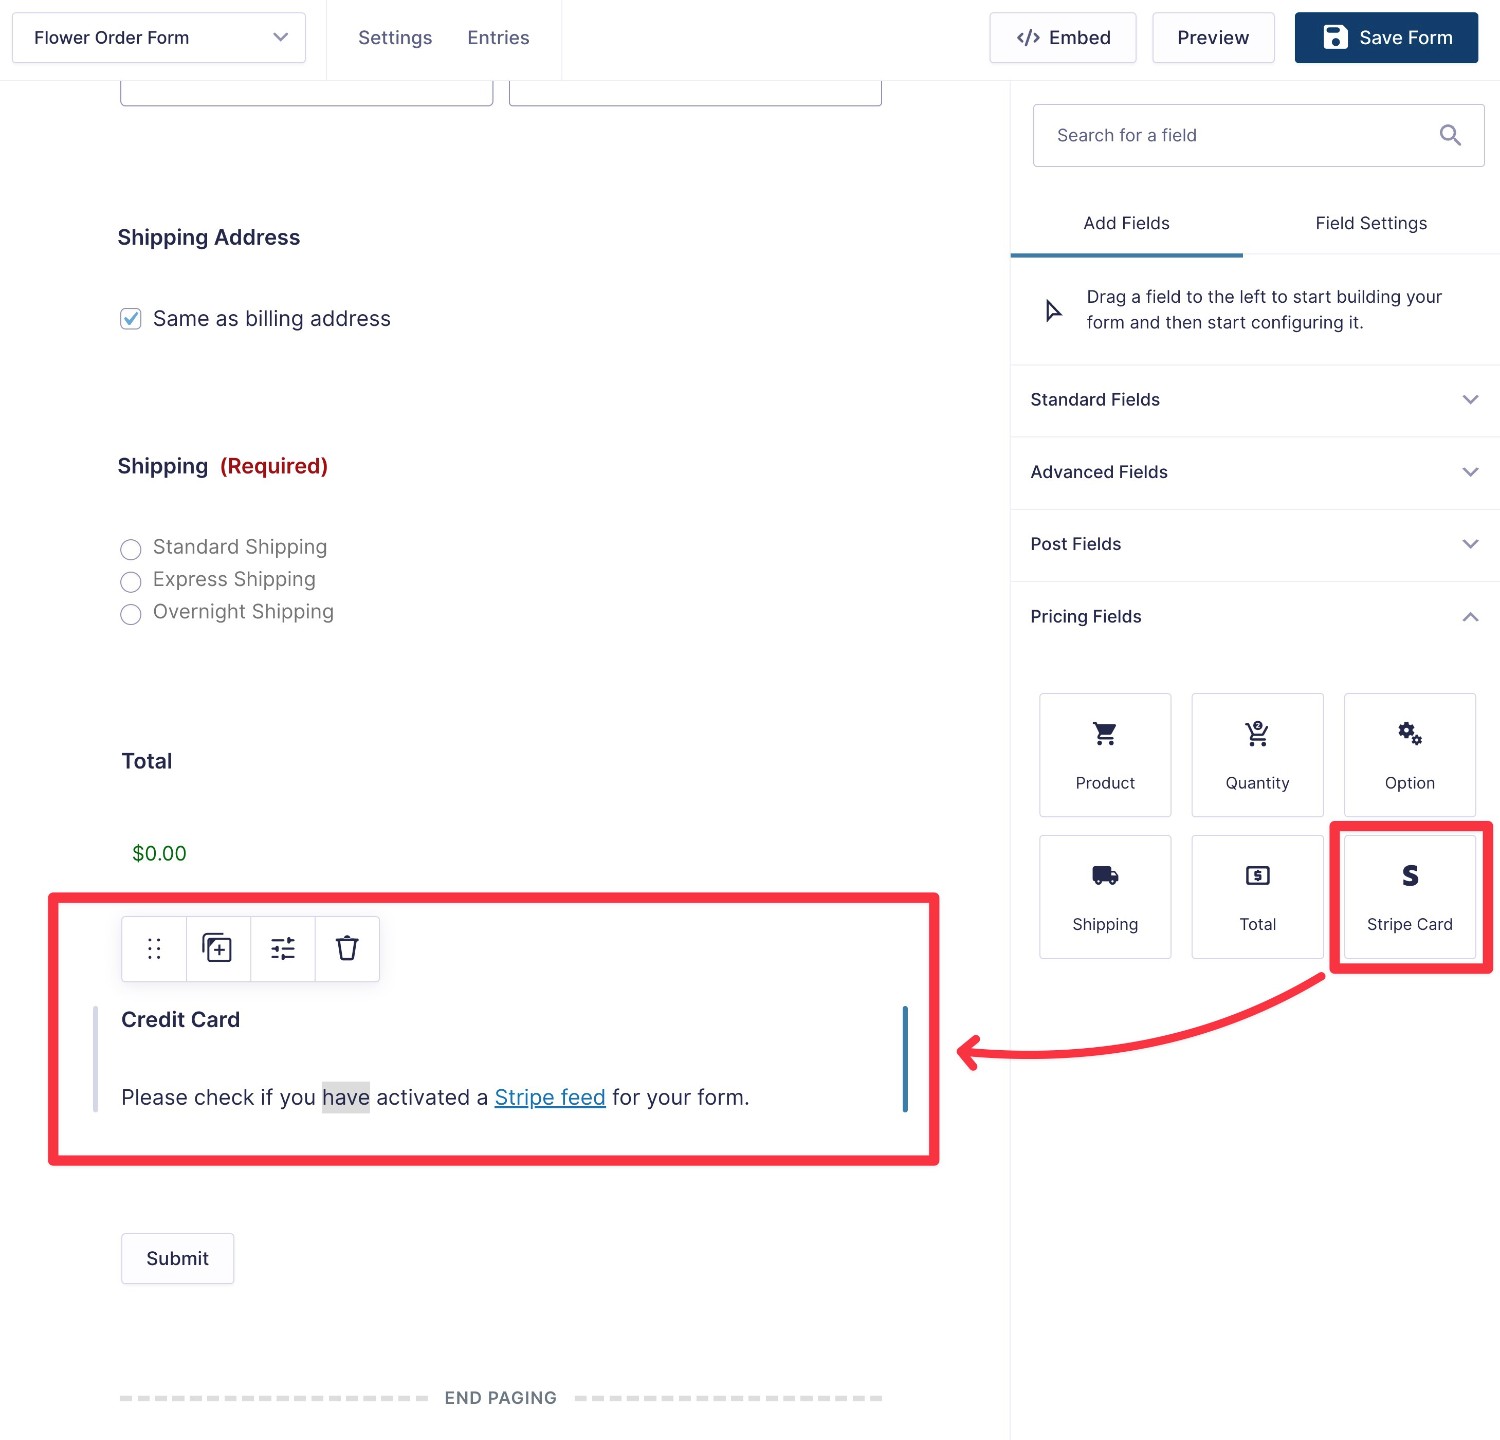
Once you’ve connected Gravity Forms to Stripe, you can open the form editor for your flower order form and add a Stripe Card field.
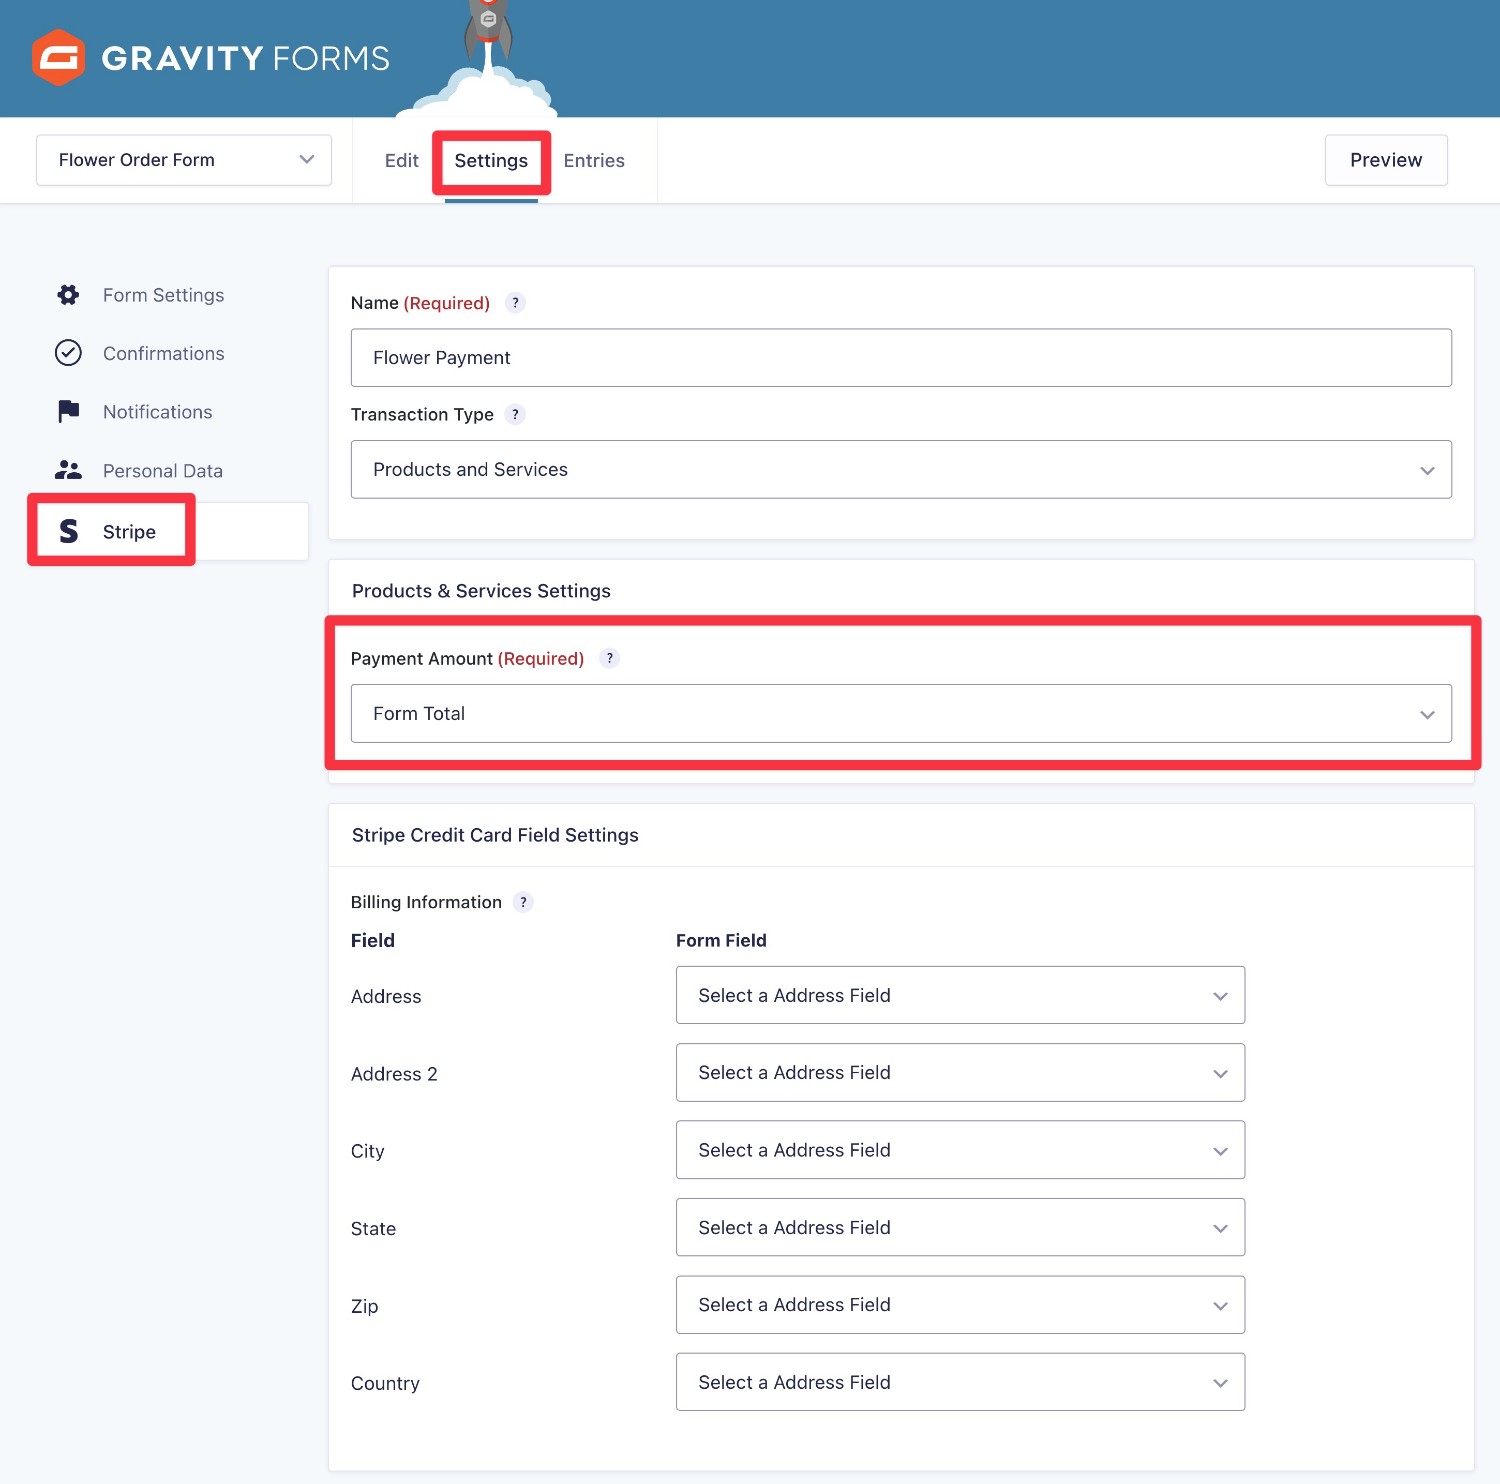
The final step is to set up a Stripe “feed”, which is what connects your specific flower order form to Stripe:
- Go to Settings → Stripe in the form editor.
- Create a new feed.
- Fill out the feed details – here are more detailed instructions if needed.
4. Integrate With Other Services to Simplify Admin Workflows (Optional)
As we mentioned earlier, another reason that Gravity Forms works well for a flower order form is that it also lets you connect to other services that your business might be using.
Here are a few examples of the types of integrations that you might want to set up:
- Give customers an option to join your newsletter to receive emails about products and promotions.
- Add customers to your customer relationship manager (CRM).
- Create a task in your to-do list software so that you can promptly process customers’ orders.
Gravity Forms offers dedicated add-ons for many of these services. Or, you can connect your form to Zapier to integrate with the thousands of apps available on Zapier.
To discover what types of integrations you can set up, you can browse the Gravity Forms add-ons here.
5. Embed Your Flower Order Form
Once you’re happy with your form, the last step is to embed the form publicly on your site so that your customers can start placing their orders.
To get started, create a new page (Pages → Add New) to act as your order page or edit an existing page.
Then, add the Gravity Forms block and choose your flower order form from the drop-down.
You should see a live preview of your form, along with some options to control its behavior. You can also add other content around the form as needed.
Make sure to Publish/Update the page. Then, your flower order form will be live.
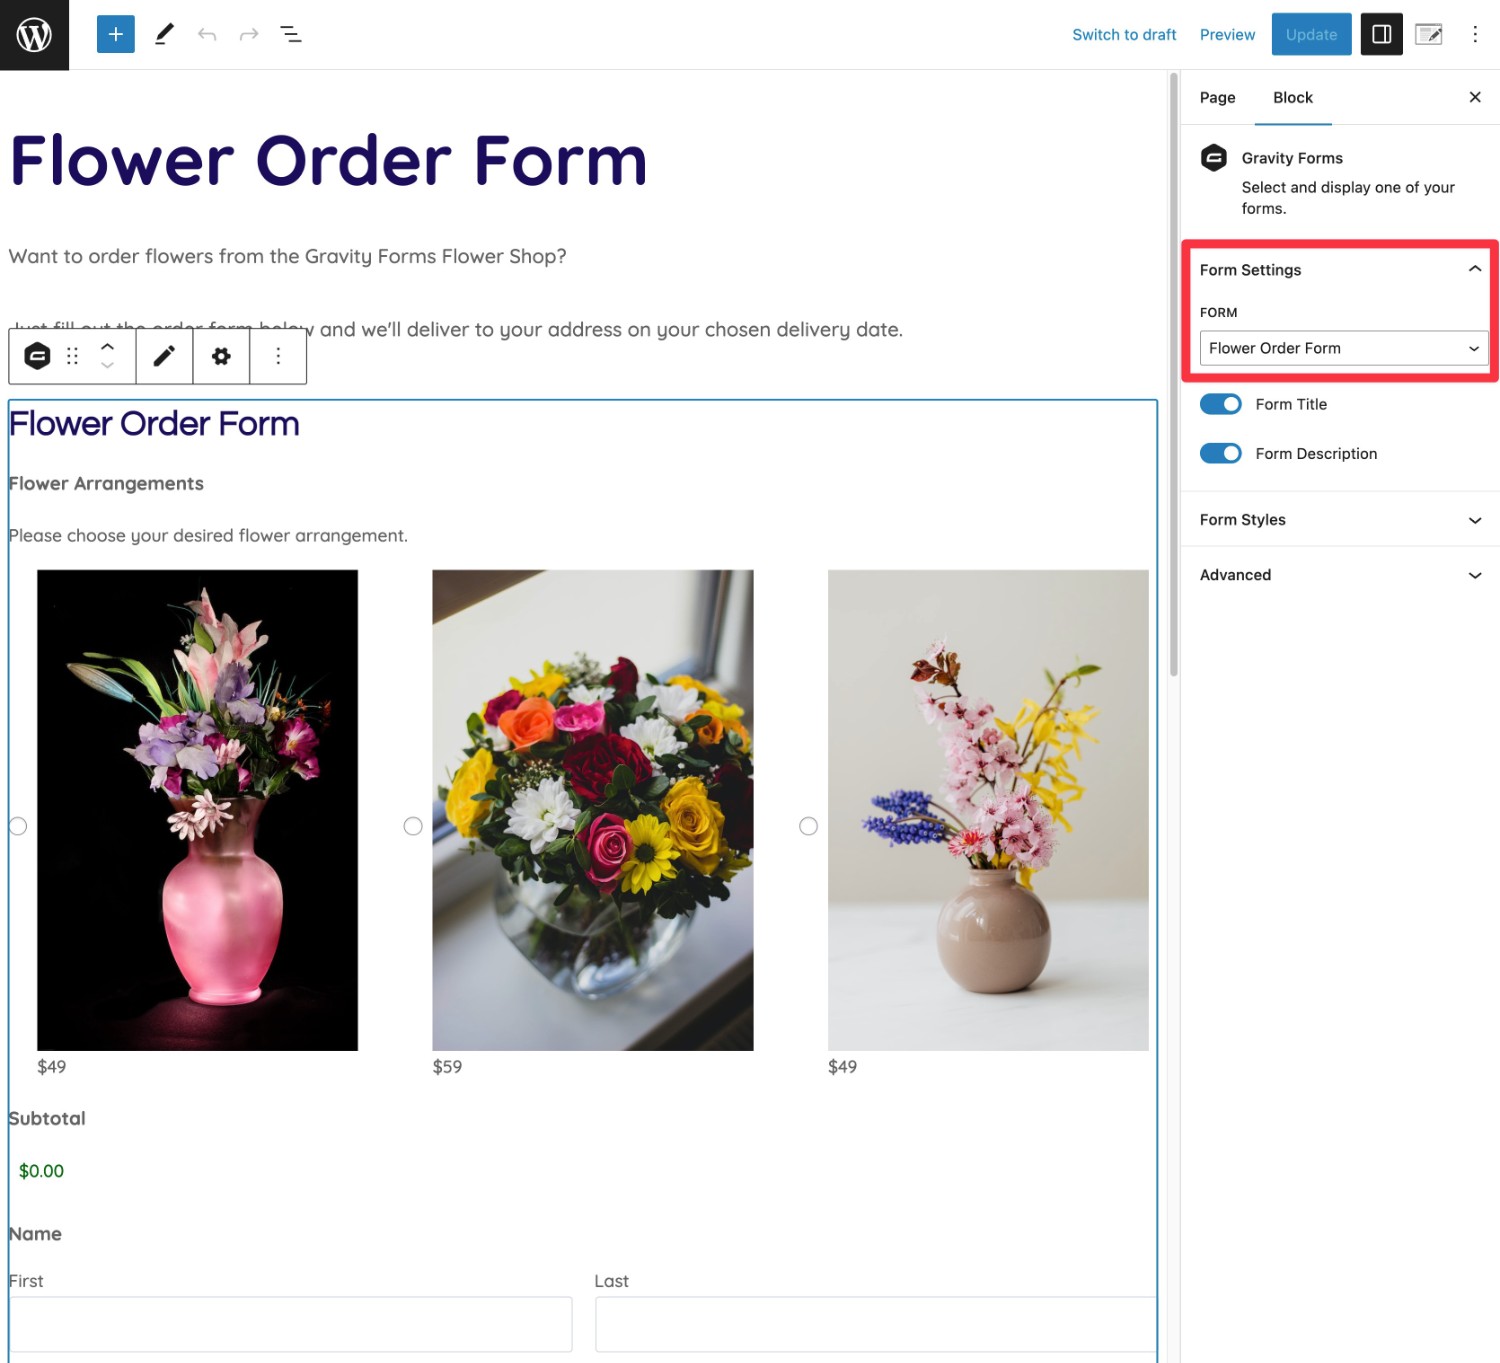
Here’s an example of what it might look like:

6. Create Additional Flower Order Forms (or Other Types of Forms)
Unlike some other solutions, Gravity Forms lets you create unlimited forms for your business.
One option would be to create additional flower order forms for different situations. You can use your existing form as your flower order form template to save time.
Another option would be to create some other forms for your business, such as a contact form, customer service form, and so on.
If you want to build a newsletter, you can also create forms that add customers’ data to your email marketing service or CRM.
To create new forms, just go to Forms → Add New and repeat the steps in this guide.
Create Your Flower Order Form Today
With WordPress and Gravity Forms, you can create a completely custom flower order form without needing any technical knowledge. You can collect important information from customers, accept payments online, integrate with other business tools, and more.
If you don’t want to accept online payments via your form, you can likely get started with the Gravity Forms Basic license.
If you do want to accept online payments, you’ll want to purchase at least the Gravity Forms Pro license so that you can access the payment processor add-ons.
Purchase your license today and you’ll have a working flower order form in no time.
Or, if you want to try before you buy, you can create a free Gravity Forms demo site to test all of this functionality.

If you want to keep up-to-date with what’s happening on the blog sign up for the Gravity Forms newsletter!
