How to… Create a Quiz for Your WordPress Website

Think quizzes are just a fun pastime? Think again! A quiz has many benefits for your business and website, helping you to increase engagement on your site, learn a lot about your audience, and generate leads, all at the same time.
What’s even better is that you can easily set up a quiz with Gravity Forms. In this post, we’ll share the benefits of using a quiz on your site, discuss the many features of our Quiz Add-On, and walk you through the steps of setting up a quiz on your site.
Don’t feel in the mood for reading? Watch our video instead…
Benefits of Using a Quiz On Your Site
There is no doubt that quizzes are fun. But they can also be powerful business tools when you take the time to set one up. Here’s why you should consider using a quiz on your WordPress website.
Generate Leads
As mentioned earlier, a quiz is a fun and effective way to generate leads for your business. After all, if quizzes weren’t fun, BuzzFeed wouldn’t offer a whole plethora of them!
But if you want your quiz to be an effective lead generator, the questions and the results need to relate to your offers. Otherwise, you’ll attract a bunch of people who have no interest in your products or services and will, most likely, never turn into clients and customers.
Learn More About Your Audience
Just like we take quizzes to gain deeper insight into our own personality, you can use a quiz to learn more about what your audience really needs. For example, a quiz title “What kind of a shopper are you?” can tell you a lot about their shopping habits.
Similarly, a quiz about their website style would make a great lead generator if you’re a web designer. Another example would be a quiz on helping them discover what’s their productivity nemesis.
All of the above examples would tie in greatly with various services and products and help you learn more about what your audience prefers, what their struggles are, and how you can support them.
Create and Send More Targeted Marketing Campaigns
Based on the responses to a quiz, you can easily segment your audience into various groups. You can then use those segments or groups to send more targeted marketing campaigns which cater to their preferences and interests.
In the long run, a more targeted marketing campaign typically results in better conversion rates.
Boost Your Website Engagement
Lastly, a quiz on your WordPress website can help boost your website engagement. Your visitors will be inclined to spend more time on your site, especially if the results point them to other relevant resources and content.
Indirectly, this can also give you a small boost in SEO as longer page dwell time is a signal to search engines that your website content is engaging enough to keep visitors on your site rather than sending them away.
Gravity Forms Quiz Add-On

So the benefits we’ve listed above have convinced you to create a quiz for your WordPress website! The good news is that you don’t have to resort to using a third-party tool.
Our Quiz Add-On for Gravity Forms makes it easy to create quizzes that are automatically graded once the user submits the form. The Quiz Add-On is available with the Gravity Forms Elite license.
Here are the top features of our Quiz Add-On:
- You can quickly add a quiz to any form created with Gravity Forms.
- Creating a quiz is easy — all you have to do is add quiz fields to your form, add appropriate text and adjust the quiz settings.
- You can score answers differently for each question or each answer. This is known as weighted scoring and it gives you a lot of flexibility in setting the scores for your quiz.
- You can also customize the grading method to work with your needs.
- Finally, you can view and filter quiz results from within your WordPress dashboard.
Beyond that, you can make use of other Gravity Forms features to make your quiz even more powerful. For example, you can use conditional logic to segment your audience based on their answers or limit the quiz to only run between certain dates.
You can also integrate your quiz with a number of marketing tools such as Mailchimp to add users to a specific mailing list or a group within your mailing list. This allows you to follow up with them and nurture the relationship until they’re ready to buy.
How to Set up a Quiz With Gravity Forms
Now that we’ve covered the benefits of quizzes and how our Quiz Add-On makes it easy to set up a quiz, let’s go through the steps of setting it all up.
Note that you’ll need to have Gravity Forms installed on your site so if you don’t have a license yet, now is the time to get one. Keep in mind you’ll need the Elite license to enable the Quiz Add-On.
Step 1: Install the Gravity Quiz Add-On
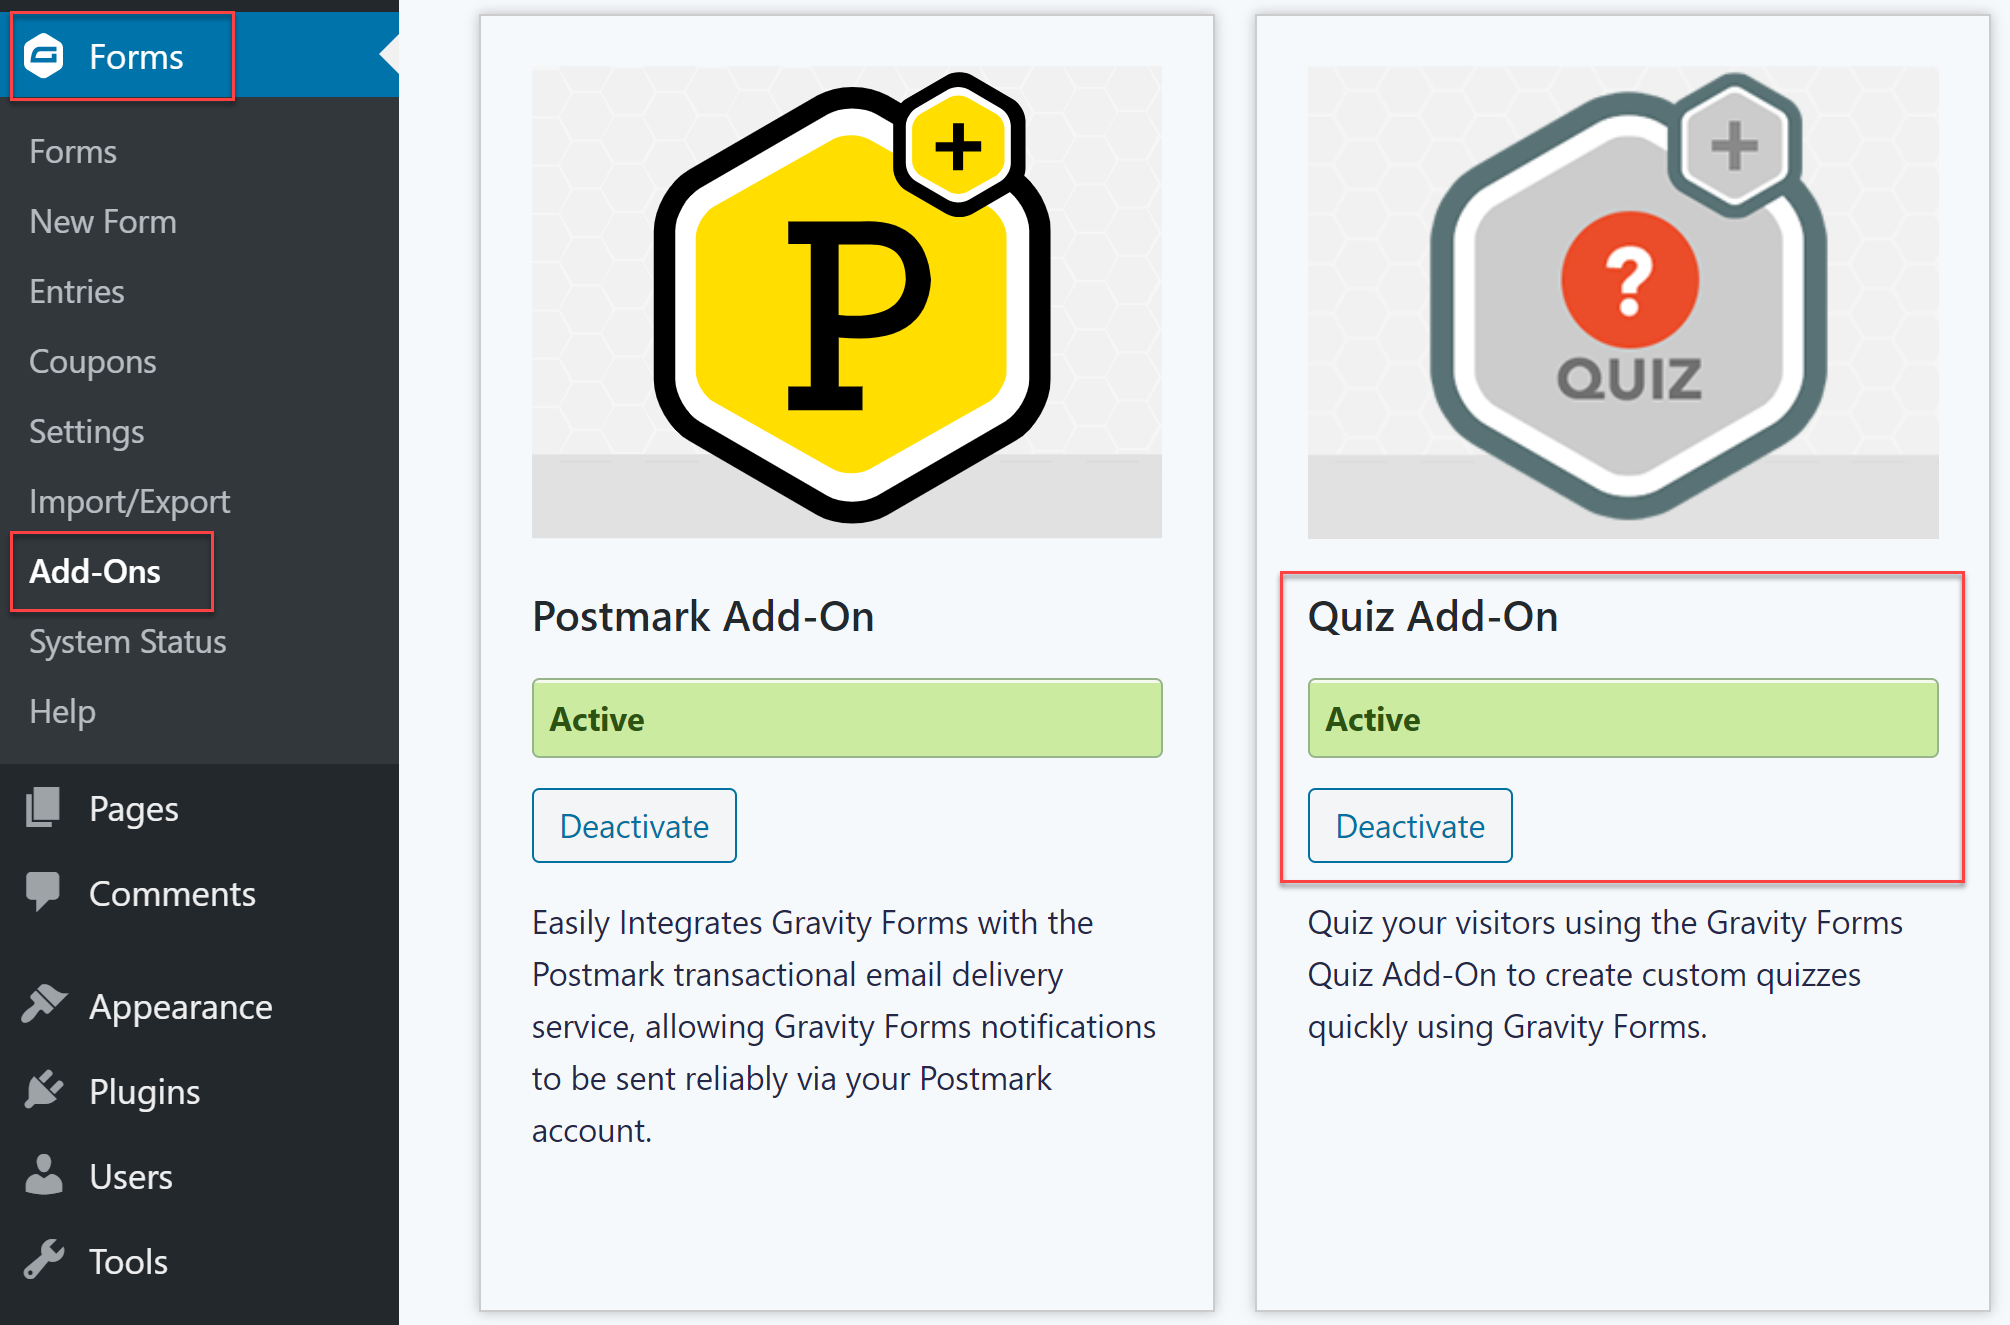
First things first, you need to install the Gravity Forms Quiz Add-On. To do this, go to your WordPress dashboard and navigate to Forms > Add-Ons. Scroll down the page until you locate the Quiz Add-On and click on Install >Activate.
 Once the add-on is active, you can begin setting up your quiz.
Step 2: Set Up The Quiz Fields
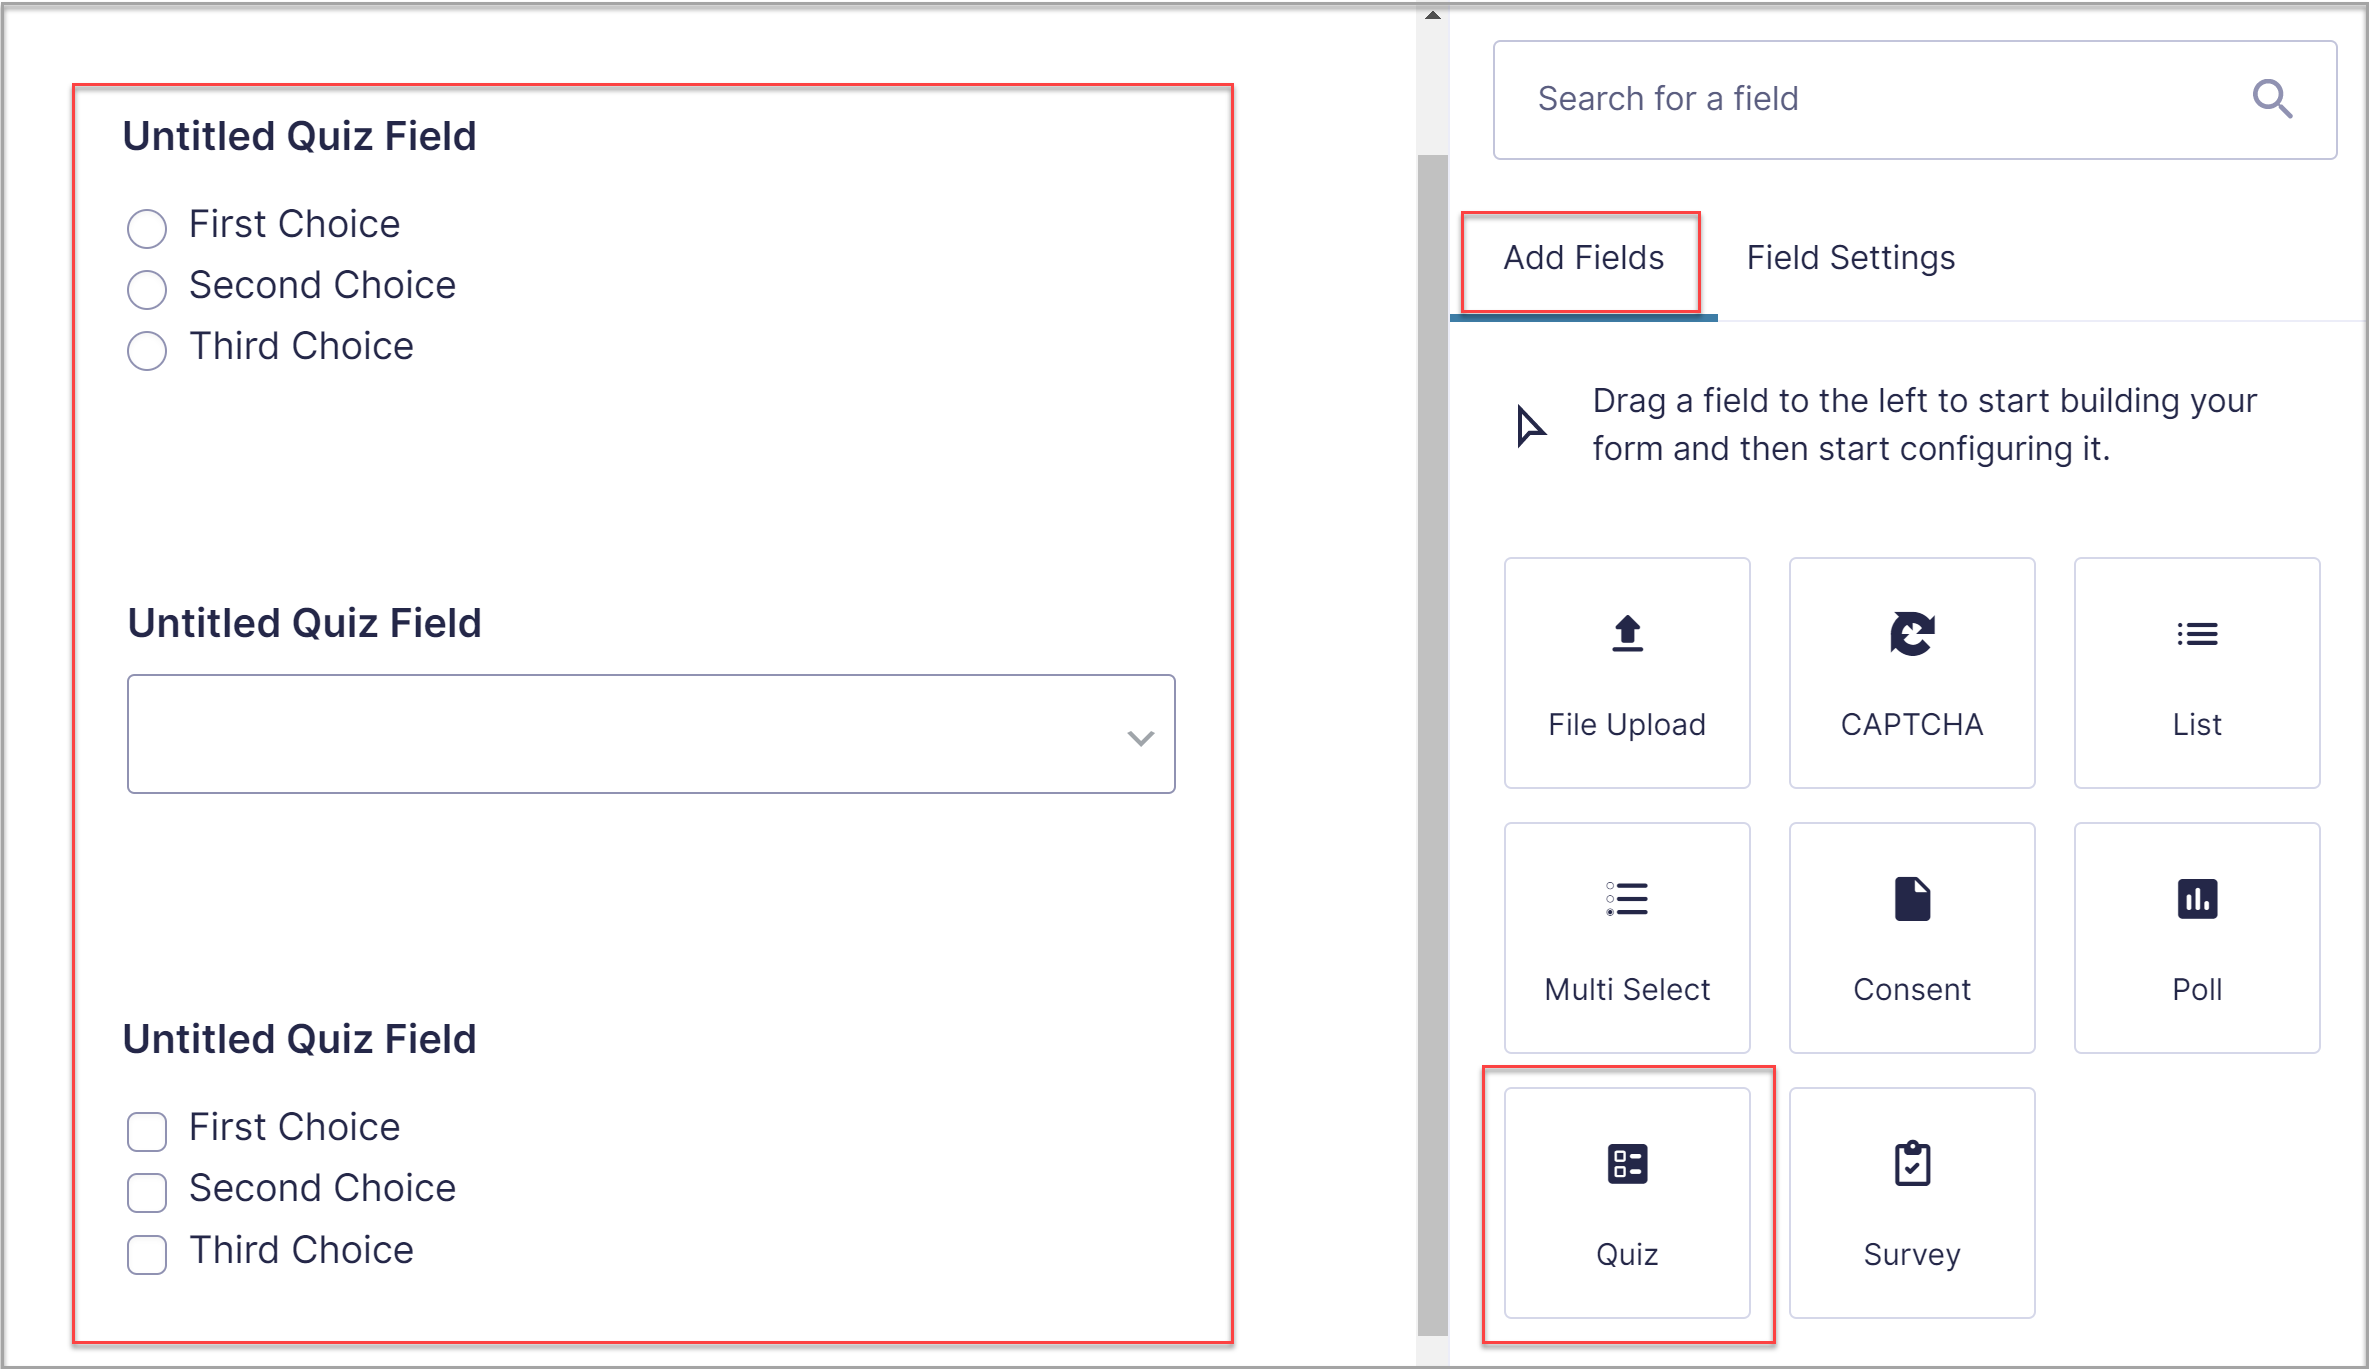
To create the quiz, go to Forms > New Form. Give your form a name and then go to Advanced Fields, and select Quiz to begin creating your quiz. You can choose between drop-down, checkboxes, and radio fields.
Drop-down and radio fields allow your visitors to choose only one answer while the checkbox fields allow them to select multiple answers.

Within the Field Settings, you can also add your own text for the quiz questions and answers, configure the options for scoring and customize the appearance of the field or enable conditional logic.
To add further questions to your quiz, simply add additional Quiz fields to your form. When you’re done, click on Update to save your changes.
Step 3: Set Up Quiz Grading
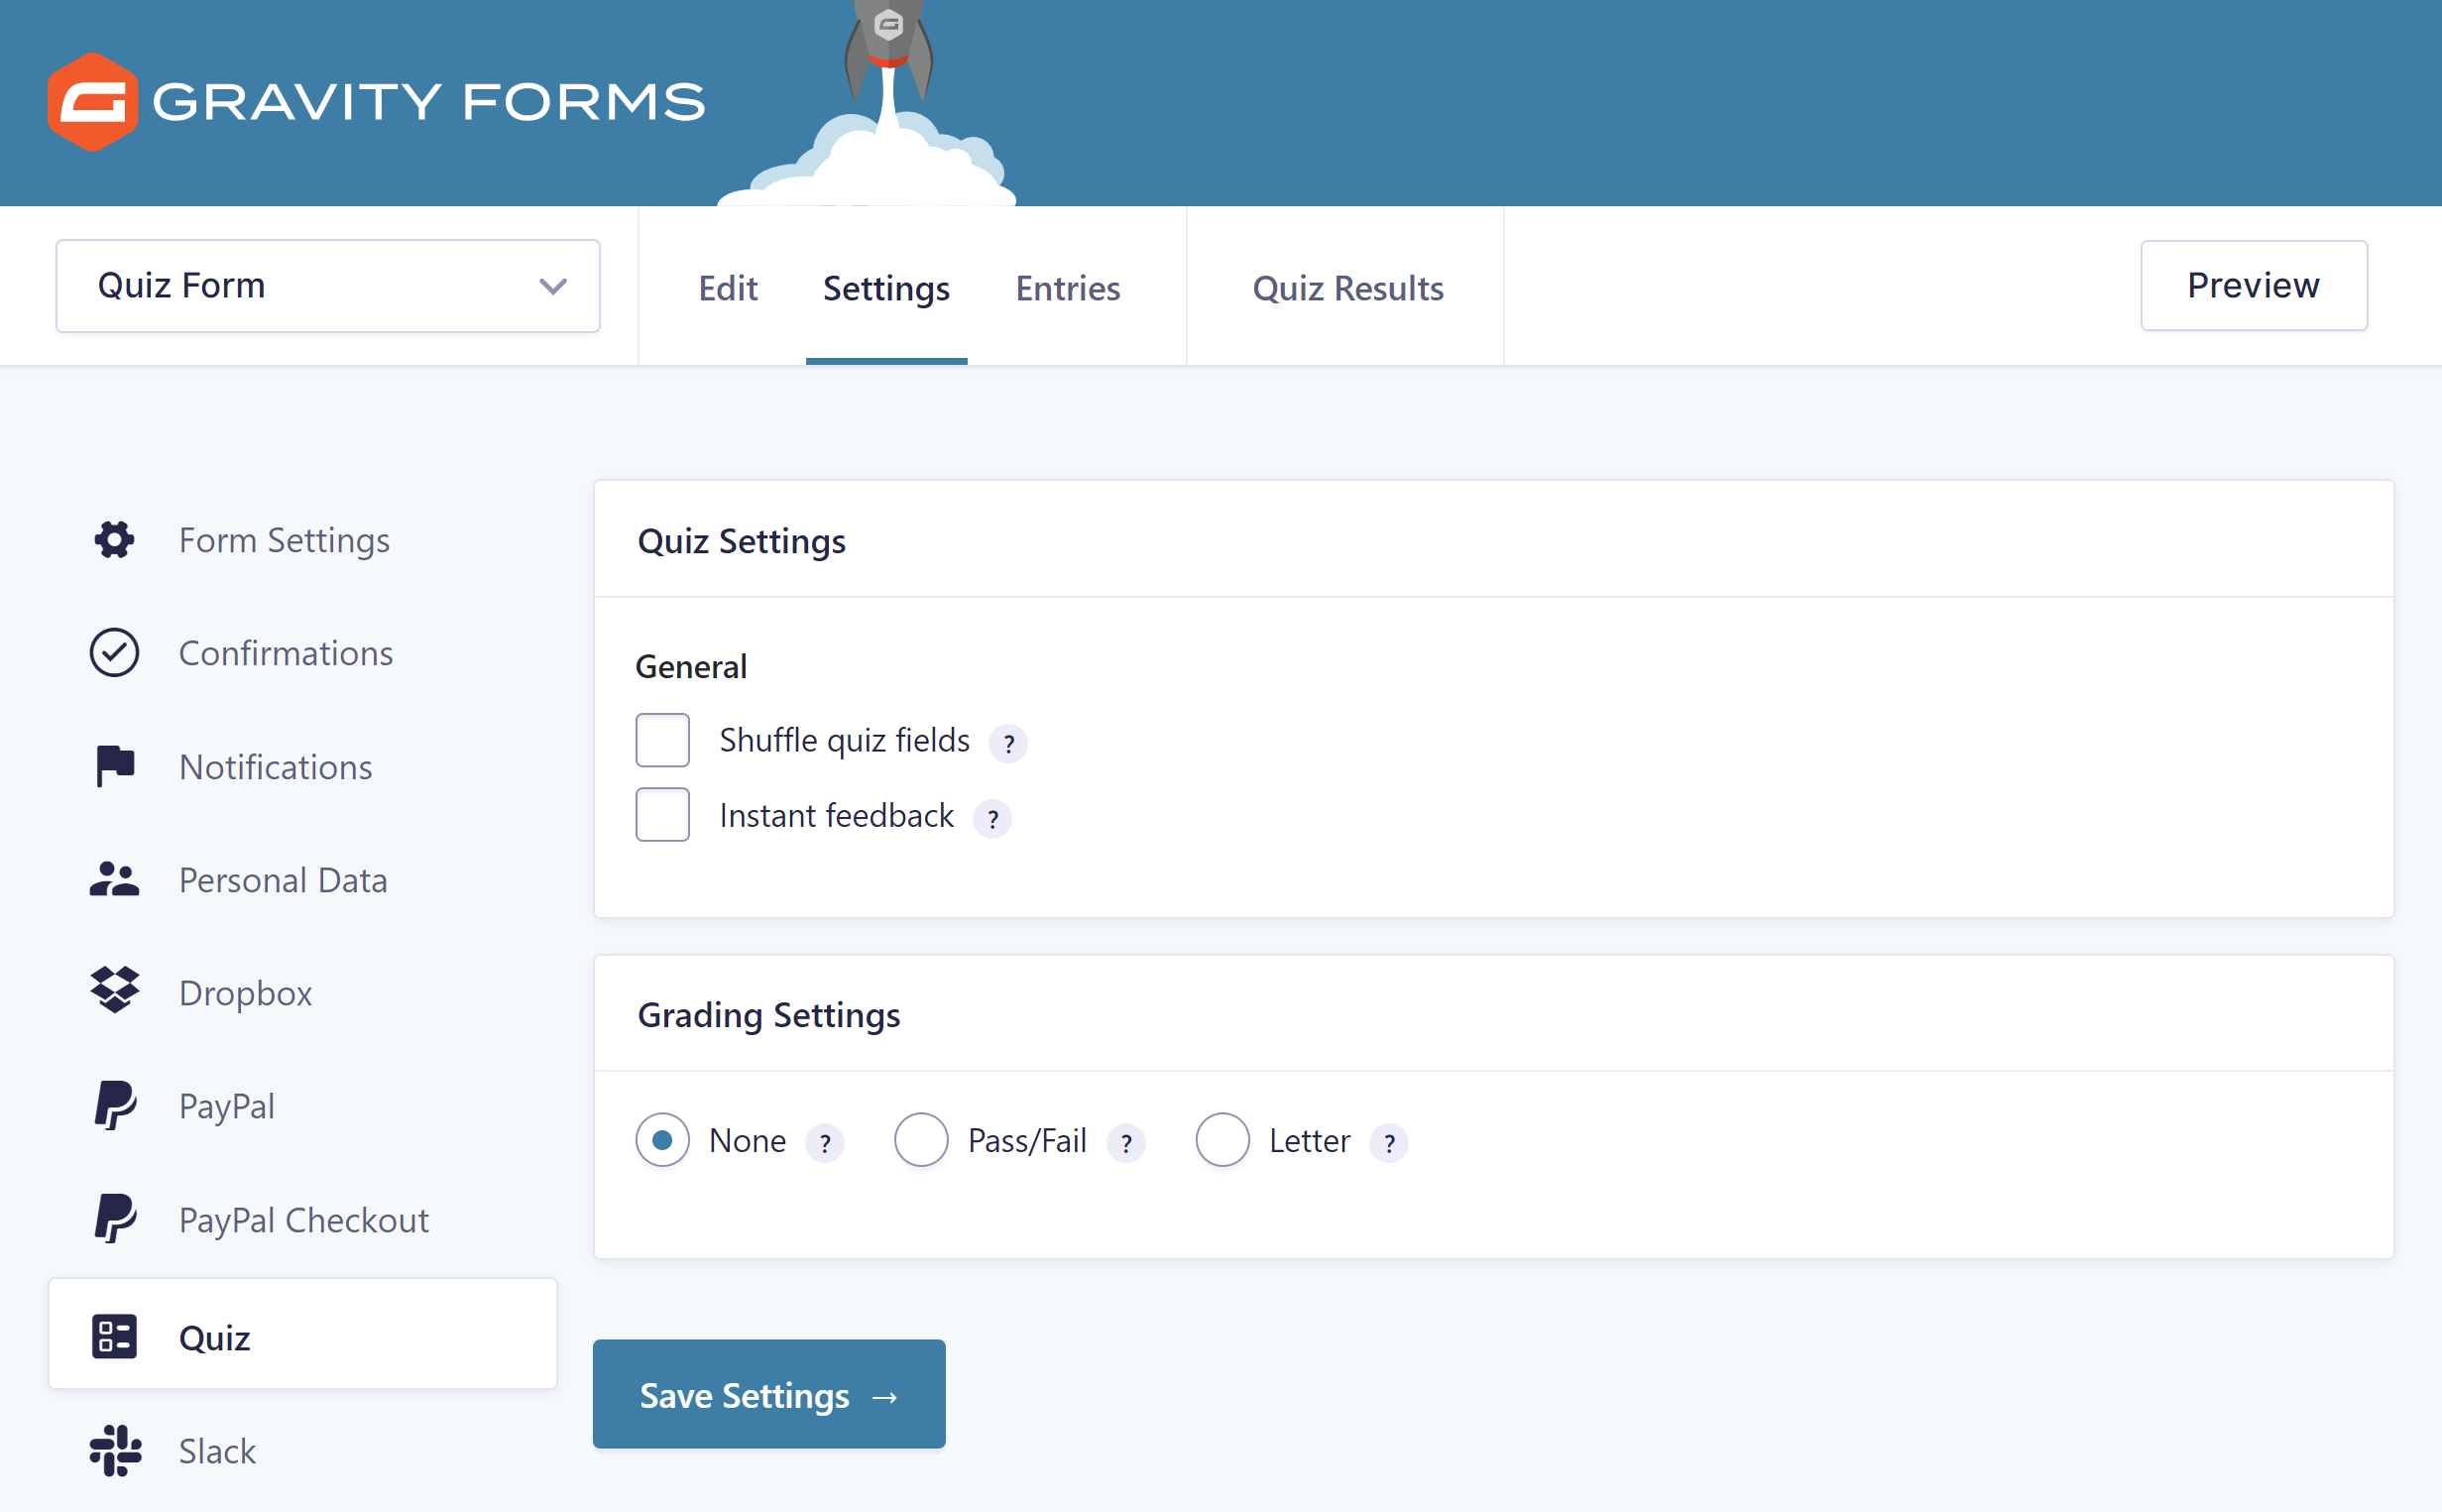
To set up a grading system for your quiz, go to Form Settings > Quiz. You’ll be able to select the grading system by choosing either a Pass/Fail or Letter grading system. You can also disable grading by opting for None.
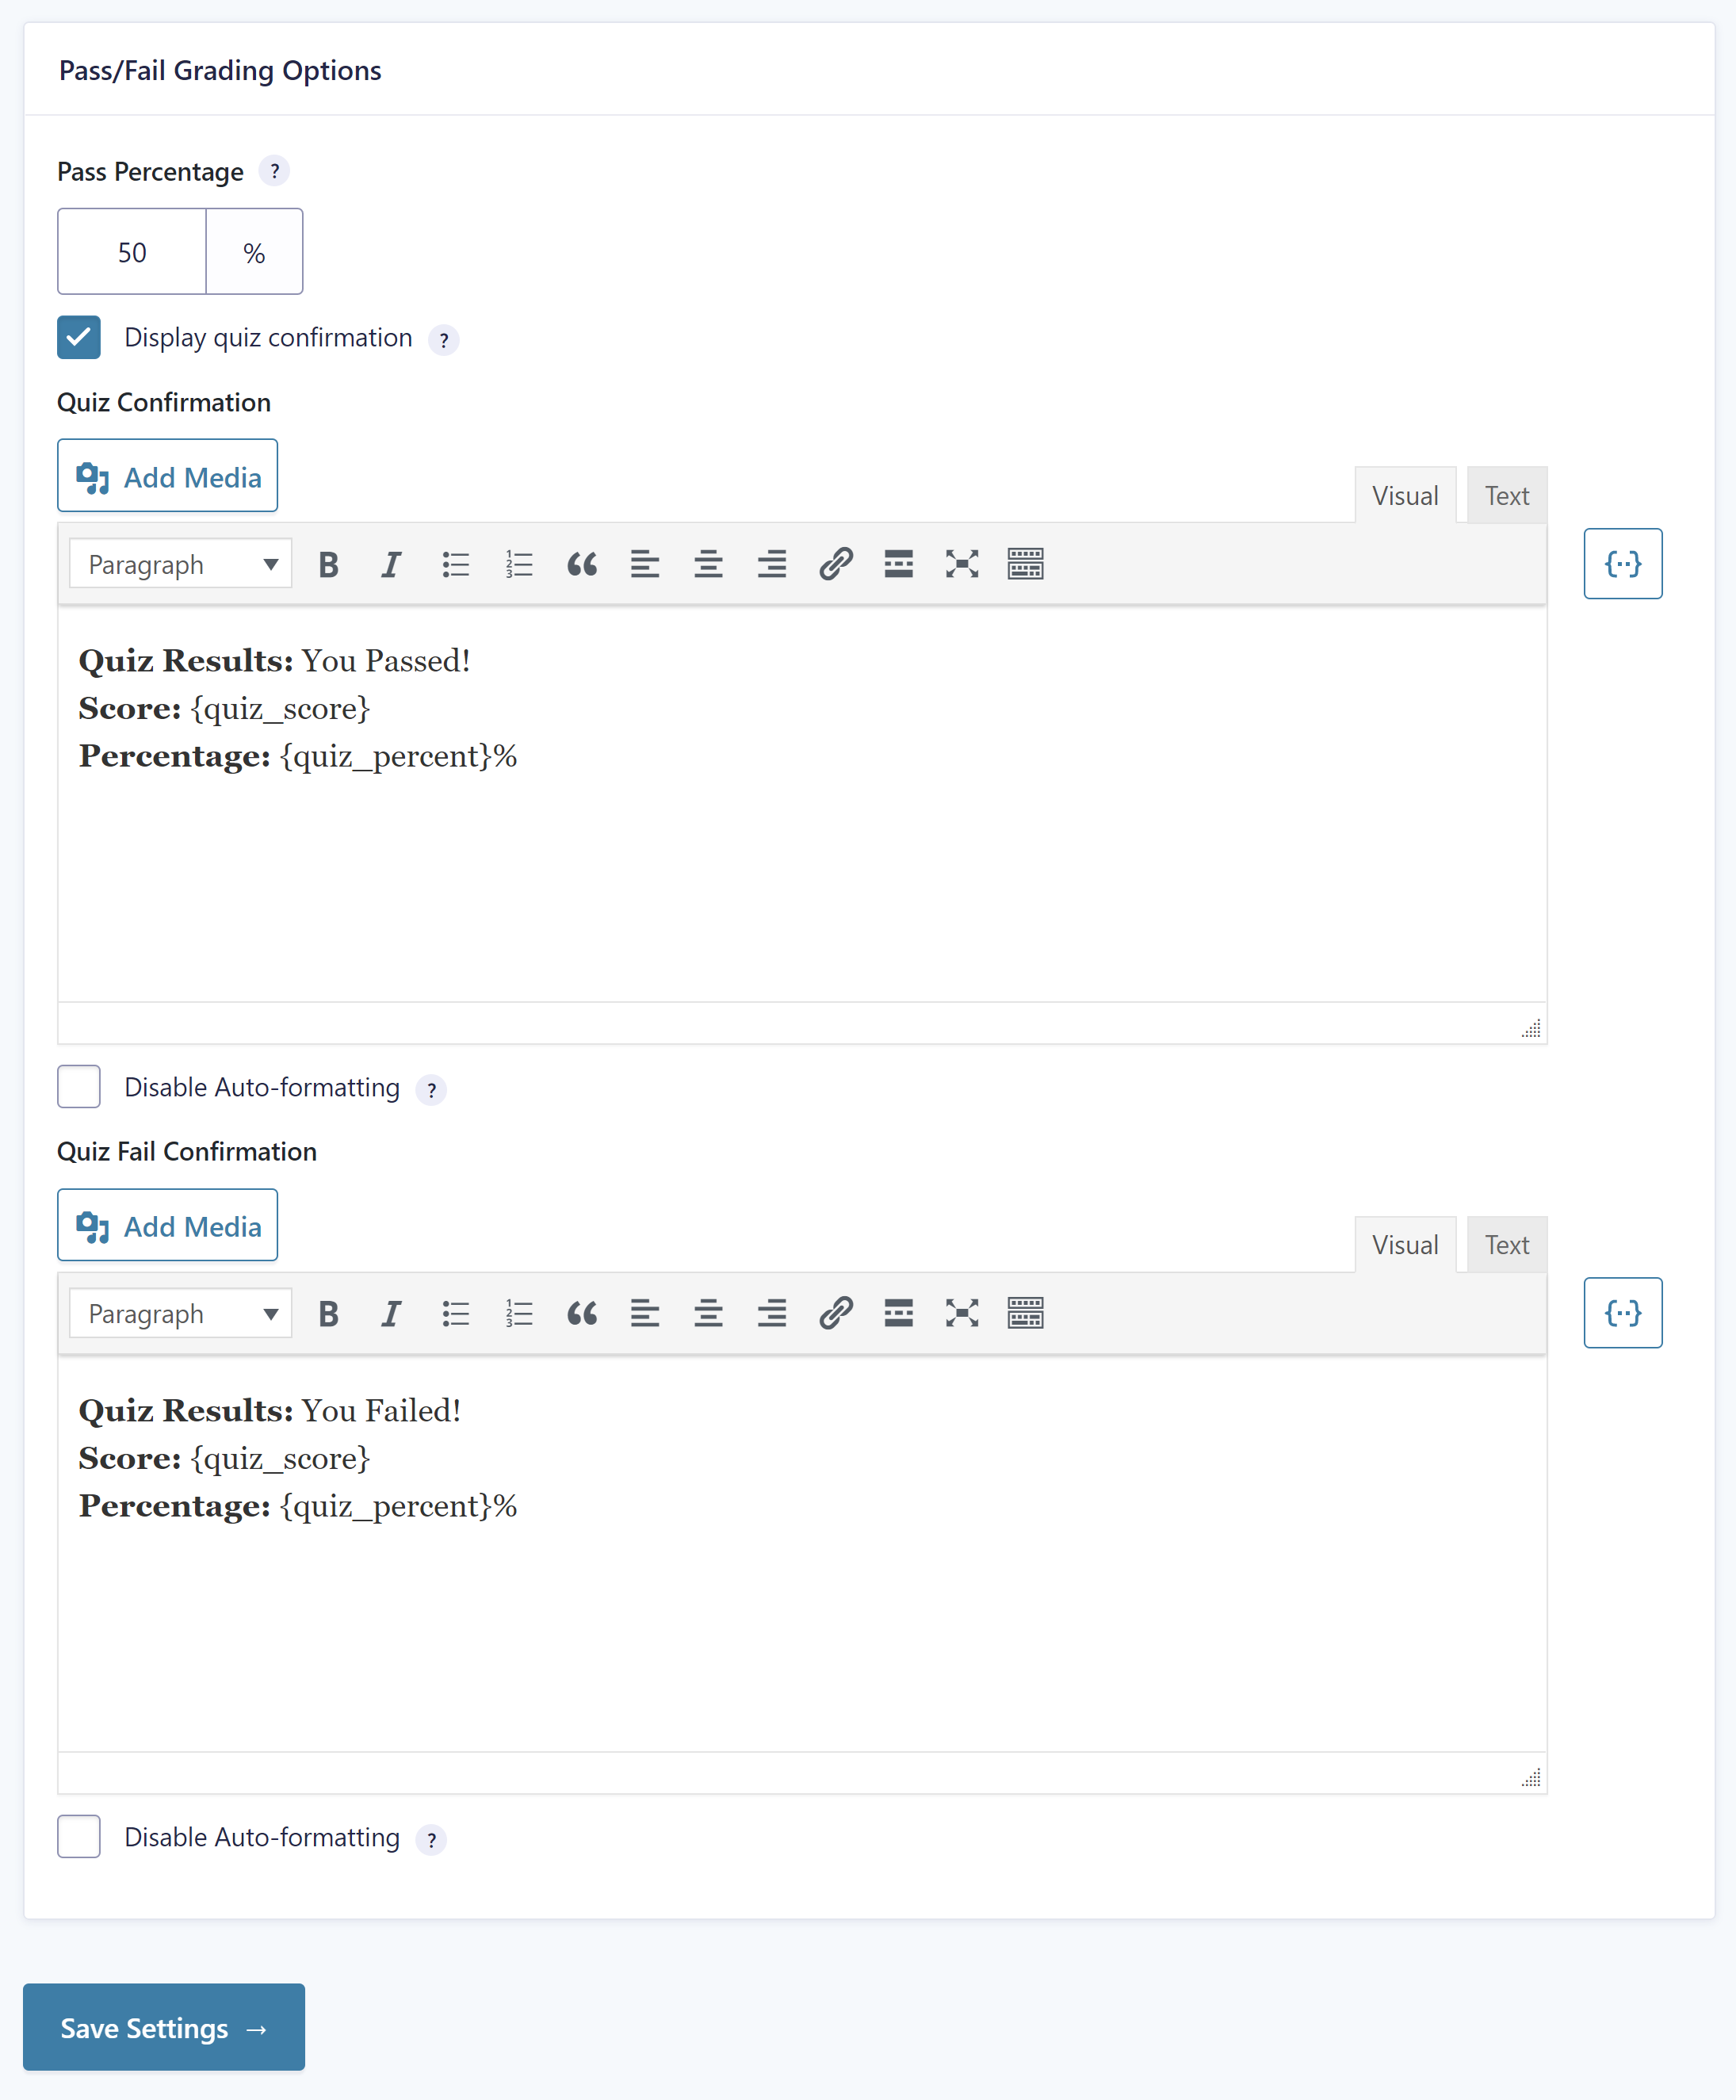
 The Pass/Fail option allows you to set a percentage needed to pass the quiz. This is a great option if you’re using the quiz for a membership or an online course. However, you can also use it whenever you want to assess the performance.
Alternatively, you can use the Letter grade based on the pass percentage. Once you’ve set up the grading system, you can choose to display the result to anyone who takes the quiz.
Step 4: Configure Other Settings
When you’re done configuring the grading for your quiz, it’s a good idea to go through the other settings. For example, you might want to configure quiz confirmations so participants’ results are displayed on the page once they have submitted their quiz.
 You can also create a Mailchimp or HubSpot feed that populates your mailing list depending on the result the visitor has gotten.
Don’t forget that you can also schedule your quiz, limit the number of entries, enable conditional logic, and more. Configure these to your liking and then save your settings.
Step 5: Publish Your Quiz
The last step is to add your form to a page on your site. Simply go to Pages and select one of your existing pages or create a new one. Then, add the Gravity Forms block and select your Quiz form from the drop-down menu. Publish your page and then start promoting it!

Once your quiz is live you can view and filter all your quiz results from within your WordPress dashboard.
For more information on how to get started with the Gravity Forms Quiz Add-On, check out our in-depth documentation.
Ready to Create a Quiz For Your Website With Gravity Forms?
As you can see, creating an effective quiz for your WordPress website with Gravity Forms is easy and quick.
But if you’re still on the fence about Gravity Forms don’t worry! Sign up for a personalized free demo and take all of our features for a test drive. You’ll be able to see for yourself how easy it is to create forms and quizzes with our intuitive form builder.

If you want to keep up-to-date with what’s happening on the blog sign up for the Gravity Forms newsletter!
