How to Migrate from WP Mail SMTP to Gravity SMTP
Interested in making the switch from WP Mail SMTP to Gravity SMTP for connecting your WordPress site to a transactional email service?
In this post, you’ll learn step-by-step how to migrate WP Mail SMTP to Gravity SMTP in just a few minutes.
Gravity SMTP includes a built-in migration feature to do this for you, so you can easily bring over all your WP Mail SMTP settings and start sending emails with the help of Gravity SMTP in no time.
If you’re still on the fence about making the switch, we’ll also cover some of the key reasons why you might want to change from WP Mail SMTP to Gravity SMTP.
Let’s dig in…
Why Migrate from WP Mail SMTP to Gravity SMTP
If you’ve already committed to making the switch, you can click this link to jump straight to our migration tutorial.
However, if you’re still on the fence, let’s kick things off by discussing some of the main reasons to migrate from WP Mail SMTP to Gravity SMTP.
Major Cost Savings for Gravity Forms Elite License Holders
If you’re already a Gravity Forms Elite license holder, one of the biggest reasons to switch is cost.
While WP Mail SMTP does have a free version at WordPress.org, you’ll need the Pro version to access essential features such as email logging, which is a must for any site sending important emails. Some of the integrated services also require a premium version, such as Microsoft 365 / Office.
These premium plans start at $99 and range all the way up to $449.
In contrast, if you’re holding the Gravity Forms Elite license, you get access to Gravity SMTP at no extra cost.
All the Essential Email Features You Need (With Lots More on the Way)
Of course, cost-savings don’t mean much if you need to sacrifice features. Thankfully, Gravity SMTP includes a bunch of integrations and features to help you make your site’s emails as reliable as possible.
Currently, Gravity SMTP supports the following direct integrations:
There’s also a Custom SMTP option that lets you use any SMTP server just by entering its credentials.
We’re also actively working on adding new integrations to Gravity SMTP. You can see some of the upcoming integrations on the product roadmap and vote on the integrations that you think are the most important.
Beyond that, you also get all the essential features that you need for your site’s emails:
- Email logging – you can track all of the emails that your site sends, including technical information and the actual content and design of each email. There’s also an option to log email attachments, as well. By default, Gravity SMTP permanently stores these logs, but you can adjust the log storage period according to your preferences.
- Backup email sending method – in addition to your primary email sending service, you could also configure a secondary backup email sending service. If an email fails to send via your primary service, Gravity SMTP will automatically resend that email using your backup service to ensure deliverability.
- Manual email resends – you can manually resend any email from the email log.
- Test email sending – you can send a test email to any email address with just a few clicks.
- Test email mode – in addition to sending a live test email, you can also enable test mode while developing your site. This will disable live email sending but still store all of the emails that your site would have sent in the email log. You can use this to test email behavior before you enable live sending.
- Option to force plugins to use the same From email and name – if you enable this optional feature, Gravity SMTP will override a plugin’s settings to force all of your site’s emails to use a consistent From email address and name.
- WordPress email management – you can use simple toggles to enable or disable all of the emails that the core WordPress software sends.
We’re also actively working on adding new features to Gravity SMTP. Again, you can see upcoming features on the product roadmap so that you know what’s in the pipeline.
Backed By the Same Team Behind Gravity Forms
Finally, Gravity SMTP comes from the same team behind Gravity Forms, which means that you can expect the same quality and reliability that you get from Gravity Forms.
Gravity Forms has been around for 14+ years now, so you can be confident that the team behind Gravity SMTP is in it for the long haul.
How to Migrate from WP Mail SMTP to Gravity SMTP
Now, let’s get into the actual step-by-step guide for how to migrate your site from WP Mail SMTP to Gravity SMTP.
For this example, we’ll use Mailgun as our site’s service. We’ll assume that you’ve already fully configured WP Mail SMTP to Mailgun and now you want to switch to Gravity SMTP without any interruption in your site’s email sending.
However, the same basic migration steps will work for the other services including SendGrid, Postmark, Brevo, and others. If you’ve set up multiple services in WP Mail SMTP, Gravity SMTP will bring along all of your credentials – not just those of your primary service.
Here’s how it works…
1. Install the Gravity SMTP Plugin On Your Site
To begin, you’ll want to install and activate the Gravity SMTP plugin on the same site where you’re using WP Mail SMTP.
As we mentioned above, Gravity SMTP is currently available at no extra cost to anyone holding the Gravity Forms Elite license. If you’re holding that license, you can download Gravity SMTP from your Gravity Forms My Account area.
However, Gravity SMTP is still a completely standalone plugin, which means you do not need to have Gravity Forms installed in order to use Gravity SMTP (though Gravity SMTP does work great for sending form notification emails from forms that you’ve created with Gravity Forms).
Do not deactivate the WP Mail SMTP plugin yet. You’ll want to wait until you complete the migration process before doing that so there’s no interruption in your site’s emails.
2. Migrate Your Settings Using the Gravity SMTP Setup Wizard
Once you install and activate Gravity SMTP, you can launch the setup wizard by clicking on the SMTP option in your sidebar.
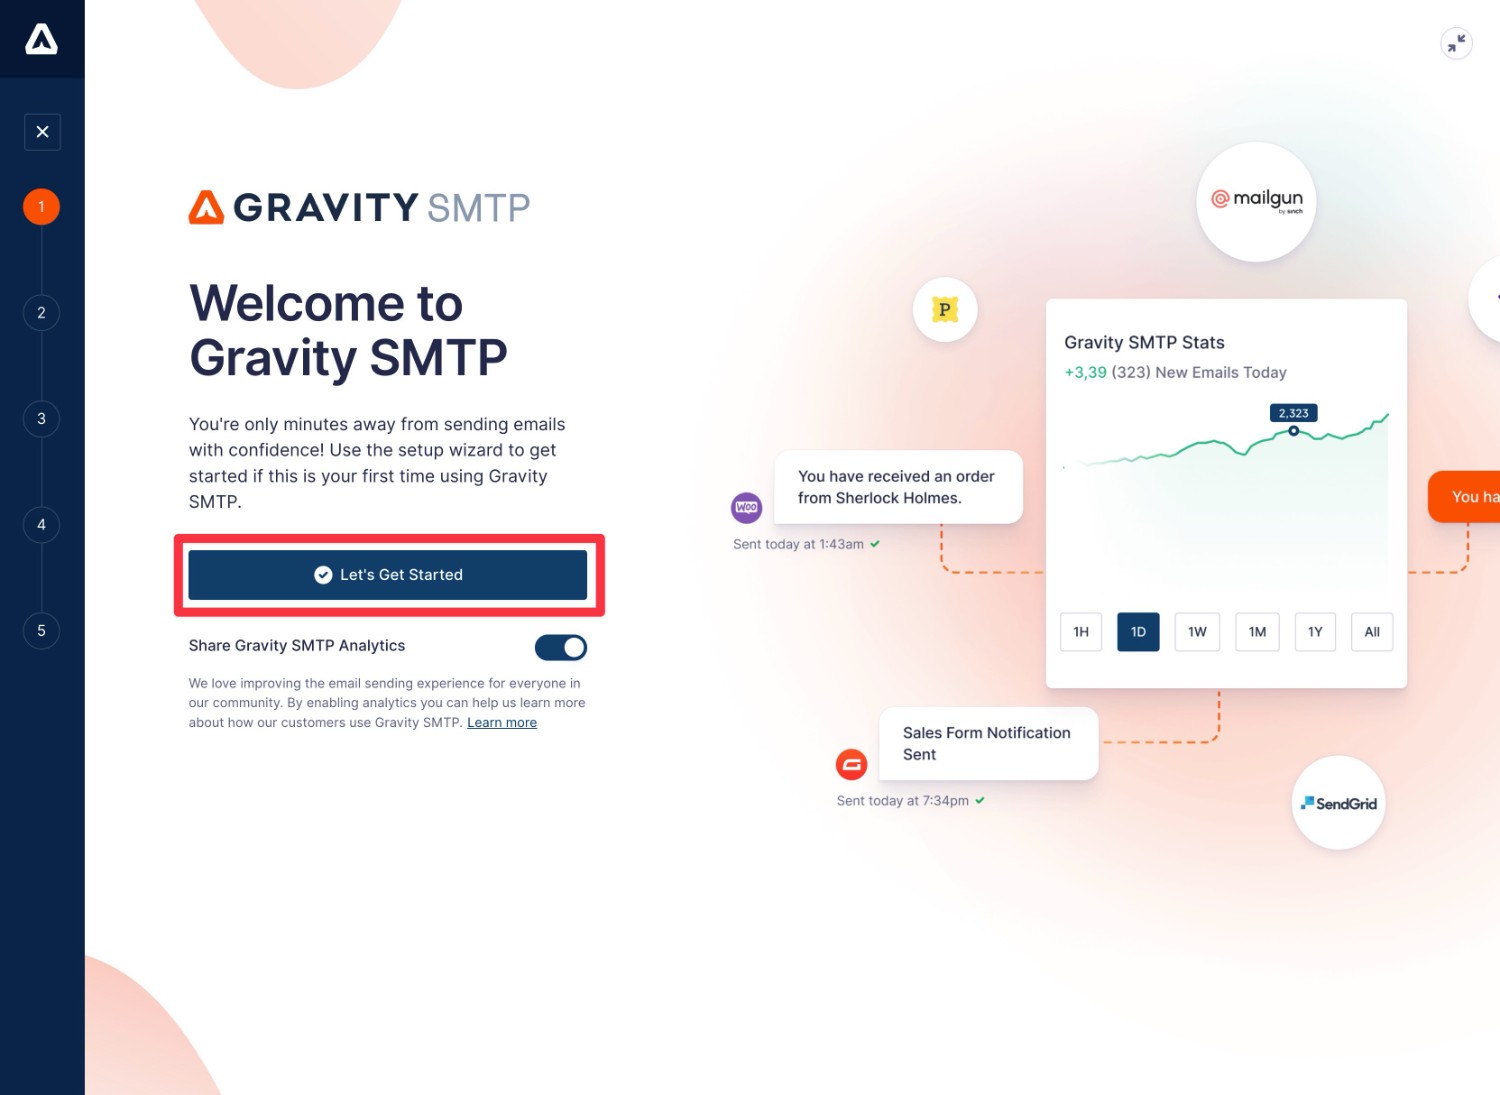
On the first screen of the setup wizard, click the Let’s Get Started button to advance.
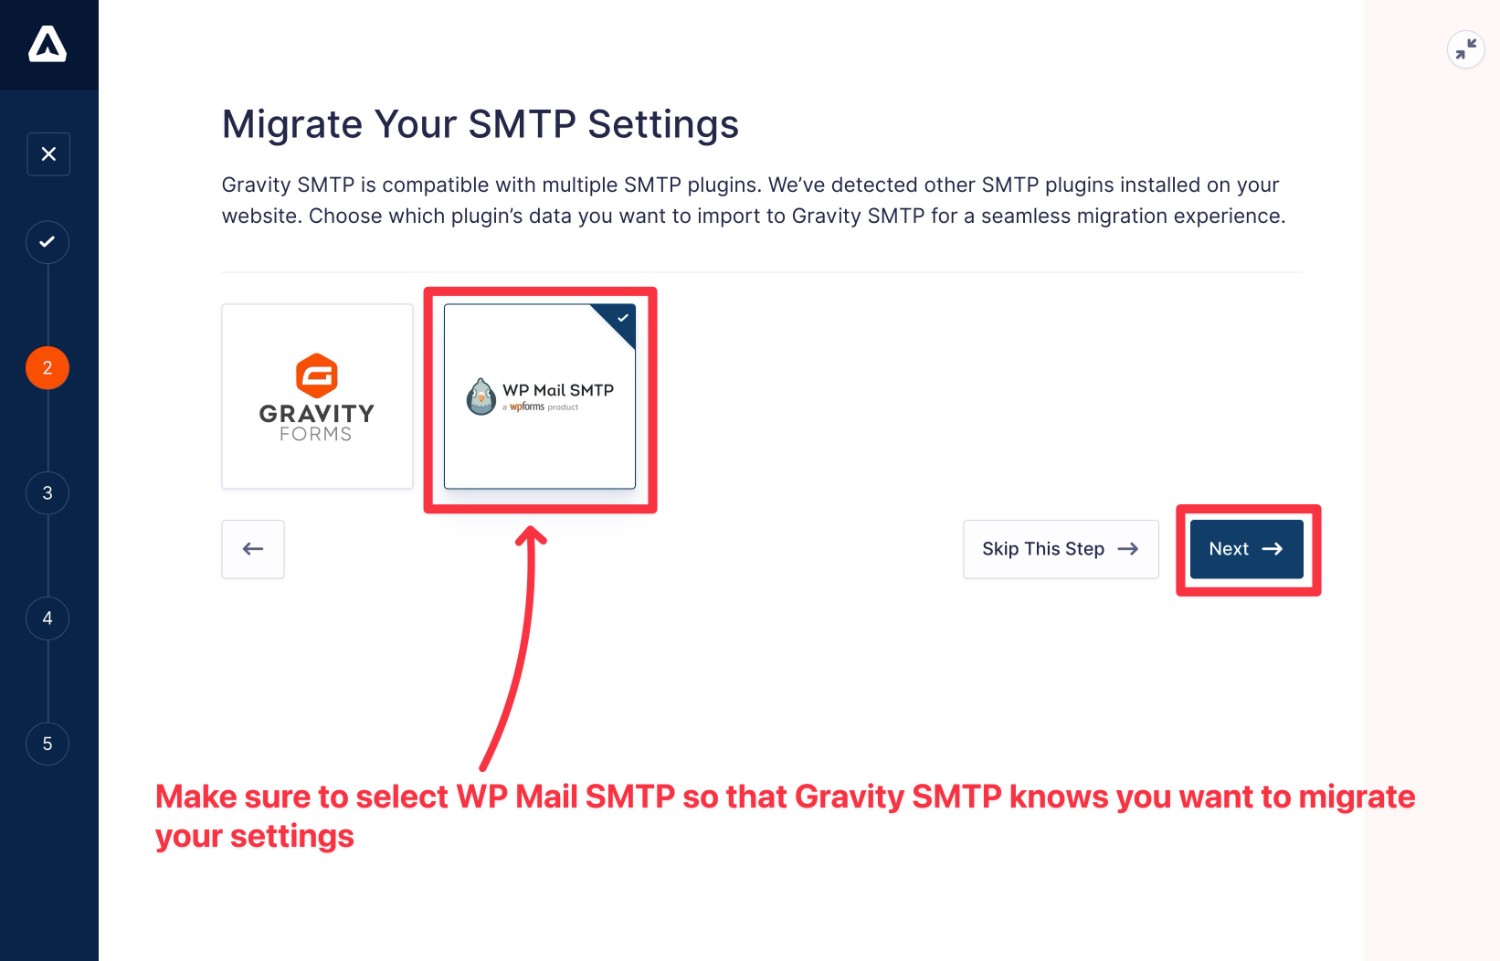
On the next screen, you should see an option to migrate your SMTP settings from WP Mail SMTP.
Make sure that you’ve selected WP Mail SMTP – you should see a blue checkmark appear on it – and then click Next to continue.
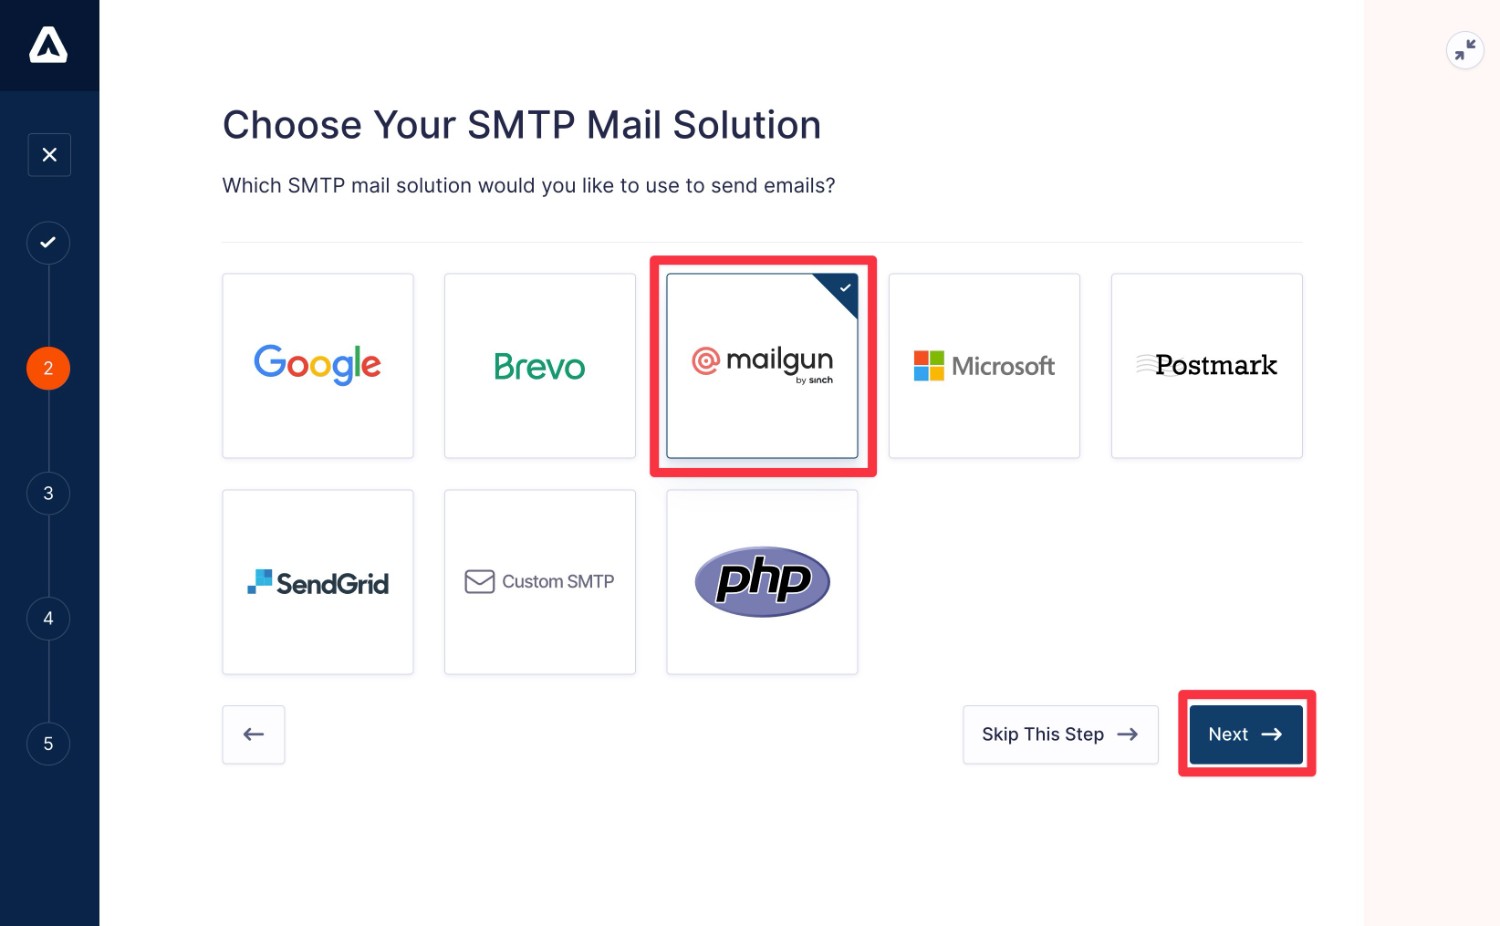
On the next screen, you can choose which SMTP service you want to use as your site’s default email sending service.
For this example, we were using Mailgun as our sending service in WP Mail SMTP so we’ll also choose Mailgun for Gravity SMTP.
If you connected WP Mail SMTP to multiple services, Gravity SMTP will still migrate the credentials for any other services that you’ve connected, even if you don’t select one of those services as your primary email sending method.
Once you’ve made your choice, click Next to advance.
On the next screen, you’ll see a summary of the information that Gravity SMTP imported for your primary email sending service.
For Mailgun, Gravity SMTP will automatically import the API key, region, sending domain, and from name/email.
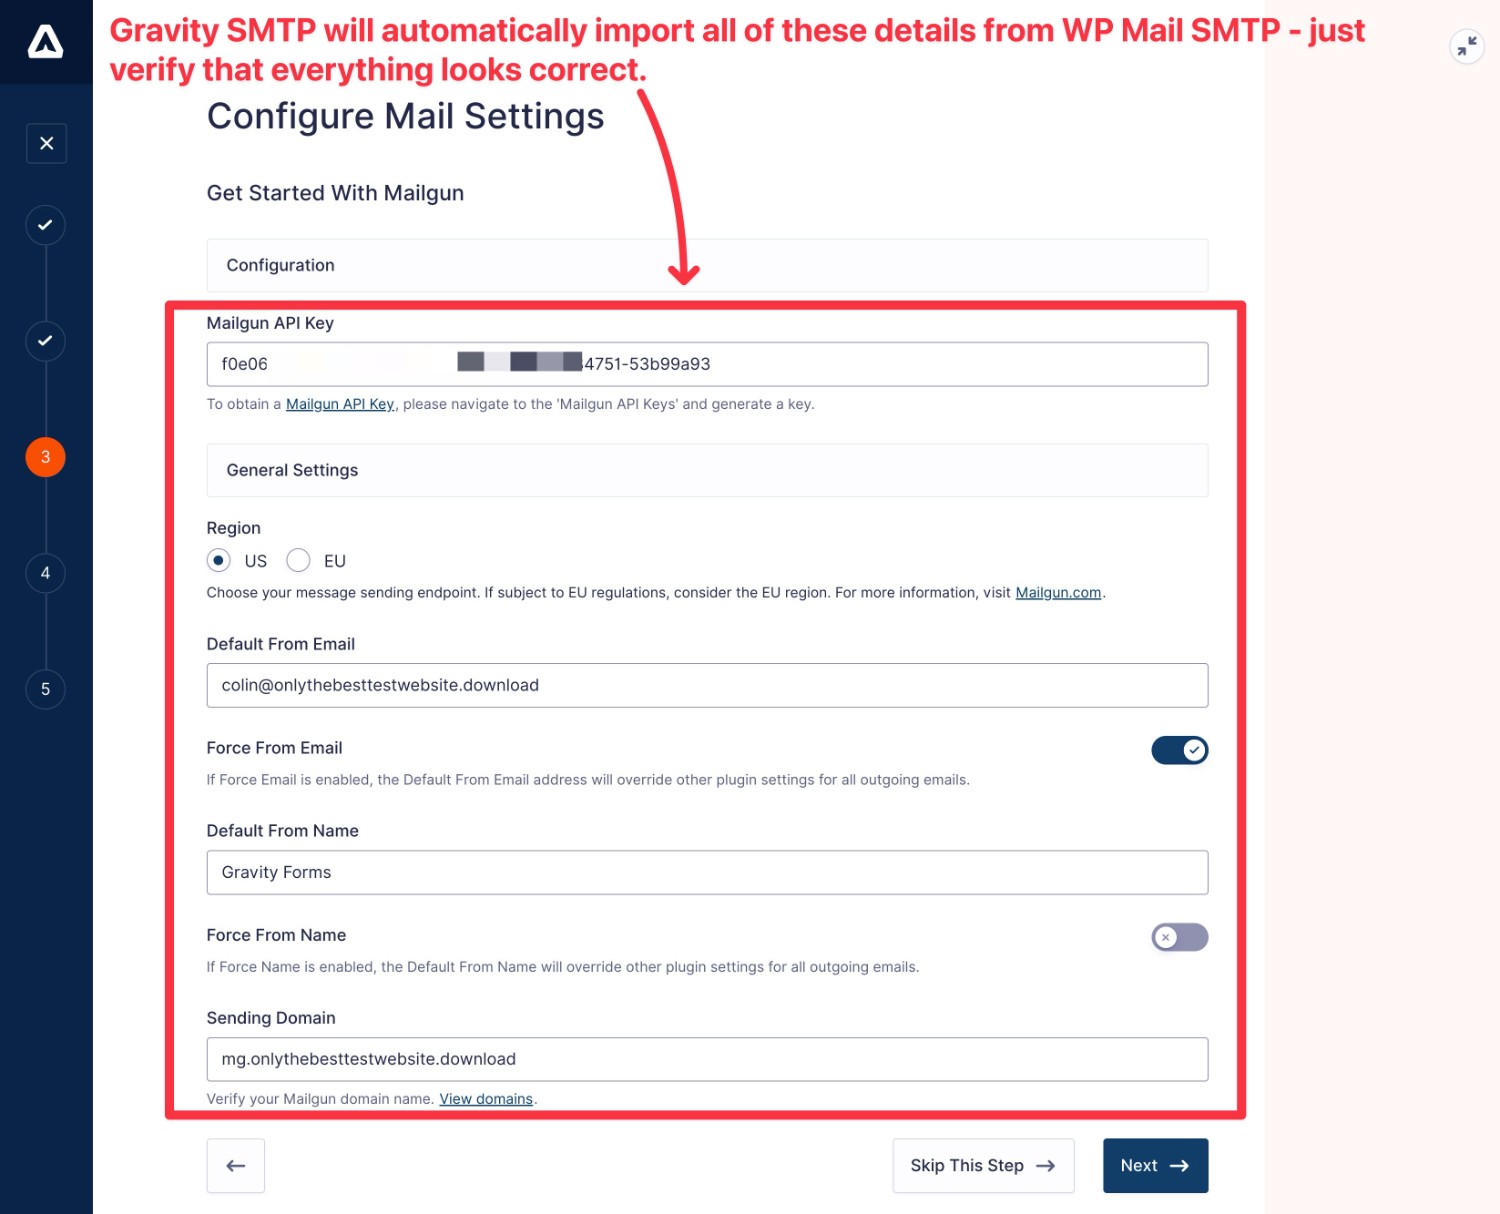
Once you’ve checked all of the information, click the Next button to advance.
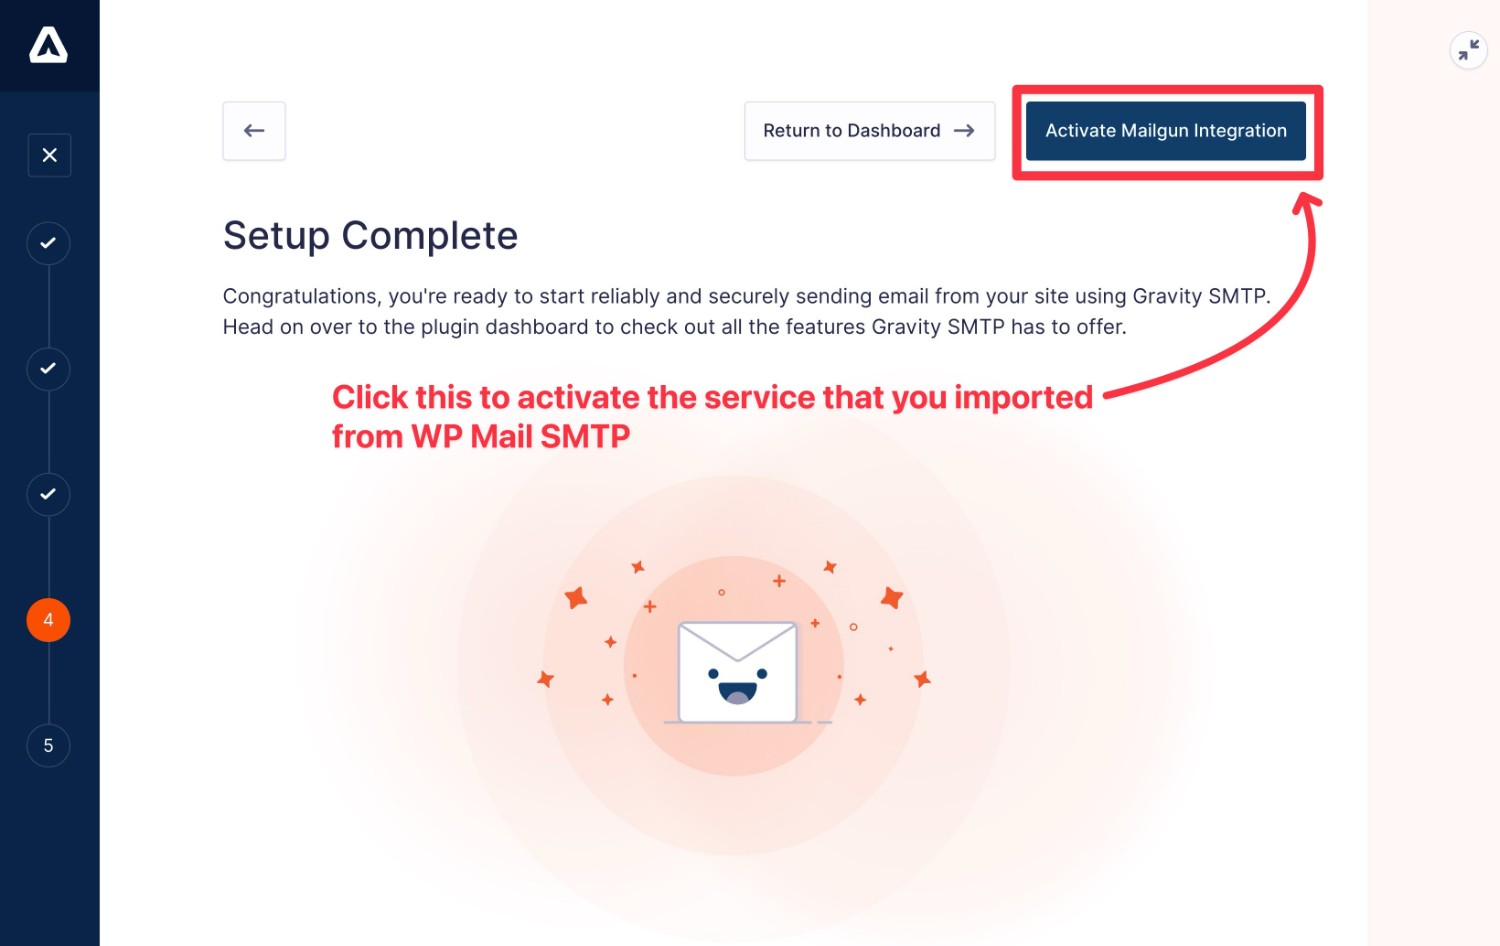
On the last screen of the setup wizard, you’ll see an option to activate your chosen email sending service. In our example, there’s a button to Activate Mailgun Integration.
Make sure that you click this button to make your chosen sending service your site’s primary email sending method.
3. Deactivate the WP Mail SMTP Plugin
Once you activate your chosen email sending service, Gravity SMTP will start sending your site’s emails using this method.
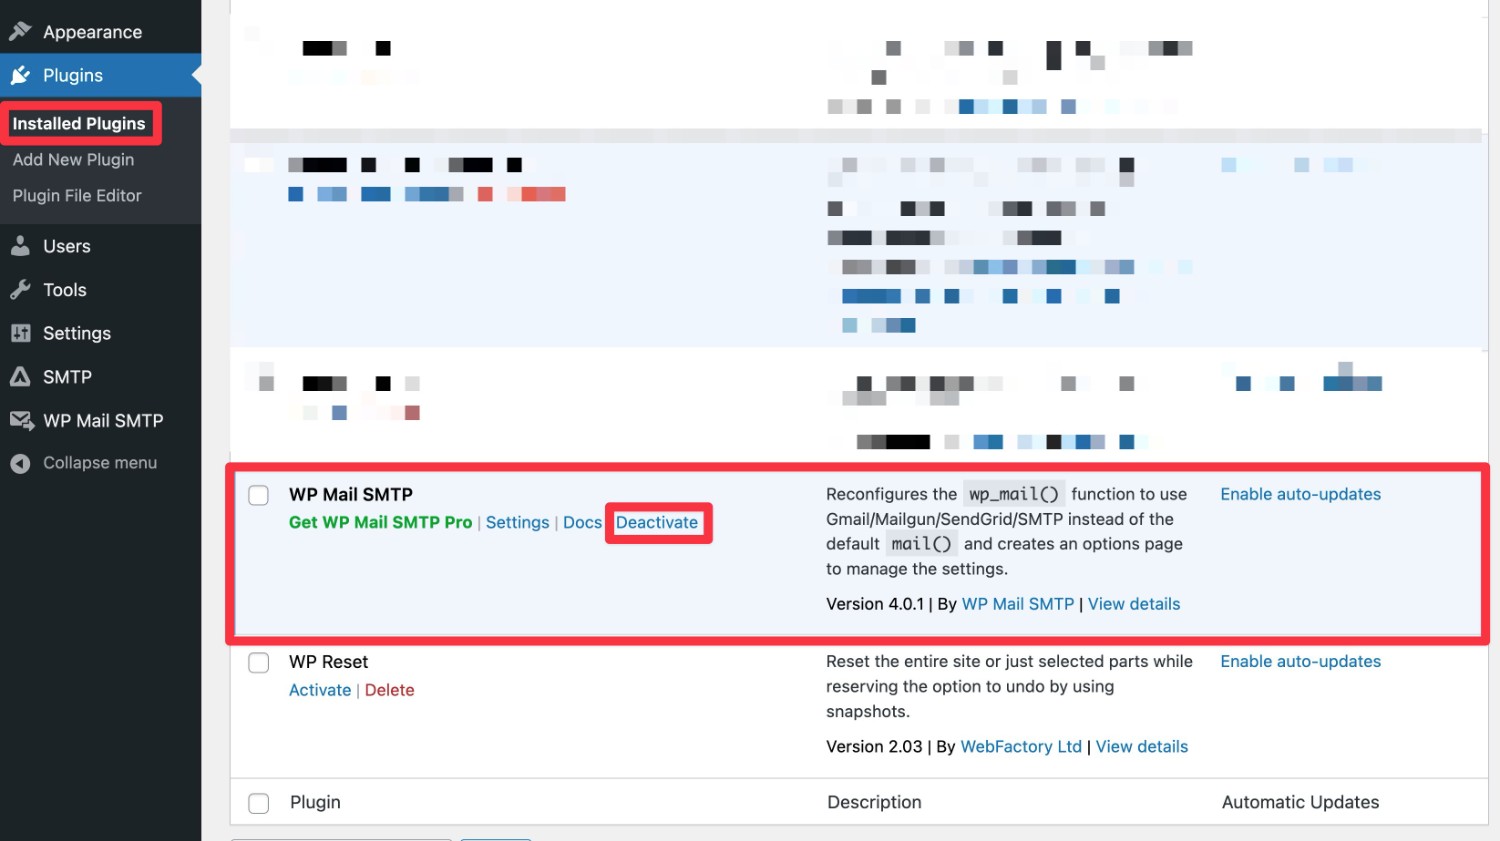
Now, you can go ahead and deactivate the WP Mail SMTP plugin:
- Go to Plugins → Installed Plugins.
- Find WP Mail SMTP in the list.
- Click the Deactivate link underneath the name.
4. Send a Test Email
To verify that your imported email settings are working properly, we recommend sending a test email after deactivating the WP Mail SMTP plugin.
Gravity SMTP includes a built-in feature to help you do this:
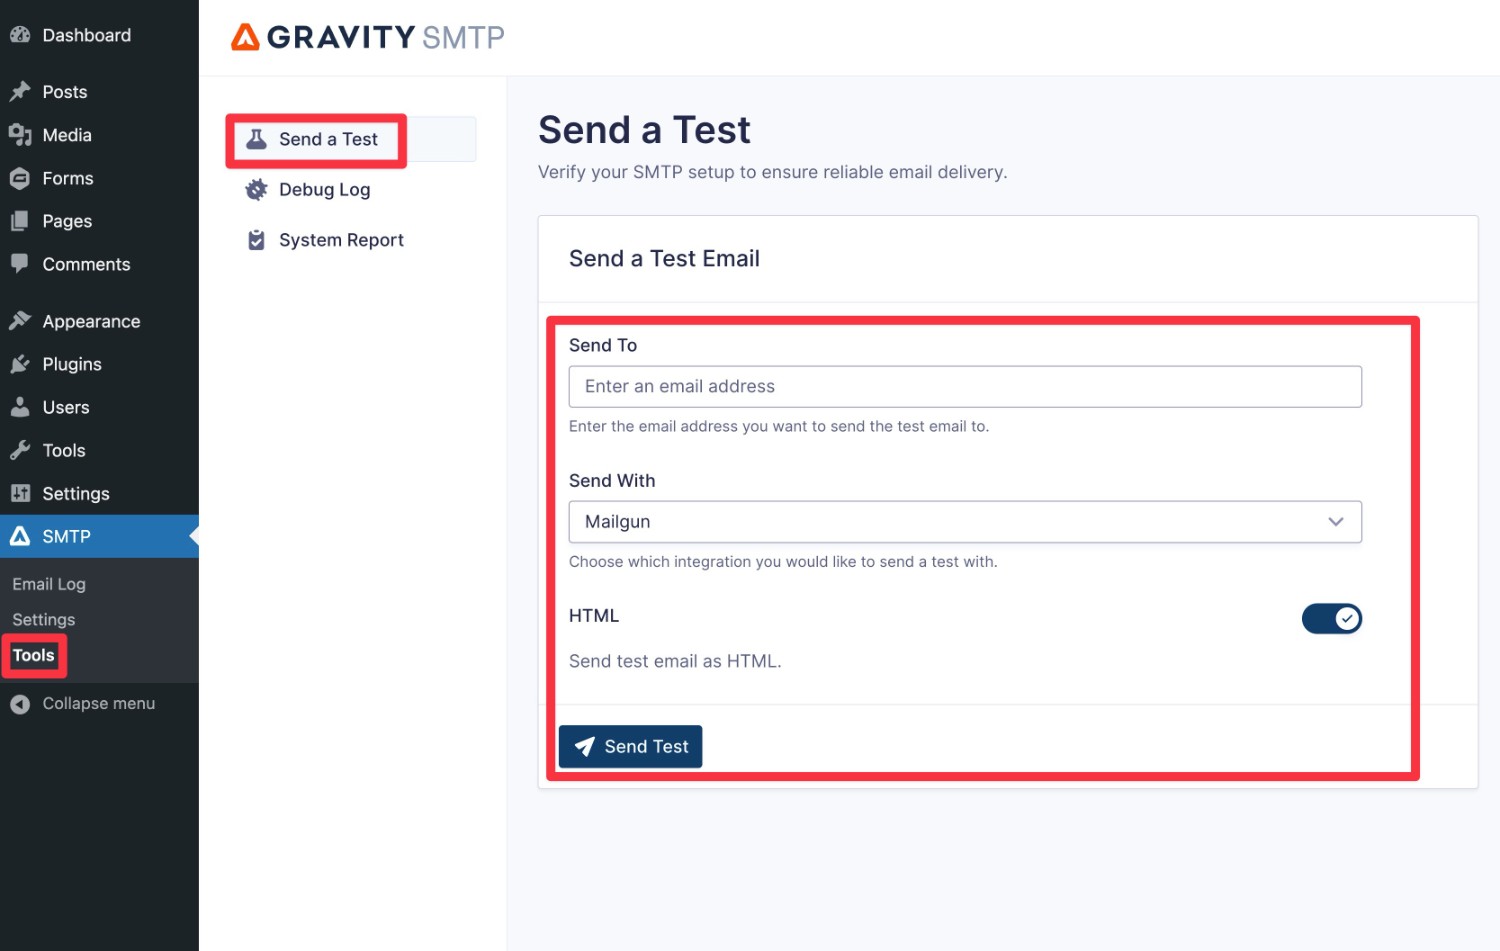
- Go to SMTP → Tools.
- Select the Send a Test tab (it should be selected by default).
- Enter the email address to which you want to send a test email.
- Use the Send With drop-down to select the email sending service that you want to use (if you imported multiple connections from WP Mail SMTP.
- Click the Send Test button.
You should see a success message appear in the Gravity SMTP interface. Then, if you check your email inbox, you should receive an email that looks something like below.
In addition to making sure that you’ve received the email, we also recommend checking the From email and name to make sure that they appear as you want them to.
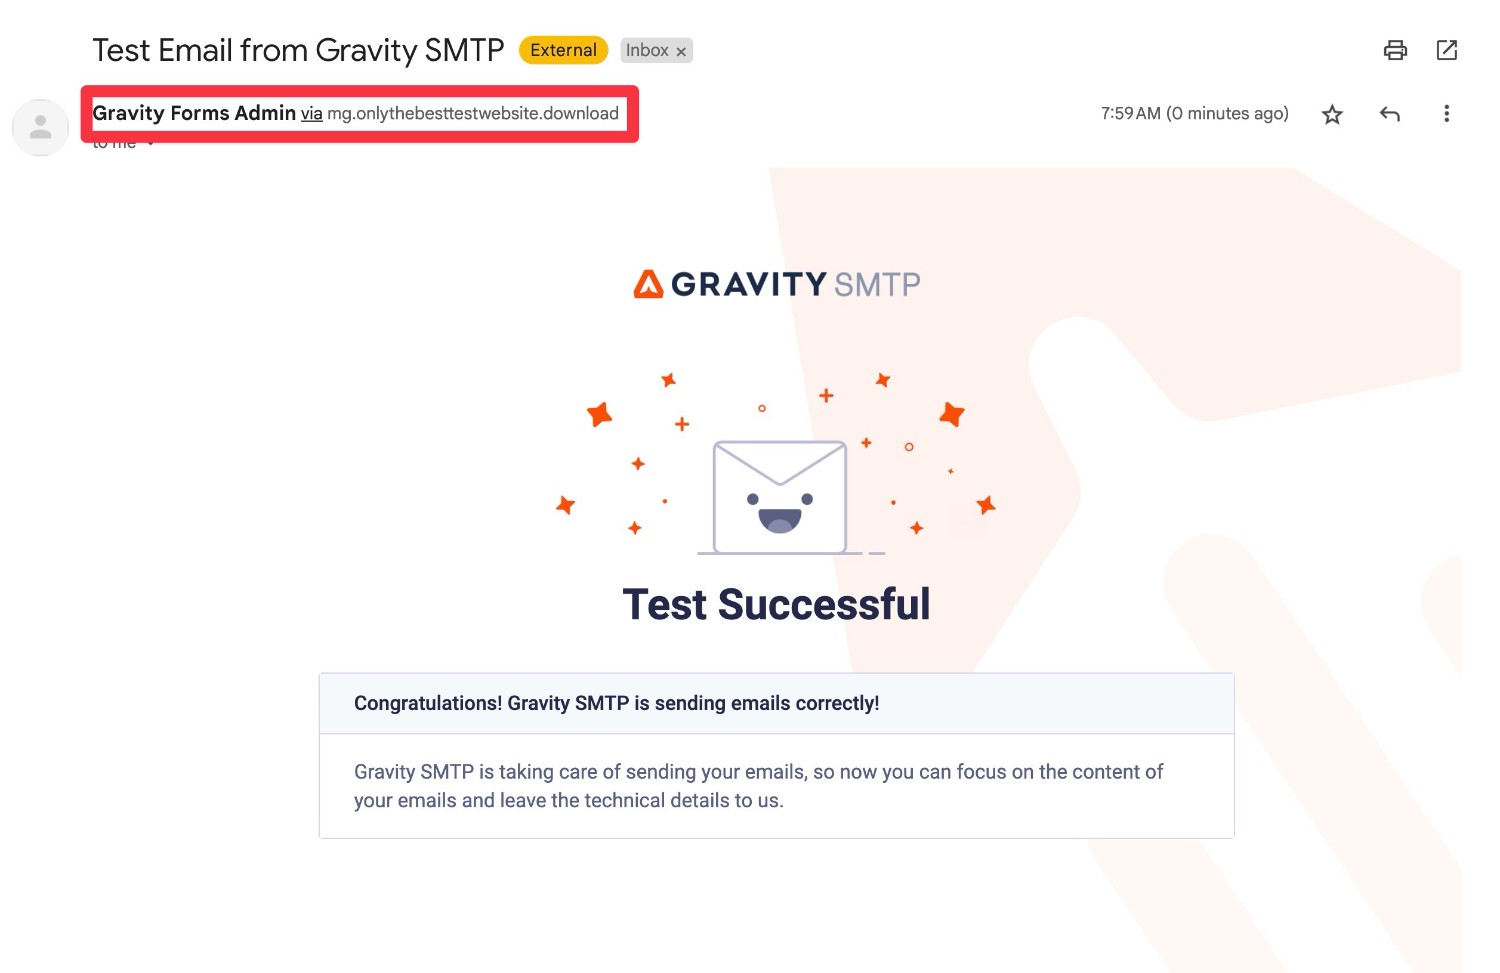
If you want to change any details, you can go to SMTP → Settings → Integrations and click the gear icon next to your chosen sending service.
5. Monitor Your Site’s Emails
At this point, you’ve successfully migrated from WP Mail SMTP to Gravity SMTP and verified that your site is successfully sending emails.
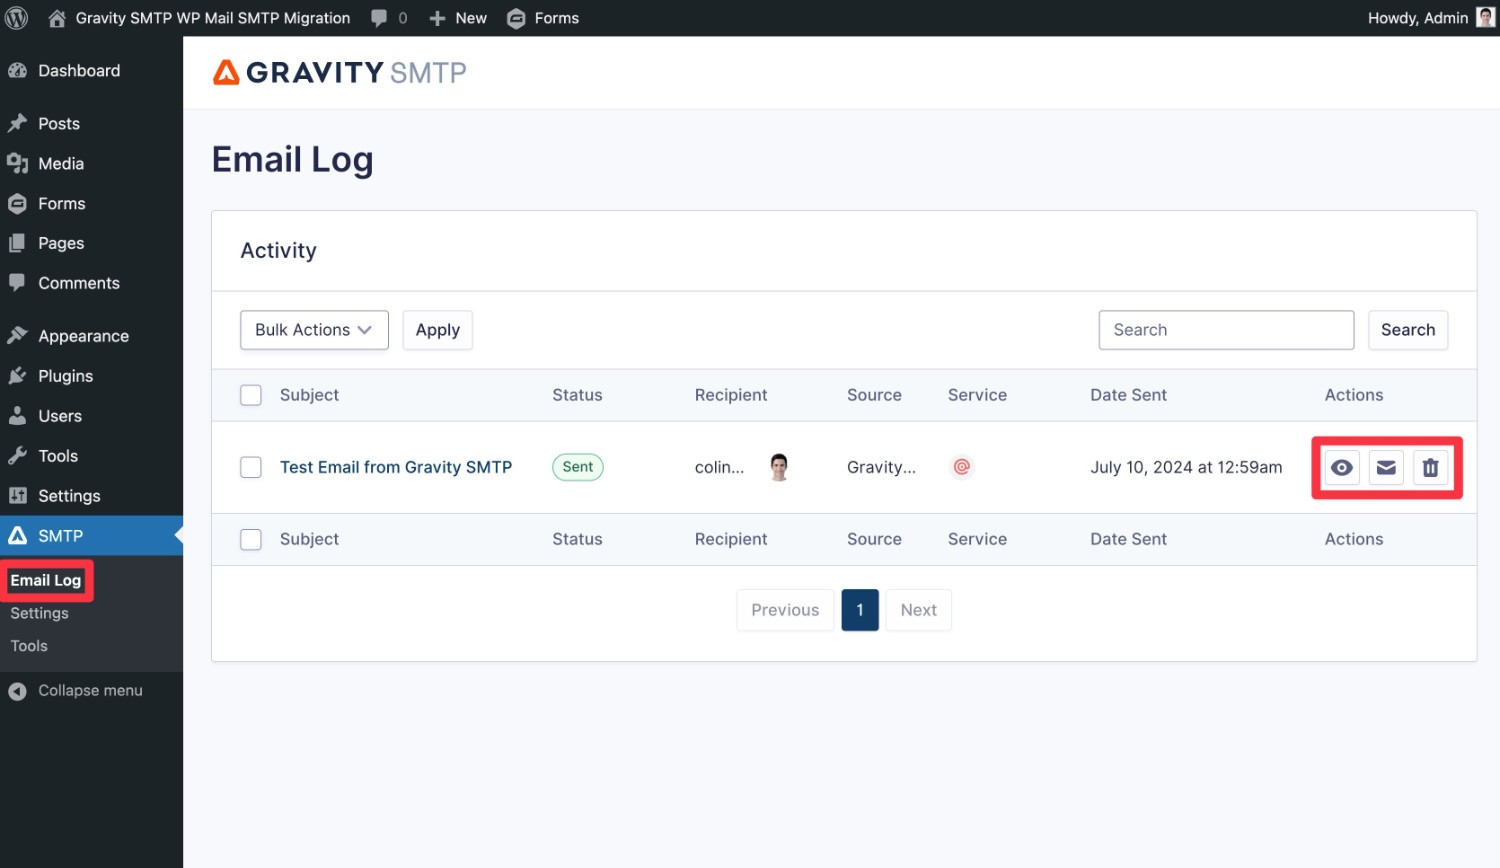
To help you stay on top of your site’s emails going forward, Gravity SMTP also includes an email logging feature, which isn’t something that you get with the free version of WP Mail SMTP.
It will log all of the emails that your site sends, including letting you see the content and technical details of every email.
To access the email log, you can go to SMTP → Email Log. Then, you can use the icons in the Actions column to view the content or technical information of a specific email.
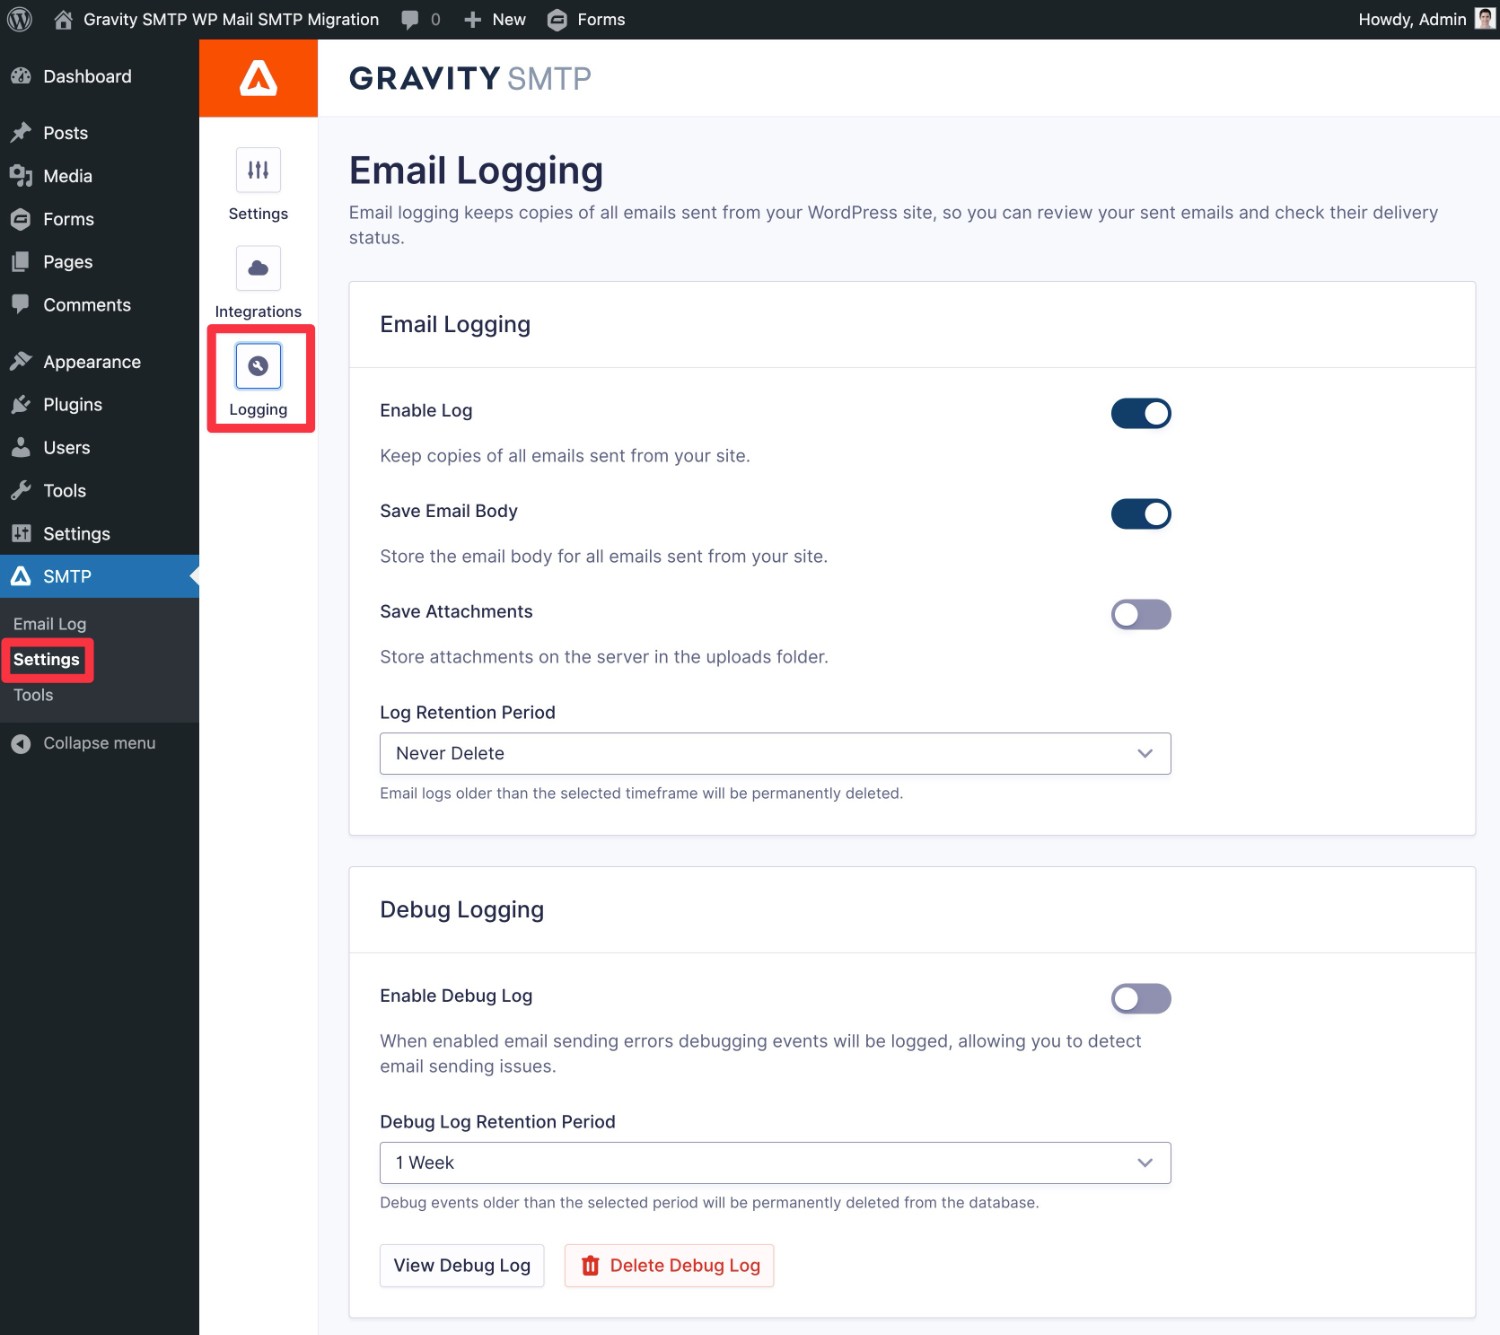
By default, Gravity SMTP will permanently store the logs. However, you can adjust the storage period (or completely disable the logging functionality) by going to SMTP → Settings → Logging.
Migrate WP Mail SMTP to Gravity SMTP Today!
That wraps up our guide on how to migrate WP Mail SMTP to Gravity SMTP in just a few minutes.
Currently, anyone holding the Gravity Forms Elite license gets access to Gravity SMTP at no extra cost, which means you can save a bundle versus paying for WP Mail SMTP.
Because Gravity SMTP makes the migration process so painless, it also won’t take you much time to switch your site over.
If you’re ready to make the switch, install the Gravity SMTP plugin today and follow this guide to easily migrate all your existing WP Mail SMTP settings and connections.

If you want to keep up-to-date with what’s happening on the blog sign up for the Gravity Forms newsletter!
