How to Send a Test Email from WordPress
Whether it’s for password resets, form notifications, order confirmations, or anything else, most WordPress sites need to be able to send emails.
However, the default way that WordPress sends emails can often cause issues with WordPress emails not sending. If you’re expecting your site’s emails to “just work” out of the box, you might run into issues.
The right solution? Sending some test emails to make sure everything is working properly, which is what we’re going to cover below.
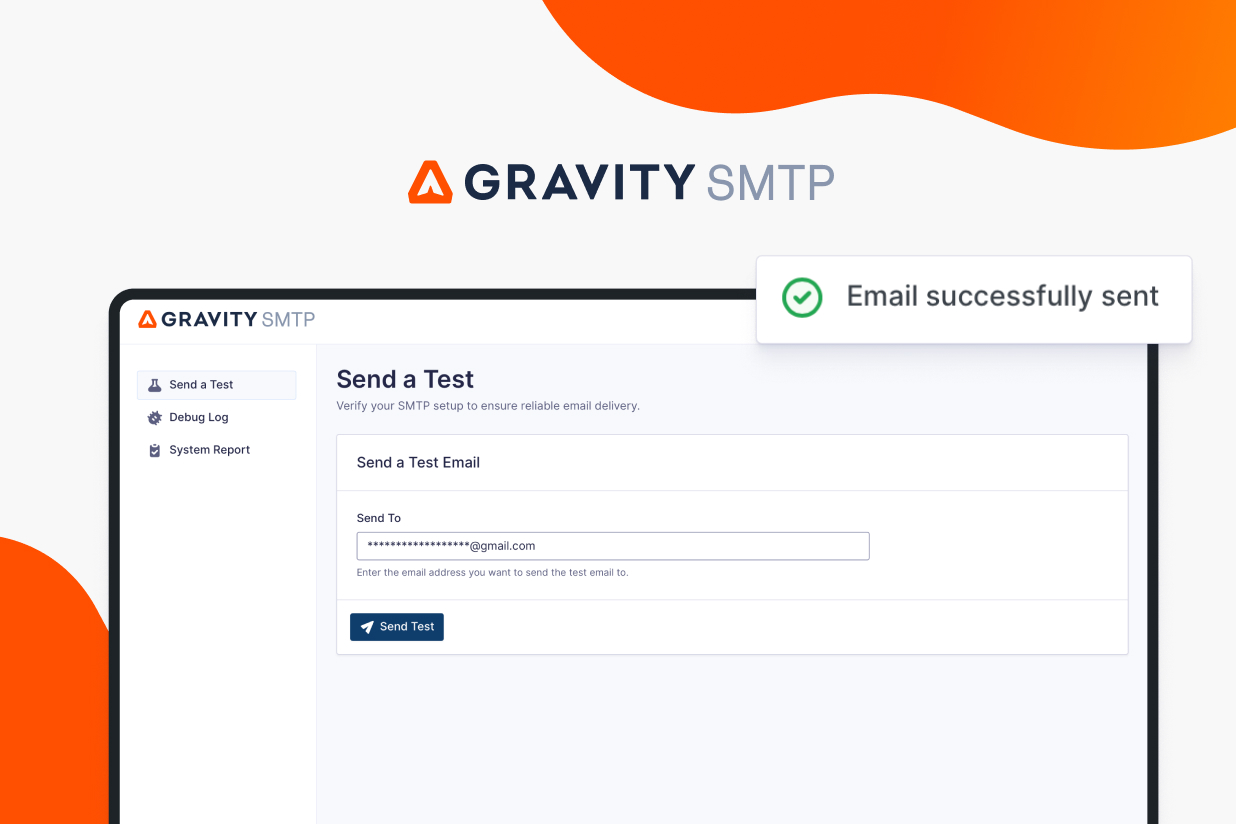
In this post, we’ll show you how to quickly send a test email from your site using the Gravity SMTP plugin.
If sending a few test emails helps you uncover problems with email deliverability on your site, we’ll also cover how to fix your site’s issues by connecting it to a dedicated email sending service.
Let’s dig in…
Key takeaways
- WordPress emails often fail or land in spam if you rely on the default
wp_mailfunction, making it essential to test deliverability. - Gravity SMTP makes email testing easy, allowing you to send test emails, view detailed logs, and verify whether messages reach inboxes.
- If test emails fail, integrating a dedicated transactional email service (like SendGrid, Mailgun, Postmark, or Brevo) ensures reliable email delivery.
- Domain authentication and API keys (e.g., with SendGrid) help your WordPress emails look more trustworthy and avoid spam filters.
- Backup connections and logging features in Gravity SMTP provide added reliability and monitoring for ongoing WordPress email performance.
Why Is It Important to Test WordPress Email Sending?
Whether you’re sending emails to yourself or your users (or both), it’s essential that your emails make it to the right spot.
Even if you haven’t set up any additional emails, WordPress will still need to send important emails such as password resets. If you’re using Gravity Forms, you’ll also probably want to be able to send form notification emails.
Unfortunately, as we mentioned above, the default way that WordPress sends all of these emails usually isn’t very reliable.
To discover where your site stands, it’s important to send some test emails.
When testing your site’s emails, you’ll want to focus on two things:
- Are my site’s emails actually sending?
- If my site’s emails are sending, are they making it to people’s inboxes or are they getting flagged as spam?
With Gravity SMTP, you can find the answers to both of those questions. And if you’re not happy with the answers that you do find, you can also configure your site to send its emails in a more reliable way by using a dedicated transactional email service.
How to Send a WordPress Test Email Using Gravity SMTP
With the Gravity SMTP plugin, you can easily send a test email from your site to any email address.
In addition to a one-off test email function, it also includes email logging functionality so that you can track all of the emails that your site sends, including their status, technical information, and content.
Most importantly, if your current method of sending emails isn’t working reliably, Gravity SMTP can help you configure your WordPress site to send its emails using a dedicated transactional email service like SendGrid, Mailgun, Postmark, Brevo, Google Workspace/Gmail, and more.
In this tutorial, we’ll first show you how to use Gravity SMTP to send a test email using your site’s current email sending method, which will only take a couple of minutes.
Then, if your site’s current method isn’t working reliably, we’ll also cover how to connect your WordPress site to a dedicated email sending service to fix the problem. You can then retest your site’s emails to ensure that they’re working properly.
1. Install the Gravity SMTP Plugin
To get started, you’ll want to install and activate the Gravity SMTP plugin on your site.
Currently, Gravity SMTP is available at no extra cost to anyone who’s holding the Gravity Forms Elite license. You can download it from the My Account area on the Gravity Forms website.
While Gravity SMTP comes from the same team behind Gravity Forms, it’s a standalone plugin. That is, you do not need to have Gravity Forms installed to use Gravity SMTP (though Gravity SMTP does work great for sending form notification emails).
2. Send Your Test Email
Once you’ve installed and activated the plugin, you can send a test email right away to see if your site’s emails are working properly.
If you’ve never set up any type of dedicated email sending service, this email will just send using the default WordPress email method (wp_mail), which is typically powered by your hosting server.
In the next section, we’ll show you how to change this sending behavior if you’re experiencing issues with the test email. We’re getting ahead of ourselves, though.
Here’s how to send your test email:
- Go to SMTP → Tools in your WordPress dashboard.
- Select the Send a Test tab if it’s not already selected by default.
- Enter the email address to which you want to send a test email to, such as your own personal email address.
- Click the Send a Test button.
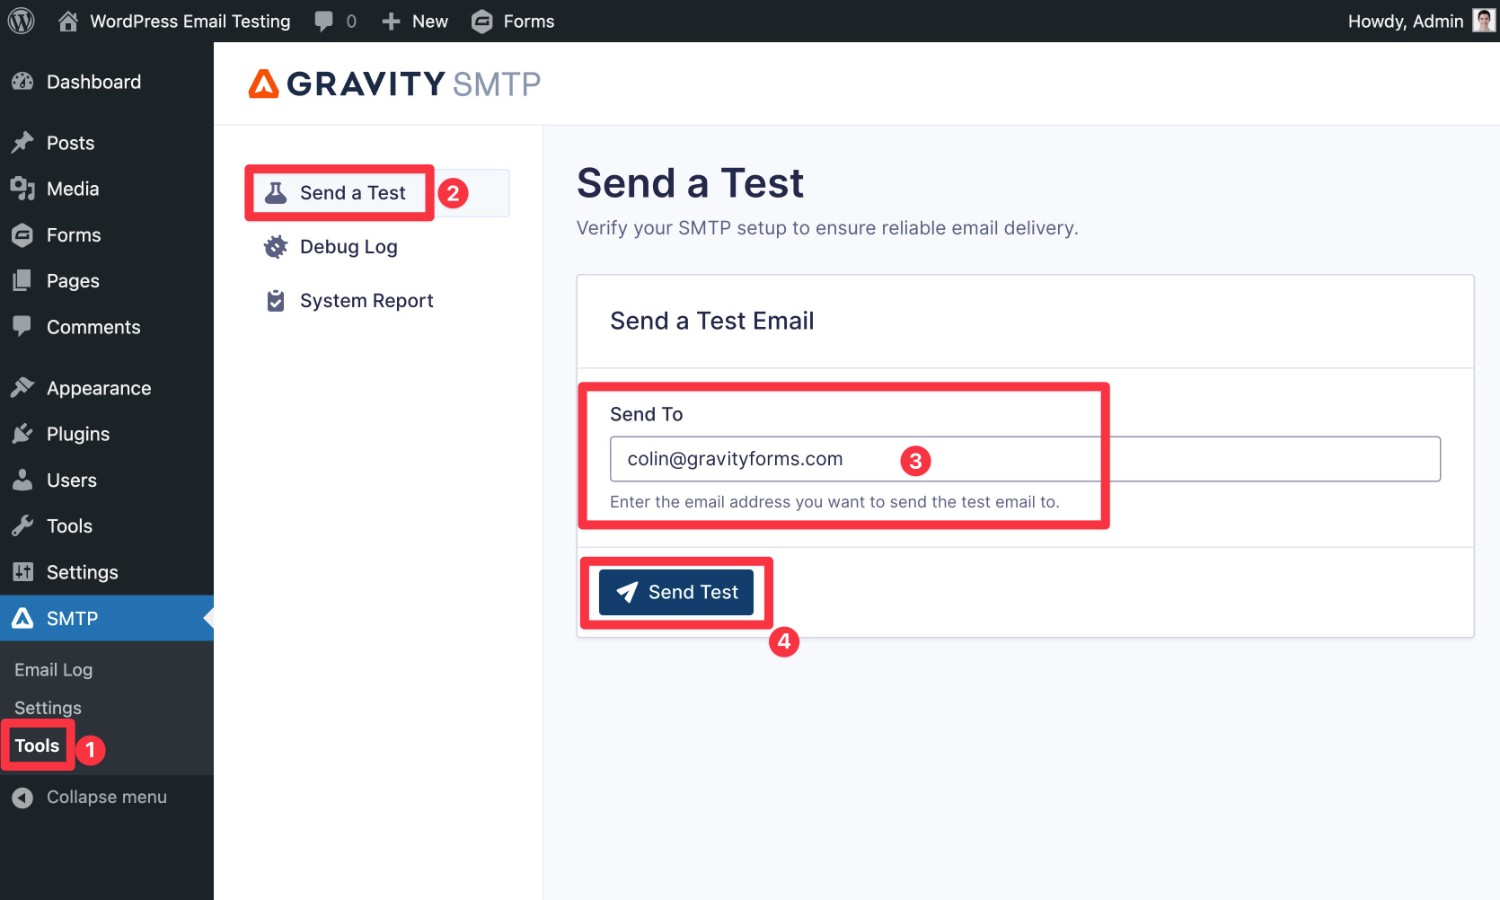
You should then see a success message in your interface, which indicates that Gravity SMTP was able to tell WordPress to send the email.
However, seeing a success message there doesn’t guarantee that the email will actually make it to your inbox, as you’ll see in a second. It just means that nothing was able to block WordPress from trying to send the email.
At this point, go to your email inbox. If you see an email like this in your primary email inbox, it means that your site’s emails seem to be working well.
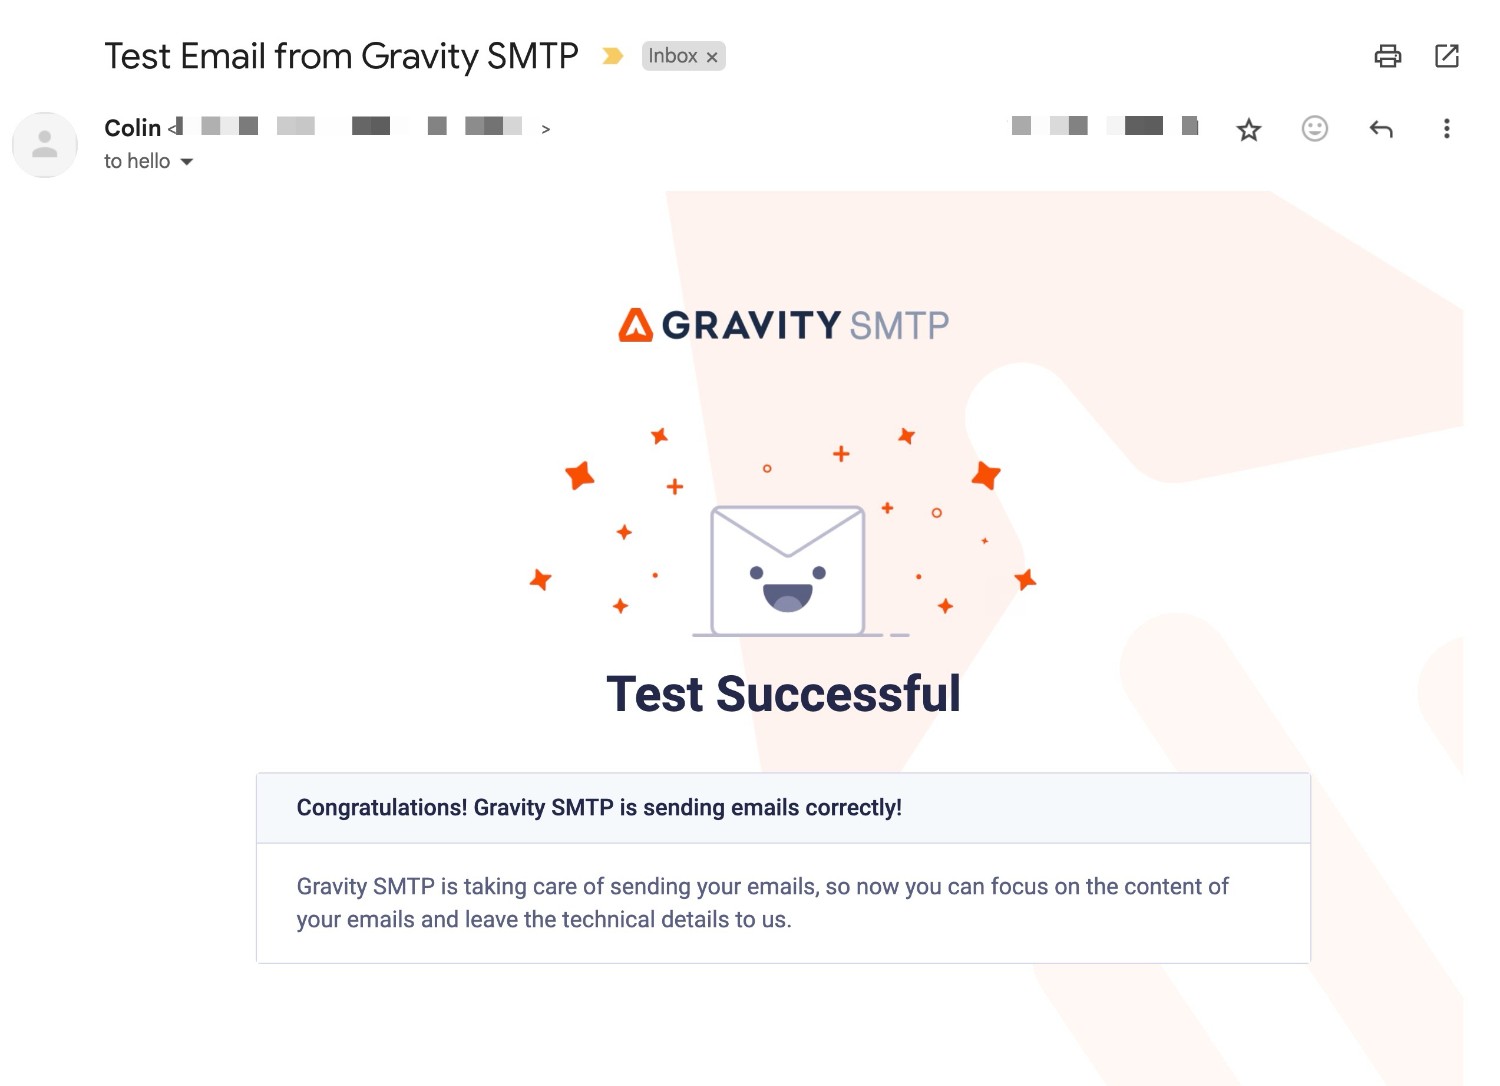
If you’re not seeing the email in your inbox (or if it got flagged as spam), it’s likely that there’s a problem with the way in which WordPress is sending emails.
To check how your site sent the test email, you can go to SMTP → Email Log. Then, click on the eye icon next to the test email to show the full technical details.
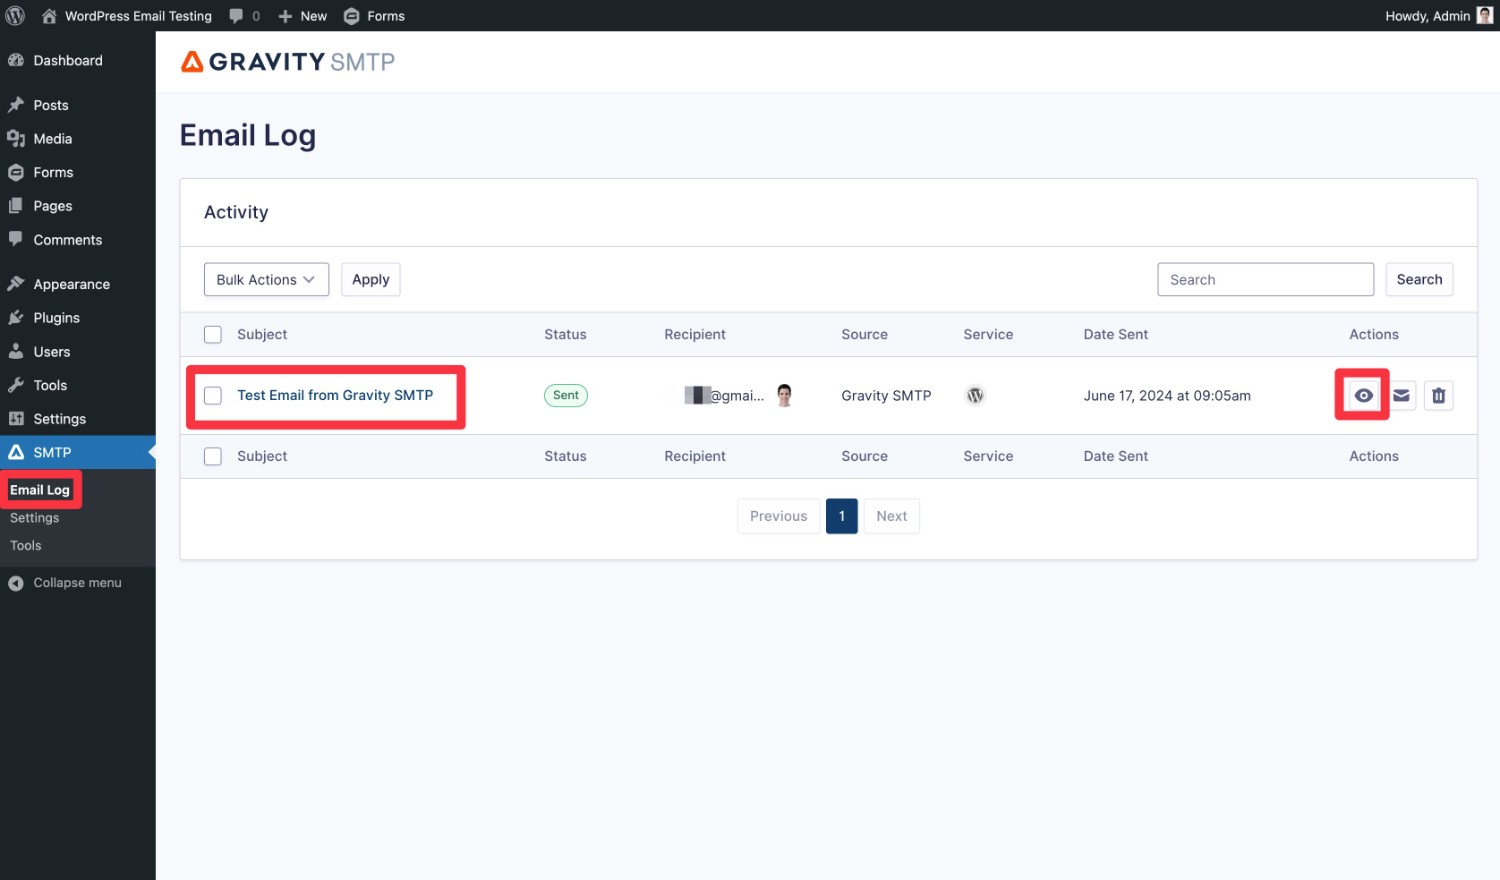
If you look at the Service option under the Log Details heading, you can see the exact service that your WordPress site is configured to use. Because our test site is using the default configuration, you can see that it displays as wp_mail.
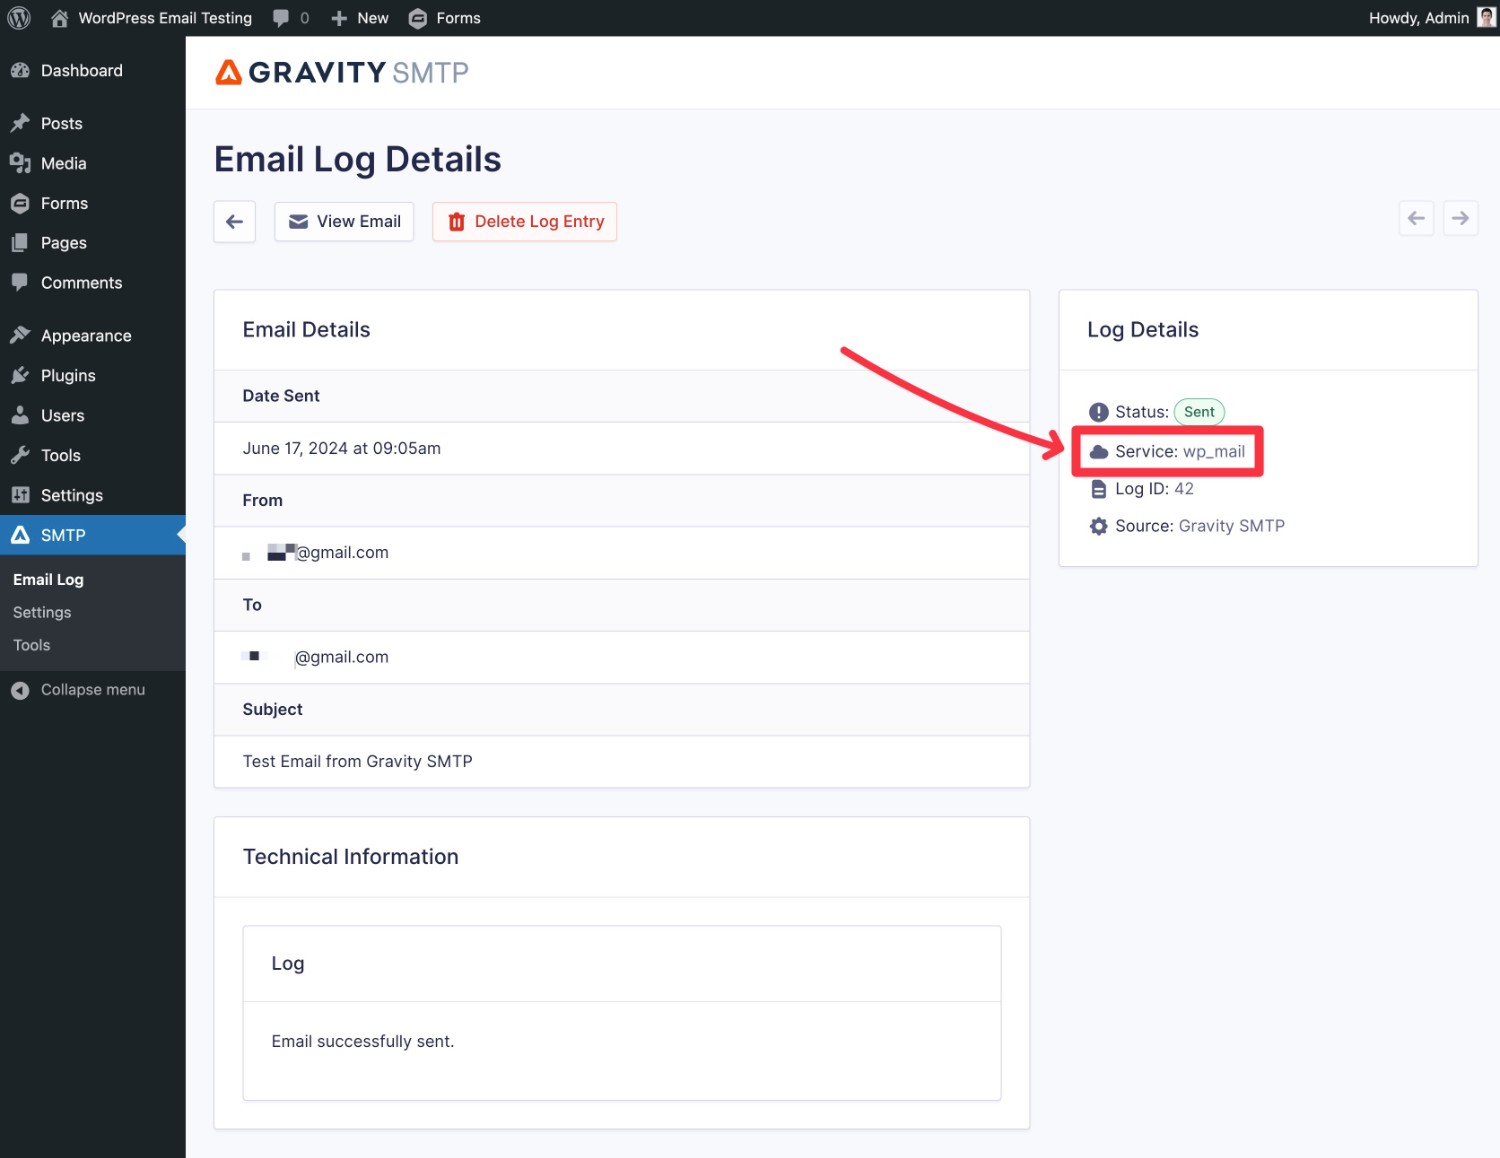
If your email didn’t show up and your site is sending its emails using the default wp_mail method, you can fix the problem by configuring your site to send its emails using a dedicated transactional email service.
3. Set Up a Dedicated Email Sending Service to Fix Deliverability Issues
If your test email worked perfectly, you might not need to perform any further actions.
However, if the test email feature has helped you discover that your site’s emails aren’t working in a reliable way, you’ll want to fix that. By “reliable way”, that could mean that your emails are failing to send or that they are sending, but are getting flagged as spam.
The best way to fix the problem is to configure your WordPress site to send its emails using a dedicated email sending service, instead of the default wp_mail method.
Because these services are specifically designed to send your website’s emails, they fix two main issues:
- You can be confident that all of your site’s emails will send quickly and reliably.
- Your site’s emails are much less likely to be flagged as spam by users’ email clients.
Gravity SMTP currently offers dedicated integrations for the following transactional email sending services:
- SendGrid – lets you send up to 100 emails per day for free.
- Mailgun – lets you send up to 1,000 emails per month for free.
- Postmark – no free plan, but a high-quality service.
- Brevo (formerly Sendinblue) – lets you send up to 300 emails per day for free.
- Gmail/Google Workspace – lets you send up to 500 emails per day for free using your Gmail or Google Workspace account, but we don’t recommend it for mission-critical emails.
- Outlook/Microsoft 365 – lets you send thousands of emails per day for free using your Outlook or Microsoft 365 account, but we don’t recommend it for mission-critical emails.
There’s also a custom SMTP option that lets you use any SMTP sending service.
For important emails – e.g. emails that you send to users – we recommend going with SendGrid, Mailgun, Postmark, or Brevo:
If you’re not sure where to start, SendGrid is a great first option because it has a generous forever-free plan and it’s easy to set up and use.
Below, we’ll go through a quick guide to setting up SendGrid for your WordPress site. For a more detailed version, check out our full SendGrid WordPress email sending tutorial.
Authenticate Your Domain Name With SendGrid
Once you register for your free SendGrid account, the first thing that you’ll need to do is authenticate your WordPress site’s domain name with SendGrid.
Pretty much every single transactional email sending service will require you to do this because it proves that you control your domain name and makes your emails look more trustworthy (which helps them avoid email clients’ spam folders).
To authenticate your domain name, go to Settings → Send Authentication and then click the Authenticate Your Domain button.
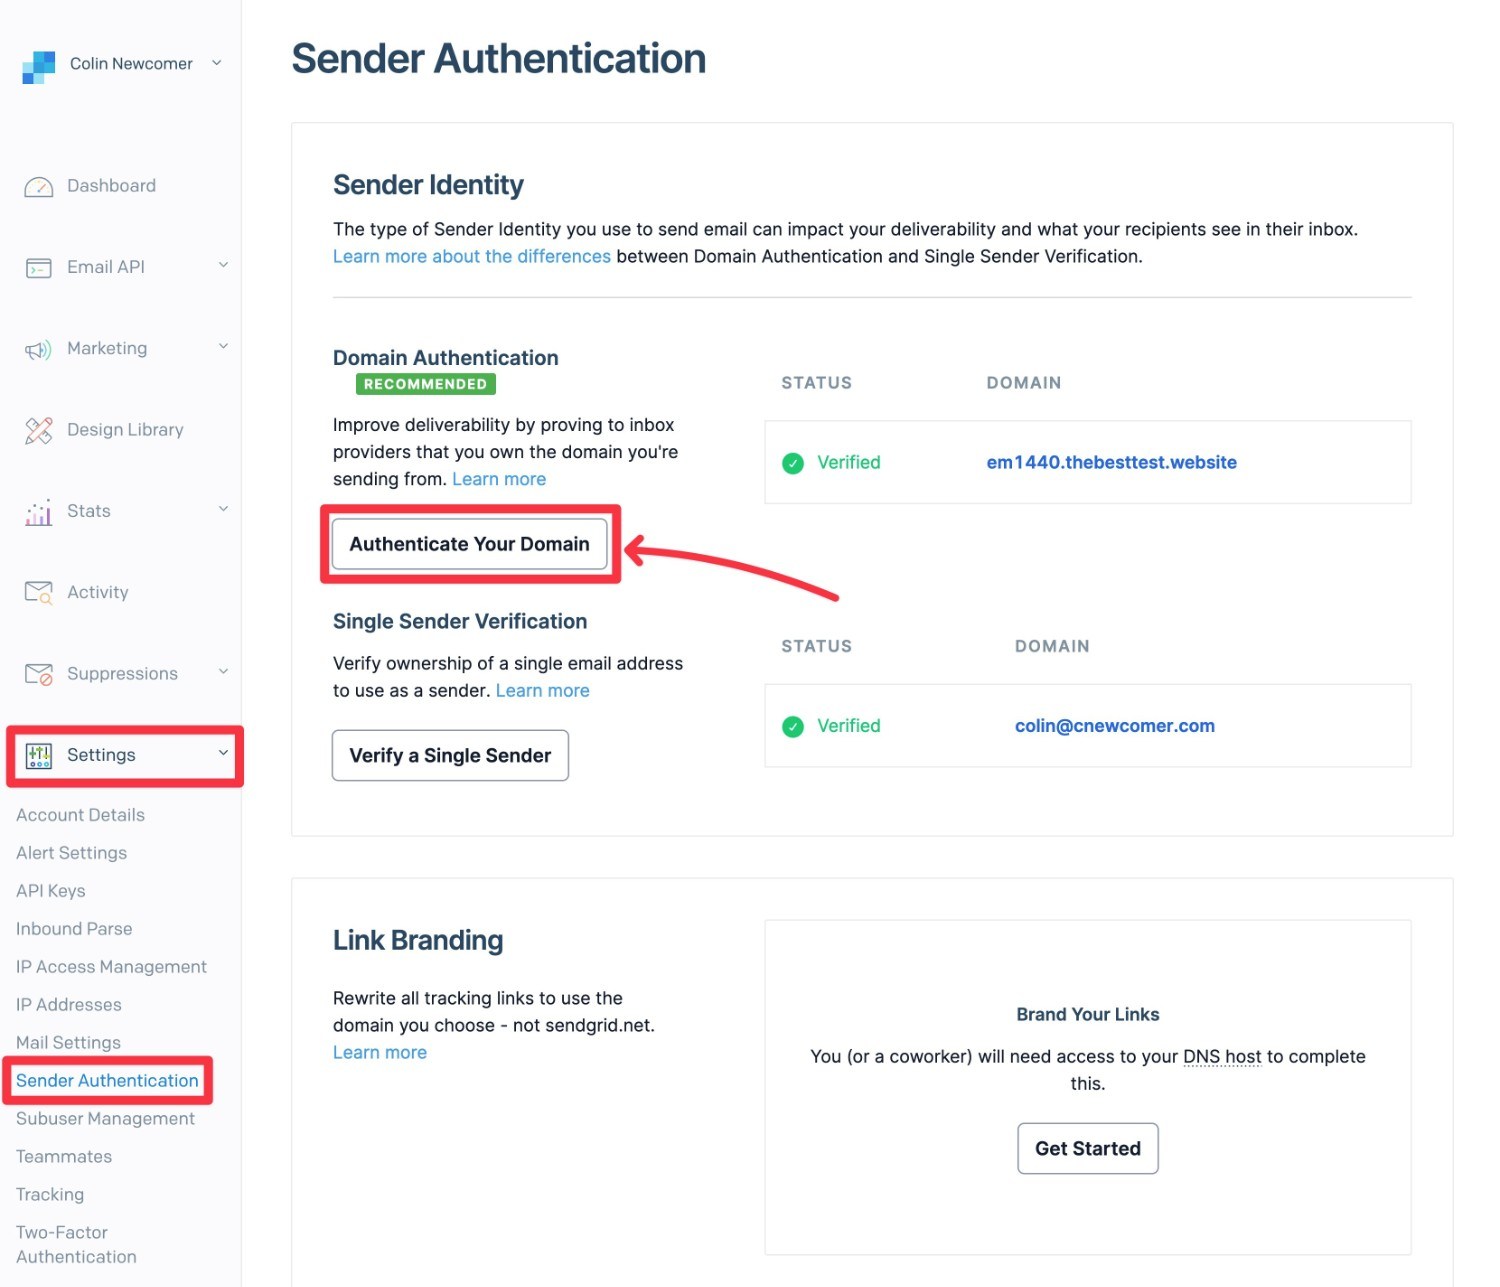
This will launch a setup wizard where you’ll provide your domain name. Then, you’ll need to add the DNS records that SendGrid provides to your domain name.
Depending on how you’ve configured your domain name, you might do this via your web host, your domain registrar, or a service like Cloudflare.
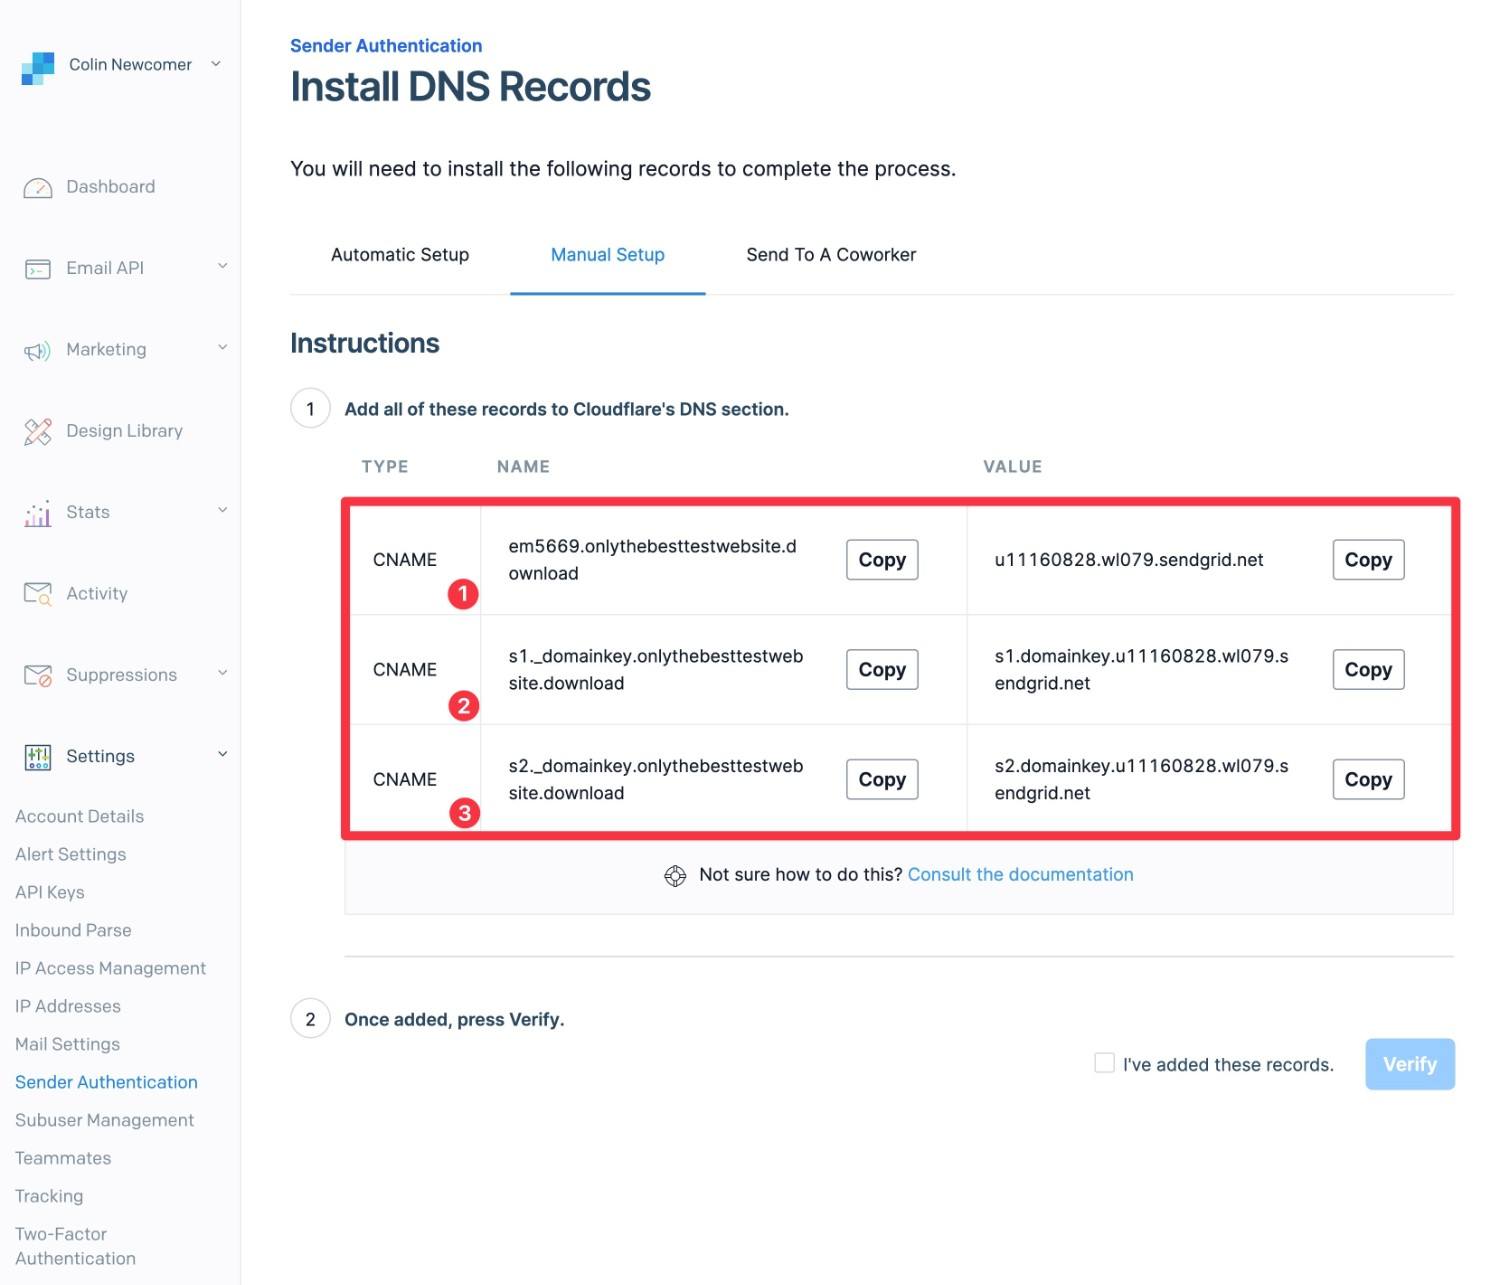
Again, we show this process in more depth in our full tutorial.
Create a SendGrid API Key
Once you’ve authenticated your domain name with SendGrid, you’ll next need to create an API key, which is what Gravity SMTP will use to connect your WordPress site to SendGrid’s email sending service.
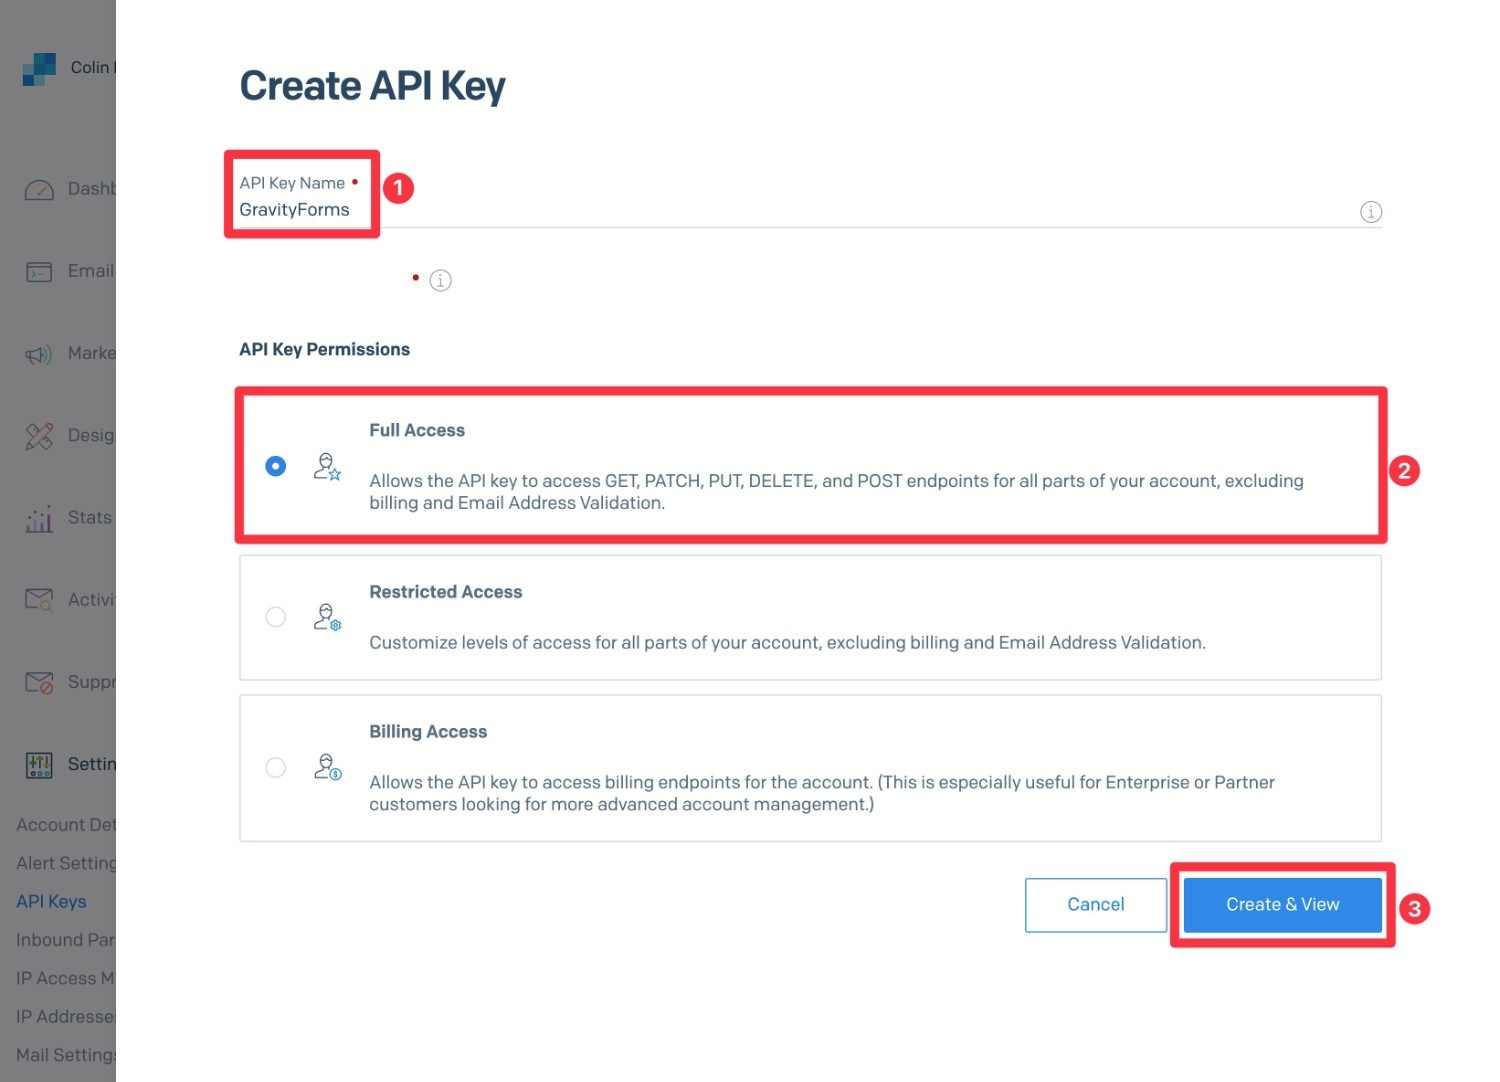
To begin, go to Settings → API Keys and then click the Create API Key button.
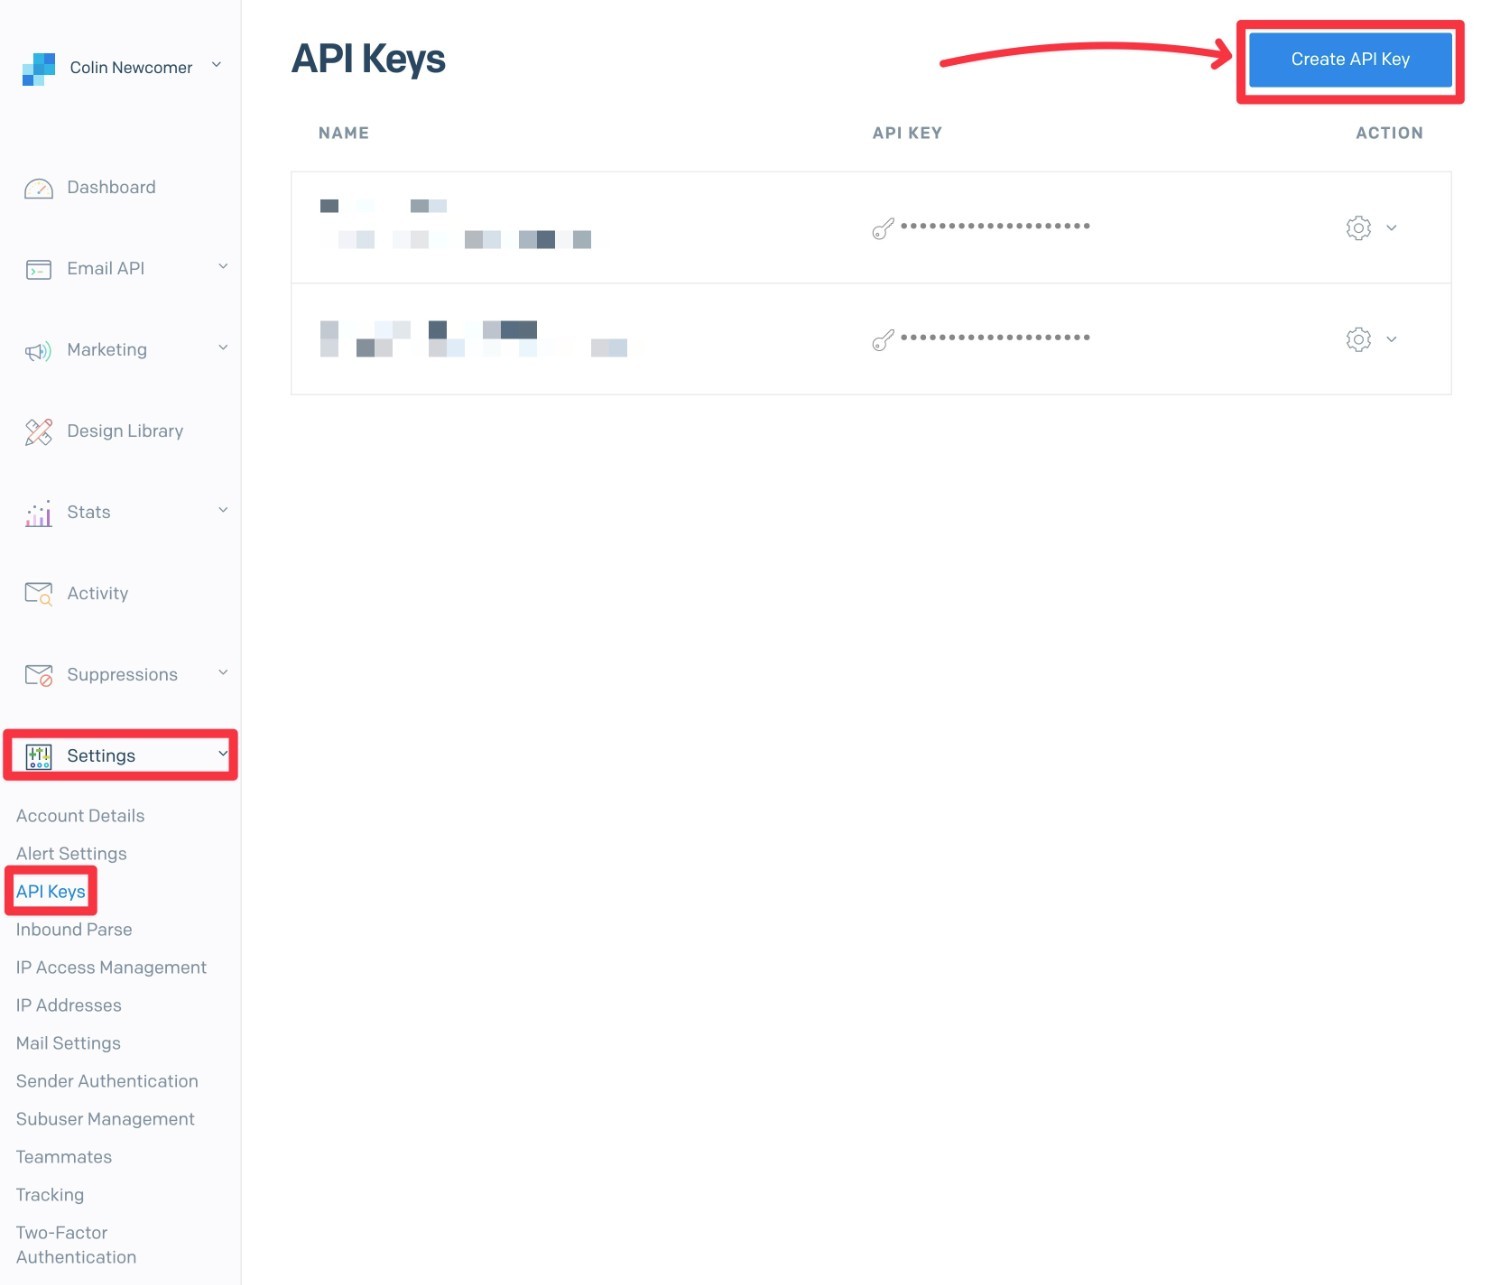
Clicking that button will open a slide-out panel:
- Give your API key an internal name to help you remember it.
- Choose the Full Access option under API Key Permissions.
- Click the Create & View button.
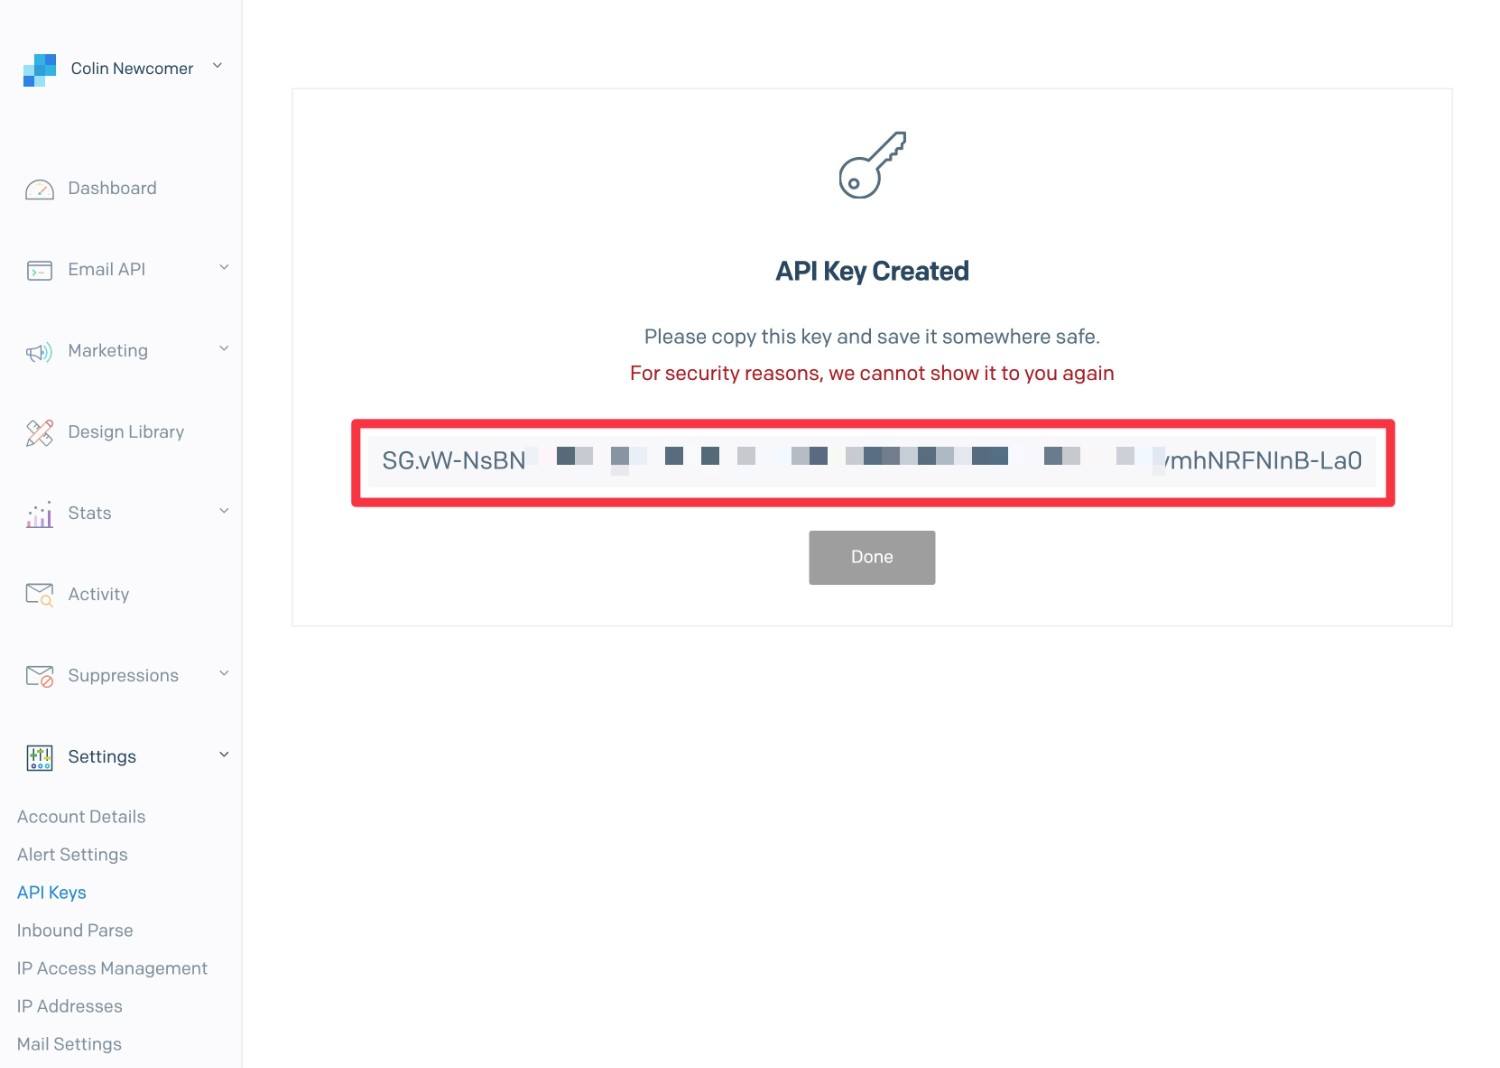
SendGrid will then show you your API key. Make sure to copy this value to a safe place because you’ll need it in the next step and SendGrid will only show it once.
If you accidentally lose it, you can just create another API key – don’t worry!
Configure Gravity SMTP to Use SendGrid
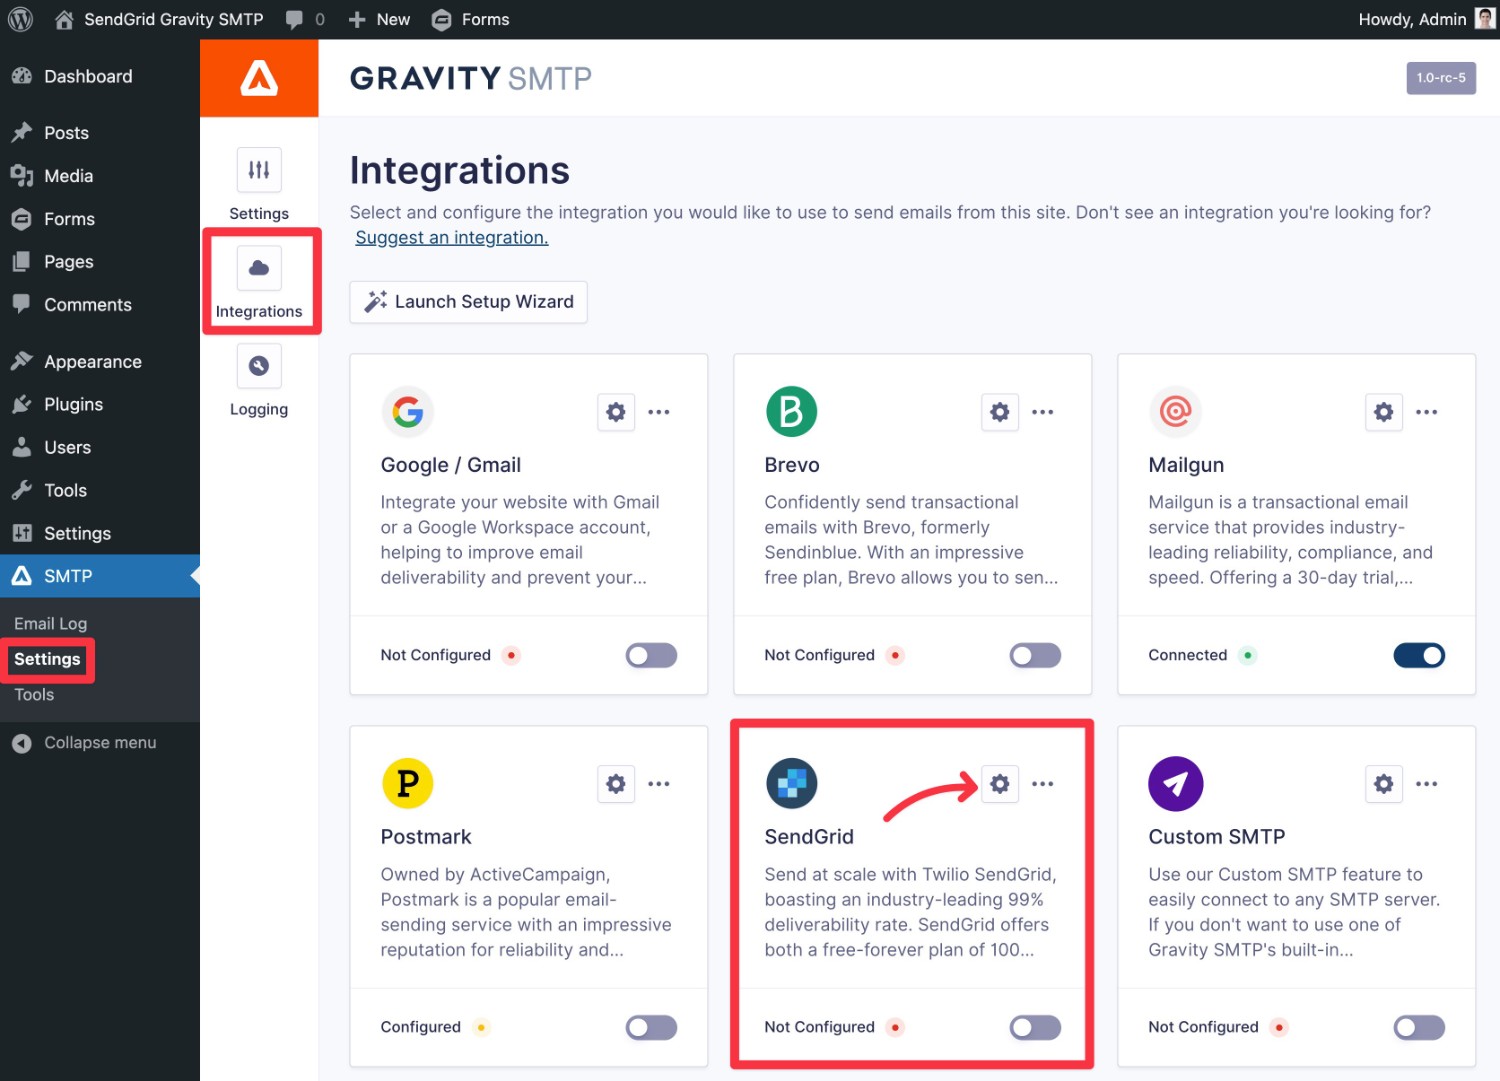
To finish things out, you’ll need to configure Gravity SMTP to connect to SendGrid:
- Open your WordPress dashboard.
- Go to SMTP → Settings.
- Click the Integrations tab.
- Click the gear icon next to SendGrid to open the settings popup.
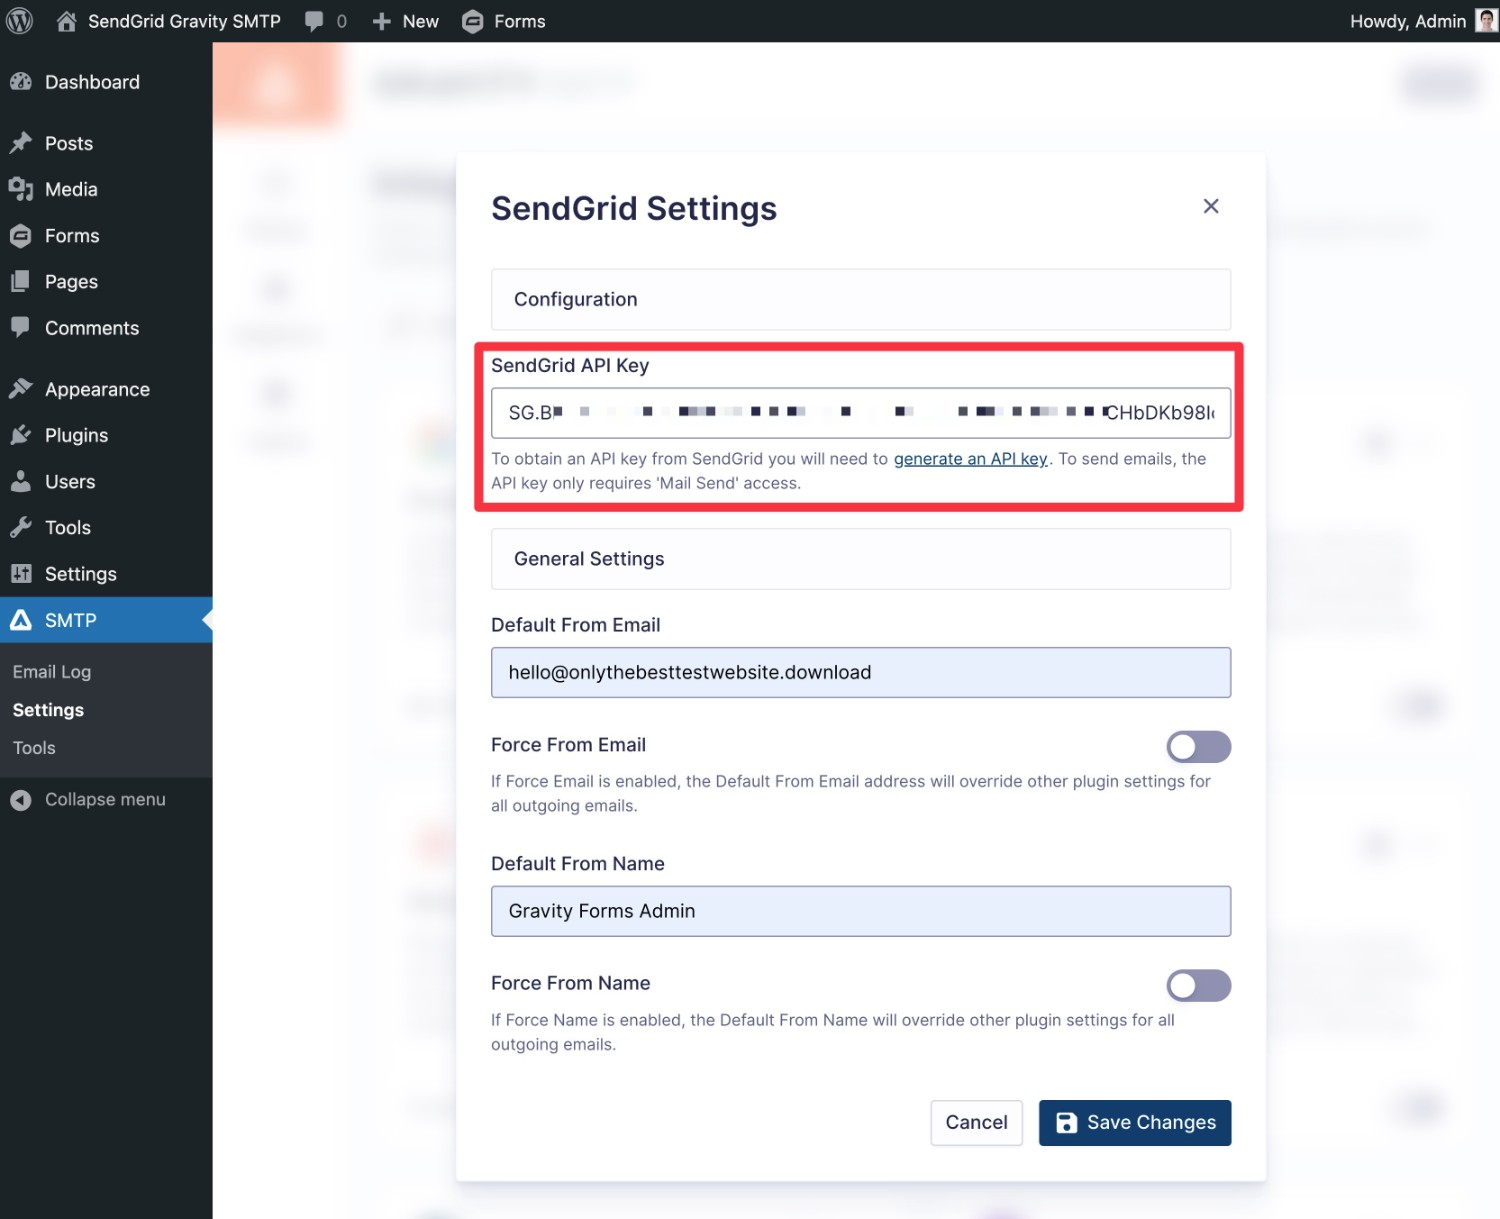
In the popup, paste the API key into the SendGrid API Key box.
Then, you can also enter the “From” name and email address that you want your site to use when sending emails, along with whether or not to force other plugins to use these same credentials when sending emails.
Then, click Save Changes.
To finish things out, you’ll need to activate SendGrid as your site’s primary email sending service. You can do this by enabling the toggle in the SendGrid box, which should change the text from Configured to Connected.
4. Test Your Test Email Again
Once you’ve set up SendGrid on your site (or one of the other transactional email services), you can try sending another email to see if it’s working:
- Go to SMTP → Tools in your WordPress dashboard.
- Select the Send a Test tab if it’s not already selected by default.
- Enter the email address to which you want to send a test email to, such as your own personal email address.
- Click the Send a Test button.
- Check your inbox for the email.
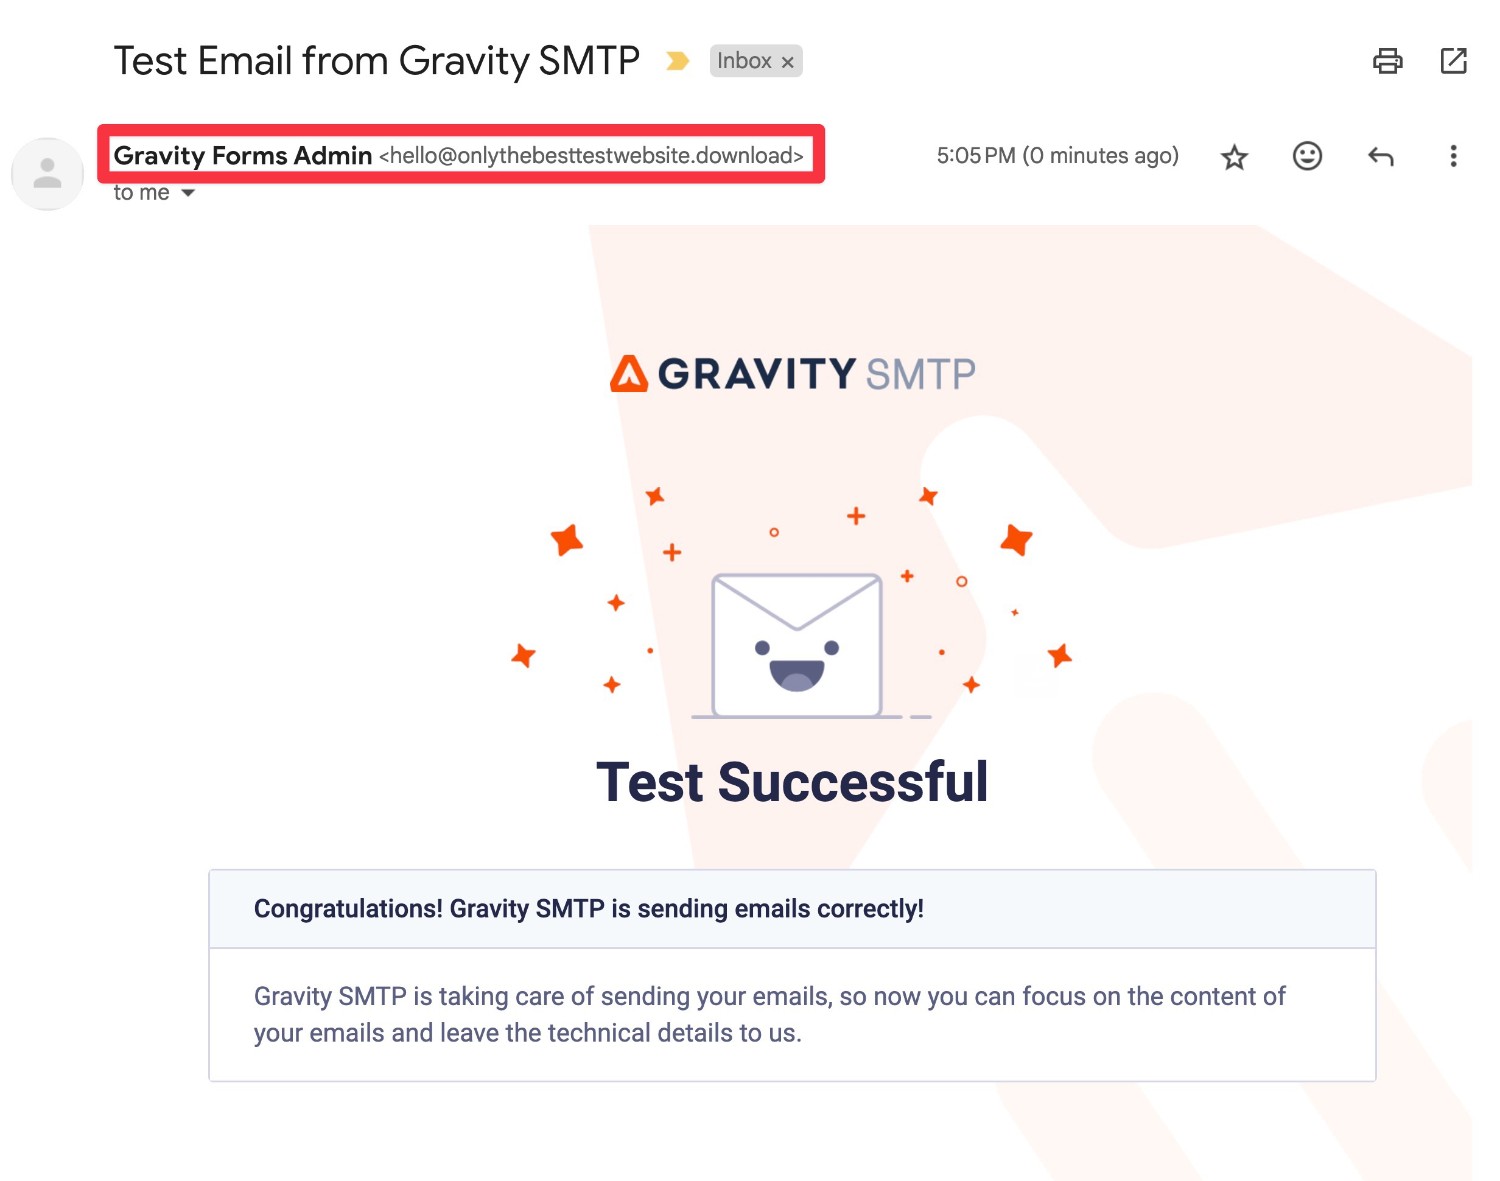
Once you receive the test email, you can be a lot more confident that your site will be able to reliably send its emails going forward. To help make sure that’s the case, we’ll finish things out with the last step…
5. View Email Logs to Monitor for Issues
In addition to the email testing tool, Gravity SMTP also includes a feature that lets you log all of the emails that your site sends, which we touched on earlier.
You’ll be able to see whether any emails are failing, along with tracking the timing and content of all of your site’s emails.
To view the log, you can go to SMTP → Email Log.
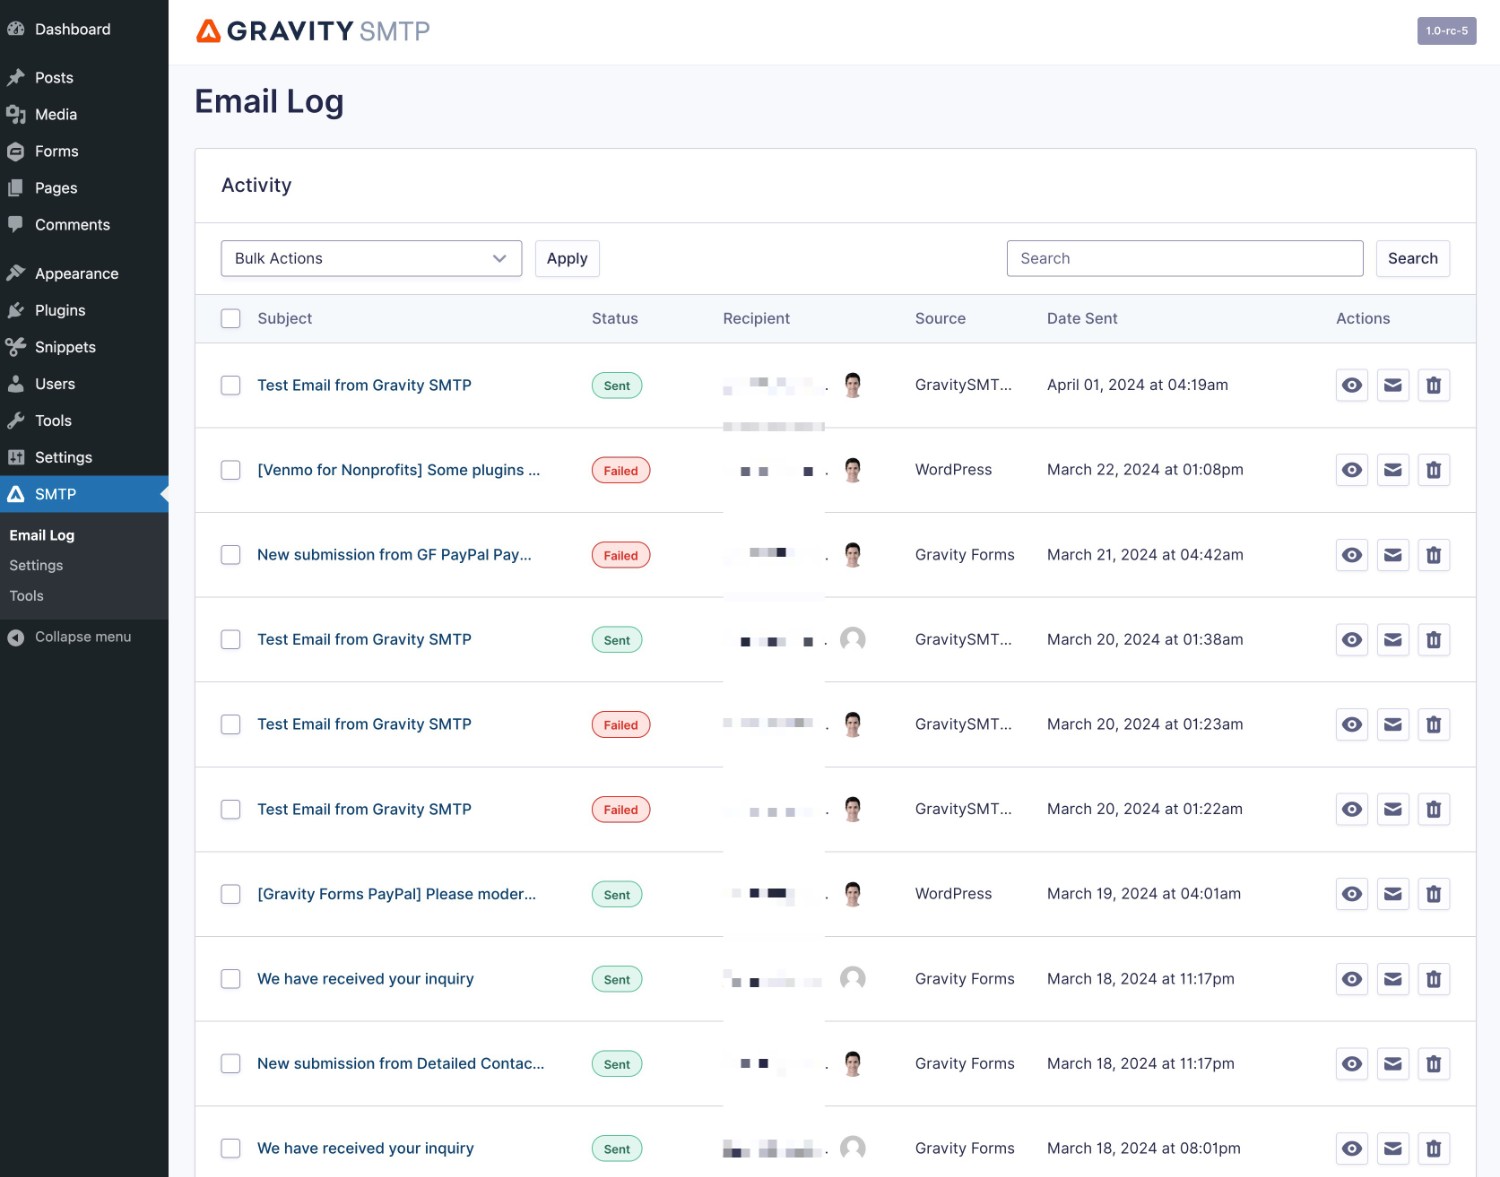
By default, Gravity SMTP will keep these records permanently. However, you can adjust how long to retain the logs by going to SMTP → Settings → Logging.
For more information on Logging Settings, check out the documentation.
6. Set a Backup Connection (Optional but recommended!)
A new Backup Connection feature that shipped with Gravity SMTP v1.1 that allows you to select an additional email provider that you’d like to use as a backup, if your primary email service fails.
Setting up a backup option helps to ensure email deliverability and gives you peace of mind that your emails will be sent, even if there’s an issue with your primary email service.
For more details on this new feature, check out the documentation.
Cheers to More Reliable WordPress Emails
That wraps up our guide on how to send a WordPress test email. If things went well, we hope it was a very short tutorial and you were able to stop after the second step.
But, if Gravity SMTP’s WordPress email testing tool helped you discover that your site’s emails aren’t quite as reliable as you want them to be, you might want to go one step further and use Gravity SMTP to connect your site to a dedicated email sending service like SendGrid.
If you have a Gravity Forms Elite license, install Gravity SMTP today and start enjoying more reliable WordPress emails.

If you want to keep up-to-date with what’s happening on the blog sign up for the Gravity Forms newsletter!