How to Send Transactional Emails with WordPress

Trying to figure out how to send transactional emails with WordPress so that they actually make it to people’s inboxes?
While marketing emails get a lot of focus, having reliable transactional emails is also essential for most WordPress sites.
This can include emails for core WordPress features like new account confirmations and password resets, along with emails from plugins that you’re using, such as form notification emails from Gravity Forms or order confirmation emails for WooCommerce purchases.
However, the default way that WordPress sends these transnational emails isn’t very reliable. Your site’s transactional emails could fail to send. And even if they do send, they could get caught up in users’ spam folders.
To fix that, you can configure your site to send its transactional emails using a dedicated email sending service, which is what we’re going to cover in this post.
Below, you’ll learn step-by-step how to send WordPress transactional emails using your preferred transactional email service and the Gravity SMTP plugin.
But before we get to that tutorial, let’s start with a basic introduction to everything that you need to know about transactional emails on WordPress…
A Quick Introduction to Transactional Emails in WordPress
As we mentioned in the beginning, WordPress transactional emails are automated emails for things like password resets or comment notifications.
These emails are typically triggered by some type of routine action, which is one of the big things that differentiates transactional emails from marketing emails that you might also be sending.
For example, let’s say you have a WooCommerce store:
- If you send a promotional email about an upcoming sale, that’s an example of a marketing email.
- When your store automatically sends an order confirmation after a person places an order, that’s a transactional email.
Transactional emails can come from both the core WordPress software, as well as plugins that you might be using.
Here are a few examples of both types…
Core WordPress transactional emails:
- Password reset emails.
- A notification about a new comment on your site.
- New account confirmations after registering for an account on your site.
Transactional emails from WordPress plugins:
- Form notification emails that your site sends after someone submits a form from Gravity Forms.
- Order confirmation emails after someone makes a purchase on your WooCommerce store.
- Event registration confirmations after someone registers for an event in your event plugin.
By default, WordPress will try to send all of these transactional emails using wp_mail (based on PHP mail), which relies on your hosting server to send the emails.
There are a few problems with relying on your web hosting server for your site’s transactional emails:
- Your hosting server isn’t optimized for sending emails, so it might not always work.
- Some web hosts outright block sending emails from your server, which means your transactional emails just flat-out won’t send.
- Even if your server is able to send the emails, these emails lack proper authentication technologies and might have other issues that make them look suspicious to users’ email clients. This makes your site’s emails much more likely to end up in users’ spam folders.
How Gravity SMTP Helps You Send Transactional Emails With WordPress

If you want to reliably send transactional emails with WordPress, you should consider using a dedicated email sending service instead of your hosting server.
Using a dedicated transactional email sending service solves all of the issues above:
- The server is specifically optimized for sending transactional emails, so it will do so reliably.
- Even if your host blocks transactional emails, you’ll still be able to send them via the third-party service.
- Your emails will be properly authorized and a quality transactional email service will do a lot of work to maintain its sending reputation. This means that your emails should avoid the spam folder and actually make it to people’s inboxes.
However, WordPress doesn’t include a built-in feature to connect to an email sending service, which is where the Gravity SMTP plugin comes in.
With the Gravity SMTP plugin, you can easily connect your site to a variety of different transactional email services, while also accessing other helpful features to test and monitor your site’s transactional emails.
Which Transactional Email Services Does Gravity SMTP Support?
To give you more flexibility, Gravity SMTP supports multiple transactional email sending services.
You can choose one of these services to use. Or, you can configure multiple services on your site. That way, you could quickly switch to a fallback service if you’re experiencing problems with your primary service.
Currently, Gravity SMTP offers direct API integrations for the following transactional email services:
- Mailgun
- SendGrid
- Postmark
- Brevo
- Google/Gmail
- Microsoft 365 / Outlooki
There’s also a Custom SMTP option that lets you manually connect to any other sending service by entering its SMTP server details (rather than using a dedicated API integration).
The Gravity SMTP team is also in the process of adding more direct API integrations, which you can see here. You can also vote on the integrations/features that you’d like to see added.
Other Helpful Features in Gravity SMTP
In addition to letting you choose from multiple transactional email services, Gravity SMTP also includes some other helpful features:
- Backup Feature – Select an additional email provider that you’d like to use as a backup, if your primary email service fails.
- Email testing tools – you can easily send a test email to make sure that your chosen service is working.
- Email logging – you can log all of the transactional emails that your site sends, including viewing technical information and the actual content/design of each email.
- Force plugins to use consistent “From” name/email – you can ensure consistency by forcing all of your plugins to use the same information.
How to Send Transactional Emails With WordPress (Using Gravity SMTP and Mailgun)
Now, let’s get into the actual step-by-step guide for how to send WordPress transactional emails using a dedicated email sending service.
For this example, we’ll use the Mailgun transactional email service. Here are a few reasons why Mailgun makes a great option for WordPress transactional emails:
- Send 1,000 emails per month for free – with the Flex plan, you can send up to 1,000 emails per month for free, which can be enough for a lot of sites. You will still need to enter your credit card, but you won’t be billed unless you exceed 1,000 emails (and then you’ll pay just $1 per 1,000 emails).
- Easy API setup – you can easily connect Gravity SMTP to Mailgun using the Mailgun email sending API.
- Reliable deliverability – Mailgun offers a 97.4% deliverability rate, which is above the industry average.
If you’d rather use a different service like SendGrid, Postmark, or Brevo, the same basic steps will apply. You can check out our dedicated guides for these services:
Let’s get into the full guide for setting up Mailgun…
1. Install the Gravity SMTP Plugin On Your Site
To get started, you’ll want to install and activate the Gravity SMTP plugin on your site.
Gravity SMTP is a completely standalone plugin, which means that you don’t need to have the Gravity Forms plugin installed to use it (though it will work great with Gravity Forms).
Currently, Gravity SMTP is available at no extra cost to people holding the Gravity Forms Elite license. You can download it from your Gravity Forms My Account area.
2. Register for Your Free Mailgun Account
Next, you’ll want to register for your Mailgun account.
There are two ways that you can get started for free with Mailgun:
- Preset plans with 30 day free trial – if you choose one of Mailgun’s preset plans, you can get a 30-day free trial to test it out for free for your first month.
- Flex plans – if you use the Flex plan, you can send up to 1,000 emails per month for free forever. Mailgun doesn’t advertise this as a free plan, but they’ll only bill you if your usage exceeds $1 in a given month (and your balance won’t roll over to the next month). Since the Flex plan charges $1 per 1,000 emails, this means that you can send up to 1,000 emails per month without being charged (technically 999 emails).
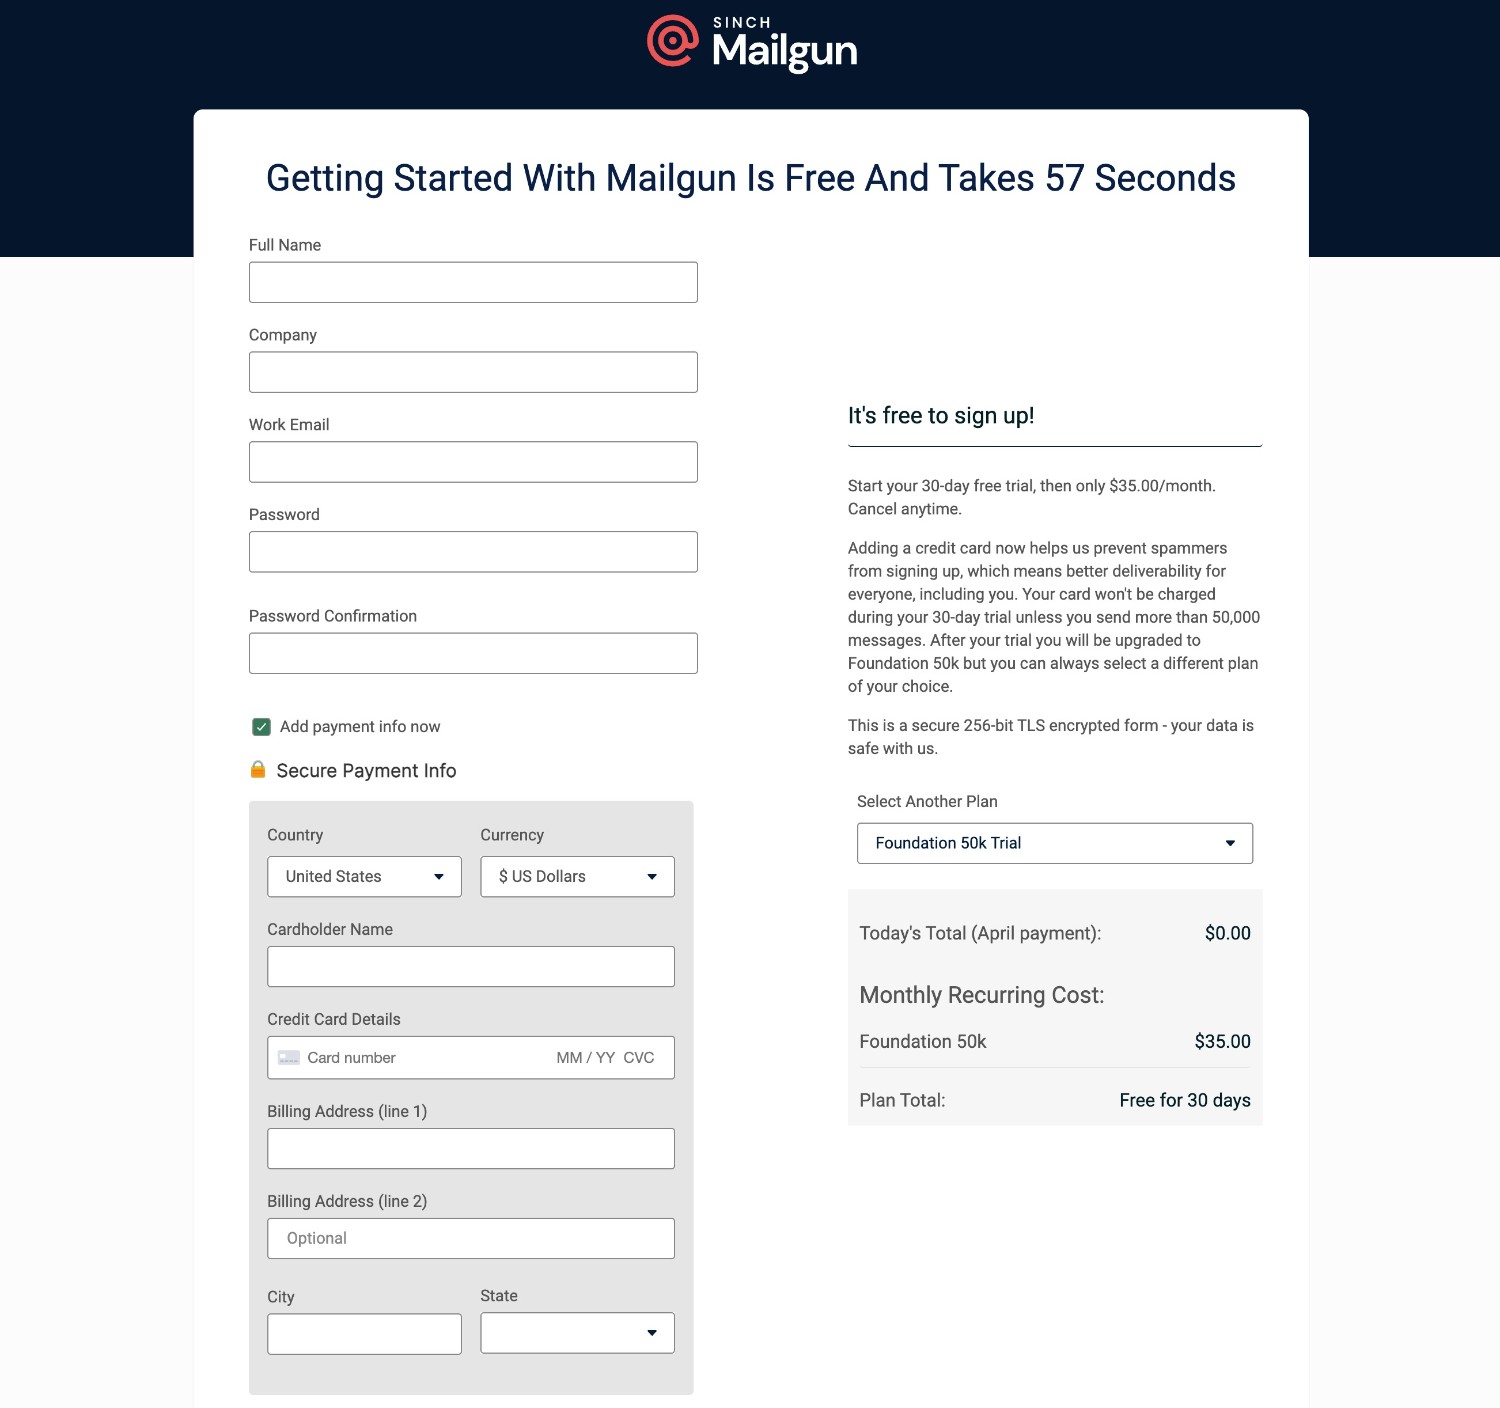
Even though you won’t be billed anything right away, you will still need to enter your credit card during the signup process.
3. Authenticate Your Domain Name With Mailgun
Before you can start sending emails using Mailgun, you first need to authenticate your WordPress site’s domain name with Mailgun.
This proves to Mailgun that you actually control your site’s domain name and also makes your transactional emails look more trustworthy, which helps them avoid users’ spam folders.
This requirement is not specific to Mailgun, either – you’ll need to do it with pretty much any transactional email service.
Here’s how to authenticate your site’s domain name…
Add Your Domain Name to Mailgun
To add your WordPress site’s domain name to Mailgun, follow these steps:
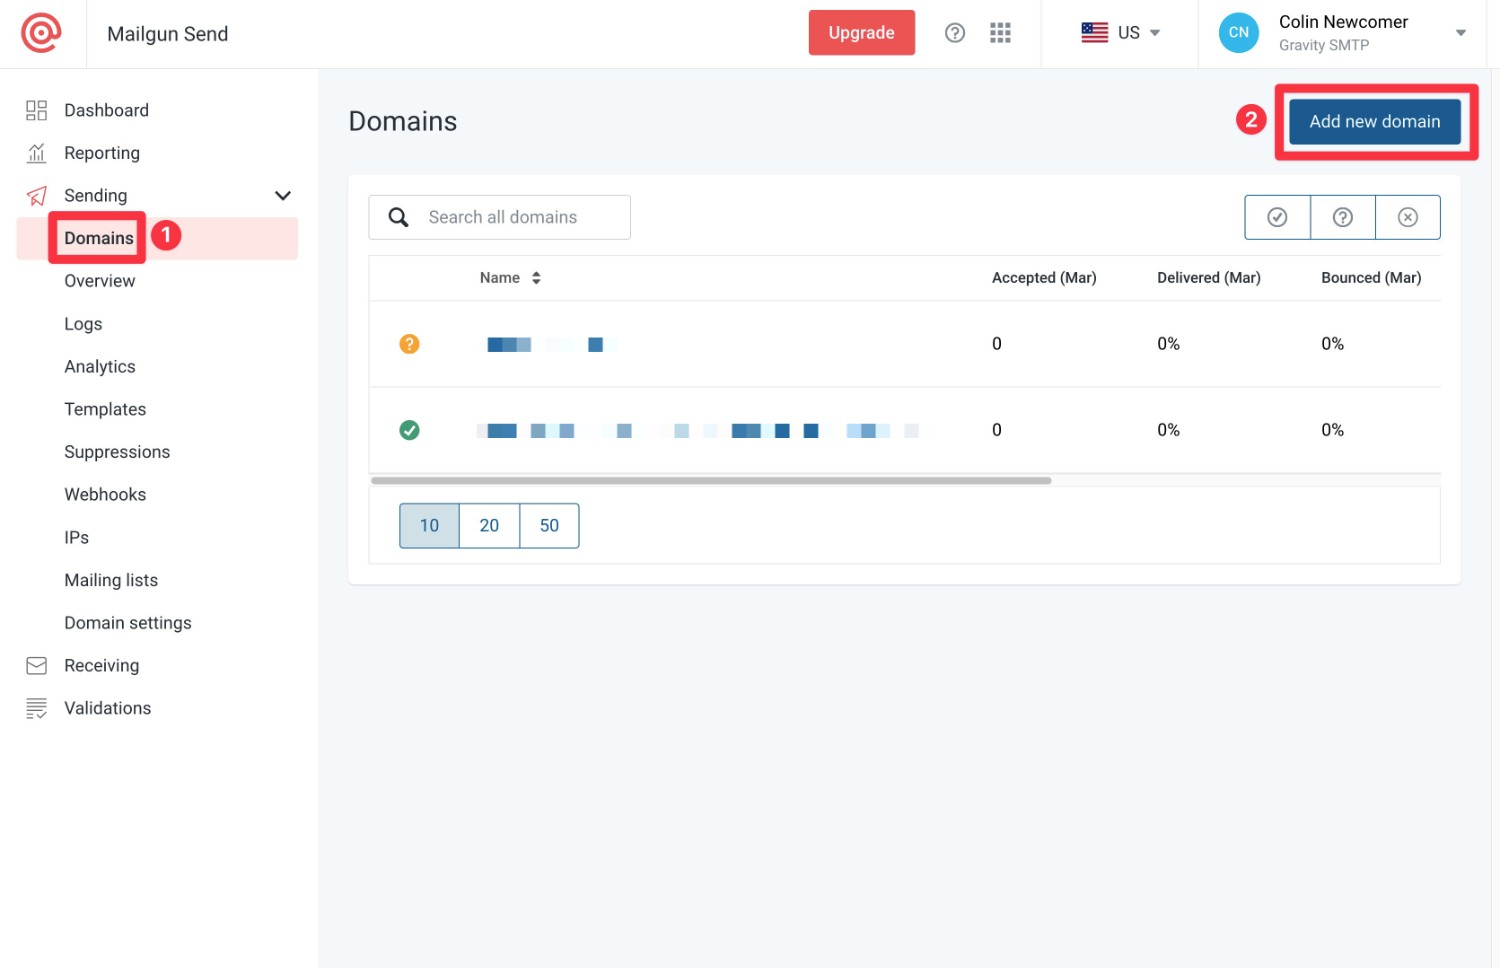
- Click this link to open the domains dashboard. Or, you can go to Sending → Domains in your Mailgun dashboard.
- Click the Add new domain button in the top-right corner.
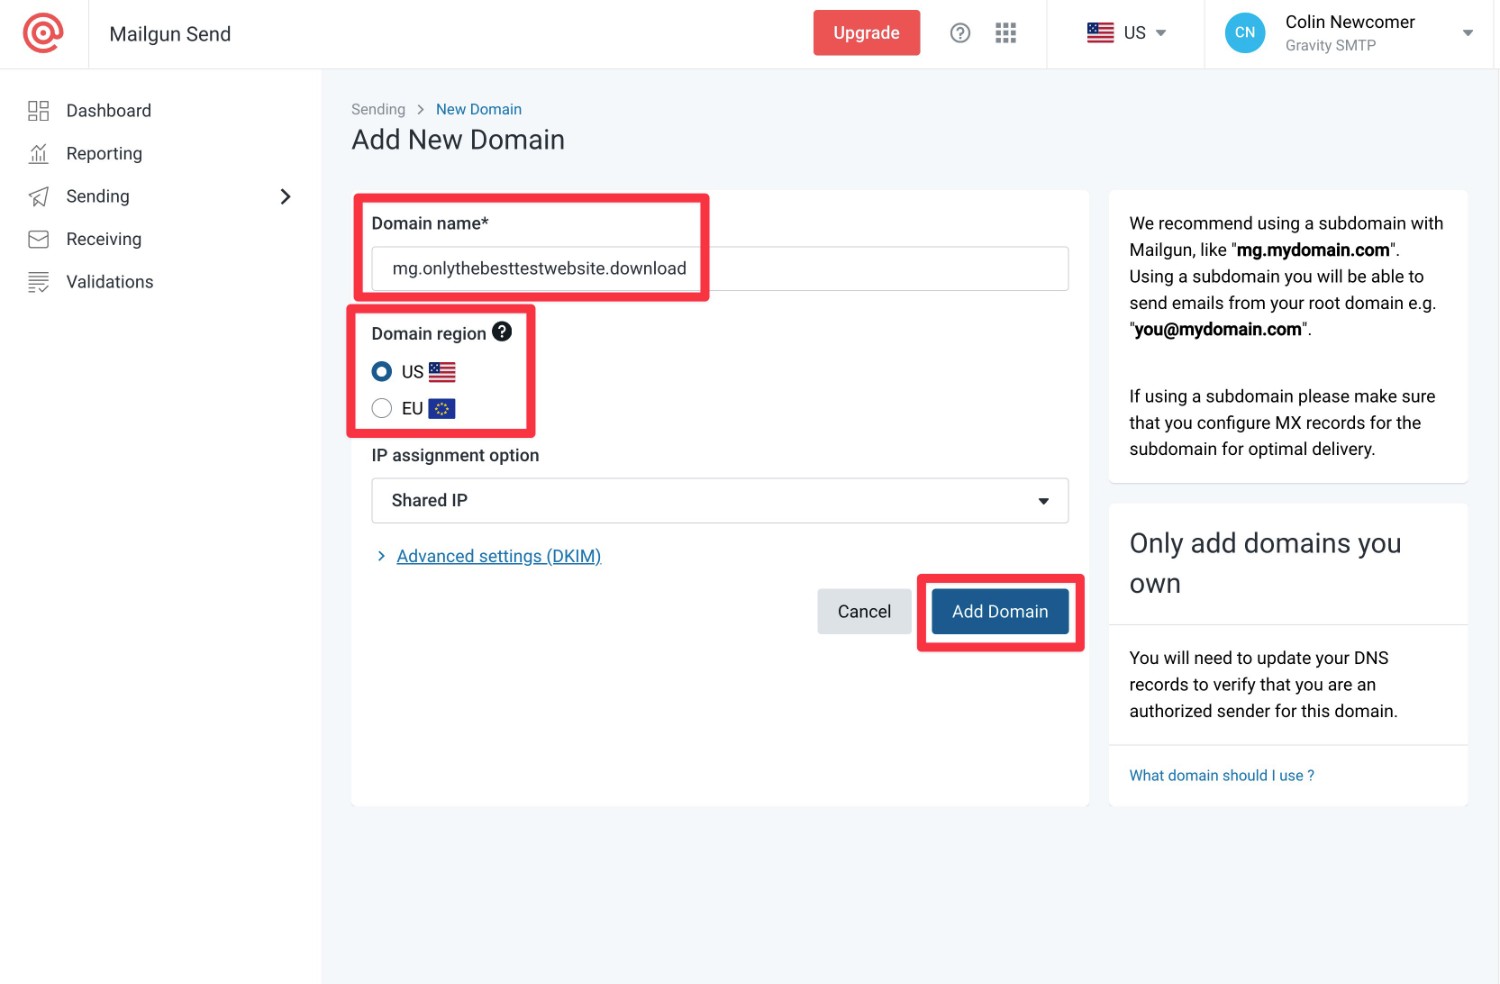
Then, enter your WordPress site’s domain name.
While you can add your root domain name (yoursite.com), Mailgun recommends adding a Mailgun-specific subdomain instead – e.g. mg.yoursite.com.
You will still be able to send emails from your main domain name even if you authenticate a subdomain.
For that reason, we recommend using the subdomain approach.
Second, you can choose the Domain Region for your domain name, which determines the physical location from which your emails will be sent.
If you’re subject to European Union regulations, you’ll probably want to choose the European location. Otherwise, you’re free to choose the USA region.
You should be able to leave all the other settings as the defaults – make sure to click the Add Domain button to advance.
Add DNS Records to Authenticate Domain Name
To actually authenticate your domain name, you’ll need to add some DNS records to your domain name, which Mailgun will display on the next page.
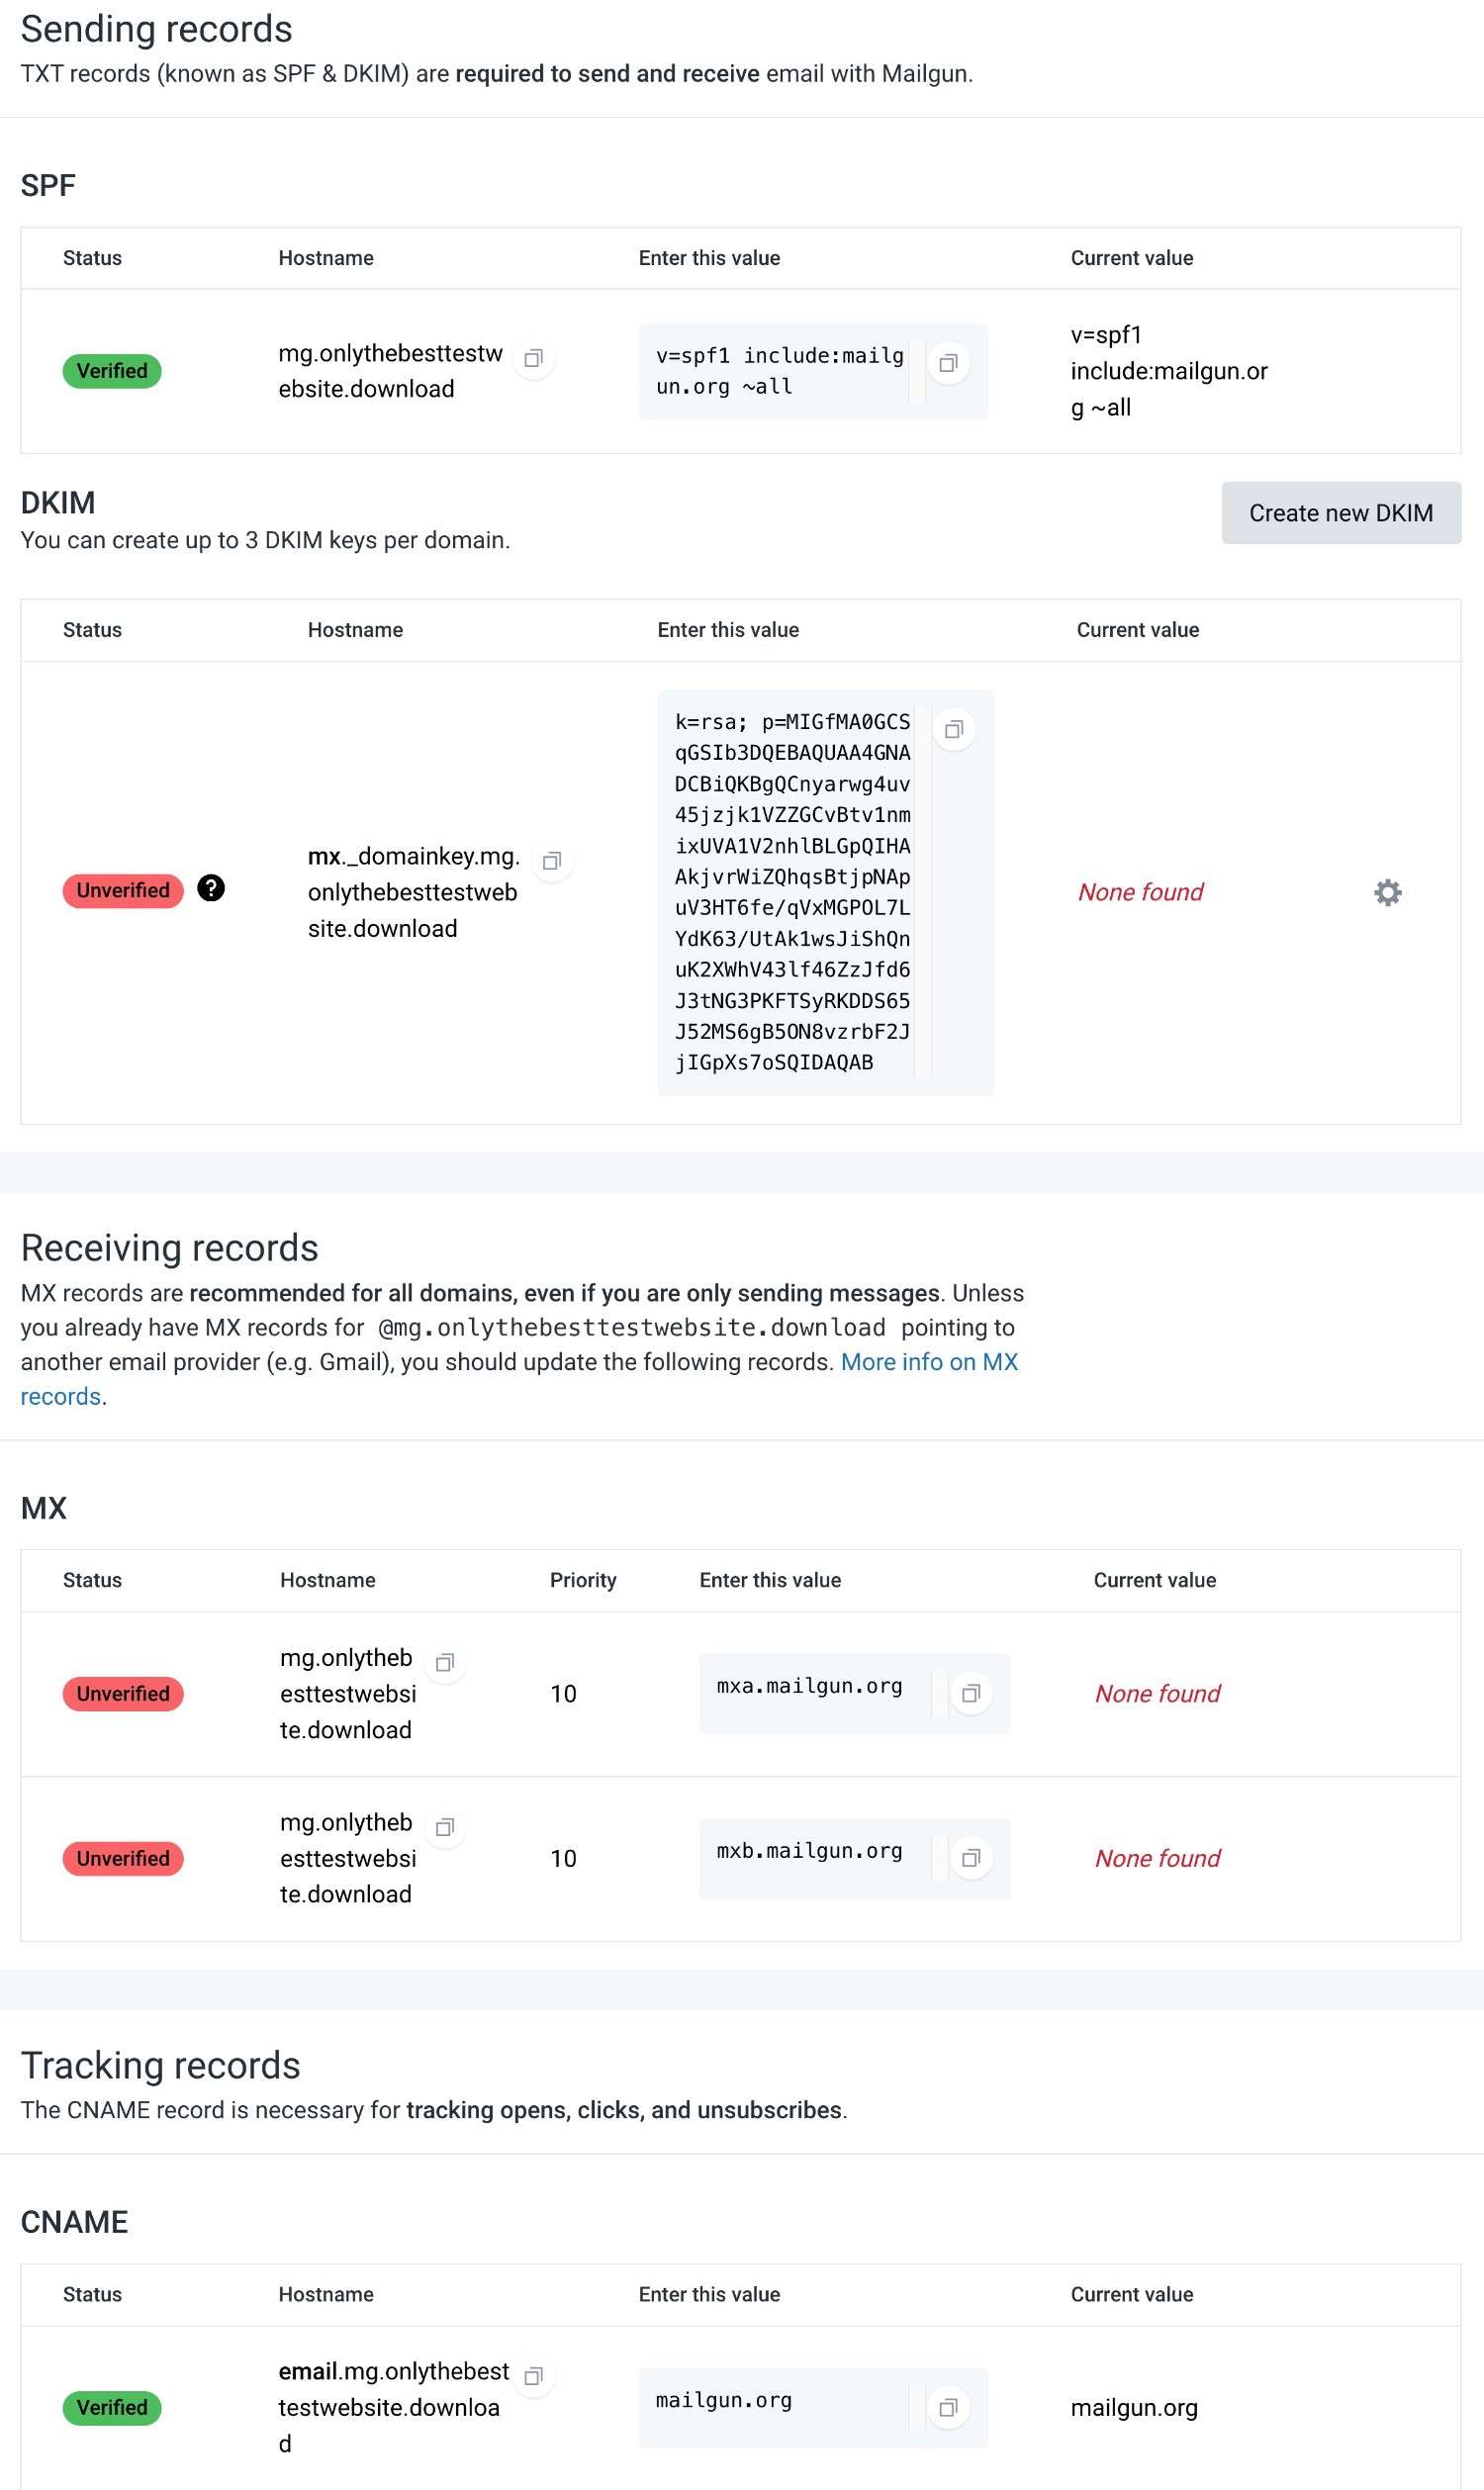
You’ll need to add these records wherever you manage your domain’s DNS. Depending on how you’ve configured your domain name, this could be your domain registrar, your hosting account (if you pointed your domain name to your host’s nameservers), or a service like Cloudflare (if you pointed your domain name to Cloudflare’s nameservers).
When in doubt, we recommend asking your hosting support – they should be able to point you in the right direction.
After adding everything, you can click the Verify DNS Settings button to have Mailgun verify the records. If it doesn’t work the first time, try waiting 30 minutes and trying again – it can sometimes take a little time before the DNS changes fully update.
4. Create a Mailgun API Key
Next, you’ll want to create a Mailgun API key, which is what Gravity SMTP will use to connect your WordPress site to Mailgun:
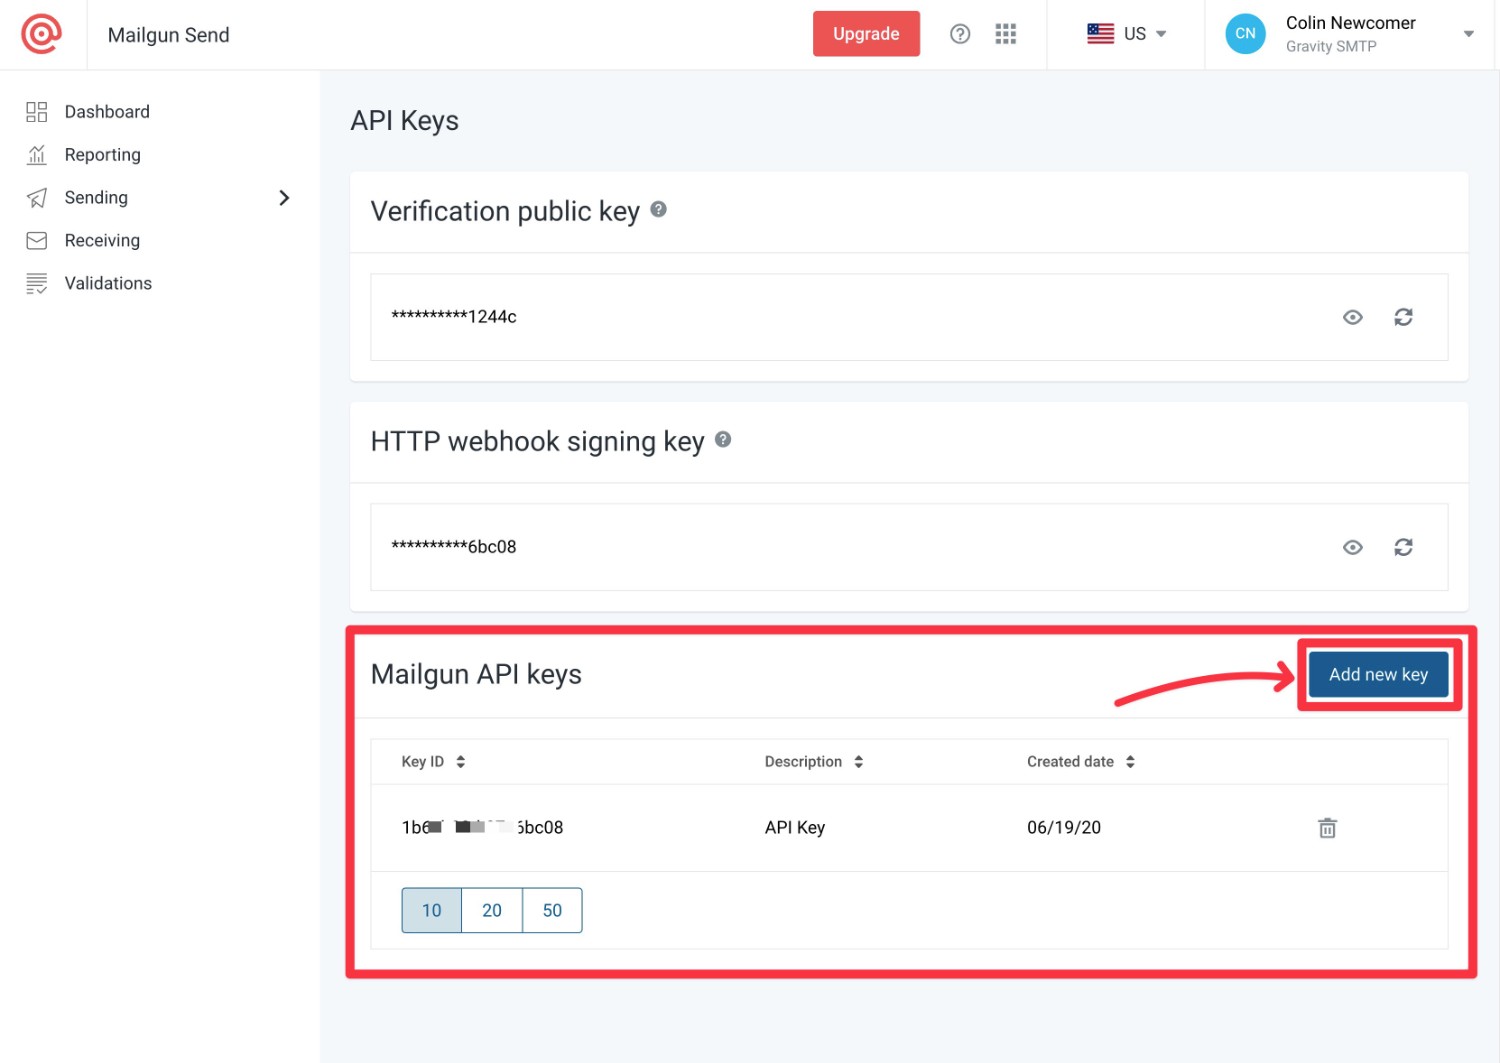
- Click this link to open the API security page in your Mailgun dashboard. Or, select your name in the top-right corner and then choose API Security from the drop-down.
- Click the Add new key button in the Mailgun API keys section.
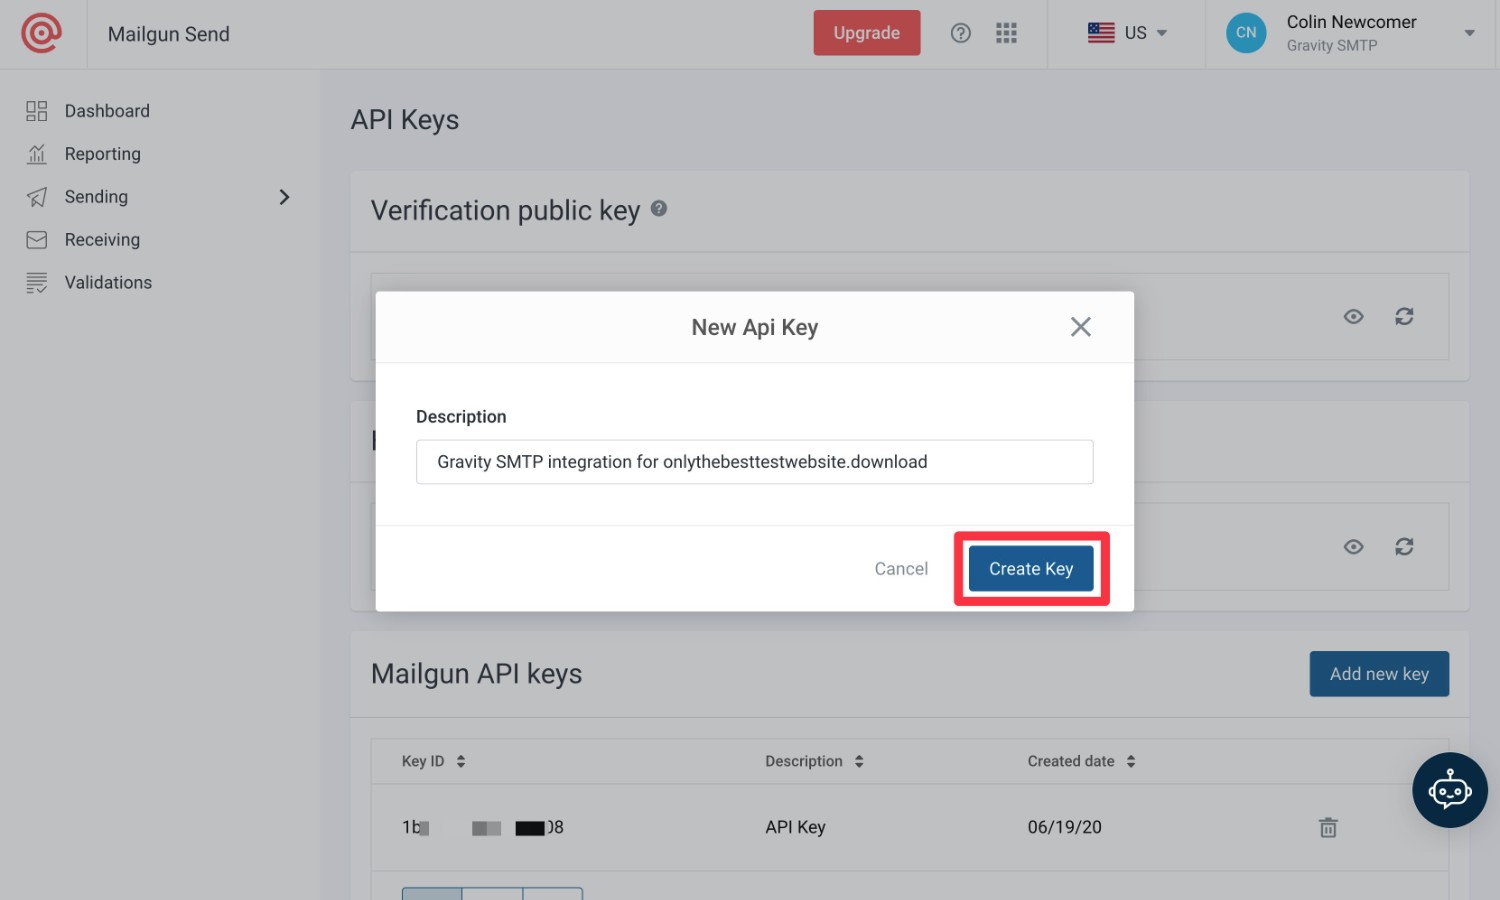
Give your API key an internal name to help you remember what it’s for. Then, click the Create Key button.
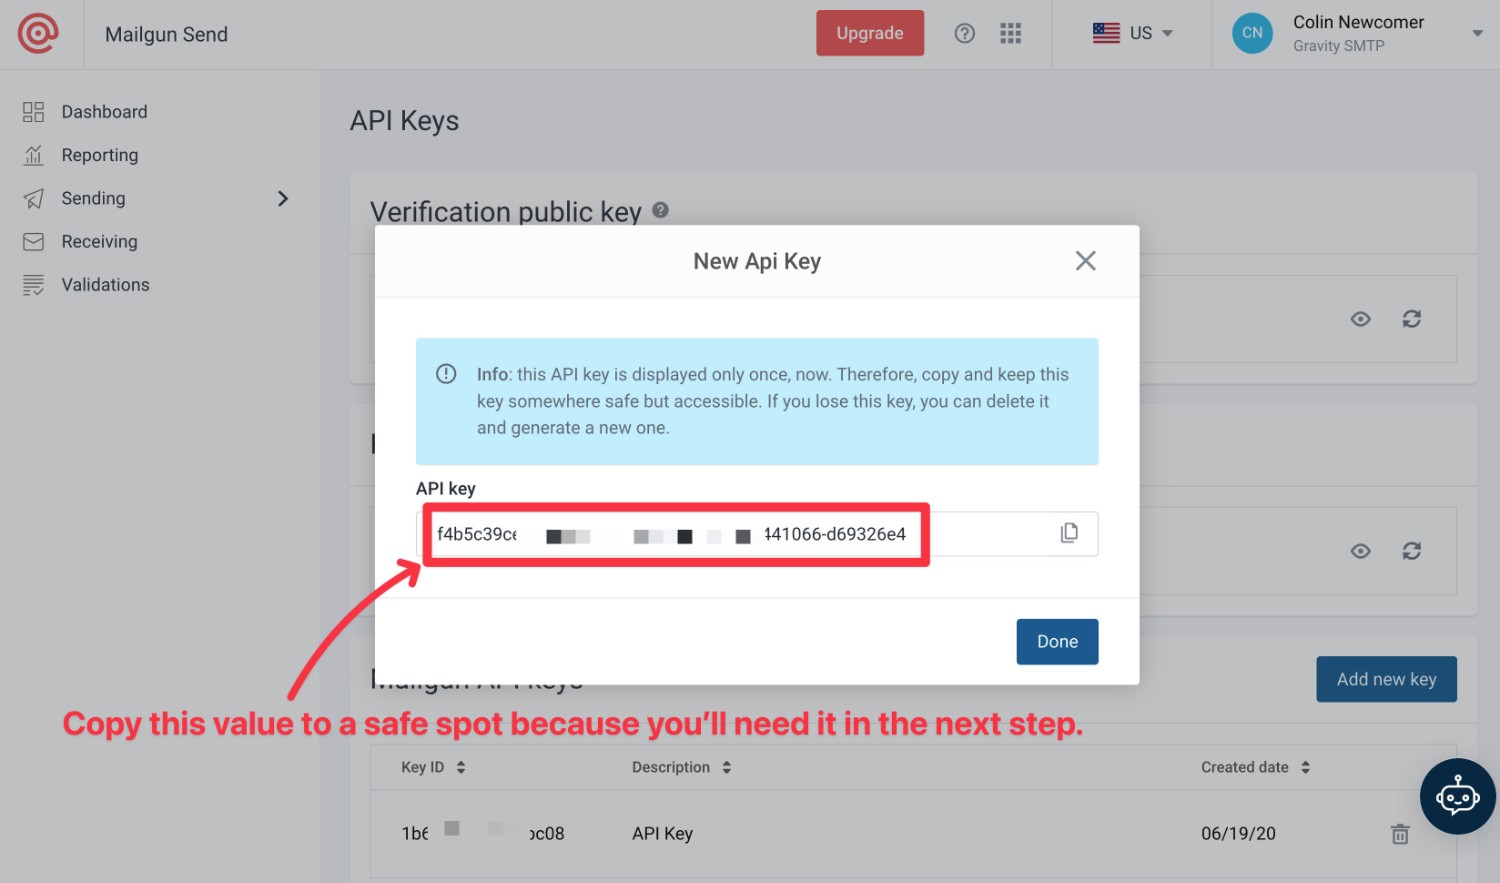
You should then see your API key. Copy it to a safe place because you’ll need it in the next step and Mailgun will only show you it once.
If you accidentally lose the API key, you can just repeat the same steps to create a new one.
5. Configure Gravity SMTP to Use Mailgun
Once you have your Mailgun API key, you’re ready to connect your WordPress site to Mailgun using Gravity SMTP:
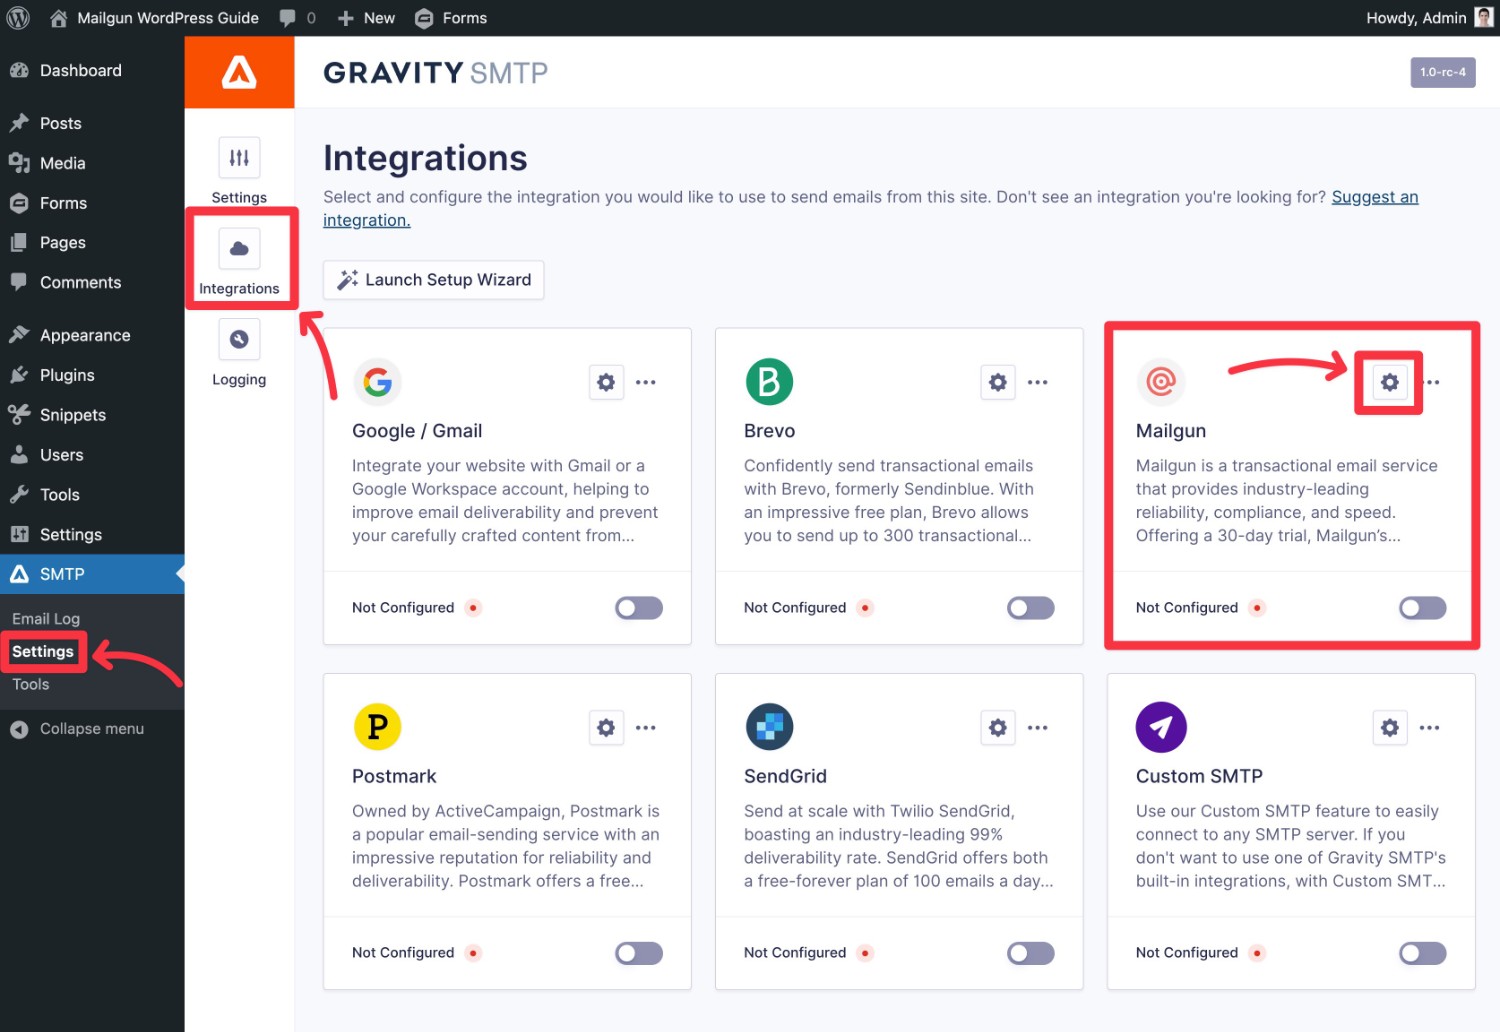
- Open your WordPress dashboard.
- Go to SMTP → Settings.
- Select the Integrations tab.
- Click the gear icon next to Mailgun to configure Mailgun on your site.
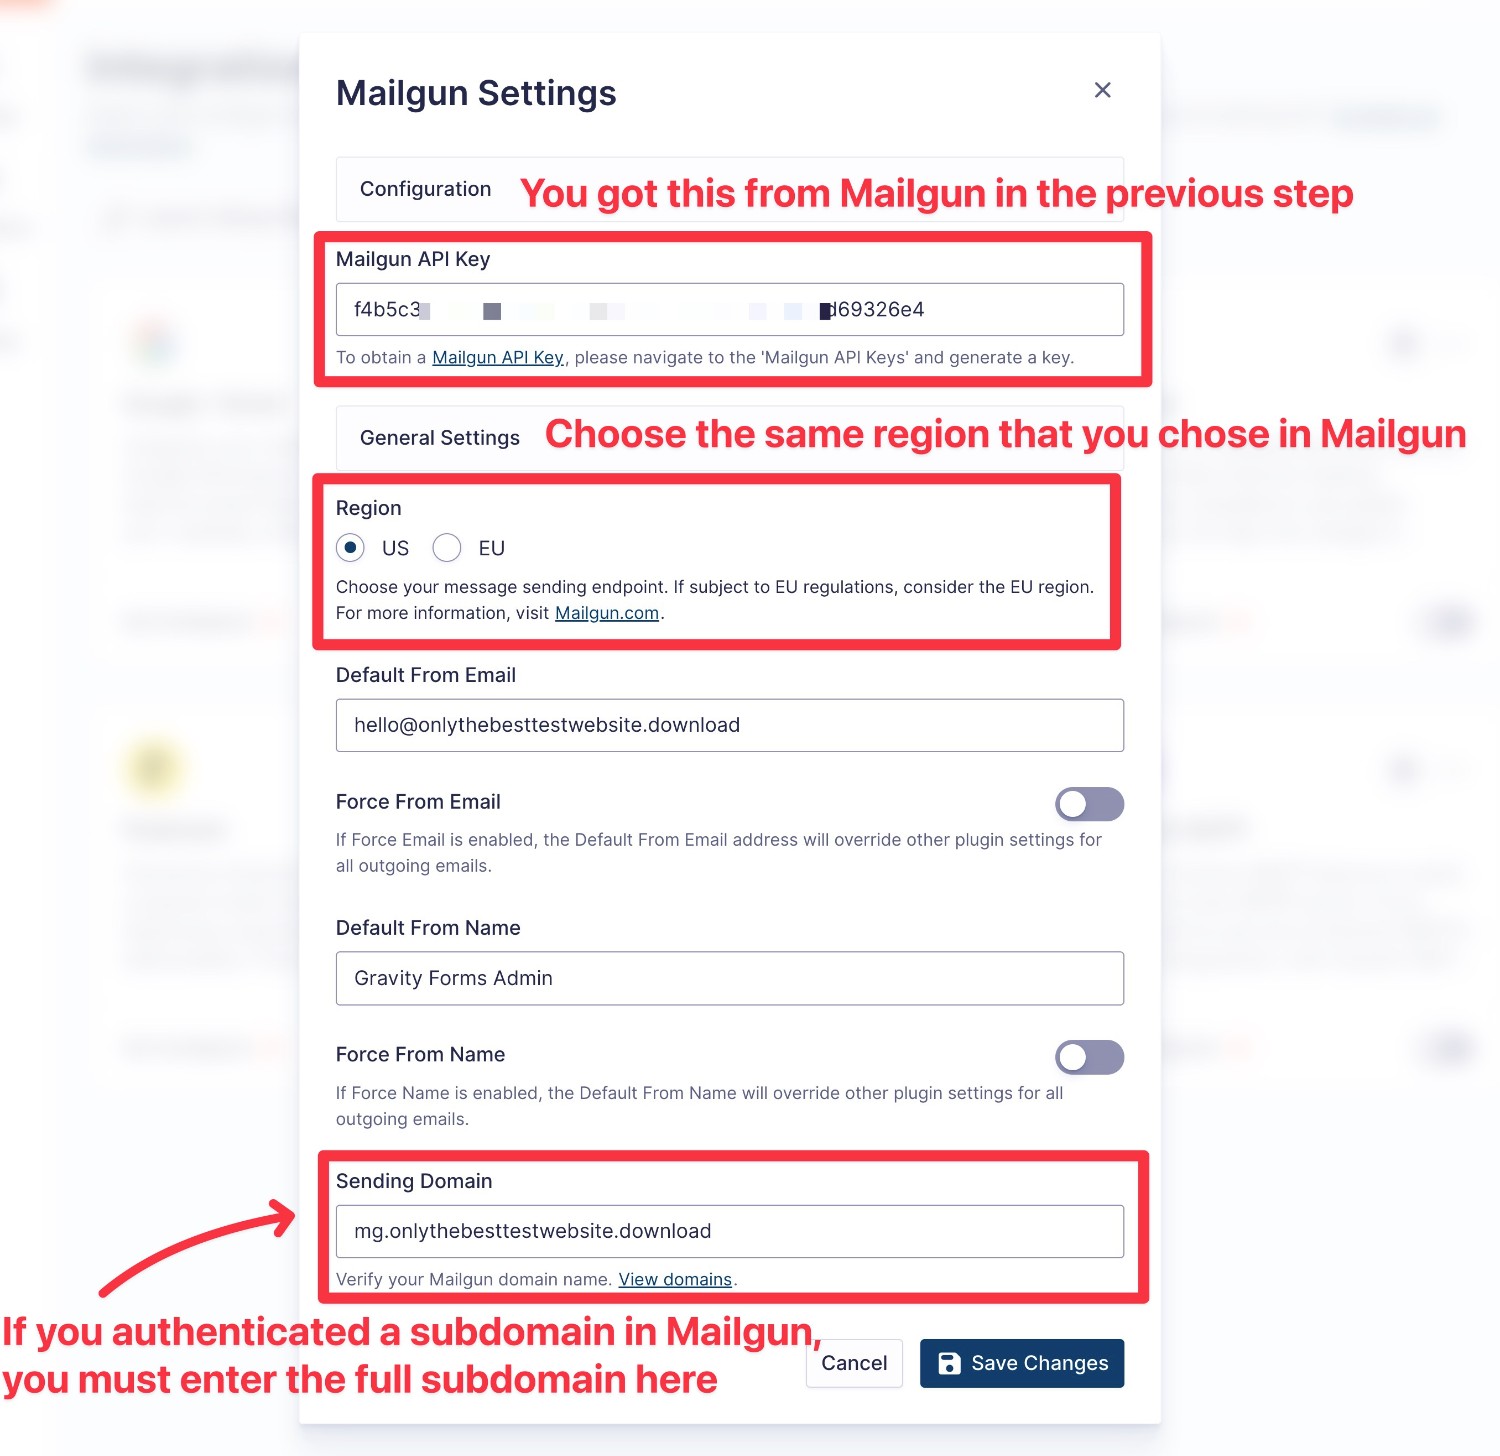
This should open a popup where you can configure the Mailgun connection:
- Mailgun API Key – add the API key from the previous step (Step #4).
- Region – select the same region you chose when authenticating your domain name with Mailgun (Step #3).
- Default From Email – the email address that your emails will be sent from.
- Force From Email – force all plugins to use this same “From” email for emails from those plugins.
- Default From Name – the name that your emails will appear as coming from.
- Force From Name
- Sending Domain – add the domain name of your site (that you authenticated with Mailgun in Step #3). If you authenticated a subdomain, you must enter that exact subdomain in this box. You can still use your root domain name as the “From Email”, though.
Make sure to click Save Changes, which should close the popup.
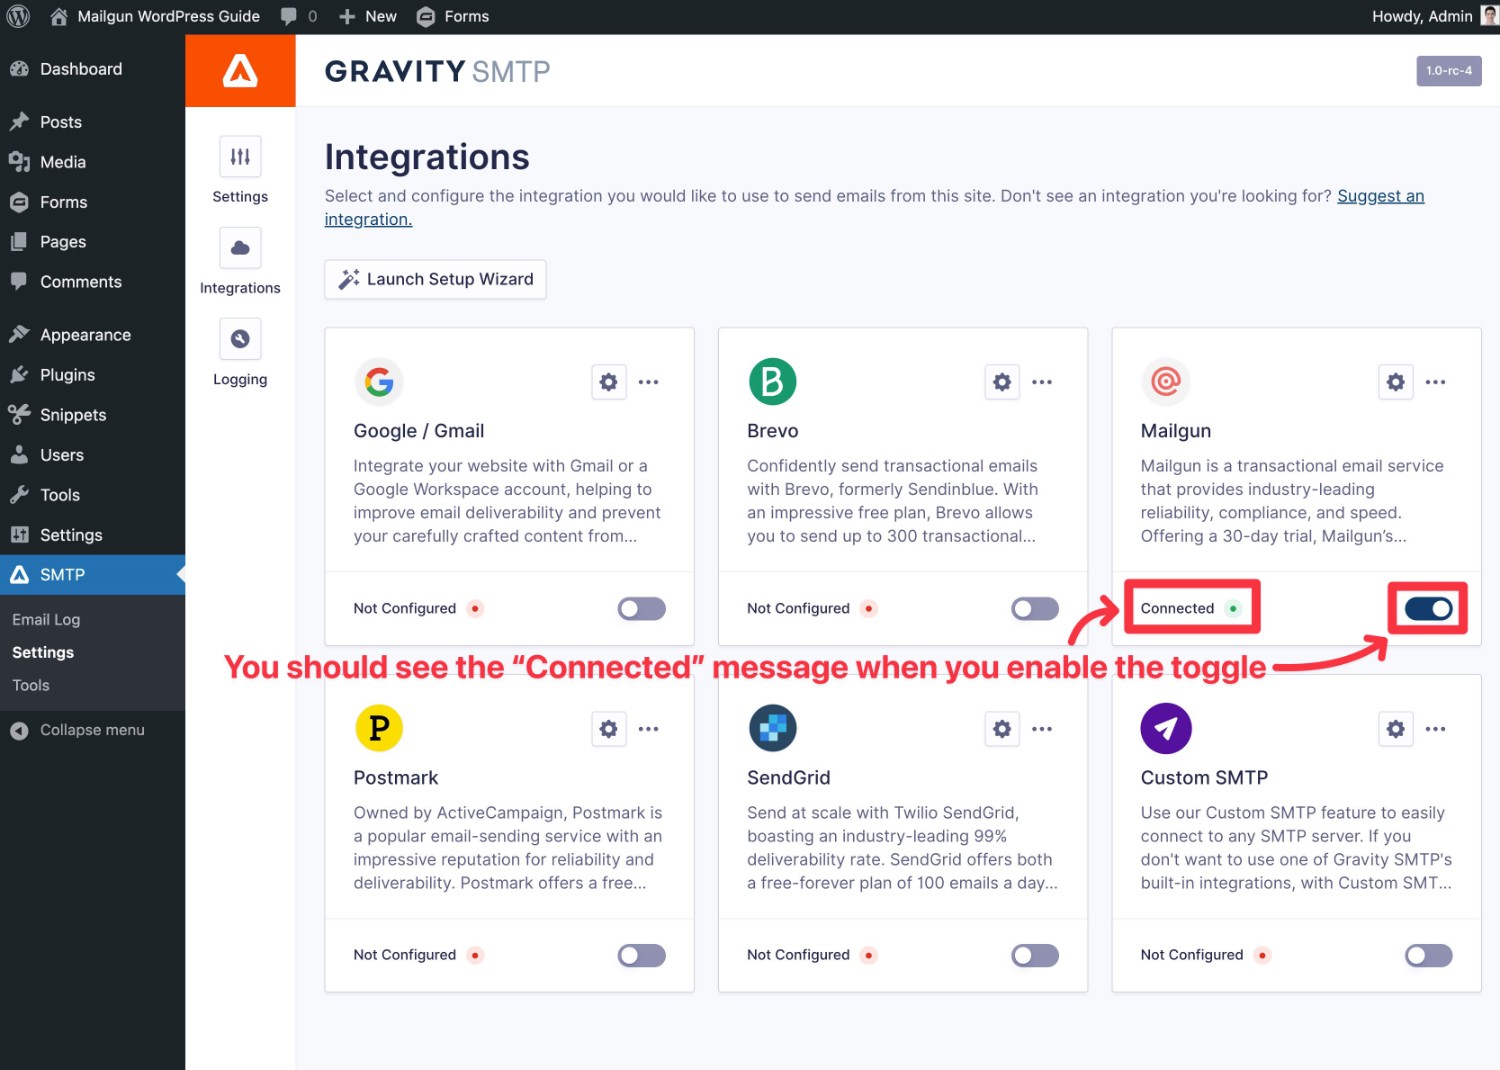
You should then see Configured appear for Mailgun in the integrations list.
To actually make Mailgun your site’s active transnational email service, you’ll need to enable the toggle. This should change the text from Configured to Connected.
6. Test and Monitor Your Site’s Transactional Emails
At this point, your site’s transactional emails should be already sending via Mailgun.
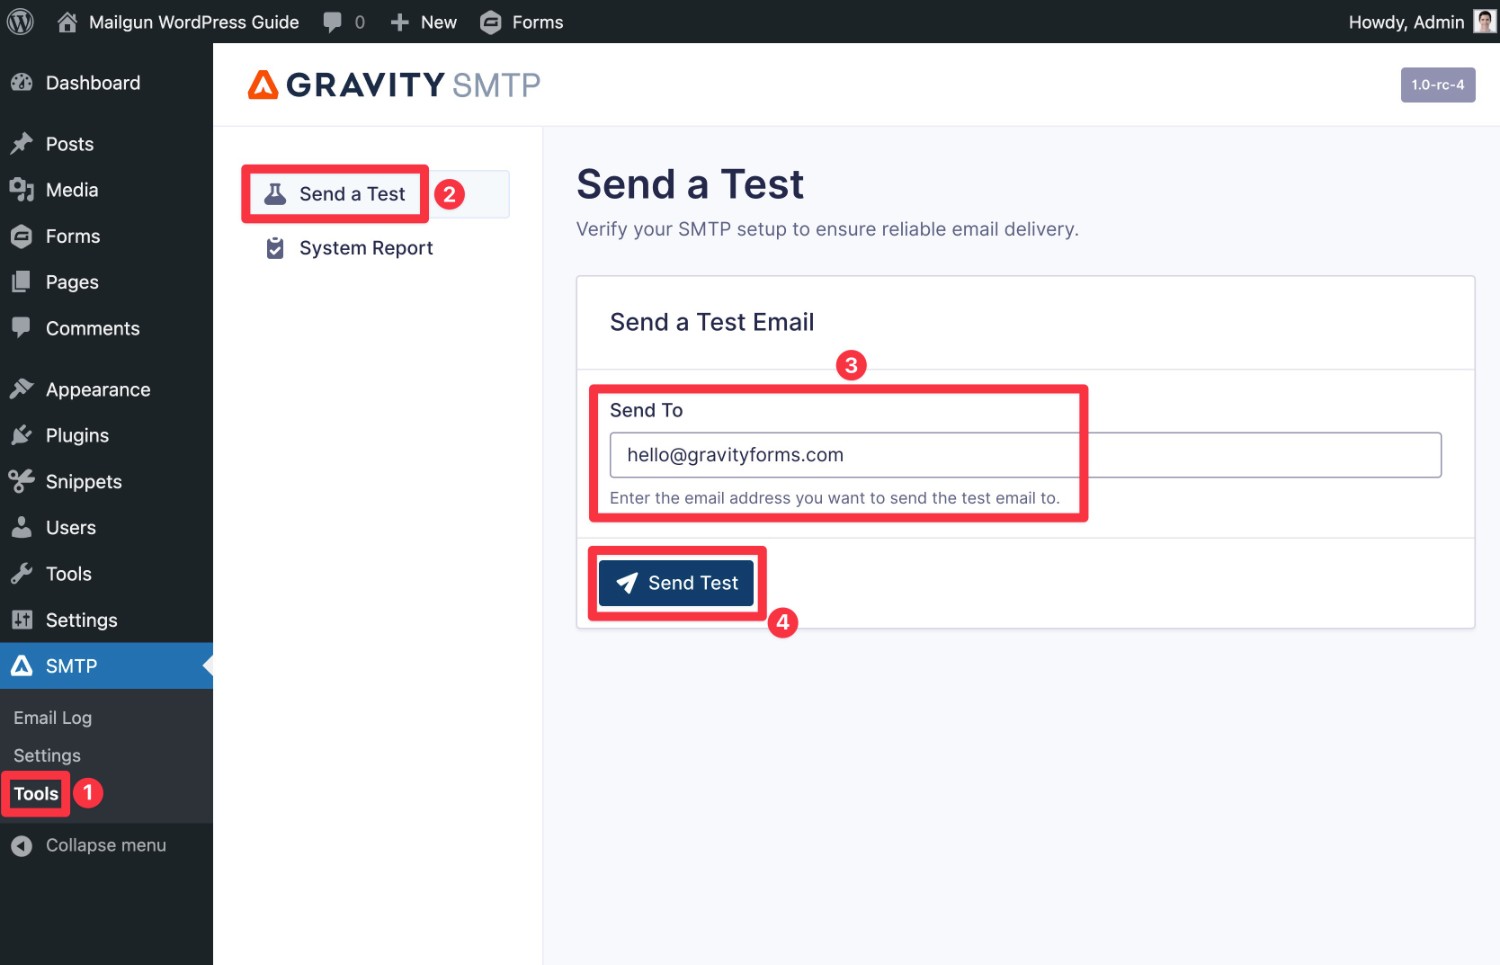
To make sure that everything is working, Gravity SMTP includes a feature to let you send a test email:
- Go to SMTP → Tools.
- Make sure the Send a Test tab is selected.
- Enter the email address to which you want to send a test email in the Send To box.
- Click the Send Test button.
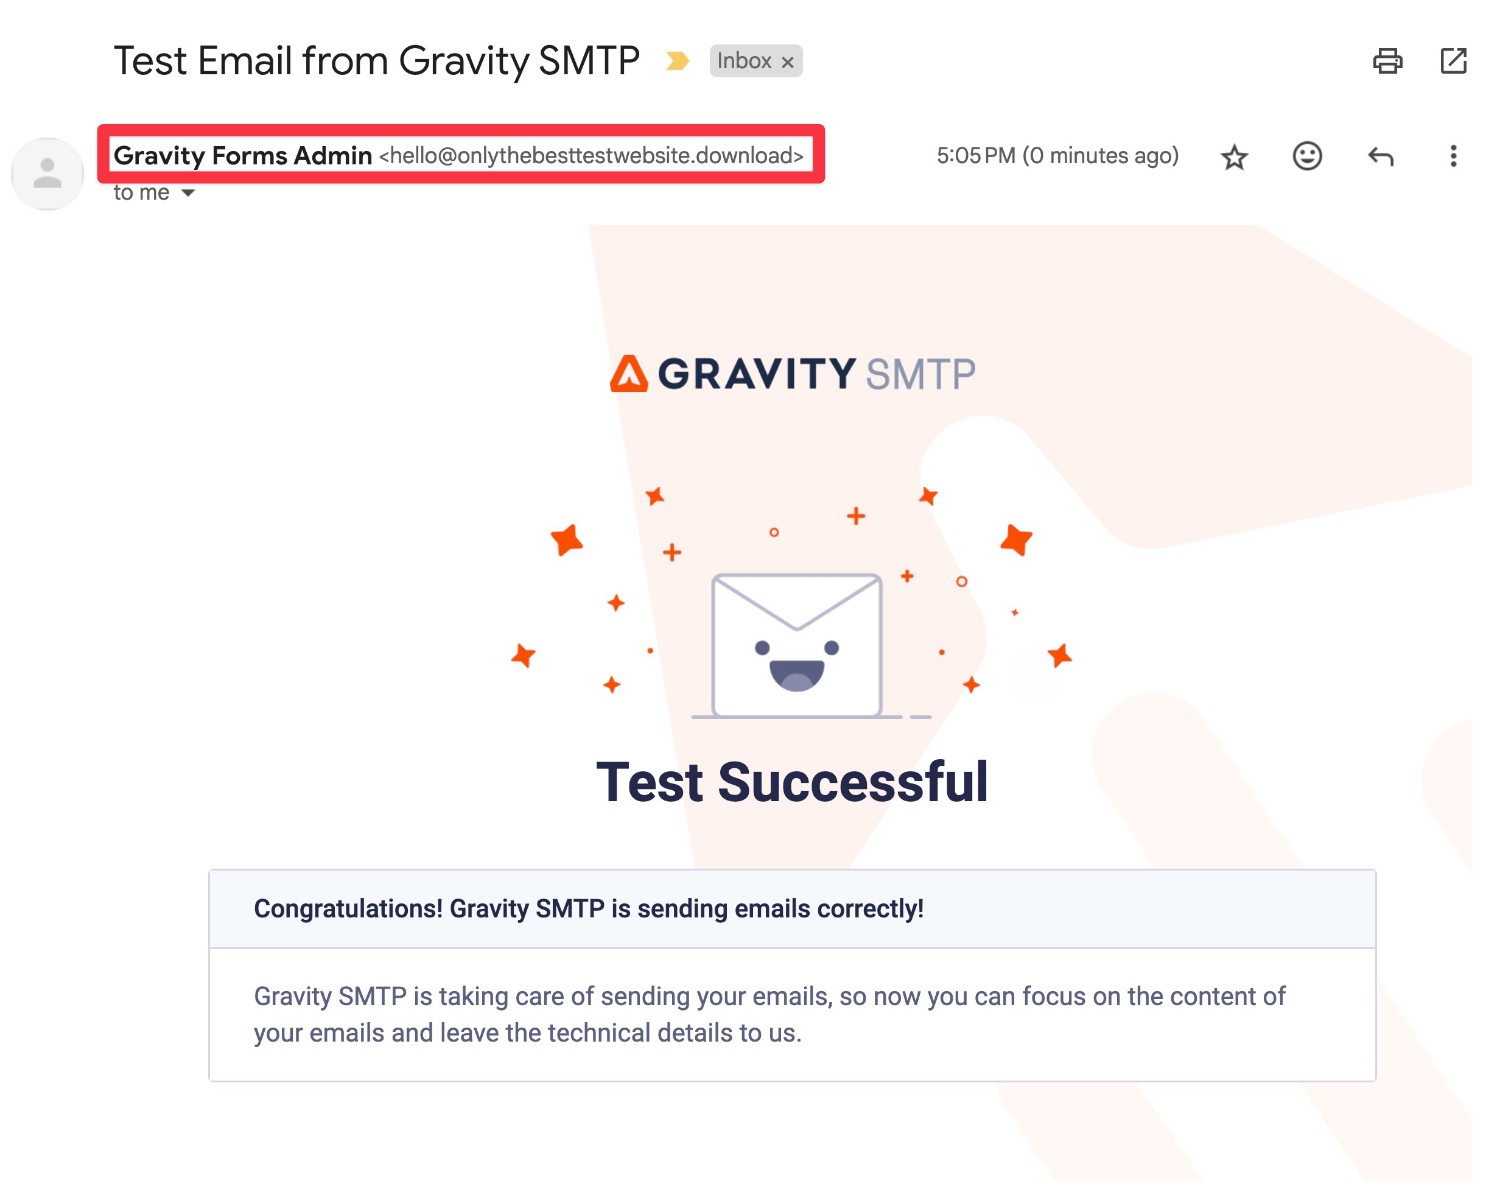
You should then see a success message in the interface, along with an email at your email address that looks something like this:
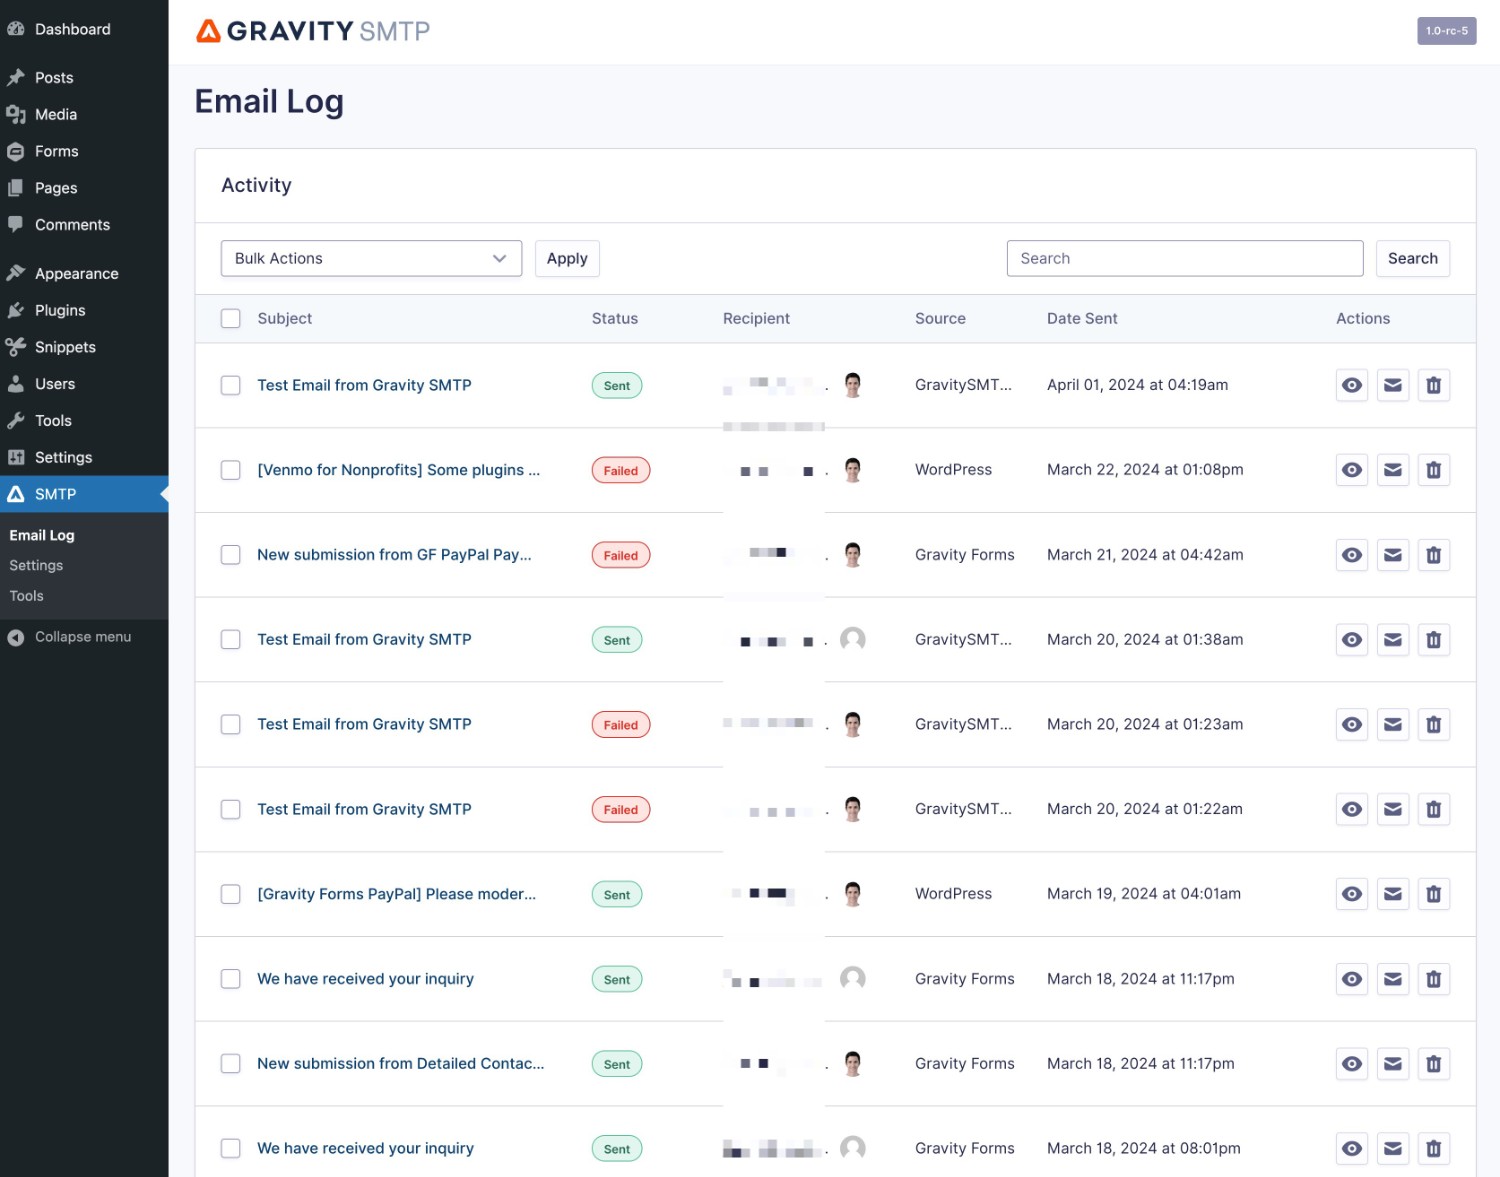
To help you stay on top of your WordPress site’s transactional emails, Gravity SMTP also includes full email logging for all of the emails that your site sends. You can see technical details about each email, as well as a visual preview of the content and style of each email.
You can access this log by going to SMTP → Email Log.
You can also adjust the log storage period or completely disable transactional email logging by going to SMTP → Settings → Logging.
For more in-depth details on Gravity SMTP, check out the documentation.
Start Reliably Sending WordPress Transactional Emails
If you’re searching for a better way to send transactional emails on WordPress, the Gravity SMTP plugin should be your new best friend.
Gravity SMTP lets you easily connect to a variety of transactional email services to send all of your site’s transactional emails, including core WordPress emails, emails from Gravity Forms, and emails from other plugins that rely on the WordPress email sending functionality.
Plus, Gravity SMTP also gives you some really handy tools to test and monitor your site’s transactional emails to make sure they’re working exactly as you intend them to.
Gravity SMTP is available for free with a Gravity Forms Elite license. If you have an active Elite license, simply head on over to your Gravity Forms Account section to download Gravity SMTP.
Get started today and start enjoying more reliable transactional emails on WordPress!

If you want to keep up-to-date with what’s happening on the blog sign up for the Gravity Forms newsletter!