How to Send WordPress Email Using Mailchimp Transactional
Interested in setting up Mailchimp Transactional for sending your WordPress emails?
If you’re already using Mailchimp for your marketing emails, the Mailchimp Transactional plans offer an easy solution for handling your WordPress site’s transactional emails, as well.
Formerly known as Mandrill, Mailchimp Transactional is an extra service that you can add to your existing Mailchimp plan.
And, with the Gravity SMTP plugin, you can easily configure your WordPress site to send all of its emails using the Mailchimp Transactional Email API.
In this post, we’ll show you exactly how to set up WordPress Mailchimp Transactional email sending – no technical knowledge needed.
The Advantages of Using Mailchimp Transactional for Sending Email on WordPress

If you’re already using Mailchimp for your marketing emails, one big advantage is that you can also use the same service for your WordPress transactional emails.
Beyond the simplicity of using one service for everything, here are some of the other advantages of using Mailchimp Transactional:
- Reliable delivery – Mailchimp has decades of experience with email deliverability, so you can be confident that your emails will quickly make it to users’ inboxes.
- Transactional email API – the API allows for easy and reliable email sending, without the need to enter SMTP credentials.
- Pay-as-you-go pricing – you can purchase exactly as many “blocks” as you need for your usage, without being locked into a preset plan. This can be especially helpful if your monthly email volume can vary, as you can easily just purchase more blocks when needed.
- Affordable dedicated IP address option – you have the option to add a dedicated IP address for just $29.95 per month.
Why Use Gravity SMTP for the WordPress Mailchimp Transactional Integration?
If you want to use Mailchimp Transactional Email on WordPress, you’ll need the help of a WordPress SMTP plugin like Gravity SMTP.
Here are some of the main reasons to use Gravity SMTP to connect your WordPress site to Mailchimp:
- Easy API integration – you can connect using the Mailchimp Transactional API, which offers fast, reliable email sending.
- Reporting dashboard – you can view high-level reports to track email usage on your site right from your WordPress dashboard, including the top sending sources and email open rates.
- Email logging functionality – you can log each individual email that your site sends. This includes technical information for each email, as well as the actual content/design of an email and its attachments (which is optional).
- Easy email resends – you can manually resend an email with the click of a button.
- Backup email sending methods – in addition to connecting to Mailchimp Transactional, you can also connect to one of the other email sending services that Gravity SMTP supports and specify it as your backup service. If an email ever fails to send via Mailchimp Transactional, Gravity SMTP will automatically resend it using your chosen backup service.
- Reliability – Gravity SMTP comes from the same team behind Gravity SMTP, so you can be confident in its reliability.
- Support – if you ever need help, you can get one-on-one ticket support from the Gravity SMTP team.
The Gravity SMTP team is also constantly working on adding new features – you can view those features and vote for your favorites on the Gravity SMTP roadmap.
How to Set Up Mailchimp Transactional With Gravity SMTP
Now, let’s get into the actual step-by-step guide on how to use Mailchimp Transactional to send your WordPress emails.
1. Install the Gravity SMTP Plugin
To get started, you’ll want to install and activate the Gravity SMTP plugin on the WordPress website where you want to set up Mailchimp Transactional.
While Gravity SMTP comes from the same team behind the Gravity Forms plugin, it’s a completely standalone plugin. That is, you don’t need to have Gravity Forms installed to use Gravity SMTP (though Gravity SMTP is a great solution for sending your form notification emails).
Gravity SMTP is currently available for free to anyone holding one of these Gravity Forms licenses:
- Elite license
- Nonprofit license
- Developer license (a legacy license that is no longer available for purchase)
If you hold one of those licenses, you can download Gravity SMTP from your Gravity Forms My Account area.
2. Add Mailchimp Transactional Email to Your Mailchimp Account (or Register for Mailchimp)
Next, you’ll need to enable the Mailchimp Transactional Email add-on.
Let’s go through it…
Register for a Mailchimp Account
To start, you’ll need to register for a Mailchimp account, if you haven’t done so already.
Mailchimp Transactional Email is an add-on for the core Mailchimp service, so you won’t/can’t just sign up for it separately.
If you don’t have a Mailchimp account yet, you can register by clicking this link.
While Mailchimp does have a free tier, you’ll need one of the paid Standard or Premium plans to use the Transactional Email Add-On (or the legacy Monthly Plan, which is no longer available for new signups).
If you’re just signing up for Mailchimp or you’ve never used one of the paid Mailchimp plans, you can try the Standard plan for free for a month, which lets you test everything out at no cost. After the one-month free trial, the Standard plan starts at $20 per month (at the time of writing).
Enable the Mailchimp Transactional Email Add-On
Once you’ve registered for a Mailchimp account and signed up for either the Standard or Premium plan, the next step is to enable the Transactional Email Add-On.
Open your Mailchimp dashboard and go to Automations → Transactional Email. Or, you can click this link to go straight there.
Then, choose the option to either Try for free or Pick a plan.
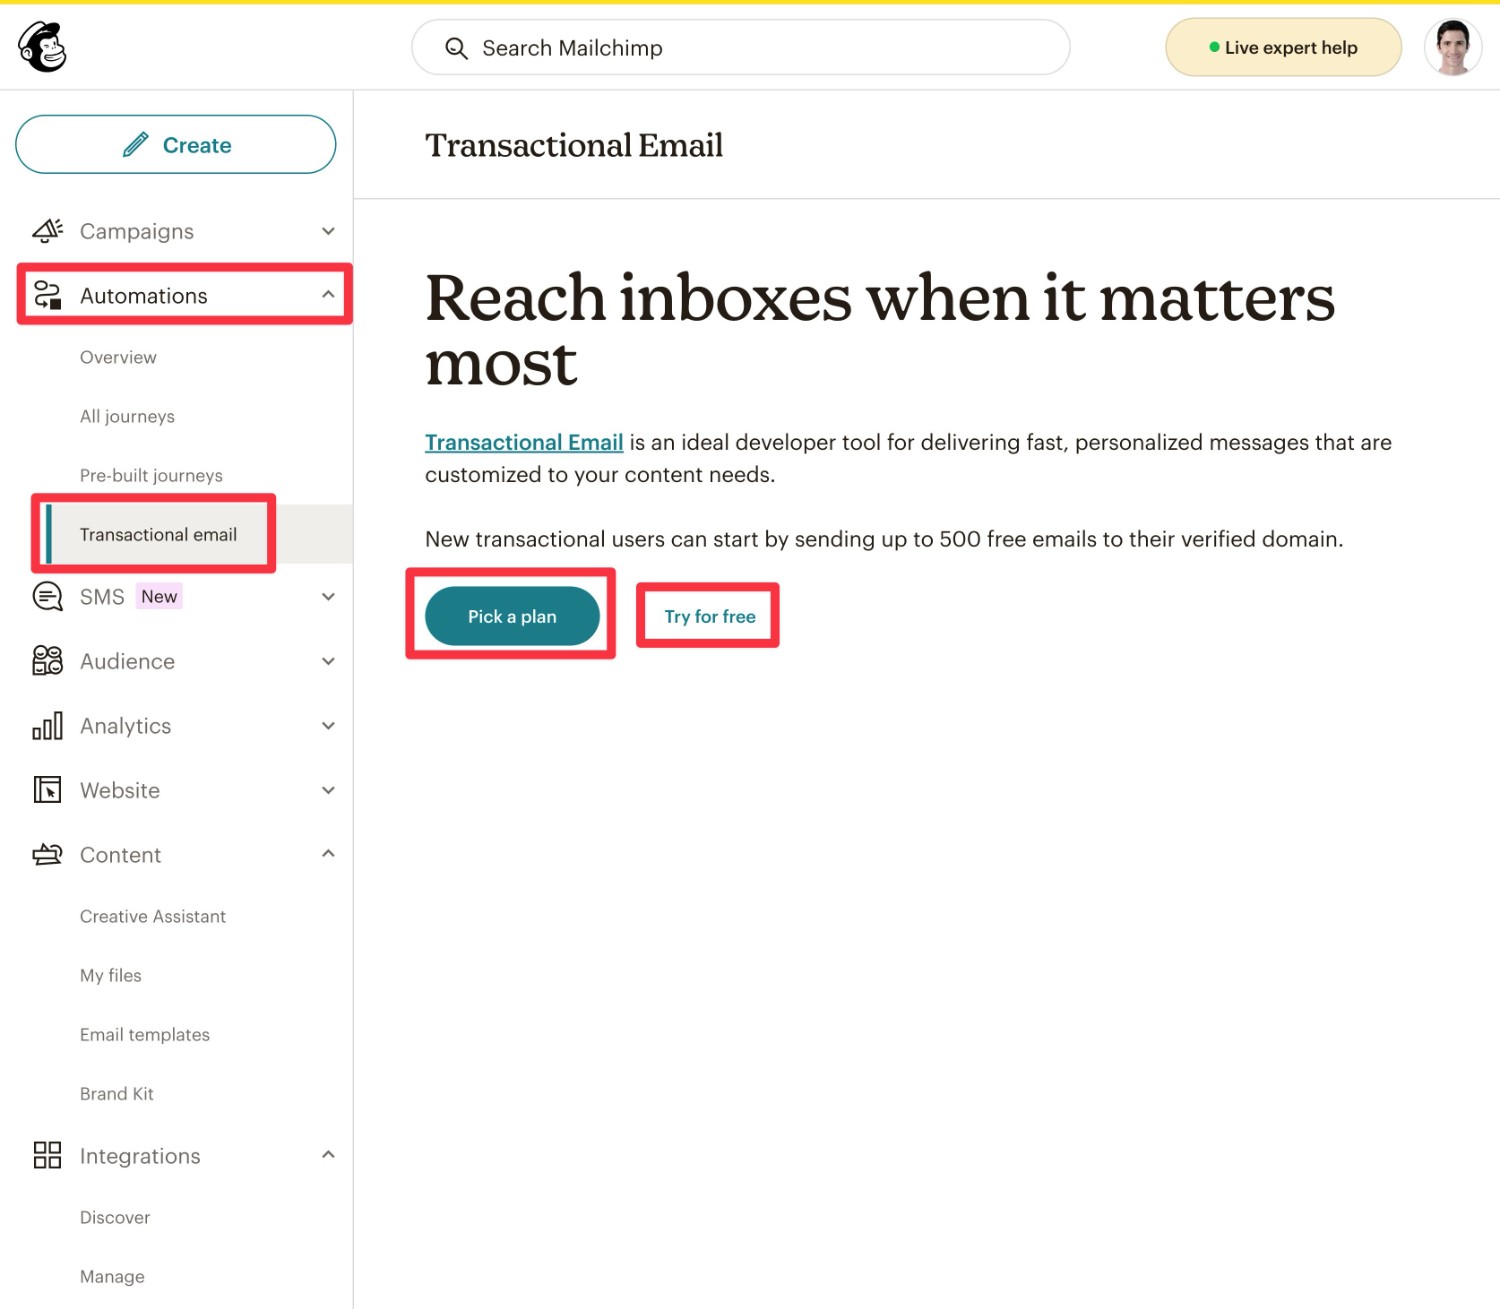
If you choose Try for free, you’ll be able to send up to 500 emails to your verified domain name, which should be enough to test the service.
However, when you actually want to send emails to other users, you’ll need to choose one of the paid plans.
You’ll pay by purchasing blocks of emails. Each “block” lets you send 25,000 emails.
The price of each block ranges from $10 to $20, depending on your usage volume. For example, if you send 100,000 transactional emails per month, you would need four blocks. At that volume, each block would cost you $20, for a total cost of $80 (at the time of writing).
You also have the option to purchase a dedicated IP for $29.95 per month, though this is not required.
You can use this calculator to get an exact price.
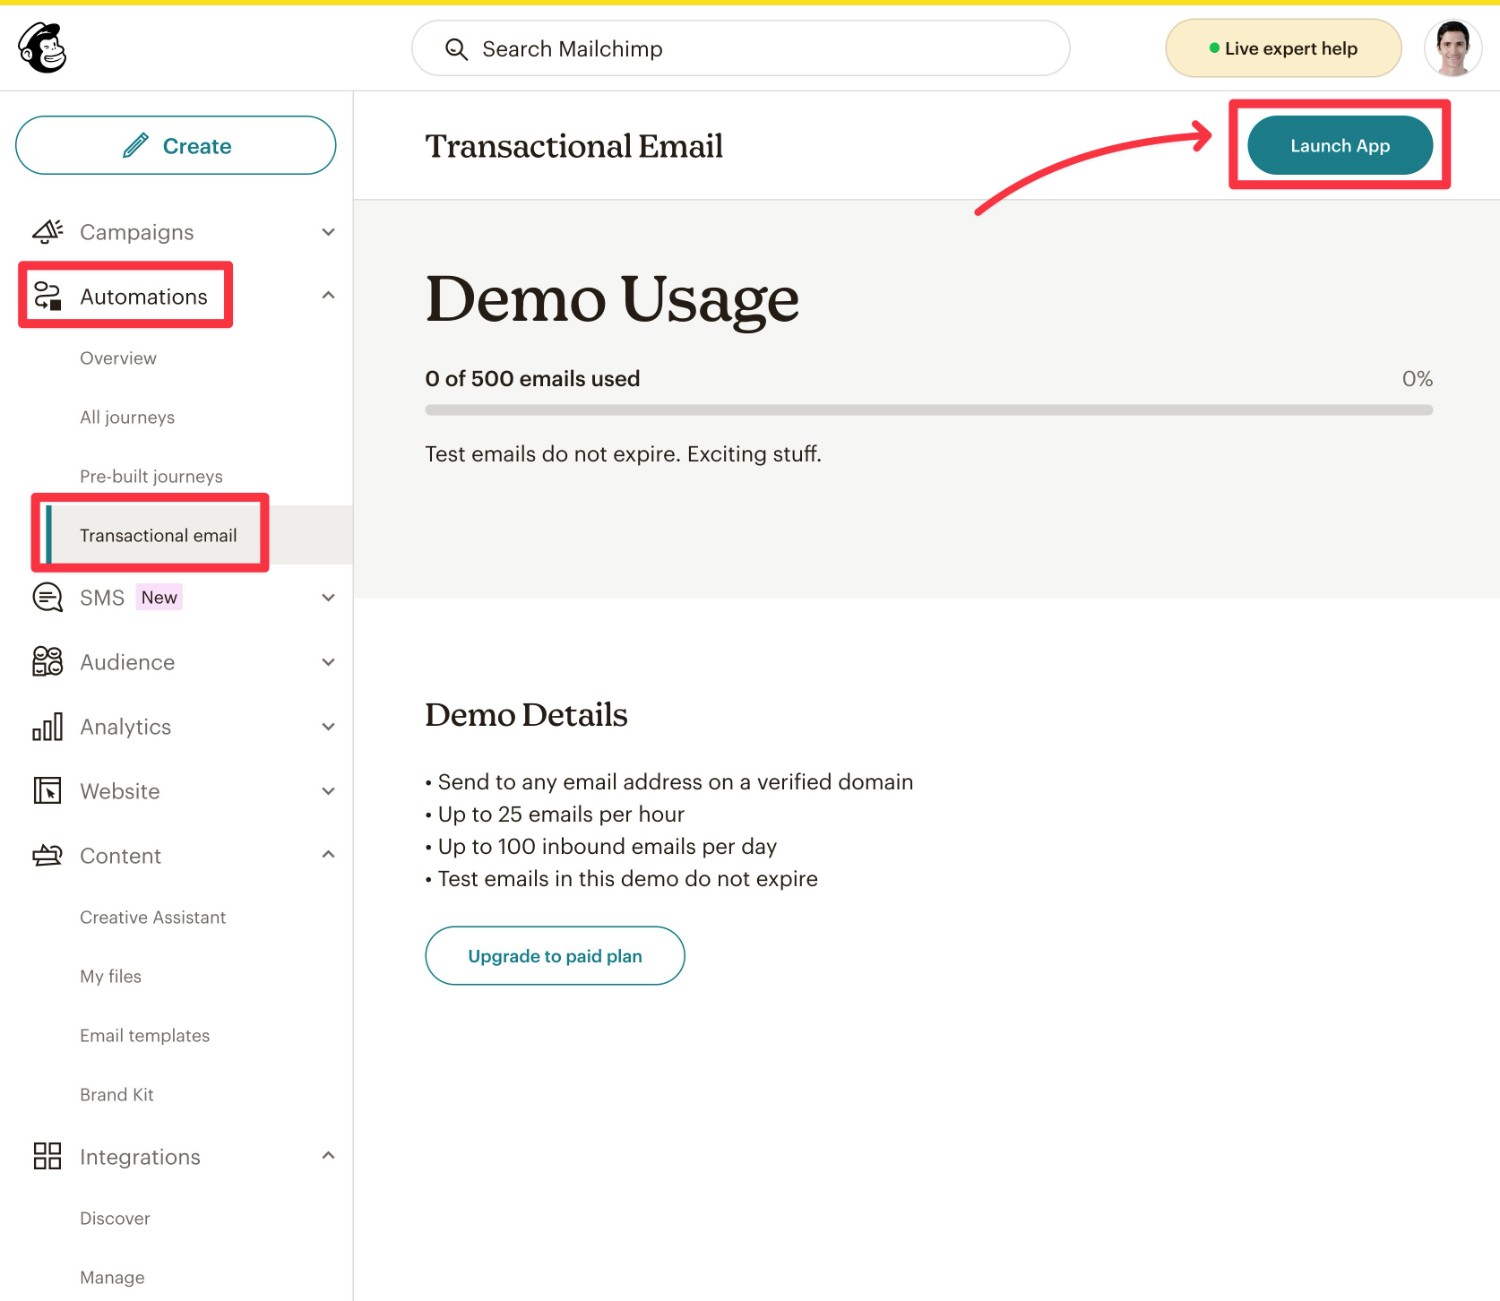
For this tutorial, we chose to Try for free. This will launch another screen where you can click the Launch App button to access the Mailchimp Transactional interface.
3. Authenticate Your Domain Name With Mailchimp Transactional
Once you click the Launch App button, Mailchimp will take you to the Mailchimp Transactional interface, which still uses Mandrill branding at the time that we’re writing this tutorial.
Again, Mailchimp Transactional used to be branded exclusively as Mandrill, which is why you’ll see both referenced at times.
To set things up, you’ll need to authenticate your WordPress site’s domain name with Mailchimp Transactional.
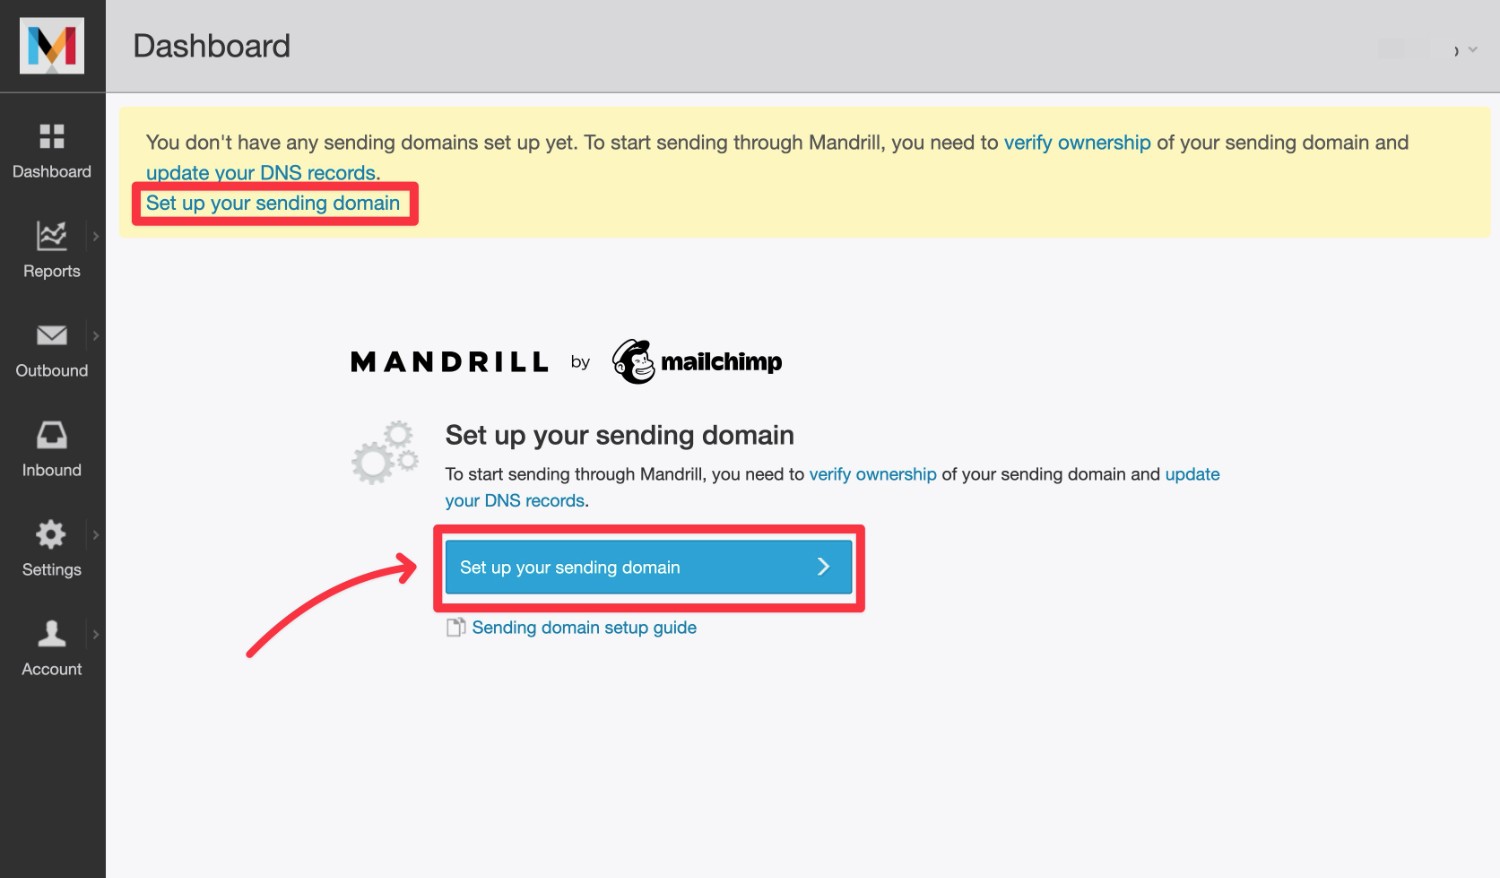
You can do this by clicking Set up your sending domain.
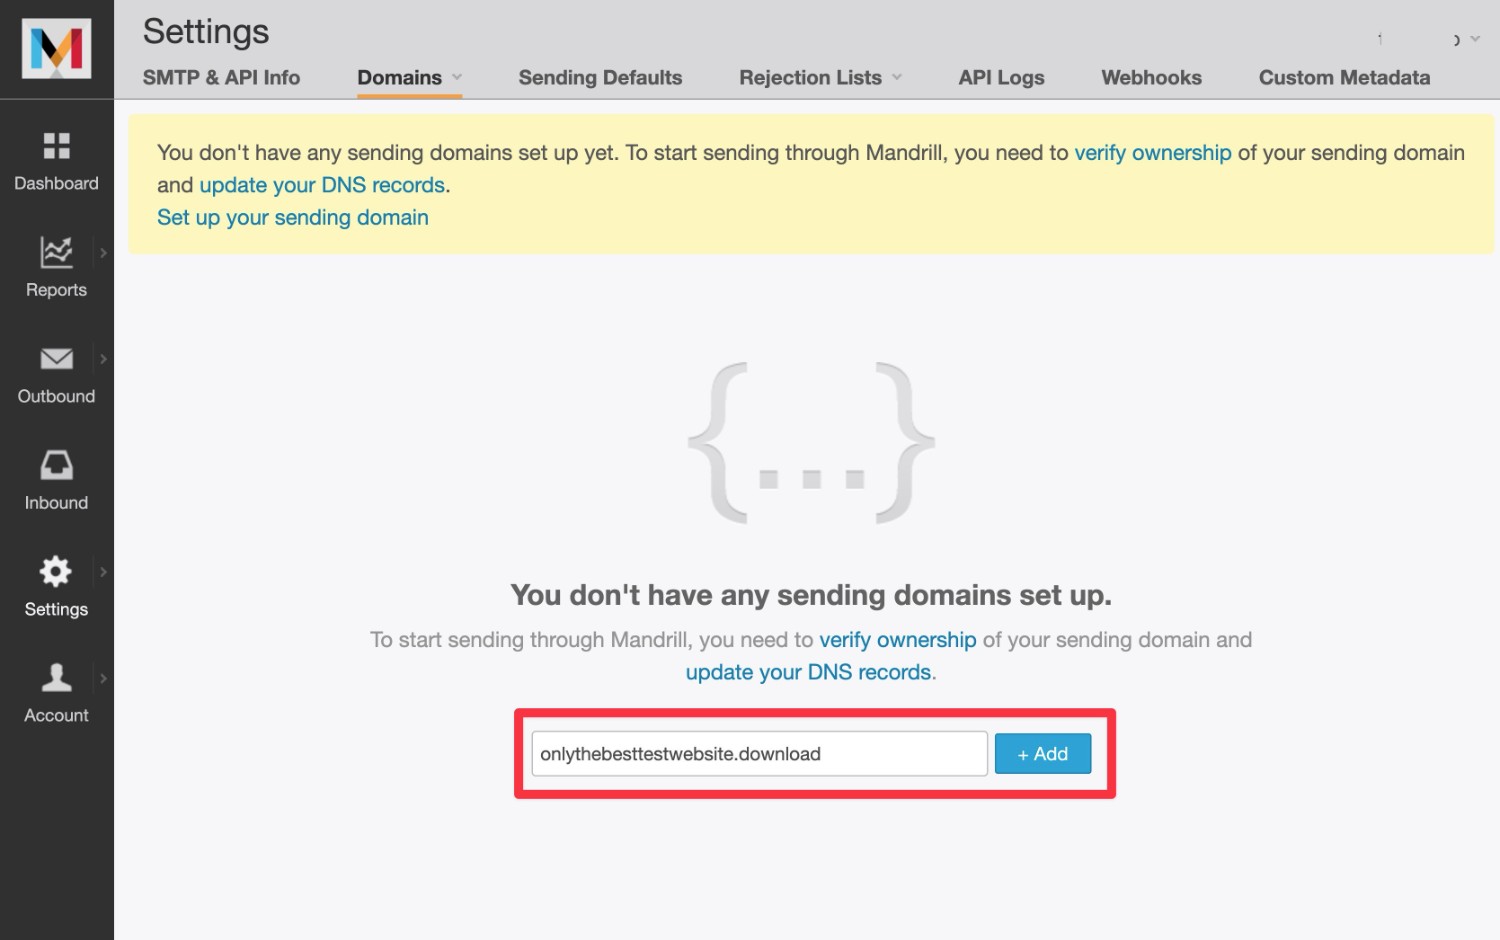
On the next screen, enter your WordPress site’s domain name in the box and click the + Add button.
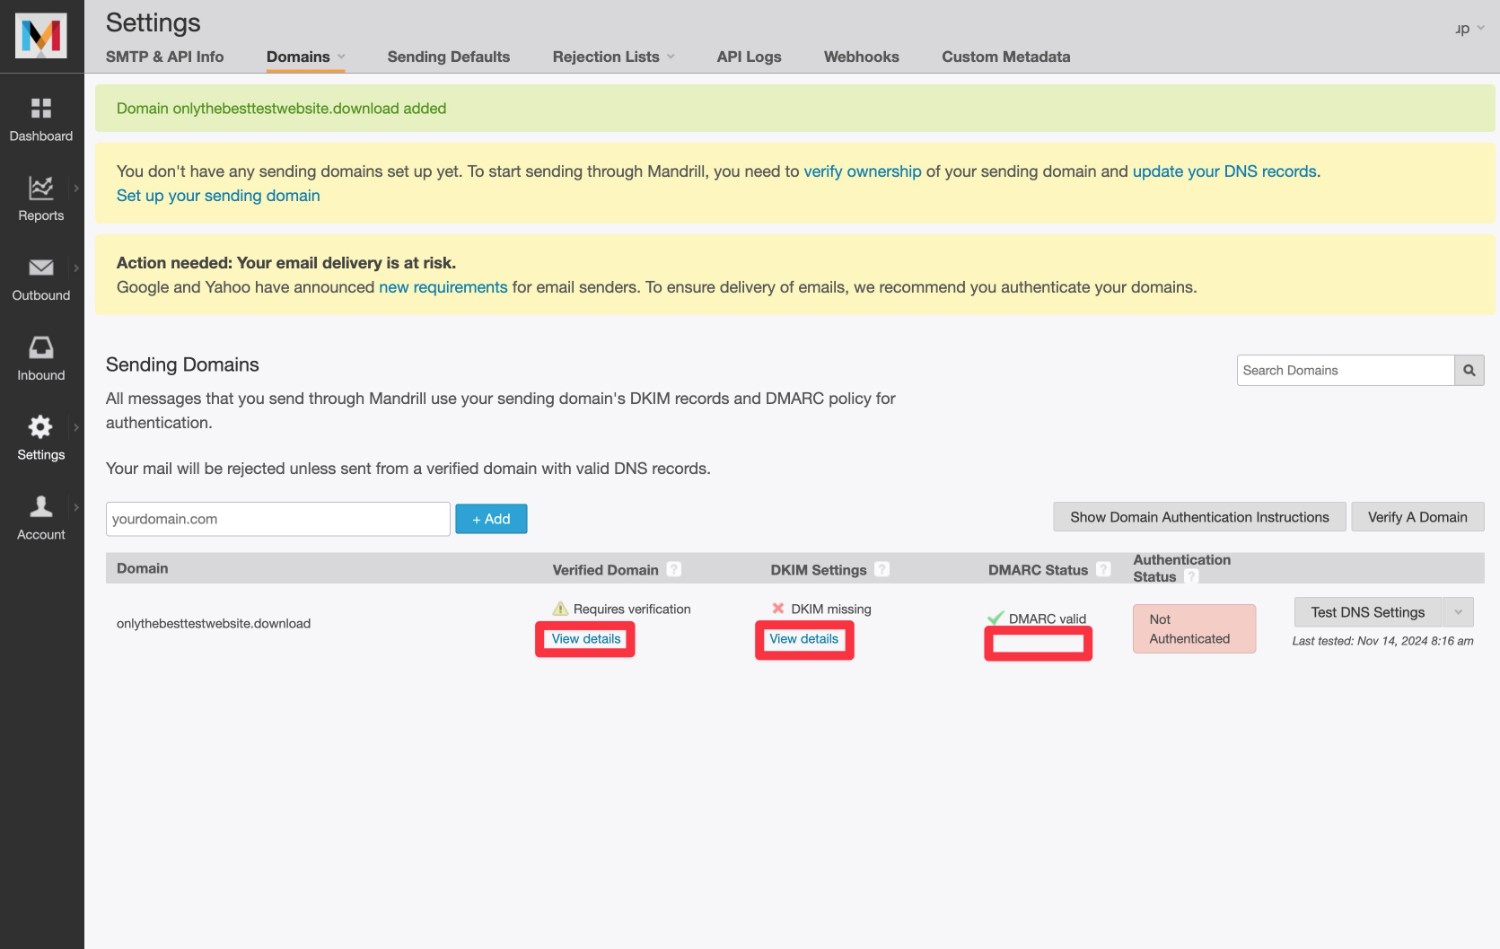
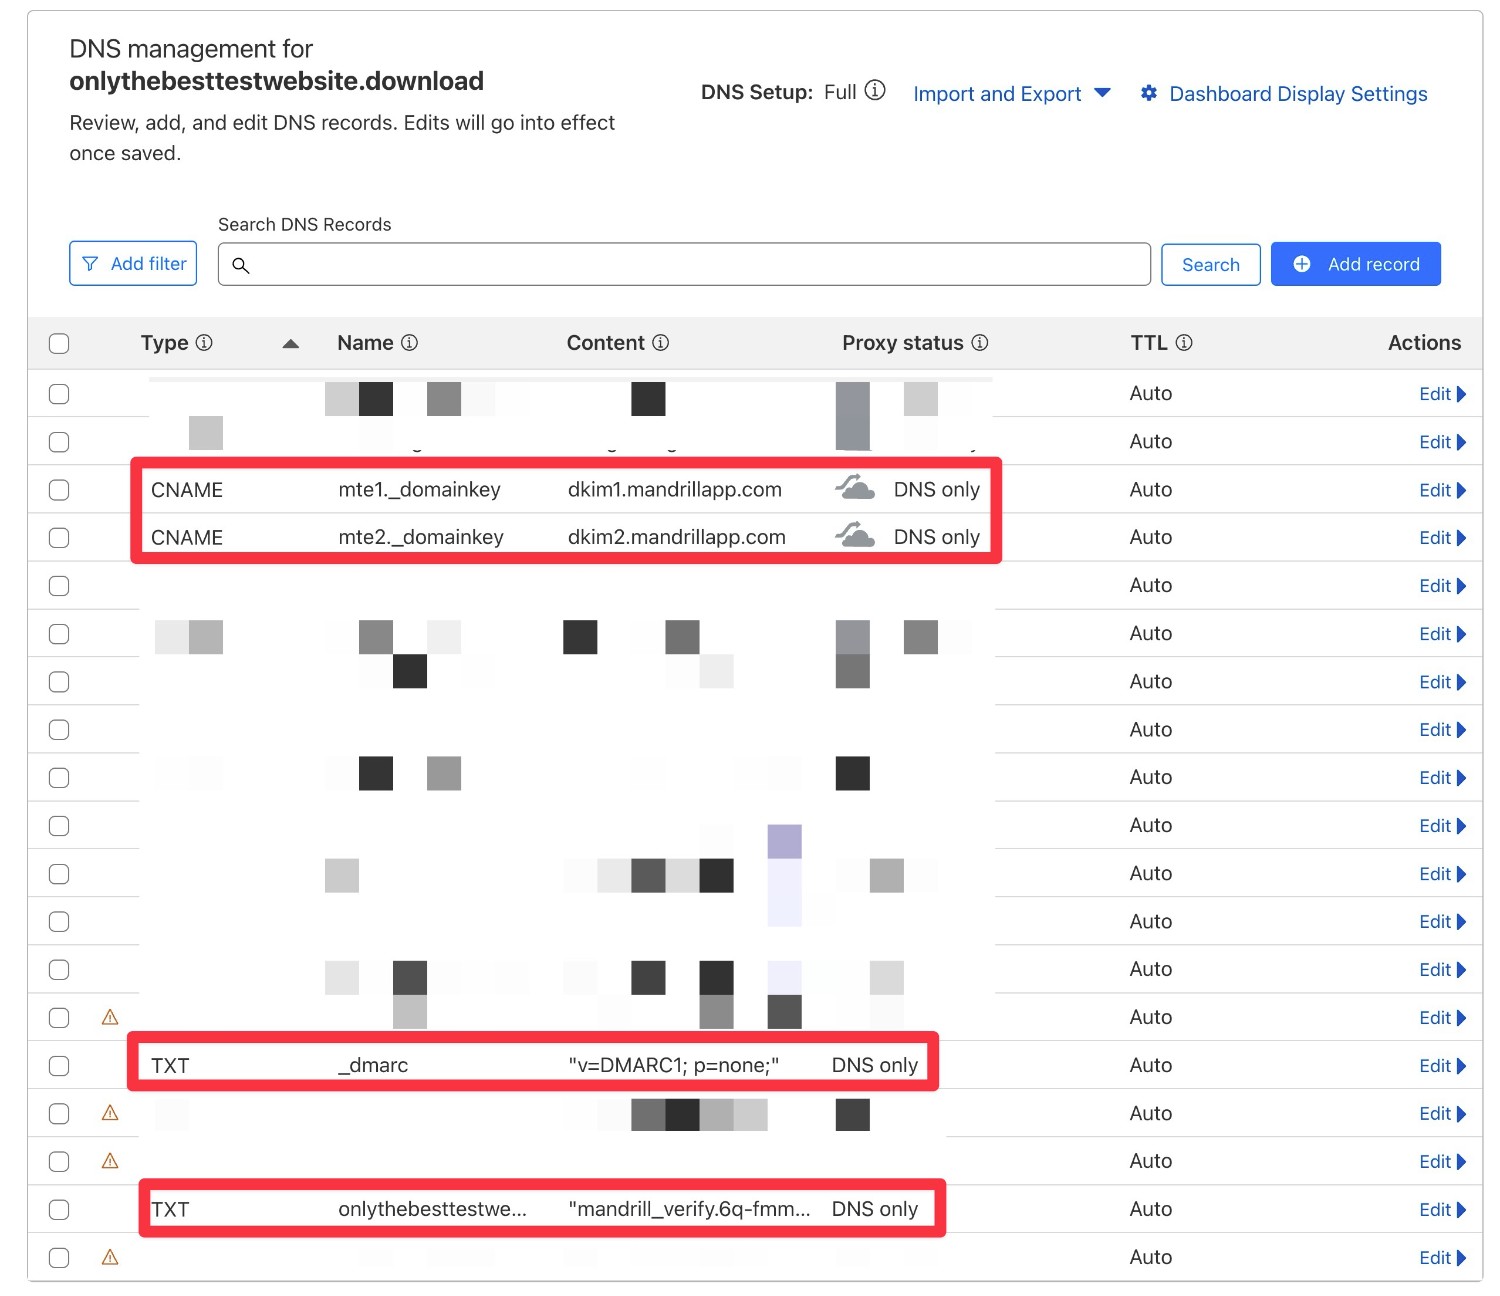
Now, Mailchimp will ask you to add four DNS records to your domain name:
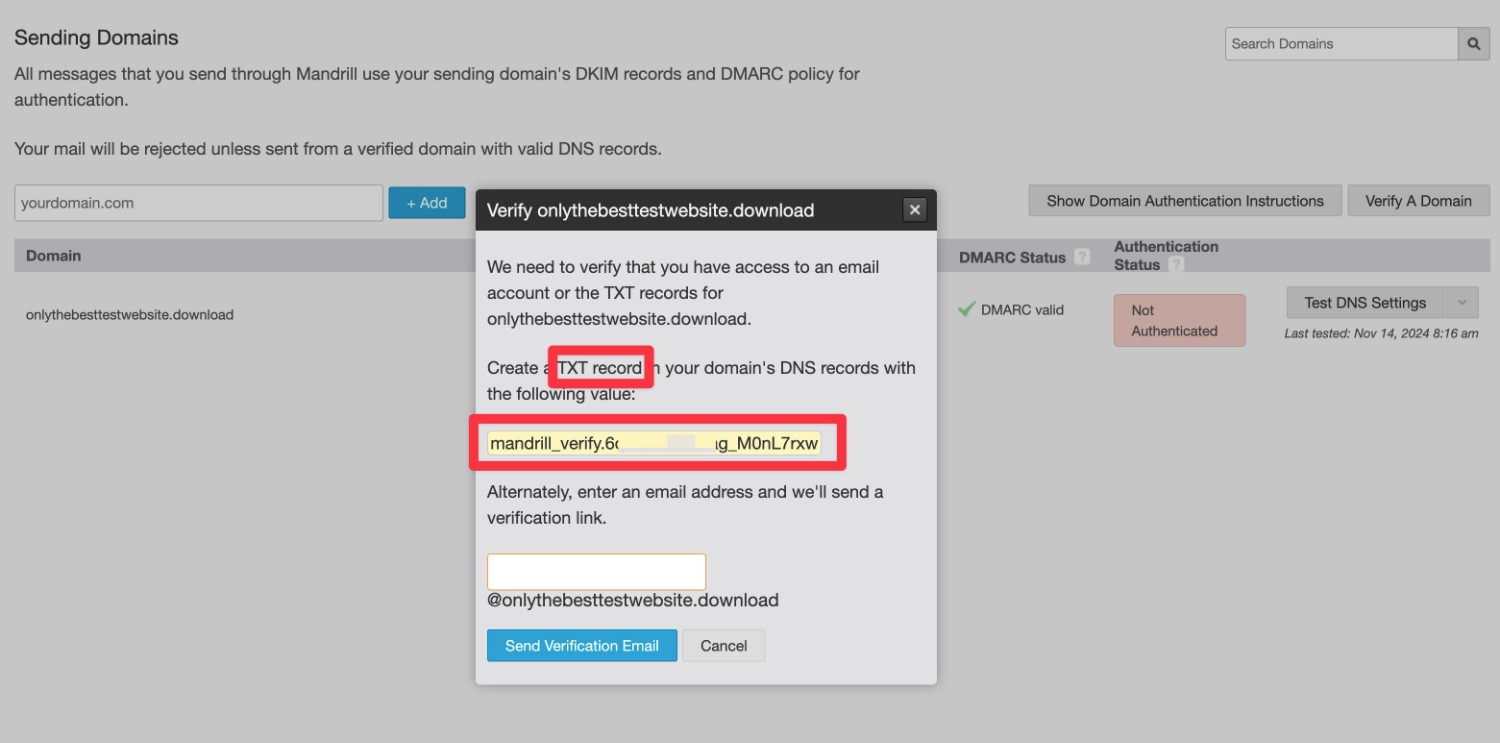
- One TXT record to verify your domain name with Mailchimp.
- Two CNAME records with DKIM settings.
- One TXT record with DMARC.
You’ll need to add these records wherever you manage your domain’s DNS:
- If you’re using your web host’s nameservers, you’ll typically manage DNS records via your hosting dashboard.
- If you pointed your domain name to your host using an A or CNAME record, you’ll usually manage these at your domain registrar.
- If you’re using a reverse proxy service like Cloudflare, you’ll manage these via the Cloudflare dashboard.
To see the records that you need to add, you can click View details underneath each column.
For example, here’s what it looks like if you click View details for the domain verification.
Here’s what it looks like with all four records for our test domain, which is managed at Cloudflare.
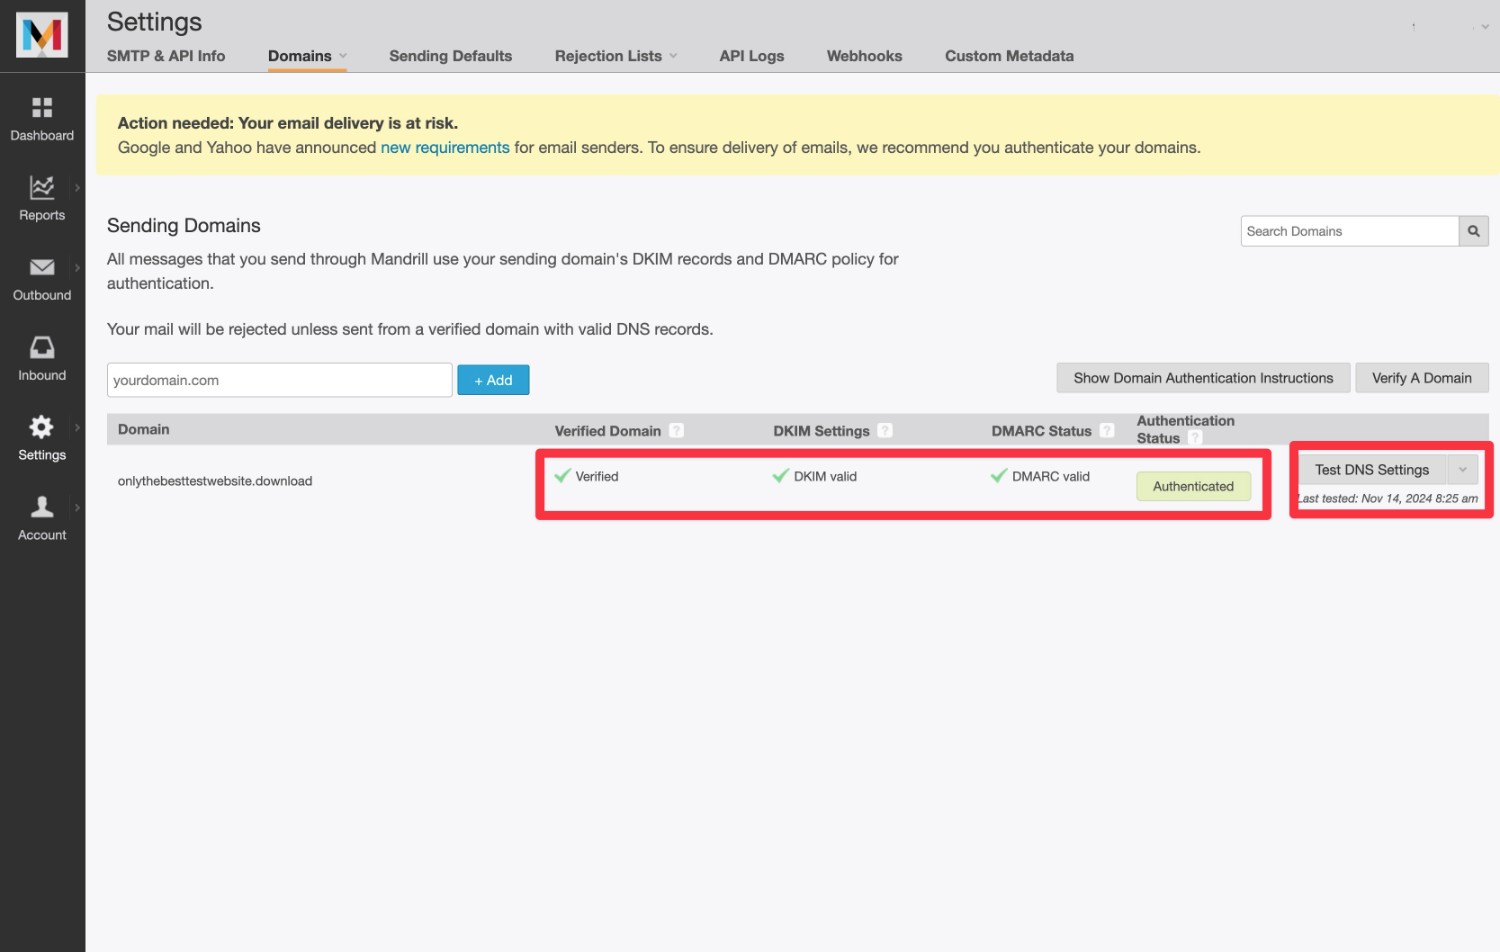
Once you’ve added all four records, click the Test DNS Settings button on the right side.
When you refresh the page, you should then see the Authentication Status change to Authenticated and green checkmarks for each column.
4. Obtain Your Mailchimp Transactional API Key
Next, you’ll need to create a Mailchimp Transactional API key so that Gravity SMTP can connect to Mailchimp.
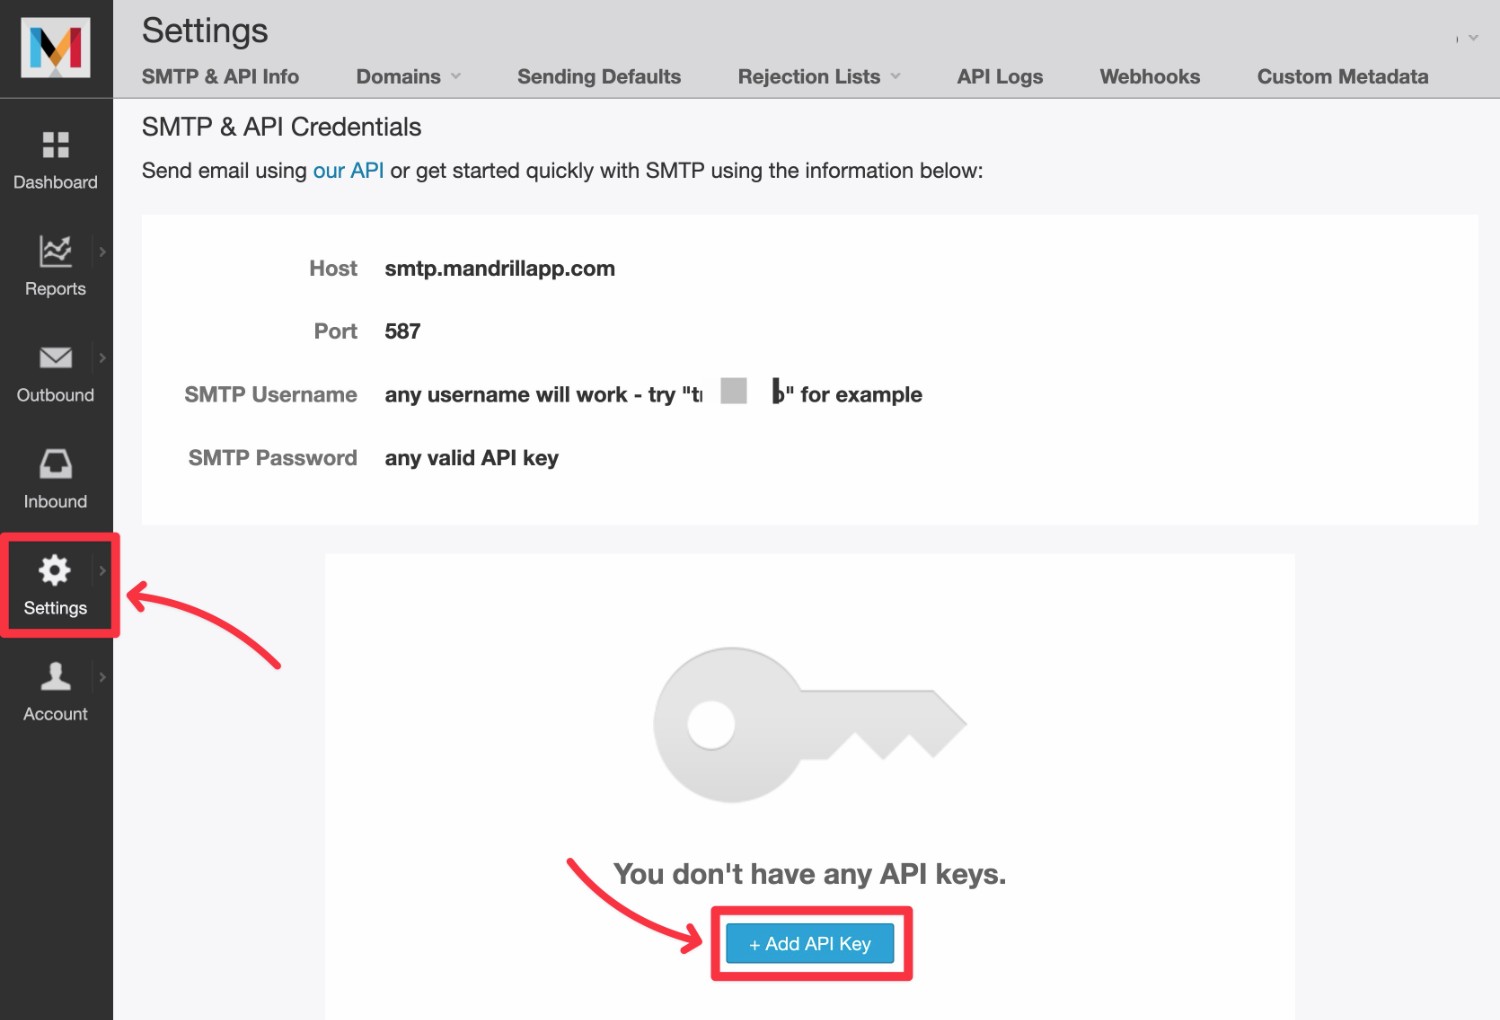
Go to the Settings tab in your Mandrill/Mailchimp Transactional dashboard, or click this link to go straight there.
Then, click the + Add API Key button.
This will display a popup with your API key. Copy this value to a safe spot because you’ll need it in the next step.
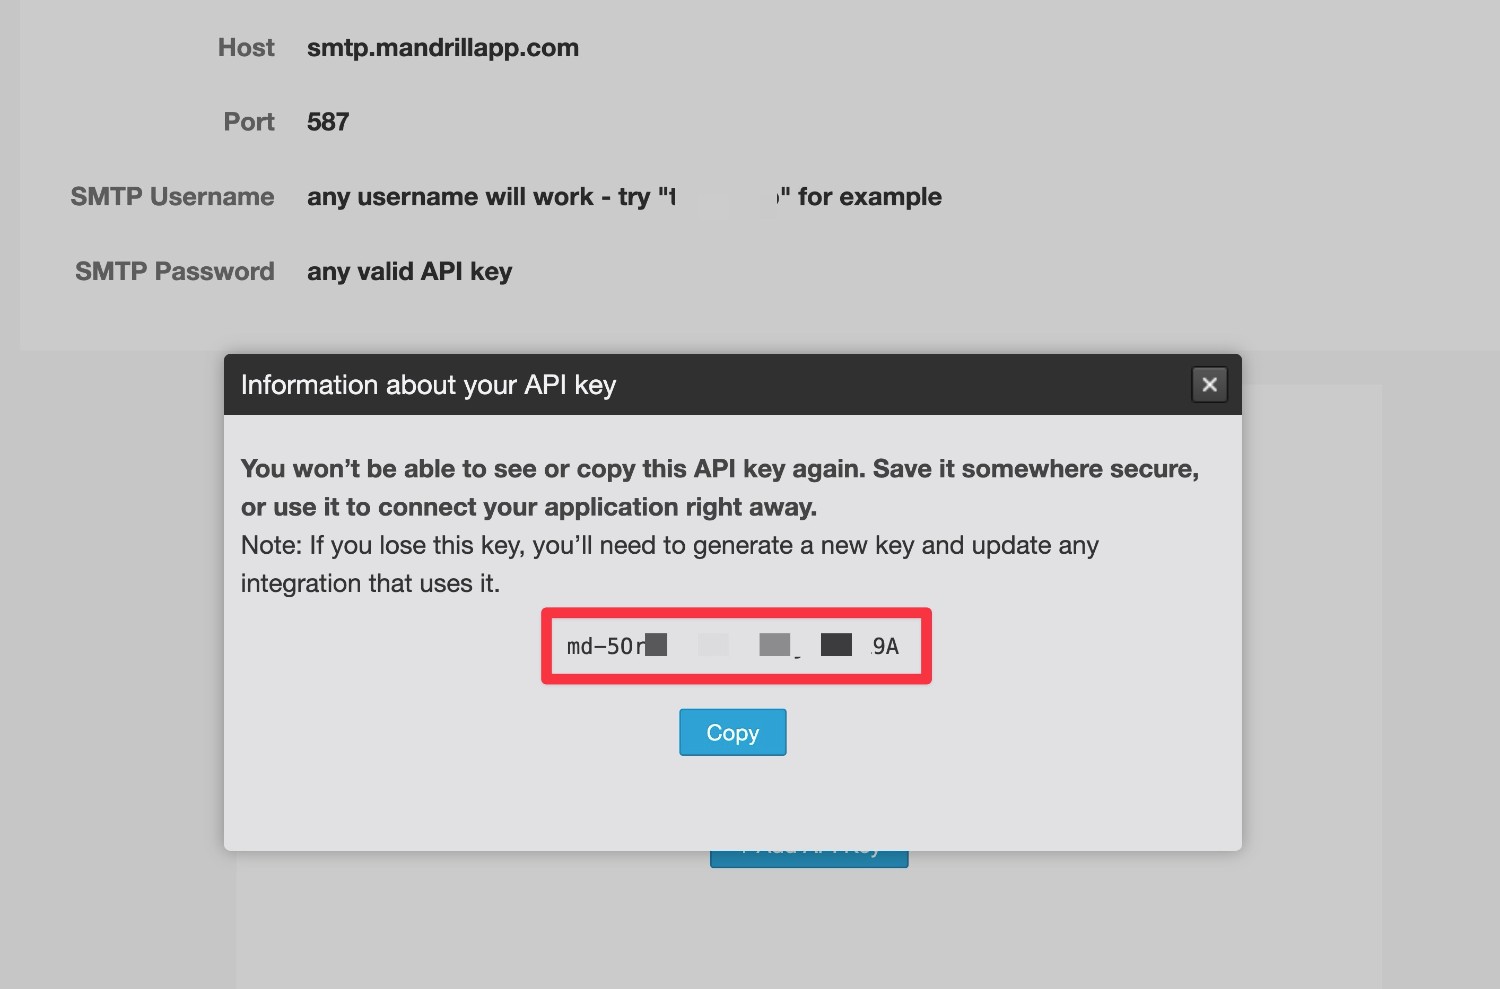
Mailchimp will only display this key once. But don’t worry – if you misplace it, you can just follow the same steps to create a new API key.
5. Connect Gravity SMTP to Mailchimp Transactional
Once you’ve copied your API key to a safe spot, you’ll perform the rest of the setup from your WordPress dashboard.
Here’s how to get started
- Open your WordPress dashboard.
- Go to SMTP → Settings.
- Select the Integrations tab in the Gravity SMTP settings area.
- Click the gear icon next to Mailchimp to open the Mailchimp Transactional settings.
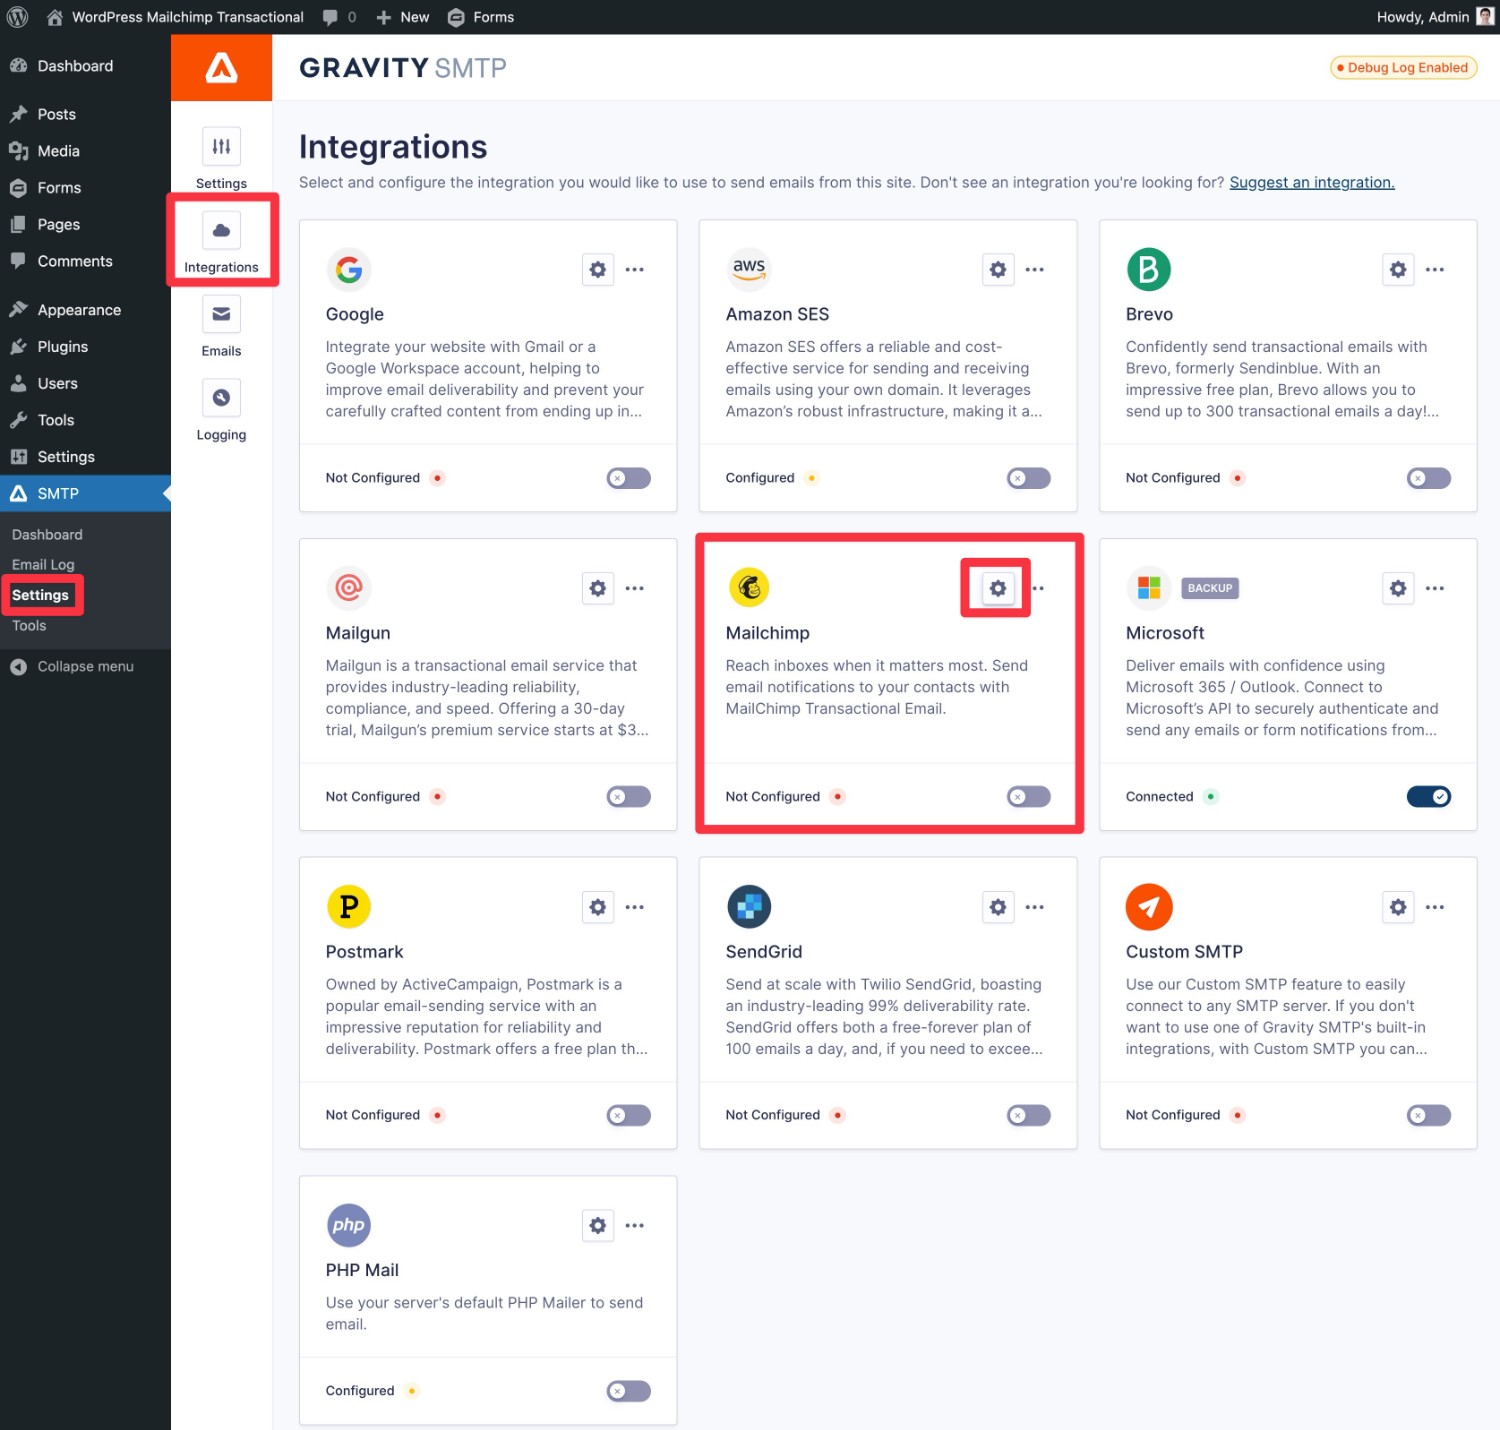
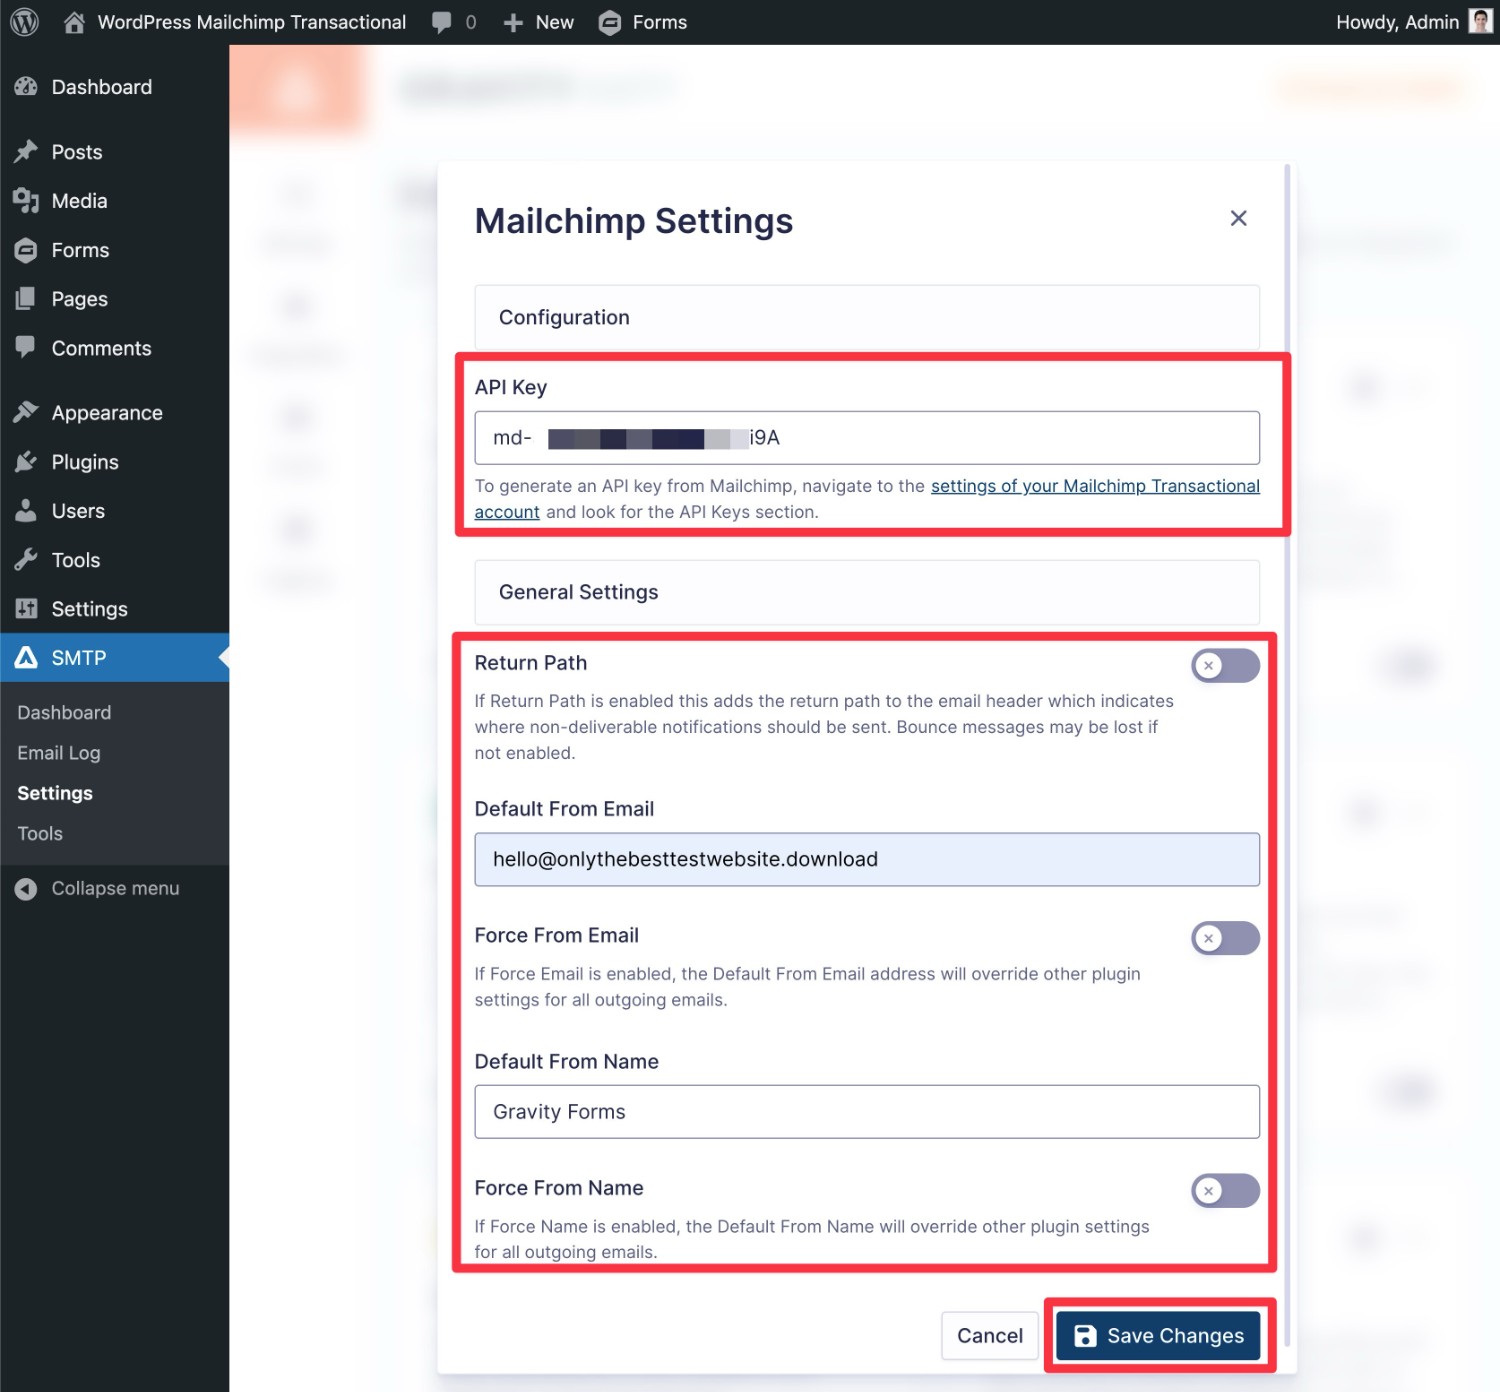
This will expand a popup where you can configure the connection:
- Paste the API key from Mailchimp Transactional into the API Key box.
- Choose whether to enable Return Path, which can help ensure you receive bounced messages.
- Enter the From Email, which is the email address that your site’s emails will appear to be sent from. You can choose any email for the domain that you verified. If you try to set your From Email to an email from a domain name that you have not verified, you will encounter errors when sending emails.
- Enter the From Name, which is the name that your emails will appear to be sent from.
- Choose whether to force other plugins on your site to use these same identifiers to ensure consistency.
To save everything, click Save Changes at the bottom.
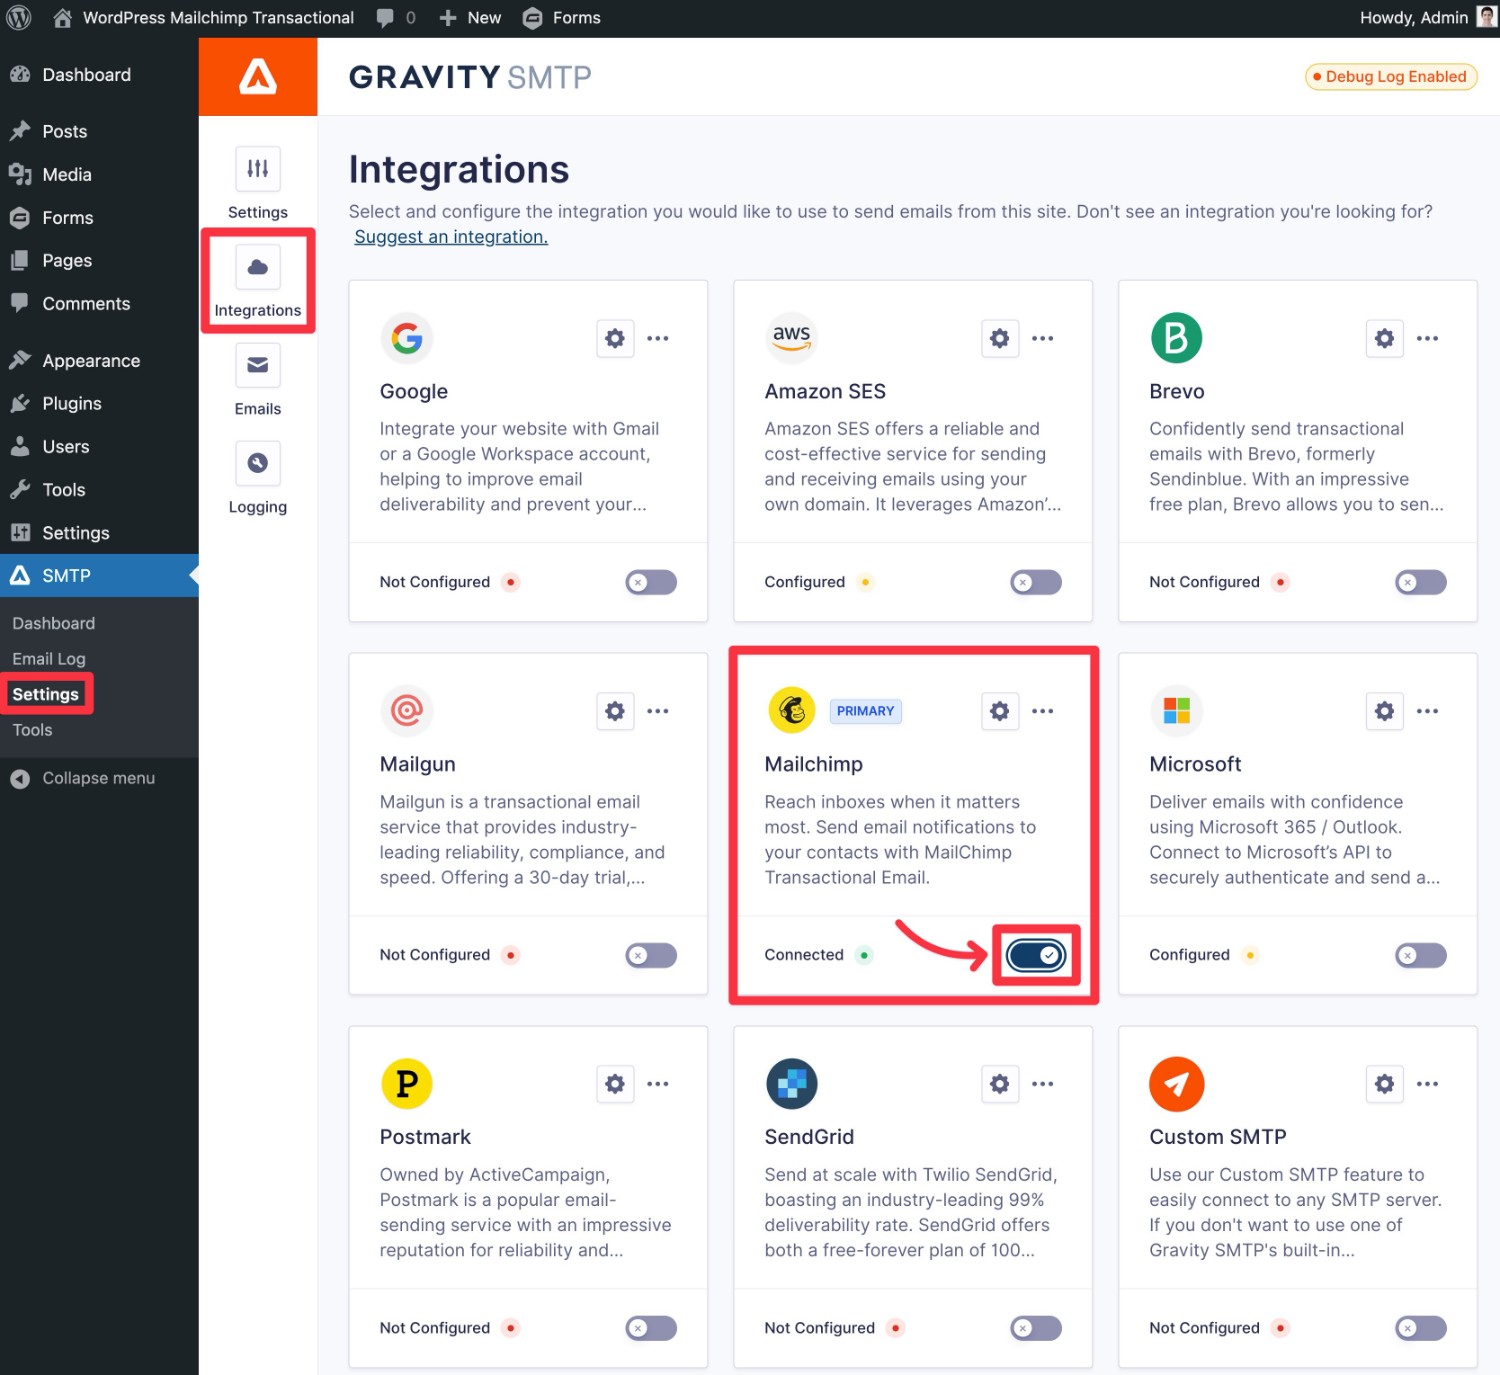
To finish things out, you need to enable Mailchimp Transactional as your site’s primary email sending service.
In the Integrations area, enable the toggle for Mailchimp. This should change the text from Configured to Connected and you should see a Primary label appear next to Mailchimp.
6. Send a Test Email Using Mailchimp Transactional
To make sure everything is working properly, we recommend using Gravity SMTP’s built-in email testing tool to send yourself a test email using Mailchimp:
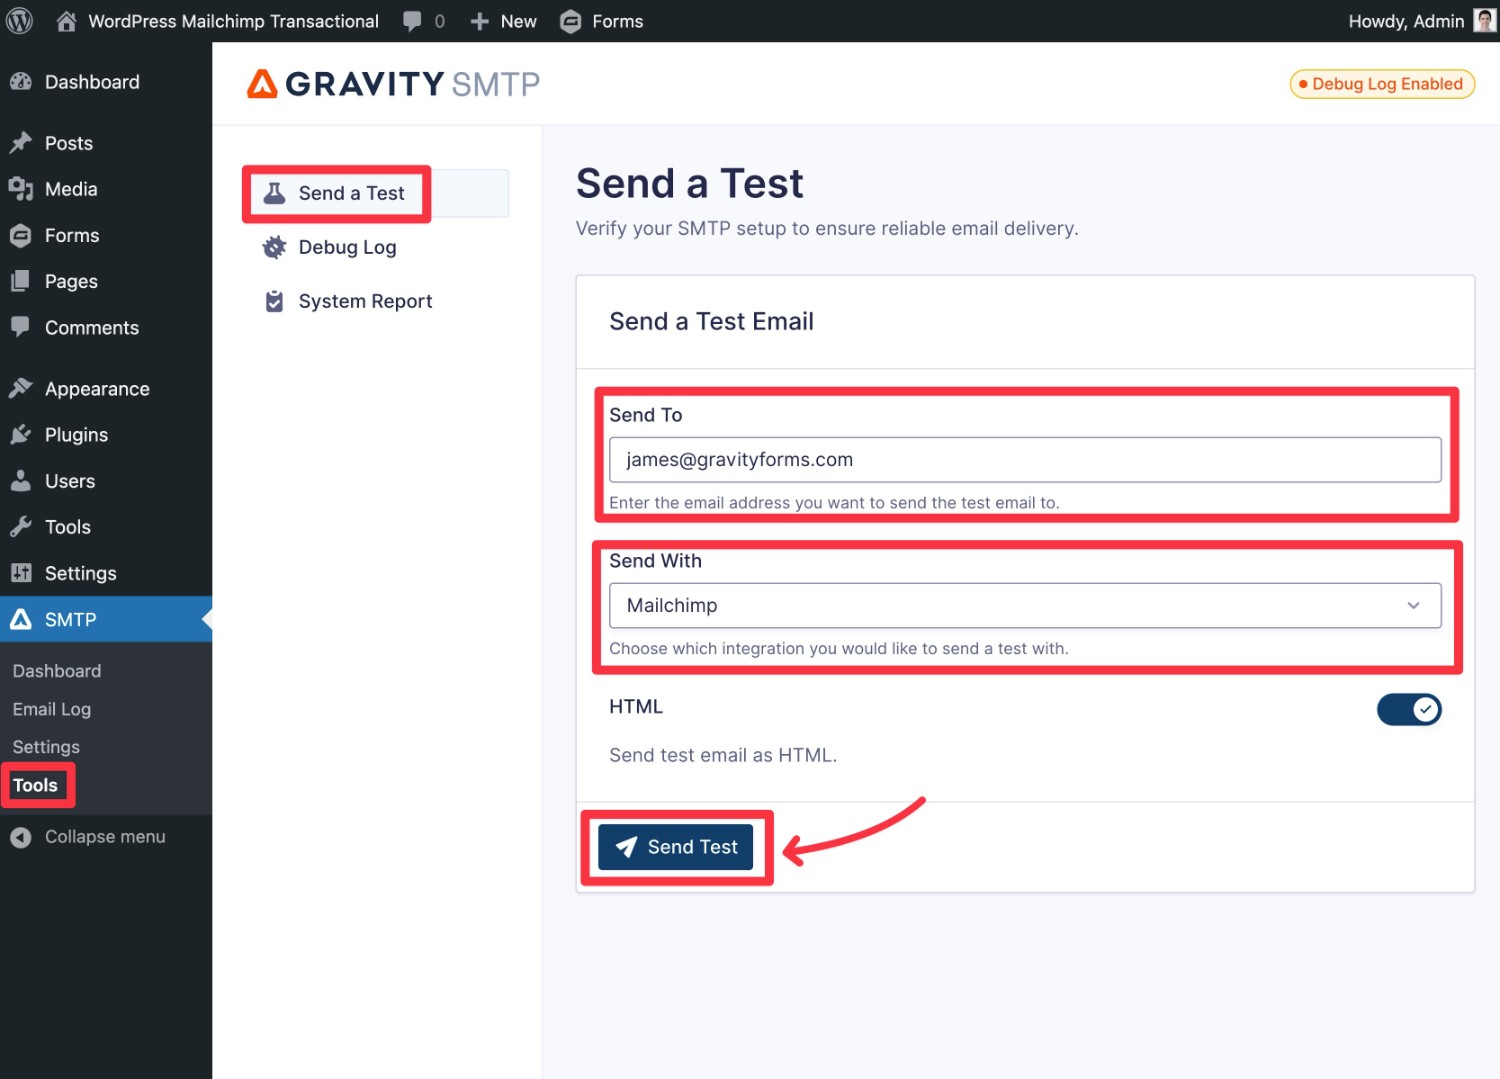
- Go to SMTP → Tools.
- Select the Send a Test tab. This should be selected by default.
- Enter the email address you want to send a test email to in the Send To box. Note – if you’re using the free trial for Mailchimp Transactional, you will only be able to send to email addresses on the domain that you verified with Mailchimp. If you’re paying for Mailchimp Transactional, you can send to any email address.
- Make sure that Mailchimp is selected in the Send With drop-down.
- Click the Send Test button.
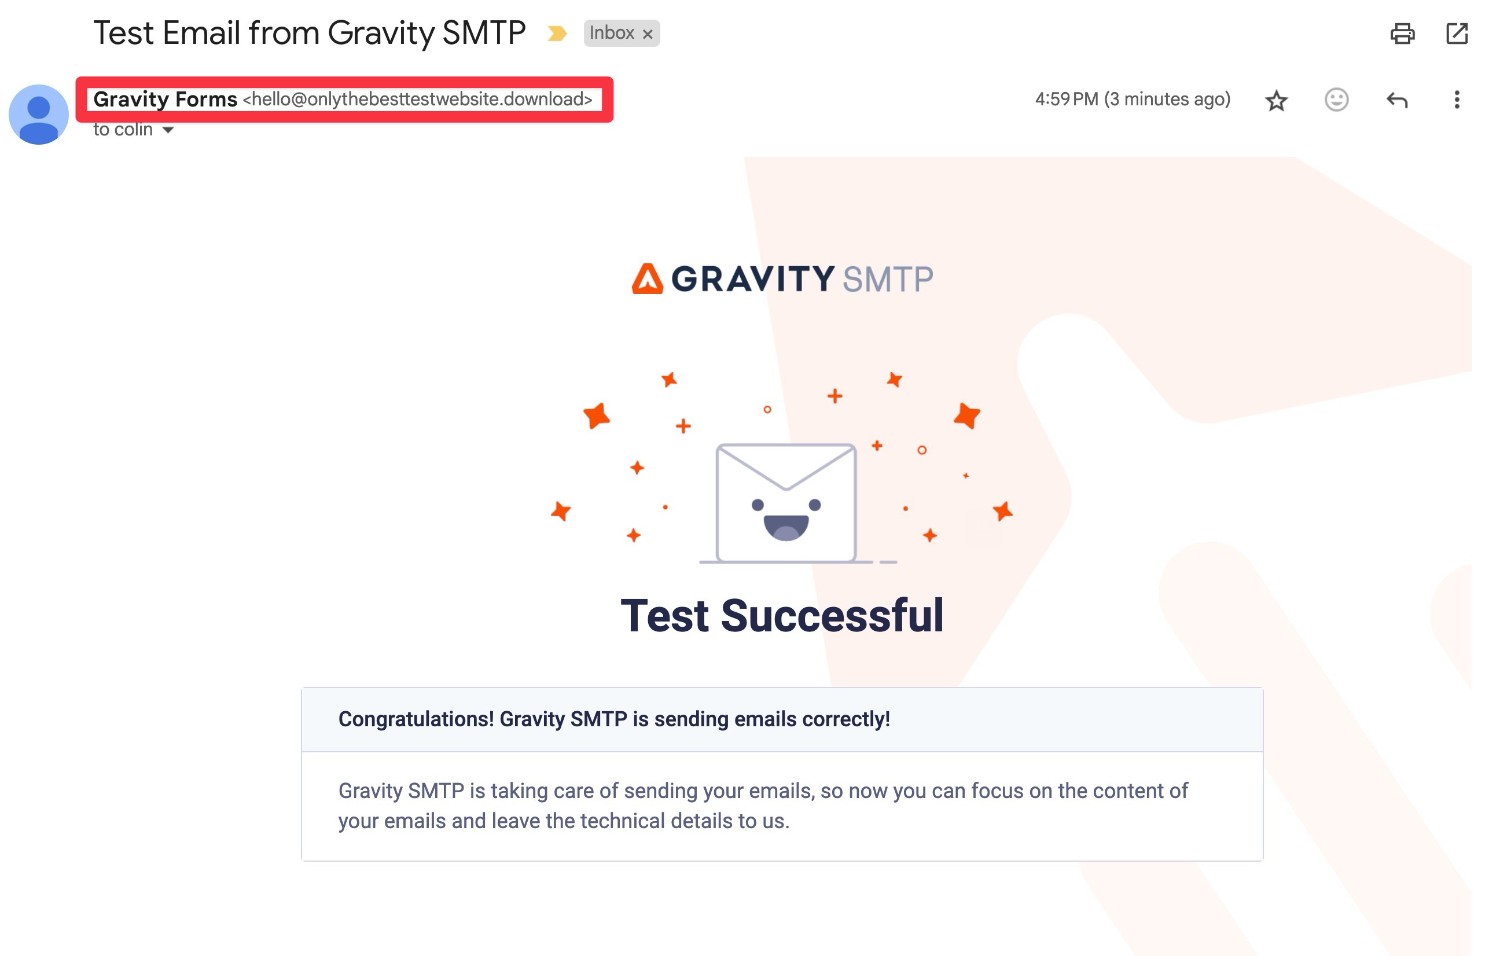
You should see a success message appear in the interface. Then, if you open your email inbox, you should also see an email that looks something like below.
If you encounter an error when sending the email, here are a few things you might want to check:
- If you’re using the free trial and haven’t purchased blocks yet, make sure that the email address that you’re sending the test email to is on the domain name that you verified with Mailchimp. You cannot send to email addresses on other domain names until you pay.
- Make sure that the From Email you chose uses the domain name that you verified with Mailchimp.
- Check whether you copied and pasted the API key correctly. For example, there might be an added character, one character missing, and so on.
7. Set Up a Backup Email Sending Service (Optional)
This step is entirely optional. At this point, your site is properly configured to send all of its emails using Mailchimp Transactional.
However, one of the nice things about using Gravity SMTP to set up transactional email sending is that Gravity SMTP also lets you set up a backup email sending method.
If an email ever fails to send via Mailchimp Transactional for some reason, Gravity SMTP can automatically resend that email using your backup service.
This lets you ensure reliable email deliverability even if Mailchimp were to experience issues.
If you do want to set up a backup email sending service, you first need to connect your site to that service in the Integrations area. We have detailed tutorials for all the APIs that Gravity SMTP supports, but you’re also free to connect to a custom SMTP server:
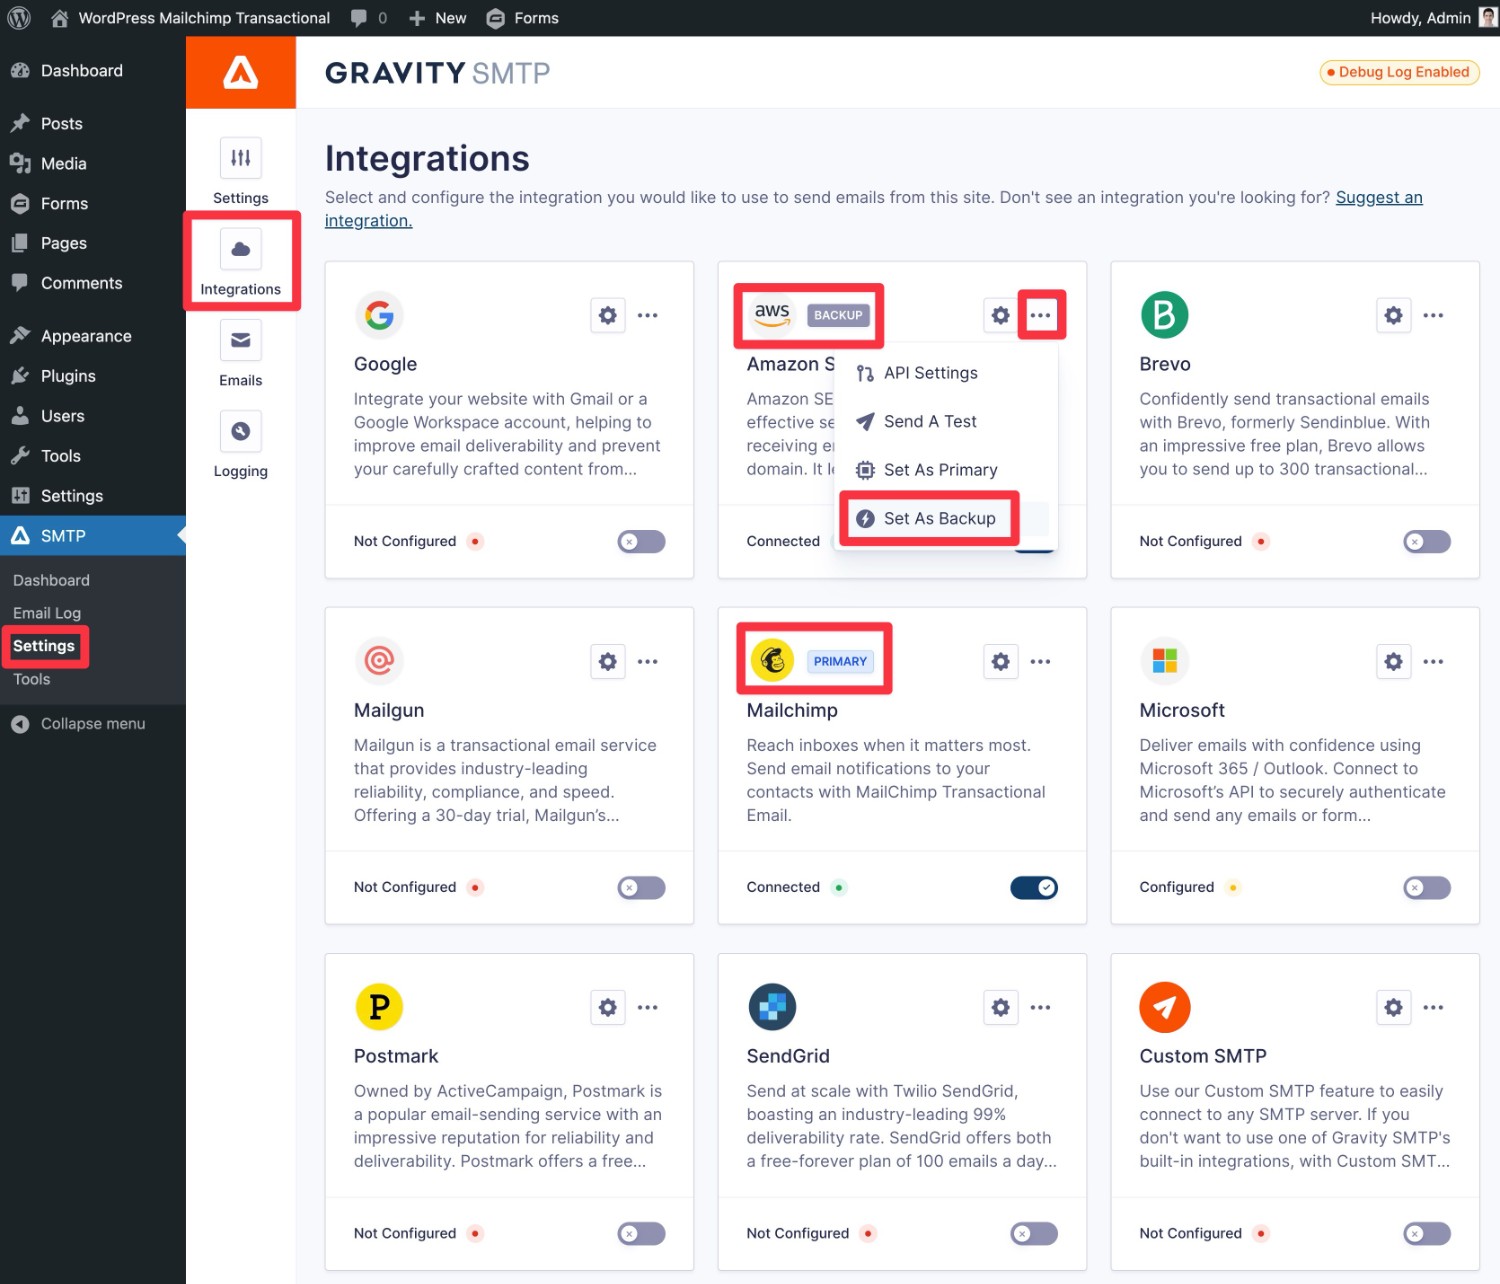
Then, click the three dots icon next to that service in the Integrations area and choose Set as Backup.
In the screenshot below, you can see that we’ve set Mailchimp as the primary sending service with Amazon SES as the backup service.
How to Monitor Your Site’s Emails
To help you stay on top of your site’s transactional emails, Gravity SMTP also includes detailed reporting and logging tools.
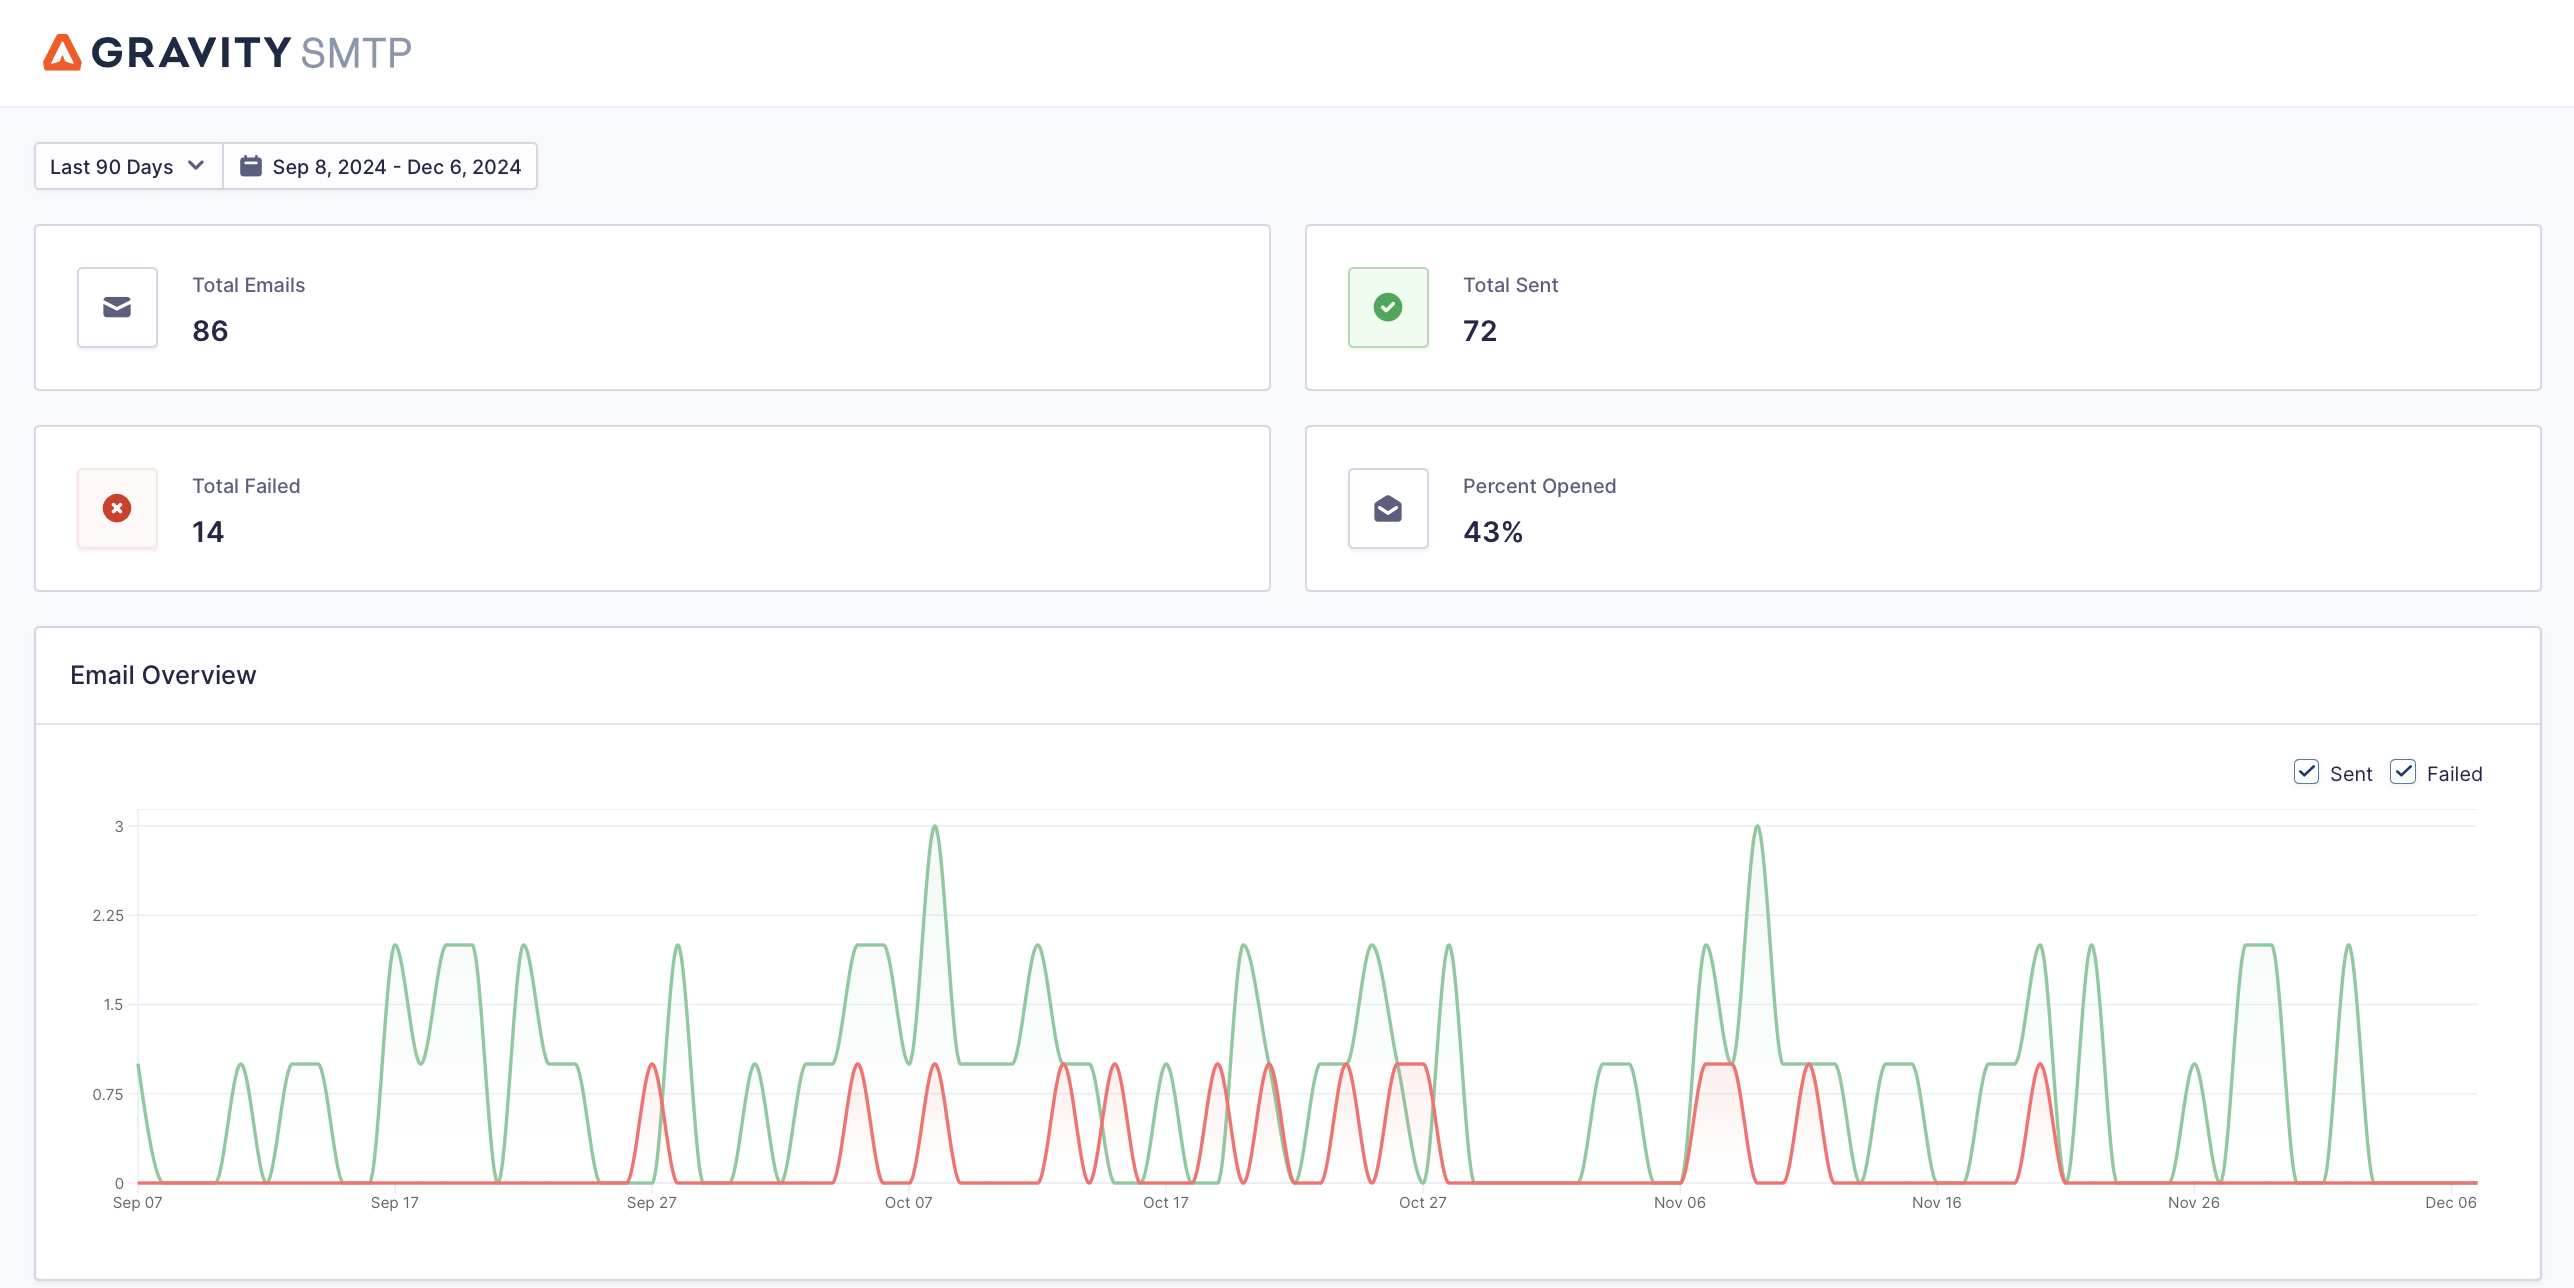
You can use these to track your Mailchimp Transactional usage, see which parts of your site generate the most emails, track email opens, resend emails, view the content of emails, and more.
To view the reports, you can go to SMTP → Dashboard, which includes the following information:
- Total number of emails sent for a given period, along with the status of each email.
- Open rate for your emails (if you’ve enabled open tracking).
- Which parts of your site generate the most emails (e.g. core WordPress software or a specific plugin).
- Top email recipients.
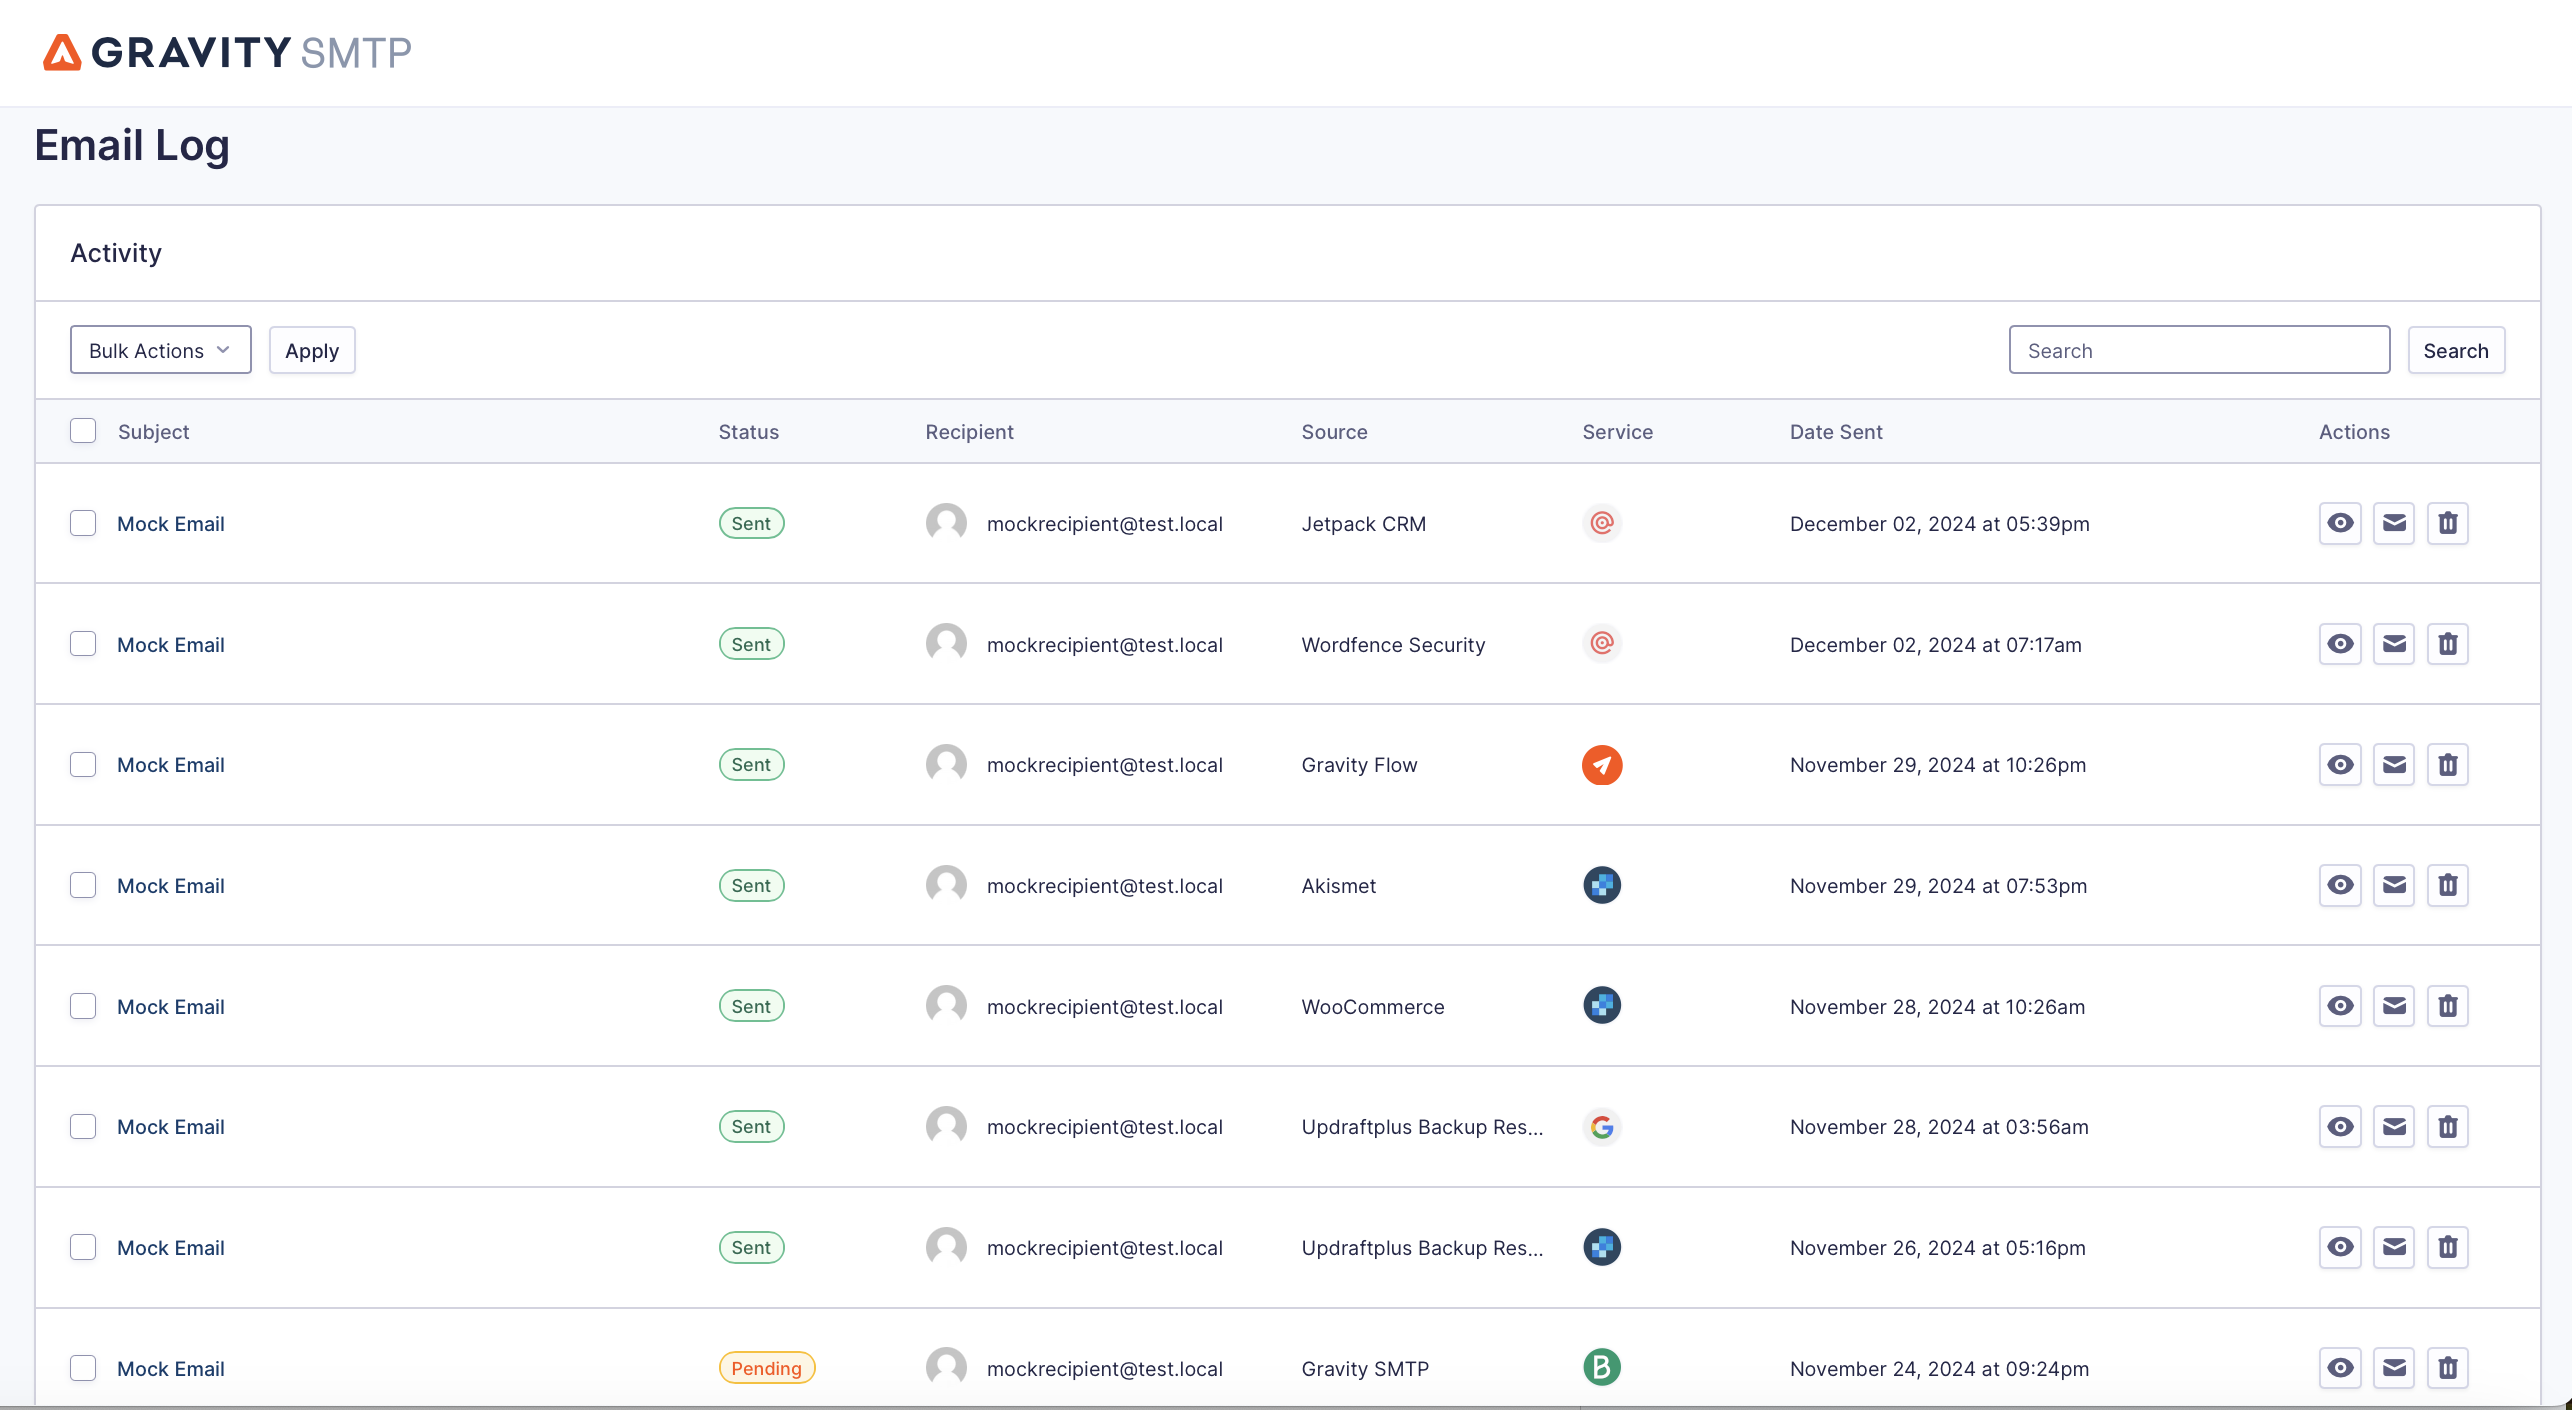
To see the logs, you can go to SMTP → Email Log. You can also use the buttons in the Actions column to view more technical information about a specific email and/or see the actual content of an email.
If you go to SMTP → Settings → Logging, you can control everything about how the log features work, including the following:
- Whether to log email content and/or attachments.
- Whether to track email opens.
- How long to store the log.
Get Started With Mailchimp Transactional Today
That wraps up our guide on using Gravity SMTP to set up Mailchimp Transactional email sending.
If you’re using Mailchimp for your marketing efforts (or are interested in doing so), adding Mailchimp Transactional lets you keep the same service for all of your site’s emails.
With Gravity SMTP, you can easily connect your WordPress site to Mailchimp Transactional Email, while also accessing helpful features such as email reporting and detailed email logging.
If you’re ready to get started, install Gravity SMTP today. Then, follow this guide to connect your site to Mailchimp Transactional Email.

If you want to keep up-to-date with what’s happening on the blog sign up for the Gravity Forms newsletter!

