How to Send WordPress Emails with Microsoft 365 / Outlook
Looking for an easy way to configure your WordPress site to send its emails using Outlook/Microsoft 365?
While Outlook might not be the best solution for every WordPress site’s emails, it can be a very cost-effective option for sites that aren’t sending mission-critical, user-facing emails.
In this post, we’ll explain when and why it might make sense to use Microsoft 365/Outlook to send your WordPress site’s emails.
Then, we’ll show you step-by-step how to set up everything using the Gravity SMTP plugin – no technical knowledge needed!
Let’s dig in…
Who Should Use Microsoft 365/Outlook for Emails?
While using Microsoft 365/Outlook to send your WordPress site’s emails can be a very cost-effective solution because of its generous free sending limits, we don’t recommend this setup for all websites.
The main advantages of using Outlook are that it’s free to use and it has a very high daily email sending limit. You can send up to 10,000 emails per day (technically, per rolling 24-hour period), which is significantly higher than the free plan from any transactional email sending service.
Note – this limit might be lower for brand new Outlook accounts. Microsoft will automatically raise it once you’ve established your account as genuine.
However, there are also some issues with exclusively relying on it for your WordPress transactional emails:
- Sending transactional emails is not the primary purpose of Microsoft 365/Outlook. In contrast, services like SendGrid, Mailgun, or Postmark are specifically designed for reliably sending transactional emails.
- Microsoft throttles the emails that your site can send in a short period, at around 30 emails per minute.
Because of those issues, we don’t recommend using Outlook for mission-critical transactional emails and/or high-volume sending.
For example, if you’re looking for a solution to send your online course’s enrollment emails, you should consider a more focused transactional email service like Postmark, SendGrid, or Mailgun.
On the other hand, if you’re primarily looking for a cost-effective solution to send emails to yourself or members of your team, that’s where this setup could be a good option. While those types of emails are still important, they’re not so important that a single hiccup could have materially negative effects on your business.
Because you’re sending emails to yourself, you can also set up filters in your email client to make sure that the emails don’t get flagged as spam (which can sometimes happen when using Outlook for WordPress emails).
In these cases, using Outlook is still better than the default wp_mail method and it won’t cost you any money.
How to Configure WordPress to Send Emails Using Outlook/Microsoft 365
Like using Gmail for WordPress emails, setting up Outlook/Microsoft 365 is a little more involved than a dedicated email sending service (like SendGrid, Mailgun, or Postmark).
Rather than just adding an API key like those other services, you’ll need to create an “app” in Microsoft Azure before you can connect your site. Microsoft Azure is Microsoft’s brand for cloud services, similar to Google Cloud and AWS.
Don’t worry, though. While “creating an app” sounds like something that’s complex and only for developers, it’s not. Pretty much all you’ll do is click a bunch of buttons in the Microsoft Azure interface, and we’ll provide lots of screenshots for the entire process.
The entire process of creating the app will probably take you around 5-15 minutes, depending on how familiar you are with the Microsoft Azure interface.
Once you create your web app in Microsoft Azure, the rest of the setup process is pretty straightforward and will only take a few minutes.
1. Create a Microsoft Account (If You Don’t Already Have One)
If you already have a Microsoft account, you can skip ahead to the next step.
However, if you don’t have a Microsoft account yet, you’ll want to create one before continuing.
This is the account that you’ll use to send your site’s emails. It’s also the account that you’ll use to create your app in Azure.
You’re totally fine to use a free Microsoft/Outlook account. Or, if you already have a paid Microsoft 365 account, you can also use that for WordPress emails.
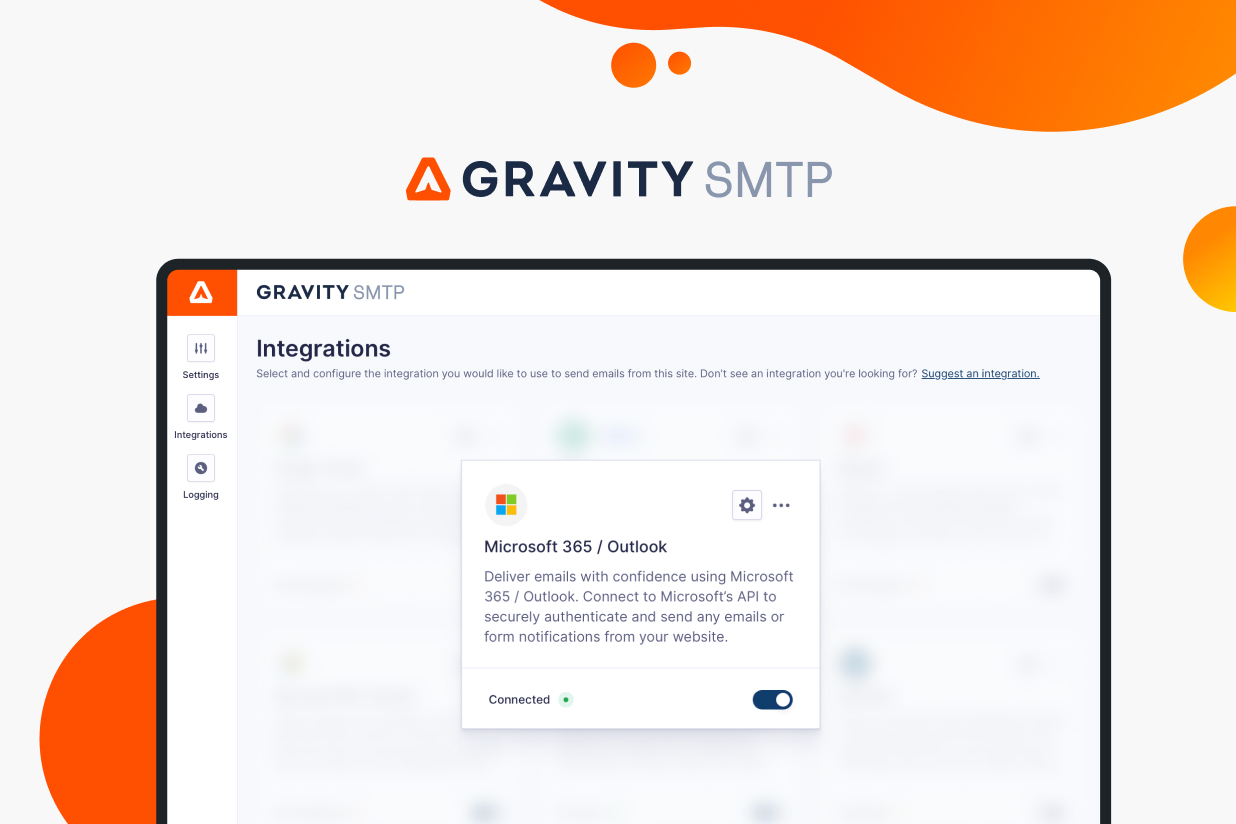
2. Install the Gravity SMTP Plugin on Your WordPress Site
Before you continue working in your Microsoft account, you’ll next want to install and activate the Gravity SMTP plugin on the WordPress site where you want to use Microsoft 365 for emails.
This is because you’ll need to copy a value from the plugin’s settings when you’re setting up your app in Microsoft Azure.
Currently, Gravity SMTP is available at no extra cost to anyone holding the Gravity Forms Elite license. It’s a completely standalone plugin so you do not need to have Gravity Forms installed to use Gravity SMTP (though Gravity SMTP is a great solution for sending your form notification emails).
If you’re holding the Elite license, you can download Gravity SMTP from your Gravity Forms My Account area. You can then install the plugin by uploading the Zip file, just like any other plugin.
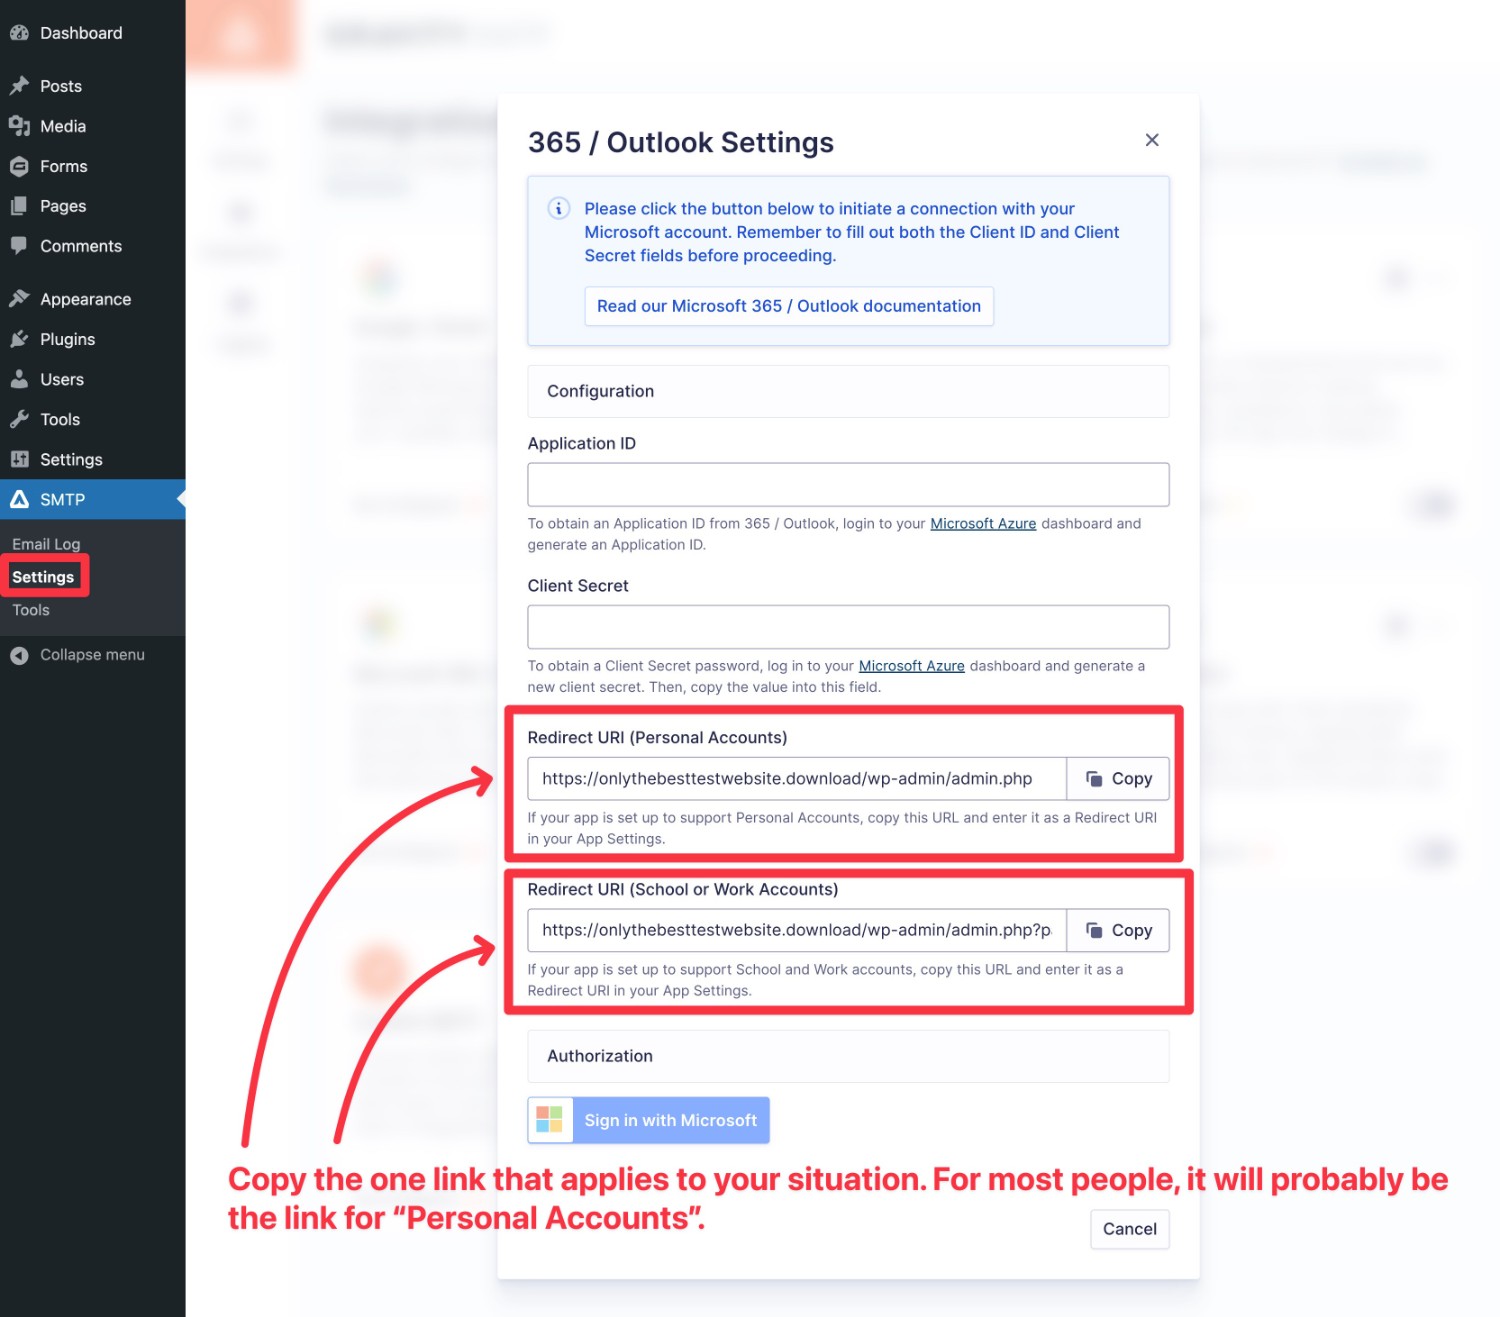
Once you activate the plugin, you need to locate the Redirect URI for Outlook/Microsoft 365, as you’ll need this piece of information when setting up your Azure app in the next step.
Here’s how to find it:
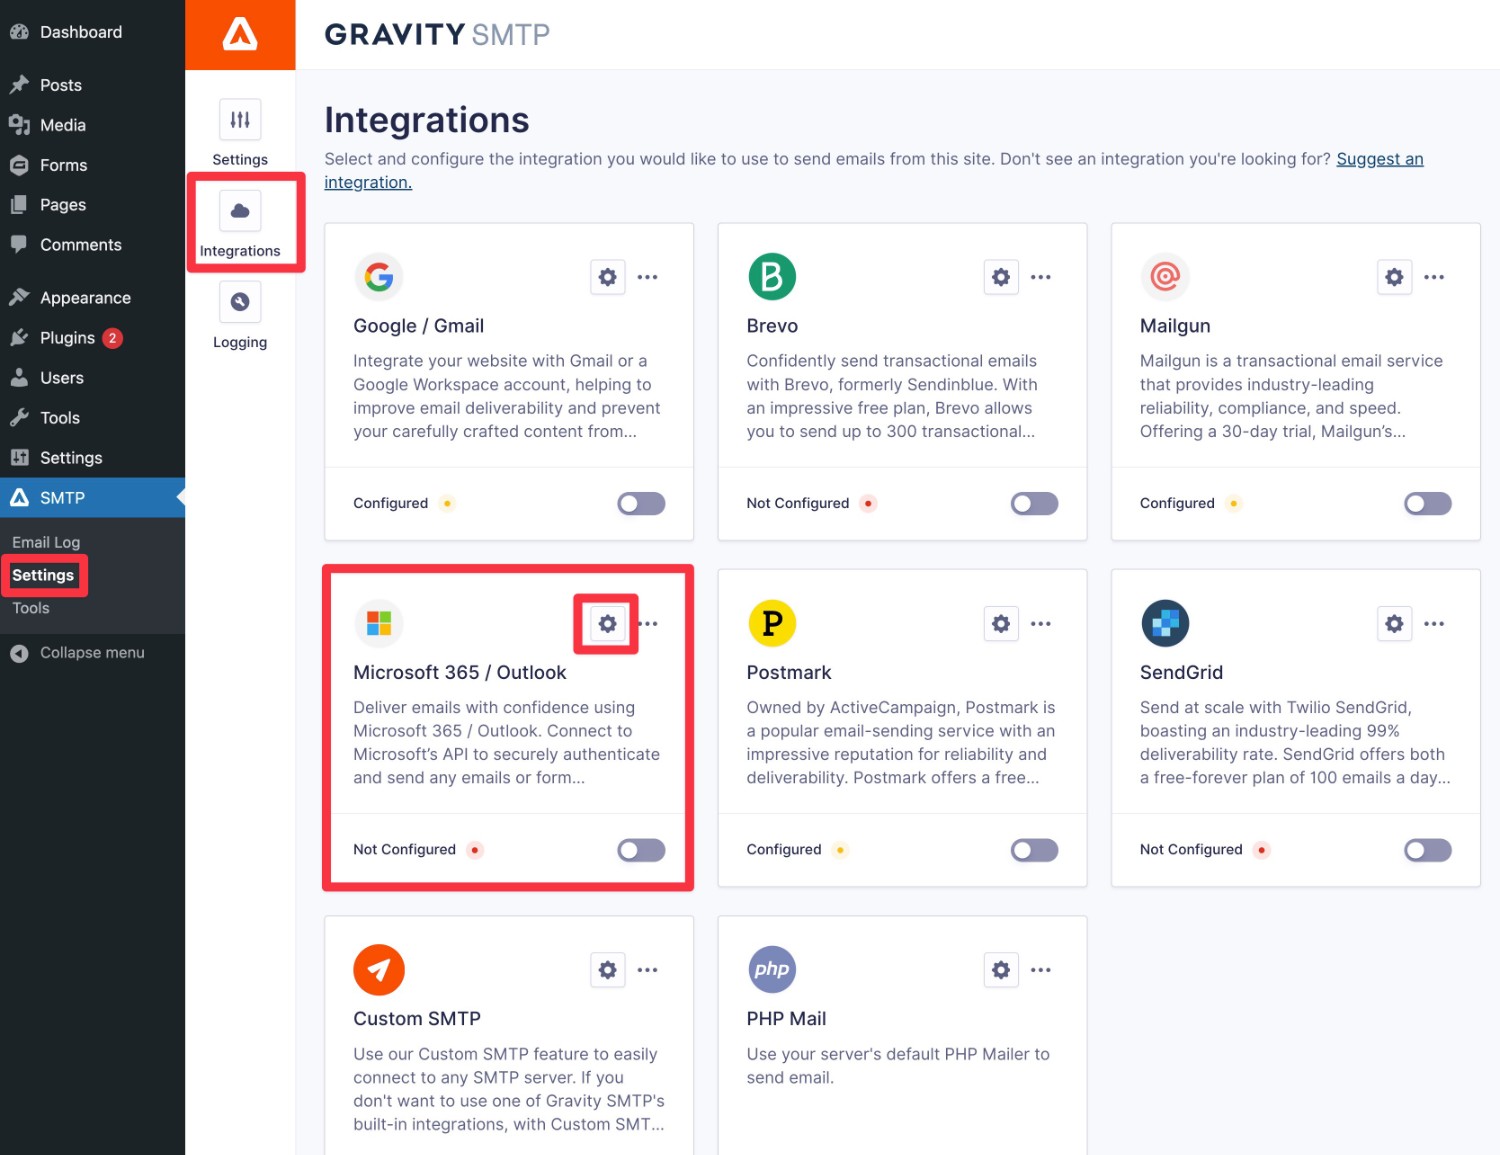
- Go to SMTP → Settings in your WordPress dashboard.
- Select the Integrations tab in the Gravity SMTP settings area.
- Click on the gear icon next to Microsoft 365 / Outlook to open its settings.
- Copy the relevant value in the Redirect URI box to a safe place because you’ll need this in the next step. For most people, you should use the Redirect URI (Personal Accounts) option. However, if your Microsoft account is via School or Work, you should copy that value instead. You only need the one link that applies to your situation – you do not need to copy both Redirect URI links.
3. Create Your Web App in Microsoft Azure Portal
Now, it’s time for the most time-consuming step of the entire setup process – creating your web app in Microsoft Azure.
Again, you do not need technical knowledge to set this up. But you will need to click a lot of buttons to set up everything that you need.
Open Azure Portal
To begin, click this link to open the Microsoft Azure Portal.
You can use your existing Microsoft account in Azure – there’s no need to create a separate account just for Azure.
Create a New App Registration
Now, you’ll create your app registration for your email sending application.
To open the relevant dashboard, search for “App registrations” in the search box on the top menu bar. Then, select the App registrations result in the live search suggestions.
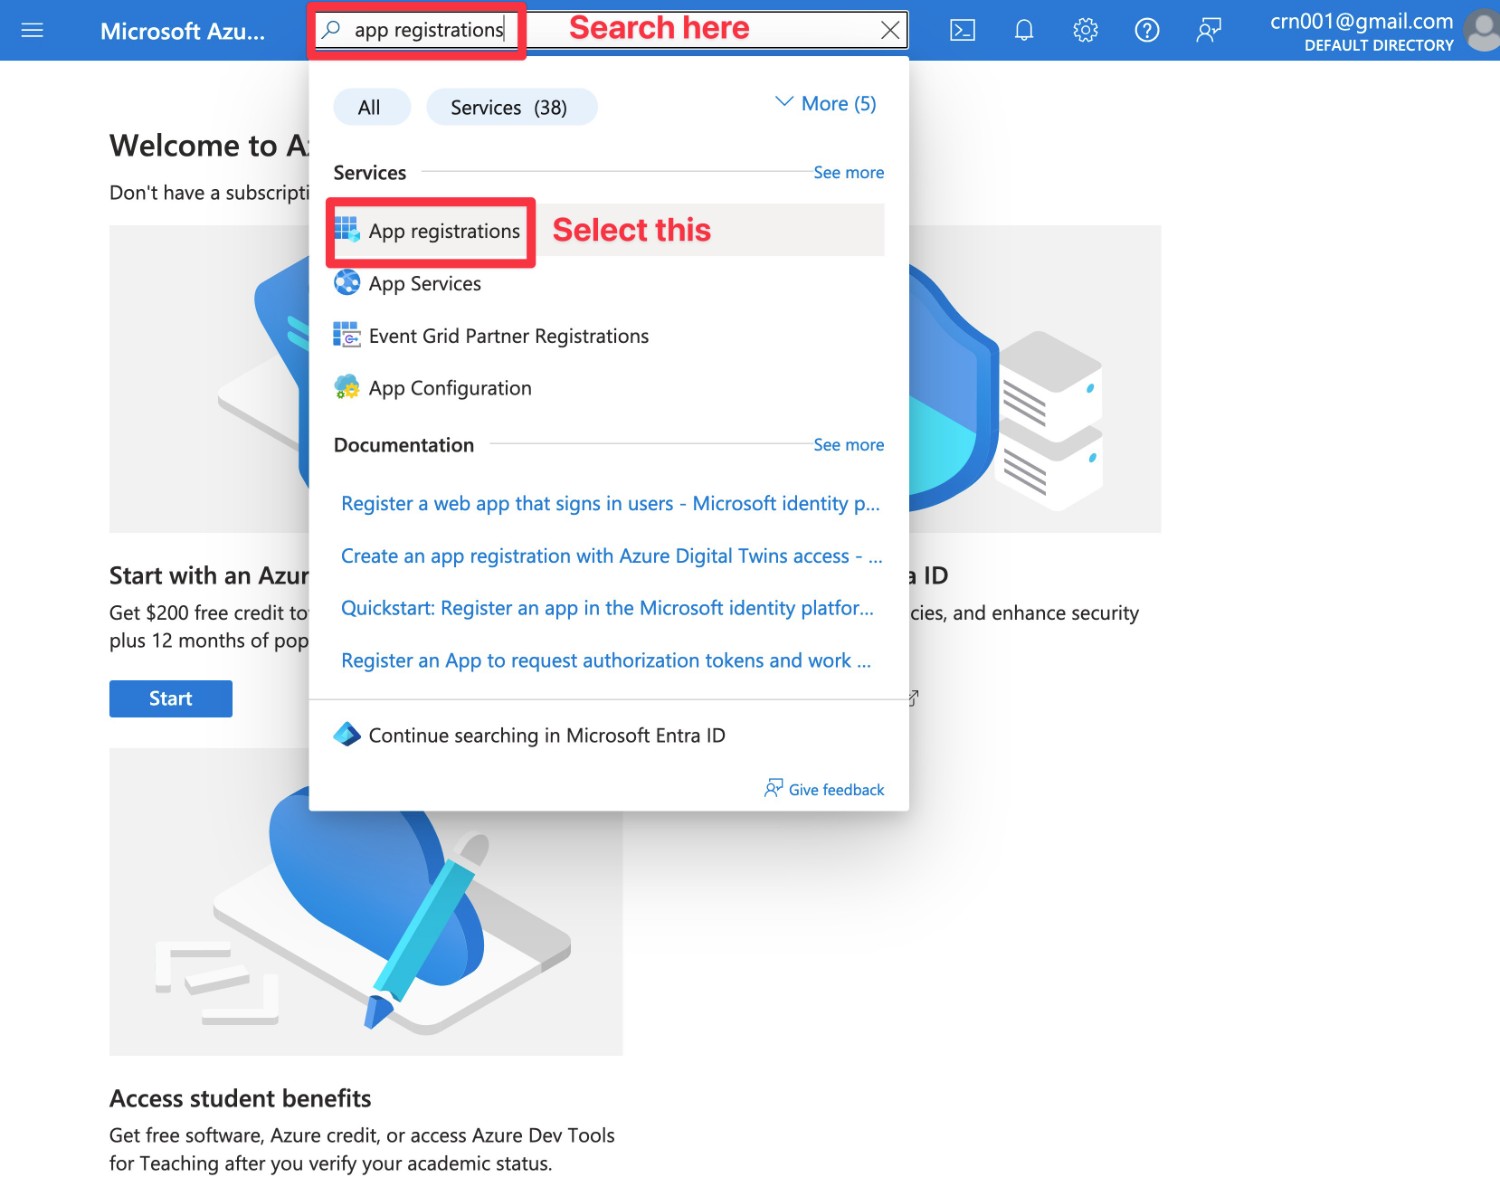
Once you’re in the App registrations interface, click the + New registration link to create your app.
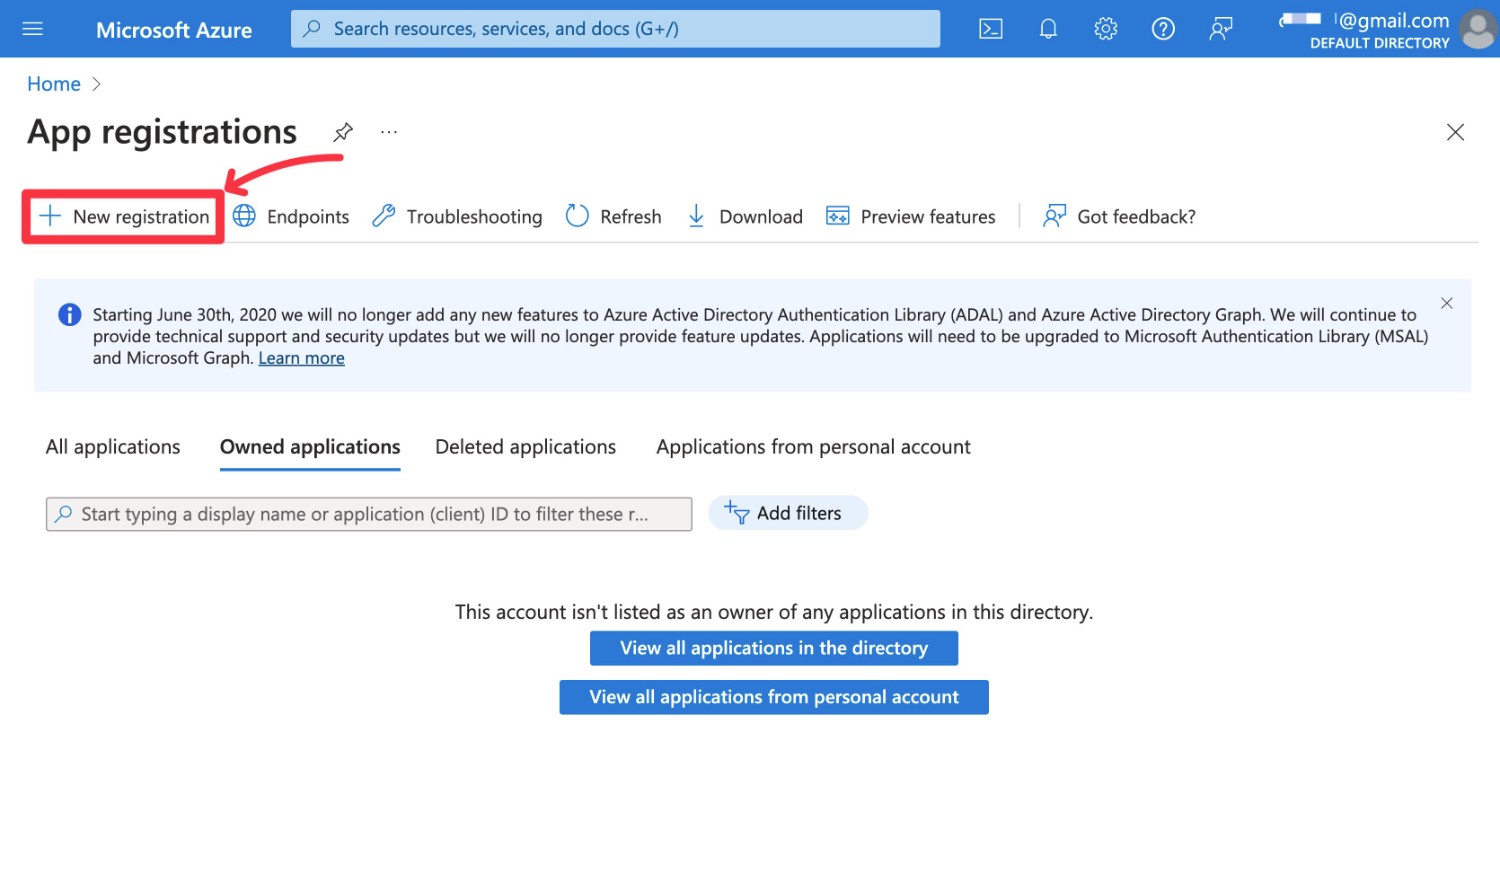
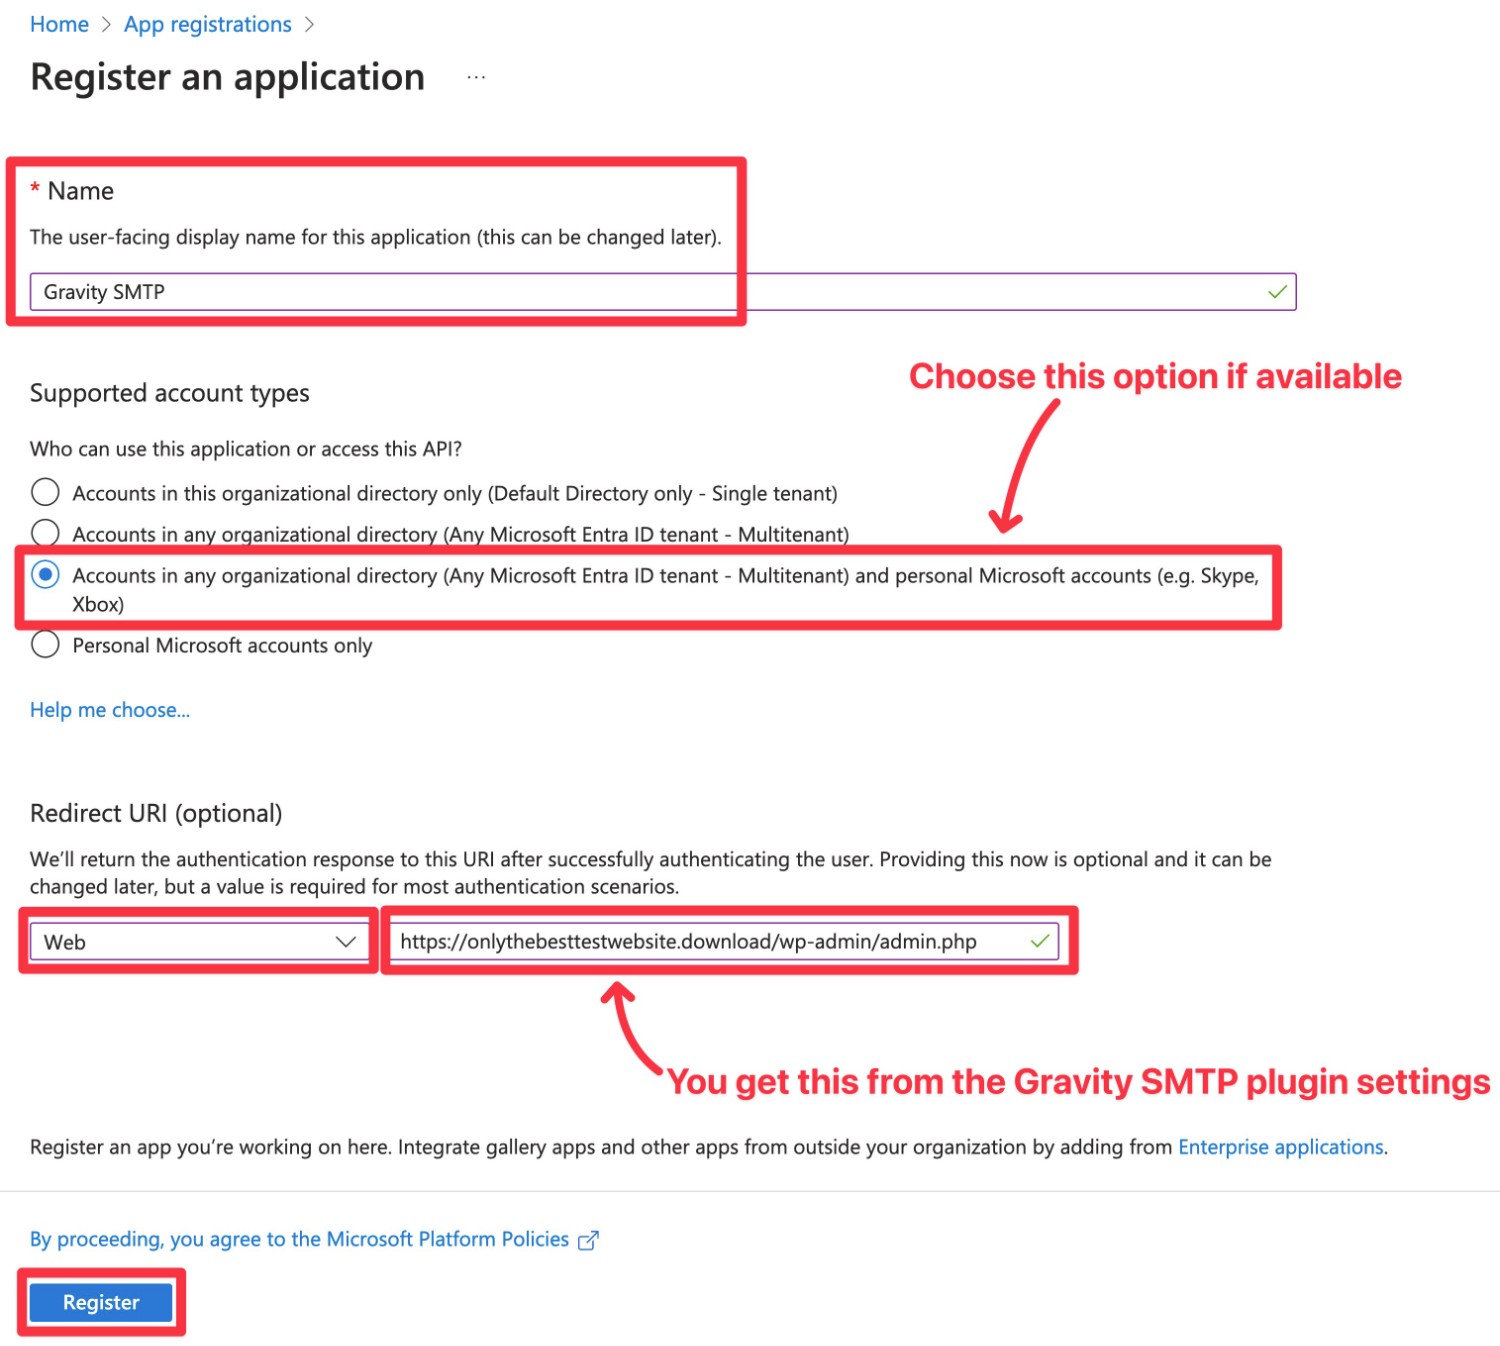
This should open a new interface where you’ll need to add a few details:
- Name – entering “Gravity SMTP” is a good option.
- Supported account types – choose “Accounts in any organizational directory and personal Microsoft accounts” if you see it as an option. If you don’t see that, you can also choose “Accounts in any organizational directory (Any Azure AD – Multitenant)”.
- Redirect URI – use the drop-down to select Web. Then, paste in the Redirect URI that you got from the Gravity SMTP plugin settings in your WordPress dashboard (the one that we told you to save in a safe place in the previous step). Again, most people will use the Redirect URI (Personal Accounts) link from the Gravity SMTP settings.
Once you’ve entered that information, click the Register button at the bottom.
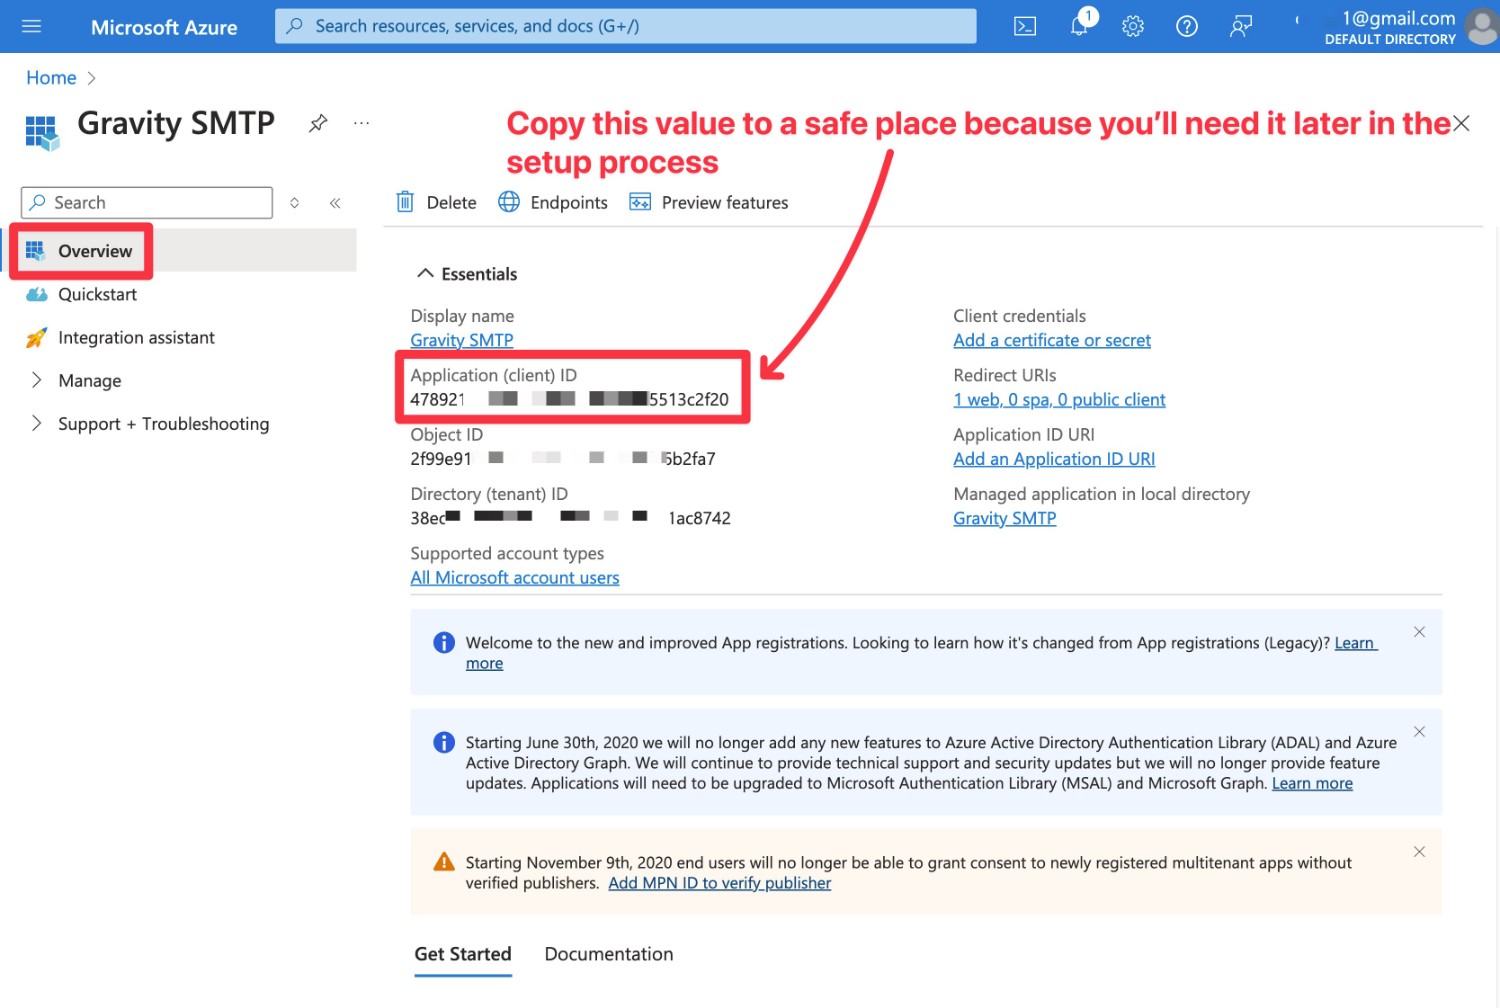
Locate Your Application ID and Copy It to a Safe Place
After registering your app, you should be in the Overview dashboard for your app.
In this interface, locate the Application (client) ID, which is listed near the top of the page under Essentials.
Copy this value to a safe place because you’ll need it a bit later in the setup process.
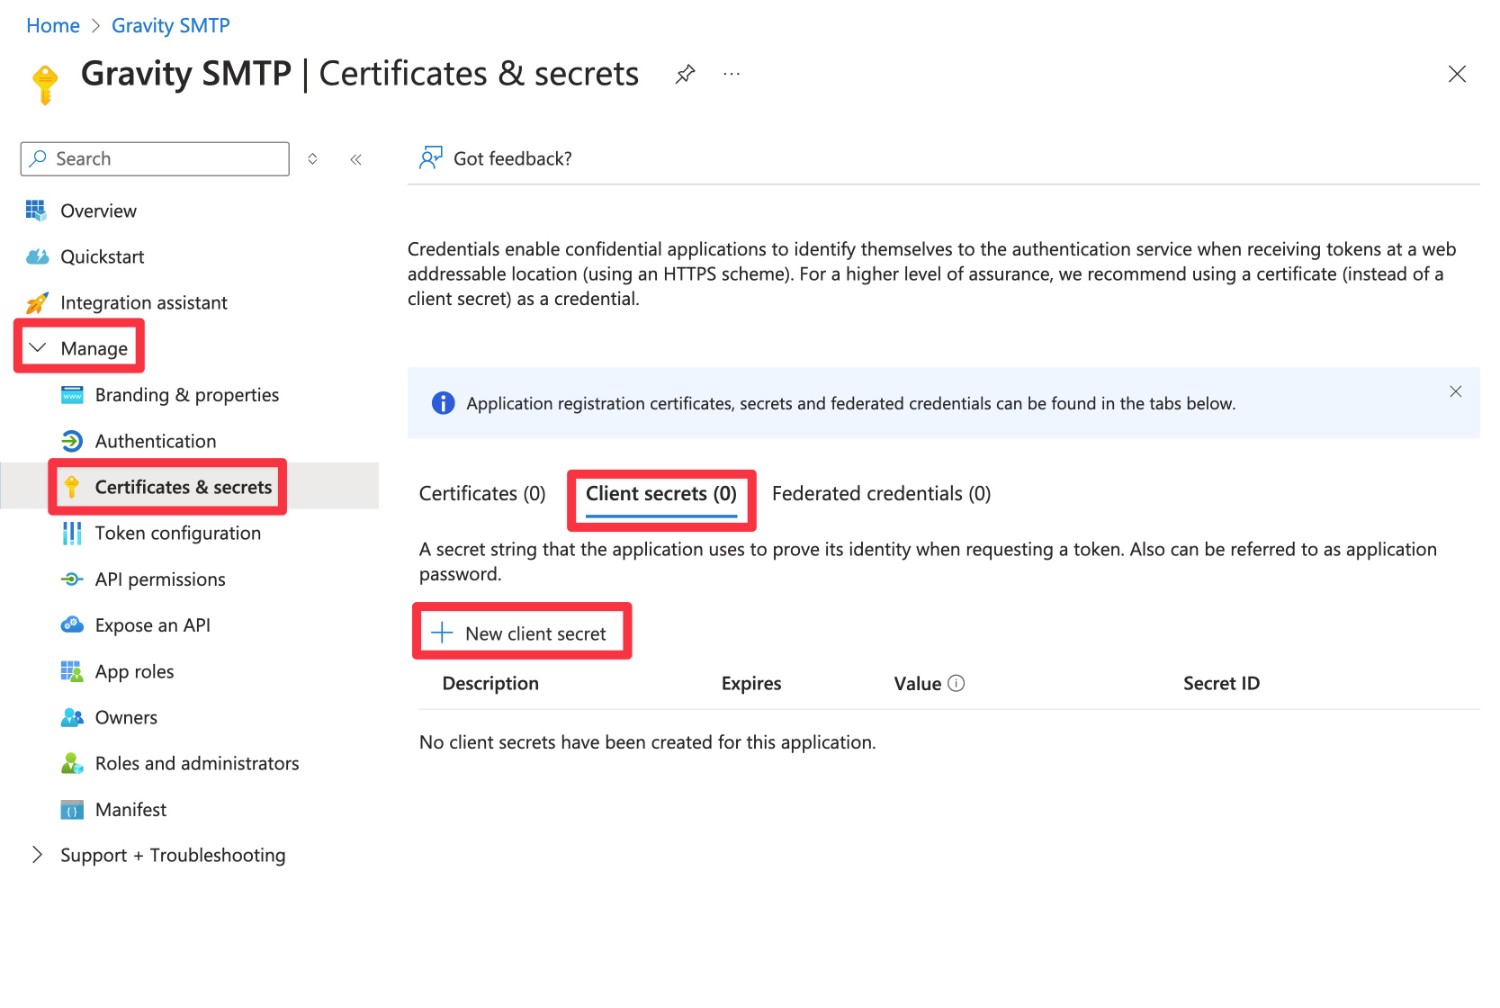
Create an Application Password
Next, you’ll need to create an application password for your app:
- Click the Manage option in the sidebar on the left to expand additional menu options.
- Select Certificates & secrets.
- In the Certificates & secrets interface, click the + New client secret link under Client secrets.
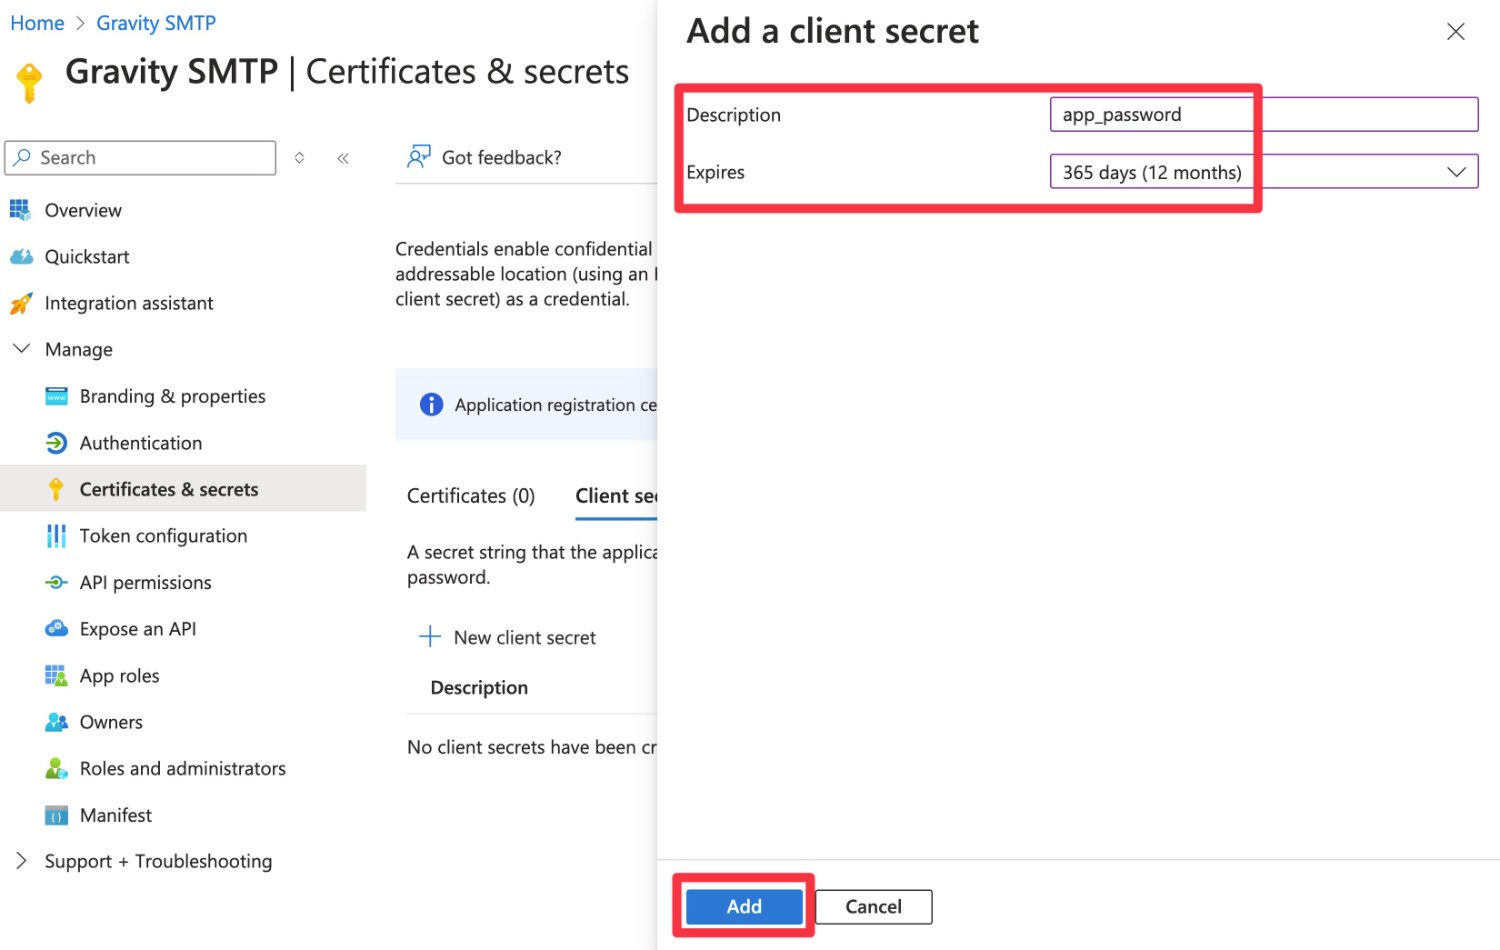
This will open a slide-out panel on the right side. Here’s how to configure it:
- Description – enter a name to help you remember it – e.g. “app_password”.
- Expires – select “365 days (12 months)”.
- Click the Add button at the bottom of the slide-out panel.
You should then see a new listing under the Client secrets heading.
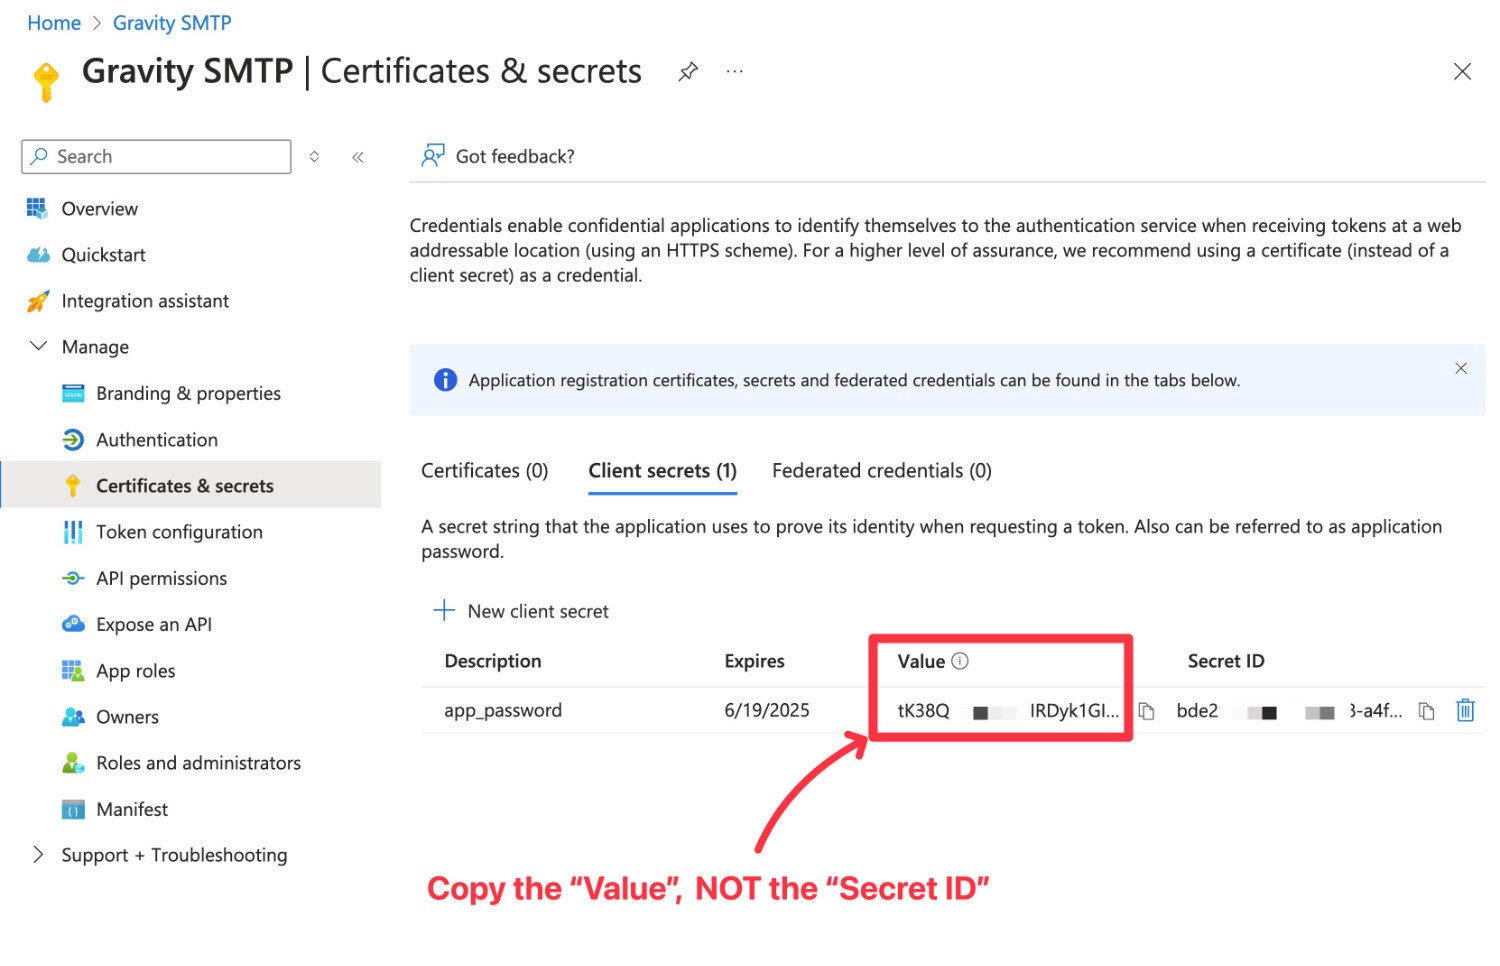
Copy the value from the Value column and store it in a safe place, because you’ll need it in a second.
Do not copy the Secret ID value – you only want the value from the Value column.
Microsoft will not show you this value again once you leave the page, so make sure you save it in a safe spot. If you accidentally misplace the value, you can just create another client secret.
And that’s it – your Microsoft Azure app is now properly configured and you’ll perform the rest of the setup process from your WordPress dashboard.
4. Connect Gravity SMTP to Your Azure App
At this point, you should have created your app in Azure and stored two pieces of information in a safe place:
- The Client ID, which you got from your app’s Overview page in Azure.
- The Value of the client secret, which you got after creating a client secret in the Certificates & secrets area of your app’s dashboard in Azure.
Now, you’ll use these two pieces of information to connect Gravity SMTP to your app and enable email sending:
- Open your WordPress dashboard.
- Go to SMTP → Settings.
- Select the Integrations tab.
- Click the gear icon next to Microsoft 365 / Outlook to open its settings.
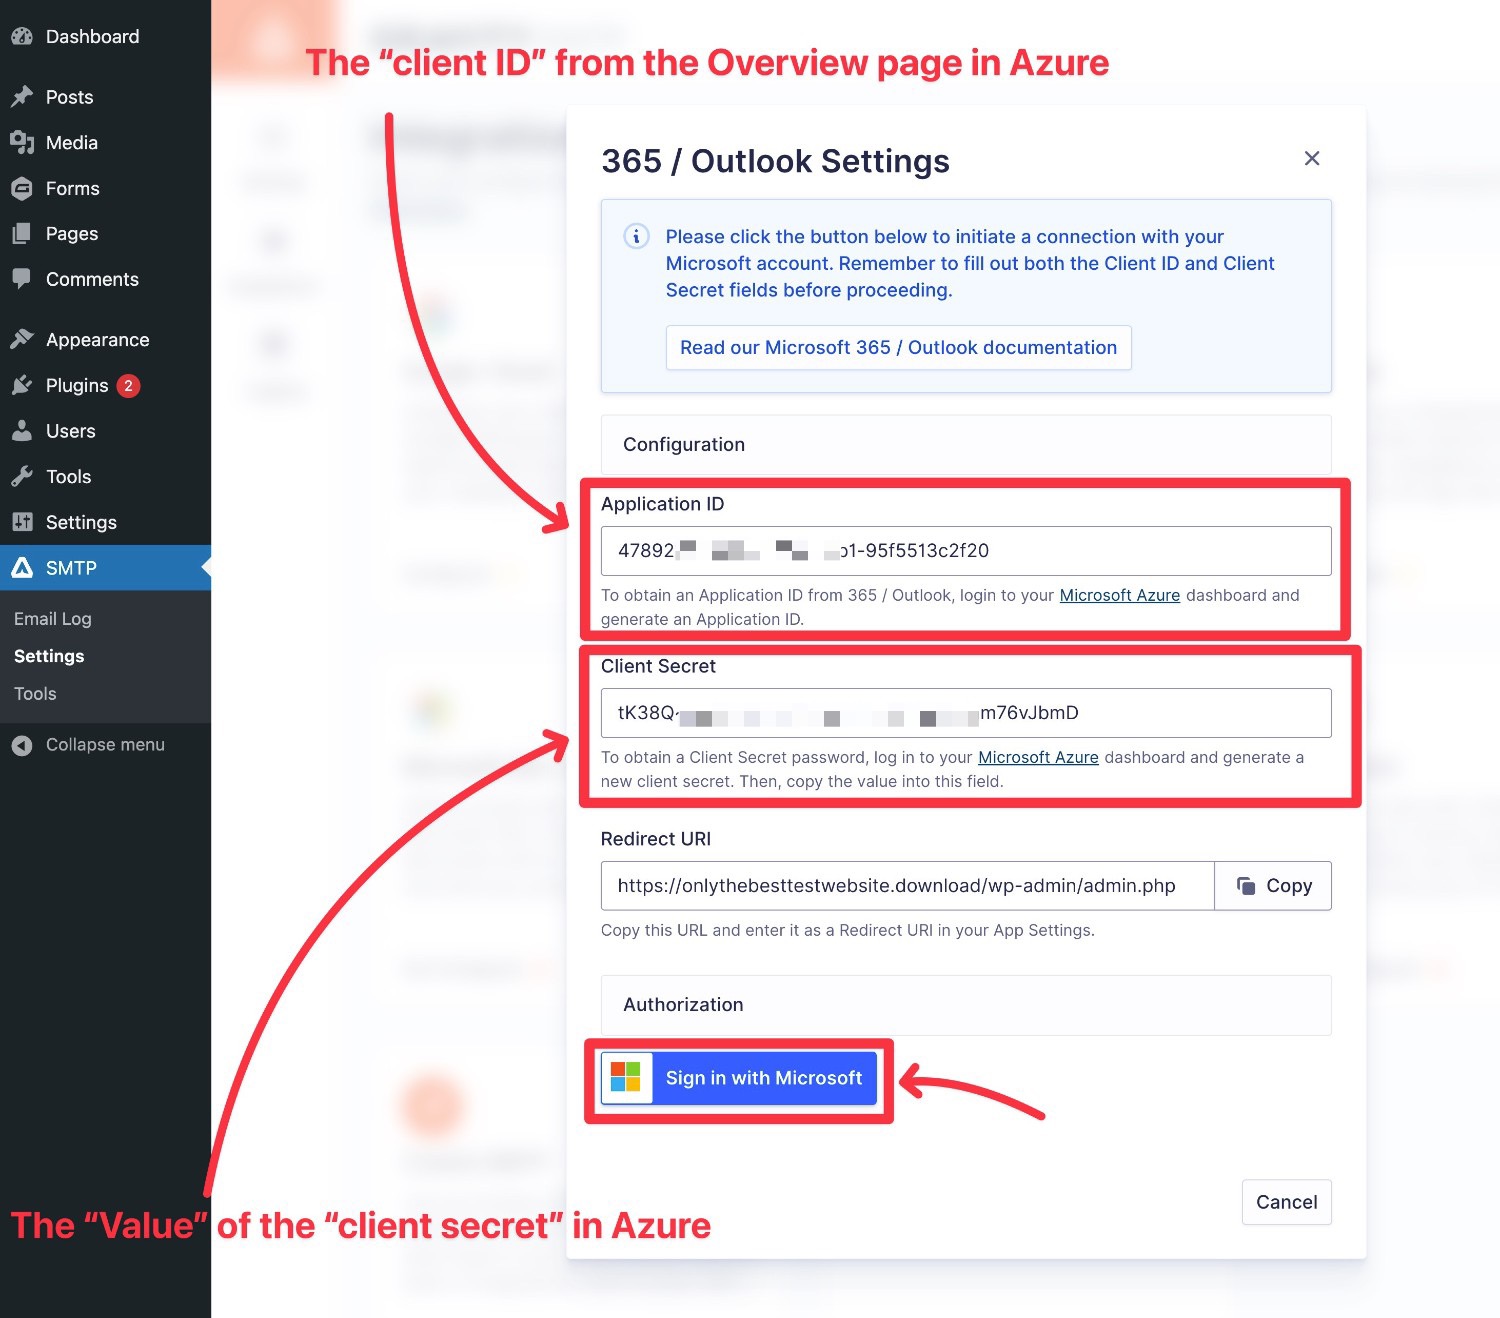
Once you’ve opened the settings popup, you need to add the Application ID and Client Secret:
- Application ID – this is the Client ID from Azure.
- Client Secret – this is the Value of the client secret from Azure.
Once you’ve added both pieces of information, you need to click the Sign in with Microsoft button.
Clicking that button should launch you into the authorization flow for your app.
You’ll just need to click the Accept button to give your WordPress site the ability to send emails via your Microsoft account.
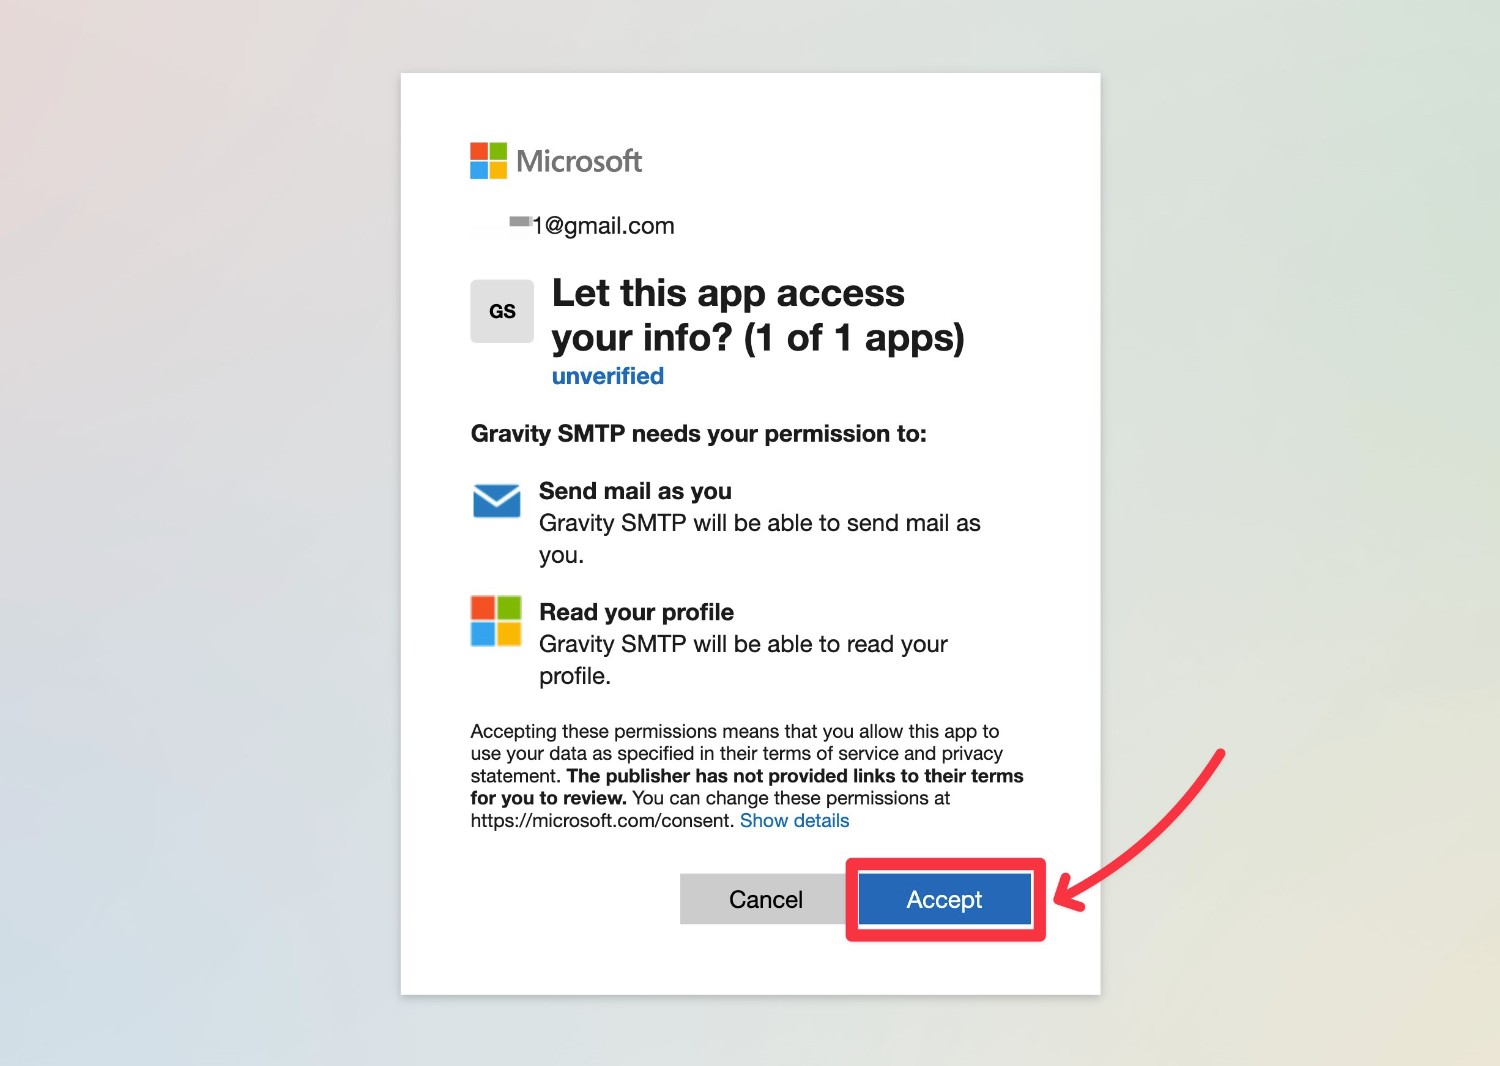
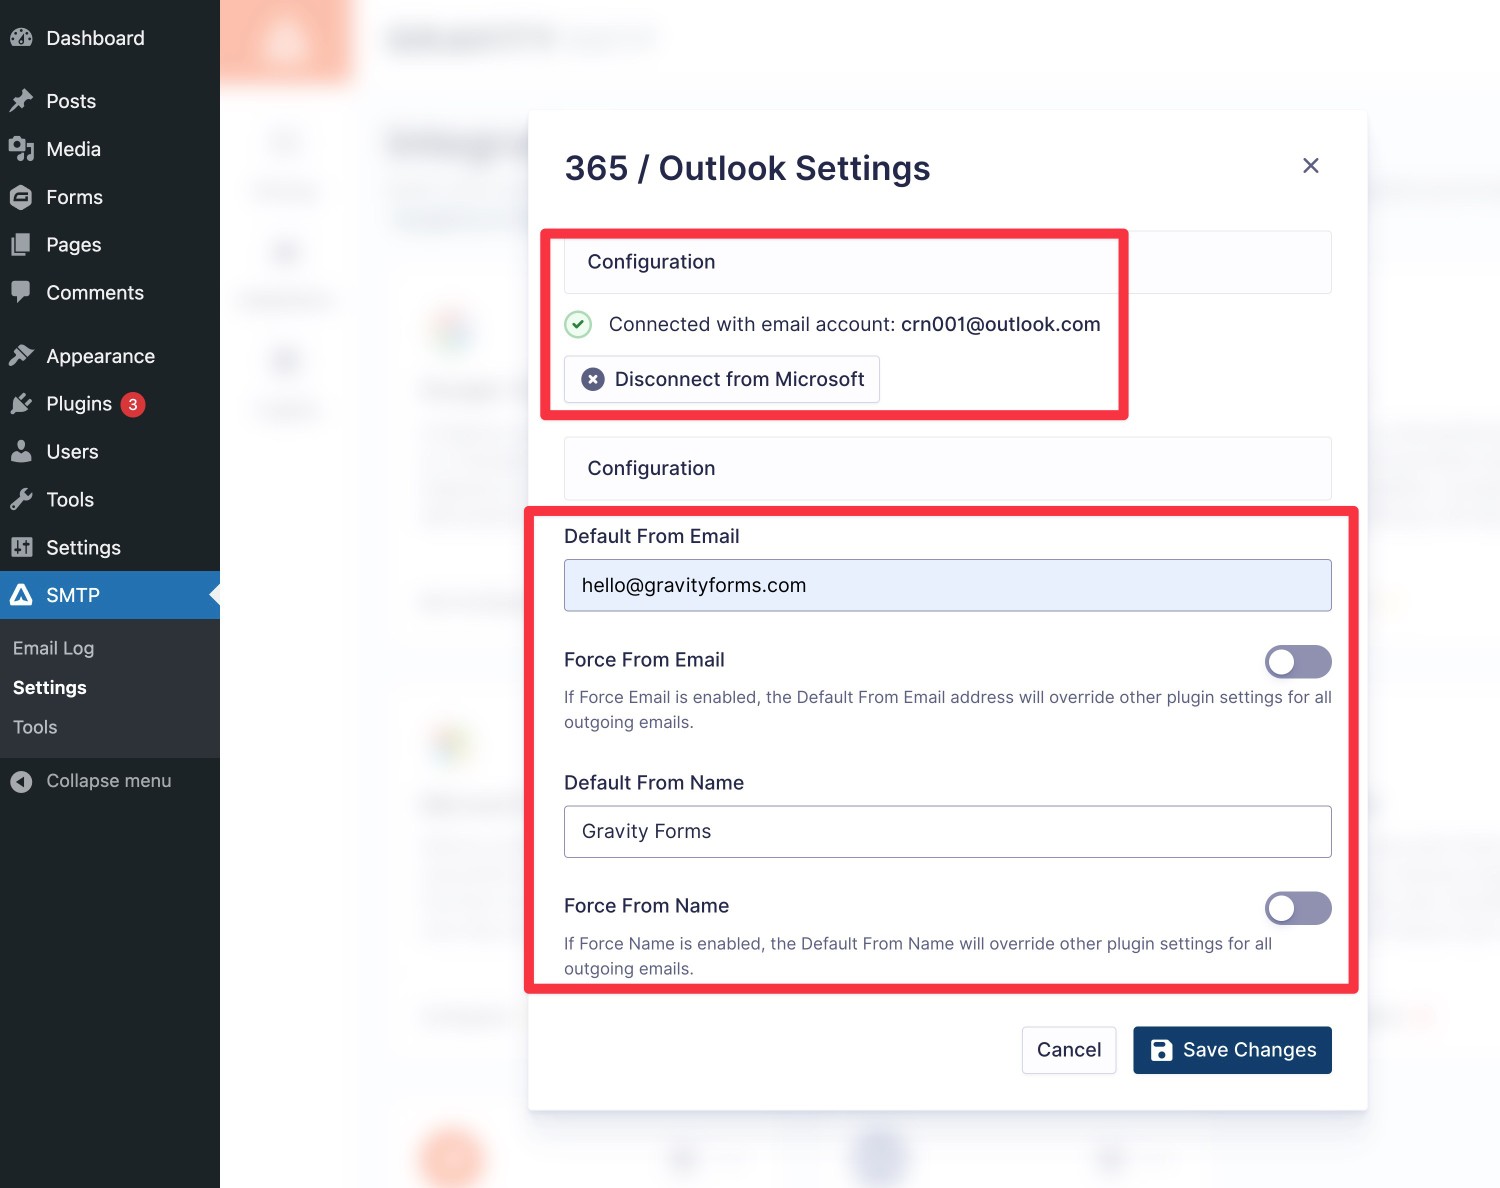
Once you click Accept, you should be redirected back to the Gravity SMTP Microsoft 365 settings popup in your WordPress dashboard.
You should now see a message saying something like “Connected with email account: [your Microsoft account email]”.
You can also now specify the default from email address and name for the emails that your site sends via Microsoft.
Once you’ve entered those details, make sure to click the Save Changes button to save everything.
5. Enable Microsoft 365 / Outlook As Your Site’s Default Sending Service
At this point, your site is connected to Microsoft 365/Outlook, but it’s not your active email sending service yet.
To enable it as your site’s primary email sending service, you need to enable the toggle in the Integrations tab of Gravity SMTP.
Once you enable the toggle, you should see the text change from “Configured” to “Connected”. You should also see a “Primary” label next to the Microsoft logo.

6. Send a Test Email
Now, your site will be actively sending its emails using your Microsoft account.
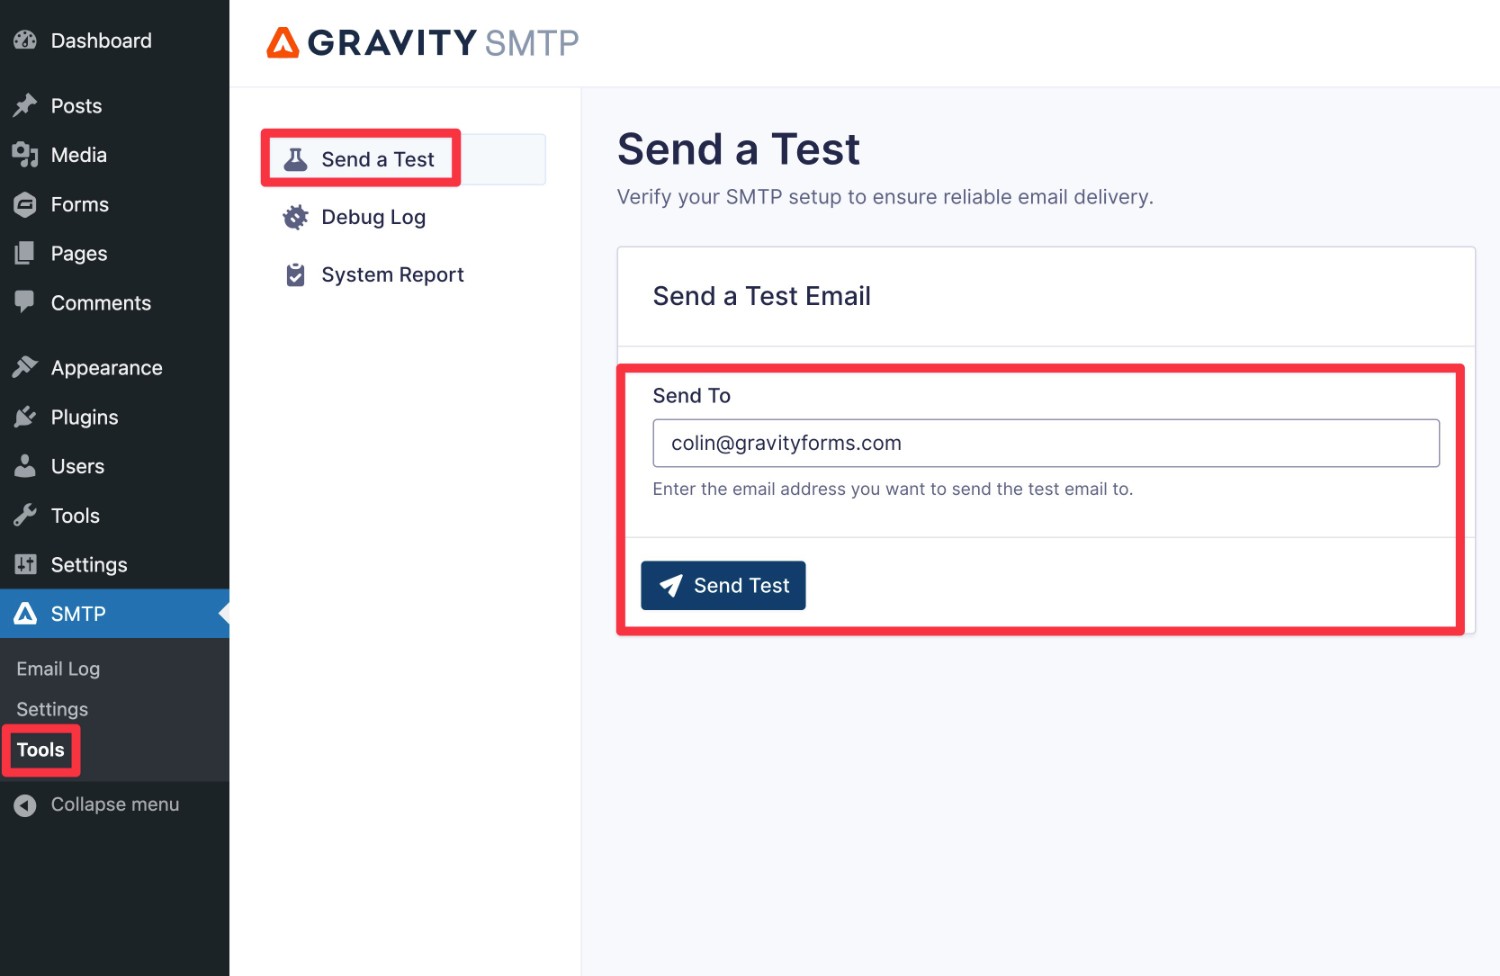
To make sure that it’s working properly, Gravity SMTP includes a feature that lets you send a test email to any email address:
- Go to SMTP → Tools.
- Select the Send a Test tab if it’s not already selected.
- Enter the email address to which you want to send a test email in the Send To box.
- Click the Send Test button.
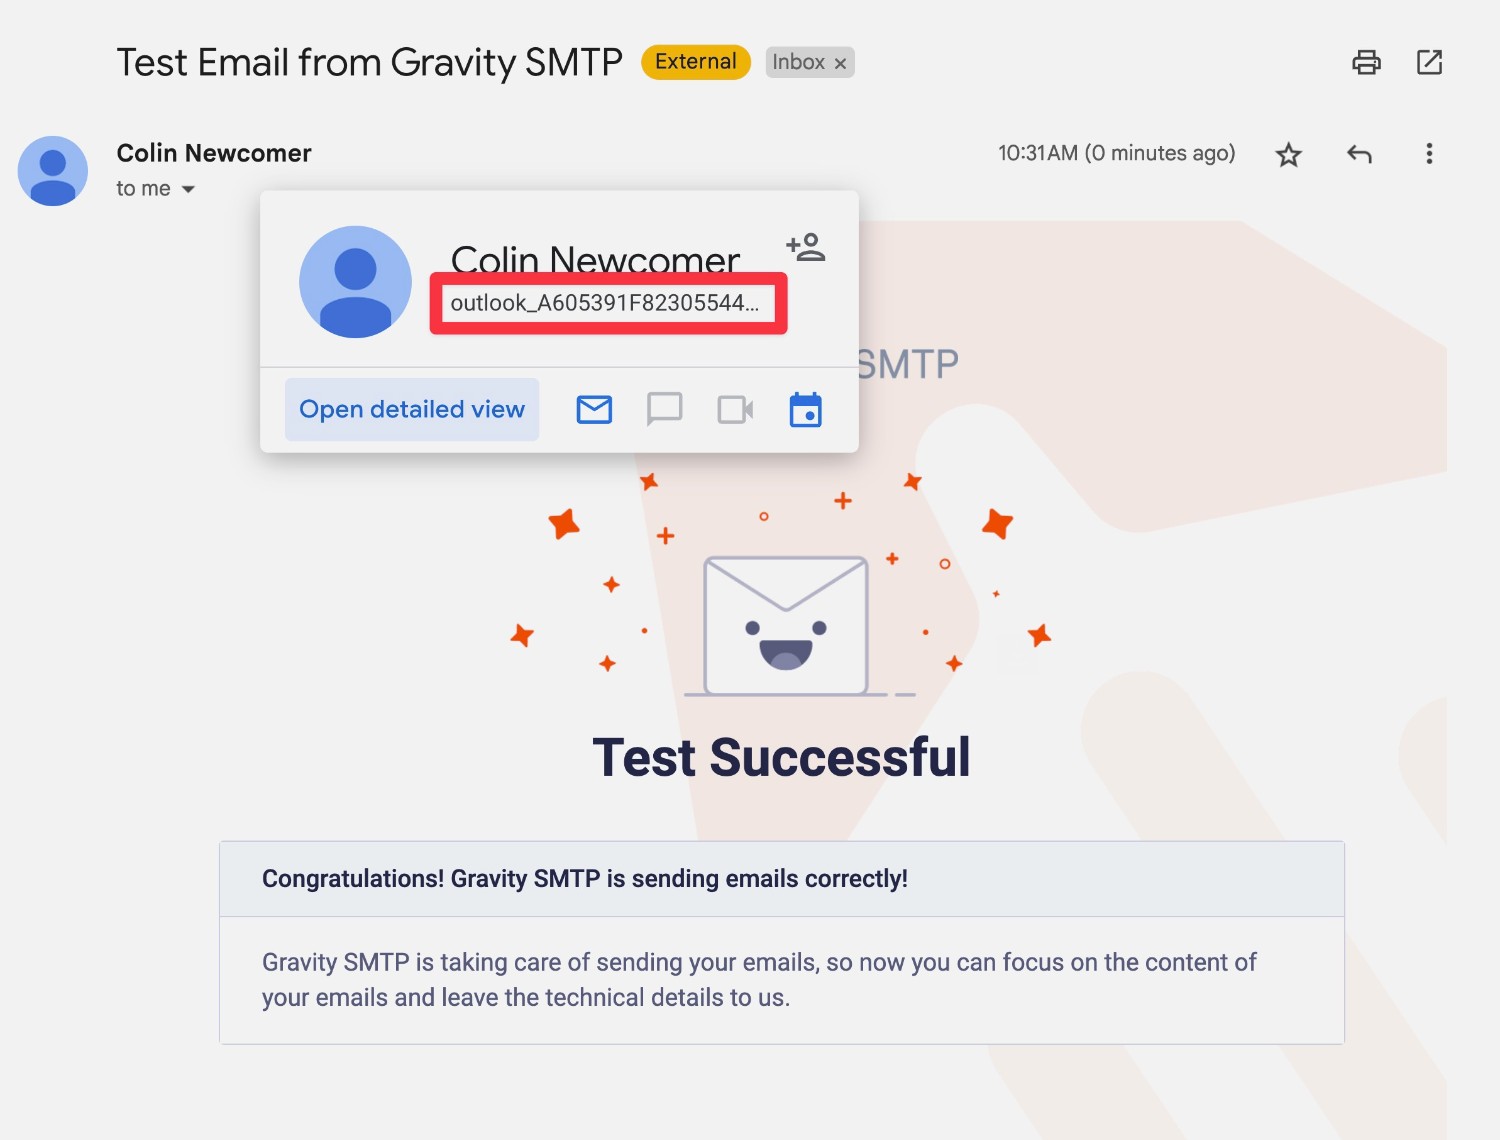
You should see a “success” message appear in the interface. And if you go to check your email inbox, you should see an email that looks something like the example below.
In addition to checking that you received the email, we also recommend checking the “From” name and email address to make sure they display how you want them to.
If you don’t see the email in your main inbox, you might want to check your spam folder. If the email went to spam, you can set up a filter in your email client to avoid that happening in the future.
7. Monitor Your Site’s Emails Going Forward
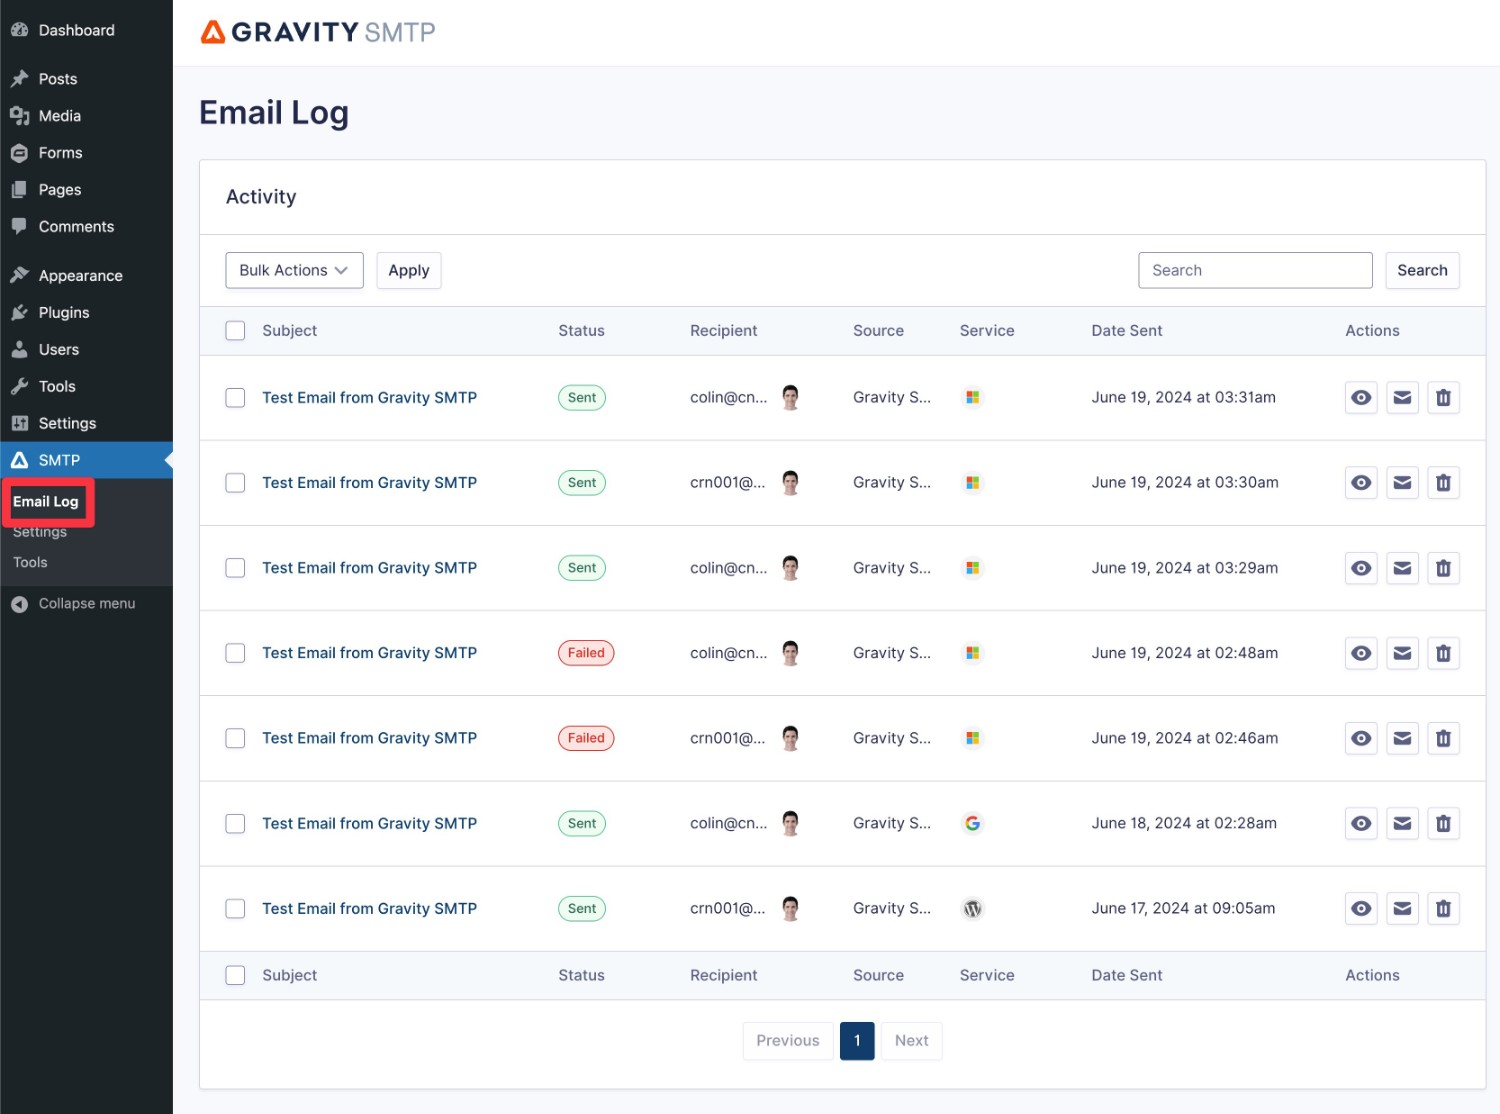
To help you monitor your site’s emails, Gravity SMTP also includes a built-in logging feature that lets you track the content and technical information of every email that your site sends.
It can be a good idea to check the log periodically, as you’ll be able to quickly catch any issues with your site’s emails, such as emails that have failed to send.
You can view the log by going to SMTP → Email Log.
By default, Gravity SMTP will permanently log all of your site’s emails. However, you can adjust the log storage period (or completely disable the logging feature) by going to SMTP → Settings → Logging.
Final Thoughts on Outlook/Microsoft 365 for WordPress Emails
That wraps up our guide on how to use Microsoft 365 or Outlook for WordPress emails.
As we mentioned earlier, using Microsoft to send your site’s emails might not be the best option for every single WordPress site. If you have mission-critical and/or high-volume email sending needs, we recommend using a dedicated email sending service like SendGrid, Mailgun, or Postmark.
However, for emails that aren’t as mission-critical (especially those that you’re sending to yourself), Microsoft can be a good free option that offers above-average daily sending limits at no cost.
If you’re ready to get started and have an active Gravity Forms Elite license, install the Gravity SMTP plugin today and then follow this guide to configure your site to start sending its emails using Microsoft 365/Outlook.

If you want to keep up-to-date with what’s happening on the blog sign up for the Gravity Forms newsletter!