How to Use Conditional Logic to Create Smarter Forms
 Long, complex forms are often necessary to collect the information that you need, but can provide a poor user-experience and greatly affect your conversion rate. But what if you could make your forms more intelligent and show only relevant, personalized fields to the person filling out the form? It turns out you can do just that — with the help of conditional logic.
In this article, we’ll explain what conditional logic is and show you different examples of using conditional logic with Gravity Forms. By the end of reading, you will have a number of actionable conditional logic strategies to help ensure you create smarter and more personalized forms.
Rather watch than read? Then check out this video instead…
What is Conditional Logic?
Having a form on your website is a must. Whether you have a business or a personal website, a contact form is one of the most basic and essential forms that makes it easy for your visitors to get in touch with you.
Beyond a contact form, you might also have a form that allows people to submit a guest post, buy a product from your website, or an application form that lets you gather all the information necessary to start a client project.
Naturally, these forms might require more information from your website users. As such, they tend to be longer which can lower your conversion rate. Enter conditional logic!
Simply put, conditional logic allows you to change your process or workflow based on preset conditions or actions that have occurred. It’s commonly used in programming. The most famous example is the “if this then that” statement.
When it comes to forms, you can use conditional logic to change the form based on the user input. This allows you to make your forms smarter and more personalized; making the person filling it out more likely to finish and submit the form.
Here’s a practical example. Let’s say you offer different services and the information you need to start a project is different for each service. You could set a radio field asking user to select the service they want…
 Then, use conditional logic to display questions based on the service the user selected in the previous answer…

How to Use Conditional Logic With Gravity Forms
Now that you know what conditional logic is and you’ve seen an example, let’s take a look at some of the many ways you can use conditional logic with Gravity Forms.
Conditional Logic and Form Fields
With Gravity Forms, you can set various form fields to display dynamically, based on rules you’ve specified.
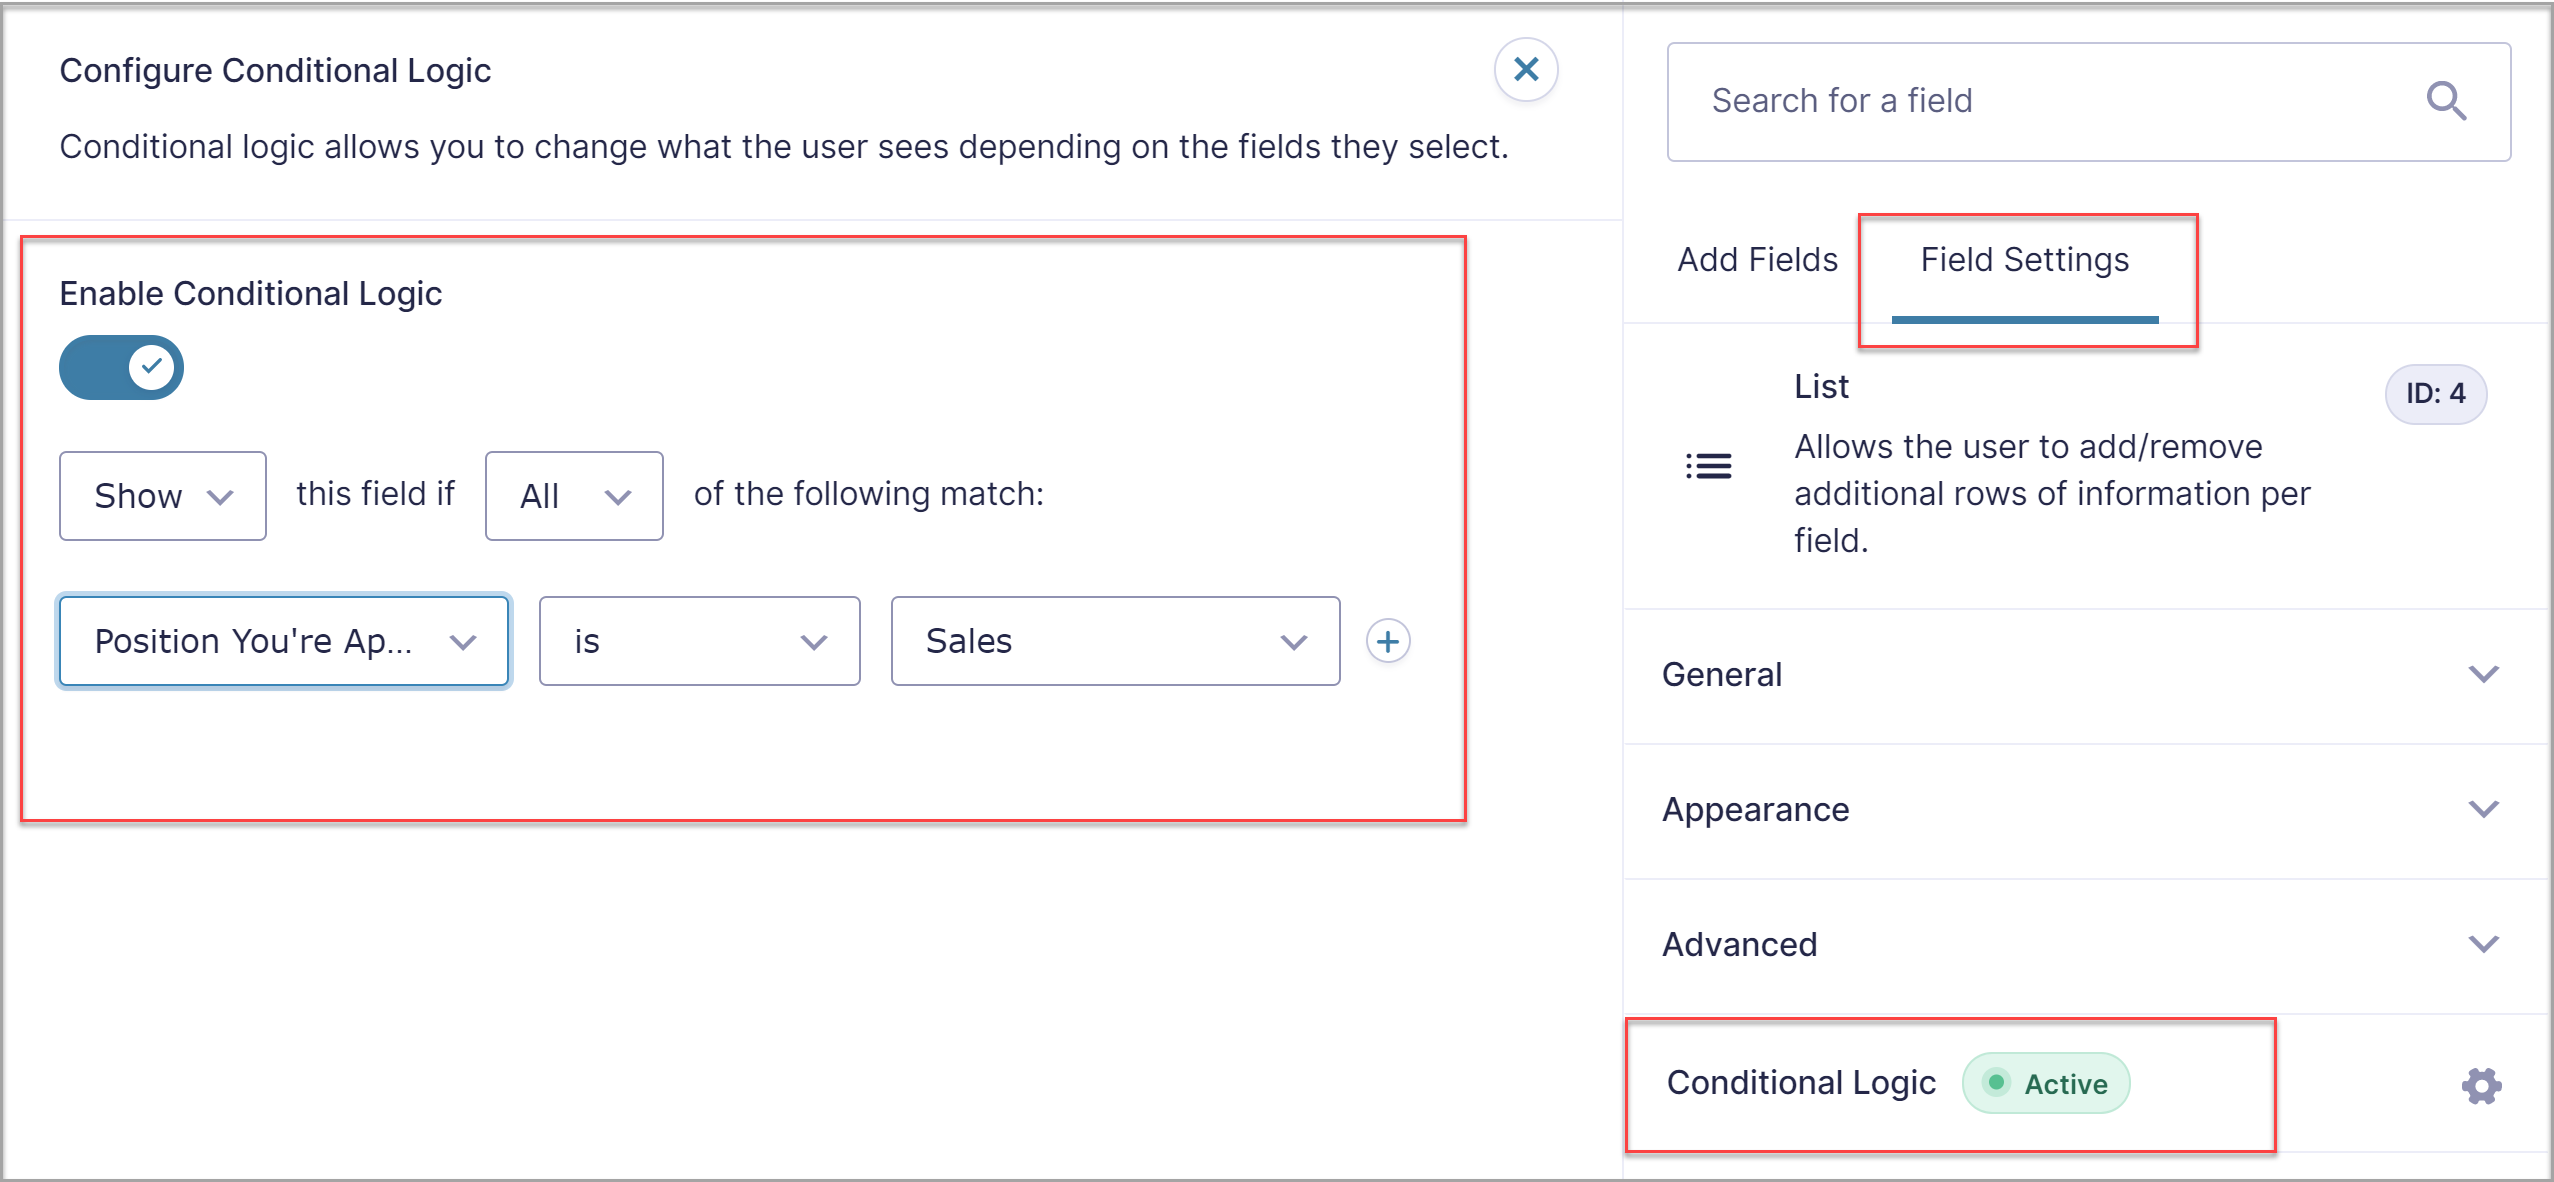
For example, in this Employee Application Form, we have set the Available Hours field to show only if the position they’re applying for is Sales.
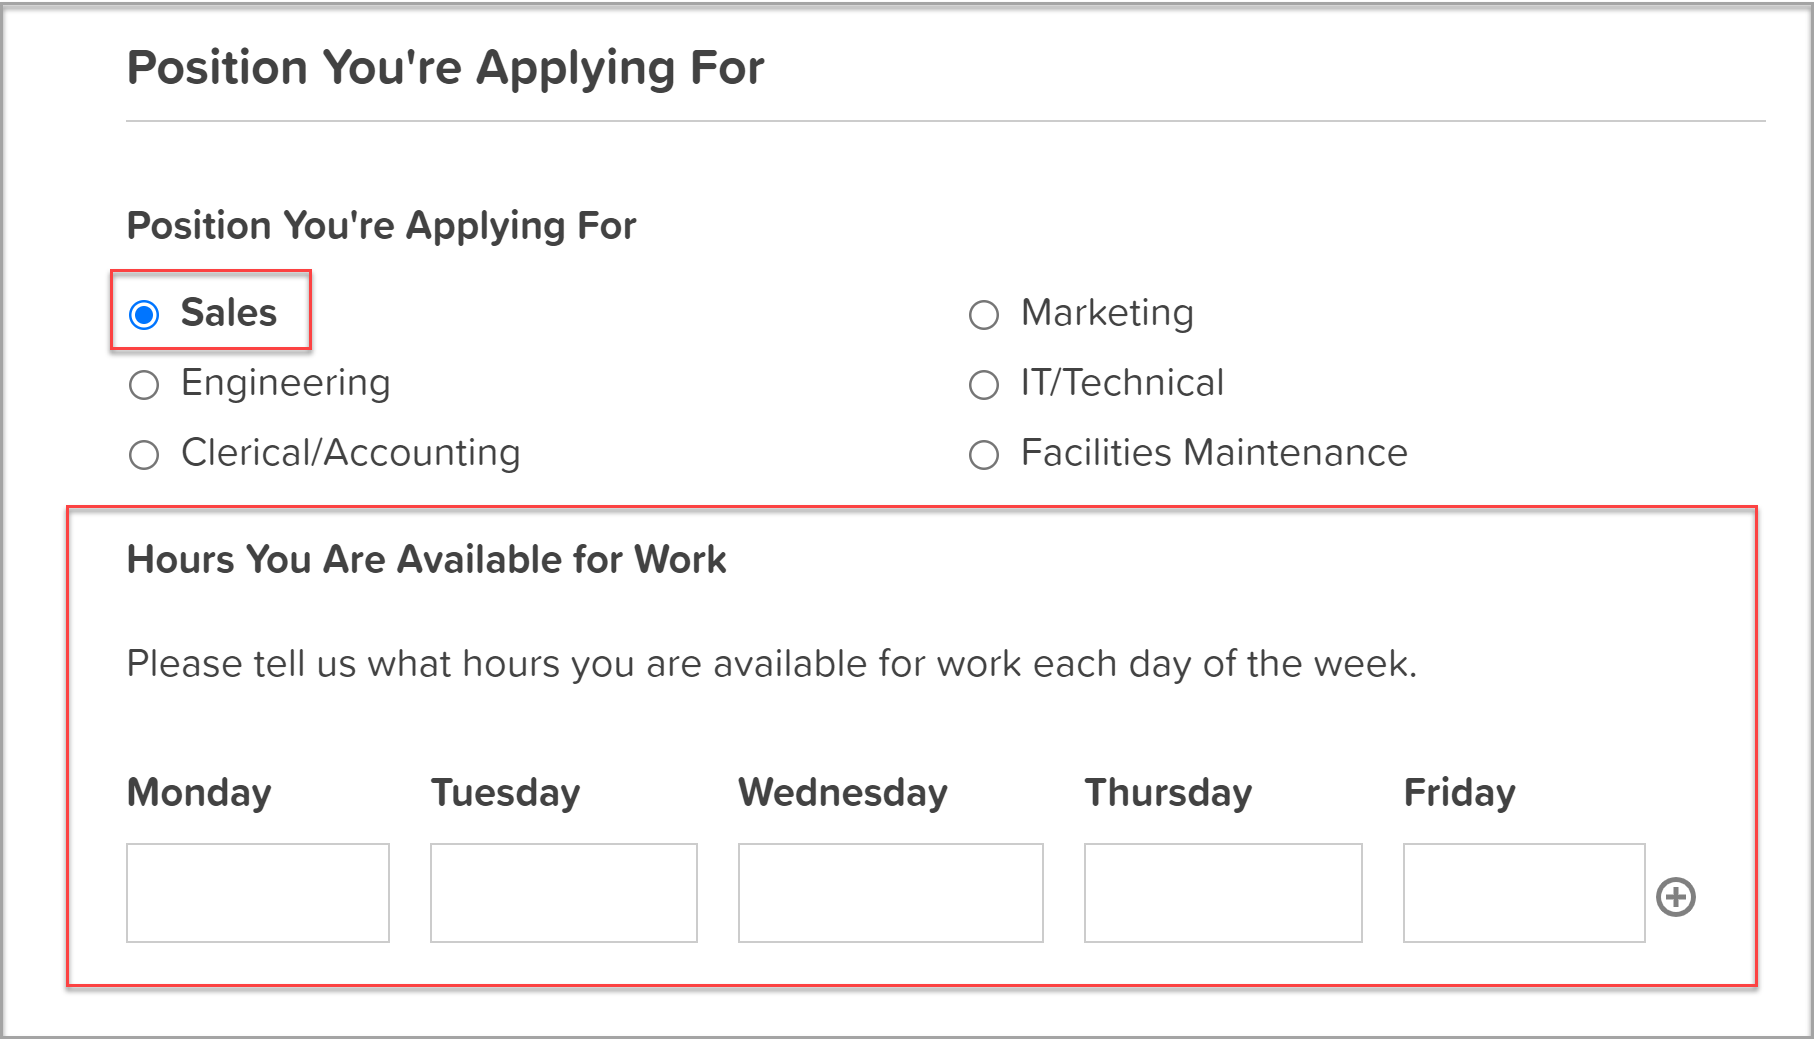 If a user selects any position other than Sales, the Available Hours field won’t display. But as soon as they select Sales, the field is visible.
Setting conditional logic for form fields is a quick and easy process. Simply select the field you want to add conditions to, then click on Field Settings > Conditional Logic > Enable Conditional Logic. You can then configure the conditional logic settings to suit your needs.
Conditional Logic For Form Confirmations
Now let’s take a look at how you can use conditional logic for form confirmations. This is useful as you can display different confirmation messages based on the information that the user submitted within the form.
Here, we’ll use a donation form example and use conditional logic to redirect users to a specific page, based on the amount they donated.
 To get started, go to Settings > Confirmations > Add New. (Keep in mind that conditional logic is not supported with default confirmations so you’ll need to create a new confirmation.)
Enter the name for your confirmation, set it to Redirect, and enter the URL for the page you want to redirect users to.
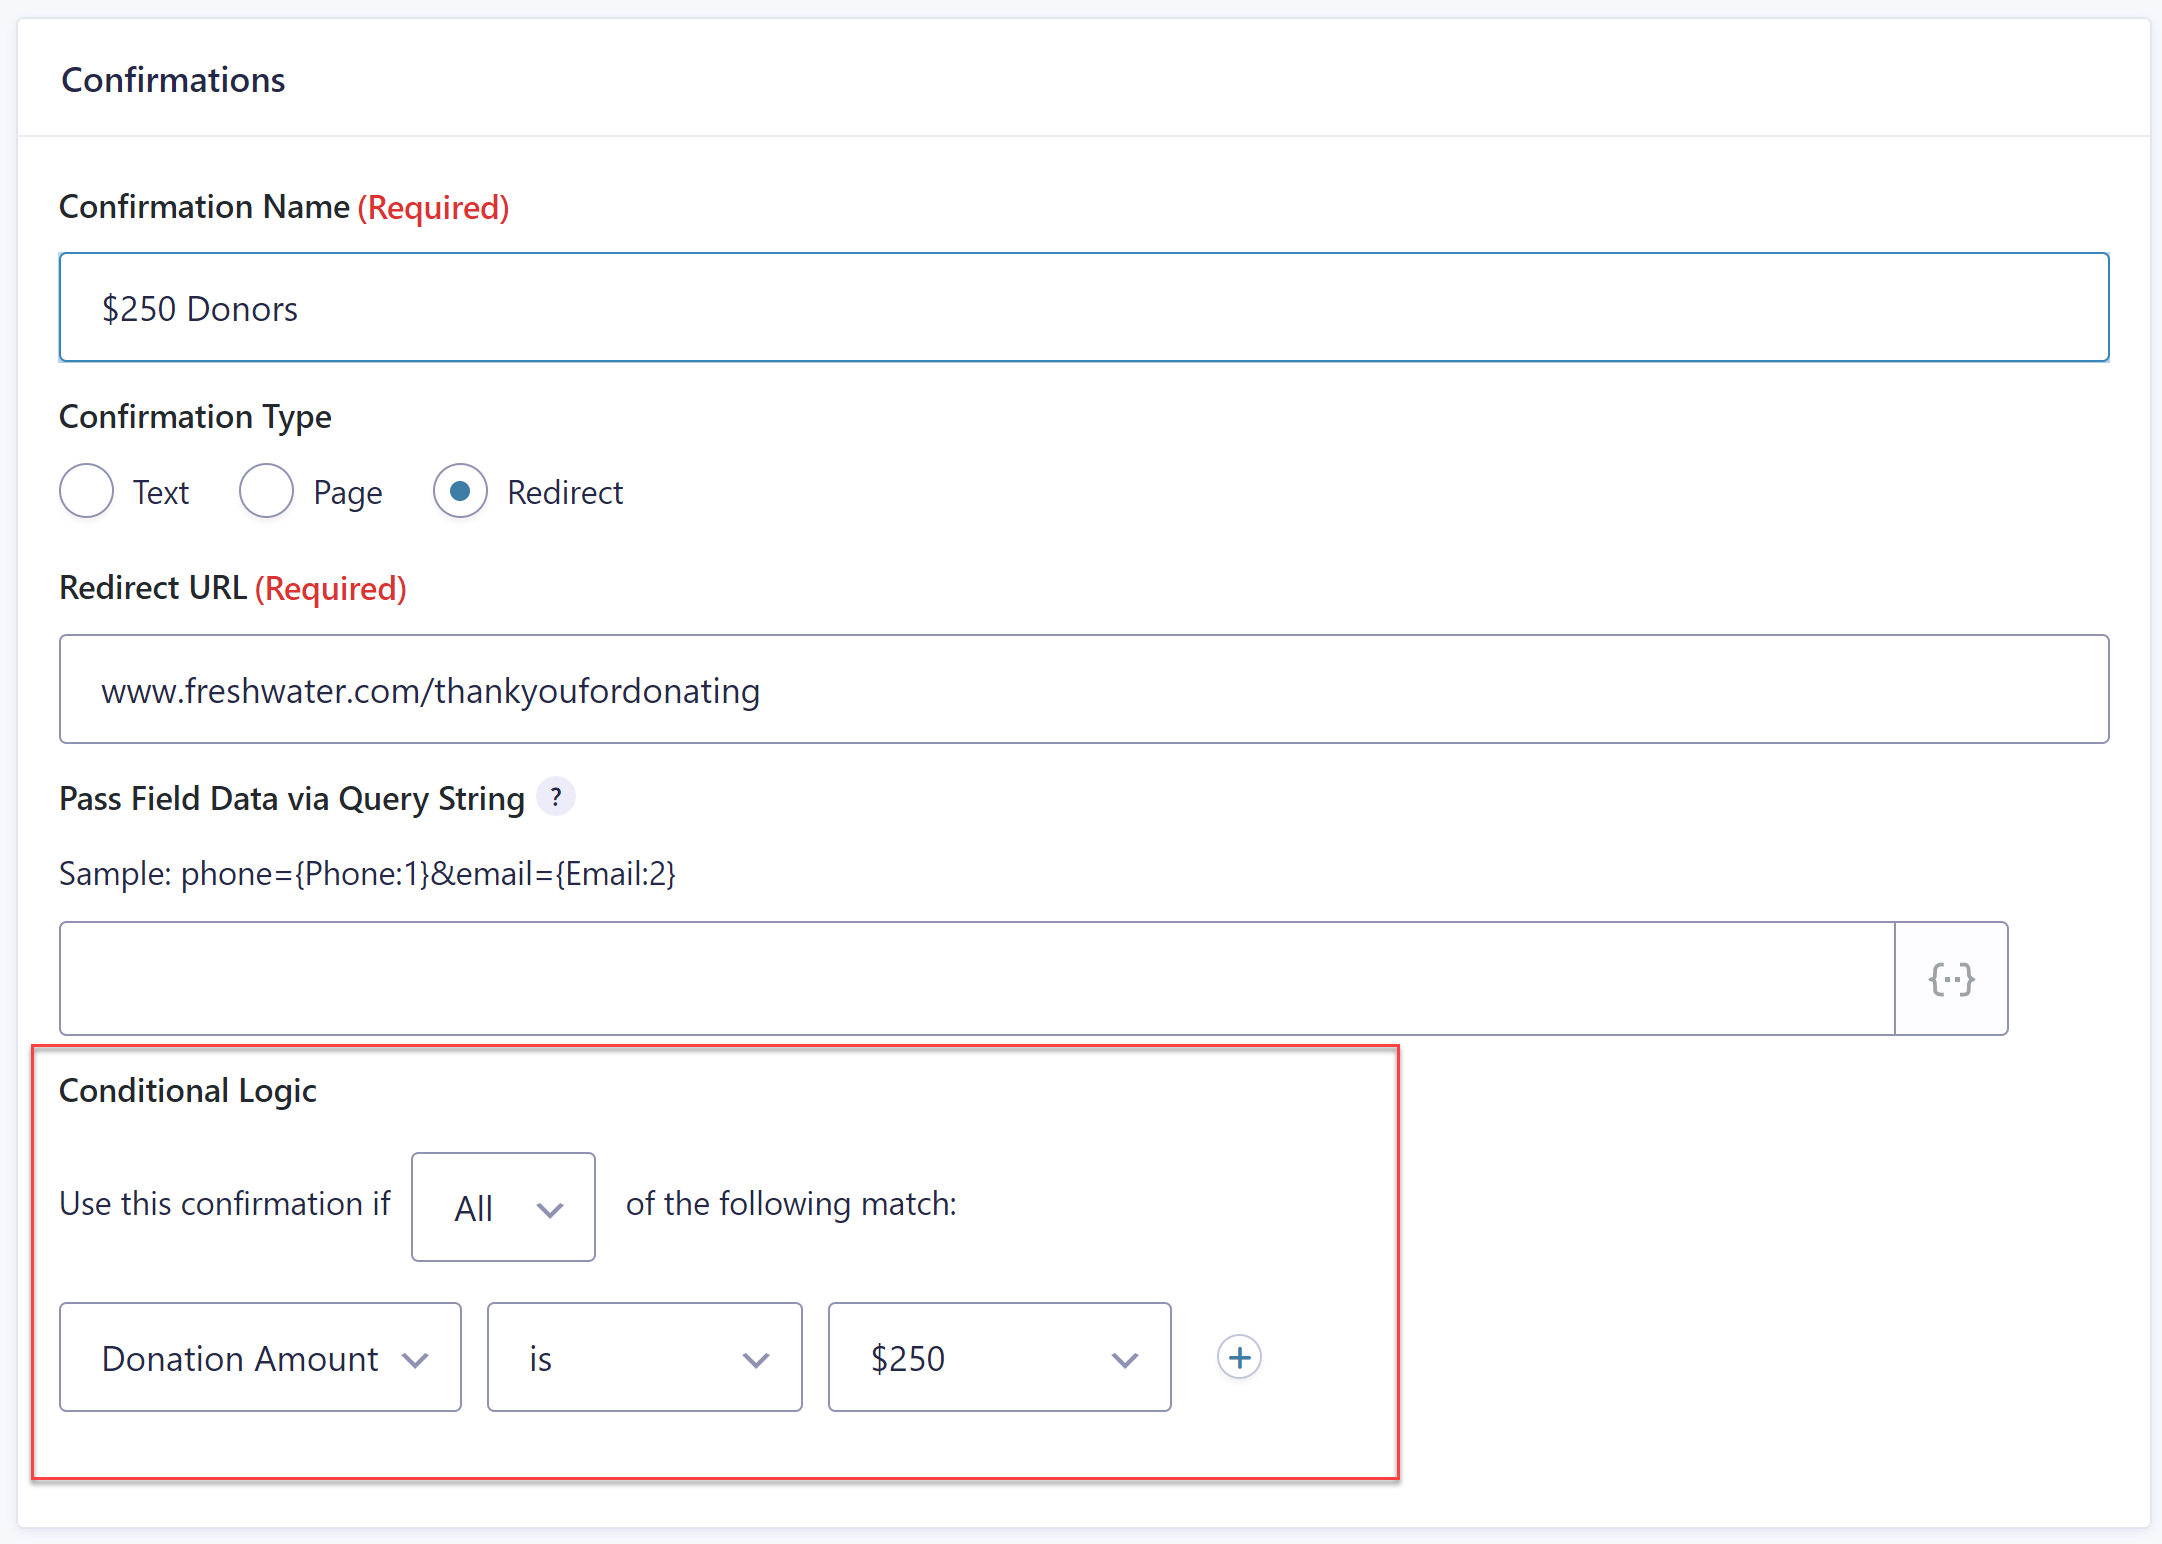 Then, under Conditional Logic, specify the rule as you see in the screenshot above. Save your confirmation and then repeat the process for any additional confirmations you need.
Now your users will be redirected to different pages, depending on the amount they have donated, allowing for a more tailored user experience on your site.
Using Conditional Logic For Form Notifications
In a similar fashion, you can use conditional logic to send smarter and more relevant form submission notifications (emails). Let’s use an Employee Application Form as an example again. We can use conditional logic to send notifications to relevant departments based on the position they’re applying for.
To do so, in your form, go to Settings > Notifications. Create a new notification and give it a name so you can easily recognize it later on. Configure the fields for the email and the email service you want to use as well as the contents of the notification.
 Then, under Conditional Logic, tick the box to enable it and set the rule to send this notification if the Position You’re Applying For > is > Sales. Save the notification then repeat the steps for other departments.
Submit Button and Conditional Logic
Another place where you can use conditional logic is on the submit button. This is useful if you want your users to agree and accept the terms and conditions of a sale or application process, or opt in to GDPR compliance.
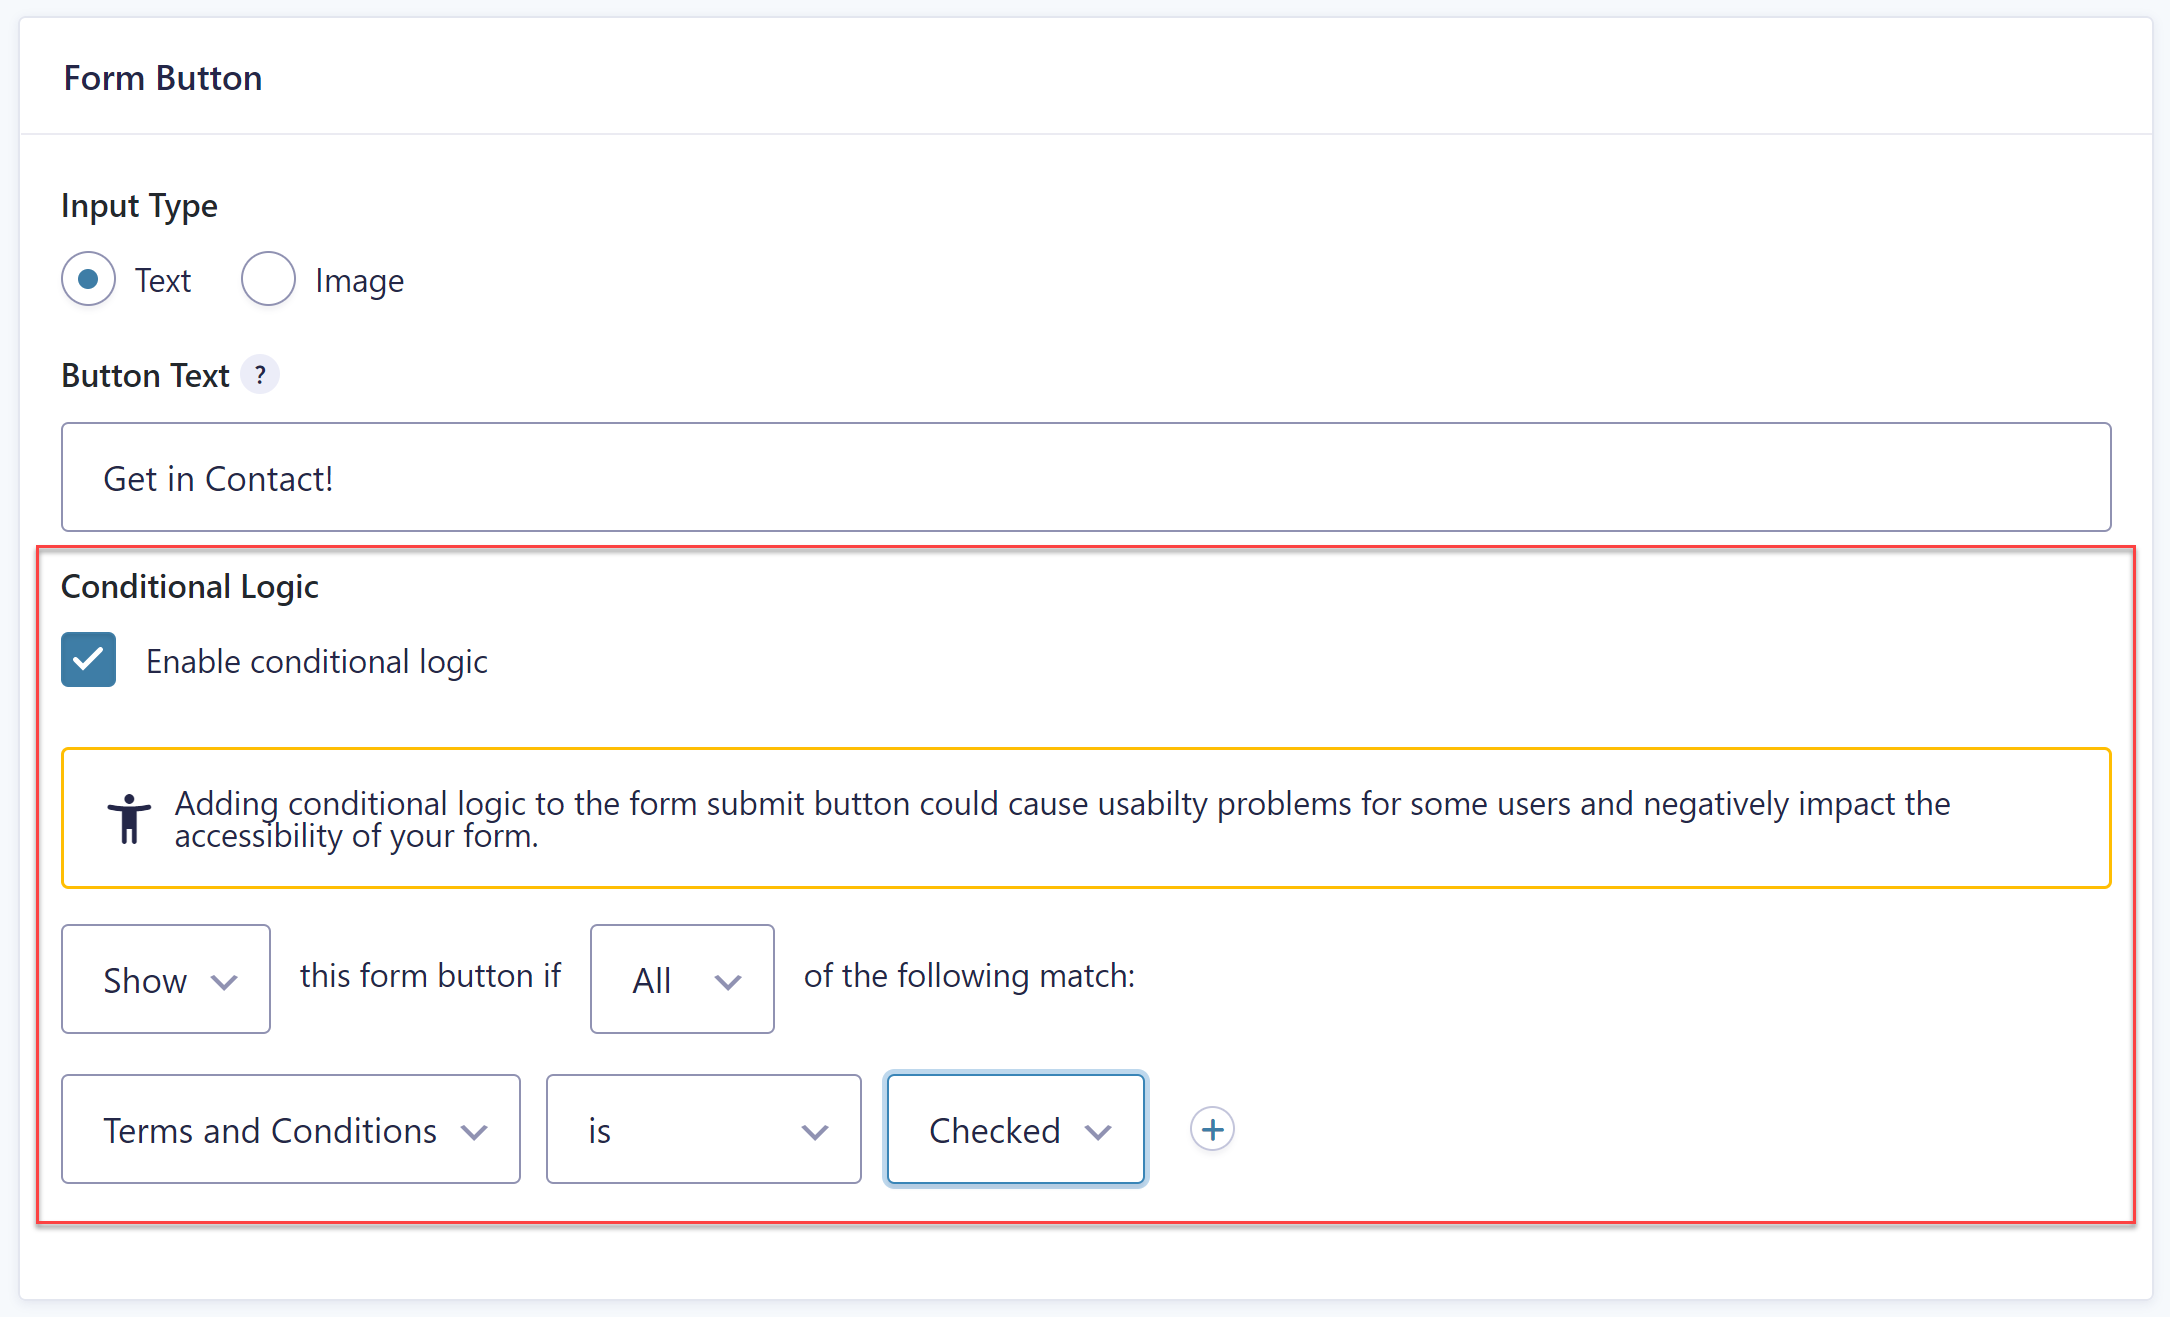 To enable conditional logic on a Submit button, go to your Form Settings and under Form Button, select to Enable Conditional Logic. Then, set the rule to only display the button if the Terms and Conditions field is checked.
Conditional Payments in Gravity Forms
Gravity Forms makes it easy to accept payments on any of your forms. If you’re already using this feature, conditional logic can make your payment forms more personalized, giving customers the option of selecting which payment gateway they want to use to pay.
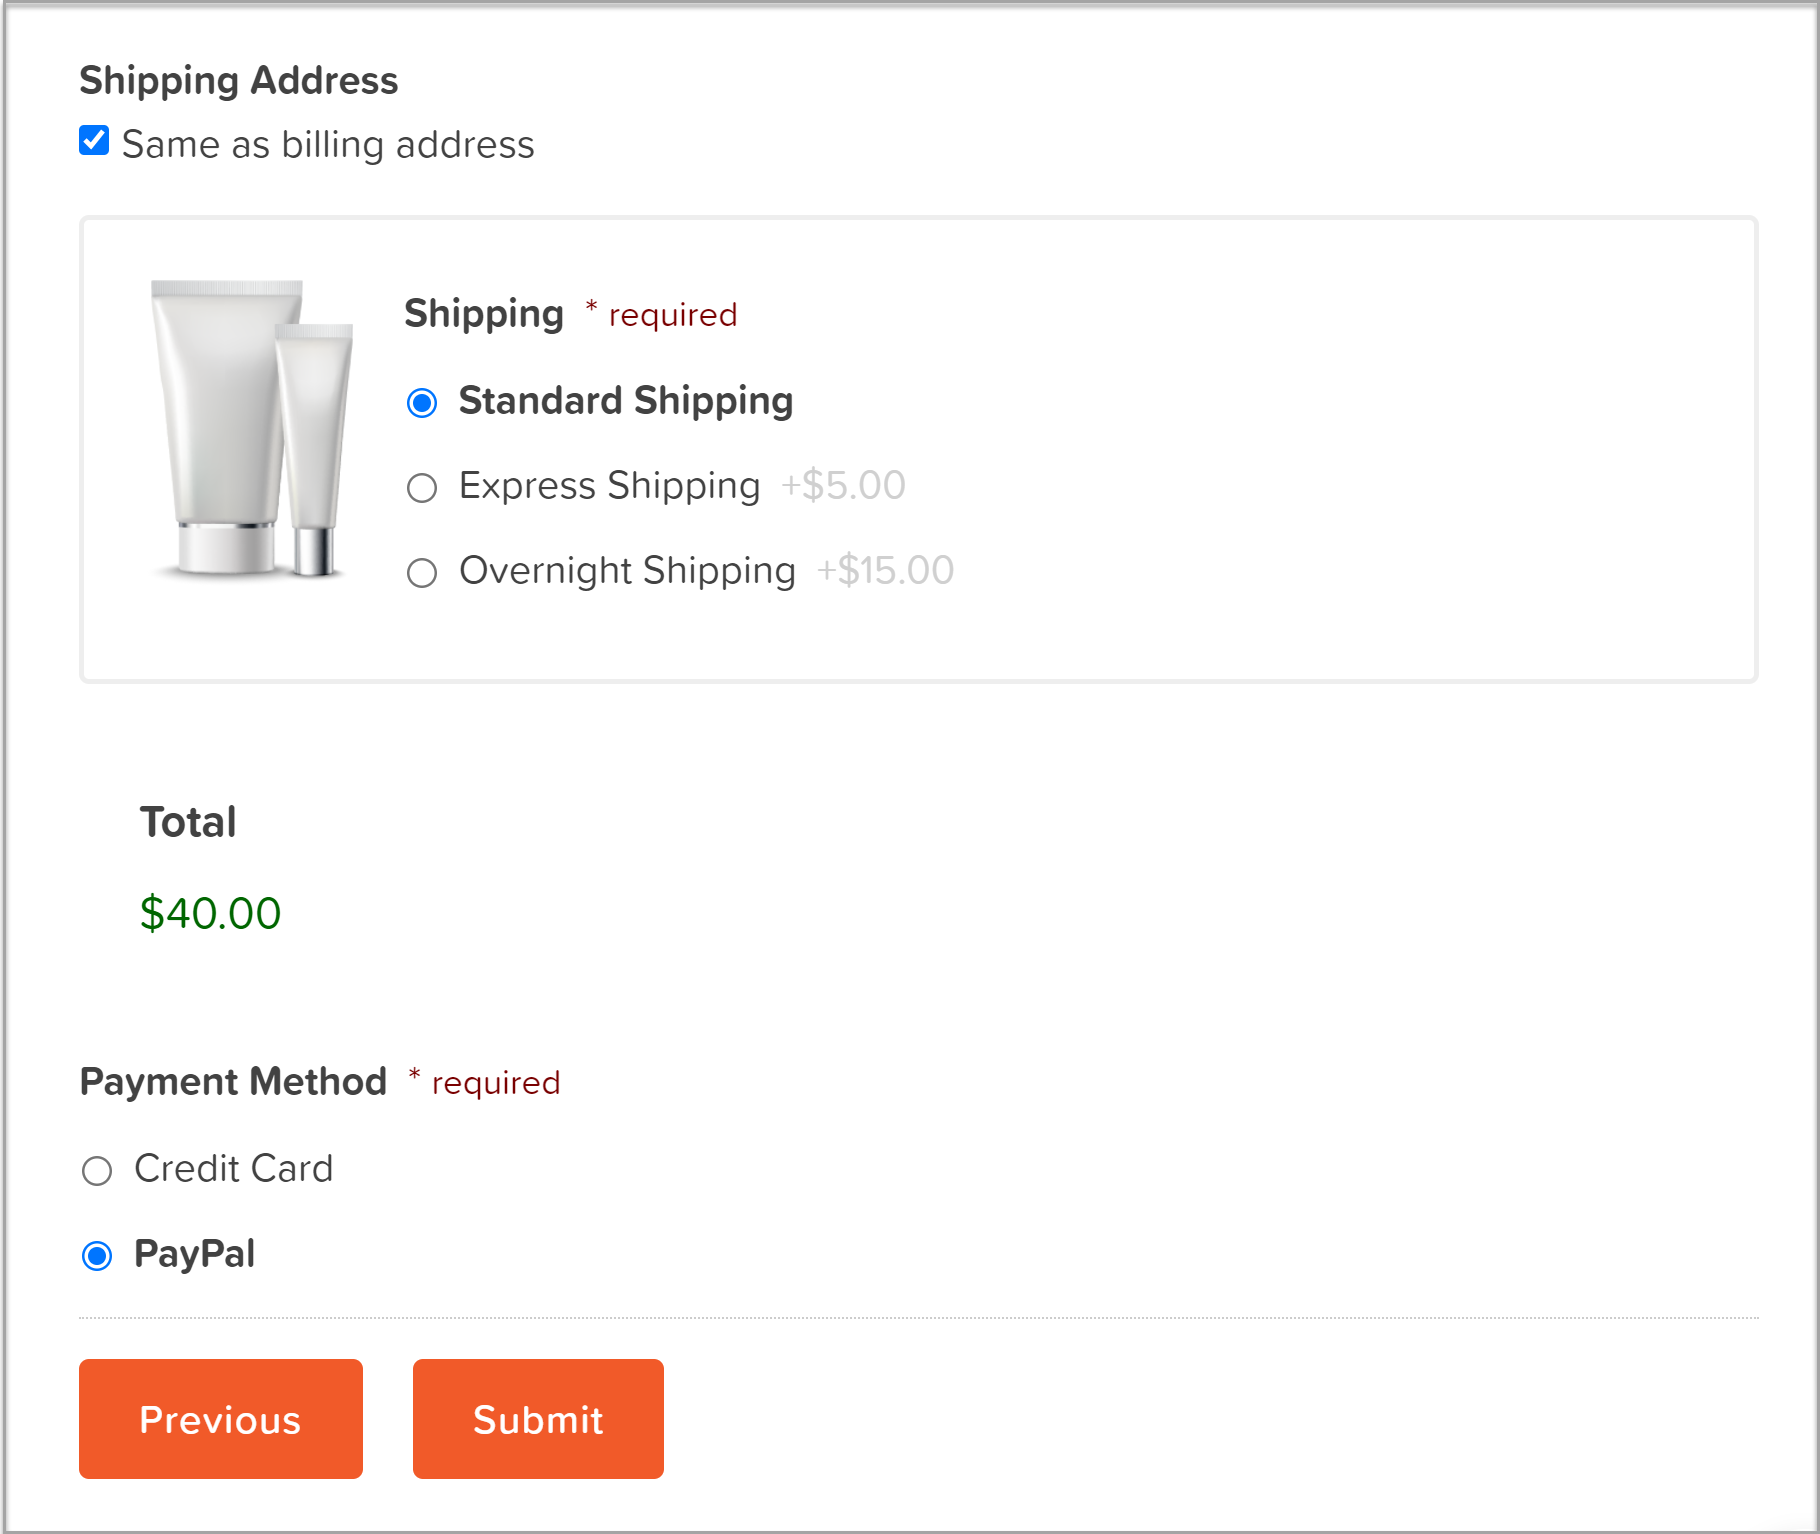
For example, you can offer your users to select their preferred payment method and then display the specific fields for that payment method. Here we have provided the option of paying off-site with PayPal, or with a credit card via the form using Stripe…
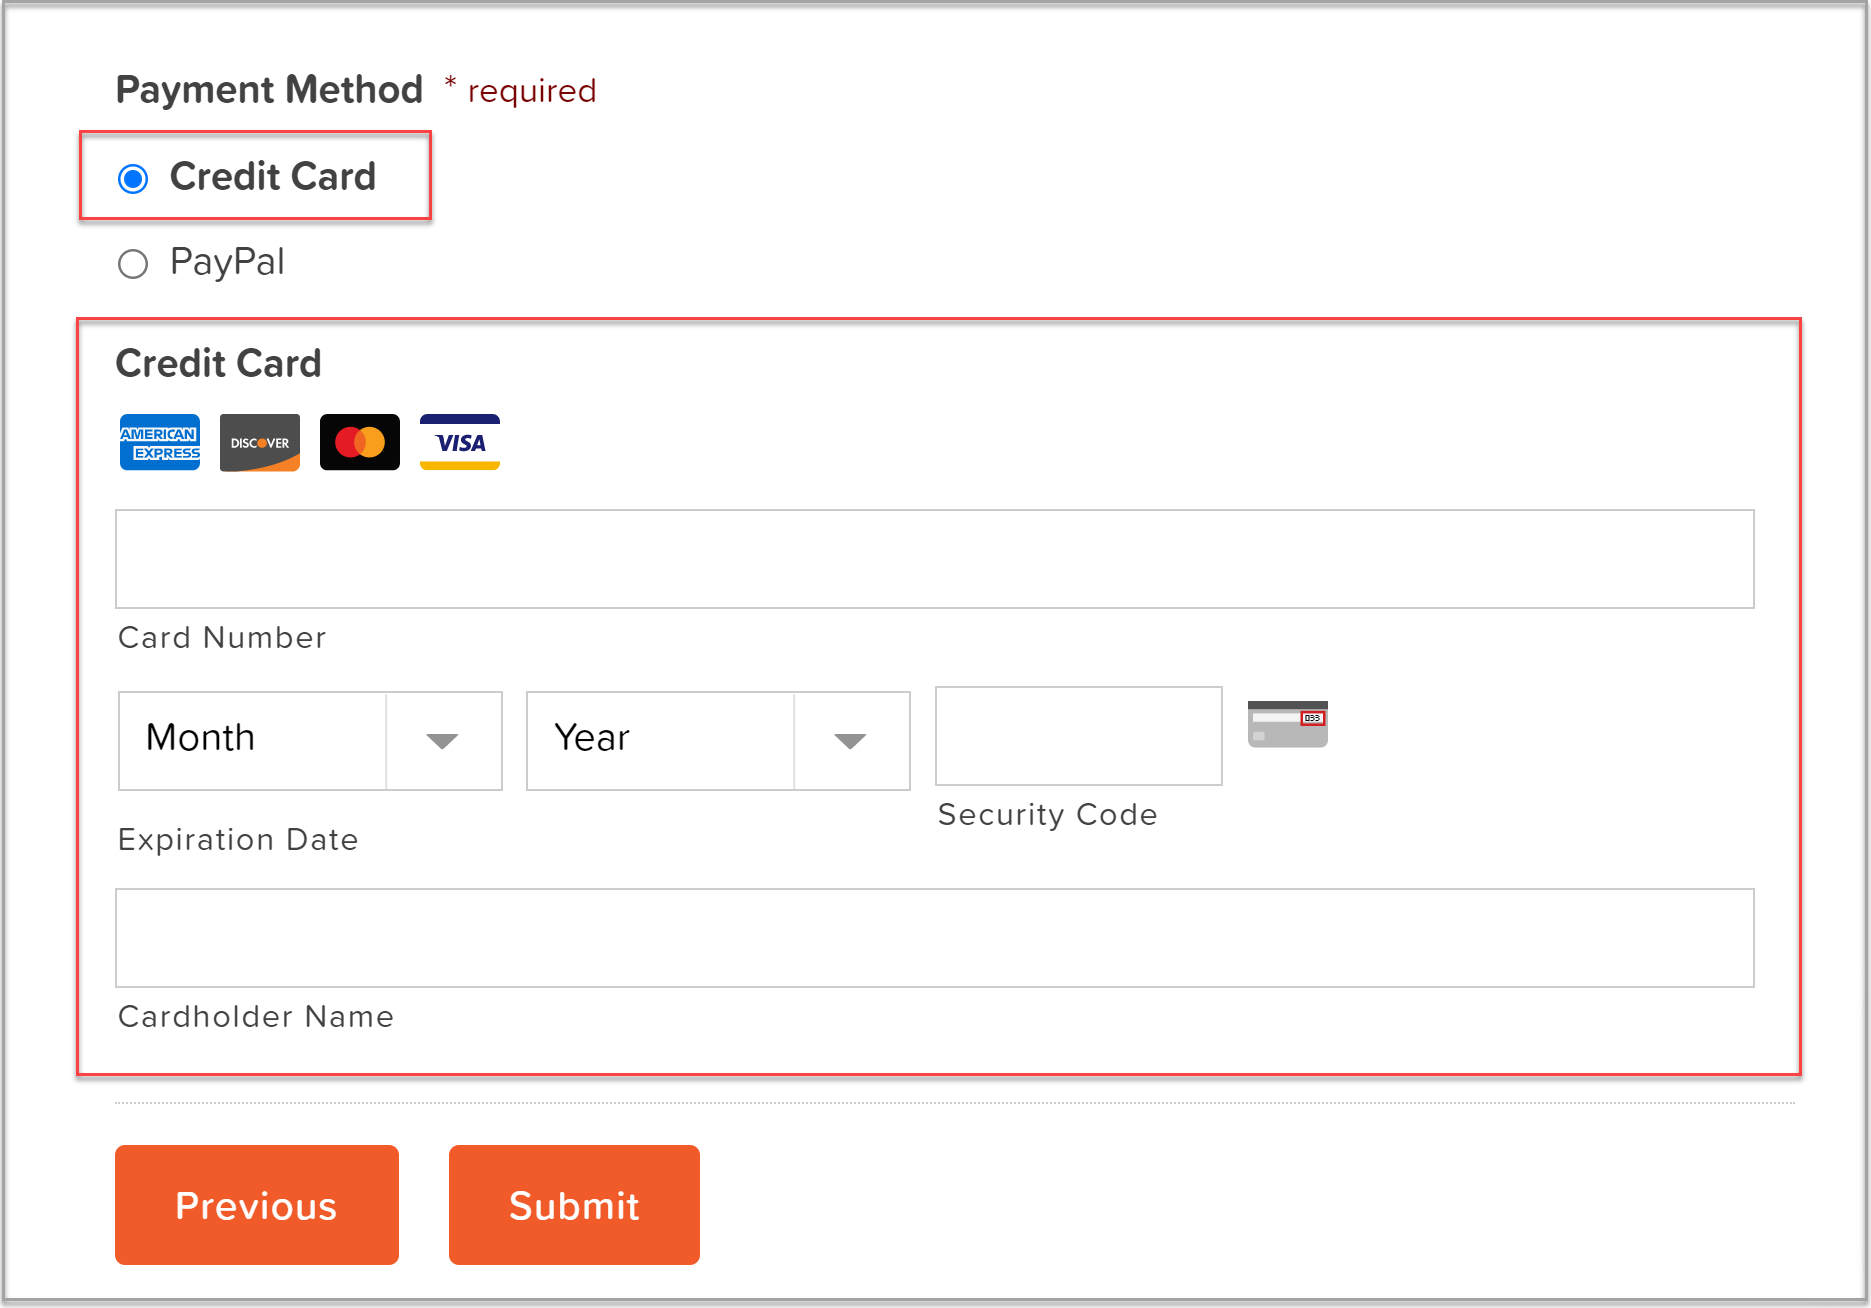
 As you can see below, if the user selects Credit Card as their payment method, the credit card field is displayed on the form…
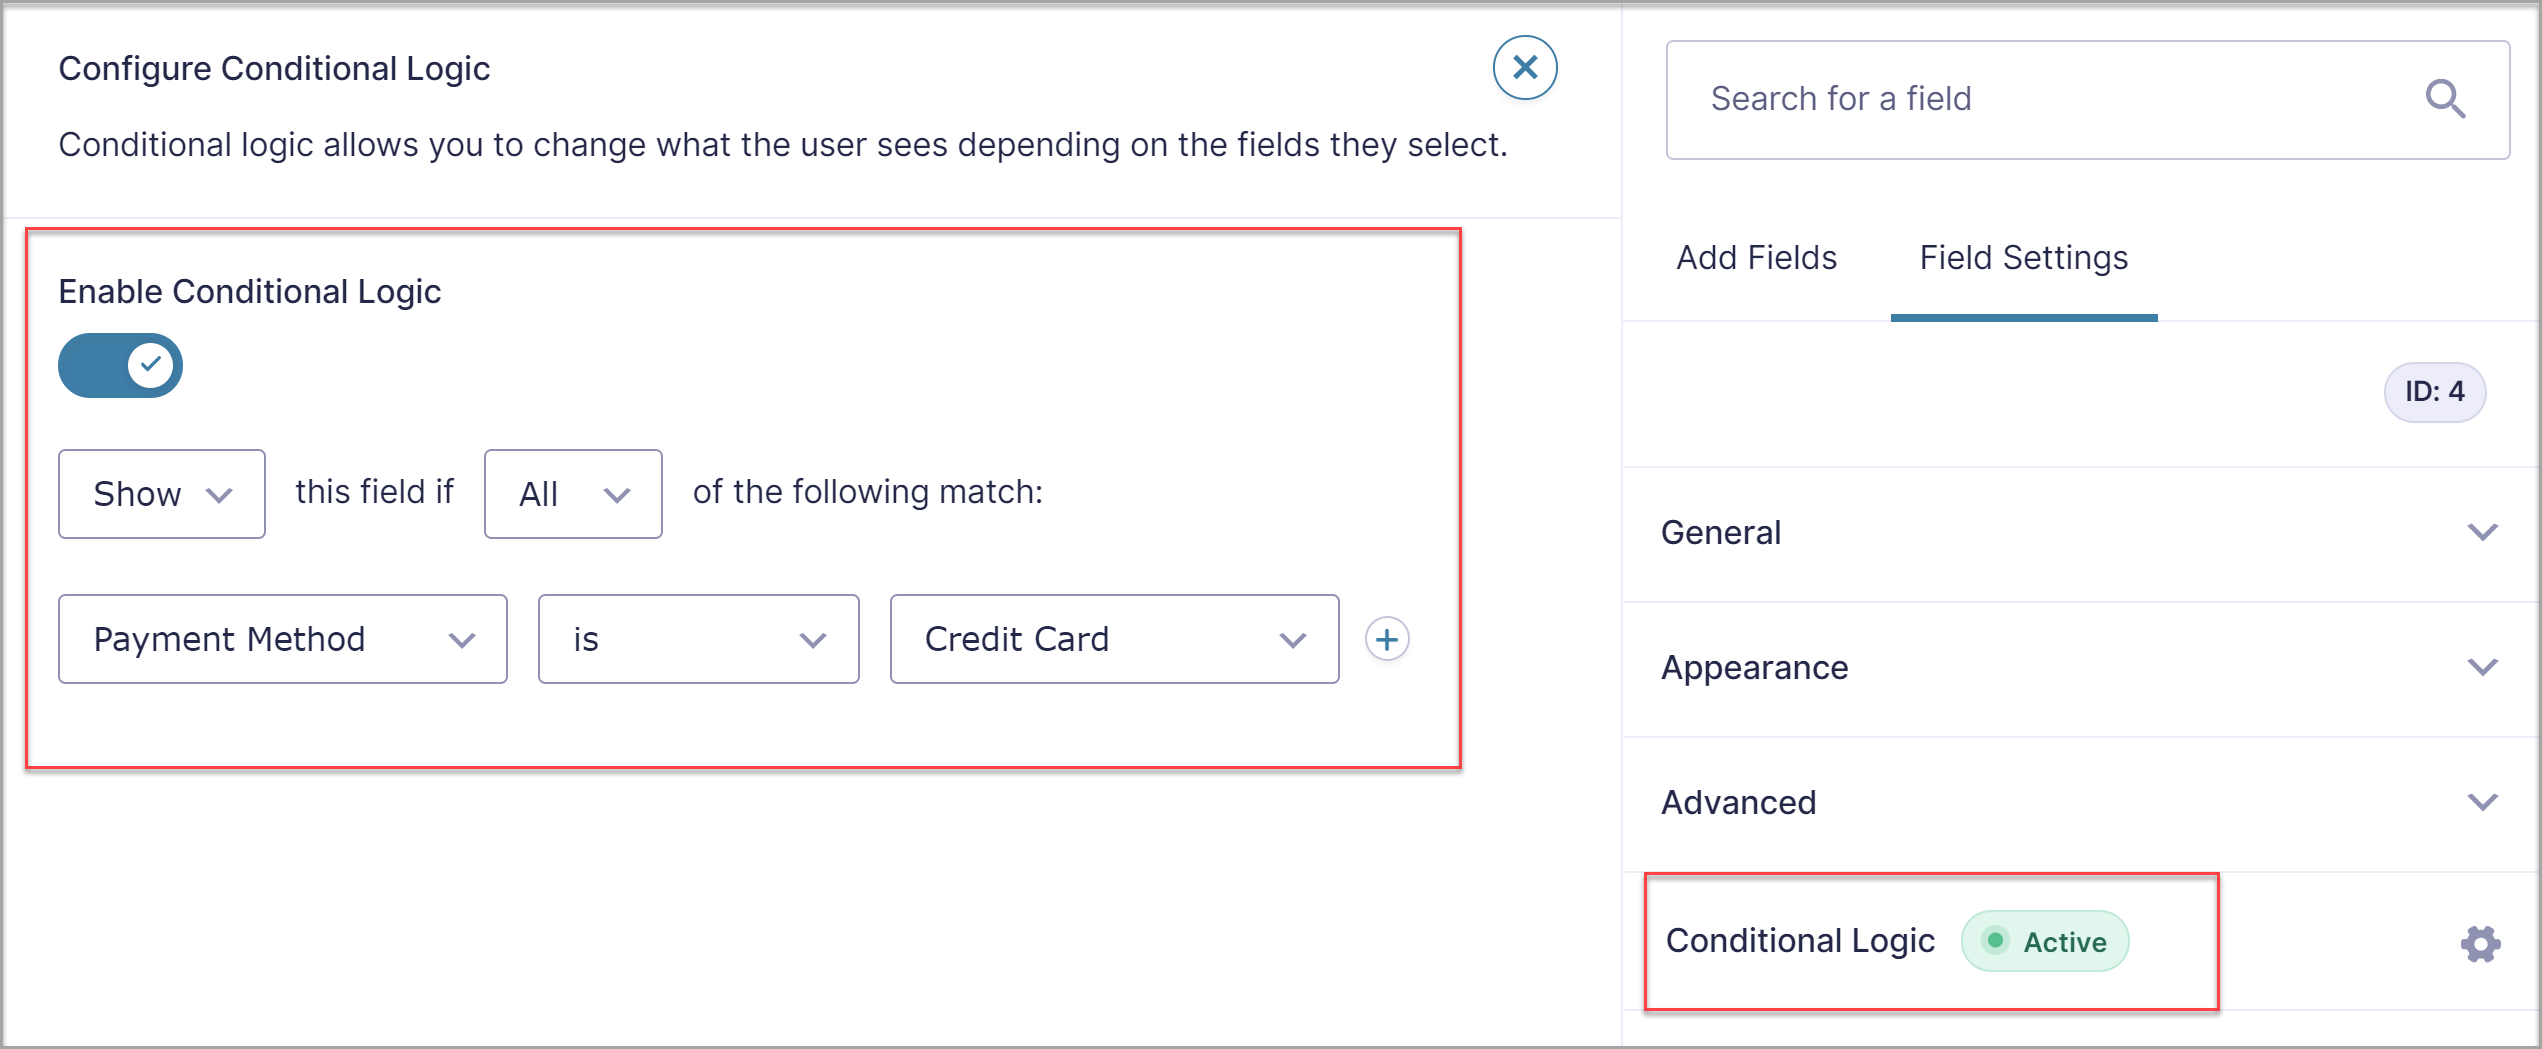
 Conditional logic is configured via the payment form fields (in this case, the Stripe field)…
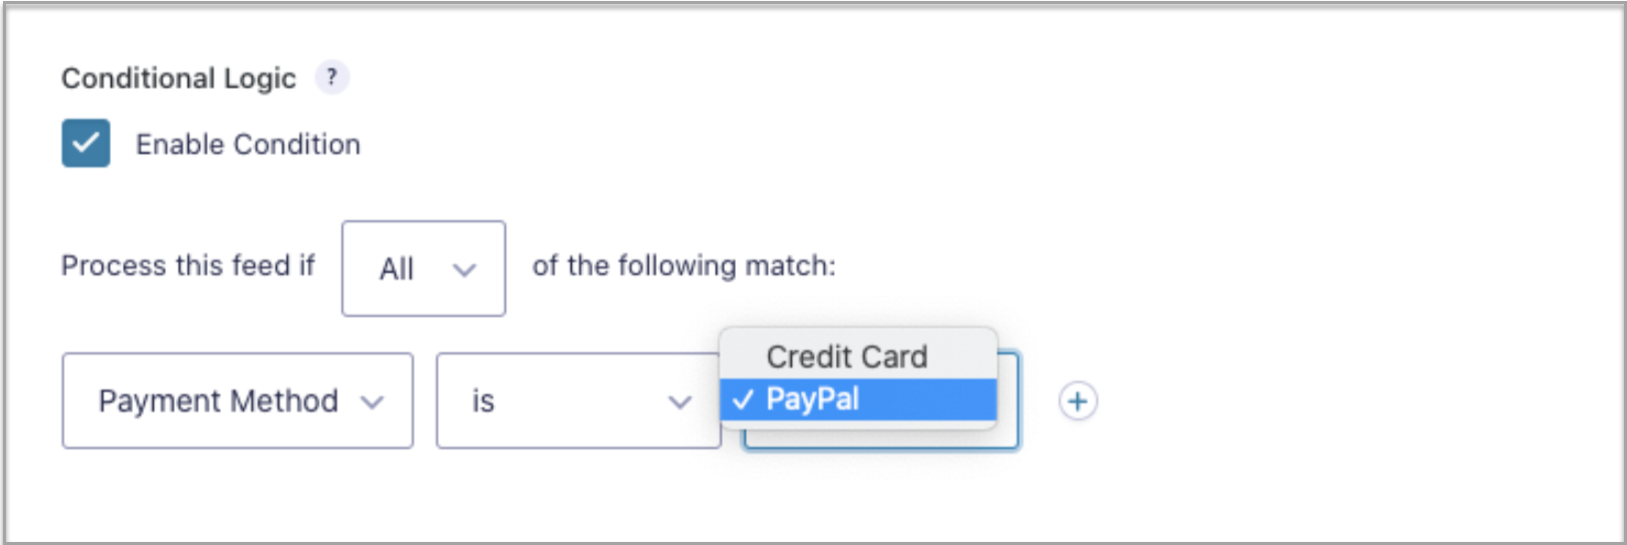
 You will also need to set conditional logic for each payment form feed, so the correct feed is processed when a form is submitted. To do so, hover over Form Settings and select the appropriate payment gateways that need to be configured. Below you can see we have set the conditional logic for the PayPal feed…
 You can use the same setup for any other payment gateway that you have enabled on your website with Gravity Forms. For more information on this process, check out this article – Setting Up Conditional Payments.
Using Form Feeds with Conditional Logic
Form feeds allow you to send your form information to various other services and applications, not just to process payments. You can use conditional logic to determine which feeds should be processed and triggered based on the user’s input.
For example, you could use conditional logic to only add users to your email list if they select to receive emails about company news and updates. This helps ensure you collect valuable leads and target them with the right information in the future.
Here we have configured a Mailchimp feed to only process a form’s data if the user has agreed to being sent the ‘latest news and announcements’…

Ready to Make Your Forms Smarter with Conditional Logic and Gravity Forms?
As you can see, there are plenty of ways to make use of conditional logic and make your forms more intelligent. If you want to learn more about conditional logic and how it works, the following resources will be helpful:
- Gravity Forms Documentation: Conditional Logic official docs
- How to Use Conditional Logic – Gravity Forms Video Tutorial
- Quick Guide to Using Conditional Logic for Smarter Forms
Still don’t have Gravity Forms? No worries! Start with a personalized free demo and play around with all of the features our plugin has to offer. Use the intuitive form builder to create forms from scratch, customize the different form templates, and check out all the add-ons that can make your forms even more powerful.
Already sold on using Gravity Forms? Purchase our premium WordPress form plugin today!

If you want to keep up-to-date with what’s happening on the blog sign up for the Gravity Forms newsletter!
