This Month’s Featured Add-On: GetResponse

If you want to use GetResponse for collecting email subscribers via your WordPress website, Gravity Forms makes this process very easy. The GetResponse Add-On allows you to quickly connect your web forms with the email marketing provider and automatically pass on any relevant information you want to gather.
In this blog post, we’ll show you the entire process in detail. We’ll talk about reasons why using GetResponse for powering your email marketing is a great idea and give you a step-by-step rundown of how to integrate your sign-up forms with the popular email platform using Gravity Forms.
Why Use GetResponse for Your WordPress Forms?
As a first step, let’s talk about reasons to consider using GetResponse as your email marketing software and beyond:
- Wide range of options — The service allows you to send newsletters, abandoned cart emails, autoresponders, transactional emails, RSS emails, and more. In addition, you can easily create email sequences and customer journeys to onboard and keep subscribers engaged.
- AI-powered email generator — GetResponse has a drag-and-drop email template generator. It comes with 200+ pre-designed templates, access to two million free stock images and GIFs, as well as an AI writing assistant and subject line generator. All of these make creating emails faster and easier.
- Analytics and tracking — Segment your audience based on behavior and engagement to send more targeted emails. A/B test your emails to find winning subject lines, images, CTAs, and more. Track open rates, bounces, unsubscribes, what people click on in your emails, and other metrics.
- Integrations — GetResponse integrates with many popular platforms and apps aside from WordPress. Examples include PayPal, Stripe, Facebook, Instagram, YouTube, etc.
- Other marketing features — Besides email marketing, GetResponse offers other tools to make your online marketing successful. This includes an AI website builder and landing page generator, popups, push notifications, live chat, SMS marketing, marketing automation, and e-commerce solutions.
In short, the email marketing subscriber is chock full of features to build and engage your audience. If you want to experience them, they have a free plan and a 30-day trial for their paid features.
GetResponse + Gravity Forms = Awesome Team

That leaves the question, what makes GetResponse a great companion for Gravity Forms?
For one, using the Gravity Forms GetResponse Add-On, you can connect your WordPress website to the email marketing provider with just a few clicks. You don’t need technical knowledge, can build your forms in the usual way, and easily send any data you collect to your desired email campaign in GetResponse.
What kind of data, you ask?
Thanks to Gravity Forms, that is entirely up to you, allowing you to collect pretty much any information you want and in many formats. With the help of the add-on, you can map this information to the respective fields in GetResponse.
Furthermore, Gravity Forms’ powerful conditional logic allows you to segment email subscribers into lists at sign-up and qualify leads beforehand. Plus, you can easily ensure GDPR compliance of your email list. Gravity Forms’ Consent field allows you to do so in just a few clicks.
The GetResponse Add-On is available on all Gravity Forms licenses.
How to Use GetResponse on Your WordPress Website With Gravity Forms
Enough preamble, let’s get to why you are actually here, which is how to implement the whole thing. For the following, we will assume you already have a WordPress website with Gravity Forms installed. If you are not yet a Gravity Forms customer, you can also follow along by creating a free demo site to test drive the plugin first.
1. Sign Up to GetResponse and Create an API Key
One thing you will need is a GetResponse account. So let’s take care of that first. (If you are already a GetResponse user, you can skip this step.)
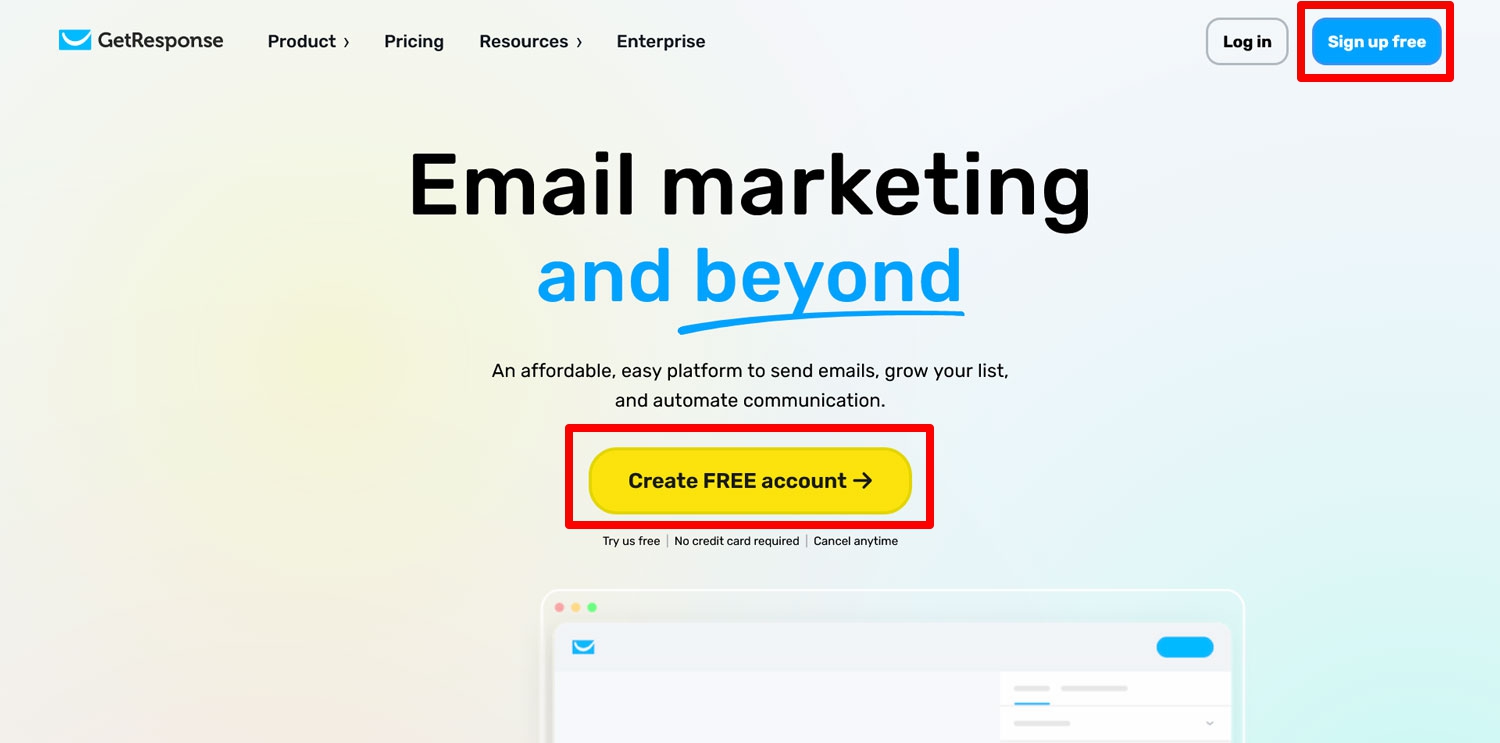
Head on over to the GetResponse homepage and click one of the calls to action to sign up (it’s free).
The sign-up process is nothing you haven’t done before. Provide your name, email address, and a password. Then, click the confirmation link in the email they send you and provide your address information in the next step (this is required for legal reasons to authenticate your emails). A few more clicks and you should find yourself In the dashboard.
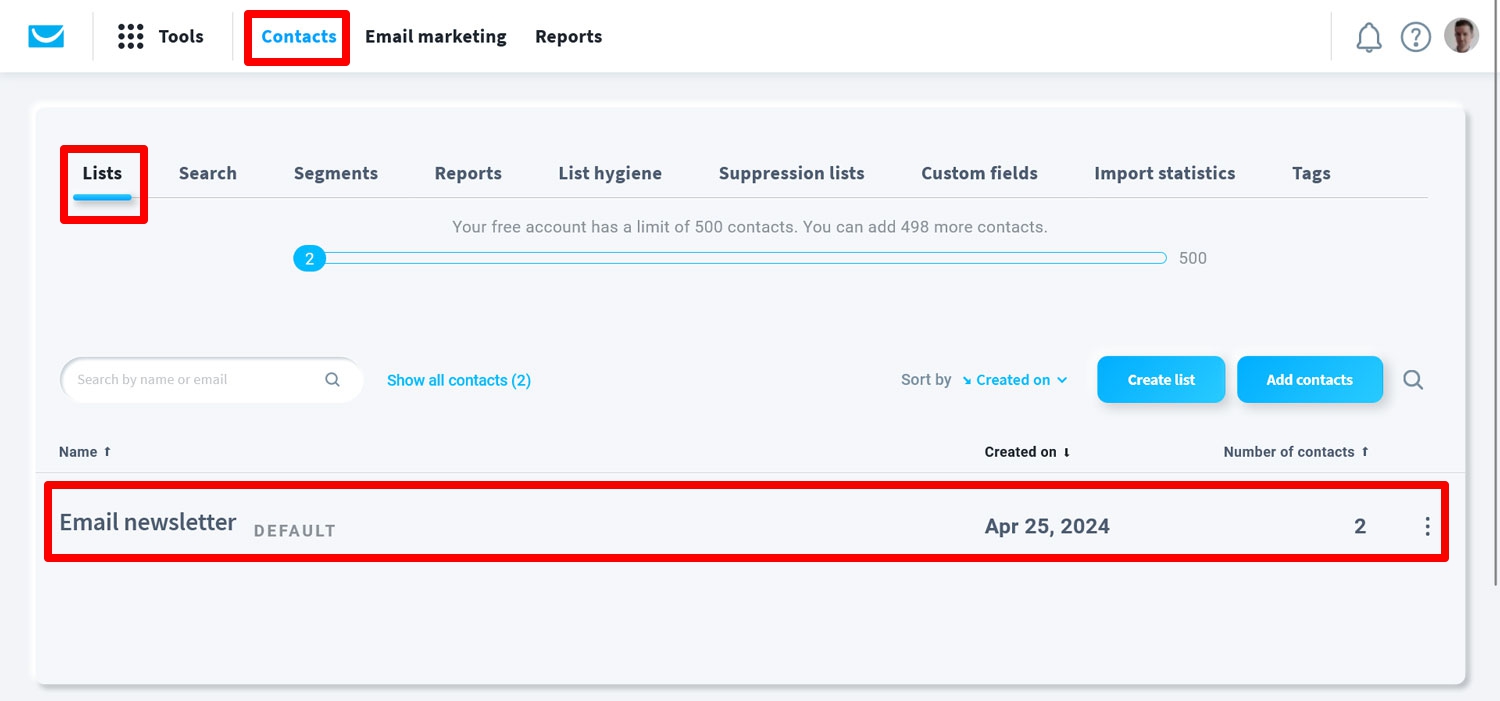
GetResponse automatically creates an email list for you. You can find it under Contacts.
Feel free to rename it or create a new one.
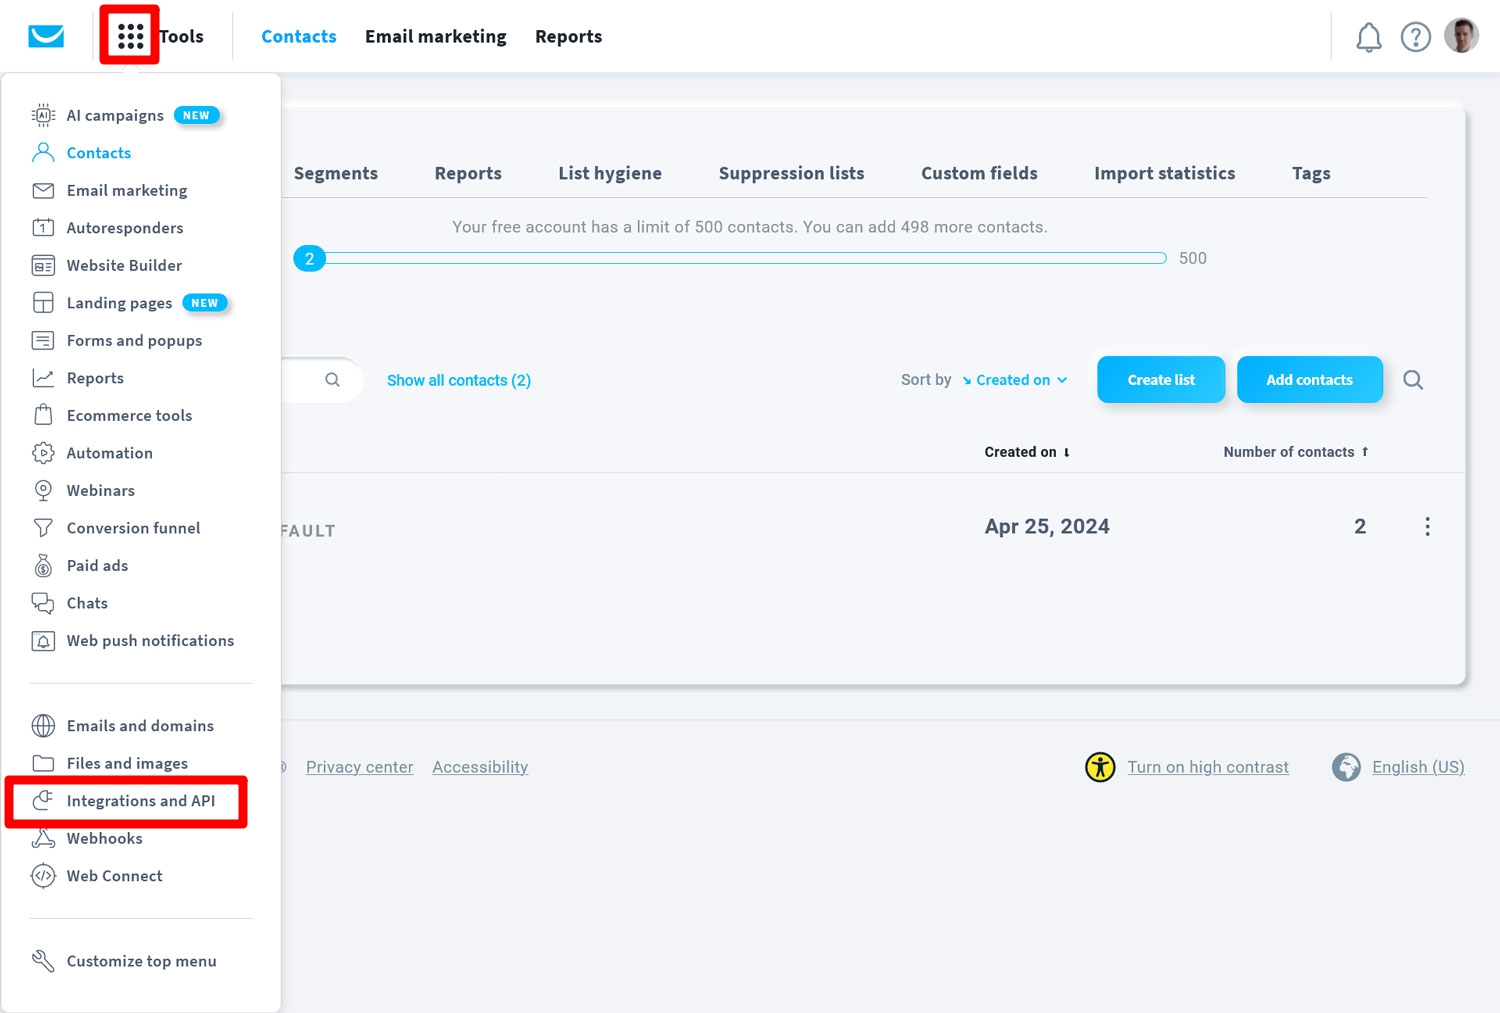
Then, your next step is to click on Tools in the top toolbar and then API and Integrations.
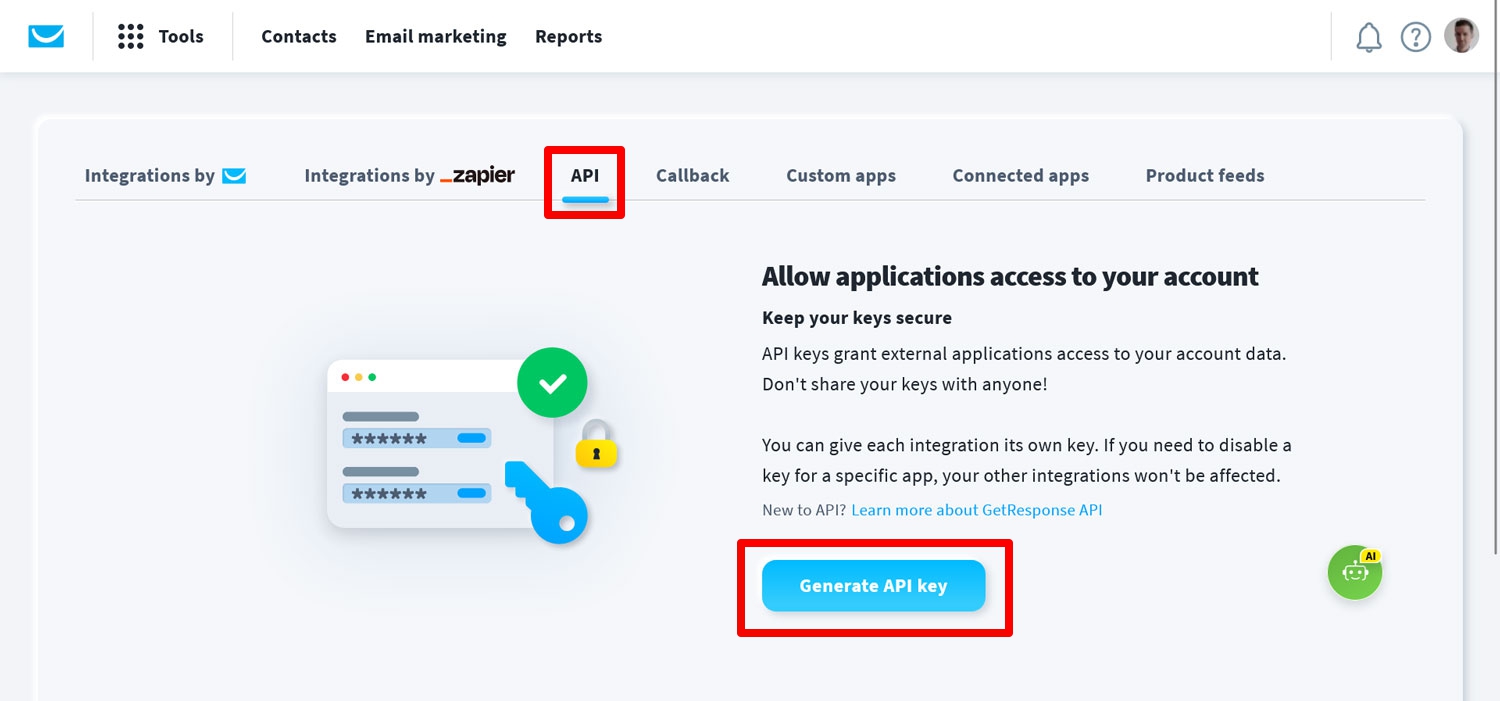
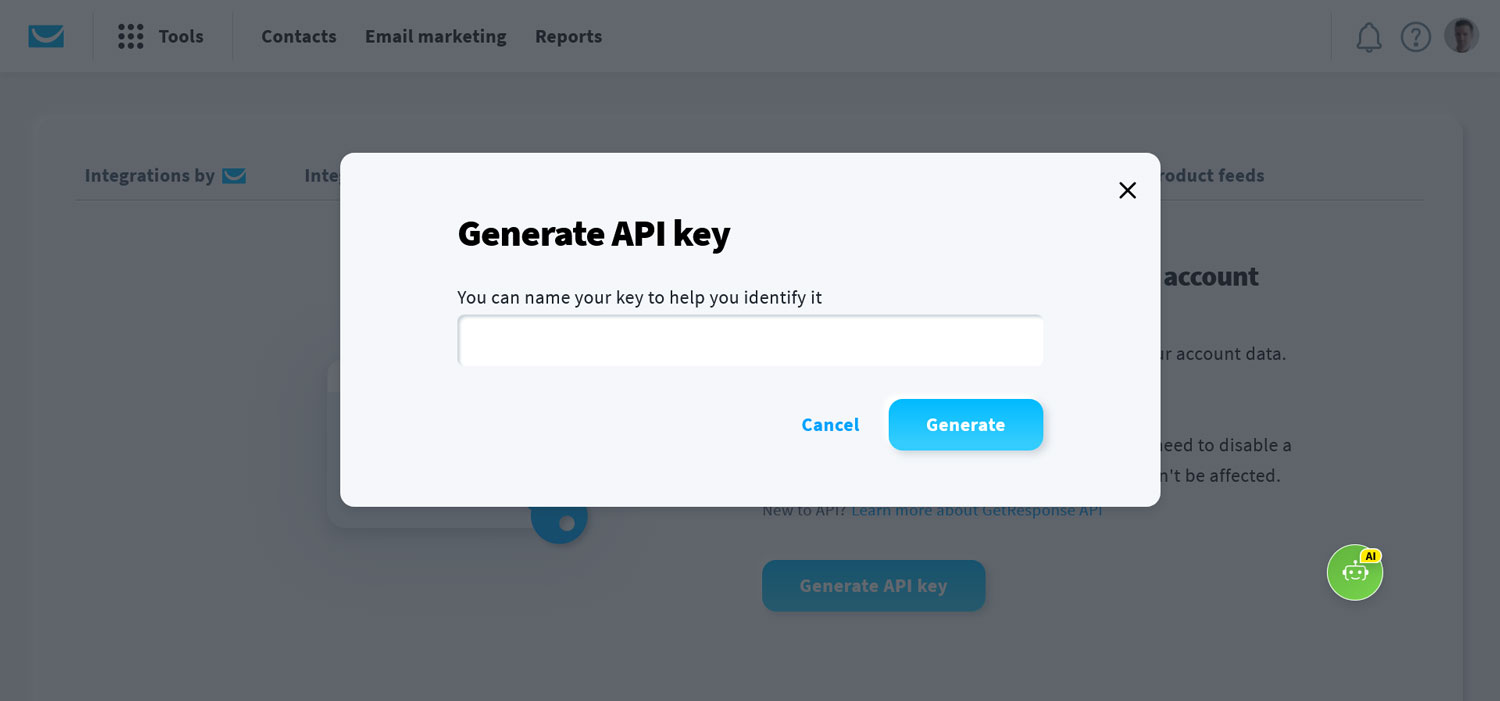
After that, pick the API tab and then click the button that says Generate API Key.
A popup will appear asking you to name the key so you can identify it later.
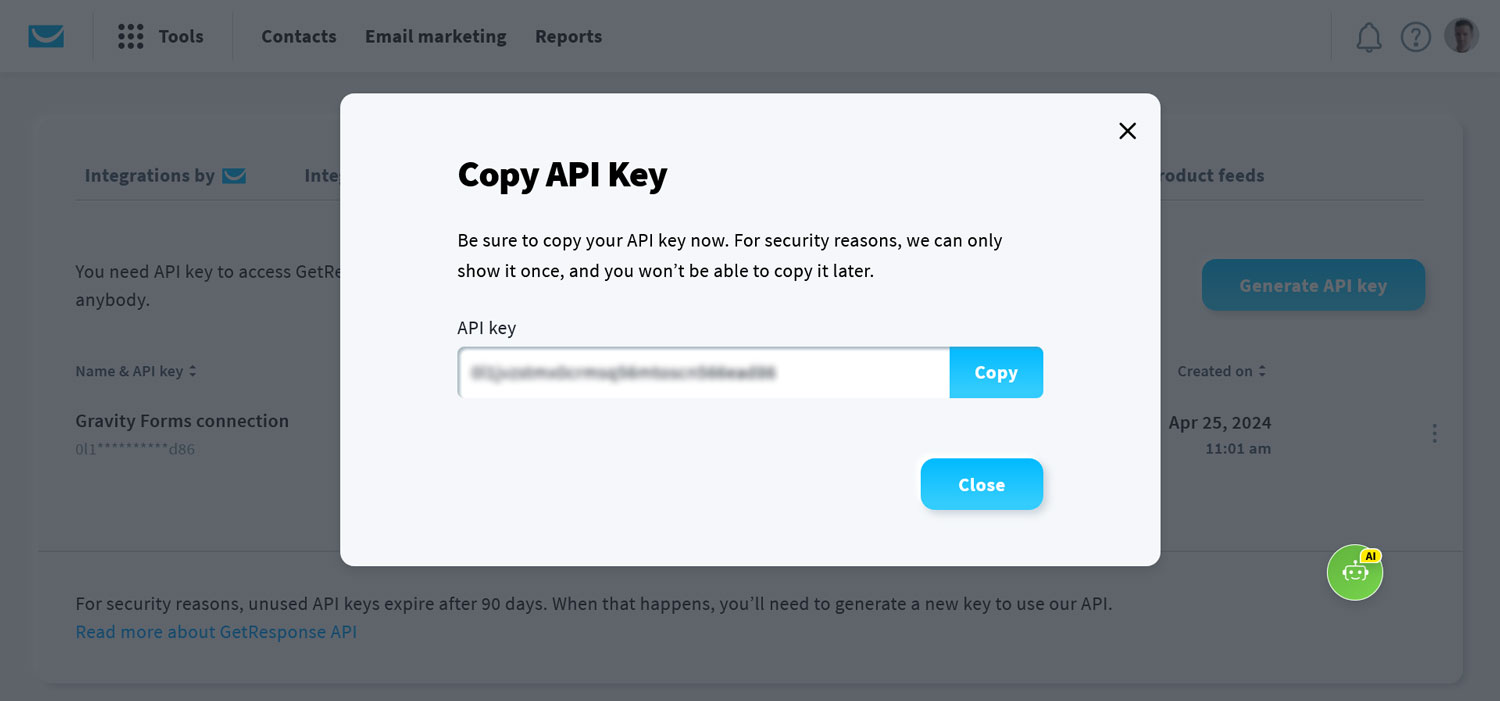
Do that and click Generate. After that, GetResponse will show you the API key.
Make sure to copy and save it somewhere because once you close the window, you won’t be able to access it again.
2. Install the GetResponse Add-On and Connect Your Site
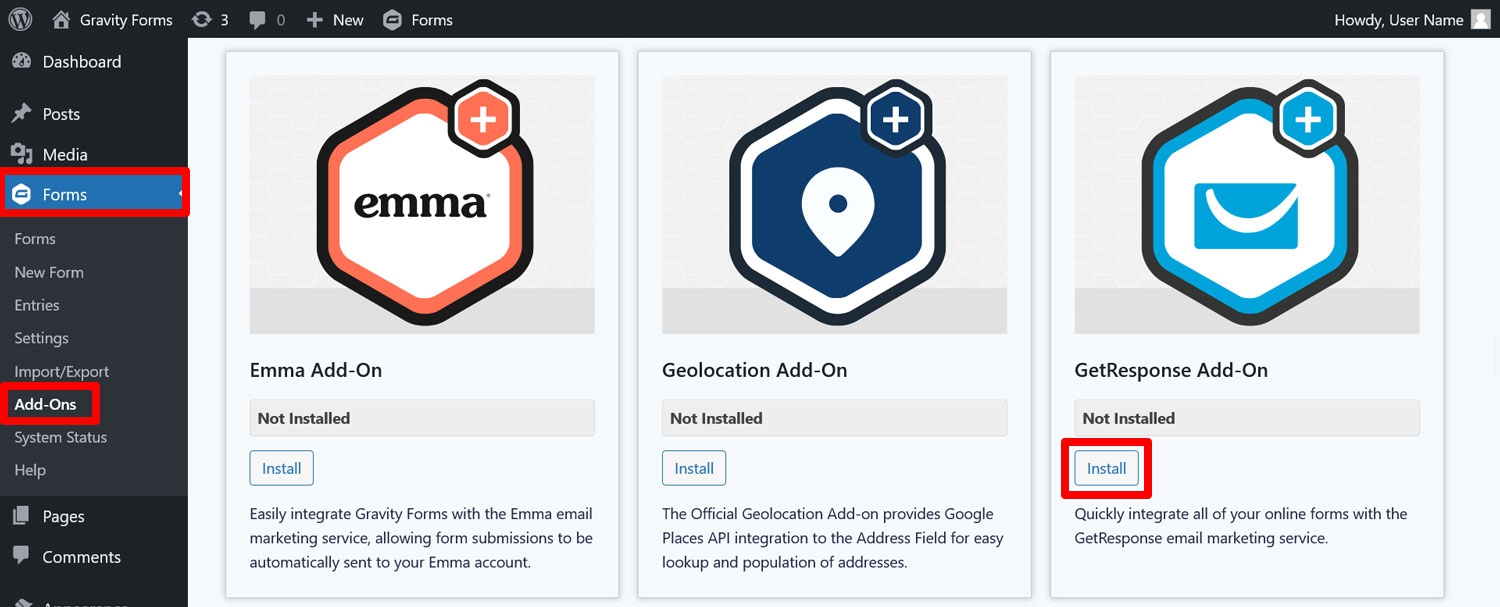
Now it’s time to turn to your WordPress website. Here, go to Forms → Add-Ons and look for the GetResponse Add-On by name. Click Install once you have found it.
When the installation is complete, make sure to activate the add-on as well.
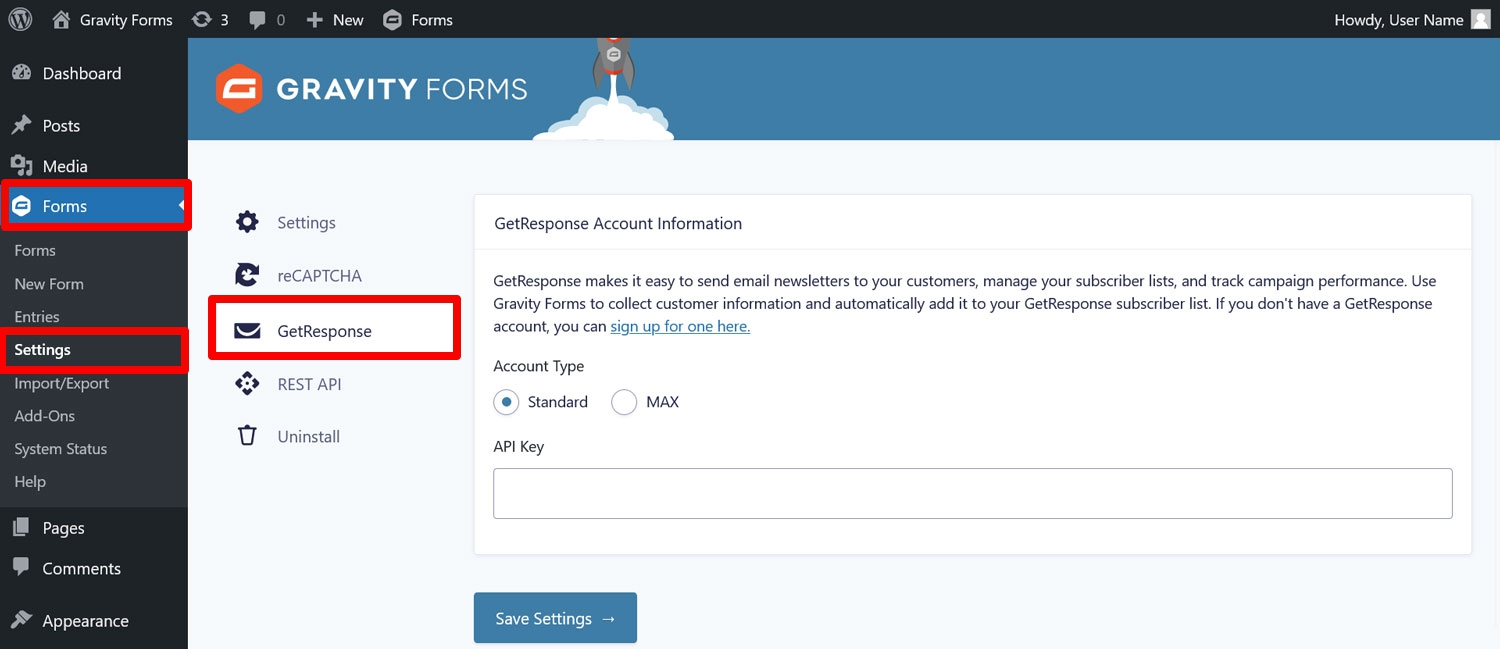
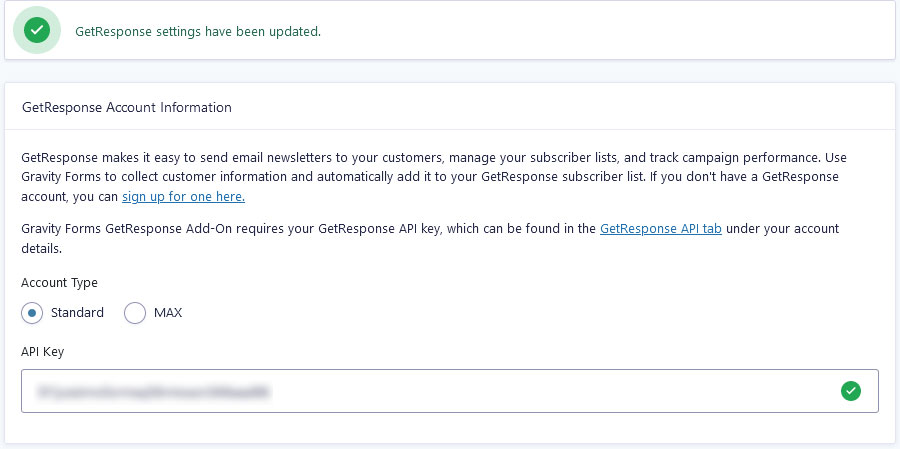
After that, go to Forms → Settings → GetResponse in order to establish a connection between your WordPress website and email marketing provider. Once there, you will immediately see that it is asking for the API key you created earlier.
Copy and paste it in the correct field.
The singular other setting is only of interest if you are a subscriber of the GetResponse MAX plan. In that case, you need to pick the appropriate radio button at the top so that your site will connect to the correct API. This doesn’t apply in our case, so all we do is click Save Settings.
If everything worked, you should see a green check mark and positive feedback at the top.
3. Create an Email Signup Form
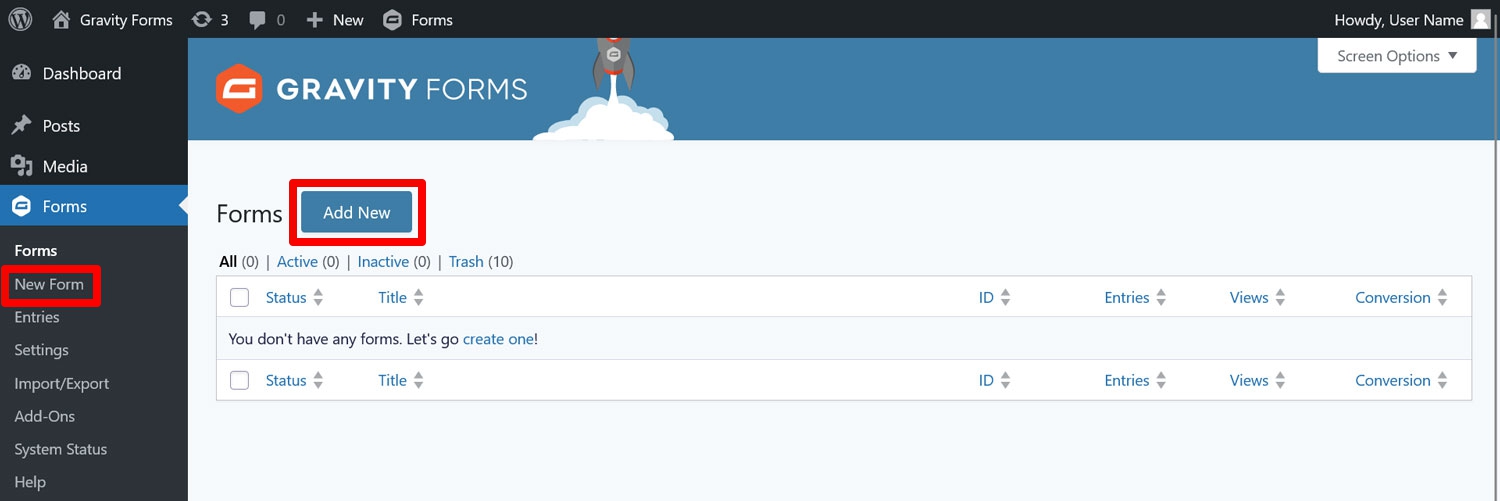
It’s now time to create a form that you’re going to use together with GetResponse. For that, go to Forms → New Form.
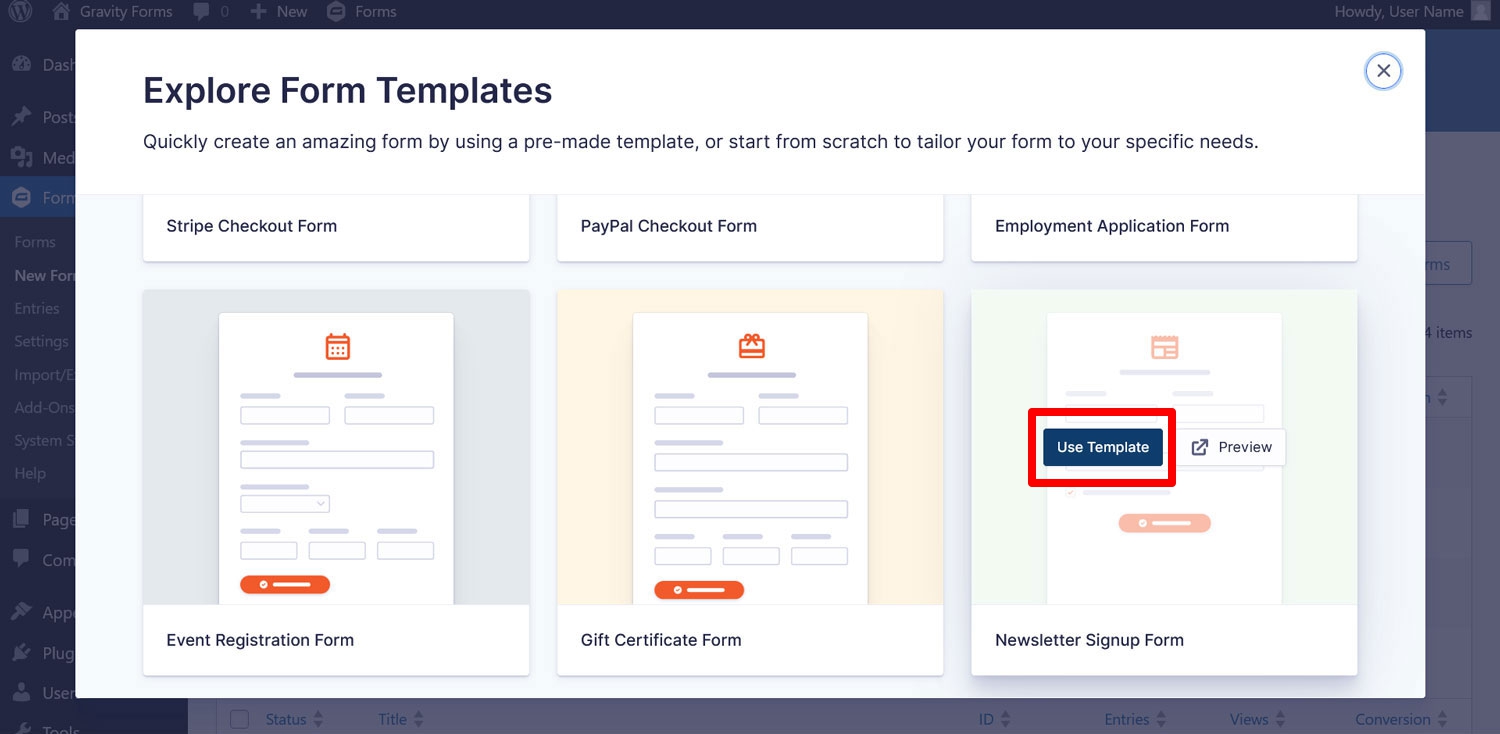
You can either start a form from scratch or use one of the many one-click templates Gravity Form offers. In this case, it makes sense to go for the Newsletter Signup Form template.
Find it in list, hover over it, and click Use Template.
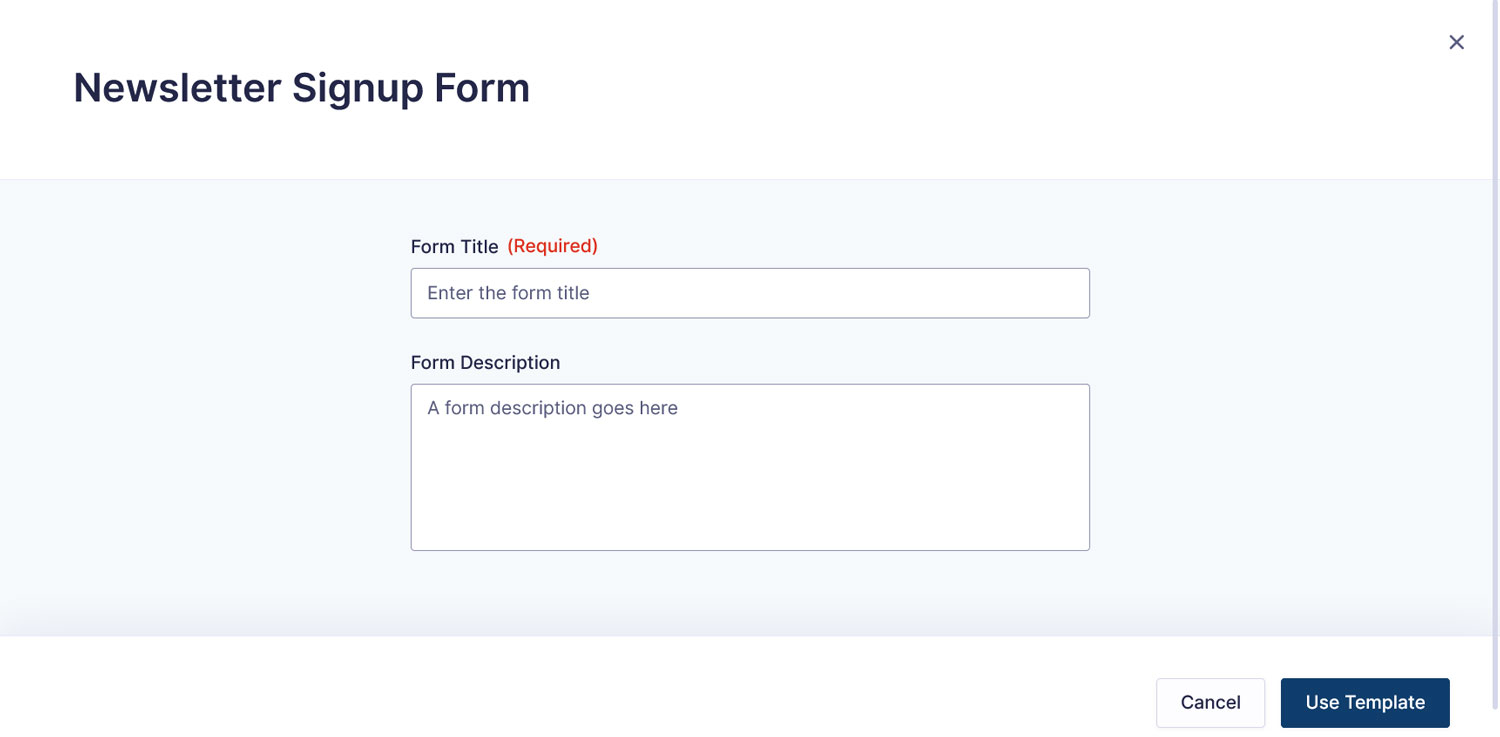
In the next step, name the form and continue.
After that, you will land in the form editor.
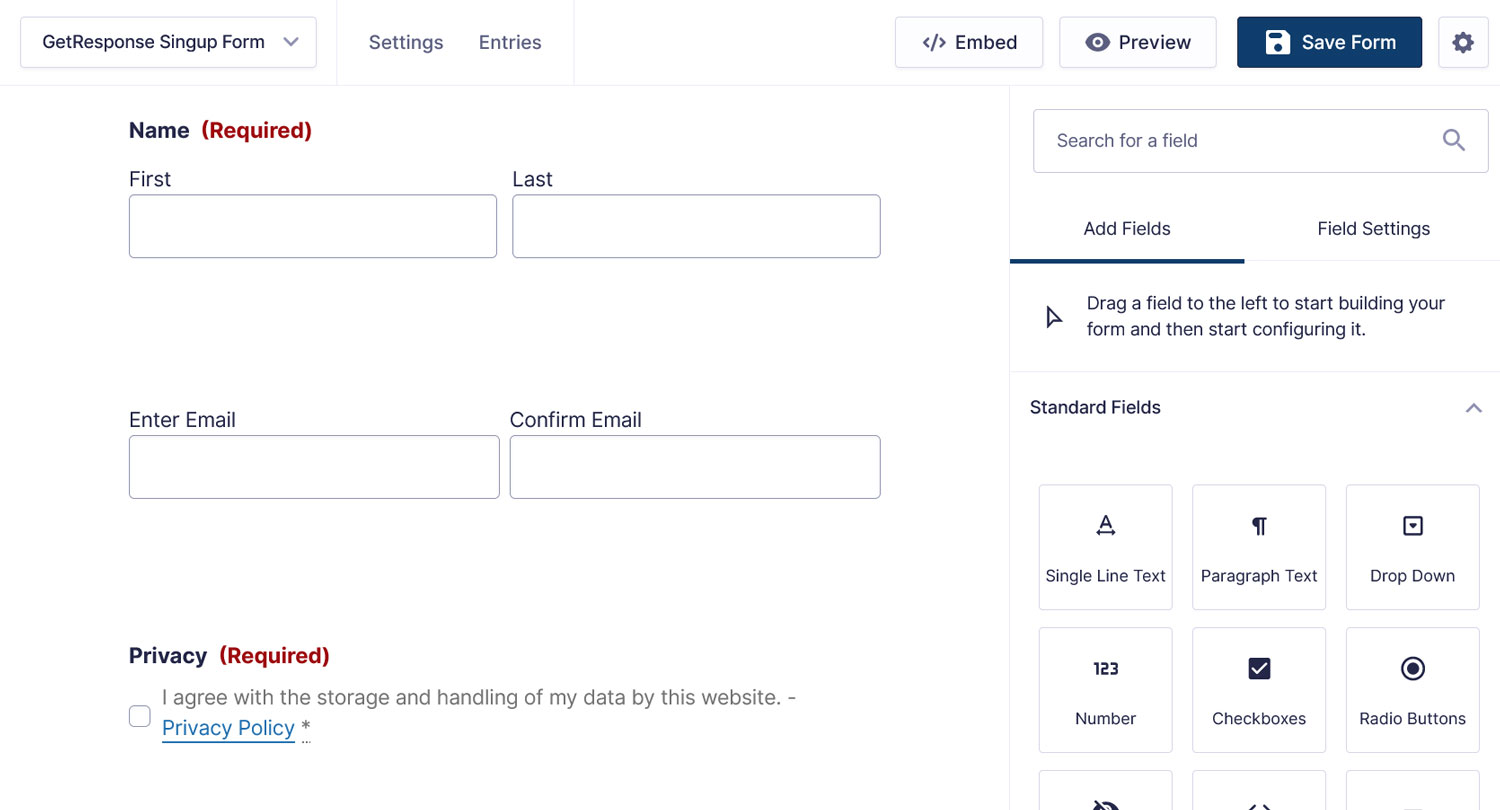
Because you chose a template, it already has all the fields you need to start collecting email subscribers:
- First and last name
- Email address and confirmation
- Opt-in confirmation field
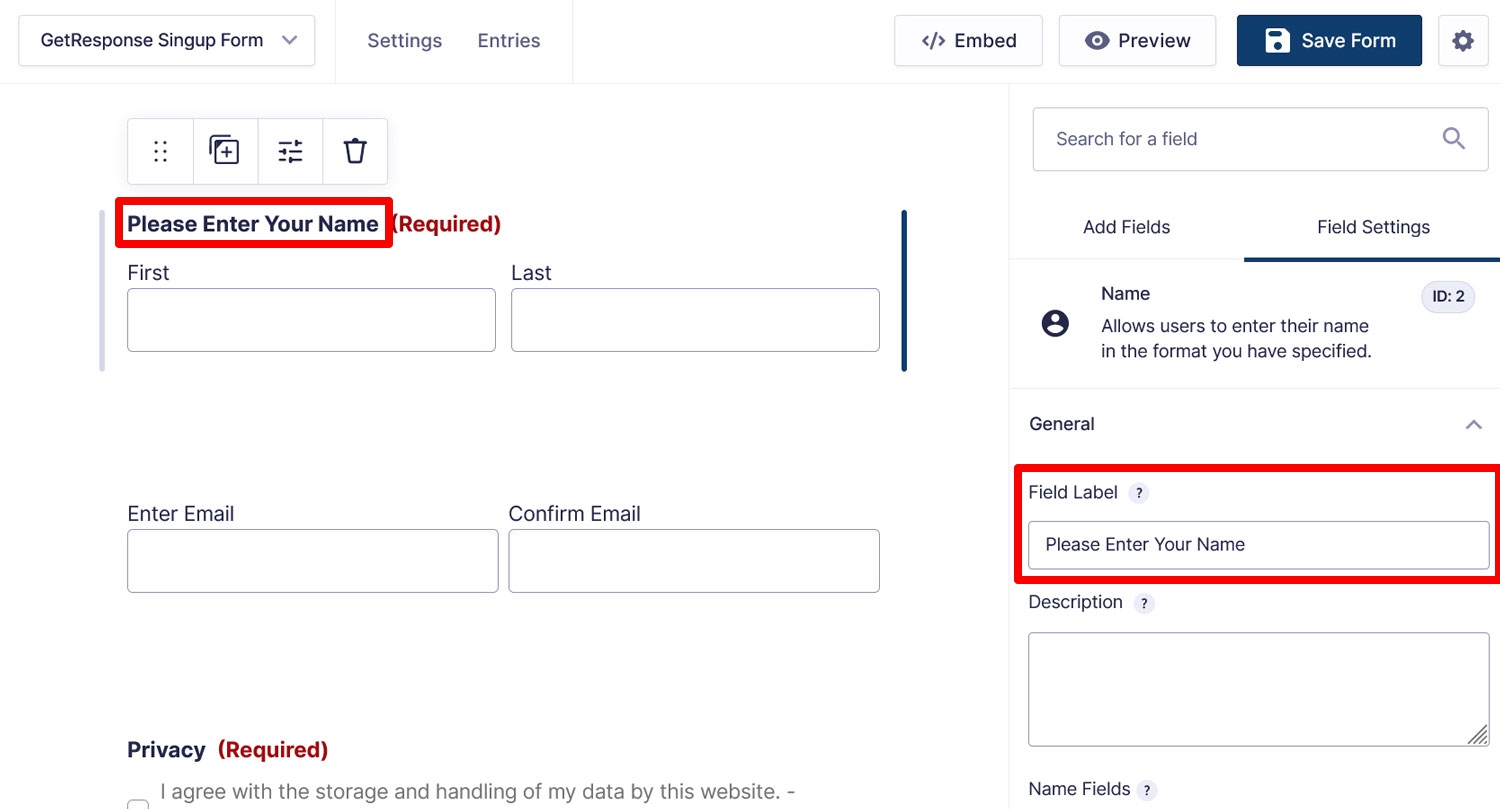
You are also free to customize it to your needs. Click on the fields to change their labels and other options, move them around, or delete them.
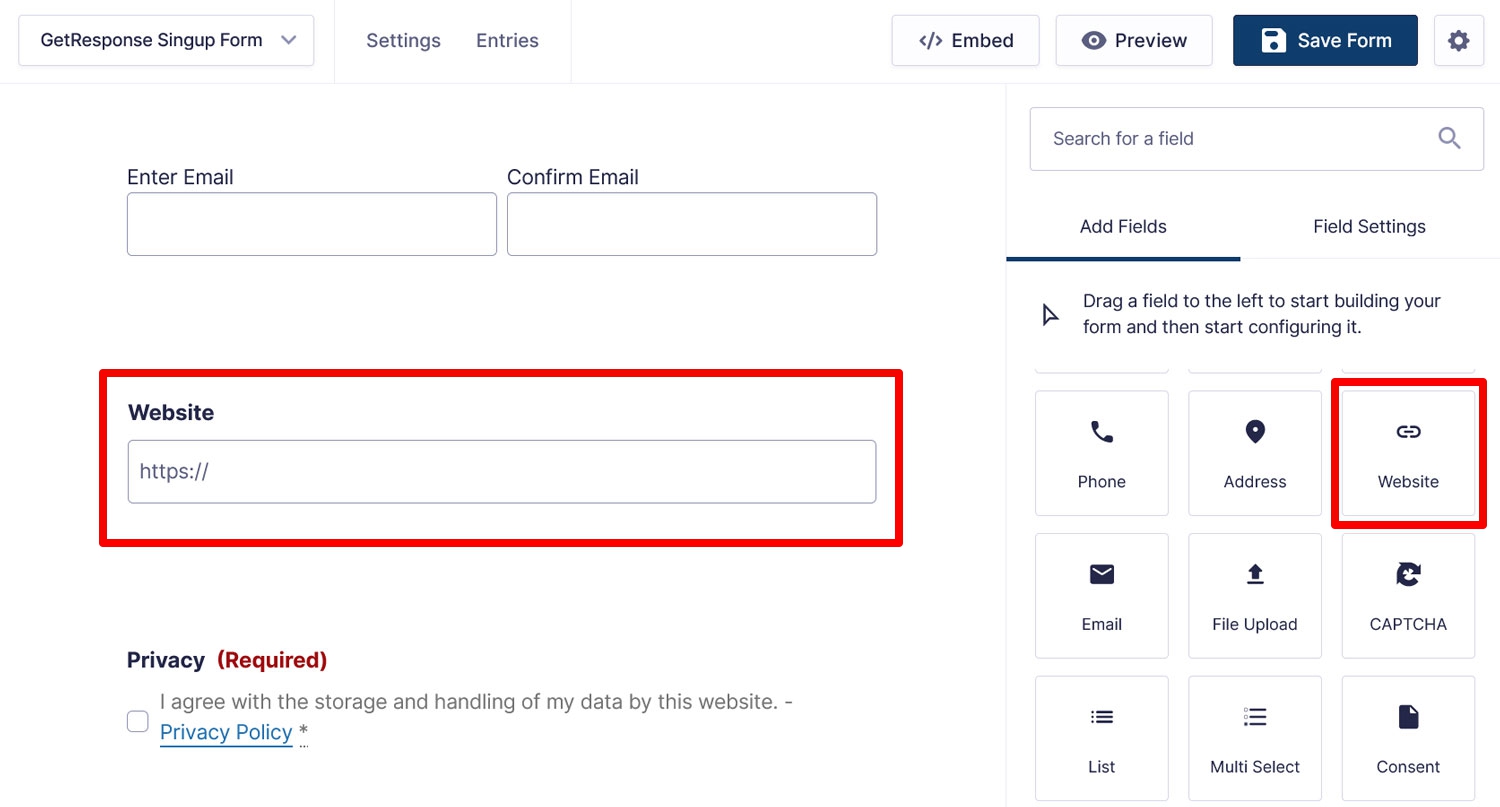
You can also add more fields from the right sidebar.
4. Set Up a GetResponse Feed
The next piece of puzzle that you need is a feed. In Gravity Forms, that’s the part that controls what happens to form data after it has been submitted. In this case, we want it to move on from your WordPress site to GetResponse.
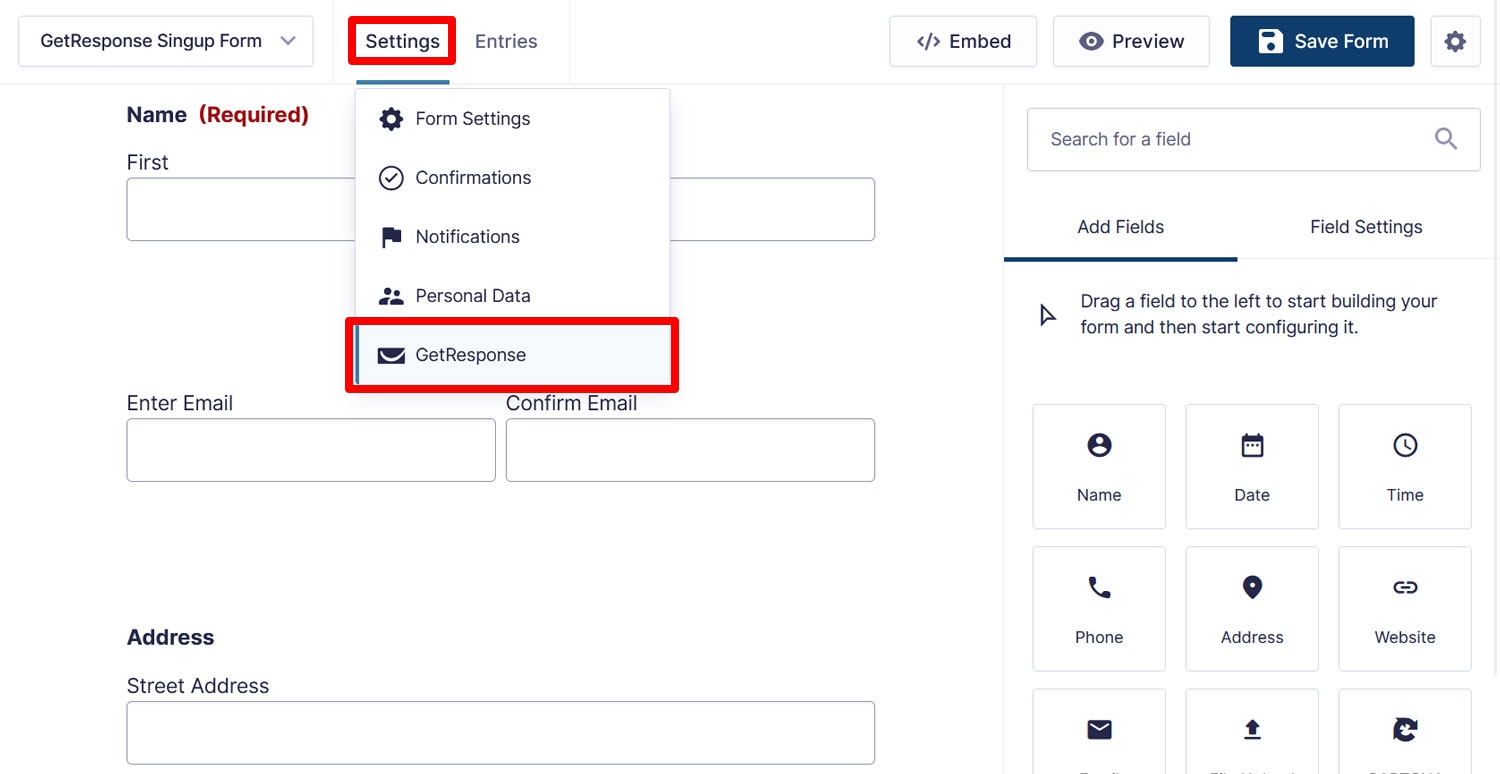
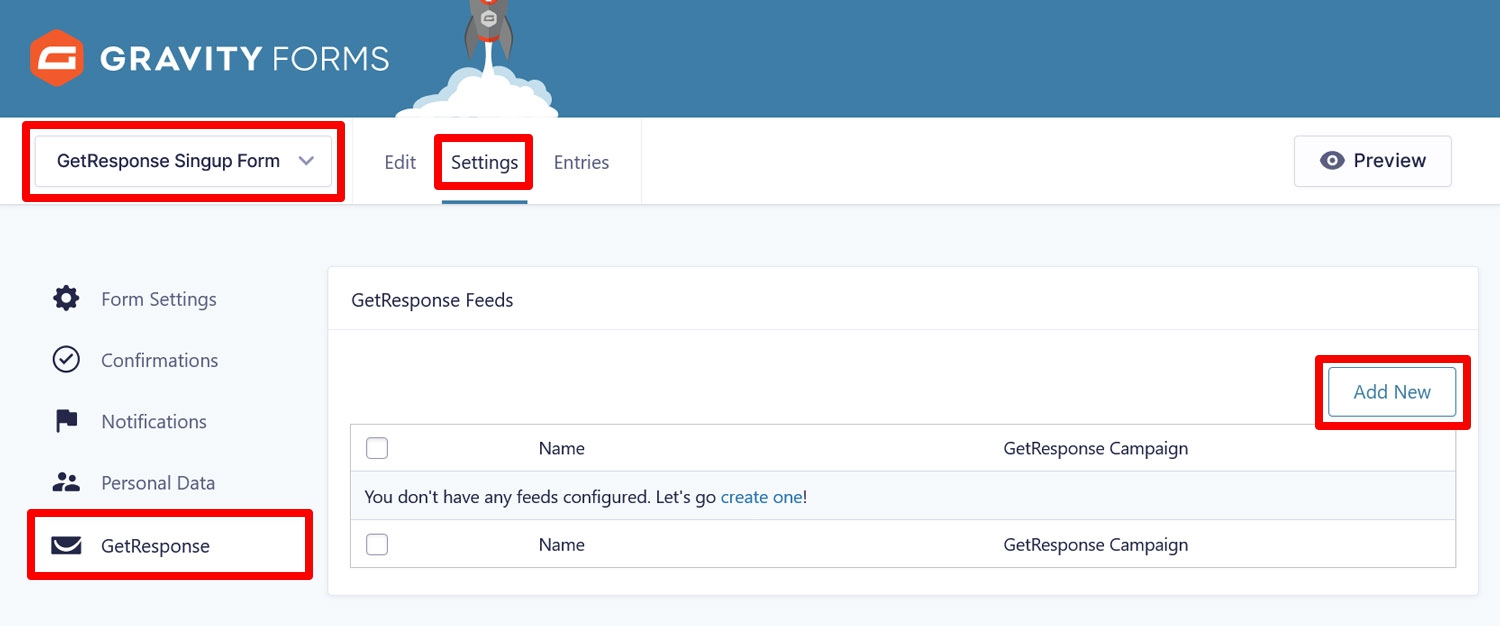
You create a feed in the form settings. Get there by hovering over Settings in the form editor and choosing GetResponse.
Alternatively, go to the Forms menu, hover over your form of choice, and choose Settings, then GetResponse. Either way gets you to this menu, where you need to click Add New under GetResponse Feeds.
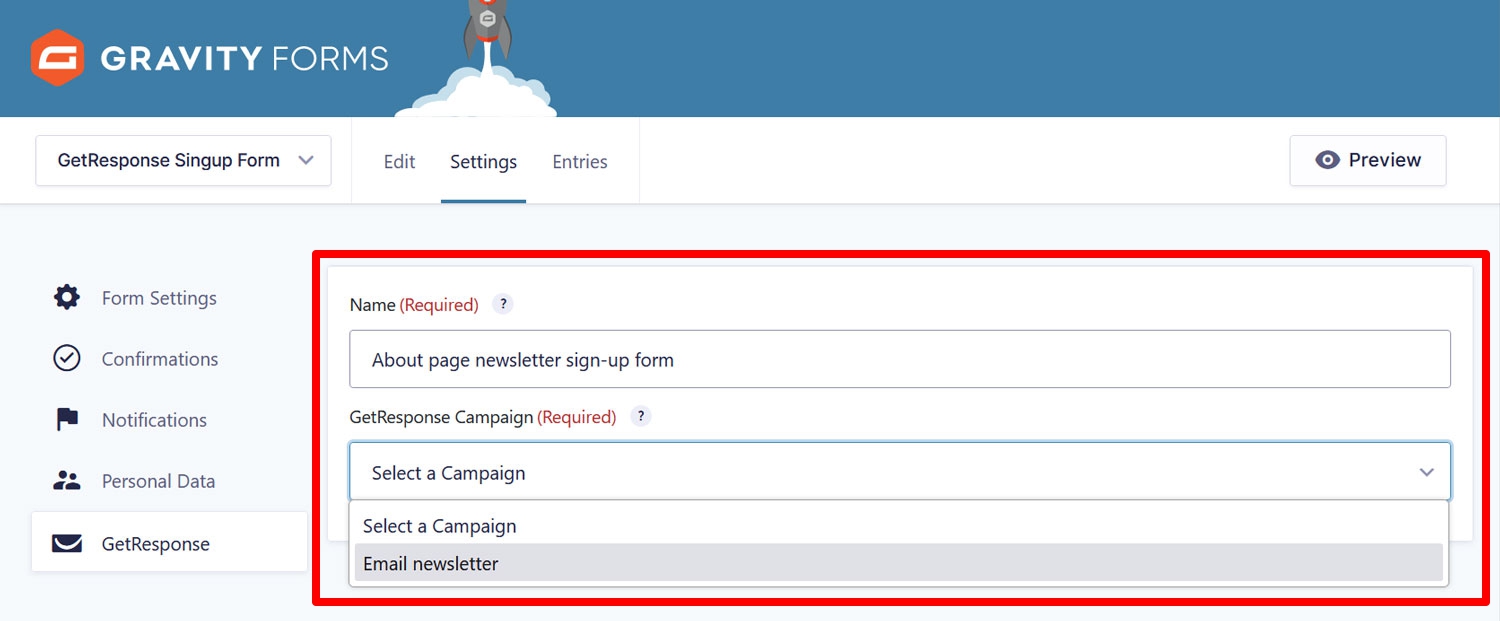
In the next screen, name your feed something meaningful and choose the email list you want to add subscribers to from the drop-down list.
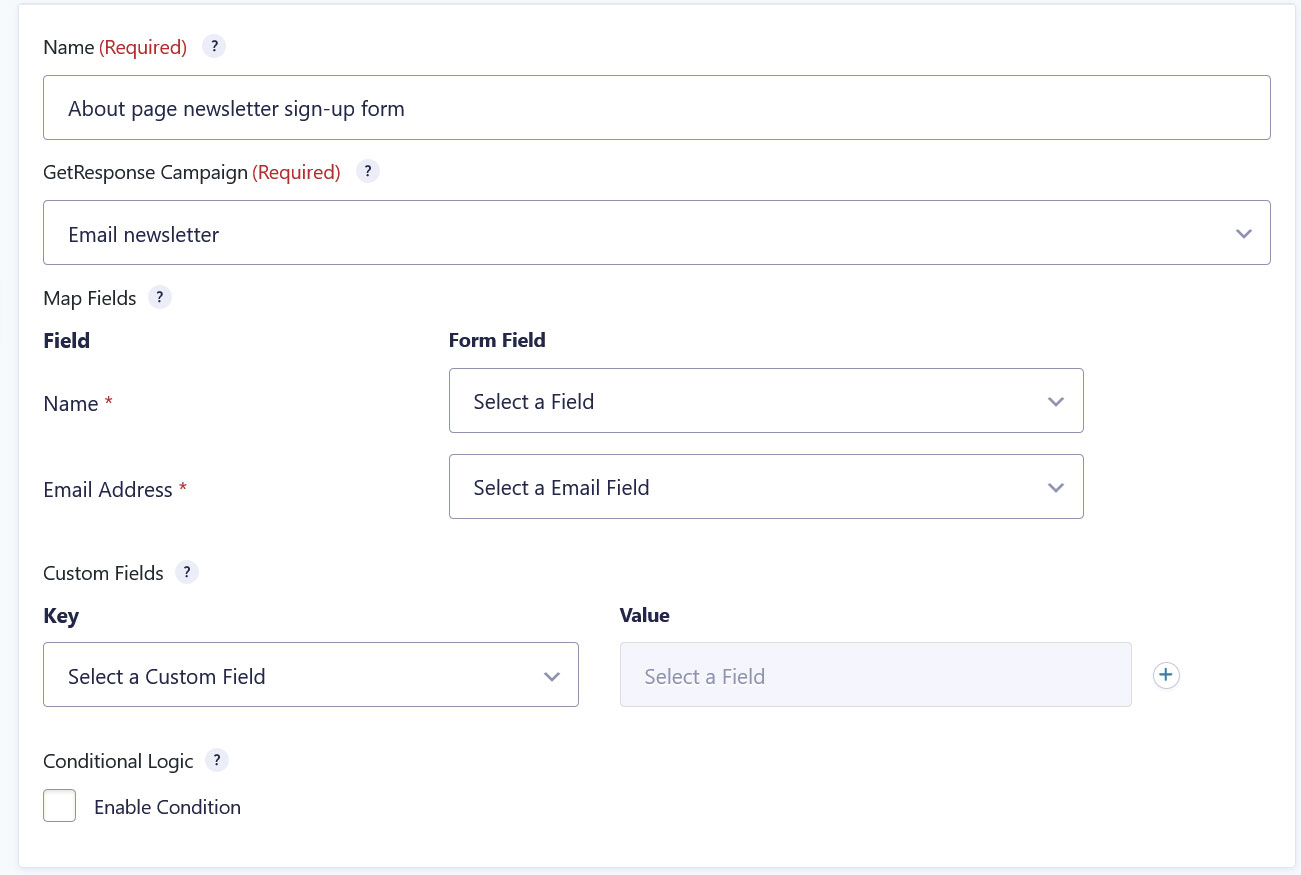
Once you pick your email list, new options will appear.
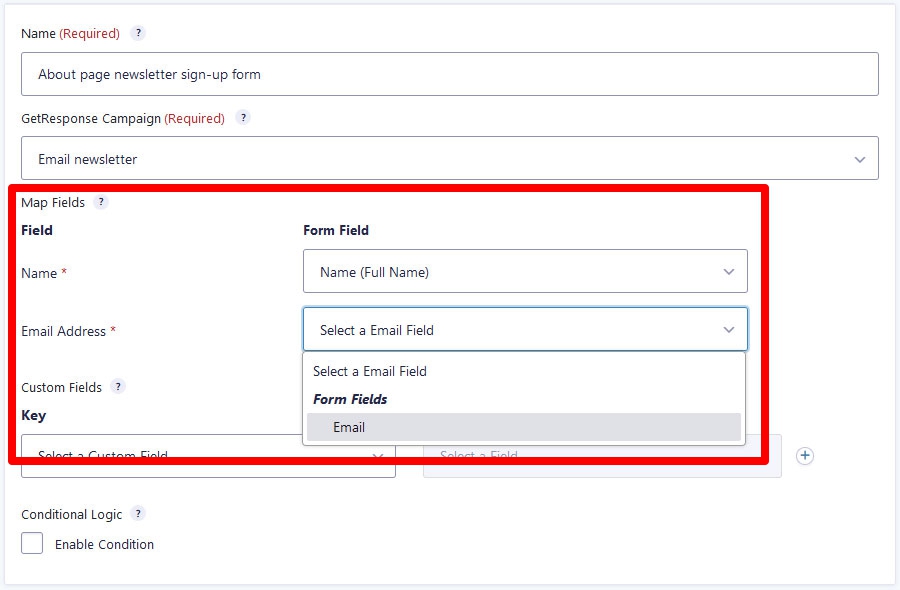
You can use these to map the information in your WordPress form to the data saved in GetResponse. The default options are just Name and Email Address. Use the drop-down menus to choose the respective form fields with this information.
After that, save at the bottom. That’s it, from now on your subscriber info will be passed on to GetResponse when they use the form.
5. Take Advantage of Custom Fields
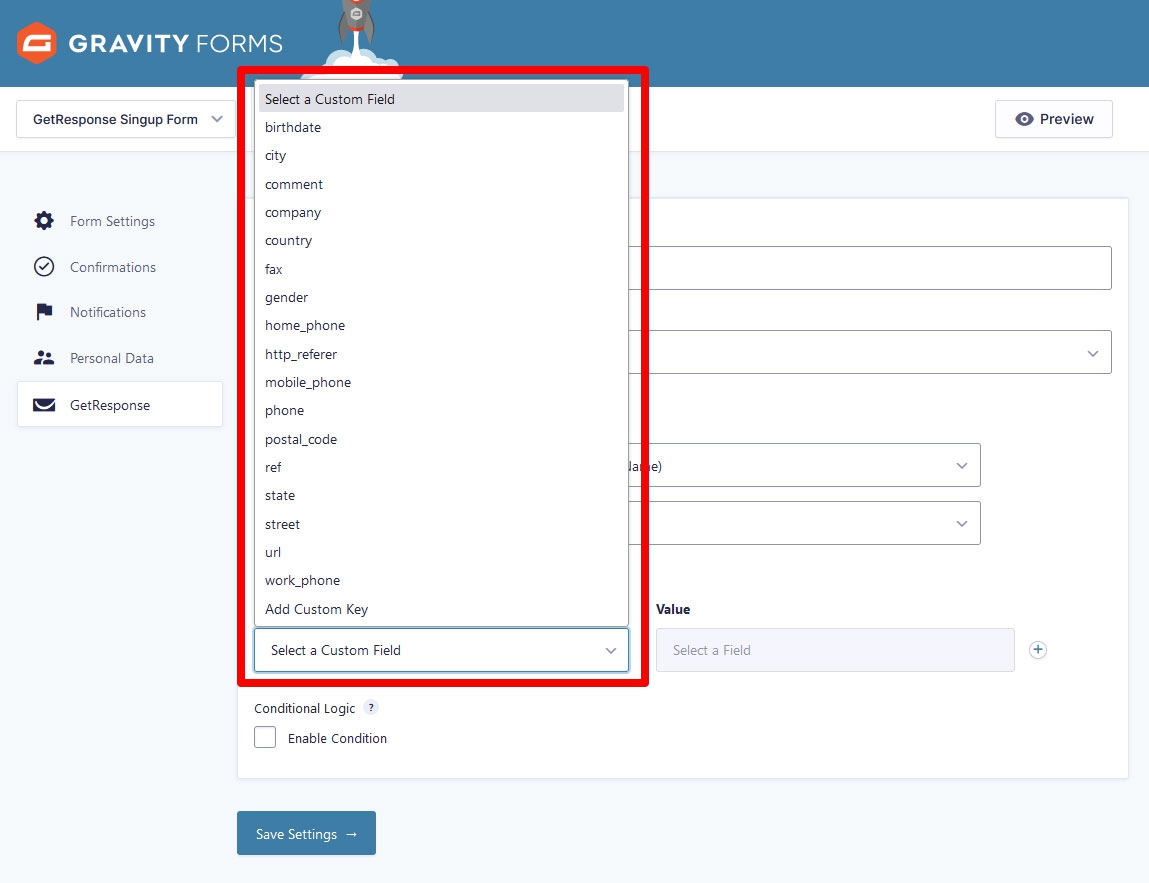
Keen observer that you are, you have probably noticed that there are more options in the feed that we haven’t addressed. The most prominent is the Custom Fields section. You can use this to collect additional information about your subscribers.
GetResponse offers a number of existing options for this. You can see them when you click on the drop-down menu that says Select a Custom Field.
The information ranges from a subscriber’s birth date over different phone numbers to their address and website URL.
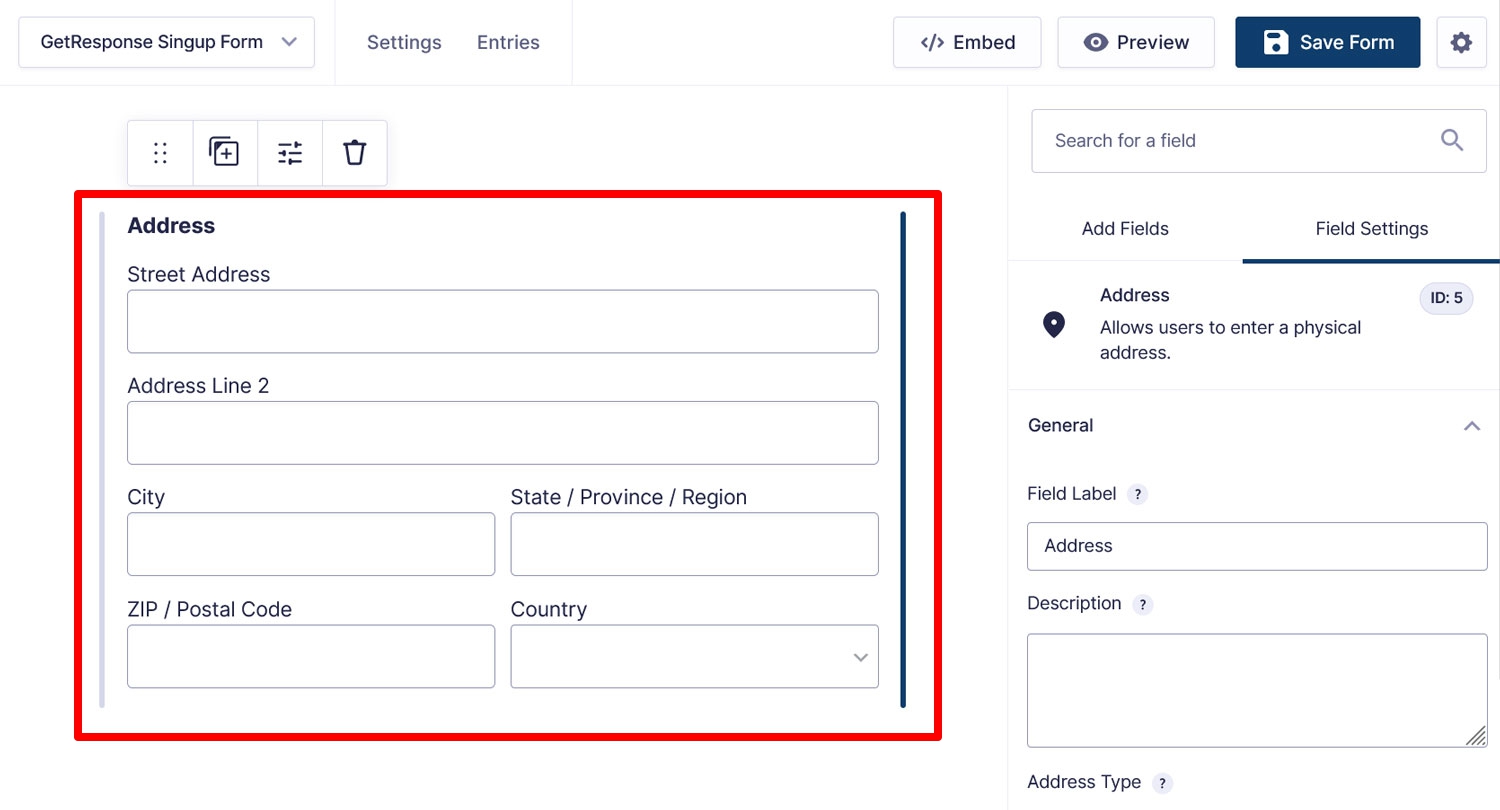
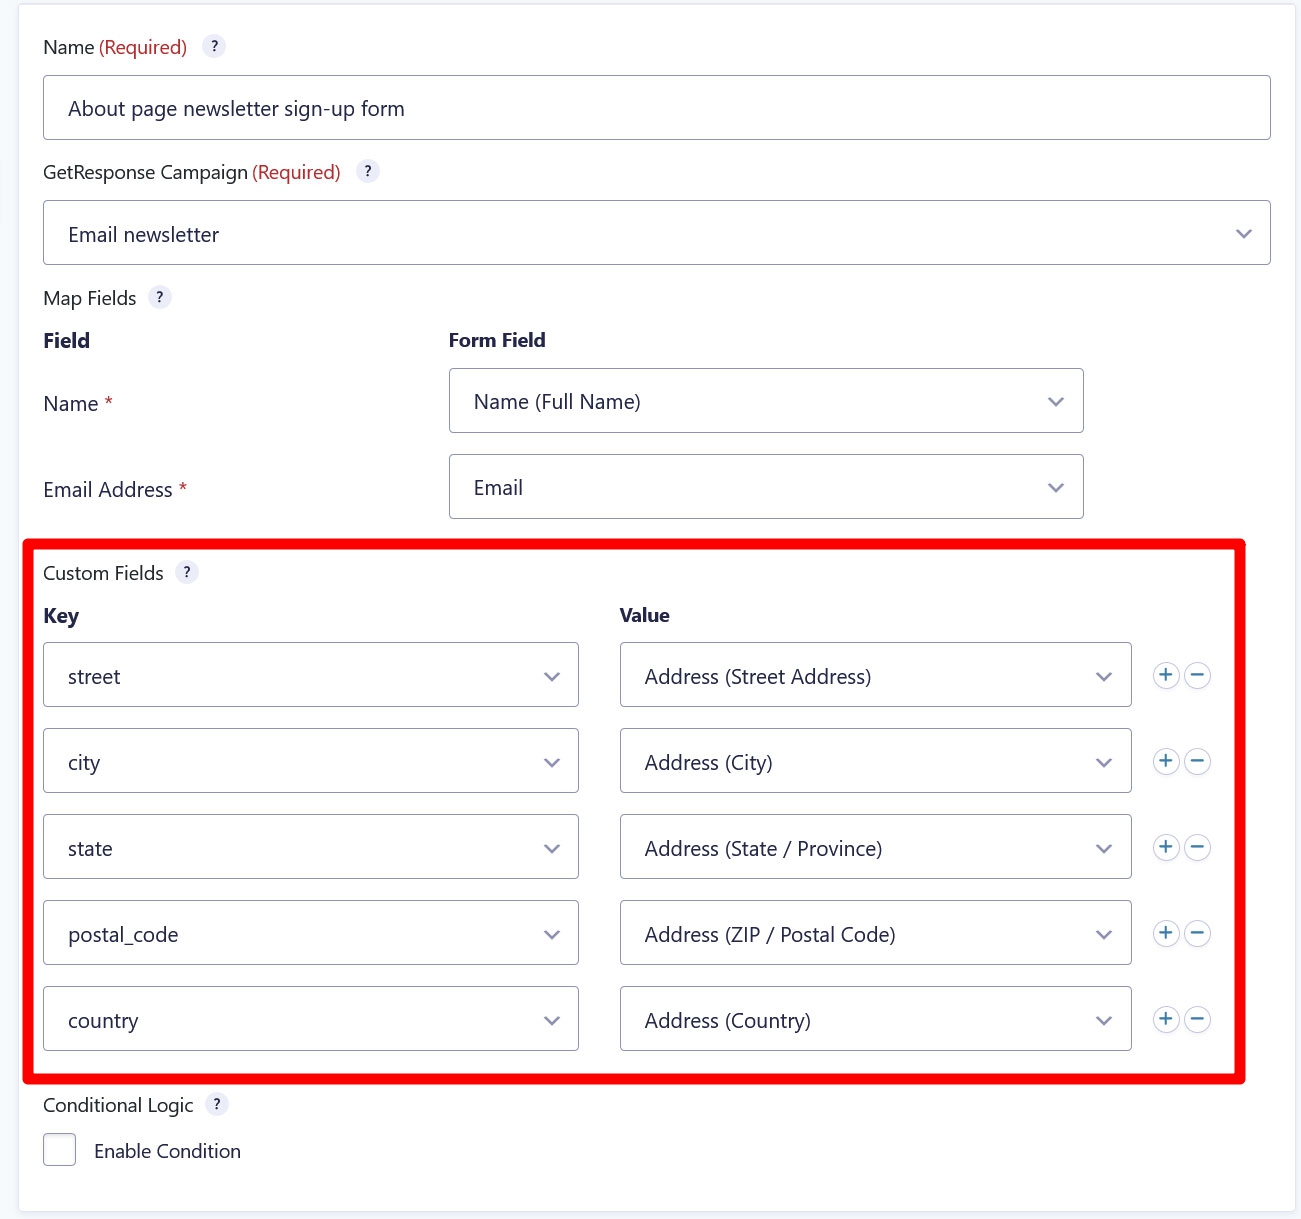
If you want to use any of these, all you need to do is include a corresponding field in your form. For example, if you want to capture your subscribers’ address data, you simply need to go back to editing the form and add an Address field to it.
Then, edit the feed and map the GetResponse custom fields under Key to each form field under Value (use the plus button to add more pairs).
Besides the given custom fields, GetResponse also allows you to create your own. For that, they have detailed instructions in their documentation. The most important thing is that you make the data type match in both Gravity Forms and GetResponse.
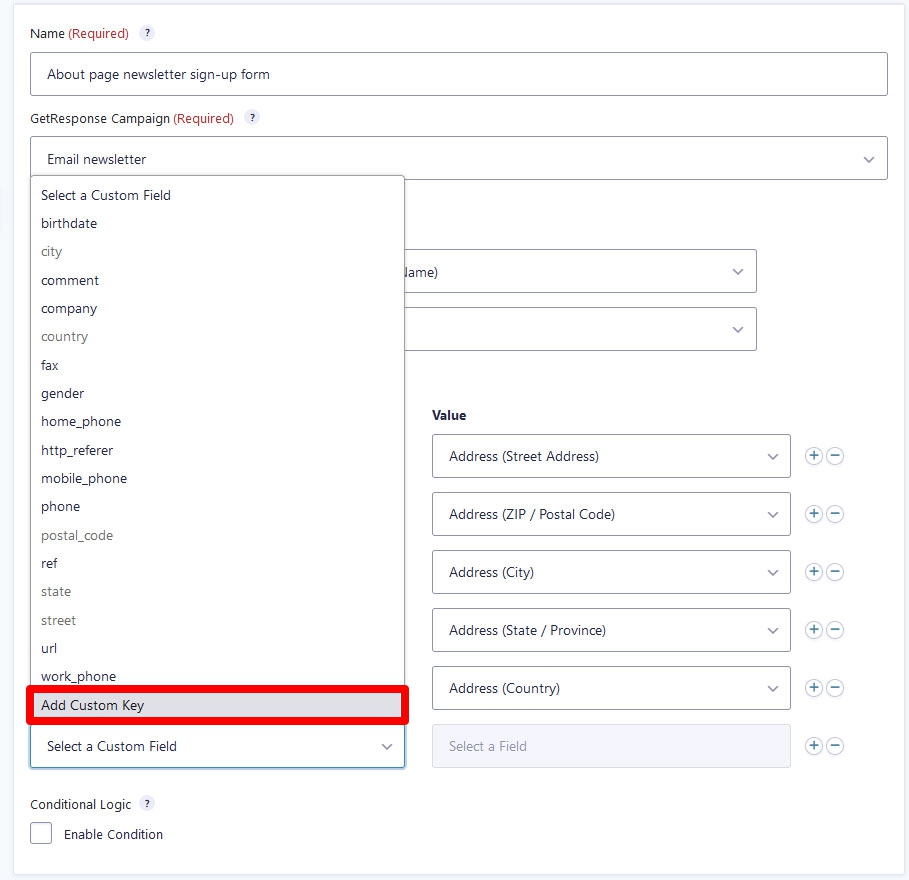
Finally, you can also create custom fields on the fly by picking Add Custom Key in your GetResponse feed and then entering one yourself (pay attention to the naming requirements in the documentation).
When you save the feed, they are automatically added in GetResponse but you still have to configure them to be able to use them.
6. Employ Conditional Logic
Another option in the feed menu that we haven’t covered yet is the one named Conditional Logic. When you check the box here that says Enable Condition, you are able to set one or more preconditions for when Gravity Forms should process this feed.
What is this for?
There are many use cases. For example, you are able to use this to segment subscribers at signup. If you are collecting address data, such as we are doing above, you could sort subscribers residing in different countries or cities into their own email lists using conditional logic. For that, just create different feeds for different lists, then set the condition that the country or city field must match a certain locale.
You can find more information and inspiration in our detailed tutorial.
7. Embed the Form and Test It
Once done with all of the above, the last step is to test if your setup works. For that, you first need to embed your form somewhere. This could be a page where it is eventually supposed to reside, but, for the beginning, it’s advisable to make the form live right away.
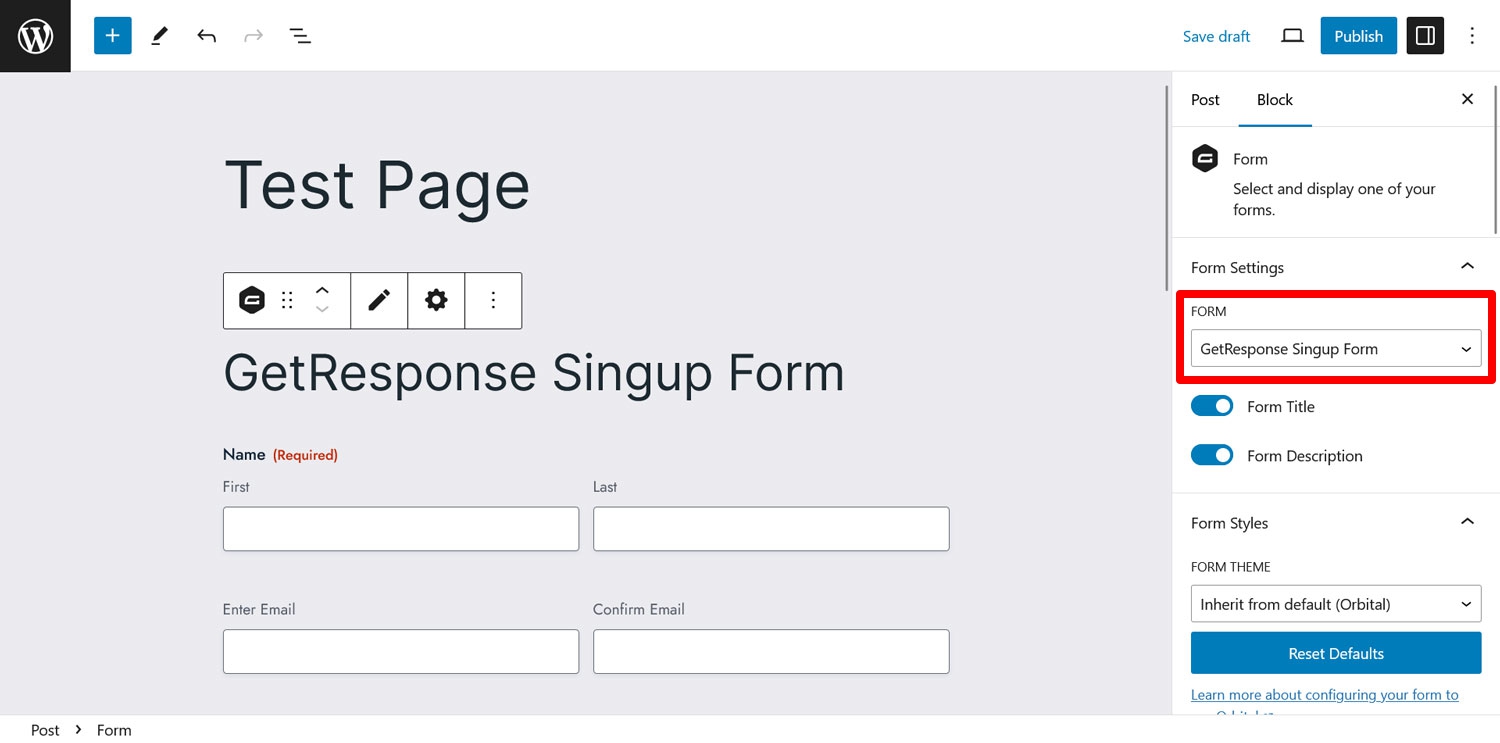
The easiest way is to use the WordPress preview function. For that, simply open a new page or post or the location where you want to embed the form. Then, use the Gravity Forms block or shortcode to embed it in the editor.
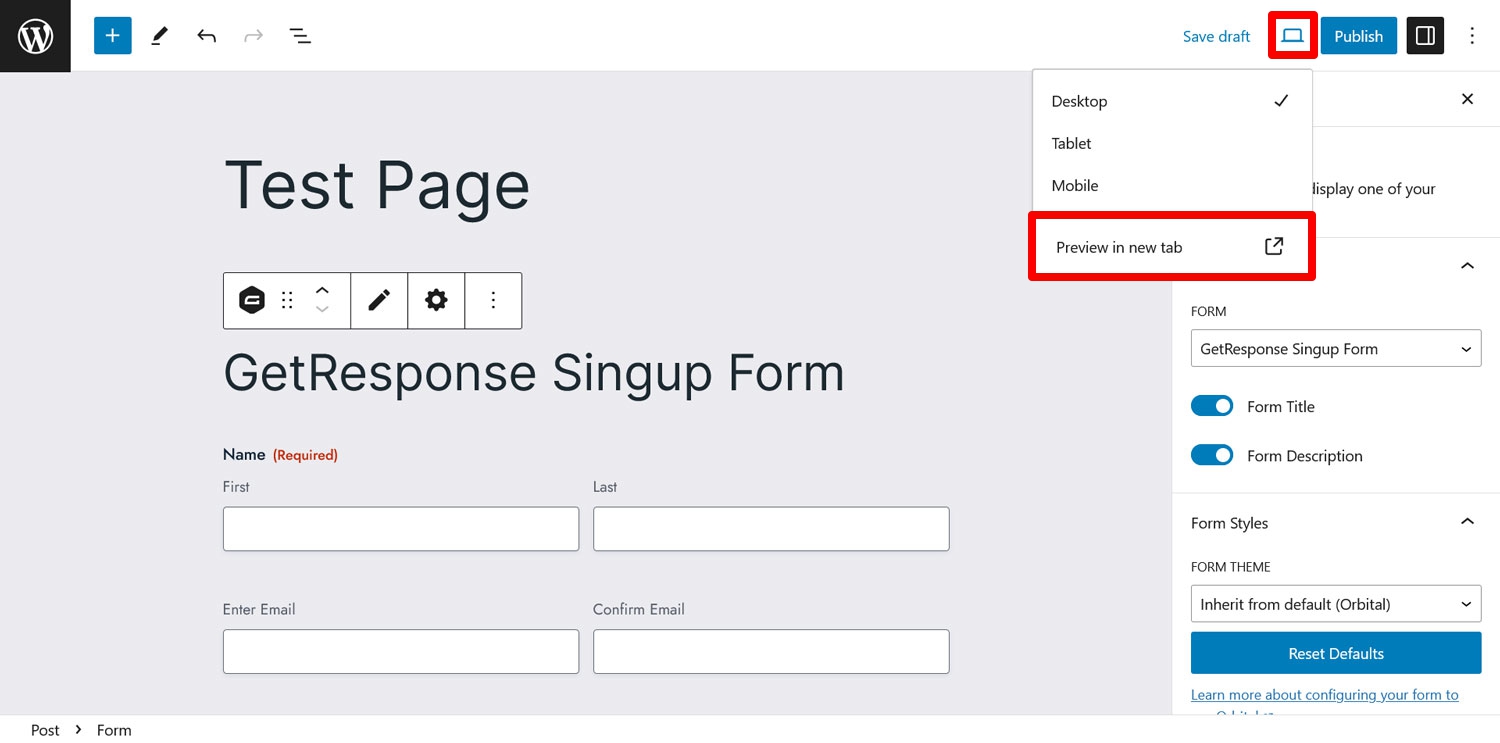
After that, preview the post or page (usually, using the small computer icon and then Preview in new tab).
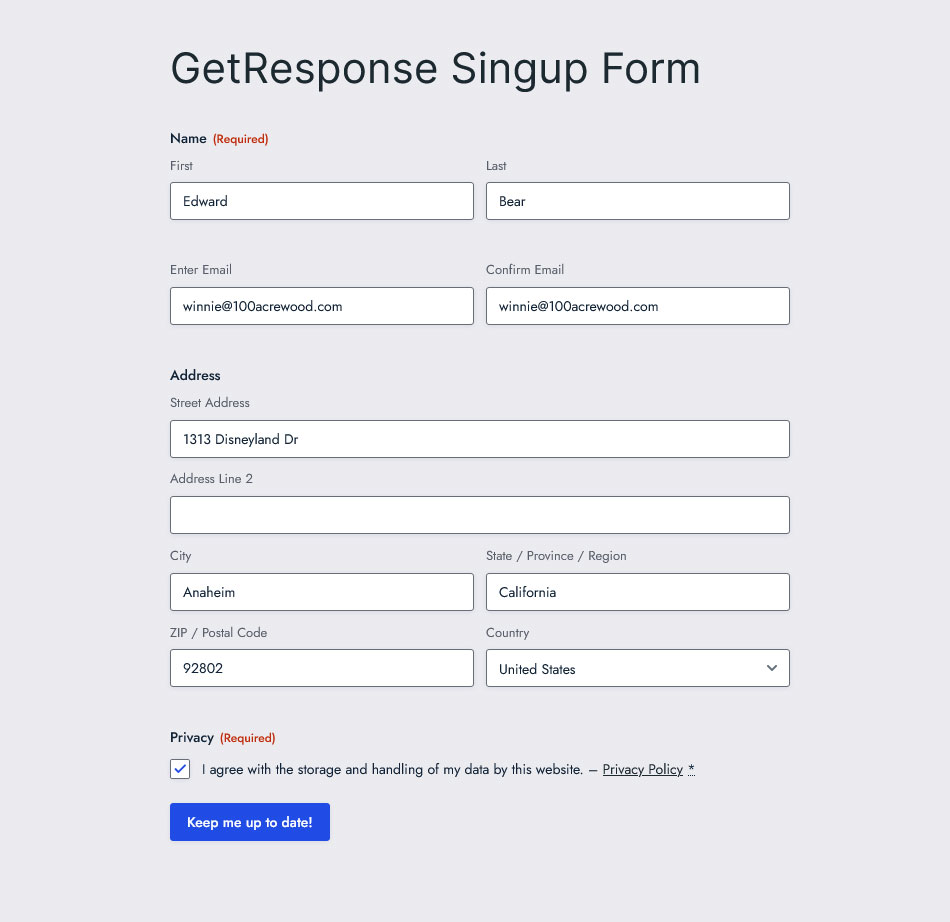
Then simply fill in the form with all the relevant information you want to test and submit it.
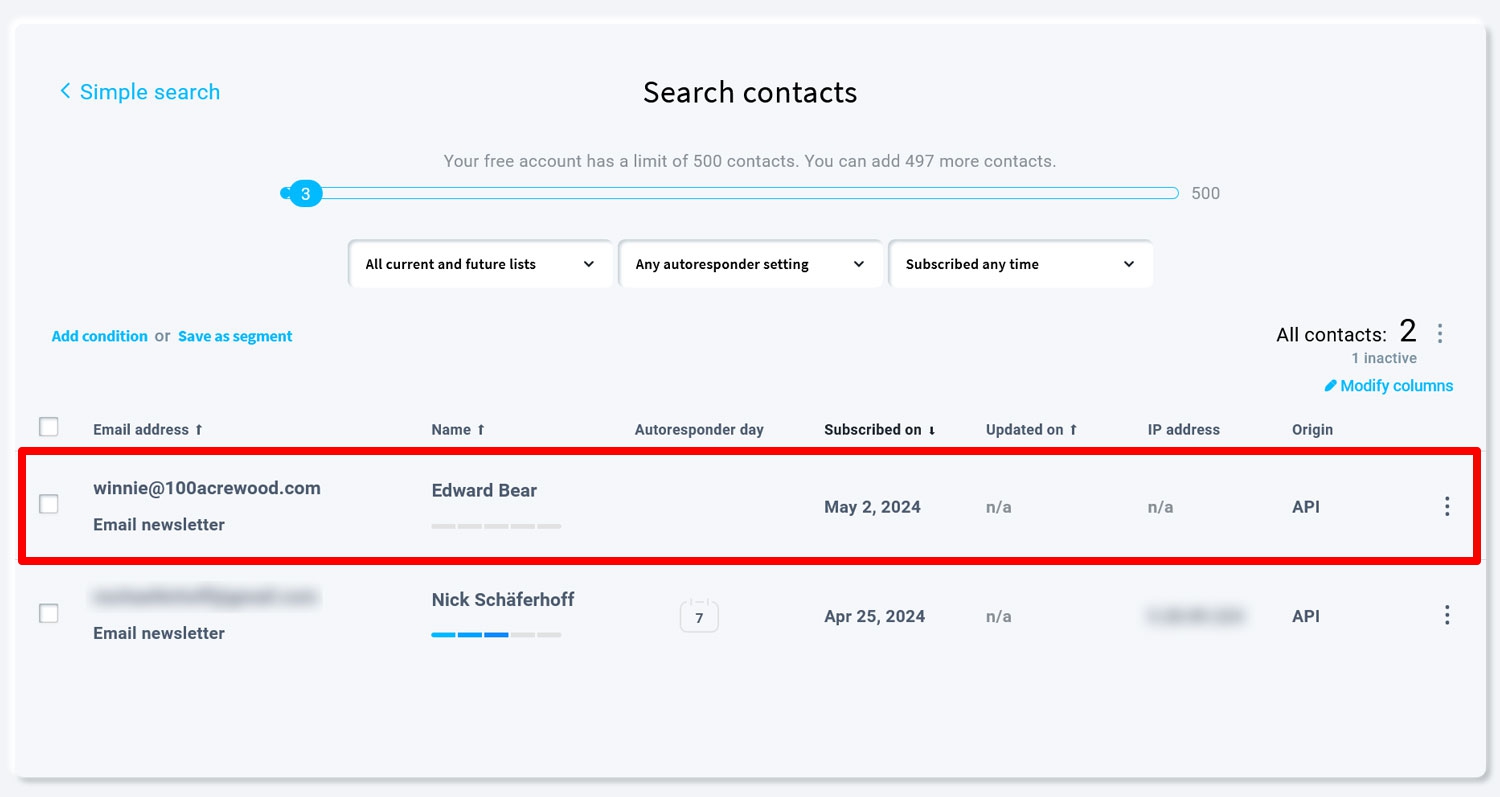
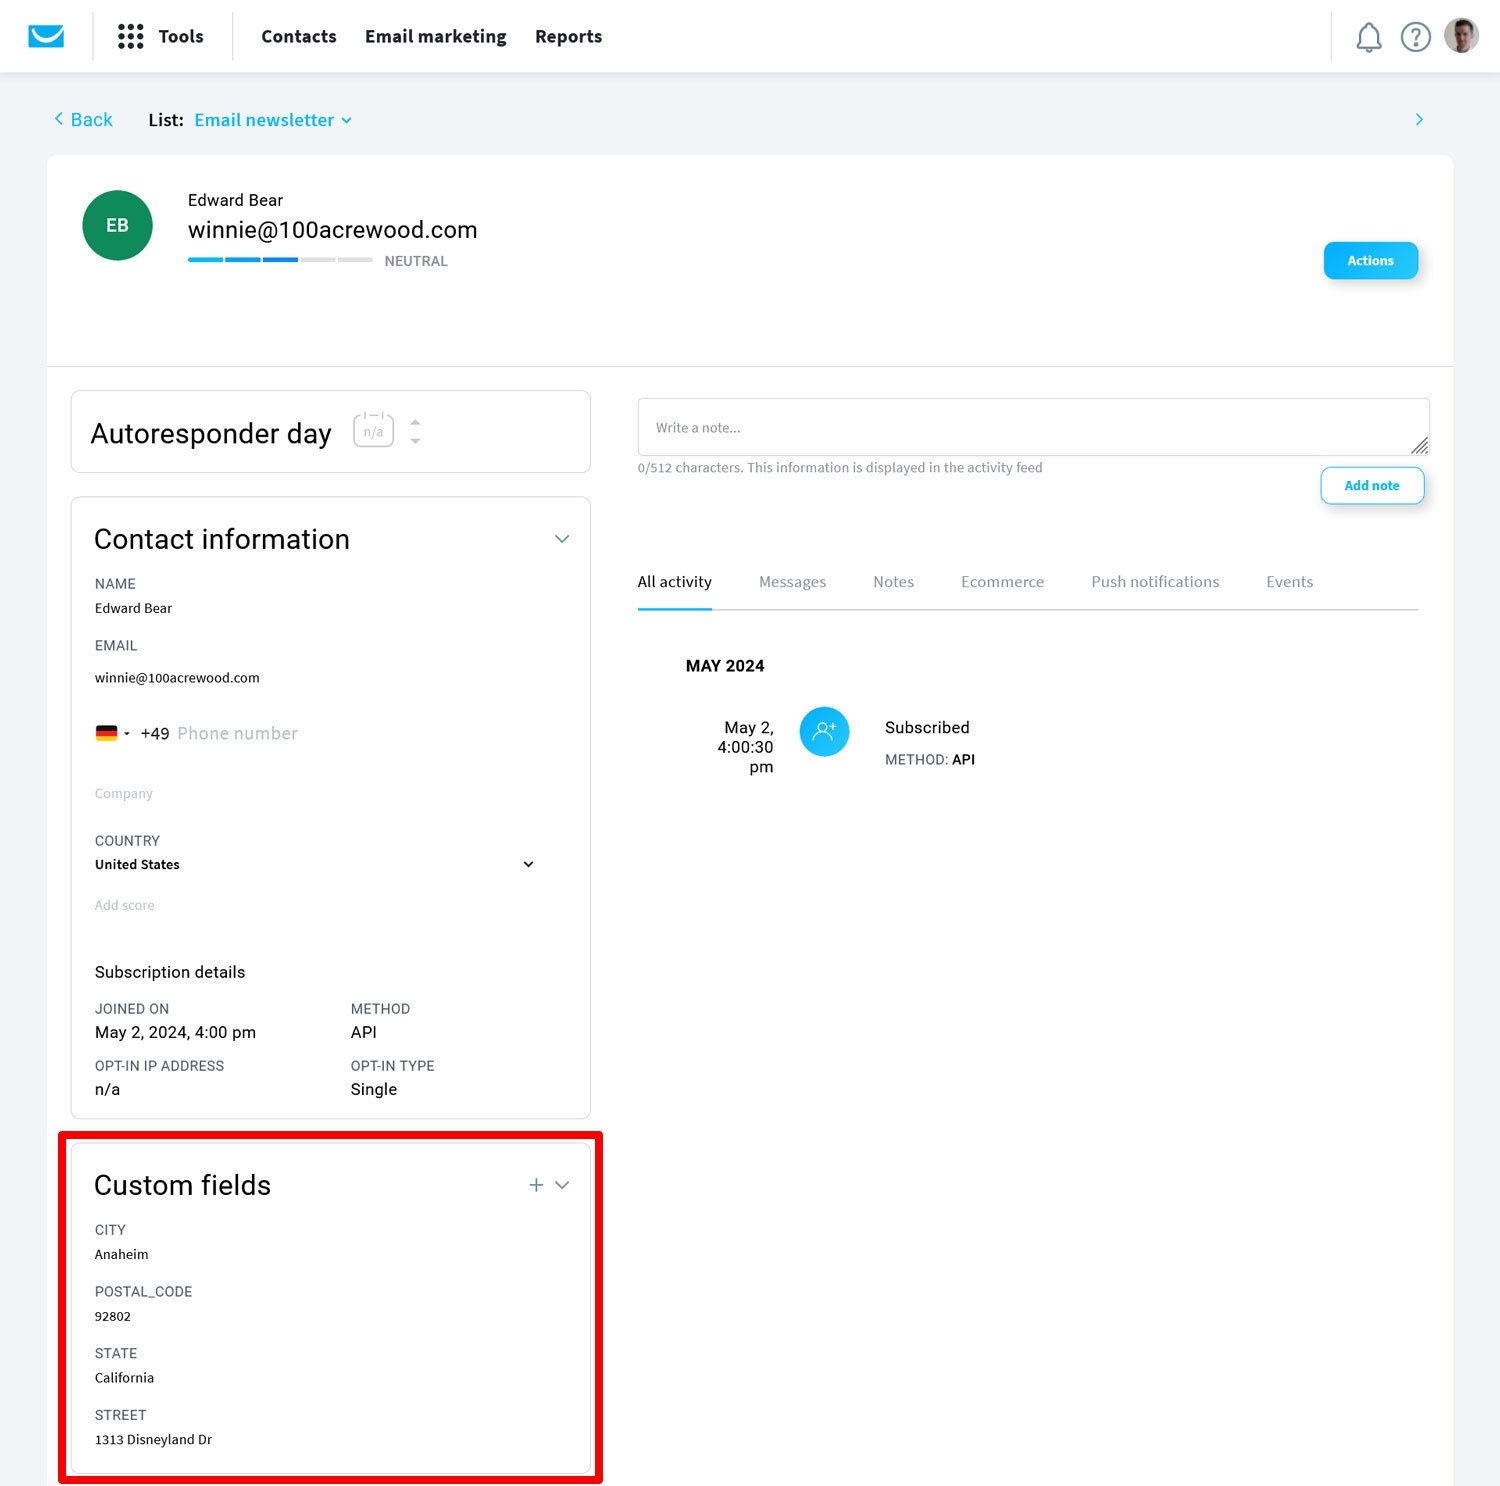
Now, go to your GetResponse account and access the email list that you tested the WordPress form for. You should find your new subscriber here.
Click on it to see if all the information has been successfully transferred.
If it has, congratulations, your work is done!
Final Thoughts: GetResponse for WordPress
GetResponse is a great solution to run your email campaigns and other online marketing measures. It comes with a plethora of useful features and integrations to make your efforts a success, including AI-powered tools.
The best part: combining it with Gravity Forms makes populating your email lists easier than ever. As you have seen above, thanks to the Gravity Forms GetResponse Add-On, it’s as easy as copying and pasting an API and you are in business.
Gravity Forms allows you to collect pretty much any information you want about your subscribers and pass it on to your favorite email marketing provider. The process is beginner friendly, requiring no technical knowledge. Everything happens with an easy-to-use interface.
As mentioned, you can test the GetResponse Add-On with a free demo site. It is also available on all Gravity Forms licenses. Get yours today!

If you want to keep up-to-date with what’s happening on the blog sign up for the Gravity Forms newsletter!
