How to Send Email Using SendGrid with WordPress

Trying to set up SendGrid WordPress email sending to improve your site’s transactional emails?
By default, WordPress tries to send its emails using wp_mail (based on PHP mail). This often causes problems, either because the emails just don’t send in the first place or they end up in users’ spam folders.
With a WordPress SMTP plugin like Gravity SMTP, you can configure your WordPress site to send its emails using SendGrid’s dedicated email sending service instead, which means you can be confident that your emails will actually make it to your users’ inboxes.
In this post, you’ll learn step-by-step how to set up SendGrid WordPress email sending using the Gravity SMTP plugin.
But before we get to the step-by-step tutorial, let’s briefly run over the tools that you’ll need to follow this guide.
How the Gravity SMTP Plugin Helps You Connect to SendGrid
If you want to connect WordPress to SendGrid, you’ll need the help of a WordPress SMTP plugin like Gravity SMTP.
Gravity SMTP is a new standalone plugin from the same team behind Gravity Forms.
It helps you send all of your site’s emails using your preferred service, including core WordPress emails, email notifications from Gravity Forms, and emails from most other plugins (as long as those plugins use the wp_mail function).
Here are some of the specific reasons why Gravity SMTP makes a great option for integrating your site with SendGrid:
- Simple SendGrid integration – all you need to do is add your SendGrid API key and Gravity SMTP handles the rest.
- Email testing tools – you can access multiple email testing tools to make sure your site’s emails are working properly.
- Detailed email logging – you can log all the emails that your site sends so that you can monitor everything and catch potential issues before they become problems.
- Reliability and support – while Gravity SMTP is a standalone plugin, it’s still backed by the support and reliability of the same team that’s behind Gravity Forms.
- Supports other email sending services – in addition to SendGrid, you can also integrate with other email services like Mailgun, Postmark, and others. This lets you set up fallback services in case something ever goes wrong with SendGrid.
- More features on the way – the Gravity SMTP team is already working on a bunch of new features, which you can see on the public product roadmap. You can also vote on which features you’d like to see added, which lets you play a role in shaping the future of Gravity SMTP.
Benefits of SendGrid Vs Other Email Sending Services
As we mentioned above, Gravity SMTP supports multiple email sending services.
However, here are some of the specific reasons why you might want to consider SendGrid:
- Generous forever-free plan – SendGrid has a forever-free plan that lets you send up to 100 emails per day, which will be enough for a lot of WordPress sites.
- Affordable paid plans – even if you need to exceed the free plan’s limits, SendGrid is still one of the cheaper email sending services out there. Paid plans start at $19.95 to send up to 50,000 emails per month.
- Well-established and reliable – SendGrid is owned by Twilio and used by big brands like Uber, Spotify, and Airbnb, which should give you confidence that it’s a reliable long-term solution.
- Good deliverability rates – SendGrid has a 97% email deliverability rate, which is well above the industry average.
How to Set Up SendGrid WordPress Email Sending
Now that you have all of the relevant background information, let’s jump into the full step-by-step guide for how to set up SendGrid WordPress email sending using the Gravity SMTP plugin.
Here’s a high-level look at the process – keep reading for the details:
- Install the Gravity SMTP plugin
- Register for a SendGrid account
- Authenticate your domain name with SendGrid
- Create a SendGrid API key
- Configure Gravity SMTP to use SendGrid
- Send a test email
1. Install the Gravity SMTP Plugin On Your Site
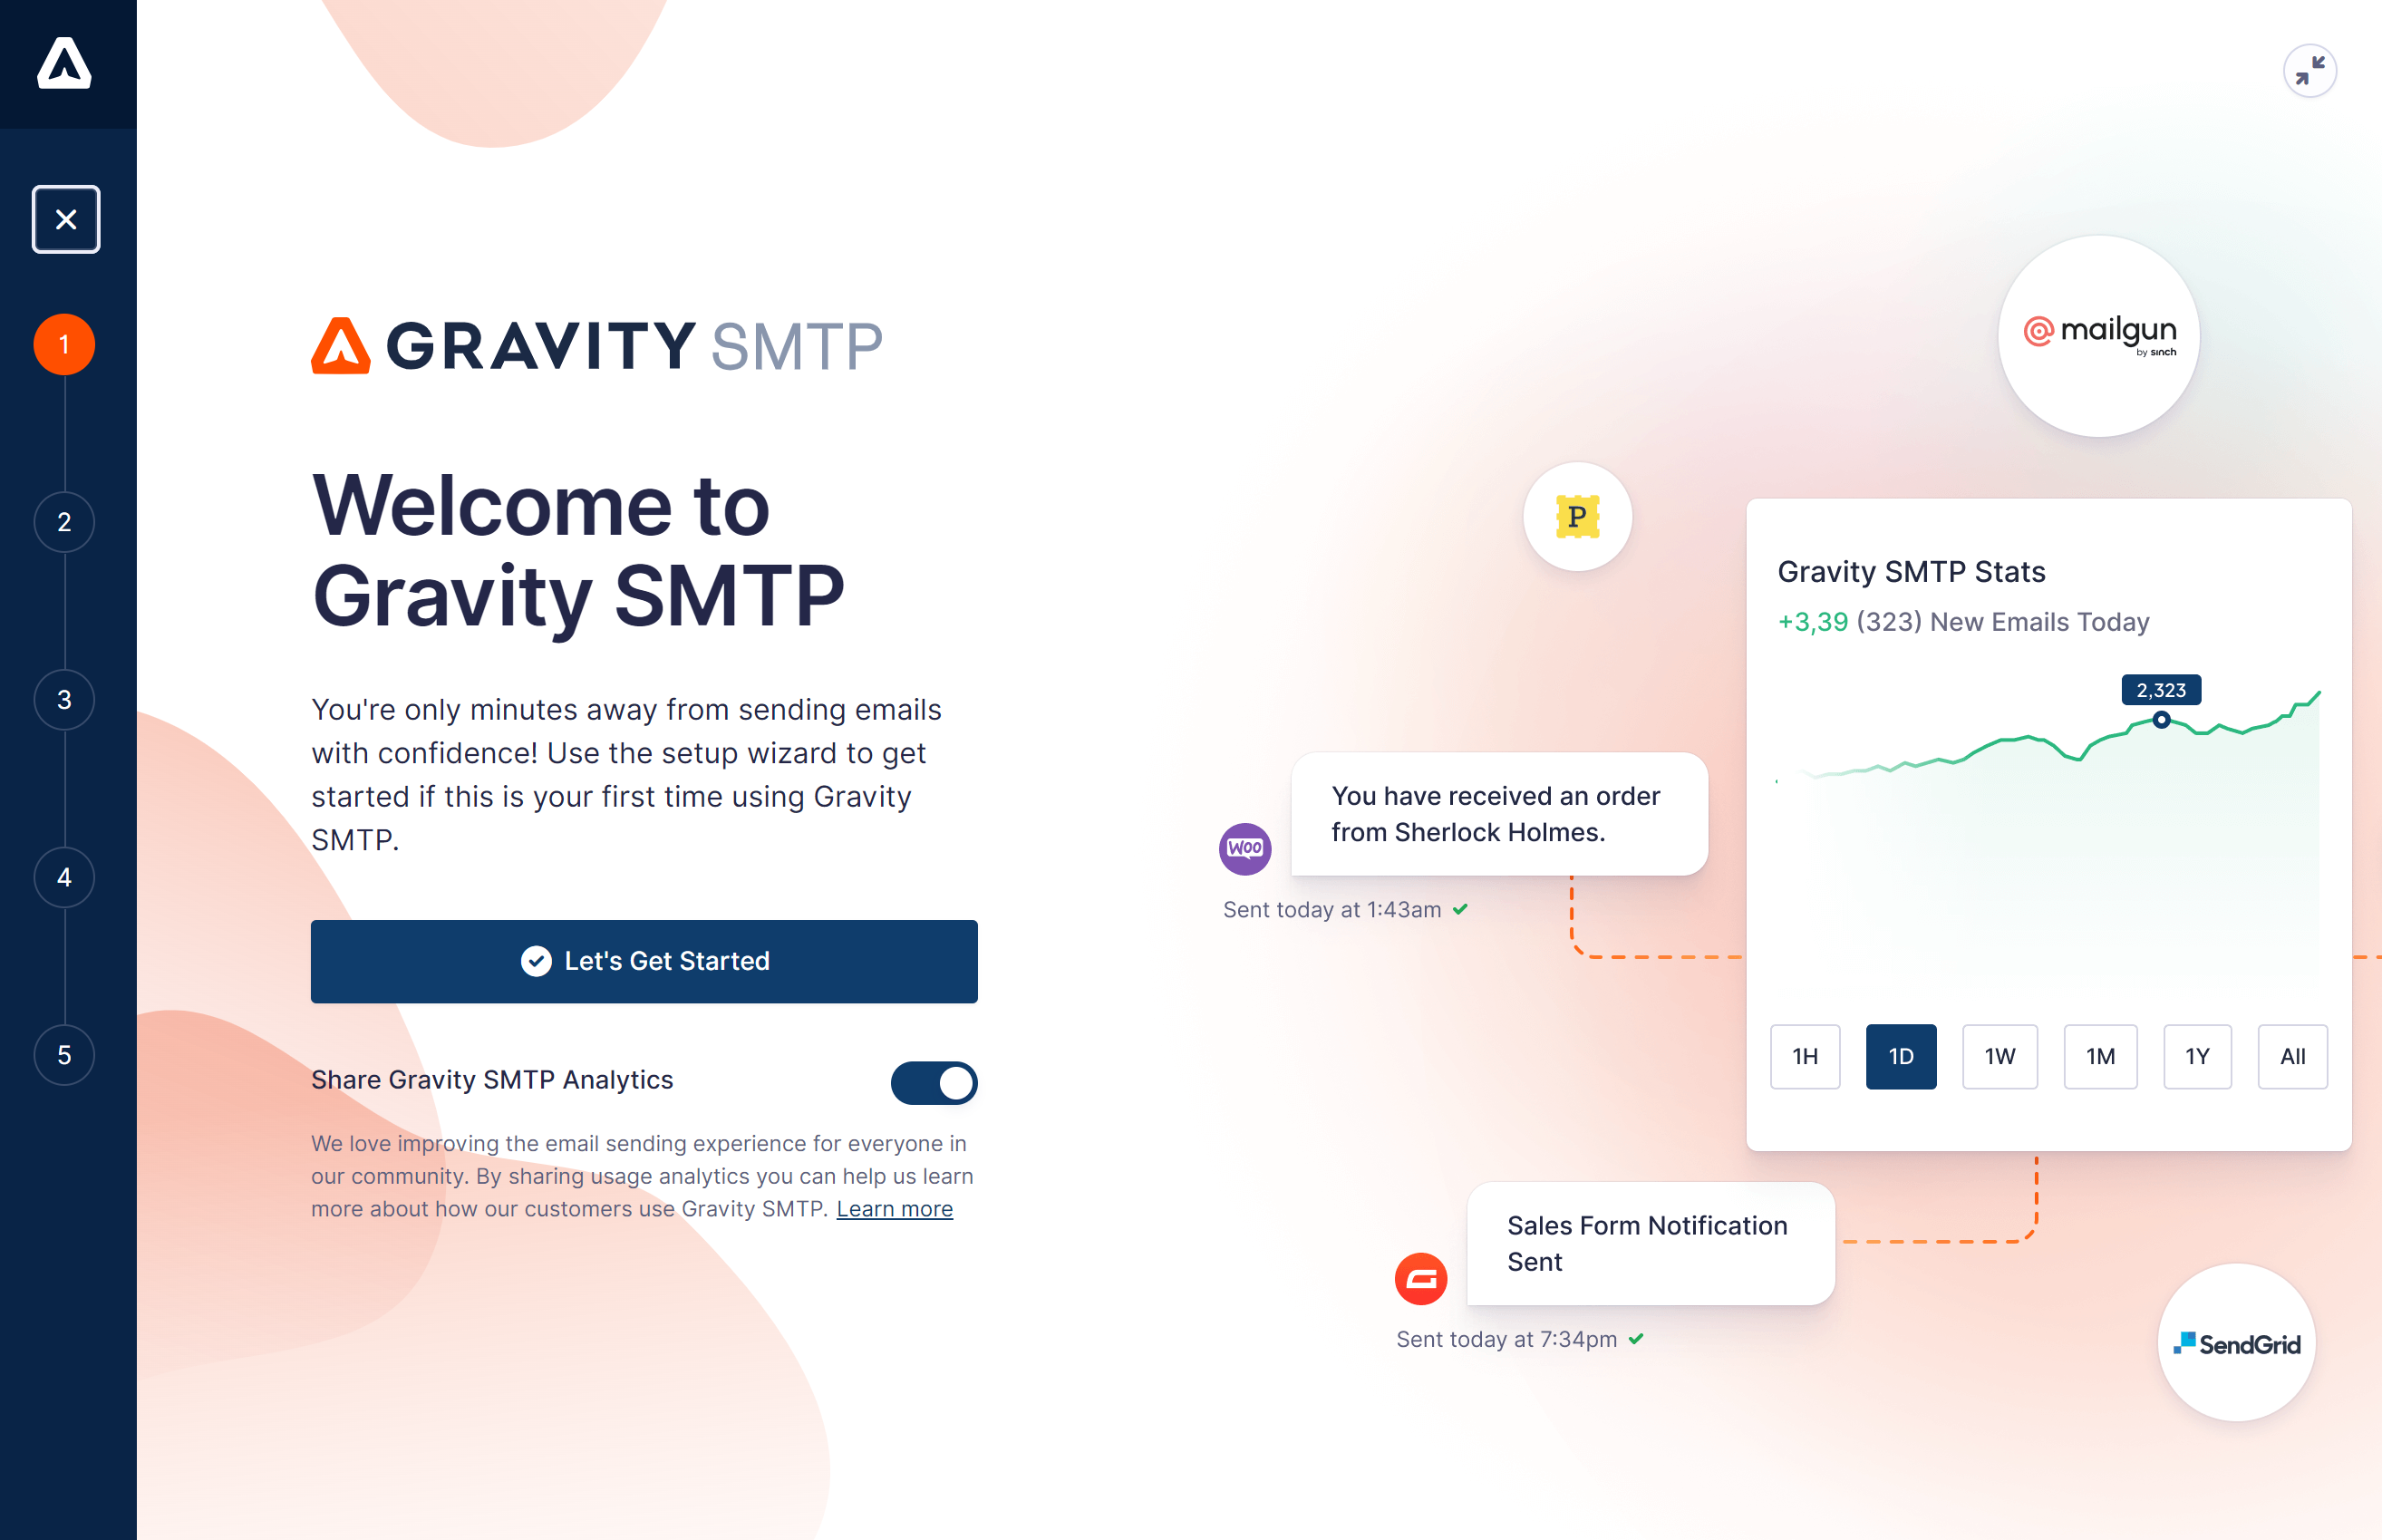
To get started, you’ll want to install and activate the Gravity SMTP plugin on your site.
As we mentioned earlier, Gravity SMTP is a standalone plugin, so you do not need to be using Gravity Forms to use it on your site (though it does work well with Gravity Forms).
Currently, you can access Gravity SMTP at no extra cost on the Gravity Forms Elite license. You can find the plugin in your My Account area on the Gravity Forms website.
2. Register for Your SendGrid Account (If You Haven’t Already Done So)
Next, you’ll want to register for your SendGrid account, if you haven’t done so already.
You can register for your account for free and without needing to enter a credit card.
SendGrid offers a generous forever-free option that lets you send up to 100 emails per day for free. That limit should be fine for many WordPress sites.
It also means that you can follow this guide and set everything up without needing to pay anything or enter your credit card.
If you ever need to exceed the free limit, paid plans start at just $19.95 per month to send up to 50,000 emails.
3. Authenticate Your Domain Name With SendGrid
In order to send emails directly from your domain name and improve your email deliverability, you’ll need to authenticate your domain name with SendGrid.
This not only proves to SendGrid that you control your domain name, but it also makes your emails look more trustworthy to email spam filters, which helps you avoid getting accidentally flagged as spam.
SendGrid offers two methods to authenticate your site:
- Domain Authentication – you’ll authenticate your entire domain name by adding some DNS records.
- Single Sender Verification – you can authenticate a single email address (e.g. [email protected]) just by clicking a link in an email.
While the Single Sender Verification method is a little simpler, we recommend using the Domain Authentication approach (as does SendGrid). It will further improve your email deliverability and it also lets you send from any email address on your domain name, which gives you more flexibility.
For these reasons, we’ll focus exclusively on the Domain Authentication approach, though Single Sender Verification is still an option if you’re unable to set up Domain Authentication for some reason (e.g. you can’t access your domain’s DNS records).
Here’s how to get started:
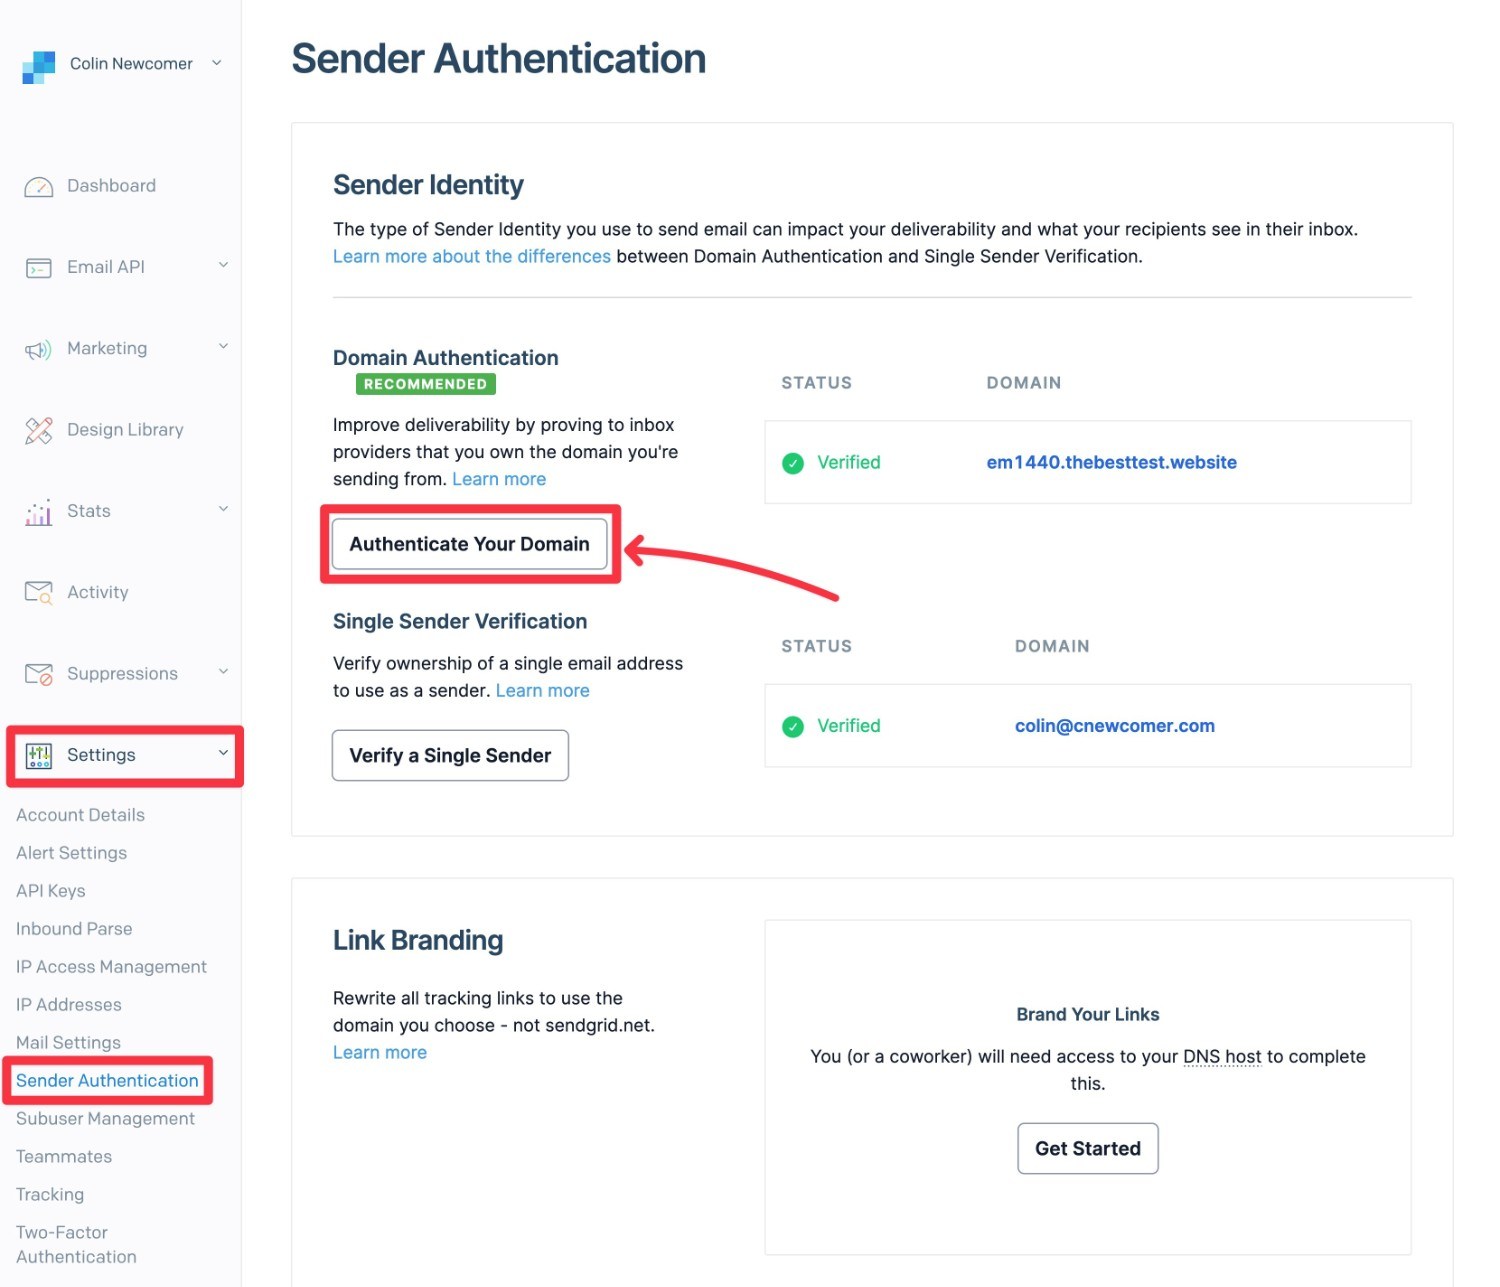
- Open your SendGrid dashboard.
- Go to Settings → Sender Authentication.
- Choose the option to Authenticate Your Domain.
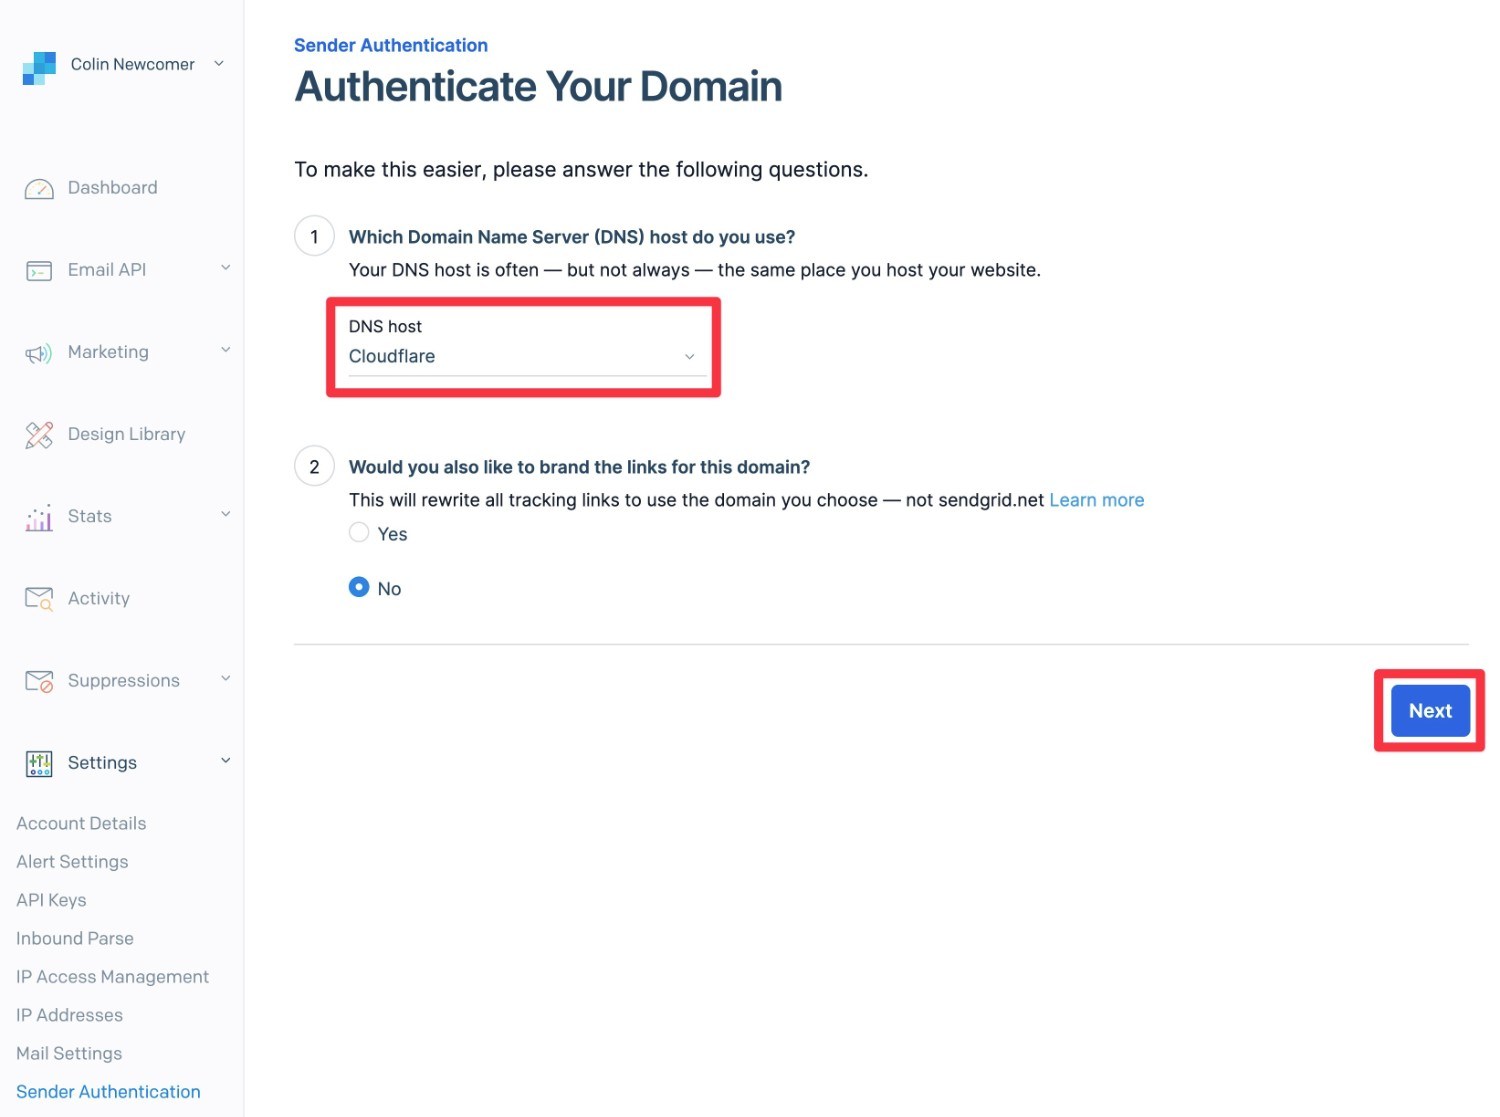
Next, you’ll be prompted to choose your DNS host, which will usually be one of these three options:
- Your web host, if you’re using your host’s nameservers.
- Your domain registrar, if you pointed your domain name to your host using an A or CNAME record.
- Cloudflare, if you’re using Cloudflare’s nameservers.
There’s also an “other” option if you don’t see your provider.
You’ll also be asked whether you want to use custom link branding for tracking links in your email. This will let you rewrite the tracking links in your emails to use your own domain name, rather than sendgrid.net.
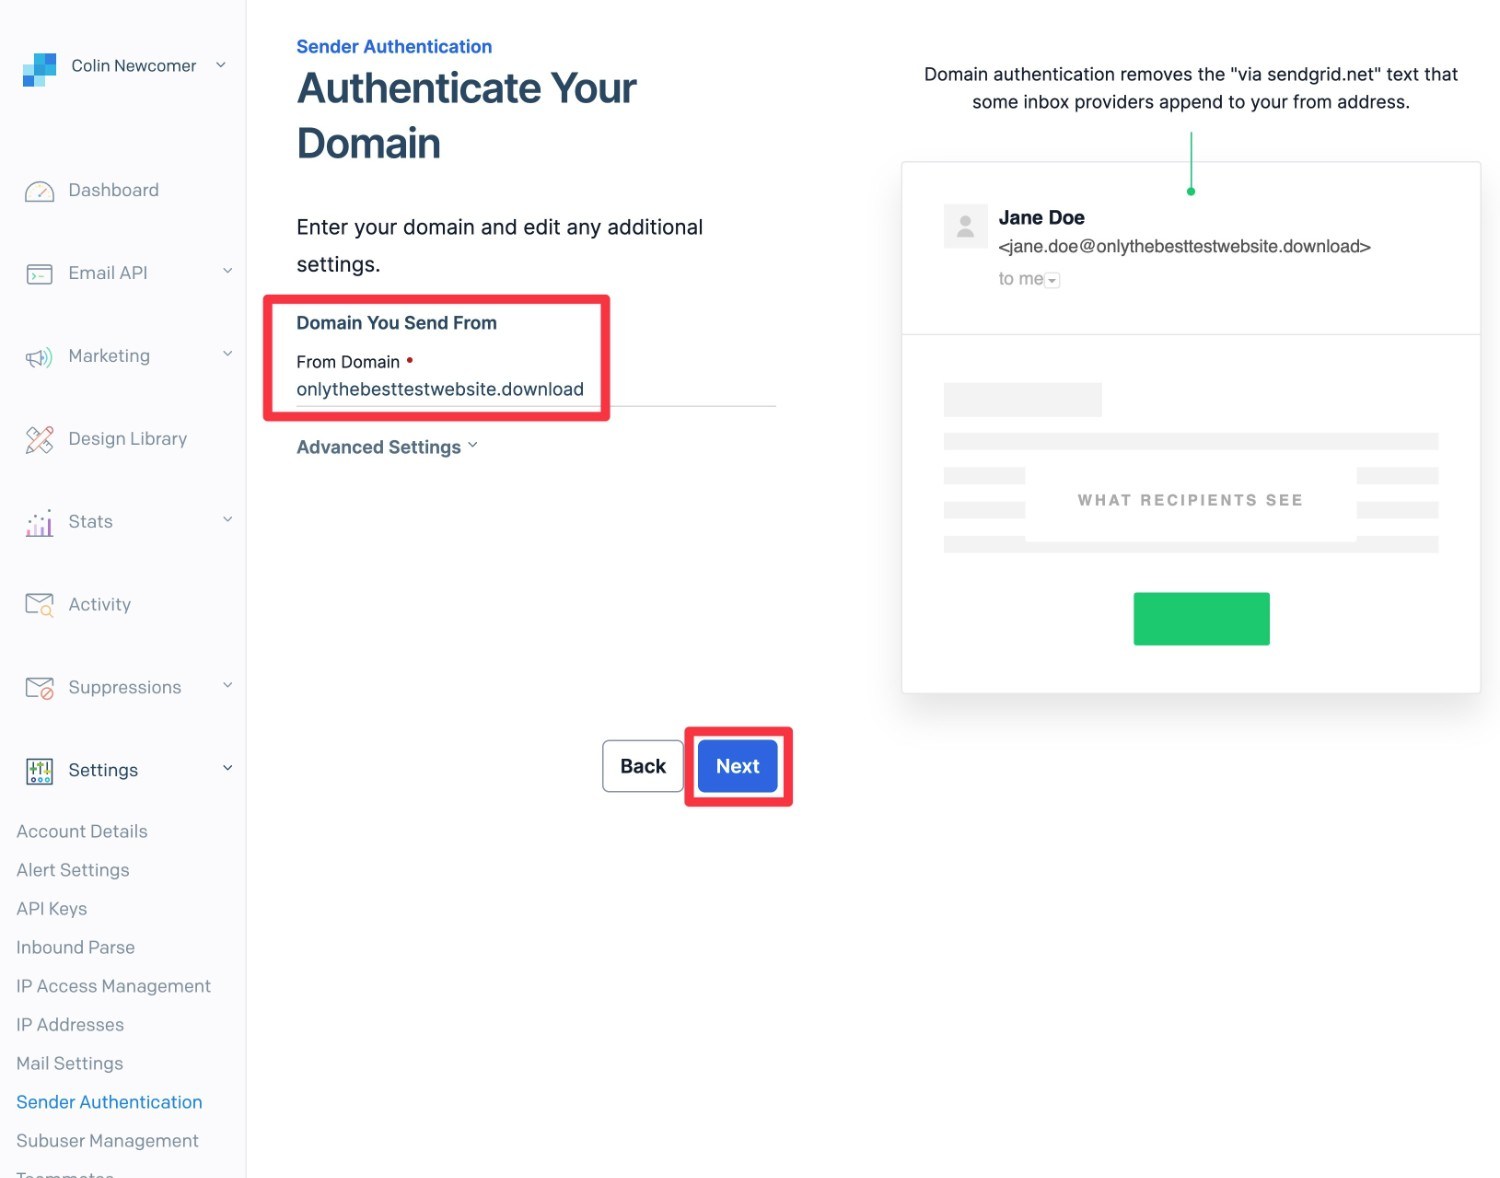
Once you click Next, you’ll need to enter your actual domain name and then click Next again.
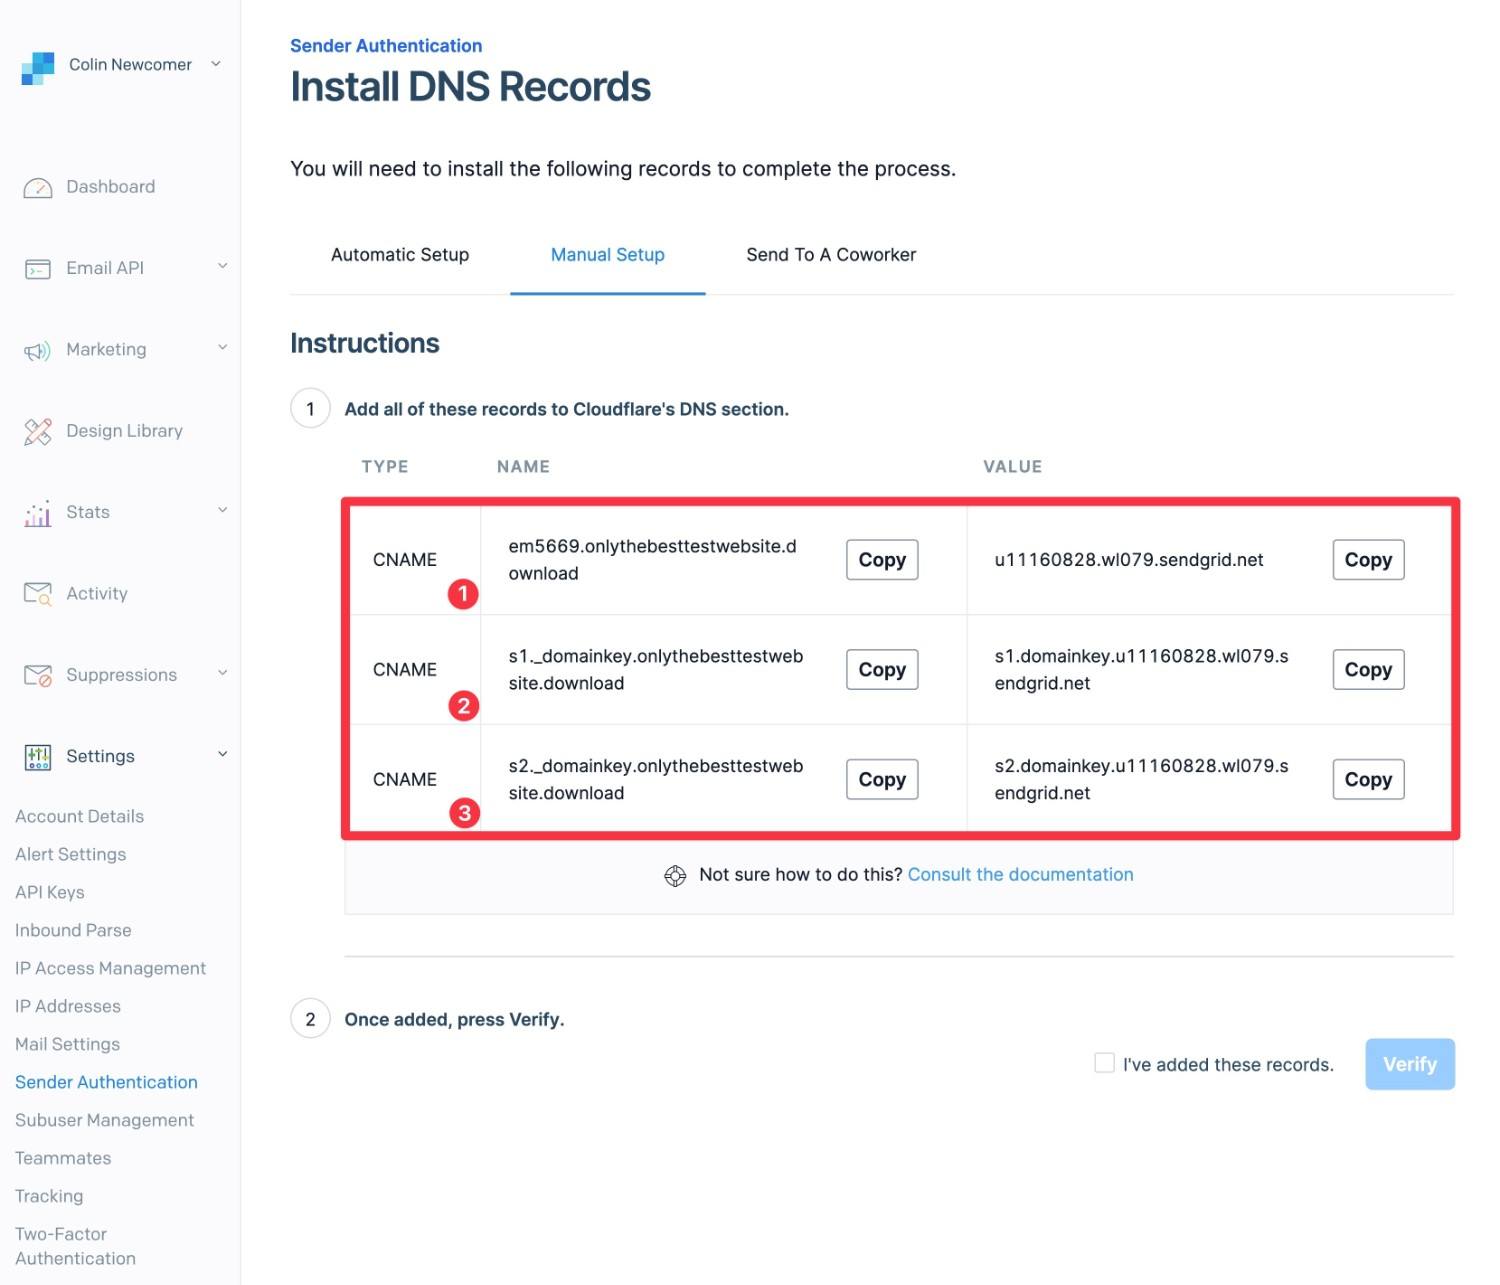
You’ll then be prompted to add the DNS records that SendGrid provides. Whenever possible, SendGrid will show instructions that are specific to the DNS host that you chose earlier in the setup process.
For the regular authentication, you’ll need to add three CNAME records. If you want to use branded links, you’ll also need to add records for that.
Here’s what it looks like to add the records to Cloudflare:
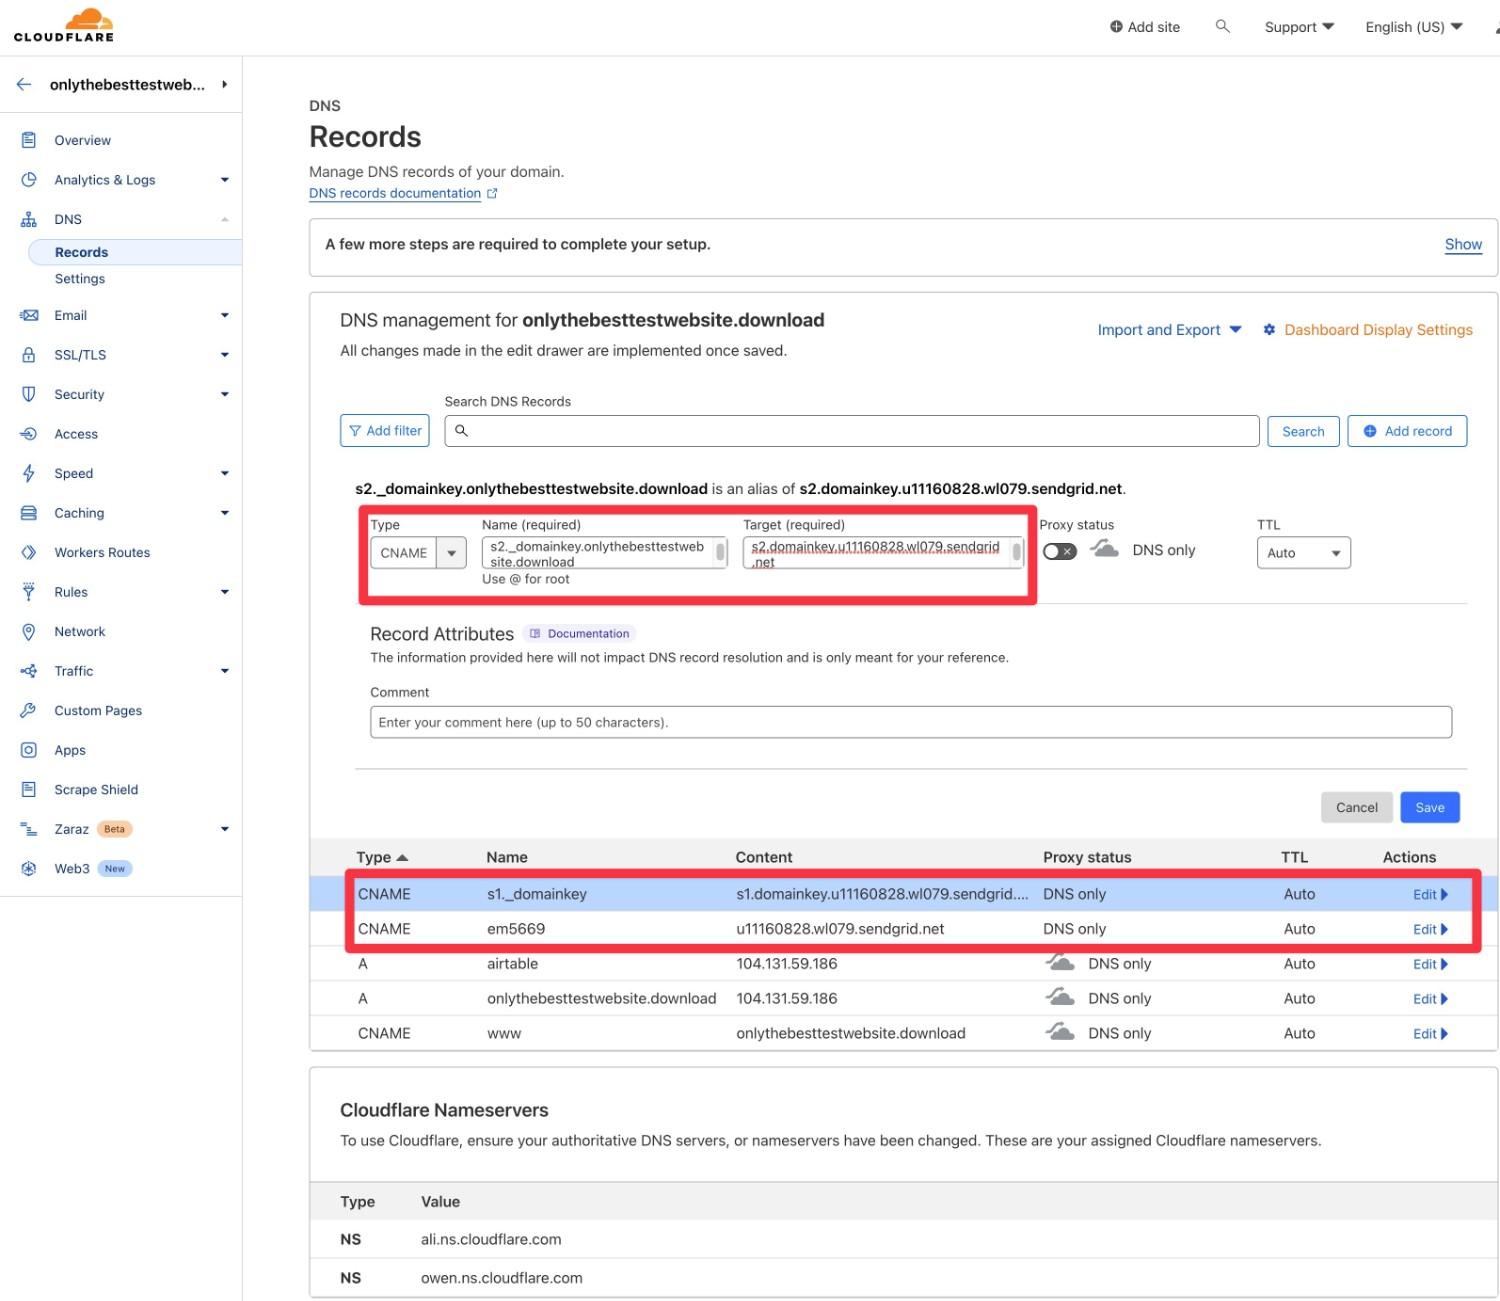
Once you’ve added all of the records, you can check the I’ve added these records box and then click Verify.
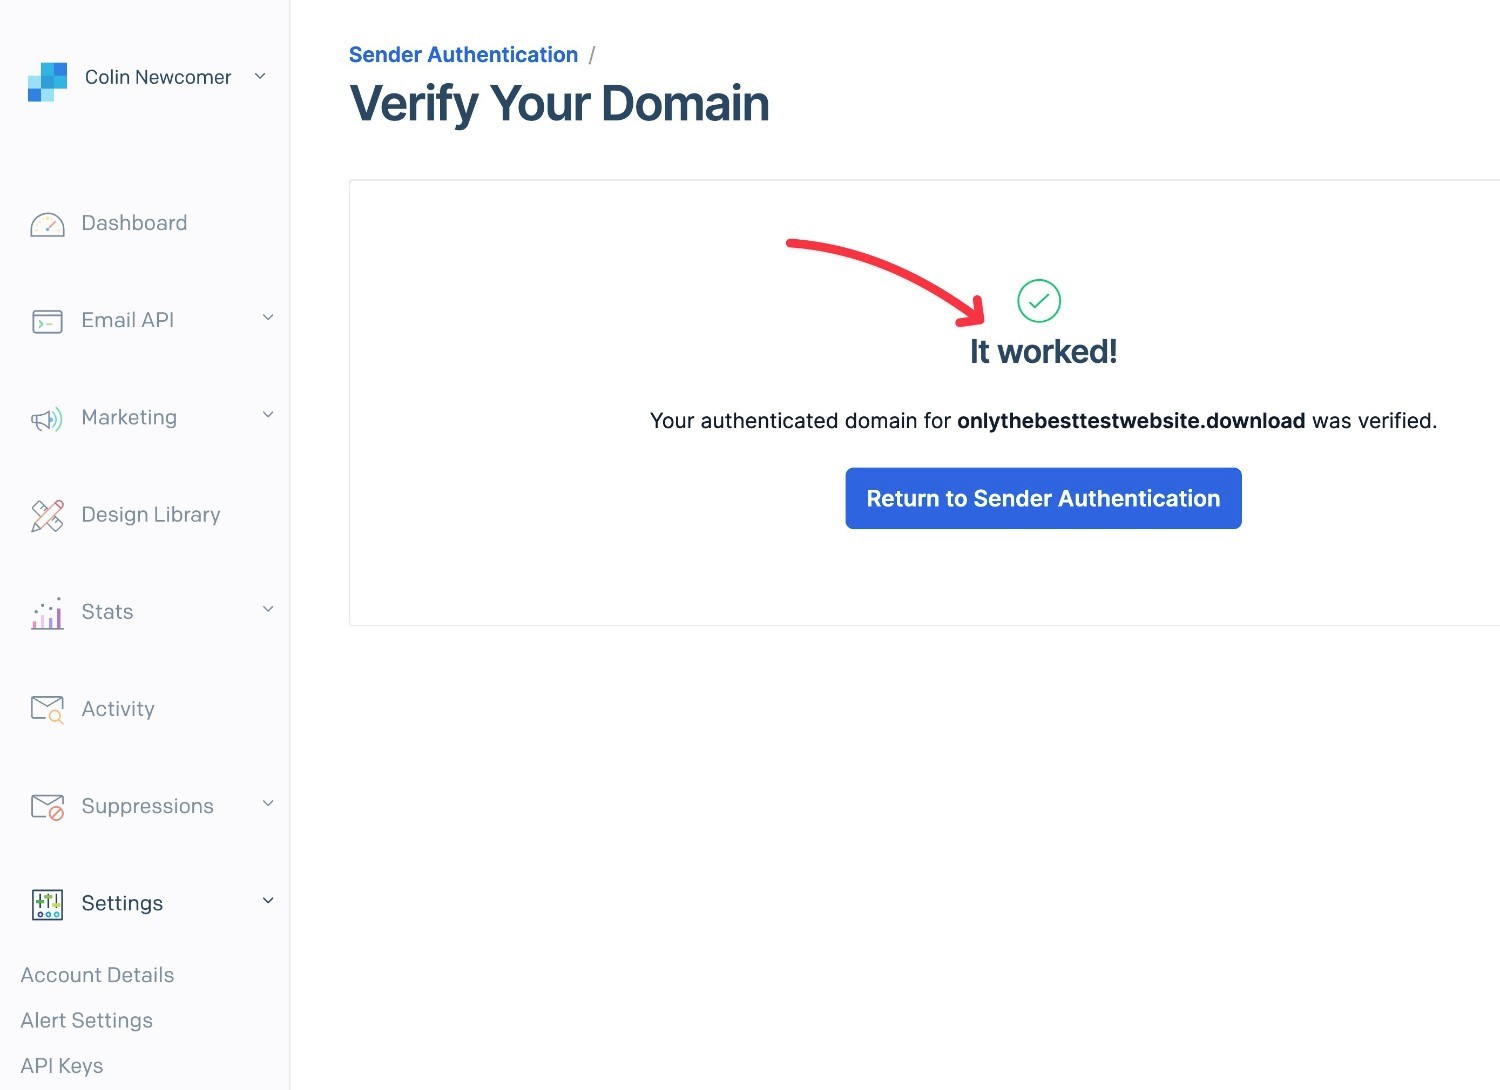
If all goes well, you should see a success message. If it doesn’t work, you can wait 30 minutes and then try again. Sometimes it can take 30 minutes (or even multiple hours) for your DNS changes to fully propagate.
4. Create a SendGrid API Key for Gravity SMTP
Once you’ve authenticated your domain name, the next step is to create an API key, which is what you’ll actually use to connect WordPress to SendGrid.
Here’s how to do that:
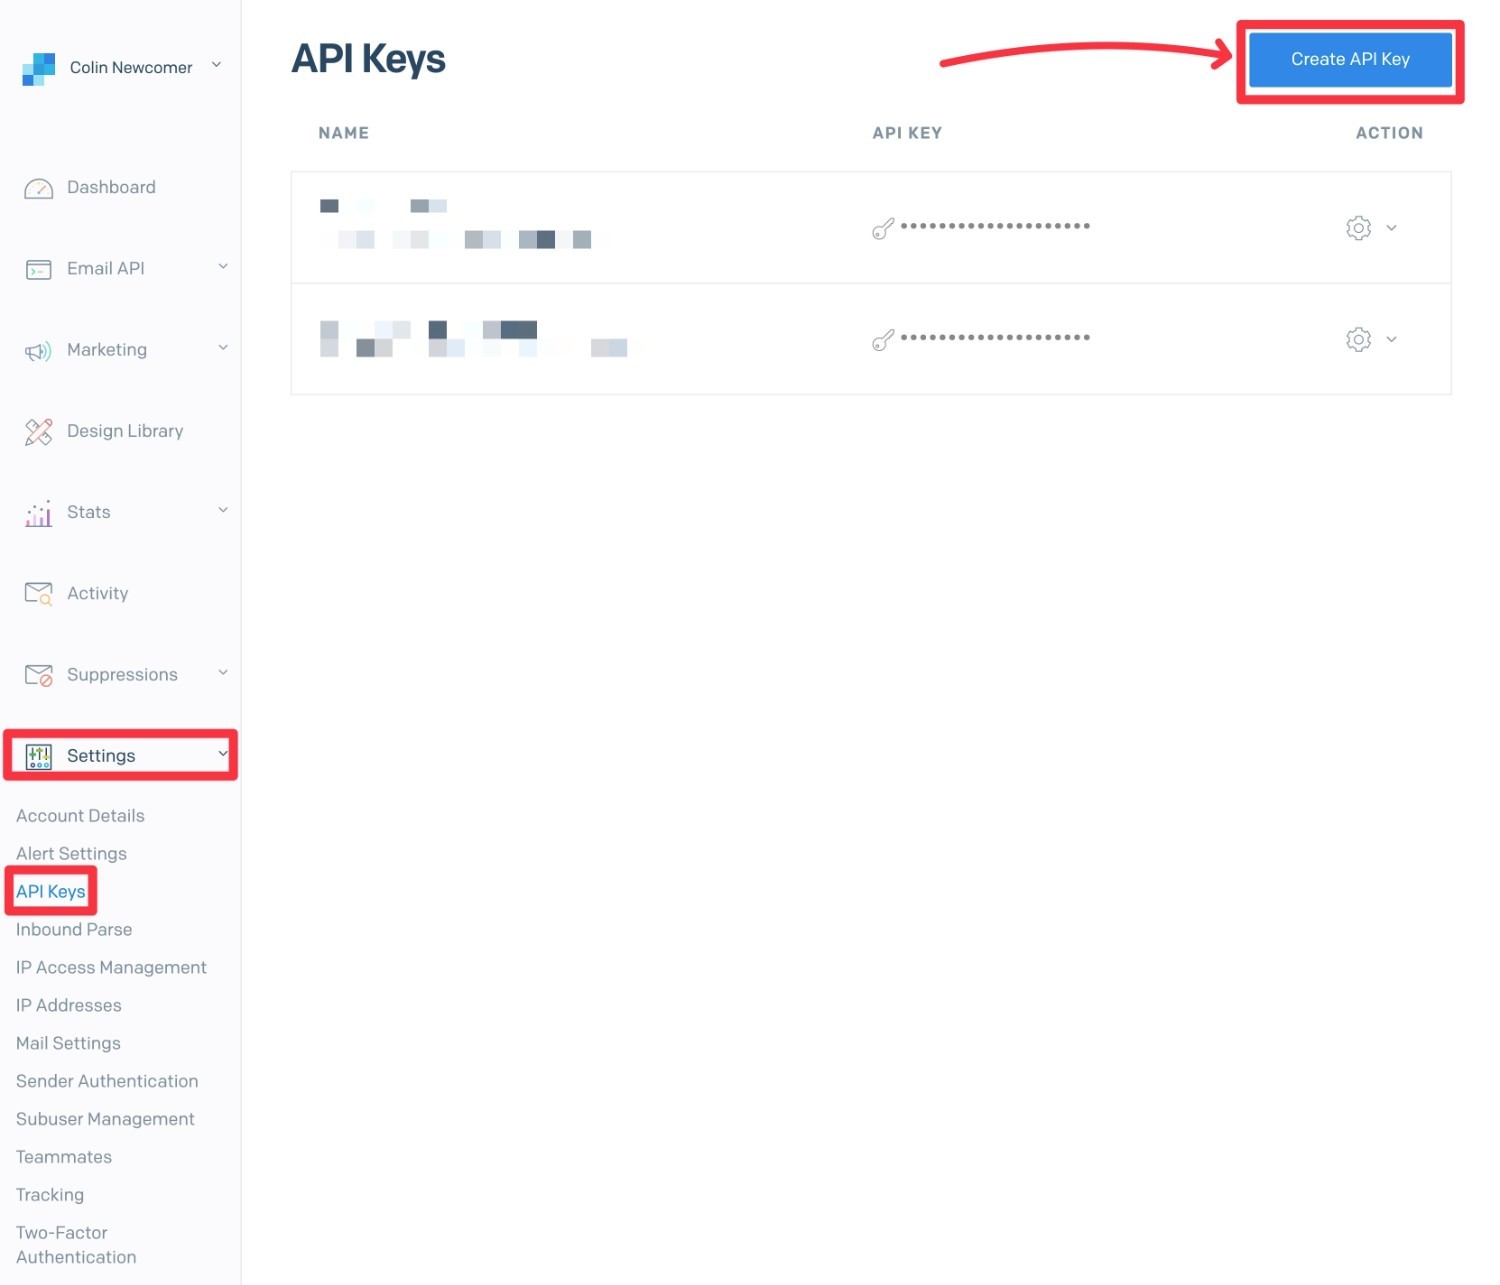
- Go to Settings → API Keys in your SendGrid dashboard (or click this link to go straight to the API key dashboard area).
- Click the Create API Key button.
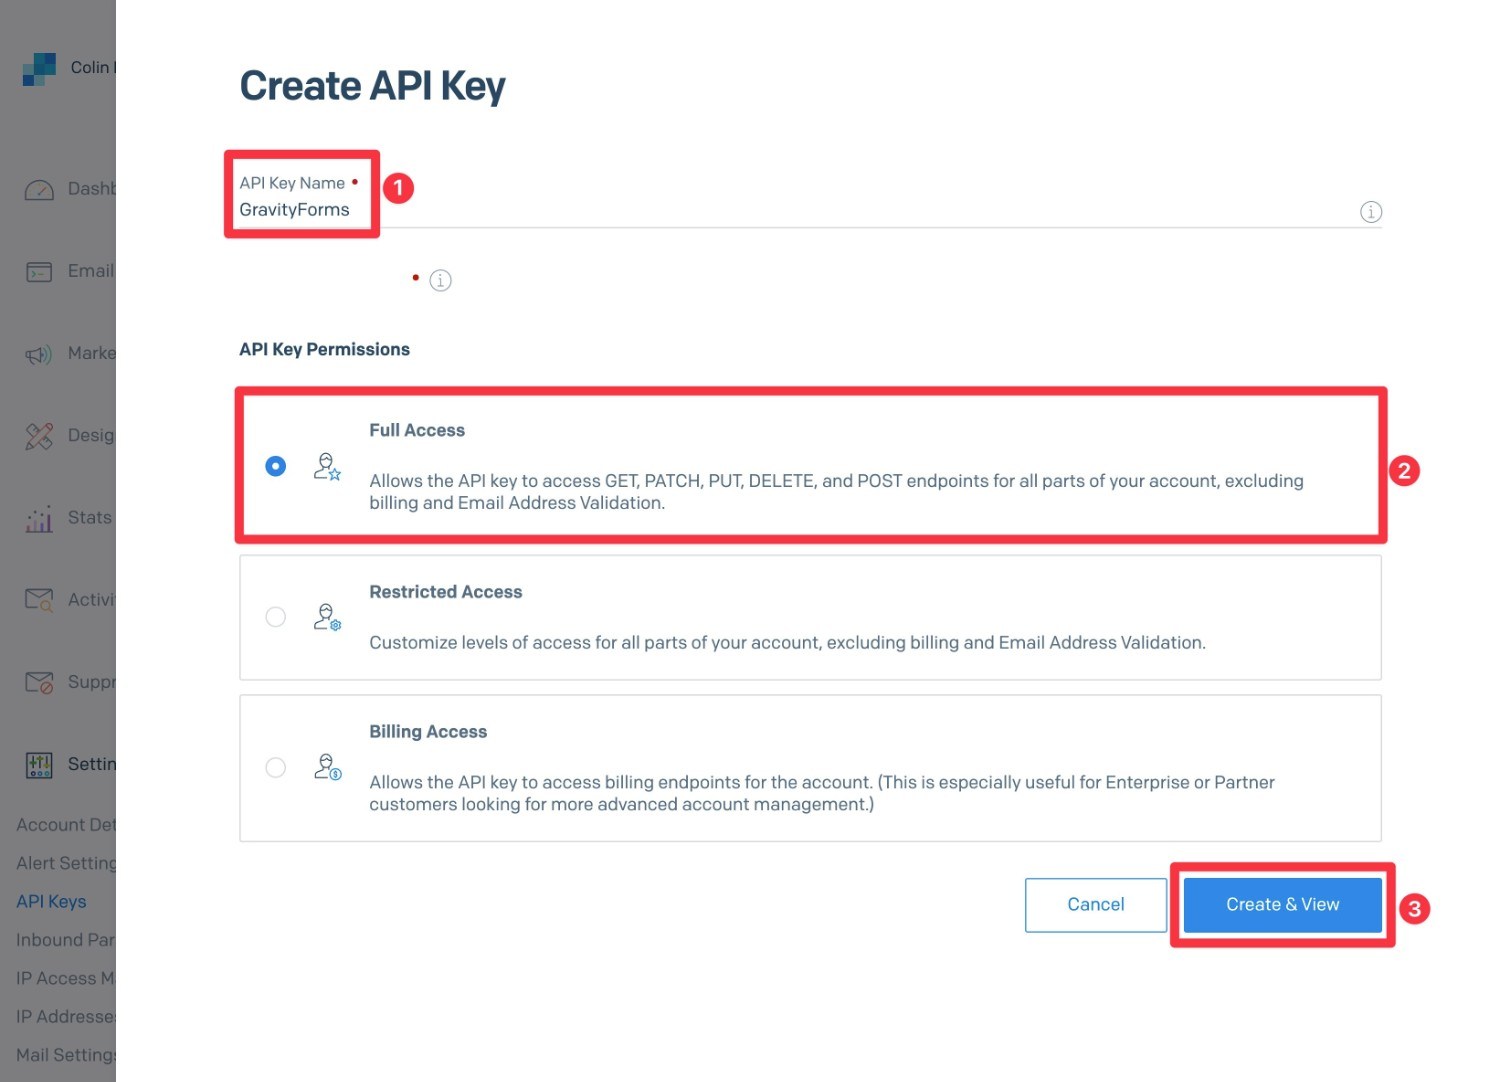
This will open a slide-out panel:
- Give your API key an internal name to help you remember it.
- Choose the Full Access option under API Key Permissions.
- Click the Create & View button.
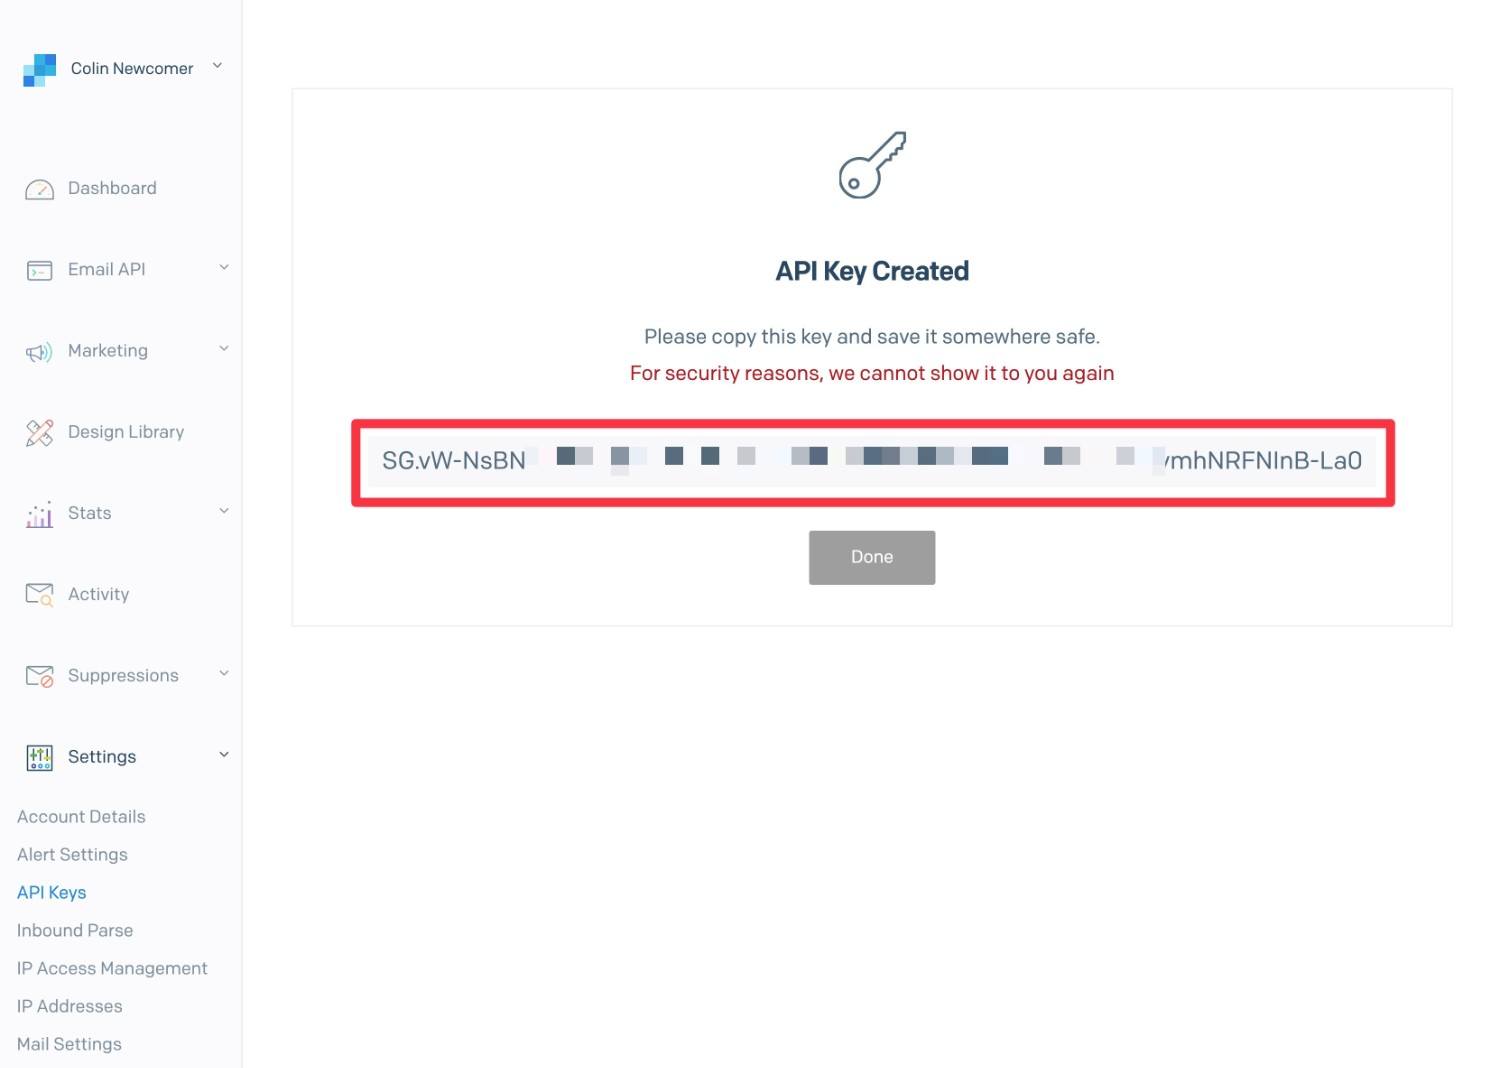
SendGrid will then show you your API key. You should copy this key to a safe place because you’ll need it in the next step and SendGrid will not show you the key again.
Don’t worry – if you accidentally lose the API key, you can just follow the same steps to create a new one.
5. Configure Gravity SMTP to Use SendGrid
Once you have your SendGrid API key, you’re ready to configure Gravity SMTP to start sending your WordPress site’s emails using SendGrid.
To set things up, follow these steps:
- Open your WordPress dashboard.
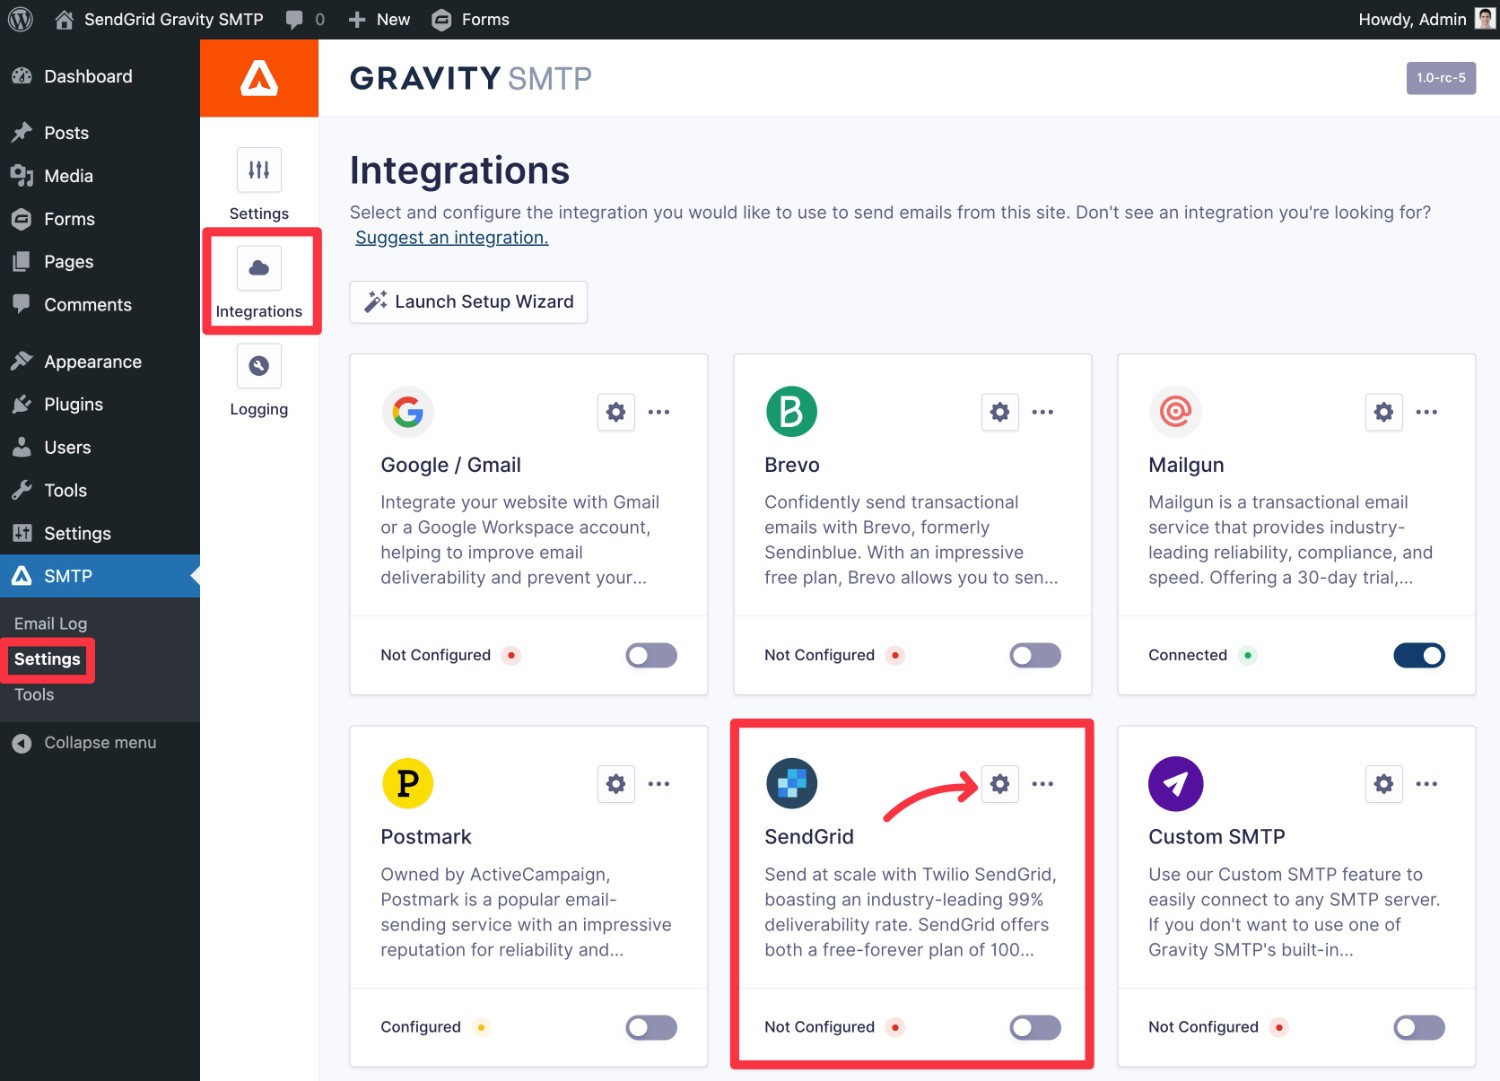
- Go to SMTP → Settings.
- Select the Integrations tab.
- Click the Gear icon next to SendGrid to open the settings for SendGrid.
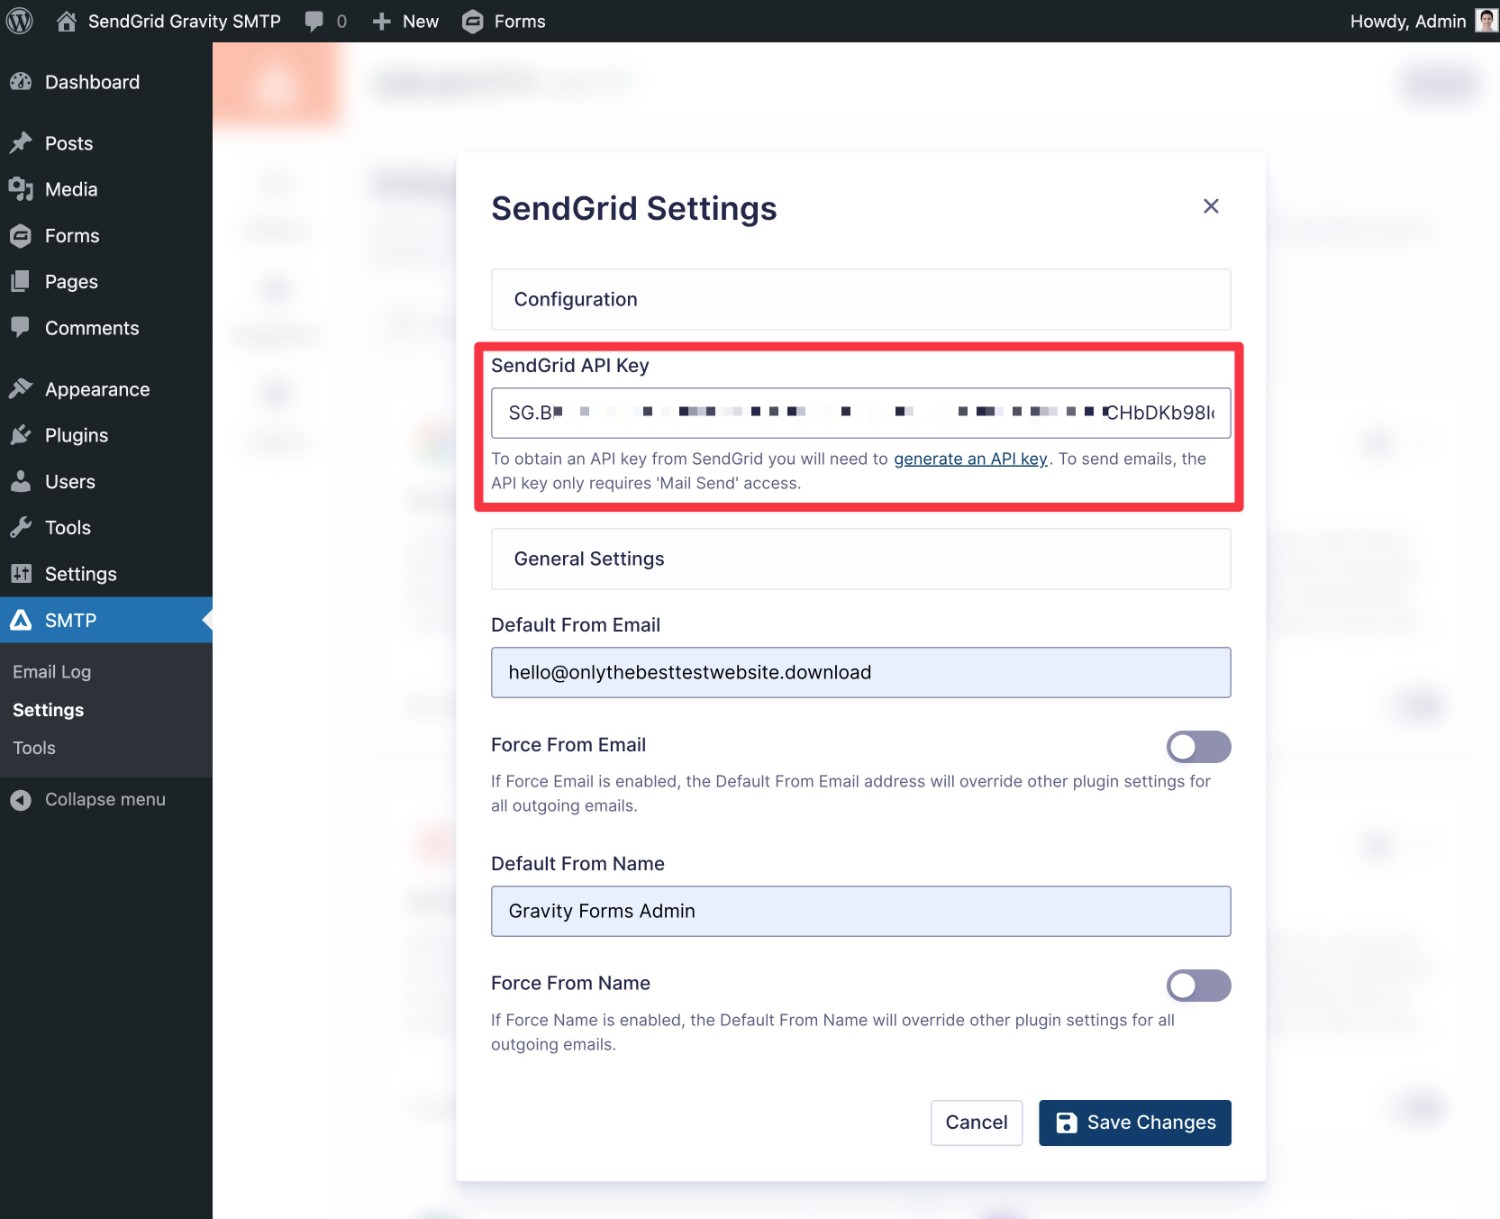
This will open a popup – here are the details that you’ll need to enter:
- SendGrid API Key – paste in the SendGrid API key that you created in the previous step.
- Default From Email – this is the email address that your site’s emails will be sent from – e.g. “[email protected]”. If you set up Domain Authentication in step #3, you can enter any email address that uses your domain name. If you set up Single Sender Verification, you must enter that exact email address.
- Force From Email – this lets you force other plugins on your site to use this same email address.
- Default From Name – this is the name that your site’s emails will be sent from.
- Force From Name – this lets you force other plugins to use the same name.
Once you’ve added everything, click the Save Changes button.
Finally, to activate SendGrid as your site’s primary email sending service, you need to enable the toggle in the SendGrid box.
After enabling the toggle, you should see the status change from Configured to Connected, which indicates that SendGrid is now your site’s primary email sending service.
6. Send a Test Email Using SendGrid
At this point, your site should be properly configured to start sending its emails using SendGrid.
To make sure that everything is working properly, Gravity SMTP includes a built-in feature to let you send a test email:
- Go to SMTP → Tools in your WordPress dashboard.
- Select the Send a Test tab (it should be selected by default).
- Enter your email address in the Send To box (or any email address to which you want to send a test email).
- Click the Send Test button.
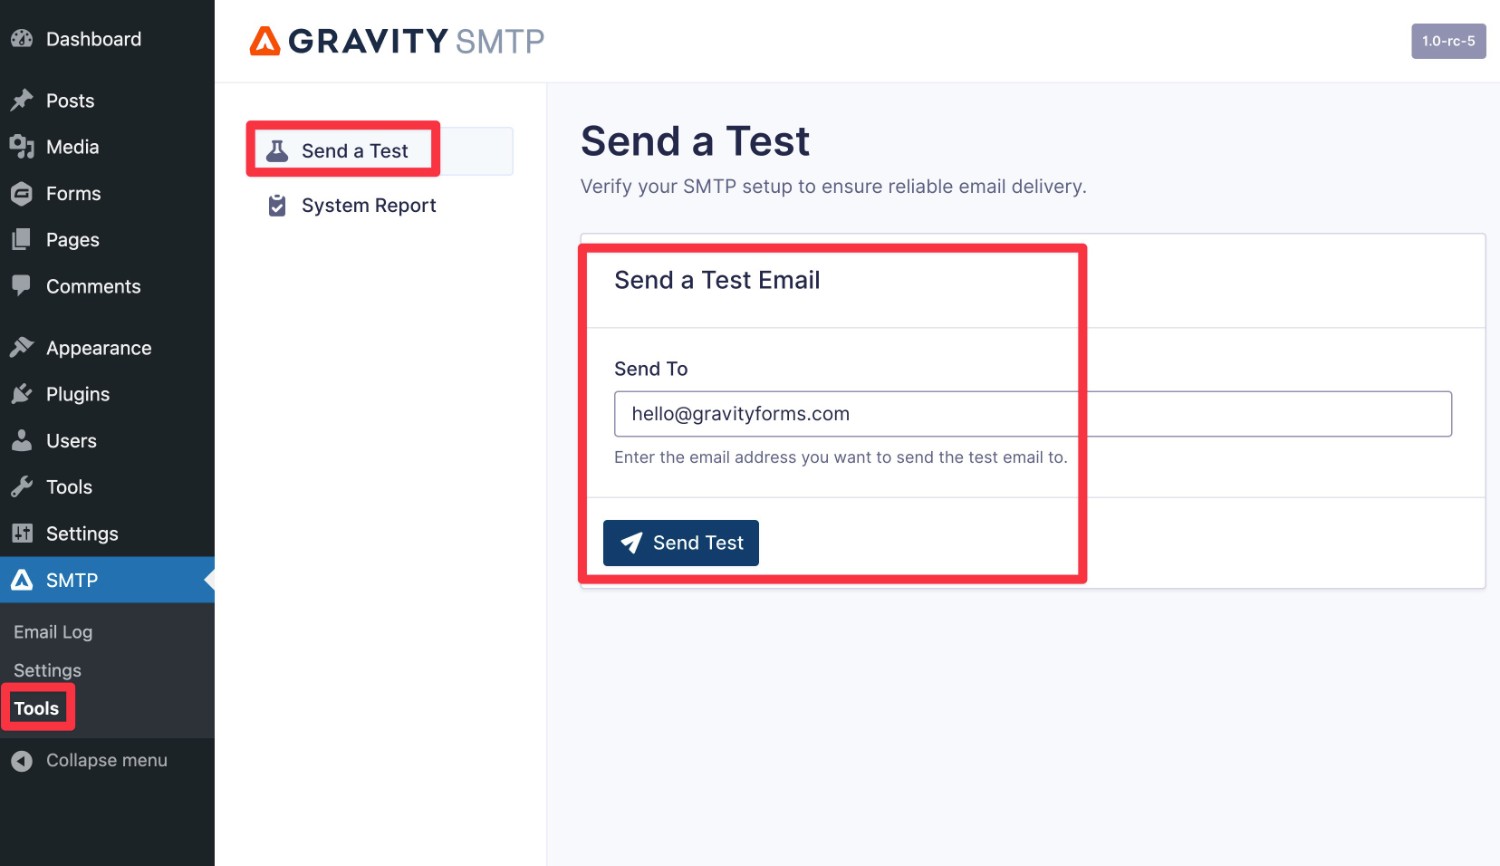
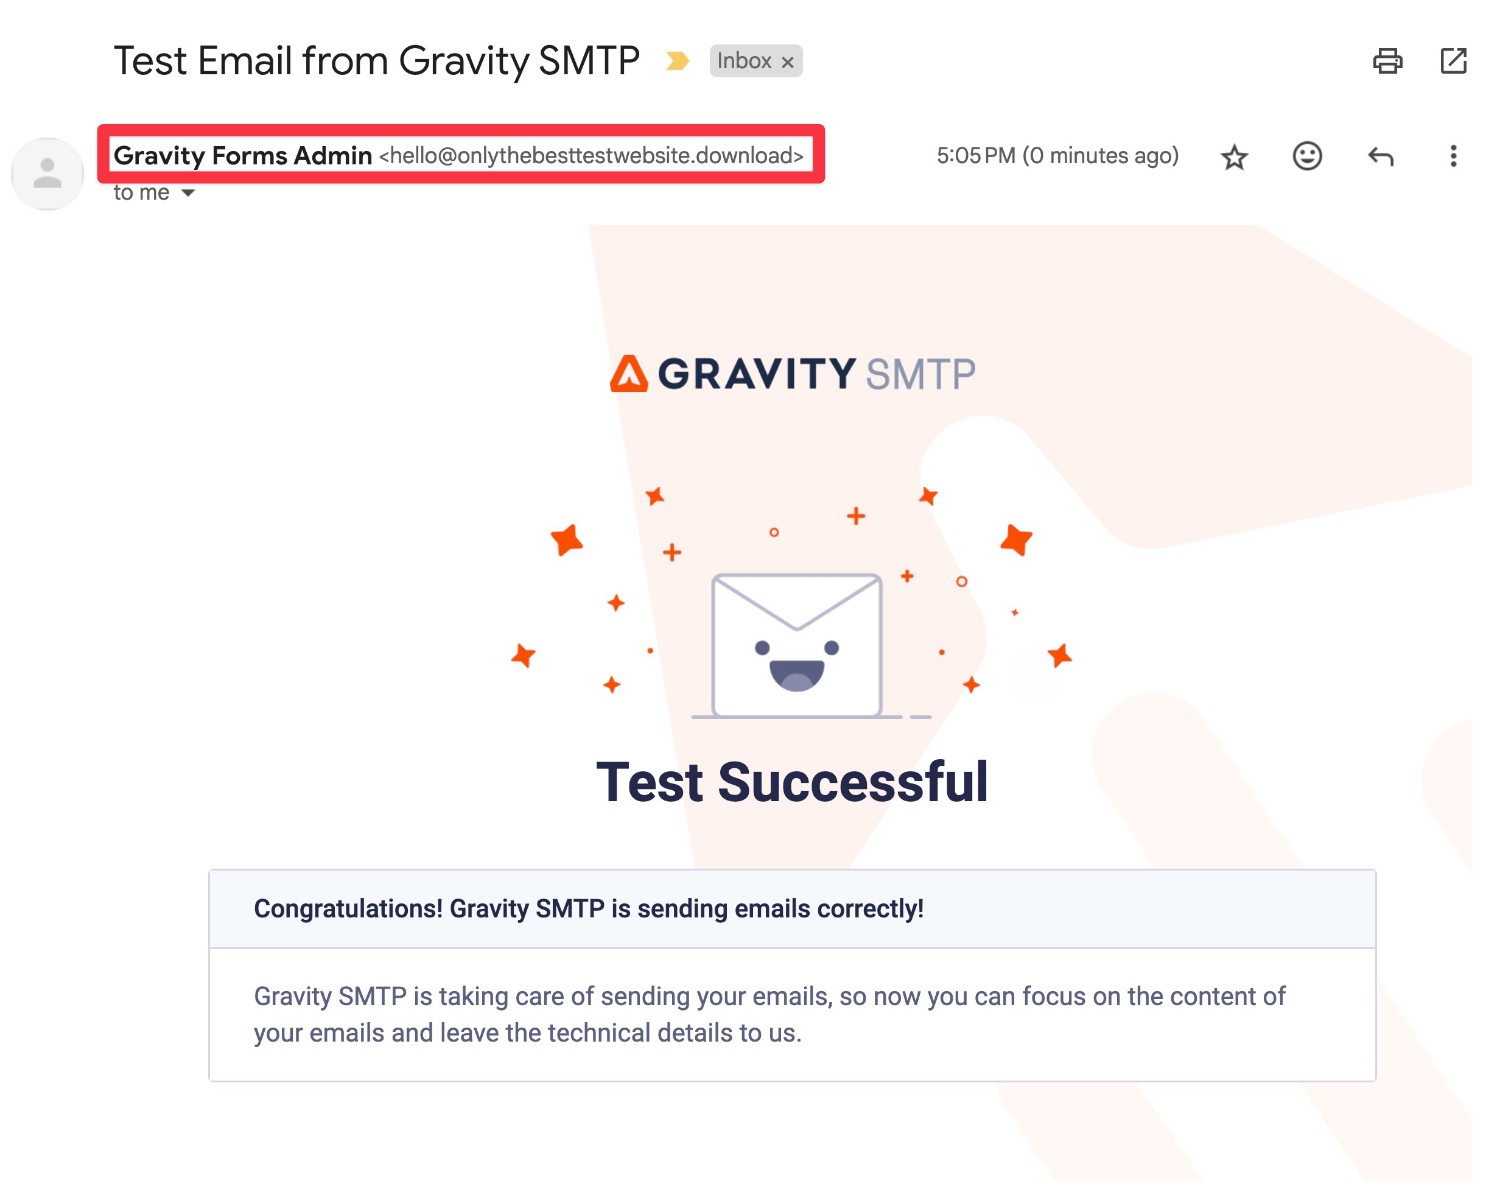
You should then see a success message in the Gravity SMTP interface and you should also receive an actual email in your email client.
Here’s an example of what the email might look like – in addition to checking for the email itself, we also recommend checking the “From Email” and “From Name” to make sure they’re displaying as you want them to.
7. Monitor WordPress SendGrid Email Sending Going Forward
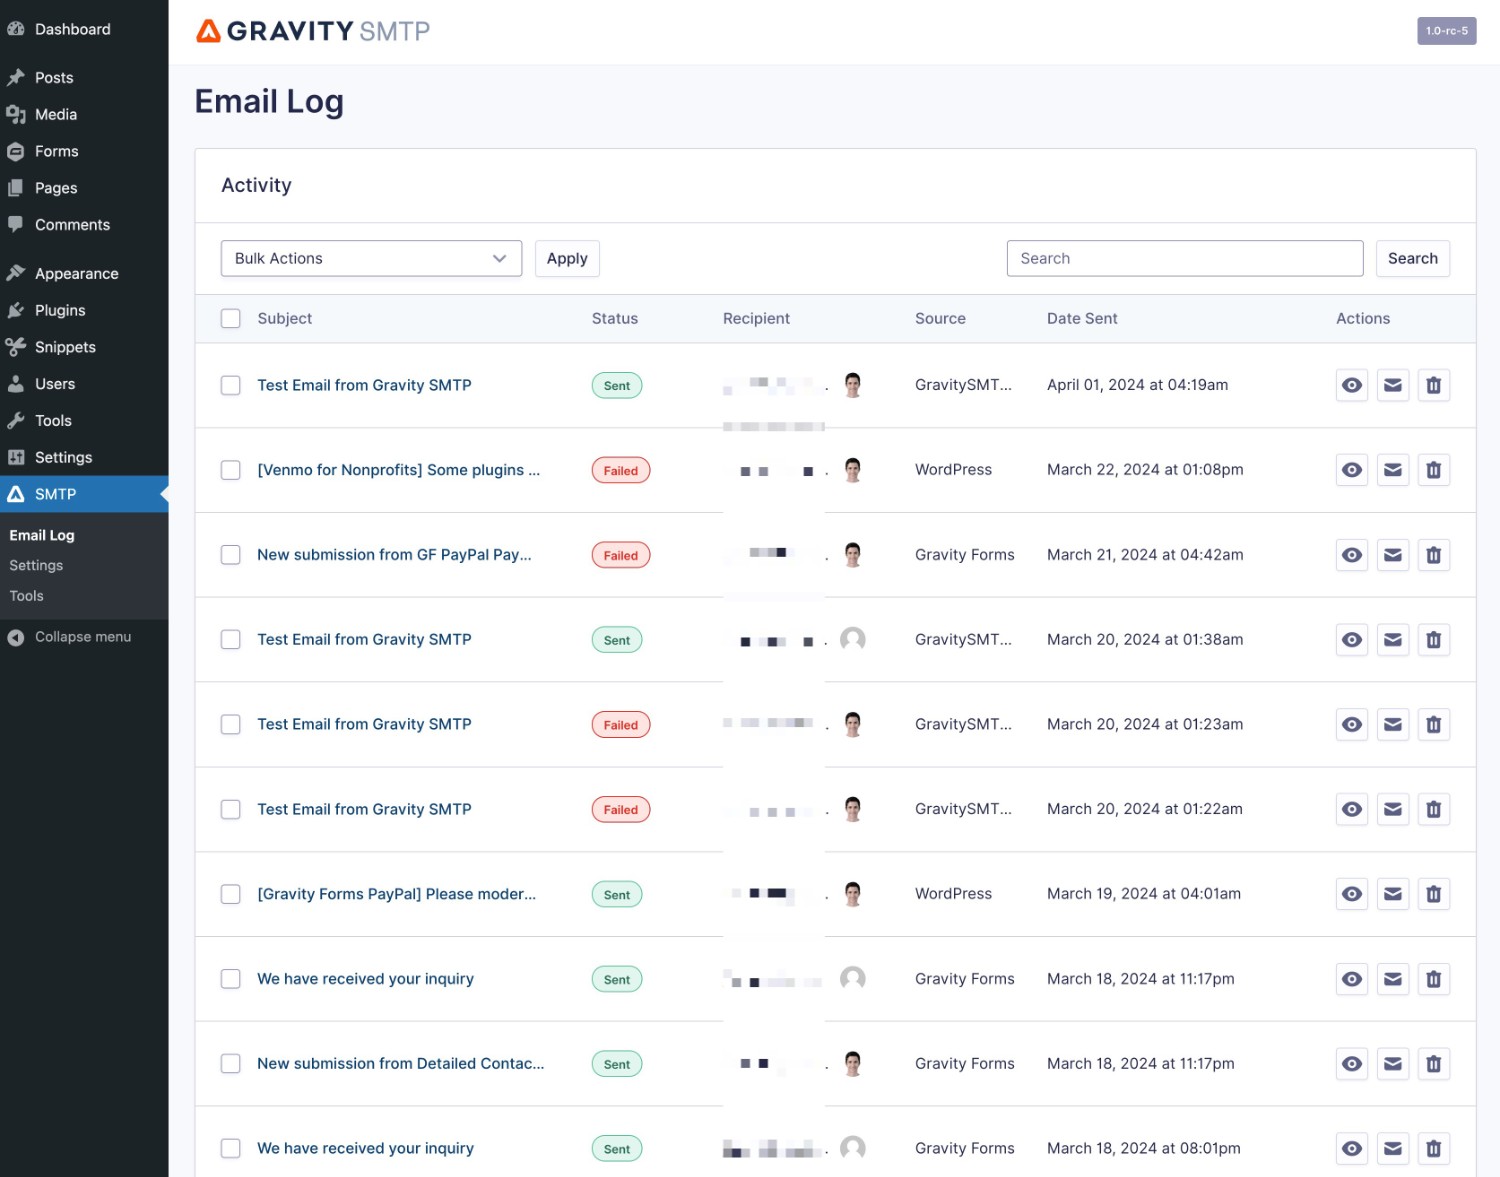
To help you monitor the emails that your site is sending via SendGrid, Gravity SMTP also includes a detailed email logging feature.
If you go to SMTP → Email Log, you’ll see a list of all of the emails that your site has sent, along with some basic technical information.
You can also use the buttons in the Actions column to access more information:
- View email log – you can see more technical information about that email.
- View email – you can view a visual preview of the actual content and design of that email.
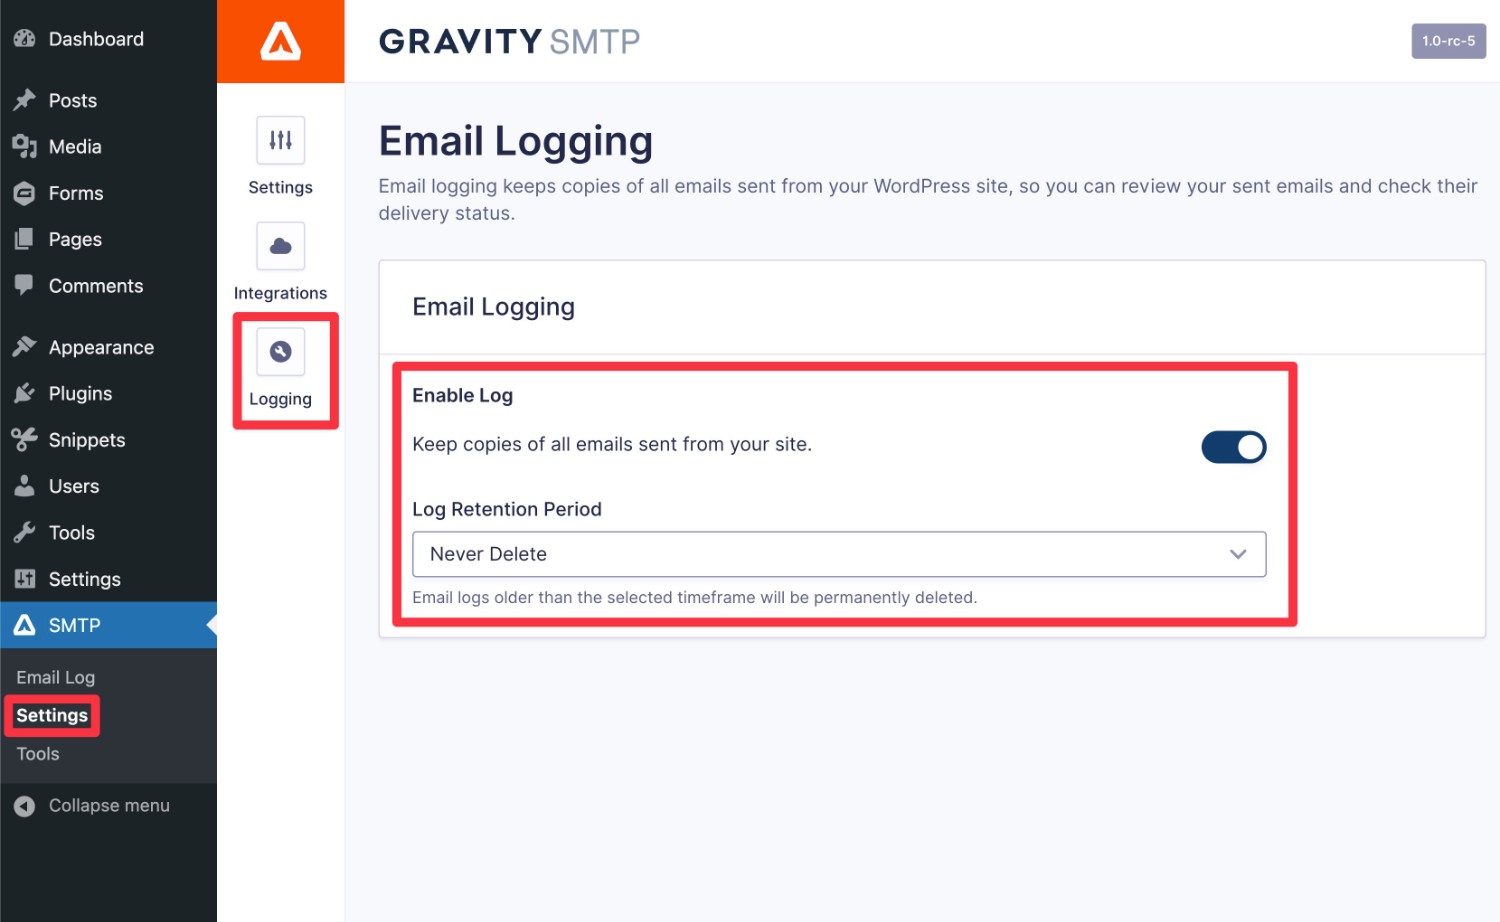
By default, Gravity SMTP will permanently log all of the emails that your site sends. However, you can adjust this storage period (or disable logging completely) by going to SMTP → Settings → Logging.
For more in-depth details on Gravity SMTP and getting started with SendGrid, check out the documentation.
Connect WordPress to SendGrid Today
That wraps up our guide on how to use Gravity SMTP to connect WordPress to SendGrid.
With its generous forever-free plan and competitively priced paid plans, SendGrid makes a great option for sending your WordPress site’s emails.
And with Gravity SMTP, you can easily connect your WordPress site to SendGrid, while also accessing helpful features to monitor and test your site’s email configuration (with lots more features on the way).
If you have a Gravity Forms Elite license and you’re ready to get started, install Gravity SMTP and you’ll be up and running with SendGrid email sending in no time.

If you want to keep up-to-date with what’s happening on the blog sign up for the Gravity Forms newsletter!
