Starter Guide: How to Create a Contest Entry Form
 Running a contest or a giveaway is a great way to boost engagement on your site and build brand awareness. With Gravity Forms, a versatile form plugin for WordPress, you can easily create contest entry forms for your website.
In this starter guide, we’ll take a look at how you can use Gravity Forms to design an effective contest entry form. We’ll also talk about how to enhance your form with extra fields, and how to integrate your contest entry form with an email marketing or CRM platform.
Let’s get started…
Why Run a Contest on Your WordPress Website
As mentioned earlier, running a competition on your website is a great way to boost engagement and build brand awareness. However, there are a few more reasons why you should consider running a contest:
- To grow your email list and generate qualified leads for your business
- Add a fun element to your brand
- Drive traffic to your website
- Or learn more about your followers and fans through their answers
With that in mind, let’s take a look at what makes an effective contest entry form and how to create one.
What Makes an Effective Contest Entry Form
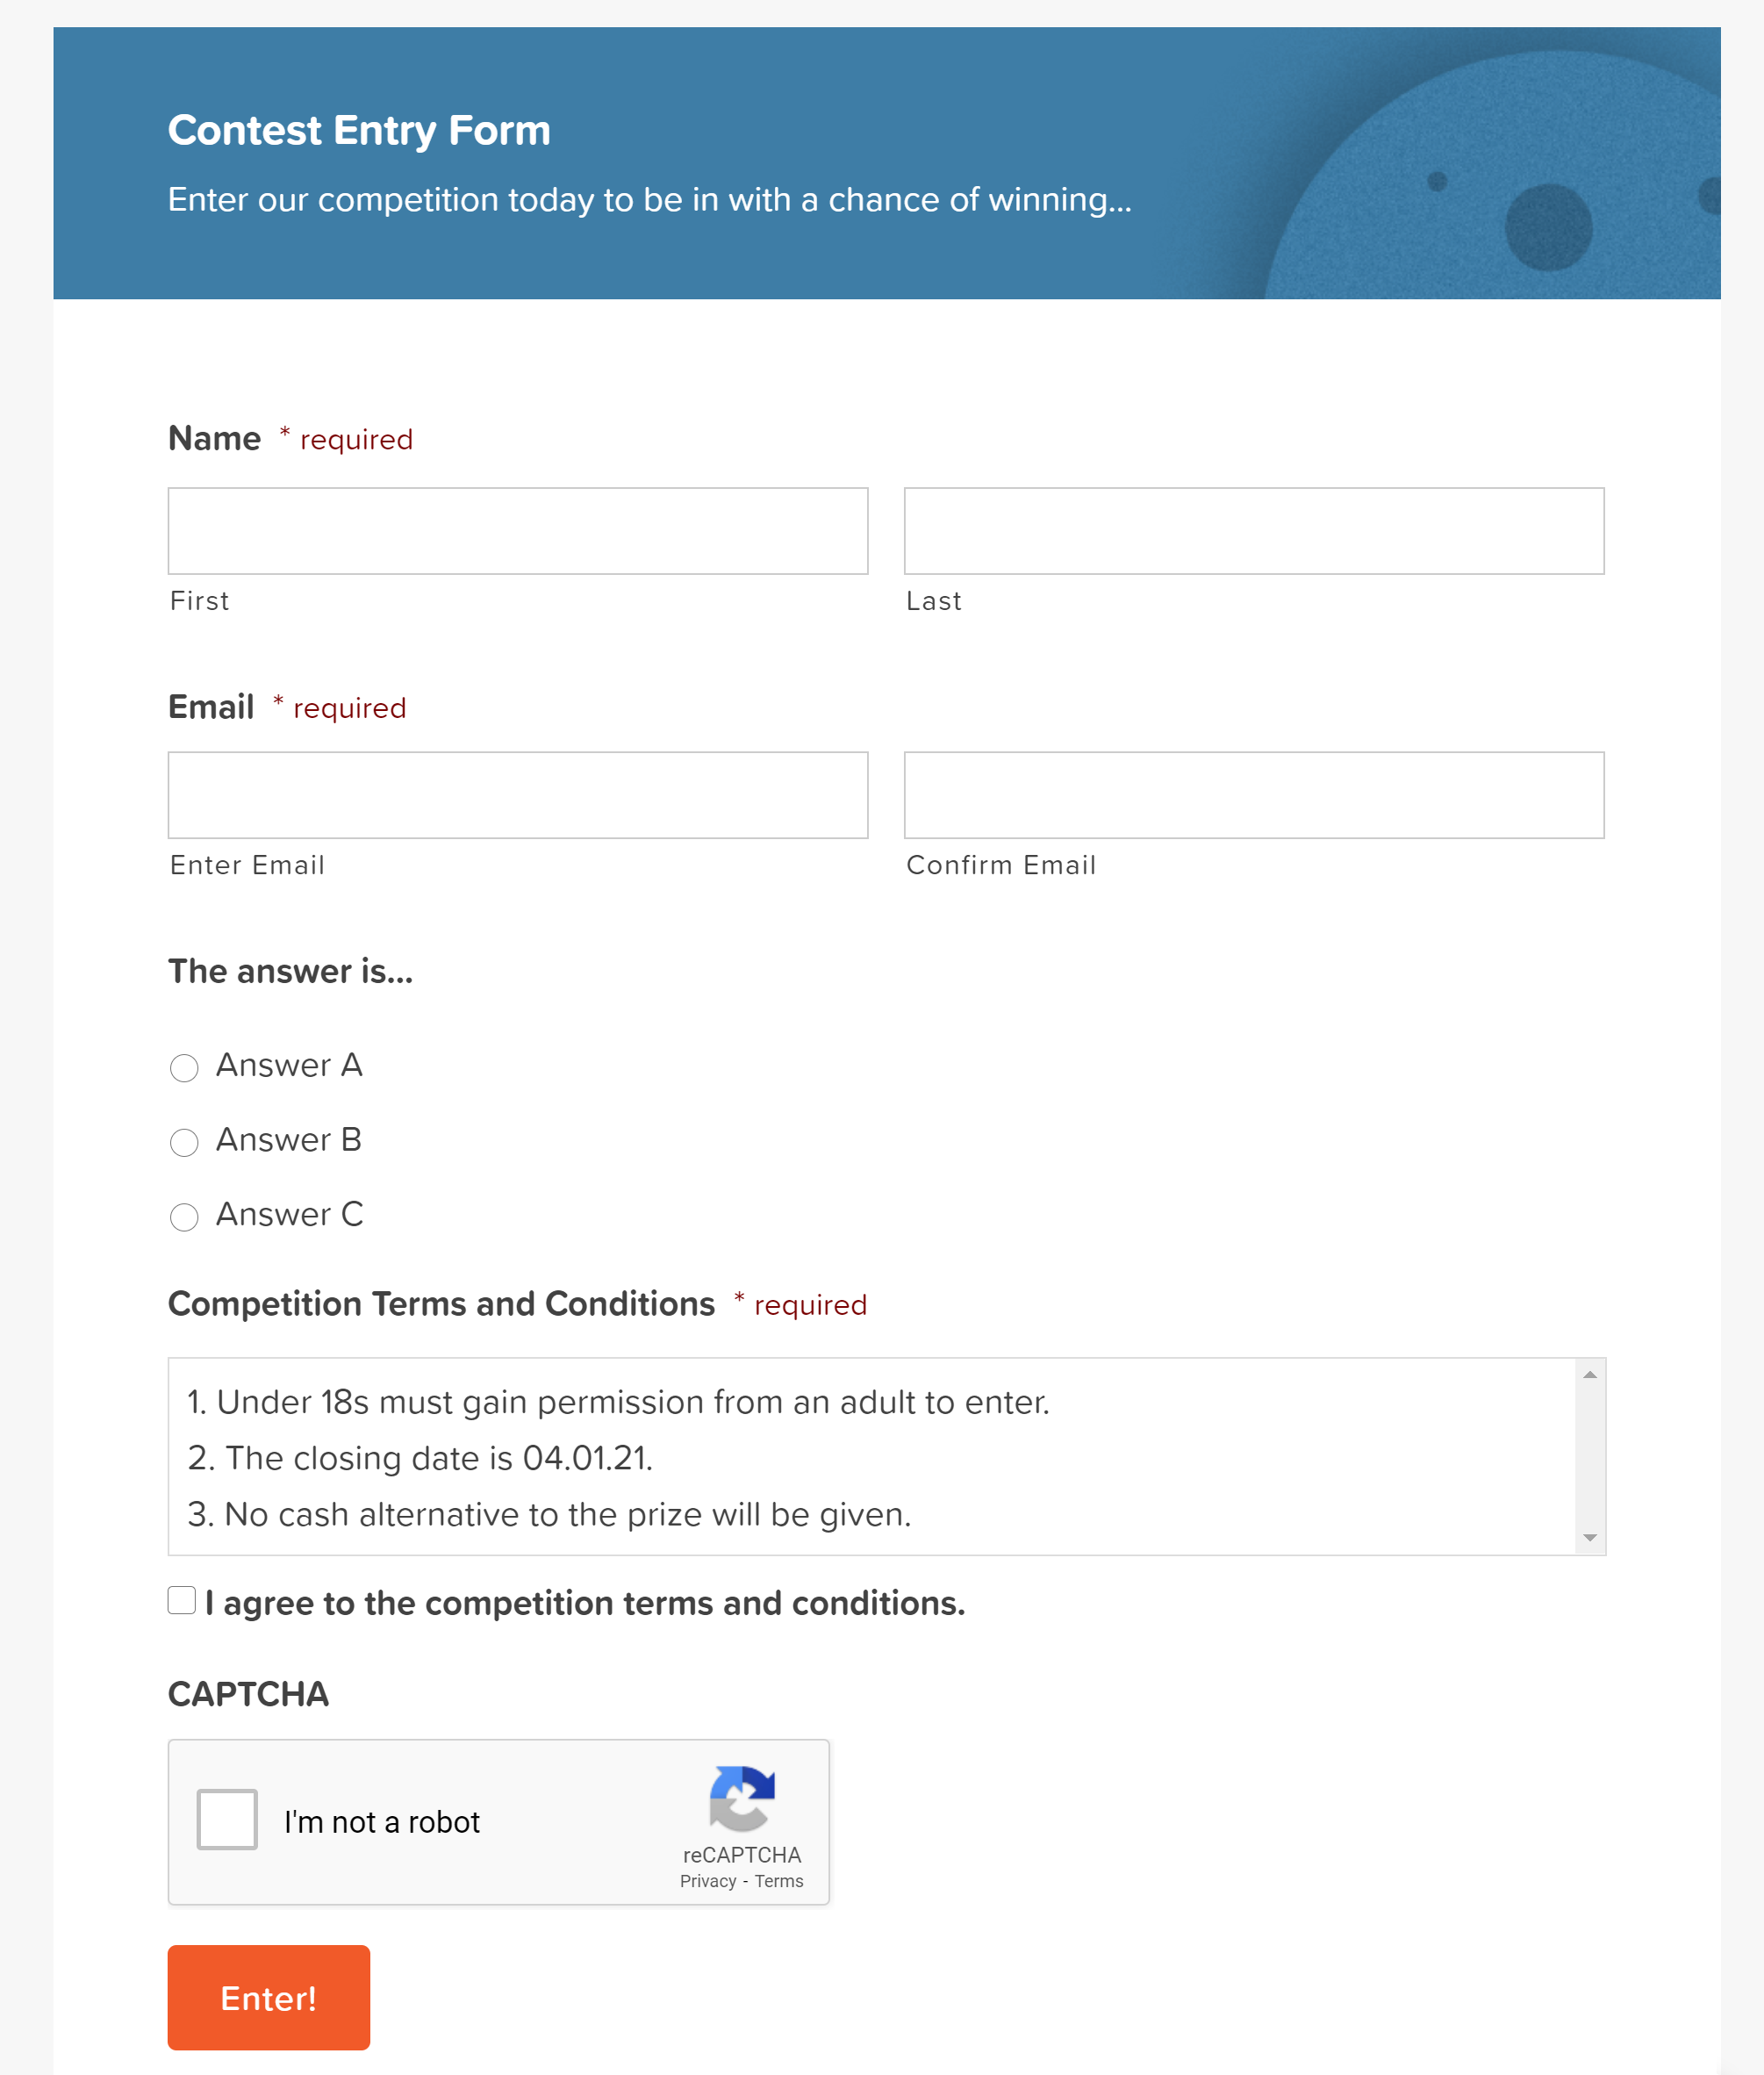 An effective contest entry form shouldn’t be too long. If you make the form too long or ask too many questions, you risk visitors abandoning the form before they fill it out completely.
Since the goal is to generate entries for your contest, your contest entry form should ask for the following as the bare minimum:
- Contact information such as name and email address
- Physical address if you’re going to ship a physical item as a reward to the contest winner
- Contest entry rules so people know what’s required to win and when the contest takes place
- Checkbox so they can agree to the rules of your contest
How to Create a Contest Entry Form With Gravity Forms
Now that we’ve covered why you should run competitions on your website and what makes an effective contest entry form let’s go through the steps of creating the form itself.
Step 1: Create a New Form Using the Contest Entry Form Template
The first step is to create a new form. If you already have Gravity Forms, log into your WordPress dashboard and click on Forms > New Form from the sidebar menu.
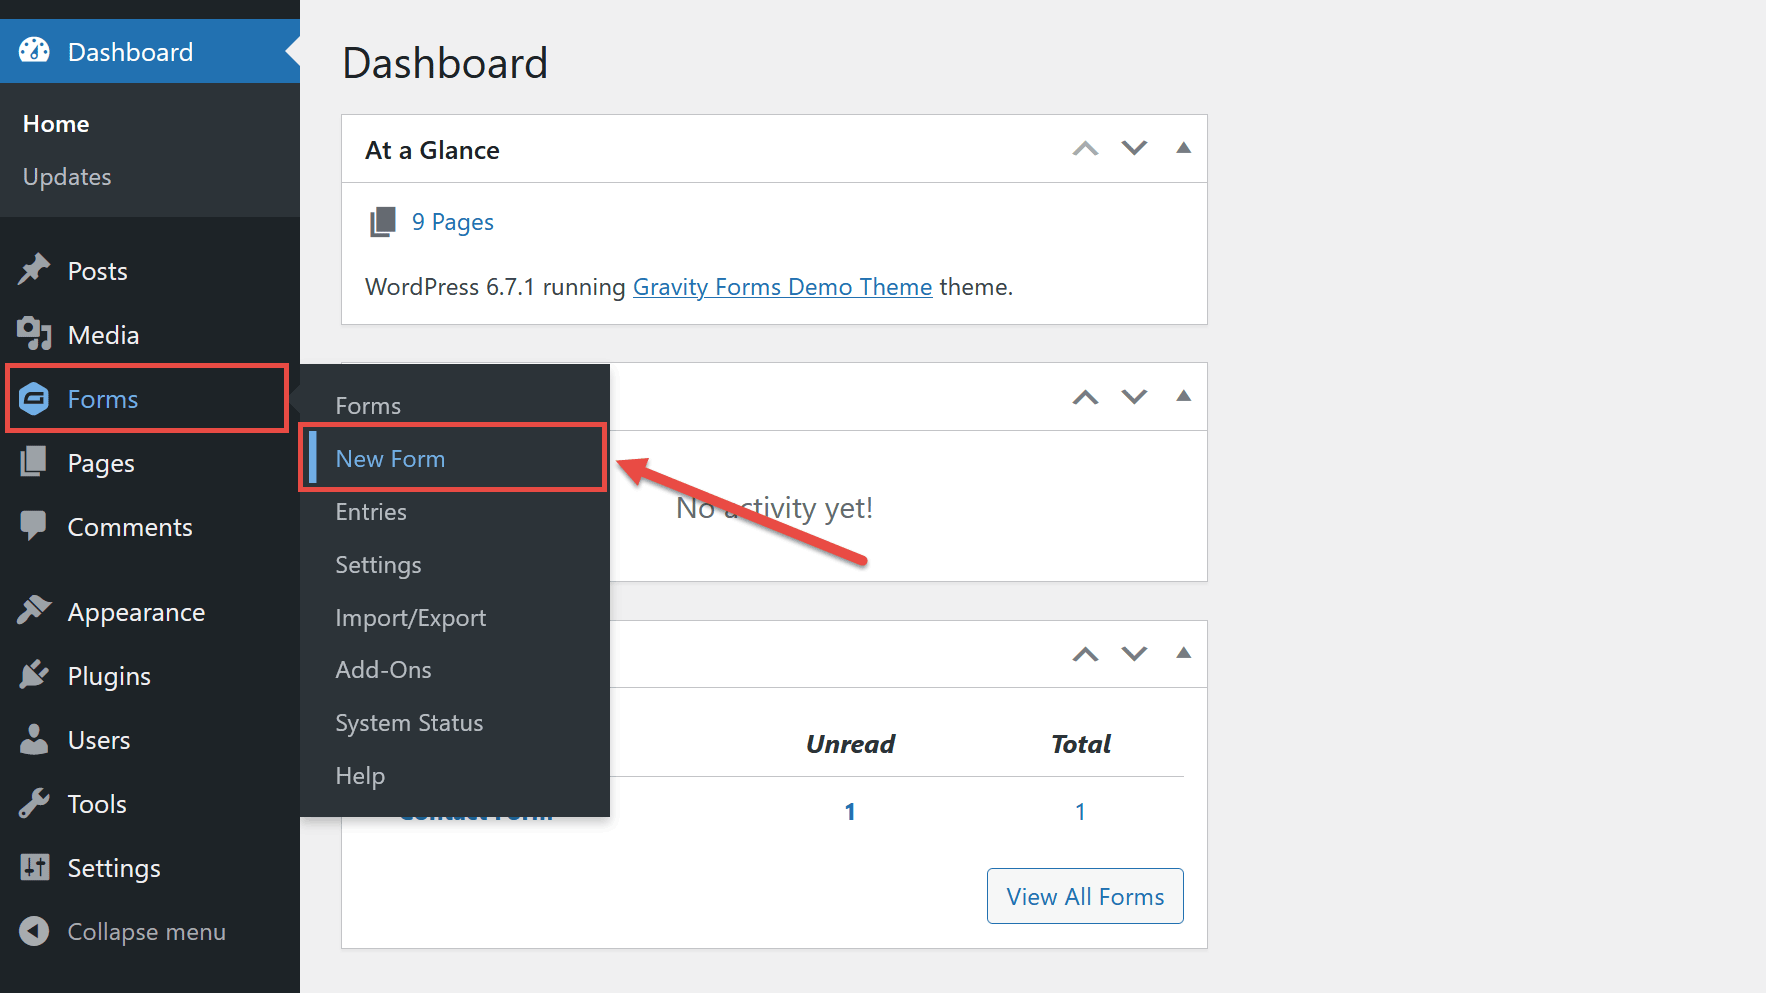
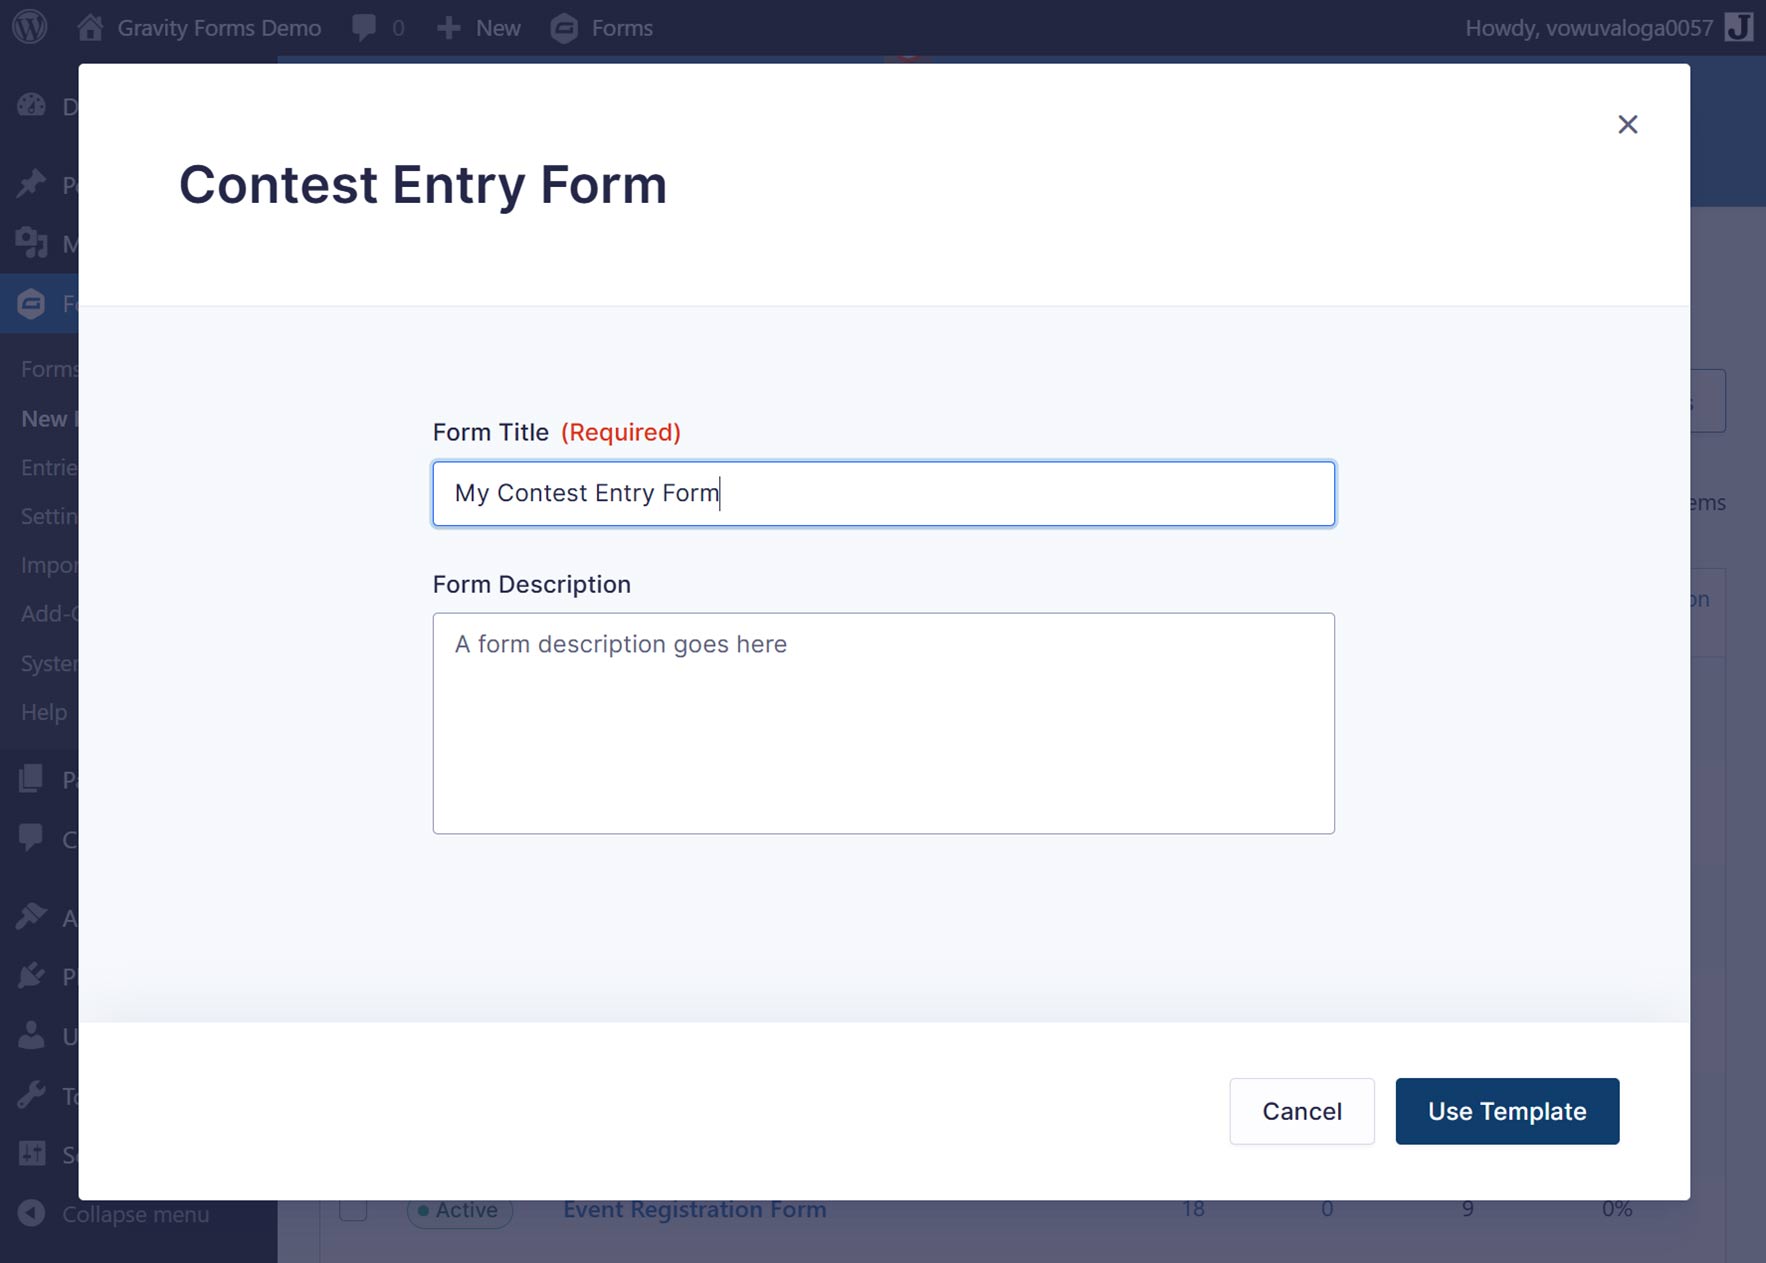
Once the Gravity Forms template library is displayed, find the Contest Entry Form and click the Use Template button.

You can then give the new form a title and optional description. Next, click the Use Template button.
If you don’t have Gravity Forms installed, you’ll need to buy a license first and download the plugin to your computer. Log into your WordPress website and click on Plugins > Add New Plugin from the sidebar menu. Then click the Upload Plugin button. Press, Choose file, and locate the zipped file you’ve downloaded. Then, click Install > Activate.
Once the plugin has been installed and activated, follow the instructions to register the plugin with Gravity Forms. Then, follow the steps above to create the new form for your contest.
For more information on how to get started with our plugin, check out this video tutorial – How to Install Gravity Forms on Your WordPress Website.
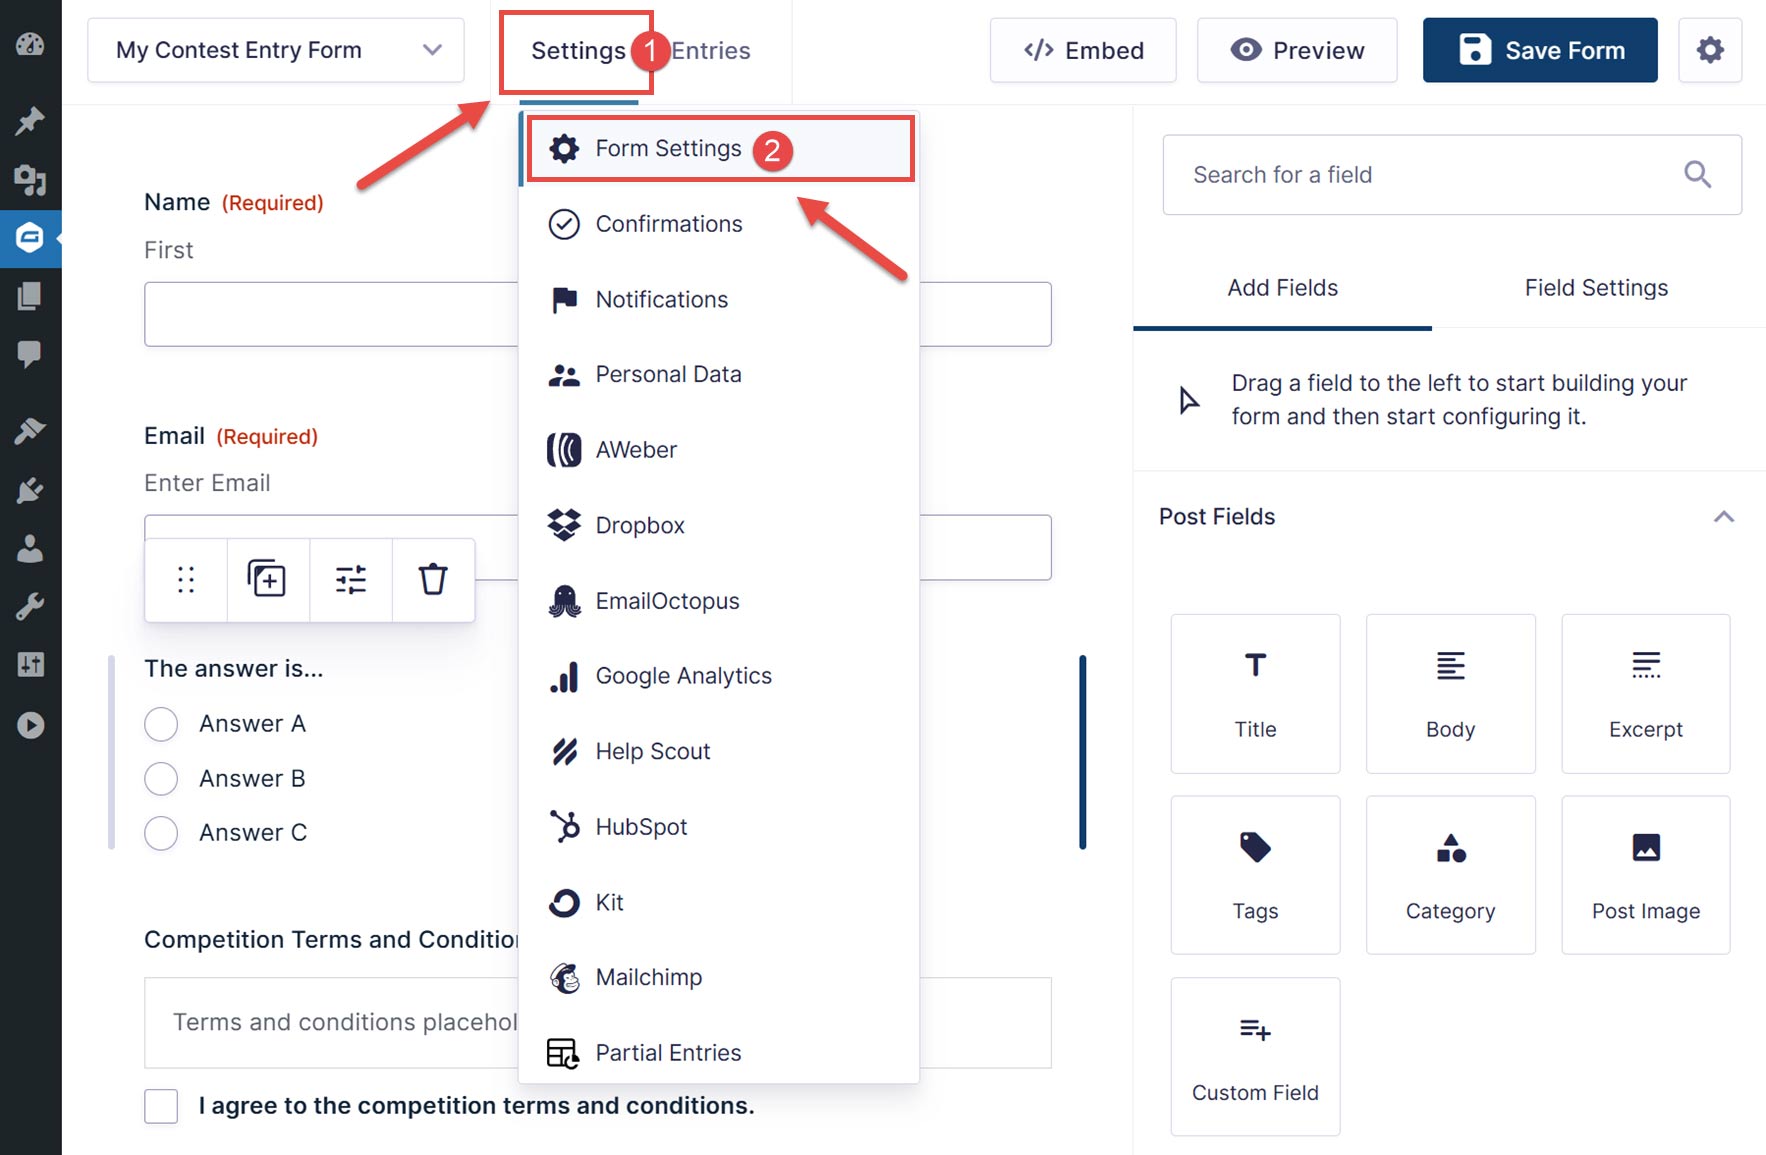
Step 2: Customize the Form
The form template should now be loaded into the Gravity Forms editor. To make the form match your requirements, you’ll need to edit the existing fields and possibly add more fields.
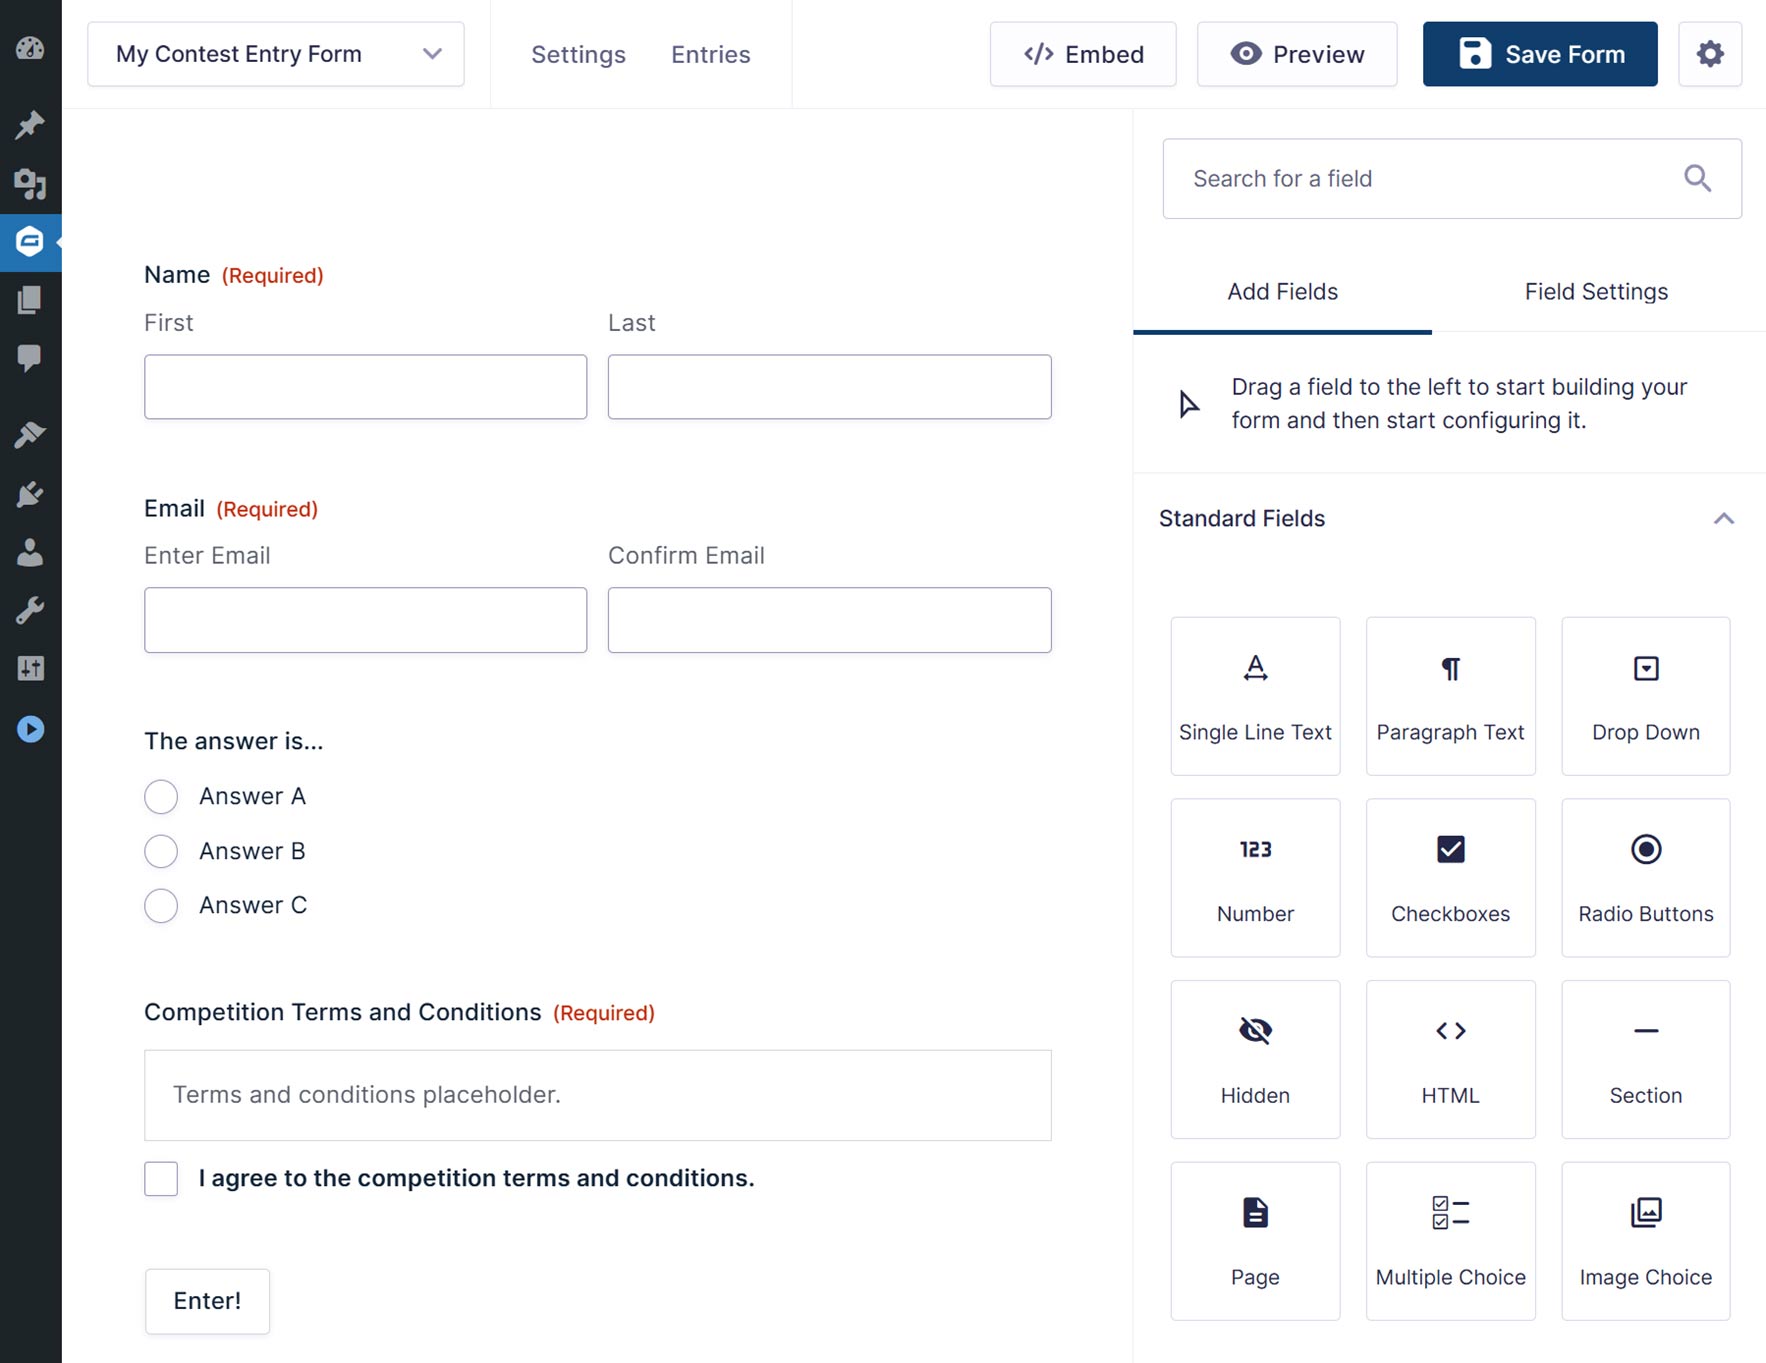
The fields on the right side of the editor can be dragged and dropped onto the form. Then, once a field has been added to the form, click on it to access the field settings on the right side of the editor screen.
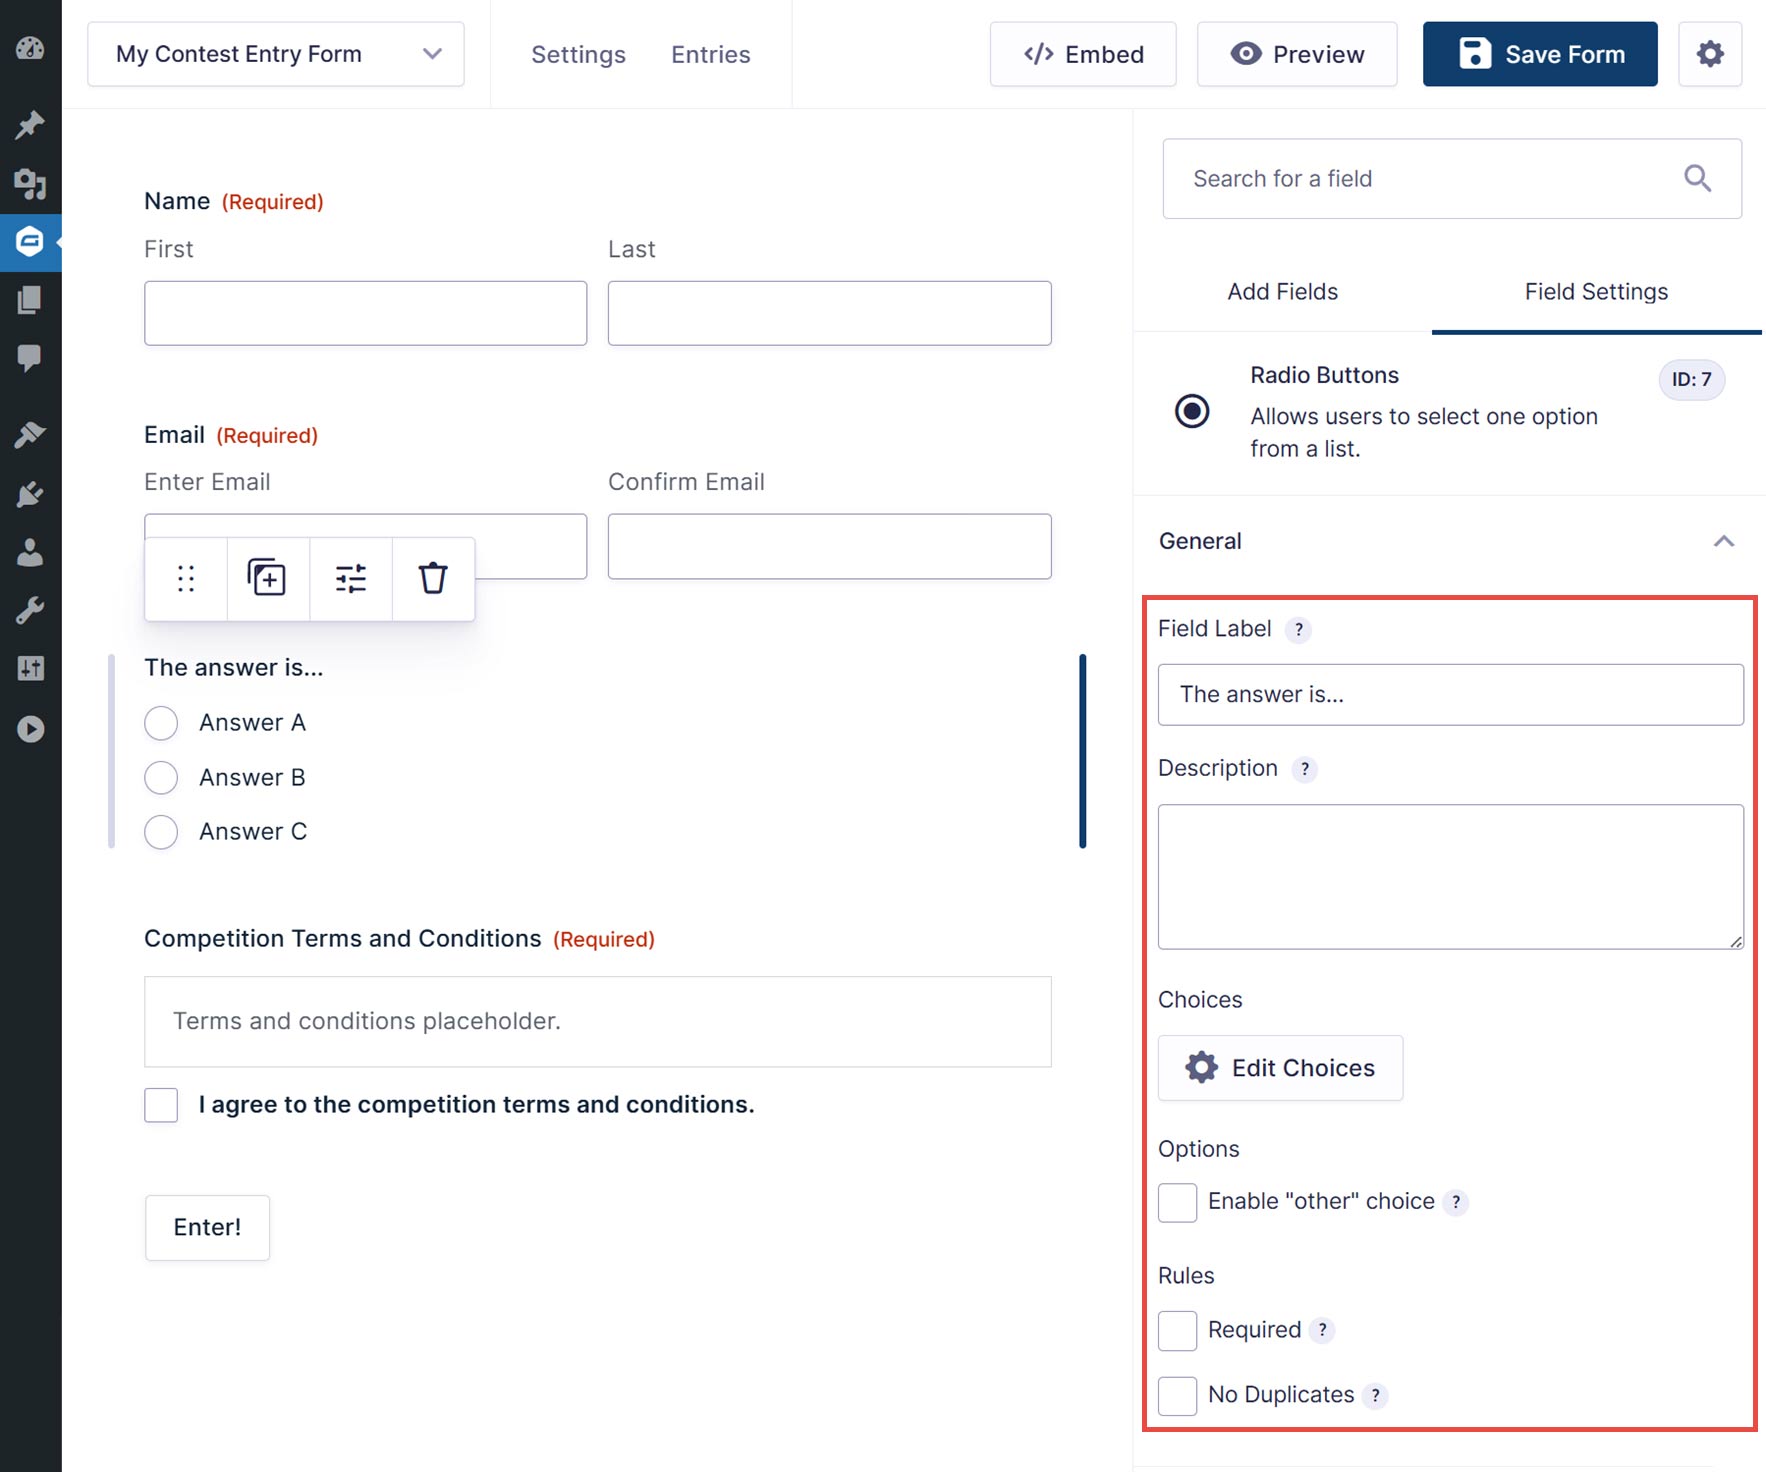
Depending on the type of contest you’re running, you might want to add extra fields to your form. For example, you could add additional checkboxes if the contestants need to correctly answer multiple questions or a file upload field if they need to submit a photo or any other type of file as part of their entry.
Lastly, don’t forget that you can also add spam protection to your form to ensure you’re getting legitimate entries.
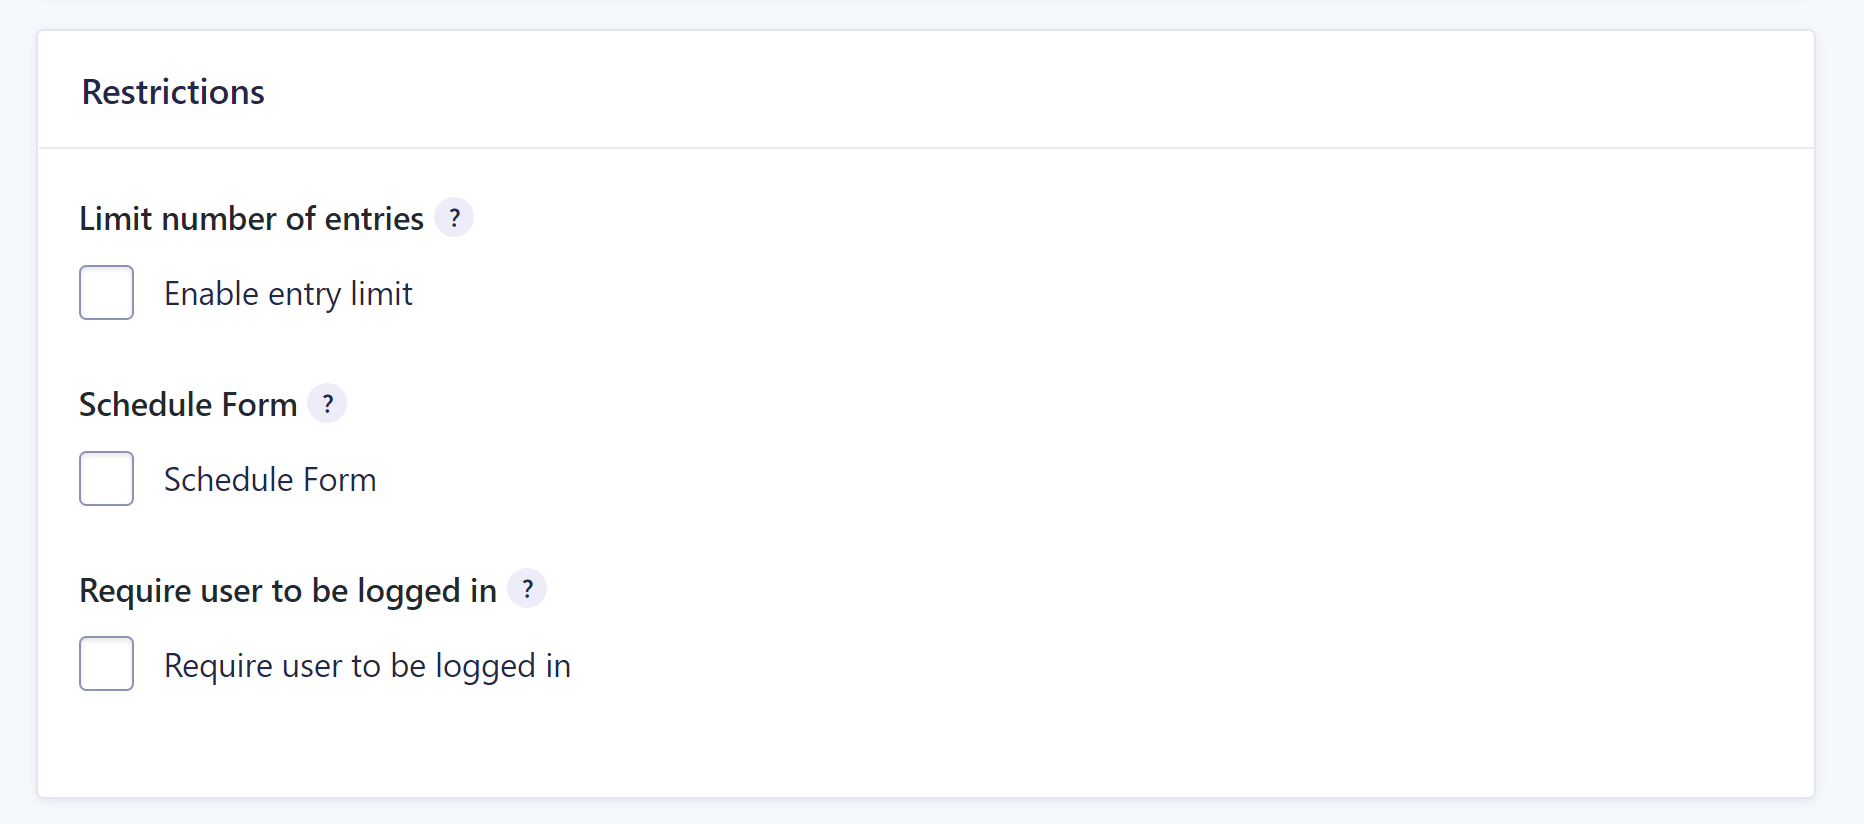
Step 3: Enable Form Restrictions
Contests are typically time-based. In other words, they have a set beginning and end time which is what makes them so effective for generating buzz and building interest.
With that said, you’ll need to enable some form restrictions to prevent visitors from entering the contest after it has passed. To do so, start by going to your contest Form Settings.
From the settings page, scroll down to the Restrictions section. From here, you can limit the number of people who can enter the contest. This is a good option if you want to run a small-scale contest and make it even more exclusive.
You can also schedule a time when your form starts and stops being active to match the contest’s deadline. Tick the box to schedule the form and you’ll be able to enter the start and end date as well as customize the message that appears on the page where your contest form is located.
 When you’re done, click the Save Settings button.
Step 4: Configure the Form Confirmation and Notifications
You can now customize the Form Confirmation settings to define what happens after a user has completed the form.
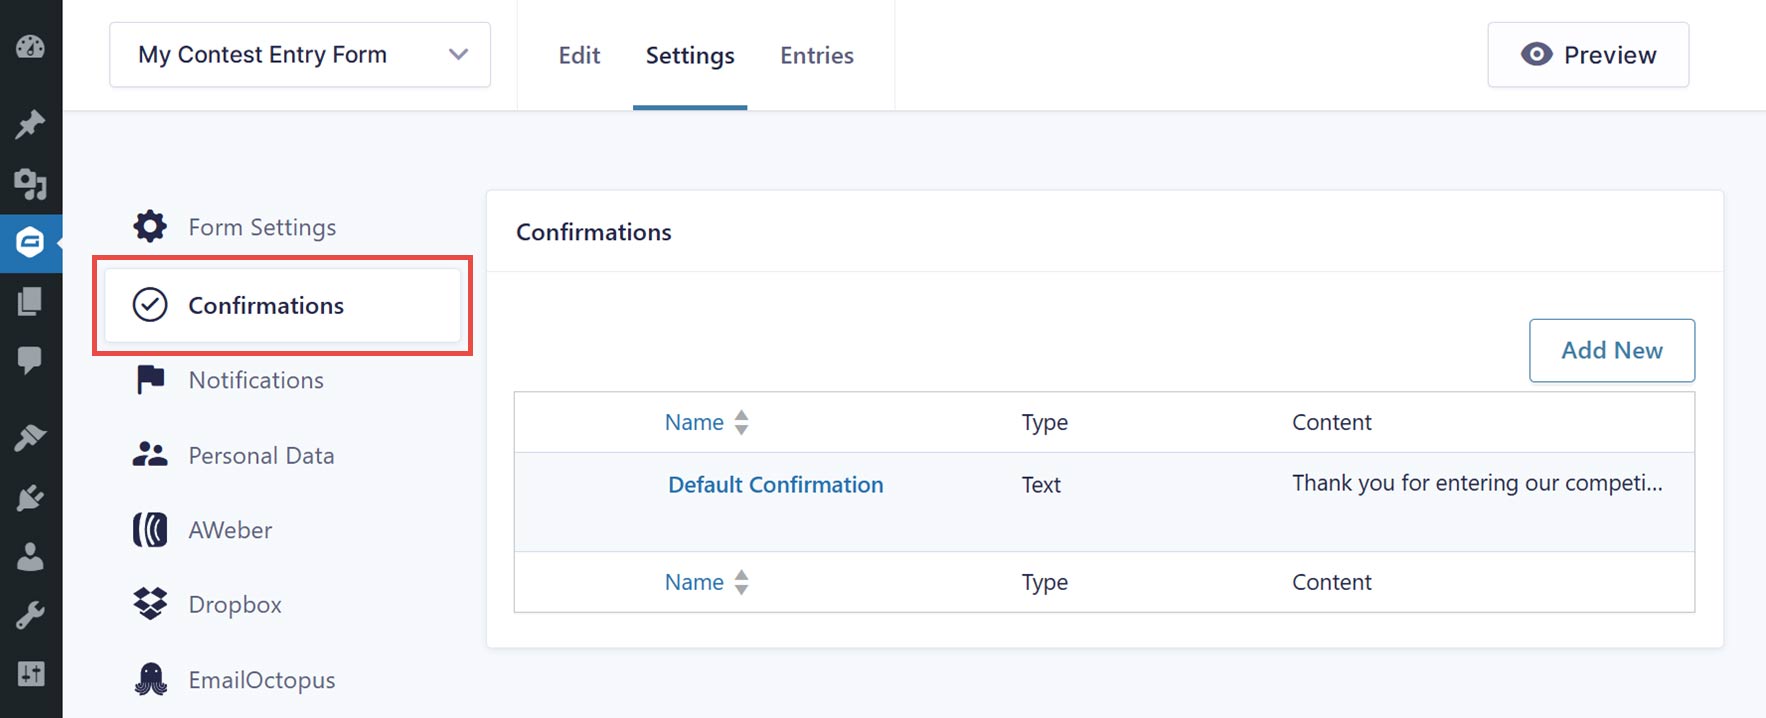
By default, a confirmation message that you can customize is displayed after the user has submitted their entry.
However, you also have the option of redirecting users to a page on your website or a custom URL after they have submitted the form.
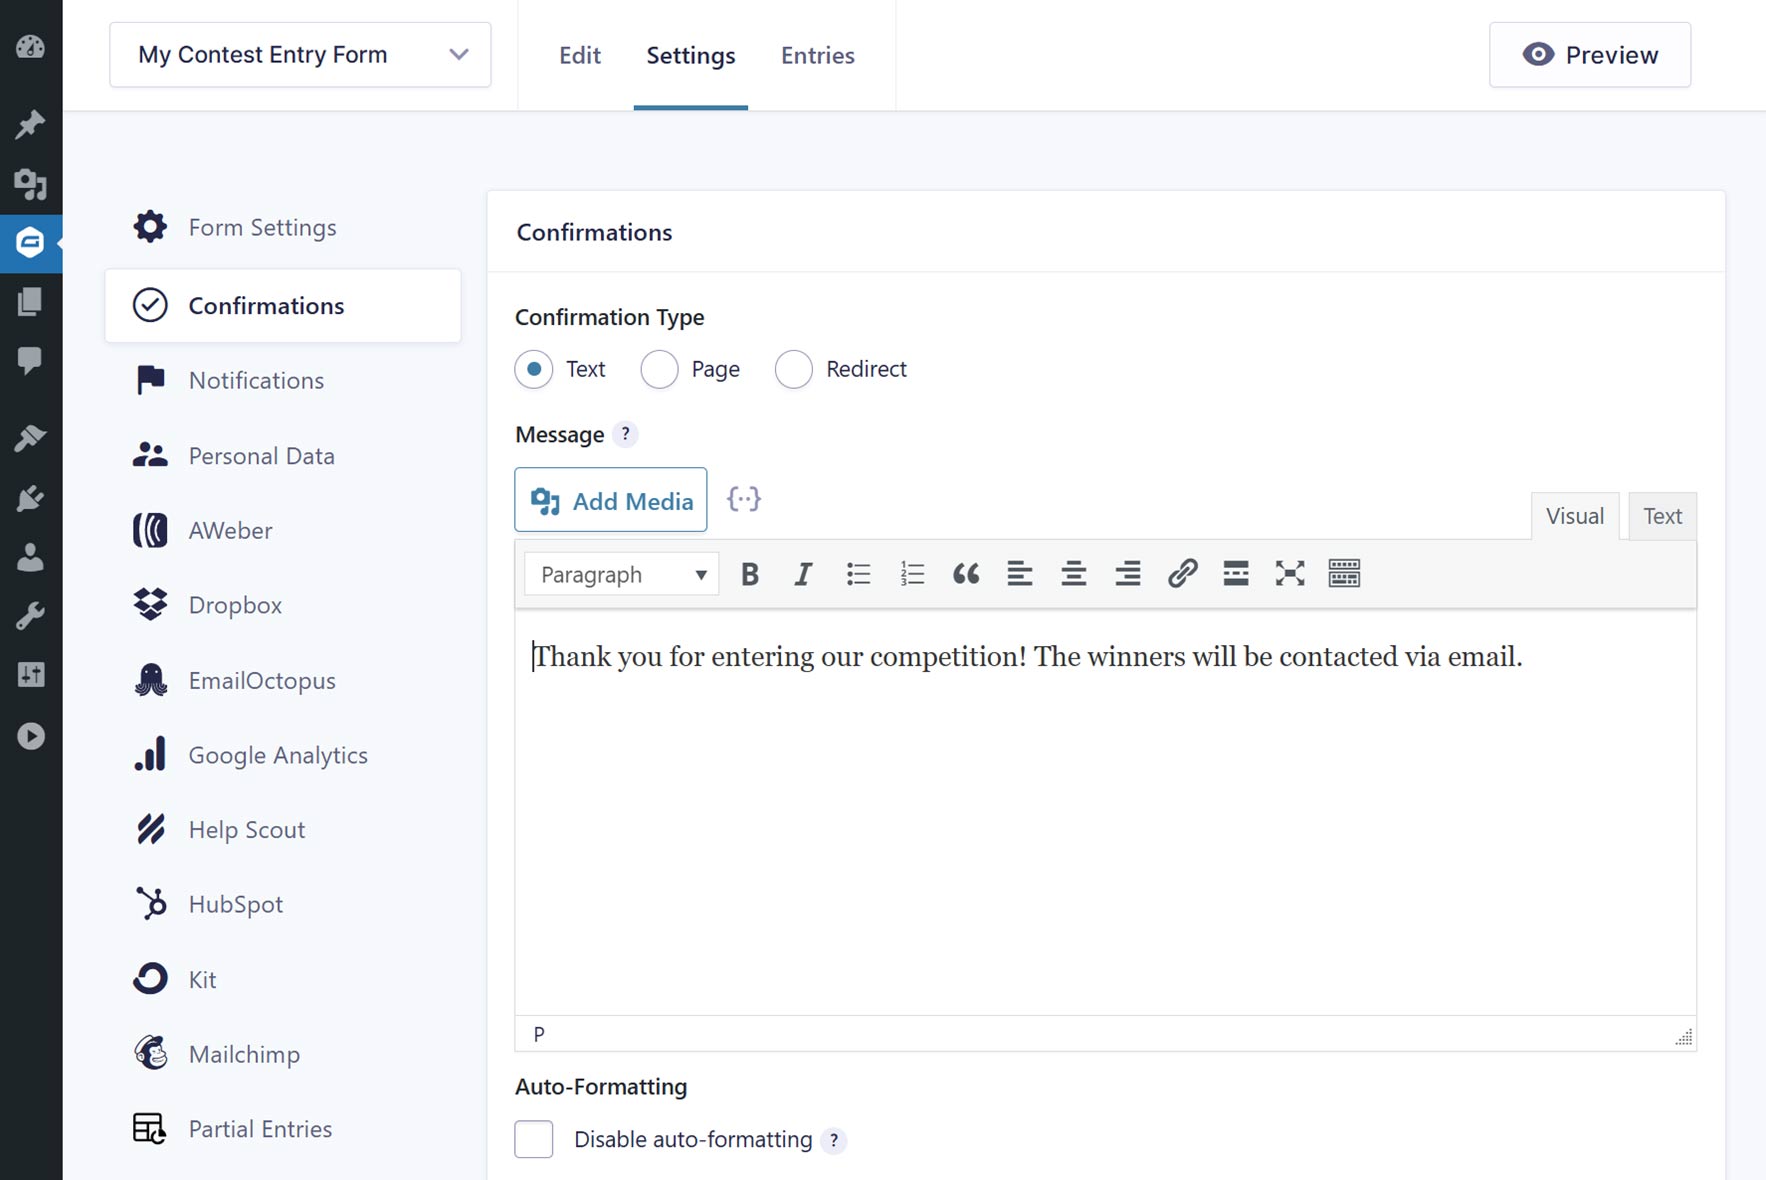
For more information on confirmation messages, check out these articles…
- How to… Configure a Custom Confirmation Message
- How to… Redirect Users to a New Page or URL After Form Submission
Next, you can configure the form notifications. By default, you, as the site admin, will get notified via email about new form submissions. The person who used the form will also receive an email notification. You can also create notifications for anyone else who needs to know when a new contest entry has been submitted.
To configure the existing notifications or set up a new one, click on the Notifications tab.
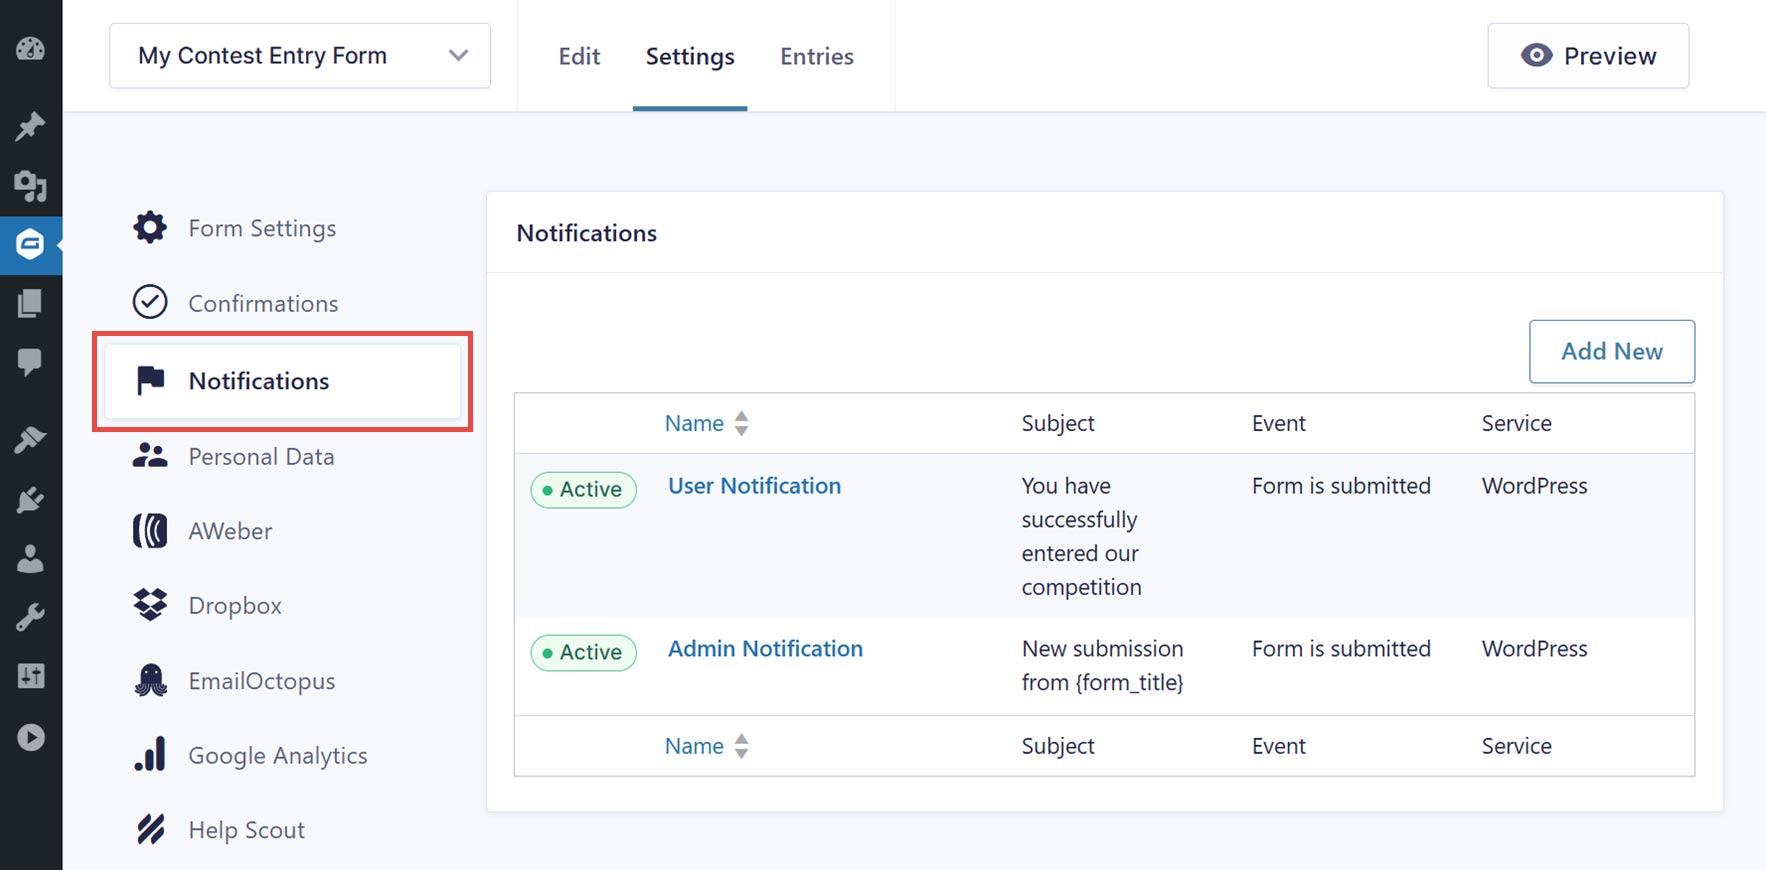
You can then edit the existing notifications or create a new one by clicking the Add New button.
For more information on creating notifications, check out this article on How to… Configure Custom Notifications.
Step 5: Embed and Publish the Contest Entry Form
Now, it’s time to publish the contest entry form on your site so that visitors can access it.
This can be done in a few different ways. One is to click on the Embed button from the form editor.
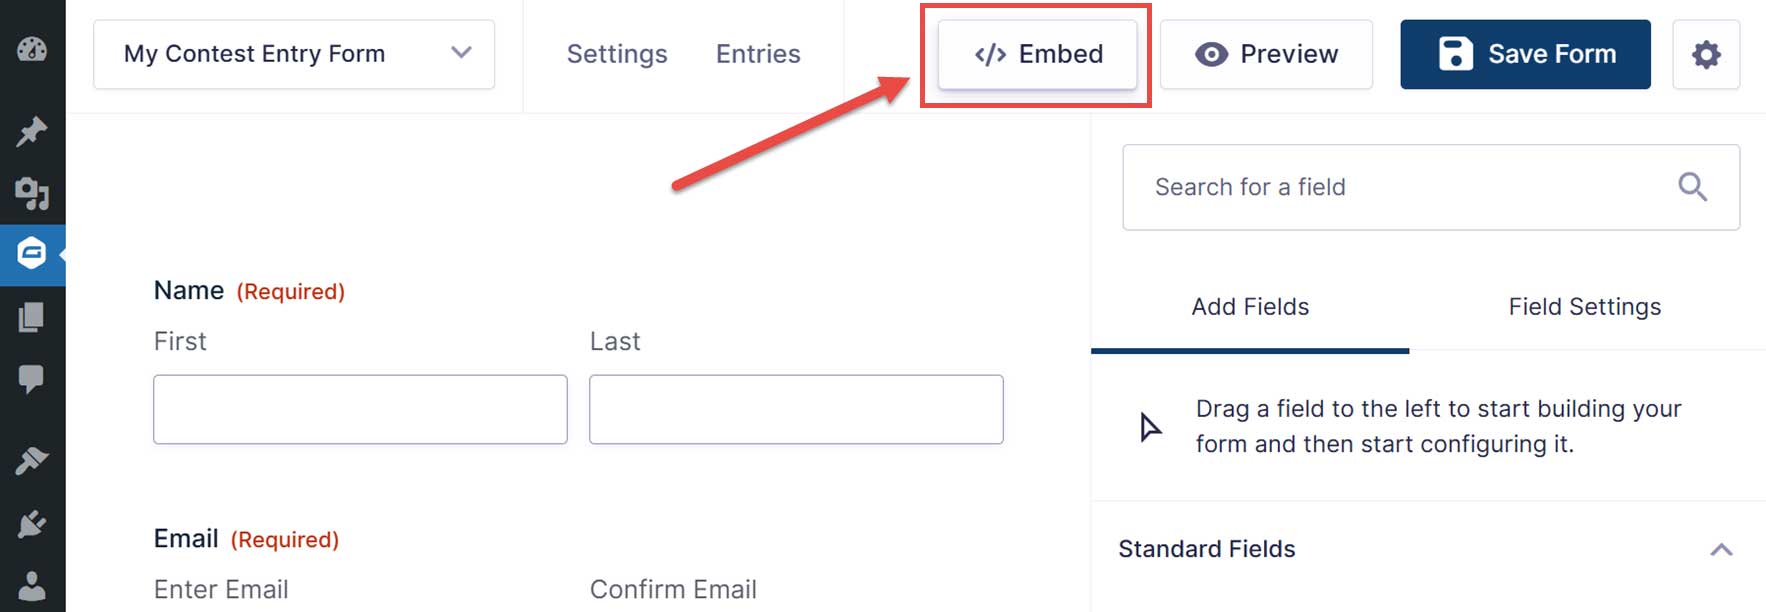
You can then create a new post or page to embed the form into or choose an existing post or page to add it to.
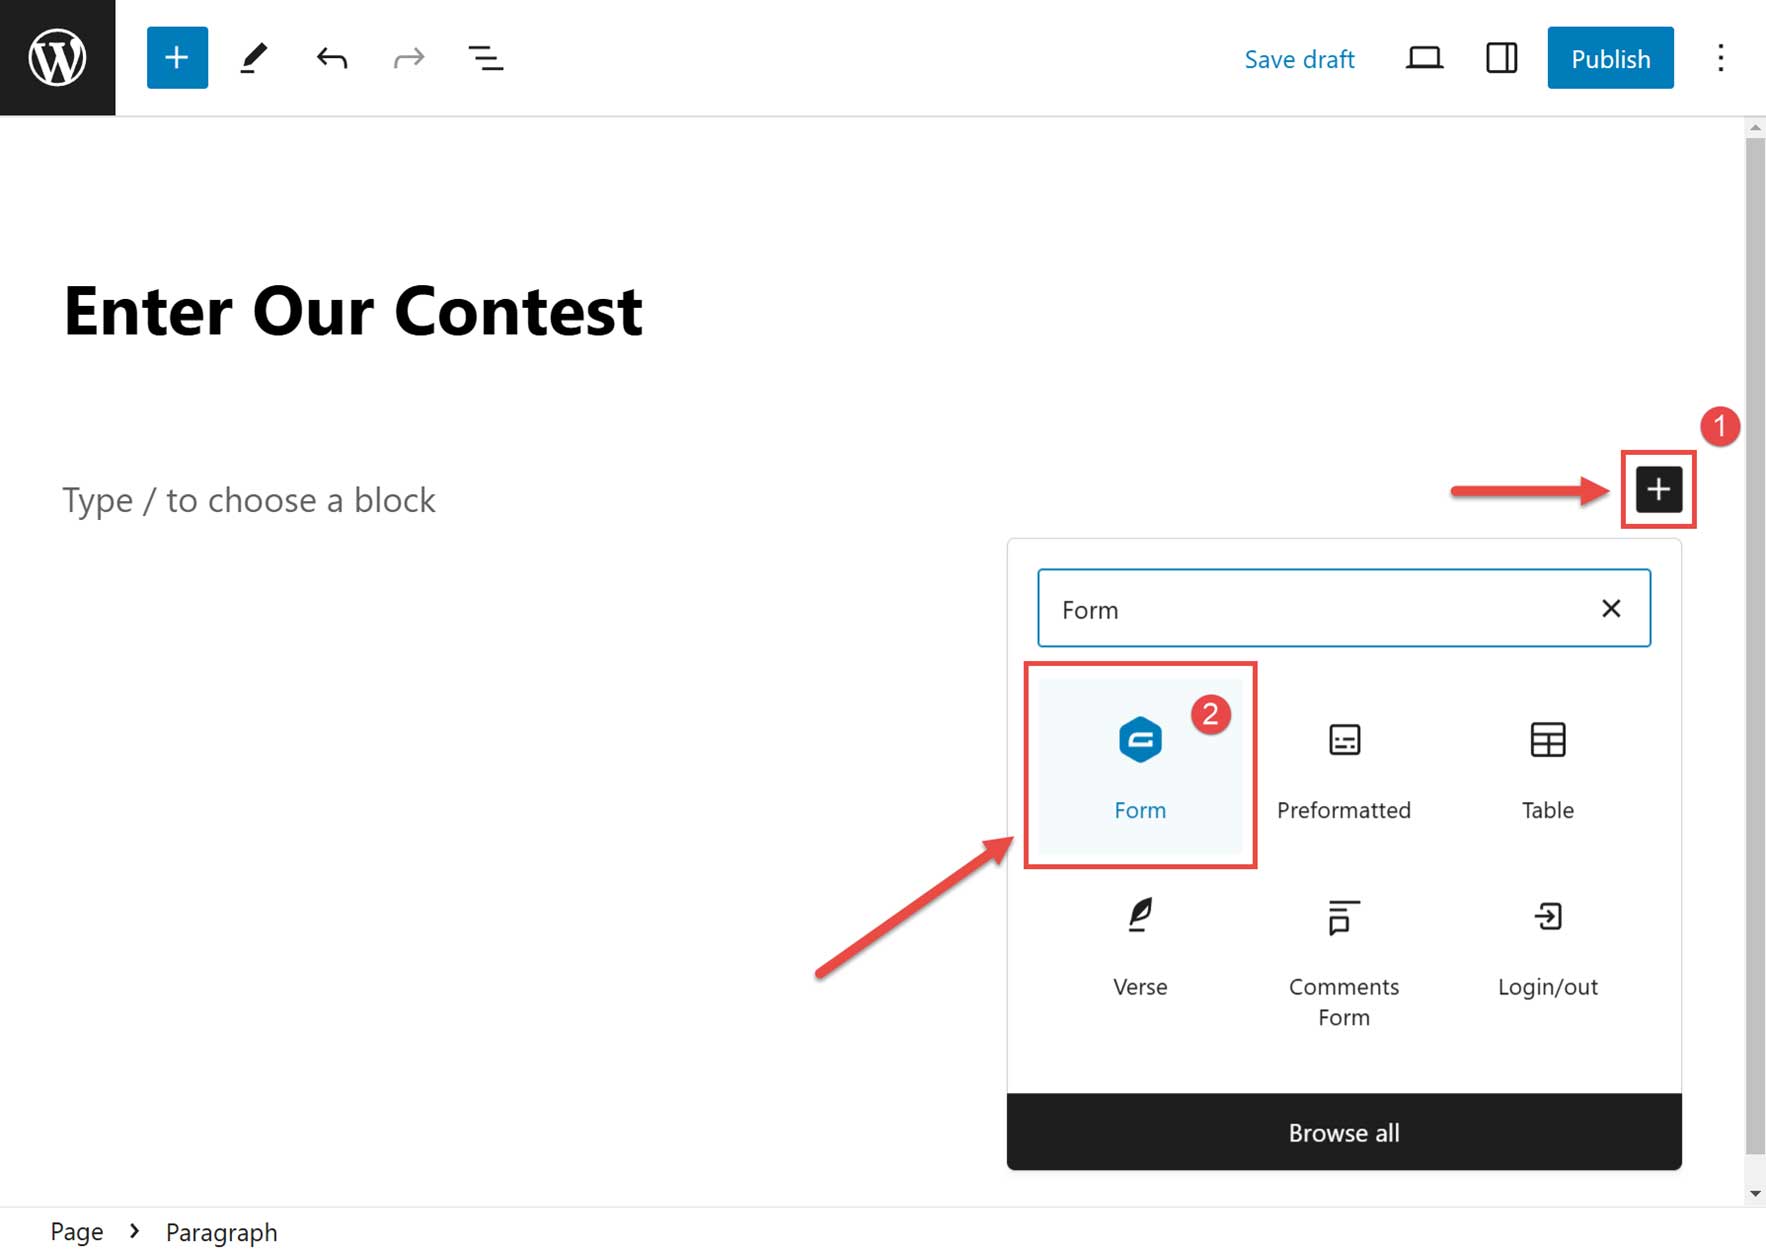
You can also add the form to your site from the WordPress post or page editor using the Gravity Forms block if you’re using the Gutenberg editor. Alternatively, if you’re using the Classic Editor, you can add the shortcode.
You can find step-by-step instructions for this in our guide to Adding a Form to Your Site.
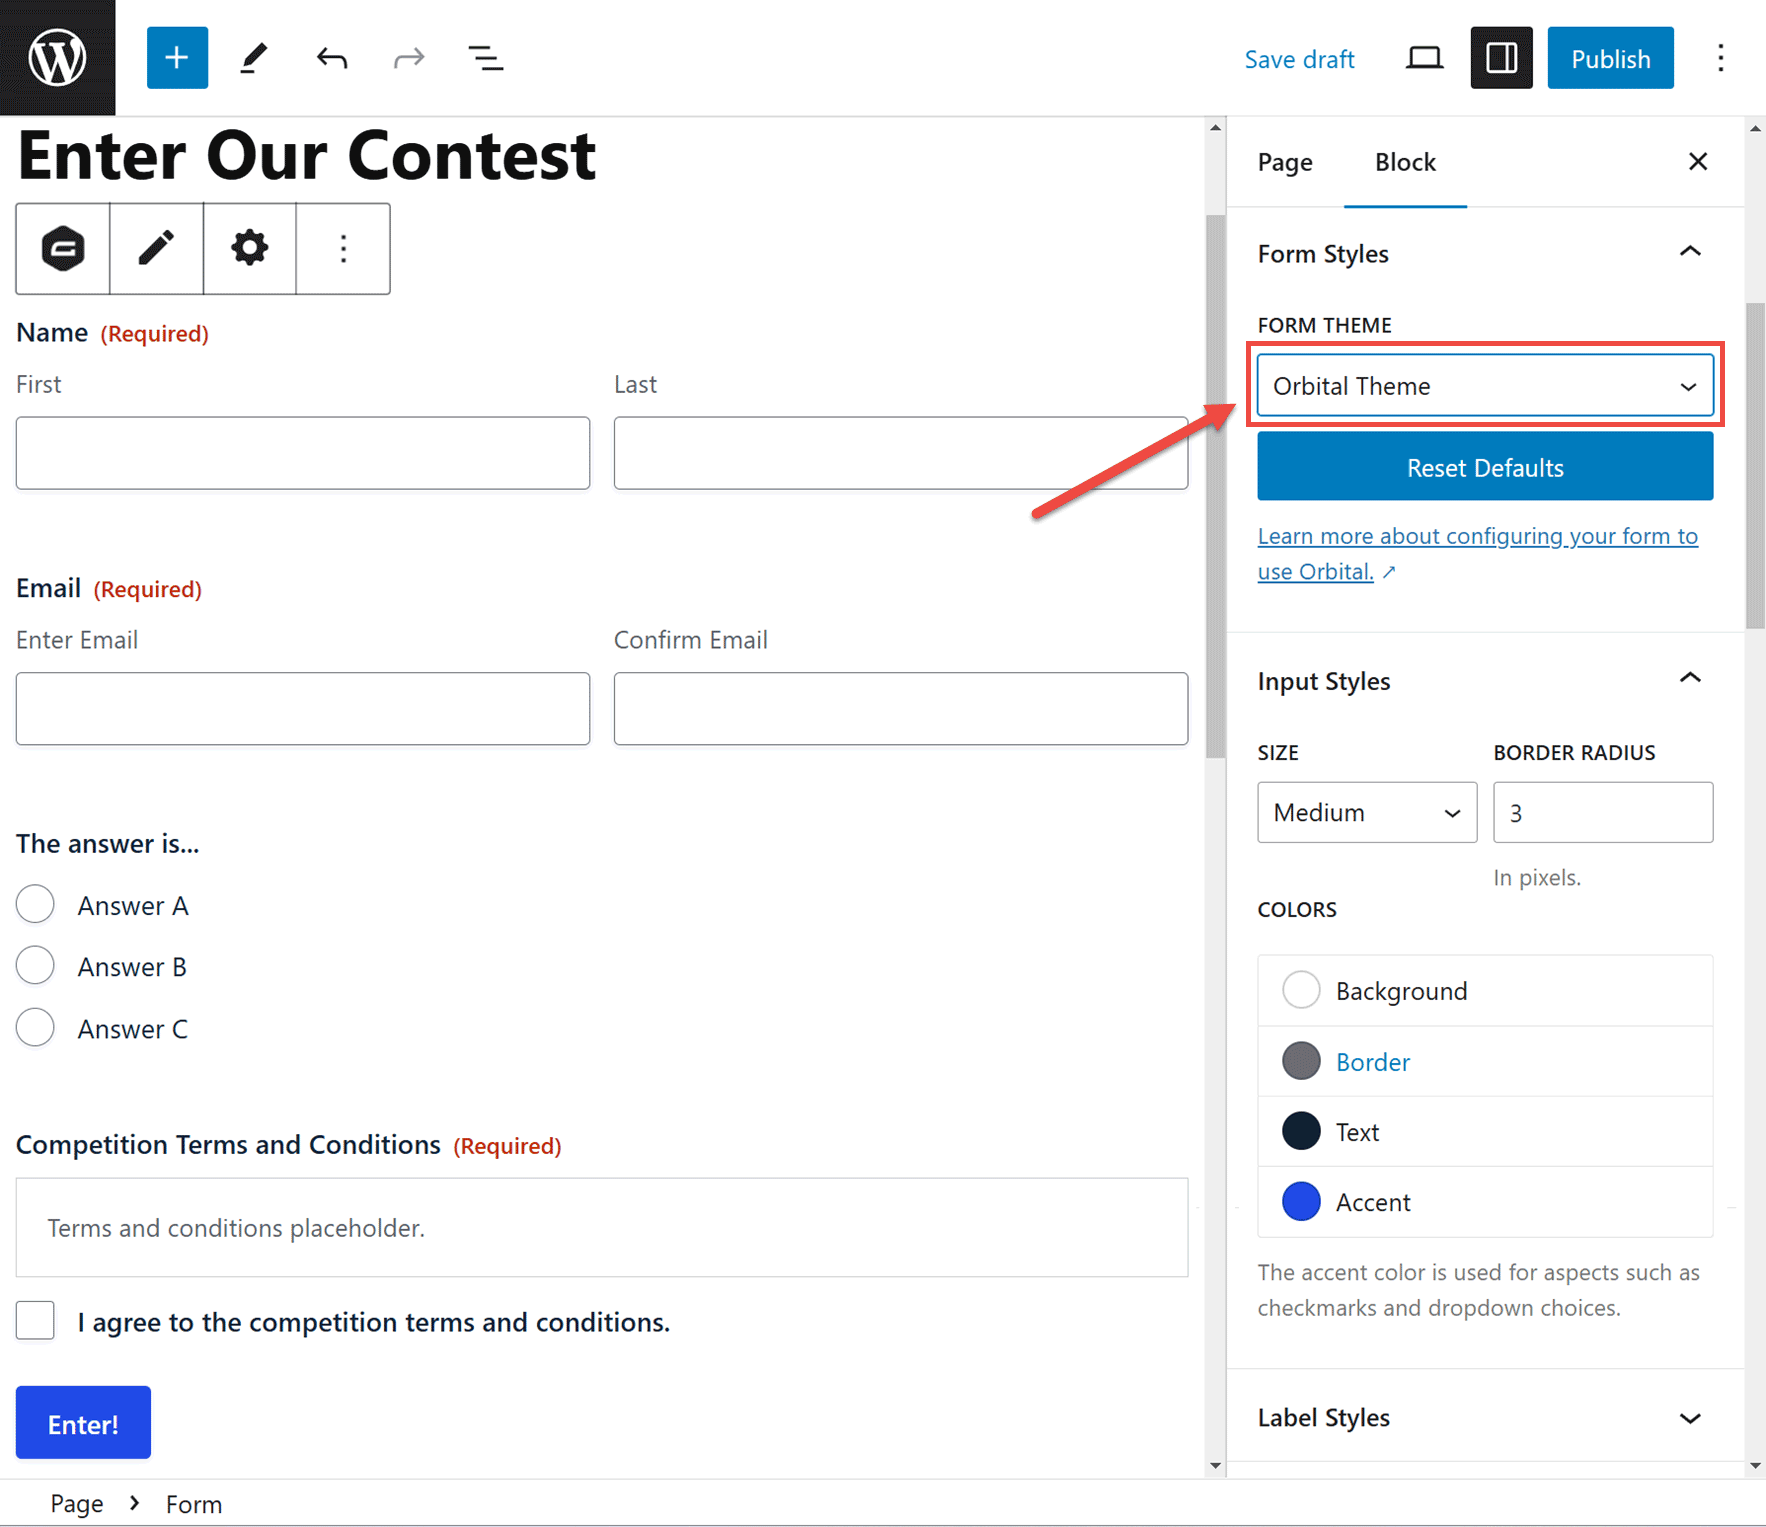
When it comes to styling your form, if you’re using Gutenberg, you’ll find styling options built into the Gravity Forms block. To access the most form styles, choose the Orbital Theme from the available options.
For more information, check out our ultimate guide to styling forms in Gravity Forms.
Step 6: Integrate the Form With a CRM or Email Marketing Provider
Once your contest entry form is live and you start collecting entries, you’ll need a way to keep contestants updated with any news or updates related to the contest. You’ll also want to send details of upcoming promotions and other marketing materials related to your business.
Gravity Forms integrates with a number of email marketing providers and CRMs so you can easily stay in touch with your contestants. These include services like Mailchimp and HubSpot.
For example, to integrate your contest entry form with HubSpot, go to Forms > Add-Ons and activate the HubSpot Add-On.
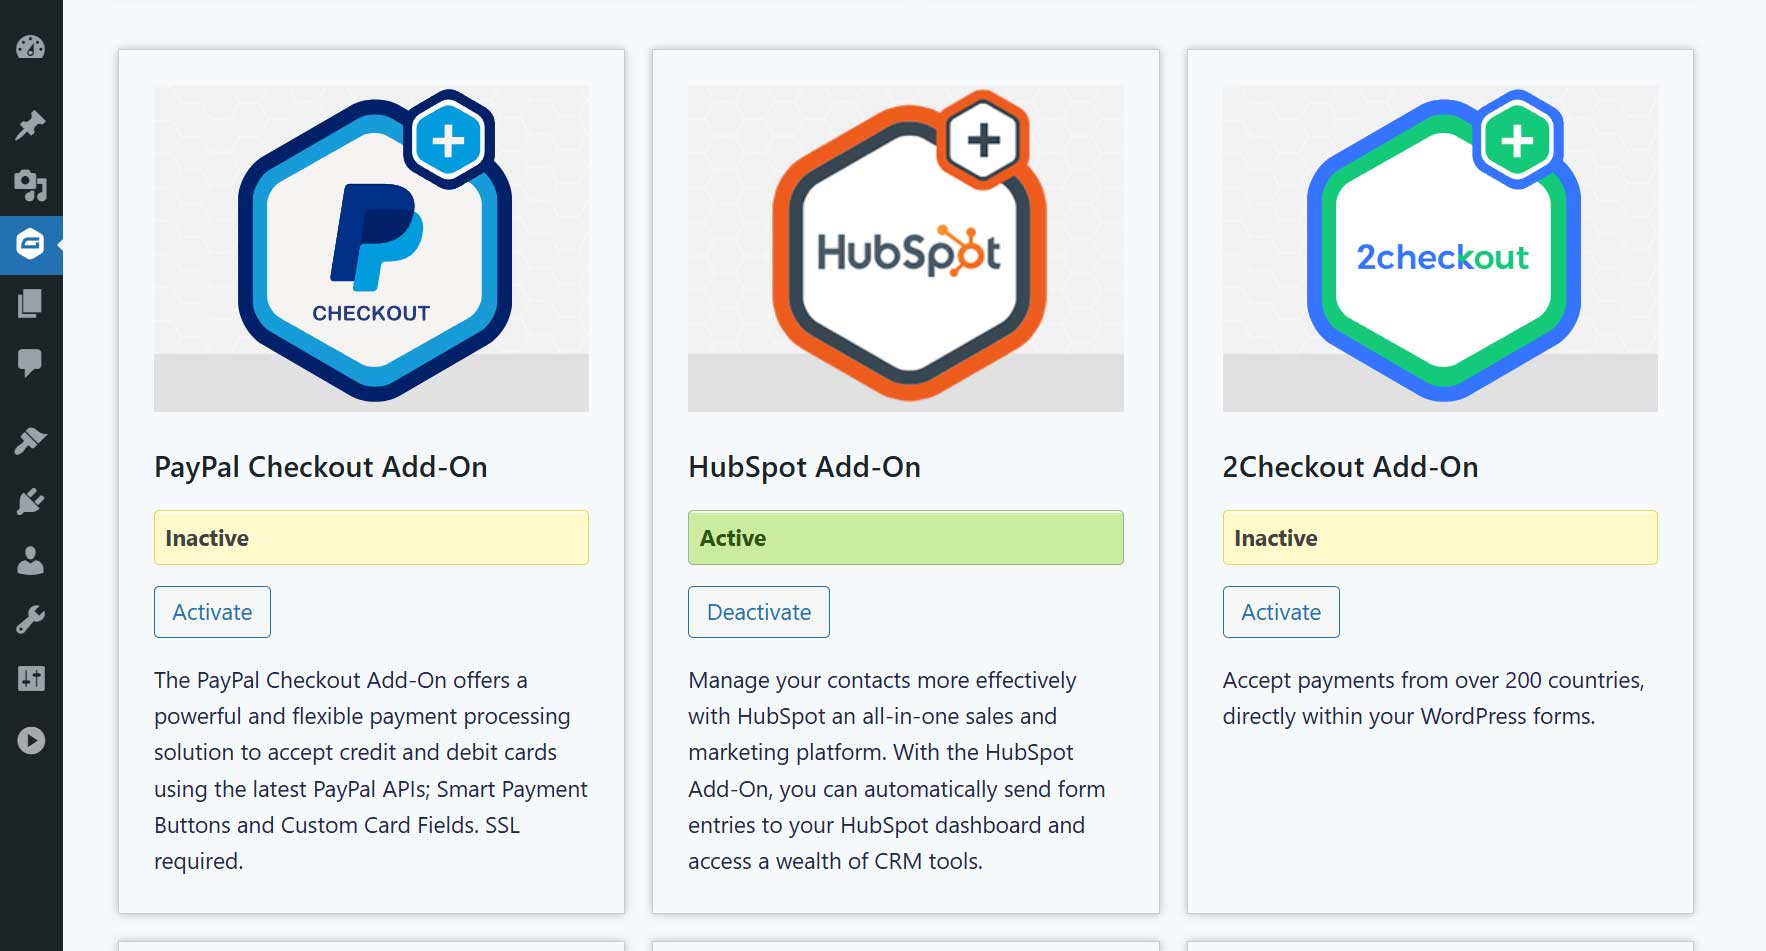
You will then need to authorize your HubSpot account with Gravity Forms and create a HubSpot feed for your form to enable form submission data to be sent to HubSpot.
For more information on HubSpot and how to integrate it with your forms, check out this article: This Month’s Featured Add-On… HubSpot.
Final Thoughts on Creating a Content Entry Form
As you can see, creating a contest entry form with Gravity Forms is quick and easy. If you want to boost visitor engagement and build brand awareness for your business, a contest entry form is a great way to knock out two birds with one stone.
Are you ready to create a contest form for your website? Check out our pricing page and get Gravity Forms today.
Not a Gravity Forms customer yet? Give our free demo a try to see just how easy it is to create forms with our drag-and-drop form builder and integrate them with other services that your already business uses.

If you want to keep up-to-date with what’s happening on the blog sign up for the Gravity Forms newsletter!