Want to create a more personalized and user-friendly experience for your web visitors when they are filling out lengthy forms? Then you need the Gravity Forms Chained Selects Add-On!
When creating a form that contains numerous options for people to select from, you often need the ability to change the options in a select field based on the user’s previous selection(s). Otherwise, your user may be overwhelmed with choices!
For example, if you’re collecting information about a user’s car, you might first ask the user to choose the car manufacturer. Then, in the second field, you could ask them to select their model from a list of models for that specific manufacturer (rather than including models from other manufacturers).
By only showing the options that apply to a user’s previous choices, you can simplify your forms and create a much better experience for your users.
With this month’s featured add-on – the Chained Selects Add-On – you can easily create these types of cascading select fields in your forms.
In this post, you’re going to learn everything that you need to know about the Gravity Forms Chained Selects Add-On, including the following:
- What the Chained Selects Add-On does
- Example use cases for the Chained Selects Add-On
- How to use the Gravity Forms Chained Selects Add-On, with a full step-by-step guide
What Does the Gravity Forms Chained Selects Add-On Do?
The Chained Selects Add-On gives you the ability to easily create a chained select WordPress form on your site.
As we mentioned above, a chained select form is a form where the options in a select field (e.g. a drop-down field) change based on the options that a user has selected in previous fields.
You also might see these called cascading drop-down fields or cascading select fields.
To make what’s happening more clear, let’s take a look at some screenshots of the car example above.
If you want to fully understand what car a person has, you would typically want to collect three pieces of information at a minimum:
- Manufacturer – e.g. Ford, Toyota, Honda, etc.
- Model – e.g. if a user selected Toyota, models could include Prius, Camry, Tundra, etc.
- Year – e.g. 2019, 2020, 2021, etc.
Here’s how the cascading drop-down fields would work.
First, a user would choose the manufacturer from the list:
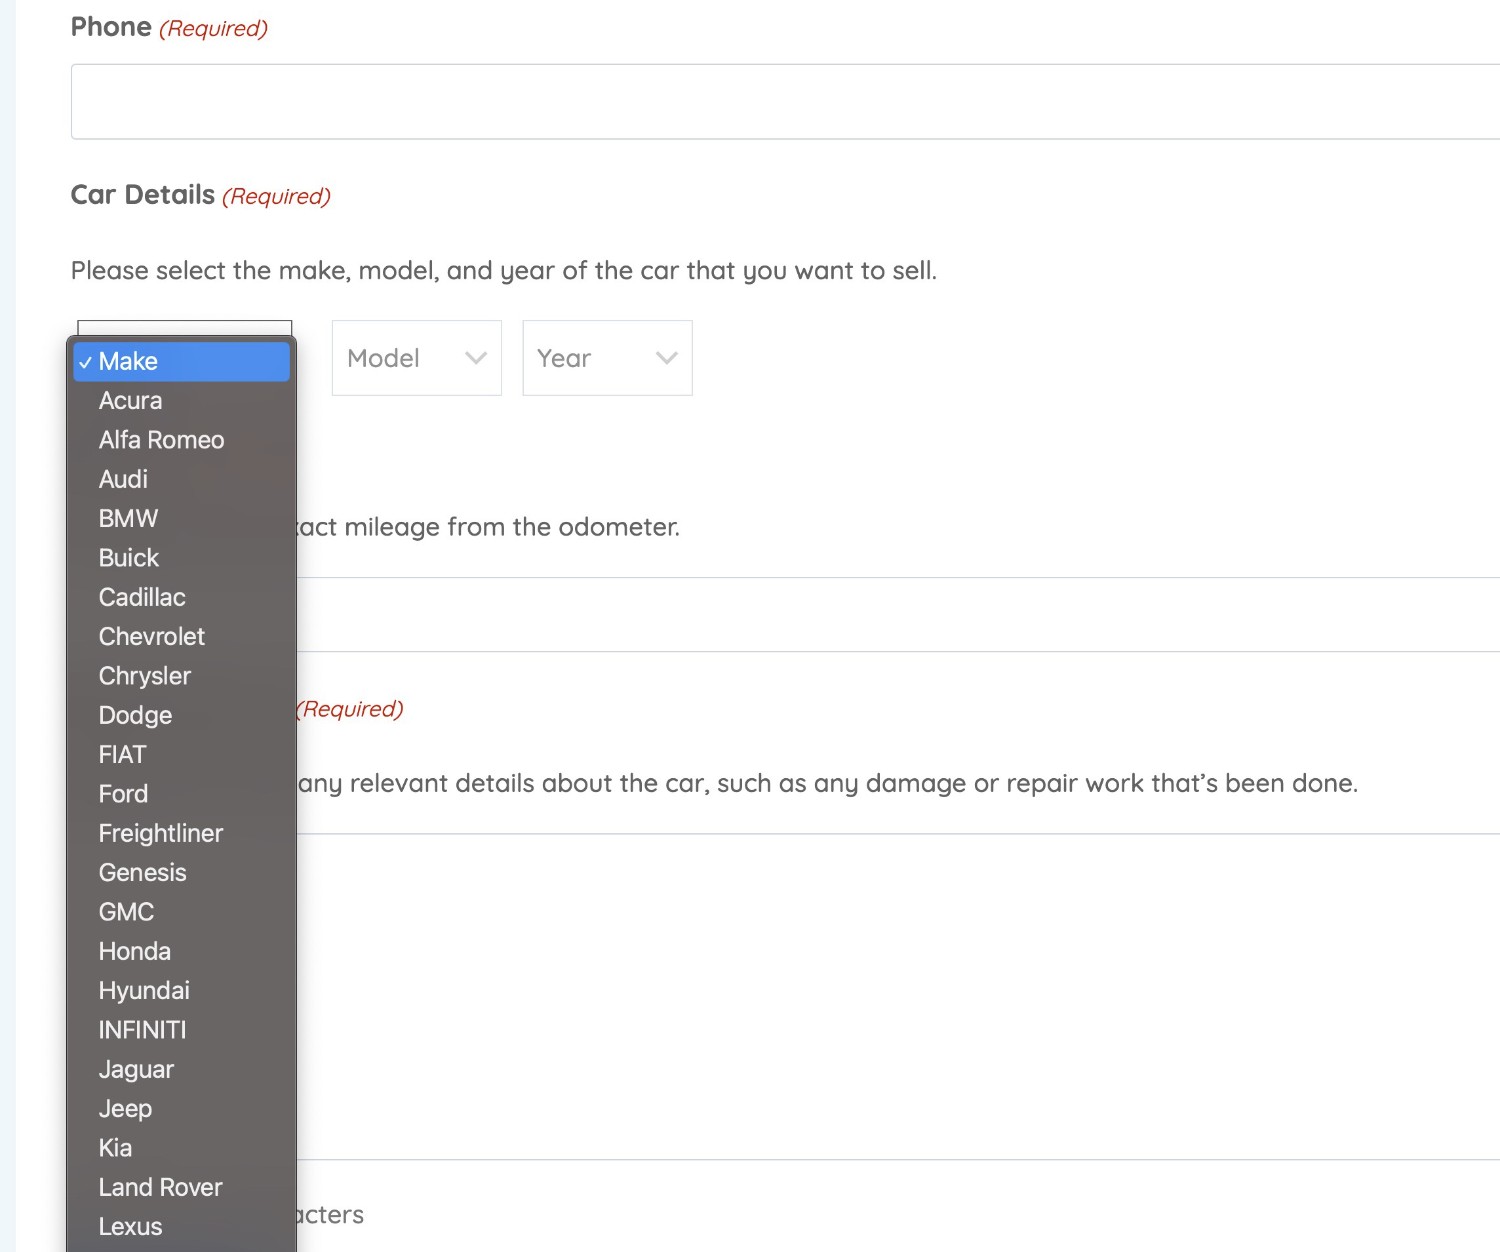
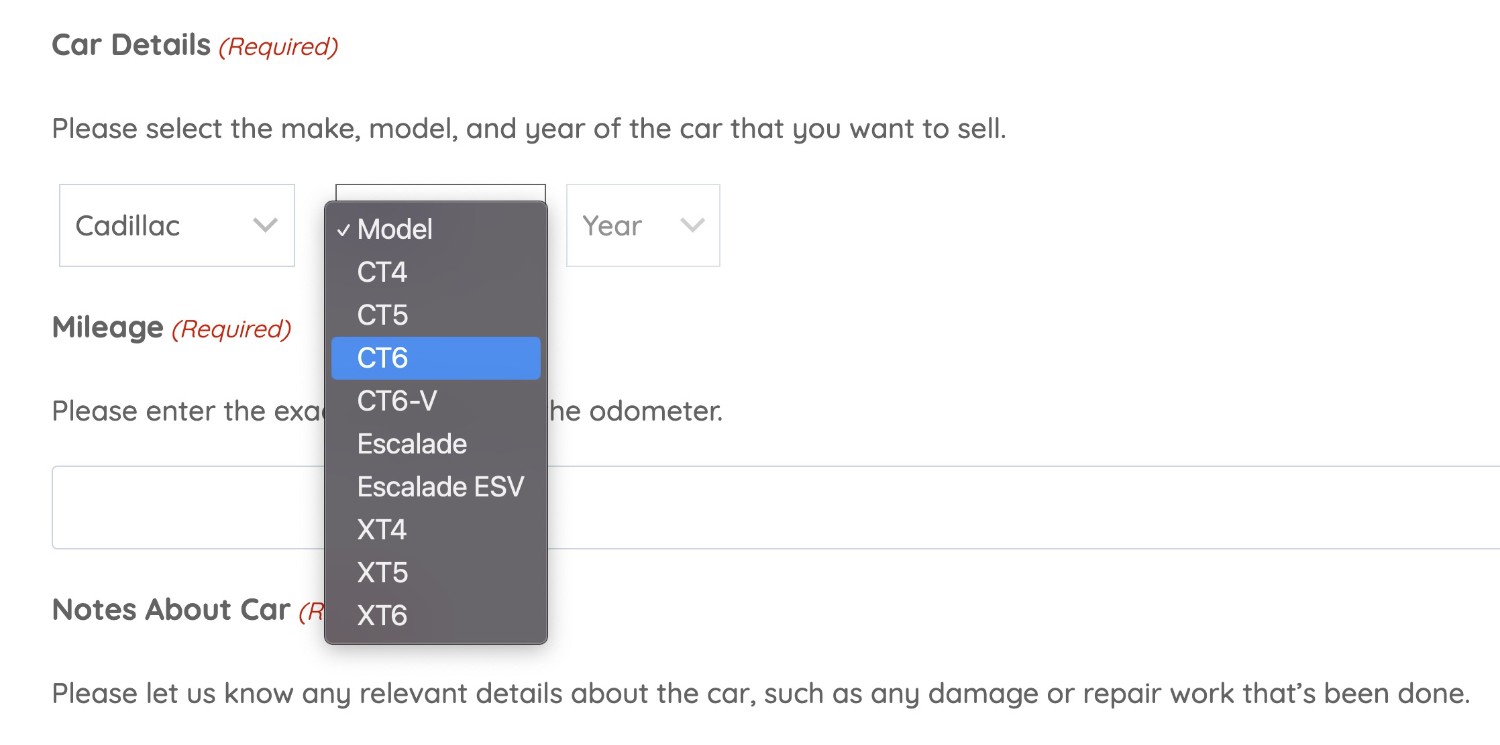
Then, in the next drop-down field (Model), they would see only the models for that manufacturer.
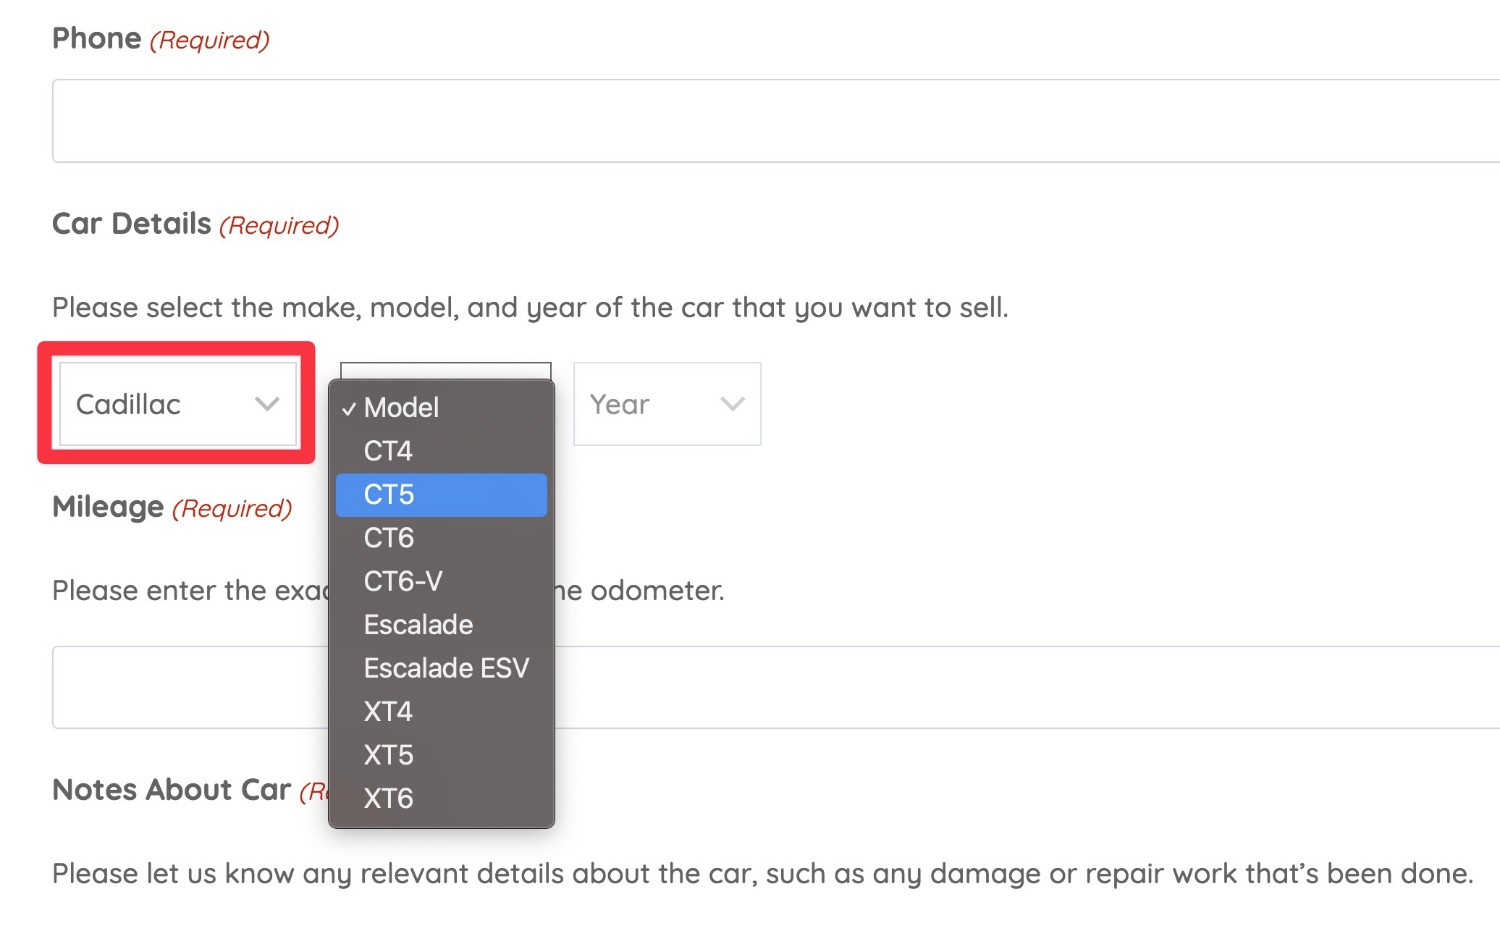
For example, if they choose Cadillac, they might see the following models:
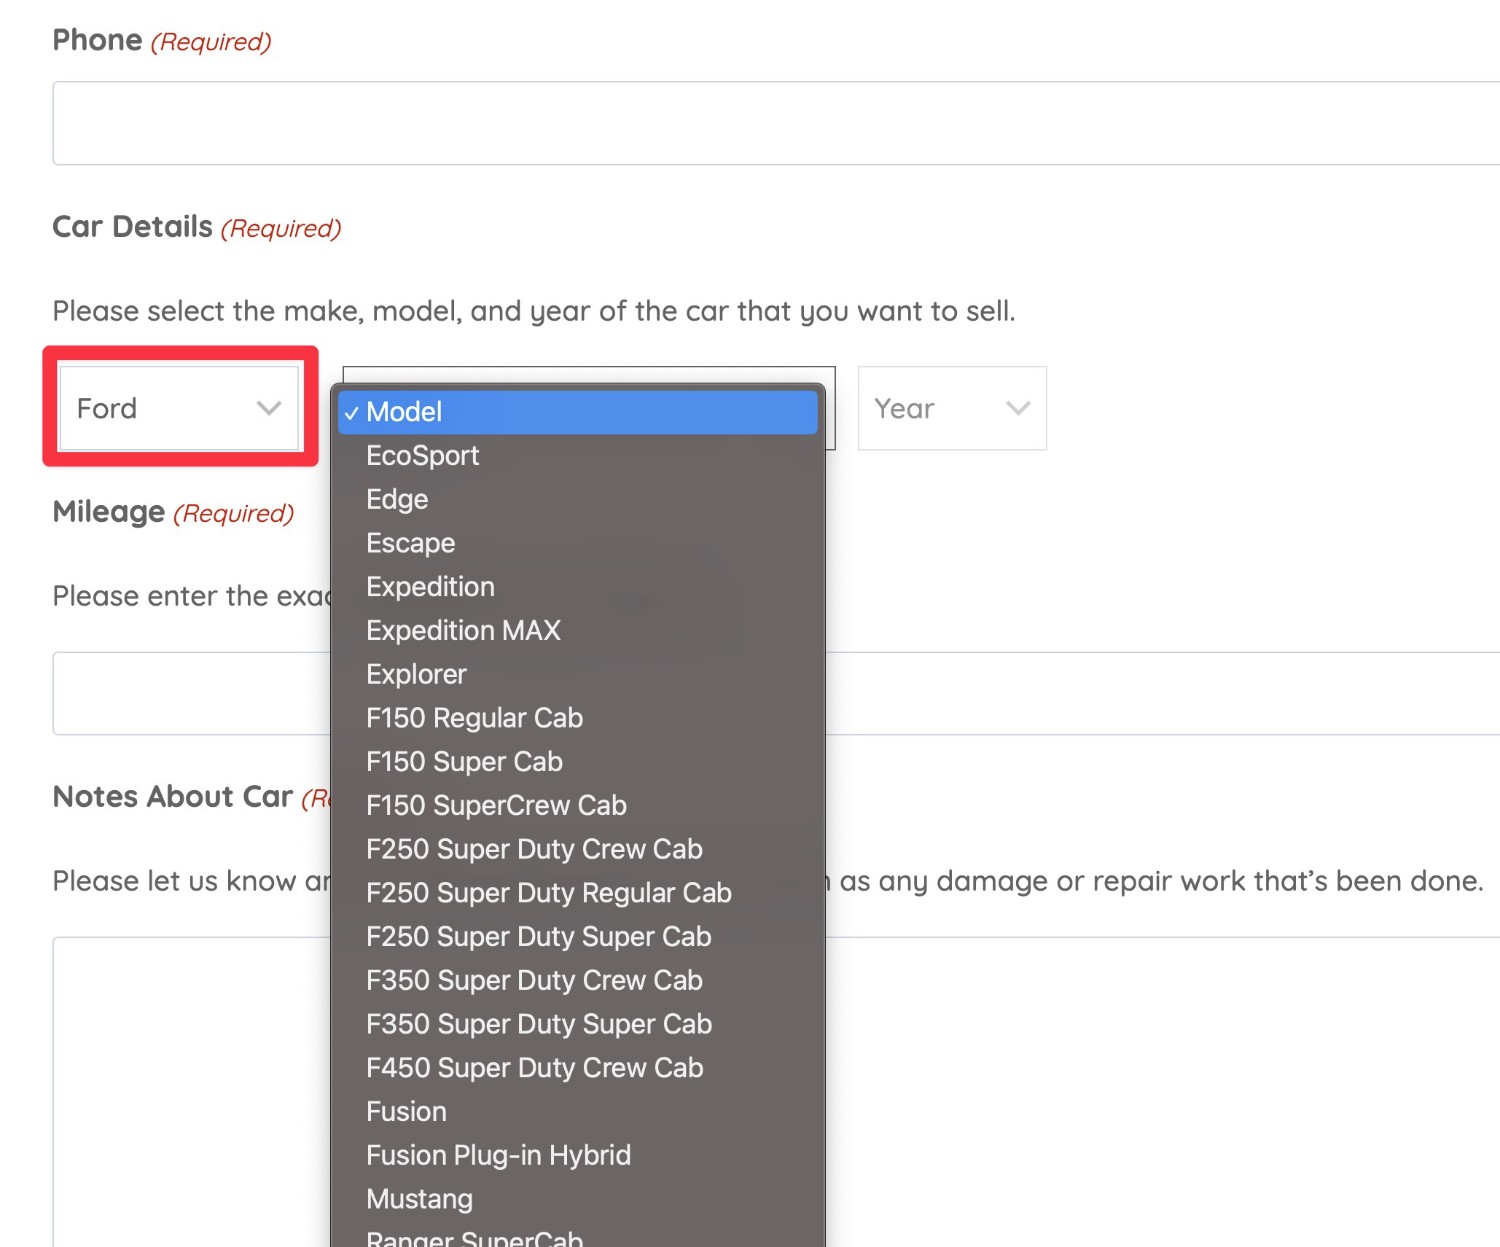
But if they chose Ford, they would see a completely different list of models:
The same would hold true for the year of each car model.
Benefits of Using the Chained Selects Add-On
- Better user experience – by only showing the options that are relevant to a user, you make it less confusing for them to fill out the form.
- Reduce form friction and abandonment rates – tying with the point above, making it easier for users to fill out your form can reduce your form abandonment rates and boost your conversion rates.
- More accurate data – by controlling a user’s choices, you can make sure you get more accurate data. For example, it would be impossible for a user to accidentally select a “Ford Prius” (a car that doesn’t exist – the Prius is made by Toyota).
Example Use Cases for Gravity Forms Chained Selects
To help you better understand when the Chained Selects Add-On can be helpful, let’s take a look at a few more use cases beyond the car example above.
This is by no means an exhaustive list – we just want to get your creative juices flowing with a few more ideas.
Location Selector
Let’s say you run a chain of local businesses that cover a few USA states and counties. You want to create a way for a user to select a specific store when they’re filling out a form.
You could first ask users to choose the state of the store – e.g. Pennsylvania. Then, you could show a list of counties in Pennsylvania where you have active stores.
Once a user chooses the county, you could then show a list of all your stores in that county to let them pick a specific store.
Agent/Representative/Specialist Selector
Let’s say you have agents/representatives who cover specific geographic areas as well as specific industries/specialties. Each geographic area and specialty can have multiple agents.
For example, this could apply to a booking form for medical practice, which might have multiple locations and multiple specialties at each location (e.g. Cardiology, Infectious Disease, Pediatrics, etc.).
First, you could ask users to select the location. Then, you could display a list of specialties that are available at that location. Then, you could display specific doctors who work at that location and in that specialty.
Users could then choose the specific doctor that they want to book an appointment with.
Product Selector
As a last example, let’s say you’re creating a customer service form for your products, and that you offer multiple products in multiple categories.
To understand which product a customer is contacting you about, you could first ask them to choose the product category. Then, you could ask them to choose a specific product from that category.
How to Use the Gravity Forms Chained Selects Add-On
Now that you understand how the Chained Selects Add-On can improve your site, let’s get into a step-by-step guide for how to set up your first form using chained selects.
Here’s the basic high-level process – keep reading for full instructions on every step:
- Install the Gravity Forms Chained Selects Add-On.
- Prepare your chained selects options (typically using a CSV file).
- Add the Chained Selects field to your form and upload the CSV file.
- Embed your form and test the cascading drop-down fields.
1. Install the Gravity Forms Chained Selects Add-On
To get started, you’ll want to install the Chained Selects Add-On on your site.
The Chained Selects Add-On is available with the Elite license, as well as the Nonprofit license (for registered non-profits).
If you’re not already using the Elite license, you can purchase a new license here or upgrade your existing license and only pay the prorated difference.
Once you’ve verified that you’re using the Elite license, here’s how to install the Chained Selects Add-On:
- Go to Forms → Add-Ons in your WordPress dashboard.
- Find the Chained Selects Add-On from the list of options.
- Click Install.
- Click Activate Plugin on the next screen.

2. Prepare Your Chained Selects Options (Typically Using a CSV)
Because your chained select form could have hundreds or even thousands of potential select variations, you won’t add the select options directly from the form editor.
Instead, you’ll typically want to prepare them using a CSV file, which is the method that we’re going to focus on in this guide.
However, for more advanced users, Gravity Forms also lets you manage chained select choices dynamically using hooks/filters. While we won’t cover step-by-step instructions for that method in this post, you can check out the Chained Selects filters developer documentation if you’re interested.
Let’s get back to the CSV file method…
Add Data to Google Sheets or Excel
To create your CSV file, you can use Google Sheets, Excel, or similar tools.
For some use cases, you might be able to find pre-made datasets that can save you some time.
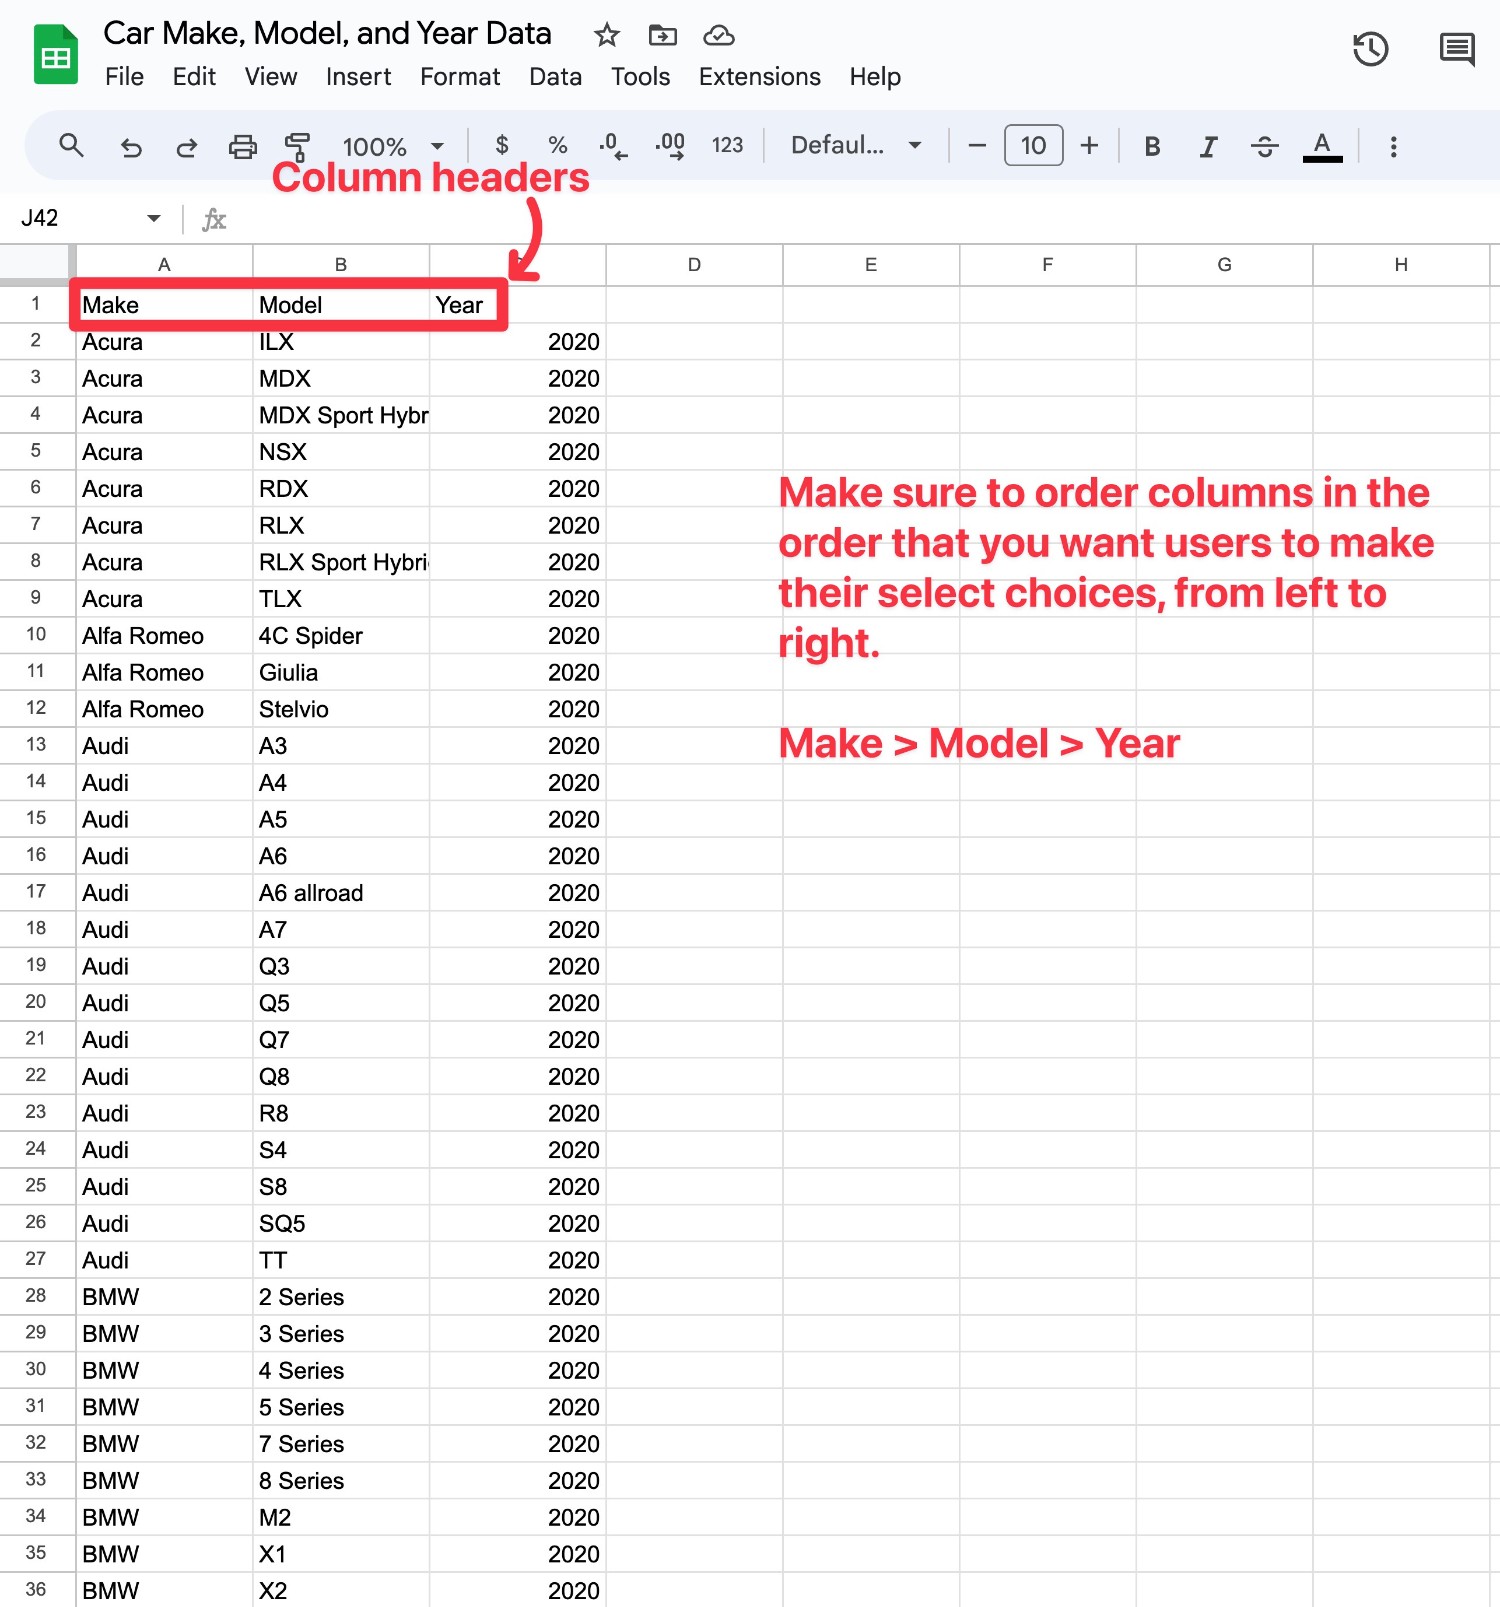
For the car example that we’re using in this post, we were able to find a bunch of open-source data on this GitHub page. By combining the data for multiple years and removing some unnecessary data, we were able to create a CSV file like this.
If you use Google, you might be able to find similar free or paid datasets for your own use case.
When setting up your data, it’s important to pay special attention to two things:
- Each column must have a header. In this example, the headers are “Make”, “Model”, and “Year”.
- The columns should be in the same order that you want users to select them, from left to right. For example, we want users to select “Make” first, which is why it’s the left-most column. After that, they’ll select the “Model”. Then, the last choice is the “Year”, which is why the year is the right-most column.
Export Your Data as a CSV File
Once you’ve added your data to Sheets or Excel (and verified that you have proper column headings and your columns are in the correct order), you can export that data to a CSV file.
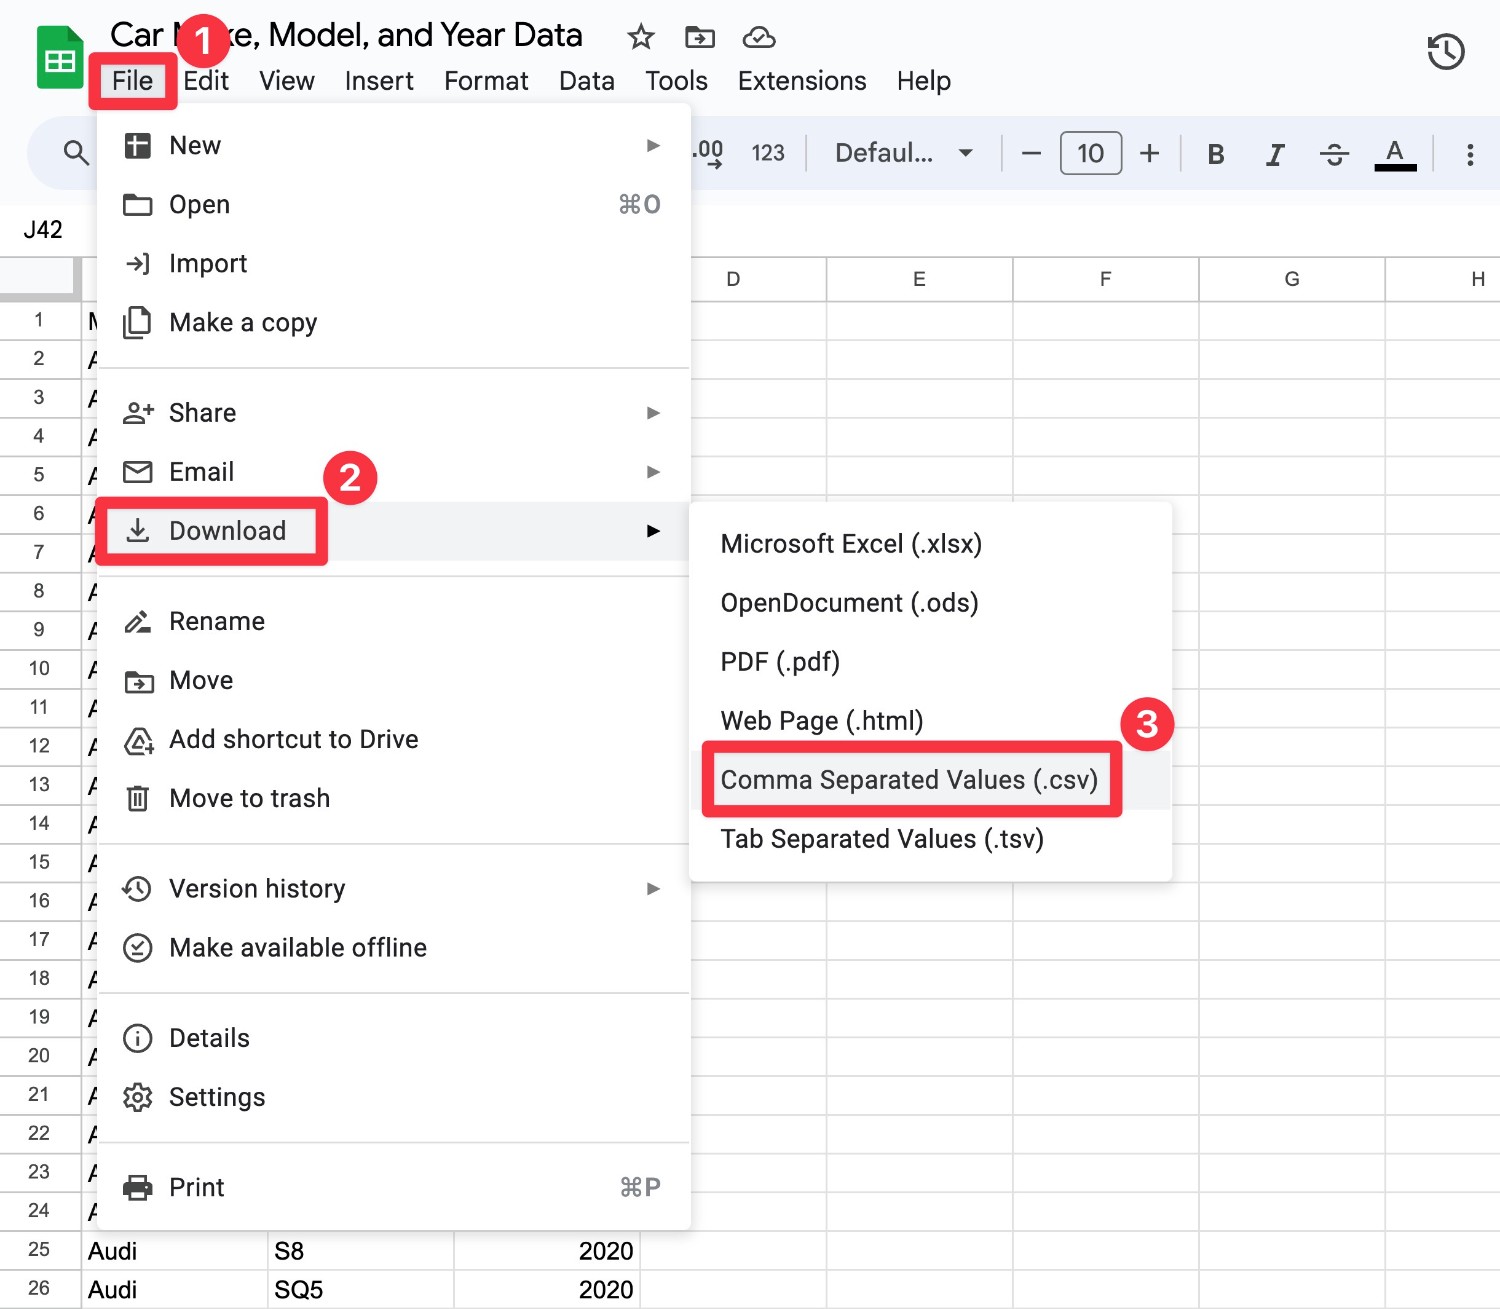
In Google Sheets, you can export your spreadsheet as a CSV by following these steps:
- Click the File option in the top-left corner.
- Hover over the Download sub-menu in the drop-down.
- Select Comma Separated Values (.csv) from the list of options.
If you’re using Excel, here are instructions from Microsoft.
3. Add Chained Selects Field to Form
Once you have your data ready, you can either create a new form or edit an existing form where you want to include your cascading drop-down fields (chained selects).
For this example, we already created a simple “Sell Your Car Inquiry” form.
Once you’re in the form editor, add the Chained Selects field to the form. You can find it under the Advanced Fields section in the sidebar.
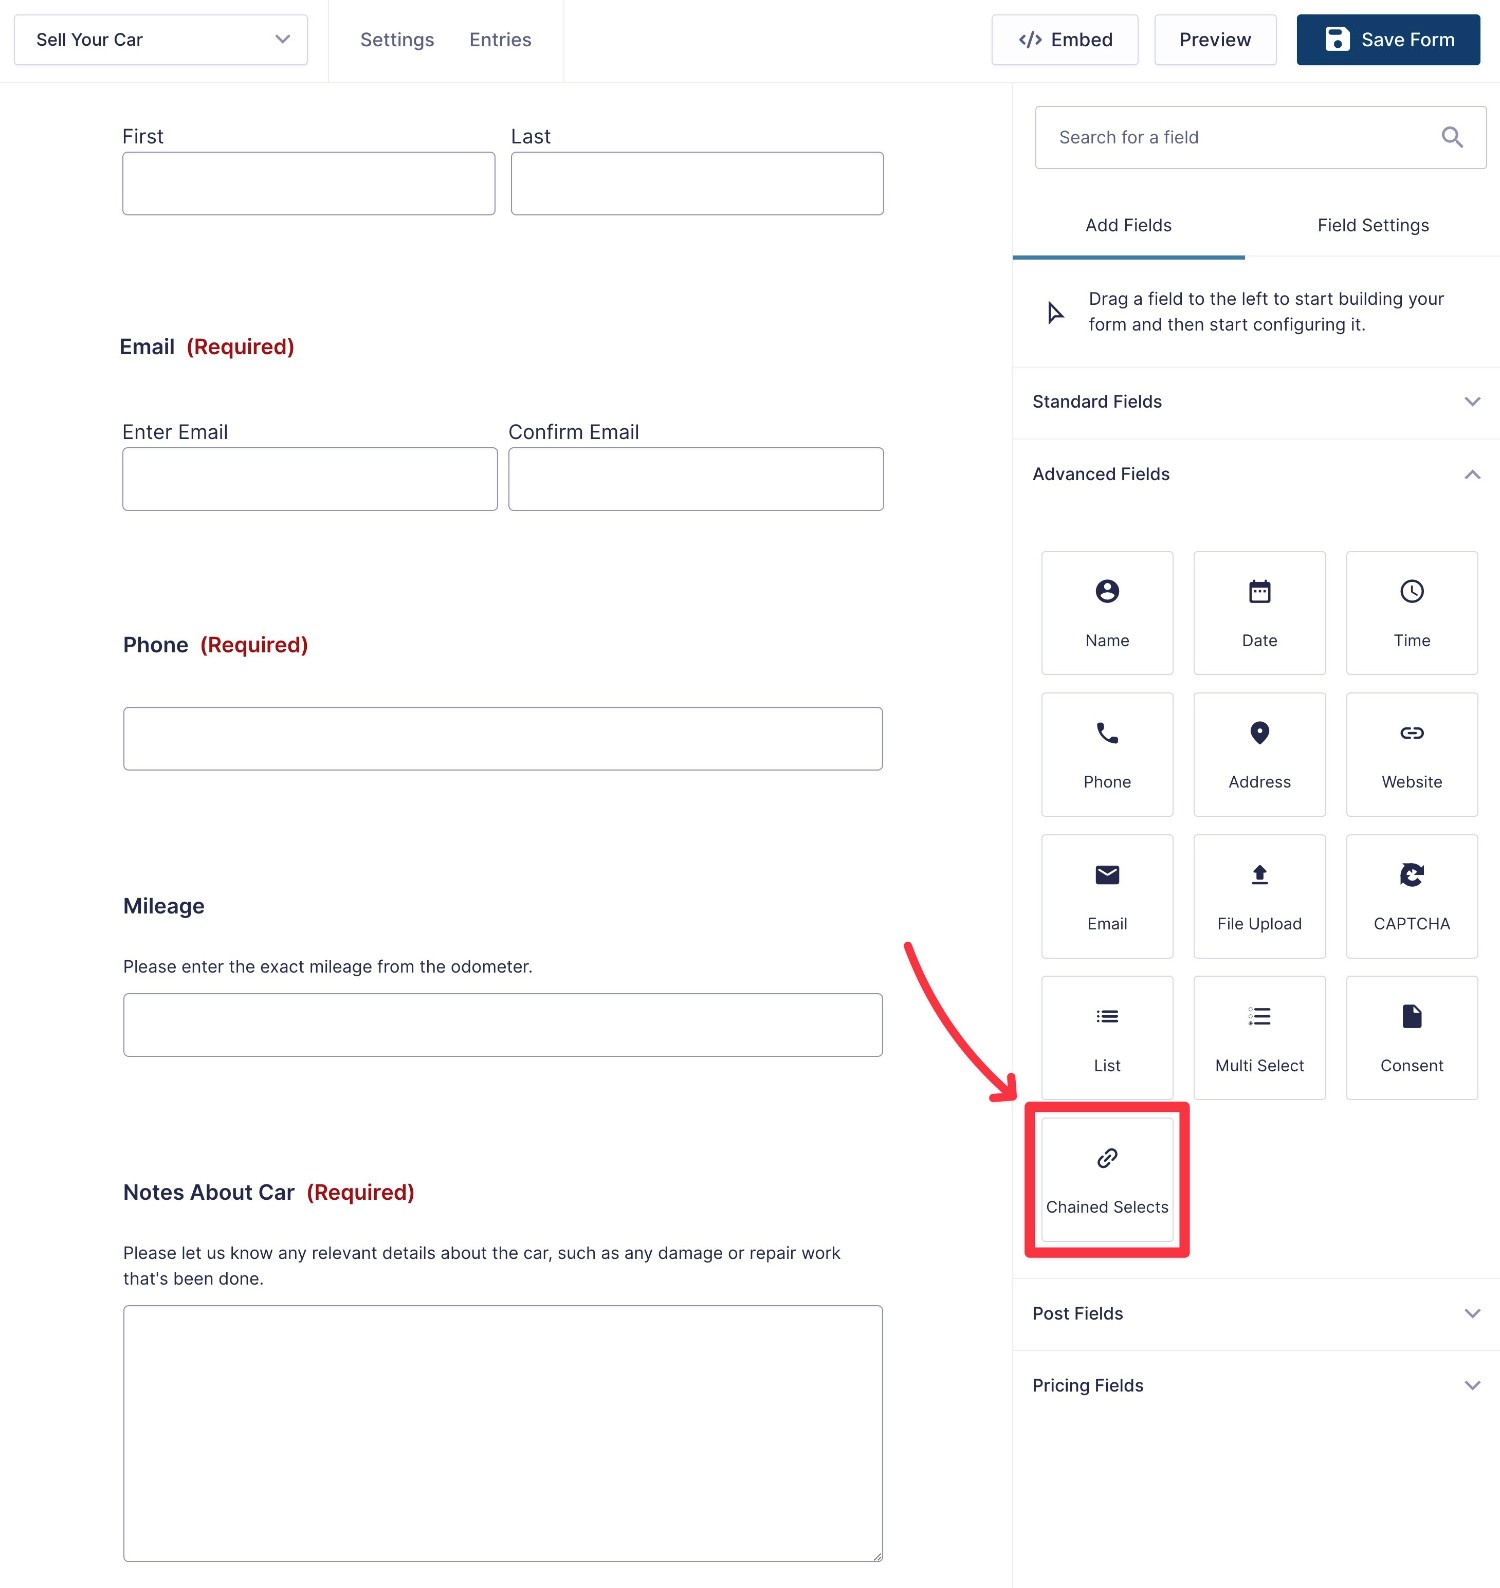
Then, select the Chained Selects field to edit its settings.
Find the Import Choices box in the sidebar and upload the CSV file that you prepared in the previous step.
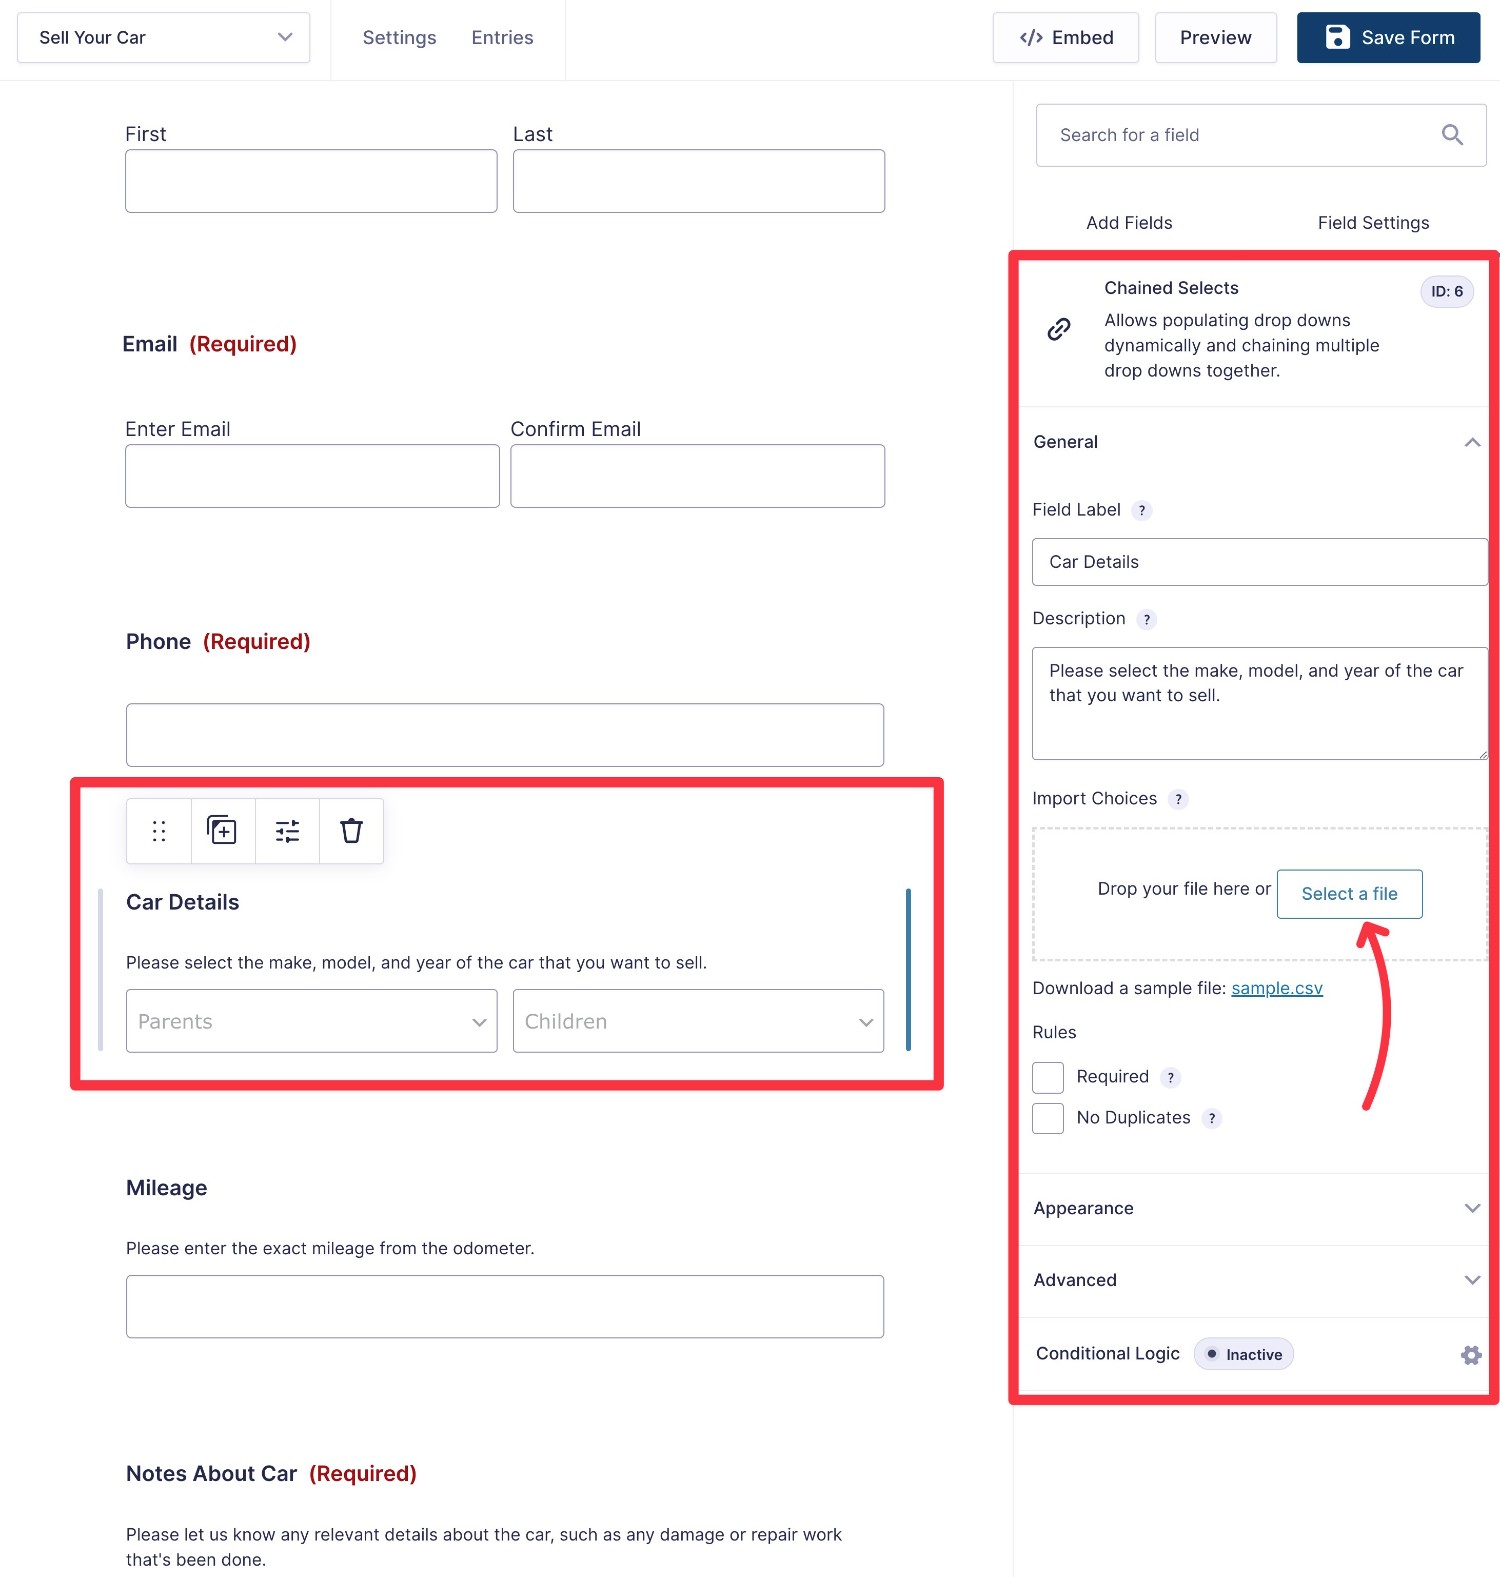
Once you upload the CSV file, you should automatically see the preview update with the options from your CSV file.
The title/name that appears in each drop-down will be the header from each column in your CSV. Again, the drop-downs will appear in the same order as the columns in your CSV file.
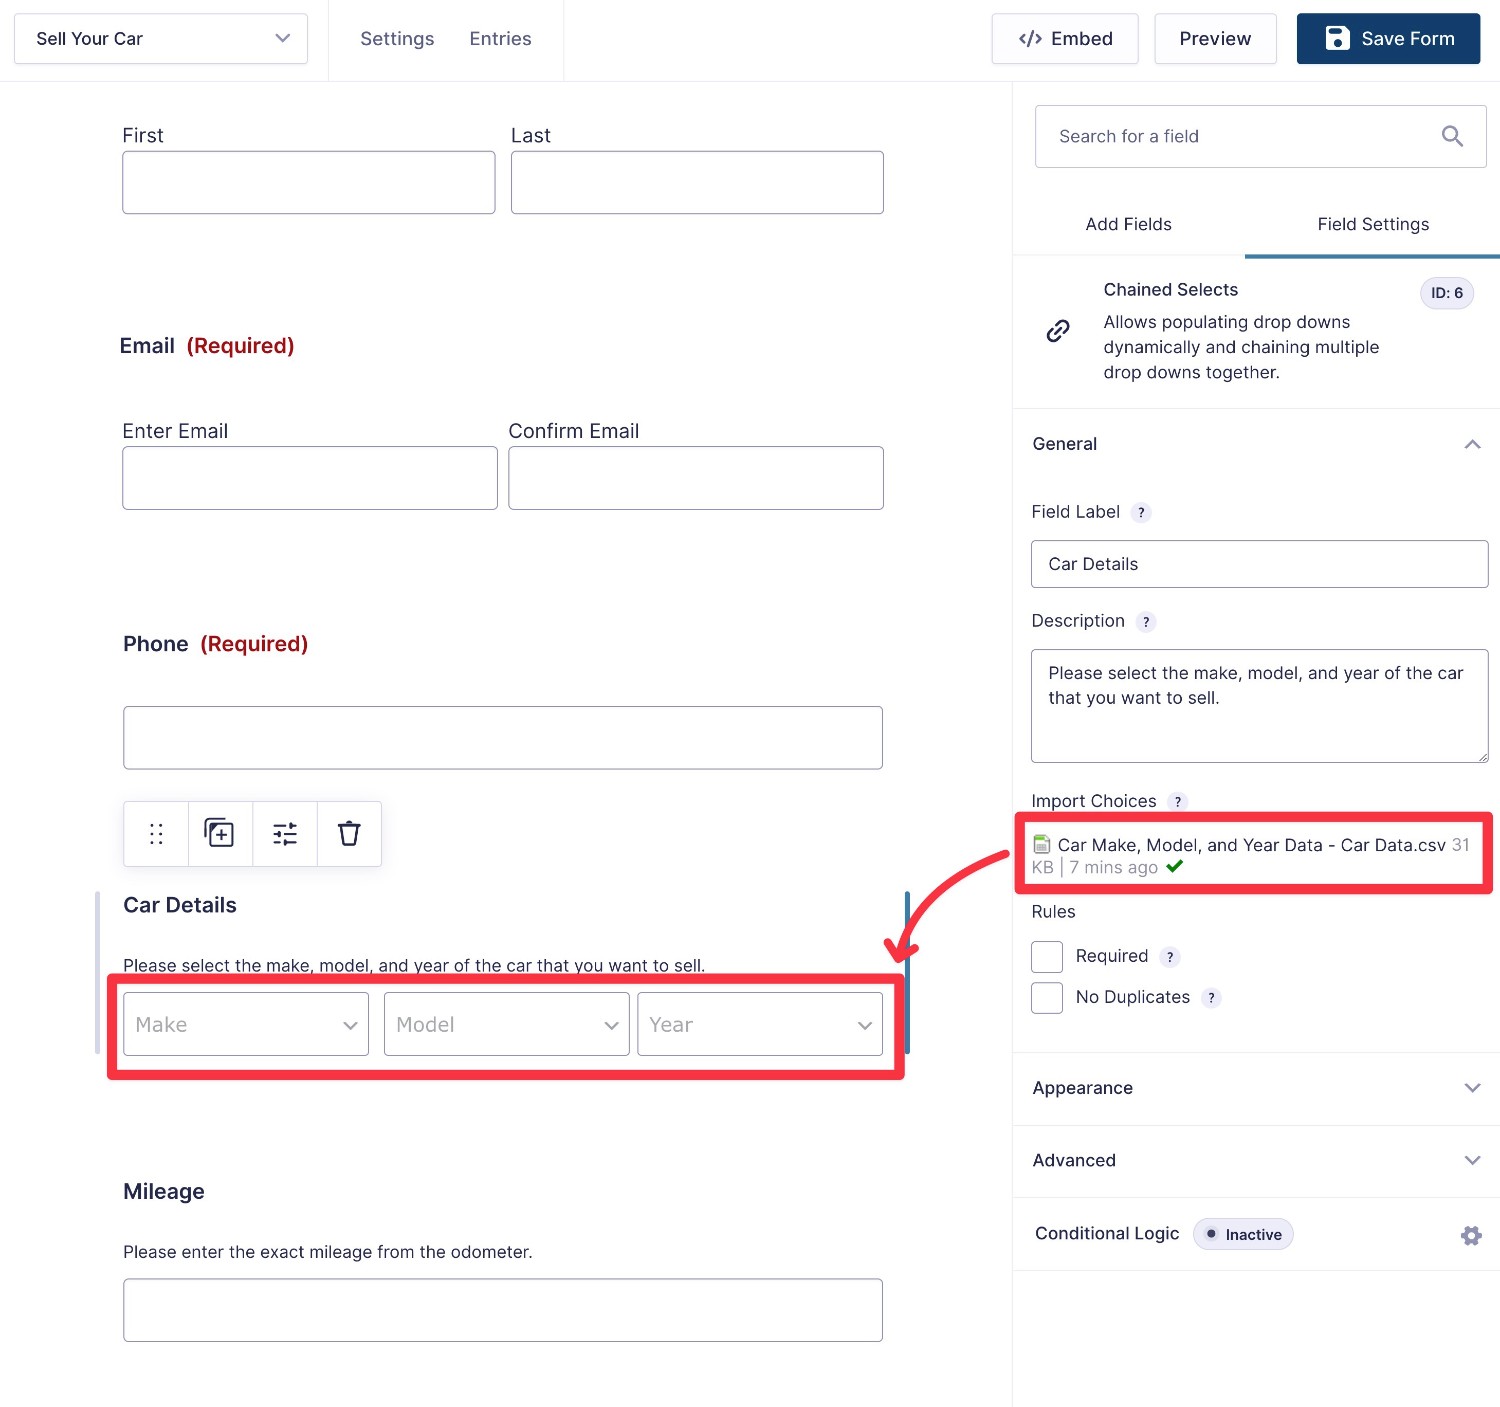
If you want to change the heading or order, you can make the edits to your CSV file and then reupload it.
You can delete the existing CSV file by hovering over it in the sidebar and clicking the red delete icon that appears next to the green checkmark.
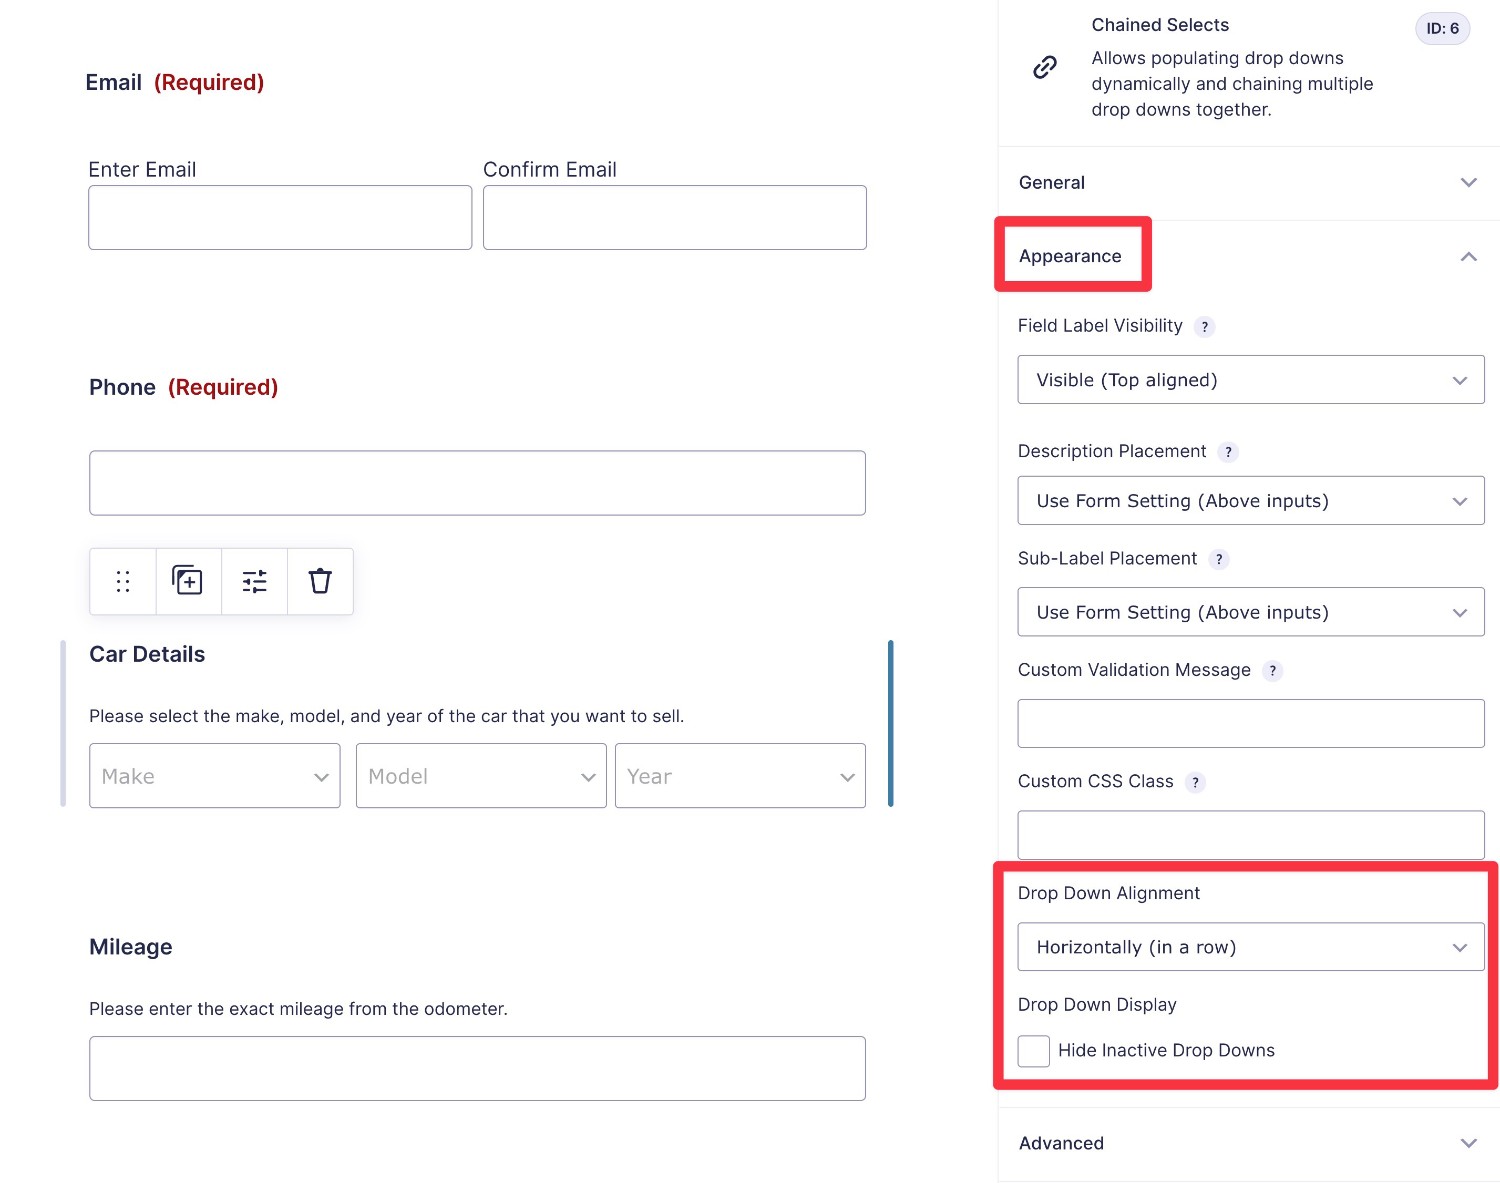
You can also use the Appearance settings to change the drop-downs from the default horizontal alignment to a vertical alignment.
This vertical alignment might be a better option if you have more than three drop-downs and/or your drop-down options have a lot of text.
You can also hide any inactive drop-downs.
And that’s it! There are no separate settings areas – you’ll do everything directly from the settings of the Chained Selects field.
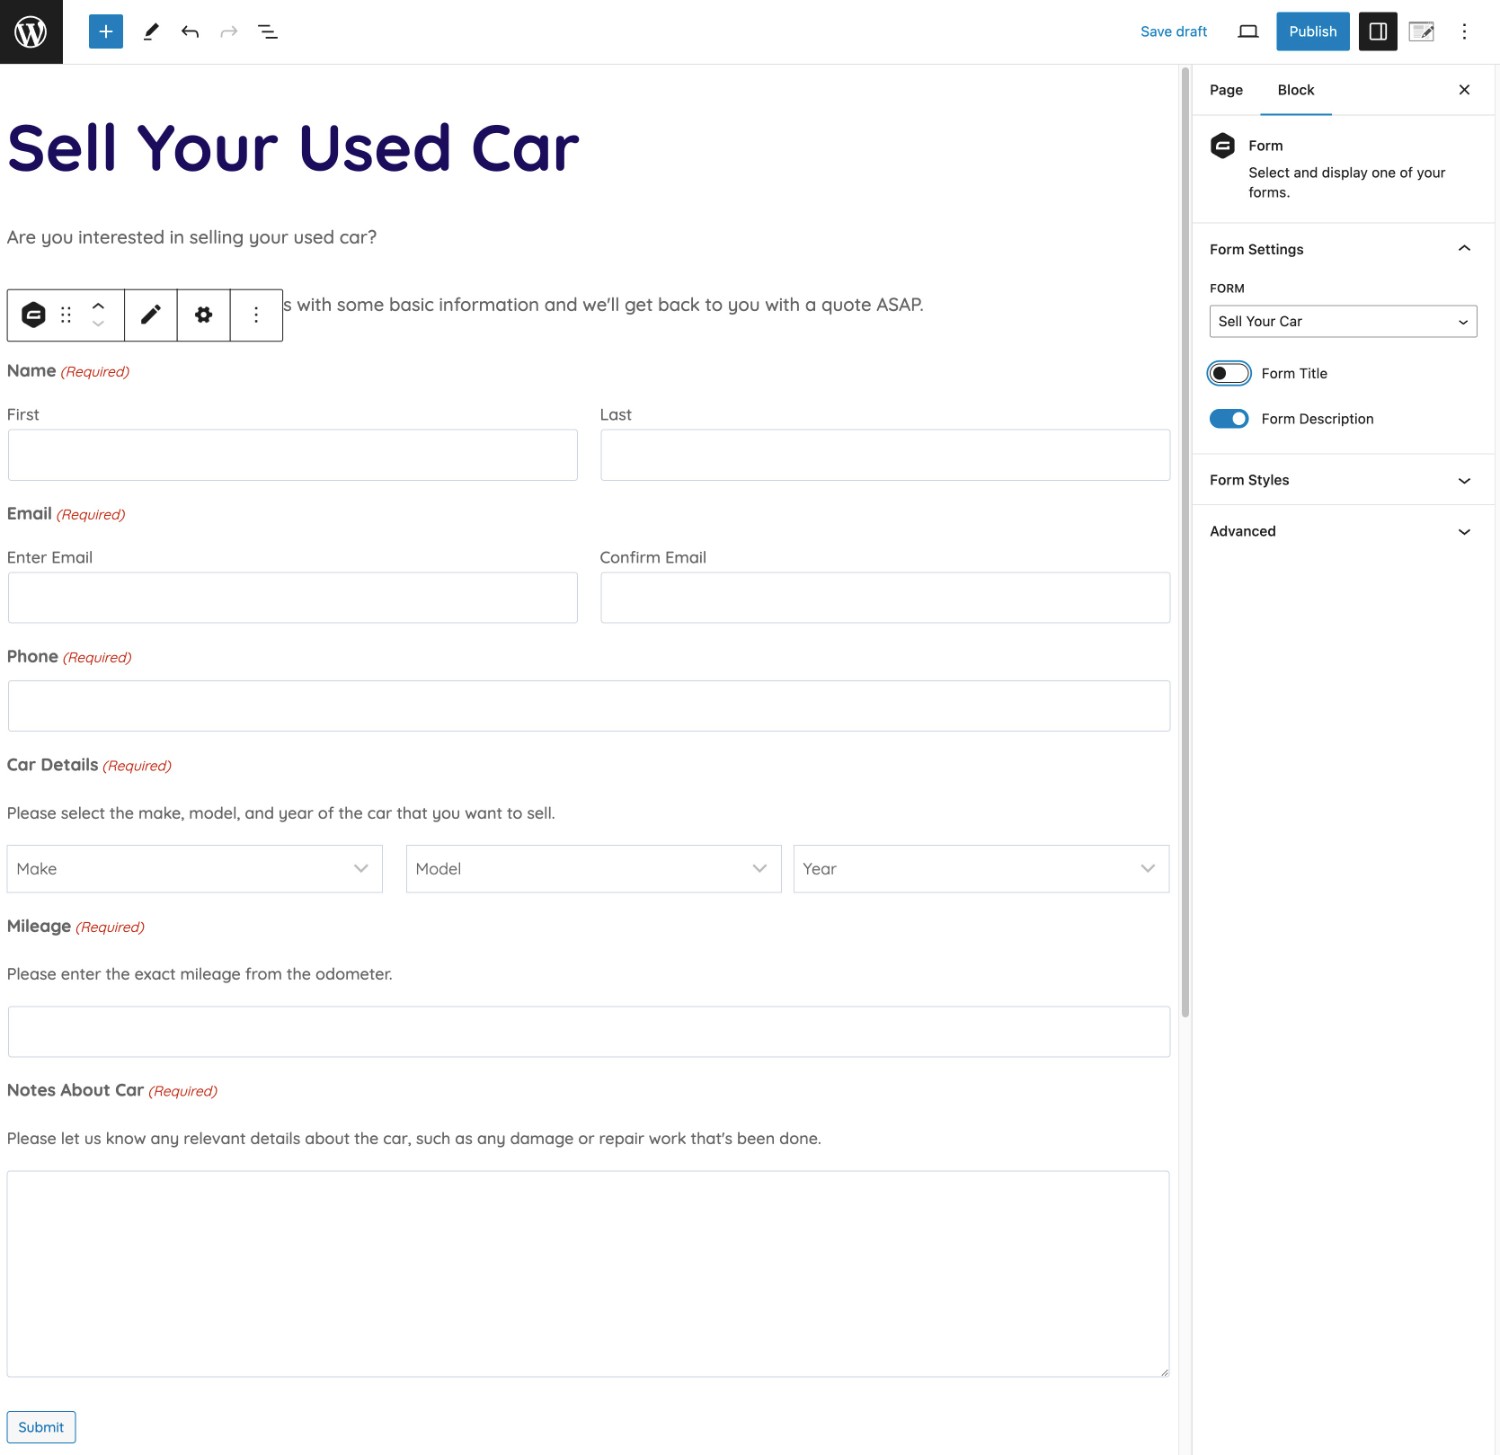
4. Embed Your Form and Test
To finish things out, you can embed your form using the Gravity Forms block or the Gravity Forms shortcode.
Once you embed the form, we recommend testing some different selections to make sure that it’s behaving as you expect it to.
If the cascading choices in later fields aren’t correct, you might want to double-check that there aren’t any errors in your CSV file.
Try the Gravity Forms Chained Selects Add-On Today
With the Gravity Forms Chained Selects Add-On, you can easily incorporate cascading drop-down fields into your forms just by uploading a CSV file.
Or, if you feel comfortable working with code, you can also use hooks/filters to dynamically populate your cascading drop-down field options.
If you need to present users with a lot of options, this can create a simpler, more user-friendly way of doing that, while still letting you collect all of the data that you need.
If you’re already using the Gravity Forms Elite or Nonprofit licenses, you can install the Chained Selects Add-On today and start experimenting with it.
If you’re not holding the Elite license yet, you can purchase your license here or upgrade your existing license and only pay the prorated difference.
Or, if you want to experiment with the Chained Selects Add-On before making your purchase, you can create a free, fully functioning Gravity Forms demo site to test it out.

If you want to keep up-to-date with what’s happening on the blog sign up for the Gravity Forms newsletter!
"*" indicates required fields