How to Set Up WeChat Pay on WordPress with Stripe and Gravity Forms
Searching for the best way to accept WeChat Pay on WordPress?
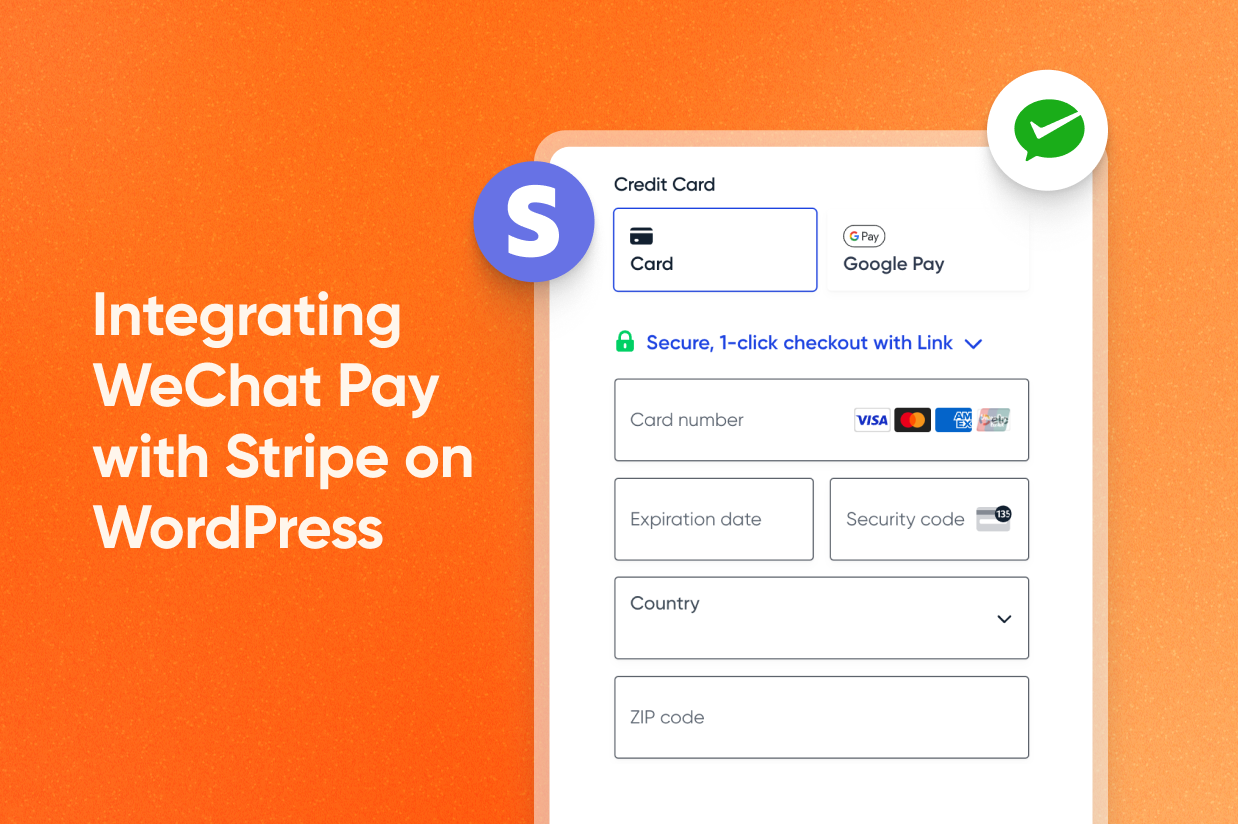
With Gravity Forms and Stripe, you can easily create a customizable WordPress WeChat Pay form on your site, without requiring any special technical knowledge.
You can make WeChat Pay the only payment method for your form. Or, you could choose to offer it as one of multiple payment options. For example, you could let users choose between credit/debit card payments and WeChat Pay.
In this post, we’ll show you step-by-step how to start accepting WeChat Pay on WordPress using Gravity Forms and Stripe. By the end, you’ll be able to create your own customizable payment form that looks something like this:
Let’s get into it…
Why Use WeChat Pay for WordPress Payments?
WeChat is a “super app” that’s one of the leading apps in China, with more than one billion monthly active users. As part of its super app functionality, it includes a payment wallet called WeChat Pay, which itself has over 800 million users.
While WeChat Pay is most popular in China, it’s used all across the world, both by tourists and residents. For example, WeChat is also used by millions of people in Malaysia, Japan, South Korea, the United States, Thailand, and many other countries.
Beyond its popularity, another advantage of WeChat Pay is that it has a relatively low rate of fraud. This is because customers must authenticate their payments from inside the WeChat Pay app (by scanning a QR code). This also means that customers can’t dispute their payments to receive a chargeback. You can choose to refund a customer’s payment within 180 days, though.
In terms of processing fees, Stripe’s fees for WeChat Pay are similar to the processing fees for credit cards and other popular wallets. You’ll pay 2.9% + $0.30 per charge, plus an additional 1% if currency conversion is required.
What You Need to Accept WordPress WeChat Pay Payments
If you want to accept WeChat Pay payments on WordPress, you’ll need the help of two tools:
- Stripe – With a free Stripe account, Stripe can seamlessly handle processing WeChat payments, along with any other supported payment methods that you want to enable. If you don’t have an account yet, you can register for Stripe here.
- Gravity Forms plugin – With the official Gravity Forms Stripe Add-On, you can create flexible payment forms that integrate with Stripe, including support for adding WeChat as a payment option. In order to access the Stripe Add-On, you’ll need a Gravity Forms Pro, Elite, or Nonprofit license. You can purchase your Gravity Forms license here.
How to Create a WordPress WeChat Pay Payment Form
Now, we’ll get into the full step-by-step guide on how to create your first WordPress WeChat Pay payment form.
1. Install Gravity Forms and the Stripe Add-On
To get started, you’ll want to install Gravity Forms and the Stripe Add-On on the WordPress site where you want to set up your WeChat Pay payment form.
If you don’t have a Gravity Forms license yet, you’ll need to purchase at least the Pro license so that you can access the Stripe Add-On.
When completing the short setup wizard that appears after installing Gravity Forms, make sure to set your default currency to USD, as WeChat Pay will not work with other default currencies. You can change this later by going to Forms → Settings.
If you want to use CNY, you can add it as a currency using the gform_currencies filter.
After you’ve activated Gravity Forms with your license key, here’s how to install the Stripe Add-On:
- Go to Forms → Add-Ons in your WordPress dashboard.
- Find the Stripe Add-On in the list.
- Click Install to install it on your site.
- Once the installation finishes, make sure to also activate the add-on.

2. Connect Gravity Forms and WordPress to Stripe
Next, you need to connect WordPress and Gravity Forms to your Stripe account.
There are a few steps involved here:
- Complete a short authorization flow.
- Add the Gravity Forms webhook URL to your Stripe dashboard.
- Add the Stripe secret key to your WordPress dashboard.
We’ll quickly go through this below, but you can read the full documentation on using the Stripe Add-On and connecting your site to Stripe if you want more details.
Connect to Stripe
To get started, open the settings for the Gravity Forms Stripe Add-On:
- Go to Forms → Settings in your WordPress dashboard.
- Select the Stripe tab in the sidebar.
In this interface, you can first choose which “mode” to use when connecting to Stripe. While you’re setting up your form, we recommend using Test mode so that you can submit test payments using WeChat Pay.
Once you’ve finalized your form, you can come back and enable Live mode to process real payments, which we’ll cover later in the tutorial.
To connect to Stripe in Test mode, select the Test option and then click Connect With Stripe.

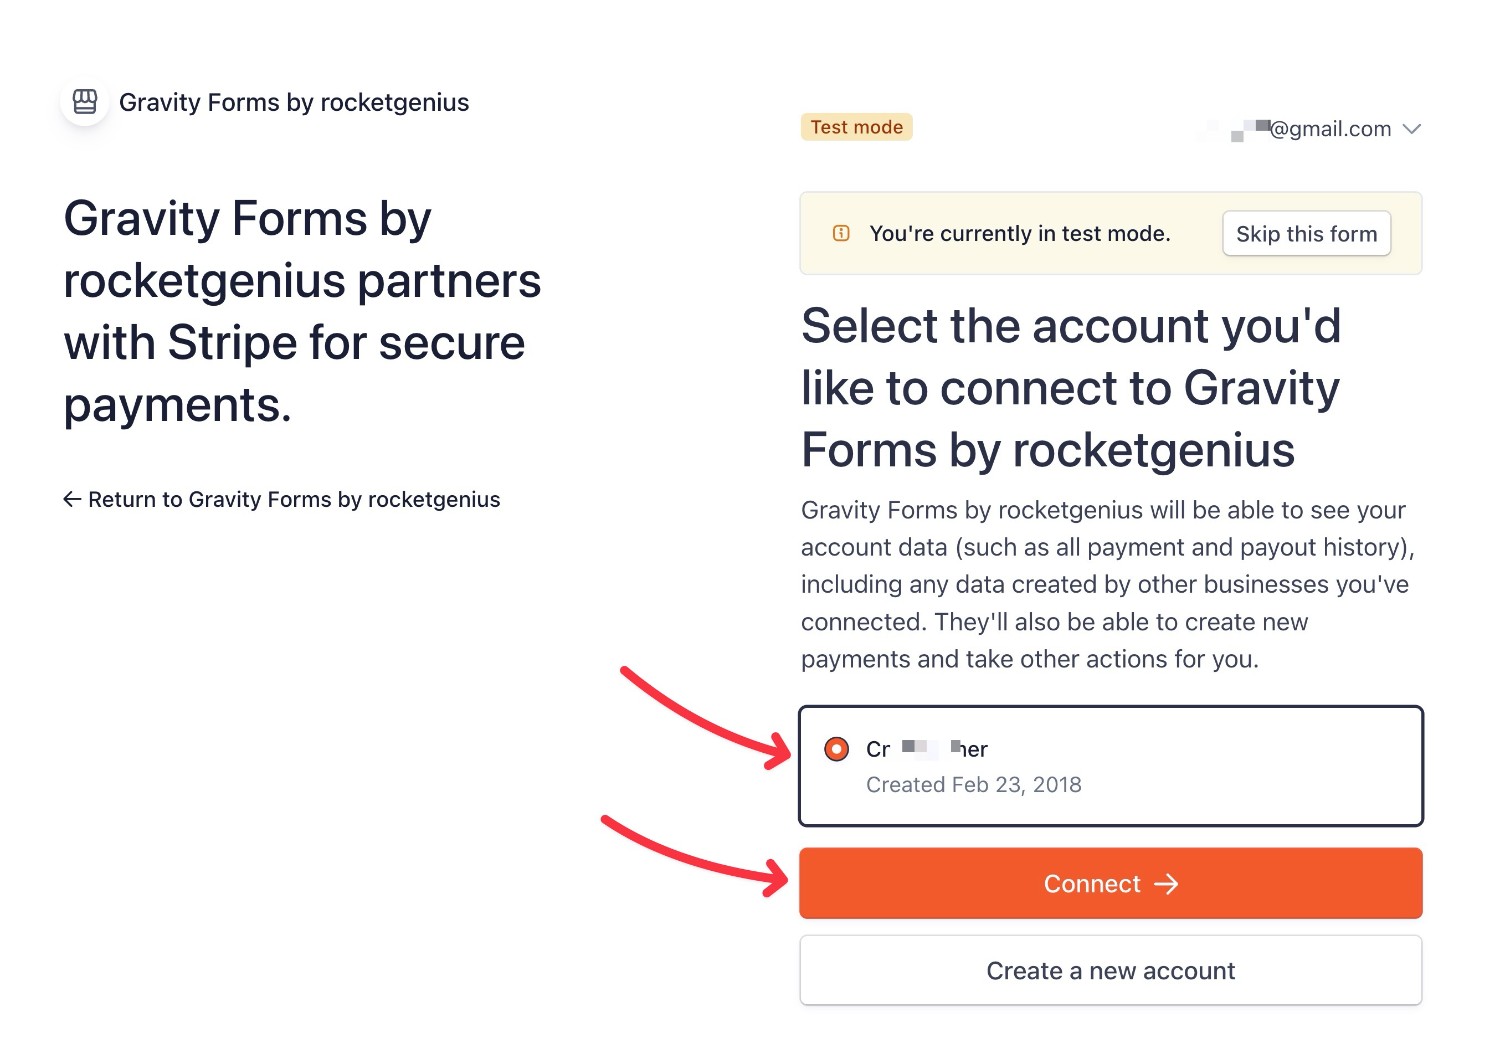
On the next screen, authorize your site with Stripe by choosing the Stripe account that you want to connect to and clicking Connect.
After completing the authorization flow, you should be taken back to the WordPress dashboard.
Add Webhook URL and Signing Secret
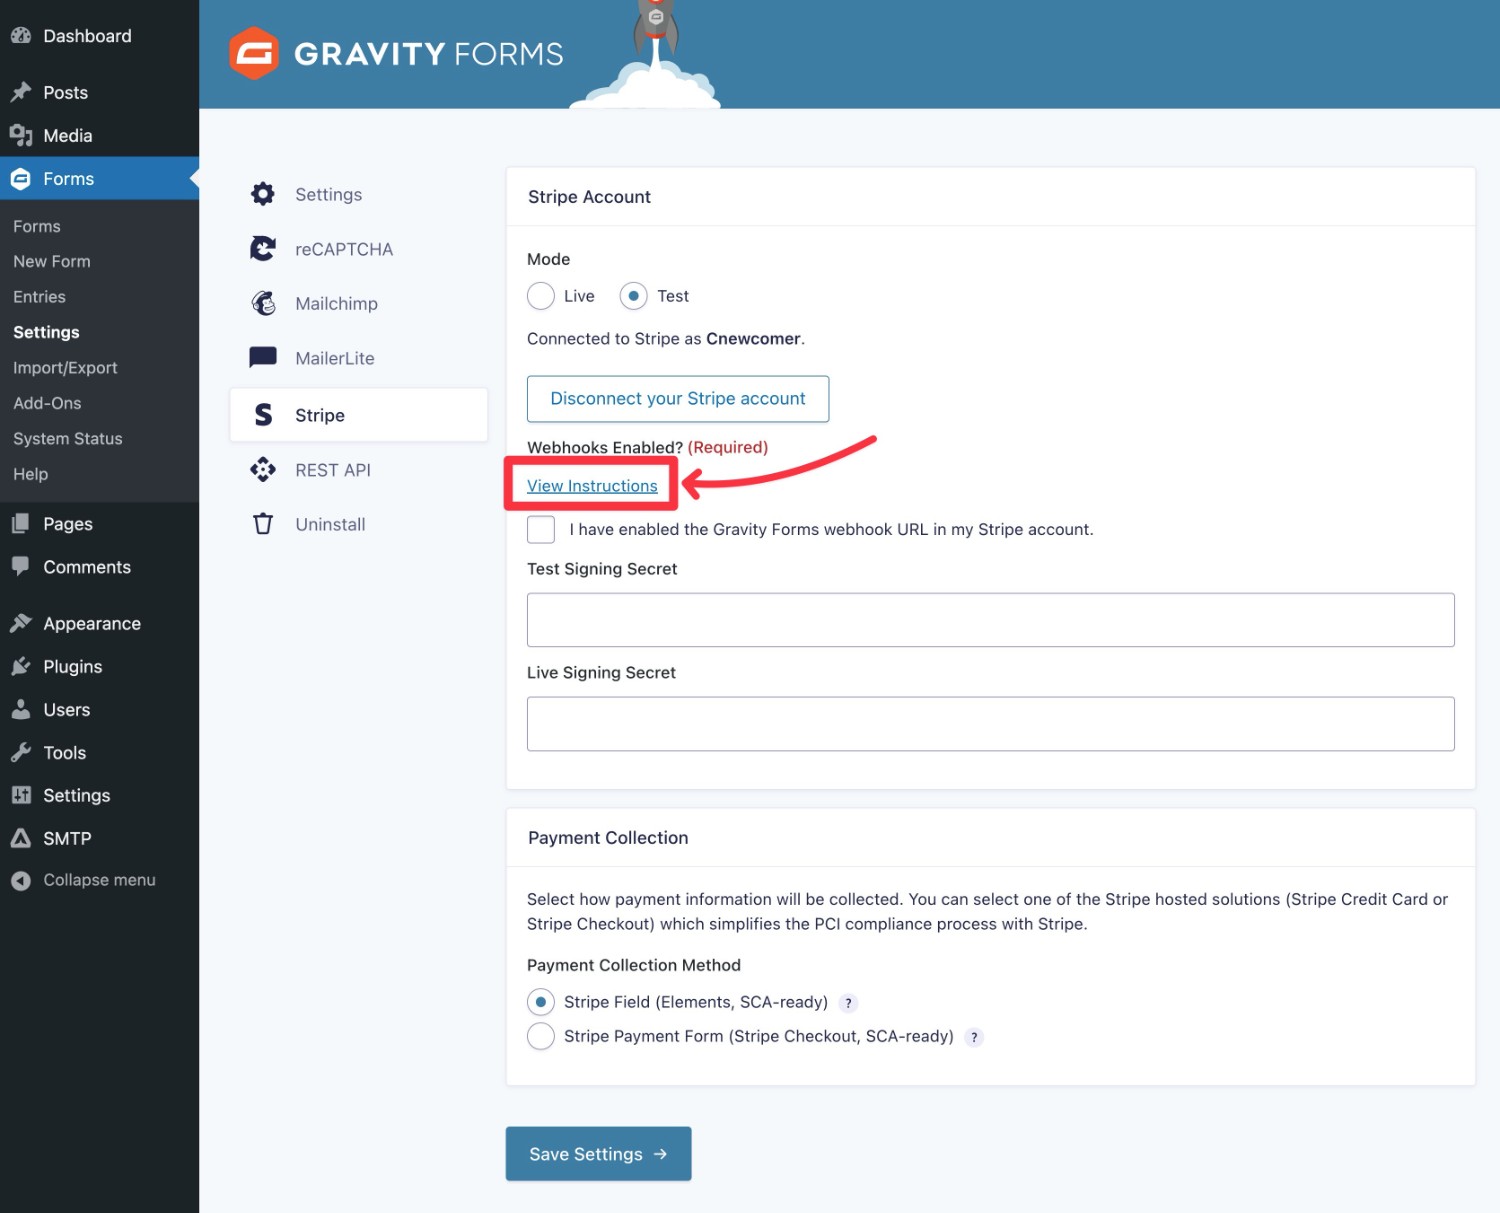
Now, add the Gravity Forms webhook URL to the Test version of your Stripe account. You can switch between Test and Live modes in Stripe by using the toggle in the top-right corner.
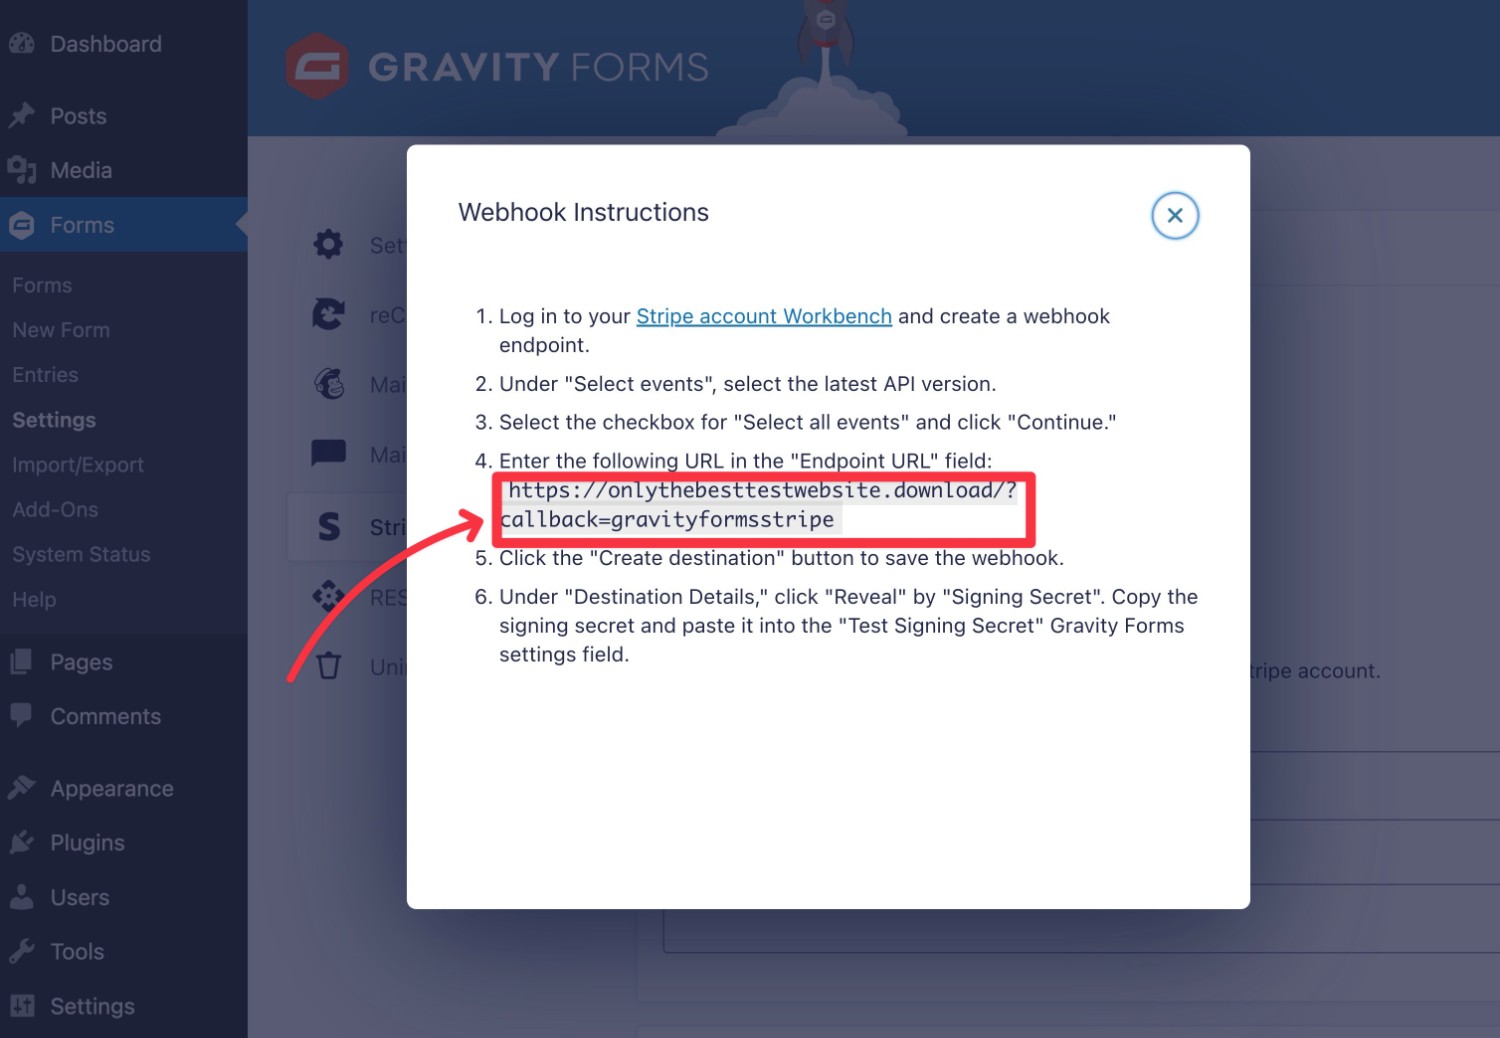
To locate the webhook URL and view full instructions, click the View Instructions link:
You should then see a popup with the URL and instructions:
Now, create a test endpoint URL in Stripe Workbench by clicking this link.
If this link redirects you back to the main Stripe dashboard, you’ll first need to enable Stripe Workbench in the Stripe Developers settings. While new Stripe accounts use Workbench by default, existing Stripe account holders need to enable Workbench before they can use it.
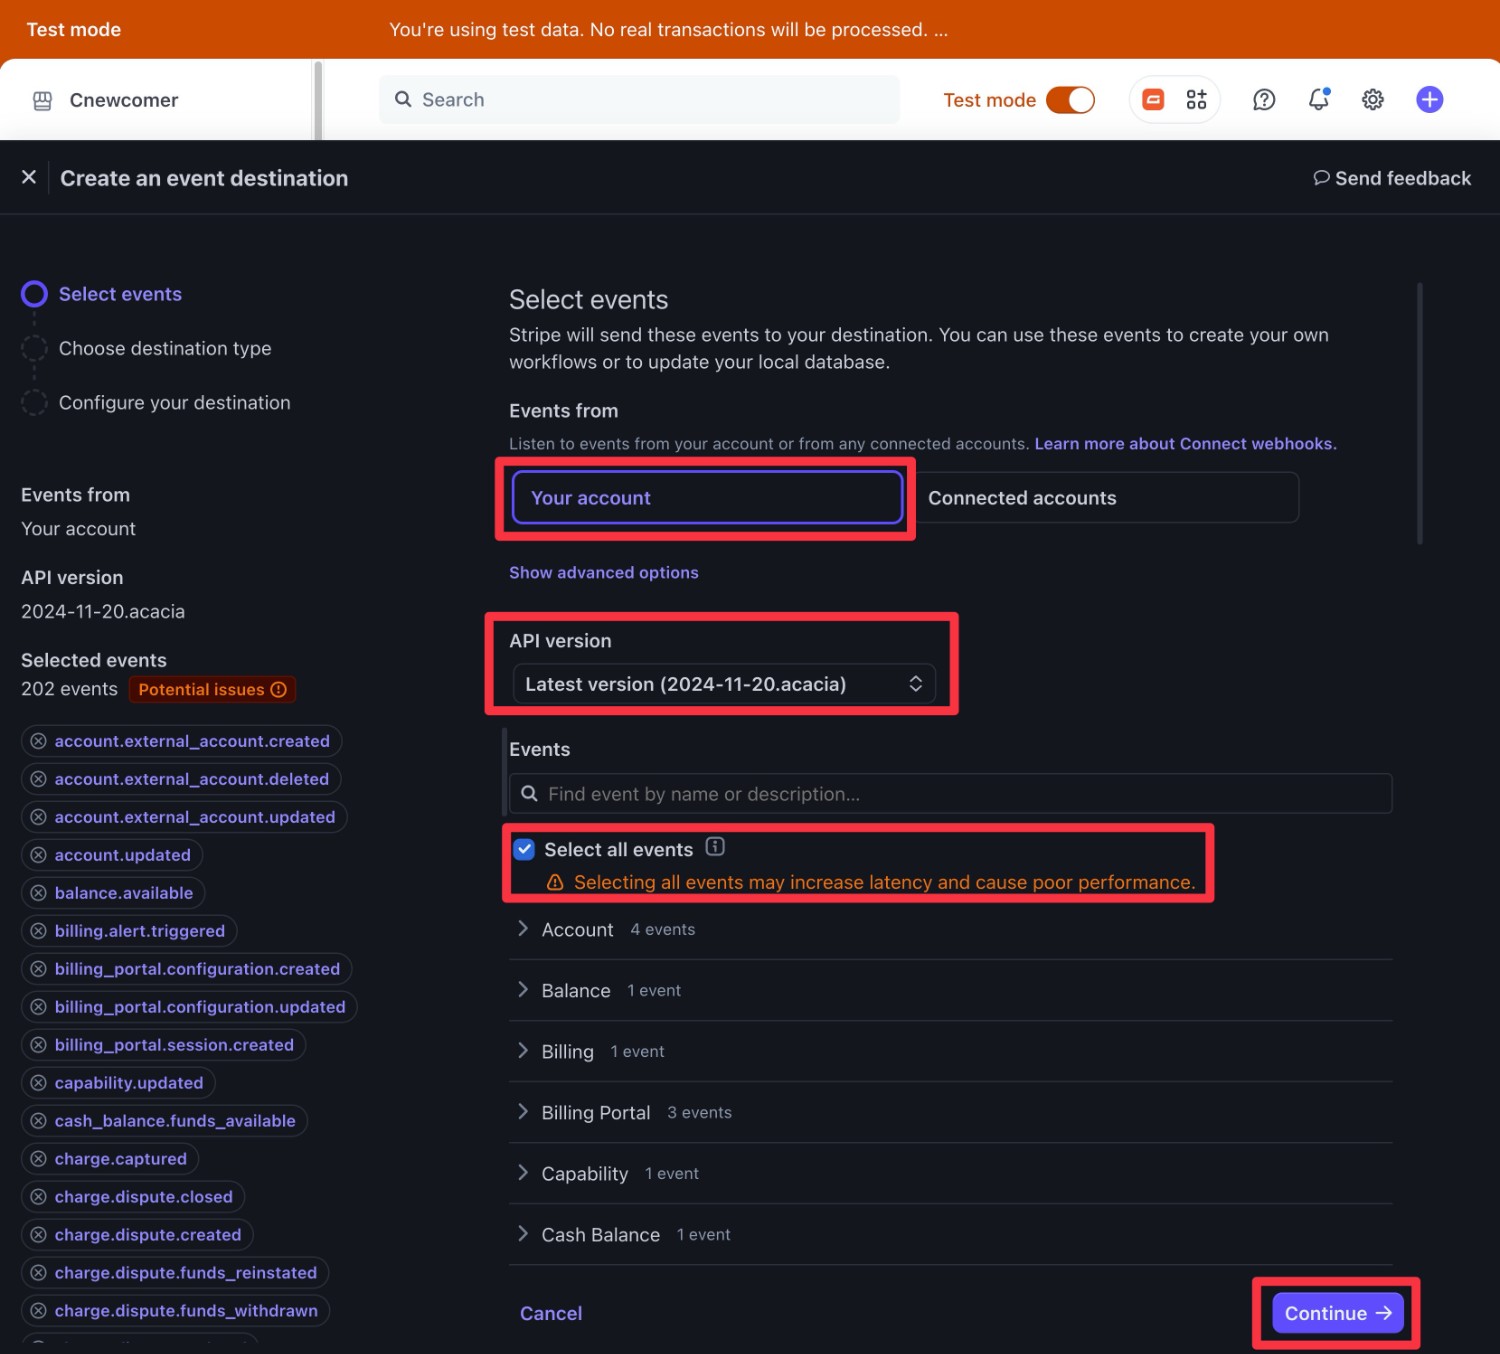
Make the following choices while configuring your webhook/event destination in Workbench:
- Events from – Your account.
- API version – Latest version.
- Events – check the Select all events checkbox.
Then, click Continue.
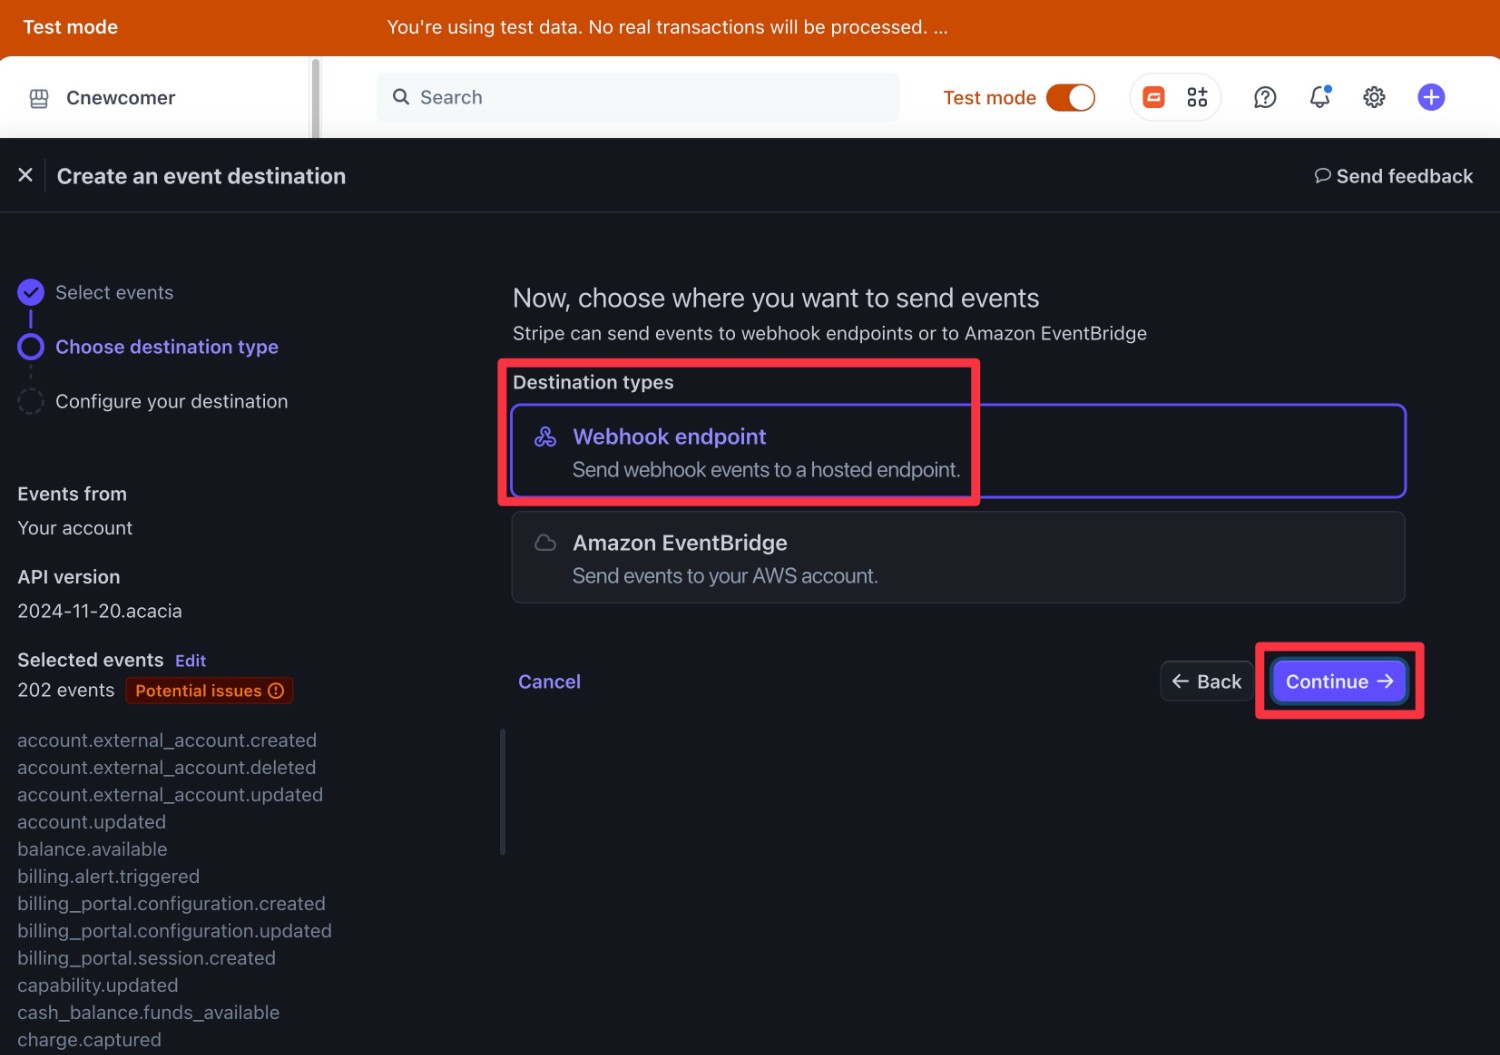
On the next step, select Webhook endpoint and click Continue.
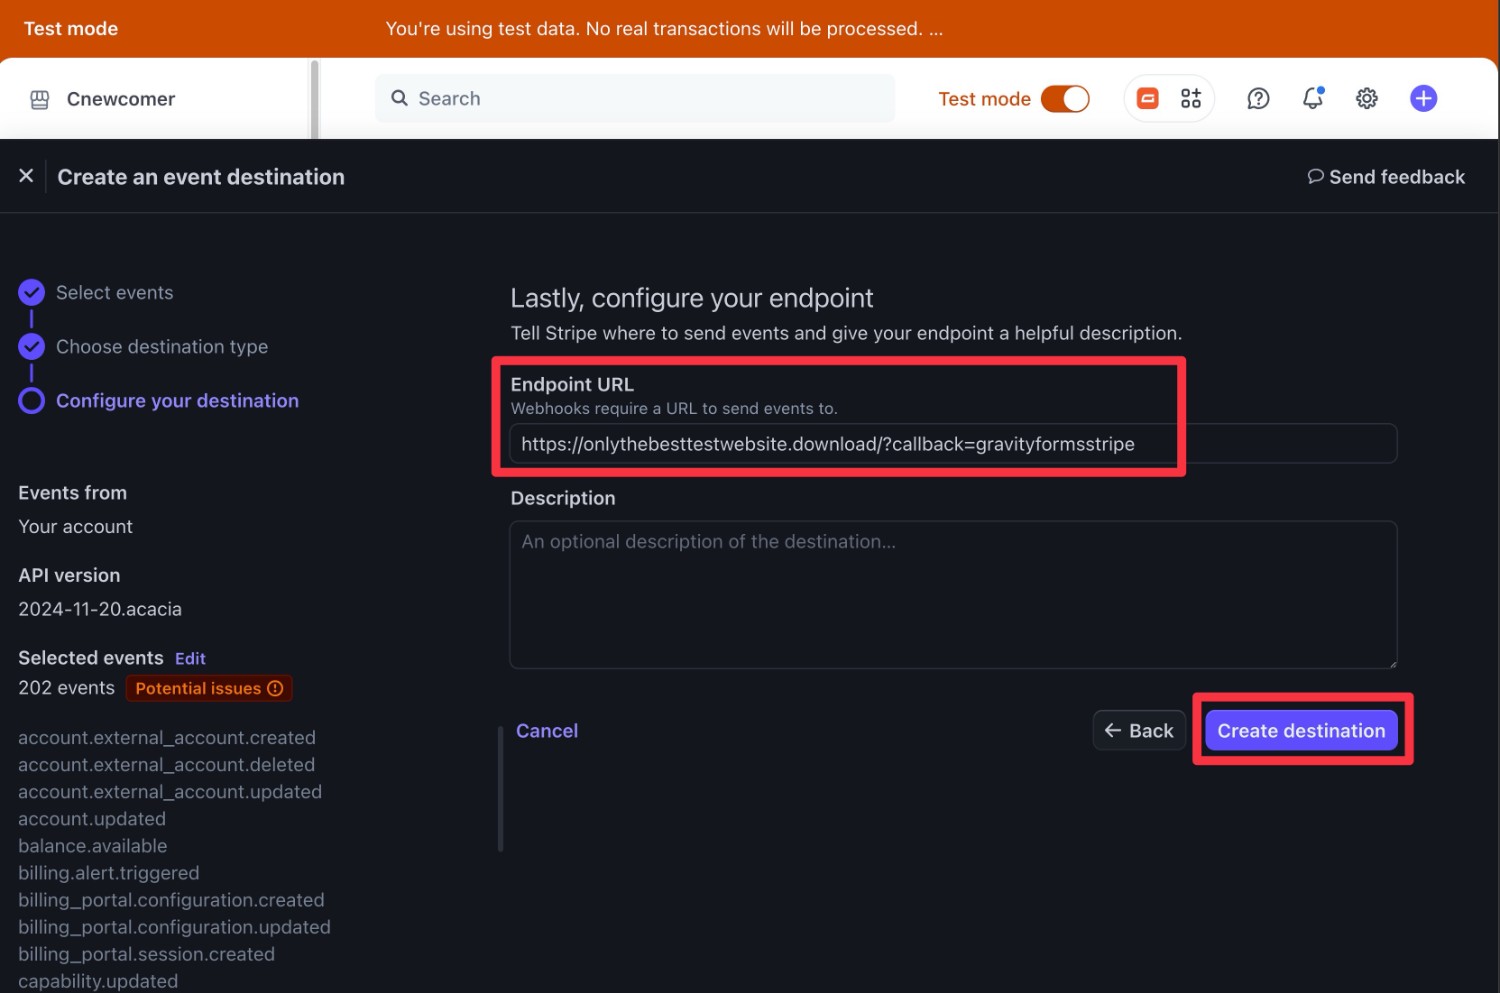
To finish, add the Gravity Forms webhook URL to the box and then click Create destination.
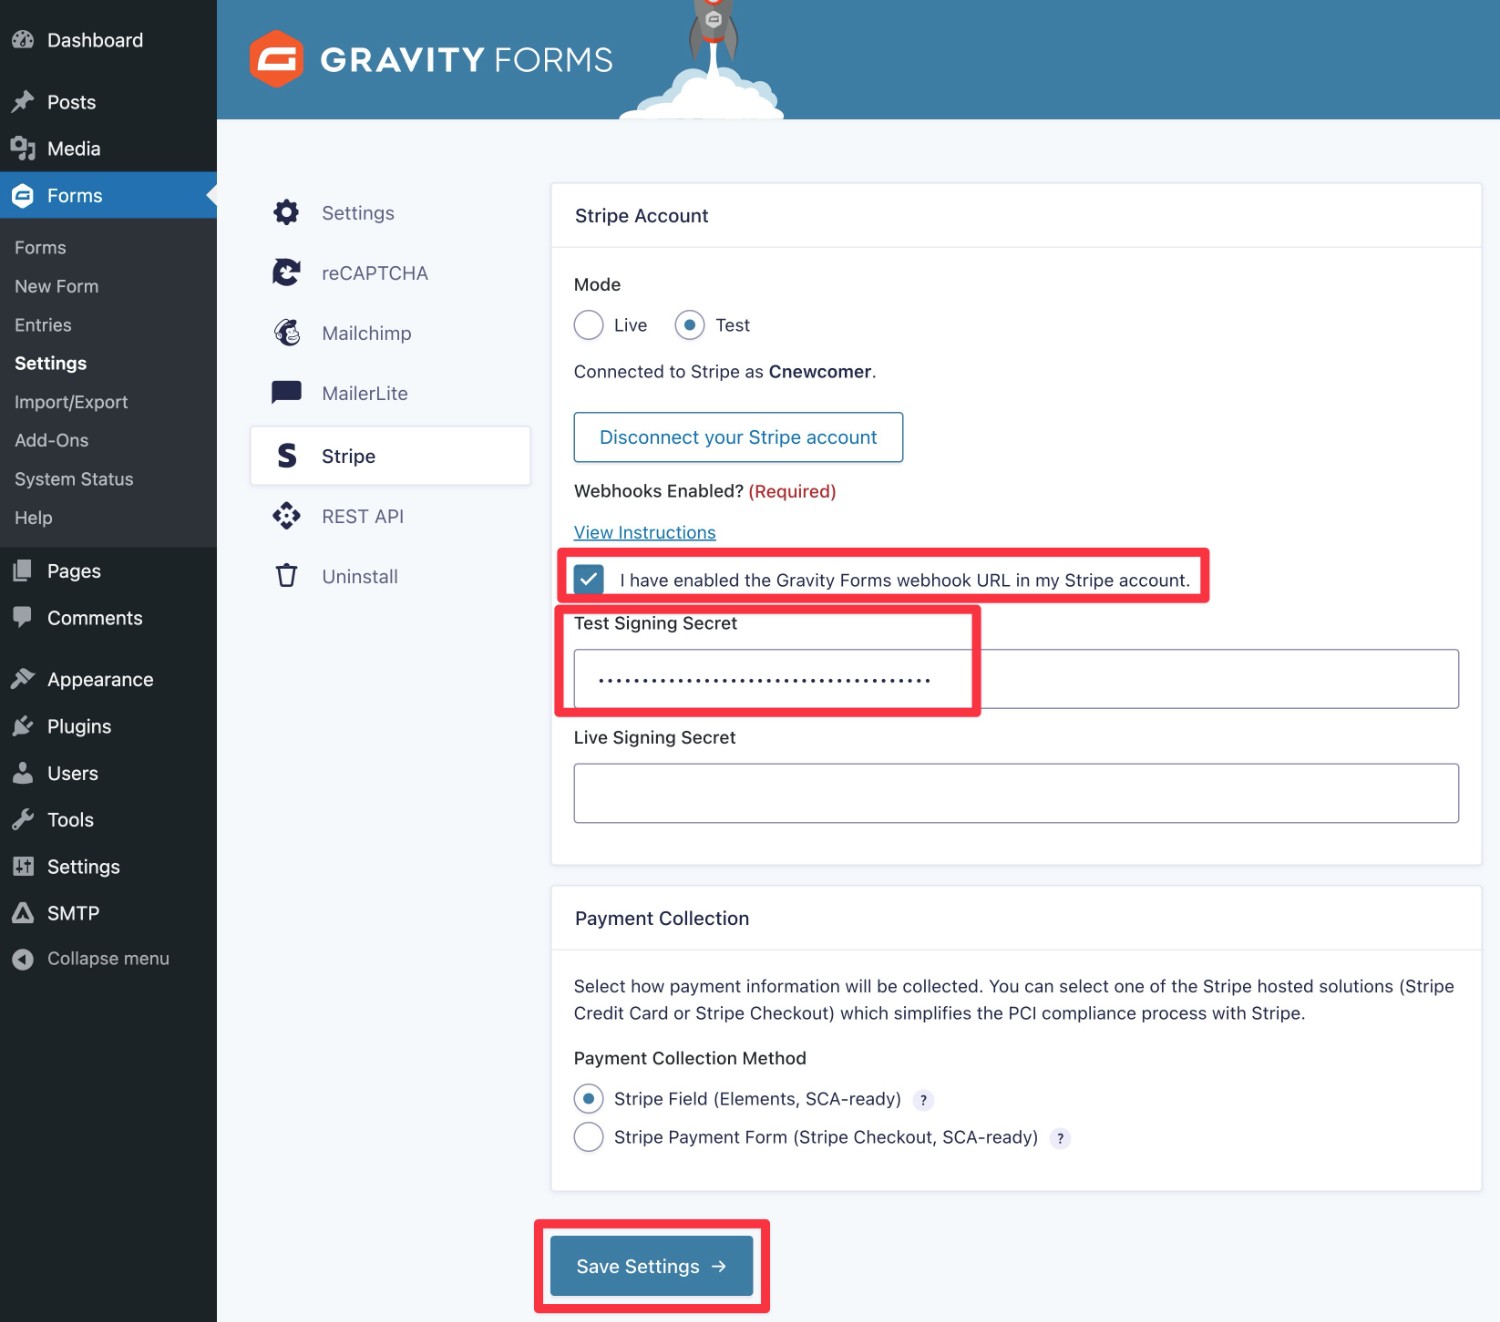
On the next screen, locate the Signing secret key, which should be listed in the Destination details column. It will start with whsec.
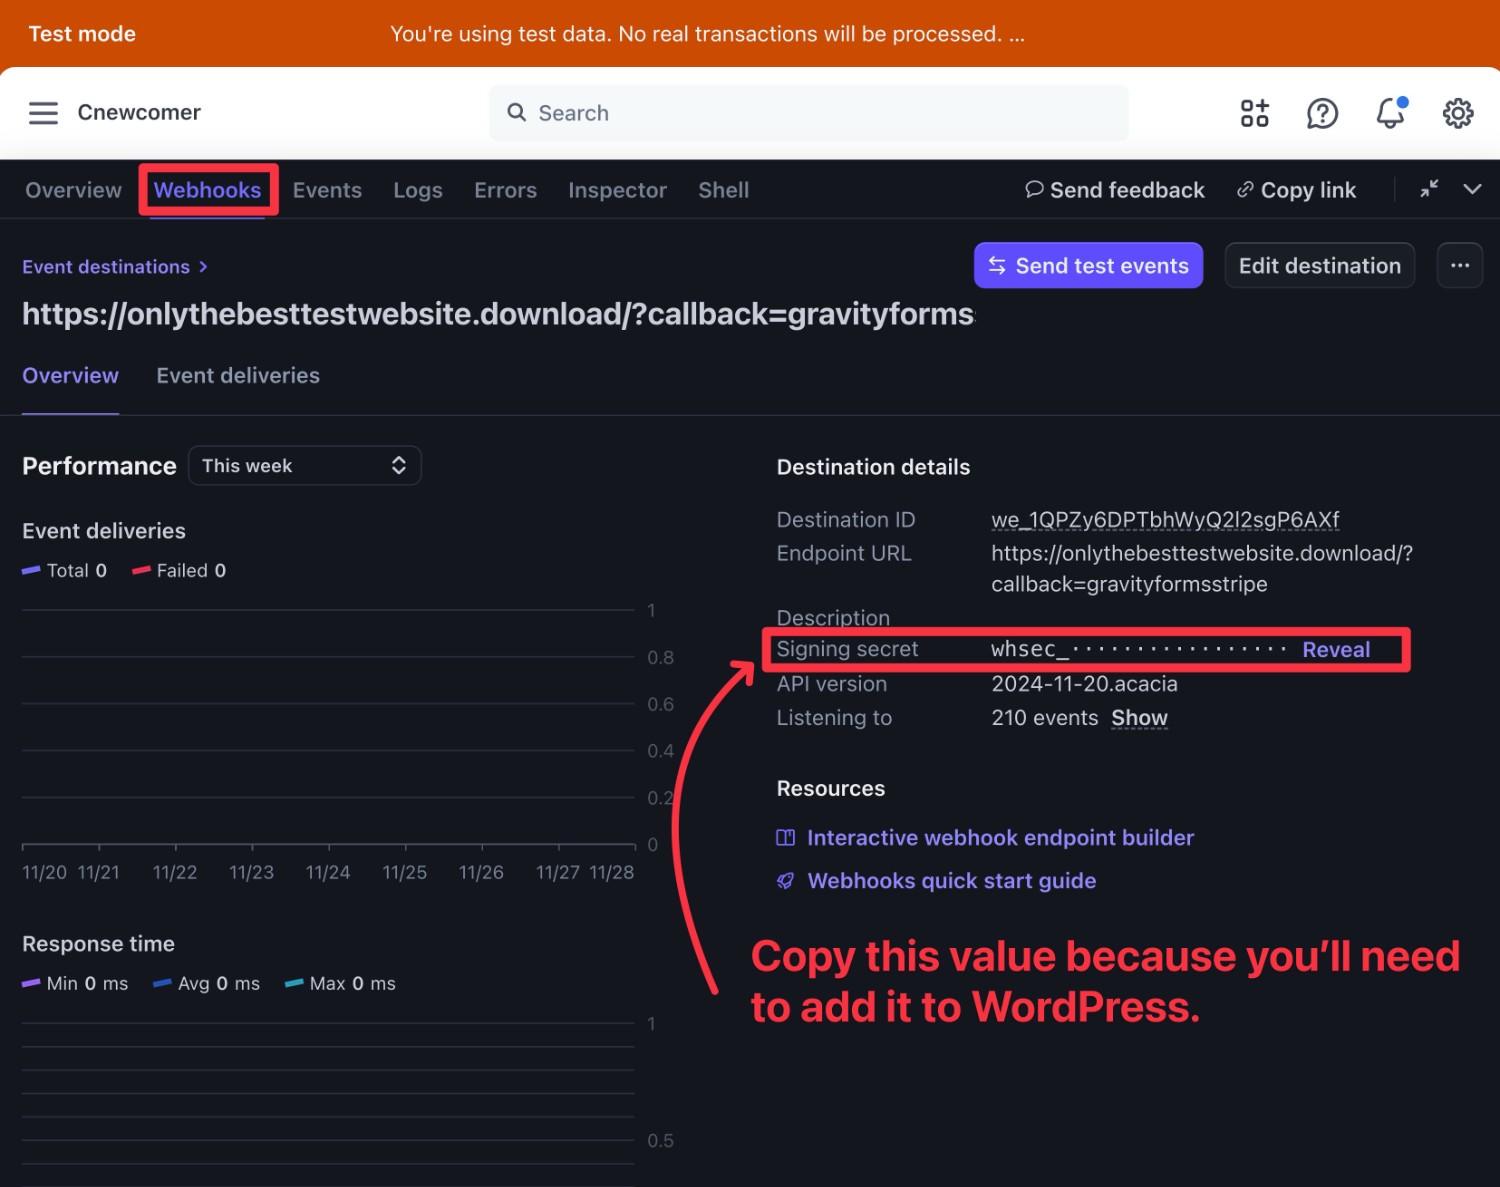
After copying the signing secret, you need to add it to your WordPress dashboard:
- Go back to the Gravity Forms Stripe Add-On settings in WordPress.
- Paste the key into the Test Signing Secret box.
- Check the box verifying that you’ve enabled the webhook URL.
- Click Save Settings at the bottom.
That’s it! Your site is now connected to Stripe in Test mode. At the end of this guide, we’ll cover how to come back and enable live payments via WeChat Pay.
3. Enable WeChat Pay Payments in Stripe
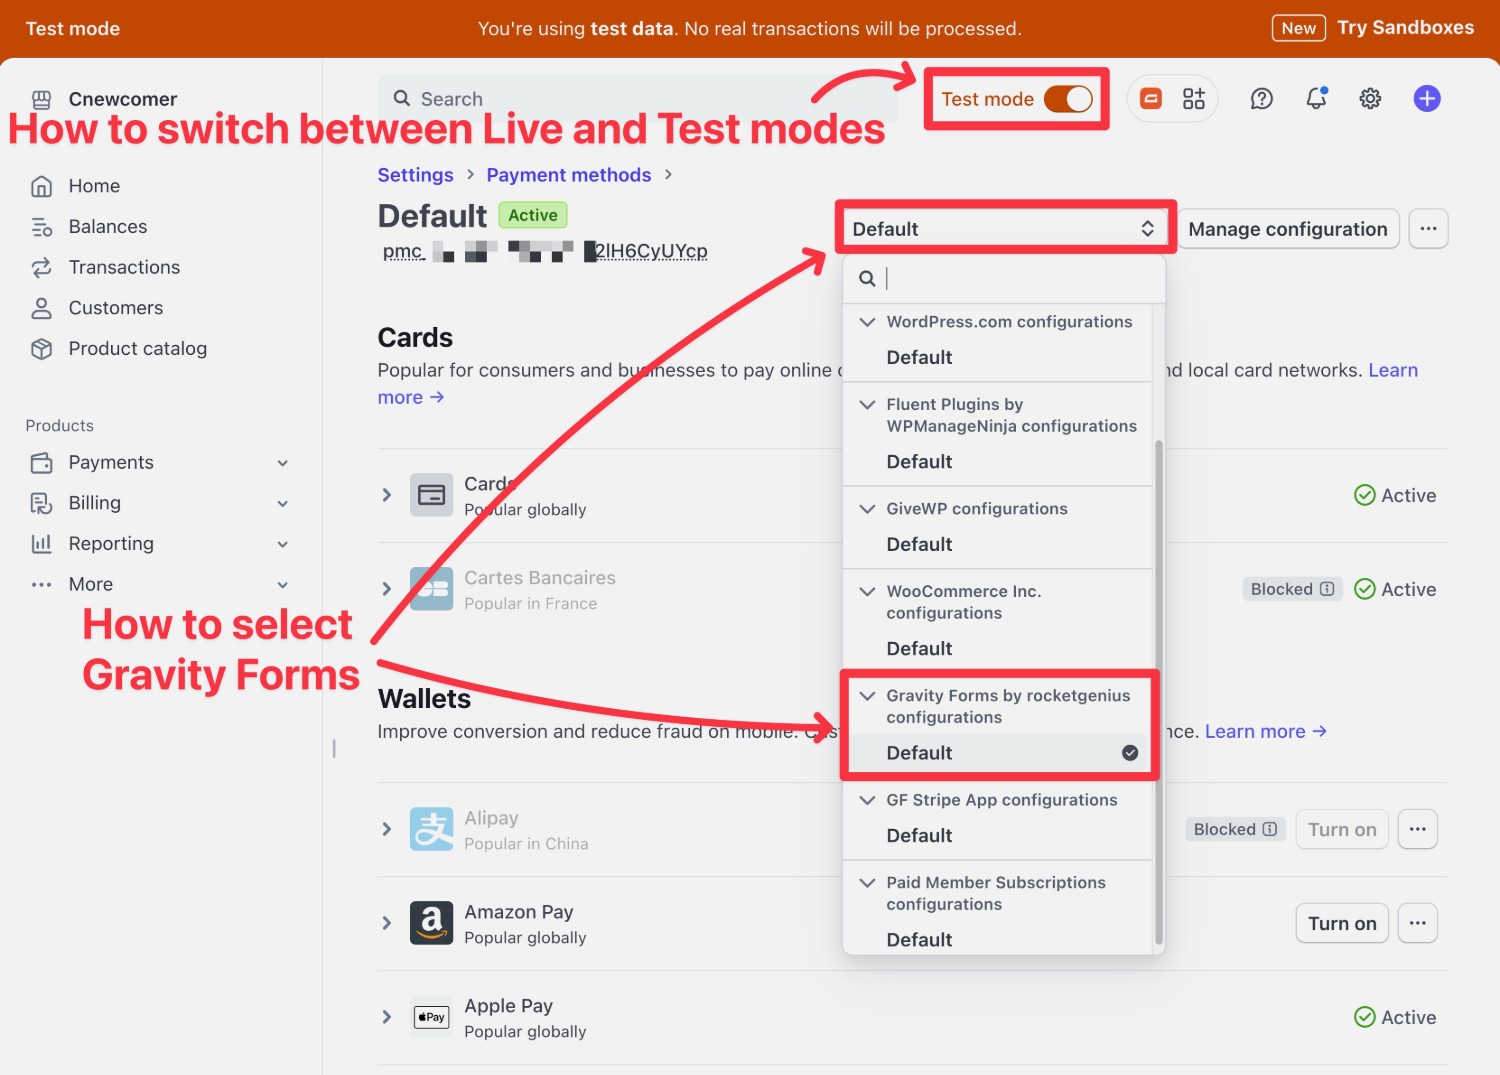
Next, you’ll need to enable WeChat Pay as a payment method in your Stripe dashboard. This will allow it to appear as an option on your WordPress payment form.
You need to activate WeChat Pay in both the Live and Test areas of your Stripe dashboard. That is, you’ll need to activate it two times in order to configure everything properly. You can change between modes by using the toggle in the top-right corner of your Stripe interface.
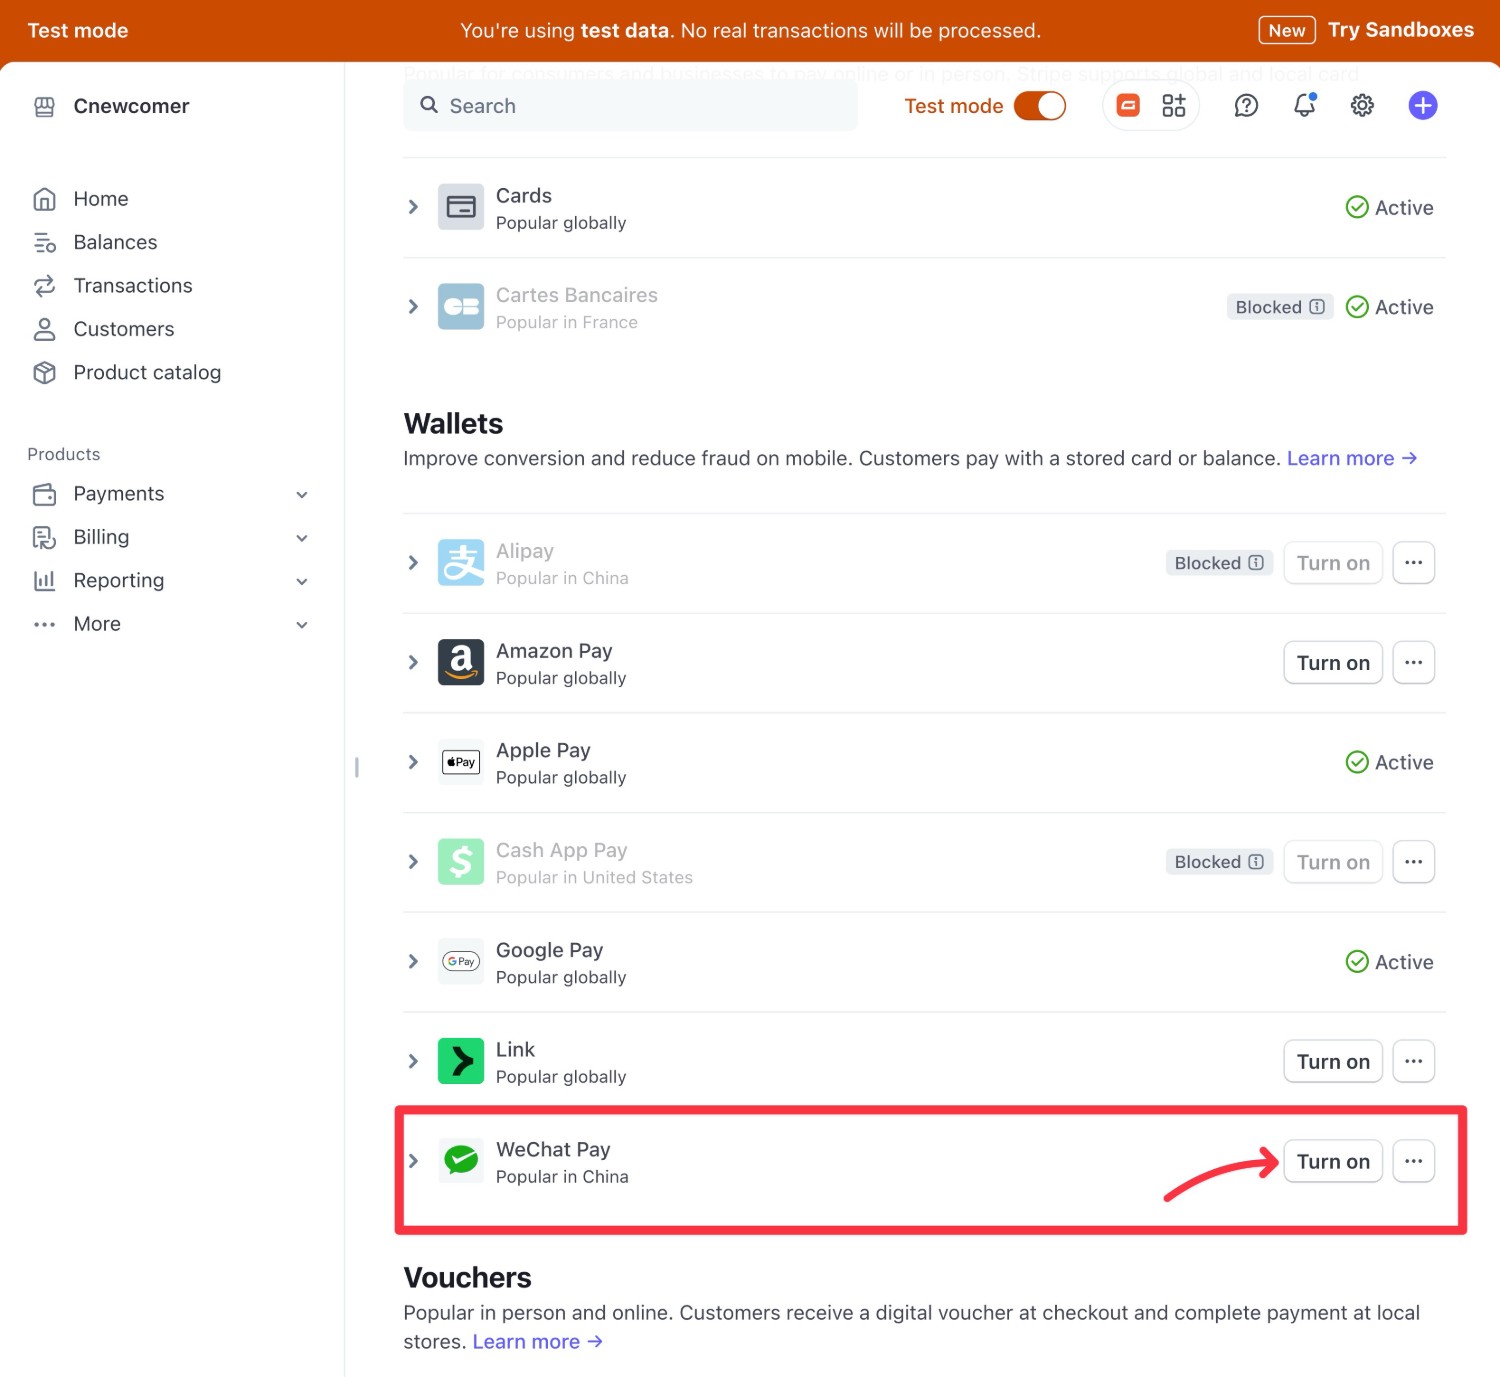
Here’s how to enable WeChat Pay:
- Open the payment methods settings area in Stripe – you can click this link for live mode and this link for test mode.
- Click on the Default drop-down and choose the Default option underneath “Gravity Forms by Rocketgenius” configuration.
- Find the WeChat Pay option – it should be listed under Wallets.
- Click Turn on.
- Verify that you see a green checkmark and an Active text message next to WeChat Pay, which confirms that WeChat Pay will be active for your payment forms.
- Make sure that you’ve enabled WeChat Pay in both Live and Test modes in Stripe.
Here’s how to choose the “Gravity Forms by Rocketgenius” payment methods:
Here’s how to turn on WeChat Pay – remember, you need to turn on WeChat Pay for both Live and Test modes:
If you want to add conditions for when to display WeChat Pay, you can click the three dots icon next to the Active text. With these options, you can…
- Only display WeChat Pay if the total transaction amount meets certain minimum or maximum conditions.
- Only display WeChat Pay for customers in certain regions or countries.
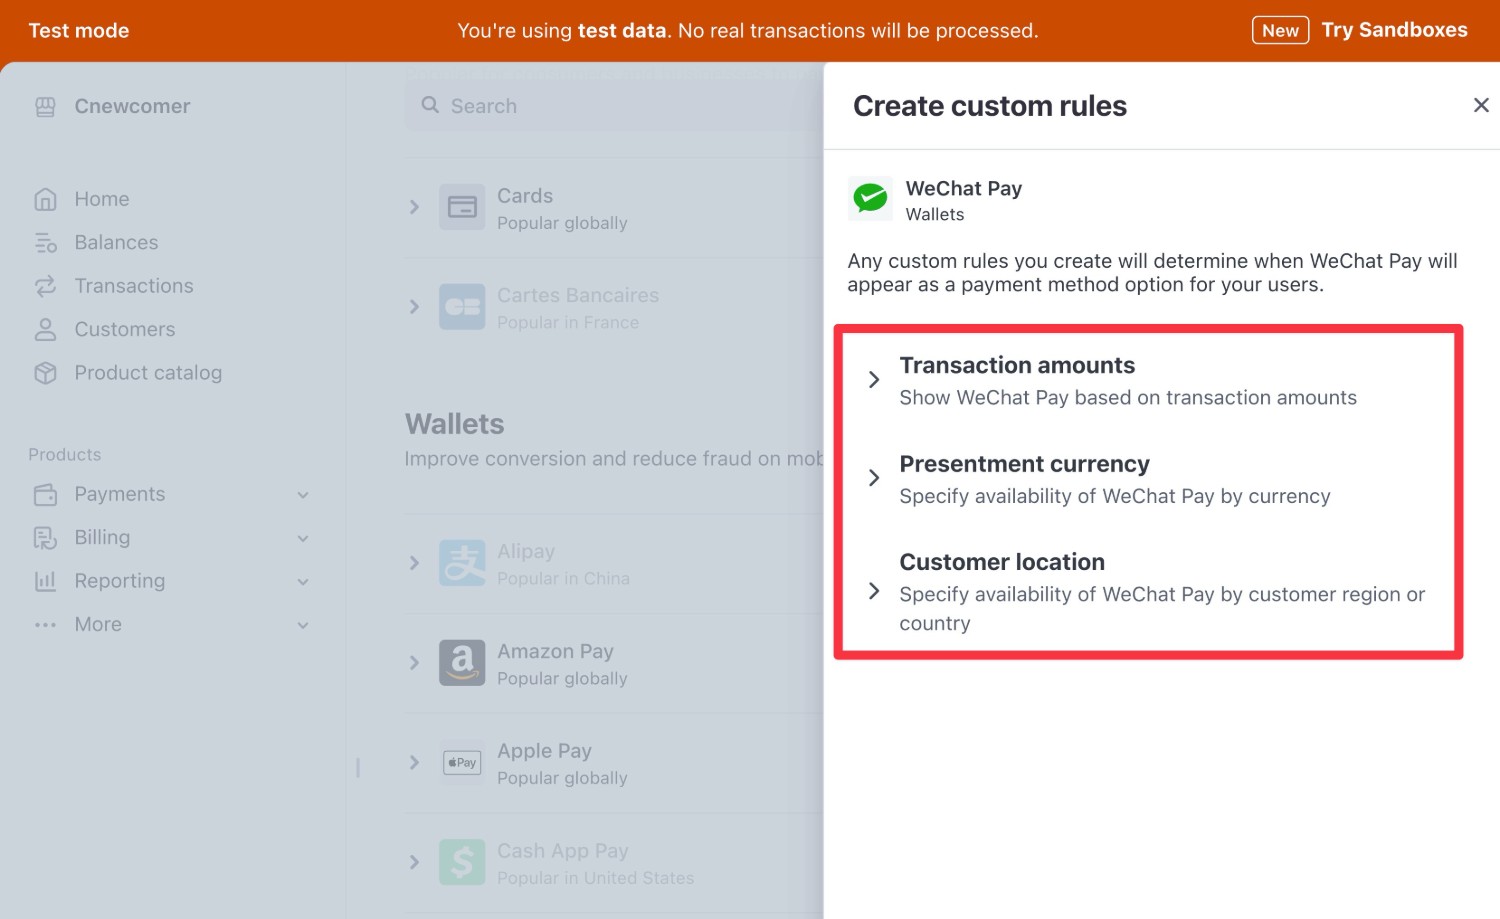
If you want WeChat Pay to be the only payment method on your form, you can also disable the other active payment methods in this interface.
If you leave multiple payment methods active, users will be able to choose from all the methods that apply to them.
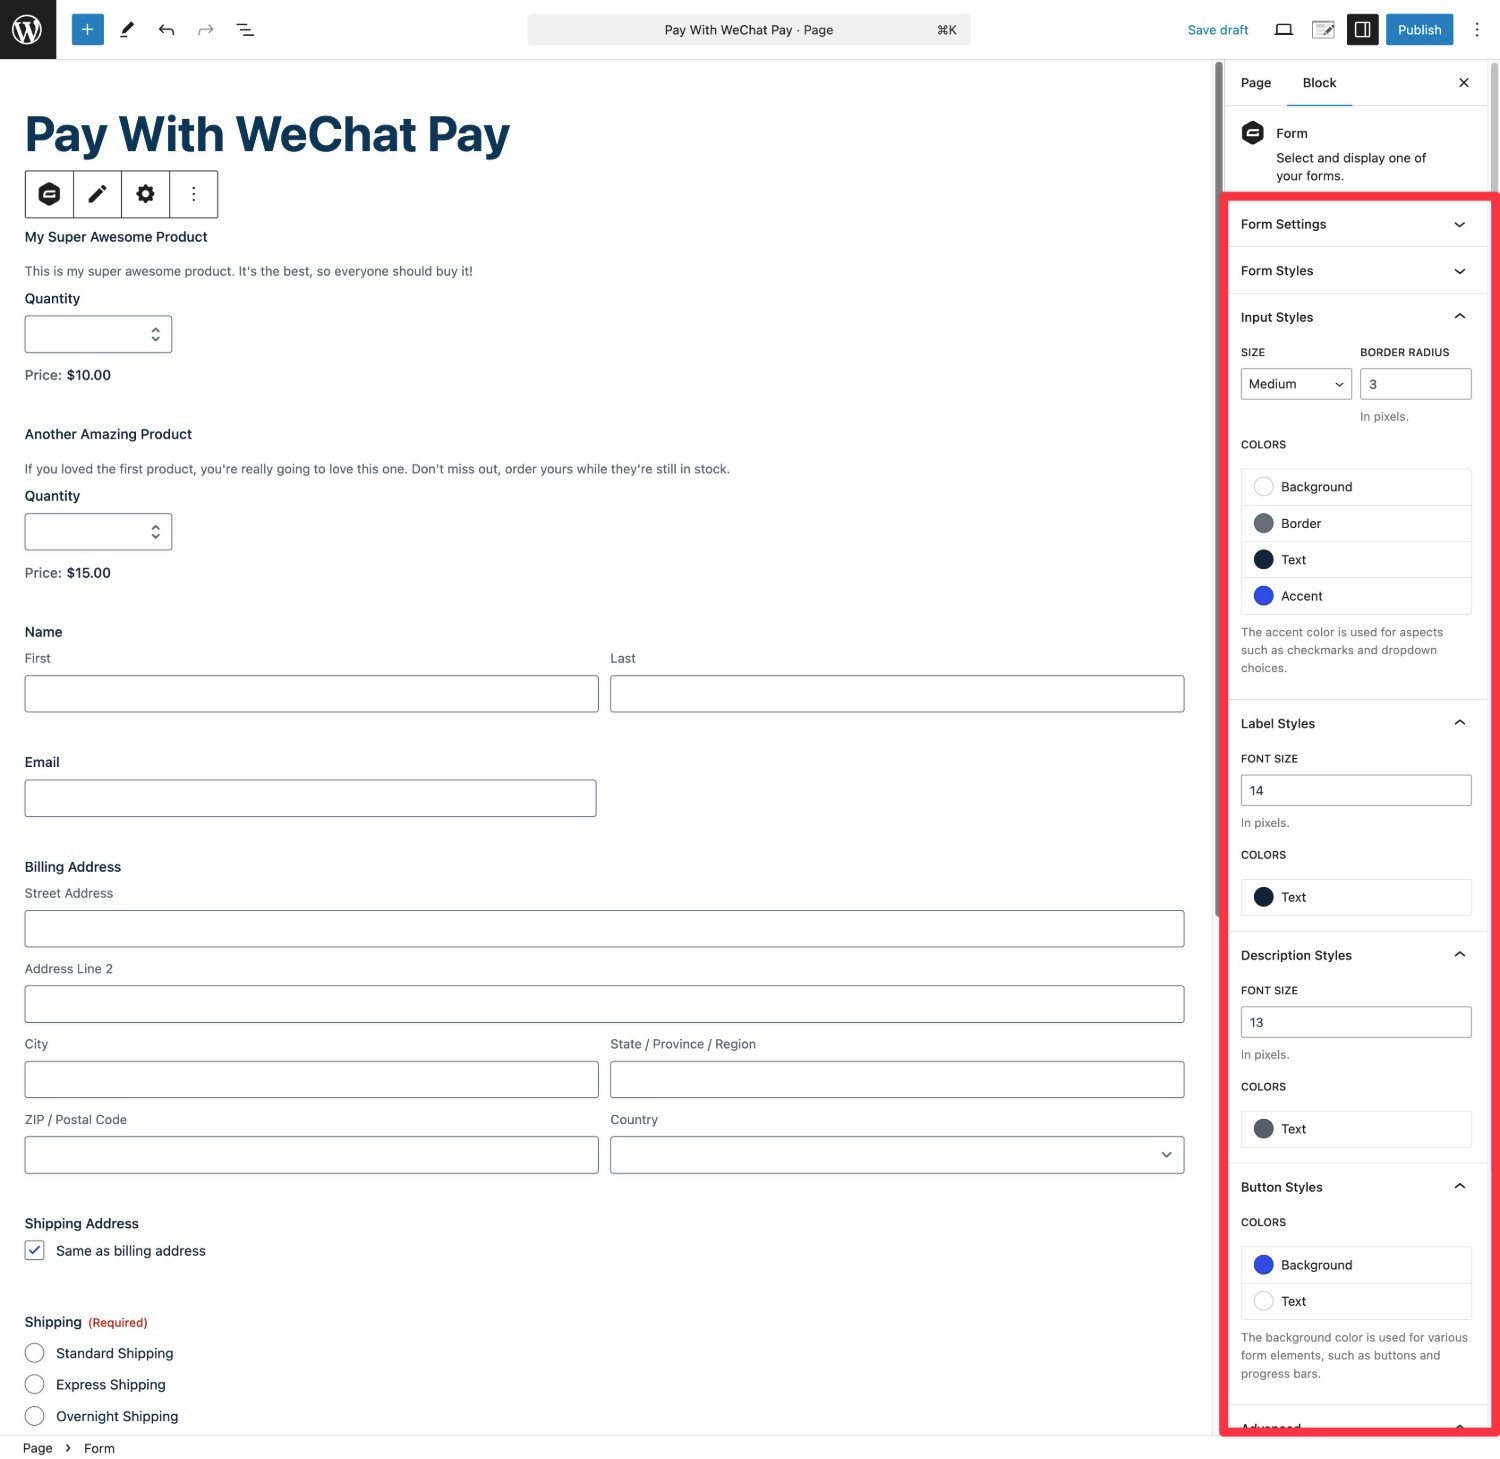
4. Create Your WeChat Pay Payment Form
Now, you’re ready to create your actual WeChat Pay form.
Open your WordPress dashboard and go to Forms → New Form.
For the easiest setup process, we recommend using the premade Stripe Checkout Form template and then customizing it to your needs. This is because it already includes all of the essential fields that you need for a WeChat Pay form.
However, you’re also free to start from a Blank Form if you prefer.

Once you choose your template and give your form a name, you should be automatically taken to the drag-and-drop form builder interface.
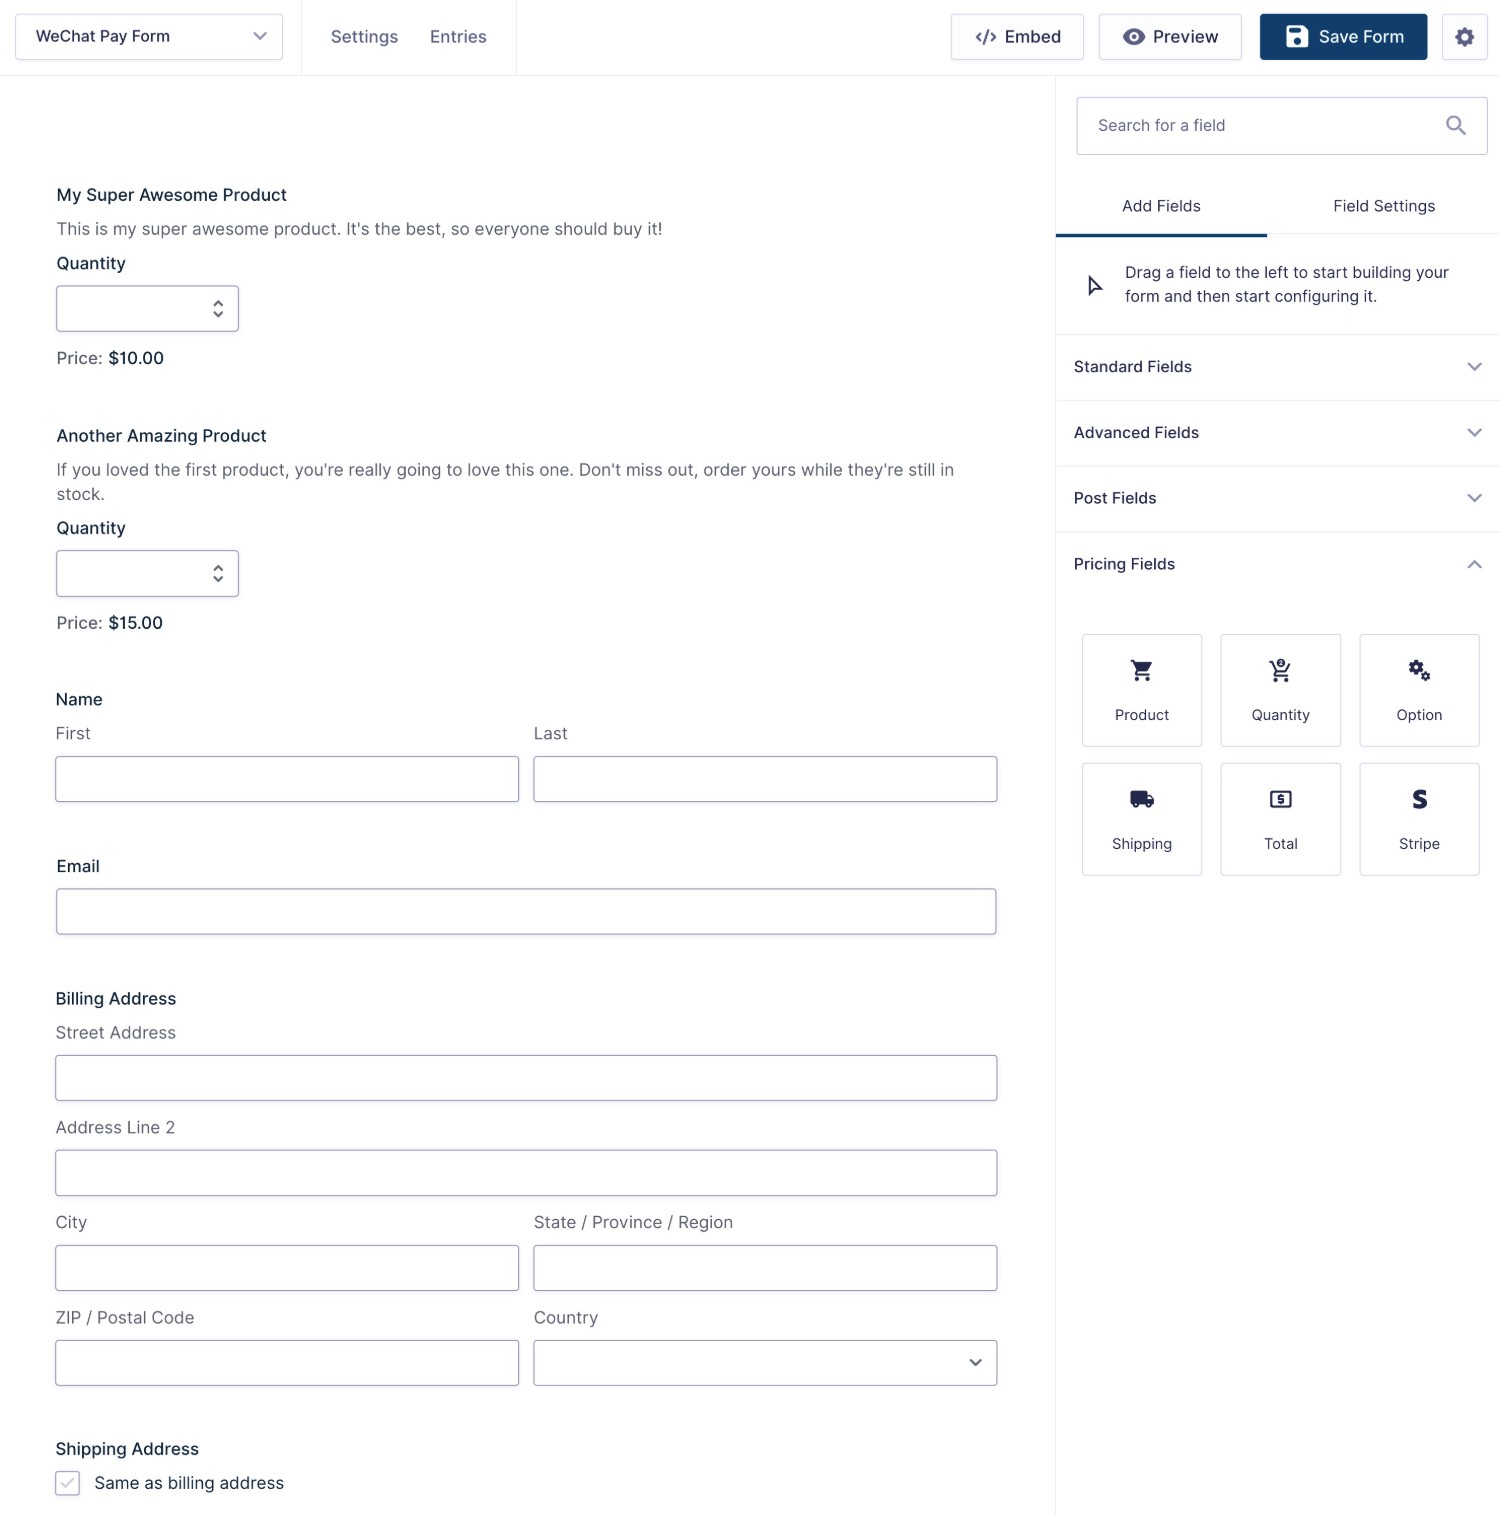
For the most part, you can fully customize the form to your preferences. At a minimum, you’ll need to include these three types of fields:
- General information fields
- Pricing fields
- Stripe field
General Information Fields
You can use general information fields to collect basic information about your customers, including having the option to map this data to Stripe.
At a minimum, you’ll typically want to collect a person’s name, email address, address, etc. These basic fields are already part of the Stripe Checkout Form template because they’re so essential.
However, you can also add additional fields that might be more unique to your use case.
Pricing Fields
Pricing fields let you control the amount that each customer will pay. You could configure your form to have one fixed amount that every single customer pays. Or, you could set it up so that the amount changes based on how each customer fills out the form.
You’ll need to use a few different pricing fields when setting up your form (which are all included in the Stripe Checkout Form template), so we recommend reading the pricing fields documentation if you need help with anything here:
Stripe Field
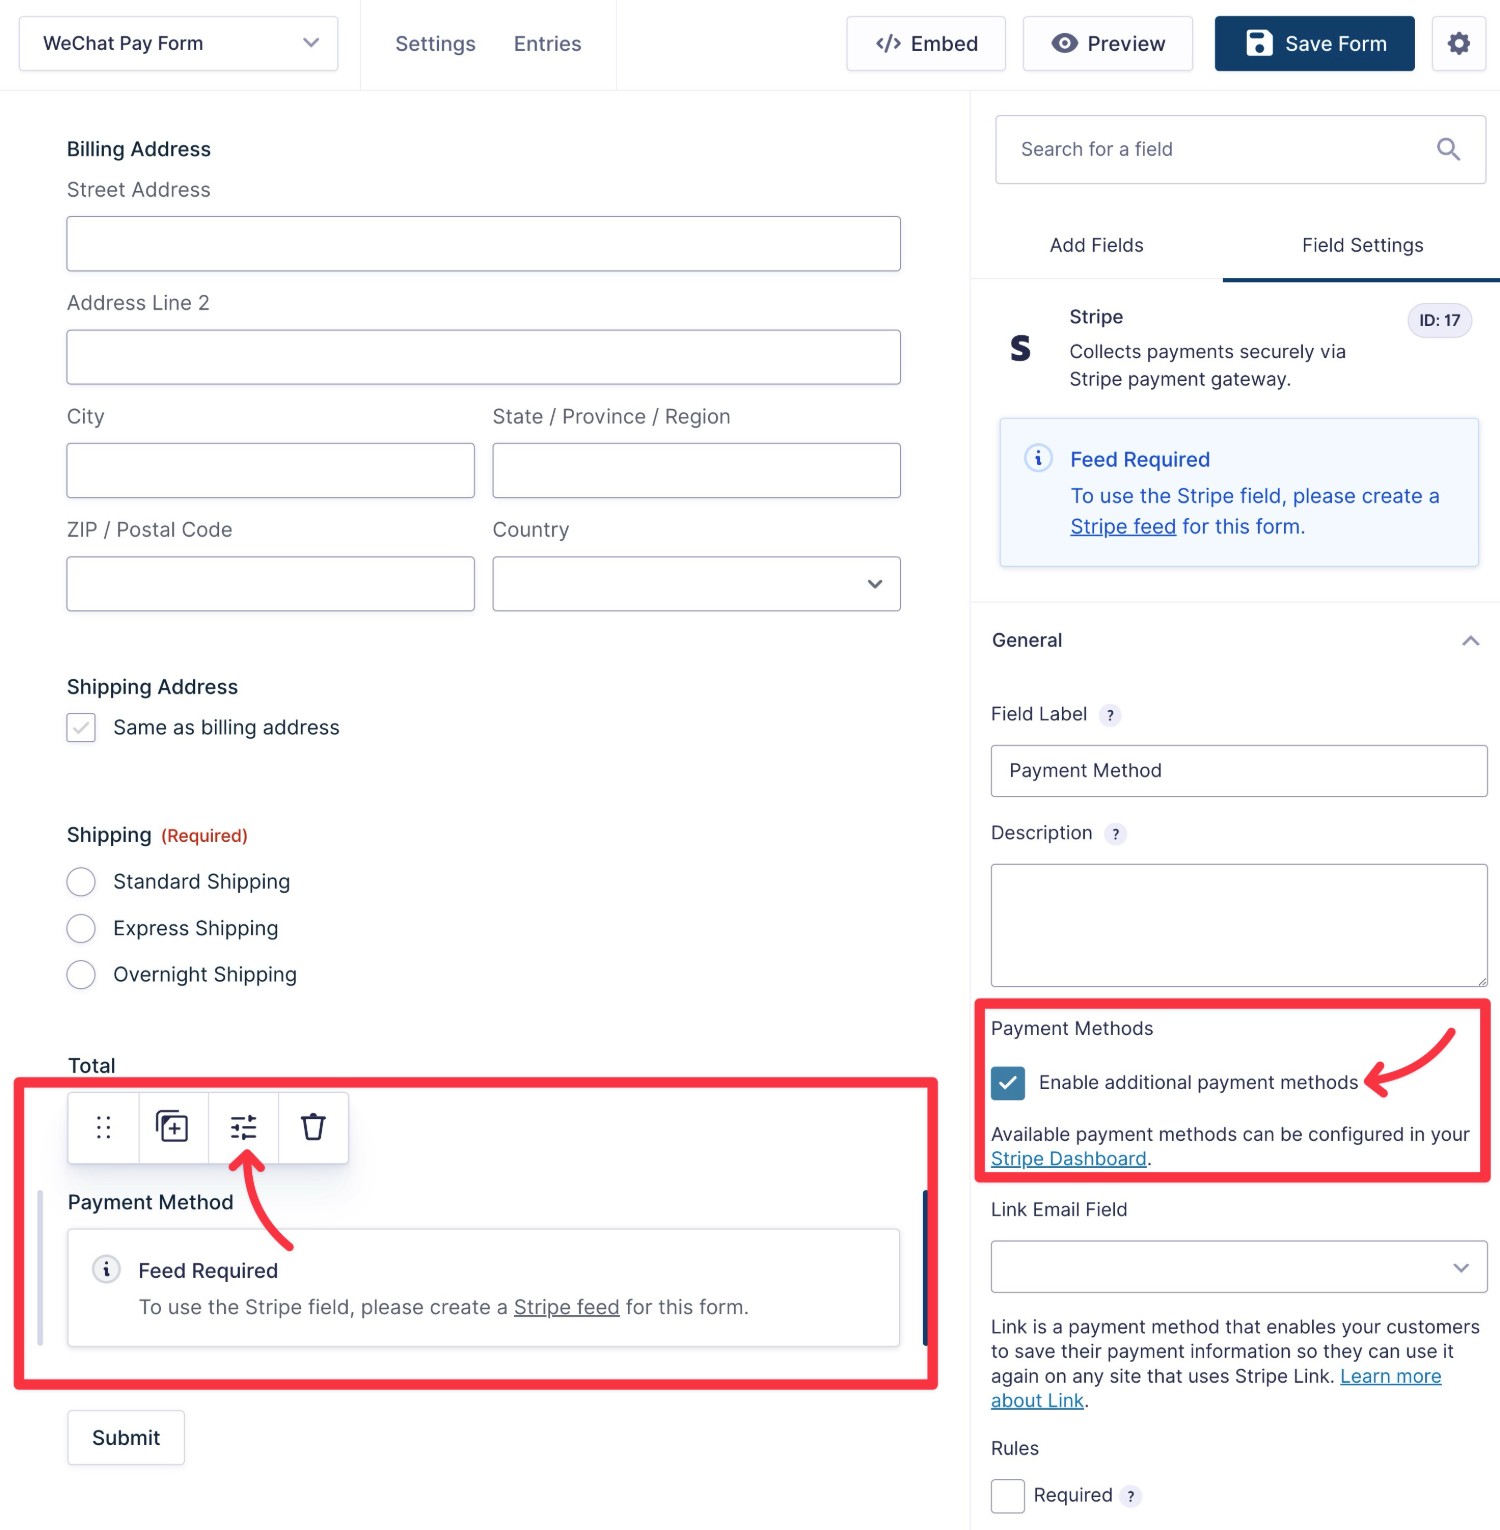
The Stripe field is what allows customers to choose their payment method and make their payments. Typically, you’ll include it at the end of your form.
In its default configuration, the Stripe field will only display an option for credit/debit card payments. To enable WeChat Pay, edit the field’s settings and check the box to Enable Additional Payment Methods.
Note – You will not see a live preview of the Stripe field until you create a Stripe feed, which we’ll cover in the next step in our tutorial.
5. Create a Stripe Feed to Control Payment Processing
To control how to process the payment with Stripe and WeChat Pay, you need to create a “feed” for Stripe. This lets you control the amount to charge customers, how to map form fields to Stripe, and so on.
To create your feed, go to Settings → Stripe in the form editor interface. Then, click Add New to create a Stripe feed.

First, you can choose the Transaction Type, which normally lets you choose between a one-time or recurring payment.
WeChat Pay only supports one-time payments at this time, so you need to create a one-time payment feed to use WeChat Pay. To do that, choose Products and Services as the Transaction Type.
Once you make that choice, you should see some additional options.
First, you can choose the Payment Amount, which is the amount that customers will be charged. For most forms, you’ll set this to the Form Total, but you could choose a different field if you want to.
Below that, you can map data from the fields in your form to Stripe and make a few other selections.
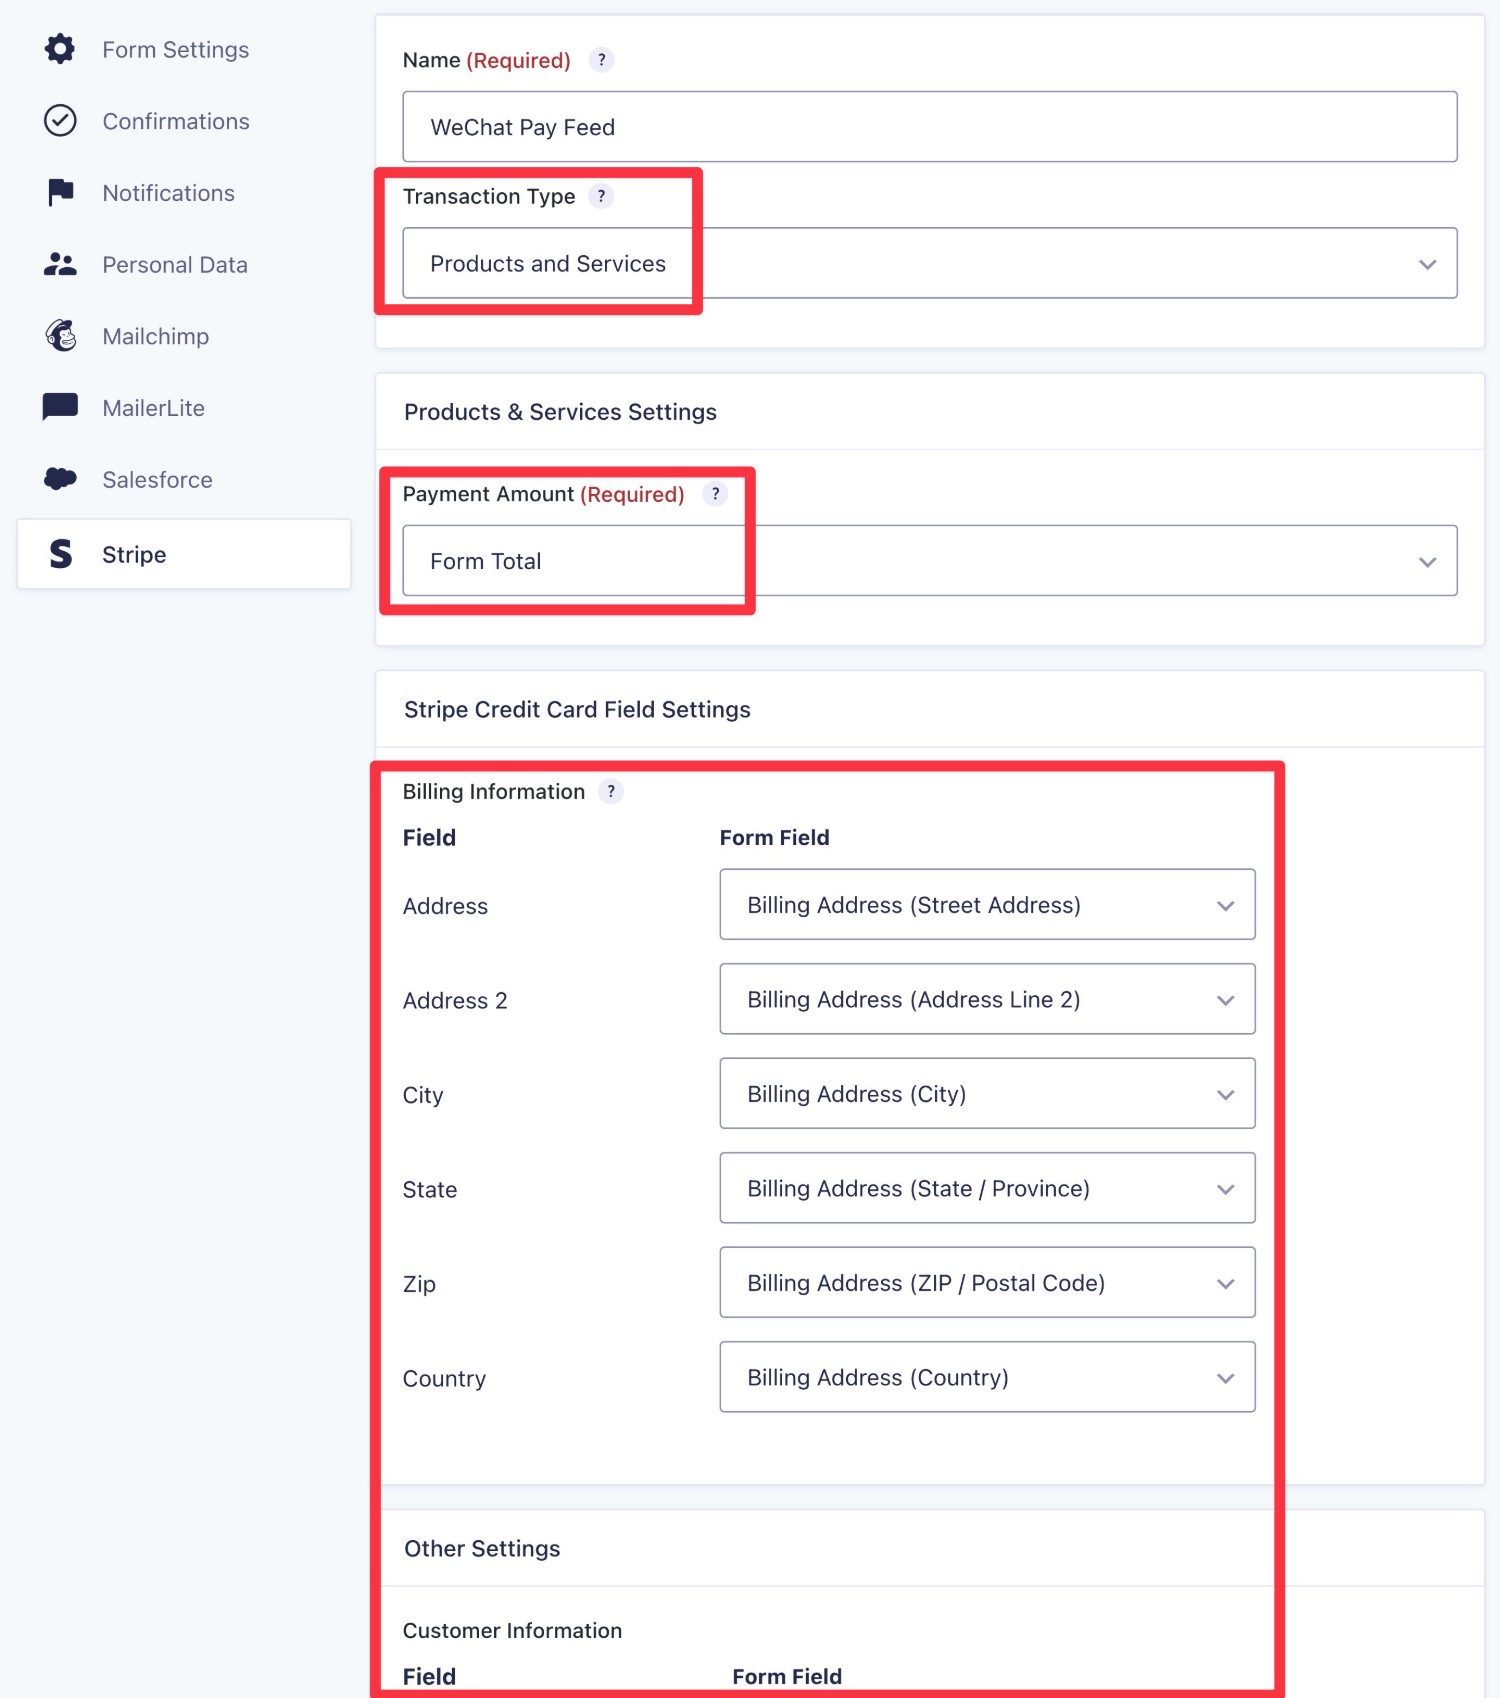
You also have the option to add conditional logic rules, which could be helpful if you want to create multiple feeds and process payments in different ways. However, this is totally optional and for a basic WeChat Pay payment form you do not need any conditional logic.
Once you’ve made your choices, click Save Settings at the bottom.
6. Set Up Other Integrations and Features (Optional)
This step is 100% optional.
One of the great things about using Gravity Forms for your WordPress WeChat Pay form is that you can also take advantage of all the other features and integrations in Gravity Forms.
You can browse all of the Gravity Forms add-ons to see your options, but here are a few integrations that you might want to set up for a WeChat Pay payment form:
- Add the person’s details to your customer relationship manager (CRM) after they make a payment, including the option to add a certain tag.
- Give people an option that lets them subscribe to your email newsletter as part of making their payment.
- Trigger an automation in other software using Zapier or webhooks, which lets you connect your WeChat Pay form to pretty much any service.
If you want to set up any other add-ons, the process typically works like this:
- Install the relevant add-on.
- Open the add-on’s settings to connect your site to that service.
- Create a feed for that service in your WeChat Pay payment form.
7. Embed Your Form and Make Some Test Payments
At this point, you’re pretty much finished configuring your form.
Now, you can embed it on the frontend of your site and submit some test payments to make sure that everything is working as you want it to.
You can embed your form anywhere on your site using the Gravity Forms block, shortcode, or PHP function. If you use the block, you’ll also be able to style your form directly from the editor using the Orbital form theme.
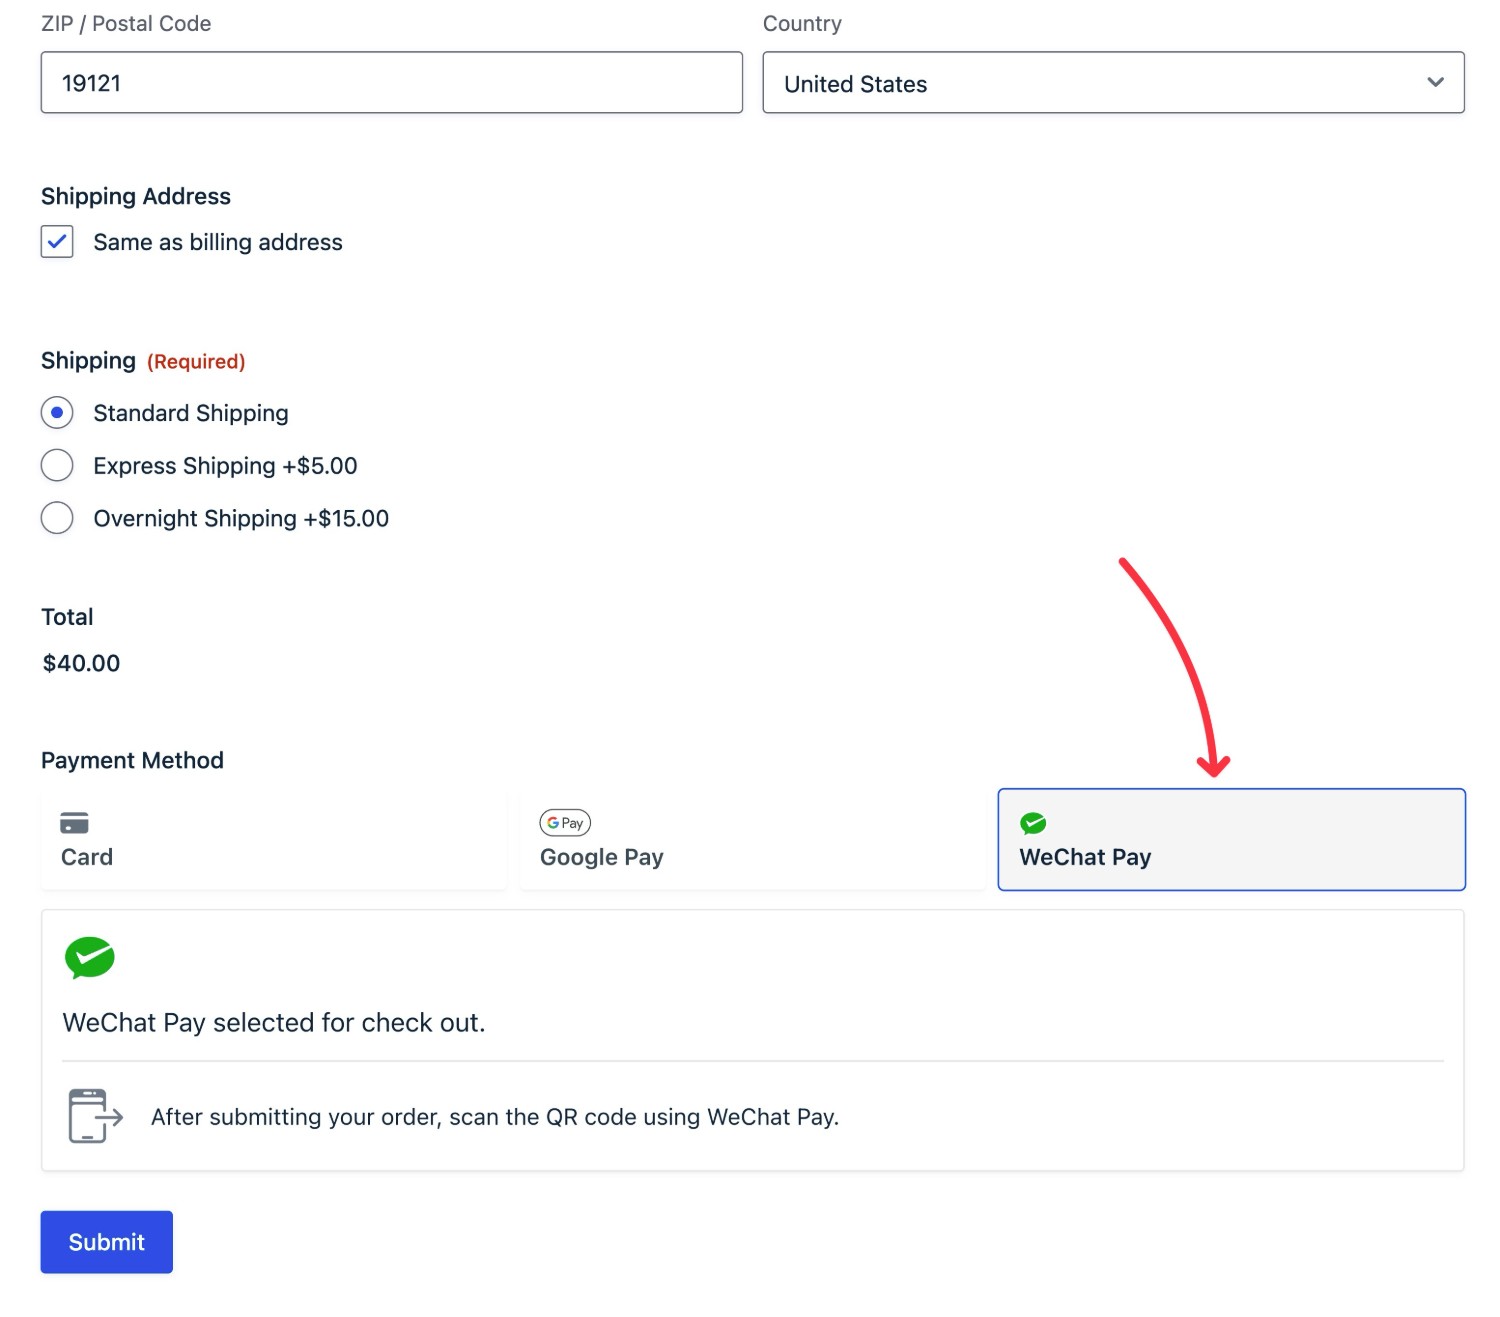
Once you’ve embedded your form, you can fill it out and submit a test payment using WeChat Pay.
You should see WeChat Pay appear as a payment option, along with any other payment methods that you’ve chosen to enable in Stripe.
After submitting the form, you should see a simulated QR code.
For a live payment, customers would need to open WeChat Pay in their app and then scan the code. But for a test payment, you can just click Simulate scan.
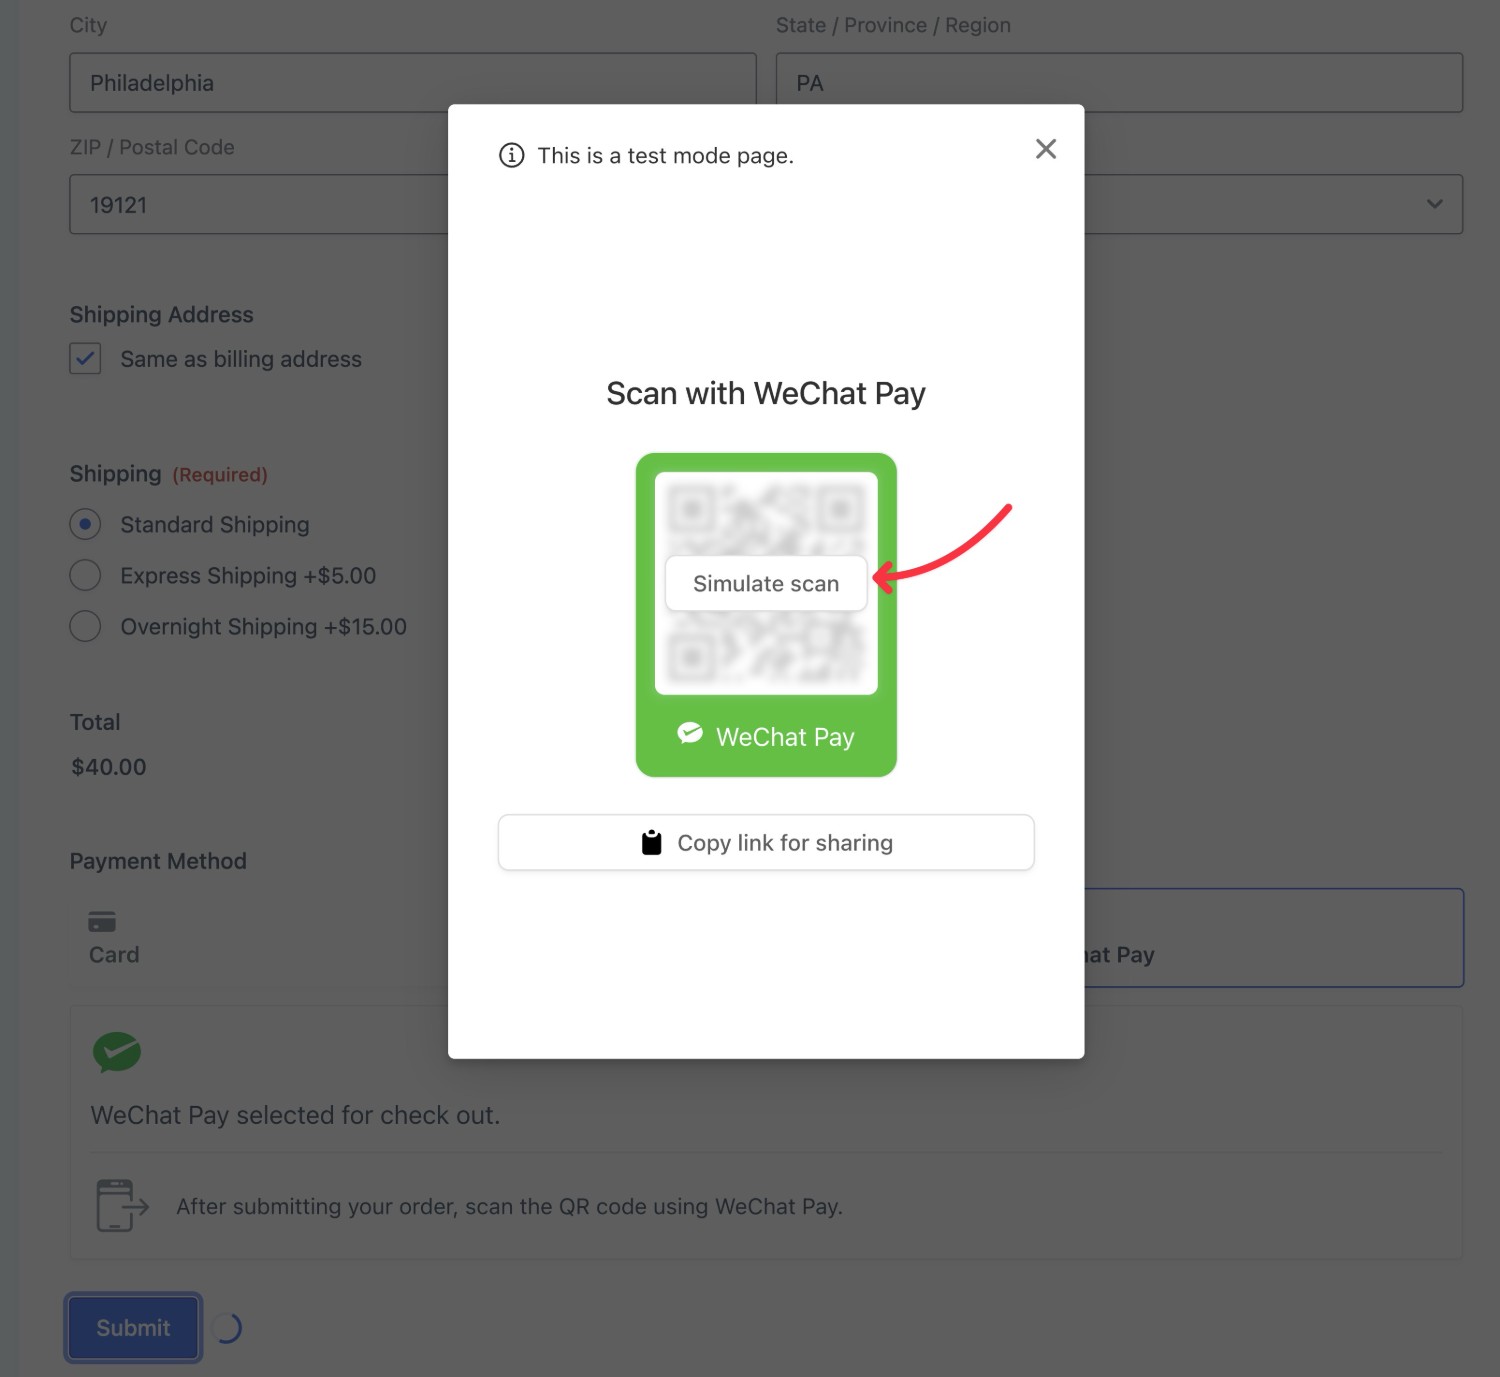
After simulating the scan, you can choose Authorize Test Payment to finalize your test payment.
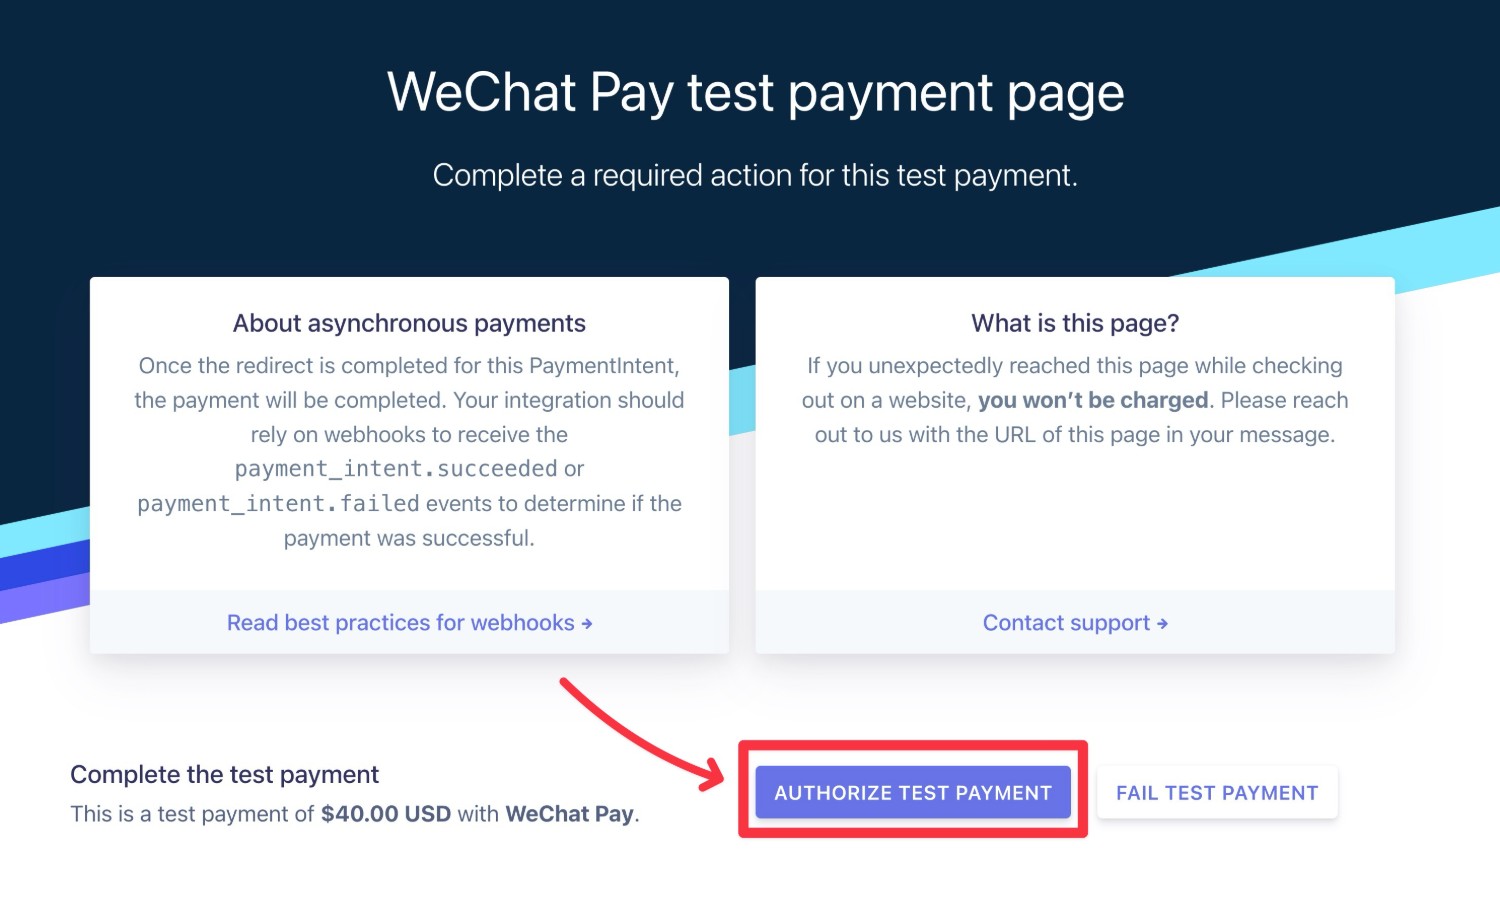
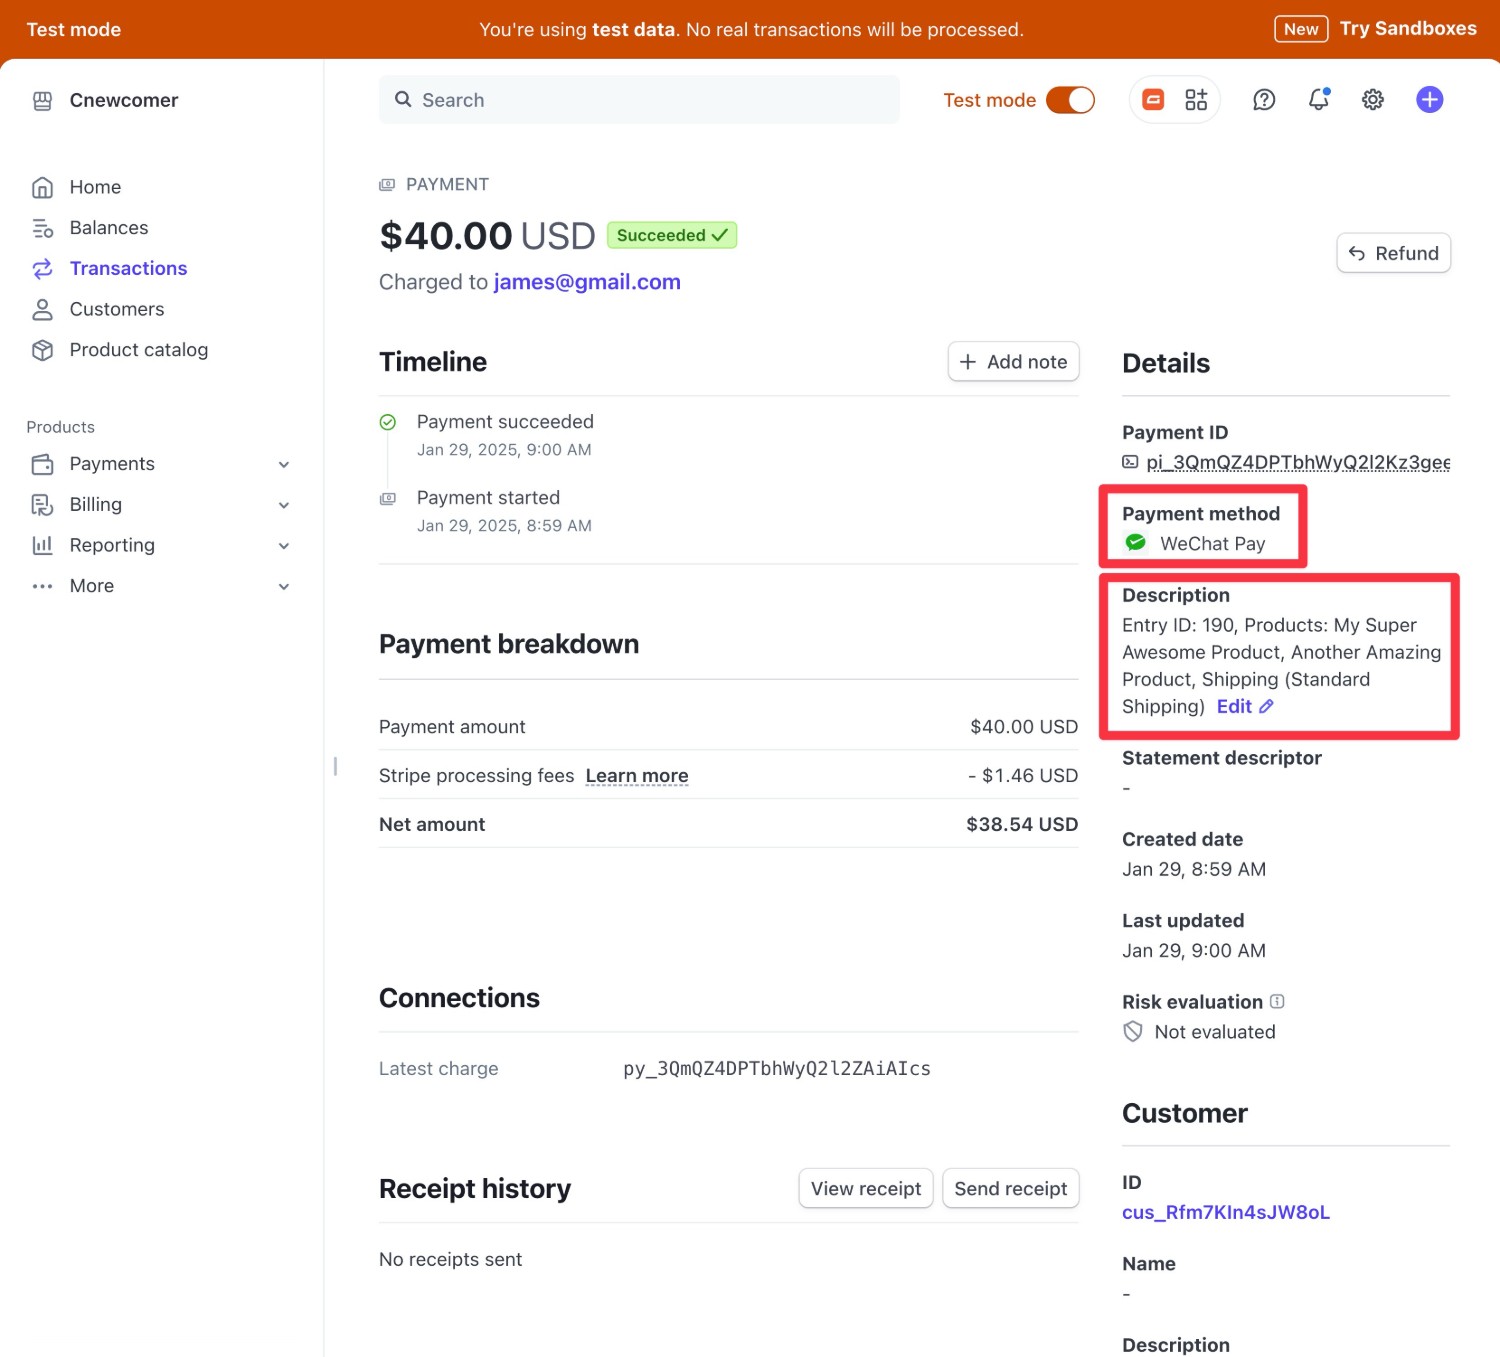
You should then see your payment appear in your Stripe Test dashboard along with in your Gravity Forms entries for this form.
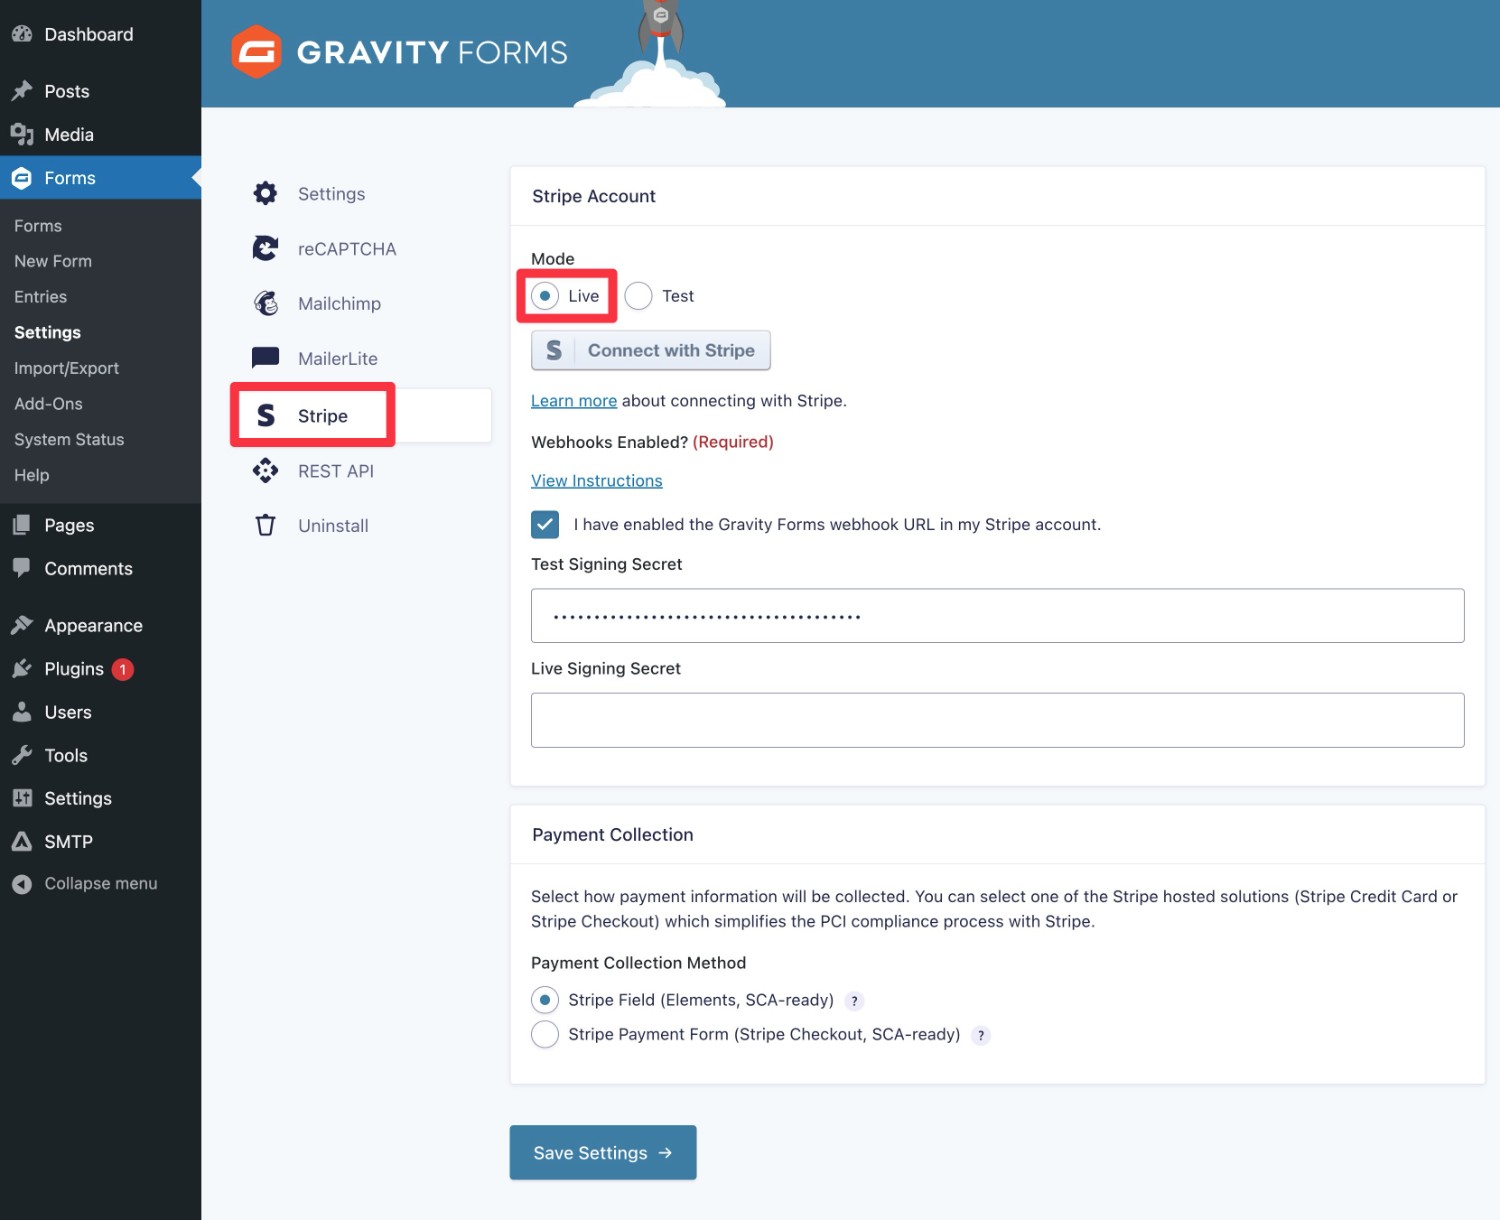
8. Enable Live Mode to Accept Real WeChat Pay Payments
Once you’ve submitted a test payment to verify that everything is working as you want it to, the last step in the process is to enable live payment processing.
To do this, you’ll essentially repeat the same steps from Step #2 in this tutorial. The only difference is that you’ll do them for Live mode instead of Test mode.
- Go to Forms → Settings → Stripe in your WordPress dashboard.
- Change the radio button from Test to Live.
- Click Connect with Stripe to authenticate with your live Stripe account.
- Add the Gravity Forms webhook URL to the live version of your Stripe dashboard using Workbench.
- Copy the live signing secret key from the Stripe dashboard and paste it into the Live Signing Secret box in the Gravity Forms settings.
- Save everything.
Once you enable Live mode, your WordPress site will start processing real payments with WeChat Pay.
Create Your First WordPress WeChat Pay Form Today
While WeChat Pay is most popular in China, it’s now used all around the world and offers a relatively affordable and low-fraud way to accept payments. It’s also convenient for users because all they need to do is scan a QR code with their app to authenticate a payment.
With Gravity Forms and Stripe, you can easily create your own customizable WordPress WeChat Pay payment form. You could use WeChat Pay as the exclusive payment method or you could offer it as one option among other payment methods.
If you want to get started with your first WeChat Pay form, purchase a Gravity Forms Pro, Elite, or Nonprofit license today and then follow this guide to get up and running.

If you want to keep up-to-date with what’s happening on the blog sign up for the Gravity Forms newsletter!