
If you’re considering using WordPress and Square to accept online payments, this post is going to cover everything that you need to know, including how to create an actual WordPress payment form powered by Square.
We’ll start with a quick introduction to Square and why it works well for WordPress payments. Then, we’ll cover how the Gravity Forms plugin can help you integrate WordPress and Square and show you step-by-step how to create your own WordPress Square payment form.
Let’s get started…
Key takeaways
- Square enables WordPress sites to accept credit and debit card payments with no monthly fees or chargeback penalties.
- The Gravity Forms Square Add-On supports one-time payments, recurring subscriptions, donations, and memberships.
- Conditional logic and multi-feed setup in Gravity Forms provide flexible payment options, such as one-time or recurring donations.
- Square also offers POS systems, invoicing, loyalty programs, scheduling, and banking services for a complete business solution.
- Exclusive Gravity Forms promotion: free processing on your first $5,000 in transactions within 180 days plus $20 off Square hardware.
Square Promotion – Free Processing
Gravity Forms and Square have teamed up to offer an exclusive promotion for new Square customers — enjoy free processing fees for up to 180 days!
Here’s how it works:
- Free Payment Processing – Get $5,000 in credit card transactions processed for free within your first 180 days. After that, standard Square fees apply.
- $20 Off Square Hardware – Receive a $20 discount on Square hardware once you sign up.
To take advantage of this promotion, simply sign up for a Square account using this link and start processing payments with no extra fees.
Why Use Square for WordPress Payments?
At a basic level, Square offers a user-friendly solution for accepting credit or debit card payments on your WordPress site.
Thanks to its simple integration process with Gravity Forms, you can connect WordPress and Square with just a few clicks, which makes it a great option for people of all technical backgrounds.
At the same time, you don’t need to sacrifice functionality. Here are some of the main reasons to use Square for WordPress payments:
- Support for one-time payments and subscriptions – This means you can accept whatever type of payments your business needs.
- Competitive processing fee rates – Square charges 2.9% + $0.30 per transaction (at time of writing) for online card payments in the USA, which is the same or better than a lot of other competitors.
- Broad card support – Square works with all US-issued cards and most international cards, including Visa, MasterCard, American Express, Discover, JCB, and UnionPay.
- Support for 8+ countries – In addition to the USA, Square is also available in Canada, the UK, Australia, Japan, Ireland, France, and Spain. You can also accept online payments from other countries – Square will charge customers in your location’s official currency.
- No chargeback/disputed payment fees – Most other payment processors will charge you a nonrefundable $15-$20 fee regardless of the outcome of the dispute. Square does not currently collect a chargeback fee, which means you won’t get penalized if a person abuses the chargeback process.
- No monthly fees – Square doesn’t charge any monthly account fee for accepting online payments. Square does have monthly plans for some of its small business tools, but you don’t need one of these plans just to accept online payments.

Square Isn’t Just for Online WordPress Payments
Another nice thing about using Square for your WordPress site’s payments is that Square can also do a lot more than just processing payments for your website.
First off, Square has a robust set of in-person payment solutions, including lightweight mobile card reader systems and full point-of-sale systems (which you’ve probably encountered at your local restaurant or coffee shop if you’re in one of Square’s supported countries).
Of the different payment processors that Gravity Forms supports, Square probably has the strongest in-person payment solutions. This can make it a great solution if you want to accept payments both in-person and via your WordPress site.
Beyond that, Square offers plenty of other solutions to help your business, including the following:
- Invoices – You can also invoice people directly in addition to having people pay via your WordPress forms.
- Loyalty programs and gift cards – Square can help you create a loyalty program for your business and also offer physical or digital gift cards, all of which can help you implement various marketing strategies.
- Scheduling/appointment management – You can manage schedules/availability, book appointments, accept payments, and more.
- Banking services – Square has its own banking services for business checking and savings accounts. Using these plans lets you access your money immediately (though you can also easily transfer your money to separate accounts).
Why Use Gravity Forms With WordPress and Square?
If you want to pair WordPress and Square together for online payments, Gravity Forms is a great solution for connecting everything. Gravity Forms offers its own Square Add-On that lets you easily accept payments via any of the forms that you create with Gravity Forms.
Here are some of the key features that you can access with the Gravity Forms Square Add-On:
- One-time payments – Accept one-time payments for the amount of any pricing field in your form.
- Subscription payments – Set up automatic recurring subscriptions on a customizable billing cycle (e.g. daily, weekly, or monthly). You can have the subscriptions automatically recur until canceled or you can set a maximum number of billing cycles after which it will stop (great for payment plans).
- In-dashboard refunds – Refund a customer’s payment directly from your WordPress dashboard.
- Authorize and capture – Authorize a person’s card when they submit the form but wait to actually capture the money until you click a button.
The Gravity Forms Square Add-On also offers a very simple setup process. If you already have a Square account, you can connect Gravity Forms to Square in minutes with just a few clicks.
As mentioned, Gravity Forms and Square have also teamed up to offer some special promotions for new Square users who sign up using this link, which we’ll discuss below.
Example Use Cases for Gravity Forms and Square
With Gravity Forms and Square, you can handle a variety of common use cases. Here are some examples:
- Physical or digital product sales – Create a form to act as a lightweight eCommerce solution.
- Subscriptions – Set up automatic recurring subscriptions for products, service retainers, and more.
- Donations – Accept one-time or recurring donations, including giving donors the option to choose which type of donation to make from the same form. We have a guide on creating a monthly donation form that uses Square.
- Membership websites – Charge users a one-time or recurring fee to create an account on your website.
- Service payments – Accept payments for online or in-person services.
- Booking – Create a form that lets users complete your booking process and accept payment as part of that form.
This is not a complete list – there are also tons of other unique ways in which you can use WordPress and Square with Gravity Forms.
How to Create a WordPress Square Payment Form With Gravity Forms
If you’re convinced that Square is the right option for your WordPress site, you’ve arrived at the fun part – how to create your first WordPress payment form powered by Gravity Forms and Square.
You do not need any special technical knowledge to set this up – just follow along and we’ll take you through every step.
1. Sign Up for Square
Before jumping into Gravity Forms and WordPress, you’ll first need to register for your Square account, if you haven’t already done so.
If you haven’t registered for Square yet, you can take advantage of a special promotion from Gravity Forms and Square.
To recap, if you register for your Square account using this link, you’ll get a special bonus:
- Free payment processing for your first $5,000 of credit card payments within the first 180 days.
- $20 off any Square hardware that you purchase for in-person payments.
2. Install Gravity Forms and the Square Add-On
Once you have your Square account, you can shift over to your WordPress site.
First, install the core Gravity Forms plugin along with the Square Add-On.
You can access the Gravity Forms Square Add-On with the Pro, Elite, or Nonprofit licenses. If you’re not holding one of those licenses yet, you can purchase your license here or upgrade your existing Basic license and only pay the prorated difference.
When you install the core plugin, Gravity Forms launches a short setup wizard to help you configure some important basics, including the Default Currency, which will be used for your Square payment forms. If you ever need to change this, you can go to Forms → Settings.
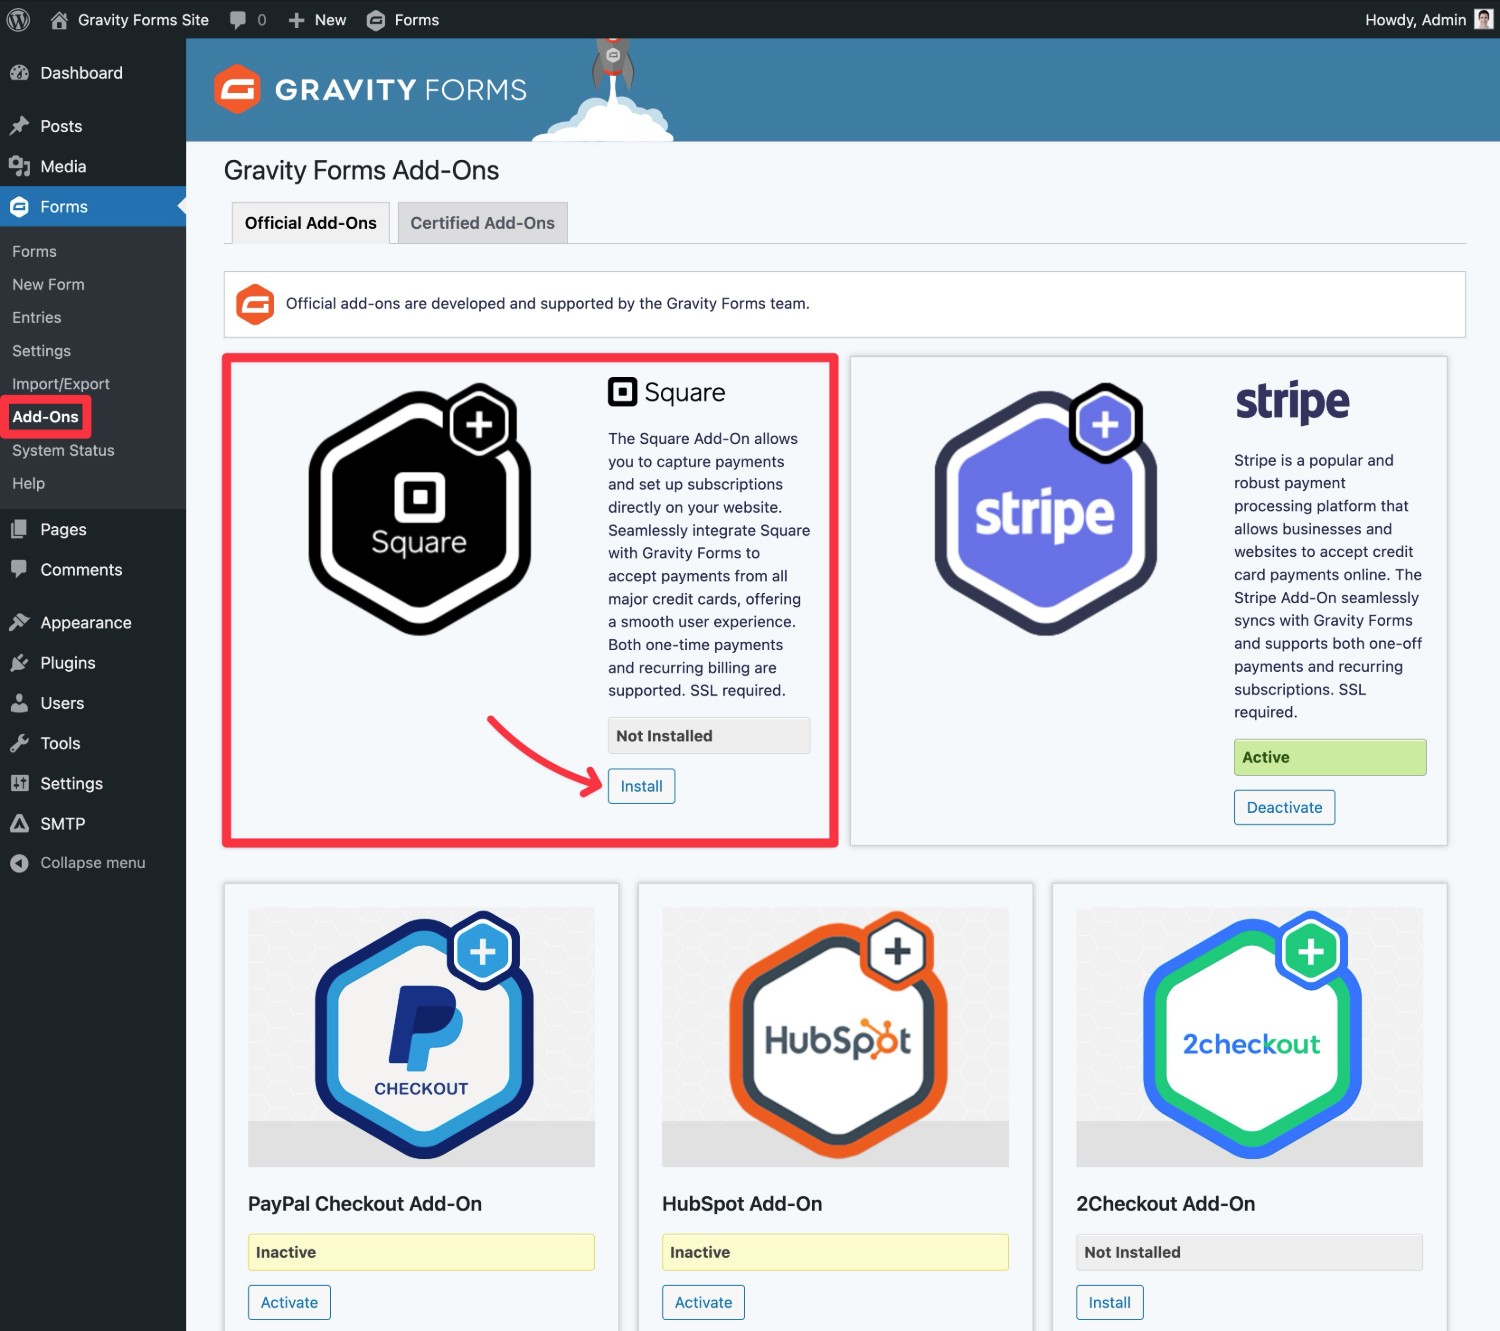
Once you’ve installed the core Gravity Forms plugin and added your license key, here’s how to install the Square Add-On:
- Go to Forms → Add-Ons.
- Find the Square add-on in the list.
- Click Install.
- Once the installation finishes, make sure to Activate the add-on on your site.
3. Connect Gravity Forms to Square
Now, you need to set up the connection between Gravity Forms and your Square account.
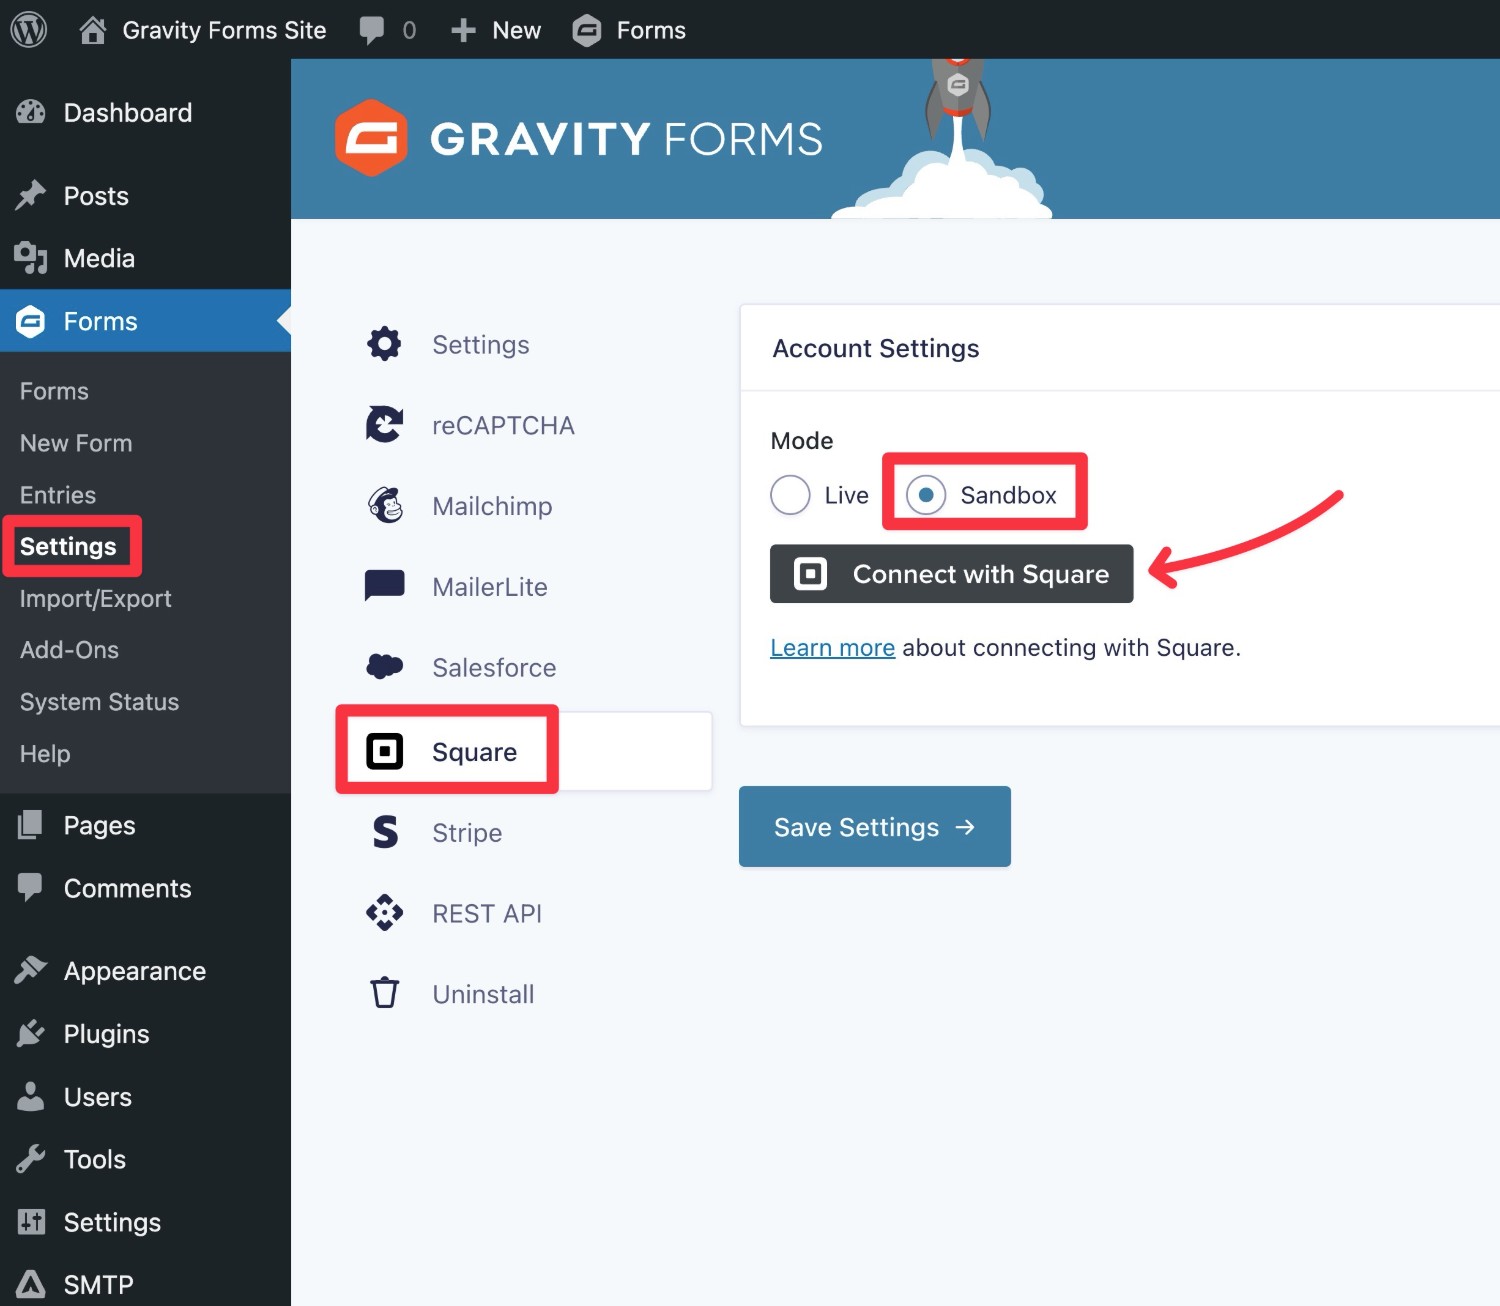
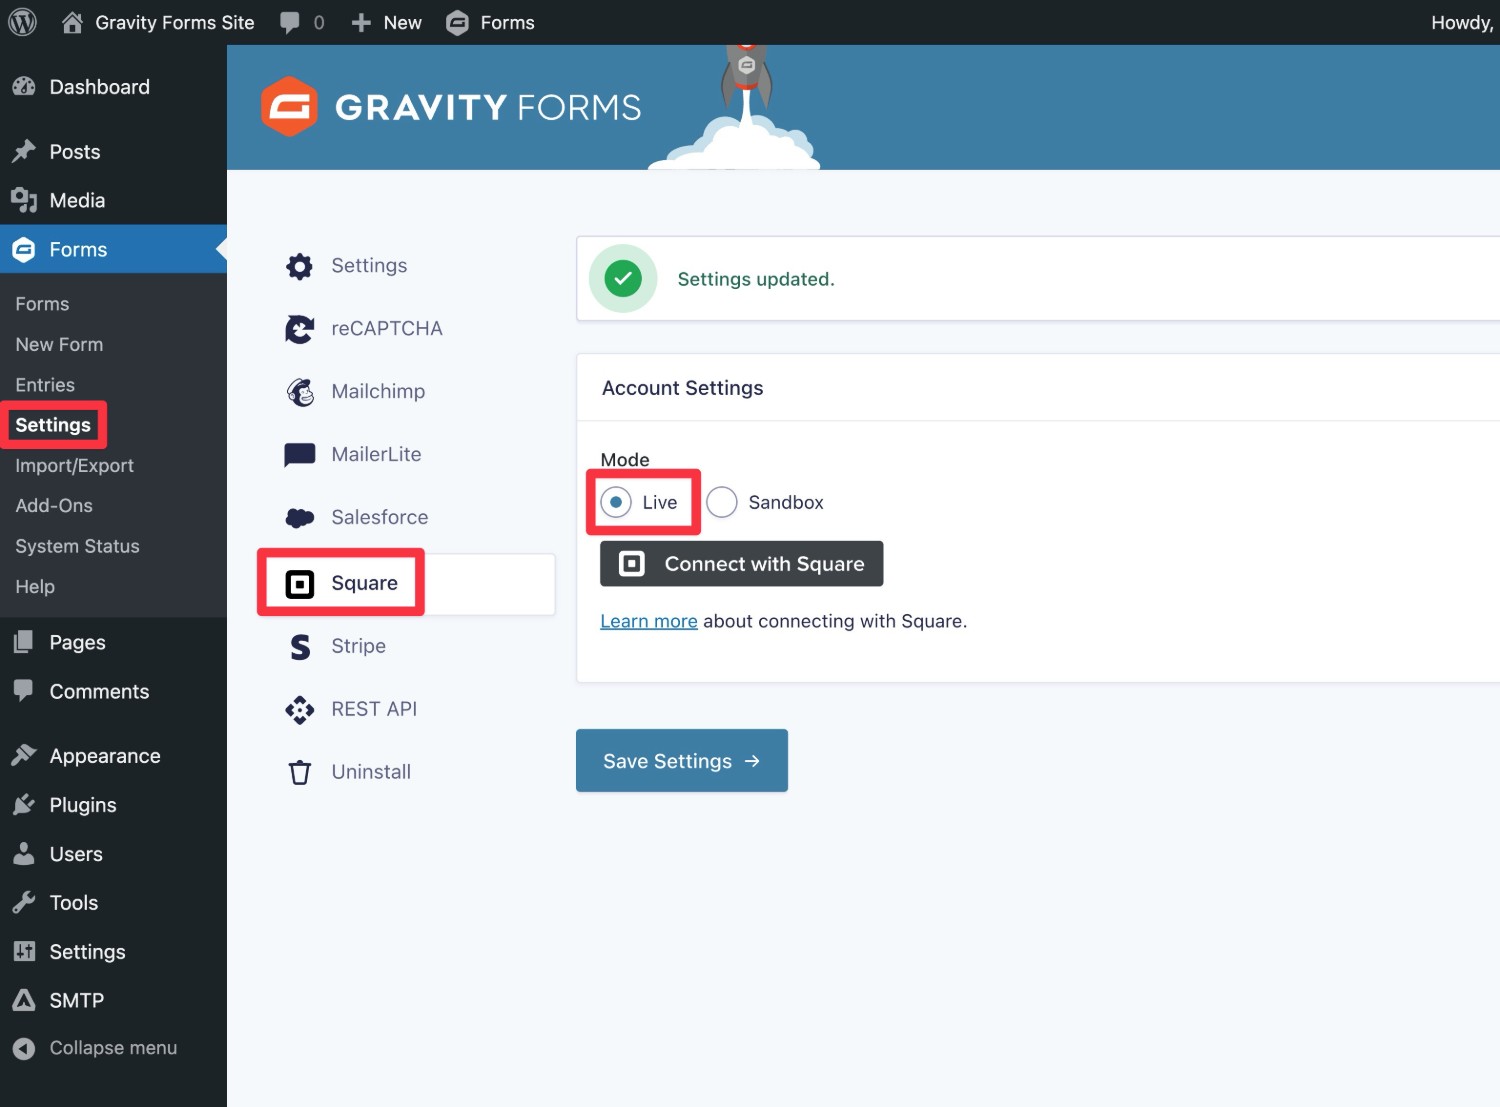
Go to Forms → Settings → Square in your WordPress dashboard to get started.
If you’re setting up your first WordPress Square payment form, we recommend starting by connecting in Sandbox mode. This will allow you to submit test payments using dummy payment information.
Once you’ve tested your form, all you need to do is enable live mode to start accepting real payments.
To connect in test mode, choose the Sandbox radio button and then click Connect with Square.
This should open the Square website and then redirect you back to your WordPress dashboard. However, if you’re connecting in Sandbox mode, you might see a blank screen or some type of error message.
If you’re seeing a blank screen or an error message, here’s how to fix it:
- Click this link to open the Square Developer dashboard in a new tab.
- In that tab, click Open (the button next to Default Test Account). This should take you to a URL that looks like this: https://app.squareupsandbox.com/dashboard/
- Leave this tab open in your browser.
- Go back to your WordPress site’s dashboard (in another tab) and click Connect with Square again.
After doing this, you should see a message saying “Connected to Square as: Default Test Account”.
To finish things out, make sure to click the Save Settings button.

4. Create Your Payment Form
Now that you’ve connected Gravity Forms to Square, you’re ready to create your first WordPress Square payment form.
To begin, go to Forms → New Form in your WordPress dashboard.
You can then choose between starting from a blank canvas or using one of the premade templates.
You could create a dedicated payment form that’s exclusively focused on payments. Or, you could add payment functionality to another type of form. For example, if you have a membership website, you could create one single form that both processes a payment via Square and creates a WordPress user account for the person.
For the fastest way to create a dedicated payment form, you can use the premade eCommerce form template, which already includes most of the essential fields that you need for a payment form. Even if you use the template, you’ll still be able to fully customize every single field on your form.

Once you choose your starting template and give your form a name, you should be taken to the visual, drag-and-drop form builder interface.
Here, you can configure your payment form pretty much however you like. However, you’ll generally want to use a few different types of fields for a Square payment form:
- General information fields
- Pricing fields
- Square field
Let’s go through them…
General Information Fields
In addition to payment and pricing details, you’ll probably want to collect some general information about your customer.
At a minimum, you’ll need their billing details, such as their name, email address, physical address, and phone number. You can store all of this information for your own records and also map these fields to Square.
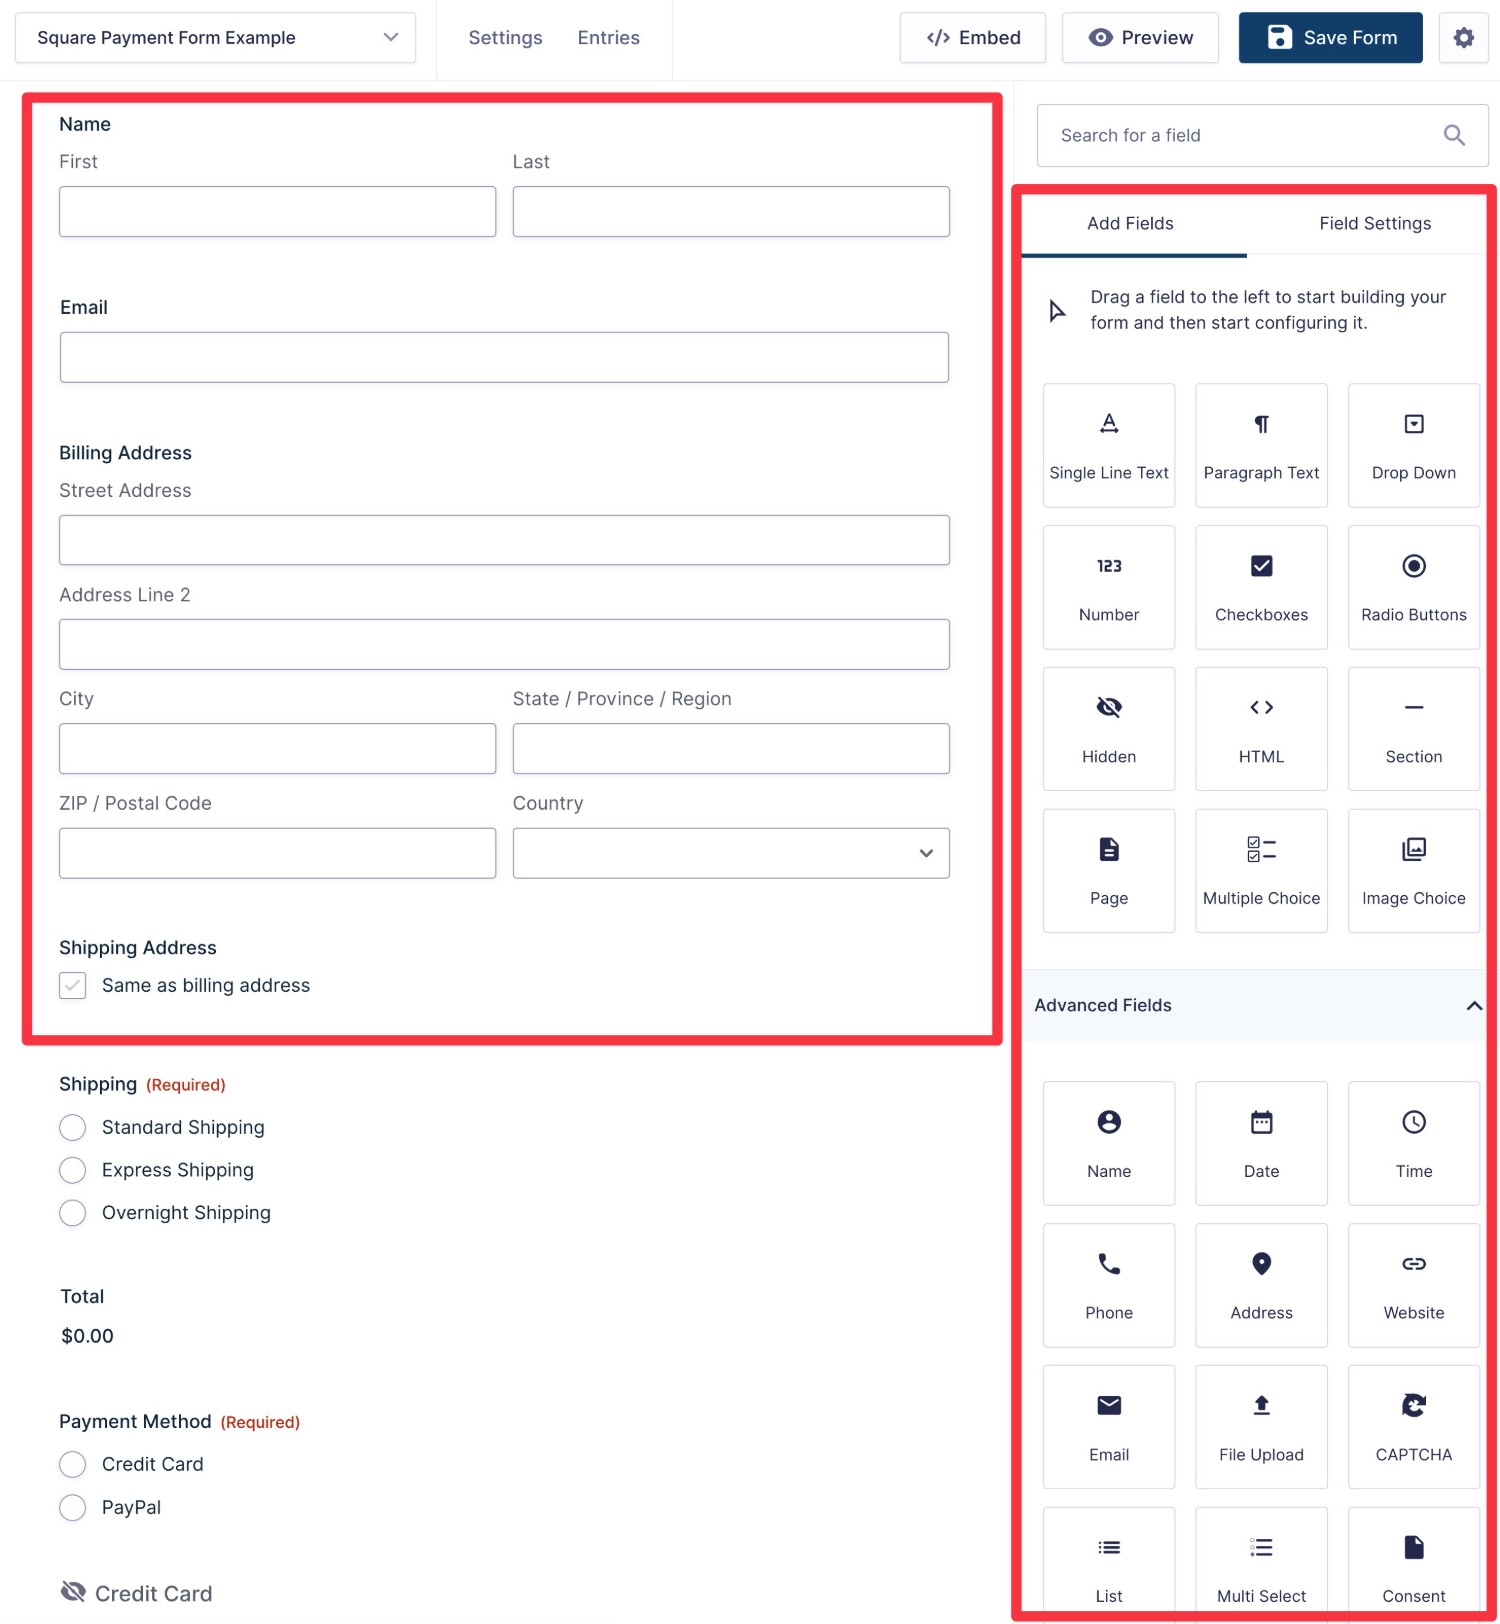
Beyond that, Gravity Forms also gives you the ability to collect any other information that you need. For example, you could add a field that asks people how they found your business.
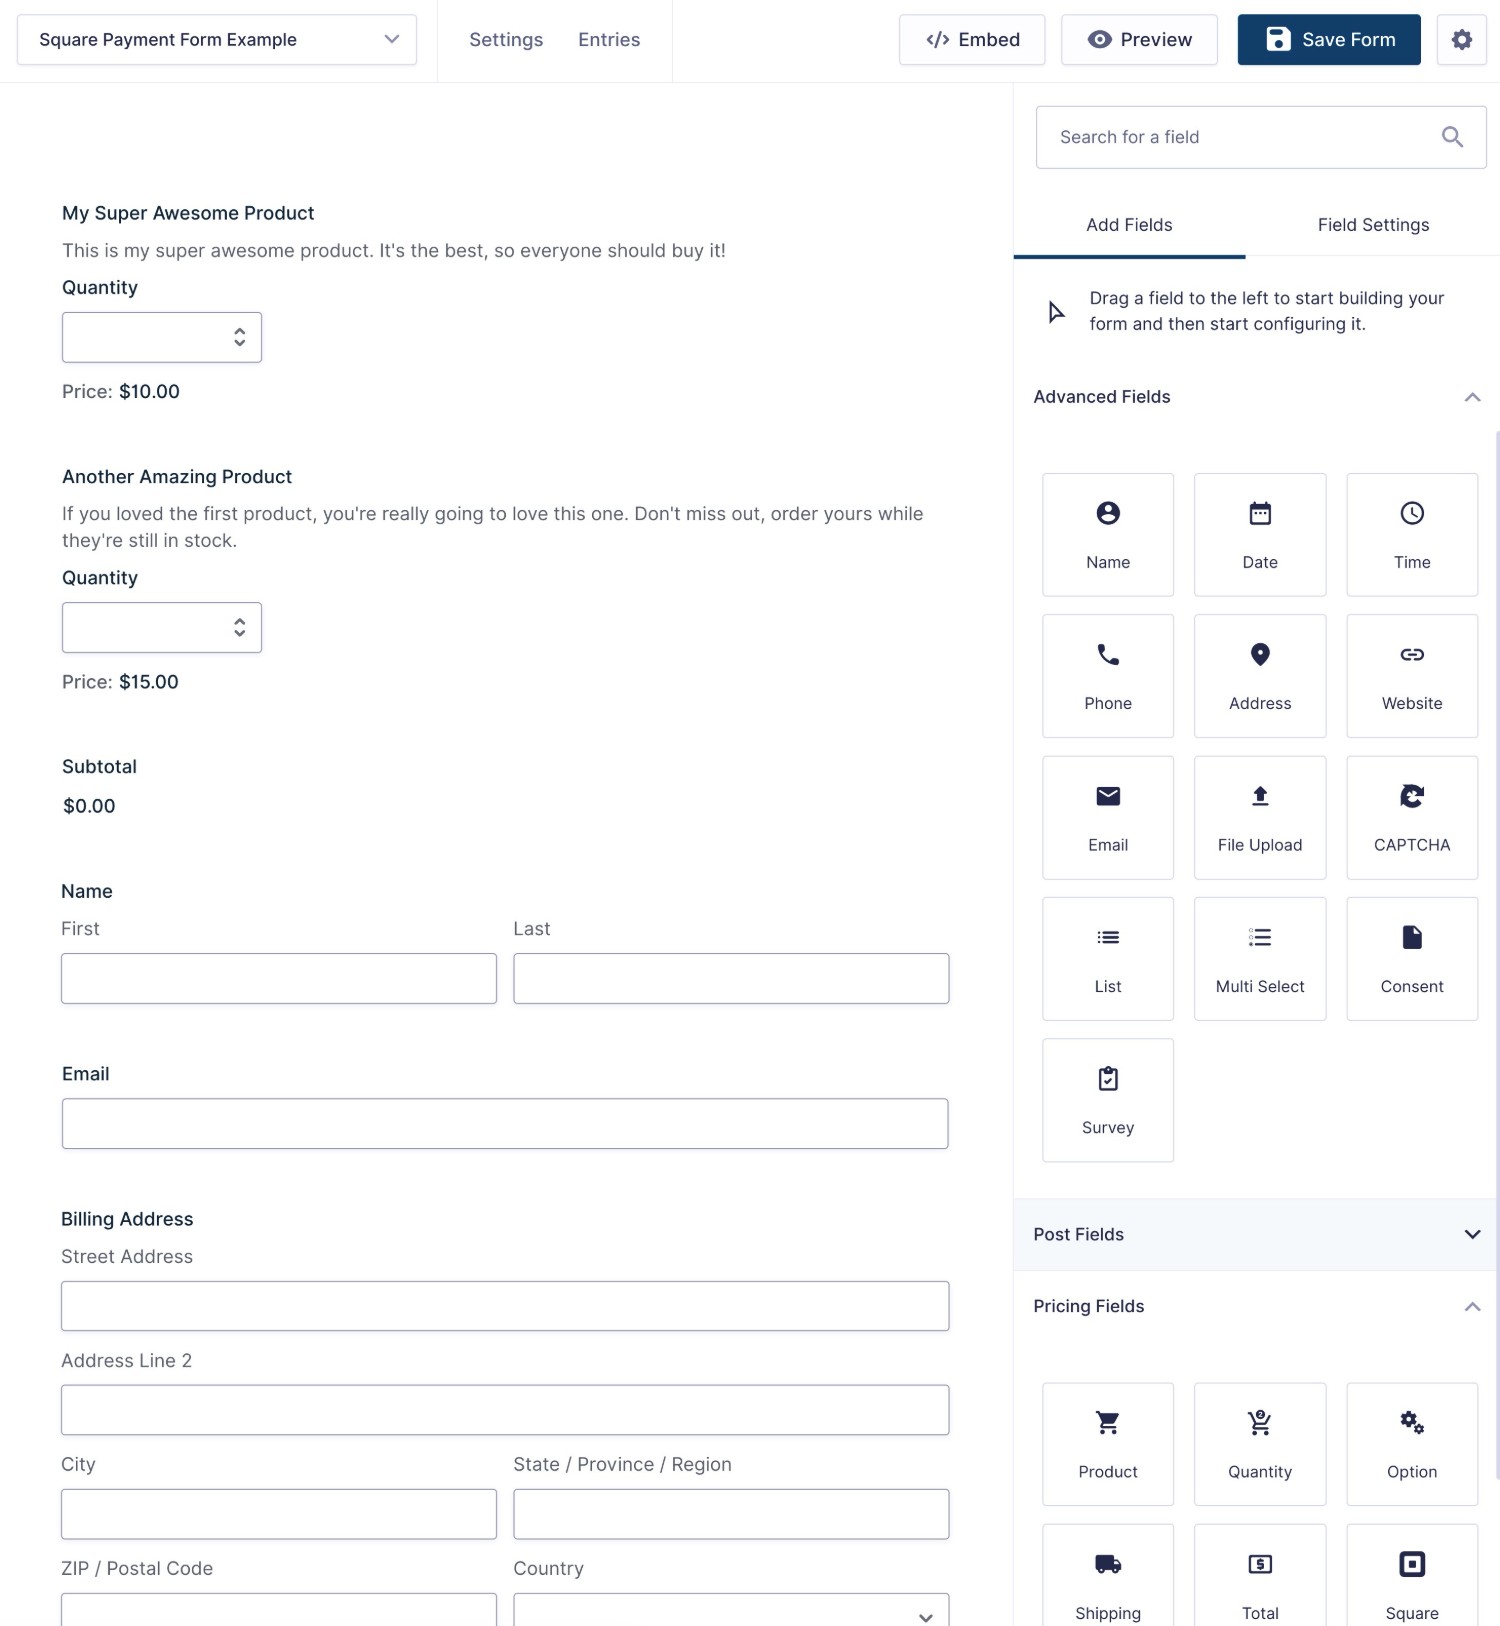
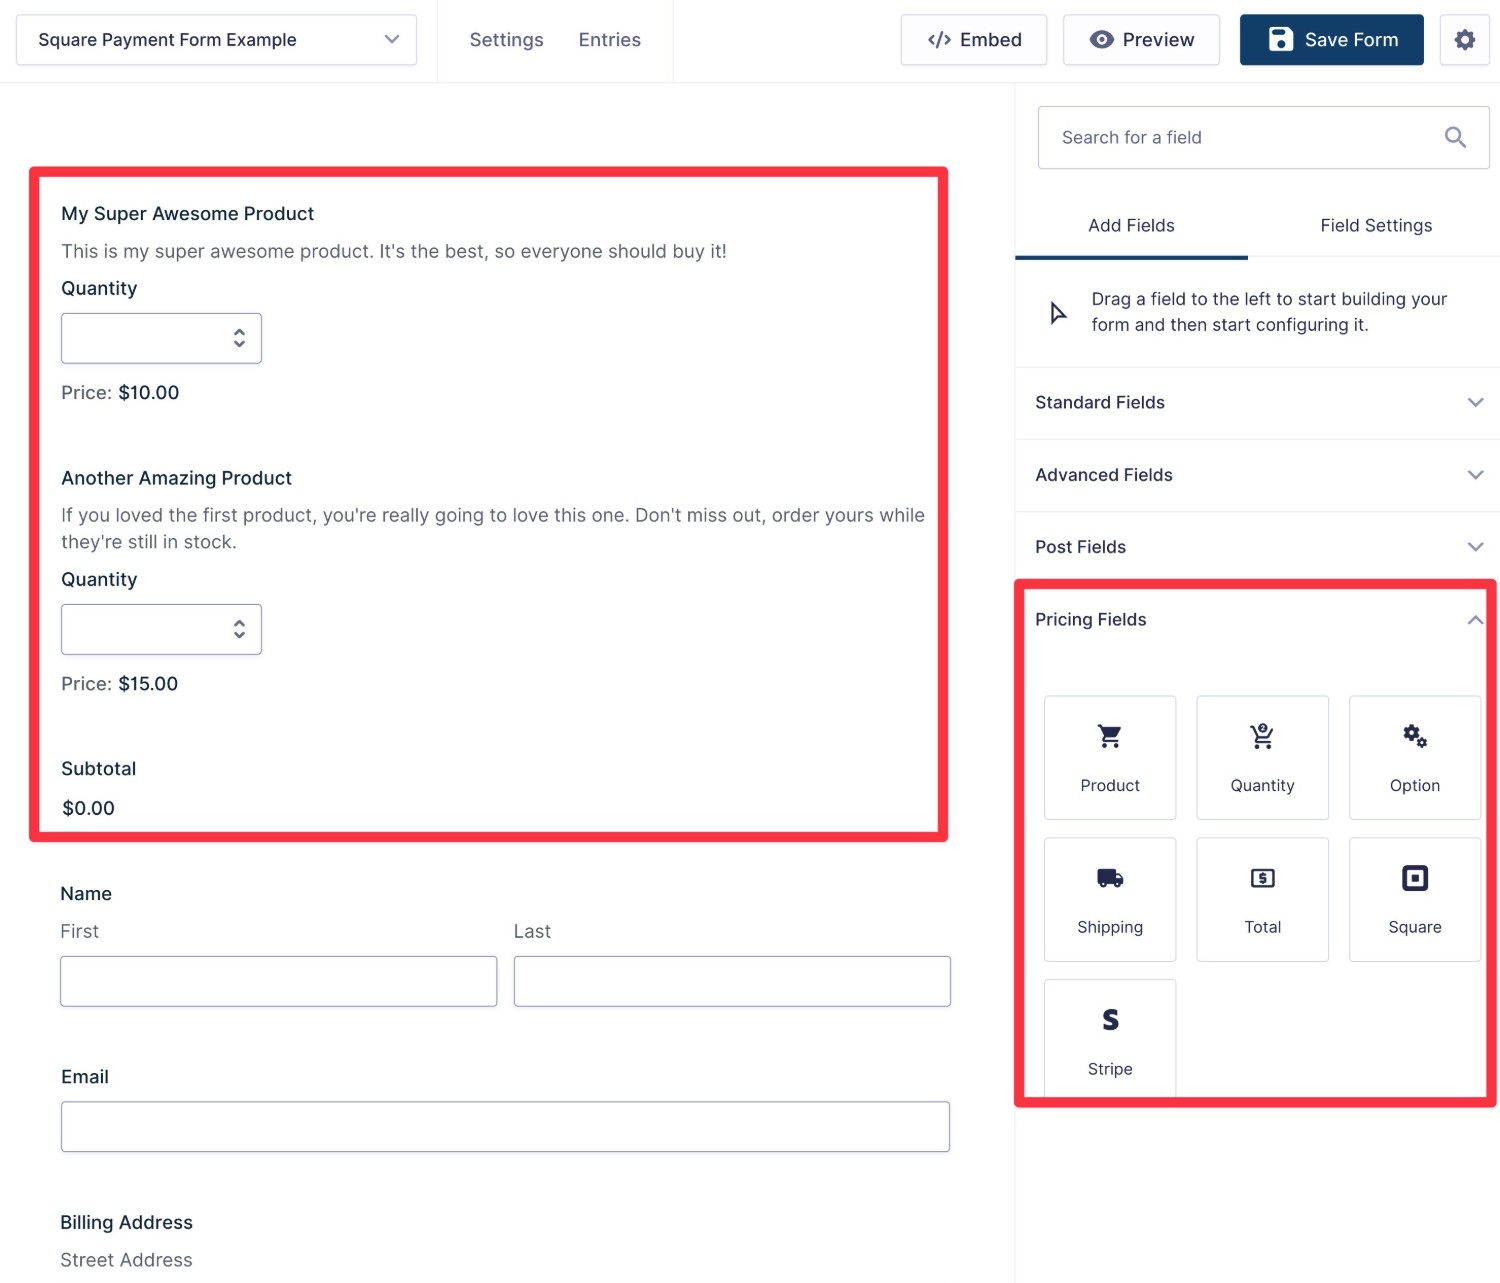
Pricing Fields
Pricing fields are used to determine the amount that you’ll charge someone who submits the form.
You can use one fixed amount for every payment. Or, you can adjust the payment amount based on how someone filled out the form, such as charging users different amounts based on the services that they select or letting them adjust the quantity of something.
You can use different types of fields to come up with the final amount, so we recommend reading the pricing fields documentation if you’d like to learn how each field works:
If you use the premade eCommerce Form template, it will already include some basic pricing fields. You can edit these pricing fields according to your preferences or add your own unique set of fields and options.
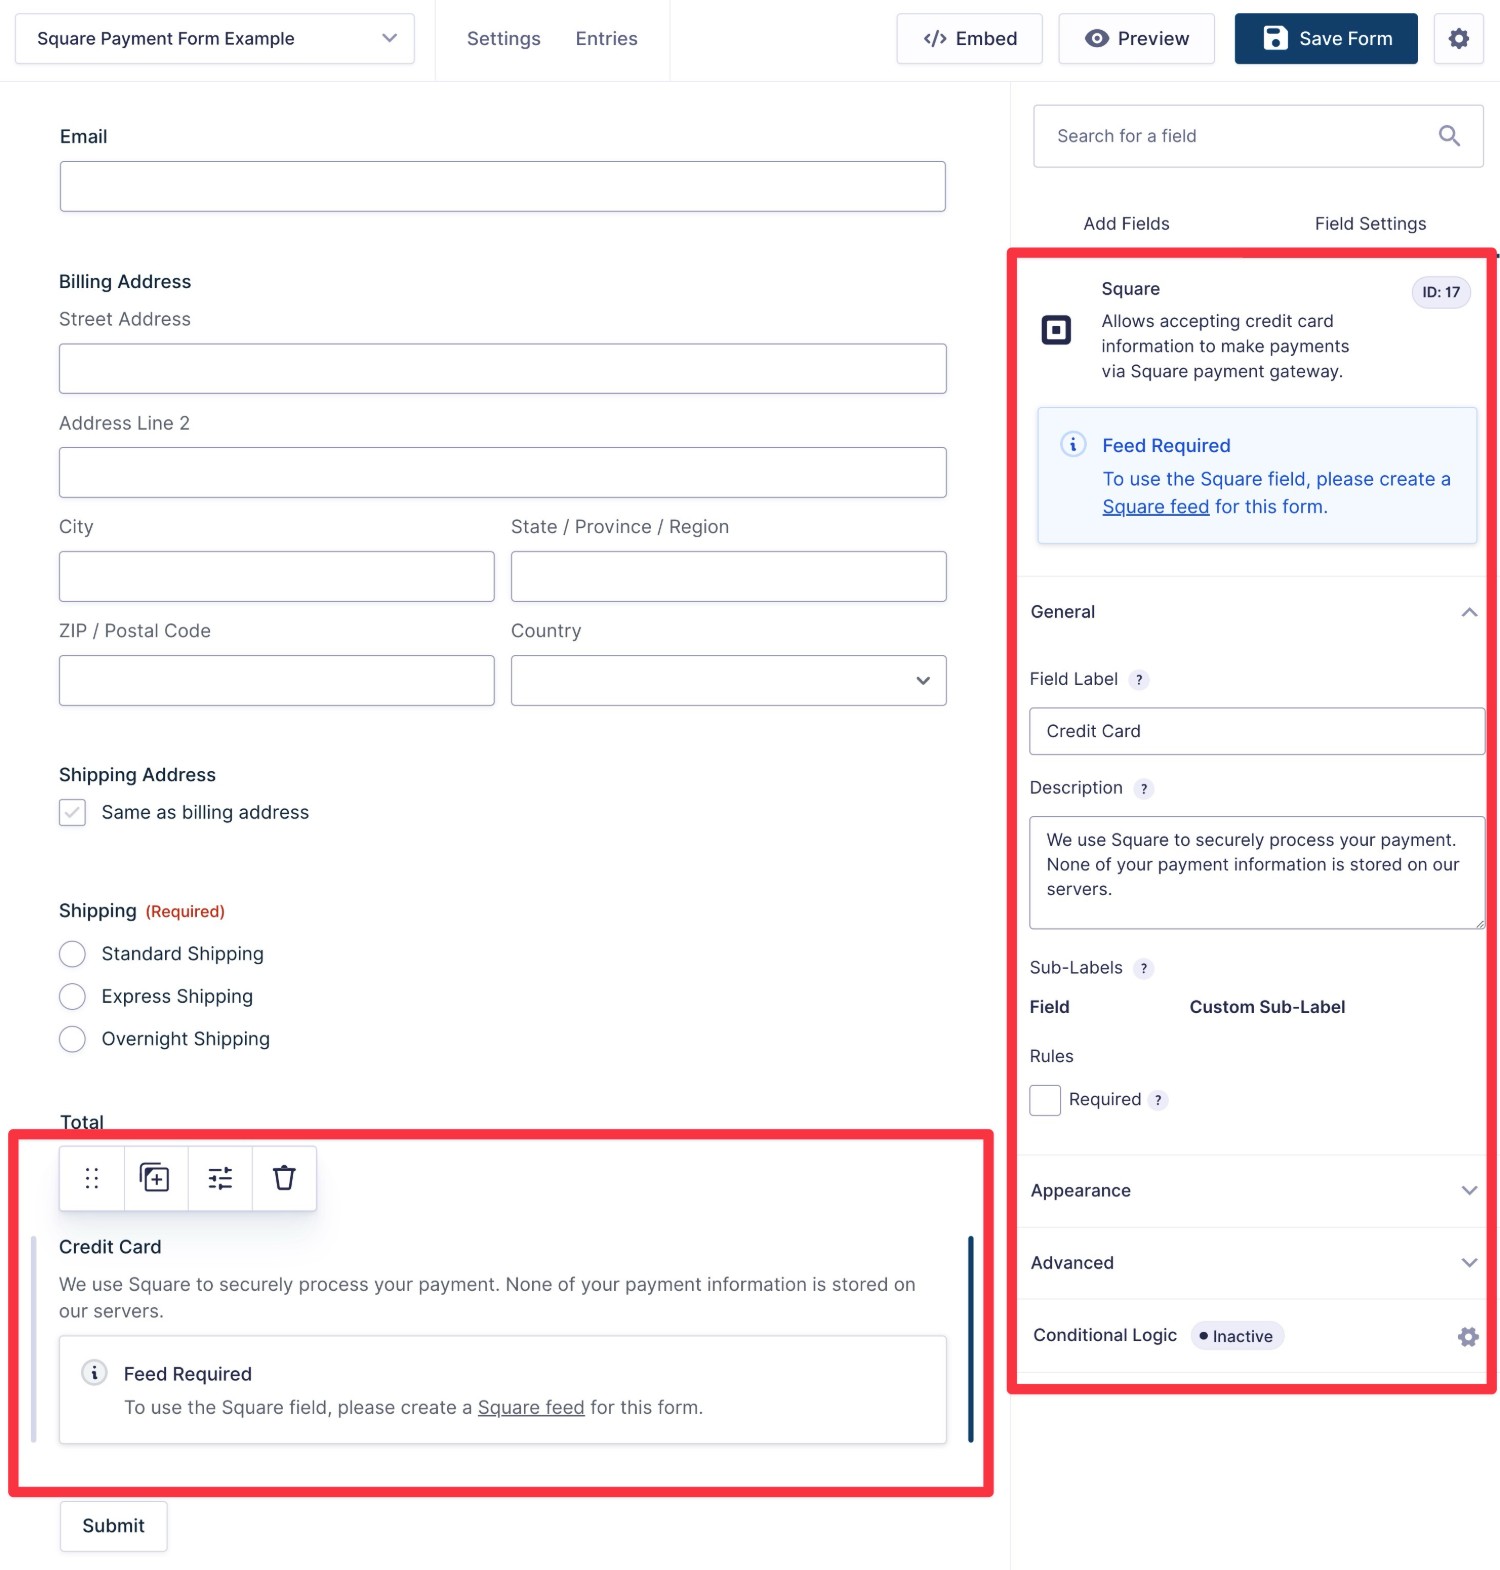
Square Field
Finally, you’ll need to add a Square field to your form. This field is where people will enter their credit/debit card information. Typically, you’ll want to place it near the end of your form.
Note – You will not see a live preview of the Square field in the visual builder until you create a Square feed, which is the next step in the process.
5. Add At Least One Square Feed
Once you’ve finished editing your form, you need to set up at least one Square feed.
In Gravity Forms, a “feed” lets you perform some action when someone submits your form. For a Square payment form, that “action” is processing a payment with Square according to the configuration of your feed.
For example, the feed lets you decide whether to make it a one-time payment or a recurring subscription, along with other important choices.
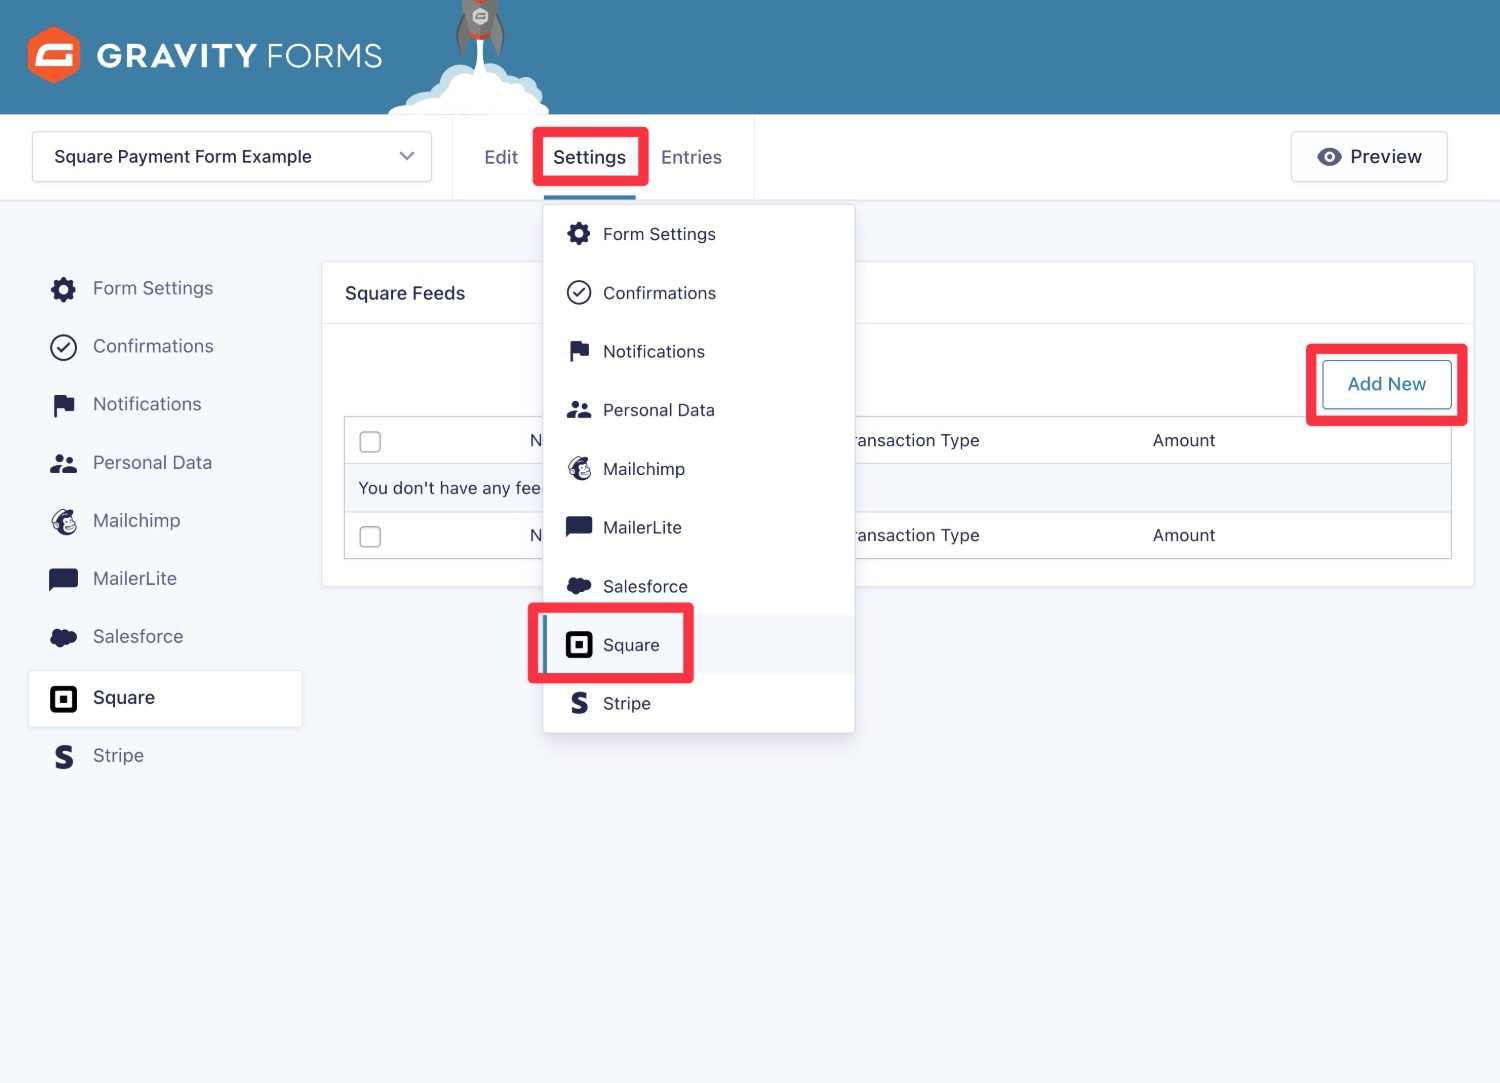
To create your feed, go to Settings → Square in the form editor interface. Then, click the Add New button.
First, choose the Transaction Type:
- Products and Services – This will process the payment as a one-time payment.
- Subscription – This will set up an automatic recurring subscription on the billing cycle that you choose.
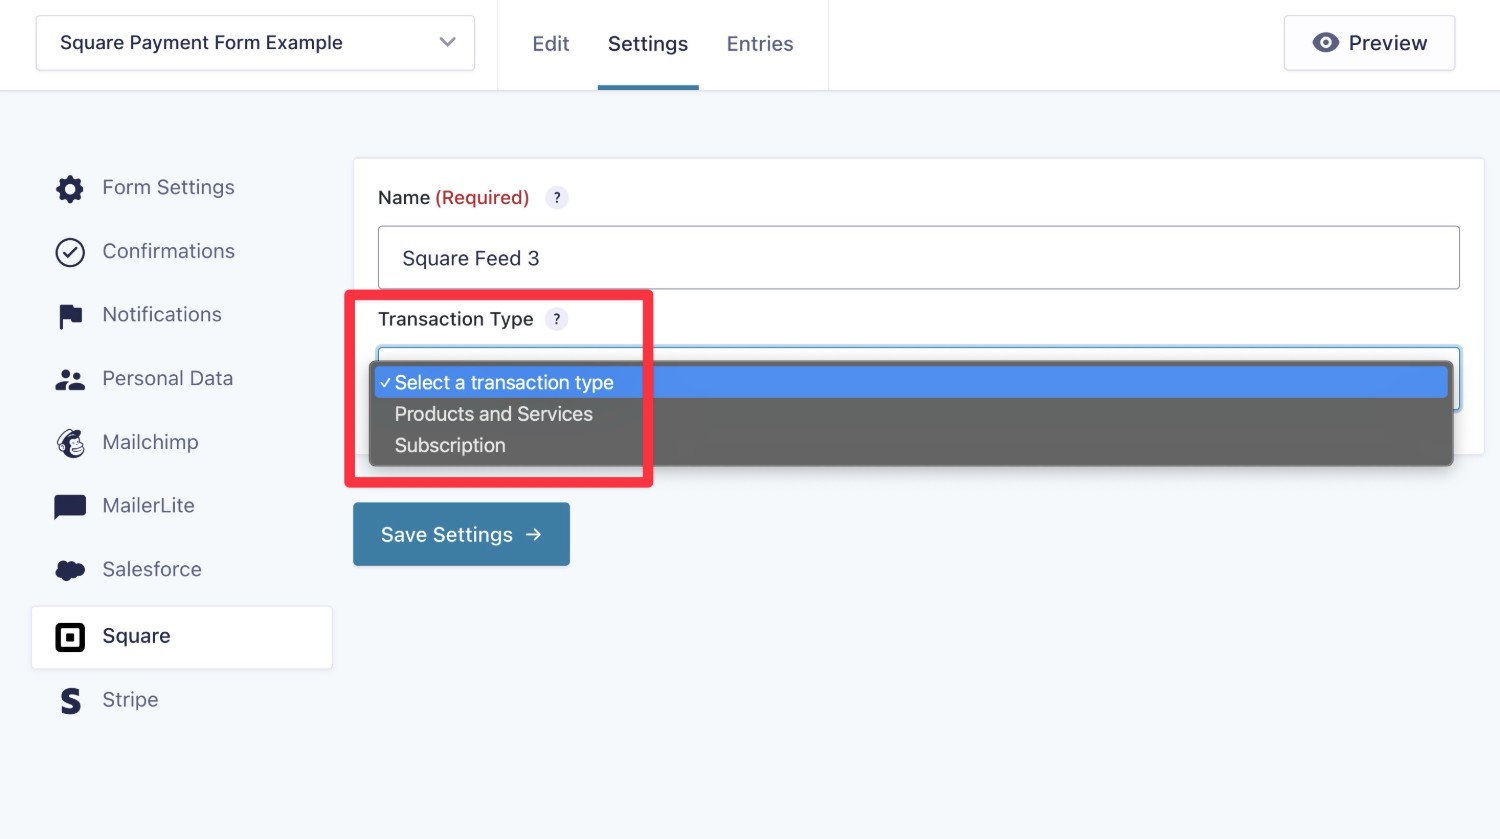
Once you make your choice, you’ll see some additional options that relate to that transaction type.
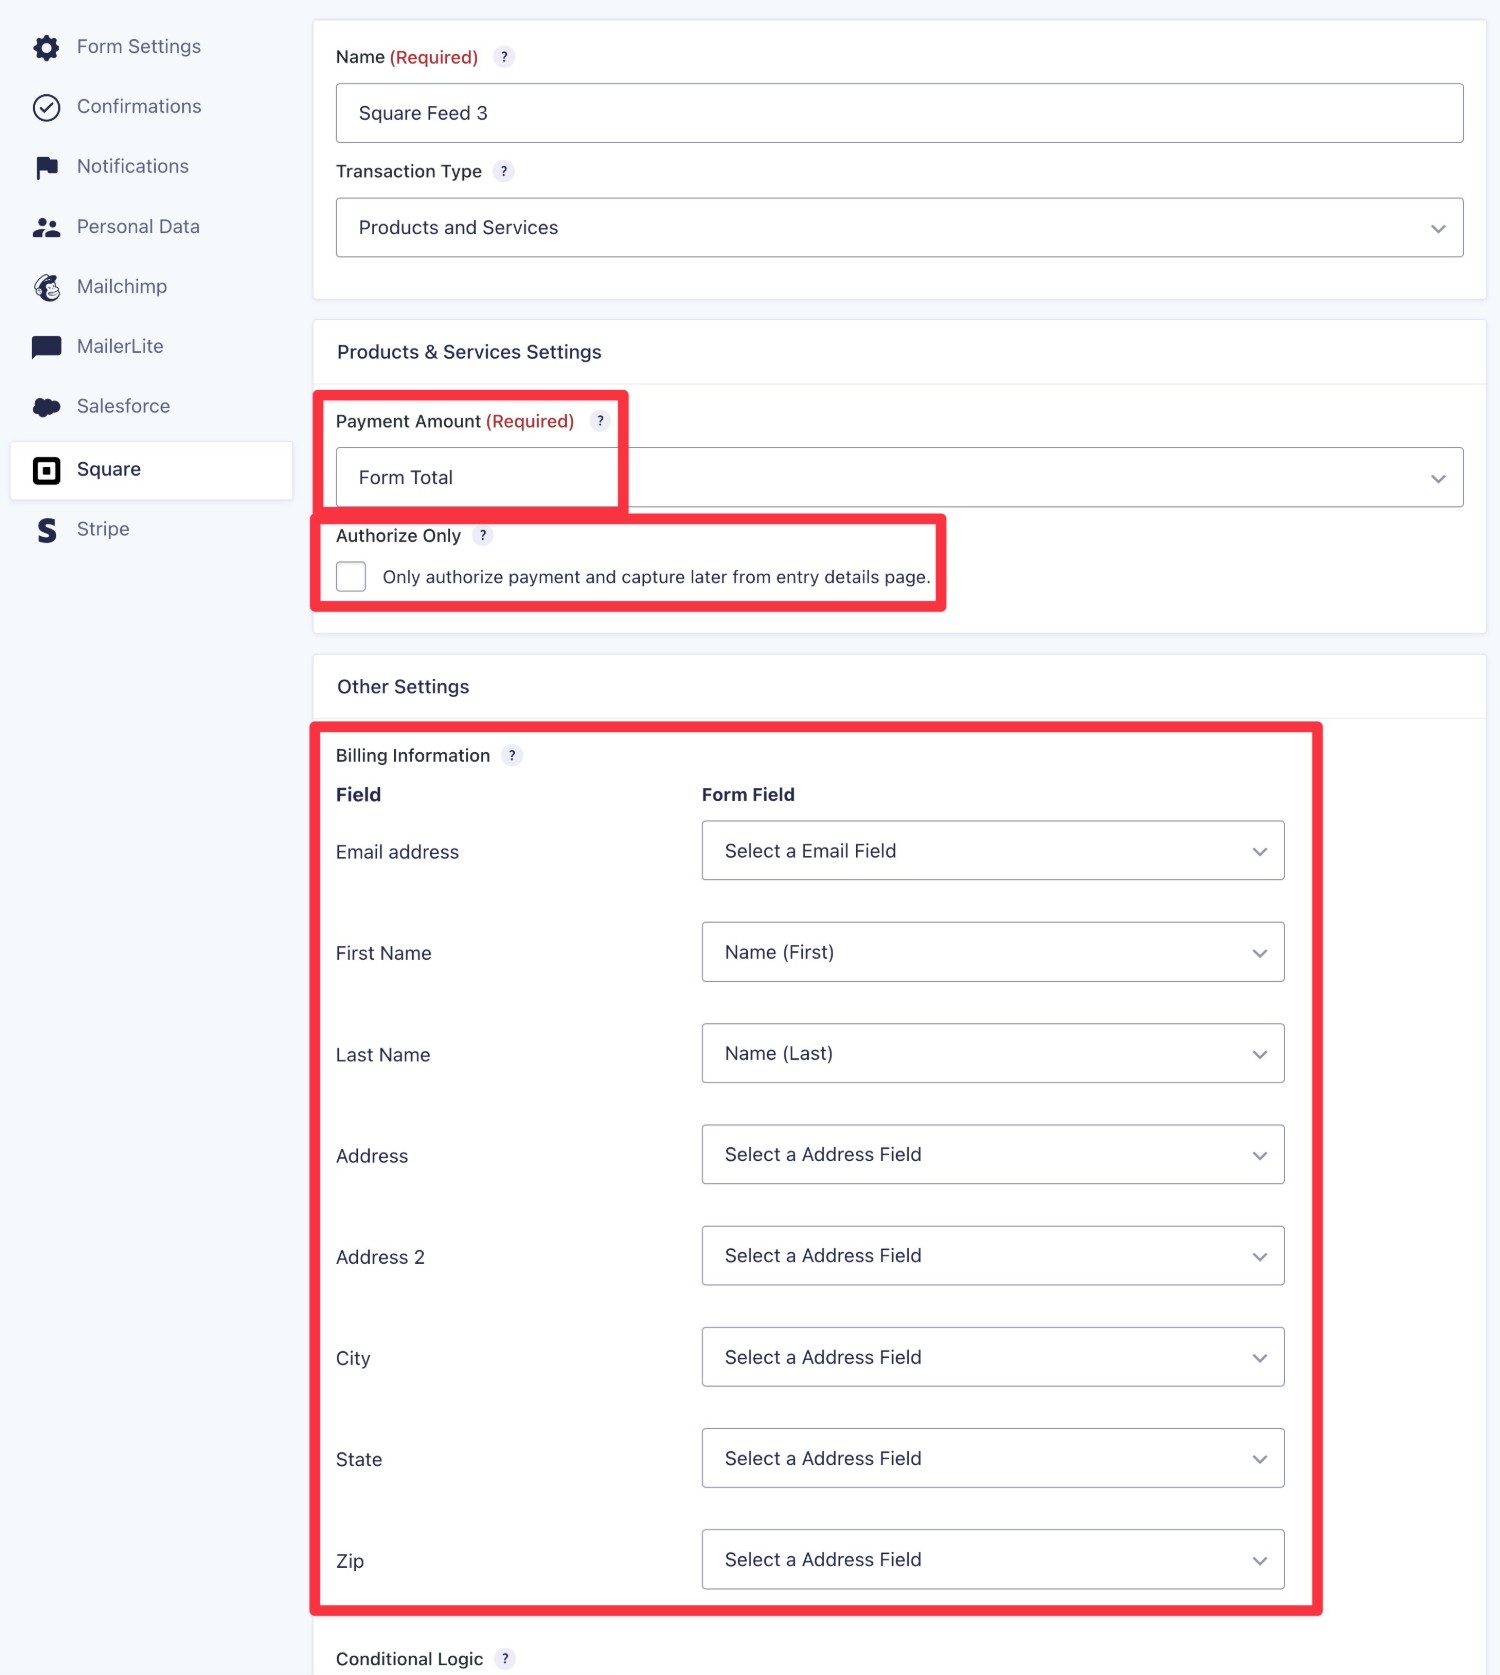
For Products and Services, you get three main options:
- Payment Amount – This is the amount that people will be charged. Usually, you’ll set it equal to the Form Total field, but you can choose a different field if you want.
- Authorize Only – If you check this box, Square will only authorize the payment upon form submission. It won’t actually “take” the money from the customer until you click Capture in the form entry interface.
- Field mapping – You can map the fields from your form to the billing information fields in Square.
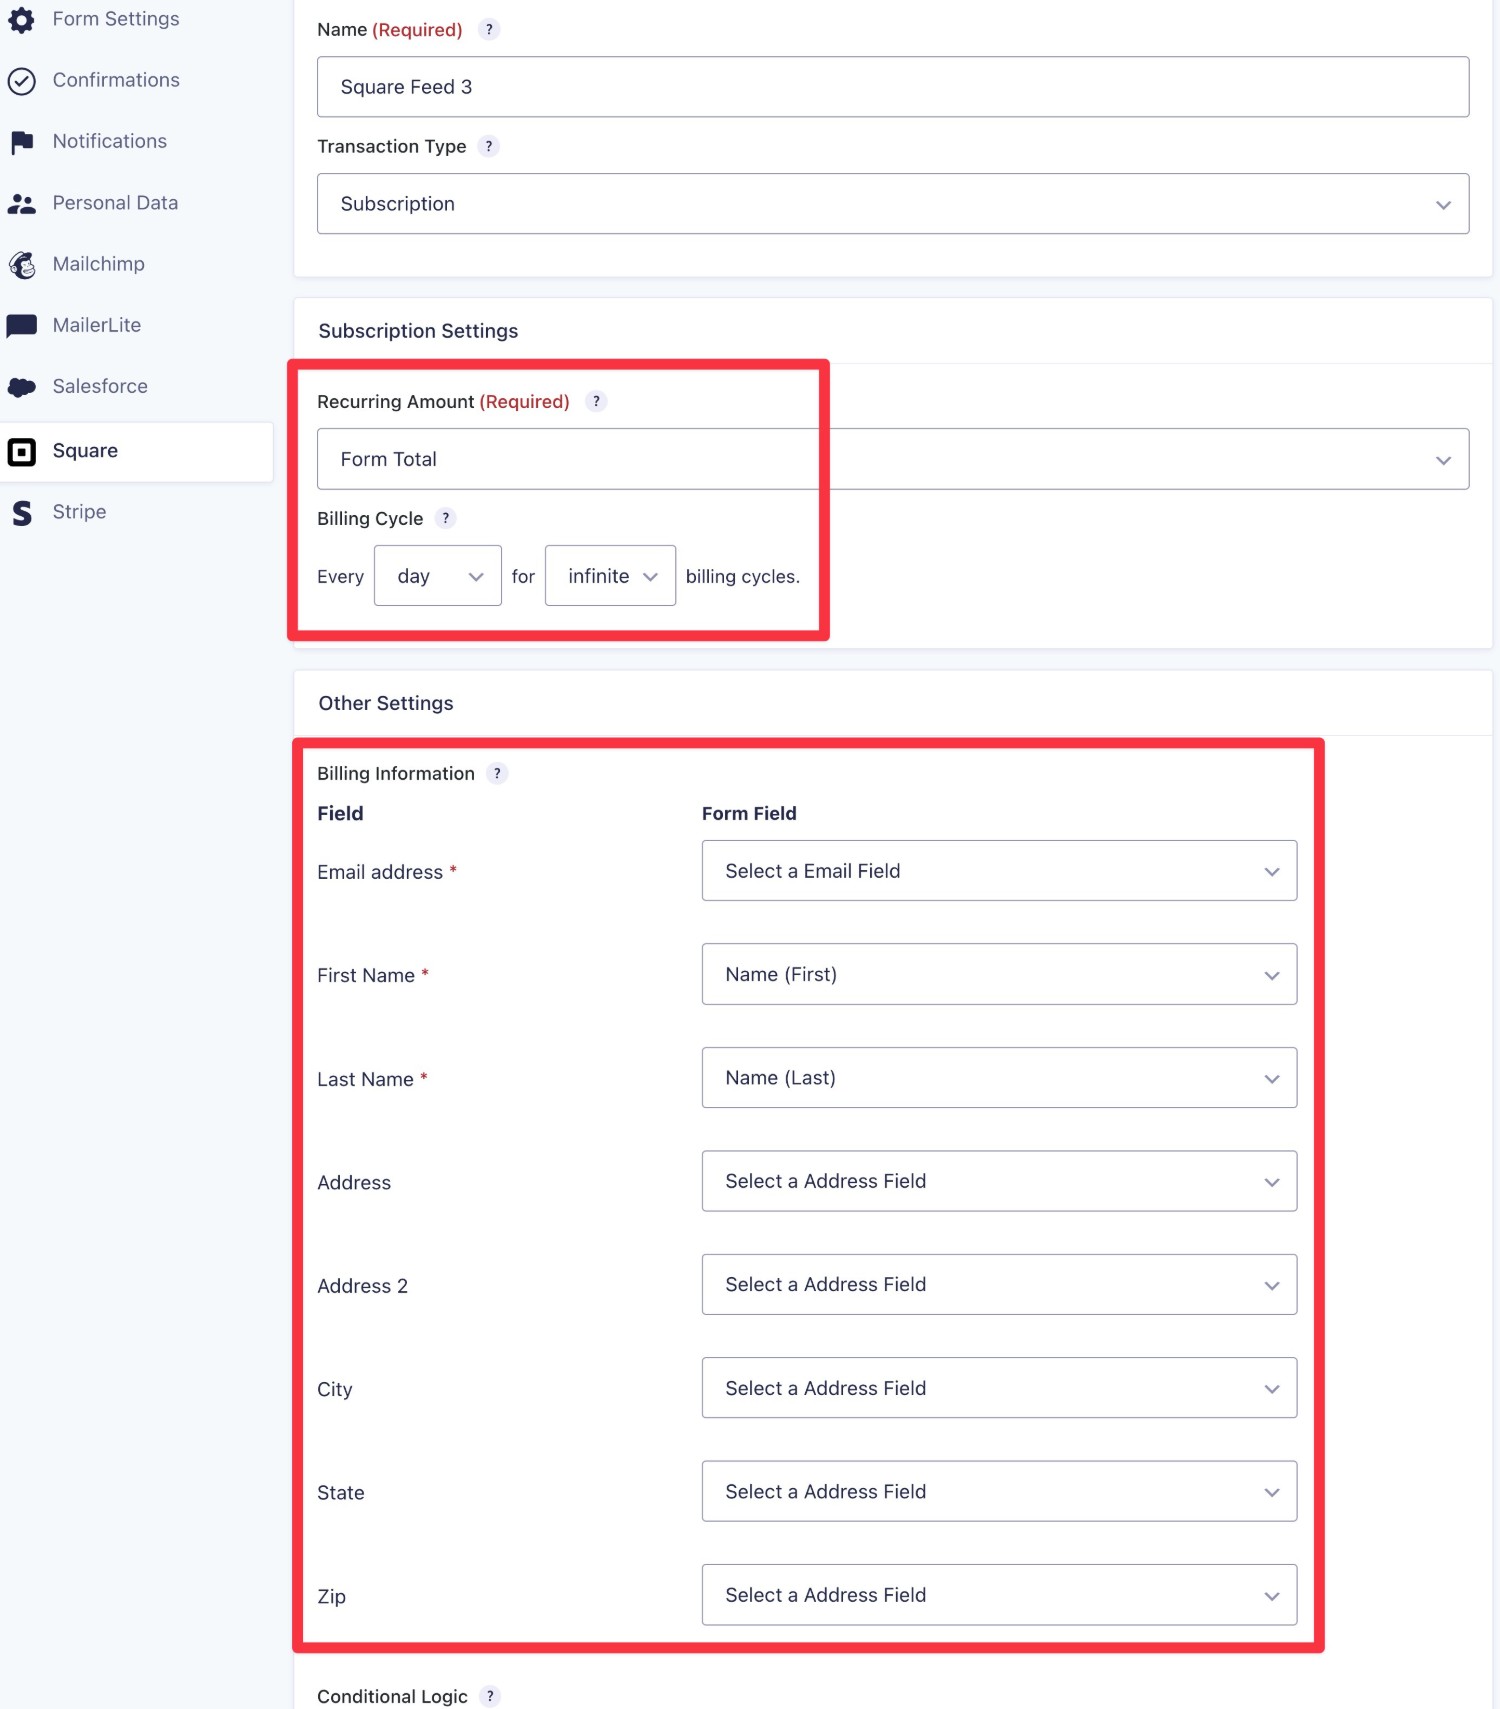
For a Subscription, you get all the same field mapping settings. However, you have some different options for setting up the payment.
To start, select the Recurring Amount. This will be the cost of the subscription. Usually it makes sense to choose the Form Total field, but you might want to choose a different field in some situations.
Then, configure the Billing Cycle. First, choose the billing frequency from four options:
- Every day
- Every week
- Every month
- Every year
Then, select the number of billing cycles for which you want to charge subscribers.
If you select infinite, the subscription will continue until it’s canceled. However, you can also set a predetermined number of billing cycles, which can be helpful for things like payment plans. For example, you could configure it to charge “three monthly payments of $99”.
Once you’ve made your choices, make sure to click Save Settings.
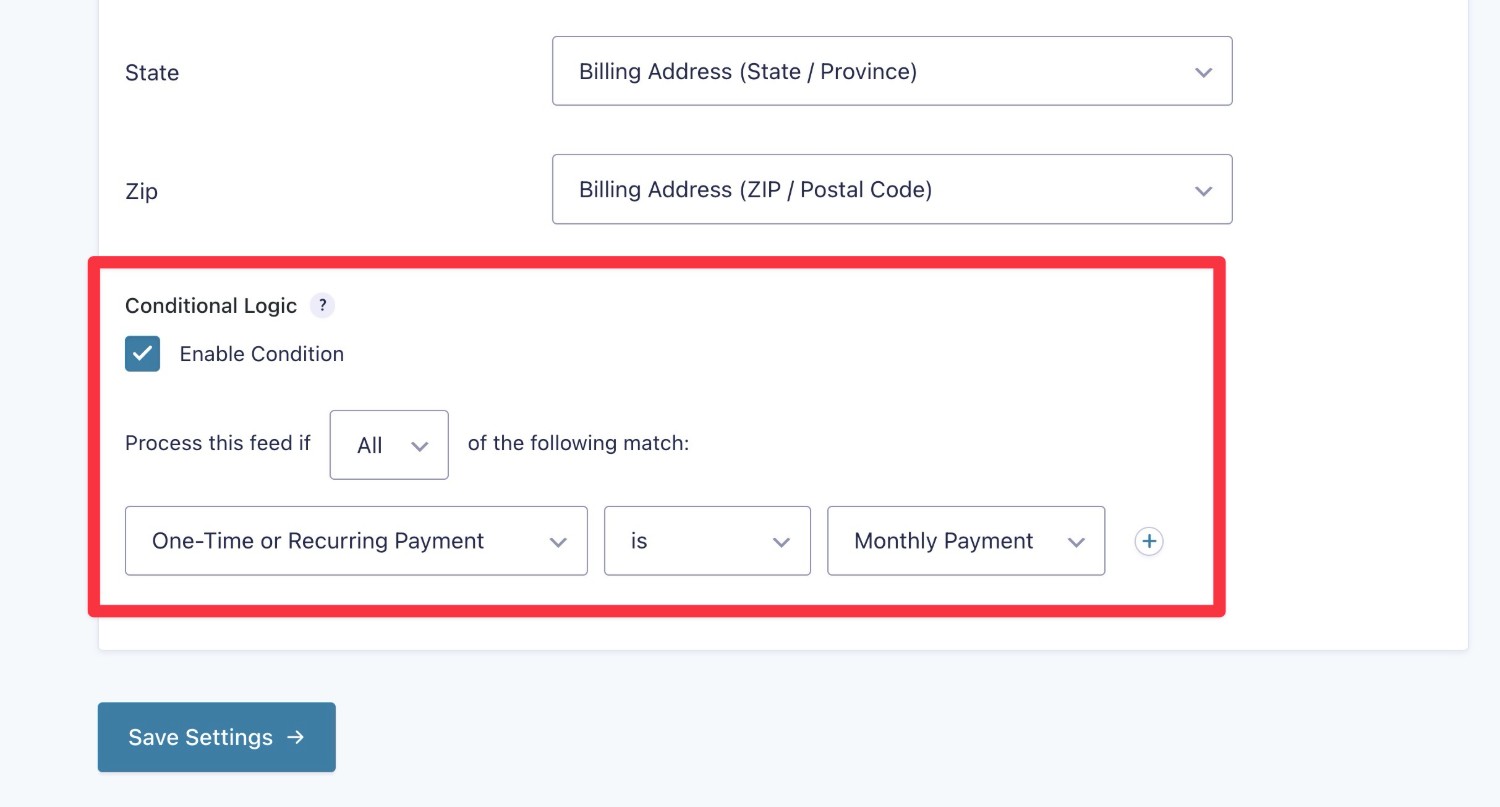
Finally, for both transaction types, you can also add conditional logic rules. Let’s go through those next…
Creating Multiple Square Feeds With Conditional Logic
One cool thing here is that you’re actually able to create multiple Square feeds, each with its own configuration. You can then use conditional logic to control when to execute each feed.
This is especially useful on forms where you offer the choice between a one-time payment or a recurring subscription.
For example, if you’re creating a donation form, you might want to let donors choose between a one-time gift or setting up an automatic monthly gift.
Here’s a quick guide for how you might set this up:
- Add a Radio Button field to your form that lets people choose between a one-time payment or a monthly payment.
- Create two separate Square feeds – one feed that processes the payment as a one-time payment and another that sets up a recurring subscription on a monthly basis.
- Add a conditional logic rule to each feed so that the feed will only execute if the person chooses the relevant option in the Radio Button field.
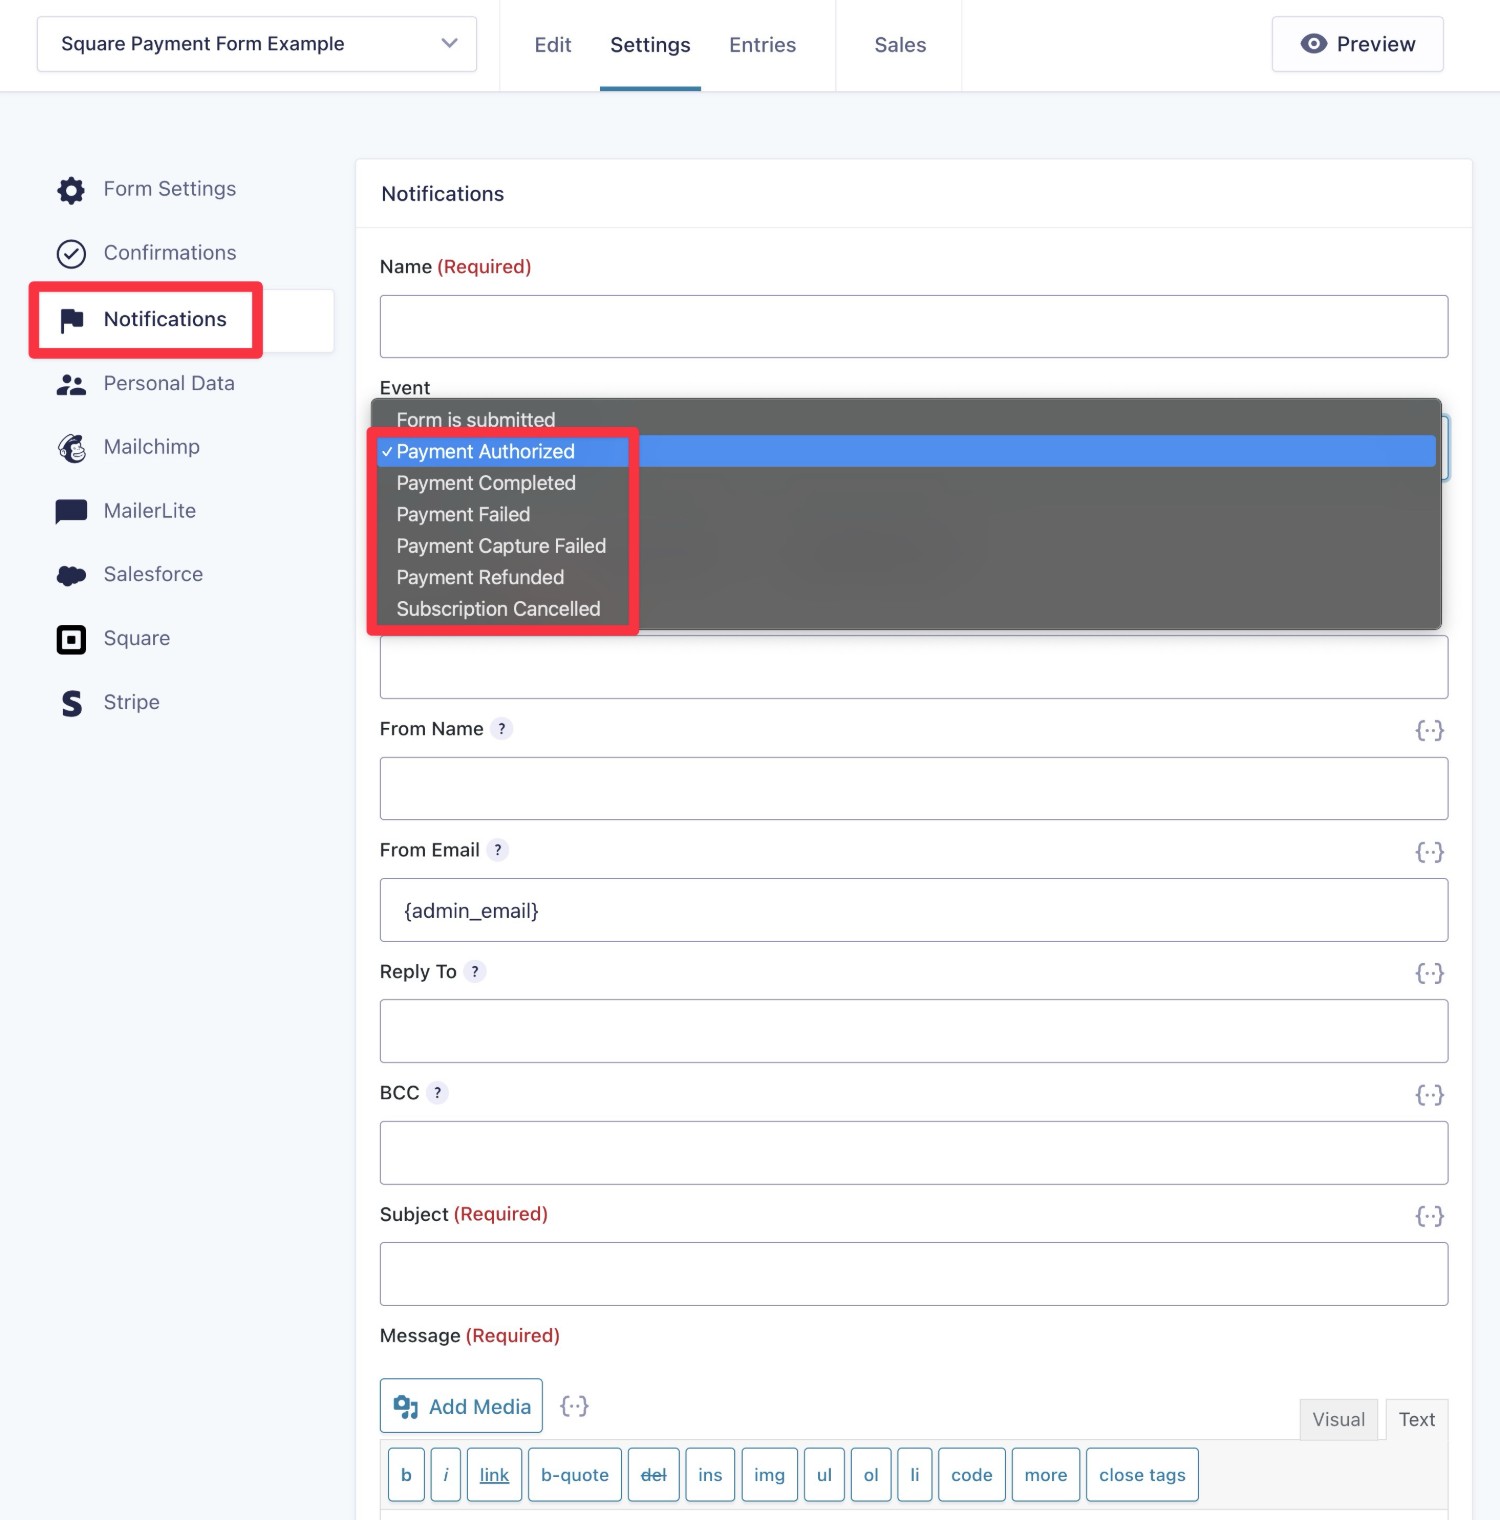
6. Set Up Payment Notification Emails
To create a more user-friendly experience for your customers and streamline your own admin processes, you can set up email notifications.
With Gravity Forms you already have the ability to set up email notifications for events like form submissions, but the Square Add-On lets you take it a step further. With the Square Add-On, you can set up email notifications for payment-related events like completed payments or canceled subscriptions.
To manage these emails, go to Settings → Notifications in the form editor interface.
Here, you can select the payment-related event you want to receive a notification for, decide who the notification should be sent to, and configure the content of the email. To learn more on this, check out our documentation on configuring notifications.
7. Set Up Other Integrations (Optional)
This step is 100% optional.
Another big advantage of using Gravity Forms to connect WordPress and Square is that you can utilize even more functionality and integrations with your Square payment forms.
Here are some examples, though this is by no means a complete list:
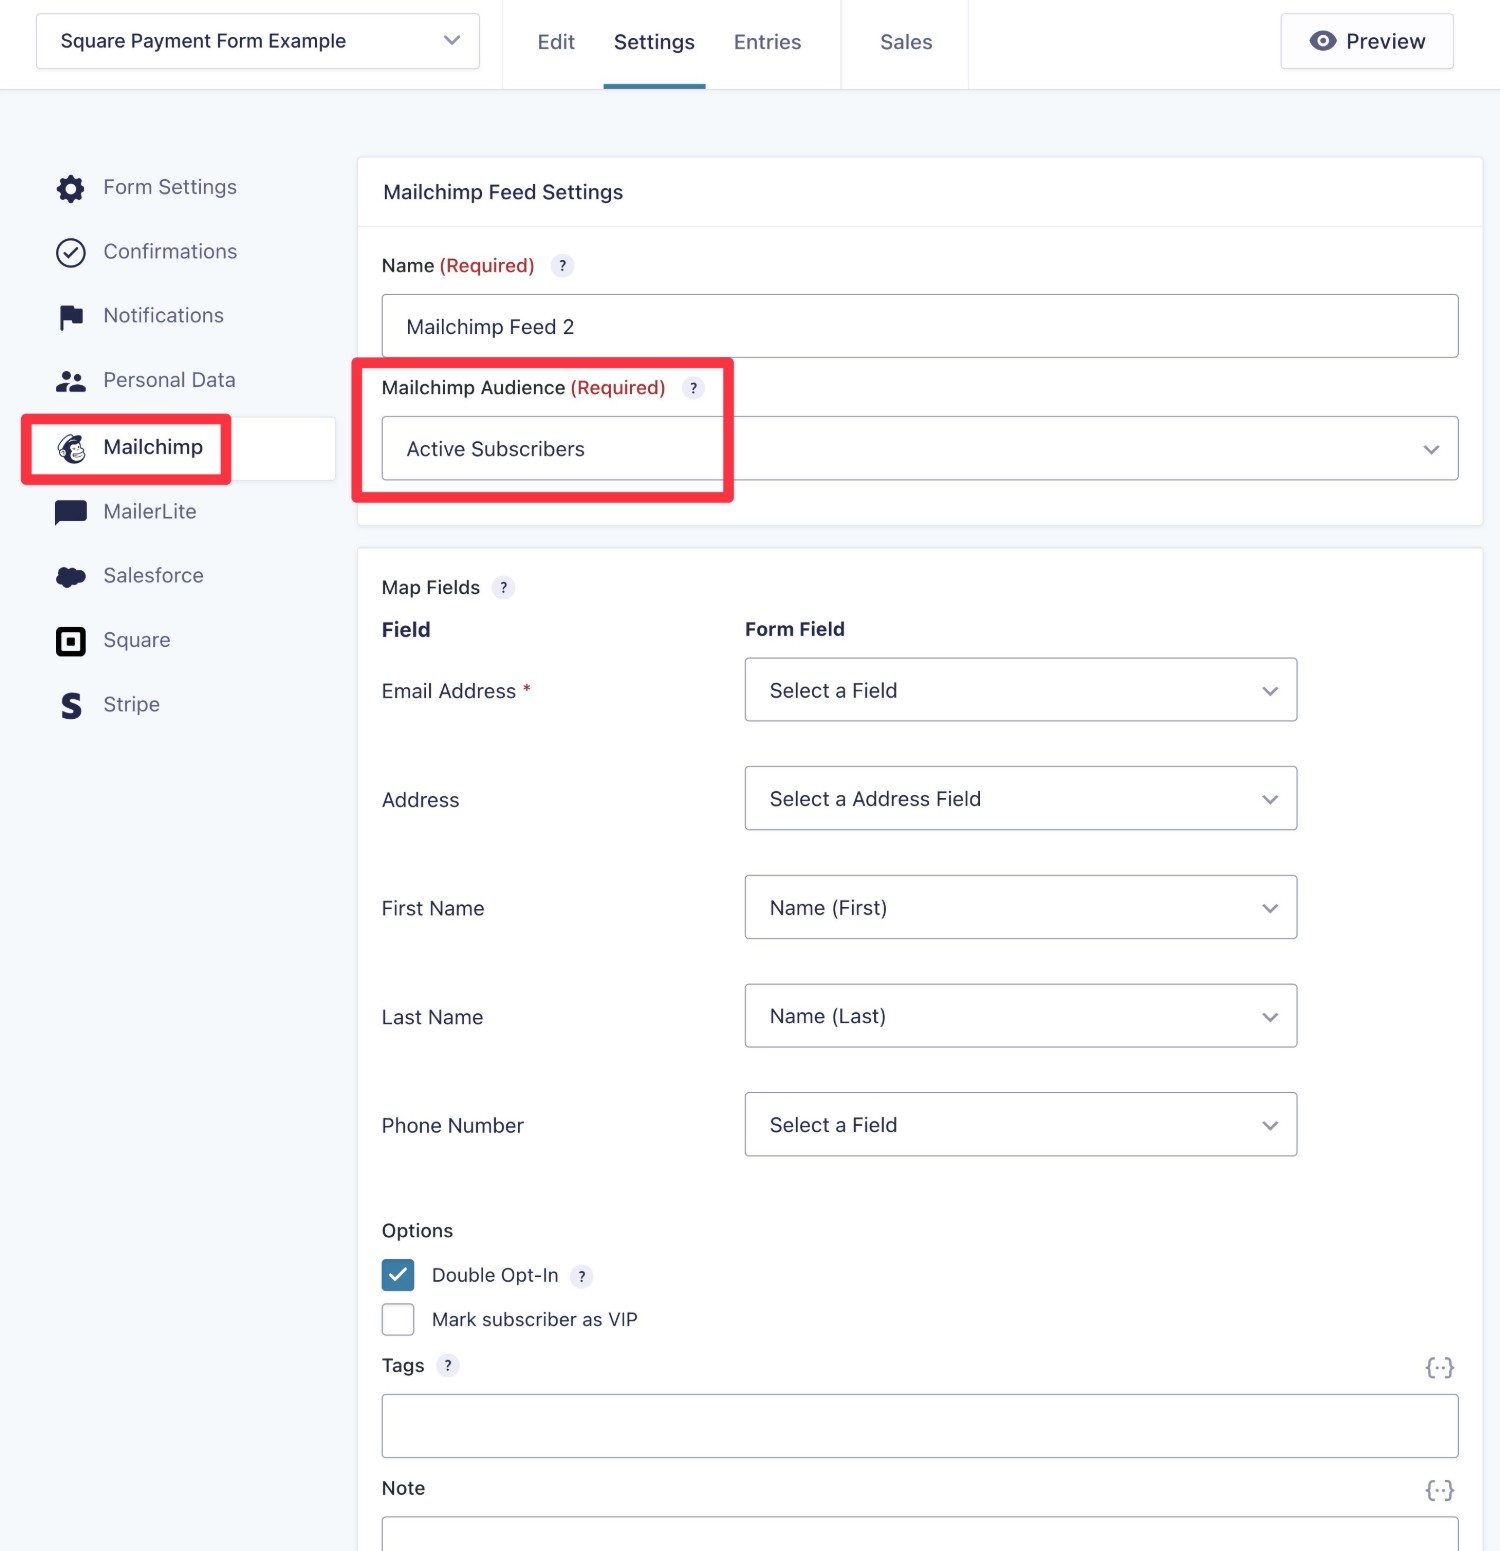
- Add a customer to your customer relationship manager (CRM) after they make a payment, including applying a certain tag.
- Give customers an option to subscribe to your email newsletter. If customers check a box, they can be automatically added to your email list. For extra convenience, Gravity Forms integrates with many of the most popular email marketing services.
- Add a task in your project management software, such as creating a Trello card.
- Create a WordPress user account for a customer after they make a successful payment.
- Create a WordPress post (or custom post type) when someone makes a payment.
- Track form conversions in your analytics software.
- Use Zapier or webhooks to set up a custom integration with pretty much any service imaginable.
For more ideas, check out the full collection of Gravity Forms Add-Ons.
The exact setup process will depend on the add-on, but it generally works like this:
- Install the add-on by going to Forms → Add-Ons.
- Connect your site to the service by going to Forms → Settings → [Add-On Name].
- Create a feed for that add-on in the form editor of your Square payment form.
For example, here’s what it looks like to add a paying customer to Mailchimp:
8. Embed Your Form and Submit a Test Payment
At this point, you’re pretty much finished setting up your Square payment form.
Now, you’re ready to embed the form on the frontend of your site and submit some test payments.
To embed your form, you can use the Gravity Forms block, shortcode, or PHP function. If you use the block, you’ll be able to style your form directly from the editor using the Orbital form theme.
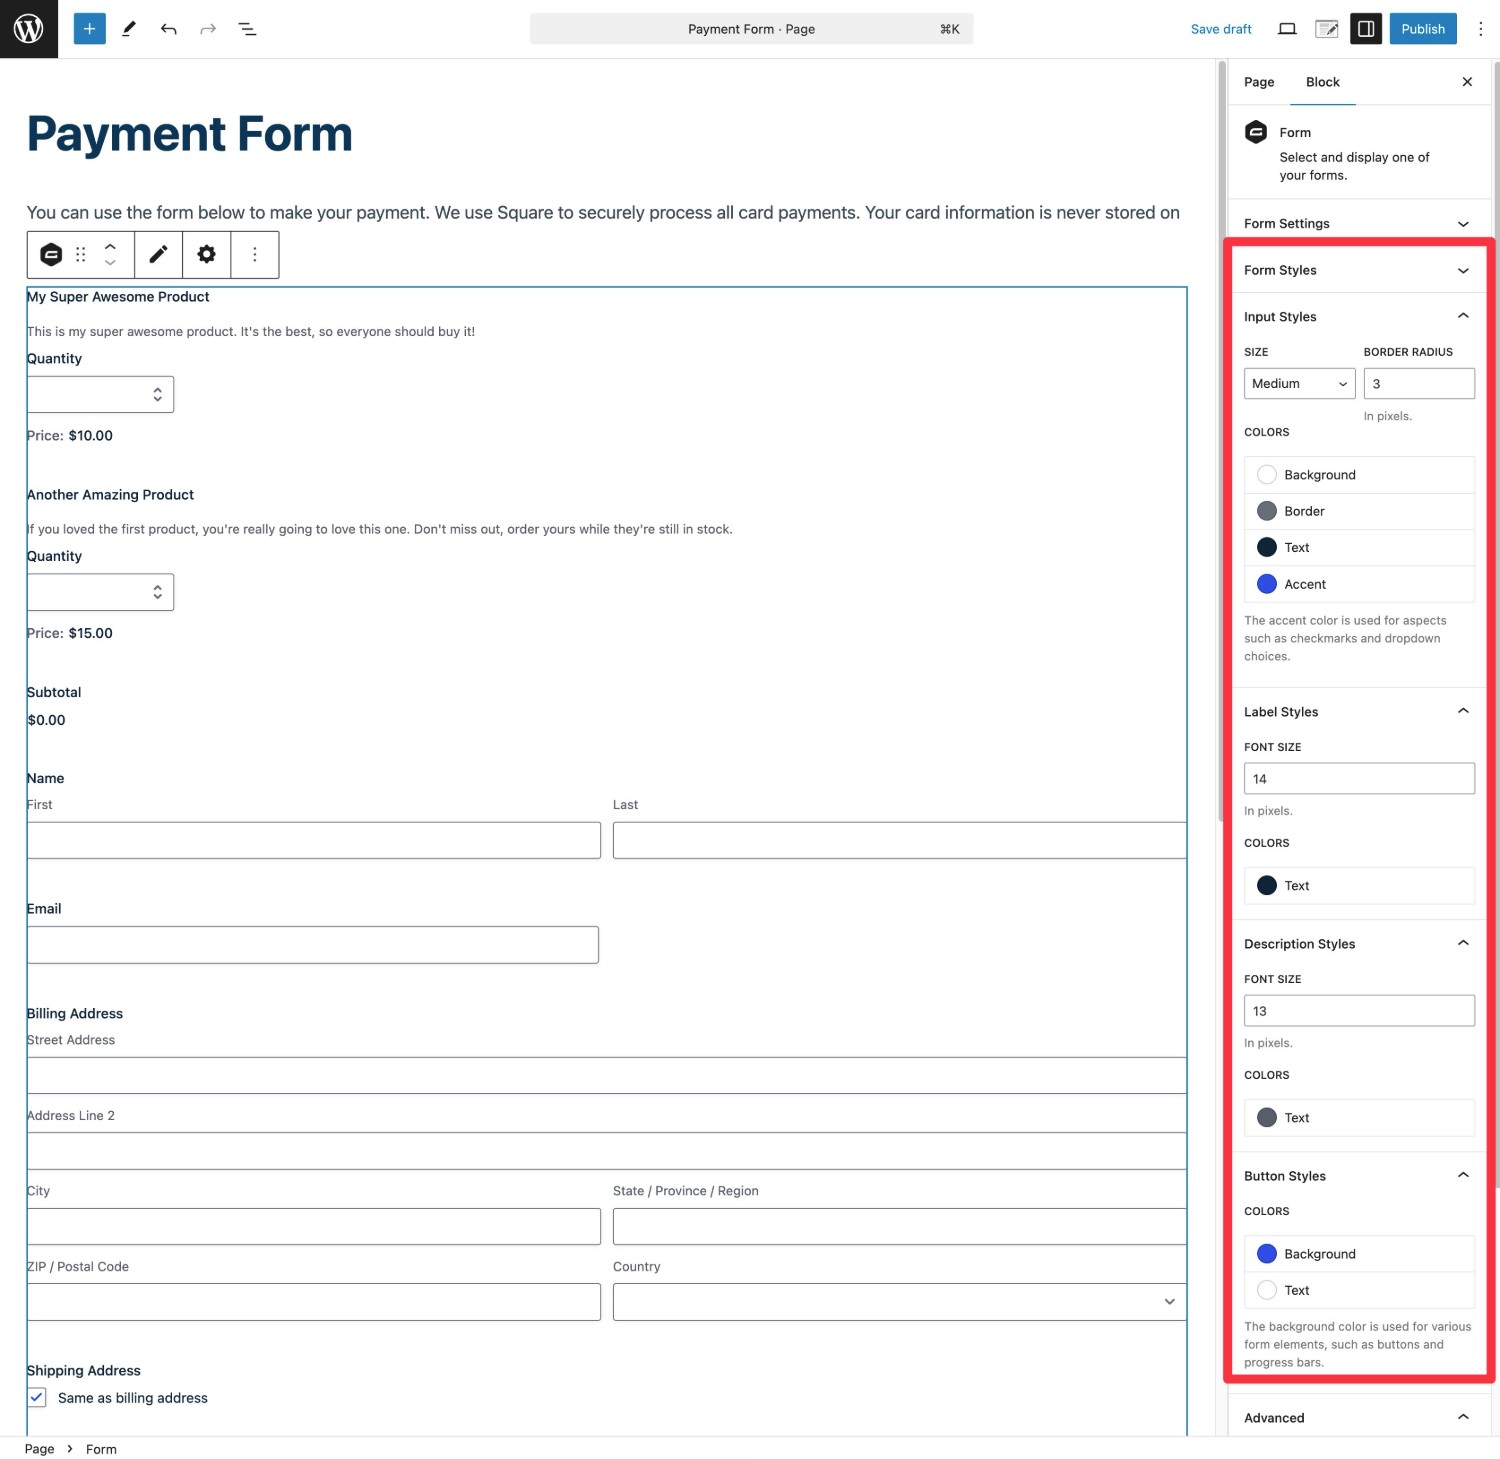
Once you’ve embedded your form, open that page on the frontend.
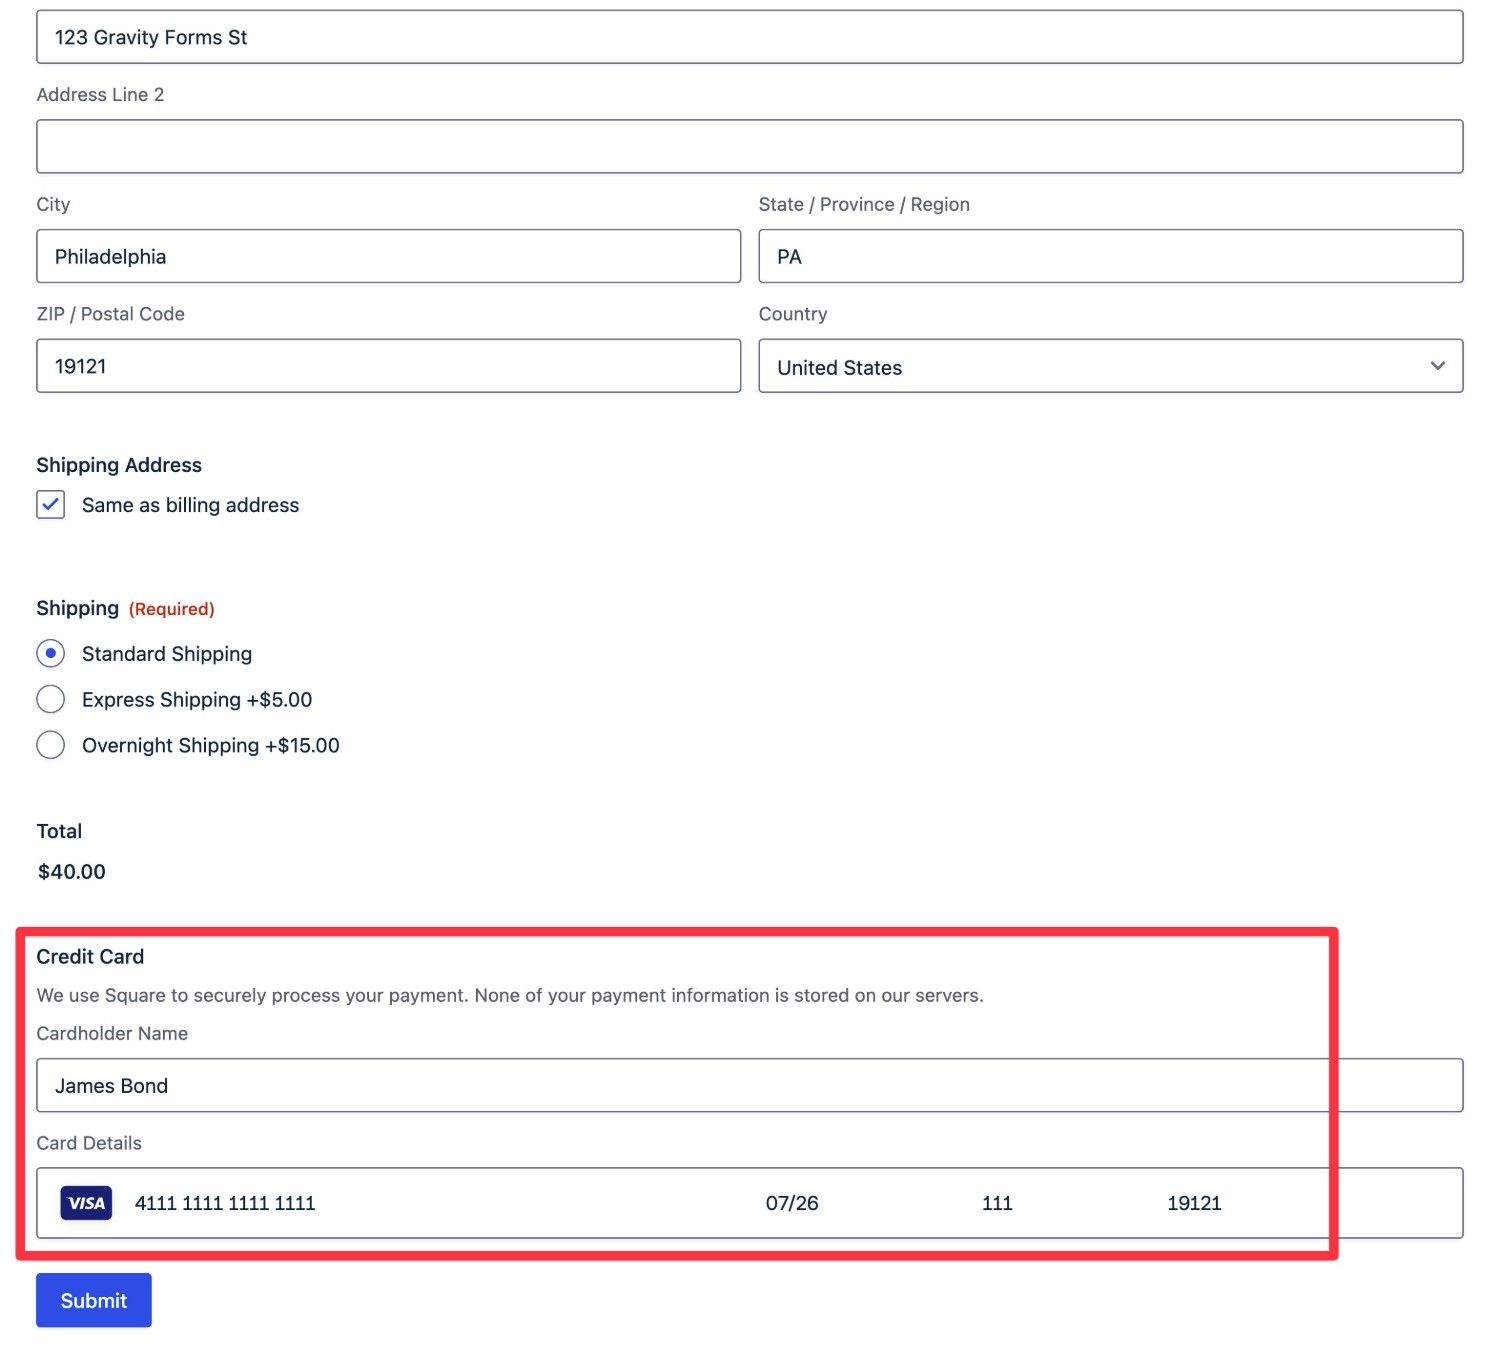
To test the form, you can fill it out and use one of the Square sandbox credit card numbers.
Here’s one you can use:
- Number: 4111 1111 1111 1111
- CVV: 111
- Expiration: Any date in the future
- Billing name/address: Anything
After submitting your form, you should see the payment show up in both your WordPress dashboard (Forms → Entries) and your Square Sandbox app dashboard transaction list. We’ll cover how to manage payments in more detail a little further down this post.
9. Enable Live Payments
Once you’ve tested your form, you’re ready to turn off Sandbox mode and start accepting real payments.
To do this, you’ll essentially repeat the same actions from Step #3 above. The only difference is that you’ll be doing them for Live mode instead of Sandbox mode.
- Go to Forms → Settings in your WordPress dashboard.
- Select the Square tab in the settings area.
- Change the radio button from Sandbox to Live.
- Click Connect to Square.
- Complete any authorization steps as needed – you should be automatically redirected back to the WordPress dashboard and see a connected message.
- Make sure to click Save Settings.
10. Manage Your Payments in Square and WordPress
As we mentioned in the test payment section, you’ll be able to view and manage your payments from both your WordPress dashboard and your Square dashboard.
Square Payments in WordPress
In WordPress, you can view individual payments by going to Forms → Entries and selecting your Square payment form.
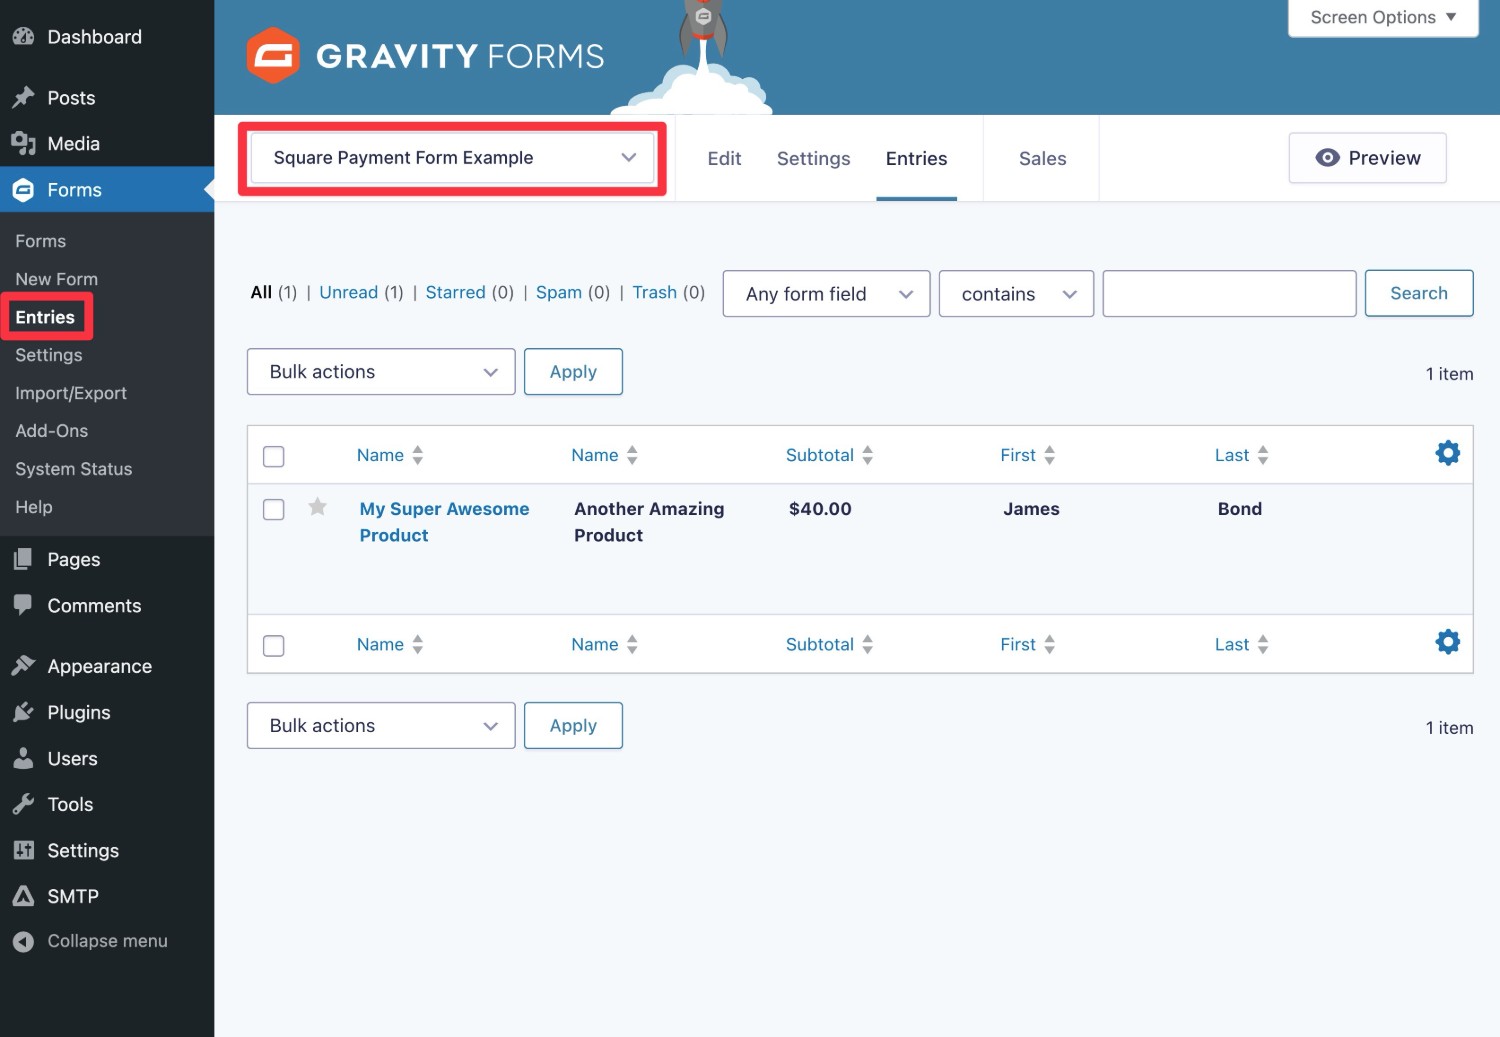
You can also open the Sales tab to view payment-specific reports for different time periods.

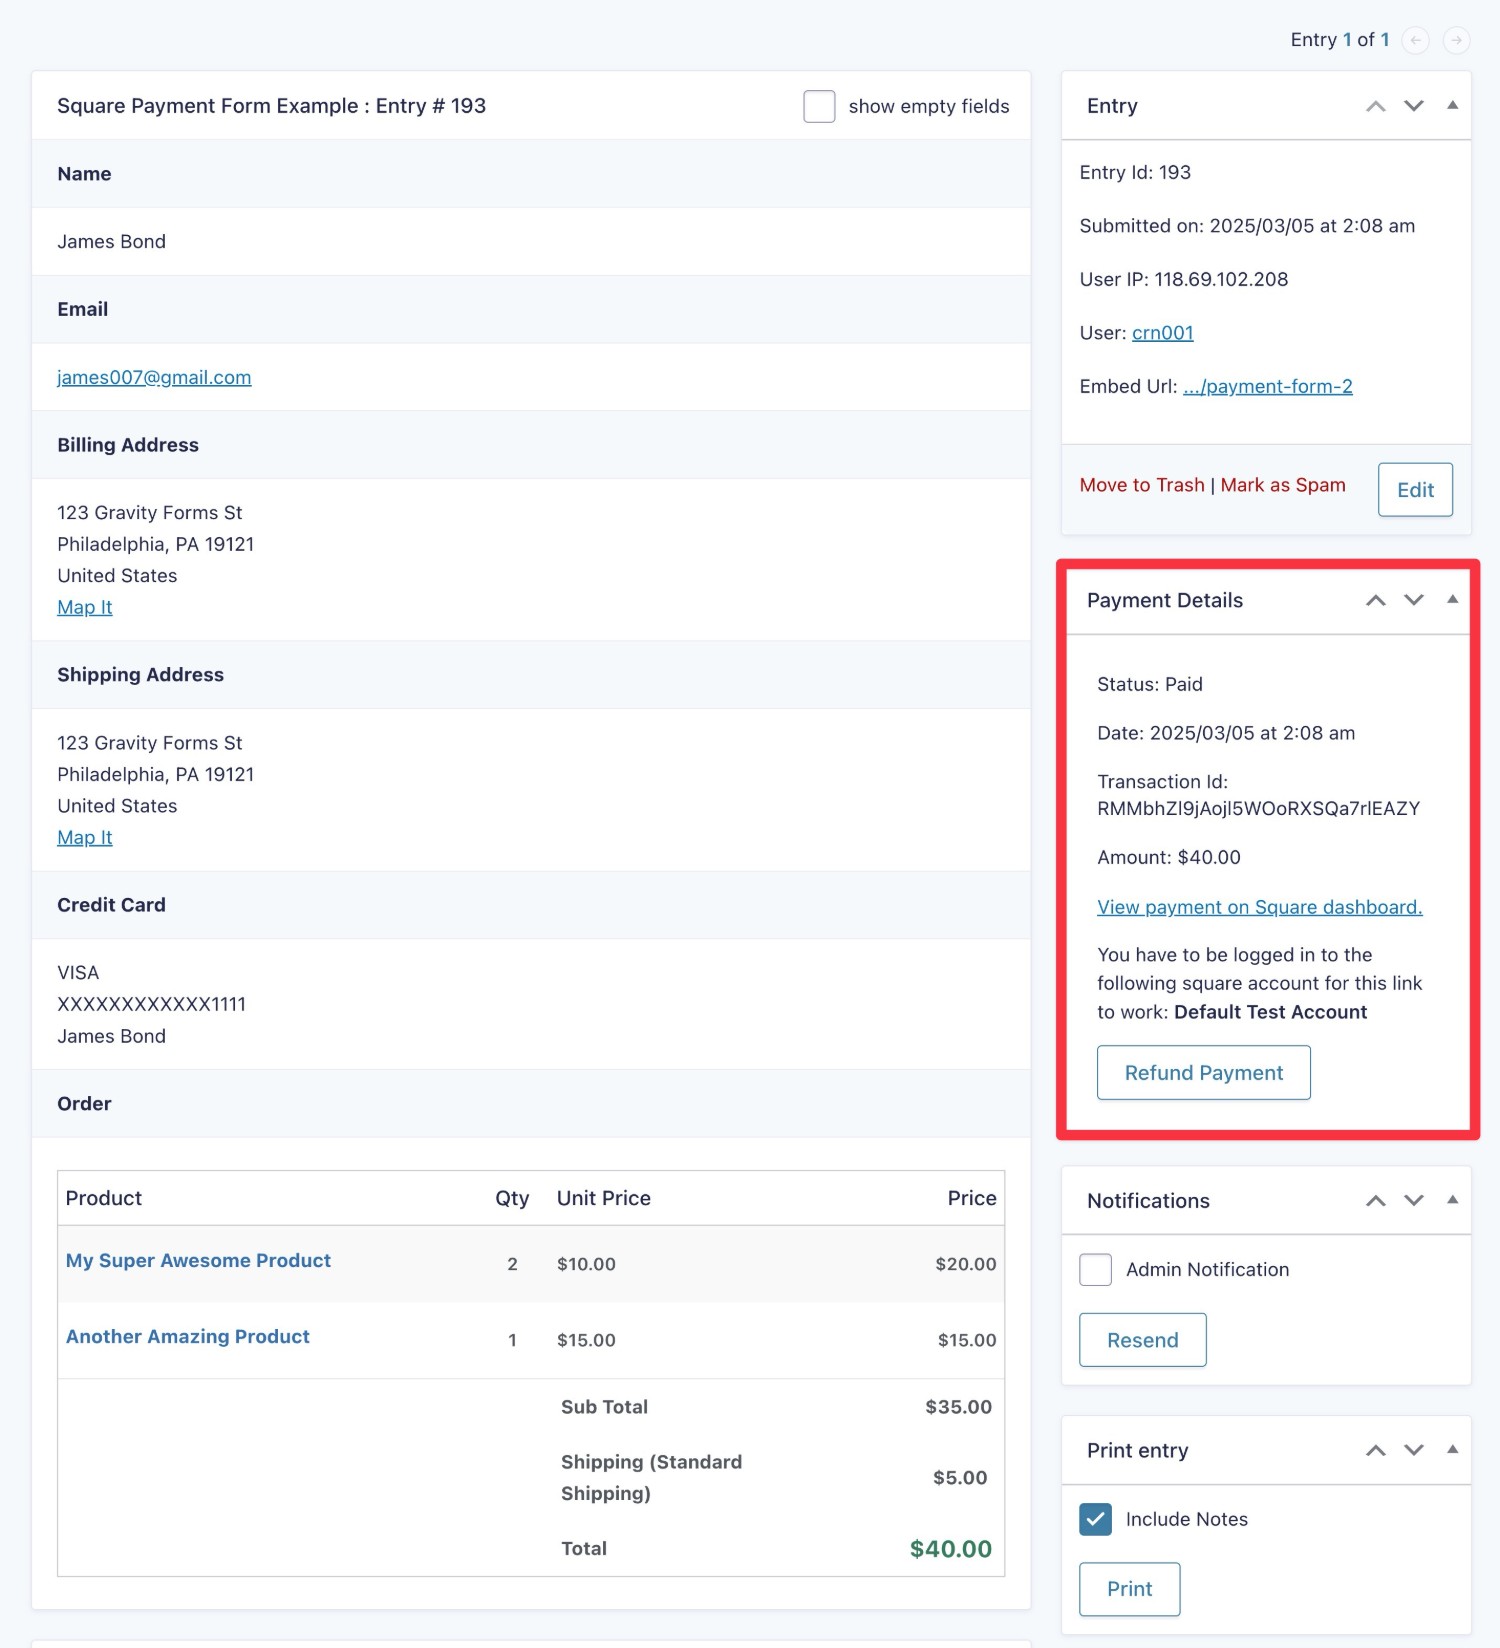
To manage an individual payment, you can click on it in the Entries list. This will not only provide you with all of the form field details, but you’ll also get options to manage the payment:
- You can refund a person’s payment.
- For subscriptions, you can cancel a user’s subscription.
You can also perform other administrative tasks, such as re-sending the payment confirmation email or receipt. There’s also a link to open that transaction directly in your Square dashboard.
Square Dashboard
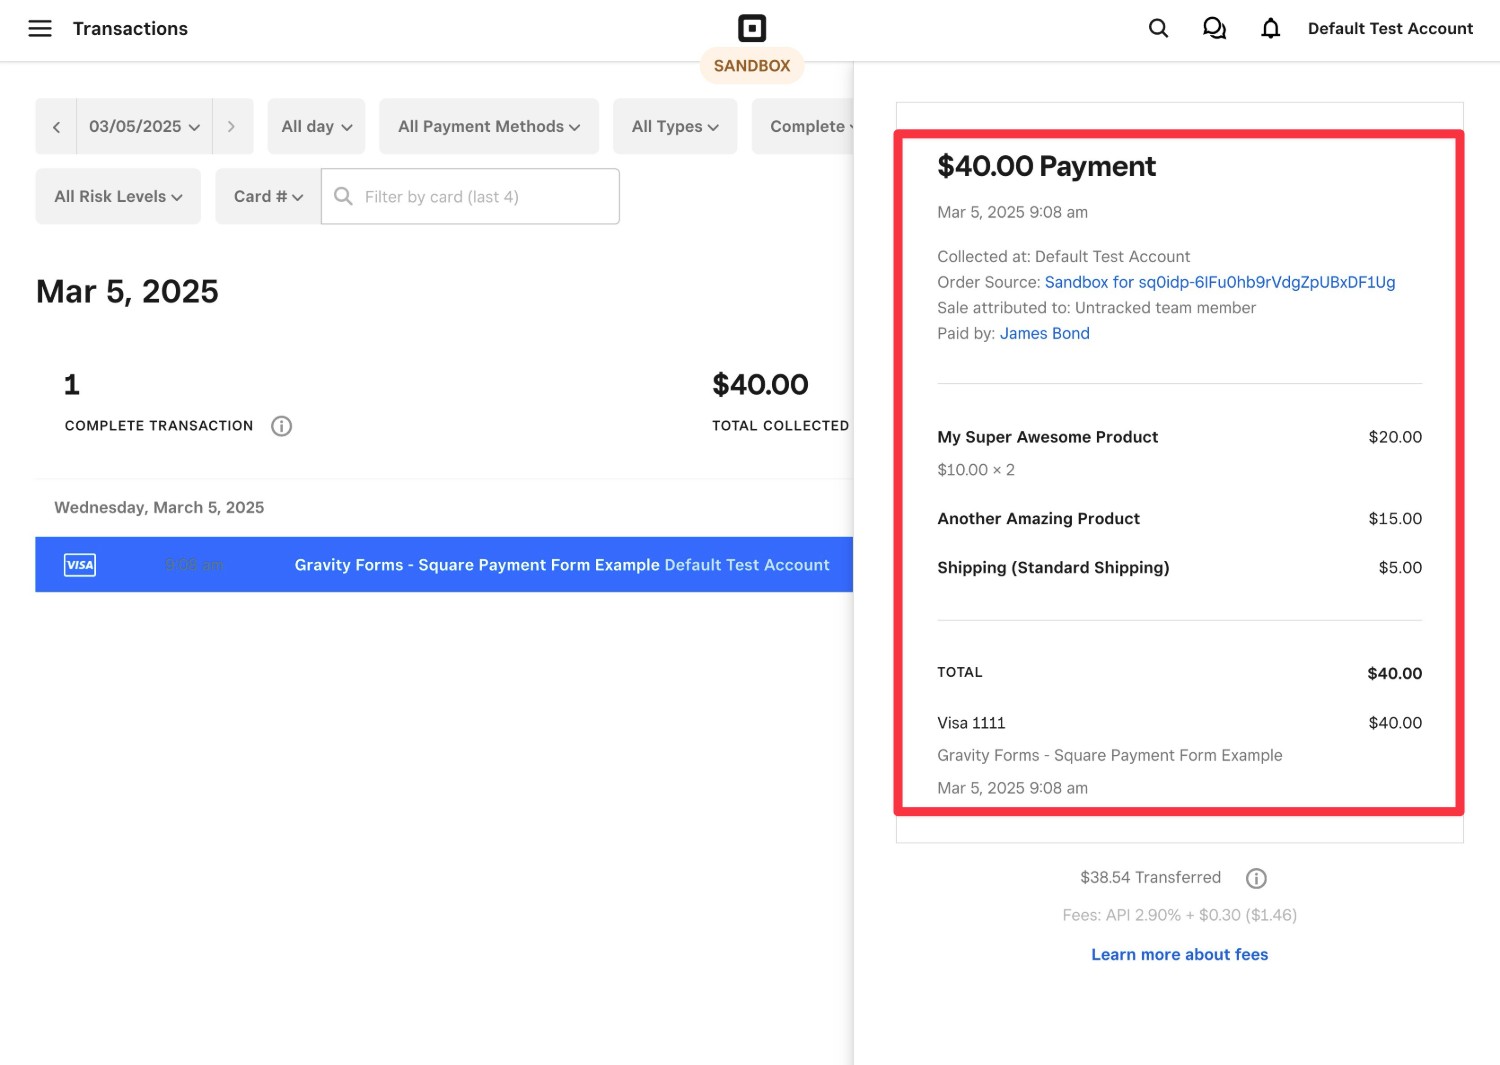
Square also offers detailed reports and payment management on the Square website.
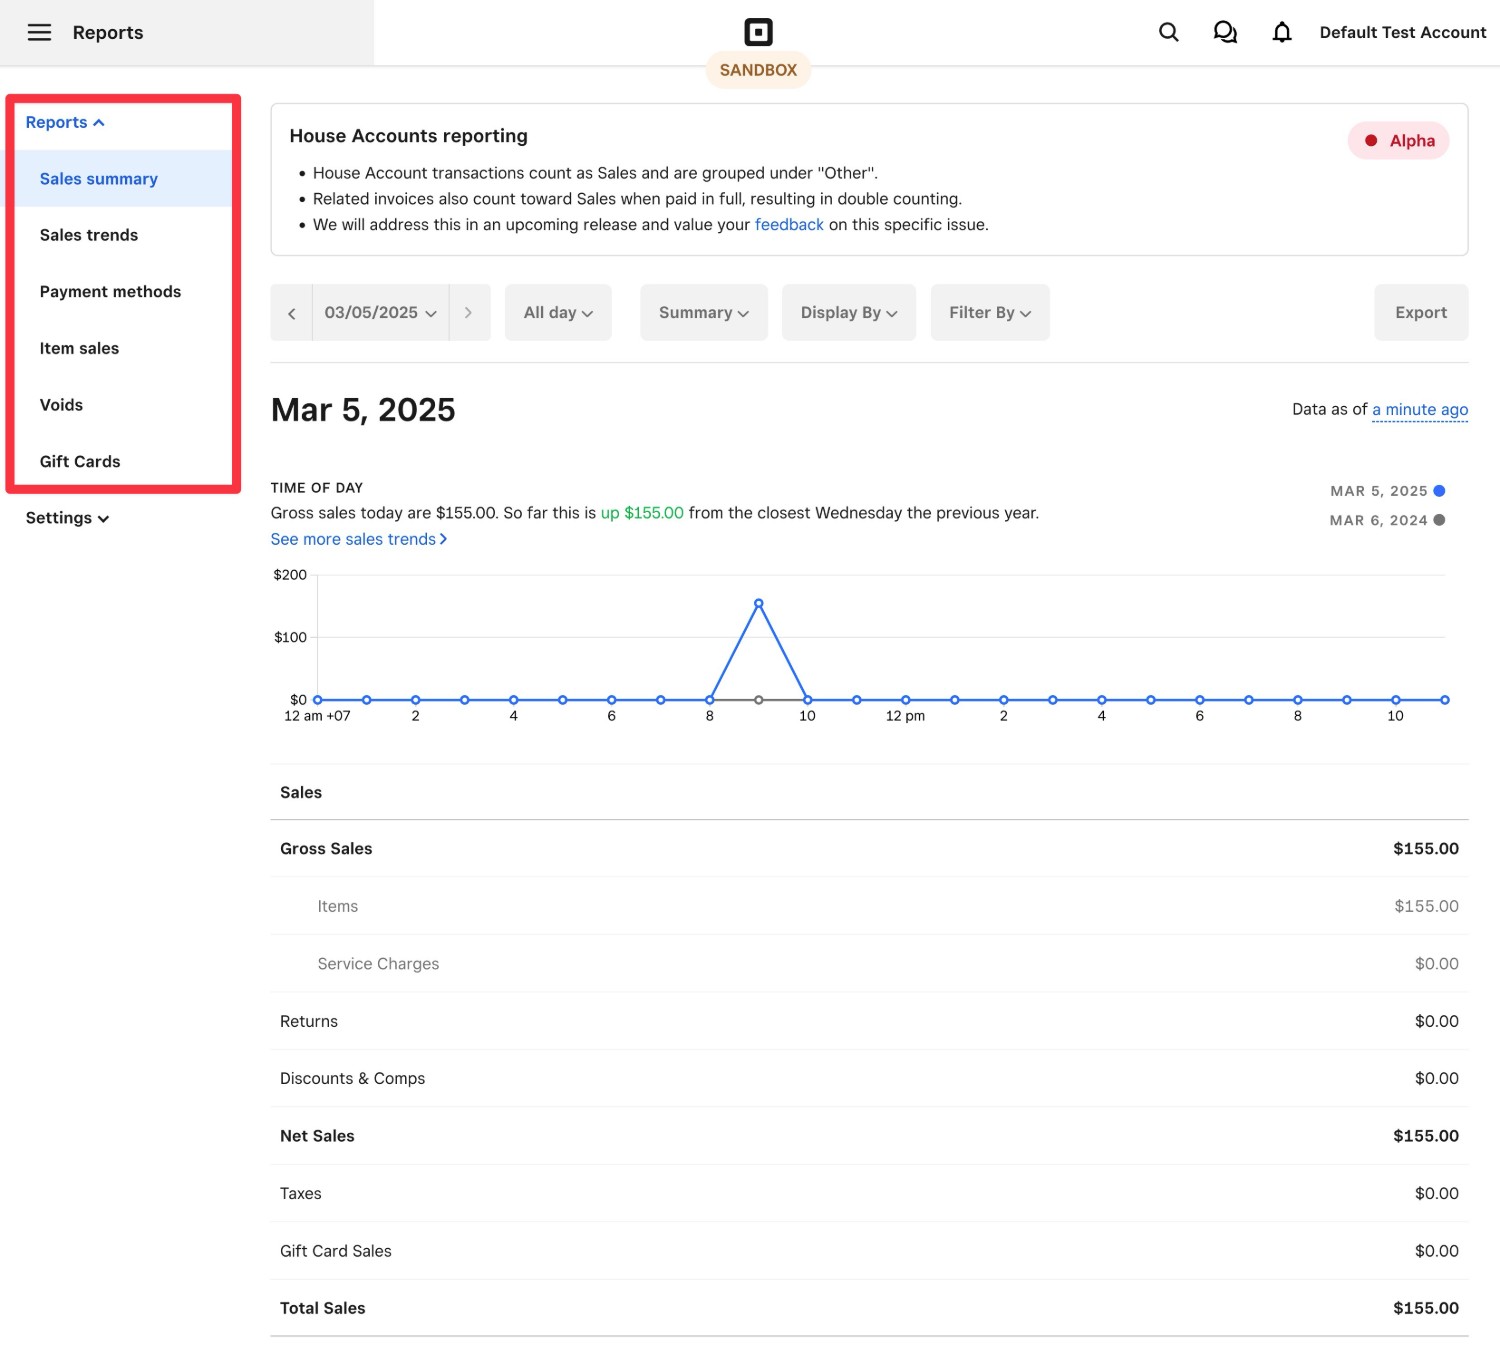
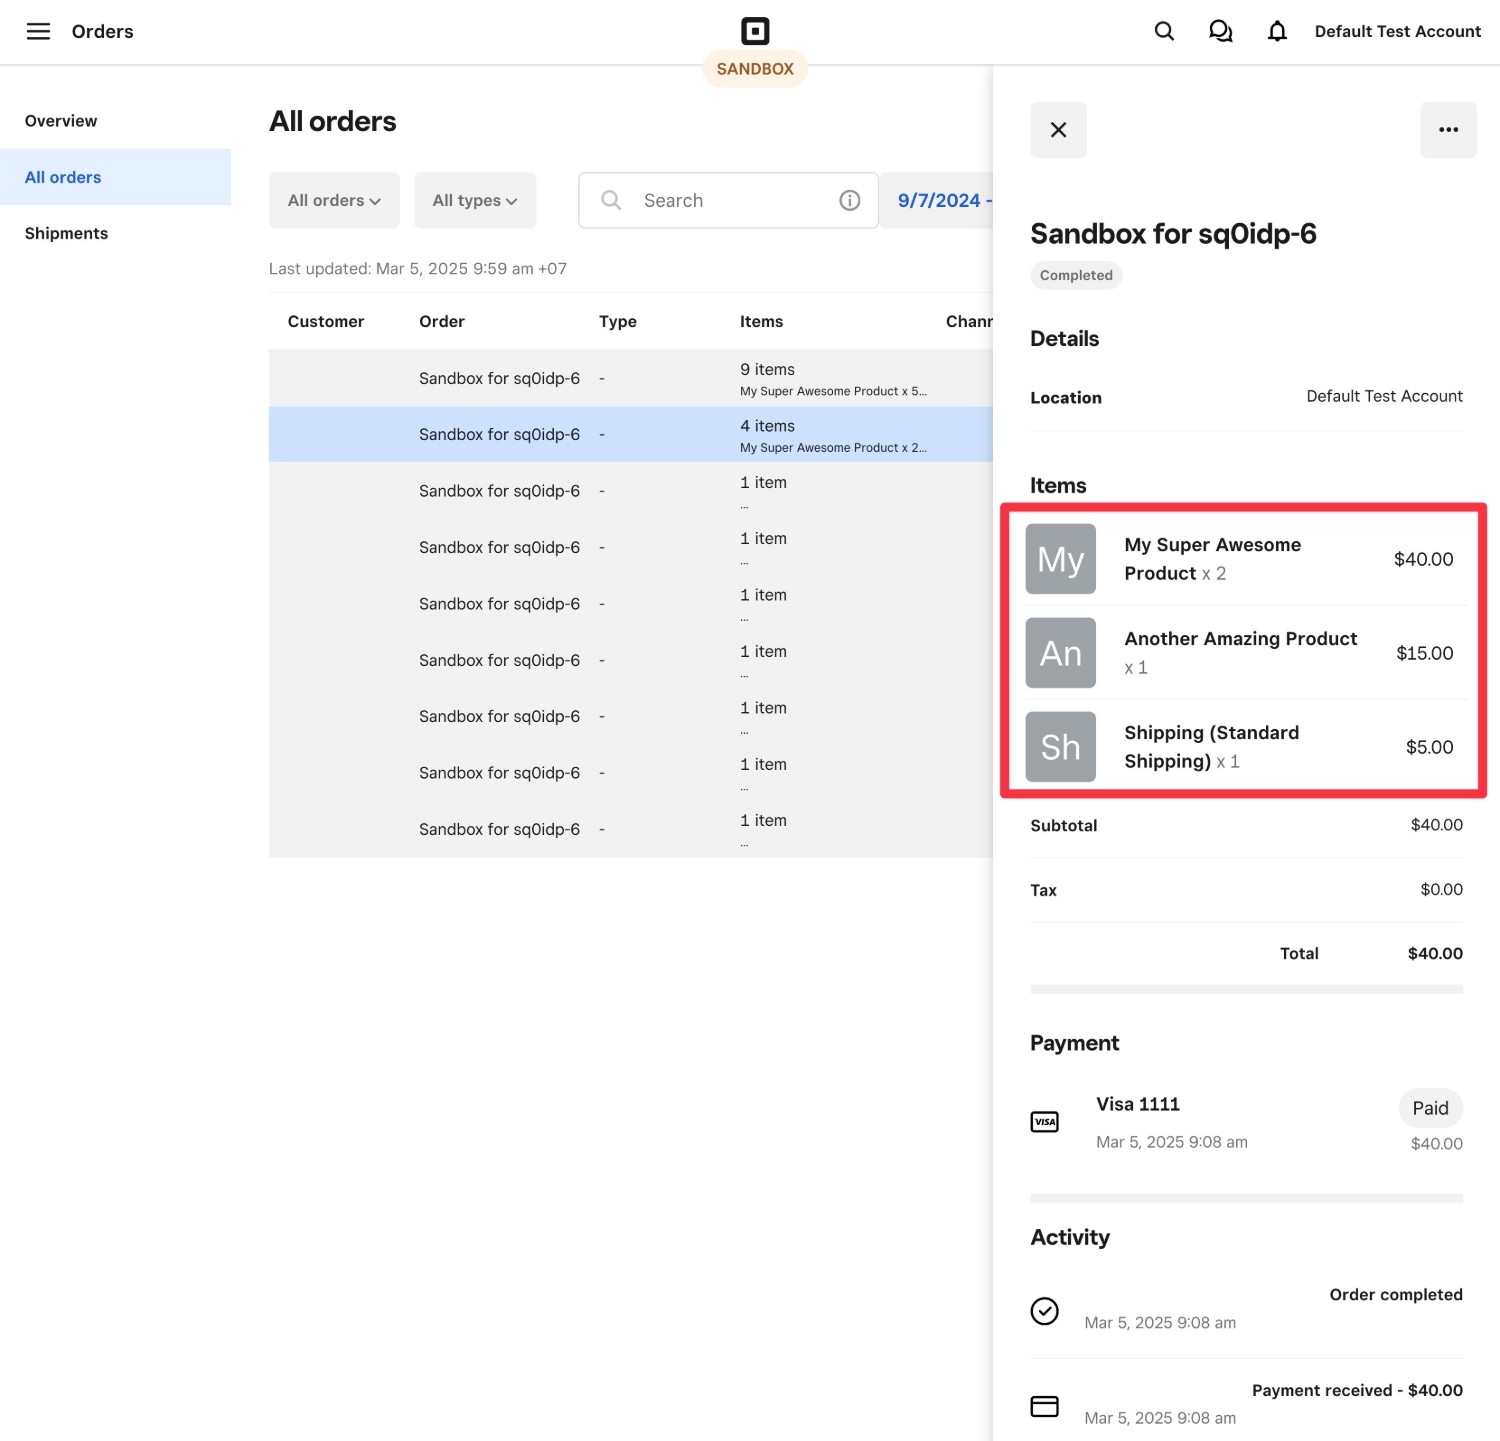
If you open the transaction list and select an individual payment, you can see more details.
Your payments will also show up as orders in Square, including showing the individual items that were purchased (if applicable).
For more details, check out Square’s documentation.
Get Started With WordPress and Square Today!
That wraps up our guide on how to use WordPress and Square together with the help of the Gravity Forms plugin.
With Square, you can process one-time and recurring payments via your WordPress site. Plus, you can also go beyond WordPress payments thanks to Square’s robust in-person payment solutions, along with other tools like invoicing.
If you’re ready to get started, purchase a Gravity Forms Pro or Elite license today to access the Square Add-On.
And if you’re not signed up for Square yet, don’t forget – Gravity Forms and Square have a special promotion where you can get fee-free processing on up to $5,000 in credit card transactions in the first 180 days, plus $20 off any Square hardware for in-person payments.
To get this great deal, just register for your Square account using this link.

If you want to keep up-to-date with what’s happening on the blog sign up for the Gravity Forms newsletter!
"*" indicates required fields