

If you’re having issues with WordPress not sending email (and/or WordPress emails being flagged as spam), this is the post for you because you’re going to learn exactly what the problem is and how you can fix it.
Unfortunately, having issues with WordPress email sending can cause serious problems for a lot of businesses, resulting in poor user experience and maybe even lost revenue.
If your WordPress emails don’t work properly, your visitors might miss out on important information and you could miss out on leads and/or orders. Obviously, that’s not a good thing!
Thankfully, there’s a simple way to avoid problems like that. Rather than relying on the default WordPress email sending method, you can use a WordPress SMTP plugin like Gravity SMTP to configure your site to send all of its emails using a dedicated email sending service.
In this post, you’re going to learn everything that you need to know about issues with WordPress email sending:
- Why the default email sending method in WordPress isn’t very reliable
- How a WordPress SMTP plugin can help fix the problem
- Step-by-step guide on how to set up a dedicated email sending service on your site to ensure that your emails make it to your users’ inboxes
Why the Default WordPress Email Sending Method Doesn’t Work Very Well
By default, WordPress tries to send its emails using wp_mail, which is based on PHP mail. Essentially, this method tries to send emails using the same server that your WordPress site is hosted on.
It does this because it lets WordPress offer an out-of-the-box solution for sending emails, which gives every single site at least a chance to have working emails without additional configuration.
However, there are a few issues with the default sending method that might be causing problems:
- Your site’s server is optimized for hosting your website, not for sending emails. This means that it might not reliably send emails.
- Some hosts outright block email sending (or are configured in a way that doesn’t allow email sending). This means that your site might not be able to send any emails.
- The emails that your site sends look suspicious to spam filters because they lack proper authentication and might have a poor sender reputation. So even if your server is able to send emails, those emails might go straight to users’ spam folders.
How Gravity SMTP Can Fix Your Broken WordPress Emails
The best way to fix your WordPress site’s email issues is to configure it to use a dedicated email sending service, instead of relying on wp_mail and your hosting server. These services are also known as SMTP services or transactional email services.
Using a dedicated SMTP sending service has a few big advantages:
- You can be confident that your emails will actually be sent. Because your emails are sent using a third-party service, they’ll continue to send even if your host has disabled email sending on your actual hosting server.
- Your emails will avoid the spam folder. Because these dedicated services maintain their deliverability reputation and let you add important authentication technologies, your emails should avoid users’ spam folders and make it into their actual inboxes.
- You can access important analytics and logging. You’ll be able to see all of the emails that your site sends, along with important metrics like open rate, clicks, bounce rate, and so on.
Unfortunately, WordPress doesn’t offer a built-in feature to connect to a dedicated email sending service, which is where the Gravity SMTP plugin comes in.
With Gravity SMTP, you can easily connect your site to a variety of different email sending services.

You’ll be able to send core WordPress emails via these services, along with emails from most plugins that you’re using (as long as the plugin utilizes the default WordPress sending method, which most do).
Gravity SMTP currently offers dedicated API integrations for the following services:
- Brevo
- SendGrid
- Mailgun
- Postmark
- Google / Gmail
- Microsoft 365 / Outlook
The Gravity SMTP team is also working on adding more integrations, which you can see here. You can also vote on the integrations/features that you’d like to see added.
If you want to use a service that’s not on that list, Gravity SMTP also offers a custom SMTP option that lets you connect to any service just by entering the service’s SMTP server details and credentials.
Beyond helping you connect to an email sending services, Gravity SMTP also includes some helpful features to test and monitor your site’s emails:
- Email testing tools – you can easily send a test email to any address, which lets you quickly check if your site’s emails are working.
- Detailed email logging – you can log every email that your site sends, along with technical information and a full visual preview of the email’s content.
How to Fix WordPress Emails Not Sending With Gravity SMTP
Now, let’s get into the actual step-by-step guide on how you can fix your site’s email issues using the Gravity SMTP plugin.
For this guide, we’re going to pair Gravity SMTP with the Brevo email sending service, which was formerly known as Sendinblue. Here are some of the reasons why Brevo can make a good starting point for WordPress users having email issues:
- Generous forever-free plan – you can send up to 300 emails per day for free, which should be plenty for most WordPress sites.
- Easy to use – Brevo makes it easy to set up your account and you can connect to Gravity SMTP just by pasting an API key.
- Works for marketing emails too – while it’s totally fine to just use Brevo for your WordPress site’s transactional emails, Brevo also offers robust email marketing tools. If you do want to be able to send both types of emails, that can make it very convenient.
If you’d rather use a different service, though, we also have detailed tutorials for some other well-known email marketing services that Gravity SMTP supports:
Regardless of which service you choose, the basic steps will be the same.
1. Install the Gravity SMTP Plugin On Your Site
To get started, you’ll want to install the Gravity SMTP plugin on the WordPress site where you’re experiencing issues.
Gravity SMTP is a standalone plugin from the same team behind Gravity Forms. That is, you do not need to use Gravity Forms in order to use Gravity SMTP, though Gravity SMTP does work well for more reliably sending your form notification emails.
Currently, Gravity SMTP is available at no extra cost to anyone holding the Gravity Forms Elite license.
If you’re holding the Elite license, you can download the Gravity SMTP plugin from the Gravity Forms My Account area.
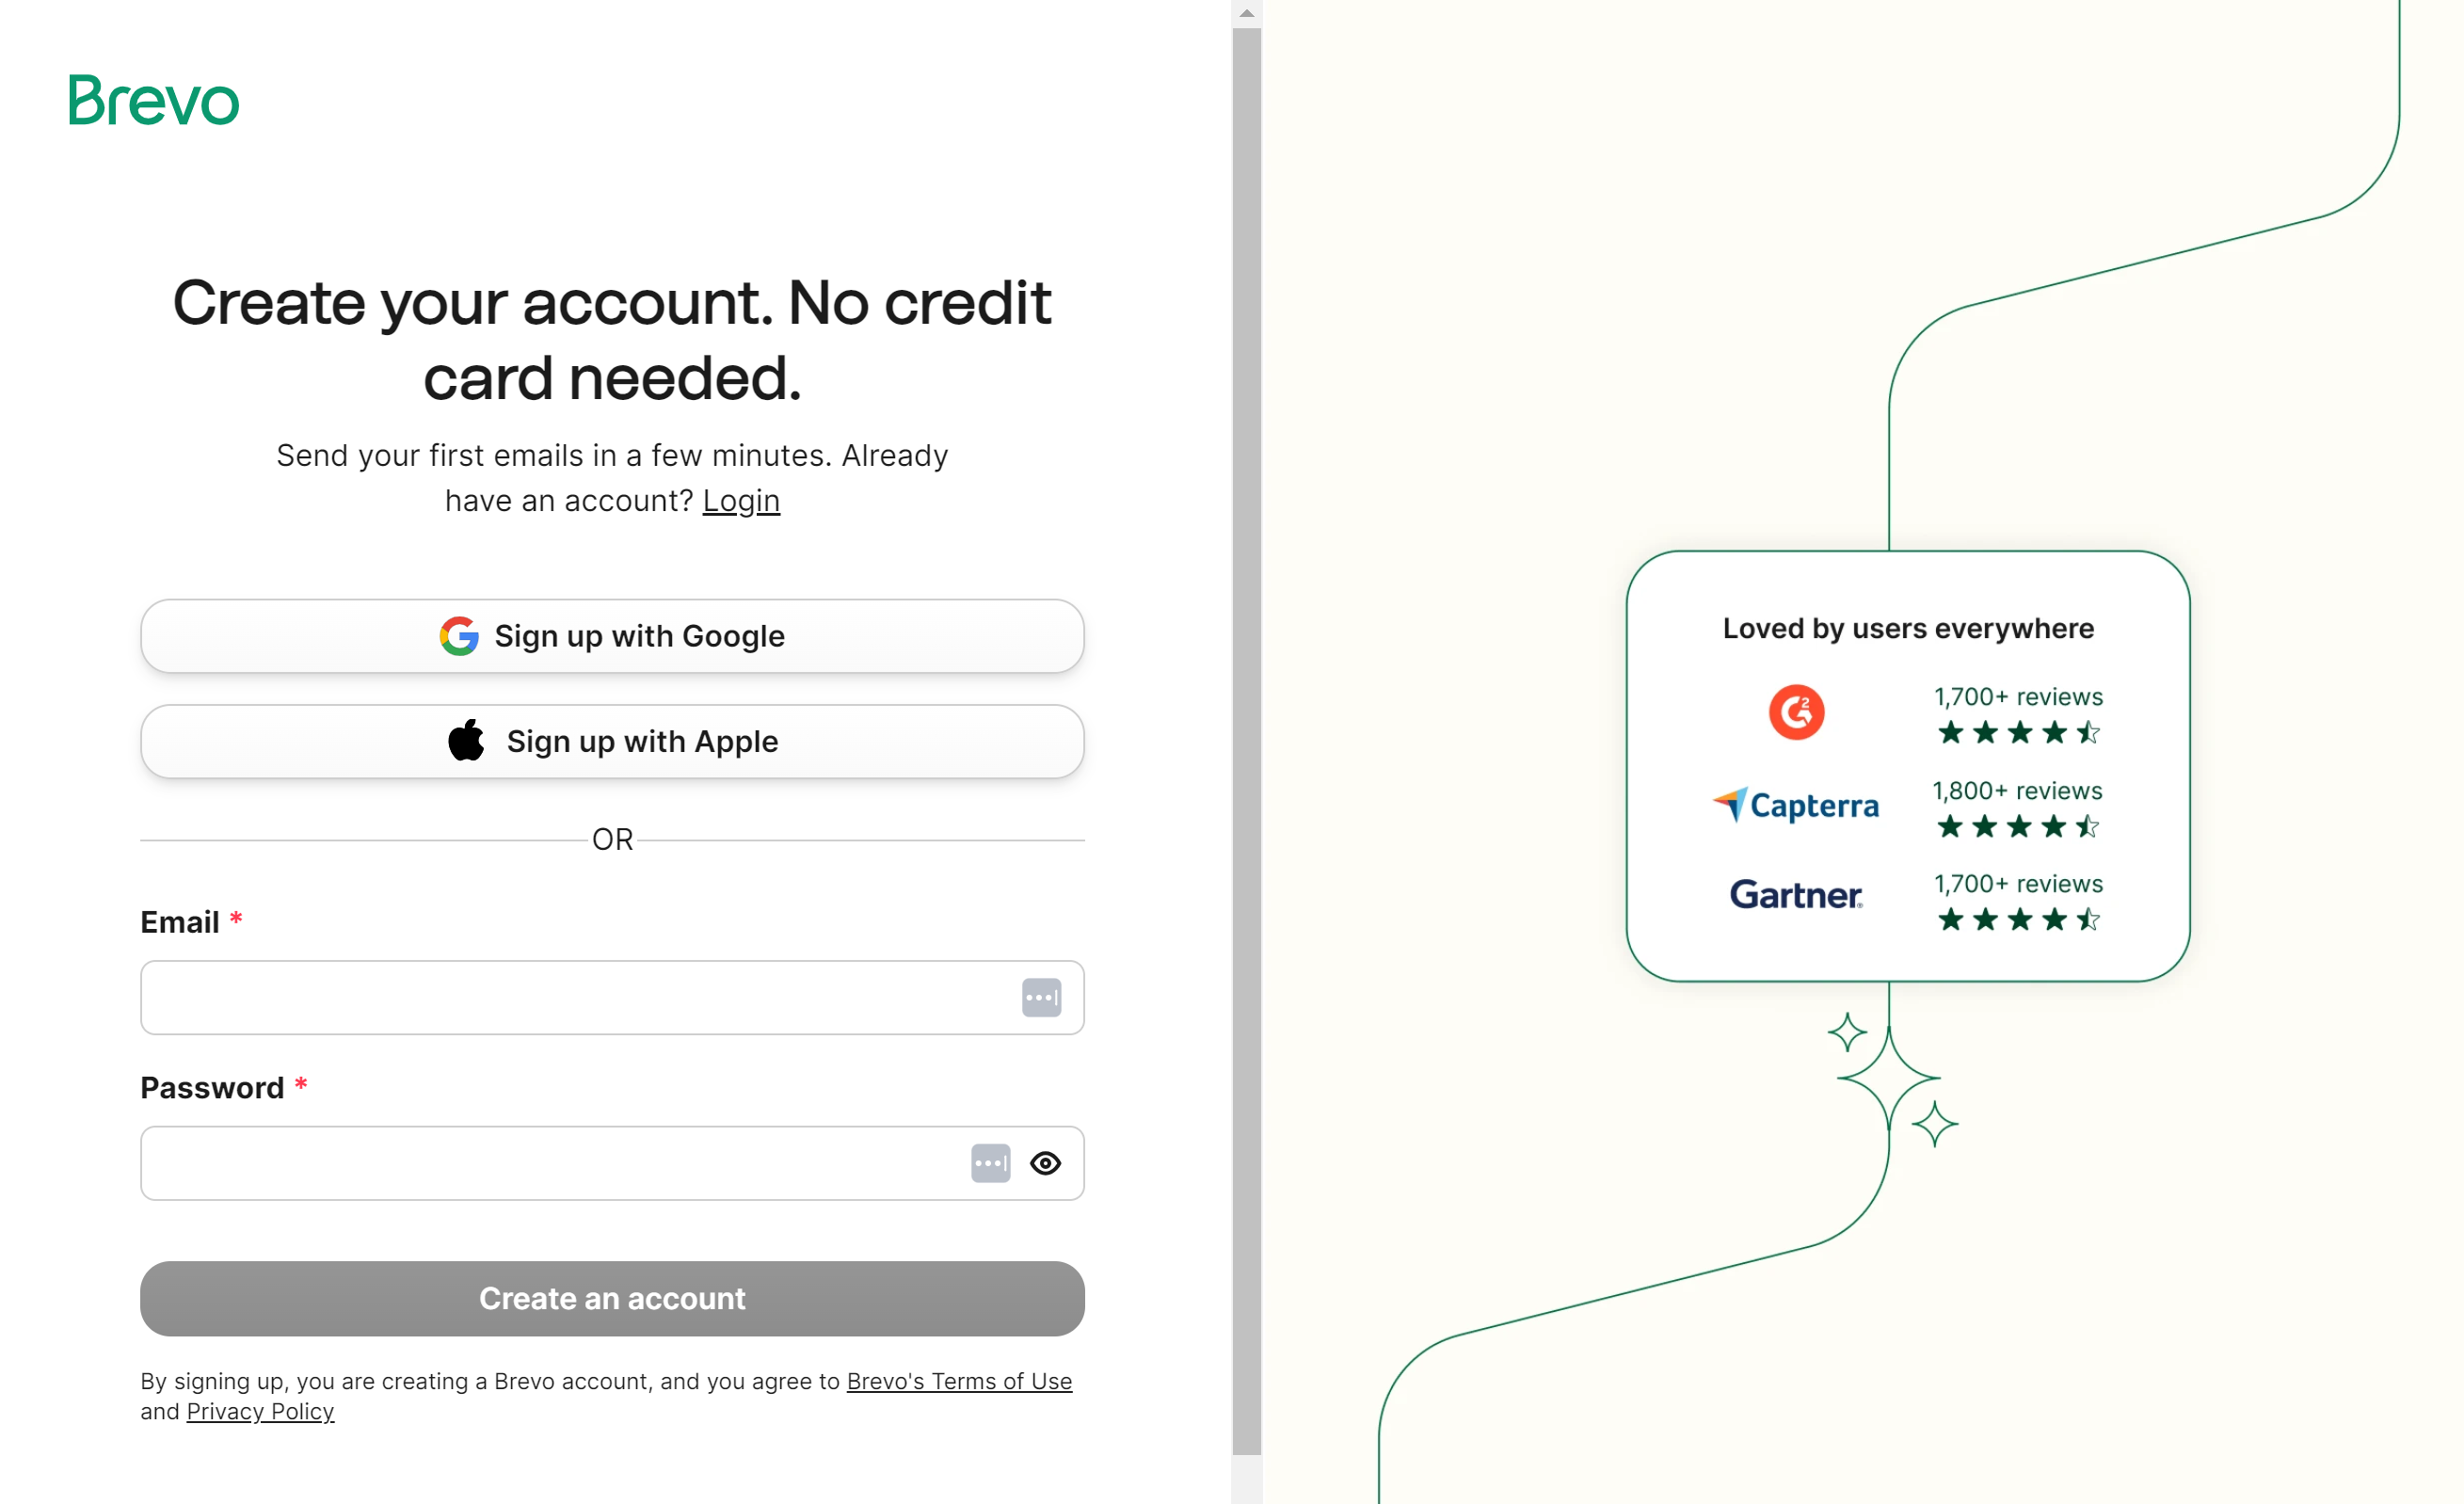
2. Register for Your Free Brevo Account
Next, you’ll want to register for your free Brevo account, if you haven’t done so already.
Again, you’ll be able to send up to 300 emails per day for free forever.
If you ever need to exceed that, the paid plans start at $25 per month and go up based on the number of emails that you send.
There’s no need to use a special Brevo SMTP plan – you can just sign up for the regular Brevo plans, which also include email marketing.
3. Authenticate Your Domain Name With Brevo
In order to have Brevo send emails from your WordPress site’s domain name, you’ll next need to authenticate your domain name with Brevo.
This is true of pretty much any dedicated email sending service. Otherwise, anyone could just sign up and impersonate sending emails from your site!
The authentication process also has the added benefit of making your emails look more trustworthy to email clients’ spam folders, which means your emails will be a lot less likely to get flagged as spam.
Here’s how to get started:
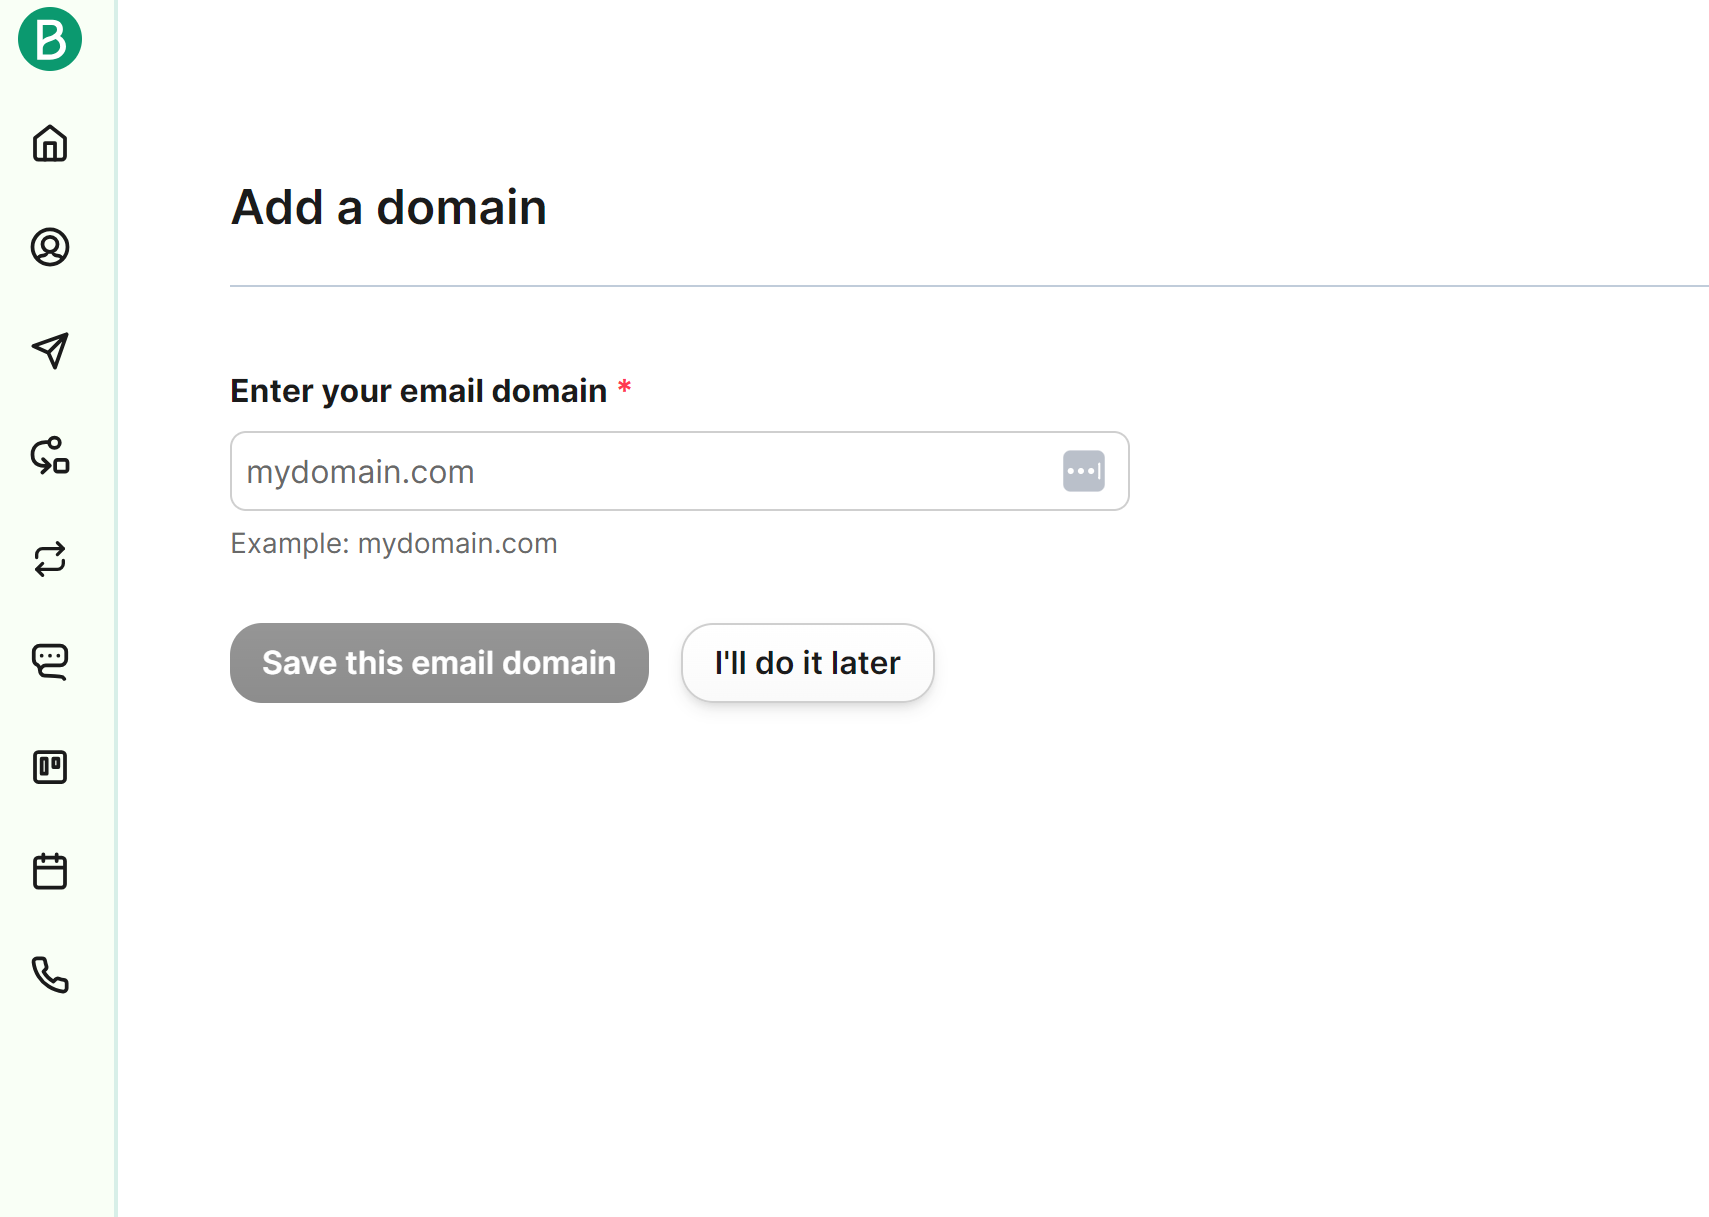
- Click this link to open the Domains page. Or, you can go to your Brevo dashboard, click the account drop-down, and then select Senders, Domains, and Dedicated IPs → Domains.
- Click the Add domain button.
- Enter your WordPress website’s domain name in the box.
- Click the Save this email domain button.
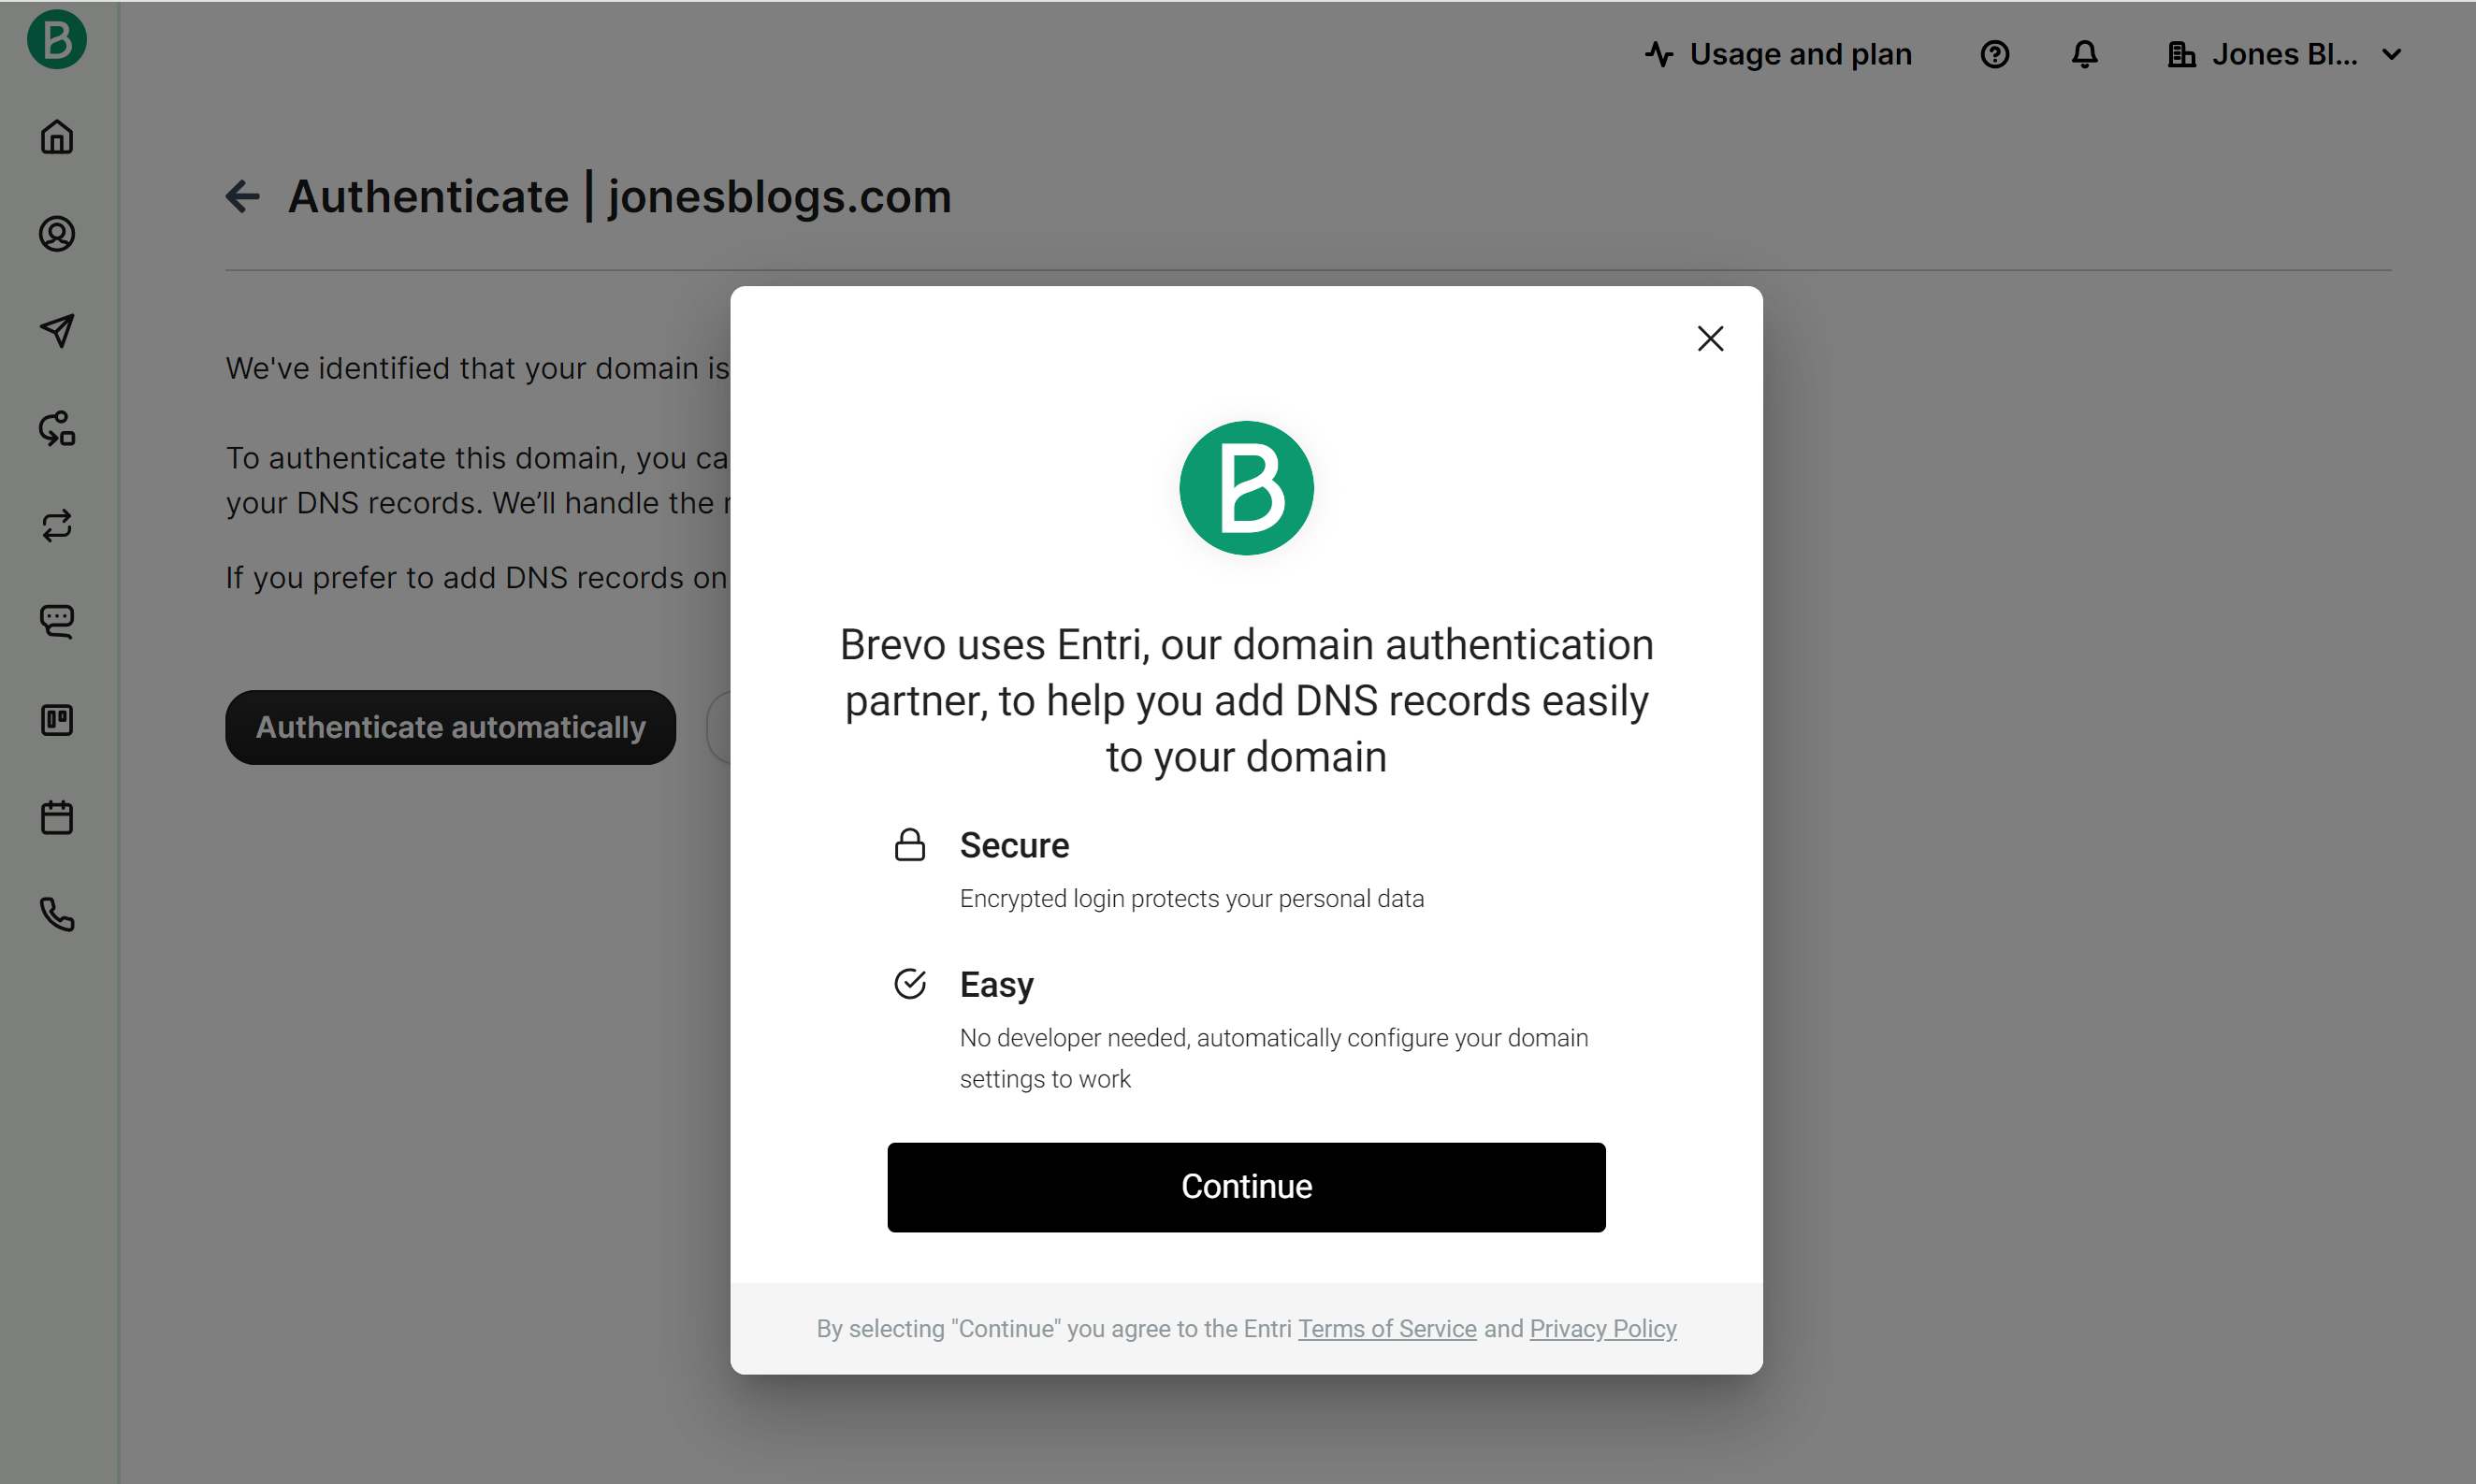
Once you’ve added your domain name in Brevo, you’ll need to add some DNS records to your domain name, which is what actually proves that you control your domain name.
Brevo offers two ways to authenticate your domain:
- Automatic authentication – if you use a domain registrar that supports Entri (Brevo’s automated service), you can do everything automatically. Many popular domain registrars do support Entri, including GoDaddy, Namecheap, and others.
- Manual authentication – you can manually add the records wherever you manage your domain’s DNS. You’ll usually do this at one of three locations – your web hosting provider, your domain registrar, or a service like Cloudflare. The exact method will depend on how you’ve configured your domain name.
4. Create Your Brevo API Key
Once you’ve authenticated your domain name, the next step is to create a Brevo API key. This is what will allow Gravity SMTP to connect your WordPress site to Brevo for emails.
Don’t worry – it’s easier than it sounds. All you need to do is follow these instructions:
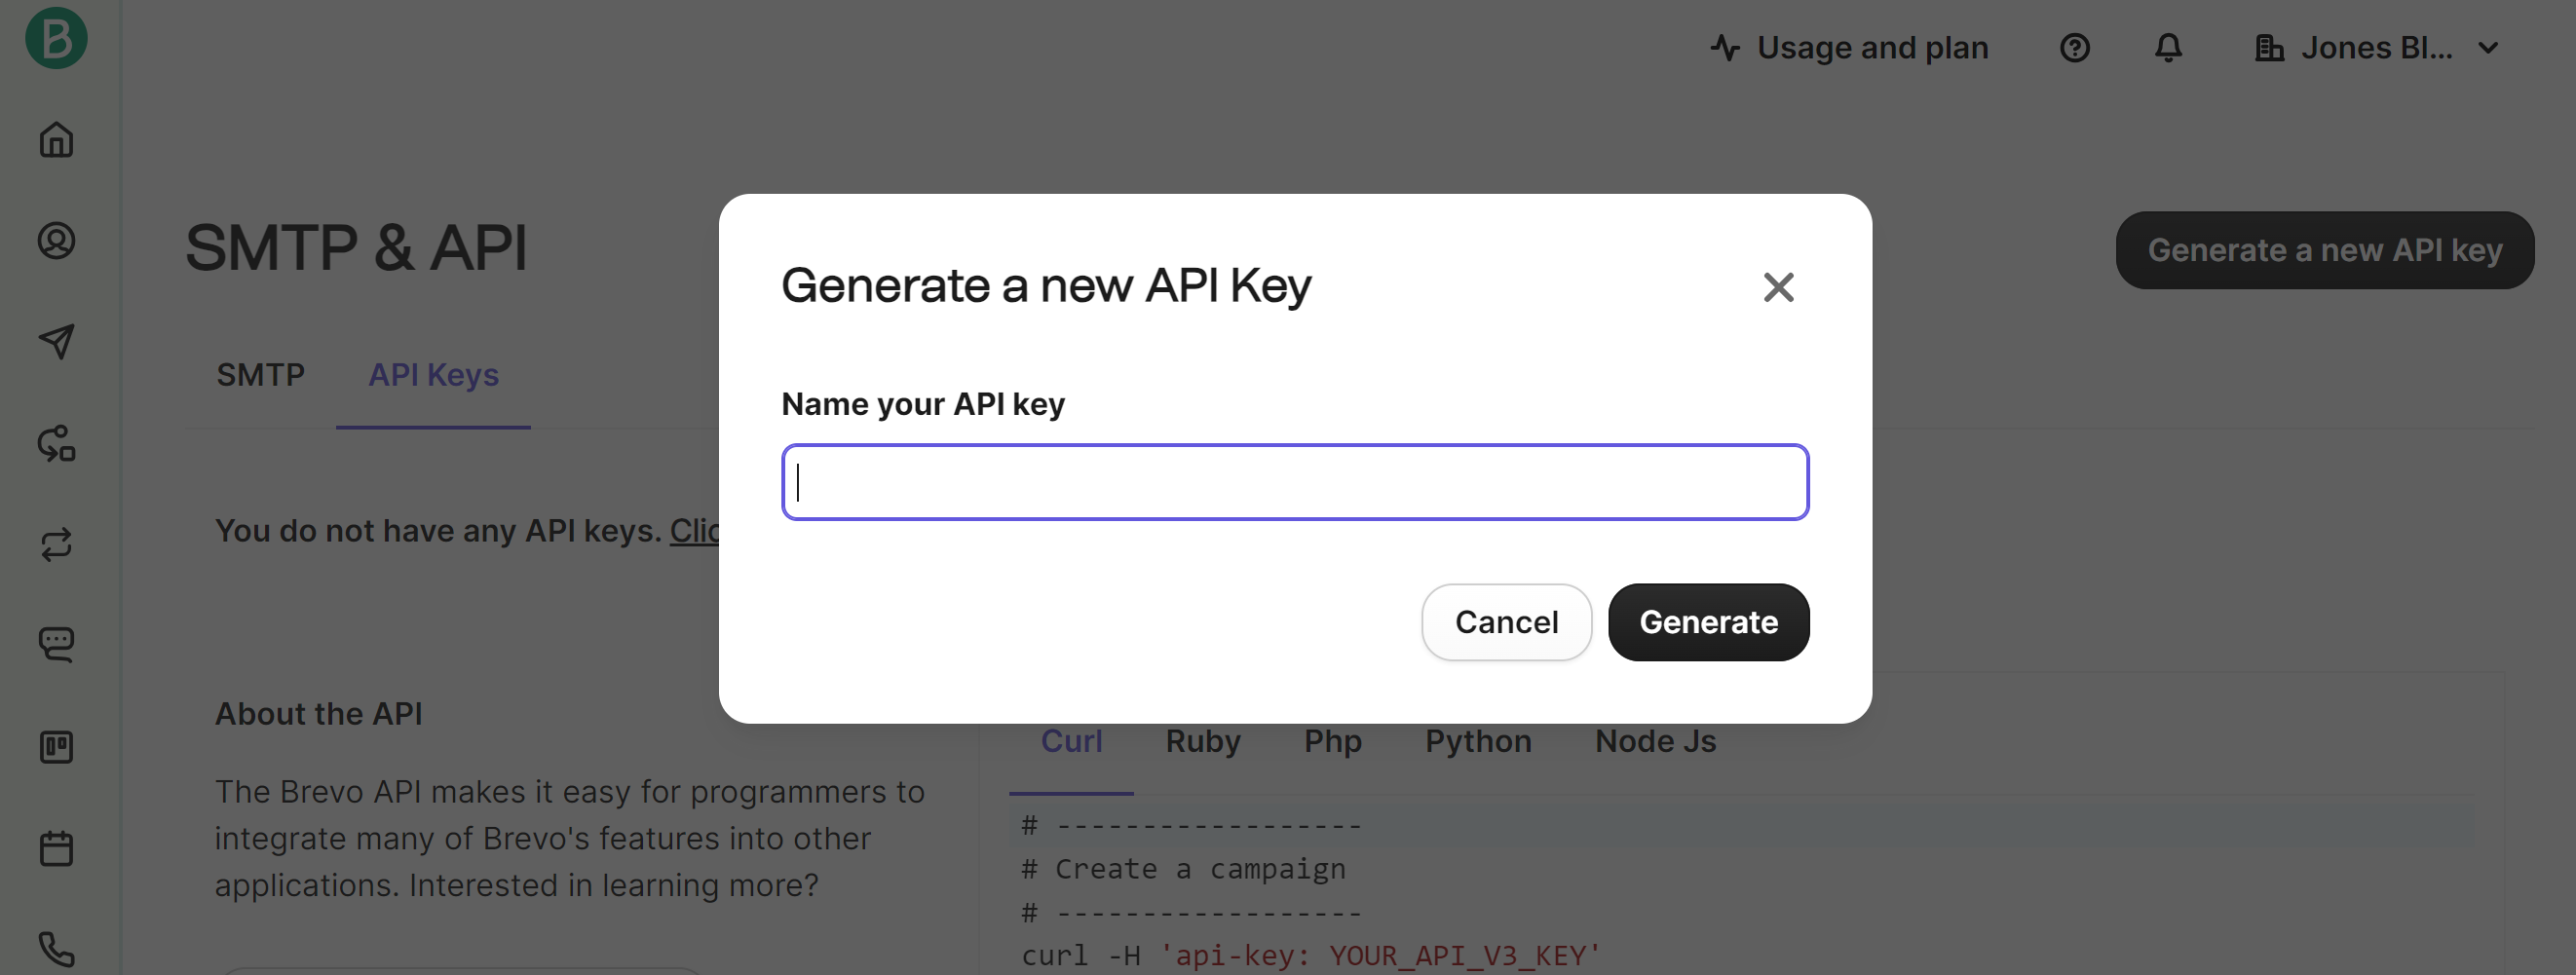
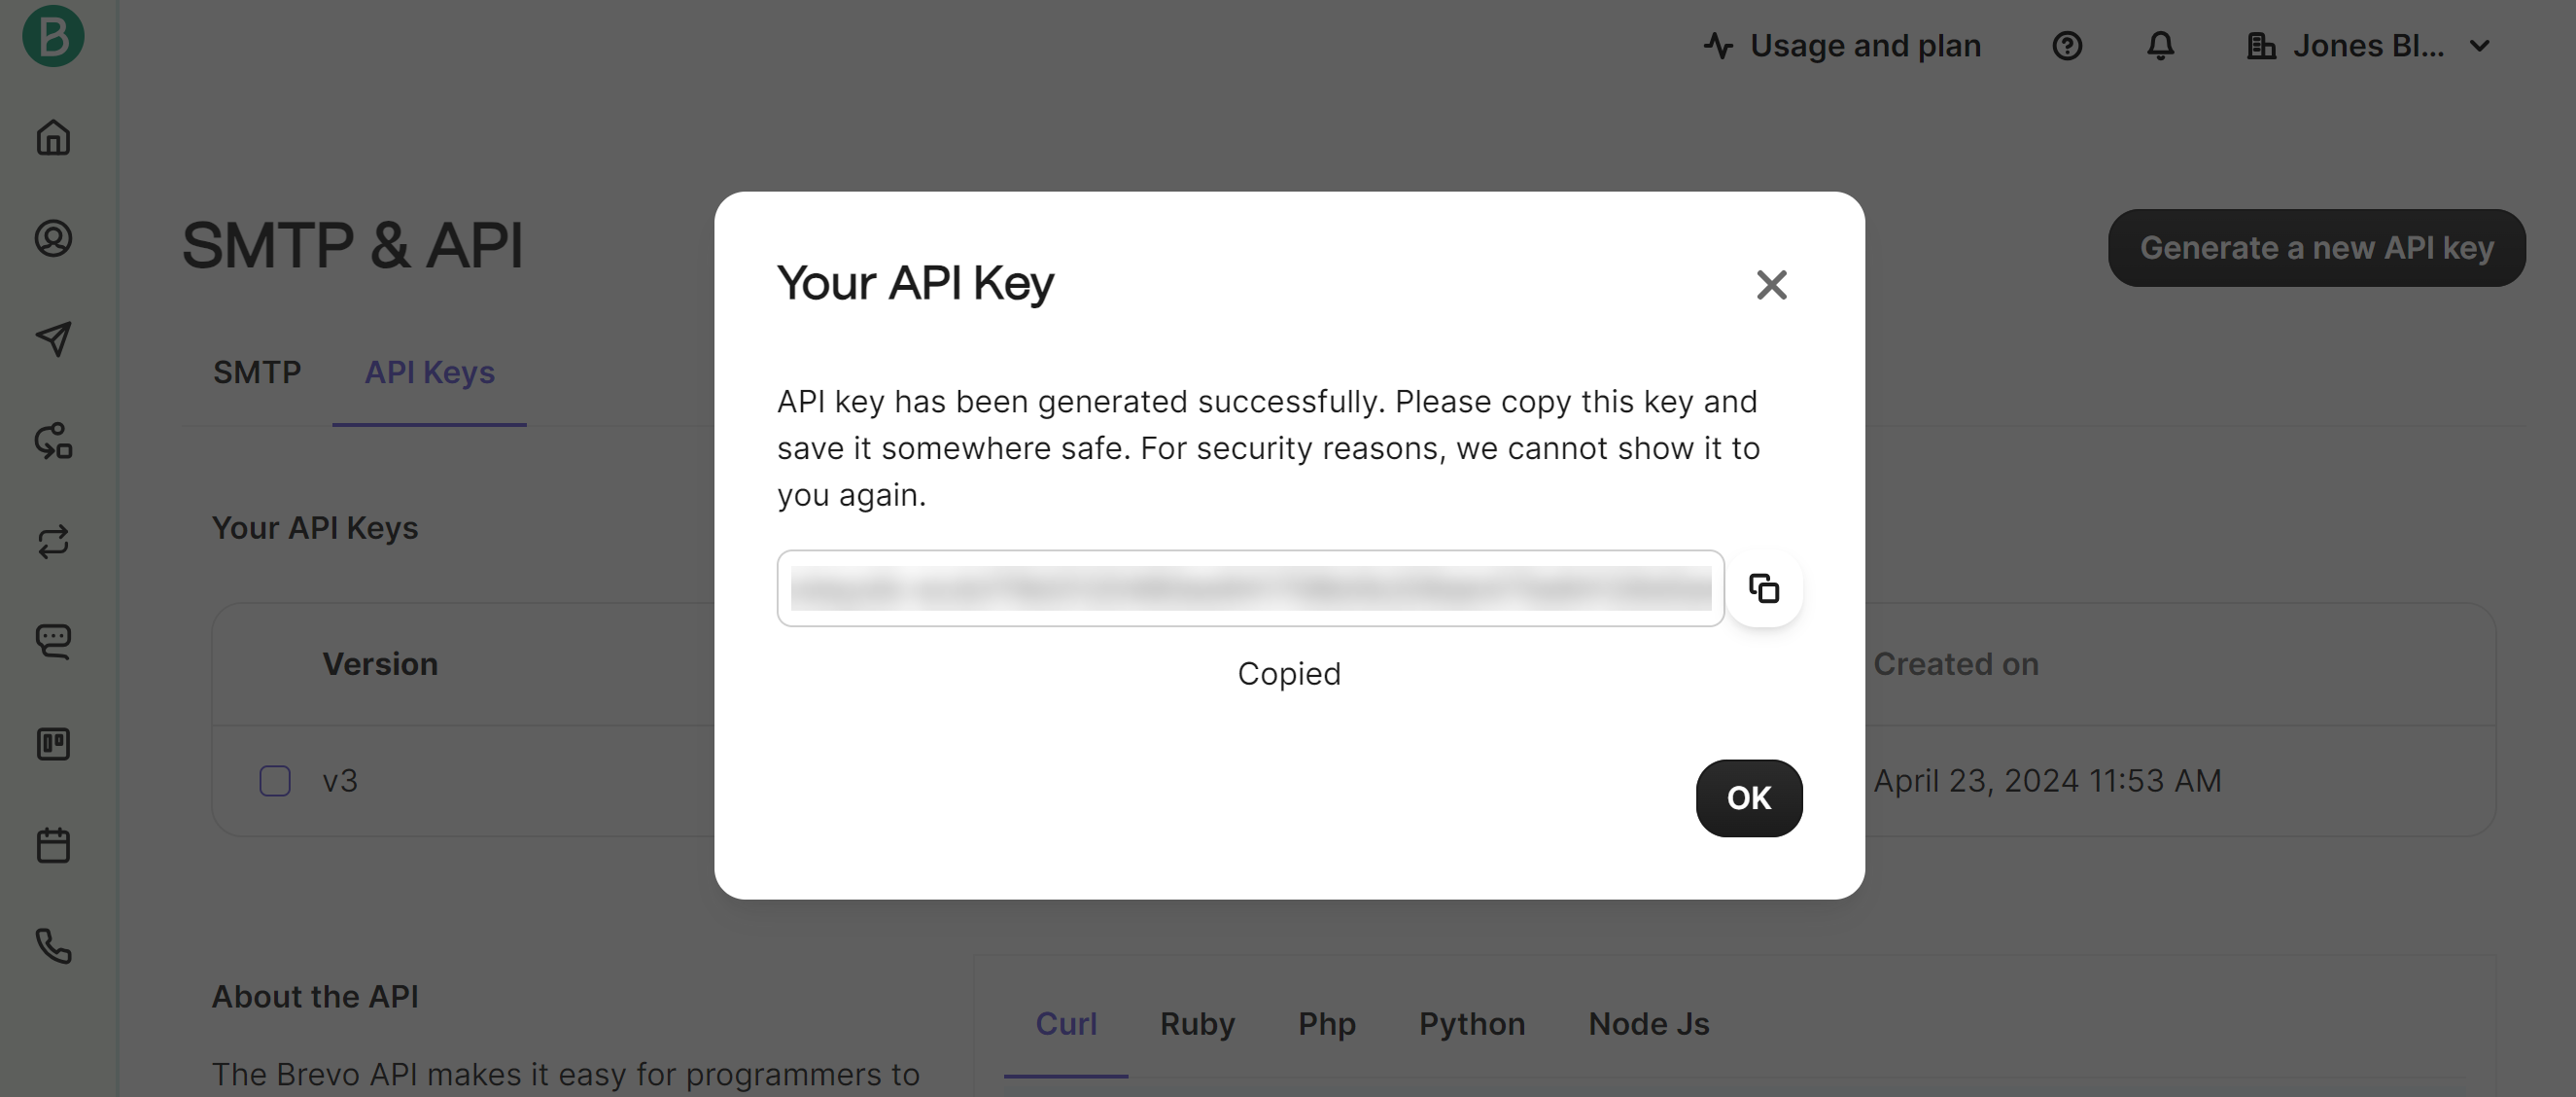
- Click this link to open the API key page. Or, you can go to your Brevo dashboard, click the account drop-down, and then select SMTP & API.
- Click the Generate a new API key button.
- Enter an internal name to help you remember what the API key does.
- Click the Generate button.
You should then see your Brevo API key. Make sure to copy it to a safe place because Brevo will only show the key once.
If you accidentally close it before copying it to a safe place, you can just repeat the same steps to create a new API key.
5. Set Up Gravity SMTP to Use Brevo
Once you have your Brevo API key, you’re ready to connect your WordPress site to the Brevo service using the Gravity SMTP plugin:
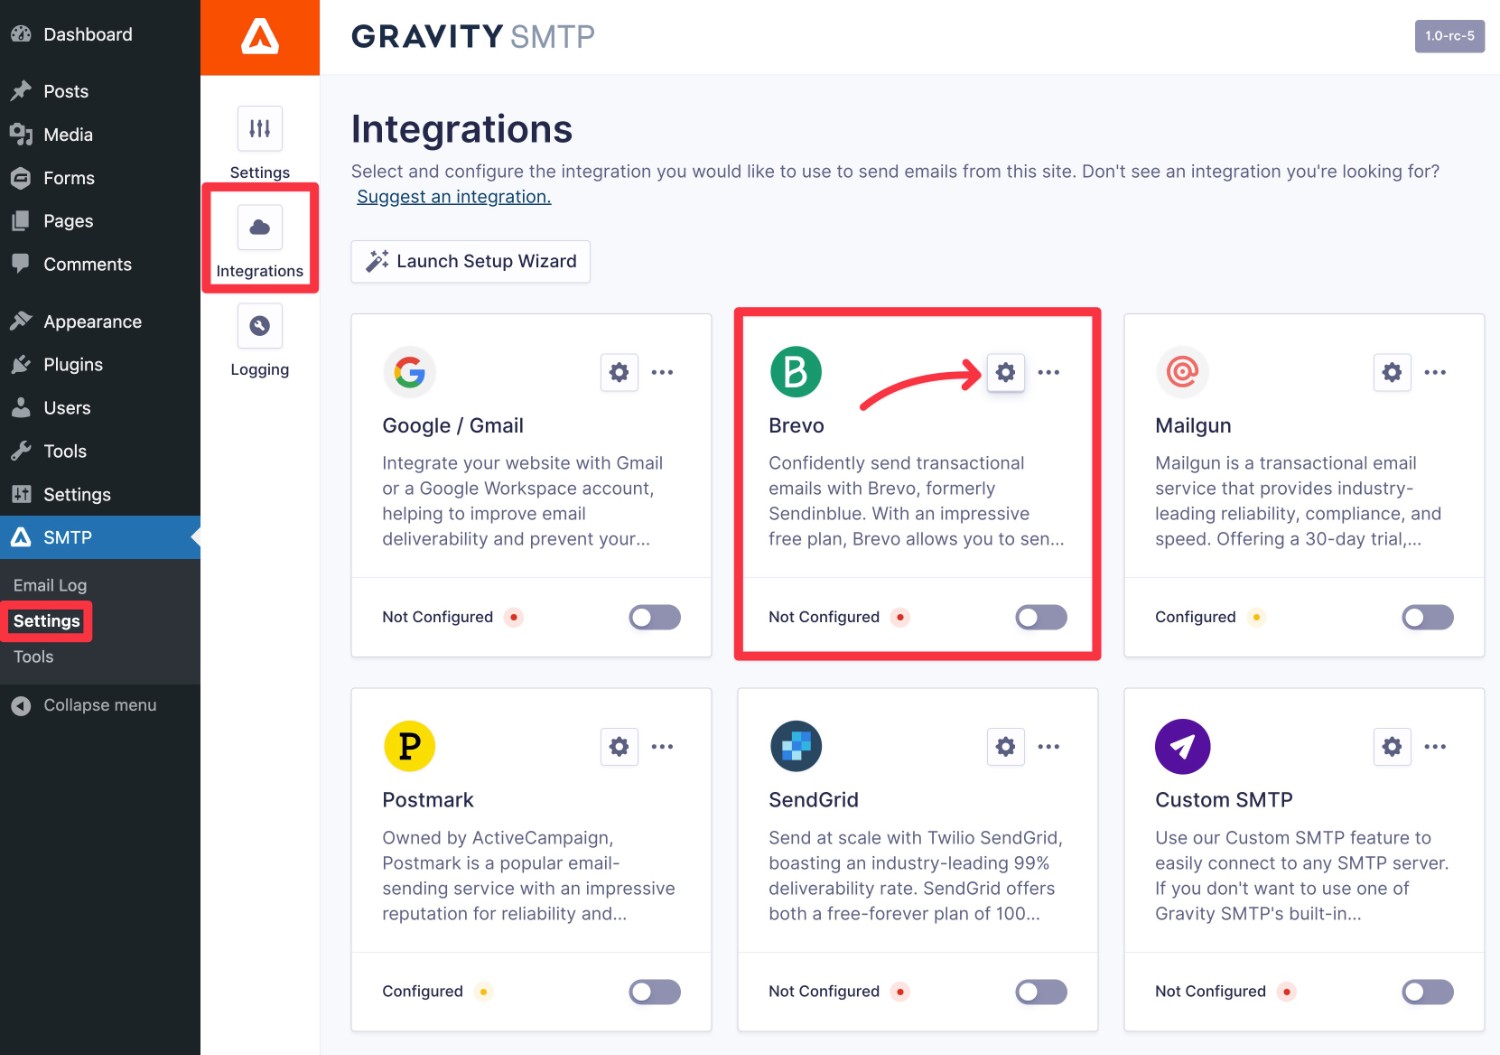
- Open your WordPress dashboard.
- Go to SMTP → Settings.
- Select the Integrations tab.
- Click the gear icon beside Brevo to open the Brevo settings.
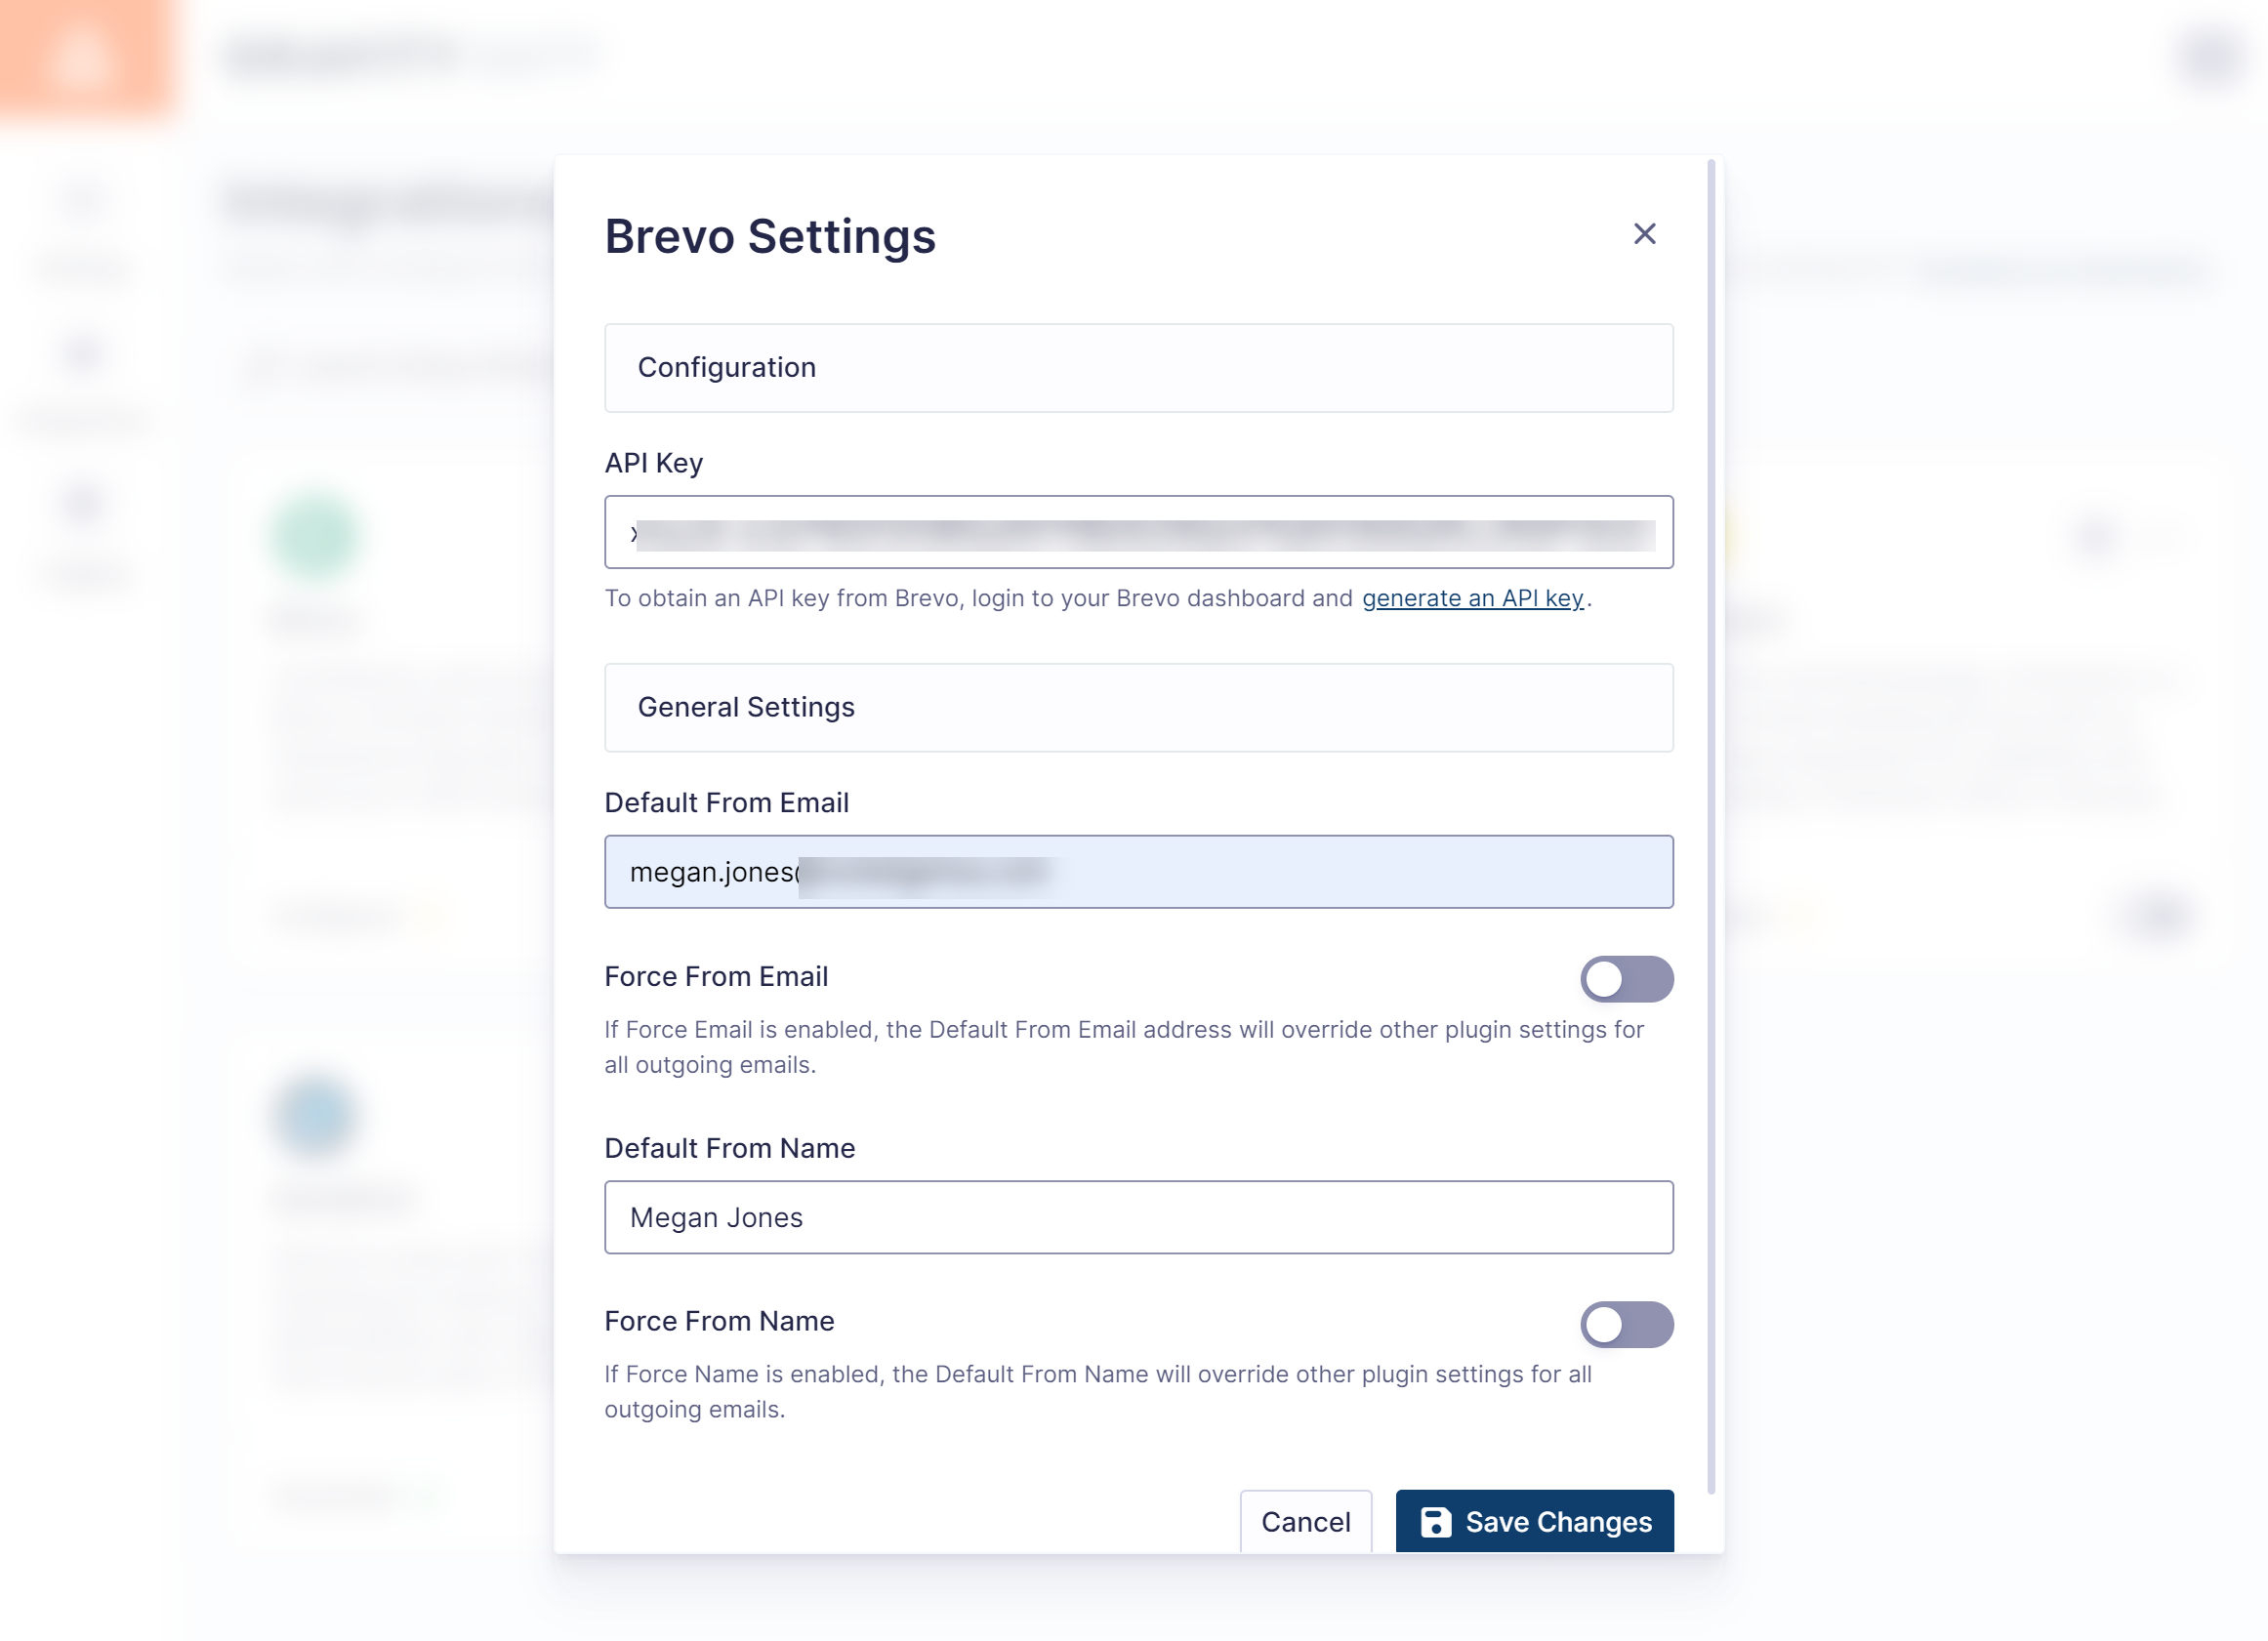
This should open a popup where you can configure a few fields:
- API Key – paste in the Brevo API key that you obtained in the previous step.
- Default From Email – enter the email address from which you want your emails to be sent.
- Default From Name – enter the name from which you want your emails to be sent.
There are also toggles that you can use to force other plugins to use the same “From” name and email when sending emails from those plugins, which can help you ensure consistency across your entire site.
Make sure to click Save Changes when you’re finished.
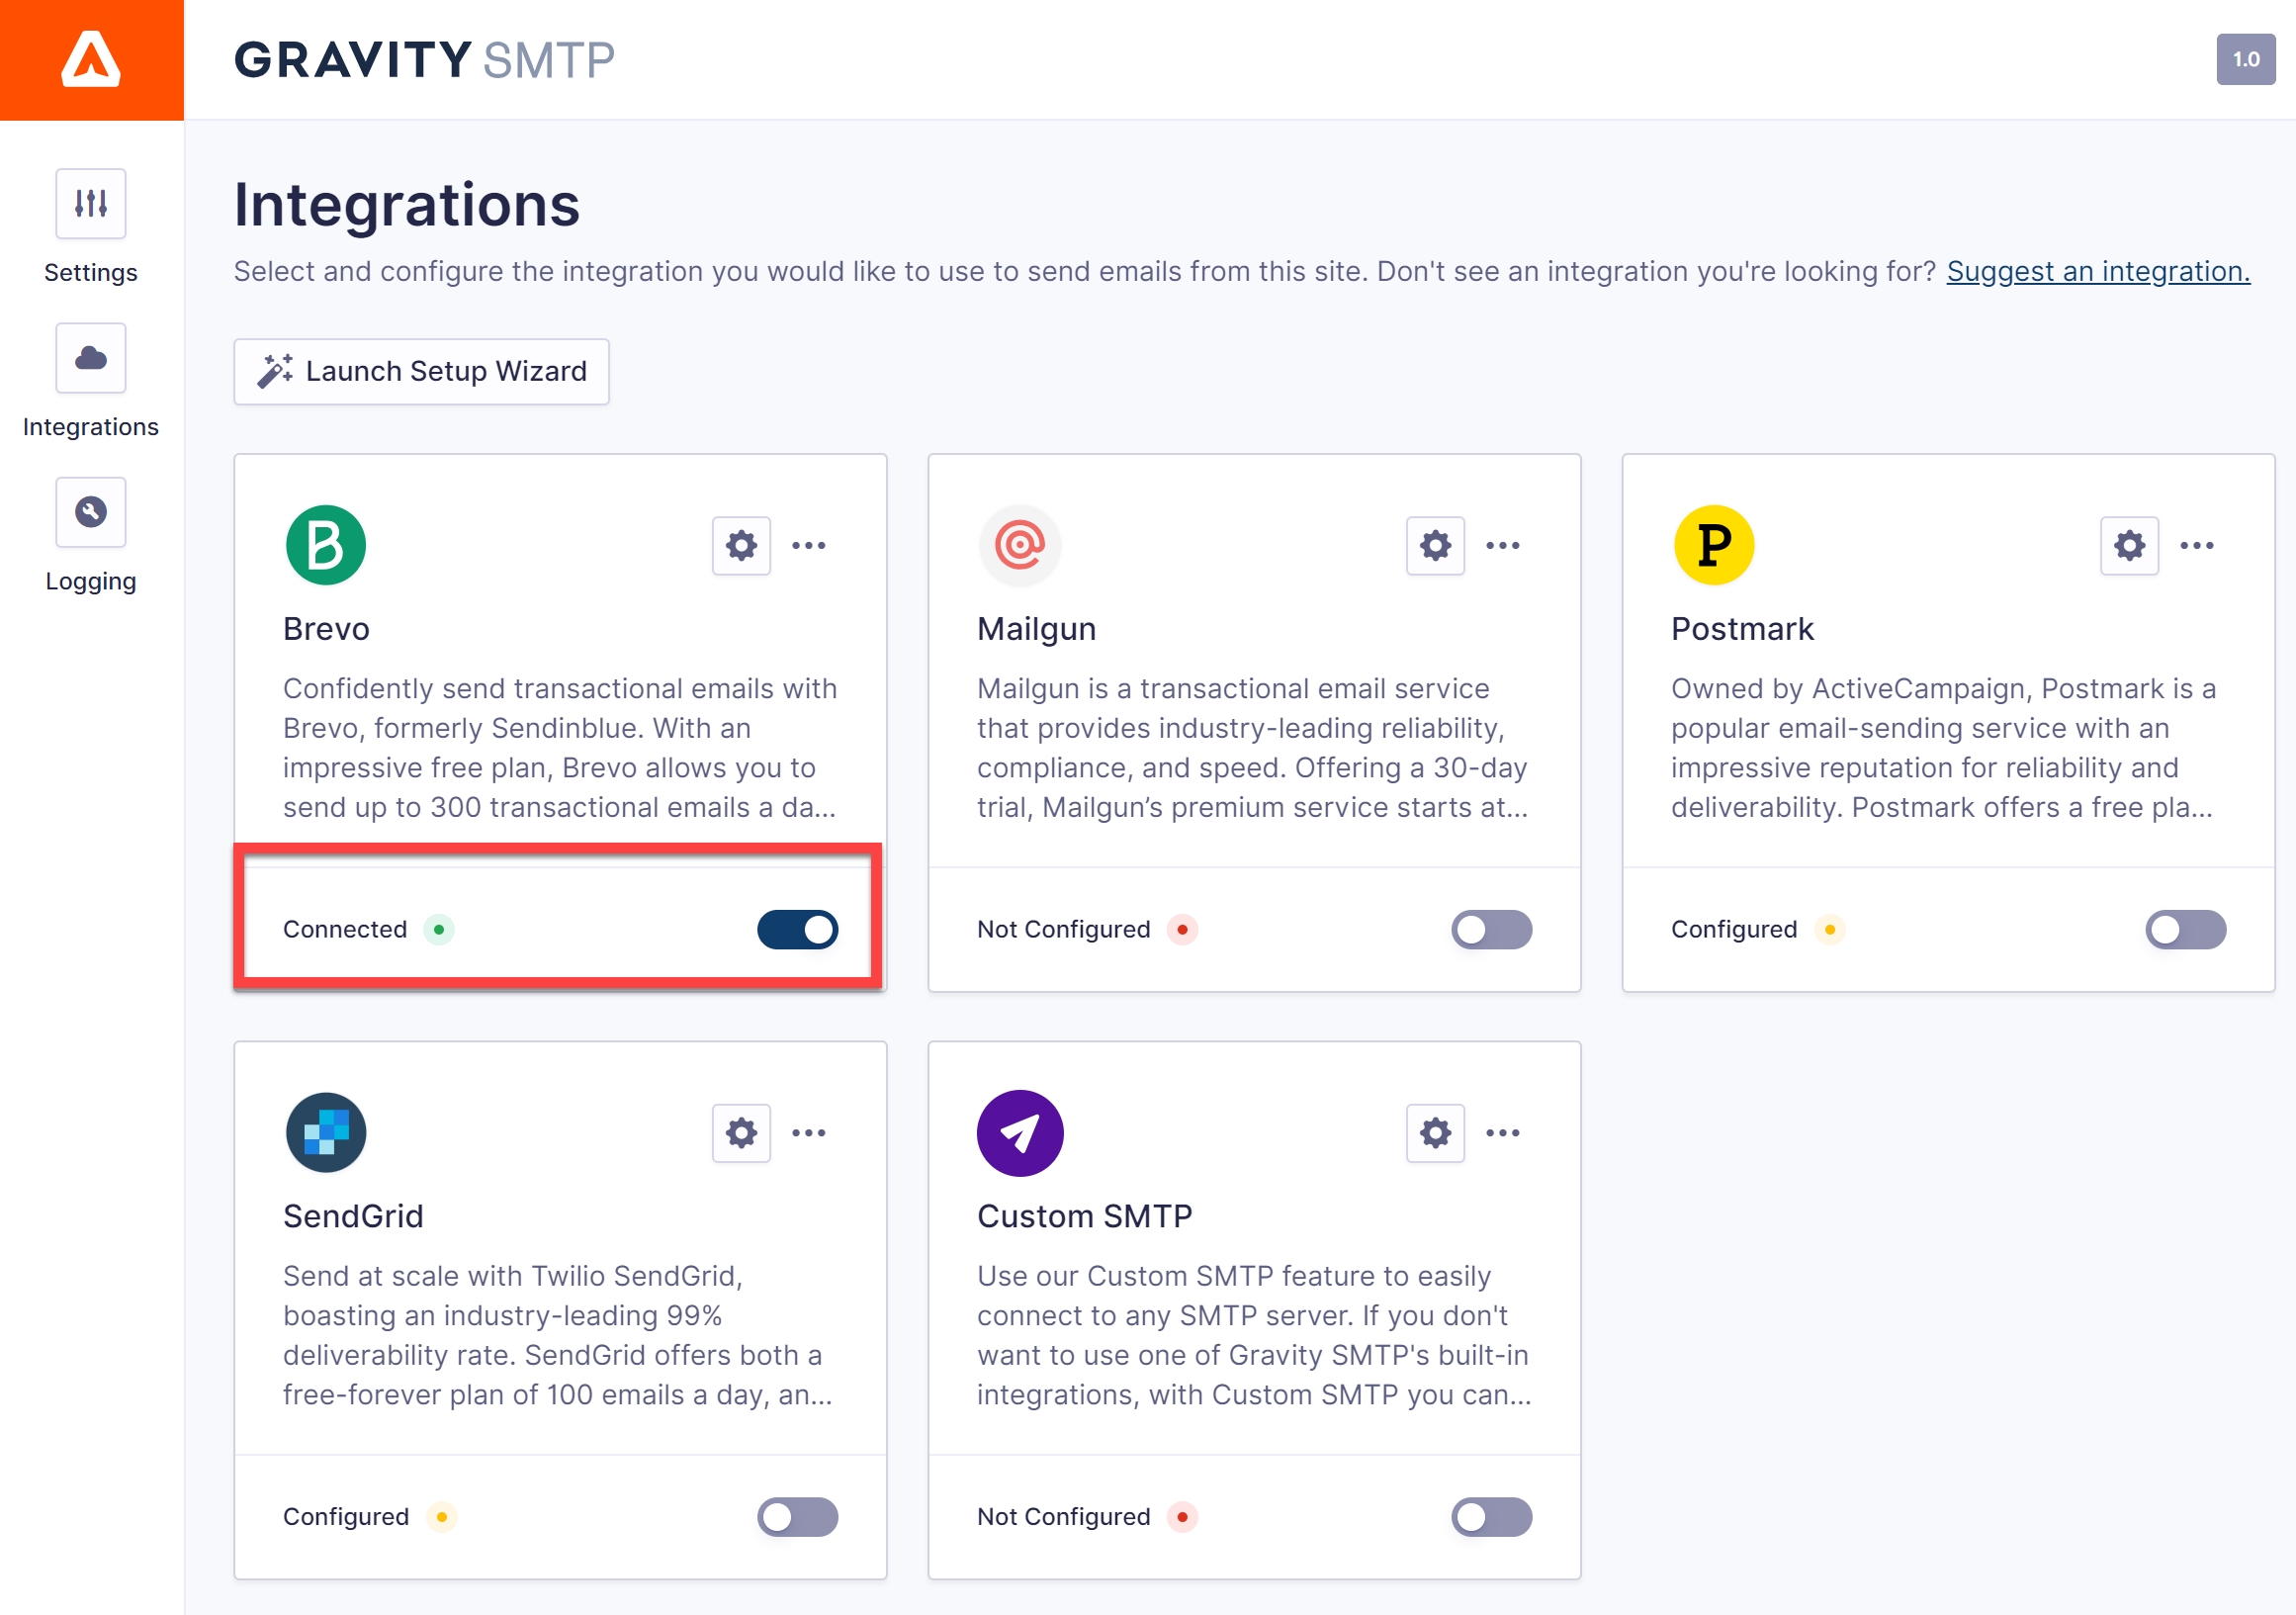
After saving your settings, you should see Configured appear underneath Brevo in the integrations list.
To make Brevo your site’s active email sending service, you just need to enable the toggle. This should change the text from Configured to Connected.
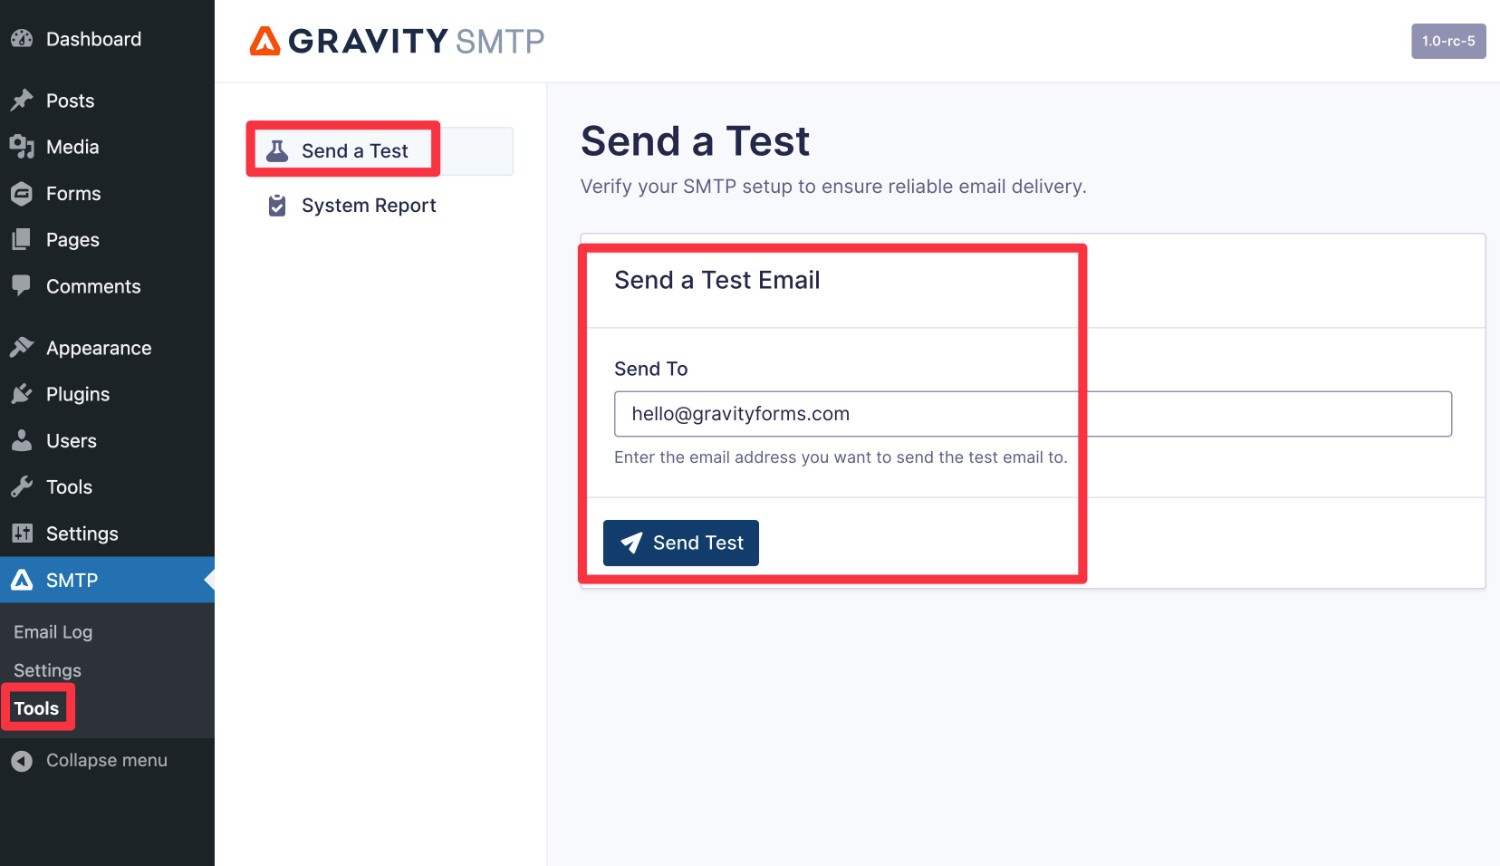
6. Send a Test Email
At this point, your site’s emails should now be working properly.
To double-check that everything is working, Gravity SMTP includes a built-in feature to send a test email:
- Go to SMTP → Tools.
- Select the Send a Test tab.
- Enter your email address in the box (or any email address to which you want to send a test email).
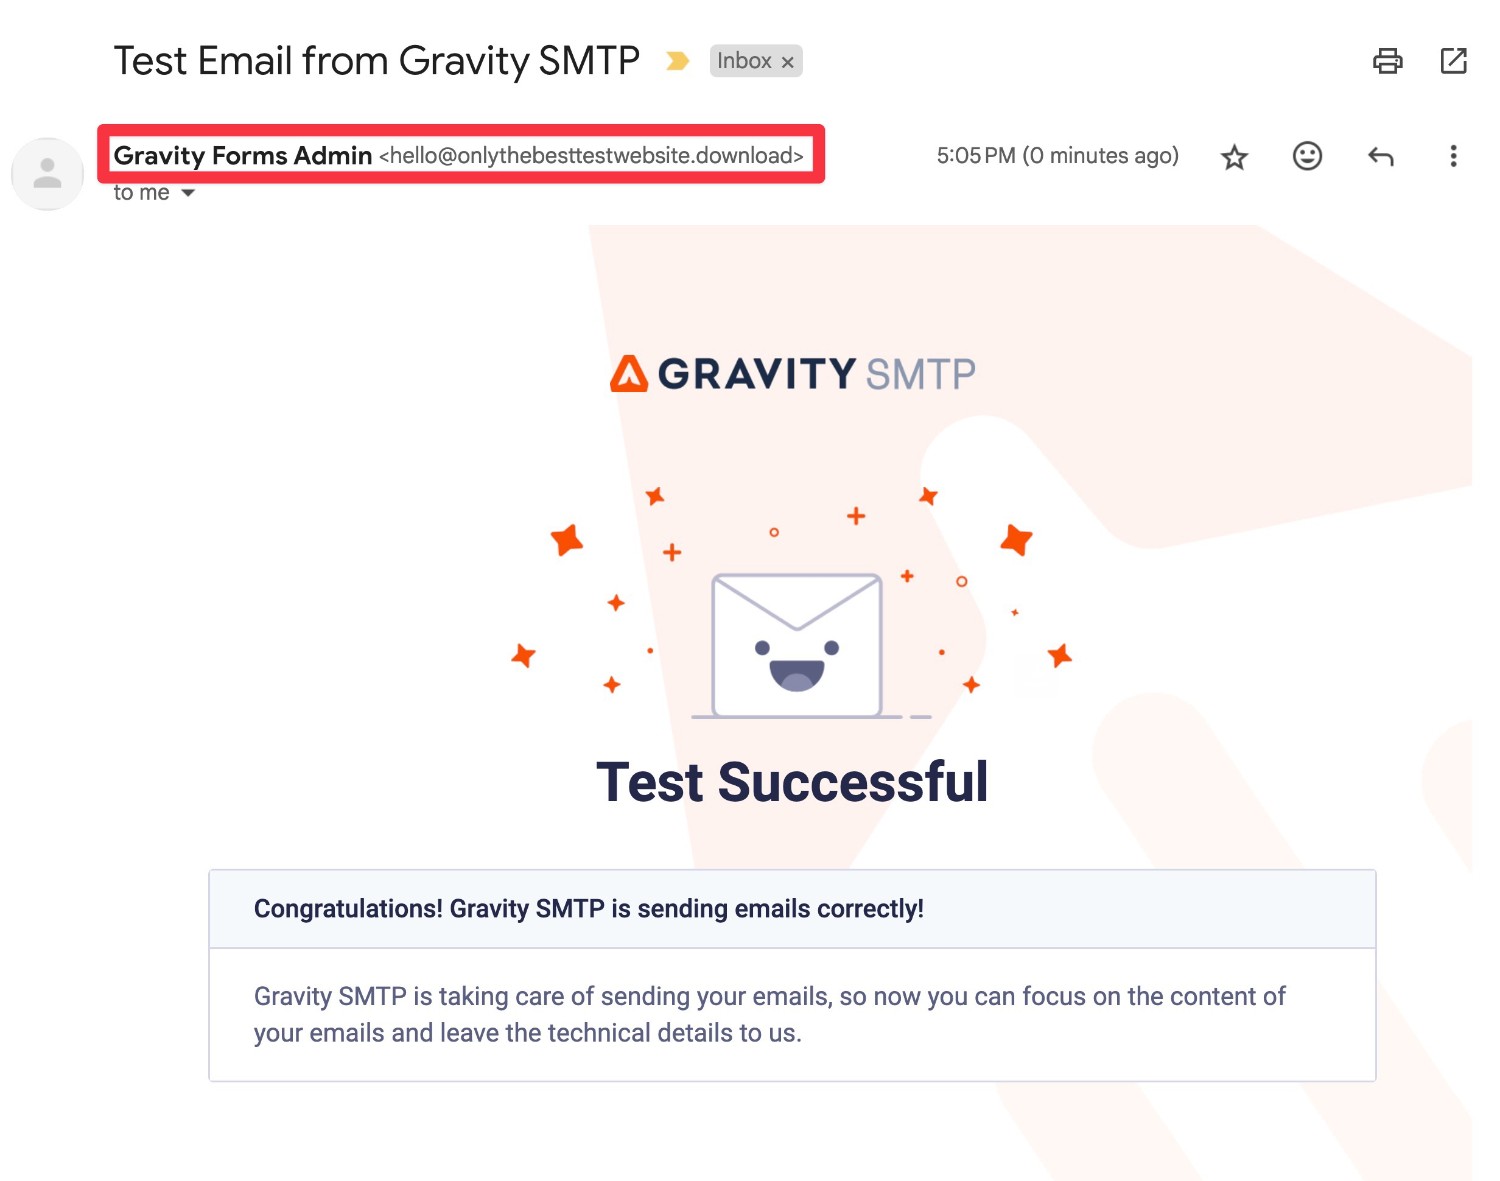
- Click the Send Test button.
You should see a success message in the interface. If you go to your email client’s inbox, you should also see a test email that looks something like below.
7. Monitor Your Site’s Emails Going Forward
To help you monitor your site’s emails, Gravity SMTP also includes a dedicated email logging feature that you can access by going to SMTP → Email Log.
It will let you track all of the emails that your site sends, including whether there are any issues. You can also view technical information about each email, along with a visual preview of the content and style of each email.
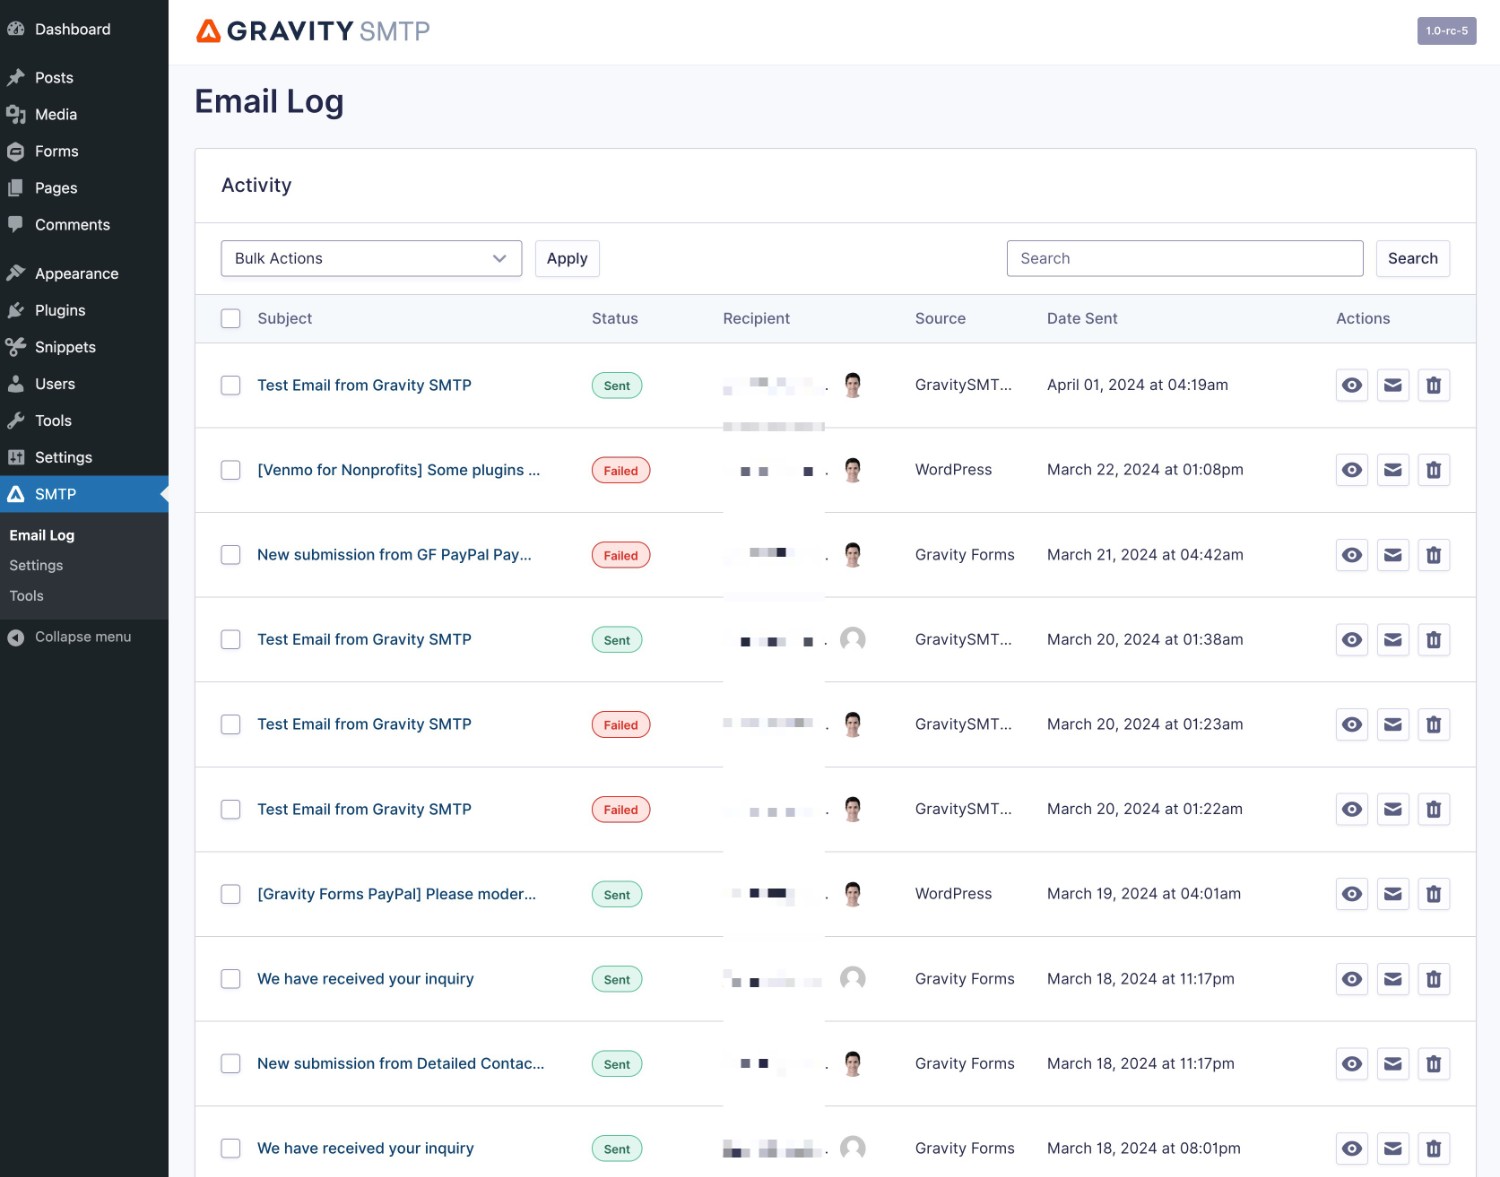
By default, Gravity SMTP will permanently log all of the emails that your site sends. However, you can adjust the logging period (or disable the logging feature completely) by going to SMTP → Settings → Logging.
For more information on getting started with Gravity SMTP, check out this documentation.
Fix WordPress Email Issues for Good
If you’re having issues with WordPress emails not sending, the best solution is to use a dedicated email sending service instead of relying on your hosting server.
With the Gravity SMTP plugin, you can easily connect your site to popular email sending services like Brevo, SendGrid, Mailgun, Postmark, Gmail, and more.
Once you put in the time to set everything up, you can be confident that your emails will continue to work on autopilot. And for added peace of mind, Gravity SMTP’s logging feature can help you keep an eye on everything.
If you have a Gravity Forms Elite license and you’re ready to get started, install the Gravity SMTP plugin today.

If you want to keep up-to-date with what’s happening on the blog sign up for the Gravity Forms newsletter!
"*" indicates required fields


