How to Accept Recurring Payments on WordPress with PayPal & Gravity Forms

If your goal is to accept recurring payments on your WordPress website, you have come to the right place. In this post, we will show you how you can easily do so using the Gravity Forms PayPal Checkout Add-On.
You’ll learn typical use cases for creating subscription payment forms, the unique benefits PayPal and Gravity Forms offer together, as well how to use the add-on to start accepting subscription payments.
Let’s dive right in.
Recurring Payments: Common Use Cases
There are a number of possibilities for offering subscriptions on your WordPress site. Here are some common examples:
- Product subscriptions — These can be both digital and physical. For digital products, think streaming services like Netflix or SaaS offerings.
- “Perk” subscriptions — Subscriptions can also include special perks. A well-known example for this is Amazon Prime, where you can pay a monthly fee for free priority shipping and other benefits.
- Membership sites — In this case, you sell access to exclusive content on a website. Online courses often use this model. It’s also possible to assign different membership levels to your subscribers that determine the content options they can access. Memberships can also be physical, such as for a gym or a club.
- Retainer agreements — If you are a service provider, such as a web developer, you can use recurring payments to sell service items that are ongoing, such as continuous website maintenance.
- Installment plans — Recurring subscriptions are also used to break down larger sums into smaller installments. Instead of paying for your product in a lump sum, you can allow your customers to pay it off in chunks over a longer time period.
- Donations — Another options is to use recurring payments to collect donations on your WordPress website. This can be to support the nonprofit you run or for other good causes.
Of course, the above examples are in no way the whole story. There are plenty other applications for recurring payments and subscriptions.
The Benefits of Using PayPal to Power Your Gravity Forms Subscriptions

So, if your goal is to collect recurring income on your website, why use PayPal with Gravity Forms? Why not one of the other payment providers? Here’s why PayPal specifically is a great match:
- Reliability — It is one of the most established and well-known payment providers. Therefore, you can trust the reliability of their infrastructure.
- Popularity and trust — PayPal has over 400 million customers worldwide. So even if you were to only offer PayPal itself as a payment option, you already have access to a large customer pool. This popularity also means that many people trust it as a payment provider. So if you use PayPal on your website, customers are more likely to trust that their transactions are safe.
- Lots of payment methods — The payment gateway supports all major credit cards and over 100 currencies in more than 200 markets. It also includes payment options such as Venmo in select locations.
- High security — PayPal adheres to all security requirements, such as encryption. It means your data and that of your customers is safe. In addition, it has safeguards against fraudulent claims and chargebacks, offers dispute resolution for problems, and buyer protection, which contributes to trust.
- Many support options — In case there is ever an issue, you can reach PayPal via chat and phone. There is also a resolution center and a community forum.
The Gravity Forms PayPal Checkout Add-On: What Does It Offer?
With Gravity Forms and the PayPal Checkout Add-On, it’s easy to connect your web forms with PayPal and start accepting recurring payments on your WordPress site.
The PayPal Checkout Add-On comes with a lot of great features that make it superb tool for this purpose:
- Different subscription options — Let your visitors subscribe to digital and physical products as well as services.
- Customizable subscription amount – Easily determine how much your subscription costs. It’s also possible to set up various prices for different subscription levels. Plus, you can still charge one-time fees for optional extras.
- Flexible billing periods – Subscription cycles can be set to days, weeks, months, or years.
- Billing cycle limits – Have your subscriptions run until your client cancels it or automatically stop them after a certain number of billing periods. The last option is great for installment plans.
- Conditional logic – Using Gravity Forms’ powerful conditional logic, you can set preconditions for accepting subscribers. For example, you can include a checkbox to confirm that someone accepts your terms and conditions before they can become a subscriber.
- On-site subscription management – Using Gravity Forms, you can cancel and/or refund your subscriptions directly inside the WordPress dashboard. Other important details are also available.
- Other Gravity Forms Add-Ons – The PayPal Checkout Add-On integrates with other Gravity Forms features and extensions and you can use them at the same time.
The Gravity Forms PayPal Checkout Add-On is available for Pro, Elite, and Nonprofit license holders. Purchase a new license or upgrade from Basic and only pay the prorated price.
Accepting Recurring Payments in WordPress Using Gravity Forms and PayPal — A Step-by-Step Tutorial
All clear? Then let’s talk about how to actually do this thing. What follows are the steps to set up recurring payments in WordPress with Gravity Forms and PayPal. But first, some preliminaries.
Website Requirements
In order to take use PayPal to power your recurring subscriptions, you need to meet some prerequisites:
- An active Gravity Forms Pro or Elite license and Gravity Forms installed and set up on your WordPress website.
- A PayPal account. Naturally, without being signed up to PayPal, won’t be able to use it. You need a login for a PayPal business account. Plus, to make sure you can use the testing environment, get yourself a PayPal developer account as well.
- You need to be in a country that is supported by PPCP, Before. PPCP stands for “PayPal Commerce Platform”, the “Before” part refers to the fact that sellers need to create a PayPal business account before they can start selling. You can find eligible countries and additional information in the PayPal documentation.
- Your site also requires an SSL certificate. This is crucial to process sensitive information like credit card data. If your site doesn’t have one, talk to your hosting provider.
1. Install the PayPal Checkout Add-On
Our first stop is to install the add-on that is going to make this all possible. For that, go to Forms → Add-Ons in your WordPress dashboard and then scroll down until you see the Gravity Forms PayPal Checkout Add-On.
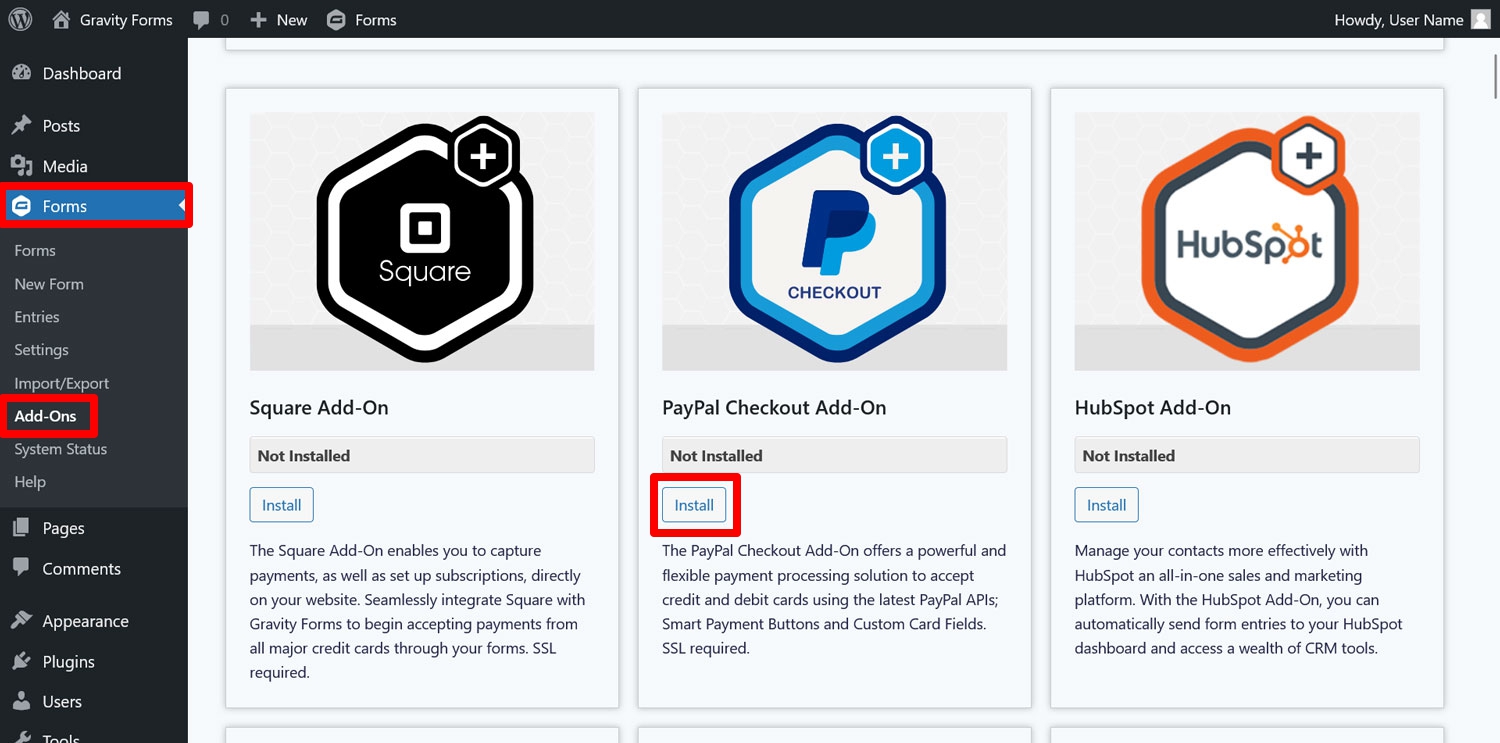
Click the Install button and activate the add-on once it has been downloaded to your site.
2. Connect to PayPal
After that, it’s time to establish the connection between your WordPress website and PayPal. As mentioned in the beginning, you need a PayPal account for that but you can also create one during the process. If you want to use the testing environment (as you probably should), be sure to also have a developer account.
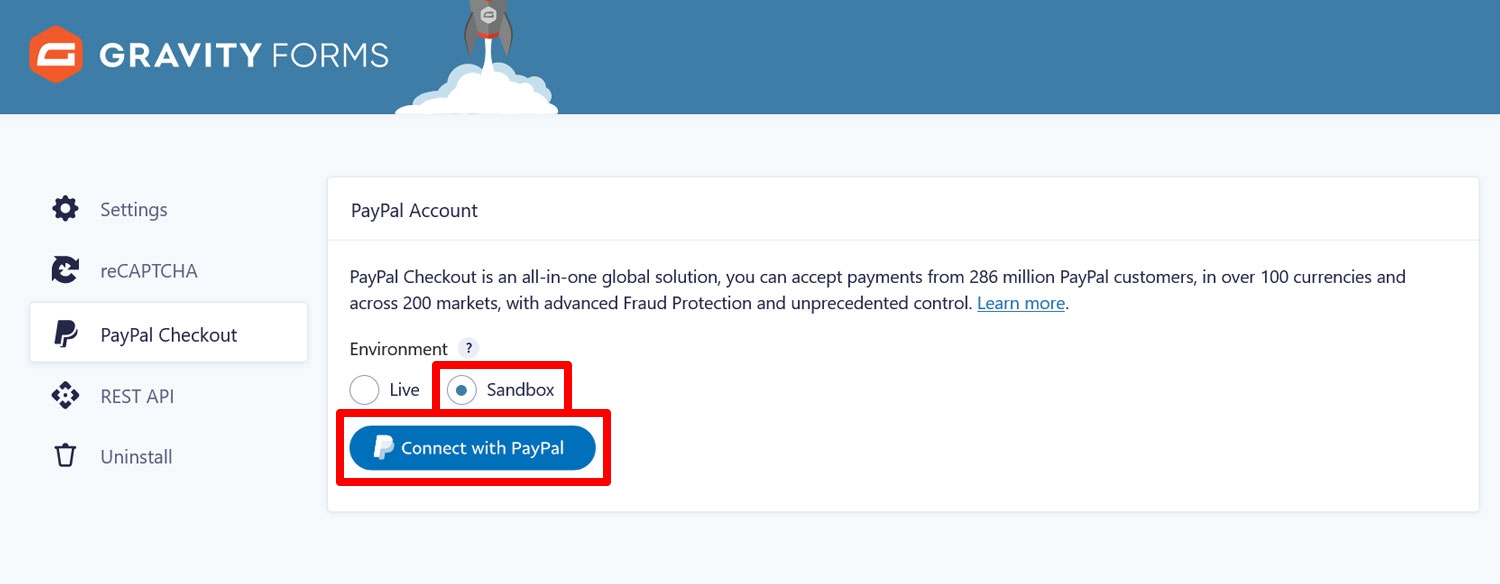
The steps are as follows. First, go to Forms → Settings → PayPal Checkout.
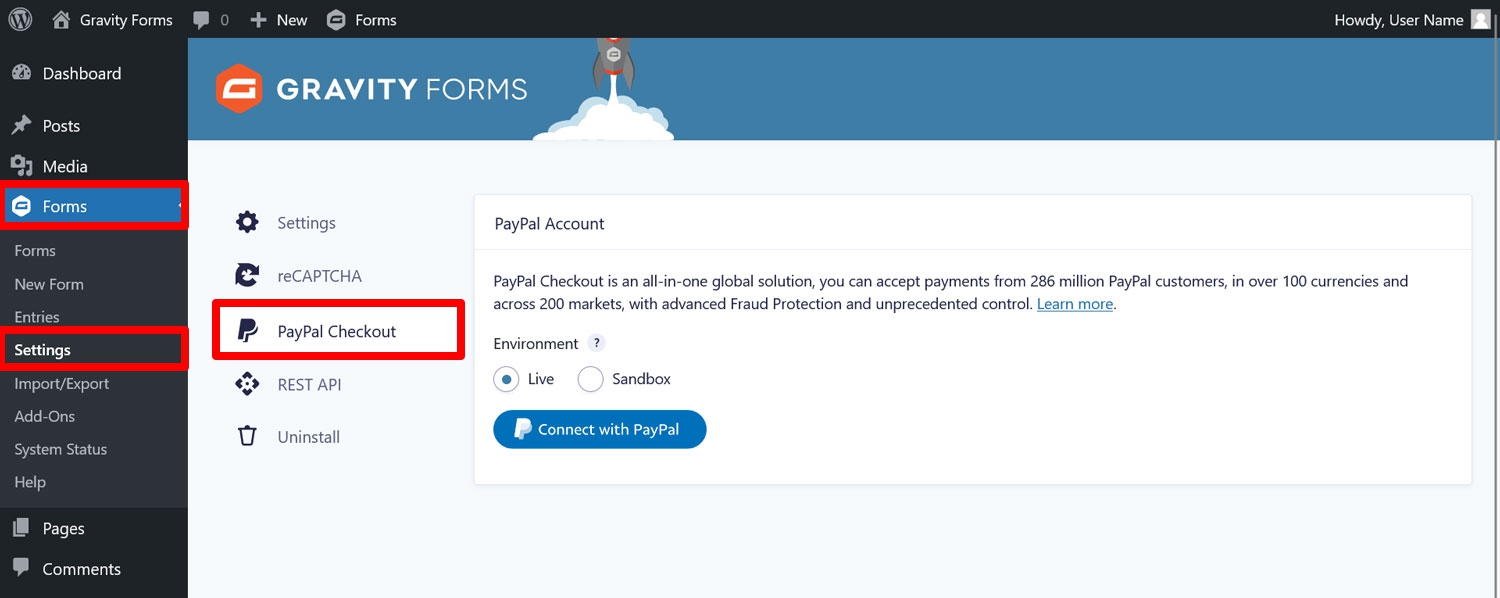
Here, choose the Sandbox option. This allows you to test the setup out without real money being exchanged. We will switch it to live mode later in order to start accepting real payments.
You can find credentials to use for the PayPal sandbox environment in your developer account under Testing Tools → Sandbox Accounts.
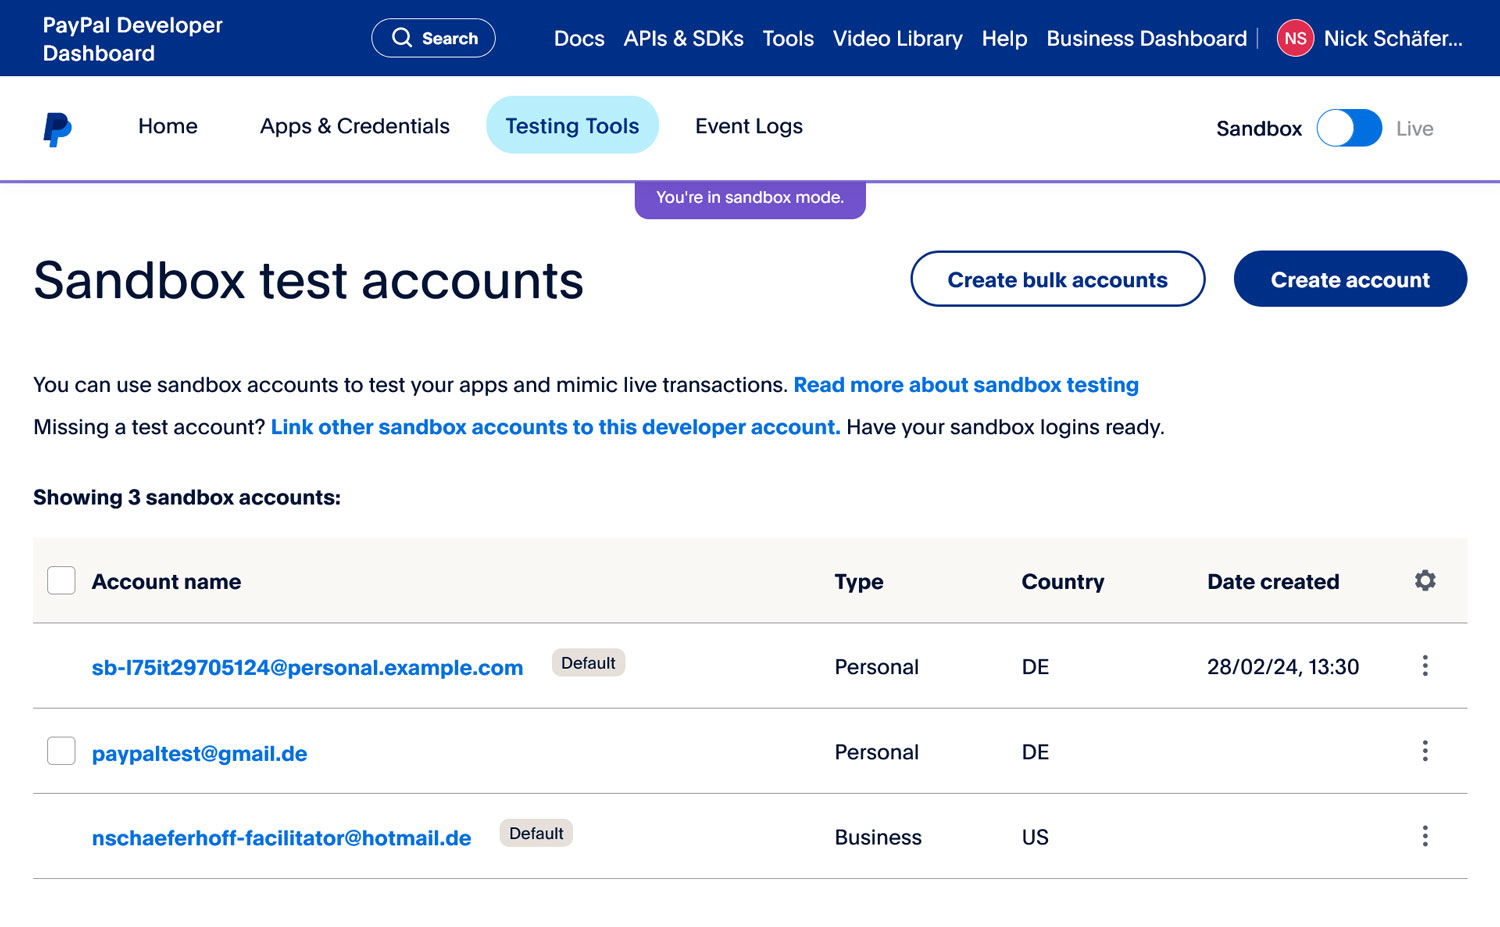
Next, create a new business account (not a personal one) or use one of the existing ones. When you click on them, you can see the email address and also set or copy a password.
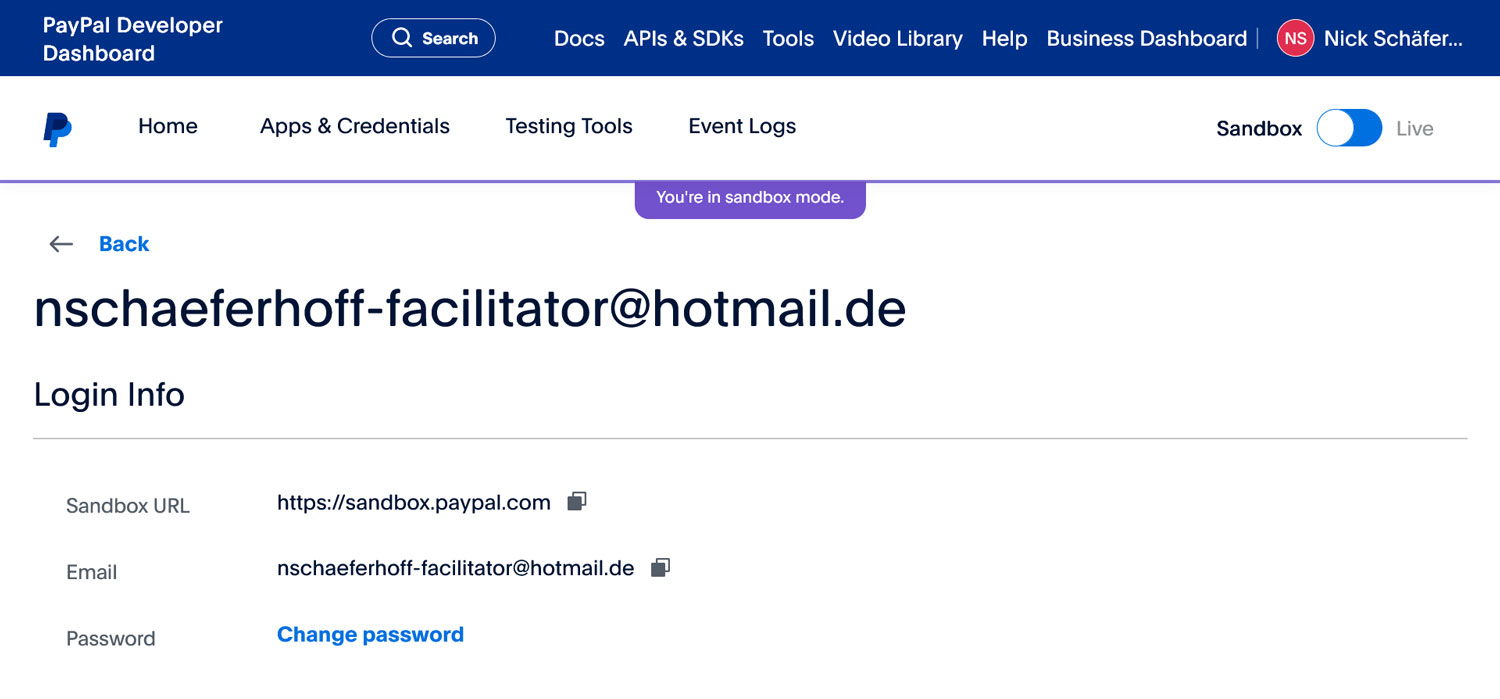
Once you have both, go back to your WordPress site and click Connect with PayPal.
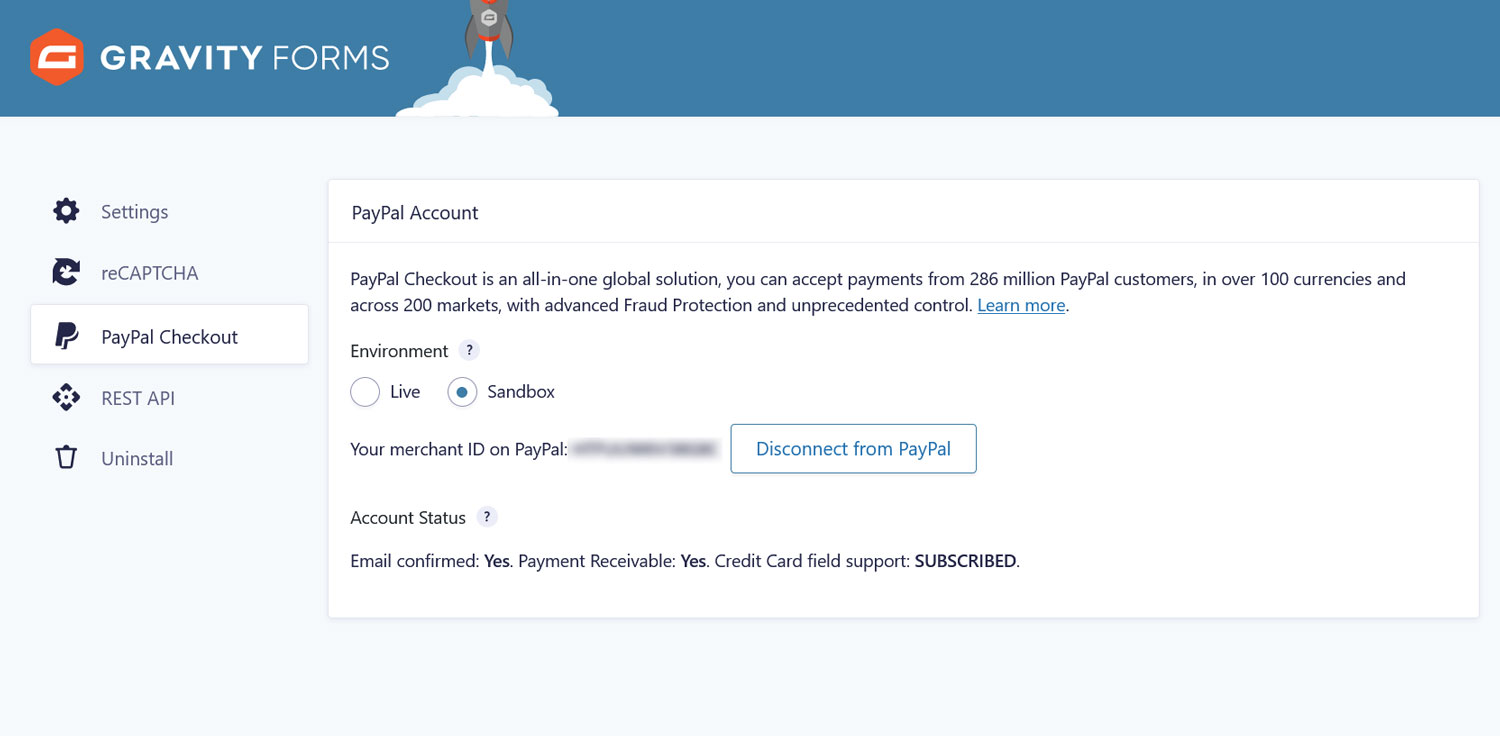
This opens up the PayPal website, where you will be asked to sign in. Use the credentials you just created. After that, you should automatically return to the WordPress dashboard and find the connection established and visible in the PayPal Checkout options.
3. Create Your PayPal Subscription Payment Form
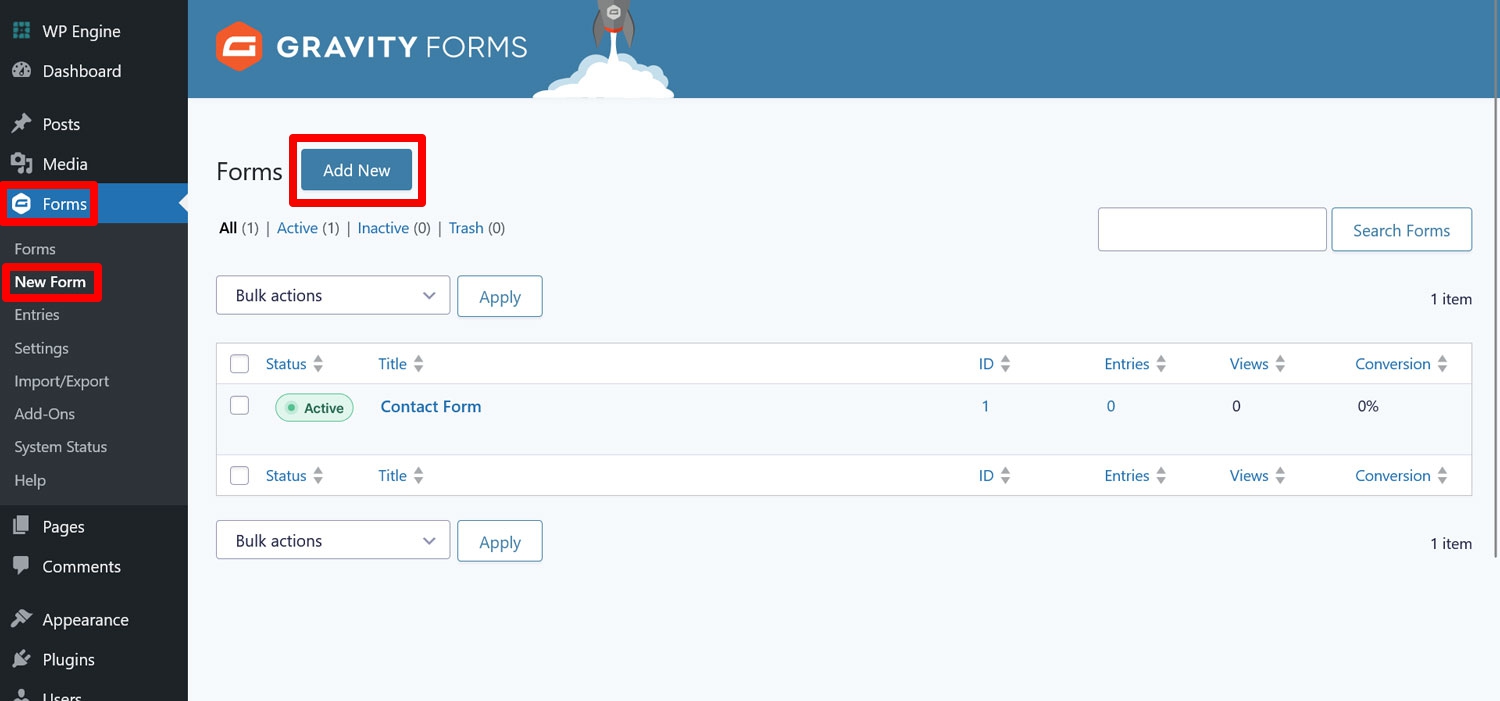
Next up, in order to start collecting recurring payments on your WordPress site, you need to create a subscription form. For that, go to Forms → New Form.
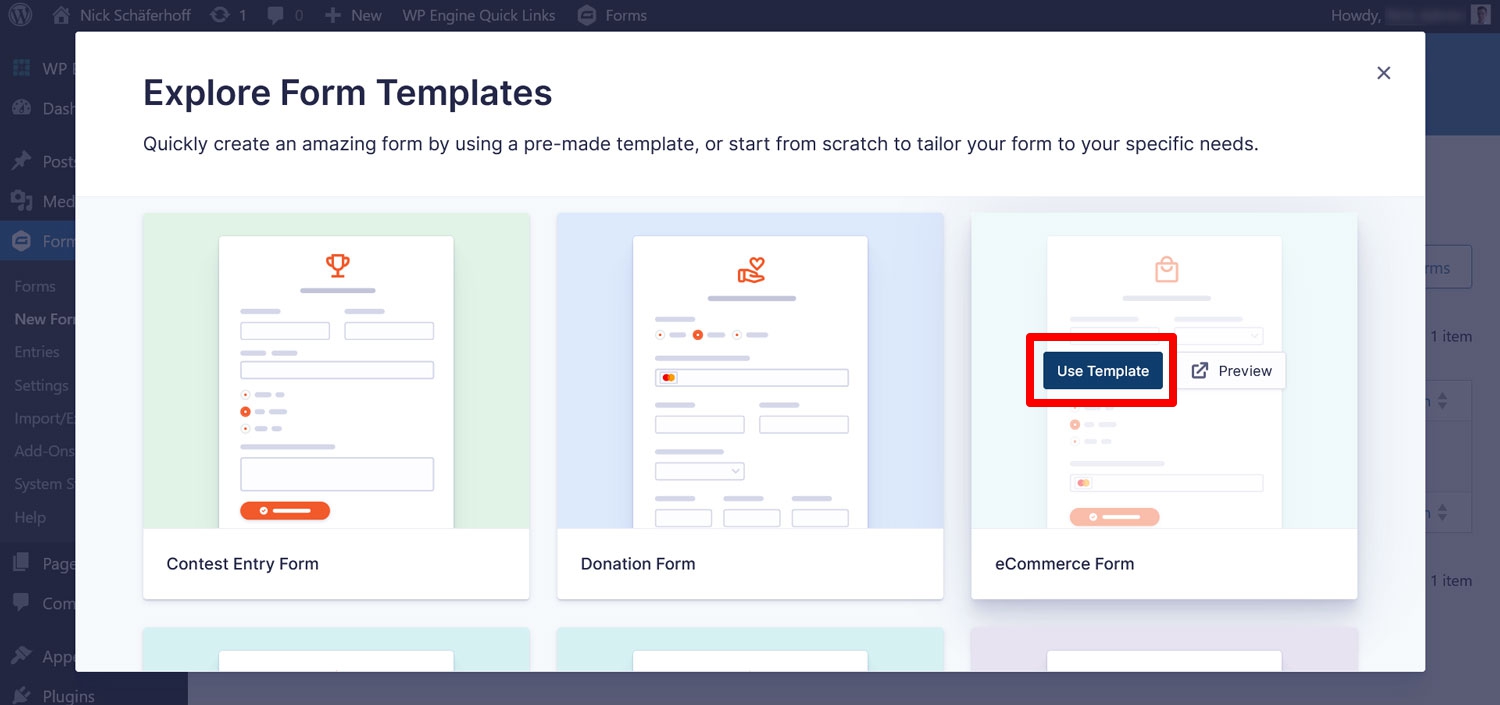
In the window that opens, you can either start a form from scratch or use a template to save time. In this case, it makes sense to go with the existing eCommerce Form template, which is what we will do. So, find it in the list, hover over it with your mouse and the click the Use Template button when it appears.
In the next screen, enter a title and, optionally, a description so you recognize what this form is for later on. Then, click Use Template again.
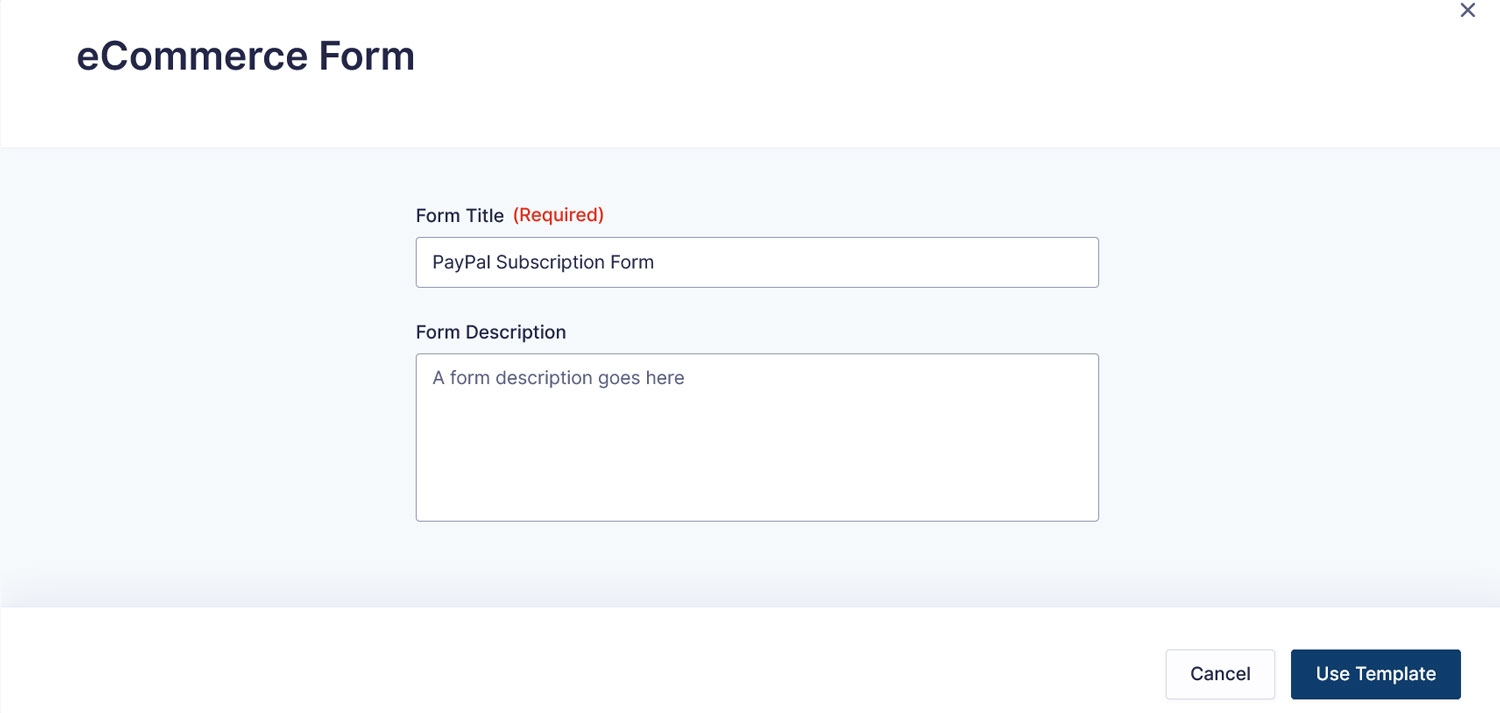
Doing so will land you in the form editor where you can make adjustments to the form and what it contains.

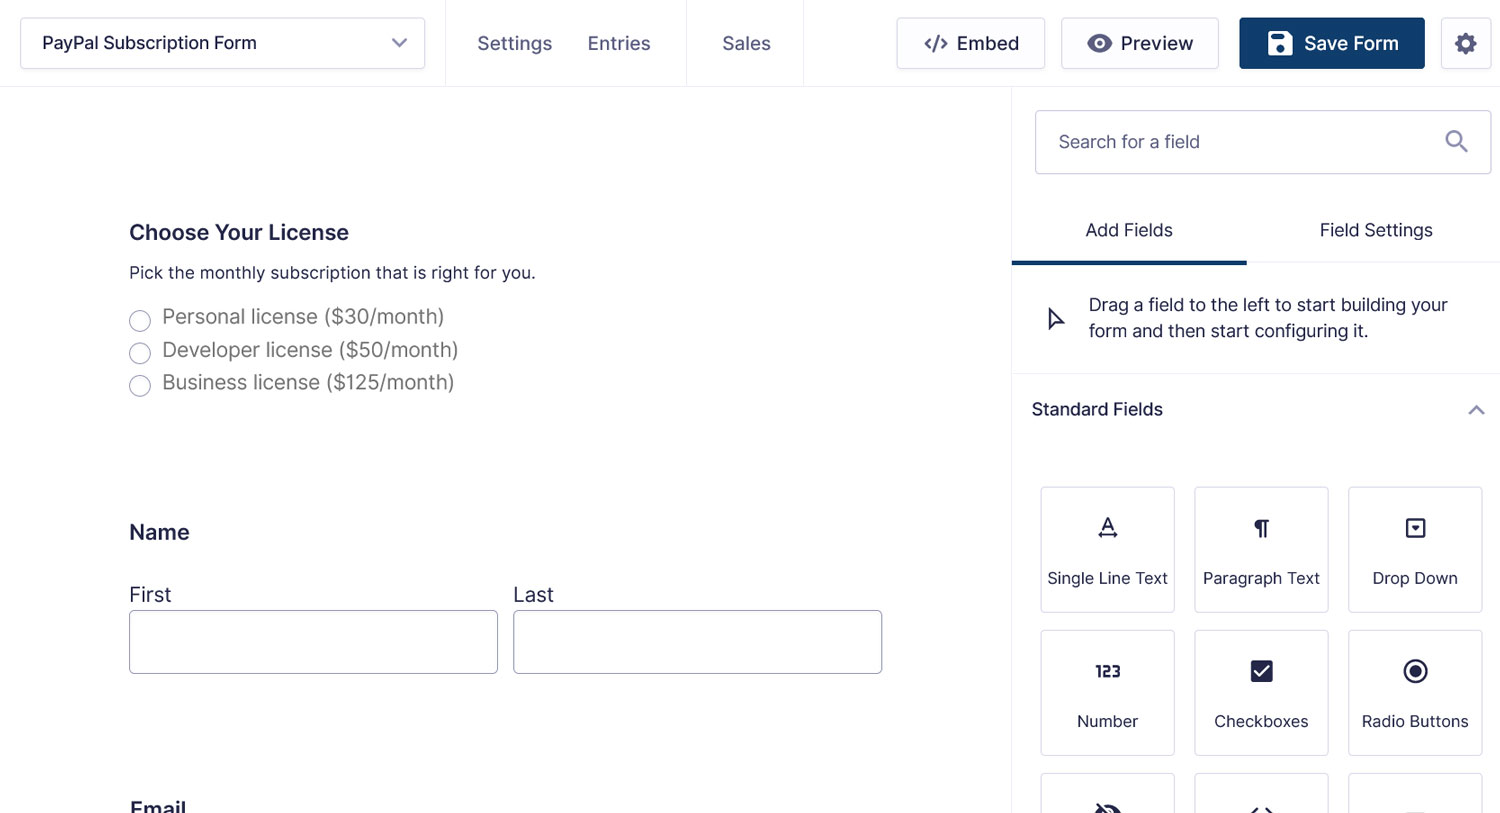
By default, it already has all the fields to collect the relevant information. If you want anything else beyond that, feel free to drag and drop in additional fields from the right sidebar.
The crucial part here are the Product fields. The form already contains two of them.
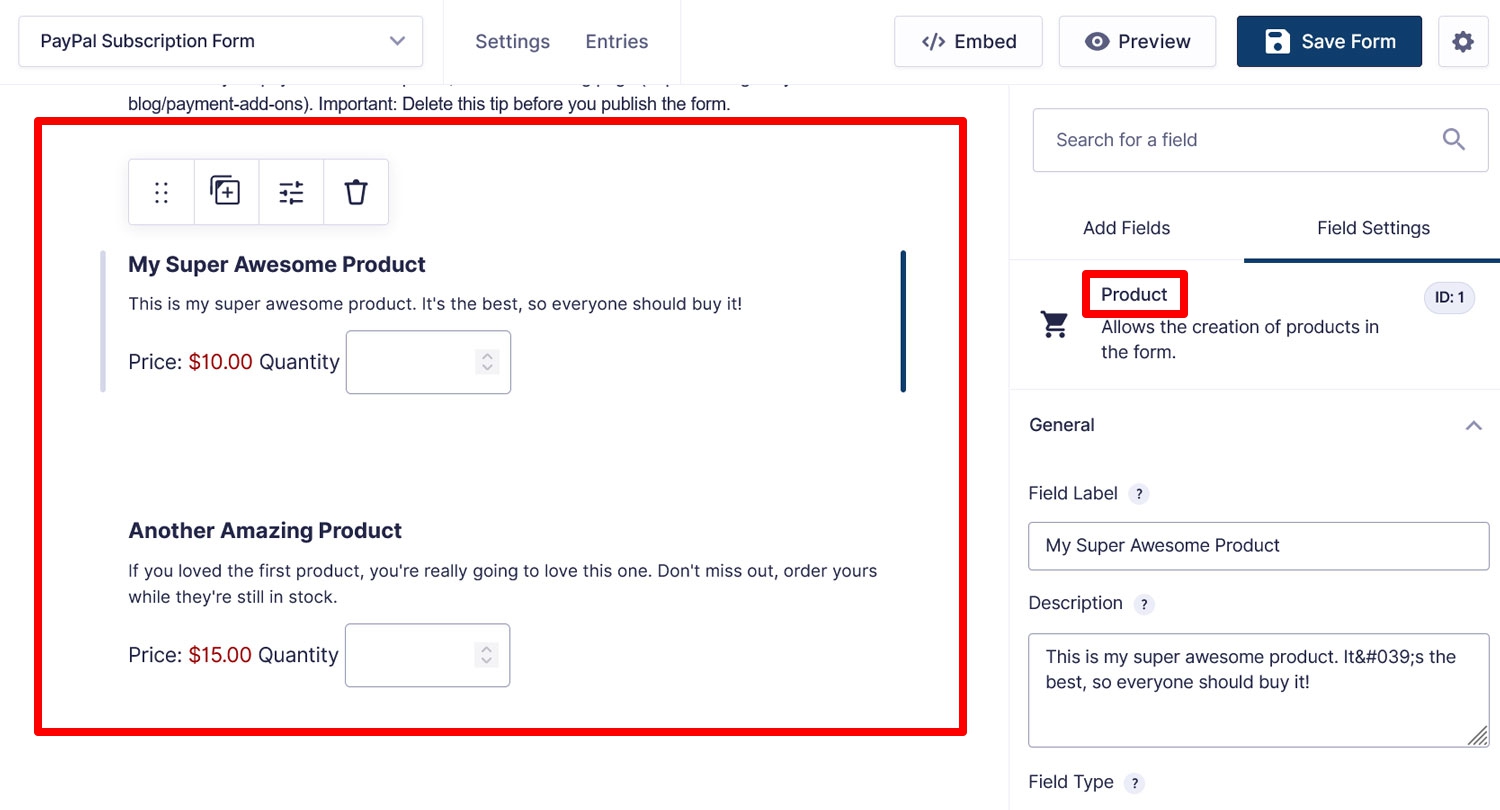
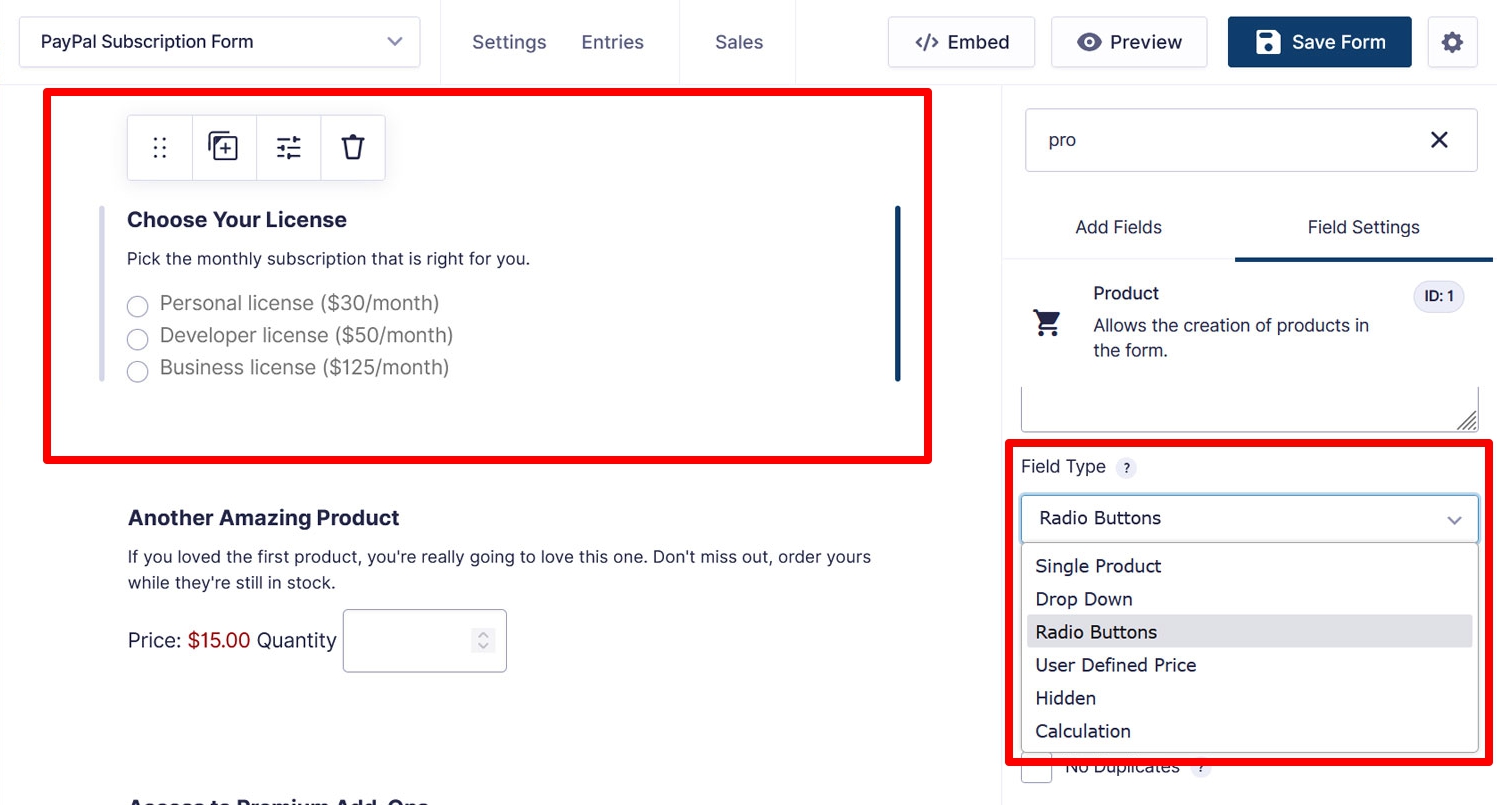
You can use those to create your subscription options. You can also add multiple subscription levels by changing the field type on the right side, for example to radio buttons.
Another thing you will find in the eCommerce Form template is a Shipping field. This is important if your subscription includes physical products that you need to send to your customers. If that is not the case, feel free to delete it.
Other fields you can use are the Subtotal and/or Total field if you offer multiple products, shipping options, or else, which need to be calculated together.
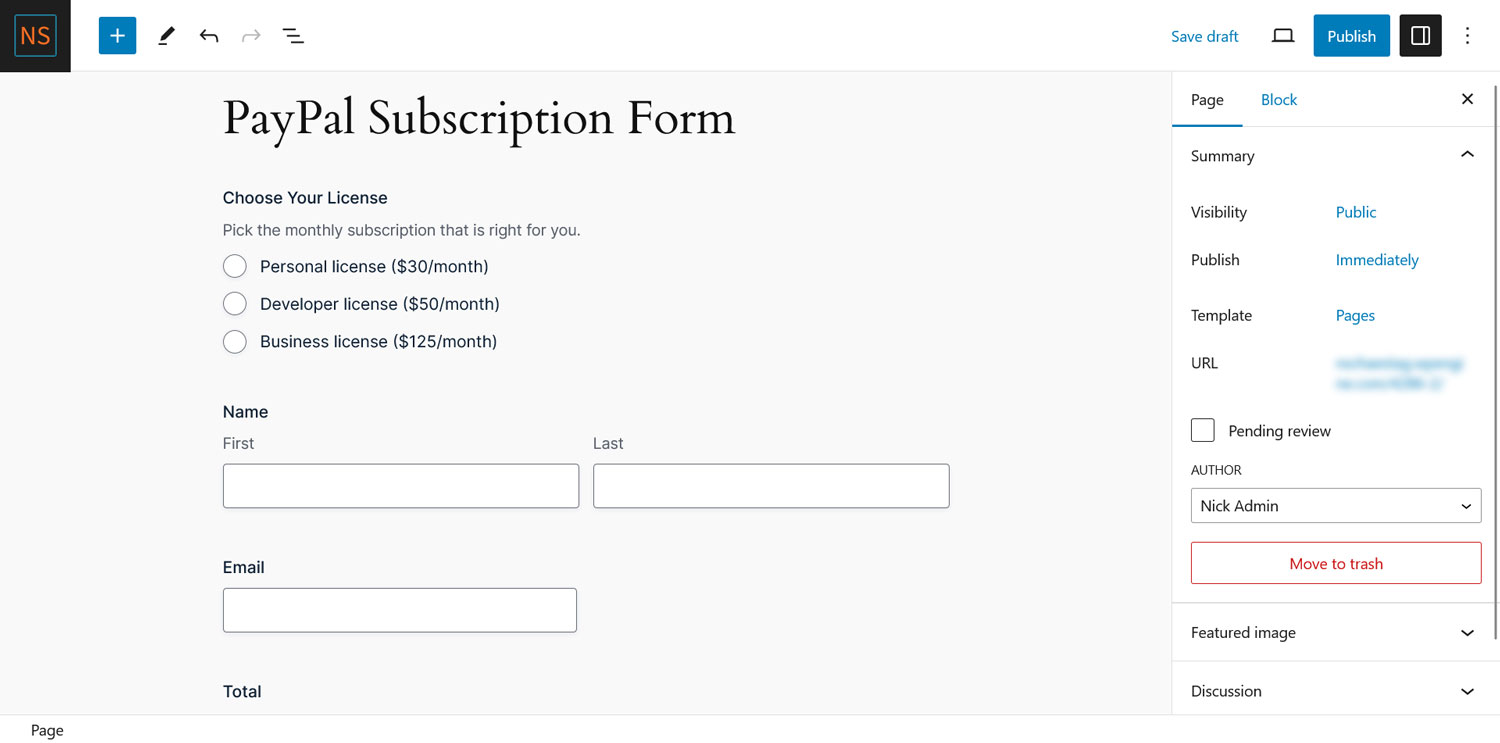
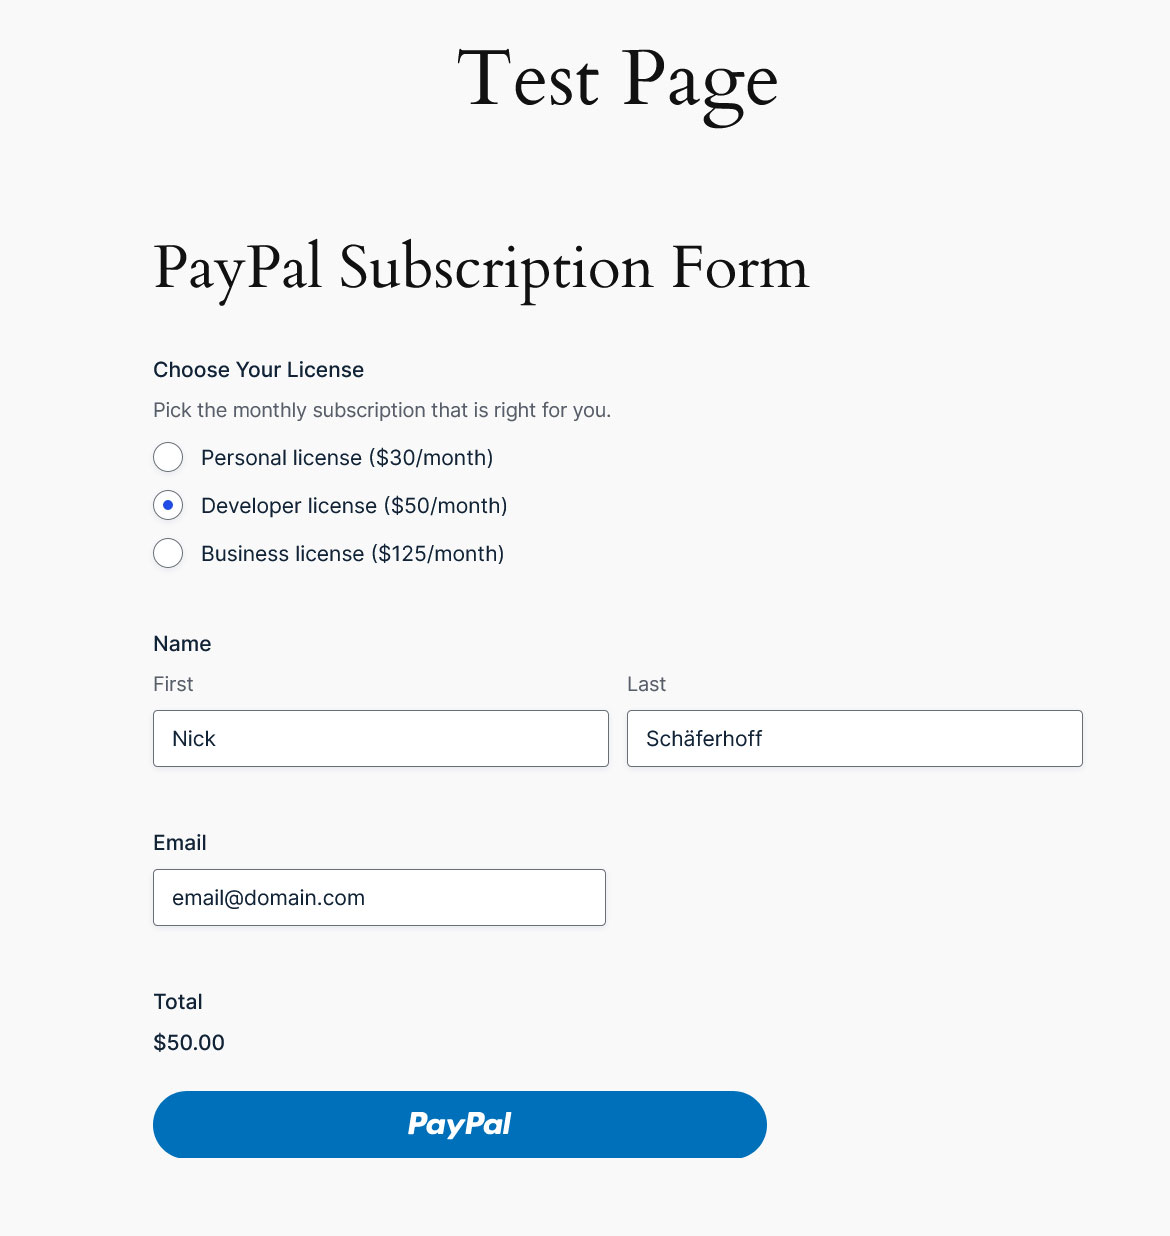
Here’s how we set up our payment form. As you can see, we created several subscription tiers.
4. Add the PayPal Field
Once your other options are configured, what’s most important is that you include your PayPal payment field at the end. After all, that’s what this entire article is about and you won’t be able to accept subscription payments without it.
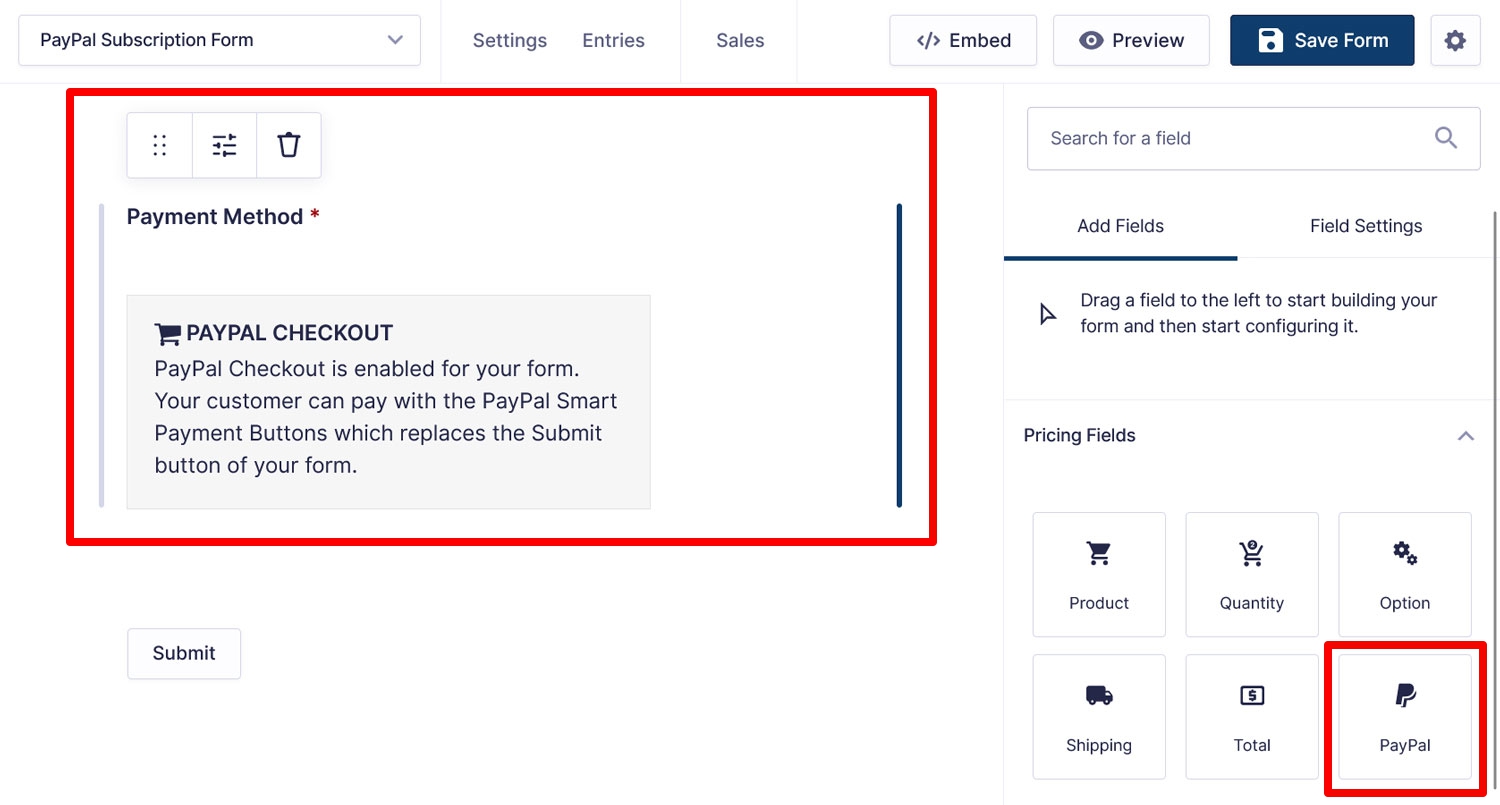
It replaces your normal Submit button with the PayPal Smart Button in the form on the page. It also lets you configure which payment methods you want to allow (PayPal Checkout, other payment methods such as Venmo, credit cards).
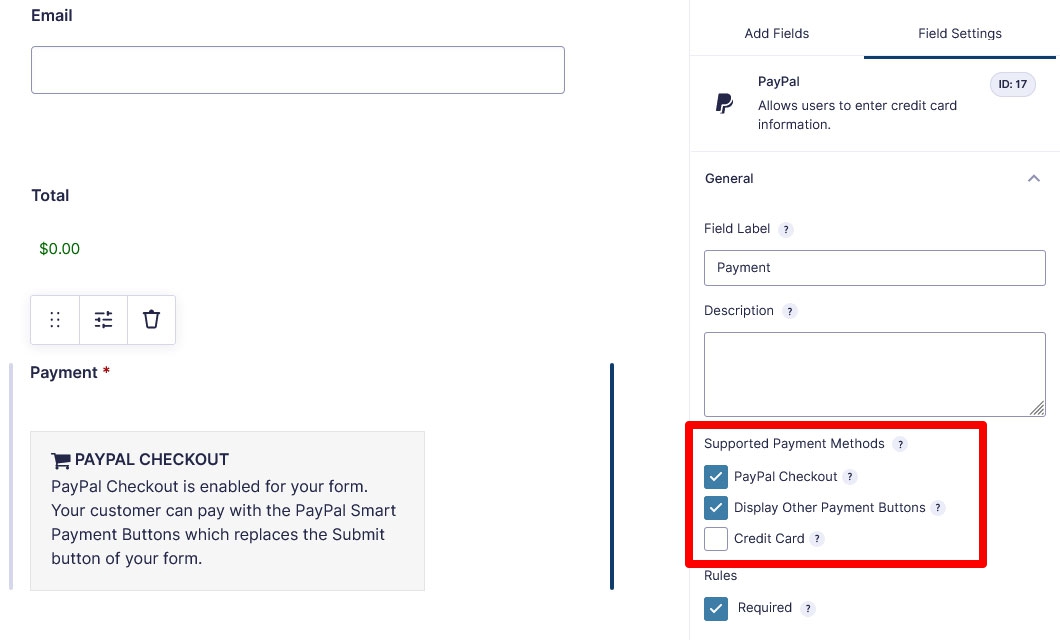
PayPal will automatically display what is eligible for your location. For example, directly using credit cards is currently not supported for subscriptions but customers can still pay with them via the PayPal checkout form.
You also have options to customize the checkout button under Appearance.
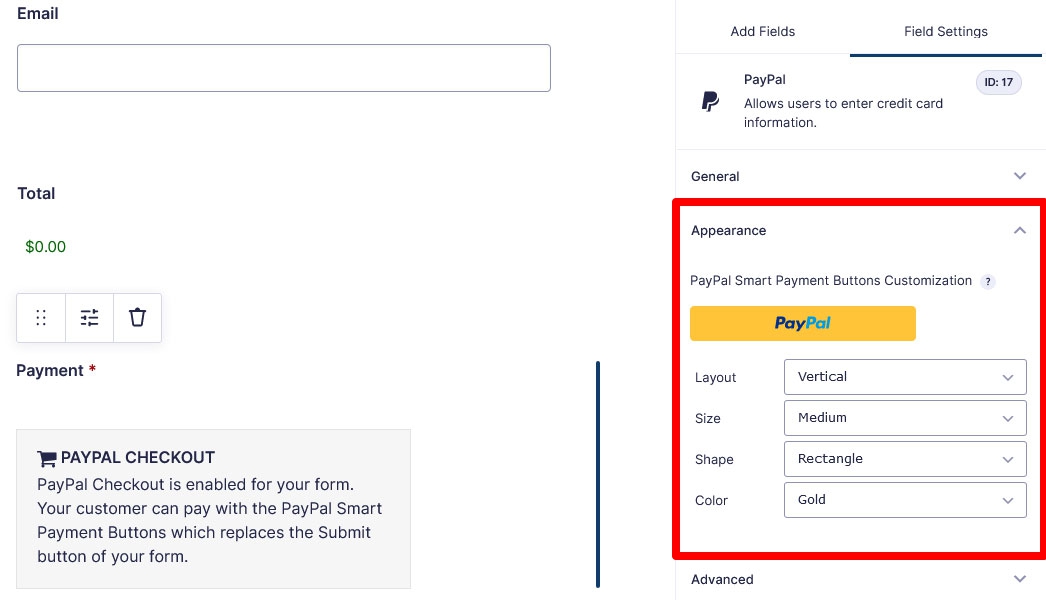
Configure its layout, size, shape, and color to make it fit the rest of your website design.
When everything is ready, save the form again.
5. Set Up a PayPal Feed
With the form ready, it’s time to set up a PayPal feed. That’s the part that controls what happens with your form data after submission. It makes sure your subscription payments get processed.
To create one, go to your form settings and then PayPal Checkout.
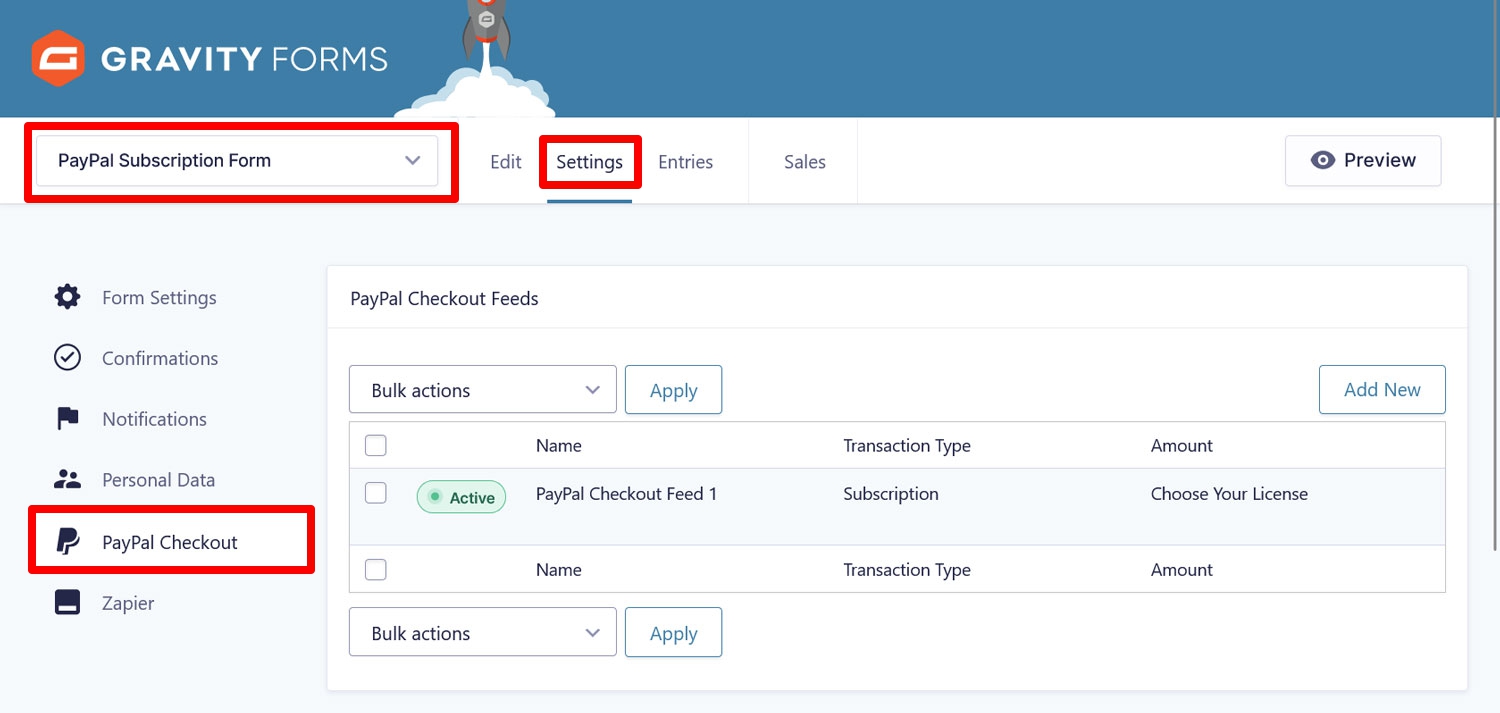
You should already find an automatically created feed in the list. Either click it to edit or click Add New to create a new one.
In the next screen, name it at the top, then pick Subscription under Transaction Type.
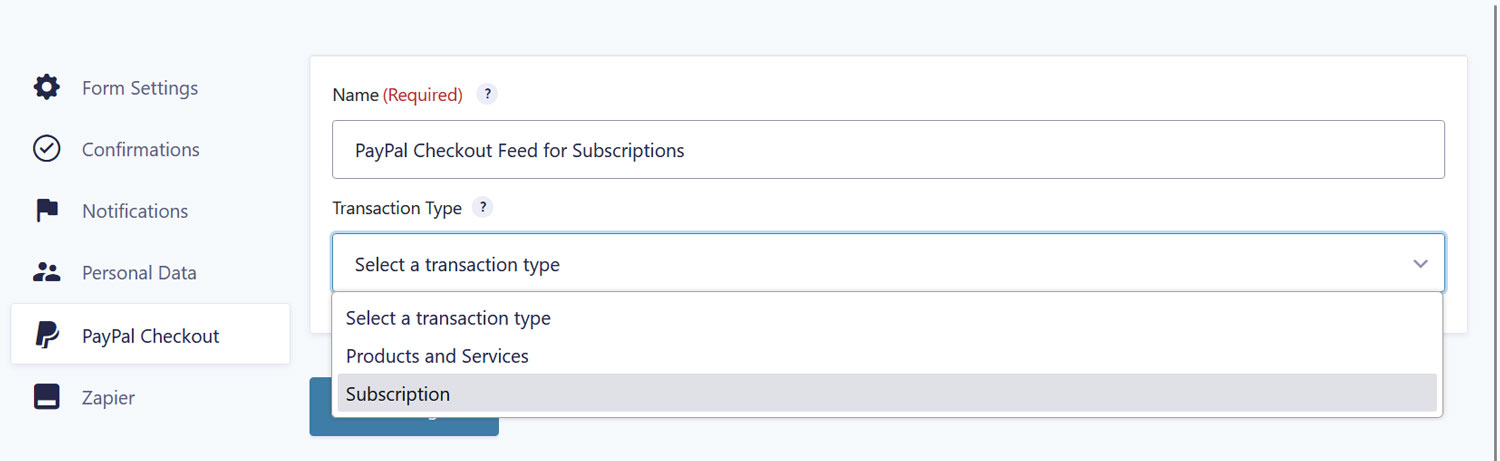
This will open up the configuration panel for the recurring payments on your WordPress site.
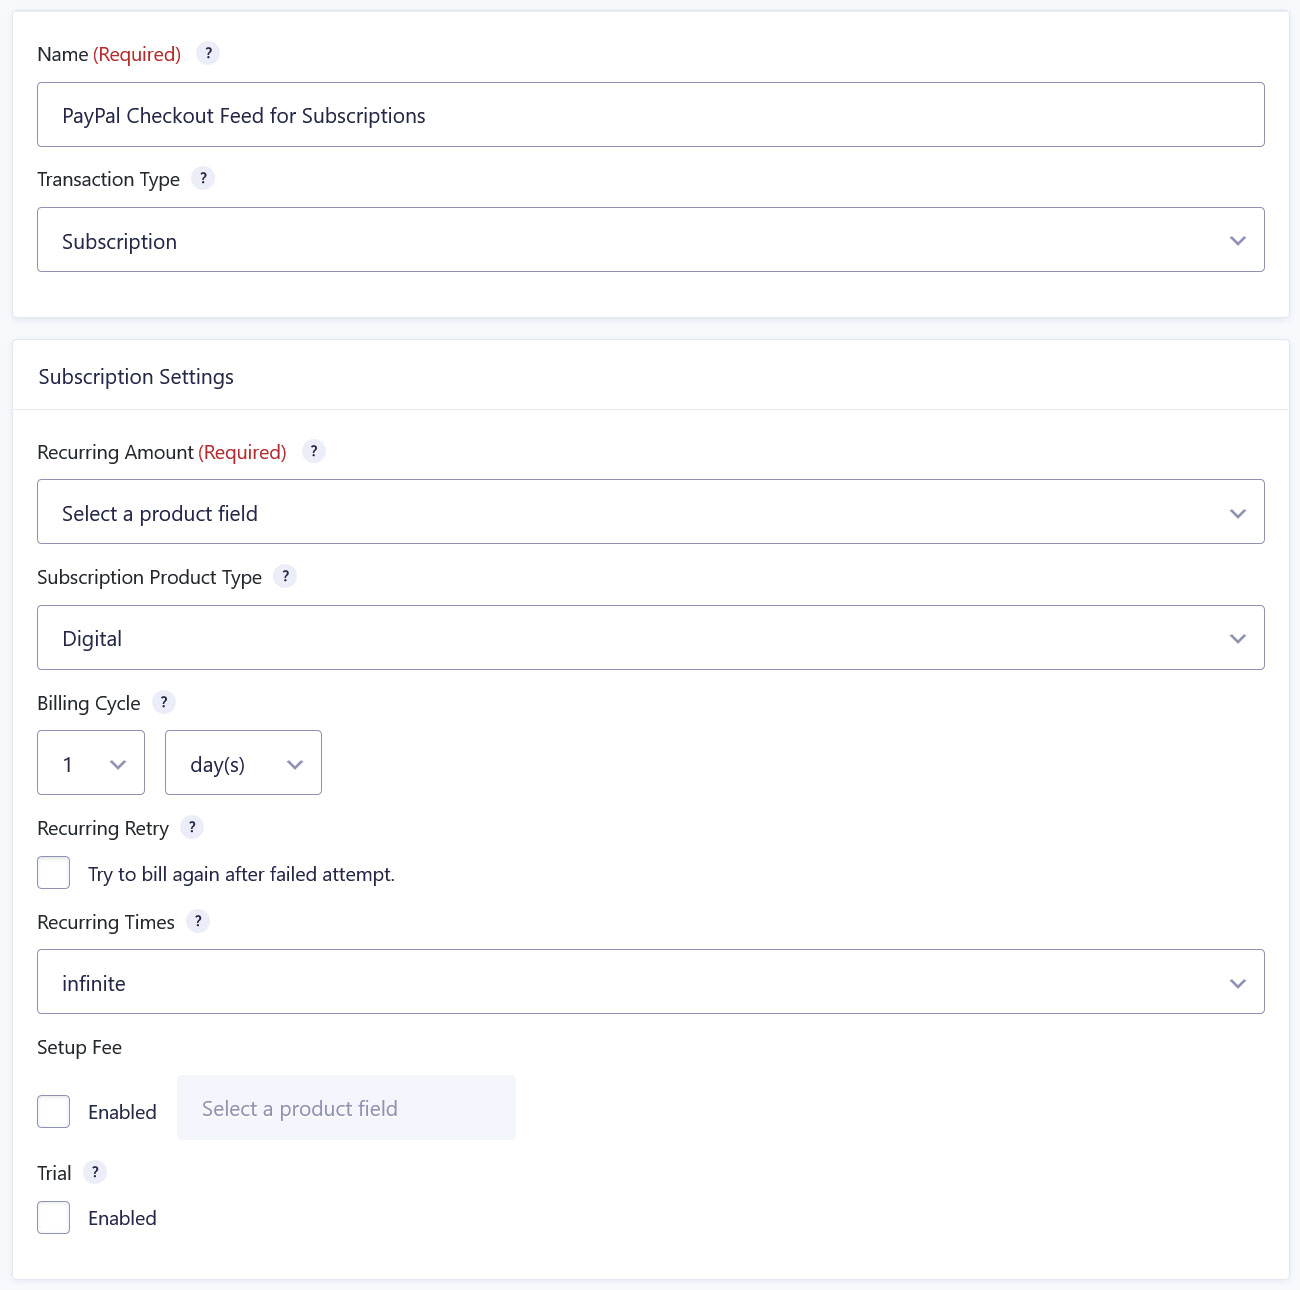
Then complete the settings accordingly:
- Transaction Type – Pick the product field you configured that contains your subscription.
- Subscription Product Type – Define what you are selling to your subscribers–a physical product, a digital one, or a service. In this case, the right choice is Digital.
- Billing Cycle – Select the number of days, weeks, months, or years at which it should renew. You can also use the checkbox to say whether it should try again if the first billing attempt fails.
- Recurring Times – Pick how often the billing cycle should recur. Leave it at infinite to have it run until your customer manually cancels or choose an appropriate number of cycles.
- Setup Fee and Trial – These allow you to charge a setup or trial fee and also define a trial period. You can only use one of them at a time.
In the case of the setup fee, this needs to be defined by a Product field on the form, so you need to make sure one is present and pick it from the list.
Under Trial, you can either offer a free trial, define a set amount, or choose a Product field as well. You also need to define the length of the trial period.
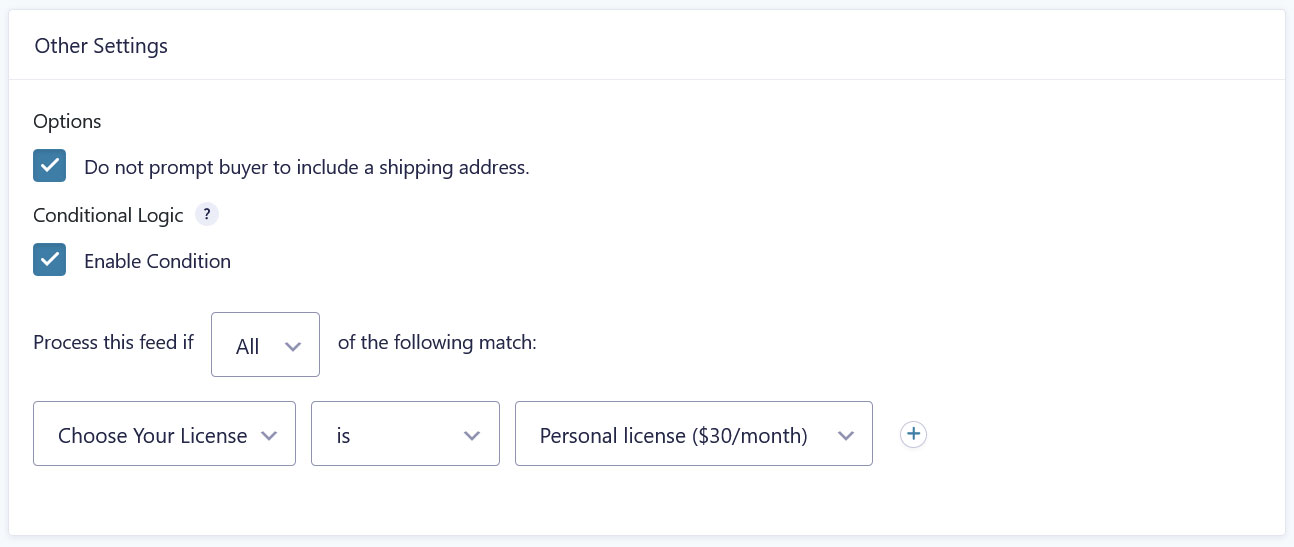
Finally, if, like us, you are selling a digital subscription, be sure to check Do not prompt buyer to include a shipping address under Other Settings.
Additionally, you can also enable conditional logic for this feed. Find more information on this check out this video.
Save the feed when you are done.
6. Use Other Gravity Forms Add-Ons
The cool thing about using Gravity Forms to power your PayPal subscription is that you can also use many of the other Gravity Forms Add-Ons to improve the user experience. Here are just a few possibilities:
- Prompt subscribers to join your email newsletter so they can stay up to date with what is happening with your website and business. You can also send them directly to your email marketing platform like MailerLite or ConvertKit.
- Add them to your customer relationship management software (CRM), like HubSpot, Agile CRM, Zoho, and more.
- Offer coupons to your customers so they can try out your subscription for cheaper.
- Include polls and quizzes in your form to get to know them better.
- Create a new task in your project management software, such as Trello, or get notified on Slack when someone subscribes.
- Make your payment forms interactive using the Conversational Forms Add-On.
- Connect to thousands of other apps using the Zapier Add-On.
Check out the full add-on list for more ideas.
7. Embed and Test Your Form
Once the feed is set up, it’s time to test if everything is working as it should. For that, embed your form in a test page using the Gravity Forms block or shortcode.
Publish or preview the form and go through the process of purchasing your subscriptions to see if everything is working right. As long as your form is set to sandbox, it will not result in real payments and you can use these credit card numbers for testing.
Any subscriptions that go through should show up in the Entries menu of your form.
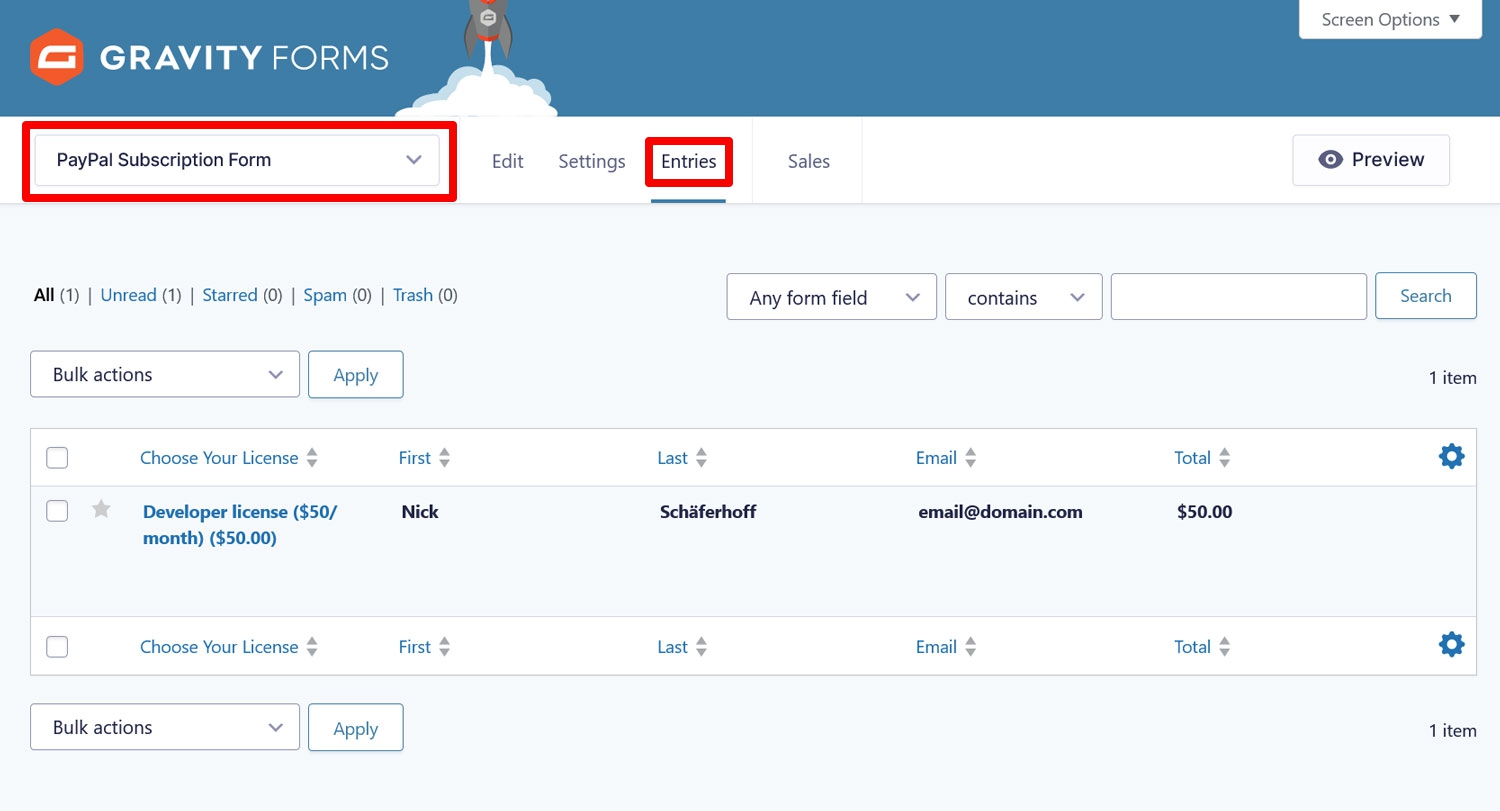
Click on any of them for additional info.

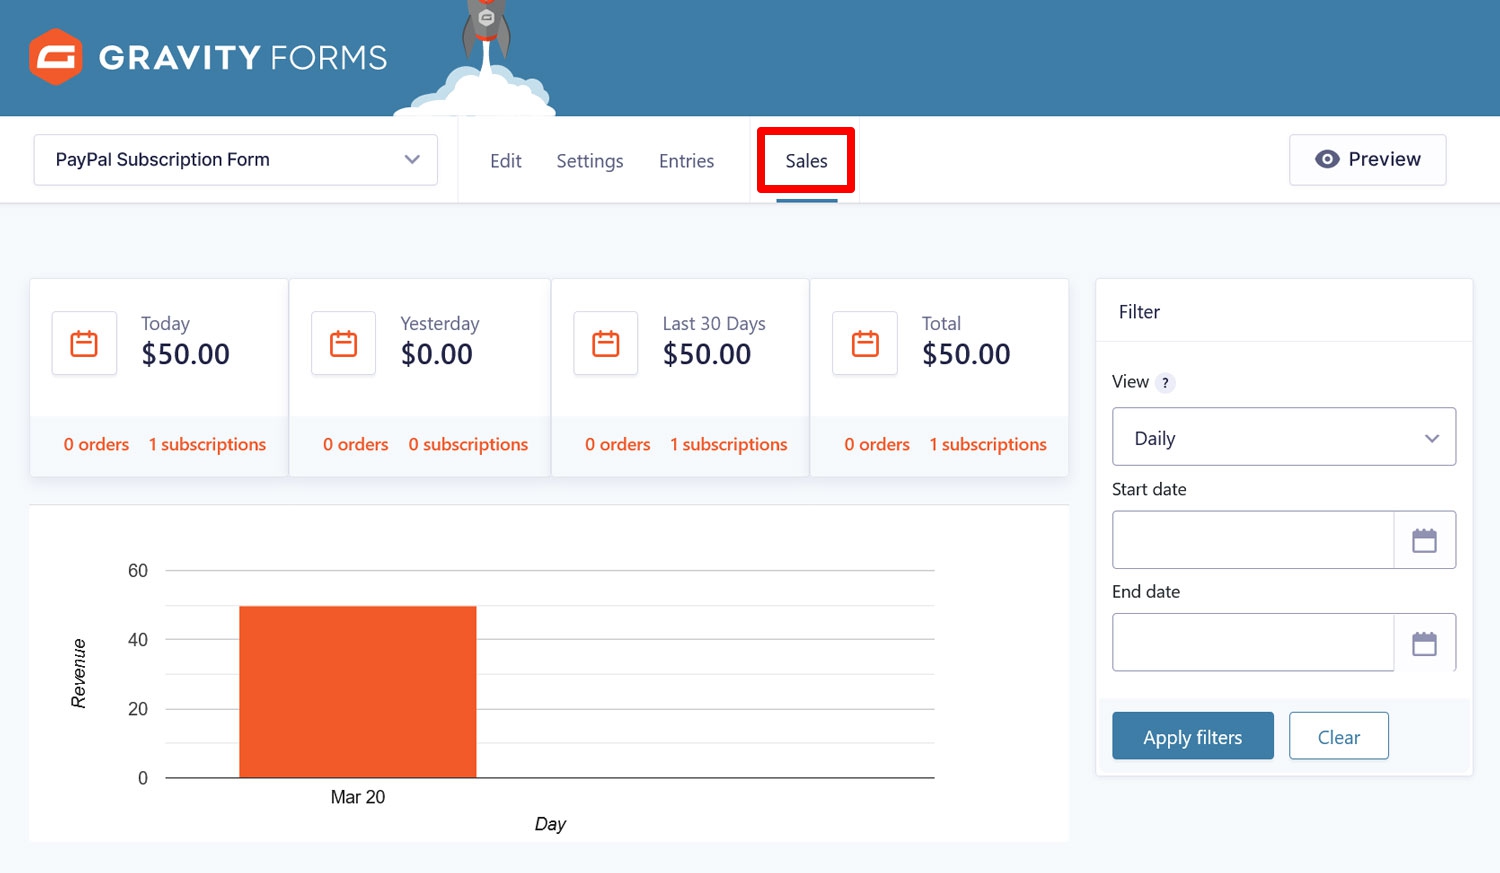
Check the Sales menu for an overview of your e-commerce activities.
8. Make Your Payment Gateway Live
Once you are convinced that everything is as it should be, in order to accept actual payments, you need to switch your PayPal account to live mode. For that, go back to the settings (Forms → Settings → PayPal Checkout, remember?) and switch the radio button from Sandbox to Live.
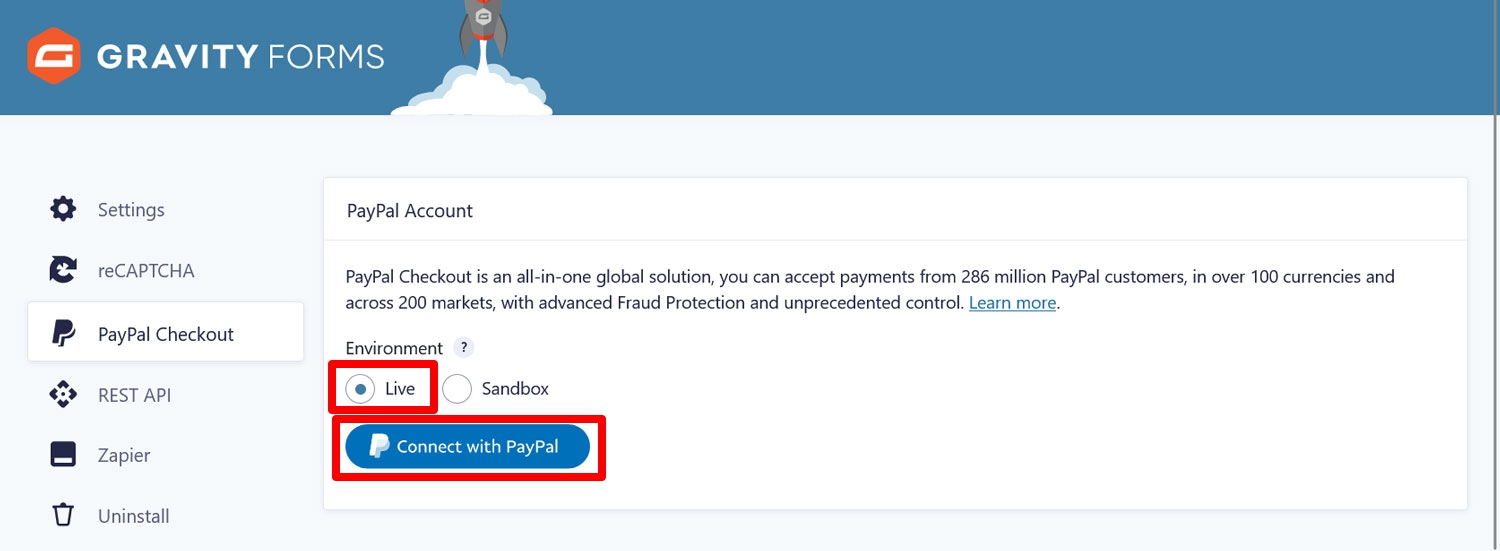
Then, click the Connect with PayPal button again to re-authorize your account. It should work the same way as for the sandbox, however, this time you need to use your real PayPal credentials, not the test login information.
After that, you should be ready to start accepting subscriptions in exchange for real money!
For more information on how to get started with the Gravity Forms PayPal Checkout Add-On, check out the documentation.
Create Your First Recurring Payments With PayPal Checkout Now!
Offering subscriptions to create recurring payments on your WordPress website is a great business model. It allows you to earn continual income and plan ahead better than with one-time purchases. There are also a number of product and services you can sell this way.
In addition, it has never been easier to implement thanks to Gravity Forms and PayPal. Using the Gravity Forms PayPal Checkout Add-On, you can set your subscription offers up in mere minutes. Simply establish a connection to PayPal, set up your subscription form, integrate the PayPal field, and you are off to the races.
If you already own the Gravity Forms Pro license or above, you can get started right away. Otherwise, purchase your Pro, Elite, or Nonprofit license now or upgrade your Basic license to start accepting subscriptions immediately.