WordPress to Salesforce: How to Get Started with the Gravity Forms Salesforce Add-On
Trying to connect WordPress to Salesforce?
With the official Gravity Forms Salesforce Add-On, you now have an easy, code-free solution to connect your WordPress site to Salesforce.
You can connect your forms to any object type in Salesforce and then easily map individual form fields to fields in Salesforce.
In this post, we’ll show you step-by-step how to set up everything and create your own unique WordPress to Salesforce integration.
Let’s get into it…
Why Use Gravity Forms for Salesforce?
With the Gravity Forms plugin, you can create pretty much any type of form on your WordPress site, from contact forms to lead gen forms, payment forms, registration forms, email subscribe forms, and lots, lots more.
With the official Salesforce Add-On, you now have the ability to connect some or all of the data in your forms to any Salesforce object type, which gives you a ton of flexibility when it comes to integrating WordPress with Salesforce.
You can create a Salesforce feed for any form, choose which Salesforce object to connect that feed to, and then map data from form fields to Salesforce.
You can also create multiple Salesforce feeds for a single form, which lets you connect to multiple object types in Salesforce.
Or, you could use conditional logic rules to execute different feeds for different situations. This lets you connect to Salesforce in different ways depending on how someone fills out the form.
Gravity Forms also lets you choose how to handle duplicate entries. You could skip duplicate entries or update the data in Salesforce when there’s a duplicate.
Finally, Gravity Forms gives you two different ways to connect to Salesforce:
- You can use the simple Salesforce auth process if you’re connecting to your own account.
- If you’re setting up a client’s account that you don’t have access to, you can manually connect to Salesforce using API keys.
As we go through the full tutorial, you can see all these features in action.
How to Connect WordPress to Salesforce
Now, let’s get into the actual step-by-step guide to set up the WordPress Salesforce integration on your site.
In the tutorial, we’ll show you every single step you need to follow to connect your site to your Salesforce account.
We’ll only make two assumptions:
- You’ve already purchased the Gravity Forms plugin. You’ll need the Gravity Forms Elite, or Nonprofit, or Developer license to access the Salesforce Add-on. If you don’t have that license, you can purchase a new Elite license here or upgrade your existing license and only pay the prorated difference.
- You already have a Salesforce account with API access. If you don’t have one yet, you can register for an account here. Not all Salesforce licenses support API access – it’s enabled by default in Enterprise, Performance, Unlimited, and Developer Edition organizations, and Professional Edition organizations can add API access with an add-on. You can use this tool to check if your account has Salesforce API access, which we’ll also cover in the tutorial below.
1. Install the Gravity Forms Salesforce Add-On
To get started, you’ll need to install the official Salesforce Add-On for the core Gravity Forms plugin:
- Open your WordPress dashboard.
- Go to Forms → Add-Ons.
- Find the Salesforce Add-On in the list of add-ons.
- Click Install Now to install the Salesforce Add-On.
- Once the installation process finishes, make sure to activate the add-on on your site.
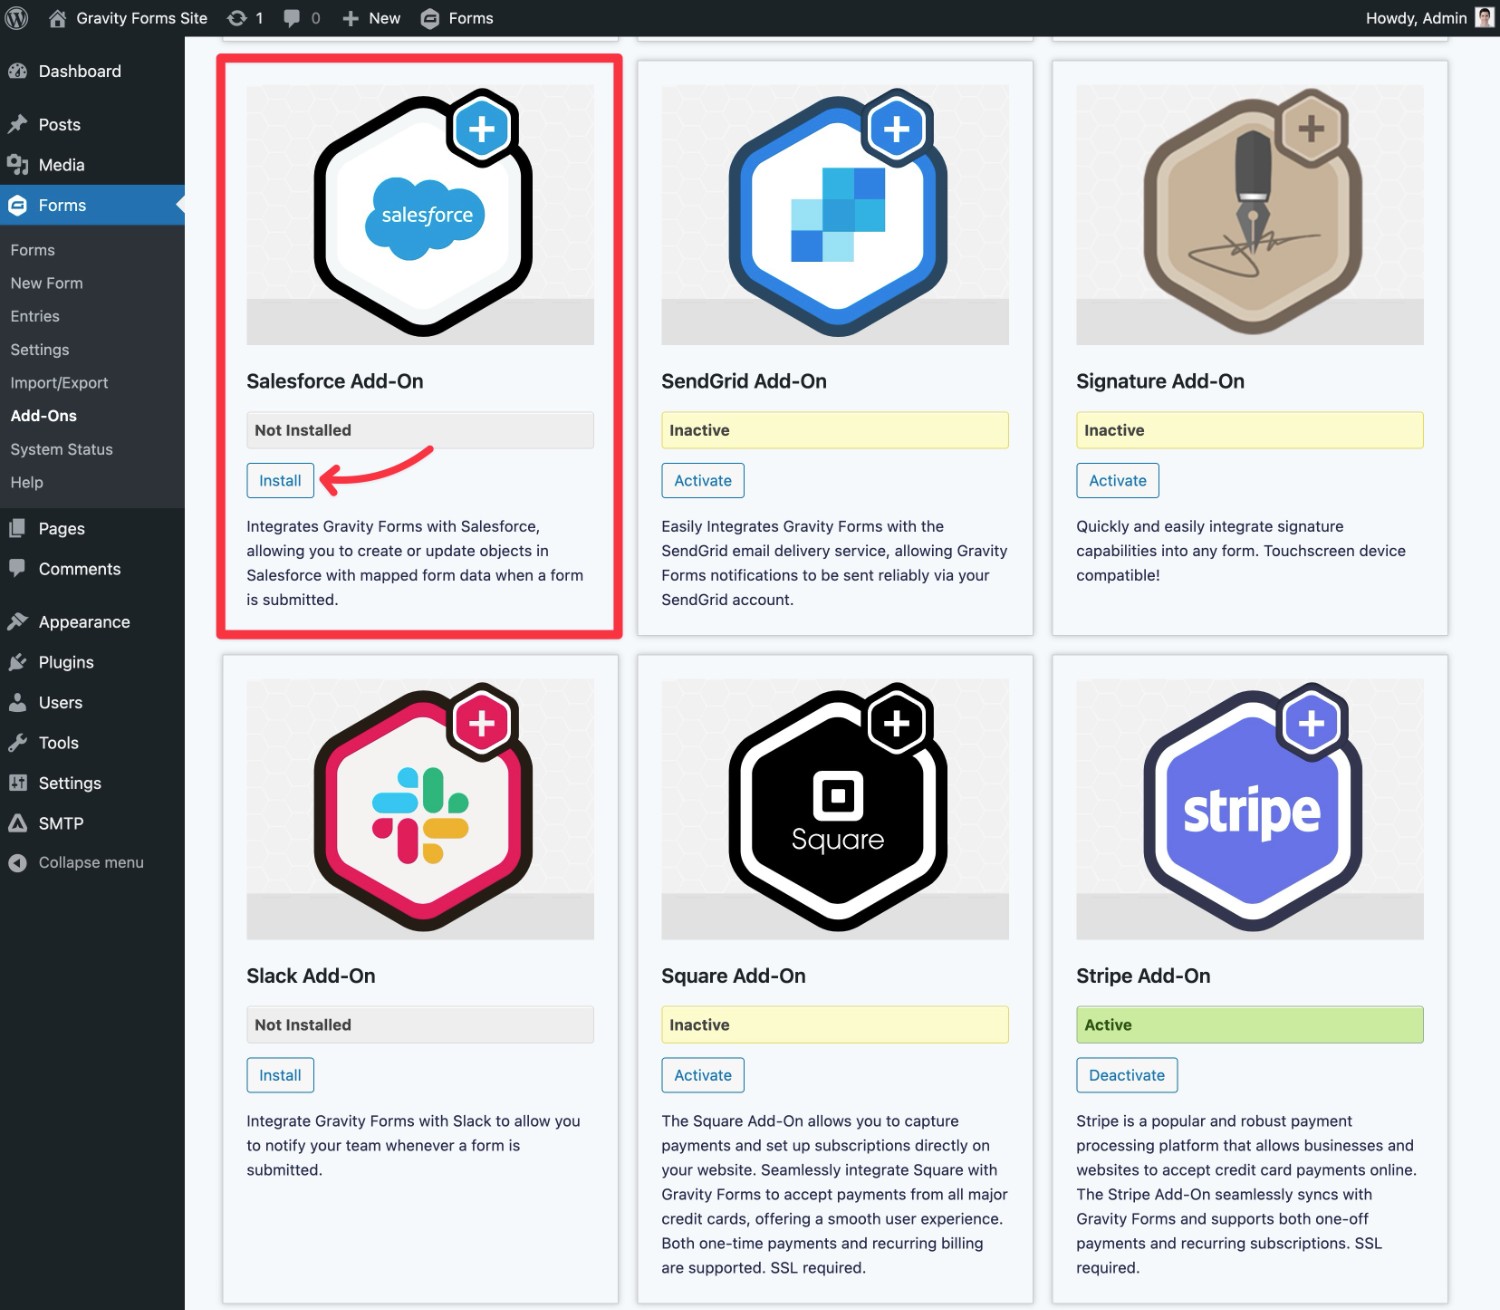
If you don’t see the Salesforce Add-On, make sure that you’re using the Gravity Forms Elite license or Nonprofit license.
2. Connect Gravity Forms to Salesforce API
Next, you need to connect Gravity Forms to Salesforce.
Let’s go through it…
Verify That Your Salesforce Account Offers API Access
To start, you’ll want to verify that your Salesforce account supports API access. As we mentioned earlier, not all accounts offer access to the Salesforce API.
Currently, Salesforce enables the API at no extra cost for organizations with the following plans:
- Enterprise
- Performance
- Unlimited
- Developer Edition
If you have the Salesforce Professional Edition, you can also add the Salesforce API using an add-on. It will cost you an extra $25 per user per month on top of your existing payment.
Unfortunately, Salesforce doesn’t make it very easy to tell whether or not your account has API access, so we created a dedicated tool to make it easier for you to check.
To begin, open the Gravity Forms Salesforce API checker tool. Then, click Start Salesforce Connection Verification Tool.
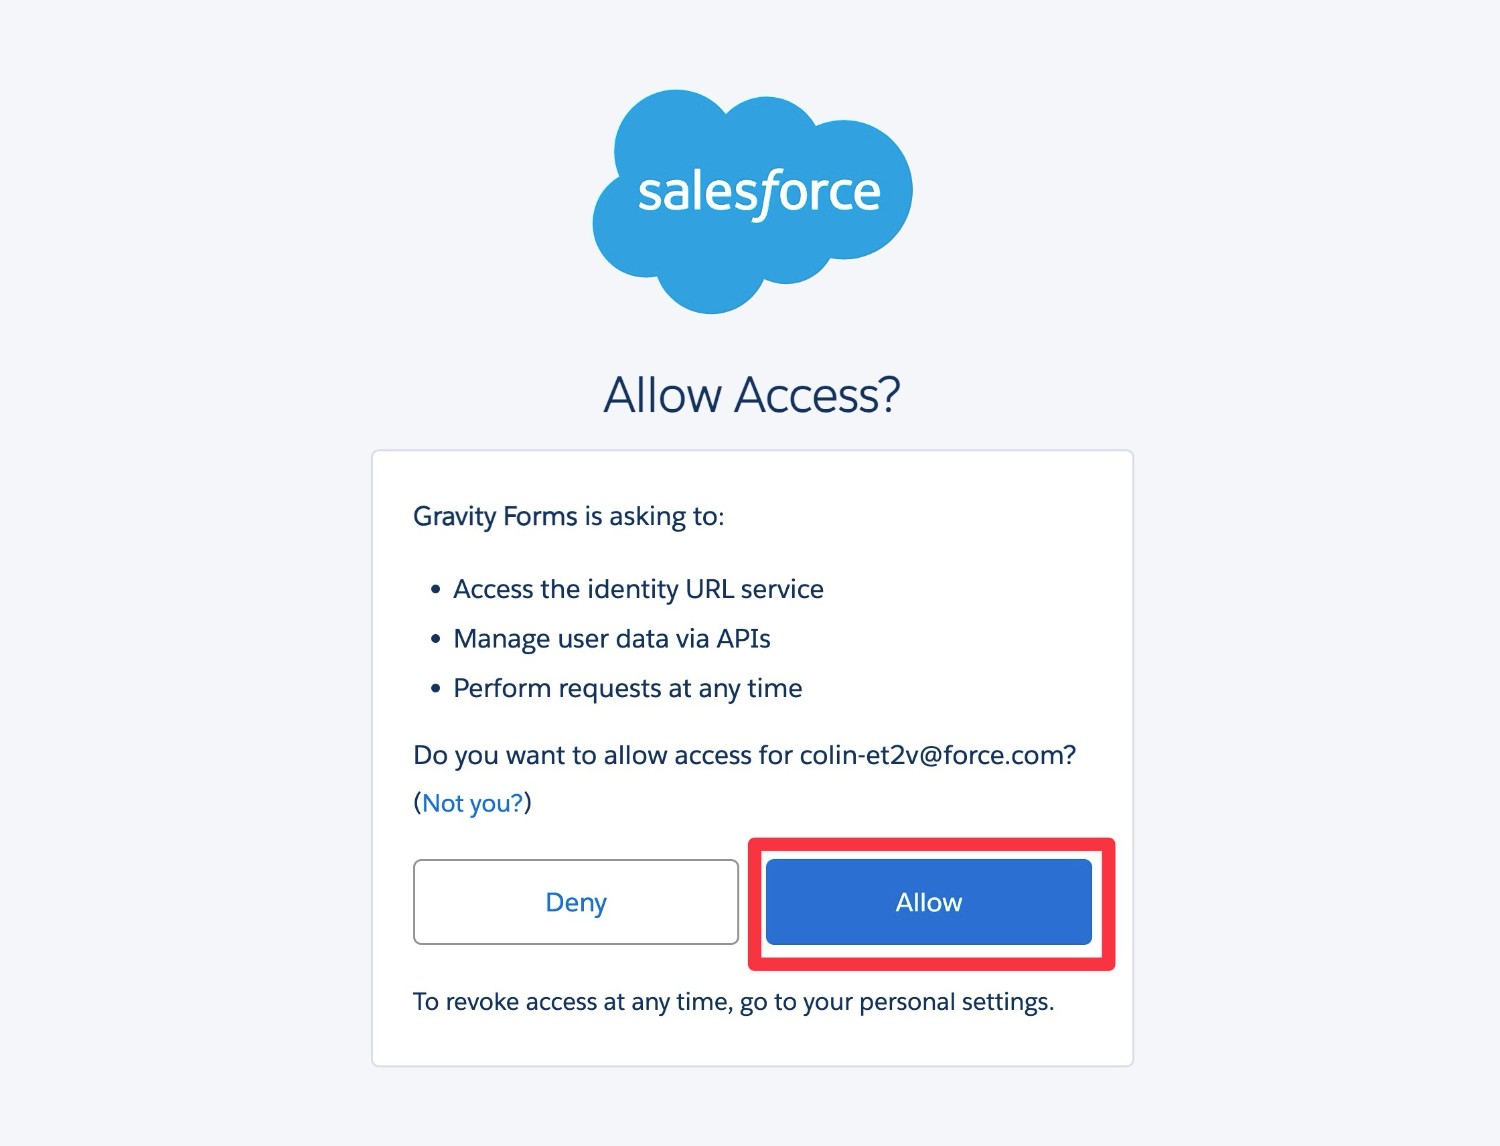
You should then be redirected to a Salesforce authorization flow. To continue, click Allow.
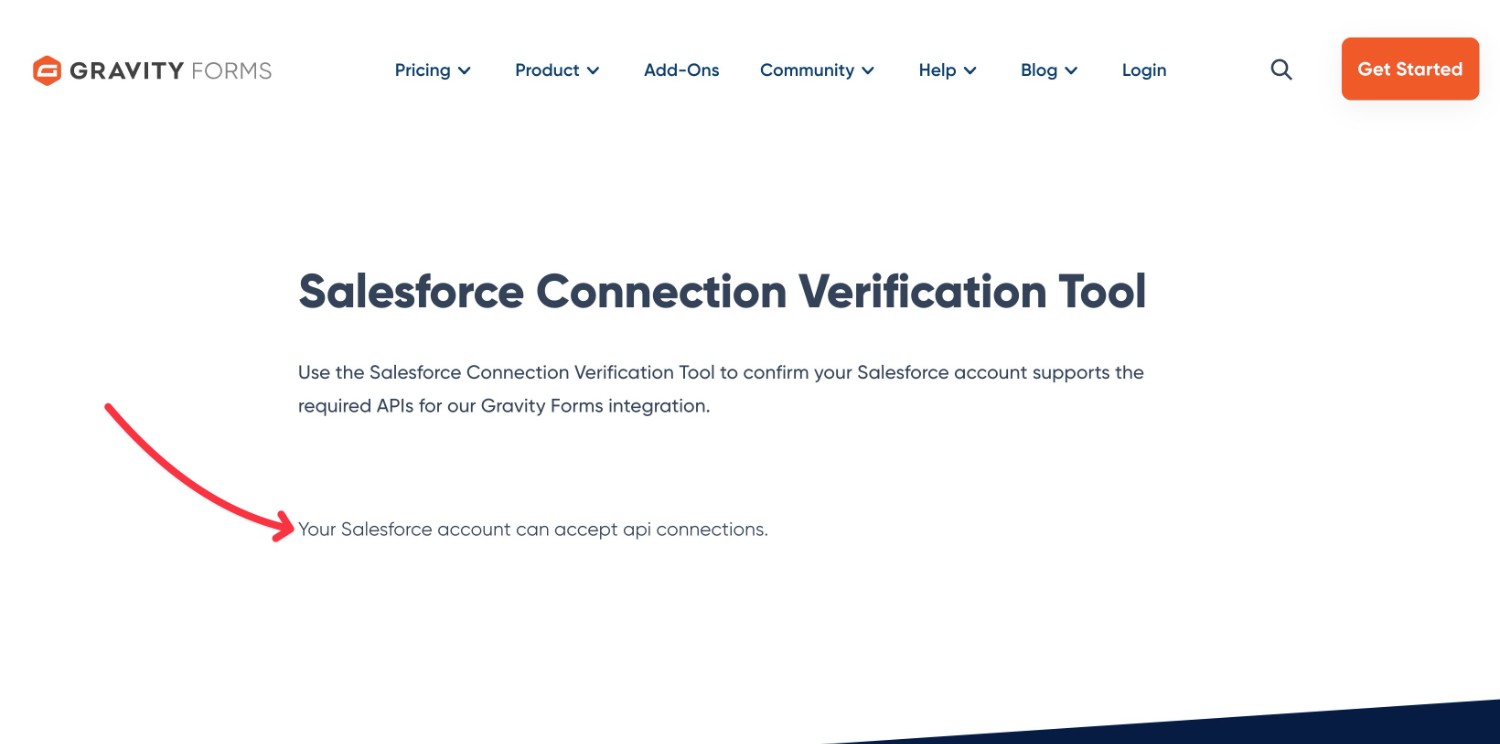
If it works, you should see a message that says “Your Salesforce account can accept api connections.” That means you’re good to go with the rest of this guide.
If your Salesforce account does not support API access, you can reach out to Salesforce support to learn the cheapest way to add API access to your account.
Connect Gravity Forms to Salesforce
Once you’ve verified that your Salesforce account supports API access, you can proceed with connecting Gravity Forms to Salesforce.
There are two ways to do this:
- Salesforce auth process – This is the simplest option. You basically just need to click a button in the add-on’s settings area. However, you need to be logged in to the Salesforce account that you want to connect to, which might not be an option if you’re working on a client site.
- Manual connection – You can manually connect by adding the Salesforce Consumer Key, Consumer Secret, and Salesforce Domain. This can be a good option if you’re working on client websites or are unable to log in to the Salesforce account for some other reason.
If you’re able to log in to the Salesforce account, here’s how to connect:
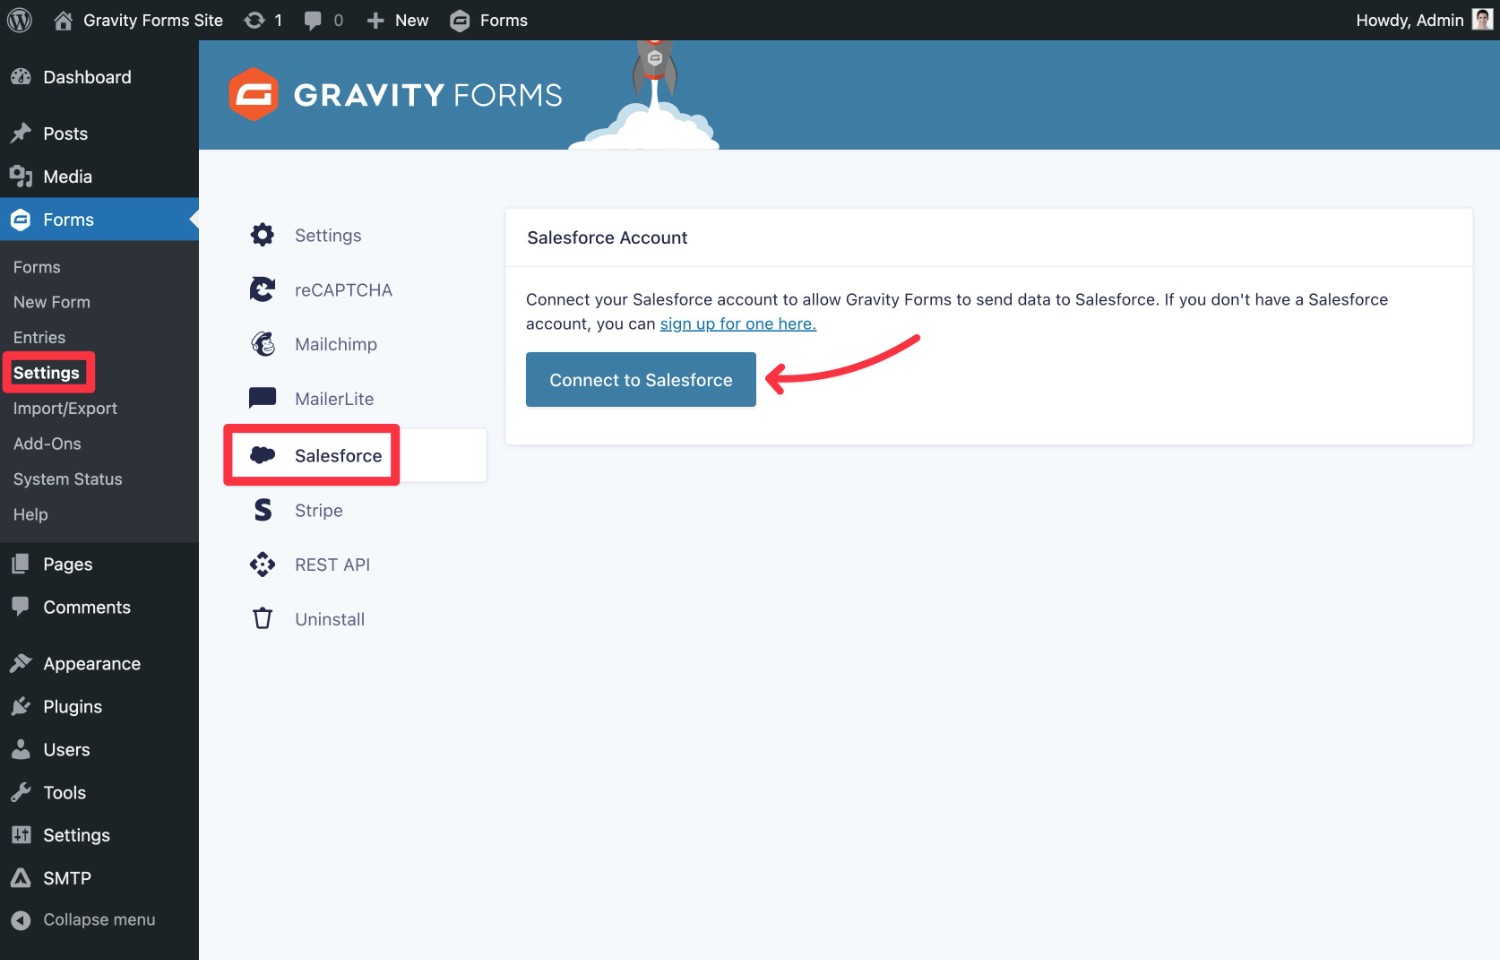
- Go to Forms → Settings → Salesforce in your WordPress dashboard.
- Click Connect to Salesforce.
- Use the Salesforce authorization interface to give Gravity Forms permission to connect.
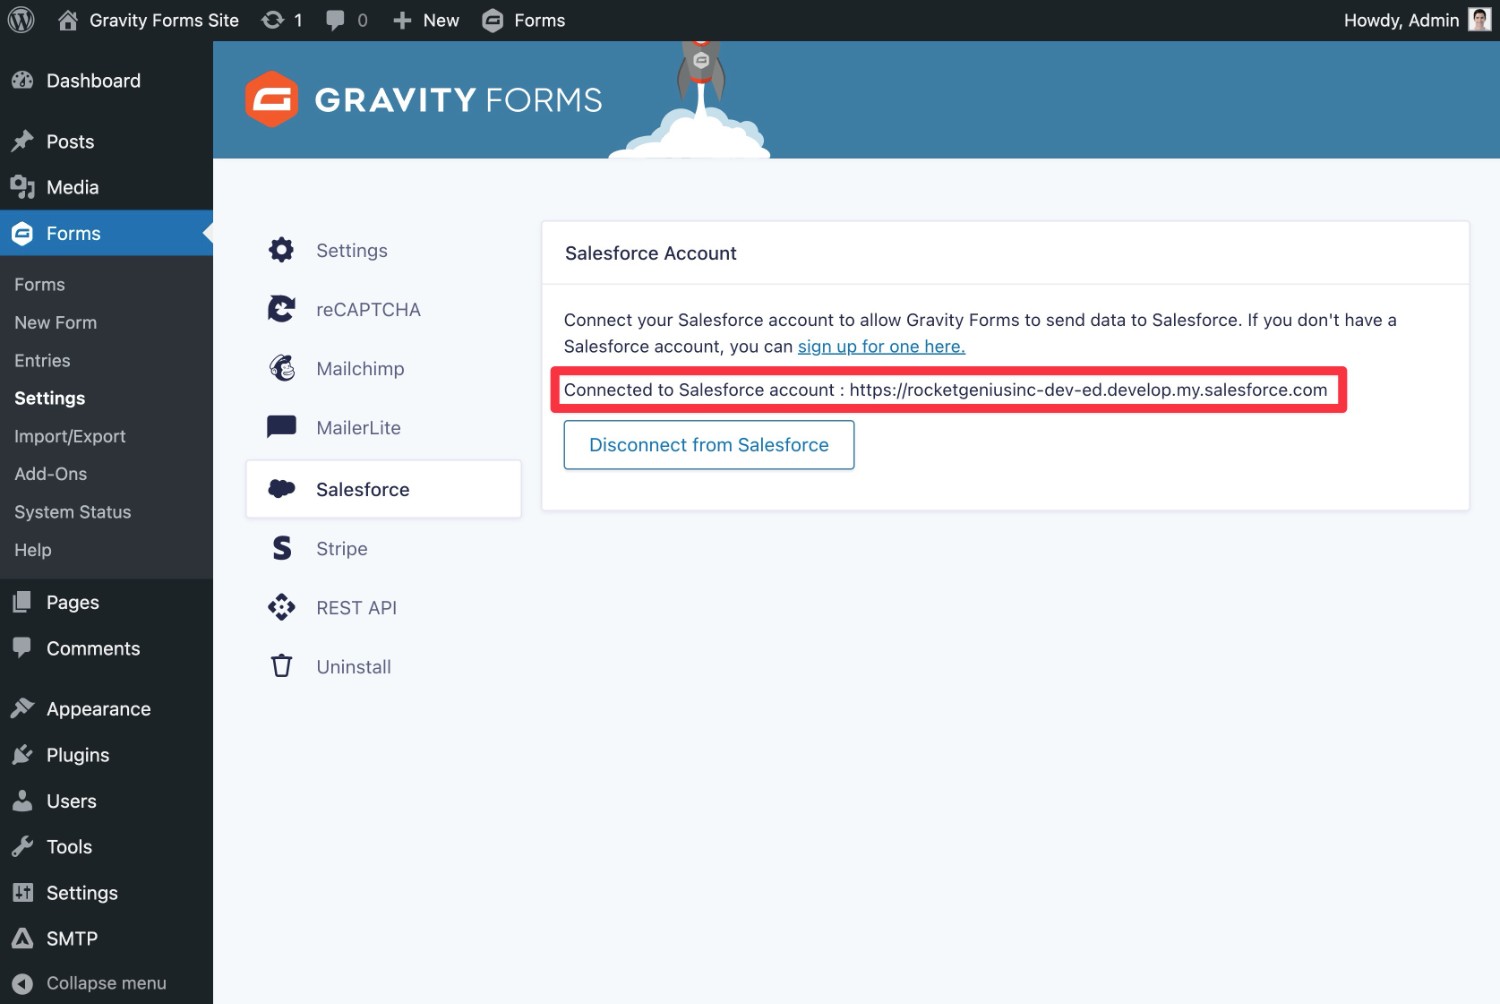
Once you authenticate with Salesforce, you should be redirected back to your WordPress dashboard. If everything worked correctly, you should see a message like “Connected to Salesforce account – your-account-domain.my.salesforce.com.”
Manual Connection
If you are unable to log in to the Salesforce account that you want to connect to (e.g. you’re working on a client website), you can follow the steps in this documentation article to set up the connection manually.
You’ll first need to add the manual configuration filter using a short code snippet. Then, you should see options to add your Salesforce Consumer Key, Consumer Secret, and Domain in the add-on’s settings (Forms → Settings → Salesforce).
You can find your Salesforce domain by looking at the domain of your Salesforce dashboard – here are more detailed instructions.
You can find your Consumer Key and Consumer Secret in the App Manager area (Apps → App Manager). You’ll need to create a new app by clicking New Connected App and choosing Create a Connected App.
3. Create or Edit the Form That You Want to Connect to Salesforce
Now that you’ve connected Gravity Forms and WordPress to Salesforce, you’re ready to set up the form that you’ll use to sync data to Salesforce.
If you’ve already created a form that you want to use, you can edit that form.
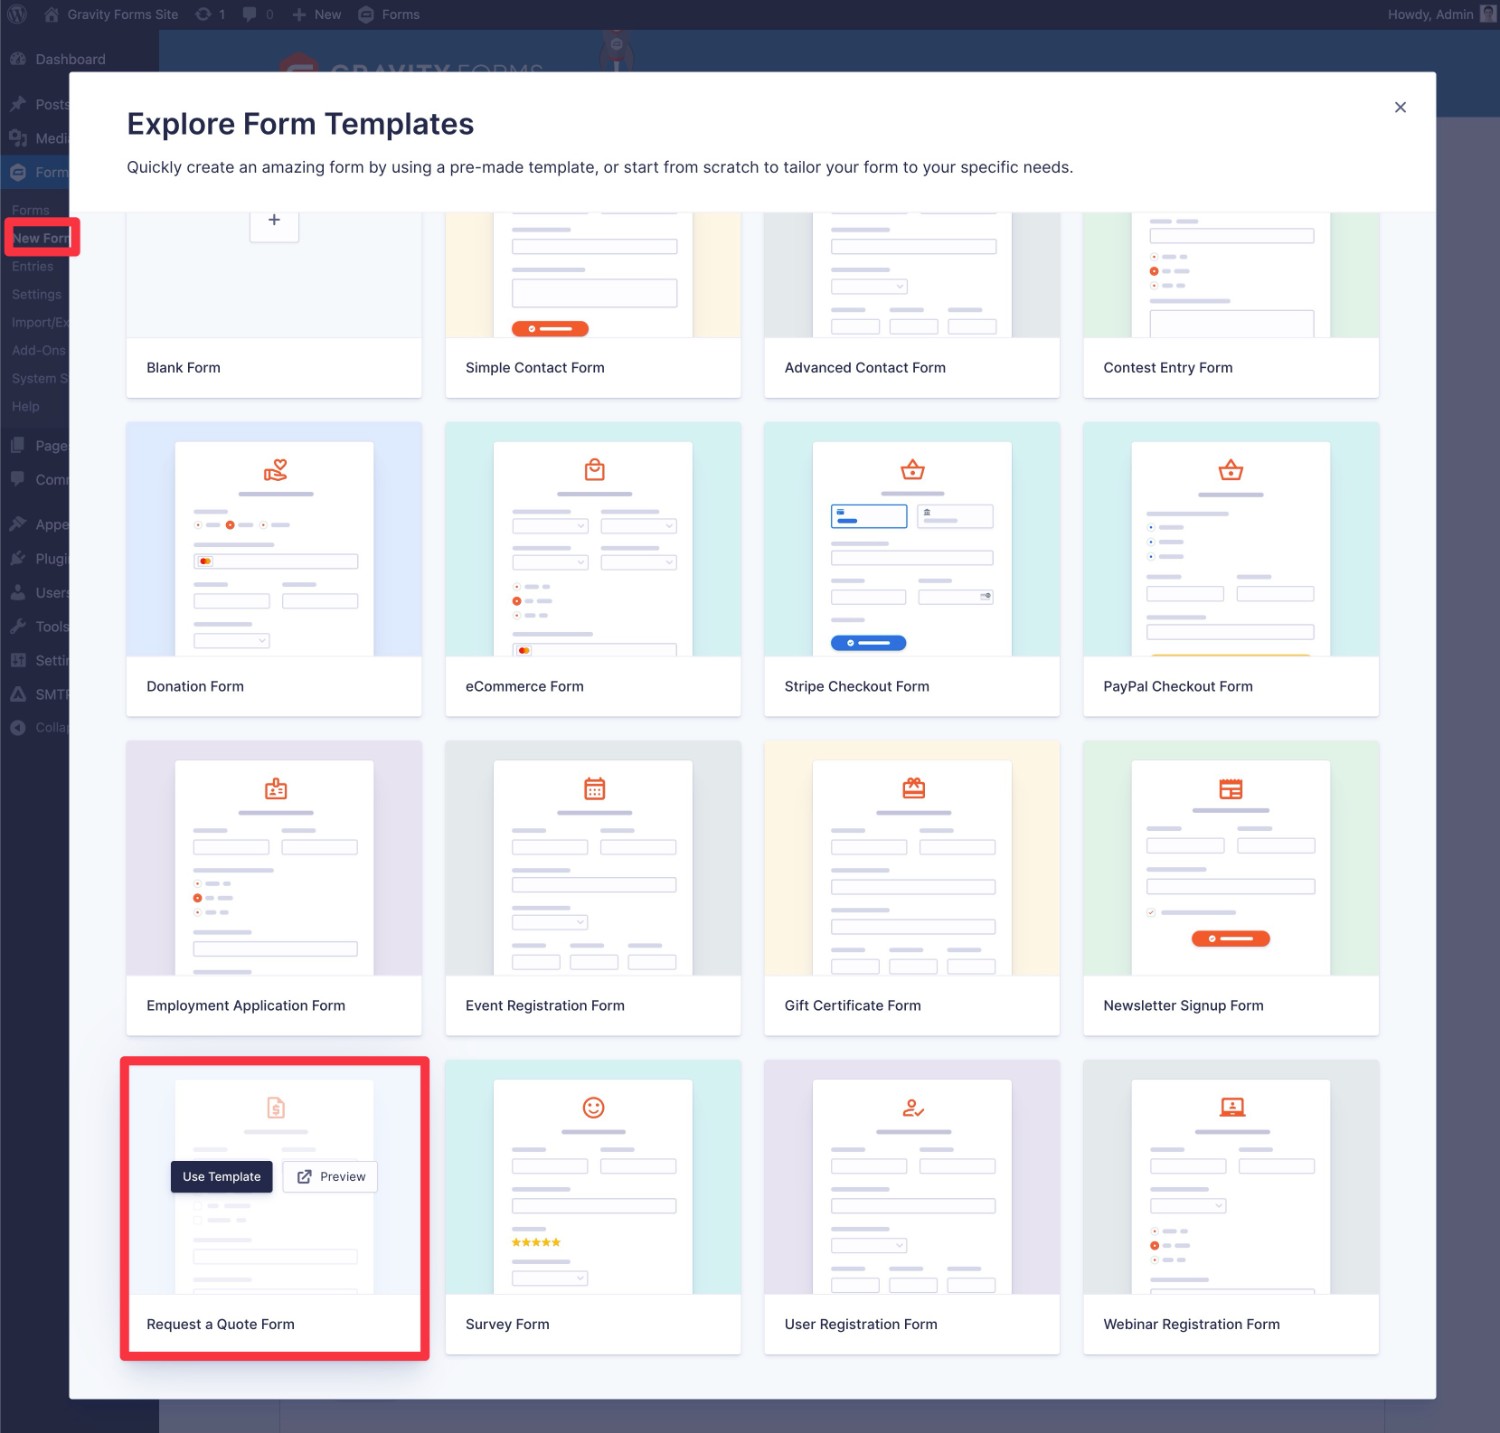
If you don’t have any forms yet, you can create one by going to Forms → New Form. You can then choose one of the premade form templates or choose a Blank Form to design your form from scratch.
You could create a dedicated lead generation form. Or, you could add the Salesforce integration to another type of form.
For example, if you create a payment form with Gravity Forms, you might want to do something in Salesforce when someone makes a payment. You can easily achieve that using the same method in this post.
For this example, we’ll use the Request a Quote Form template.
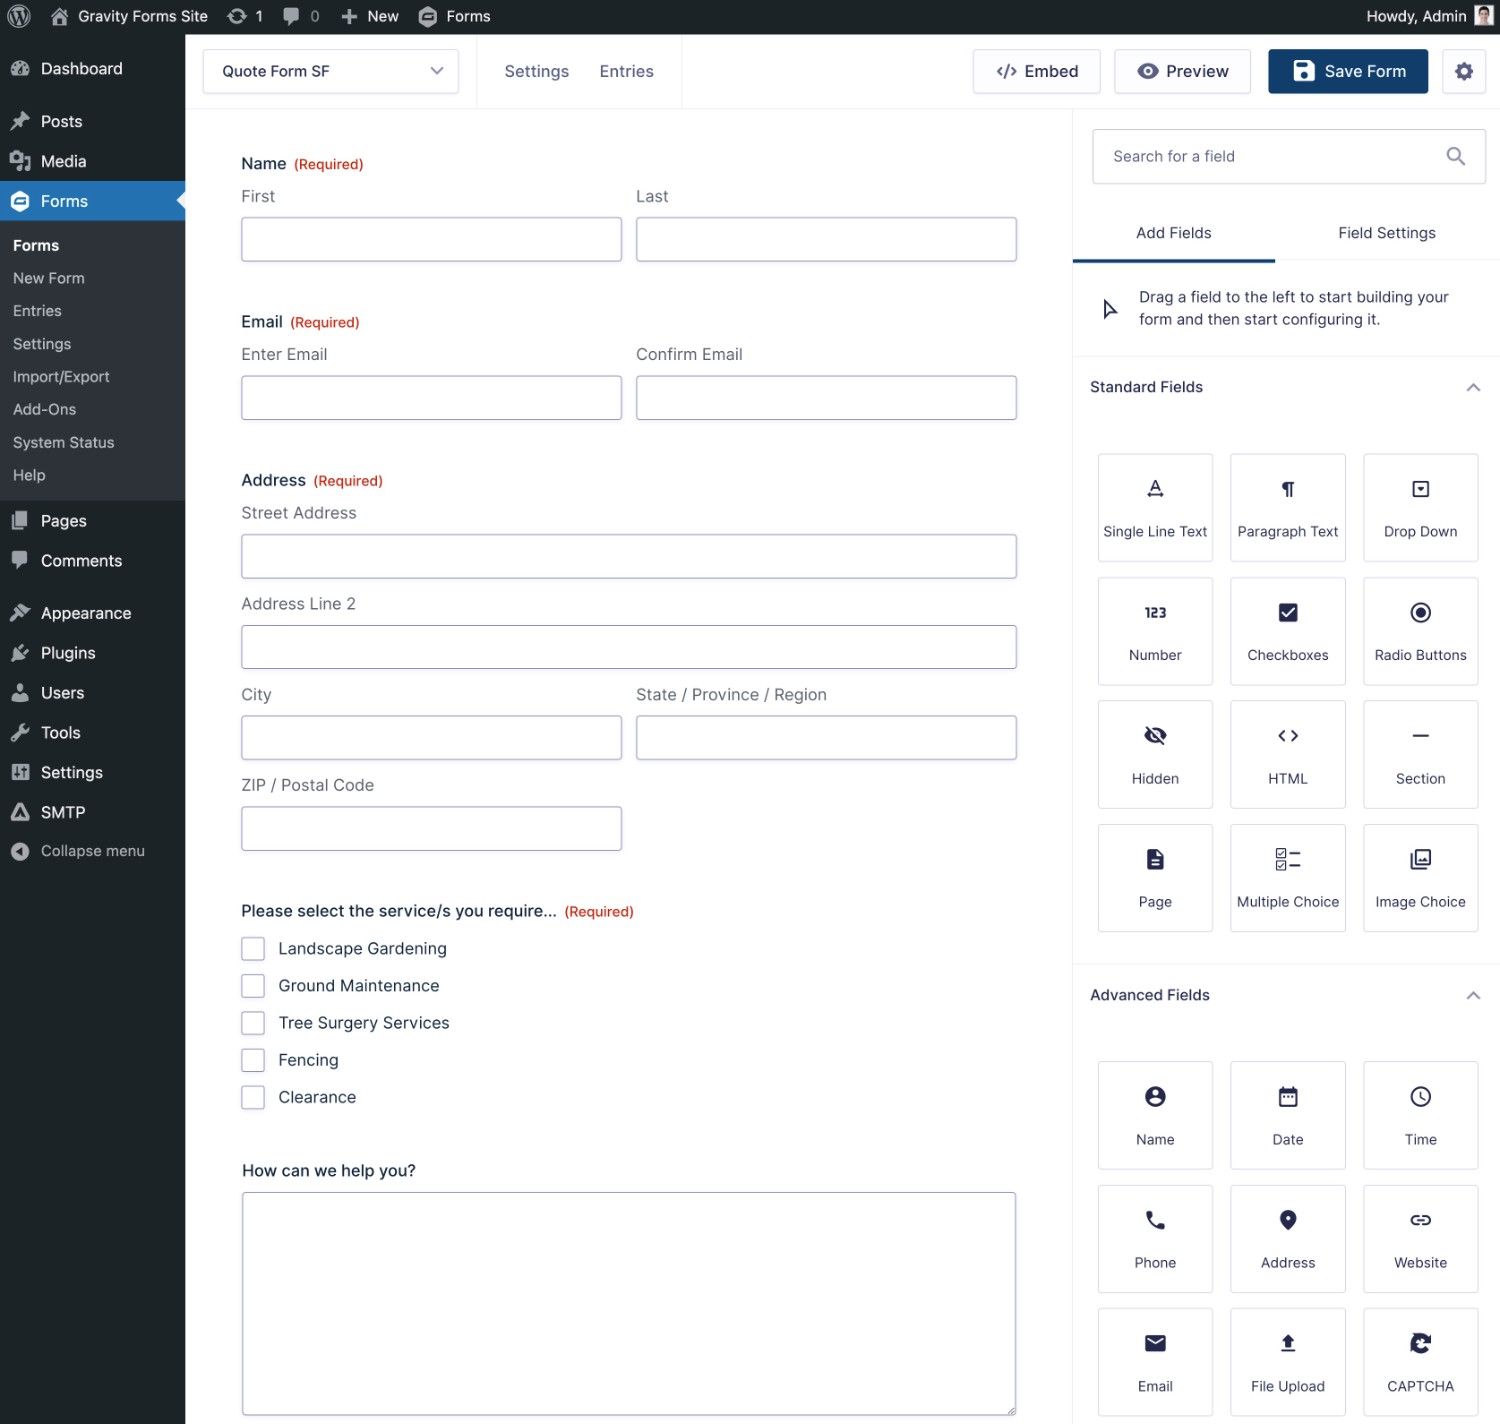
After you give your form a name, you’ll be taken to the visual, drag-and-drop form builder interface.
Here, you’re free to customize the form however you see fit.
There’s just one thing to pay attention to:
If there’s any specific information that you want to pass to Salesforce, make sure that you include a form field for that information if you need to collect it from the user. For example, depending on the form, you might need to collect a person’s email address, name, and so on.
4. Create a Salesforce Feed for Your Form
Once you’re finished setting up your form, you can connect your form to Salesforce by creating a Salesforce feed.
When someone submits the form, your feed will control how to process the form data to Salesforce.
You might create just one feed for each form, in which case every submission will be processed in the same way. Or, you can create multiple feeds, each with its own settings. You can also add conditional logic rules to control when each feed should be executed.
Let’s go through some things that you might want to do when setting up your Salesforce feed…
How to Create Your Salesforce Feed
Here’s how to create your first Salesforce feed:
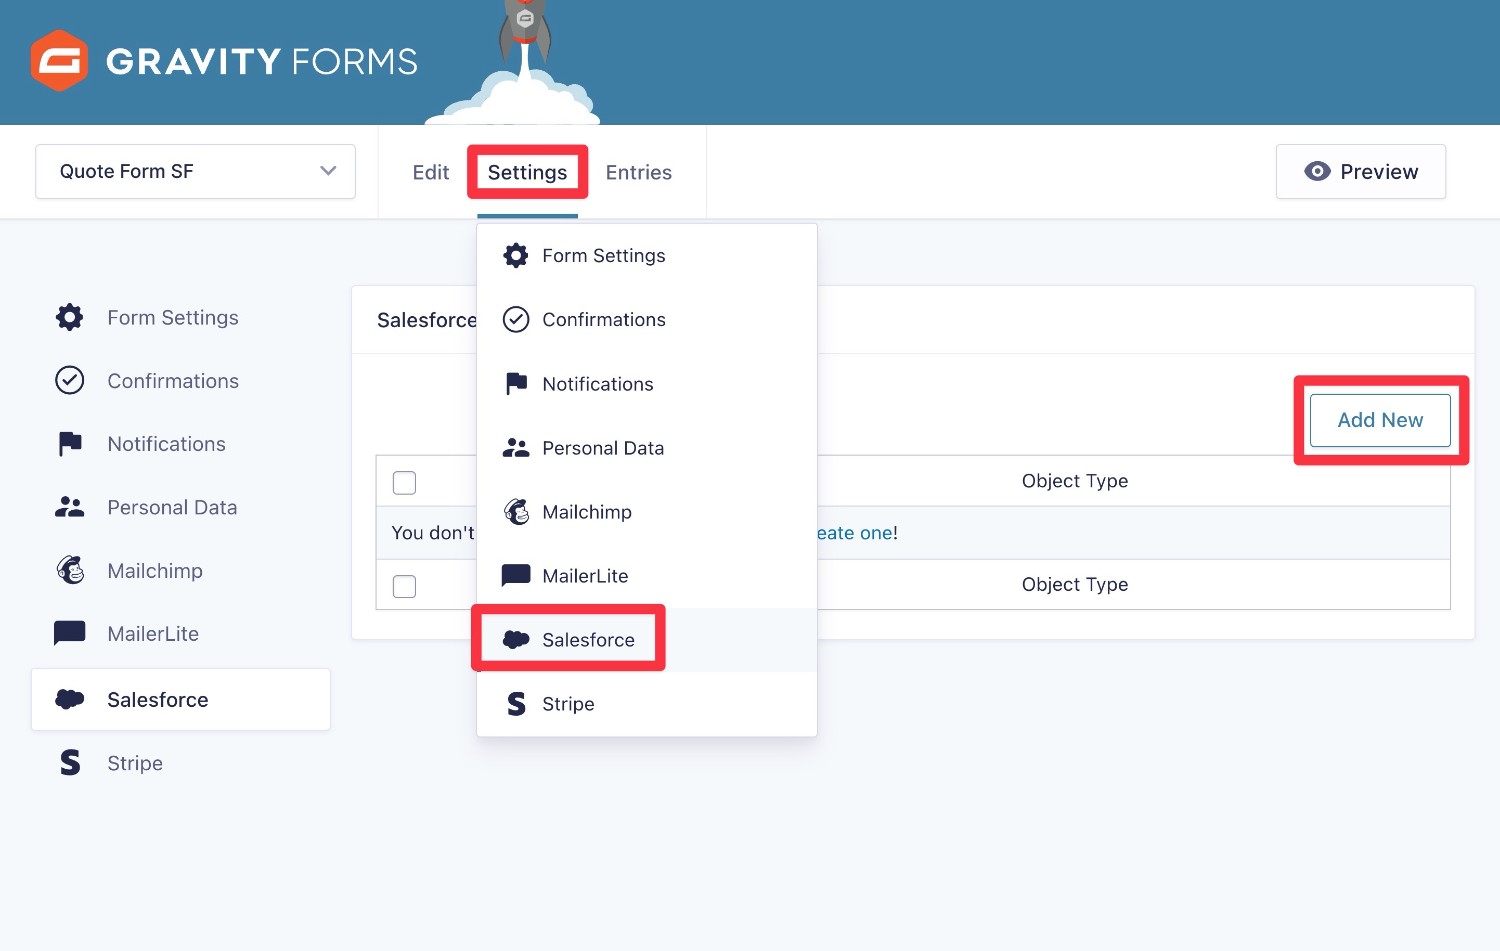
- Go to Settings → Salesforce in the form editor interface.
- Click the Add New button to create your first feed.
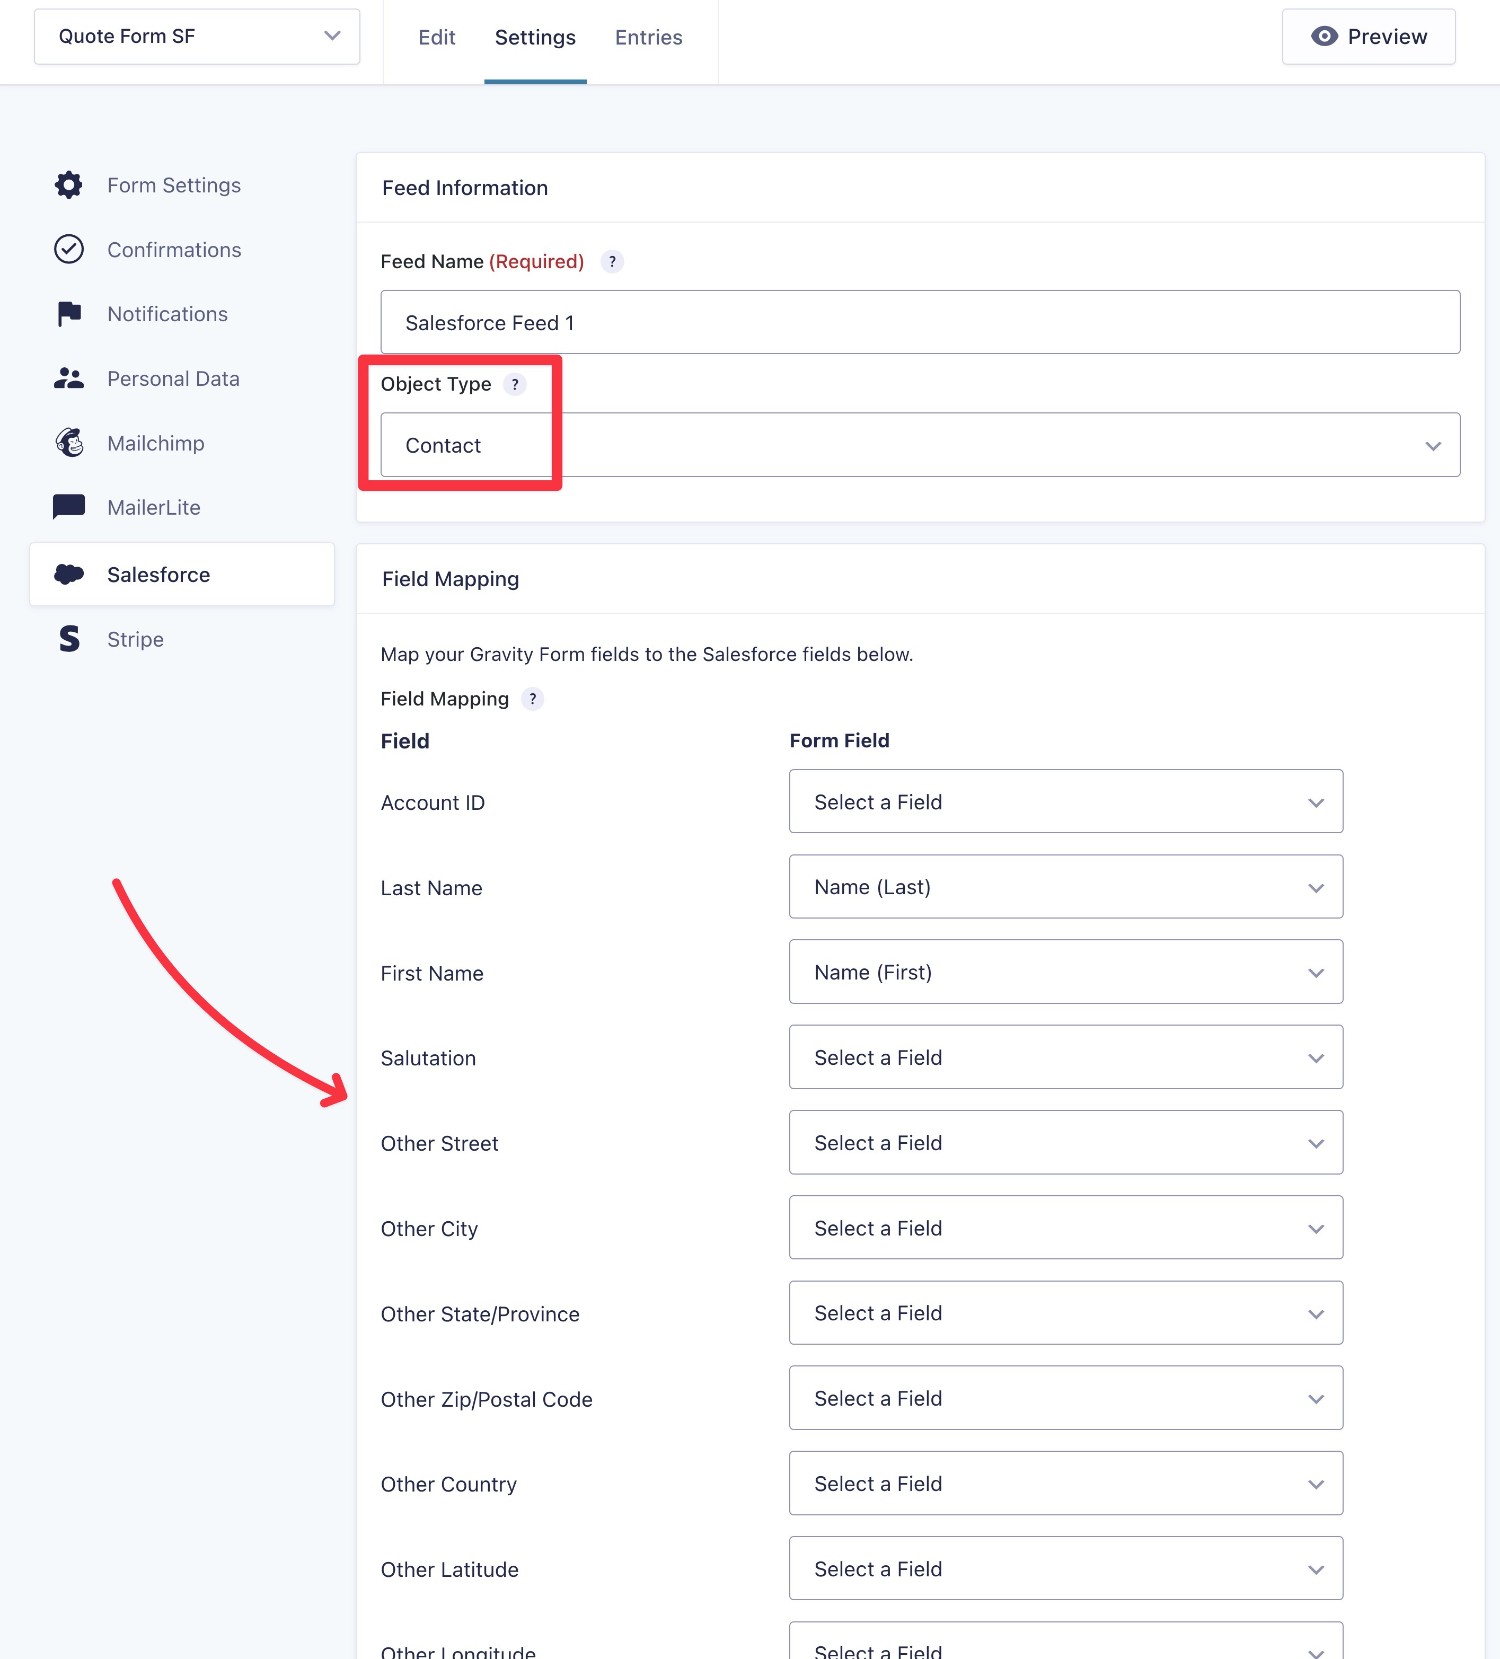
On the next screen, you’ll first need to choose an Object Type. This is the object type in your Salesforce account to which you want to send the data from this form.
You can create, manage, and edit object types from your Salesforce account using the Object Manager. Here is Salesforce’s documentation on the subject.
If you want to connect to multiple object types, you can just create multiple feeds as needed. However, each individual feed can only connect to one object type.
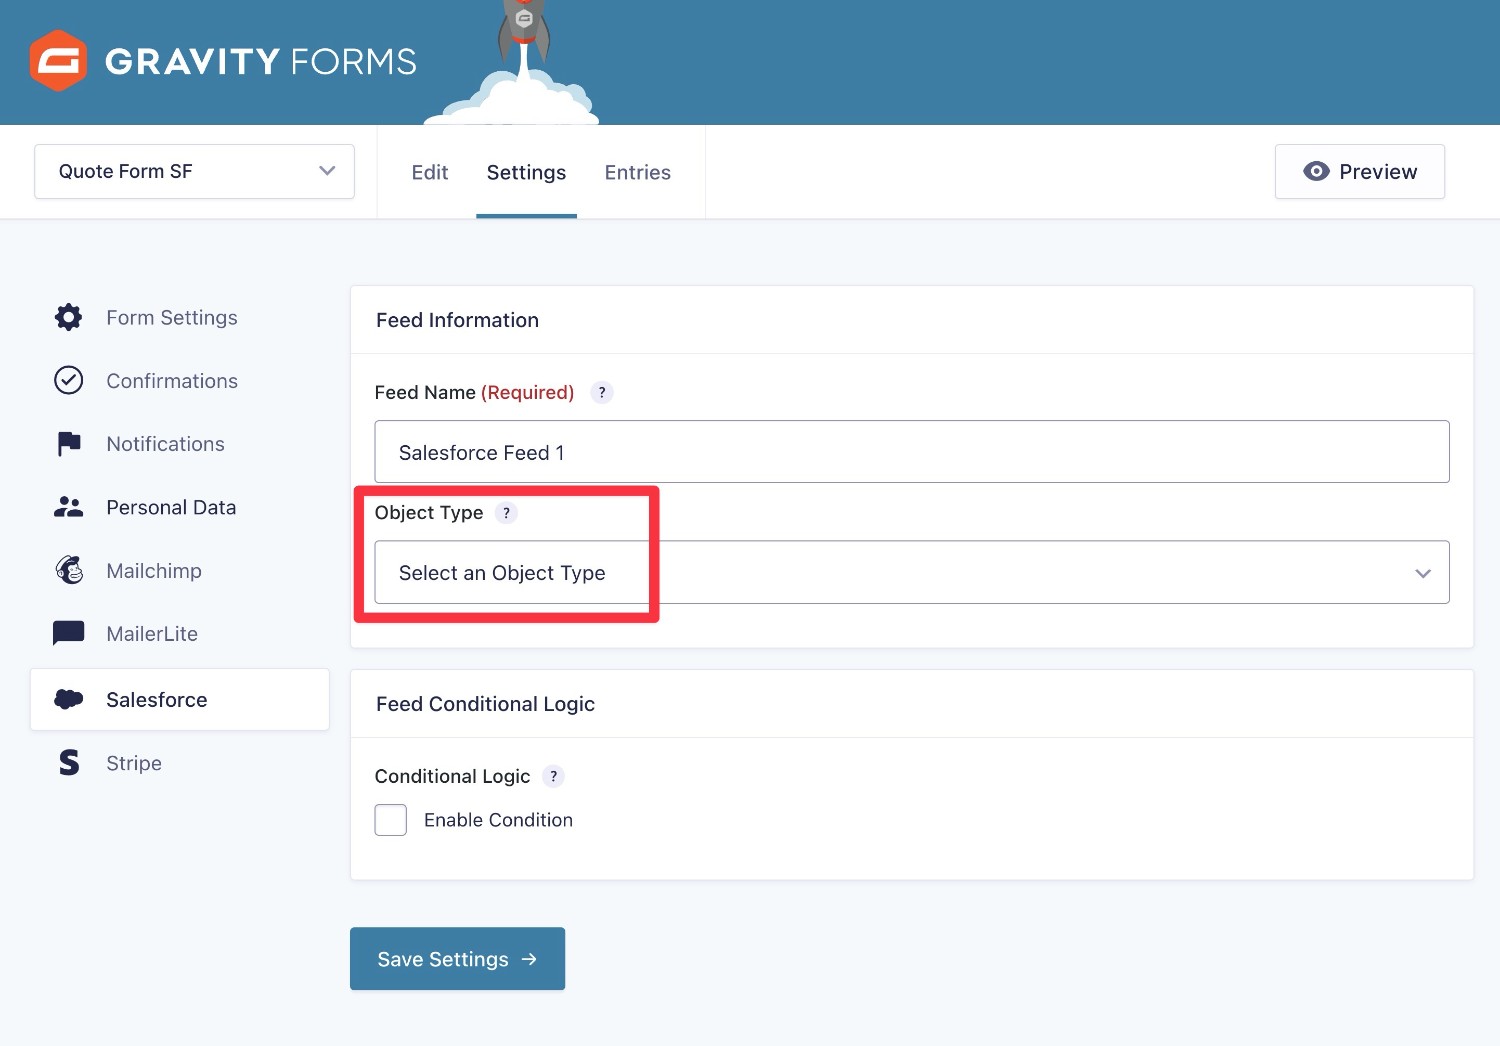
For this example, we’ll choose “Contact” as the Object Type.
Once you choose the object type, you’ll see additional options that let you map fields from your form to fields associated with that object type in Salesforce.
You might not have form fields for every single field in Salesforce. Just choose all of the fields that you want to map and ignore the rest.

At the bottom of the field mapping interface, there’s also a toggle that lets you choose how to handle duplicate records.
When disabled (the default), Gravity Forms will not update a record if Salesforce finds a duplicate. Instead, an error will be shown in the entry.
When enabled, Gravity Forms will try to update any records that Salesforce has determined to be duplicates.
Once you’ve mapped your fields and chosen how to handle duplicate records, make sure to click Save Settings at the bottom.
How to Create More Feeds (With or Without Conditional Logic)
If you want to connect to multiple object types or handle things differently depending on how someone fills out a form, you can create multiple Salesforce feeds. Just follow these same steps to create additional feeds as needed.
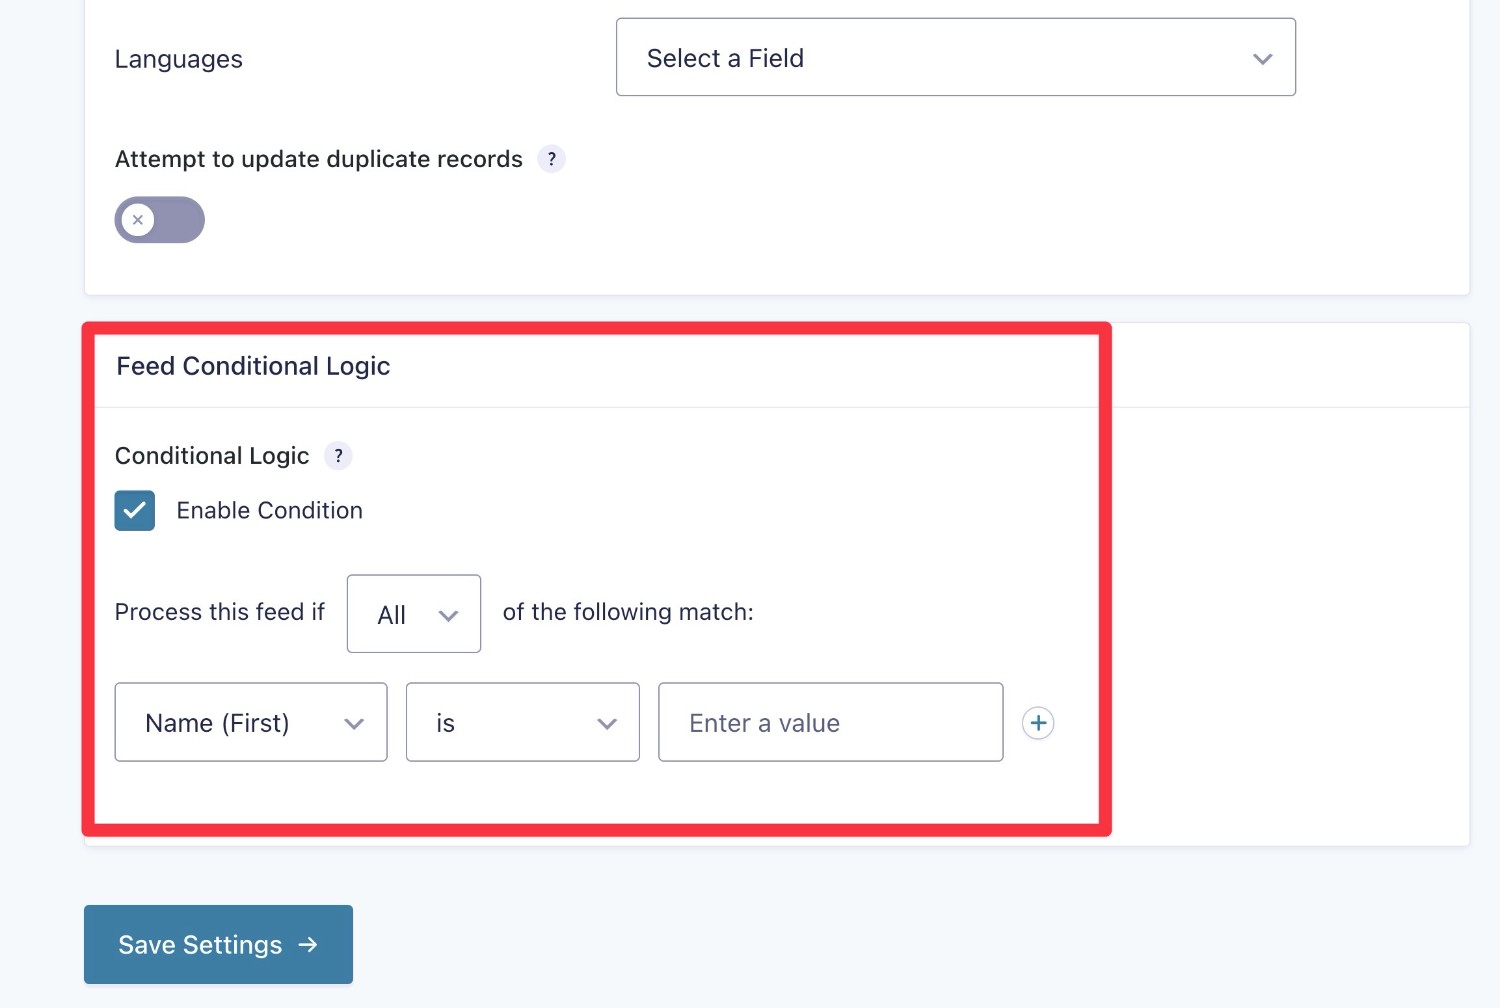
If you want even more control, you can also add conditional logic rules to some or all of your Salesforce feeds. If you add conditional logic to a feed, that feed will only execute if some or all of your conditions are met.
5. Embed Your Form
Once you’ve saved everything in the form builder interface, you’re ready to embed your form.
You can add the form anywhere on your site using the Gravity Forms block, shortcode, or PHP function.
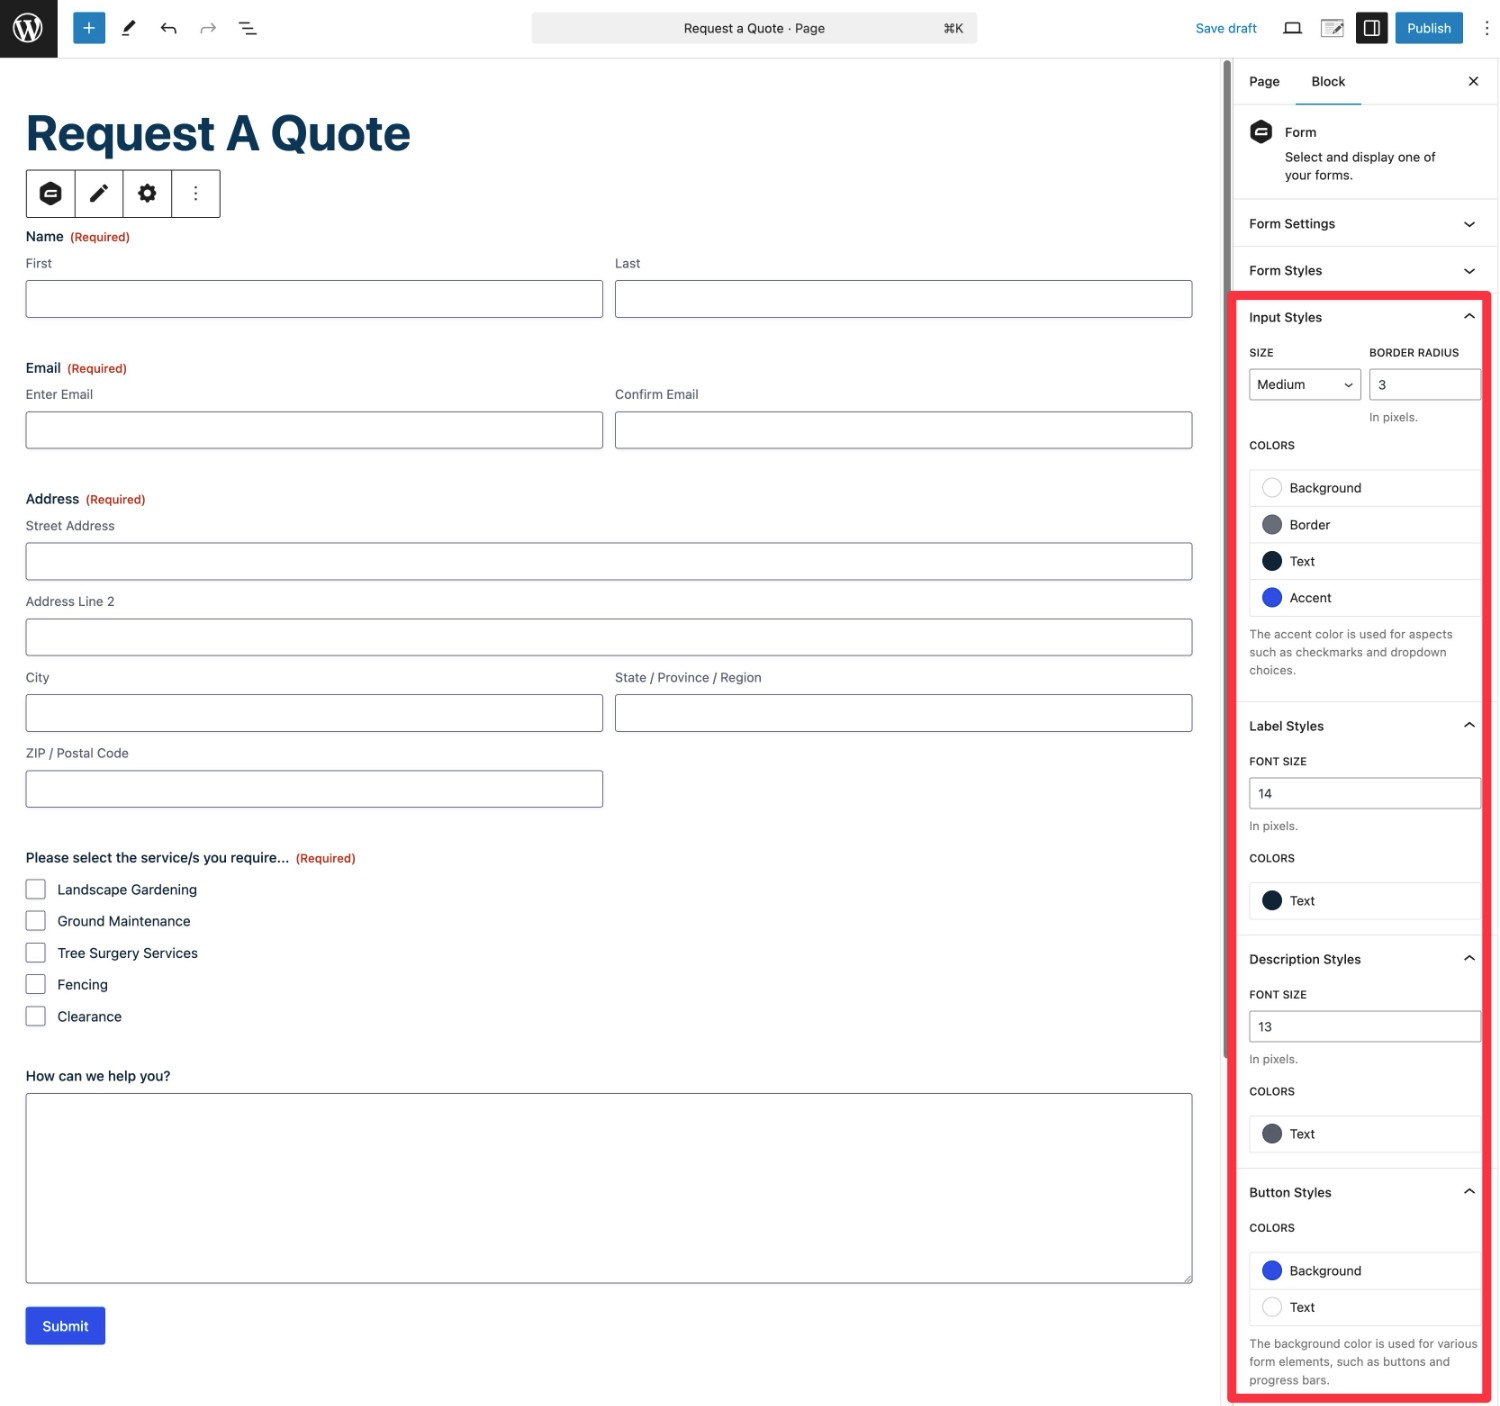
If you use the block, you can also style your form directly from the block editor using the Orbital form theme.
Once you’ve embedded your form, we recommend submitting it with some dummy information to make sure that all the data is syncing to Salesforce in the way that you want it to.
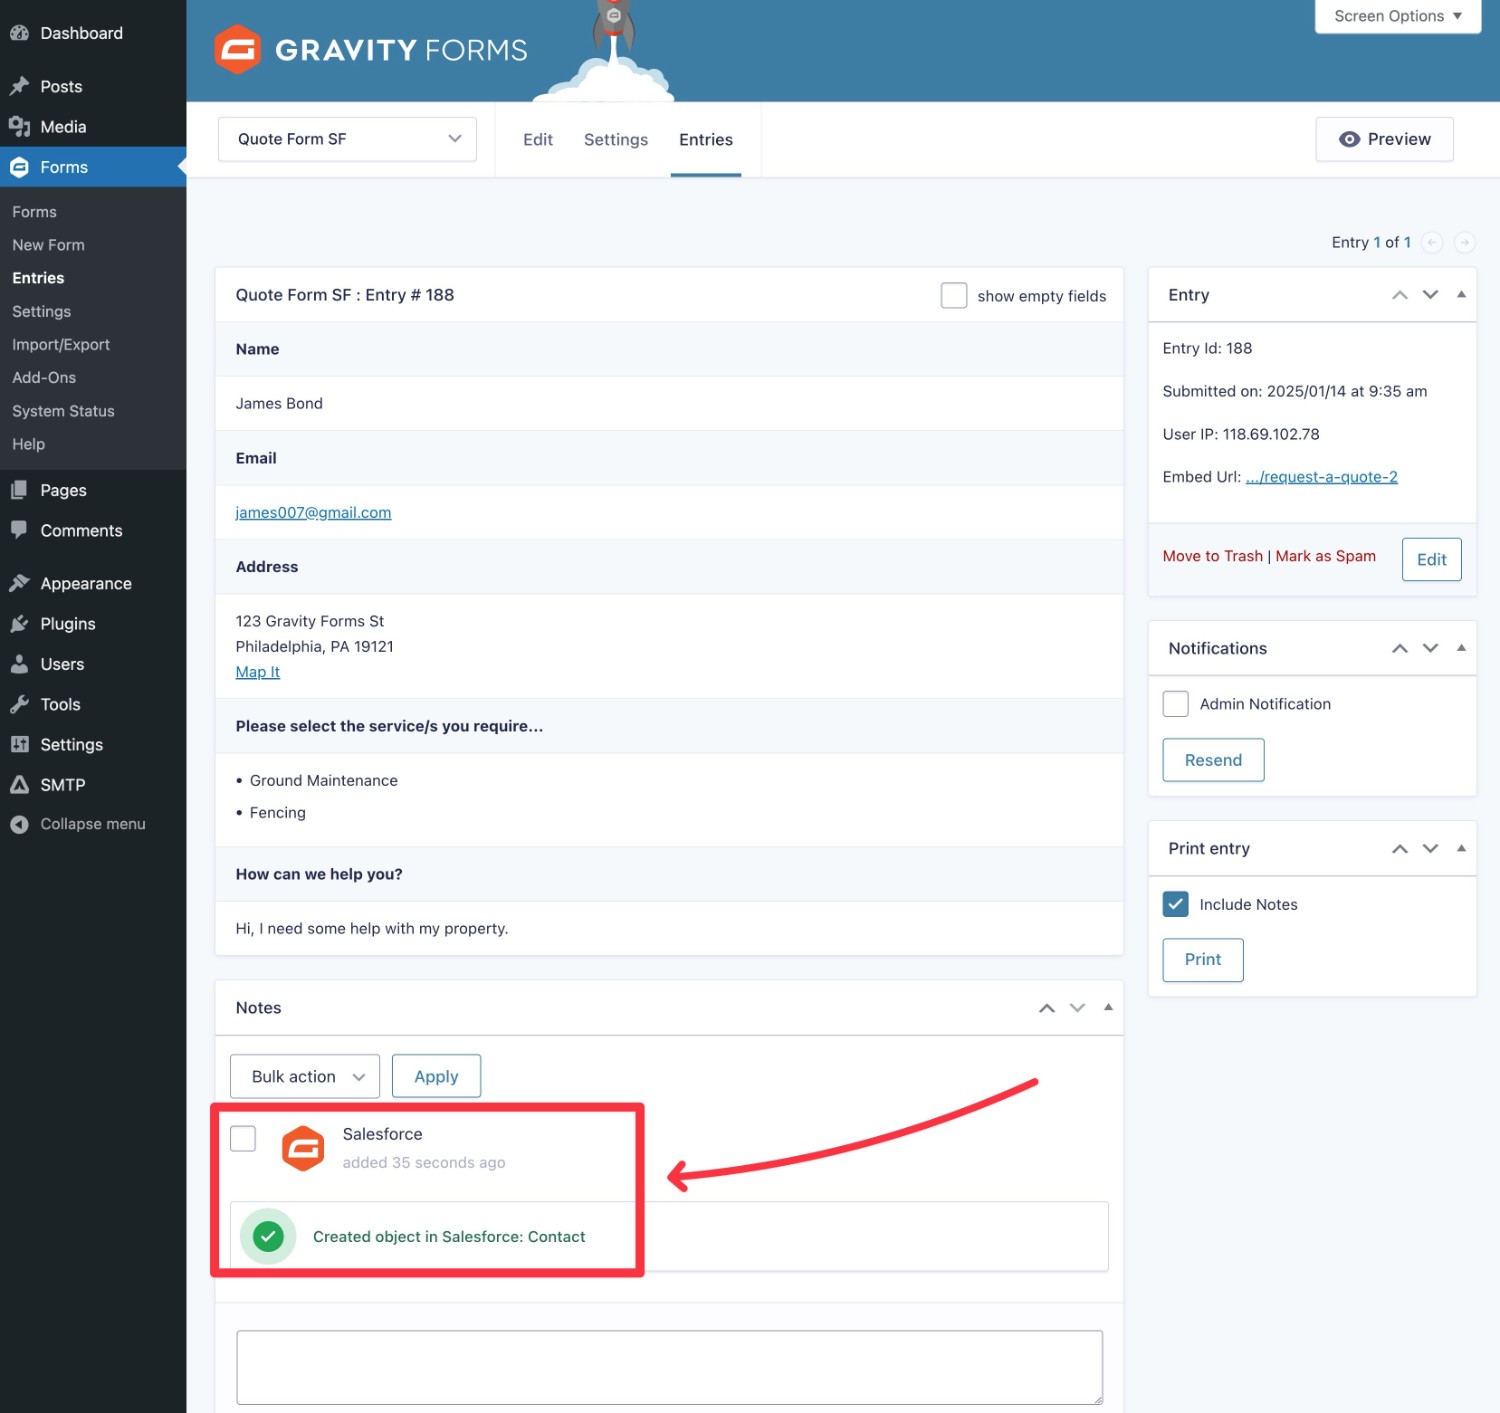
If you open the form entry in WordPress, you should see a note saying that Gravity Forms successfully created one or more objects in Salesforce.
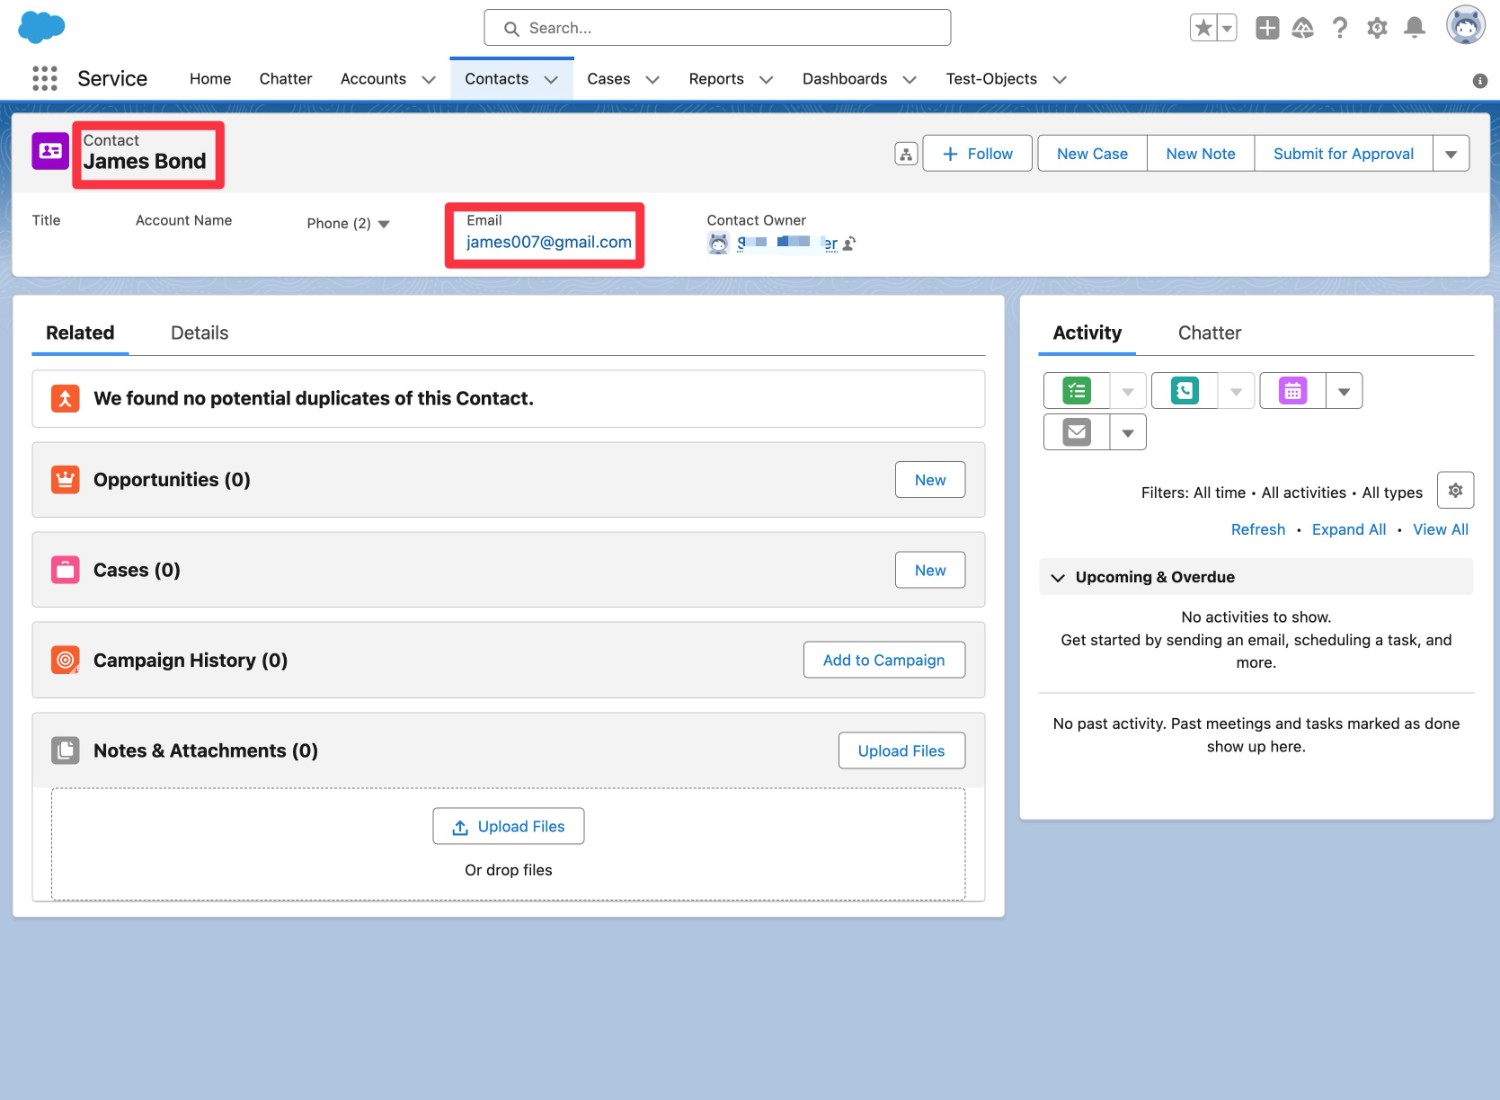
If you open your Salesforce dashboard, you should also see the form entry appear in the proper object with all of the data mapped according to your choices.
If everything looks good, you’re all finished! Feel free to repeat these same steps to create additional web forms that connect to Salesforce.
As we mentioned earlier, you can certainly create dedicated lead forms, but you can also connect other types of forms to Salesforce, including contact forms, payment forms, and more.
Set Up Your WordPress Salesforce Integration Today
With the official Gravity Forms Salesforce Add-On, you can easily connect all of your WordPress web forms to your Salesforce account.
You can connect form data to any Salesforce object type and then map some or all of your form fields to that object type’s fields.
If needed, you can create multiple Salesforce feeds to connect to multiple object types from the same form, including using conditional logic rules to control when to execute each feed.
You can access the Salesforce Add-On on with a Gravity Forms Elite, Nonprofit, or Developer license. If you’re already holding one of those licenses, install it today to get started with Salesforce.
If you’re not holding one of those licenses yet, you can purchase the Gravity Forms Elite license here. Or, you can upgrade your existing Pro or Basic license and only pay the prorated difference.

If you want to keep up-to-date with what’s happening on the blog sign up for the Gravity Forms newsletter!

