How to configure WordPress to send email using Mailgun
Looking for the easiest way to set up WordPress Mailgun email sending on your site?
With a WordPress SMTP plugin like Gravity SMTP, you can easily configure your site to send all of its emails using Mailgun, including core WordPress emails as well as emails from plugins that you might be using (including Gravity Forms).
The default way that WordPress sends its emails often causes deliverability issues, either because the emails don’t send or the emails get flagged as spam.
By setting up Mailgun with Gravity SMTP, you can fix both types of problems by configuring your site to send all of its emails using Mailgun’s dedicated email sending service.
In this post, we’re going to show you exactly how to set up everything you need. We’ll start with quick introductions to Gravity SMTP and Mailgun and then we’ll get into a full step-by-step tutorial for setting up Mailgun email sending for WordPress.
Why use Gravity SMTP for the WordPress Mailgun integration?
Gravity SMTP is a WordPress SMTP plugin, which means its sole focus is on helping you connect your WordPress site to a dedicated email sending service like Mailgun.
Here are a few reasons why we think Gravity SMTP is the best WordPress Mailgun plugin:
- Support for core and plugin emails – in addition to letting you send core WordPress emails with Mailgun, Gravity SMTP also works for emails sent from plugins (as long as the plugins are using the regular WordPress email sending method, which most do).
- Easy setup – all you need to do is add your Mailgun API key to start sending emails.
- Testing tools – you can use multiple features to test the Mailgun connection and make sure everything is working.
- Support for multiple sending services – in addition to Mailgun, you can also connect other email sending services like SendGrid, Brevo, and more. You could configure one of these services to use as a fallback if you ever experience problems with Mailgun.
- Real-time alerts for failed emails – You can receive immediate alerts for failed emails via webhooks or SMS (powered by Twilio).
- Email suppressions – Use Gravity SMTP to create suppression lists directly from your WordPress dashboard.
- Reporting dashboard – you can view high-level reports to track email usage on your site right from your WordPress dashboard, including the top sending sources and email open rates.
- Email logging functionality – you can log each individual email that your site sends. This includes technical information for each email, as well as the actual content/design of an email and its attachments (which is optional).
- Reliability and support – you can trust that Gravity SMTP is supported by the same team behind Gravity Forms and one of the most established companies in WordPress.
We also have a number of new features planned for Gravity SMTP.
If there’s a feature that you’d like to see, head on over to our feature request page to have your say.
The advantages of using Mailgun email sending on WordPress
While there are a lot of quality email sending services out there, here are some of the main reasons to use Mailgun:
- Send 1,000 emails per month for free – while Mailgun doesn’t advertise it heavily, you can send up to 1,000 emails per month for free using the Flex plan.
- Pay-as-you-go pricing – in addition to its preset plans, Mailgun also offers flexible pay-as-you-go Flex pricing where you’re only billed based on your exact usage ($1 per 1,000 emails). Most other email sending services only offer preset plans.
- Good deliverability rates – Mailgun boasts 97%+ deliverability rates, which is well above the industry average of 85.7%.
- API setup method – once you’ve authenticated your domain name, it’s very easy to connect Mailgun to WordPress thanks to its dedicated API.
How to set up WordPress Mailgun email sending with Gravity SMTP
Now, let’s get into the step-by-step guide on how to set up WordPress Mailgun email sending using the Gravity SMTP plugin.
Here’s a high-level look at the process – keep reading for the full details:
- Install Gravity SMTP
- Create your Mailgun account
- Authenticate your domain name with Mailgun
- Access your Mailgun API key
- Configure Gravity SMTP to use Mailgun
- Test your site’s emails
1. Install the Gravity SMTP plugin
To get started, you’ll want to install and activate the Gravity SMTP plugin on the site where you want to use Mailgun to send your emails.
Gravity SMTP is a standalone plugin. That is, you do not need to have Gravity Forms installed to use Gravity SMTP, though Gravity SMTP does work great for sending form notification emails.
Gravity SMTP is currently available to users with the Gravity Forms Elite license at no extra cost. If you have the Elite license, you can download the Gravity SMTP plugin from your Gravity Forms My Account area.
2. Register for your Mailgun account (if you haven’t done so already)
If you already have a Mailgun account, you can skip ahead to the next step.
However, if you haven’t set up your Mailgun account yet, you’ll need to register for your account now.
Gravity SMTP will work with both Mailgun’s preset plans, as well as the pay-as-you-go Flex plans:
- Preset plans – there’s a free plan for testing that can work if you’re only sending emails to yourself. However, you’ll need one of the paid plans if you want to send emails to other users, as the free preset plan only lets you send to up to five authorized users. Paid plans start at the $35 per month for the Foundation plan.
- Flex plans – these let you pay based on your email usage at a rate of $1 per 1,000 emails, with no preset monthly charge. You can send up to 1,000 emails per month for free to any recipients (which lets you use it to email other users). However, you will still need to add your credit card even if you’re sending fewer than 1,000 emails per month.
In general, the Flex plans will be cheaper if you’re sending fewer than 35,000 emails per month, while the preset plans will be cheaper if you’re sending more than that.
There are also some feature differences between the Flex plans and preset pricing plans, though those differences probably won’t affect most WordPress sites.
3. Authenticate your site’s domain name with Mailgun
In order to properly send emails with Mailgun, you’ll need to authenticate your WordPress site’s domain name with Mailgun.
This is not a specific requirement of the Gravity SMTP plugin – it’s a basic requirement for sending emails with Mailgun and it will apply regardless of which WordPress SMTP plugin you use.
It basically does two things:
- It proves to Mailgun that you own/control your domain name, which helps them prevent abuse.
- It improves your deliverability by making your emails look more trustworthy to email clients’ spam filters.
Add a new domain mame
Here’s how to get started:
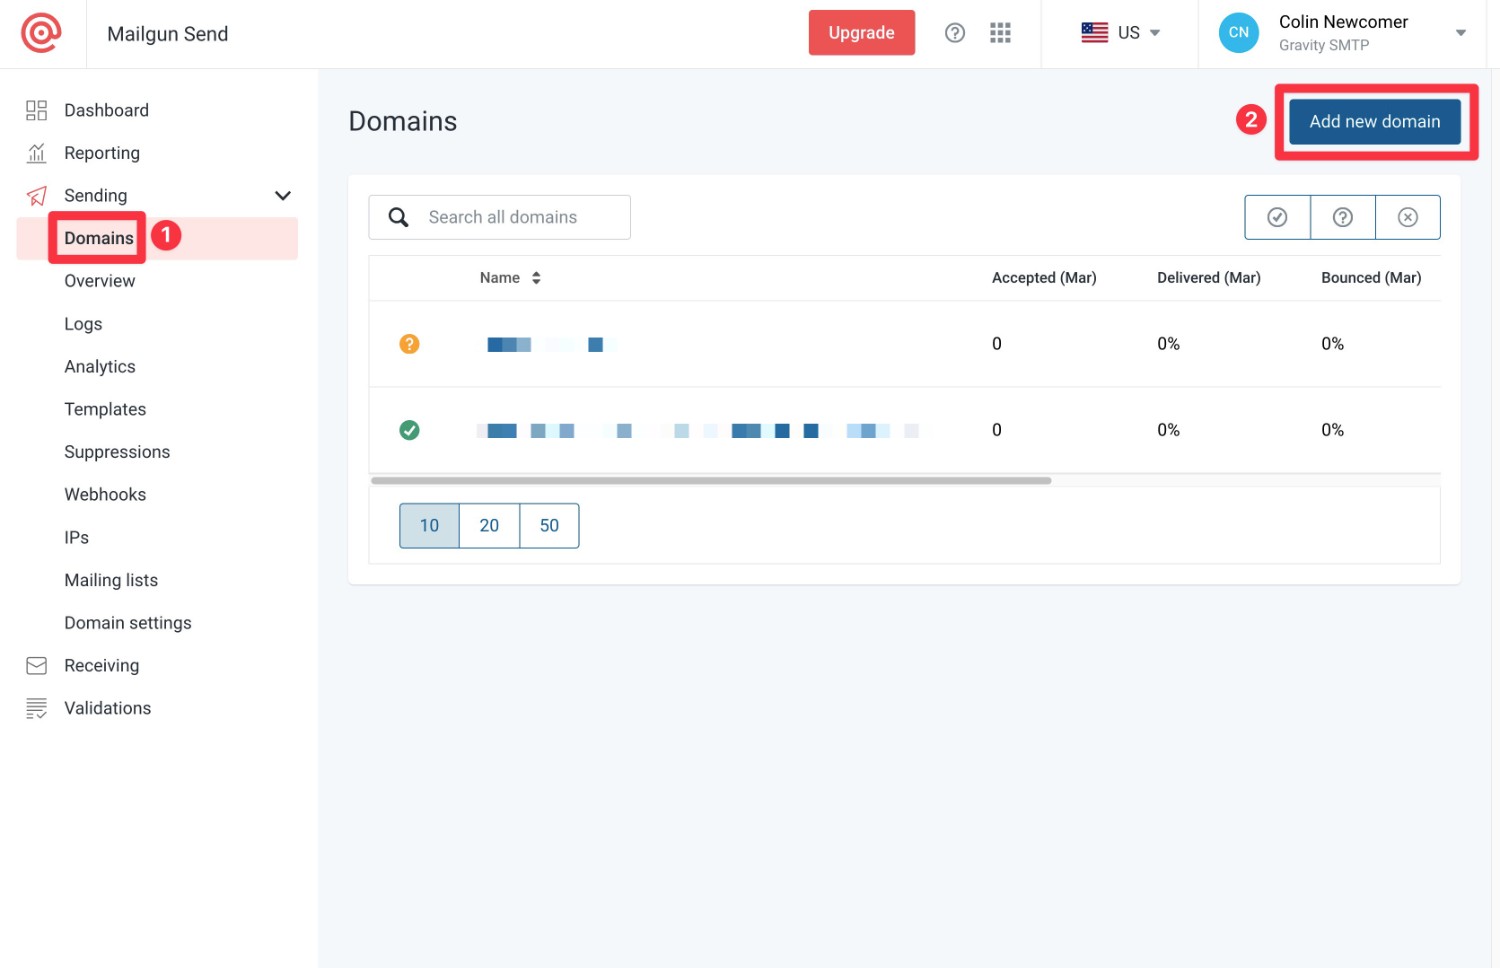
- Go to Sending → Domains in your Mailgun dashboard. Or, click this link to open the correct dashboard board.
- Click the Add new domain button in the top-right corner.
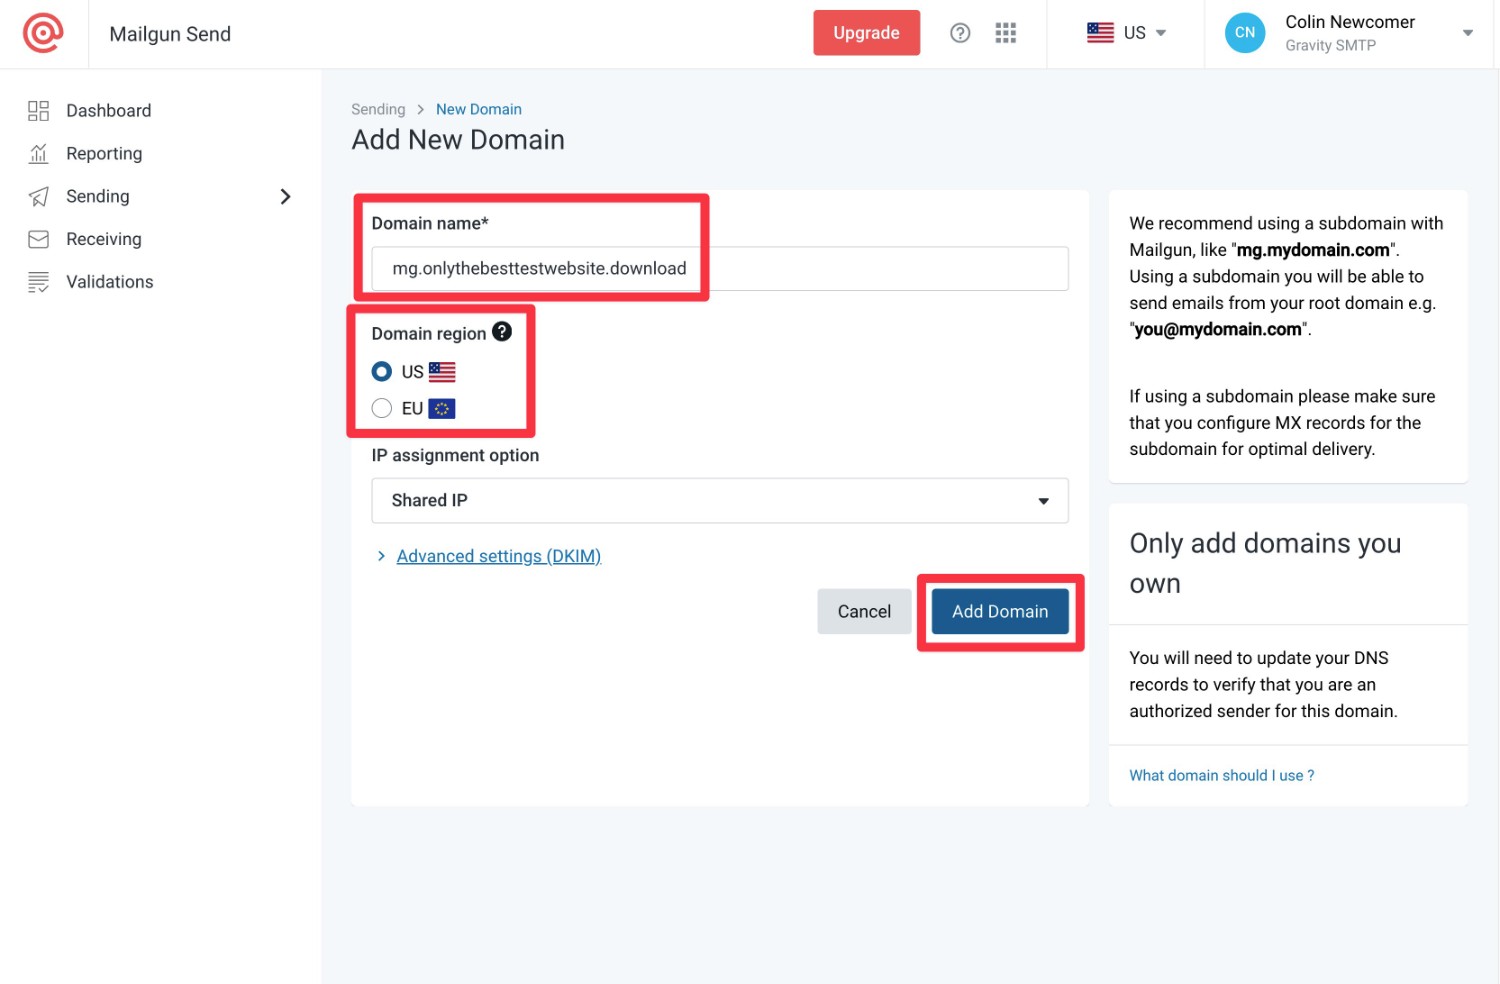
On the next screen, you’ll need to make two choices.
First, you need to enter the domain name that you want to use for sending emails. You have two options here:
- Root domain name – you can use your root domain name – e.g. yoursite.com.
- Subdomain – you can use a subdomain – e.g. mg.yoursite.com.
Mailgun recommends using a subdomain instead of your root domain name, as it can avoid potential conflicts with other email tools that you’re using. Even if you use the subdomain approach, you’ll still be able to send emails from your root domain (e.g. [email protected]).
For this example, we’ll use a mg subdomain and we recommend using this approach for your site.
Next, you can choose your Domain region, which is the physical location of the server that will send your site’s emails. If you’re subject to EU regulations (e.g. your business is based on the EU), you’ll most likely want to choose the European option.
You can leave everything else as the defaults.
Once you’ve made your choices, click the Add Domain button.
Authenticate your domain name
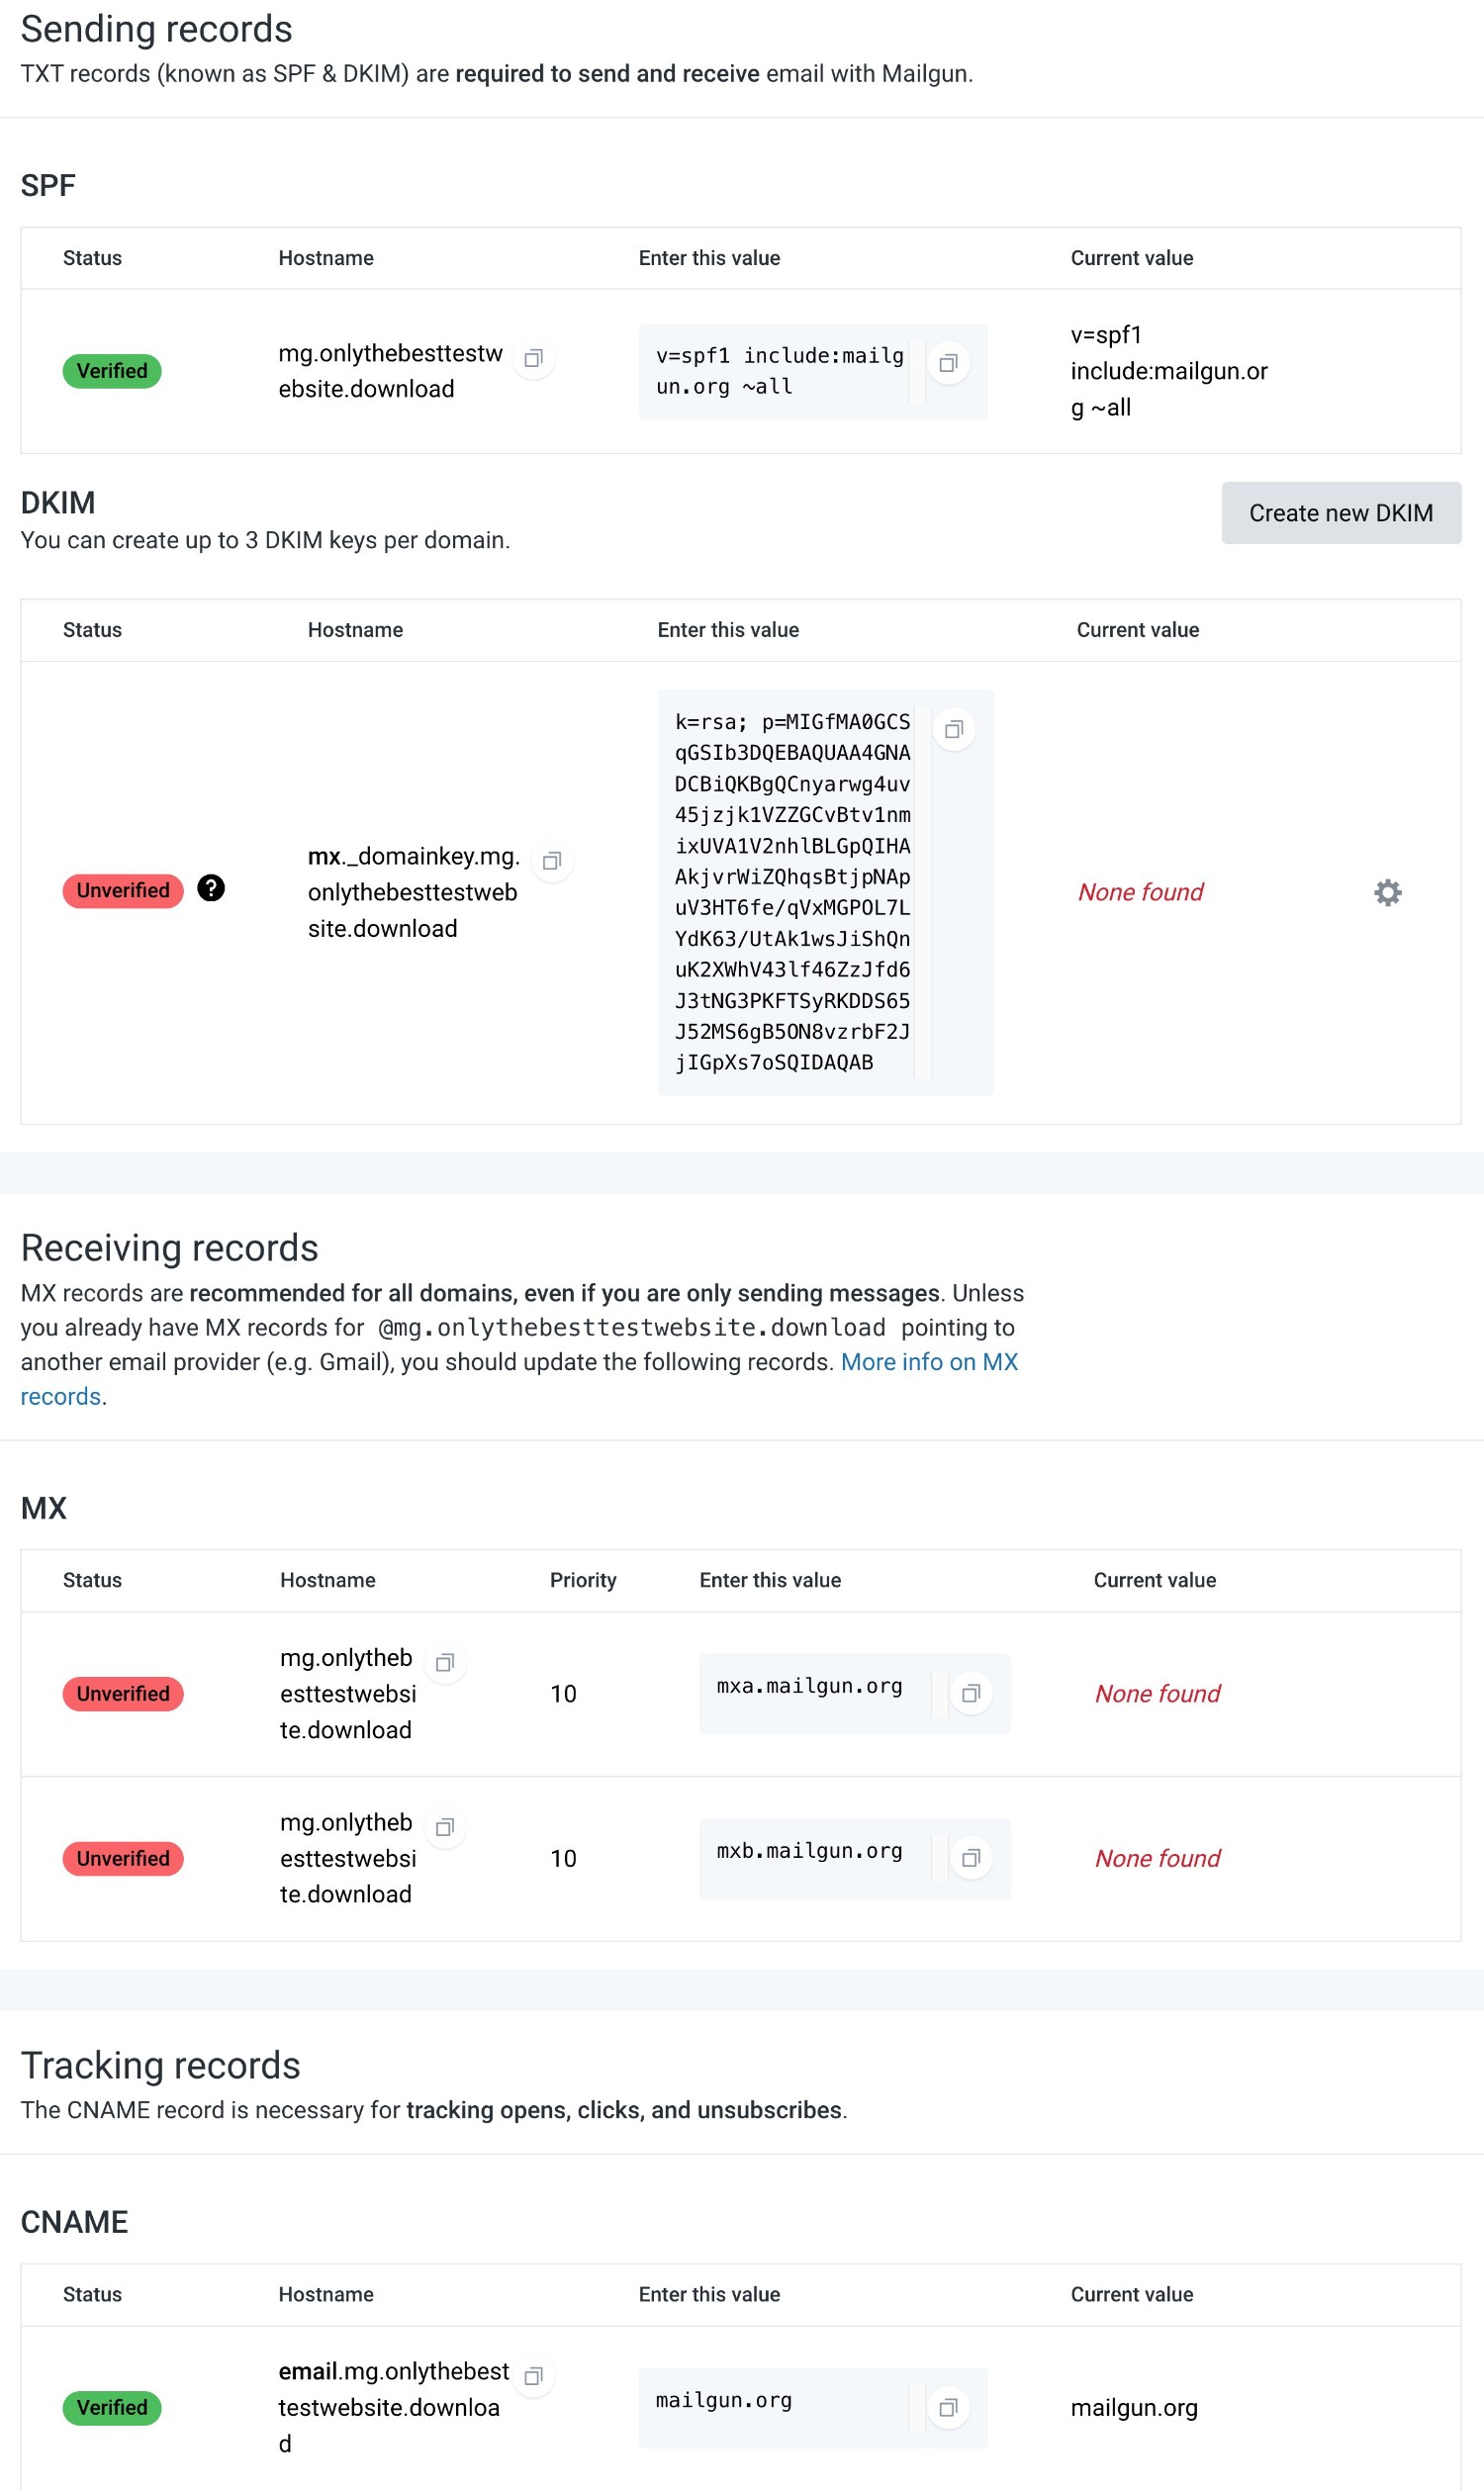
To authenticate your newly added domain name, you’ll need to add some DNS records to your domain name.
Mailgun will provide all of the records that you need to add on the page that it shows you after you add your domain name:
- Sending records – you’ll need to add SPF and DKIM values using TXT records.
- Receiving records – you’ll need to add MX records (which Mailgun still recommends even if you’re only sending emails).
- Tracking records – if you want to track opens, clicks, and unsubscribes, you’ll need to add a CNAME record.
To add these records, you’ll need to work from wherever you manage your domain’s DNS records.
Typically, you’ll manage your domain’s DNS records from your domain registrar, your hosting account, or a service like Cloudflare, depending on where you’ve pointed your domain’s nameservers.
Here’s what it looks like to add these records from Cloudflare, which is what we’re using for our test domain name.
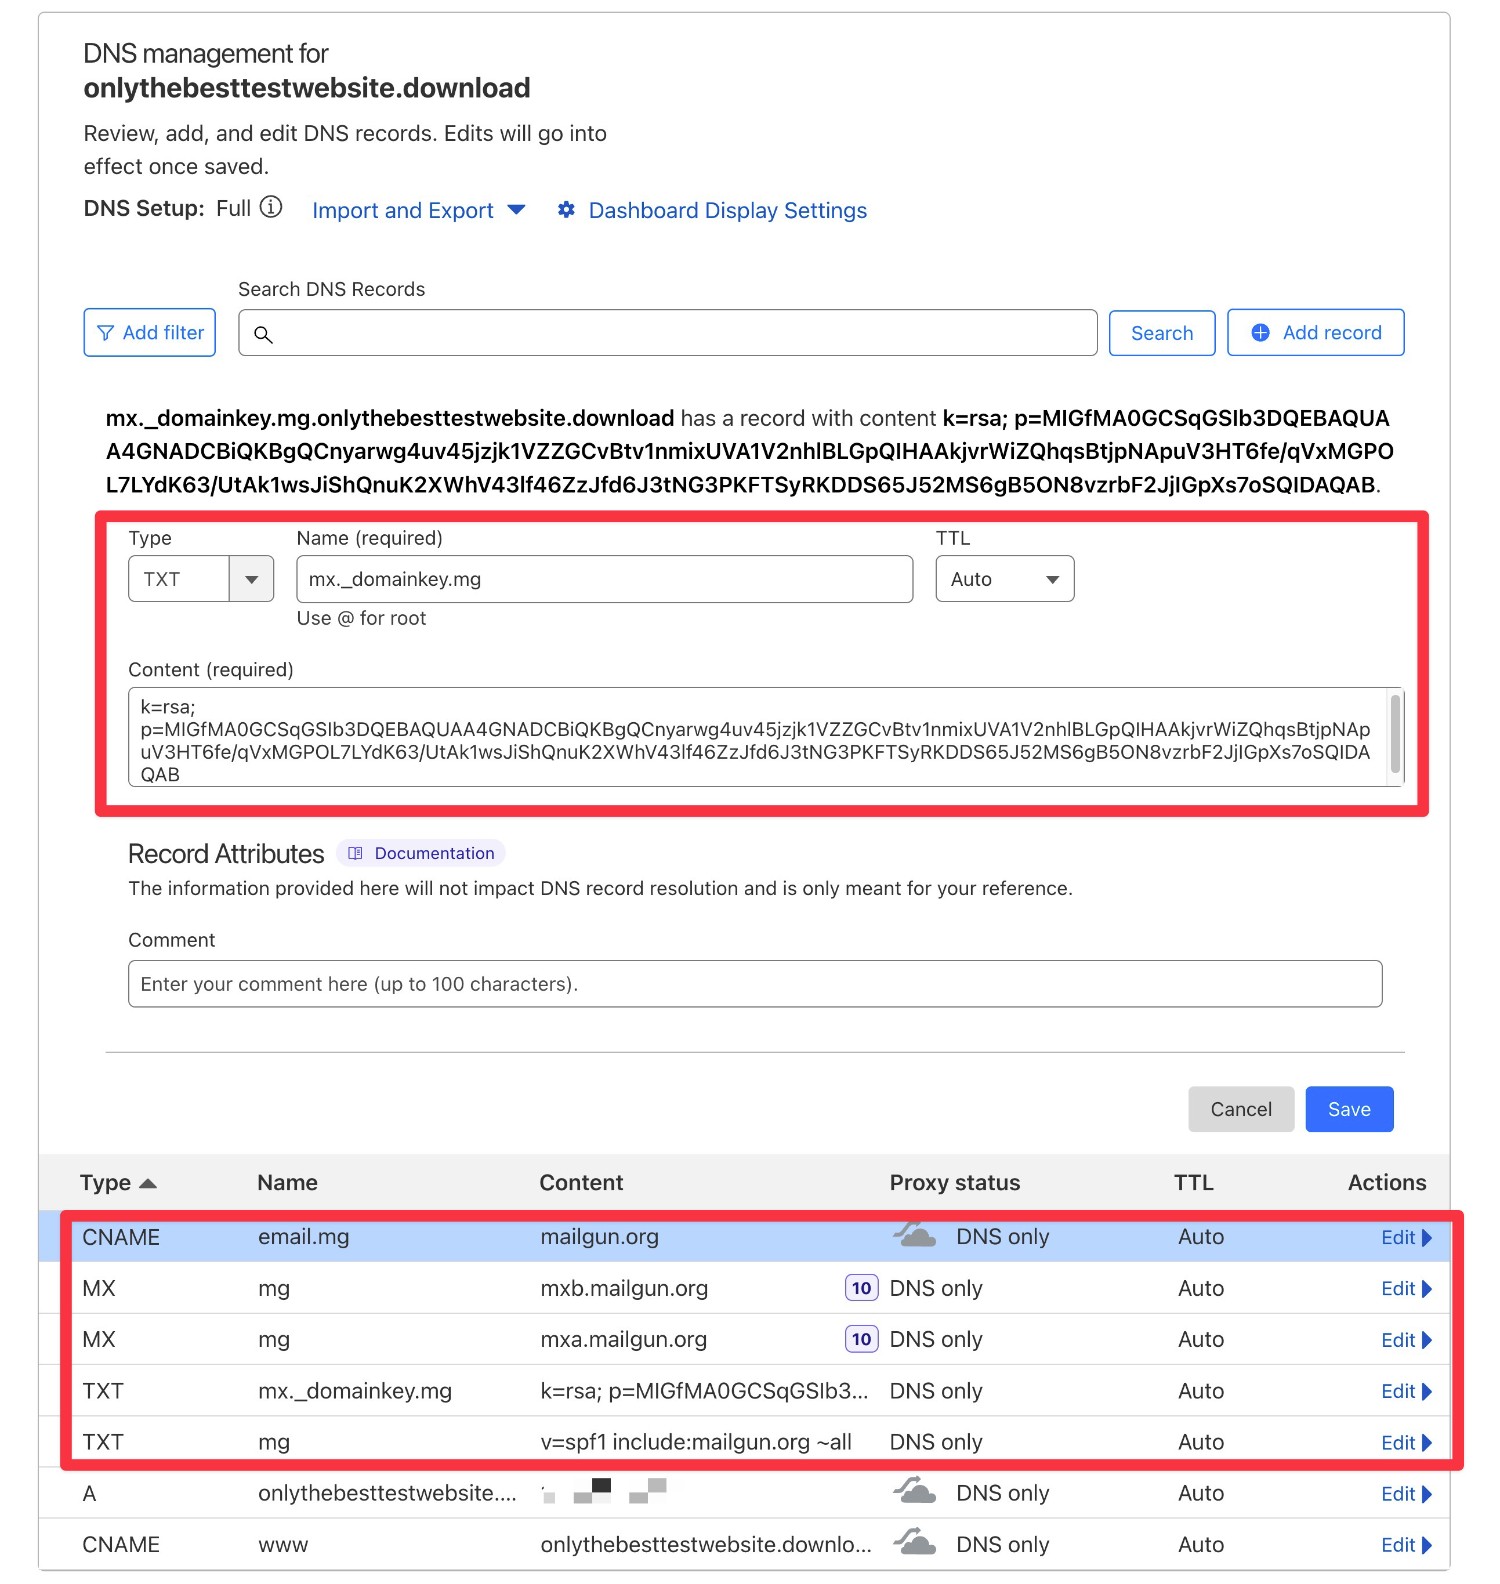
After adding the DNS records, you should see green Verified icons appear next to each record in your Mailgun dashboard after clicking the Verify DNS Settings button.
Note: It might take a few hours for the changes to take effect, so don’t worry if you don’t see the Verified icons right away. Instead, just try again a little later.
If you need some help, you can check out Mailgun’s documentation article and Mailgun also has specific instructions for some popular domain registrars:
4. Access Mailgun API key
After you’ve authenticated your domain name with Mailgun, you’ll need to create a Mailgun API key, which is what you’ll use to connect Gravity SMTP to Mailgun:
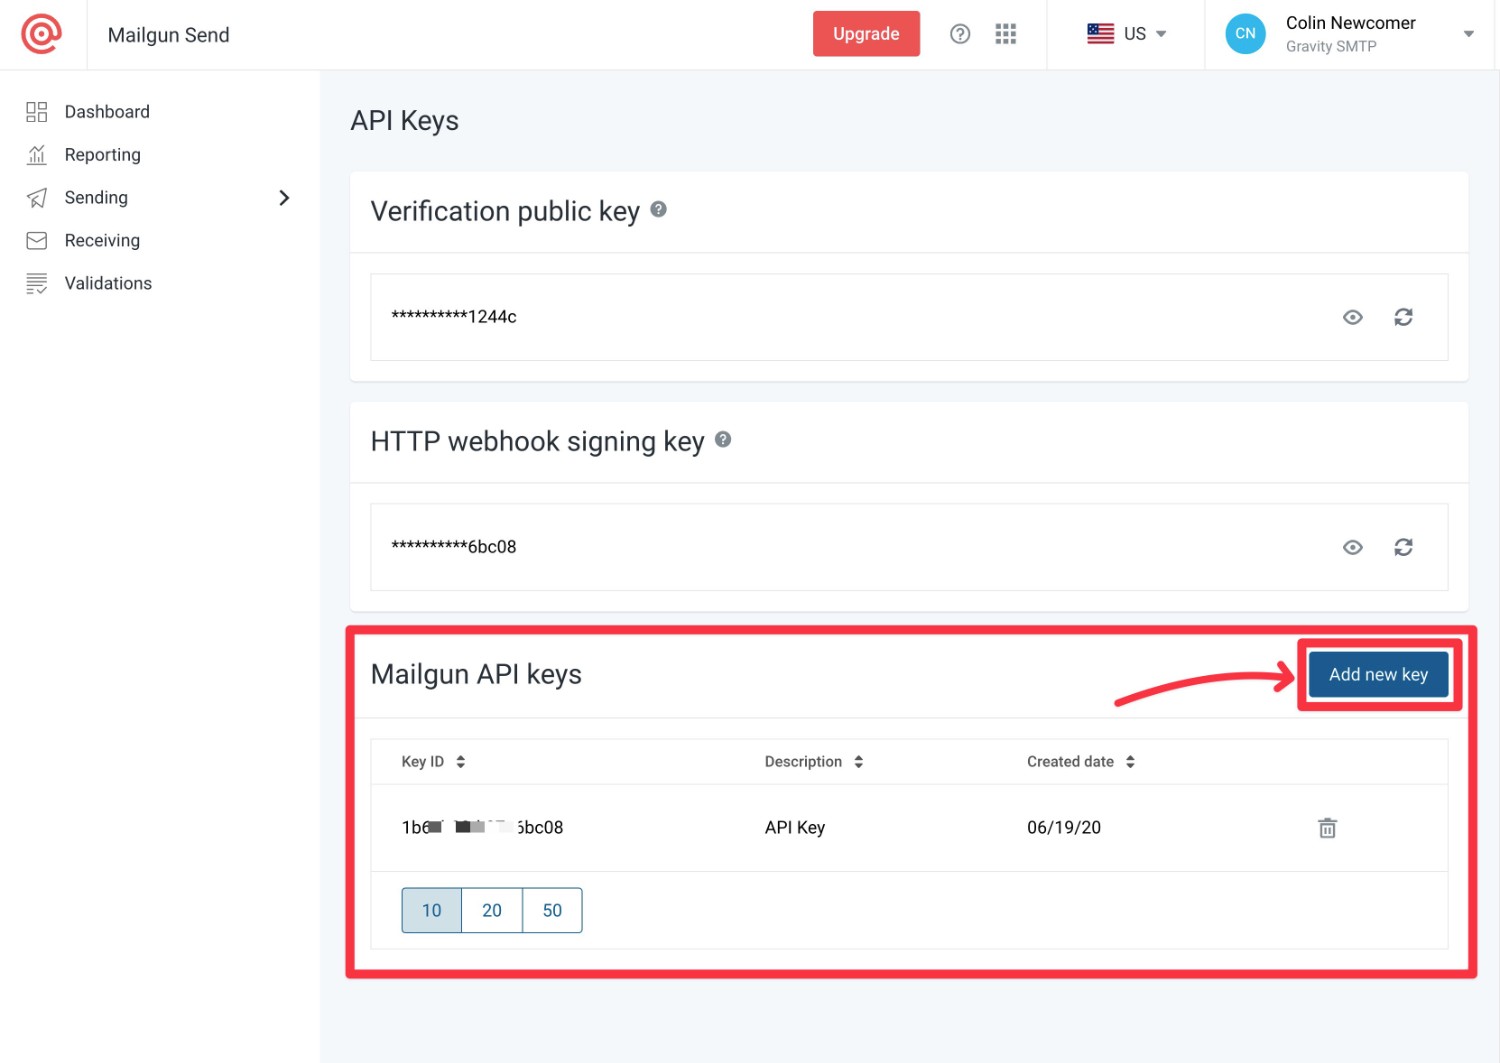
- Click this link to open the API security page. Or, you can click on your name in the top-right corner of the Mailgun dashboard and select API Security from the drop-down.
- Click the Add new key button in the Mailgun API keys section.
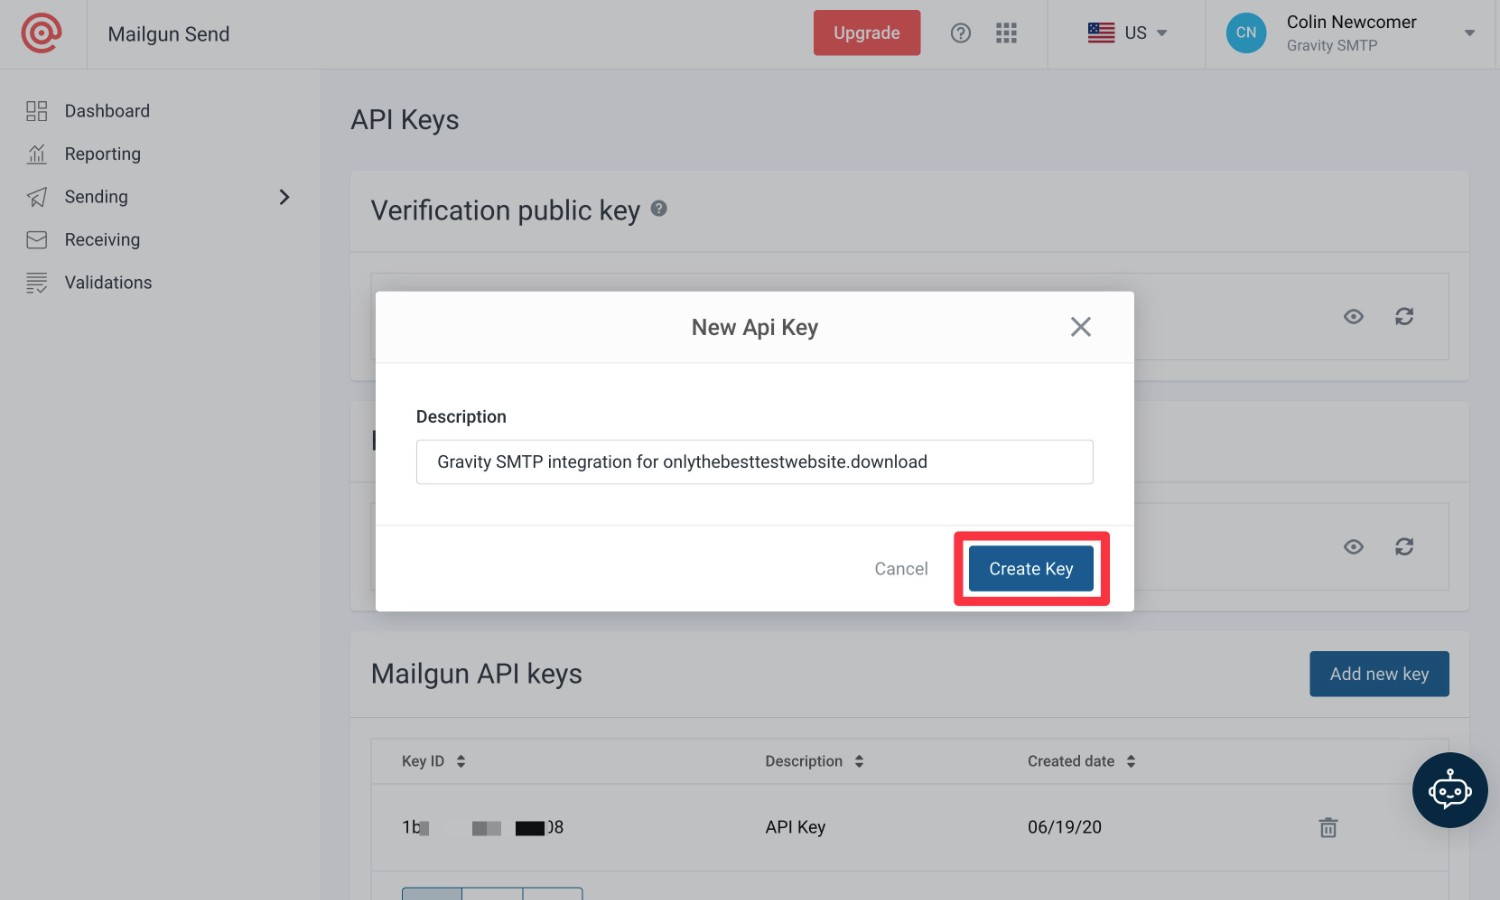
Give your API key a name in the popup that appears – this is just to help you remember what it does. Then, click the Create Key button.
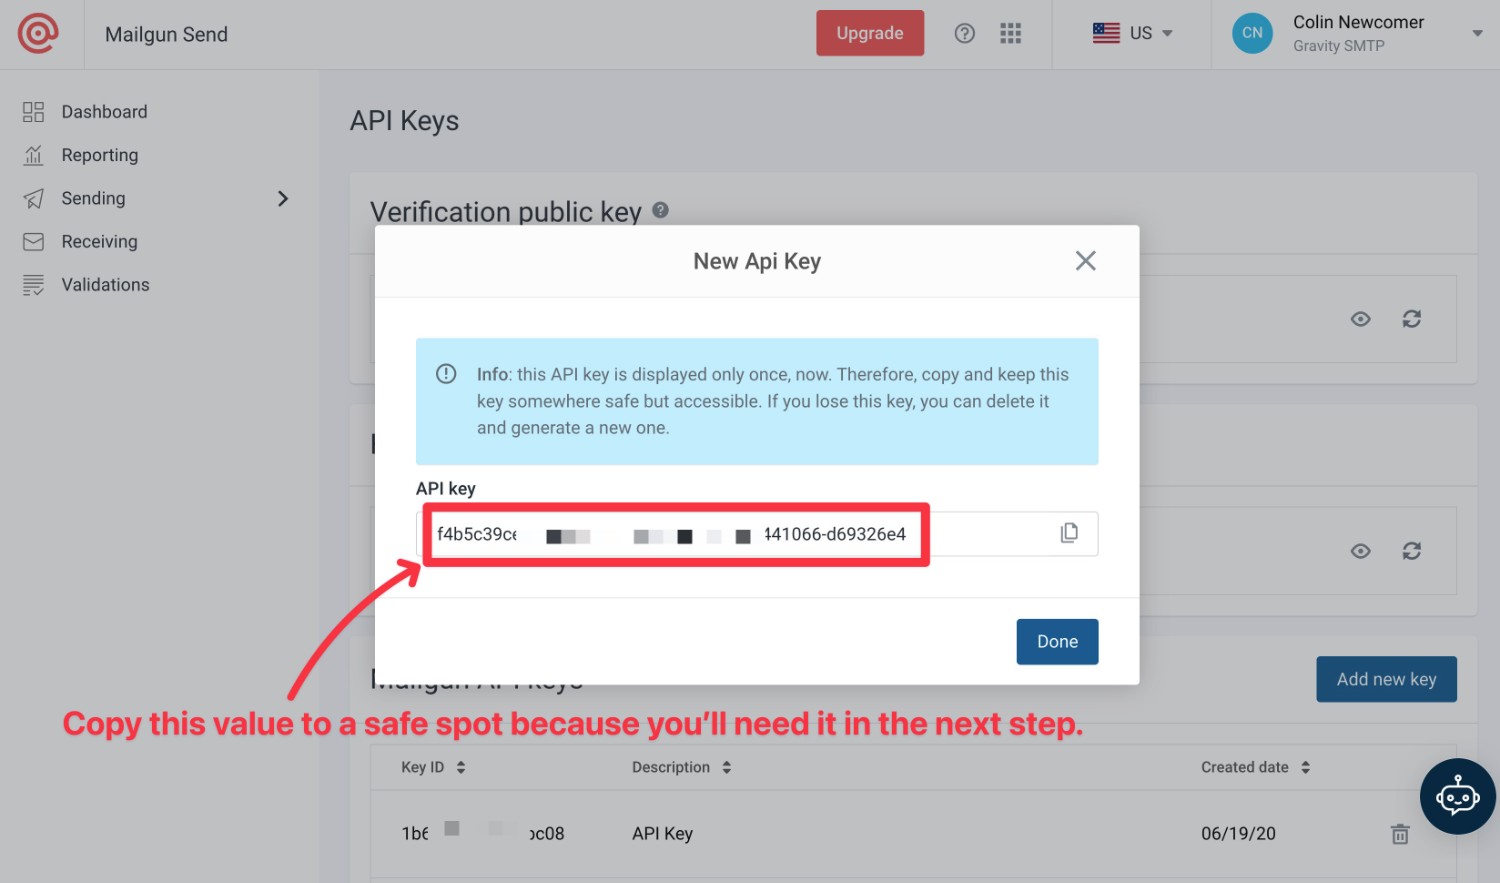
Mailgun will then display your API key. Copy this API key to a safe spot because Mailgun will only show it once and you’ll need it in the next step.
Don’t worry, though. If you accidentally lose your API key, you can just repeat these steps to create another one.
5. Configure Gravity SMTP to use Mailgun
Once you have your Mailgun API key, you’re ready to set up Gravity SMTP to start sending your WordPress site’s emails via Mailgun:
- Open your WordPress site’s dashboard.
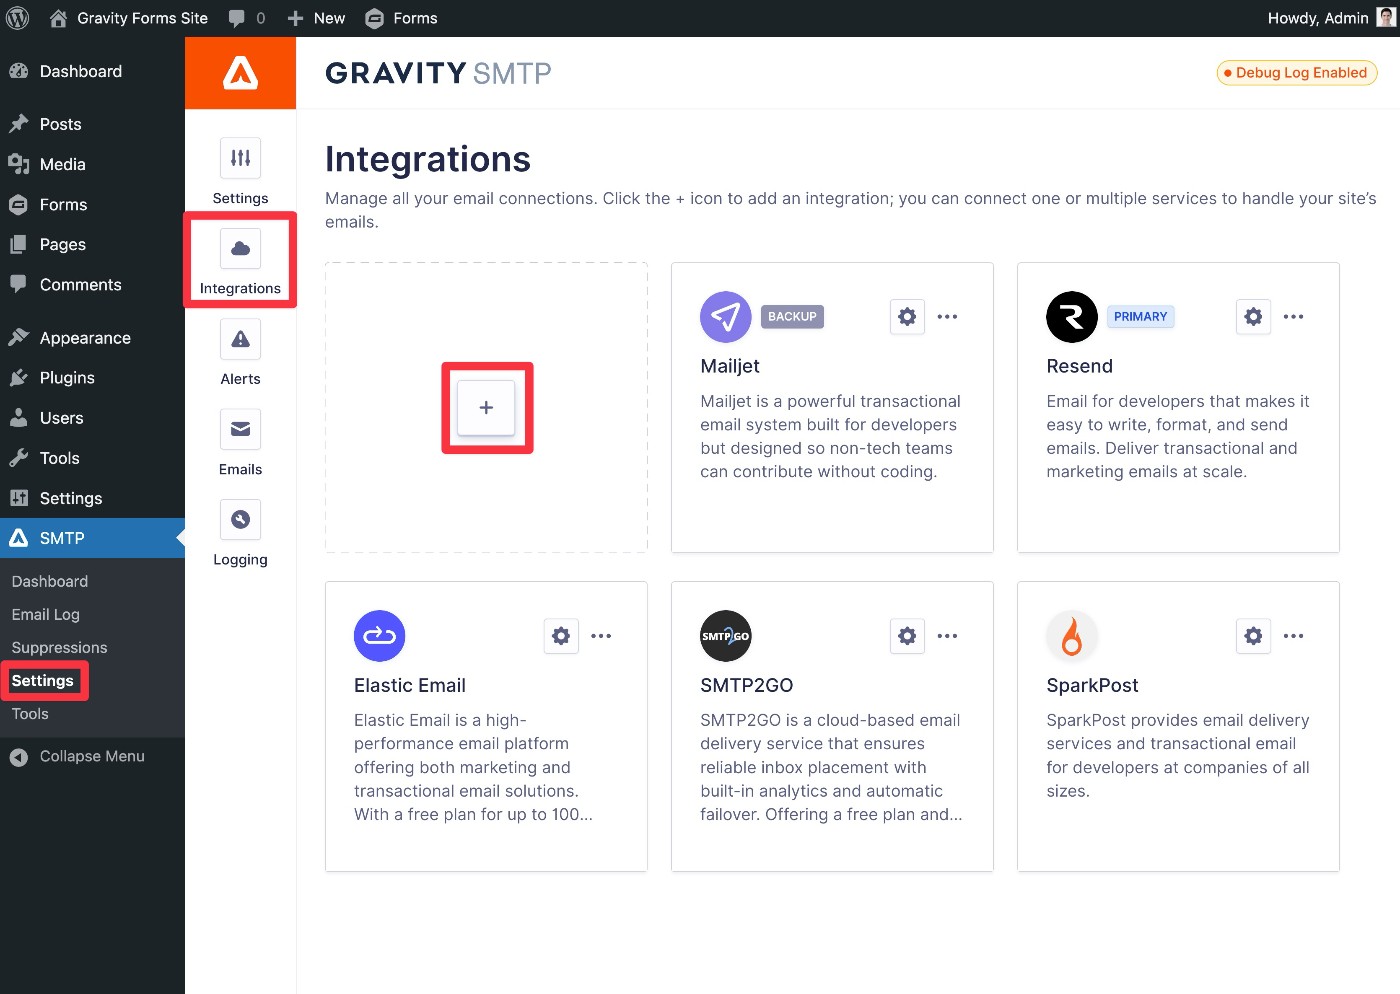
- Go to SMTP → Settings.
- Select the Integrations tab in the settings area.
- Click the plus icon to add a new integration
You should see a slide-out panel appear. In the list of integrations, choose the option for Mailgun.
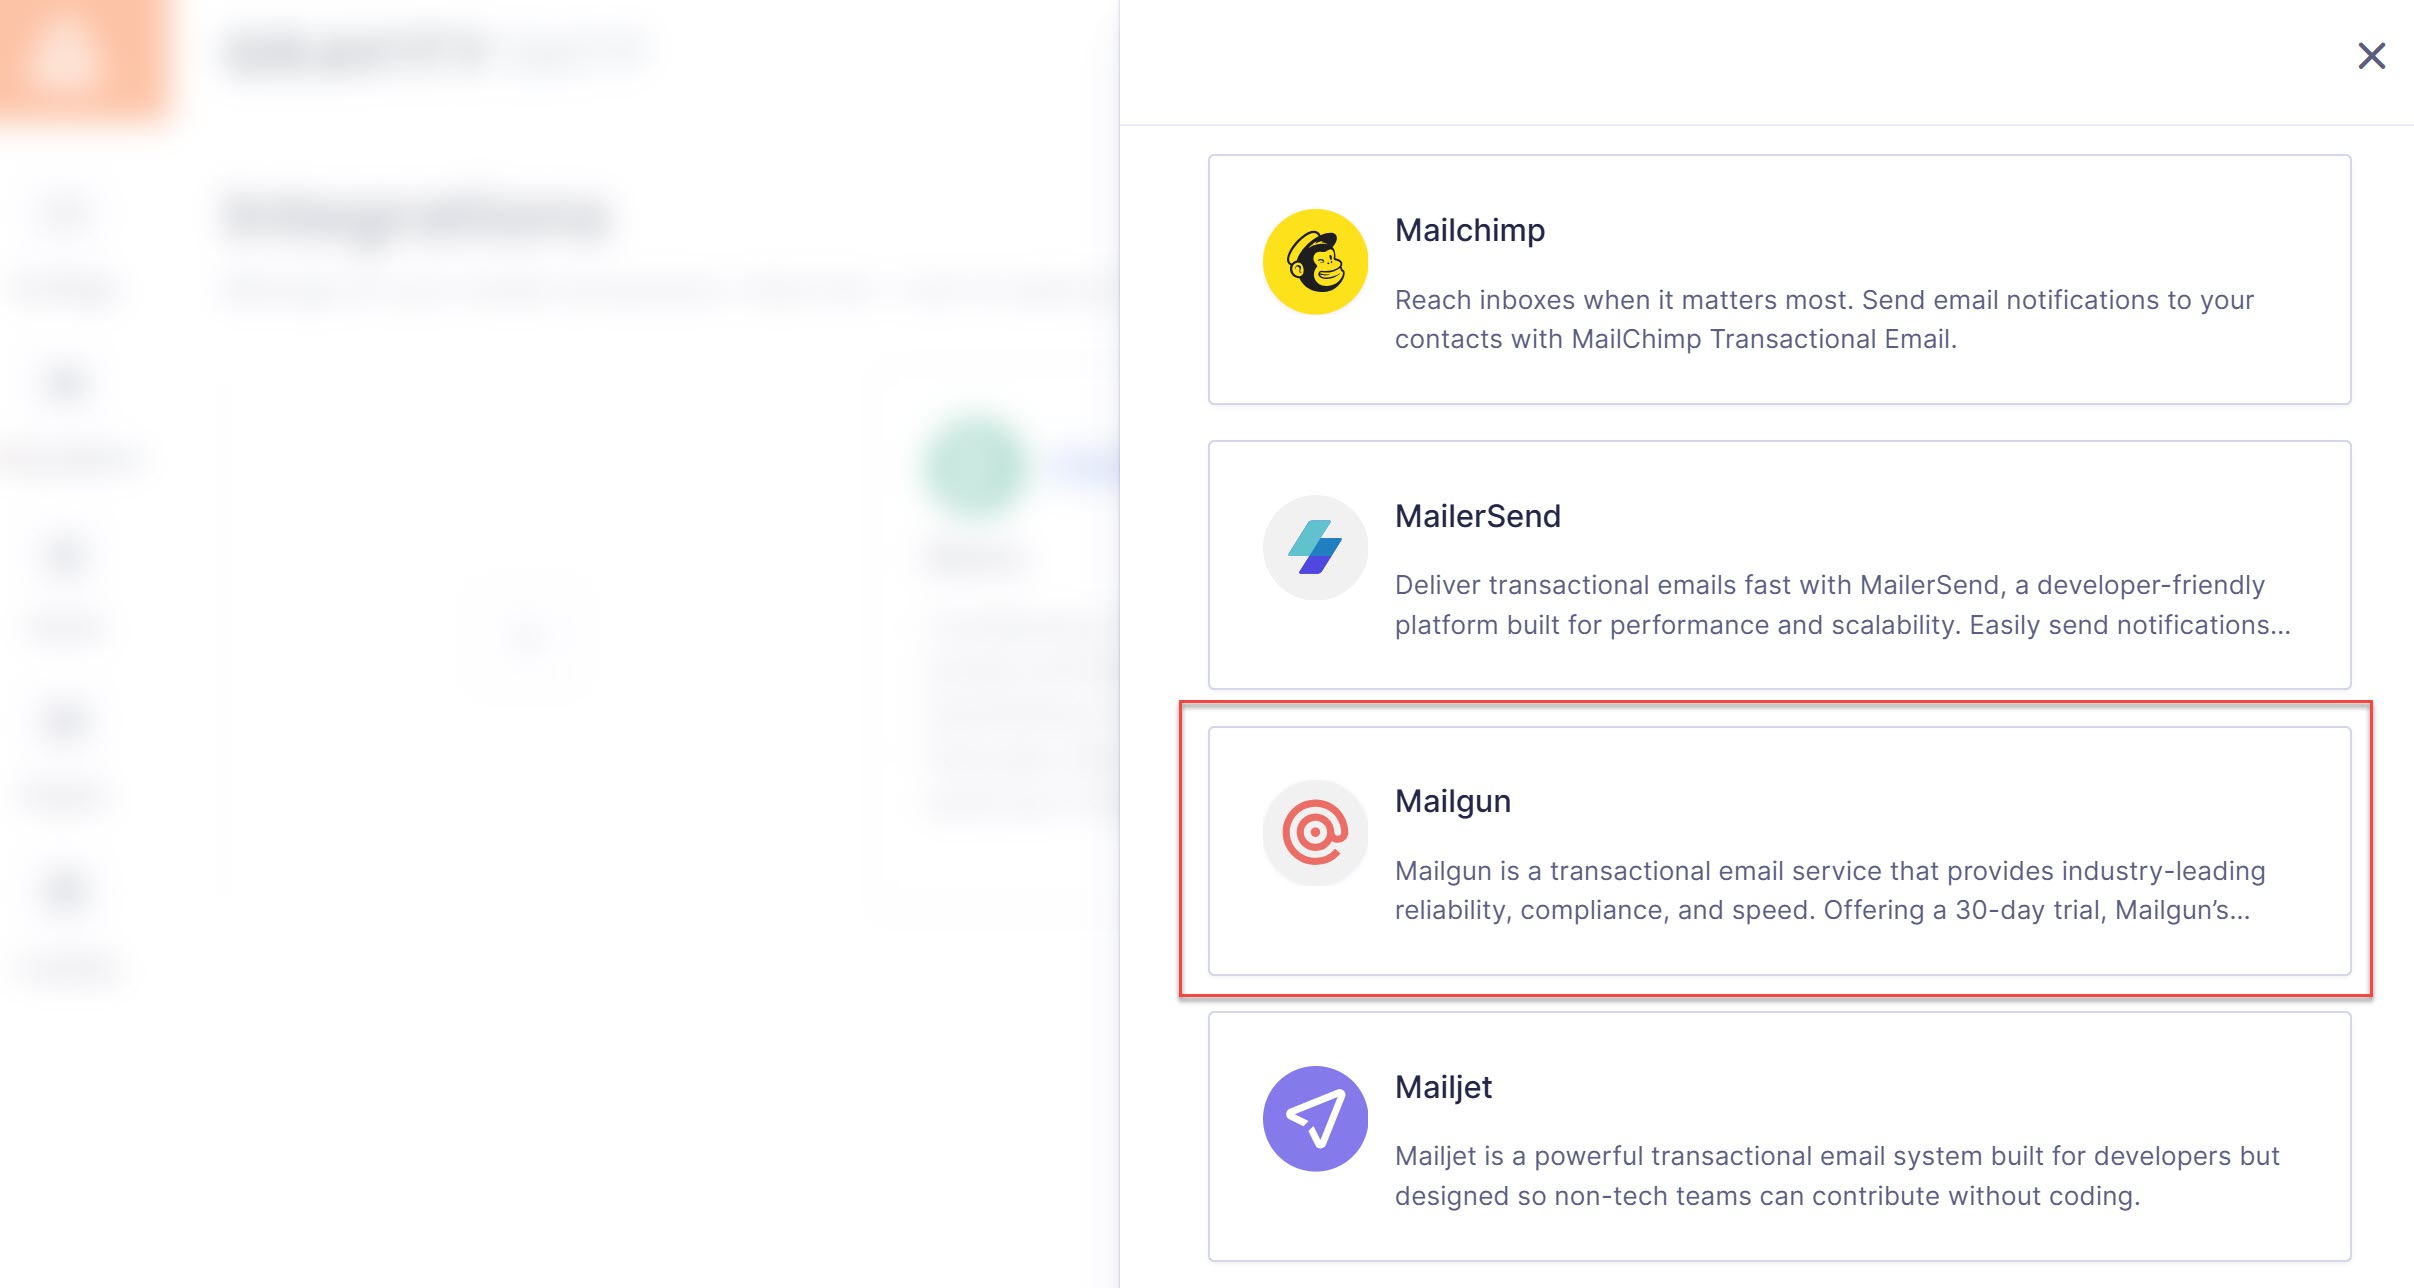
This will expand a popup where you can configure the connection:
- API Key – Paste the API key from Mailgun Transactional into the API Key box.
- Return Path – Choose whether to enable Return Path, which can help ensure you receive bounced messages.
- Default From Email – Enter the From Email, which is the email address that your site’s emails will appear to be sent from. You can choose any email for the domain that you verified. If you try to set your From Email to an email from a domain name that you have not verified, you will encounter errors when sending emails.
- Default From Name – Enter the default name from which you want to send your site’s transactional emails.
- Force From Email/Name – These toggles let you override the name/email settings in other plugins that you’re using to force them to use these same settings.
Once you’ve made your choices, click Save & Enable.

To finish things out, you need to enable Mailgun as your site’s primary email sending service.
- Go to the Gravity SMTP Integrations area if you aren’t already there (SMTP → Settings → Integrations).
- Click the three dots icon next to Mailgun.
- Choose Set As Primary from the drop-down.
- Look for the Primary label to appear next to Mailgun to confirm your selection.
For more information on connecting Gravity SMTP with Mailgun, check out the documentation.
6. Test your WordPress Mailgun setup
At this point, Mailgun email sending should be activated on your site.
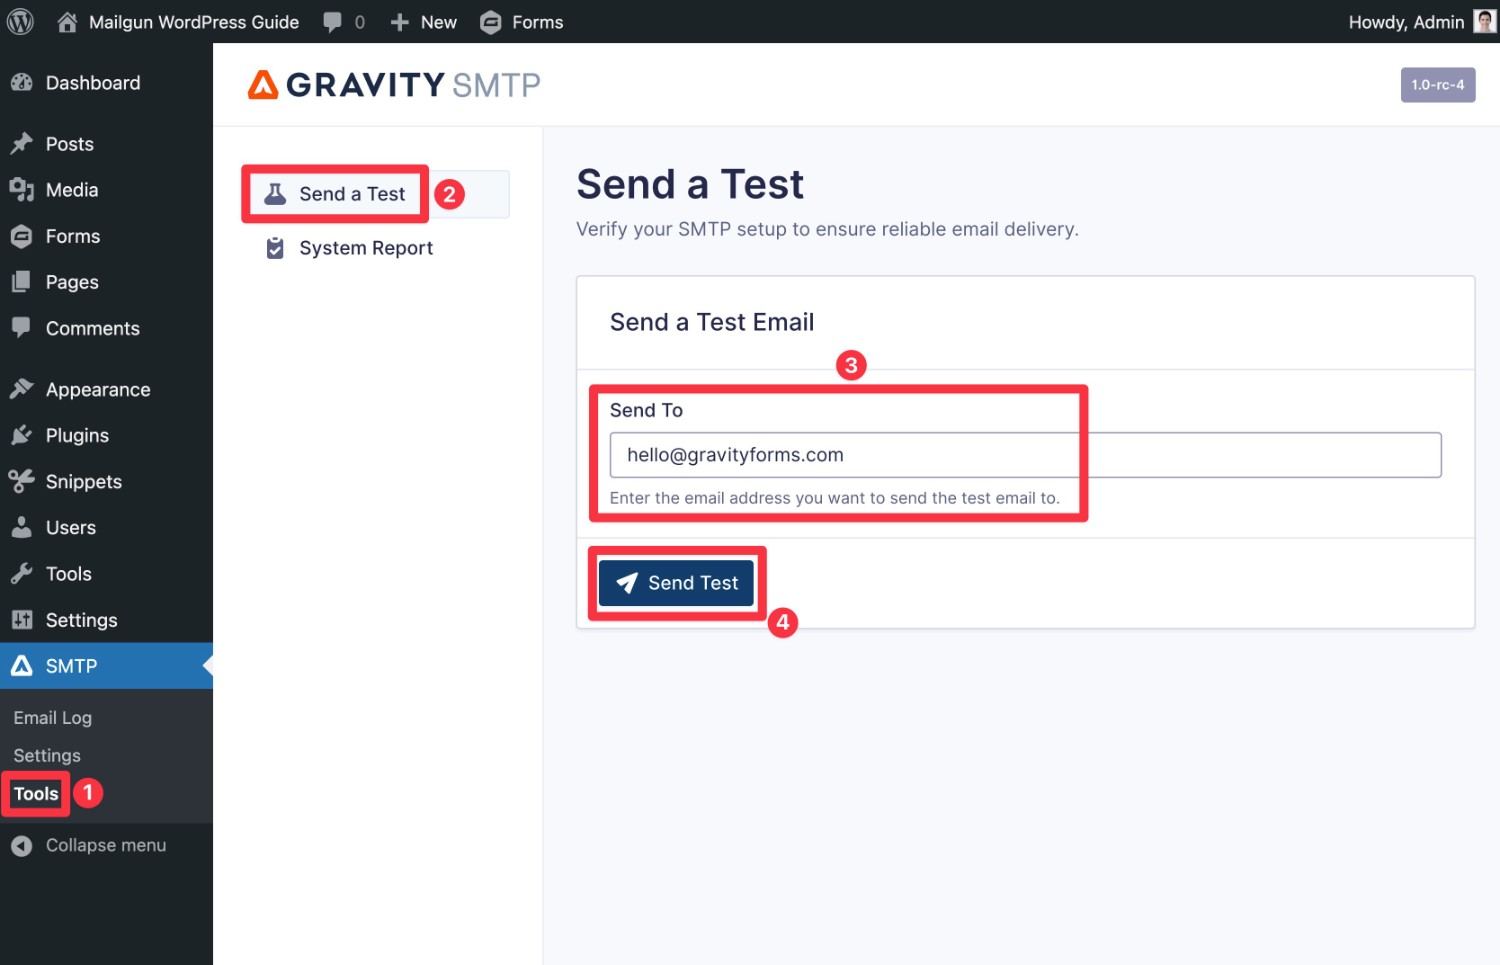
To make sure everything is working properly, Gravity SMTP includes a test email feature:
- Go to SMTP → Tools in your WordPress dashboard.
- Select the Send a Test tab (it should open by default).
- Enter the email address to which you want to send an email in the Send To box.
- Click the Send Test button.
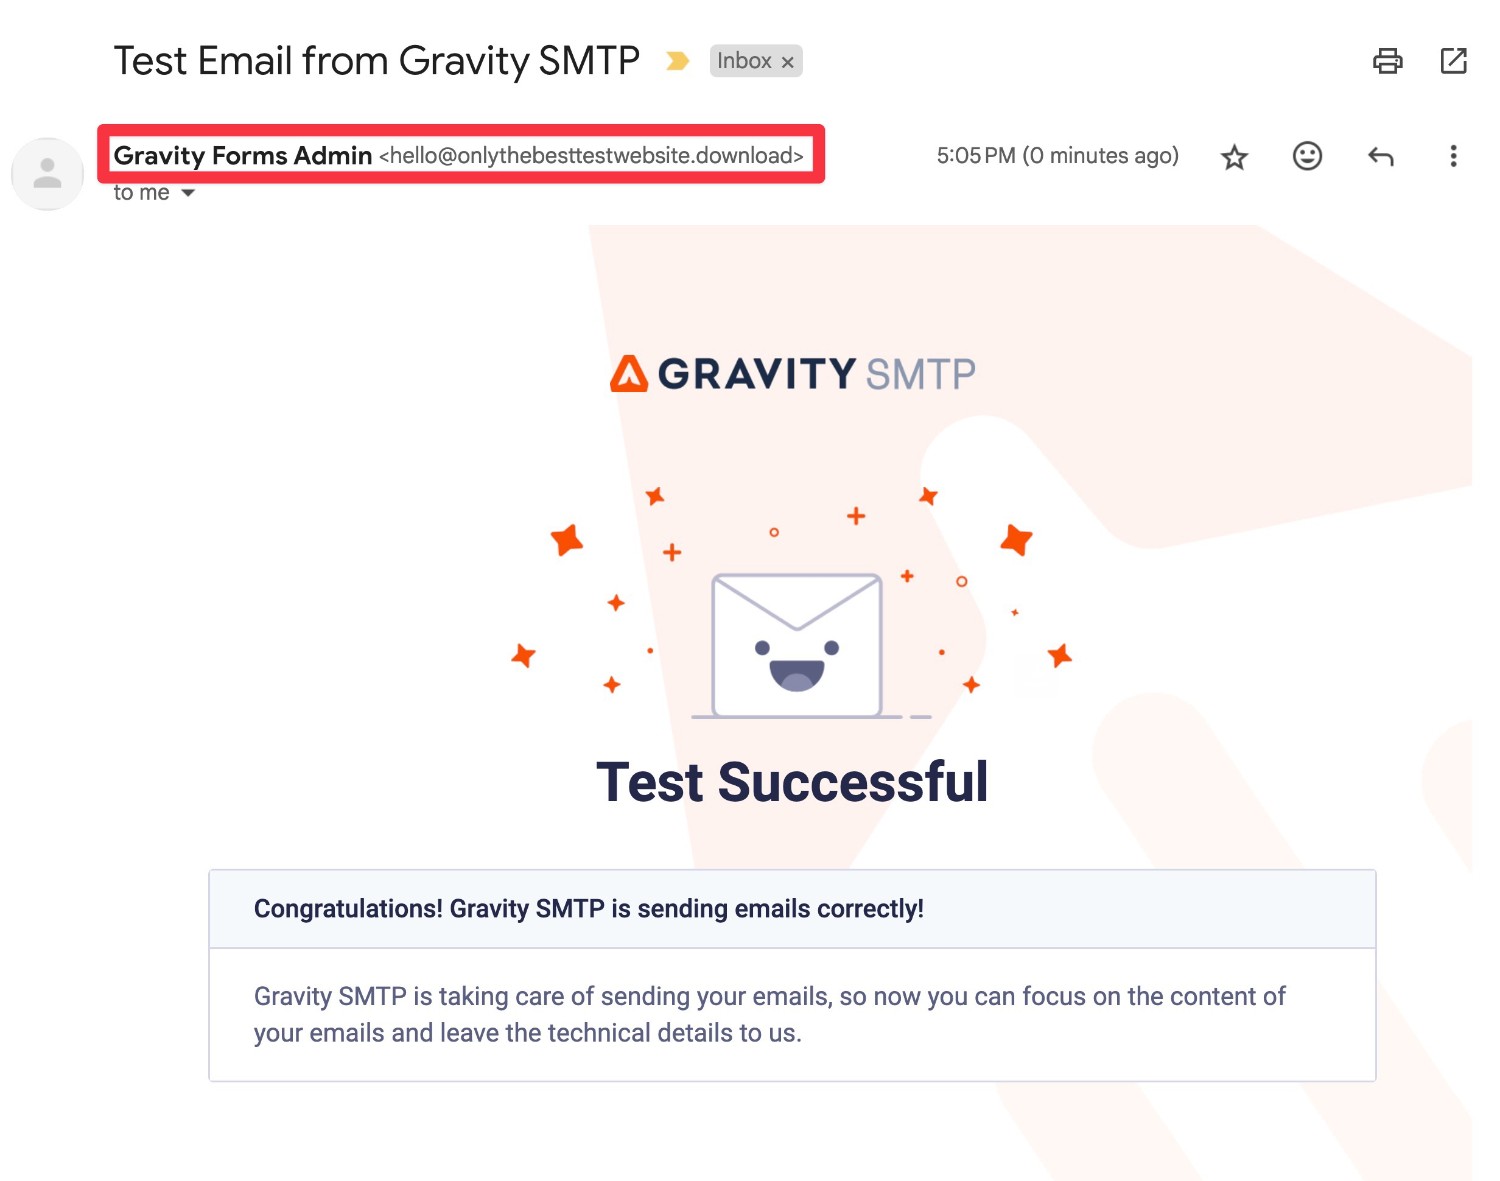
If it worked, you should see an Email successfully sent message.
And if you open your email inbox, you should see a test email that looks something like below.
In addition to making sure you receive the email, you’ll also want to check the “From Name” and “From Email Address” to make sure they appear as you want them to.
7. Set up a backup email sending service (optional)
This step is entirely optional. At this point, your site is properly configured to send all of its emails using Mailgun.
However, one of the nice things about using Gravity SMTP to set up transactional email sending is that Gravity SMTP also lets you set up a backup email sending method.
If an email ever fails to send via Mailgun Transactional for some reason, Gravity SMTP can automatically resend that email using your backup service.
This lets you ensure reliable email deliverability even if Mailgun were to experience issues.
If you do want to set up a backup email sending service, you first need to connect your site to that service in the Integrations area. We have detailed tutorials for all the APIs that Gravity SMTP supports, but you’re also free to connect to a custom SMTP server:
- Amazon SES
- Brevo
- Elastic Email
- Emailit
- Gmail / Google Workspace
- Mailchimp
- MailerSend
- Mailjet
- Outlook / Microsoft 365
- Postmark
- Resend
- SendGrid
- SMTP2Go
- SparkPost
- Zoho Mail
- Custom SMTP
Then, click the three dots icon next to that service in the Integrations area and choose Set as Backup.
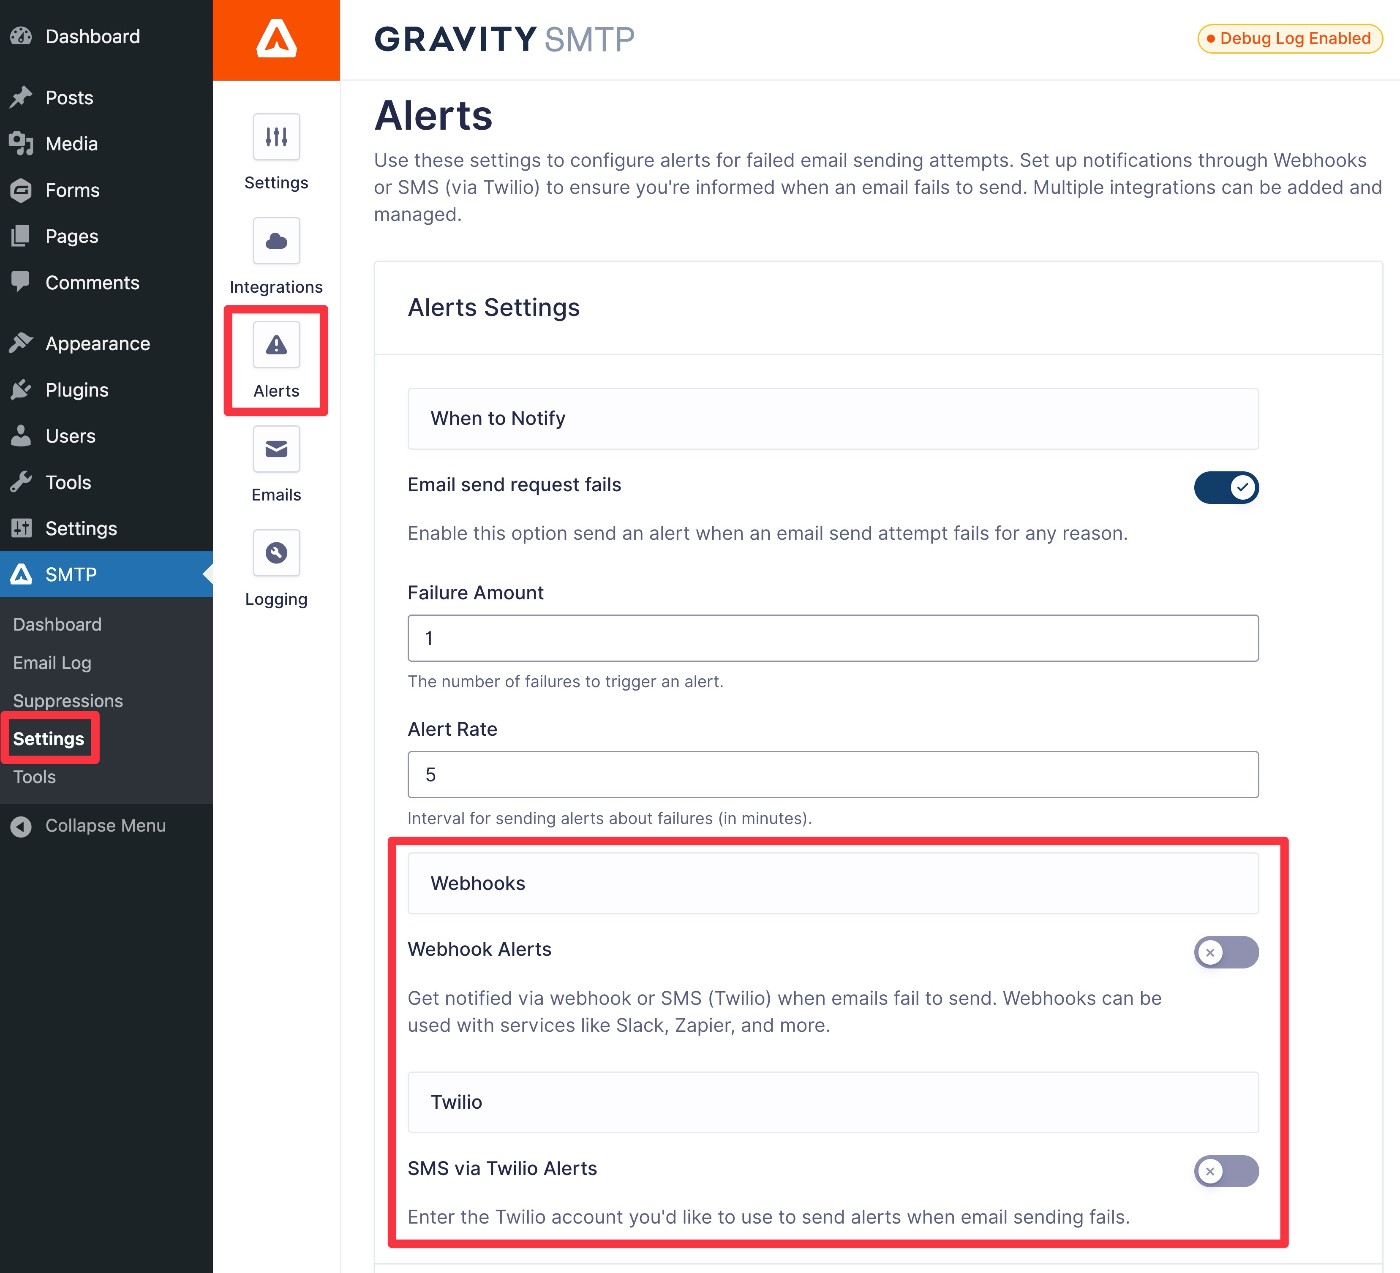
8. How to set up real-time email alerts (optional)
Gravity SMTP currently offers two different methods for receiving real-time alerts:
- Webhooks – You can send an alert to any service that lets you receive webhooks, which includes any service connected to Zapier. For example, you can receive real-time Slack messages.
- SMS – You can receive real-time text messages (via Twilio).
You can set up alerts by going to SMTP → Settings → Alerts in your WordPress dashboard:
How to monitor your site’s emails
To help you stay on top of your site’s transactional emails, Gravity SMTP also includes detailed reporting and logging tools.
You can use these to track your Mailgun usage, see which parts of your site generate the most emails, track email opens, resend emails, view the content of emails, and more.
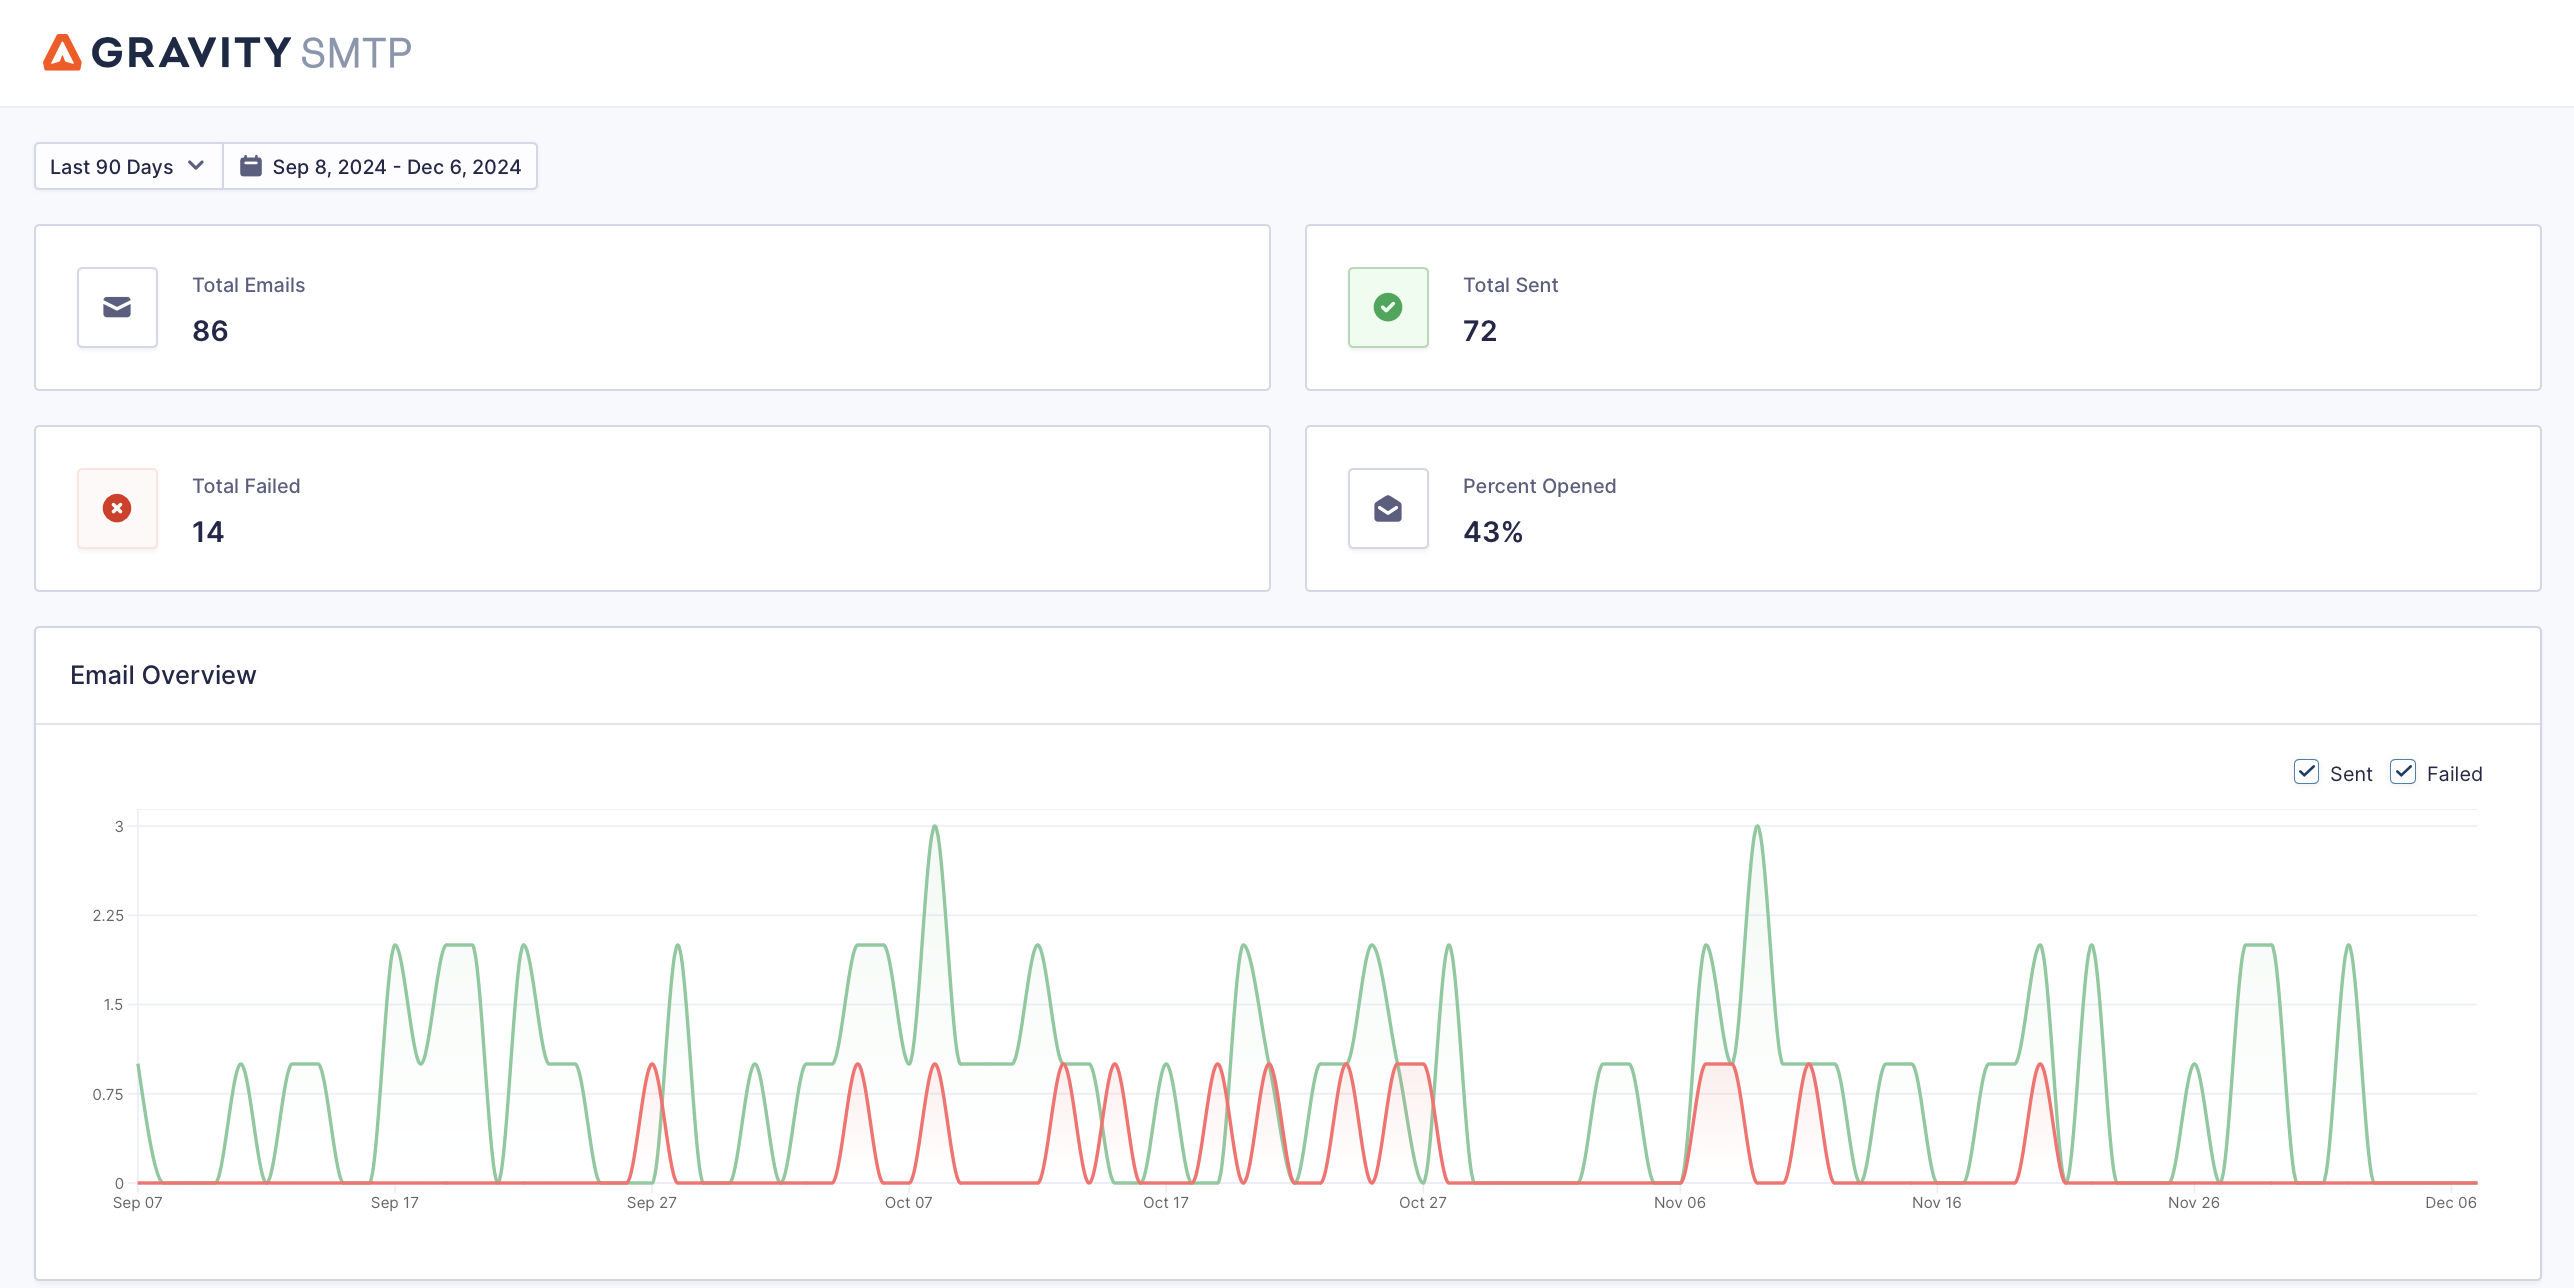
To view the reports, you can go to SMTP → Dashboard, which includes the following information:
- Total number of emails sent for a given period, along with the status of each email.
- Open rate for your emails (if you’ve enabled open tracking).
- Which parts of your site generate the most emails (e.g. core WordPress software or a specific plugin).
- Top email recipients.
To see the logs, you can go to SMTP → Email Log. You can also use the buttons in the Actions column to view more technical information about a specific email and/or see the actual content of an email.
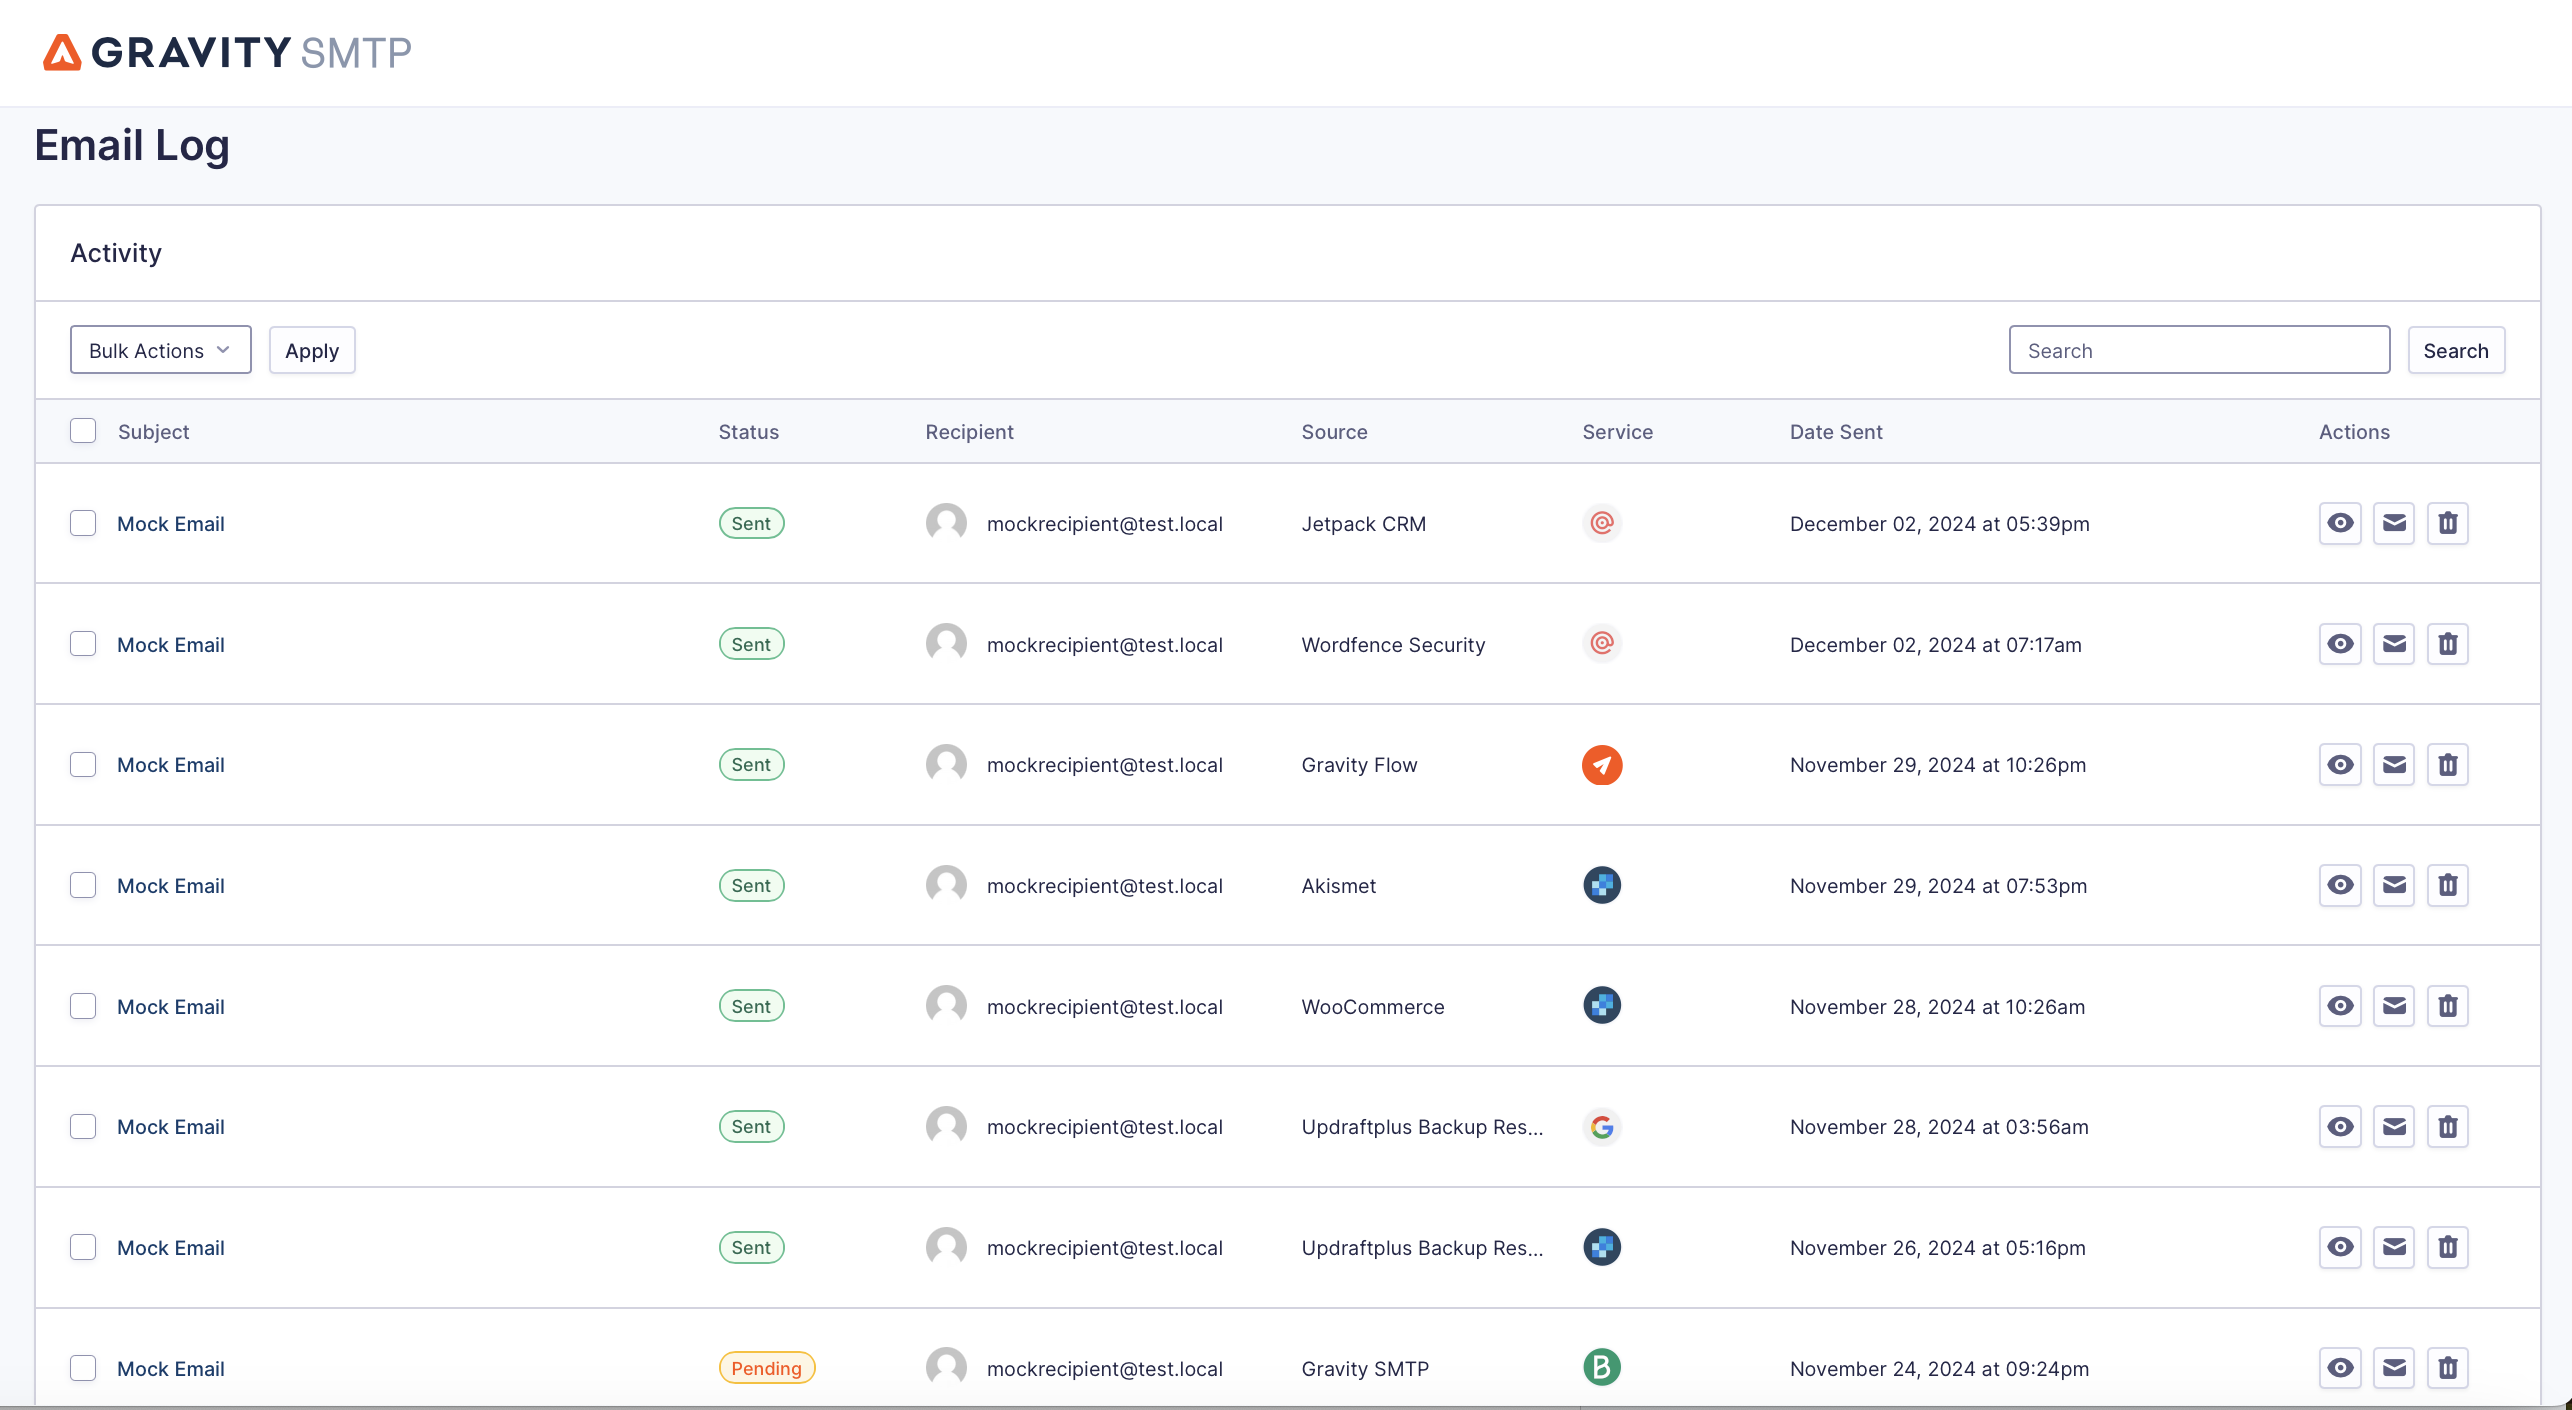
If you go to SMTP → Settings → Logging, you can control everything about how the log features work, including the following:
- Whether to log email content and/or attachments.
- Whether to track email opens.
- How long to store the log.
For more information on using Gravity SMTP, check out our Getting Started Guides.
Set up WordPress Mailgun email sending today
That wraps up our guide on how to use Gravity SMTP to configure WordPress to send email using Mailgun.
Once you’ve followed this tutorial, your site will have much more reliable email delivery. And with Gravity SMTP’s logging and testing tools, you’ll also be able to make sure everything stays working as you intend it to.
If you have a Gravity Forms Elite license and you’re ready to get started, install Gravity SMTP and you’ll be up and running with SendGrid email sending in no time.

If you want to keep up-to-date with what’s happening on the blog sign up for the Gravity Forms newsletter!