Turn Your WordPress Website into A Subscription Management Platform with GravityStripe

Written by David Bentley Hurley, founder of Frog Eat Fly…
If you have a WordPress website and need to add a form for any reason, Gravity Forms is one of the best plugins for the job.
Gravity Forms not only makes it incredibly easy to create basic contact forms for WordPress, but it’s also the perfect option for complex data entry needs. Veteran WordPress developers know that with Gravity Forms and some creativity, just about any data entry, management, and data processing problem can be solved.
One of the popular uses of Gravity Forms is the ability to take payments via Stripe. Integration with Stripe takes just a couple of minutes and in no time, you can collect one-time or subscription payments on your WordPress website.
But what if you want subscribers to manage their own subscriptions without having to send you an email every time they want to update their credit card info, upgrade or downgrade their subscription, or even cancel?
While Gravity Forms is great at processing payments, the plugin called GravityStripe was specifically created to transform your WordPress website into a fully-fledged subscription management solution.
In this how-to article, I’ll walk you, step-by-step, through the process of transforming a simple WordPress website into a subscription management platform that is both affordable and useful.
Ready to get started?
Why Gravity Forms and GravityStripe Instead of an Out-of-the-Box Subscription Management Platform?
Let’s face it, when it comes to apps and tools to help run your business, there are thousands of options. Subscription management is no exception. Software like Chargebee and Chargify are just two of the hundreds out there.
But there are a few problems with out-of-the-box options.
First, unless you pay for a premium plan, subscribers usually get introduced to the app’s branding during the transaction process. This can confuse subscribers and make them hesitant about signing up.
Second, you usually have to pay a monthly fee in addition to processing fees associated with payment processors like Stripe.
Third, and most important (at least to me), is that your options for customization are limited. With out-of-the-box subscription platforms what you see is what you get. If you have a specific need during or after the transaction process, there isn’t a developer who can make it happen.
Conversely, Gravity Forms is fully customizable and branded to you, WordPress is fully customizable, and GravityStripe can be customized to your unique needs as well.
With the Gravity Forms and GravityStripe combination the transaction process, from start to finish, is completely branded to you and your business and your subscribers get many of the same great management options as those WYSIWYG apps. You don’t need to worry about missed sales opportunities because the subscriber got confused and instead of paying, clicked the back button.
Convinced that GravityStripe is right for you? Read on.
STEP 1: Choose the GravityStripe Option that Fits Your Needs
There are 2 GravityStripe options to choose from.
- Free but Basic
- GravityStripe PRO
Free but Basic
The Free option, found in the WordPress Plugin Repository, is perfect for those who want subscribers to be able to easily cancel their subscriptions made with Gravity Forms using Stripe.
Other features include:
- A shortcode allowing subscribers to view subscription details like start date, next payment date, and amount
- A shortcode allowing site admins to view all subscriptions and subscription statuses on a page
- A backend list of all subscriptions and the status of those subscriptions
GravityStripe PRO
The Pro version of GravityStripe extends the subscription capabilities with additional useful features including:
- Subscription upgrade and downgrade
- Automatic role downgrade
- Update payment information through Stripe Portal
- Automatic subscription cancellation after x number of failed payment attempts
- Decide when the subscription ends after cancellation
- Issue refunds from the list of subscriptions
- Mapping pre-GravityStripe subscribers to new WordPress accounts so they can manage their subscriptions.
STEP 2: Installing GravityStripe
Installing GravityStripe is as easy as any other WordPress plugin.
If you decide to use GravityStripe Basic:
Click Plugins in your WordPress dashboard then click Add New.
At the top right of the plugin list, type GravityStripe in the search field.
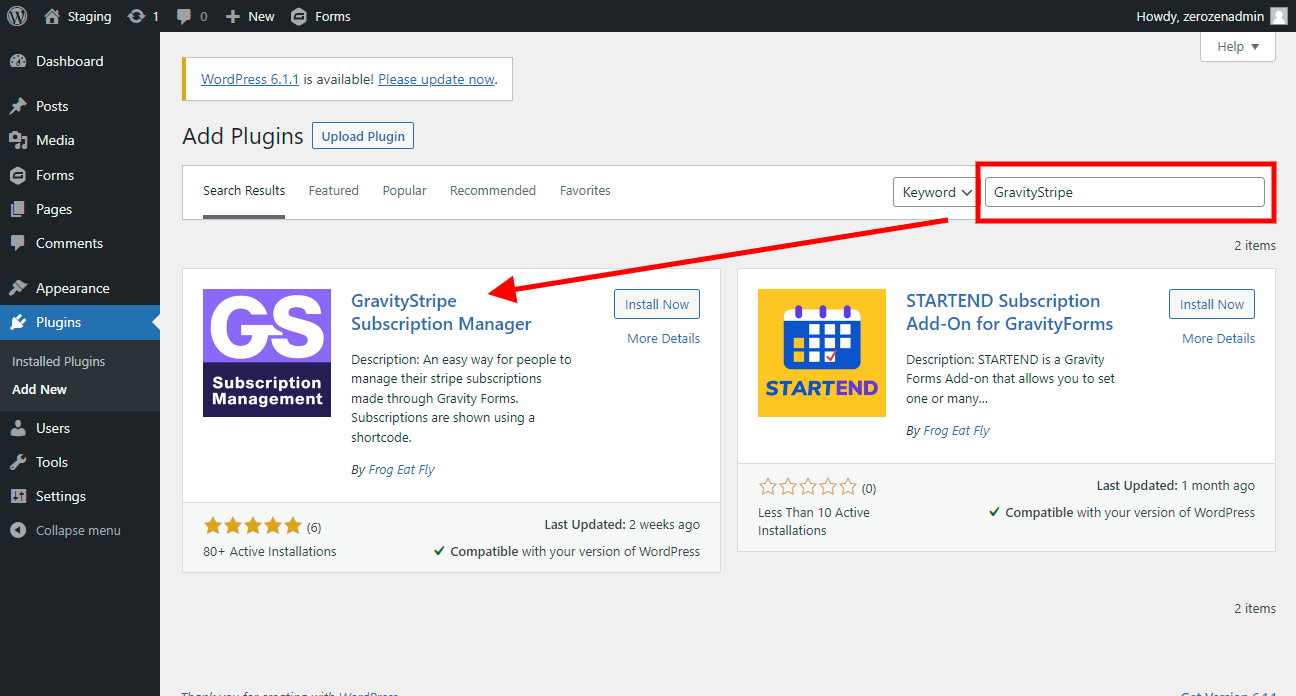
Click Install Now and when prompted, click Activate.
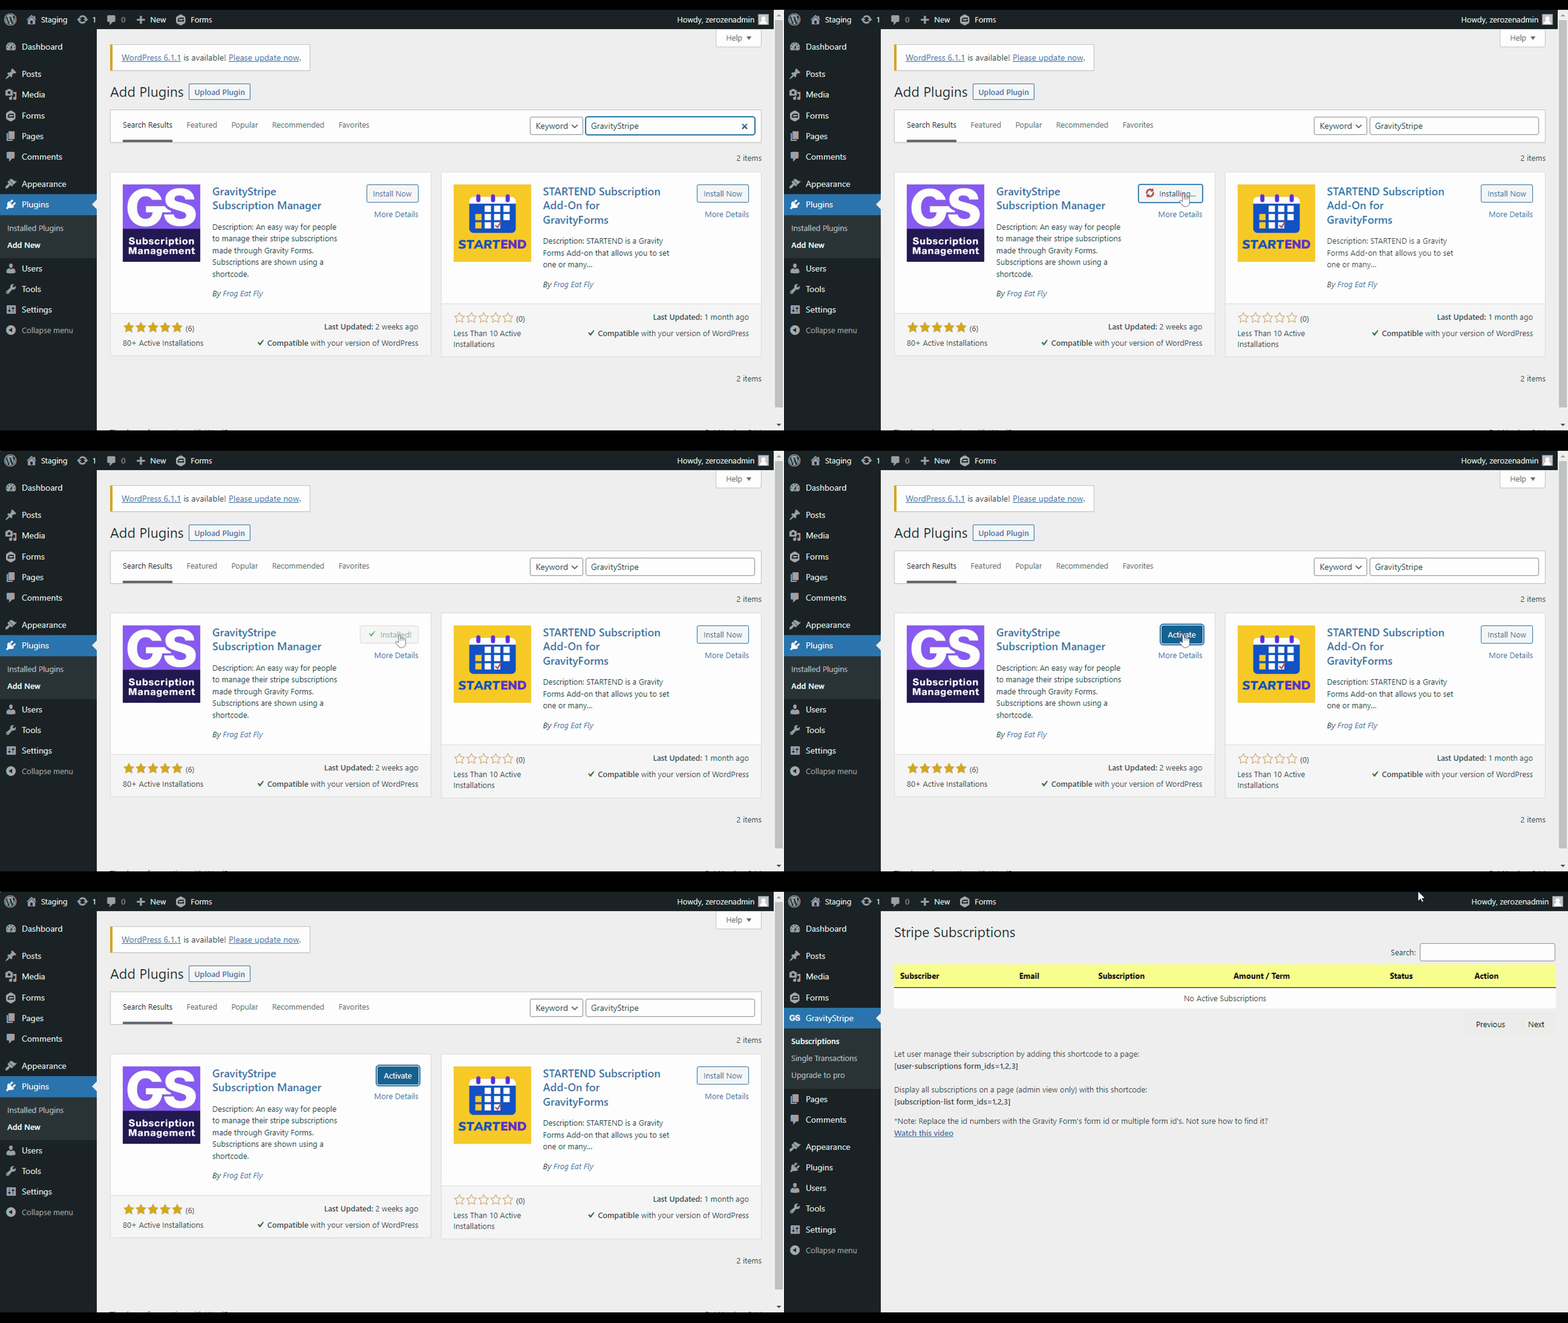
If GravityStripe PRO is right for you, follow these steps:
Visit https://www.gravitystripe.com/pricing and choose the one that suits your needs.
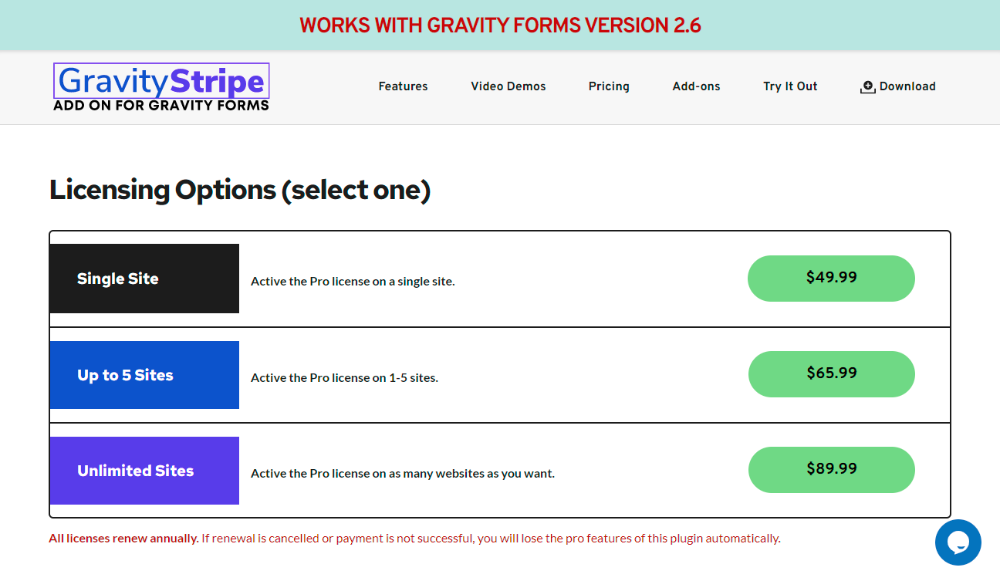
After you complete the payment transaction, check your email for a download link and license key.
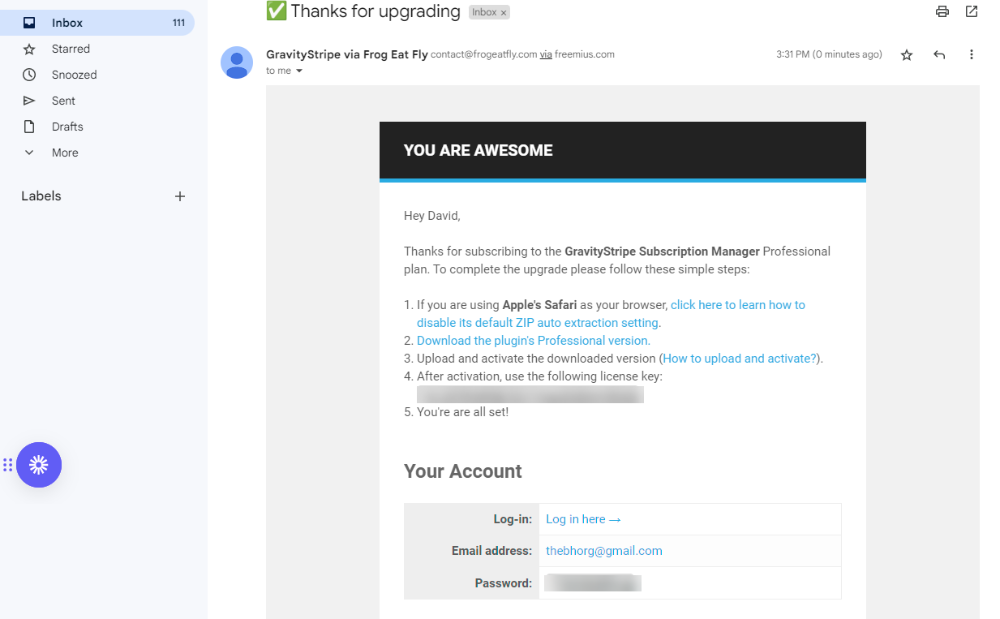
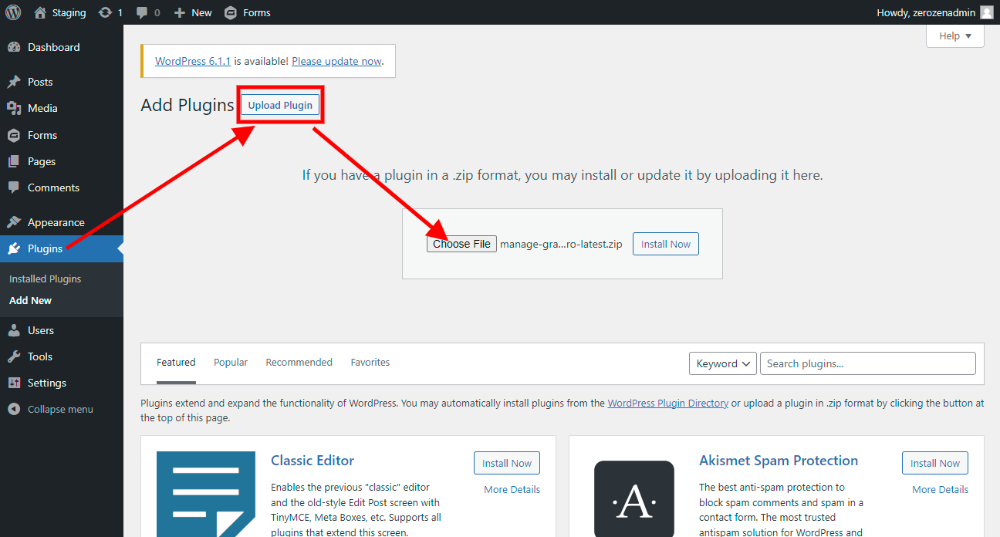
Once you download the file, go to the dashboard of your website and click Plugins → Upload Plugin and choose the .zip file containing the plugin that you downloaded from your email.
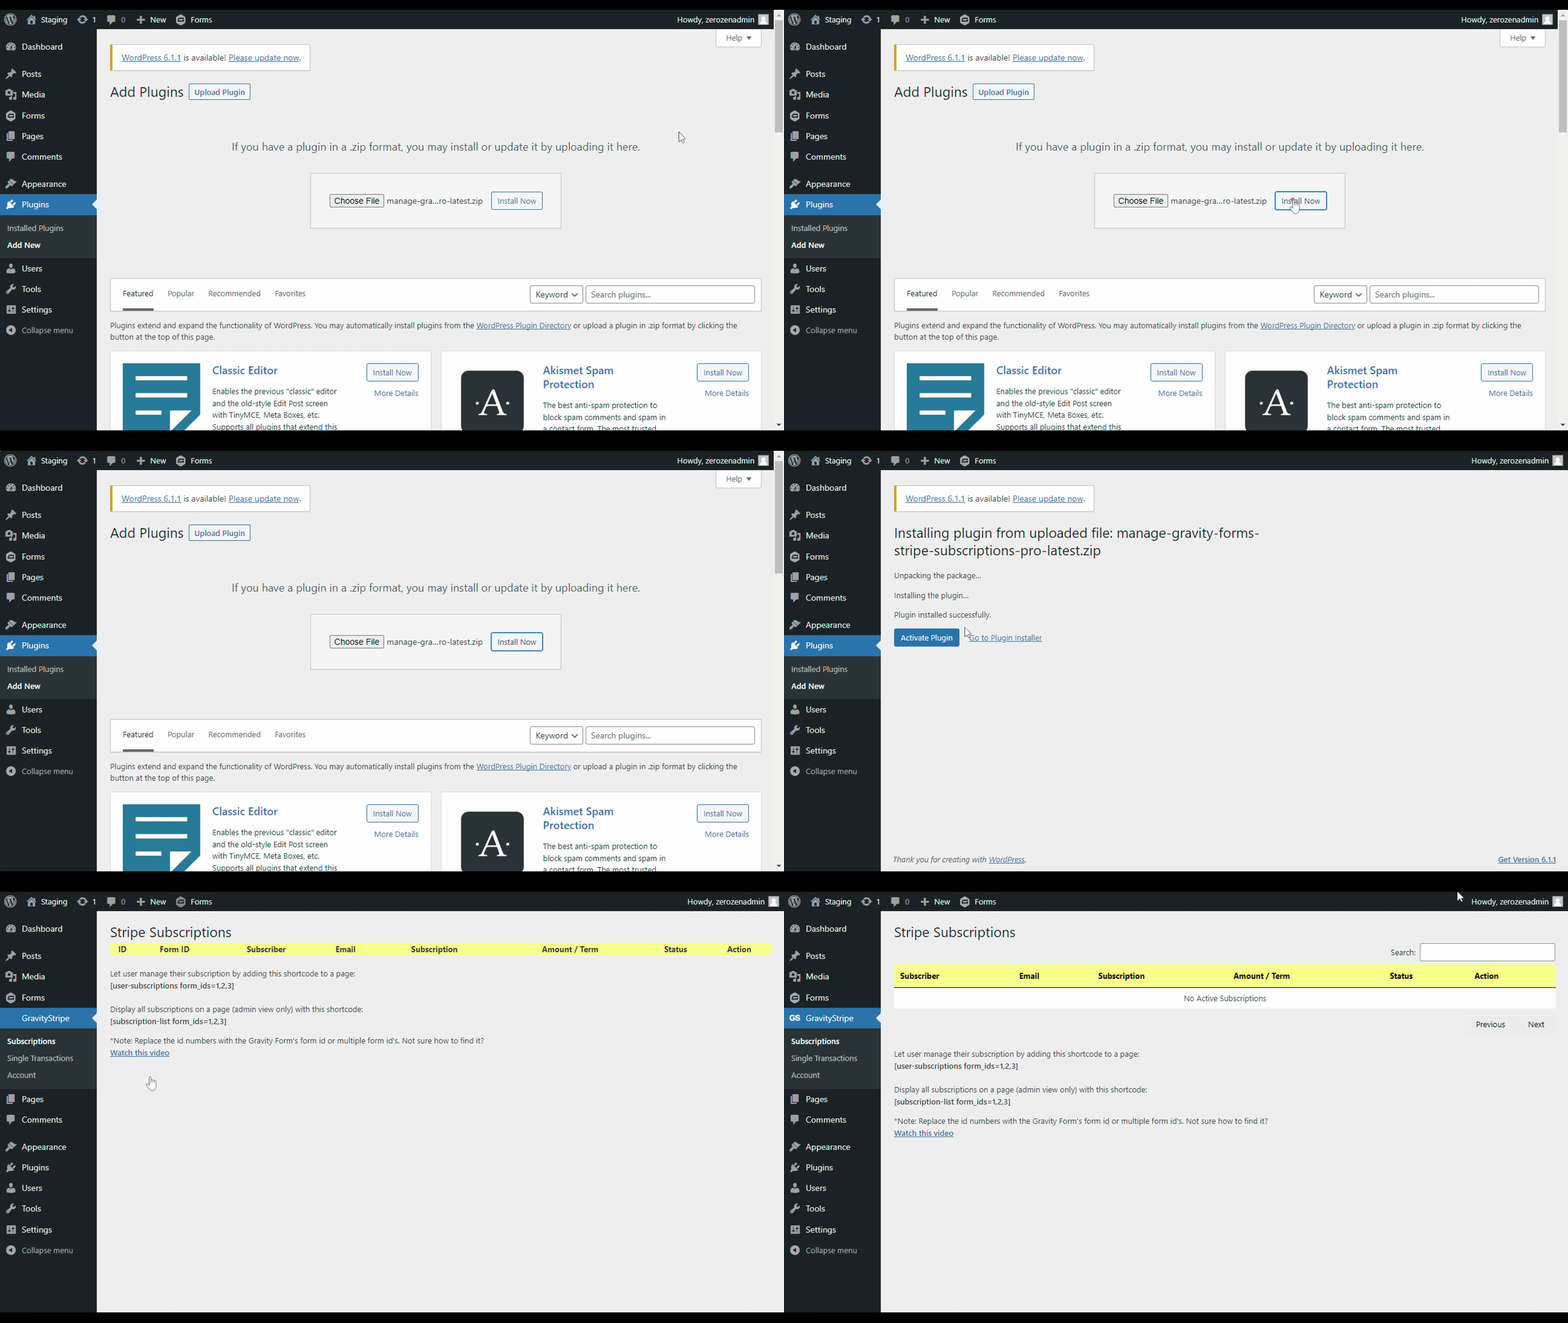
Install and activate the plugin.
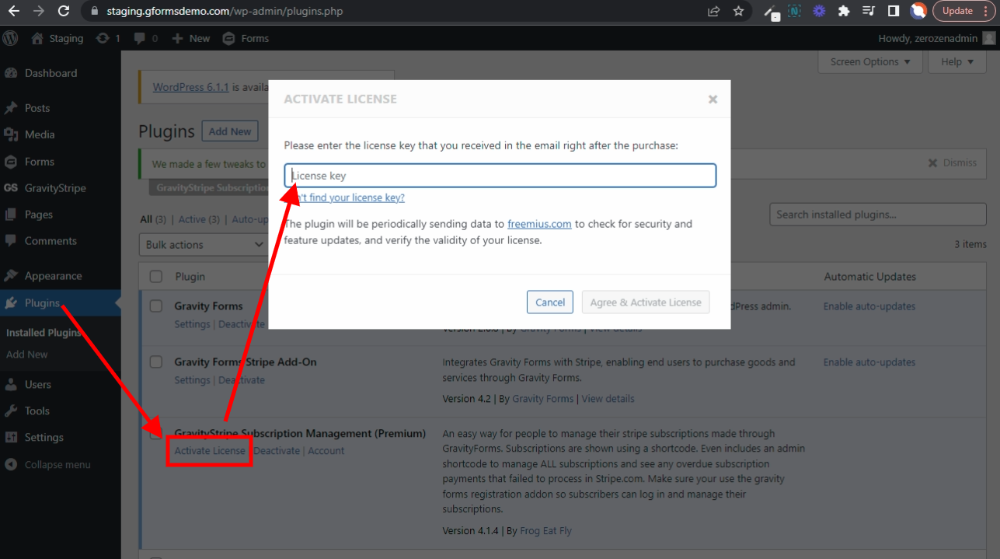
Next, you’ll need to add the license key. Copy the license key found in the email with the download link. Paste it in the Activate License field. You can find this by visiting Plugins and clicking the Activate License link under the GravityStripe plugin title.
STEP 3: Add GravityStripe Shortcodes
If you want subscribers to be able to view their subscription information and manage their subscriptions, you’ll first need to map existing subscribers to new accounts or add and set up the User Registration Add-On for Gravity Forms. If you are new to the User Registration Add-On, follow the Gravity Forms tutorial.
With user registration or mapping complete, add the following shortcode to the page you want subscribers to view and manage their subscriptions on.
[user-subscriptions form_ids=1,2,3]
Replace the numbers at the end with the form id or ids for your subscription form(s). If you are not sure how to find your form id, this video shows you where it’s located.
If you want an administrator to be able to view all subscriptions on a page of your website, use this shortcode:
[subscription-list form_ids=1,2,3]
Again, replace the numbers with the form id or ids to view a complete list of all subscriptions, the status of each, and actions available.
STEP 4: Adjust your GravityStripe Subscription Settings
GravityStripe allows you to easily configure every aspect of your subscription site. Make adjustments to give your subscribers access to the necessary management options you want them to have. For a video walkthrough of each setting, visit the GravityStripe resources page.
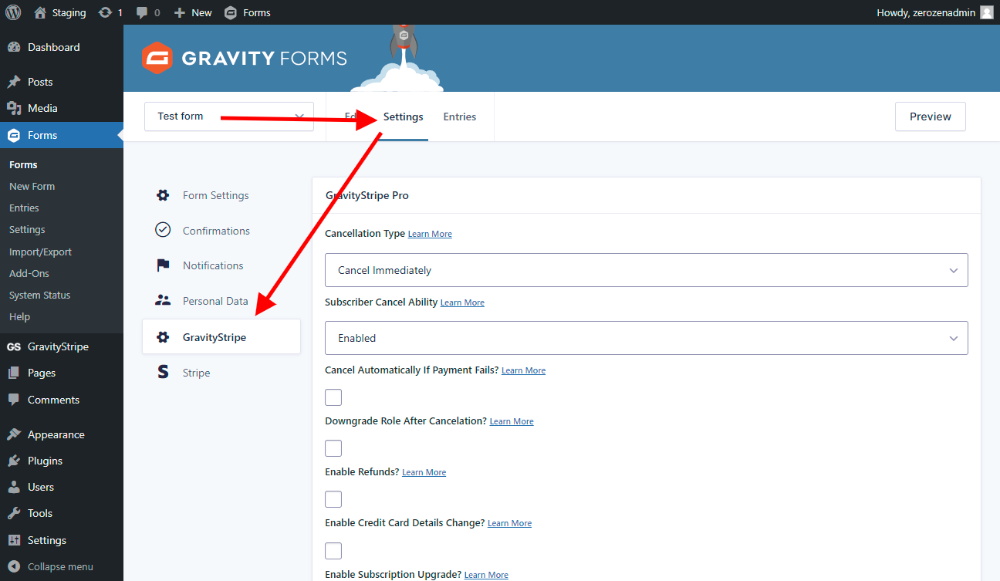
GravityStripe’s settings are adjusted inside the form settings for the form controlling your subscriptions.
STEP 5: Setting Up a Subscription Form
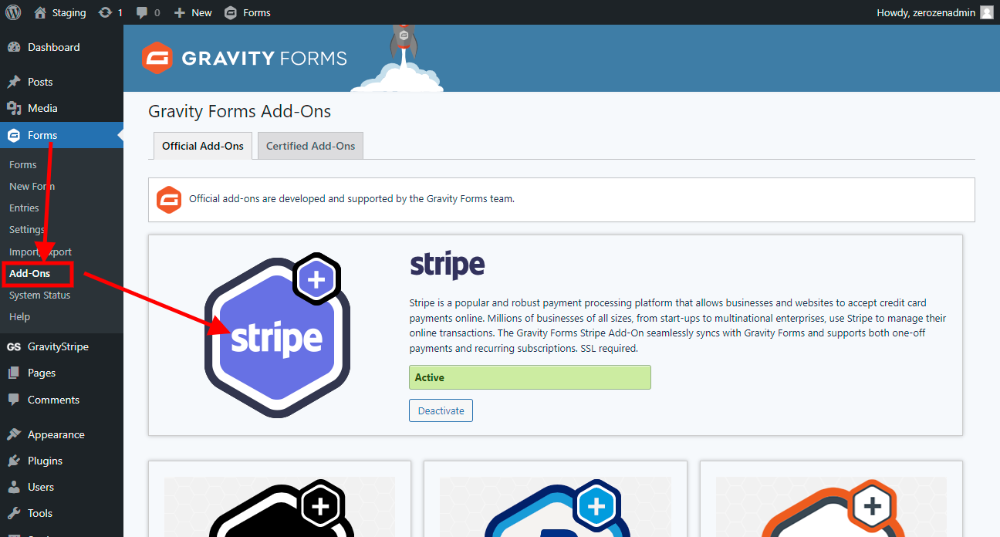
GravityStripe works in collaboration with the Stripe Add-On for Gravity forms so you’ll want to make sure you have that installed first. The first step is clicking Add-Ons under Forms. Locate the Stripe Add-On and click activate (Note: The Stripe Add-On is available with a Pro or Elite Gravity Forms license.
You will then need to connect to your Stripe Account. To do so, navigate to Forms > Settings > Stripe and follow the instructions. If you are not sure about this step, read Gravity Form’s documentation regarding connecting to Stripe.
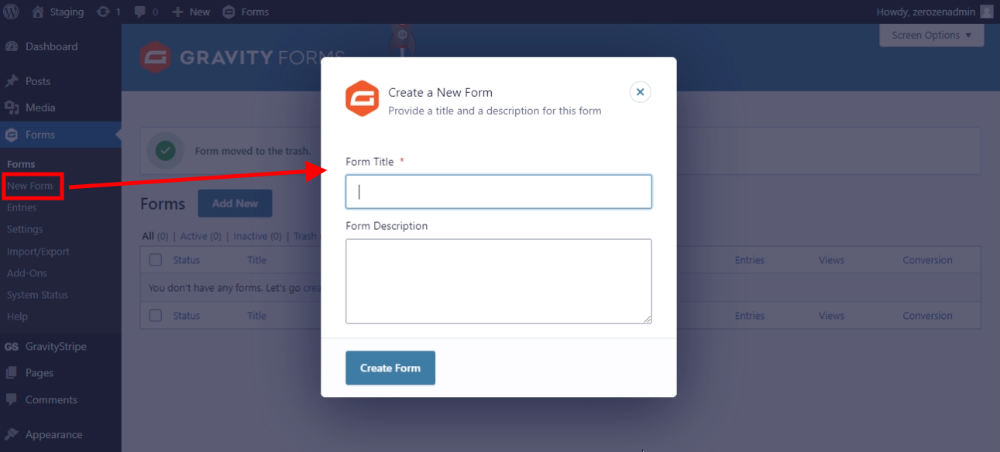
Next, create a new form.
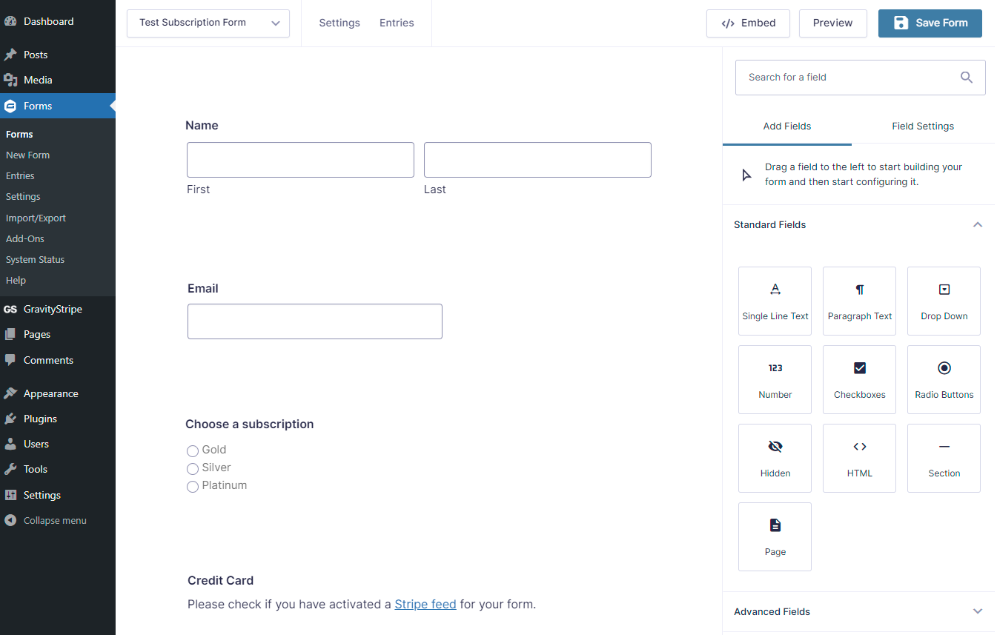
Add the fields you want to be associated with your subscription form. At a minimum, you will need an email field, a product field, and the Stripe Checkout Field (only necessary to add if you’ve selected ‘Stripe Credit Card Field’ as the payment collection method in the Stripe Add-On settings.
With your form fields added, now it’s time to create the Stripe Feed. The feed is the connection point that processes the form submission into Stripe and conducts the necessary charges and/or establishes the subscription.
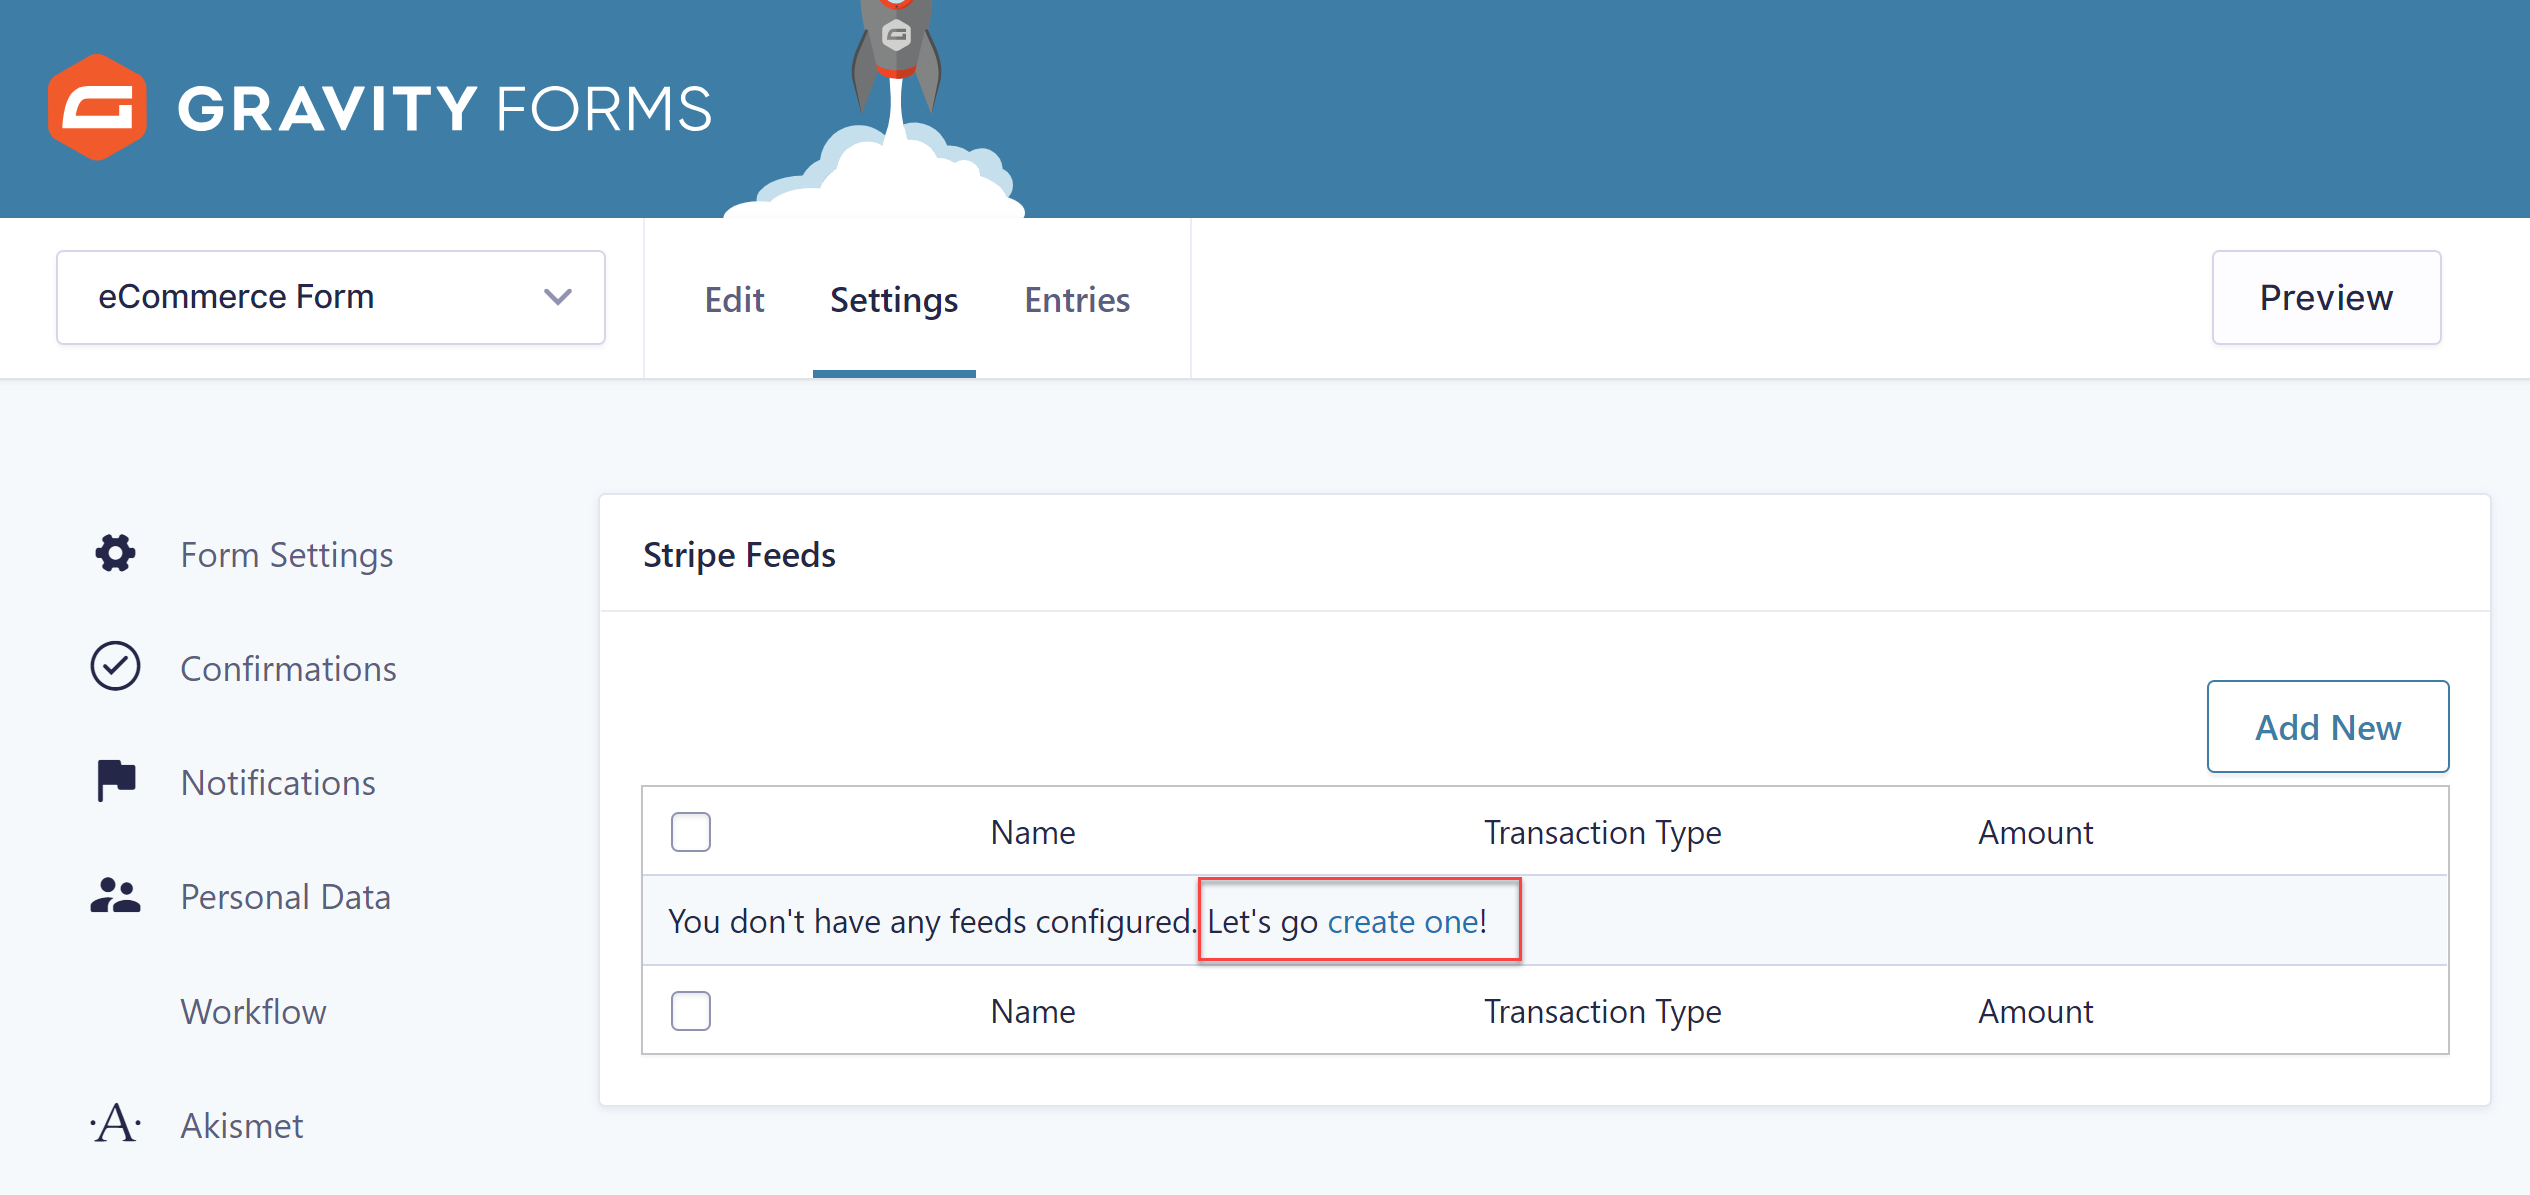
At the top of your form hover over Settings and click the Stripe option.
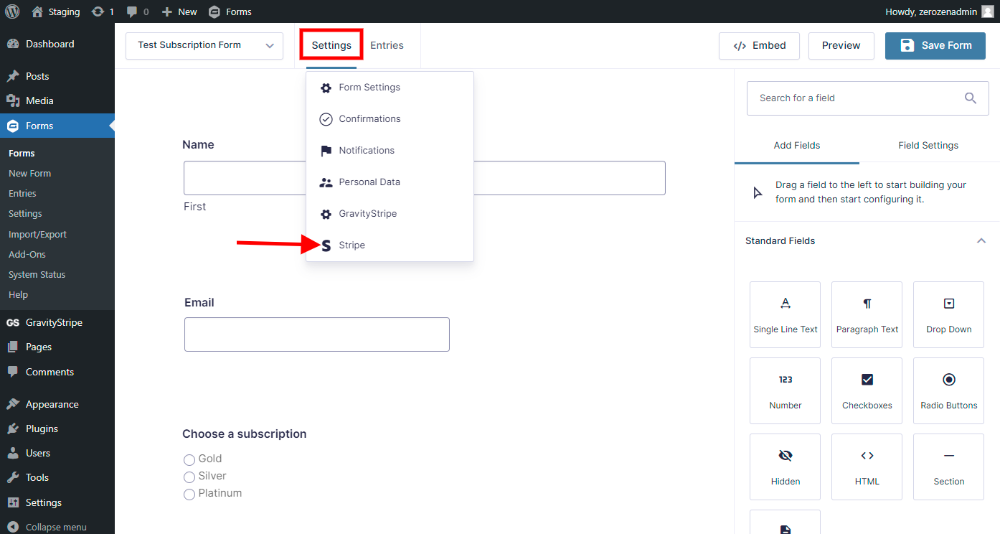
On the next screen, click the link that says Create One to set up the Stripe Feed for your subscription form.
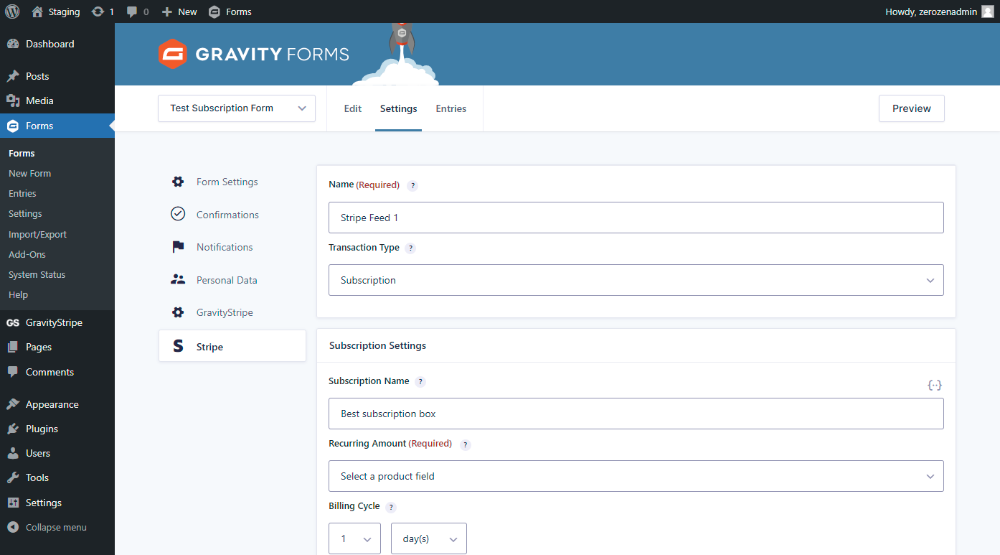
Give your feed a name. Don’t worry, this will only be visible to you.
Set your Transaction Type as a subscription.
Next, you’ll give the subscription a name. This will be visible to subscribers so make sure you give it a name relevant to the subscription they’re signing up for.
Choose the product field you designated to be the subscription price as the Recurring Amount.
Assign the Billing Cycle.
Adjust your Set up fee and trial settings.
You will then need to map your form fields to the available listed fields – this billing address information will be sent to Stripe – and configure any of the remaining settings as needed.
If you would like to watch a video walkthrough of this process, watch this tutorial video.
Once you’ve activated the Stripe Feed for your form, the last thing to do is add your form to a page of your website. How you add the form to your page depends on your website. Use a shortcode or another default option or, my personal favorite, Ultimate Add-Ons for Beaver Builder.
No matter what you choose, you’ve now got a subscription form and a complete subscription management solution for WordPress using Gravity Forms and GravityStripe.
Final Thoughts
I hope you’ve enjoyed this tutorial to transform your WordPress website and Gravity Forms into a fully capable subscription site. If you think the GravityStripe plugin is right for you, or you want to give it a try, download the free version or purchase the pro version for all the features.
Have a pre-sale question or support issue? Create a ticket to get help.
About the Contributor:
 David Bentley Hurley is the Founder of Frog Eat Fly Software and the Founder of the recently acquired web design and marketing company ZeroZen Design. For over a decade David and his team have used Gravity Forms to come up with simple solutions to complex problems.

If you want to keep up-to-date with what’s happening on the blog sign up for the Gravity Forms newsletter!
