This Month’s Featured Add-On: Stripe!
Did you know that with the Gravity Forms Pro and Elite licenses you can accept payments on your website with Stripe? In the last 12 months, more businesses than ever have looked to move their processes online, with a big focus on selling products and services – and therefore accepting payments – through their websites.
Gravity Forms and Stripe have become a natural choice for businesses across the globe, as they both provide user-friendly set-ups and service, as well as the security and reliability that is essential for any customer-facing business.
In this article, we look more in-depth at Stripe, what it offers and which businesses should consider using it to process their online payments. We will also discuss how to integrate Gravity Forms with Stripe, enabling you to easily start accepting payments on your website. Let’s get started…
Stripe: An Introduction
Stripe is a popular and robust payment processing platform that allows businesses and websites to accept credit card payments online. Millions of businesses of all sizes, from start-ups to multinational enterprises, use Stripe to manage their online transactions, and accept payments from their customers.
Stripe is a feature-rich solution, providing a suite of payment tools for any business or industry – from online and in-person retailers, subscription businesses, software platforms and marketplaces, to anything in between.
Let’s take a look at some of the benefits of using Stripe to process your online payments…
- Quick Setup – Create an account in minutes, easily integrate your account with Gravity Forms, and then immediately start taking payments on your site. It’s as easy as that!
- All Major Payment Methods Covered – Stripe accepts all major credit and debit cards, as well as Apple Pay and Google Pay.
- Accept Payments Globally – With Stripe you can accept payments in over 35 countries, with support for 135+ currencies, making it easy to launch into new markets and helping you to connect with customers across the world.
- One-Time Payments – With Stripe and Gravity Forms your customers can purchase products and services on your website with one-time credit card payments.
- Recurring Payments – Easily set up and configure recurring payment subscriptions with Stripe and Gravity Forms.
- Transparent Fees – With Stripe there are no hidden fees (no signup fees, monthly fees, etc), so there are no nasty surprises!
- Discounts for Non-Profits – Stripe offers discounted fees for all non-profits.
- Machine Learning Fraud Protection – Stripe Radar helps detect and block fraud for any type of business using machine learning that trains across the entire Stripe network. It’s built into Stripe and requires no additional setup to get started.
- World-Class Security – Stripe is certified to PCI Service Provider Level 1, the most stringent certification available in the payments industry. Your customers’ card data never touches your servers, protecting you from complexity, costs, and risk.
Stripe and Gravity Forms: Are They Right For You?
As mentioned, Stripe integration with Gravity Forms is available with our Pro and Elite licenses. The Gravity Forms Stripe Add-On syncs Stripe seamlessly with any form you create and allows Stripe to capture payments directly on your website.
Importantly, the Gravity Forms Stripe Add-On allows you to take both one-off payments and recurring subscriptions on your website, making this particular add-on a must-have for many of our Gravity Forms customers.
There are many types of businesses that can benefit from using Gravity Forms and Stripe to accept online payments. Here are just a few of the most popular use cases from our community…
- Running a Membership Site – If you run a membership site, you may want to charge your users a monthly fee to access your content. With Gravity Forms, you can set up different pricing plans and then use Stripe to charge members a subscription based on the plan they select.
- Selling Physical or Digital Products – Selling online can be an extremely profitable venture at the best of times. But in the current climate, more people than ever before are going online to make purchases. By selling your products or services online, you can ensure that you continue to cater to the needs of your everyday customers, as well as potentially tap into a new market, and importantly, enable your business to weather this storm and remain profitable.
- Taking Donations on Non-Profit Websites – If you run a non-profit organization, then it is vital that you display an attractive and user-friendly donation form on your website, helping you to collect much-needed funds for your cause. And with Stripe, you can accept one-off payments as well as allow donors to set up regular monthly donations.
- Accepting University Fees – Many universities use Gravity Forms to accept payments from their students – from tuition fees to accommodation, resources, and other costs. The reliability and security of Gravity Forms and Stripe make these two solutions the perfect option for universities and other higher education institutions.
- Charging a Monthly Retainer for Your Online Services – Agencies or freelancers often retain clients on a monthly retainer for online services – for example, web design agencies that provide on-going monthly website maintenance. This contract can be set up, agreed, and paid for all via Gravity Forms.
So, now that we have a good idea of how Gravity Forms and Stripe can be used in conjunction with each other, let’s look at how to set up a payment form on your WordPress website…
Get Started with Gravity Forms and Stripe
To get started with Gravity Forms and Stripe you will need an active Gravity Forms Pro or Elite license and a Stripe account.
It’s also important to note that, because of the nature of capturing credit card information, you will need to have an SSL certificate installed on your website to use Stripe – your hosting provider can assist you with this if necessary.
Now follow these five steps to quickly and easily add a payment form to your website…
Step 1: Install the Gravity Forms Stripe Add-On
The first step of the process is to install the Gravity Forms Stripe Add-On. To do so, select Forms > Add-Ons from your WordPress dashboard menu.
 Scroll down the page to the Stripe Add-On and click on Install.
Step 2: Integrate Gravity Forms with Stripe
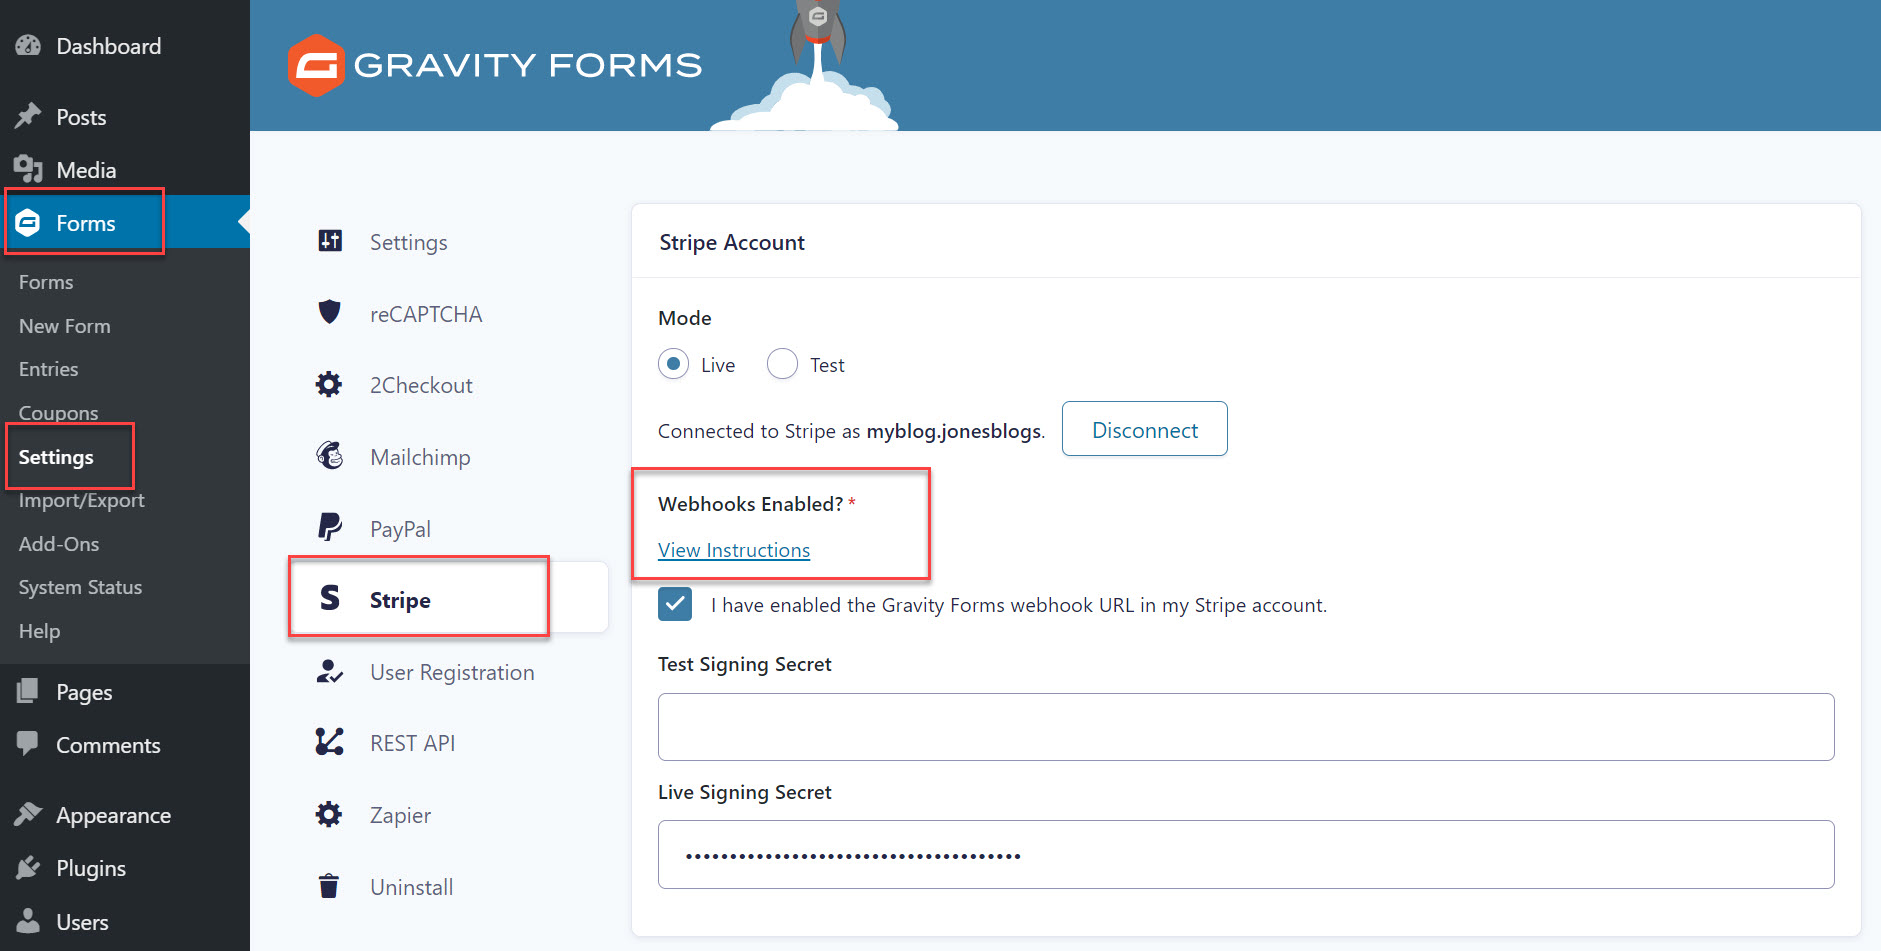
Next, you will need to integrate Gravity Forms with Stripe. Within your WordPress dashboard, select Forms > Settings > Stripe.
Here you will need to follow the instructions to authenticate your website with Stripe and to set up webhooks to communicate events between Stripe and Gravity Forms.
For more information on this integration process, check out the Gravity Forms documentation.
Step 3: Import a Payment Form from the Form Template Library
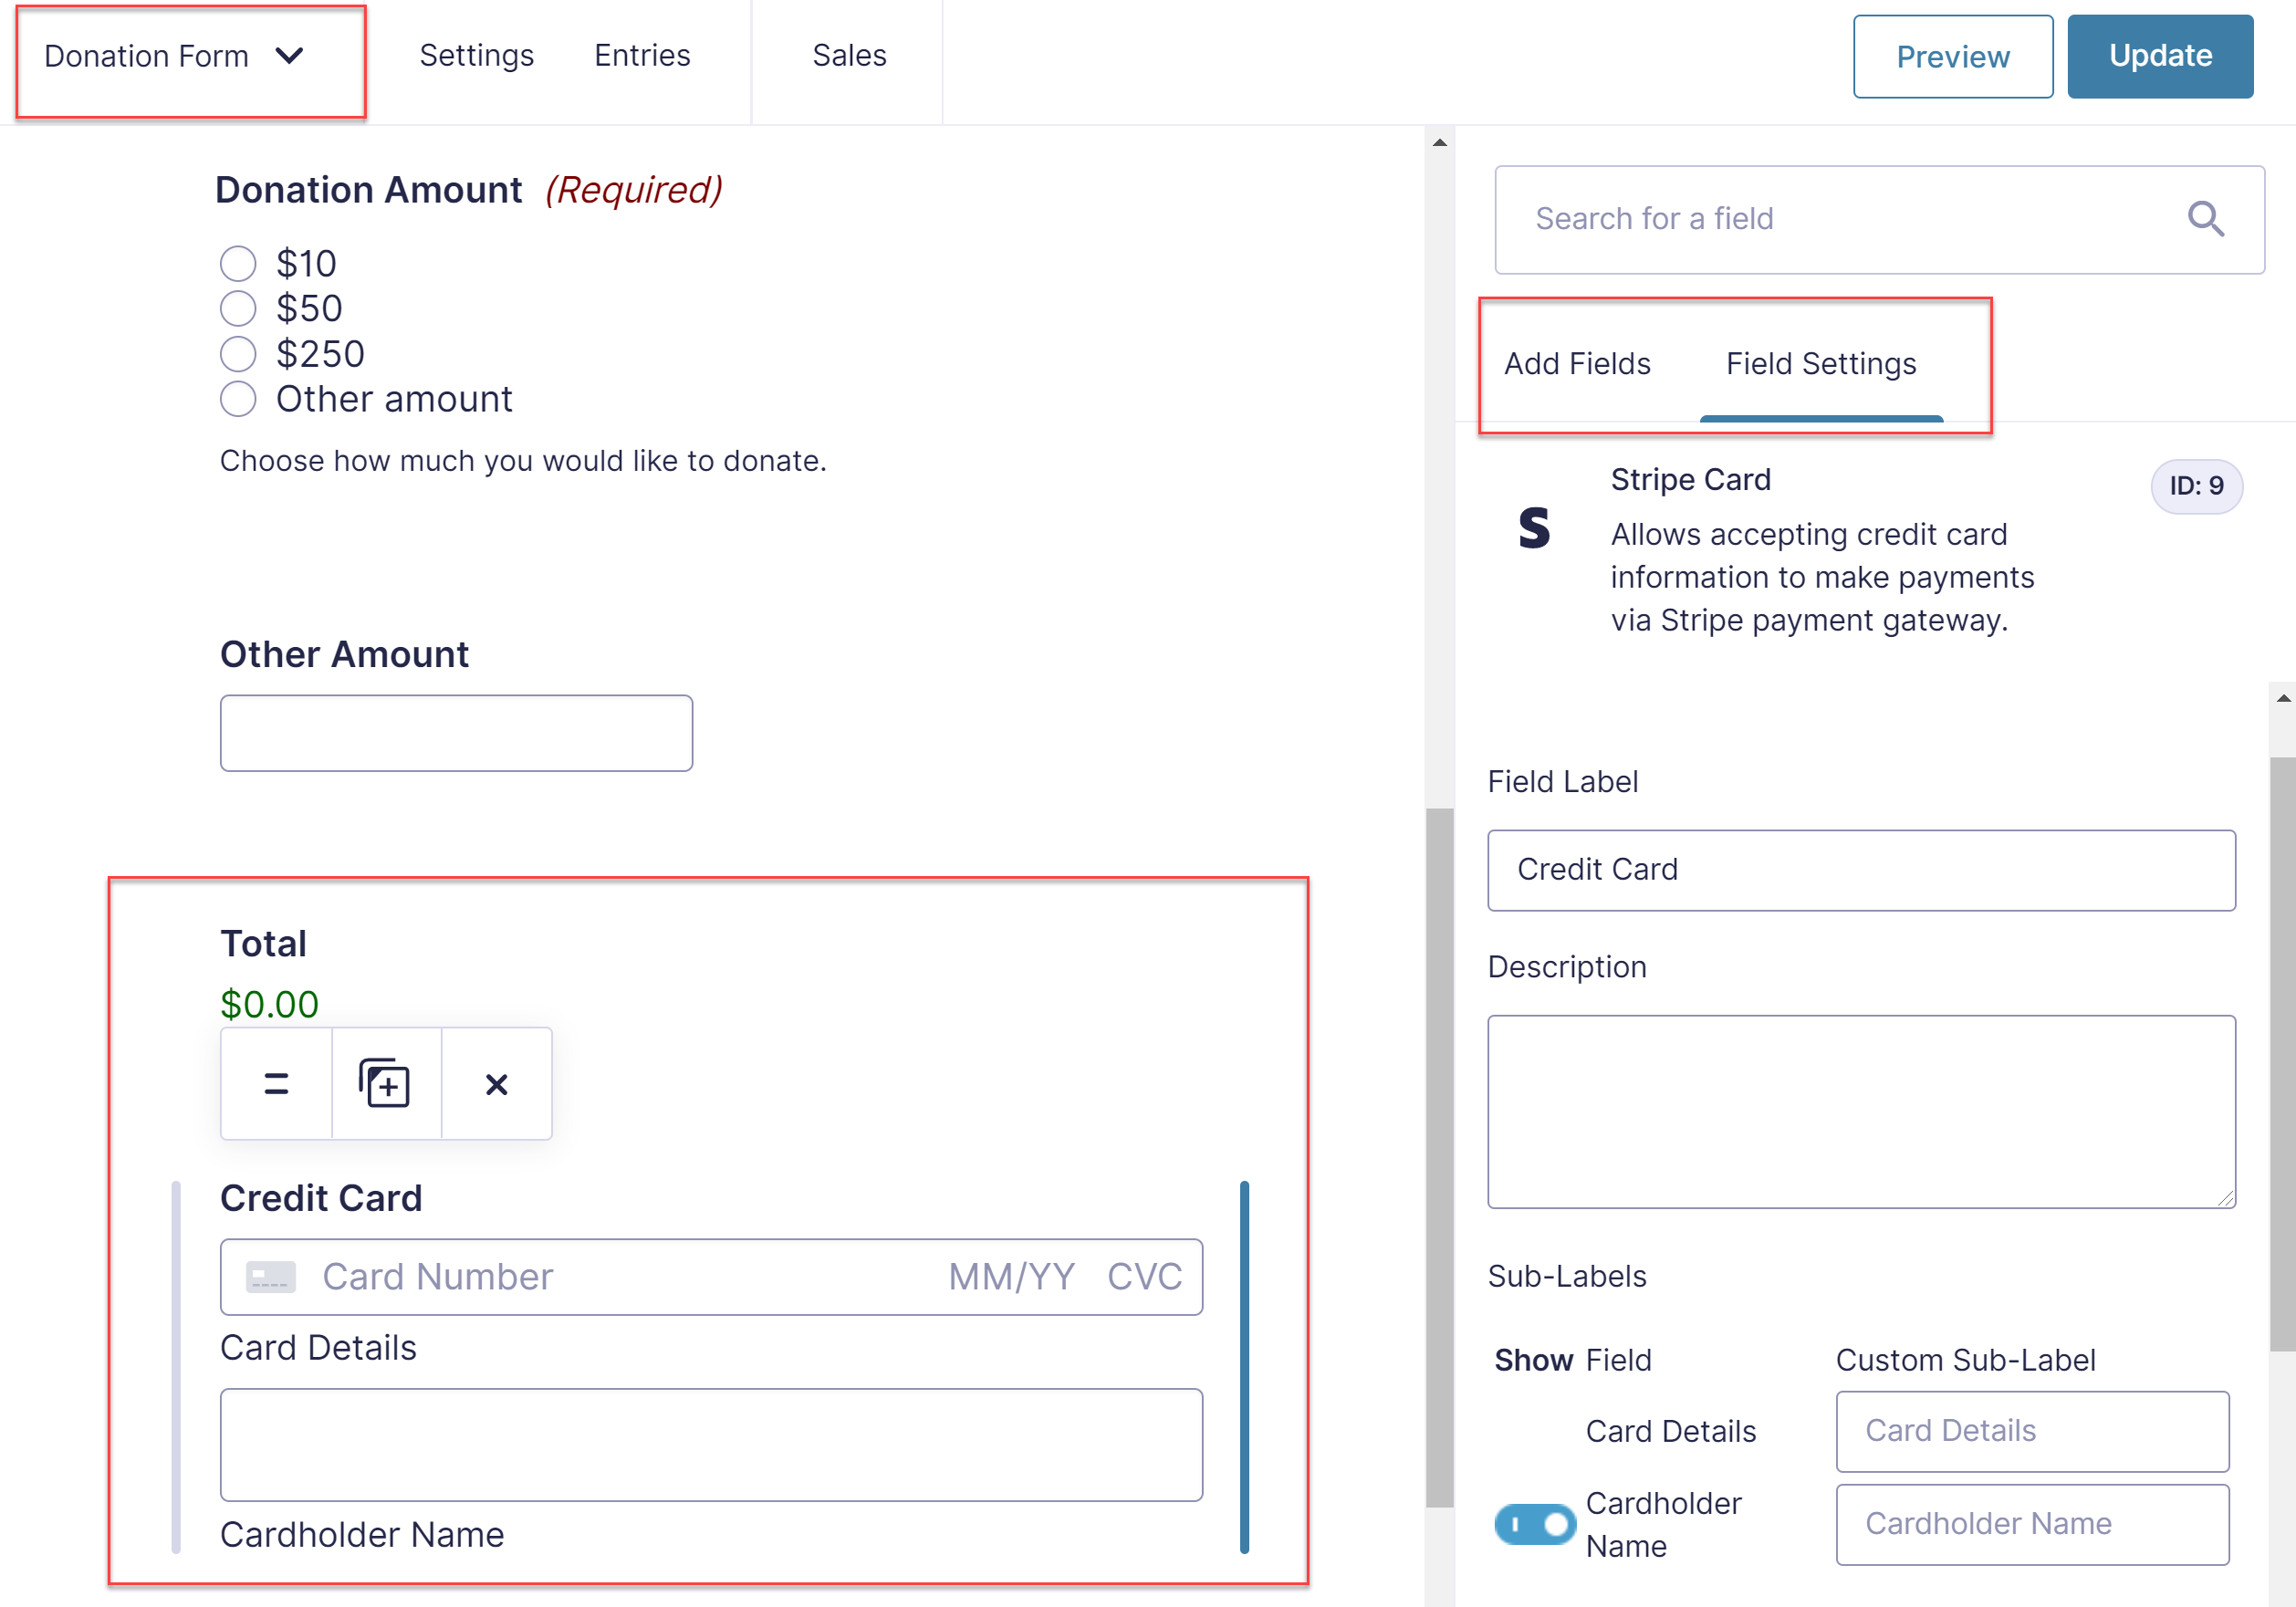
Once Gravity Forms and Stripe have been connected, you can then go ahead and import a payment form template to your website. Our form template library is packed with customizable templates that you can download and use on your website – specifically you can make use of the eCommerce form, donation form, or event registration form templates.
Here is an example of the donation form template that you can import to your website…

All forms can be easily customized with the form editor – add, rearrange or delete form fields, and edit the settings to create a form for your specific requirements.
Equally, you can create a new payment form from scratch, or add payment fields to an existing form. For more details on how to set up a Stripe payment form from scratch, check out this article in the docs.
Step 4: Create a Stripe Feed
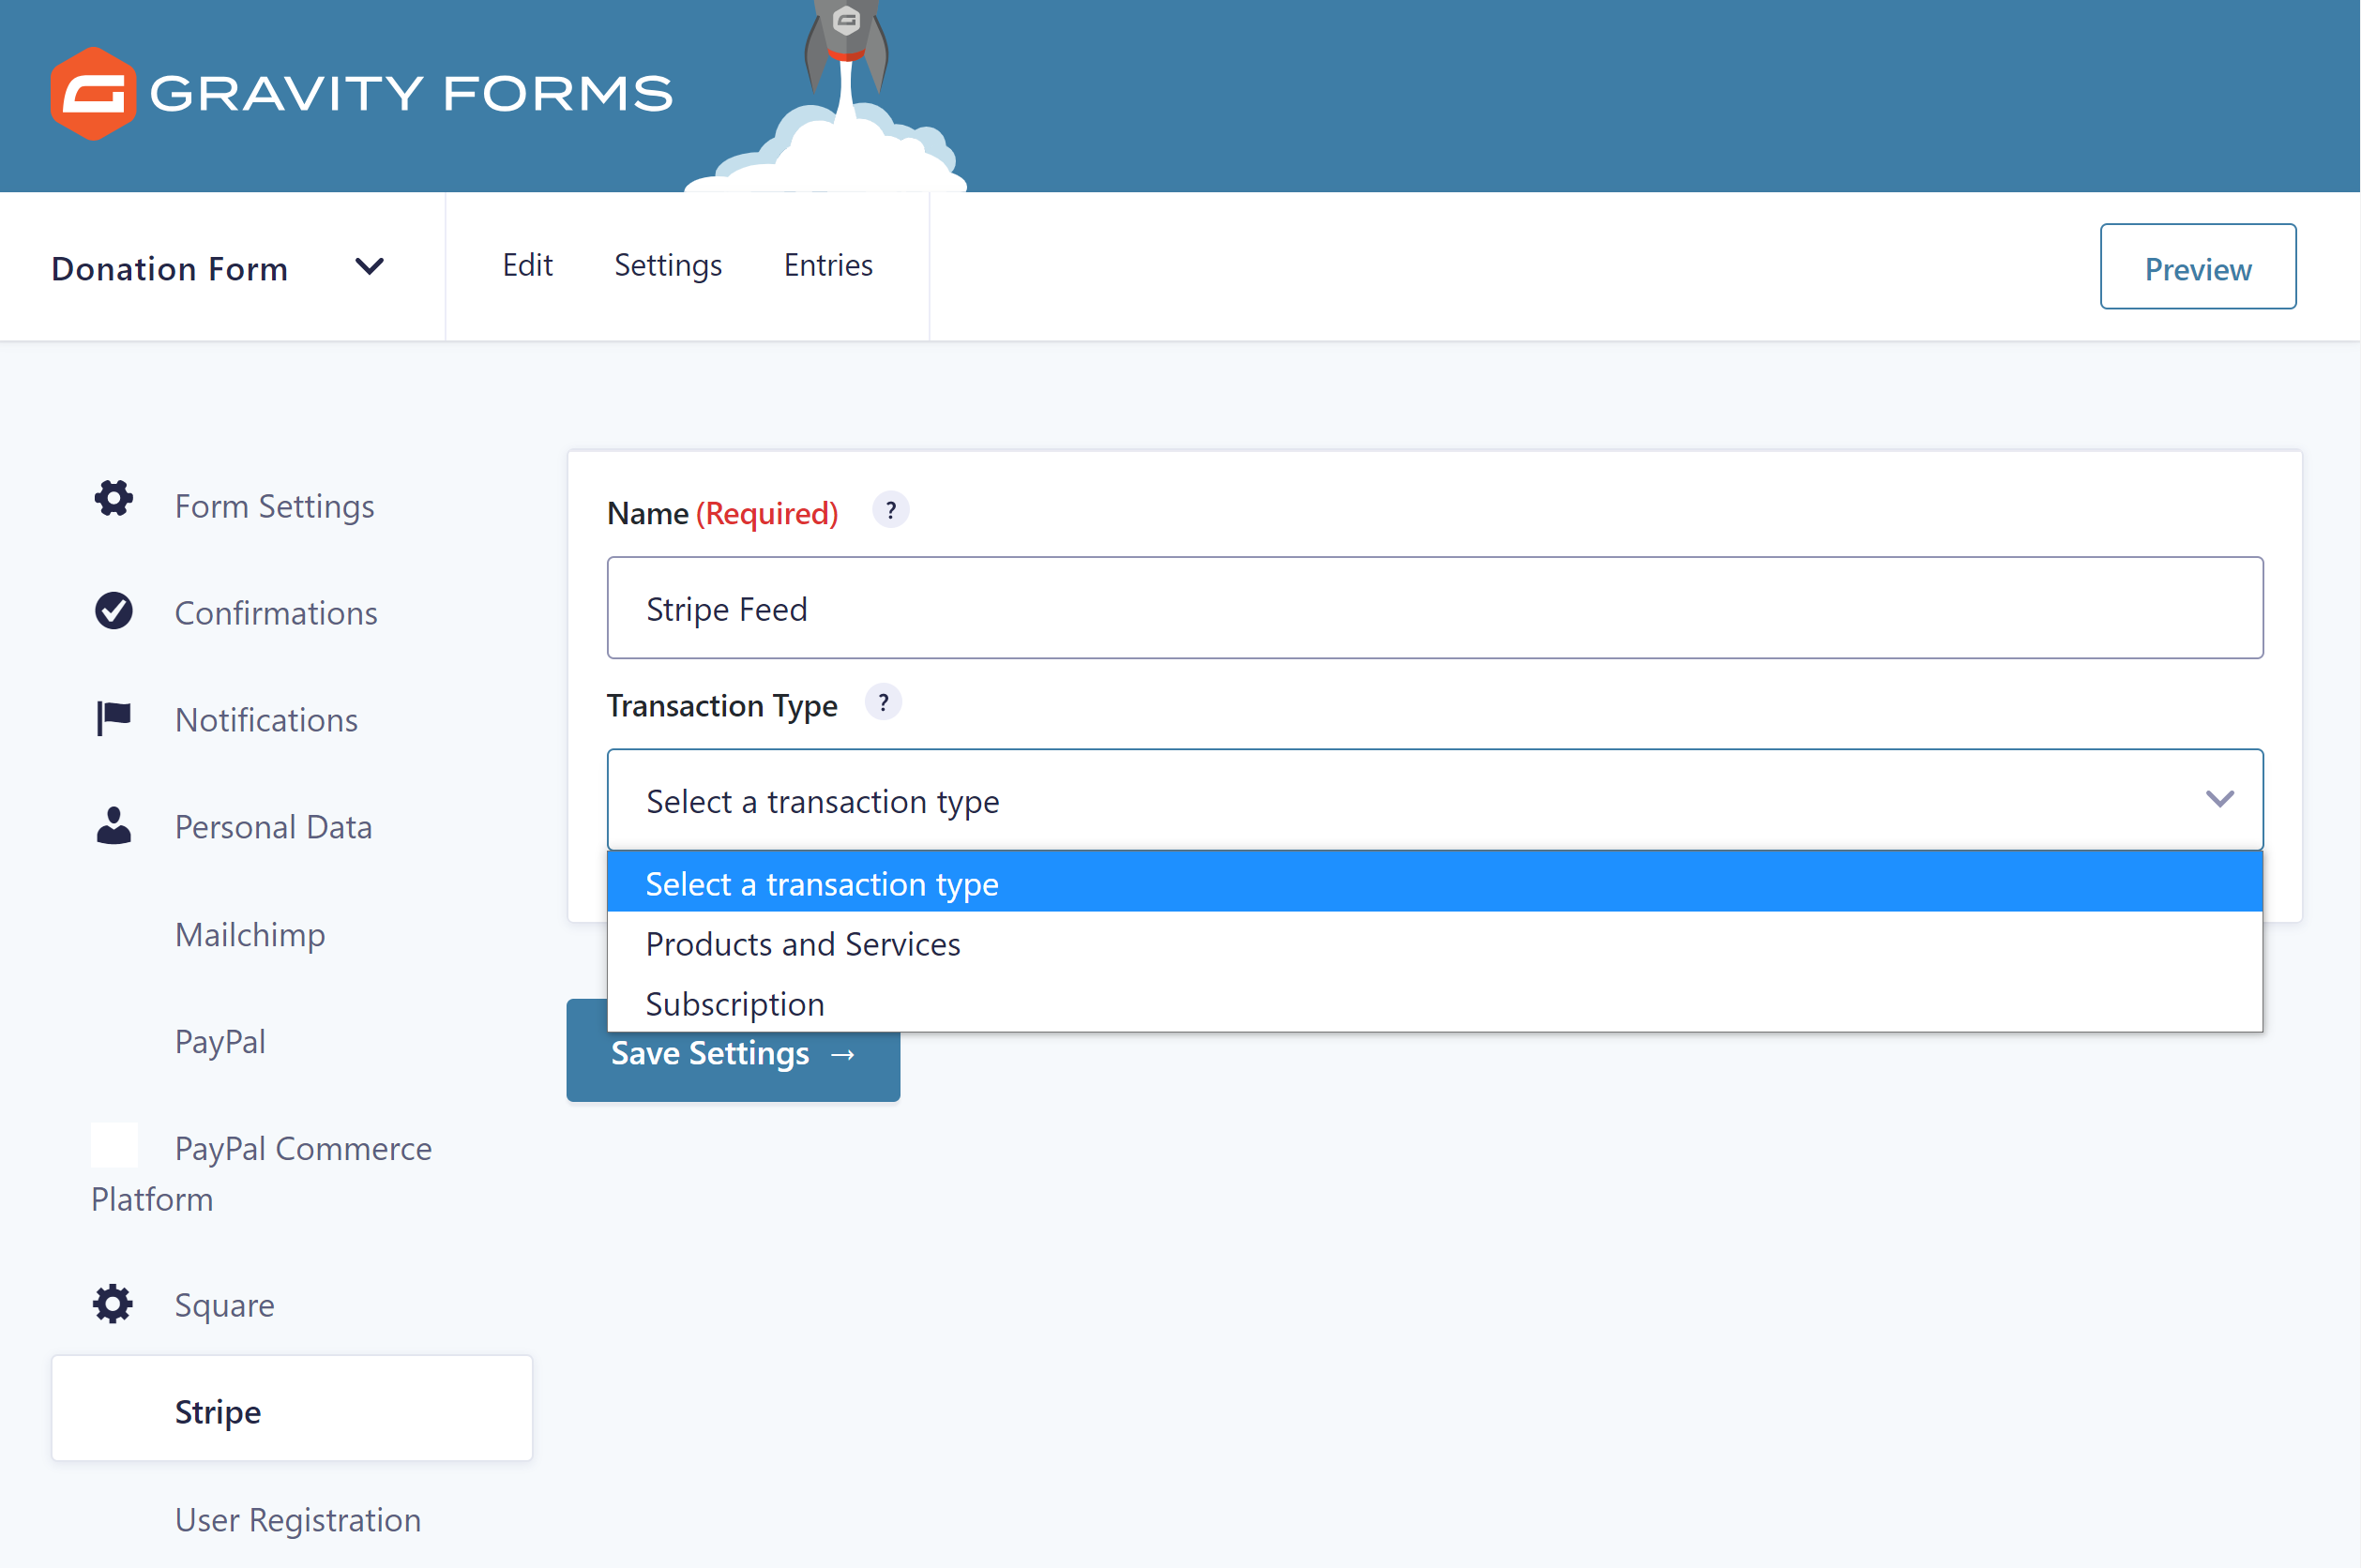
The last step to setting up a payment form with Stripe is to create a Stripe Feed. To do so, select the Form Settings > Stripe > Add New. Then, under Transaction Type, select either Products and Services or Subscription.
You will then be asked to go ahead and configure the rest of the Stripe Feed Settings. For further reading on this, check out this article in the docs – Creating a Feed for the Stripe Add-On.
Your form will now be complete. You may want to customize the form’s Confirmations or Notifications, then embed the form into a page on your website. And don’t forget to test it to make sure it is working!
Step 5: Extend the Form with the Gravity Forms Certified Add-Ons
With Gravity Forms, you can easily create custom forms to suit any business requirements. One way of doing so is to use the Gravity Forms third-party certified add-ons, that will enable you to extend and enhance your payment forms. Certified add-ons particularly relevant to payment forms include…
- Gravity Perks eCommerce Fields – This powerful Perk from Gravity Wiz adds a selection of features that will upgrade your payment or eCommerce forms, including support for Tax, Discounts, and Subtotal fields, amongst a number of other eCommerce options.
- Gravity PDF and ForGravity – Both offer PDF functionality and will automatically generate and email PDF documents to users once a form has been submitted. This can be particularly useful in instances where your customers and clients may want an invoice, receipt, or some type of confirmation of payment for their records and accounts.
All Gravity Forms certified add-ons can be viewed and accessed through the Gravity Forms add-on browser. These add-ons are the best-of-the-best, and when you make a purchase you can be confident in the quality and security of the product, as well as the support offered from the third-party developers.
Don’t Have Gravity Forms Yet?
If you don’t have Gravity Forms or the Stripe Add-On, don’t worry. Head on over to our pricing page to select a license and make a purchase. (Remember, Stripe is available on our Pro and Elite plans).
Equally, you can test out everything in this article for free inside your own personalized Gravity Forms demo and see why Gravity Forms is the top choice for WordPress sites worldwide.
Find out how easy it is to customize our form templates using the intuitive drag-and-drop form editor, as well as extend any payment form with powerful features and add-ons…

If you want to keep up-to-date with what’s happening on the blog sign up for the Gravity Forms newsletter!

